

Page 1
reer 5006 SCOPI
User Manual
Page 2

A
Introduction
The User Manual for this unit consists of two parts. The first part contains a Quick Start
Manual for use as a baby monitor; the second part informs about advanced functions
as normal PMR 446 transceiver for you or your children to enjoy at a later stage. Here
you also find the Safety Precautions and other legally binding information.
Prepare Radio As Baby Monitor System
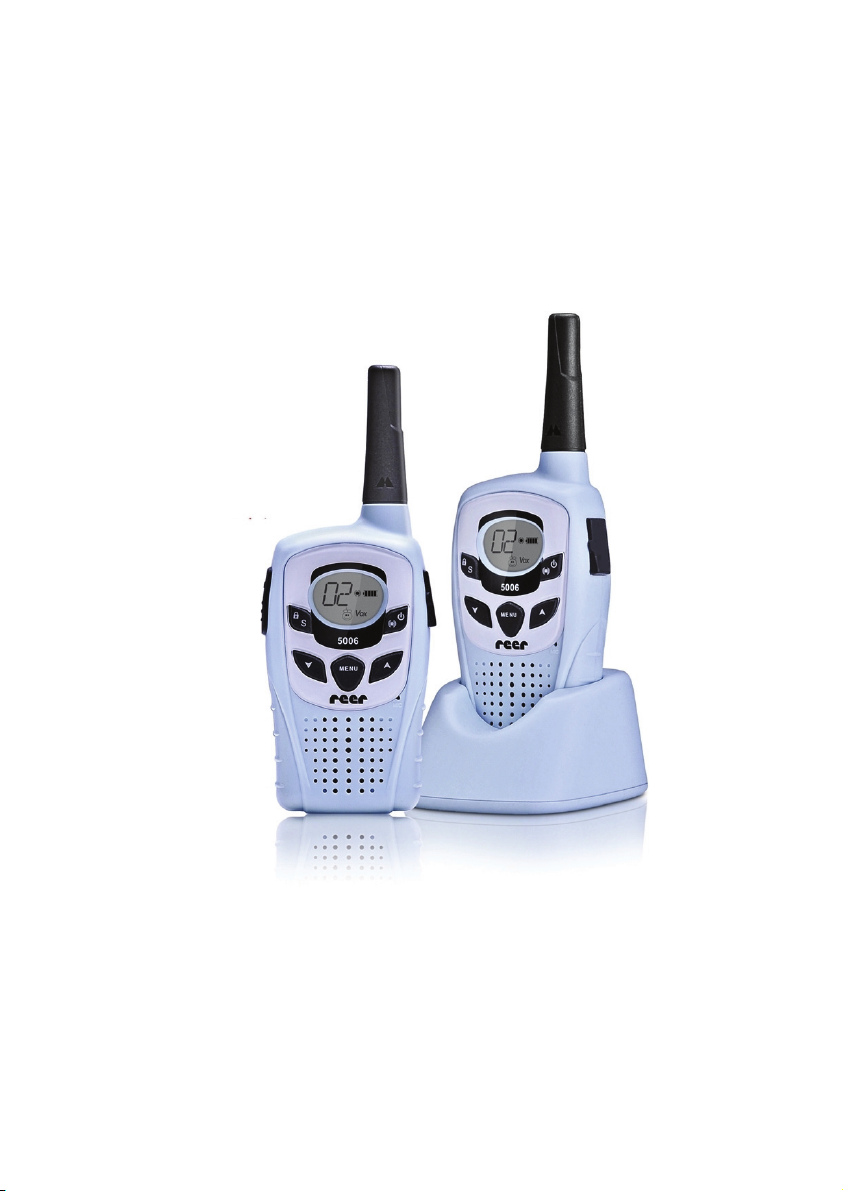
Your reer 5006 Scopi comes in a two-pack. In default setting both units are equal
portable transceivers, working according to the European standard PMR 446 for free
use. Select one unit as baby unit, the other as parent unit before using the radios as
baby monitors.
Location Of Controls
ntenna
PTT button
Search +
Keypad lock
Select down
Select functions:
Menu button
2
External
connections
On/Off
Out-of-range
function
Select up
Page 3
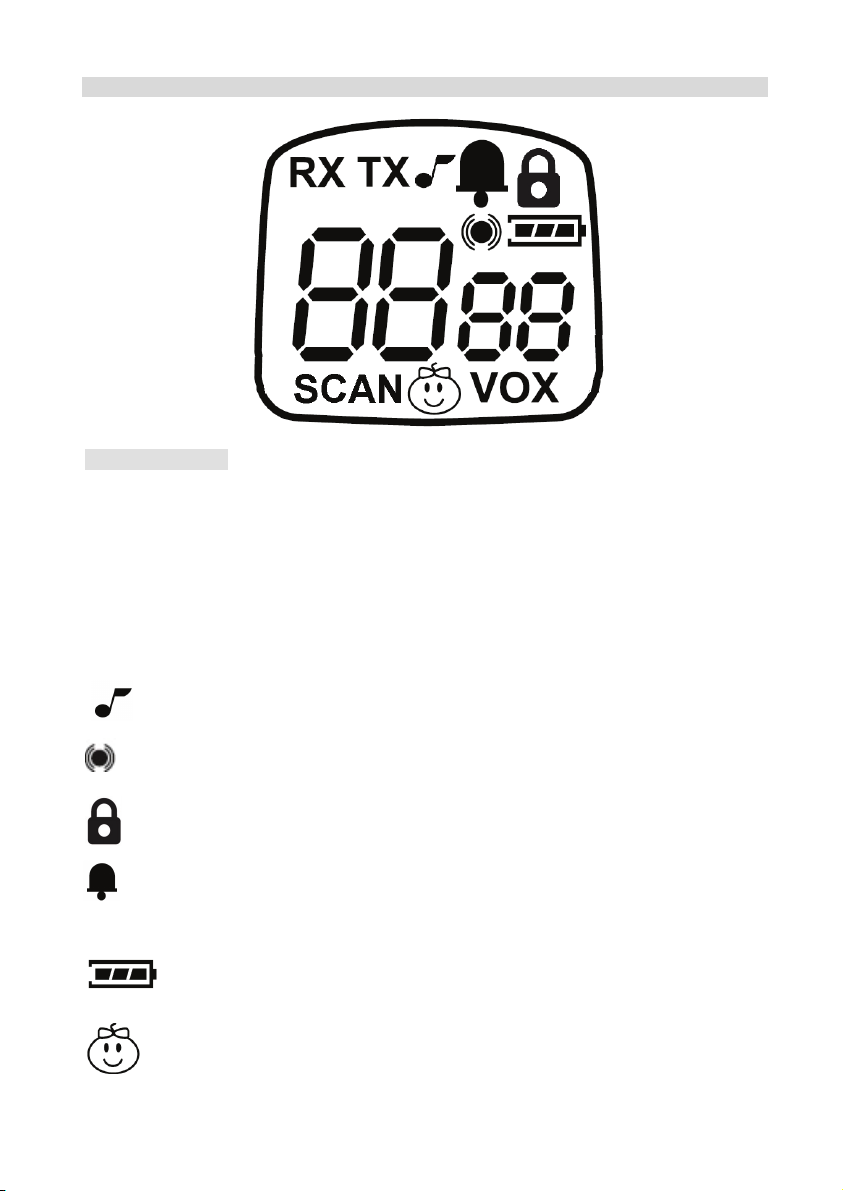
Display and Icons
Icons and Terms
RX Reception: listen via the speaker
TX Transmission: PTT button is pressed or unit transmits in VOX
mode
SCAN Auto scan: unit scans channels one by one
VOX Active VOX mode: unit transmits automatically (without pressing
PTT) when detecting sounds
Key tones are activated
Out-of-range function is activated (automatically AU, manually Pb,
or both)
Keypad lock is activated
Roger beep (short beep after transmission) is activated (only in
PMR 446 transceiver mode)
Battery level indicator: 3 bars = full, 1 bar = nearly exhausted
(check during or right after transmission!)
Baby icon: displays in babysitter mode on both baby and
parent units. No display in PMR 446 transceiver mode.
3
Page 4
Chapter 1: Baby Monitor Function
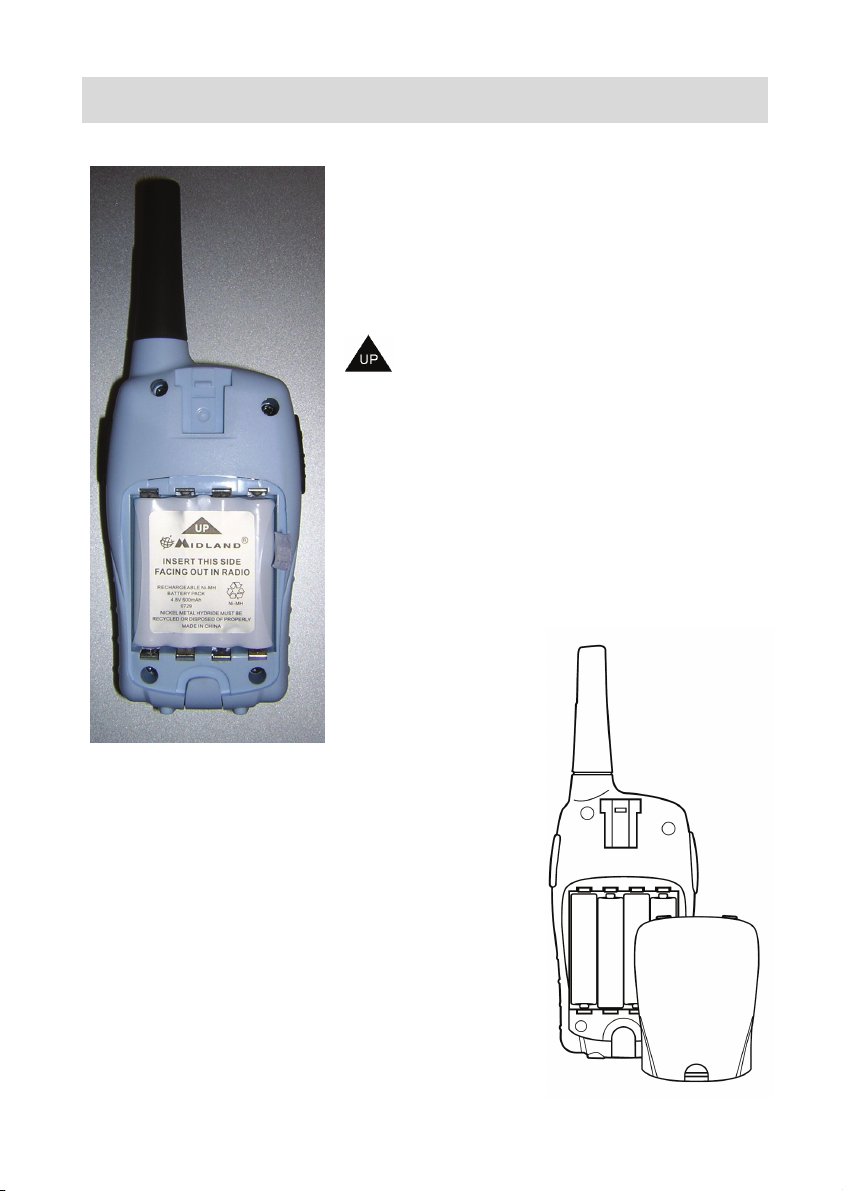
Prepare Unit – Insert Battery
Remove the belt clip (pull spring and remove to top)
and open the battery compartment.
Insert a supplied battery pack in each unit (packed
separately).
The arrow on the battery pack indicates the direction
in which to insert:
The arrow shows up and the print must be
legible after insertion, as shown in the figure).
Connect one of the power adaptors with the base
station and connect to a 230V wall outlet.
Charge the unit for several hours (new batteries are
only partly charged ex factory).
Note: Never open or dismantle the supplied battery
pack!
Alternatively, insert commercially available AAA alkaline
batteries (4 units) or 4 individual rechargeable Ni-MH
batteries.
DO NOT charge alkaline batteries, never place the
transceiver in the charger when using batteries. Do
not mix rechargeable and normal batteries!
Observe the polarity as printed inside the battery
compartment.
4
Page 5

Prepare As Baby Monitor
It only takes one simple programming step after inserting and charging the battery
pack to determine which unit will serve as the baby unit and which one as the parent
unit.
• Turn one unit on (press the On/Off button
• Press the MENU button twice.
The display shows the baby icon and OF.
• Press
parents).
• Briefly press the PTT button to confirm, or simply wait a few seconds.
The babysitter setup is completed.
Now the display shows the baby or parent channel top left, such as
bottom center.
This setting already includes the highest sensitivity setting for the baby unit, automatic
out-of-range control between baby and parent unit, the possibility to test the range and to talk to
the baby.
on the baby unit to select b (on the other unit select P (=
for 3 sec).
b1 and the baby icon
What Else Can Be Set?
Volume
• Press
The display shows the volume setting in steps between LE 00 and LE 09.
The volume setting is important in case you want to talk to the baby. Set the volume level to LE
00 to mute the baby unit at all times.
Set the volume level for the parent unit to the desired level.
Display Alarm
The parent unit with muted speaker (set to LE 00) still lights up to show that the baby unit is
communicating.
• The display backlight turns on for approximately 5 seconds with every alarm.
to set the volume.
5
Page 6

Channel Number
The channel number must be the same for both units.
There are 9 possible settings, for the baby unit b 1 to b 9 and for the parent unit P 1 to P9.
1 to 9 stands for channel combinations programmed ex factory between PMR 446 radio
channels and CTCSS encoding. The numbers are only valid for this type of transceiver and
there is no communication with other baby monitors!
Set Channel
• Briefly press the MENU button once. The set channel will flash.
• Press
• Press the PTT button to confirm or simply wait a few seconds.
Set Baby Monitor Sensitivity
You can set the sensitivity of the baby unit in 4 levels.
With initial installation the unit is set to level 4
• Briefly press the MENU button three times to access the VOX menu.
The display shows the sensitivity setting as a number on the right (between
Press to select a level between 1 and 4.
1 setting for highest distance from the baby cot
2 medium sensitivity setting
3 low sensitivity setting
4 highest sensitivity setting (default setting) with additional talkback function
We recommend level 4 as start position. If your baby cries for a longer period without
breaks you may want to talk to your baby to calm it down. For this set the baby unit to
level 4 to allow you after 20 seconds of transmission to talk back for 10 seconds.
• Use these 10 seconds to talk to your baby and calm it down.
• Simply press the PTT button on the parent unit and talk to your baby.
As long as your baby is quiet you can speak from the parent unit at any time (if the
volume on the baby unit is not set to 00).
to select a different setting.
1 and 4).
6
Page 7

Automatic Out-Of-Range Function
The automatic out-of-range function is automatically activated in babysitter mode and
needs no further settings!
The automatic out-of-range function automatically checks every 60 seconds if baby
and parent units are communicating. The parent unit sends a “search pulse”, which is
answered by the baby unit. In case there is no reply for more than 2 minutes, then both
units are no longer communicating. This can be due to a dead spot, the batteries of the
other unit being exhausted or the unit being turned off.
During communication the
the communication is interrupted and the event is optically displayed on the parent unit
OU and 5 beep tones are audible.
as
After 2 minutes the icon is again constantly displayed if a unit changes the location and
is again within the range of the other unit.
The out-of-range function can also be deactivated.
• Press the MENU button four times.
The display shows, depending on the previous setting, AU, Pb or OF.
• Press to select:
Pb out of range function on request (=Press button)
AU automatic function activated
OF automatic function deactivated
icon is constantly displayed. The icon flashes in case
Manual Out-Of-Range Test
Independent of the automatic out-of-range control of the other unit you also have the
manual out-of-range test. This test is also available with the out-of-range function
deactivated on the baby unit!
On the press of a button you can determine if the other unit is within range. The automatic
control on the parent unit must be set to
Pb or AU.
• Press the button and wait a few seconds. The baby unit answers your request
and the parent unit plays a melody.
7
Page 8

External Microphone
For the baby monitor function we supply an external microphone (type BM 1). This has the
following advantages:
• It is more sensitive than the build-in microphone and it responds to a greater distance.
• It allows you to extend the distance between transceiver and baby cot – HF radiation
is greatly reduced!
• It allows you to position the radio in optimum location, such as the windowsill or high
up on a wardrobe.
Please locate the BM1 microphone in a position where the baby cannot reach it. Use the
supplied sticky pad to safely attach the microphone.
Connect the microphone to the MIC jack on the side of the baby unit. Flap the rubber cap open
and use the bottom jack.
Chapter 2: Advanced Functions and Use As PMR 446 Transceiver
By default (or after storing the radios with removed battery packs) both units are in equal
transceiver mode. They can be used for different purposes; as walkie-talkies for older children,
during hikes and trips, events, maintenance work in and around the house, where
communication is needed and for many more purposes. The communication range is up to 5
km, depending on the terrain, in open spaces with no obstructions or reduced range in the city.
Use With Default Setting And No Further Programming
• Insert the batteries (as described on page 4).
In case you are using individual AAA batteries instead of the supplied rechargeable battery
pack, please observe the correct polarity.
• Press for approx. 3 seconds to turn both units on.
• A channel number is displayed, e.g. 1 or any other previously set channel
number between
1 and 48.
8
Page 9

If both units display the same channel number they are ready for use.
Press the PTT button on the left side of the unit to communicate.
PTT Button To Talk
• Press and hold the PTT button to transmit; release the button to receive.
PTT Button To Call
• Briefly press the PTT button twice in quick succession.
• The unit transmits a call melody to all other units on this channel within your
range.
Toggle Between Baby Monitor And Transceiver Modes
You can easily switch to transceiver mode in case your radios were set to baby monitor
mode:
• Turn the units on.
• Press the MENU button twice.
• b or P (according to previous setting) flashes on the display.
• Press
must be
to toggle between b, P and OF. In transceiver mode the setting
OF (= baby mode OFF).
• Briefly press the PTT button or wait for 5 seconds.
Volume
• Press to set the volume.
The display shows the volume setting in steps between LE 00 and LE 09.
Select Channel
In Europe you can use one of 8 PMR 446 channels. Furthermore, you can individually set the
coding via CTCSS tones separately for channels 1 to 8 among 38 possible codes. This code is
displayed right from the channel number 1 to 8 as a smaller 2-digit number between 00 and 38.
5 I0 for example stands for channel 5 and CTCSS sub code 10.
To simplify operation with channels and sub codes the unit is preprogrammed with additional
channel combinations:
These are the channel numbers
PMR channels with different CTCSS codes, saving the user the trouble with codes and
channels while using the numbers 9 to 48.
You only have to take care that all communicating units are set to the same numbers
on the display.
9 to 48. These are all combinations with one of the 8 permitted
9
Page 10

If communicating with users of other transceiver makes only use channels 1 to 8 and set the
sub codes manually, they are following international standards.
Set Channel
• Press the MENU button once. The currently set channel flashes.
• Press
• Press the PTT button to confirm or simply wait a few seconds.
to select a different setting.
Channel Scan
Briefly press the S button to automatically scan all channels for activity.
• Press the button
• Scanning stops after a signal is detected and you listen to the channel for 8 seconds.
Press the PTT button to stop scanning and to respond.
With no response scanning starts again.
to start scanning; press again to stop scanning.
Keypad Lock
All keys (except the PTT button and On/Off) can be locked to prevent accidentally pushing
the buttons.
Lock keypad:
• Press and hold the button
displayed.
• Press and hold the button again for approx. 3 seconds, until the lock icon turns off.
for approx. 3 seconds, until the lock icon ( ) is
Backlight
The display backlight automatically comes on for 5 seconds after pressing any button.
Set CTCSS Codes
The additional CTCSS codes serve to avoid listening to other stations on the same channel.
This can even be a combination of baby and parent unit – you would not want to listen to
somebody else’s baby. It is always possible that other users are on the same channel.
Do not mistake this for safety from interception: it is always possible to intercept non-encrypted
analog radio talk; this only needs any PMR 446 transceiver or a scanner.
10
Page 11

The CTCSS (continuous tone coded squelch signal) tones are inaudible low frequency tones
mixed into the microphone signal. On reception the unit checks if the set tone exists and only
enables the speaker after detecting the correct tone.
For channels 1 to 8 the CTCSS codes can be set manually:
• Press the MENU button three times (or until the numbers
display).
• Press to select the desired CODE.
• Briefly press the PTT button or simply wait 5 seconds.
00 to 38 flash on the
Cycle Through Other Menu Items In Sequence
Access all menu items the same way.
• Press the MENU button once or several times.
• Each time the setting flashes (until now we introduced channel setting, baby mode
parent PMR446 setting and CTCSS setting).
• Press
• Briefly press the PTT button to confirm – or simply wait a few seconds until
the setting is saved.
to select the desired setting.
Menu Item VOX – Hands-Free Function
This is the sensitivity setting for hands-free operation. The unit detects your voice and
there is no need to press the PTT button. This is very useful if you have no free hand to
press the PTT button; but it can be a problem on a motorbike or in noisy environs. The
hands-free function can respond to noise and your unit transmits without you knowing
and possibly interrupting the channel.
The levels 1 to 4 correspond to the sensitivity like a baby monitor:
OF normal control with PTT button (default)
1 high sensitivity
2 medium sensitivity
3 low sensitivity
4 as 1, but with a 10-second talkback interruption after 20 seconds
transmission
Level 4 is also good for radio discipline: if your unit transmits continuously it will be
interrupted after 20 seconds. During this break other parties can answer and point out
your continuous transmission.
11
Page 12

RX - Squelch On/Off
You can deactivate the automatic squelch and set the unit to continuously receive any
signal on the channel. This is helpful at the edge of the range and communication is
interrupted or if you just want to listen to what is happening on the channel.
The menu item
RX is displayed; select On or OF.
Roger Beep On/Off
The radio sends a tone sequence as confirmation after releasing the PTT button (as in
space travel this is called the “roger beep”).
The menu item
Key Tones On/Off
A short beep tone is audible after pressing a button. Deactivate the key tones with this
menu item.
is displayed; select On or OF.
The menu item
is displayed; select On or OF.
Baby Mode – Menu Item
These menu items are displayed as described in chapter “Baby mode”.
In baby mode
is displayed, select P, b or OF.
Out-Of-Range Control In PMR 446 Mode
The out-of-range control also works in PMR 446 mode:
Select between AU (automatic on), Pb (only manual out-of-range test) or OF for deactivated
out-of-range control.
Activation or deactivation of out-of-range control is set on the unit, which wants to check the
range.
Even if the remote unit has no out-of-range control activated you can check the range from your
unit.
Select AU (automatic check every minute) or Pb (manual check).
In radio networks consisting of more than 2 equal units the out-of-range control does not really
make sense because you cannot determine, which unit responds. For this reason there is no
out-of-range control for several transceivers on the network.
12
Page 13

Important Information
We are legally bound to include disposal and warranty information as well as EU declaration of
conformity with the use instructions in different countries for every unit.
Please find this information on the following pages.
2-Year Warranty from Date Of Purchase
The manufacturer/retailer guarantees this product for two years from date of purchase.
This warranty includes all malfunctions caused by defective components or incorrect
functions within the warranty period excluding wear and tear, such as exhausted
batteries, scratches on the display, defective casing, broken antenna and defects due
to external effects such as corrosion, overvoltage through improper external power
supply or the use of unsuitable accessories. Defects due to unintended use are also
excluded from the warranty.
Please contact your local dealer for warranty claims. The dealer will repair or exchange
the product or forward it to an authorized service center.
You can also contact our service partner directly. Please include your proof of
purchase with the product and describe the malfunction as clearly as possible.
WEEE and Recycling
The European law does not allow for the disposal of
electric or electronic devices with the household waste. Return your
product to a municipal collection point for recycling to dispose of it. This
system is financed by the industry and ensures environmentally
responsible disposal and the recycling of valuable raw materials.
old or defective
Service Address and Technical Hotline
reer GmbH
Riedwiesenstr. 7
D- 71229 Leonberg
Contact our service hotline by phone 0700-73 33 74 62 4 (12 cents/ minute from
German fixed phone network) or e-mail at service@reer.de
Before returning a product check in chapter “Troubleshooting” for some easy steps
and tests or contact our hotline:
.
Troubleshooting - Reset
Remove the batteries and wait 2 minutes before inserting them again.
The unit is reset to default settings and displays channel 1 in PMR 446 mode. If this is
not the case, please check if the batteries are exhausted. Sometimes weak batteries
13
Page 14

can cause problems, such as being able to receive but not to transmit.
Frequency Table PMR 446
Channel Frequency (MHz) Channel Frequency (MHz)
1 446.00625 5 446.05625
2 446.01875 6 446.06875
3 446.03125 7 446.08125
4 446.04375 8 446.09375
CTCSS Code Table
No. Freq. No. Freq. No. Freq. No. Freq.
1 67.0 11 97.4 21 136.5 31 192.8
2 71.9 12 100.0 22 141.3 32 203.5
3 74.4 13 103.5 23 146.2 33 210.7
4 77.0 14 107.2 24 151.4 34 218.1
5 79.7 15 110.9 25 156.7 35 225.7
6 82.5 16 114.8 26 162.2 36 233.6
7 85.4 17 118.8 27 167.9 37 241.8
8 88.5 18 123.0 28 173.8 38 250.3
9 91.5 19 127.3 29 179.9 OF -
10 94.8 20 131.8 30 186.2
14
Page 15

15
Page 16

16
 Loading...