

Page 1

Babyphone Neo 200
Gebrauchsanleitung, Art.Nr.: 50010
Babyphone Neo 200
Manual de uso, N° d‘art.: 50010
Babyphone Neo 200
Notice d‘utilisation, Art. Núm.: 50010
Dětská chůvička Neo 200
Návod k použití, Artikl č: 50010
Babyphone Neo 200
Használati utasítás, Cikkszám: 50010
Baby monitor Neo 200
Instructions for use, Art.no:: 50010
Babyphone Neo 200
Istruzioni per l‘uso, Art. Nr.: 50010
Babyfoon Neo 200
Gebruiksaanwijzing, Art. nr.: 50010
Monitor za bebe Neo 200
Uputstvo za upotrebu, Broj artikla: 50010
Elektronska varuška Neo 200
Navodila za uporabo, Stevilko artikla: 50010
DE
ES
FR
CZ
HU
GB
IT
NL
RS
SI
NEO 200
Page 2
Babyphone Neo 200
Allgemeine Sicherheitshinweise . . . . . . 04
Sicherheitshinweise zur Installation. . . . . 05
Technische Daten . . . . . . . . . . . . . . . . 05
Lieferumfang . . . . . . . . . . . . . . . . . . . 06
Gerätebeschreibung . . . . . . . . . . . . . . 06
Inbetriebnahme . . . . . . . . . . . . . . . . . 07
Einstellungen . . . . . . . . . . . . . . . . . . 08
General safety information. . . . . . . . . . 12
Safety instructions regarding installation . 13
Technical specication . . . . . . . . . . . . . 13
Scope of delivery . . . . . . . . . . . . . . . . 14
Description of babyphone . . . . . . . . . . 14
Before rst use . . . . . . . . . . . . . . . . . . 15
Conguration . . . . . . . . . . . . . . . . . . 16
Indicaciones generales de seguridad . . . 20
Indicaciones de seguridad para la
Instalación, Datos técnicos . . . . . . . . . . 21
Volumen de suministro . . . . . . . . . . . . 22
Descripción del dispositivo . . . . . . . . . . 22
Puesta en funcionamiento . . . . . . . . . . 23
Ajustes . . . . . . . . . . . . . . . . . . . . . . . 24
Avvertenze di sicurezza generali . . . . . . 28
Istruzioni di sicurezza per l‘installazione . . 29
Dati tecnici . . . . . . . . . . . . . . . . . . . . 29
Dotazione . . . . . . . . . . . . . . . . . . . . . 30
Descrizione dell‘apparecchio . . . . . . . . 30
Messa in funzione . . . . . . . . . . . . . . . . 31
Impostazioni . . . . . . . . . . . . . . . . . . 32
Consignes générales de sécurité. . . . . . 36
Conseils de sécurité pour l‘installation . . . 37
Caractéristiques techniques . . . . . . . . . 37
Contenu de la livraison. . . . . . . . . . . . . 38
Description de l‘appareil . . . . . . . . . . . . 38
Mise en service . . . . . . . . . . . . . . . . . . 39
Paramètres . . . . . . . . . . . . . . . . . . . . 40
Betrieb der Elterneinheit mit Batterien . . 08
Erweiterung des Empfangsbereichs . . . 09
Lautstärkeregelung / Elterneinheit. . . . . 09
Reinigung und Wartung . . . . . . . . . . . 09
Garantie, Entsorgungshinweise. . . . . . . 10
Problembehebung. . . . . . . . . . . . . . . 11
Funcionamiento de la unidad
parental con pilas. . . . . . . . . . . . . . . . 24
Consejos para ampliar el alcance . . . . . 25
Regulación de volumen . . . . . . . . . . . 25
Limpieza y mantenimiento . . . . . . . . . 25
Garantía, Indicaciones de eliminación . . 26
Solución de problemas . . . . . . . . . . . . 27
Funzionamento dell‘unità genitore con
batterie. . . . . . . . . . . . . . . . . . . . . . . 32
Estendere l‘area di copertura . . . . . . . . 33
Regolatore del volume / unità genitori. . 33
Pulizia e manutenzione . . . . . . . . . . . . 33
Garanzia, Modalità di smaltimento . . . . 34
Soluzione problemi . . . . . . . . . . . . . . 35
Fonctionnement de l‘unité parentale
avec des piles . . . . . . . . . . . . . . . . . . 40
L‘extension de la zone de portée . . . . . . 41
Réglage du volume / unité parents. . . . 41
Nettoyage et entretien . . . . . . . . . . . . 41
Garantie, Instructions d‘élimination
des déchets. . . . . . . . . . . . . . . . . . . . 42
Résolution des problèmes . . . . . . . . . . 43
Inhaltsverzeichnis
Contents
Índice
Contenuto
Table des matières
DE
GB
ES
IT
FR
Battery operation of the parent unit . . . 16
Tips for extending the range . . . . . . . . 17
Volume control / parent unit . . . . . . . . 17
Cleaning and maintenance . . . . . . . . . 17
Warranty, Disposal instructions . . . . . . . 18
Troubleshooting . . . . . . . . . . . . . . . . 19
2
Page 3
Babyphone Neo 200
Algemene veiligheidsaanwijzingen . . . . . 44
Veiligheidsaanwijzing voor de installatie . . 45
Technische gegevens . . . . . . . . . . . . . 45
Leveringsomvang. . . . . . . . . . . . . . . . 46
Beschrijving van het apparaat . . . . . . . . 46
Ingebruikname . . . . . . . . . . . . . . . . . . 47
Instellingen . . . . . . . . . . . . . . . . . . . 48
Všeobecné bezpečnostní pokyny . . . . . 52
Bezpečnostní pokyny k instalaci . . . . . . . 53
Technické údaje . . . . . . . . . . . . . . . . . 53
Obsah dodávky . . . . . . . . . . . . . . . . . 54
Popis přístroje . . . . . . . . . . . . . . . . . . . 54
Uvedení do provozu . . . . . . . . . . . . . . 55
Nastavení . . . . . . . . . . . . . . . . . . . . . 56
Opšte bezbednosne informacije . . . . . . 60
Bezbednosne informacije za instalaciju . . 61
Tehnički podaci . . . . . . . . . . . . . . . . . 61
Obim isporuke . . . . . . . . . . . . . . . . . . 62
Opis uređaja . . . . . . . . . . . . . . . . . . . . 62
Pre prve upotrebe . . . . . . . . . . . . . . . . 63
Podešavanja . . . . . . . . . . . . . . . . . . . 64
Általános biztonsági tudnivalók . . . . . . 68
Biztonsági tudnivalók a telepítéshez . . . . 69
Műszaki adatok . . . . . . . . . . . . . . . . . 69
Szállítási terjedelem . . . . . . . . . . . . . . 70
A készülék leírása . . . . . . . . . . . . . . . . . 70
Üzembe helyezés . . . . . . . . . . . . . . . . 71
Beállítások . . . . . . . . . . . . . . . . . . . . 72
Splošni varnostni napotki . . . . . . . . . . 76
Varnostni napotki za namestitev . . . . . . 77
Tehnični podatki . . . . . . . . . . . . . . . . . 77
Obseg dobave . . . . . . . . . . . . . . . . . . 78
Opis naprave. . . . . . . . . . . . . . . . . . . . 78
Vklop . . . . . . . . . . . . . . . . . . . . . . . . . 79
Nastavitve . . . . . . . . . . . . . . . . . . . . 80
De werking van de oudereenheid met
de batterijen . . . . . . . . . . . . . . . . . . . 48
Uitbreiding van het ontvangstbereik . . . 49
Volumeregelaar / oudereenheid . . . . . . 49
Reiniging en onderhoud . . . . . . . . . . . 49
Waarborg, Verwijdering . . . . . . . . . . . . 50
Probleemoplossing. . . . . . . . . . . . . . . 51
Provoz rodičovské jednotky s bateriemi . 56
Tipy k rozšíření oblasti příjmu. . . . . . . . . 57
Regulace hlasitosti / rodičovská jednotka . 57
Čištění a údržba . . . . . . . . . . . . . . . . . 57
Záruka, Vhodné způsoby likvidace. . . . . 58
Odstraňování problémů . . . . . . . . . . . 59
Rad sa baterijama roditeljske jedinice. . . 64
Saveti za povećanje dometa prijemnika . 65
Regulacija jačine zvuka / roditeljska
Jedinica, Čišćenje i održavanje . . . . . . . 65
Garancija, Uputstvo za odlaganje . . . . . 66
Otklanjanje problema . . . . . . . . . . . . . 67
Szülői egység akkumulátoros üzeme . . . 72
Tippek a vételi terület kiterjesztéséhez . . 73
Hangerőszabályzás / szülői egység . . . . 73
Tisztítás és karbantartás. . . . . . . . . . . . 73
Garancia, Ártalmatlanítással
kapcsolatos tudnivalók . . . . . . . . . . . . 74
Hibaelhárítás . . . . . . . . . . . . . . . . . . . 75
Delovanje starševske enote z baterijami. . 80
Razširitev področja sprejemanja . . . . . . 81
Regulator glasnosti / starševska enota . . 81
Čiščenje in vzdrževanje . . . . . . . . . . . . 81
Garancija, Napotki za odstranjevanje
med odpadke . . . . . . . . . . . . . . . . . . 82
Odpravljanje težav . . . . . . . . . . . . . . . 83
Inhoudsopgave
Obsah
Sadržaj
Tartalomjegyzék
Kazalo
NL
CZ
RS
HU
SI
3
Page 4

Allgemeine Sicherheitshinweise
Herzlichen Glückwunsch zum Erwerb Ihres neuen reer Babyphones. Das intuitive Babyphone mit seinem hochempndlichen Mikrofon überträgt die Geräusche Ihres Babys klar
und zuverlässig. Sobald Ihr Kind ruhig ist, schaltet das Gerät automatisch in einen „ECOModus“. In diesem ECO-Modus geht von der Babyeinheit keine Strahlung mehr aus. Die
Babyeinheit fängt erst wieder an zu senden, sobald Geräusche empfangen werden. Dank
optionalem Batteriebetrieb der Elterneinheit und robustem Gürtelclip kann das handliche
Babyphone sowohl stationär als auch mobil verwendet werden. Wir sind sicher, Sie werden
lange Zeit Freude an der Qualität unseres Produktes haben.
Bitte nehmen Sie sich ein paar Minuten Zeit um die Sicherheitshinweise gründlich zu lesen.
Nur wenn alle der hier aufgeführten Punkte gewährleistet sind, kann das reer Babyphone
bedenkenlos verwendet werden. Bewahren Sie die Bedienungsanleitung für späteres
Nachschlagen sorgfältig auf.
! Überprüfen Sie vor jeder Benutzung das Gerät auf oensichtliche Beschädigungen.
Sollten Sie Schäden feststellen, darf dieses Gerät nicht verwendet werden.
! Verwenden Sie nur die im Lieferumfang enthaltenen Ladegeräte und Netzteile. Stellen Sie
sicher, dass die Betriebsspannung der Steckdose der des Netzteils entspricht. Prüfen Sie,
insbesondere auf einer Auslandsreise, ob die lokale Netzspannung mit der angegebenen
Spannung auf den Geräten bzw. den Netzteilen übereinstimmt.
! Die Geräte und Netzteile dürfen, mit Ausnahme des Deckels am Batteriefach, nicht
geönet werden, da dies zu Stromschlägen führen kann. Sollte ein Gerät fehlerhaft
arbeiten, versuchen Sie bitte NICHT das Problem selbst zu beheben. In diesem Fall bitten
wir Sie, sich an Ihren Händler zu wenden.
! Bewahren Sie die Batterie außerhalb der Reichweite von Kindern auf. Es besteht die
Gefahr des Verschluckens.
! Vermeiden Sie die Berührung von metallischen Gegenständen mit den Batterie- bzw.
Stromanschlusskontakten an den Geräten.
! Dieses Produkt ist kein Spielzeug! Lassen Sie Kinder nicht mit dem Gerät spielen.
HINWEIS: Dieses Babyphone wurde ausschließlich als Hilfsmittel für die Beobachtung
Ihres Babys entwickelt. Es darf weder als Ersatz für die Aufsichtspicht der Eltern, noch als
medizinisches Gerät angesehen werden!
4
Page 5

Sicherheitshinweise zur Installation
! Platzieren Sie die Babyeinheit immer außer Reichweite des Kindes.
(Mindestabstand 1 Meter).
! Legen Sie das Babyphone niemals in das Baby- oder Kinderbett bzw. den Laufstall.
! Um eine Strangulation mit dem Netzkabel zu verhindern, sichern Sie die Kabel außerhalb
der Reichweite von Kindern. Verwenden Sie keine Verlängerungskabel.
! Um eine bestmögliche Übertragung zu gewährleisten, sollten die Geräte immer in
aufrechter und in erhöhter Position aufgestellt werden.
! Platzieren Sie den Empfänger NICHT in der Nähe von Funkgeräten oder Mikrowellen. Die
Abstrahlung dieser Geräte kann den Empfang stark beeinträchtigen.
! Verwenden Sie die Geräte nicht in Wassernähe oder an feuchten Orten. Tauchen Sie die
Geräte nicht in Wasser. Spülen Sie die Geräte nicht unter ießendem Wasser ab.
! Bedecken Sie das Babyphone nicht mit einem Handtuch, Kleidung oder einer Decke.
! Vermeiden Sie extreme Hitze und direkte Sonneneinstrahlung.
Technische Daten
• Technologie: Analog
• Sender: Spannungsversorgung mit
Netzteil
• Empfänger: Spannungsversorgung
mit Netzteil oder optional mit 3
AAA Batterien oder Akkus (nicht im
Lieferumfang enthalten)
• Input: 100 – 220V 50Hz 0.15 A max.
• Output: 6V / 300mA max.
• Sendeleistung: TX 50 mA , RX 130 mA
• Frequenz: 40 MHz
• Reichweite: 200 m im Freien
• Kabellänge: ca. 1,80 m
• Betriebstemperatur: 10°C - 40°C
• Lagertemperatur: 0°C - 55°C
• Standards: EN 300 220-1, EN 301 489-1
und EN 301 489-3
DE
5
Page 6

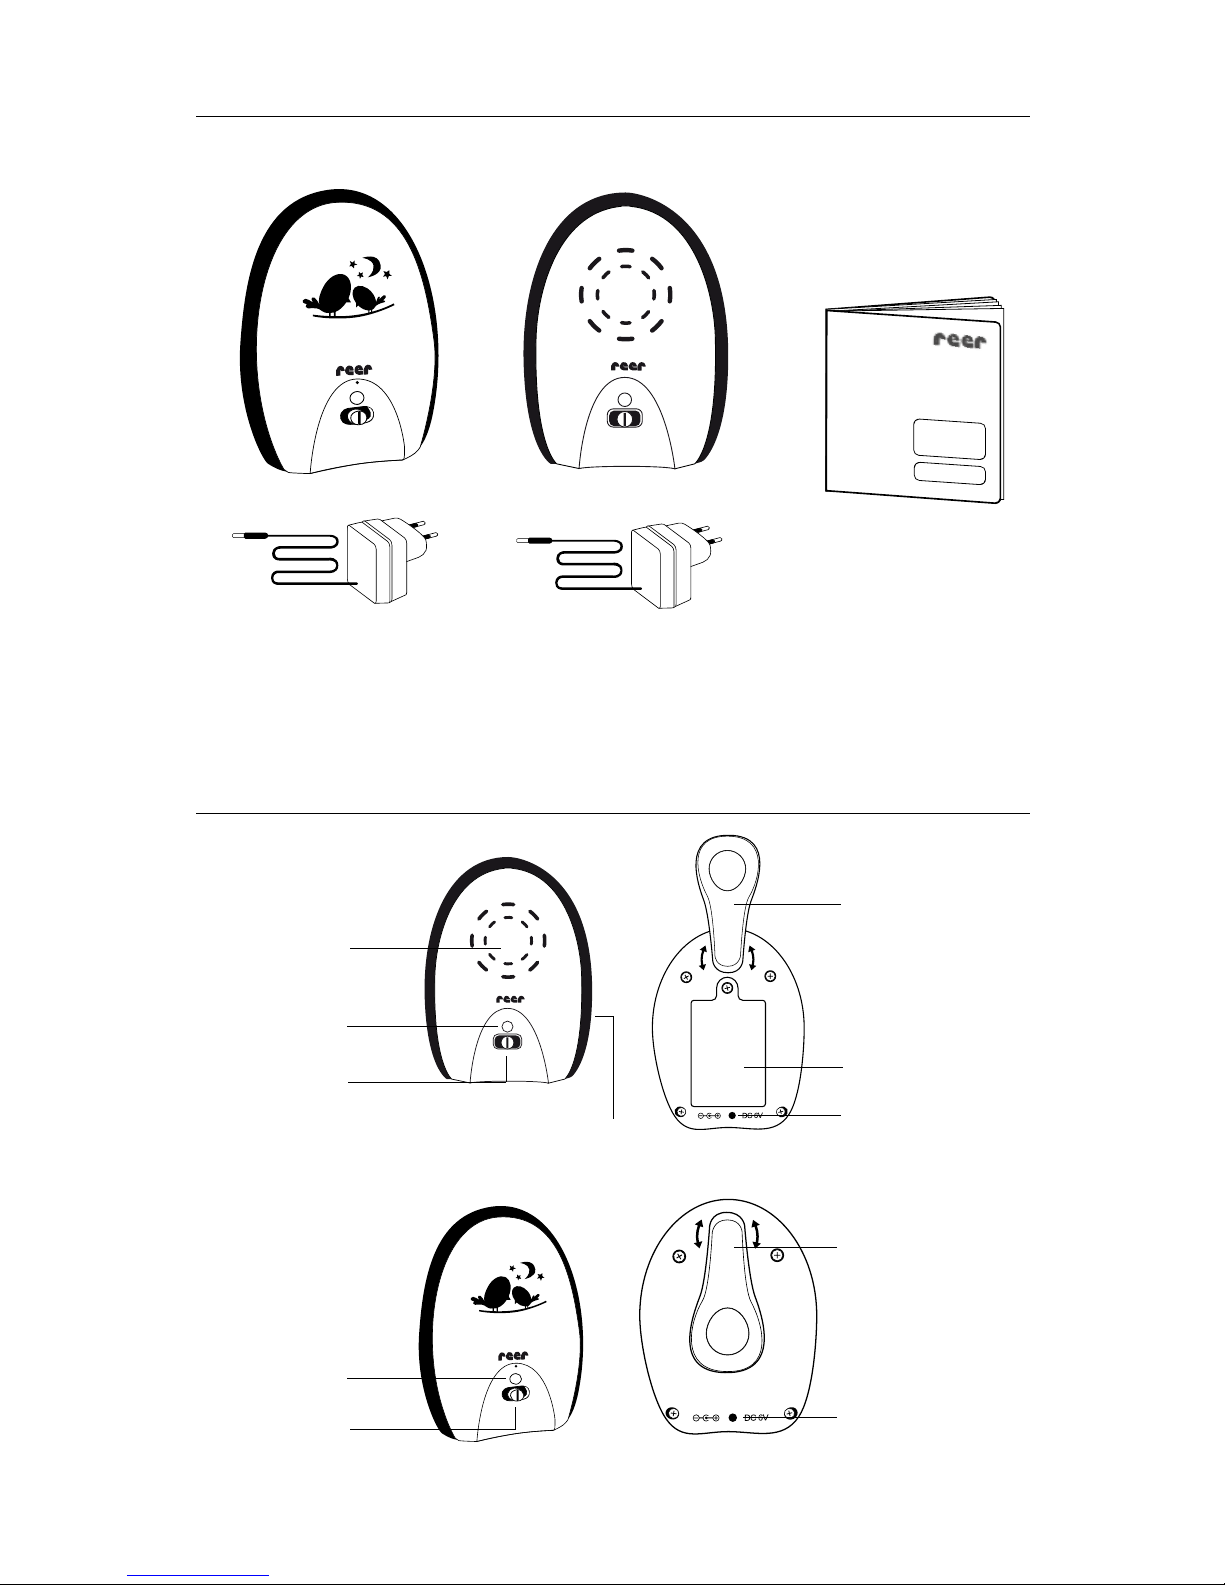
Lieferumfang
Gerätebeschreibung
Babyeinheit (Sender)
mit Netzteil
Elterneinheit (Empfänger)
mit Netzteil
Gebrauchsanleitung
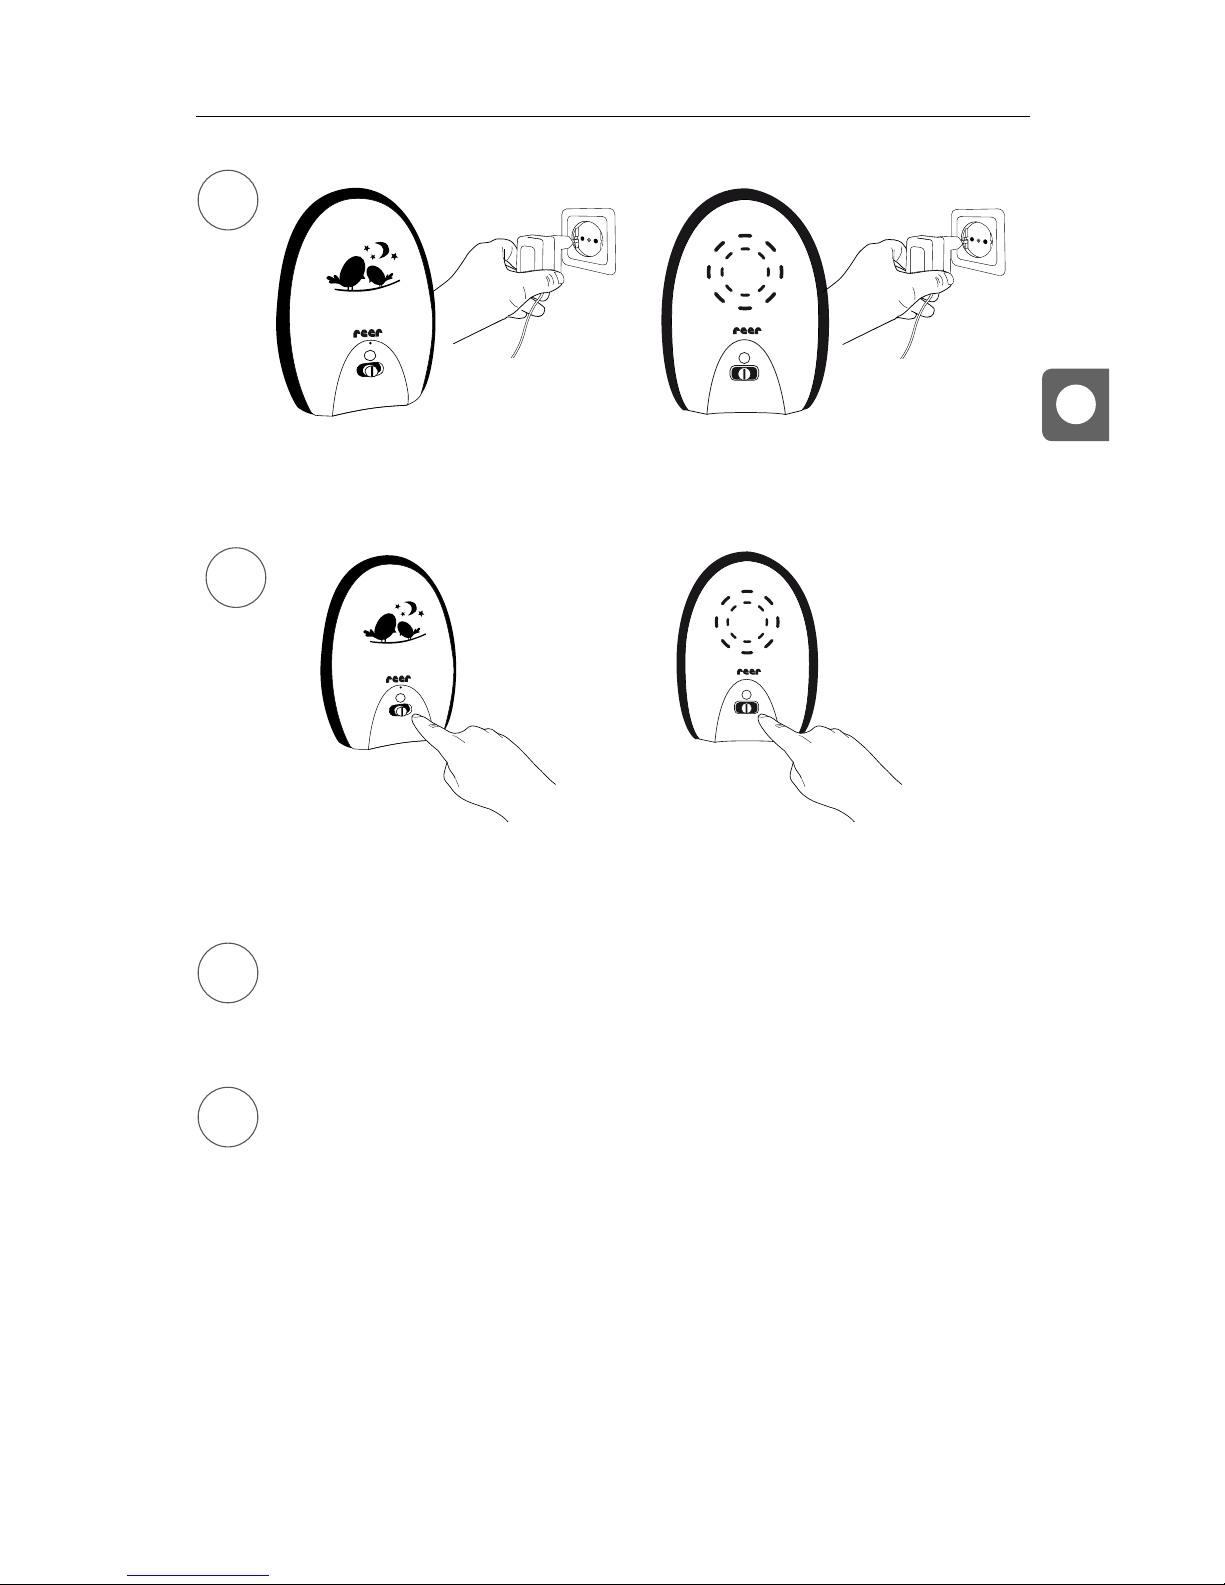
ELTERNEINHEIT
BABYEINHEIT
Lautstärkeregler
Netzteil-Anschluss
Netzteil-Anschluss
Batteriefach
Gürtelclip
Gürtelclip
Status-LED
Status-LED
Lautsprecher
Ein-/Aus-/Kanal-
wahl-Schalter
Ein-/Aus-/Kanal-
wahl-Schalter
6
Page 7
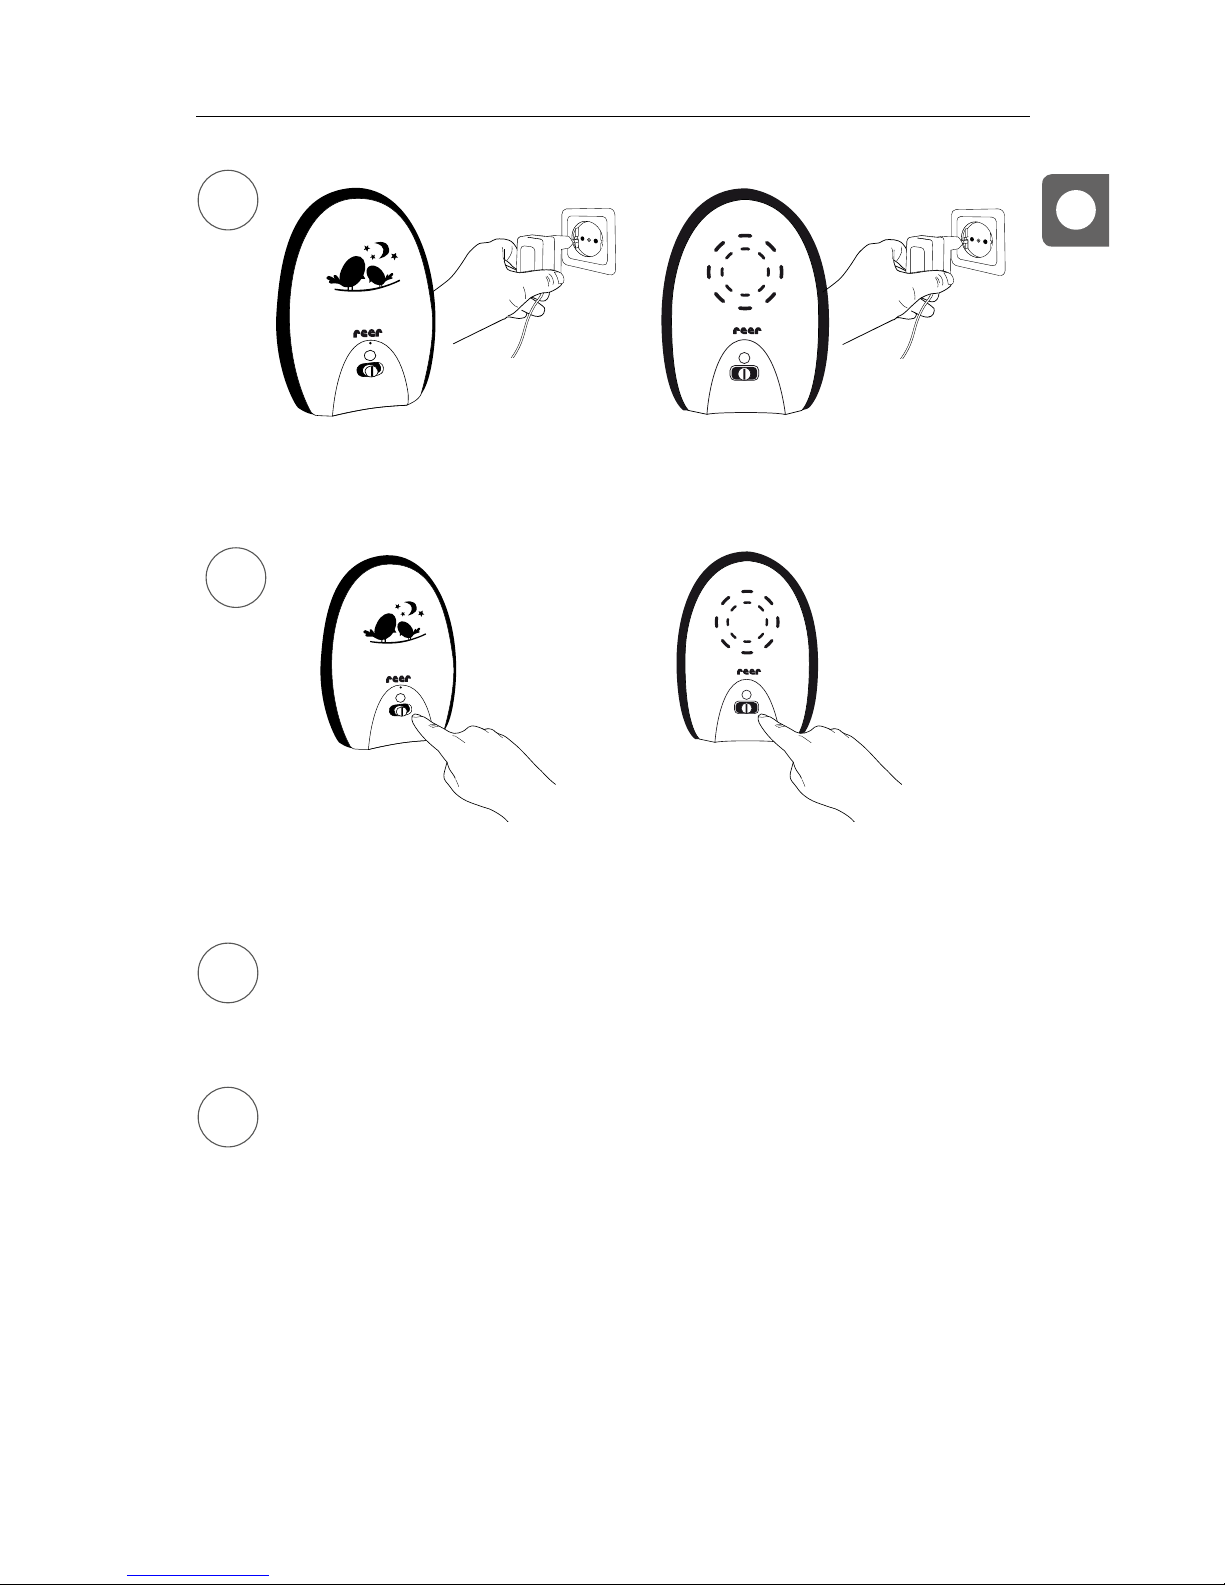
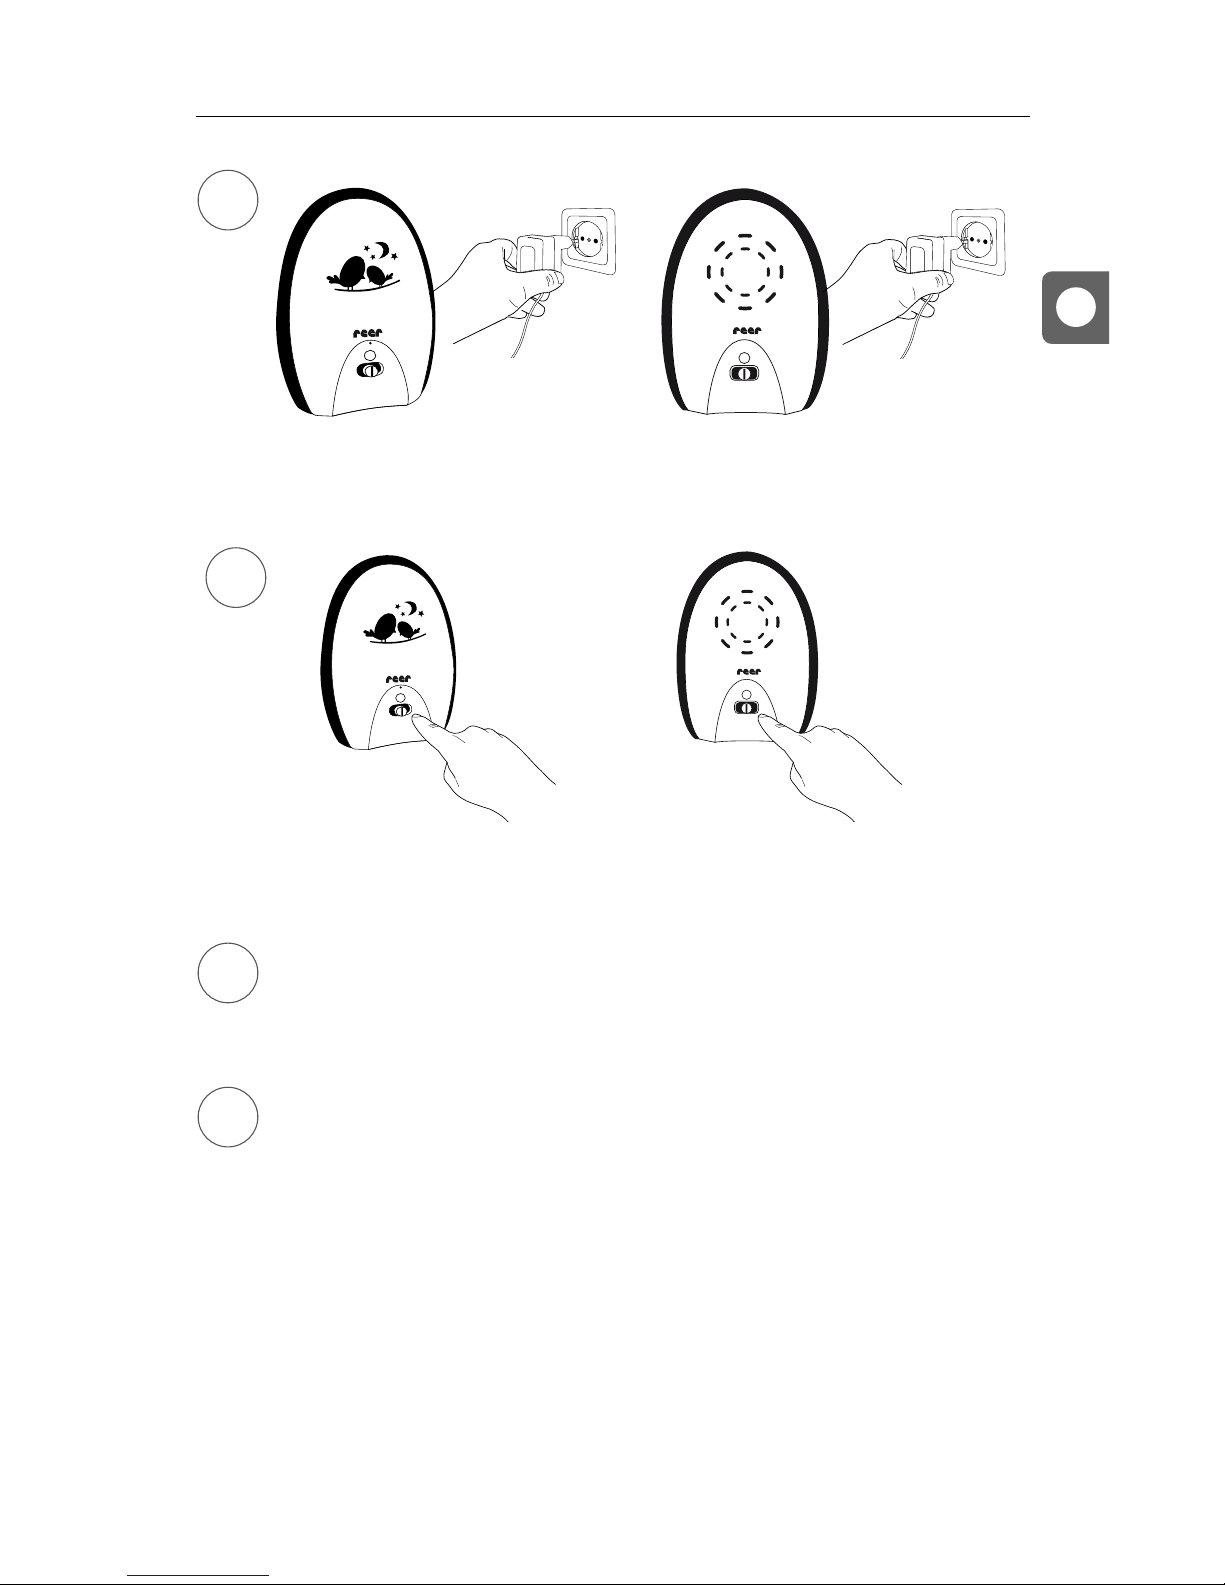
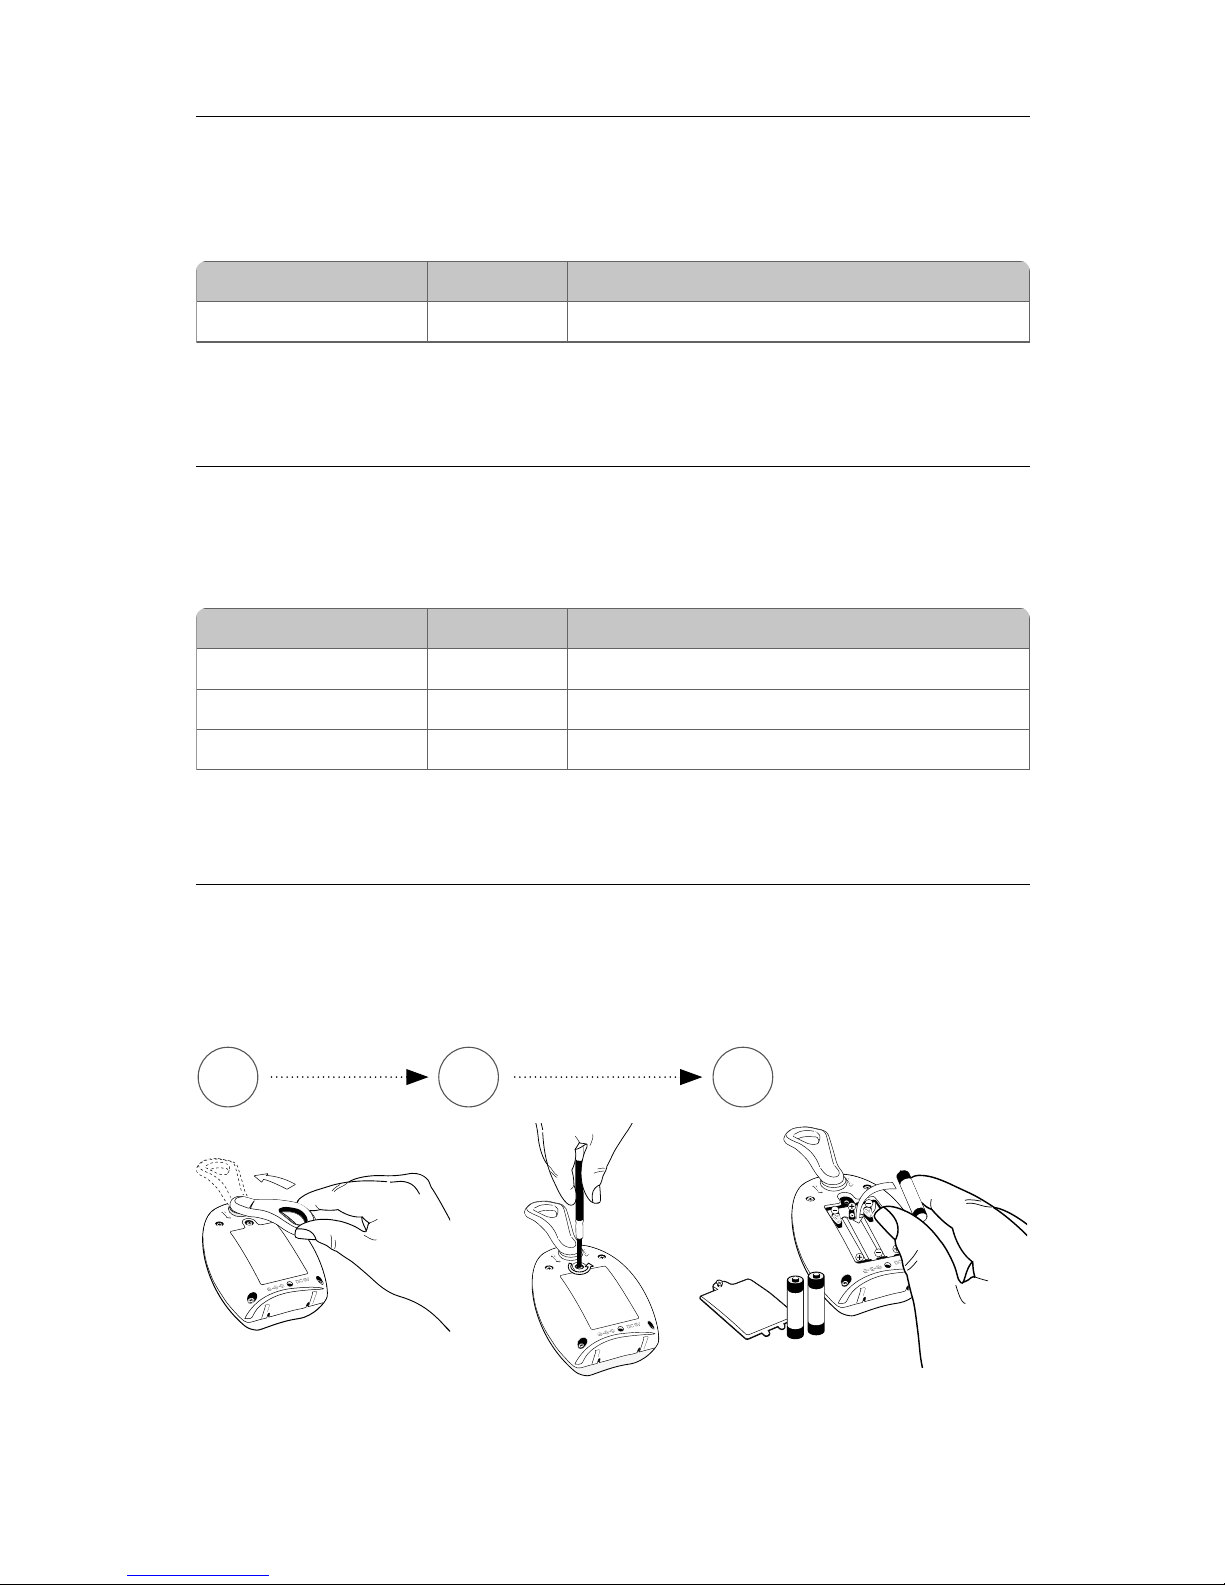
Inbetriebnahme
HINWEIS: Die Elterneinheit kann optional auch mit drei AAA Batterien (nicht im
Lieferumfang enthalten) betrieben werden.
Bitte verwenden Sie nur die im Lieferumfang enthaltenen Netzteile (6V DC / 300 mA)!
1
3
2
4
Wählen Sie auf beiden Geräten den gleichen Kanal aus (A oder B).
Die Status-LED an der Baby- und an der Elterneinheit leuchtet grün.
Sobald das hochempndliche Mikrofon an der Babyeinheit ein Geräusch erfasst,
beginnt das Gerät mit der Übertragung zur Elterneinheit. Bei Geräuschempfang
beginnt die Status-LED an der Elterneinheit orange zu blinken.
Wenn Ihr Kind ruhig ist und die Babyeinheit keine Geräusche empfängt, schaltet
das Gerät automatisch in einen ECO-Modus um. In diesem Modus geht von der
Babyeinheit keine Strahlung aus. Die Babyeinheit fängt erst wieder an zu senden,
sobald Geräusche empfangen werden.
TIPP Sie können die Geräte mithilfe des Gürtelclips an Ihrem Gürtel befestigen oder mit
geeignetem Befestigungsmaterial an einer Wand aufhängen.
DE
7
Page 8
Status-LED Power Zustand
grün ein Gerät ist eingeschaltet
Status-LED Power Zustand
grün ein Gerät ist eingeschaltet
orange blinkend ein Geräusche von der Babyeinheit werden empfangen
rot blinkend ein Akkus sind erschöpft
Status-LED Babyeinheit
Status-LED Elterneinheit
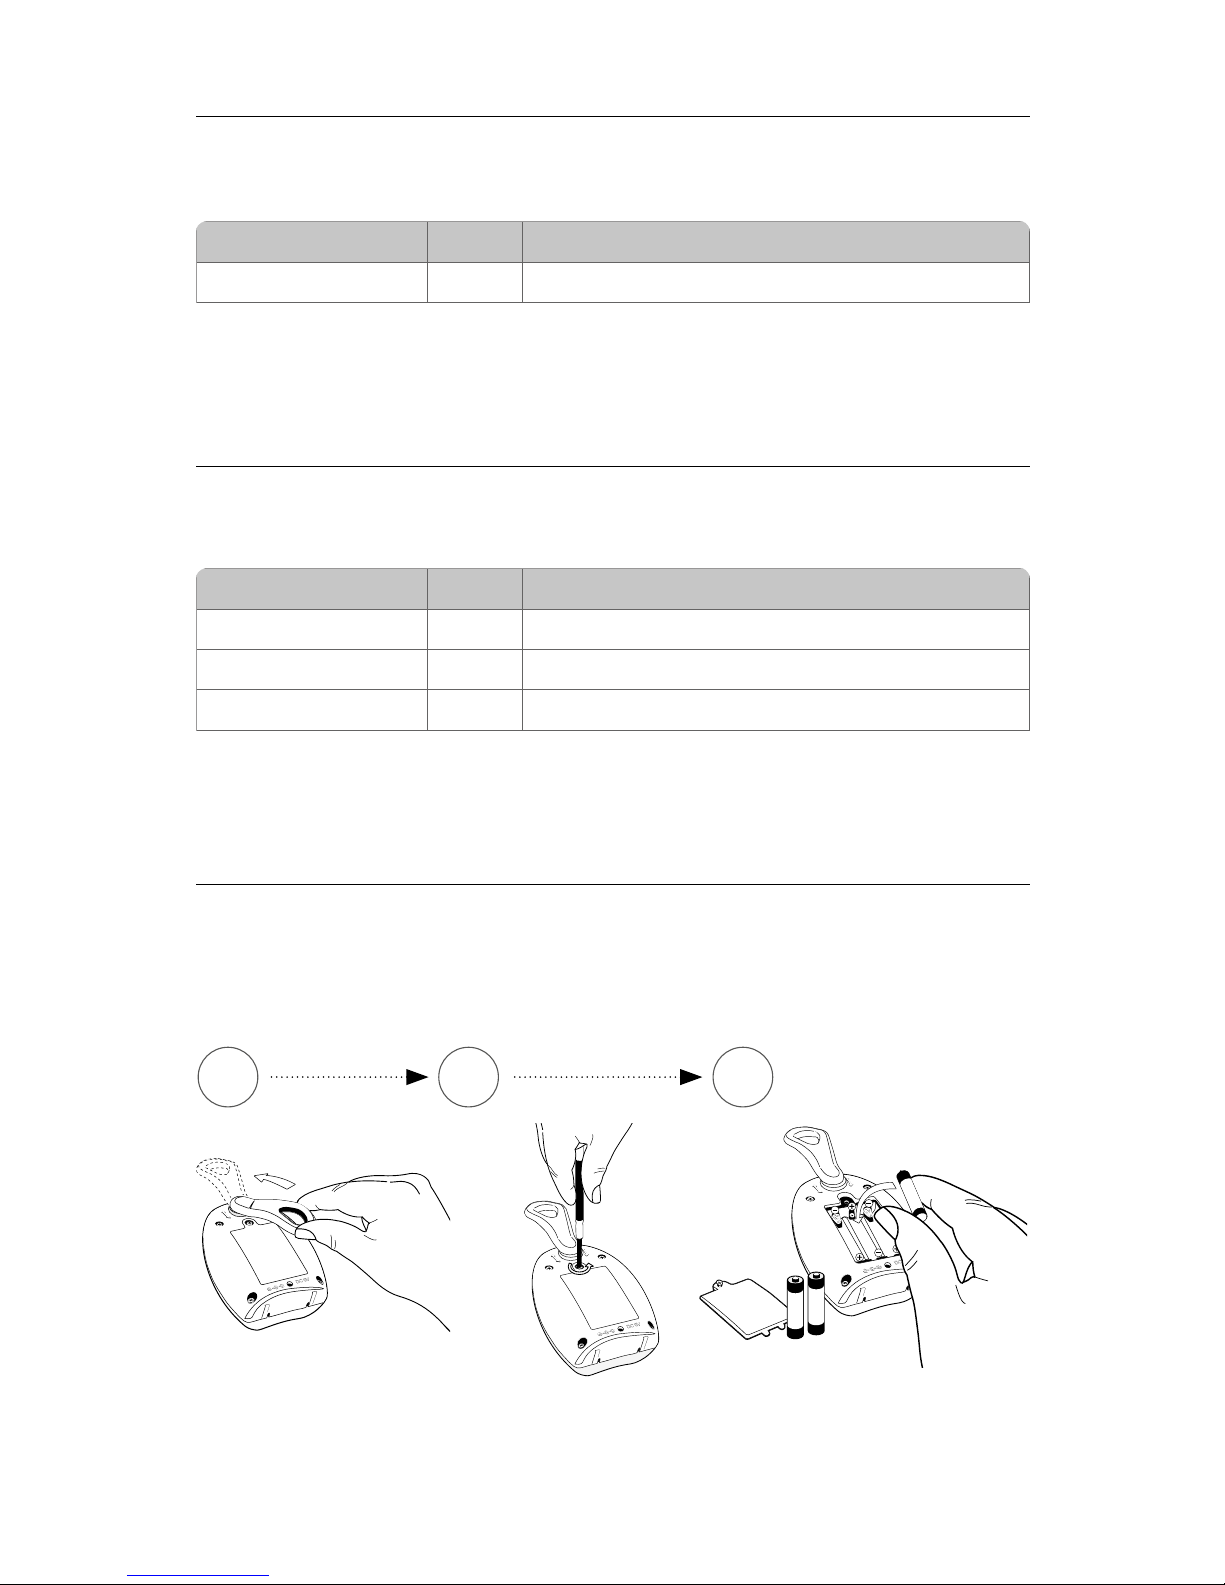
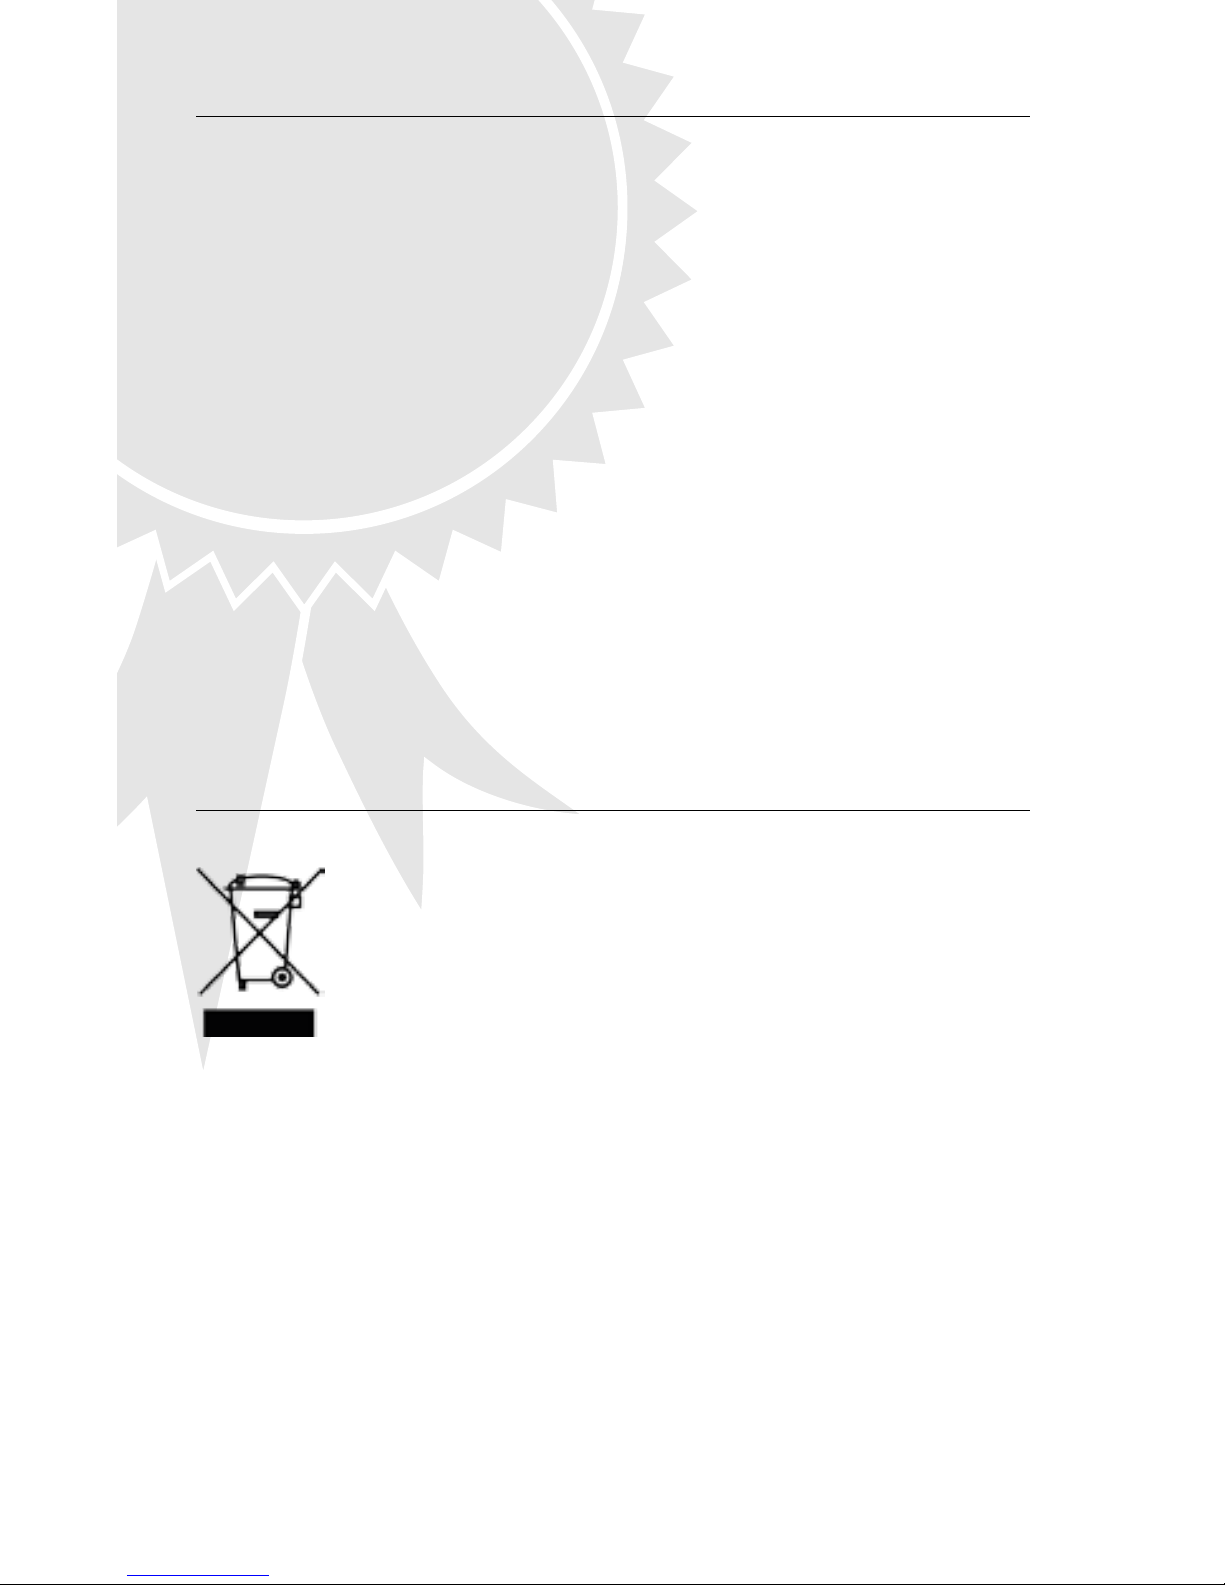
Betrieb der Elterneinheit mit Batterien
WICHTIG: Schalten Sie die Geräte aus und entfernen Sie das Netzkabel, bevor Sie einen
Batteriewechsel durchführen.
1 32
Die Status-LED oberhalb des Ein-/Ausschalters gibt den Zustand der Babyeinheit an.
Die Status-LED oberhalb des Ein-/Ausschalters gibt den Zustand der Elterneinheit an.
8
Page 9
Tipps zur Erweiterung des Empfangbereichs
Lautstärkereglung / Elterneinheit
Reinigung und Wartung
Der Empfangsbereich ist sowohl von der Umgebung als auch von anderen Faktoren
abhängig, die das Übertragungssignal stören oder blockieren können:
große metallische Gegenstände wie z.B. Kühlschränke, Spiegel, Schränke, Metalltüren
oder Stahlbeton
feste Strukturen (Wände) oder Funk-, Elektro- und Elektronikgeräte wie z.B. Fernseher,
Computer, Handys oder Dimmerschalter
Ziehen Sie immer die Netzteile aus der Netzsteckdose, bevor Sie das Gerät reinigen.
Verwenden Sie ausschließlich ein leicht feuchtes Tuch. Tauchen Sie das Gerät nicht in
Wasser. Benutzen Sie keinerlei chemische Reinigungsmittel.
Entfernen Sie die Batterien aus dem Gerät, wenn es längere Zeit nicht benutzt wird. Dieses
Produkt erfordert keine spezielle Wartung. Reparaturen am Gerät dürfen nur von einem
Fachmann durchgeführt werden.
Um die Empfängerlautstärke an der Elterneinheit zu erhöhen oder zu verringern, drehen
Sie den Lautstärkeregler (=Volume) nach oben oder unten.
HINWEIS: Ist der Lautstärkeregler ganz nach unten gedreht, ndet keine Geräuschübertragung statt.
HINWEIS: Es wird empfohlen, mindestens einen Meter Abstand zwischen Baby-Einheit
und interferierenden Geräten einzuhalten bzw. diese ggf. auszuschalten. Bei schwacher
Verbindung wird empfohlen, die Eltern- und/oder Baby-Einheit im Zimmer an einer
anderen Stelle zu platzieren.
DE
9
Page 10

Garantie
Entsorgungshinweise
Bitte Kaufbeleg, Gebrauchsanleitung und Artikelnummer aufbewahren.
Gewährleistungsansprüche oder Ansprüche aus Garantieversprechen sind ausschließlich
mit dem Händler abzuwickeln.
Alle technischen Daten, Informationen sowie Eigenschaften des in diesem Werk
beschriebenen Produktes wurden nach bestem Wissen zusammengestellt und entsprechen dem Stand bei Veröentlichung. Die von reer bereitgestellten Informationen sollten
korrekt und zuverlässig sein. Die Firma reer übernimmt dennoch keinerlei Haftung für
mögliche Fehler in diesem Dokument und behält sich das Recht vor, ohne vorherige
Ankündigung, Änderungen am Produktdesign beziehungsweise an den Spezikationen
vorzunehmen. Vervielfältigung und Weitergabe von Informationen aus diesem urheberrechtlich geschützten Werk in irgendeiner Form oder auf irgendeine Weise, grasch,
elektronisch oder mechanisch, durch Fotokopieren, Aufzeichnen auf Band oder Speichern
in einem Datenabfragesystem, auch auszugsweise, bedürfen einer vorherigen schriftlichen
Genehmigung der Firma reer.
Dieses Produkt darf am Ende seiner Lebensdauer nicht über den normalen
Hausmüll entsorgt werden, sondern muss an einer Sammelstelle für das
Recycling von elektrischen Geräten abgegeben werden. Das Symbol
auf dem Produkt, in der Gebrauchsanleitung oder auf der Verpackung
weist darauf hin. Die Werkstoe sind gemäß Ihrer Kennzeichnung wieder
verwendbar. Mit der Wiederverwendung, der stoichen Verwertung oder anderen
Formen der Verwertung von Altgeräten, leisten Sie einen wichtigen Beitrag zum Schutze
unserer Umwelt. Bitte fragen Sie bei Ihrer Gemeindeverwaltung nach der zuständigen
Entsorgungsstelle.
10
Page 11

Problembehebung
Die Status-LED leuchtet nicht
Stellen Sie sicher, dass beide Geräte eingeschaltet sind.
Überprüfen Sie die Verbindung des Netzteils zur Steckdose und zum Gerät.
Tauschen Sie die Batterien aus und/oder überprüfen Sie die Polarität.
Überprüfen Sie die Kanaleinstellung (A oder B) von Sender und Empfänger.
Die Status-LED blinkt orange
Die Elterneinheit empfängt Geräusche. Erhöhen Sie ggf. die Lautstärke an der Elternein-
heit, um die Geräusche Ihres Kindes besser zu hören.
Die Status-LED blinkt rot
Die Batterien sind erschöpft. Tauschen Sie die Batterien oder schließen Sie das Gerät an
die Stromversorgung an.
Keine Geräuschübertragung trotz bestehender Verbindung
Stellen Sie sicher, dass der Lautstärkeregler nicht ganz nach unten gedreht ist.
Sie können andere Funkteilnehmer hören
Da dieses Babyphone auf analoger Funktechnologie basiert, kann es zu Störungen
durch andere Funkteilnehmer kommen. Wechseln Sie bitte den Kanal.
Es ertönt ein lauter Pfeifton aus der Elterneinheit (Rückkopplung)
Der Abstand von Baby- und Elterneinheit ist zu gering. Erhöhen Sie die Distanz zwischen
Baby- und Elterneinheit.
Keine Verbindung zwischen Eltern- und Babyeinheit, Rauschen oder Verbindung
bricht ab
Stellen Sie sicher, dass beide Geräte eingeschaltet sind.
Überprüfen Sie die Kanaleinstellung und/oder wechseln Sie den Kanal.
Die maximale Reichweite ist überschritten. Platzieren Sie das Babyphone an eine andere
Stelle und/oder verkürzen Sie die Distanz zwischen Baby- und Elterneinheit.
Baby-/Elterneinheit befinden sich in der Nähe von störenden Geräten (z.B. Mikrowelle)
oder metallischen Gegenständen. Versuchen Sie, die Störquelle ausfindig zu machen
und platzieren sie die Geräte an einer anderen Stelle.
Die Batterien sind zu schwach. Wechseln Sie die Batterien und/oder schließen Sie die
Elterneinheit an die Stromversorgung an.
DE
11
Page 12

General safety instructions
Congratulations on the purchase of your new reer baby monitor. This intuitive unit‘s highly
sensitive microphone transmits the sounds your baby makes clearly and reliably. As soon as
your child is quiet, the device switches automatically into an „ECO mode“. In this ECO mode,
the baby unit no longer emits any radiation. The baby unit‘s soothing night light helps your
child settle to sleep, and the unit then automatically switches to „ECO mode“ as soon as
your baby is quiet. The baby unit starts to send again only when noises are received. Thanks
to optional battery operation for the parent unit and robust belt clip, the baby monitor is
handy for use as a stationary or mobile unit. We are sure you will enjoy the quality of our
product for many years to come.
Please take a few minutes to read through the safety instructions carefully. You will only
be able to use the reer baby monitor with condence if all of the points mentioned here
have been checked. Please keep the instruction manual in a safe place for future reference.
! Check the unit for visible damage before each use. If you detect any damage, do not use
the unit.
! Only use the supplied chargers and mains adapters. Make sure that the operating voltage
of the power outlet matches that of the mains adapter. Check - especially when travelling
abroad - that the local mains voltage matches the voltage specied on the units and/or
mains adapters.
! Except for the battery compartment cover, never open the units or mains adapters, as
there is a risk of electric shock. If a unit does not work correctly, please do NOT try to x
the problem yourself. Please contact your dealer with any problems.
! Keep the battery out of the reach of children. In order to avoid any risk of swallowing.
! Avoid bringing the battery and/or electrical connection contacts on the units into
contact with metal objects.
! This product is not a toy! Do not allow children to play with the unit.
NOTE: This baby monitor was designed exclusively for monitoring your baby. It may
neither be regarded as a substitute for parental supervision nor as a medical device.
12
Page 13

GB
Safety instructions regarding installation
! Always place the baby unit out of your child´s reach (minimum distance: 1 meter).
! Never place the baby monitor inside the crib, cot or playpen.
! The power lead must be secured out of the reach of children to avoid any risk of
strangulation. Do not use extension cables.
! To ensure optimal transmission, the units must be kept upright at all times and placed in
an elevated position.
! DO NOT place the receiver in the vicinity of radio transceivers or microwaves. Radiant
emissions from these devices can signicantly aect radio reception.
! Do not use the units near water or in humid places. Do not submerge the units in water.
Do not rinse the units under running water.
! Do not cover the baby monitor with towels, clothes or blankets.
! Avoid extreme heat and direct sunlight.
Technical specication
• technology: Analogue
• transmitter: Power supply with mains
adaptor
• receiver: Power supply with mains
adaptor or optionally with 3 AAA
batteries or power pack (not included in
the scope of delivery)
• input: 100 – 220V 50Hz 0.15 A max.
• output: 6V / 300mA max.
• transmitter power: TX 50 mA , RX 130 mA
• frequency: 40 MHz
• range: 200 m
• cable length: approx. 1.80 m
• working temperature: 10°C - 40°C
• storage temperature: 0°C - 55°C
• standards: EN 300 220-1, EN 301 489-1
and EN 301 489-3
13
Page 14

Scope of delivery
Description of babyphone
baby unit (transmitter)
with mains adaptor
parent unit (receiver)
with mains adaptor
instruction manual
PARENT UNIT
BABY UNIT
volume control
mains adapter
connector
mains adapter
connector
battery compartment
belt clip
belt clip
status LED
status LED
speaker
On/O/Channel
selector switch
On/O/Channel
selector switch
14
Page 15
Before rst use
NOTE: The parent unit can optionally be operated also with two AAA batteries (not
included in the deliverables).
Only the supplied adapter (6V DC/300 mA) may be used.
1
3
2
4
Select the same channel on both devices (A or B).
The status LED on the baby unit and the parent unit lights up green.
If the highly sensitive microphone on the baby unit detects a sound, the unit will
begin transmitting to the parent unit. When noise is received, the status LED on
the parent unit begins to ash orange.
When your child is quiet and the baby unit does not receive any noise, the device
automatically switches to standby mode (ECO mode). In this mode, the baby unit
does not emit any radiation. The baby unit starts to send again only when noises
are received.
TIP You can attach the units to your belt using the belt clip, or hang them on a wall using
a suitable fastening material.
GB
15
Page 16

Status LED Power Status
green on device is switched on
Status LED Power Status
green on device is switched on
orange ashing on noise is being received from the baby unit
red ashing on batteries are depleted
Status LED Baby unit
Status LED parent unit
Battery operation of the parent unit
IMPORTANT: Switch the units o and disconnect the power lead before changing the batteries.
1 32
The status LED above the on/o switch indicates the status of the baby unit.
The status LED above the on/o switch shows the status of the parent unit.
16
Page 17
Tips for extending the range
Volume control / parent unit
Cleaning and maintenance
The reception range depends on the environment and other factors which may interfere
with or block the transmission signal:
large metallic objects such as fridges, mirrors, wardrobes, metal doors and reinforced
concrete
xed structures (walls) or radio, electrical and electronic appliances such as TVs, PCs,
mobile phones or dimmer switches
Always disconnect the mains adapters from the wall power socket before cleaning the
unit. Only use a slightly dampened cloth. Do not submerge the unit in water. Do not use
chemical detergents.
Remove the batteries from the unit if it is not to be used for a long period of time. This
product does not require any special maintenance. Repairs to the unit must be carried out
by skilled personnel only.
Turn the volume switch („volume“) up or down to increase or reduce the receiver volume
of the parent unit.
NOTE: If the volume is turned all the way down, no sound will be transmitted.
NOTE: We recommend keeping a minimum distance of one metre between the
baby unit and interfering devices, or switching the latter o. In case of weak signal, we
recommend moving the parent and/or baby unit to a dierent place in the room.
GB
17
Page 18

Warranty
Disposal instructions
Please retain your receipt, the user manual and item number.
Warranty claims or claims from promises of guarantee must be processed by the dealer.
The technical specication, information and characteristics of the product described
herein have been compiled to the best of our knowledge and belief and are correct at
the time of printing. Any information provided by reer should be correct and authoritative.
Nevertheless, reer does not accept liability for potential errors in this document and
reserves the right to make changes to the product design and/or specications without
prior notice. Reproduction and disclosure of information contained in this copyrightprotected document, in any form or by any means - graphical, electronic or mechanical by
photocopying, recording on tape or storage in a data retrieval system (even in part), require
prior written consent from reer.
At the end of its life, this product must not be disposed of as normal
domestic waste, but should be recycled at a collection point for electrical
appliances. Please see the relevant symbol on the product, in the user
manual and packaging. Materials can be recycled as specied. Do not put
used batteries into household waste. Instead they should be disposed of as
hazardous waste or with a battery collection station provided by the dealer. An important
contribution to the protection of the environment can be made by reusing the unit,
recycling its components or otherwise reusing old appliances. Please contact your local
council to nd out more about an appropriate disposal centre.
18
Page 19

Troubleshooting
The status LED does not light up
Make sure that both units are switched on.
Check the connection of the mains adapter to the wall power socket and the unit.
Exchange the batteries and/or check the polarity.
Check the channel setting (A or B) of the transmitter and receiver.
The status LED flashes orange
The parent unit receives sounds. Turn up the volume on the parent unit to make sure
that you hear the sounds from your baby.
The status LED flashes red
The batteries are depleted. Replace the batteries or connect the unit to the power supply.
No sound transmission despite established connection
Check if the volume control button has been turned all the way down.
You can hear other wireless devices
As this baby monitor works with analogue radio technology, interference from other
wireless devices can occur. Change the channel.
A loud whistling tone sounds from the parent unit (feedback)
The baby unit is too close to the parent unit. Increase the distance between the baby
unit and the parent unit.
No connection between parent and baby unit / random noise / connection is lost
Make sure that both units are switched on.
Check the channel setting and/or change the channel.
The maximum range has been exceeded. Move the baby monitor to a different position
and/or reduce the distance between the baby and parent unit.
The baby/parent unit is close to interfering devices (e.g. microwave) or metal objects.
Try to find the source of interference and move the units to a different position.
The batteries are almost depleted. Replace the batteries or connect the units to the
power supply.
GB
19
Page 20

Indicaciones generales de seguridad
Le felicitamos por la compra de su nuevo Babyphone (sistema de vigilancia para bebés)
de reer. El Babyphone transmite los sonidos de su bebé con nitidez gracias al micrófono
de alta sensibilidad. Tan pronto como su bebé esté tranquilo el dispositivo pasa
automáticamente al „modo ECO“. En el modo ECO la unidad infantil ya no emite ninguna
radiación. La tranquilizadora luz nocturna en la unidad infantil ayuda a su bebé a quedarse
dormido y en cuanto está tranquilo el aparato cambia a un „modo ECO“. La unidad infantil
vuelve a emitir de nuevo tan pronto como se reciba ruido. Gracias al funcionamiento por
pilas y a la robusta pinza para cinturón puede utilizar su Babyphone de manera tanto ja
como móvil. Estamos seguros de que va a disfrutar durante mucho tiempo de la calidad
de nuestro producto.
Tómese un par de minutos para leer atentamente las instrucciones de seguridad. Solo si
se cumplen todos los puntos aquí indicados se podrá utilizar el Babyphone de reer sin
problemas. Guarde el manual de instrucciones para consultas futuras.
! Revise antes de cada uso que el aparato no presenta ningún daño visible. Si descubriese
algún daño, no debe utilizar el aparato.
! Utilice solamente las fuentes de alimentación y los cargadores incluidos en el volumen
de suministro del aparato. Asegúrese de que la tensión de la toma de corriente se
corresponda con la de la fuente de alimentación. Compruebe que la tensión nominal
coincida con la tensión indicada en los aparato o en la fuente de alimentación, sobre todo
cuando viaje al extranjero.
! Los aparatos y las fuentes de alimentación no se deben abrir, a excepción de la tapa del
compartimento para las pilas, pues podría recibir una descarga eléctrica. Si un aparato
no funcionase correctamente, NO intente solucionar usted mismo el problema. En este
caso, póngase en contacto con su distribuidor.
! Guarde las pilas fuera del alcance de los niños. Podrían atragantarse.
! Evite el contacto de objetos metálicos con los contactos de las pilas o de la toma de
corriente de los aparatos.
! ¡Este artículo no es un juguete! No deje que los niños jueguen con el aparato.
NOTA: Este Babyphone se ha desarrollado únicamente como dispositivo auxiliar para
la vigilancia de bebés. ¡No debe considerarse como sustituto de la vigilancia paterna ni
como equipo médico!
20
Page 21
ES
Indicaciones de seguridad para la instalación
! Coloque la unidad infantil siempre fuera del alcance del niño (distancia mínima 1 metro).
! No coloque nunca el Babyphone dentro de la cuna o la cama infantil, ni en el parque.
! Para evitar que el niño se estrangule con el cable, mantenga los cables lejos de su
alcance. No utilice ningún cable de prolongación.
! Para garantizar la mejor transmisión posible, debe colocar el aparato siempre en vertical
y en una posición elevada.
! NO sitúe el receptor cerca de equipos de radio, horno o microondas. La radiación de
esos equipos puede interferir en la recepción.
! No utilice los aparatos cerca del agua ni en lugares húmedos. No sumerja los aparatos en
el agua. No lave los aparatos debajo del grifo.
! No tape el Babyphone con una toalla, con ropa ni con una manta.
! Evite el calor extremo y la radiación solar directa.
Datos técnicos
• tecnología: analógica
• emisor: abastecimiento de corriente con
fuente de alimentación
• receptor: abastecimiento de corriente
con fuente de alimentación, u,
opcionalmente con 3 pilas AAA-NiMH o
pilas recargables (no forman parte del
volumen de suministro)
• entrada: 100 – 220V 50Hz 0.15 A max.
• salida: 6V / 300mA max.
• potencia de transmisión: TX 50 mA , RX
130 mA
• frecuencia: 40 MHz
• alcance: 200 m
• longitud del cable: aprox. 1,80 m
• temperatura de servicio: 10°C - 40°C
• temperatura de almacenamiento:
0°C - 55°C
• estándares: EN 300 220-1, EN 301 489-1,
EN 301 489-3
21
Page 22
Volumen de suministro
Descripción del dispositivo
unidad infantil (emisor)
con fuente de alimentación
unidad parental (receptor)
con fuente de alimentación
instrucciones de uso
UNIDAD PARENTAL
UNIDAD INFANTIL
regulación de volumen
enchufe para la
fuente de alimentación
enchufe para la
fuente de alimentación
compartimento para
las pilas
pinza para cinturón
pinza para cinturón
LED de estado
LED de estado
altavoces
interruptor con. /
descon./ selector
de canal
interruptor con. /
descon./ selector
de canal
22
Page 23
ES
Puesta en funcionamiento
NOTA: La unidad parental puede funcionar alternativamente también con dos pilas AAA
(no forman parte del volumen de suministro).
Utilice solamente el adaptador incluido en el suministro (6V CC / 300 mA).
1
3
2
4
Seleccione el mismo canal en ambos dispositivos (A o B).
El LED de estado en la unidad infantil y en la unidad parental brilla en color verde.
En cuanto el micrófono de alta sensibilidad de la unidad infantil detecta un ruido,
el aparado transmite una señal a la unidad parental. Si se recibe ruido, el LED de la
unidad parental comienza a parpadear en naranja.
Si el bebé está tranquilo y la unidad infantil no recibe ningún ruido, el aparato
cambia automáticamente al modo standby (modo ECO). En ese modo la unidad
infantil no emite ninguna radiación. La unidad infantil vuelve a emitir de nuevo
tan pronto como se reciba ruido.
CONSEJO Puede jar el aparato a su cinturón usando la pinza suministrada o puede
colgarlo en la pared con material de sujeción adecuado.
23
Page 24
LED de estado potencia Estado
verde encendido el aparato está encendido
LED de estado potencia Estado
verde encendido el aparato está encendido
parpadeo naranja encendido se reciben ruidos de la unidad infantil
parpadeo rojo encendido las pilas están gastadas
LED de estado unidad infantil
LED de estado unidad parental
Funcionamiento de la unidad parental con pilas
IMPORTANTE! Apague el aparato y desenchufe el cable antes de realizar un cambio de pilas.
1 32
El LED de estado por encima del botón de encendido/apagado indica el estado de la unidad infantil.
El LED de estado por encima del botón de encendido/apagado indica el estado de la unidad parental.
24
Page 25

ES
Consejos para ampliar el alcance
Regulación de volumen / unidad parental
Limpieza y mantenimiento
El alcance de recepción depende tanto del entorno como de otros factores que pueden
interferir en la transmisión de la señal o bloquearla:
objetos metálicos grandes como, p. ej., neveras, espejos, armarios, puertas metálicas u
hormigón armado
estructuras jas (paredes) dispositivos de radio, eléctricos y electrónicos como, p.ej.,
televisores, ordenadores, teléfonos móviles o reguladores de la intensidad de la luz
Desenchufe siempre el aparato antes de limpiarlo. Utilice únicamente un paño humedecido.
No sumerja el aparato en el agua. No utilice ningún detergente químico. Retire las pilas del
aparato si no lo va a utilizar durante un tiempo prolongado. Este producto no precisa ningún
mantenimiento especial. Las reparaciones en el aparato solo deben ser realizadas por un
especialista.
Gire el regulador del volumen hacia arriba o abajo para aumentar o reducir el volumen de
recepción de la unidad parental.
NOTA: Si el regulador de volumen se gira completamente hacia abajo no se transmitirá
ningún sonido.
NOTA: Se recomienda mantener una distancia mínima de un metro entre la unidad
infantil y los aparatos que producen interferencias o apagar estos últimos. Si la conexión
es débil se recomienda colocar la unidad parental y/o la unidad infantil en otro lugar de
la habitación.
25
Page 26
Garantía
Indicaciones de eliminación
Conserve el justicante de compra, el manual de instrucciones y el número de artículo.
Las reclamaciones de garantía o por compromisos de garantía deben tramitarse
exclusivamente a través del distribuidor.
Todos los datos técnicos, la información y las propiedades del producto descritos en
este manual han sido editadas al mejor saber y entender, y corresponden al estado del
mismo en el momento de la publicación. La información puesta a disposición por reer
es correcta y able. Sin embargo, la empresa reer no asume, ninguna responsabilidad de
posibles errores de este documento y se reserva el derecho a realizar modicaciones sin
previo aviso del diseño del producto o de las especicaciones. Cualquier reproducción y
transmisión de la información de esta obra, protegida por la Ley de propiedad intelectual,
en cualquier método o modo, gráca, electrónica o mecánica, por fotocopias, grabación
en cinta o grabación en un sistema de consulta de datos (también la parcial) precisa la
autorización por escrito de la empresa reer.
Ese producto no debe ser desechado en la basura doméstica cuando
haya concluido su vida útil, sino que debe ser entregado en un punto
de recogida encargado del reciclaje de dispositivos eléctricos. El símbolo
en el producto, en las instrucciones de uso o en el embalaje lo indica
claramente. El símbolo en el producto, en las instrucciones de uso o en
el embalaje lo indica claramente. No tire las pilas usadas en la basura doméstica, sino en
recipientes para residuos tóxicos o en la estación de recolección de pilas del comercio
especializado. Reutilizando los dispositivos, reciclando sus materiales o con otras formas de
utilización de dispositivos usados contribuye a proteger el medio ambiente. Consulte en su
ayuntamiento dónde está el organismo de eliminación de residuos respectivo.
26
Page 27

ES
Solución de problemas
El LED de estado no brilla
Asegúrese de que ambos aparatos estén encendidos.
Revise la unión de la fuente de alimentación con la caja de enchufe y con el aparato.
Sustituya las pilas y revise la polaridad.
Revise la configuración del canal (A o B) en el emisor y en el receptor.
El LED de estado parpadea en naranja
La unidad parental recibe ruidos.En caso necesario, aumente el volumen en la unidad
parental para poder oír mejor los ruidos de su hijo.
El LED de estado parpadea en rojo
Las pilas están gastadas. Sustituya las pilas o enchufe el aparato a la red de corriente
eléctrica.
No hay transmisión de sonido, pese a que existe una conexión
Asegúrese de que el regulador de volumen no esté girado completamente hacia abajo.
Puede oír a otros participantes en la radiofrecuencia
Como este babyphone se basa en tecnología de radio analógica pueden producirse
interferencias de otros usuarios de radio. Cambie el canal.
Se oye un pitido fuerte de la unidad parental (reacople)
La distancia entre la unidad infantil y la parental es muy baja. Aumente la distancia entre
la unidad infantil y la parental.
No hay conexión entre la unidad parental y la infantil / interferencias / se pierde la
conexión
Asegúrese de que ambos aparatos estén encendidos.
Revise el ajuste del canal y/o cambie de canal.
Se ha superado el alcance máximo. Sitúe el babyphone en otro lugar y/o reduzca la
distancia entre la unidad infantil y la parental.
La unidad infantil / parental se encuentra cerca de equipos que ocasionan interferencias
(p.ej., horno microondas) o de otros objetos metálicos. Intente detectar cuál es la fuente
de las interferencias y coloque el aparato en otro lugar.
Las pilas tienen muy poca carga. Cambie las pilas o enchufe el aparato en la red de cor
riente eléctrica.
27
Page 28

Avvertenze di sicurezza generali
Ci congratuliamo con voi per l‘acquisto del vostro nuovo babyphone reer. Questo babyphone
dal funzionamento intuitivo, con il suo microfono ultrasensibile, trasmette i rumori emessi
dal vostro bambino in modo chiaro e adabile. Non appena il bambino si tranquillizza,
l‘apparecchio passa automaticamente in „modalità ECO“. In questa modalità l‘unità non
emana radiazioni. La tranquillizzante luce notturna dell‘unità bambino aiuta il vostro piccolo
ad addormentarsi e non appena il bambino è calmo, l‘apparecchio passa automaticamente
alla „modalità ECO“. Inizierà a emanarle nuovamente non appena rileverà dei rumori. Grazie
all‘opzione di funzionamento a batterie e alla robusta clip da cintura, il pratico babyphone
può essere utilizzato sia in posizione ssa che mobile. Siamo certi che rimarrete soddisfatti
della qualità del nostro prodotto.
Siete pregati di dedicare il tempo necessario a leggere attentamente le istruzioni di sicurezza.
Solo se si rispettano tutti i punti qui indicati, il babyphone reer può essere utilizzato senza
preoccupazioni. Conservare con cura le istruzioni di funzionamento per futura consultazione.
! Prima di ogni utilizzo, vericare l‘eventuale presenza di danni visibili all‘apparecchio. Qualora
si dovesse accertare la presenza di danni, l‘apparecchio non deve essere utilizzato.
! Utilizzare esclusivamente i dispositivi di carica e gli alimentatori forniti in dotazione. Assicurar-
si che la tensione di esercizio della presa di corrente corrisponda a quella dell‘alimentatore.
Vericare, soprattutto quando ci si trova in viaggio all‘estero, che la tensione di rete del
luogo corrisponda alla tensione indicata sugli apparecchi o sugli alimentatori.
! Gli apparecchi e gli alimentatori, ad eccezione del coperchio dello scomparto batterie, non
devono essere aperti, onde evitare il pericolo di scosse elettriche. In caso di funzionamento
difettoso di un apparecchio, NON tentare di risolvere autonomamente il problema. In tal
caso siete pregati di rivolgervi al vostro rivenditore.
! Tenere le batterie fuori dalla portata dei bambini. Pericolo di ingestione.
! Evitare che le batterie o i contatti di collegamento elettrico degli apparecchi entrino in
contatto con oggetti metallici.
! Questo prodotto non è un giocattolo! Non lasciar che i bambini giochino con l‘apparecchio.
AVVISO: Il presente babyphone è destinato esclusivamente a essere utilizzato come aiuto
per vigilare sul vostro bambino. Non è un dispositivo medico, né sostituire il dovere di
vigilanza dei genitori.
28
Page 29

IT
Istruzioni di sicurezza per l‘installazione
! Posizionare sempre l‘unità bambino fuori dalla portata del bambino stesso (distanza
minima di 1 m).
! Non lasciare mai il babyphone nella culla, o nel lettino, o nel box.
! Accertarsi che il cavo di alimentazione si trovi fuori dalla portata dei bambini, onde
evitare il rischio di strangolamento. Non utilizzare cavi di prolunga.
! Per garantire una trasmissione ottimale, l‘apparecchio va posizionato sempre in posizione
dritta e sollevata.
! NON collocare il ricevitore in prossimità di apparecchi radio o a microonde. L‘irradiazione
di tali apparecchi può compromettere fortemente la ricezione.
! Non utilizzare gli apparecchi in prossimità di acqua, o in luoghi umidi. Non immergere gli
apparecchi in acqua. Non sciacquare gli apparecchi con acqua corrente.
! Non coprire il babyphone con asciugamani, vestiti o coperte.
! Non esporre l‘apparecchio al calore estremo e ai raggi diretti del sole.
Dati tecnici
• tecnologia: analogica
• unità trasmittente: alimentatore elettrico
con adattatore CA
• unità ricevente: alimentatore elettrico con
adattatore CA, con 3 batterie opzionali
AAA o ricaricabili (non comprese nella
dotazione)
• ingresso: 100 – 220V 50Hz 0.15 A max.
• uscita: 6V / 300mA max.
• potenza di trasmissione: TX 50 mA , RX
130 mA
• frequenza: 40 MHz
• copertura: 200 m
• lunghezza cavo: 1,80 m circa
• temperatura di esercizio:: 10°C - 40°C
• temperatura di stoccaggio: 0°C - 55°C
• standard: EN 300 220-1, EN 301 489-1,
EN 301 489-3
29
Page 30

Dotazione
Descrizione dell‘apparecchio
unità bambino (trasmettitore)
con adattatore CA
unità genitori (ricevitore)
con adattatore CA
istruzioni per l‘uso
UNITÀ GENITORI
UNITÀ BAMBINO
regolatore del volume
presa per alimentatore
presa per alimentatore
scomparto batterie
clip da cintura
clip da cintura
LED di stato
LED di stato
altoparlante
selettore on/o/
selezione canale
selettore on/o/
selezione canale
30
Page 31

IT
Messa in funzione
AVVISO: L‘unità genitore può funzionare opzionalmente anche con due batterie AAA (non
in dotazione).
Utilizzare esclusivamente l‘adattatore in dotazione (6V CC / 300 mA).
1
3
2
4
Selezionare lo stesso canale su entrambi gli apparecchi (A o B).
Il LED di stato sull‘unità bambino e genitore emette una luce verde.
Non appena il microfono ultrasensibile dell‘unità bambino rileva un rumore,
l‘apparecchio inizierà a trasmettere all‘unità genitori. Quando si sta rilevando un
rumore, il LED di stato dell‘unità genitore inizia a lampeggiare in arancione.
Quando il vostro bambino è calmo e l‘unità bambino non rileva alcun rumore,
l‘apparecchio passa automaticamente in modalità standby (modalità ECO). In
questa modalità l‘unità bambino non emana radiazioni. Inizierà a emanarle nuovamente non appena rileverà dei rumori.
SUGGERIMENTO Grazie alla clip, potete assicurare l‘apparecchio alla vostra cintura, op-
pure appenderlo a una parete servendovi di un elemento di ancoraggio adatto.
31
Page 32

LED di stato Accensione Stato
verde on l‘apparecchio è acceso
LED di stato Accensione Stato
verde on l‘apparecchio è acceso
arancione lampeggiante on si ricevono rumori dall‘unità bambino
rosso lampeggiant on le batterie sono esaurite
LED di stato unità bambino
LED di stato unità genitori
Funzionamento dell‘unità genitore con batterie
IMPORTANTE: Spegnere l‘apparecchio e rimuovere il cavo di alimentazione prima di procedere
alla sostituzione delle batterie.
1 32
Il LED di stato al di sopra dell‘interruttore on/o indica lo stato dell‘unità bambino.
Il LED di stato al di sopra dell‘interruttore on/o indica lo stato dell‘unità genitore.
32
Page 33

IT
Suggerimenti per estendere l‘area di copertura
Regolatore del volume / unità genitori
Pulizia e manutenzione
Il campo di ricezione dipende dall‘ambiente e da altri fattori che possono disturbare o
bloccare il segnale di trasmissione:
oggetti metallici di grandi dimensioni, come ad esempio frigoriferi, specchi, armadi,
porte metalliche o cemento armato
strutture sse (pareti) o dispositivi radio, elettrici ed elettronici, come ad esempio
televisori, computer, telefoni o interruttori dimmer
Estrarre sempre l‘alimentatore dalla presa di corrente prima di pulire l‘apparecchio. Utilizzare
esclusivamente un panno leggermente umido. Non immergere l‘apparecchio in acqua.
Non utilizzare mai alcun detergente chimico.
Rimuovere le batterie dall‘apparecchio quando si prevede di non utilizzarlo per un periodo
prolungato. Il presente prodotto non necessita di alcuna manutenzione particolare.
Le riparazioni all‘apparecchio possono essere eseguite esclusivamente da un tecnico
specializzato.
Ruotare il regolatore del volume verso l‘alto o verso il basso per alzare o abbassare il volume
dell‘altoparlante dell‘unità genitori.
AVVISO: Se si ruota il regolatore del volume completamente verso il basso, non verrà
trasmesso alcun rumore.
AVVISO: Si raccomanda di mantenere una distanza di almeno un metro tra l‘unità
bambino e apparecchi che possano causare interferenze, oppure di spegnere questi
ultimi. In caso di collegamento debole si raccomanda di collocare l‘unità genitori e/o
l‘unità bambino in un altro punto della stanza.
33
Page 34

Garanzia
Modalità di smaltimento
Conservare lo scontrino di cassa, le istruzioni per l‘uso e il numero dell‘articolo.
Eventuali richieste di garanzia o diritti di garanzia devono essere gestiti esclusivamente con
il rivenditore.
Tutti i dati tecnici, le informazioni e le caratteristiche del prodotto descritto in questa opera
sono stati elaborati in buona coscienza e corrispondono allo stato attuale al momento
della pubblicazione. Le informazioni messe a disposizione da reer dovrebbero essere
corrette ed adabili. reer non si assume comunque alcuna responsabilità per eventuali
errori contenuti in questo documento e si riserva il diritto di modicare senza preavviso il
design del prodotto e le sue speciche. L‘eventuale copia e trasmissione (anche parziale)
di informazioni delle presenti istruzioni per l‘uso, sottoposte al diritto d`autore, in qualsiasi
forma o in qualsiasi modalità, graca, elettronica o meccanica, mediante fotocopie,
riproduzioni audio o registrazione su un sistema di recupero dati, necessita previa
autorizzazione scritta da parte di reer.
Al termine della sua vita il presente prodotto non può essere smaltito
tra i normali riuti domestici, ma va consegnato ad un centro di raccolta
per il riciclo di apparecchi elettrici. Indicato dal simbolo sul prodotto,
nelle istruzioni per l‘uso o sulla confezione. I materiali sono riutilizzabili
conformemente al loro contrassegno. Non gettare le batterie usate tra i
riuti domestici, ma tra i riuti speciali o consegnarle in un punto di raccolta batterie in
u negozio specializzato. Con il riutilizzo, il recupero dei materiali o altre forme di riciclo di
apparecchi usati fornirete un importante contributo alla tutela dell‘ambiente. Informatevi
presso la vostra amministrazione comunale su dove siano collocati i punti di raccolta per
lo smaltimento dei riuti.
34
Page 35

IT
Soluzione problemi
Il LED di stato non si accende
Assicurarsi che entrambi gli apparecchi siano accesi.
Verificare il collegamento dell‘alimentatore alla presa di corrente e all‘apparecchio.
Sostituire le batterie e/o verificare la polarità.
Verificare le impostazioni del canale (A o B) dell‘unità trasmittente e ricevente.
Il LED di stato lampeggia in arancione
L‘unità genitori riceve la trasmissione di rumori. Alzare il volume dell‘unità genitori per
ascoltare meglio i rumori del vostro bambino.
Il LED di stato lampeggia in rosso
Le batterie sono esaurite. Sostituire le batterie o collegare l‘apparecchio all‘alimentazione
elettrica.
Nessuna trasmissione di rumori, nonostante il collegamento stabilito
Accertarsi che il regolatore del volume non sia stato ruotato completamente verso il
basso.
Si sentono altri operatori radio
Il presente babyphone è basato sulla tecnologia analogica, per cui potrebbe essere sog
getto a disturbi causati da altri operatori radio. Cambiare canale.
L‘unità genitore emette un forte fischio (feedback)
La distanza tra l‘unità bambino e l‘unità genitori è troppo ridotta. Aumentare la distanza
tra l‘unità bambino e l‘unità genitori.
Nessun collegamento stabilito tra l‘unità genitori e l‘unità bambino/fruscio/collegamento interrotto
Assicurarsi che entrambi gli apparecchi siano accesi.
Verificare l‘impostazione del canale e/o cambiare canale.
Si è oltrepassata la portata massima. Collocare il babyphone in un altro punto e/o ridurre
la distanza tra l‘unità bambino e l‘unità genitori.
L‘unità bambino e/o l‘unità genitori si trovano in prossimità di apparecchi che possono
causare disturbi (ad esempio apparecchi a microonde), o di oggetti metallici. Tentare di
individuare la fonte di disturbo e collocare gli apparecchi in un punto diverso.
Le batterie sono quasi scariche. Sostituire le batterie e/o collegare gli apparecchi all‘ali-
mentazione elettrica.
35
Page 36

Consignes générales de sécurité
Meilleurs vœux pour l‘achat de votre nouveau babyphone reer. Le babyphone intuitif avec
son microphone sensible transmet les bruits de votre nourrisson de manière able et claire.
Dès que votre enfant est calme, l‘appareil se commute automatiquement en « Mode ECO ».
Dans ce mode ECO , plus aucun rayonnement n‘est émis par l‘unité bébé. L‘éclairage de nuit
rassurant sur le babyphone aide votre enfant à s‘endormir et dès que celui-ci dort, l‘appareil
bascule en mode ECO. L‘unité bébé ne recommence à émettre que dès que des bruits sont
perçus. Grâce à l‘alimentation par piles, en option, et le clip de ceinture robuste de l‘unité
parentale, vous pouvez utiliser le baby phone aussi bien en xe qu‘en mobile. Nous sommes
convaincus que vous pourrez proter longtemps de la qualité de notre produit.
Veillez prendre quelques minutes pour lire attentivement la notice de sécurité. Le babyphone
reer ne peut être utilisé sans souci que lorsque les points décrits ci-après sont respectés.
Conservez bien ce mode d‘emploi, an de pouvoir le relire ultérieurement.
! Avant chaque utilisation, contrôlez que l‘appareil n‘a pas de défaut apparent. Si vous
constatez un défaut, cet appareil ne doit pas être utilisé.
! N‘utilisez que le chargeur et l‘adaptateur fournis avec l‘appareil. Assurez-vous que la tension
de la prise de courant correspond à celle de l‘adaptateur. Contrôlez, surtout en voyage à
l‘étranger, que la tension locale corresponde à celle de l‘appareil ou de l‘adaptateur.
! Hormis le couvercle du compartiment des piles, les appareils et adaptateurs ne doivent pas
être ouverts, car il y a risque de décharge électrique. Si l‘appareil est défectueux, n‘essayez
PAS de résoudre le problème vous-même. Dans ce cas, veuillez vous adresser à votre
commerçant.
! Conservez les piles hors de portée des enfants. Cela évite le risque d‘ingestion.
! Évitez de toucher les piles ou les contacts électriques de l‘appareil avec des objets
métalliques.
! Cet article n‘est pas un jouet! Ne laissez pas les enfants jouer avec cet appareil.
REMARQUE: Ce babyphone a été conçu exclusivement comme moyen pour la
surveillance de votre nourrisson. Il ne peut remplacer l‘obligation de surveillance des
parents et ne peut pas être considéré comme un dispositif médical!
36
Page 37

FR
Conseils de sécurité pour l‘installation
! Placez le babyphone hors de portée de l‘enfant (distance minimum d‘un mètre).
! Ne placez jamais le babyphone dans le berceau, le lit de l‘enfant ou dans son parc.
! An d‘éviter que l‘enfant ne s‘étrangle, assurez le câble hors de sa portée. N‘utilisez pas de
rallonge.
! An d‘assurer une meilleure transmission, les appareils devraient être placés verticalement
dans une position élevée.
! NE placez PAS le récepteur à proximité d‘appareils radio ou de micro-ondes. Le
rayonnement de ces appareils peut perturber fortement la réception.
! N‘utilisez pas les appareils à proximité de l‘eau ou dans des endroits humides. Ne plongez
pas l‘appareil dans l‘eau. Ne rincez pas l‘appareil à l‘eau courante.
! Ne recouvrez pas l‘appareil avec une serviette, un vêtement ou un chion.
! Évitez l‘exposition à la chaleur extrême ou aux rayons du soleil.
Caractéristiques techniques
• technologie: Analogique
• émetteur: Alimentation en tension avec
bloc d‘alimentation
• récepteur: Alimentation en tension avec
bloc d‘alimentation ou en option avec
3 piles AAA NiMH ou des accus (non
fournies avec l‘appareil)
• input: 100 – 220V 50Hz 0.15 A max.
• output: 6V / 300mA max.
• puissance de l‘émetteur: TX 50 mA , RX
130 mA
• fréquence: 40 MHz
• portée: 200 m
• longueur de câble: env. 1,80 m
• température de service: 10°C - 40°C
• température de stockage: 0°C - 55°C
• standards: EN 300 220-1, EN 301 489-1 et
EN 301 489-3
37
Page 38

Contenu de la livraison
Description de l‘appareil
unité bébé (émetteur)
avec bloc d‘alimentation
unité parents (récepteur)
avec bloc d‘alimentation
mode d‘emploi
UNITÉ PARENTS
UNITÉ BÉBÉ
Réglage du volume
prise pour
l‘adaptateur
prise pour
l‘adaptateur
logement des piles
clip de ceinture
clip de ceinture
LED d‘état
LED d‘état
haut-parleur
interrupteur arrêt/
marche/canal
interrupteur arrêt/
marche/canal
38
Page 39

FR
Mise en service
REMARQUE: L‘unité parentale peut également fonctionner avec deux piles AAA (non
comprises dans la livraison).
N‘utilisez que l‘adaptateur (6V DC / 300 mA) fourni.
1
3
2
4
Sélectionnez le même canal (A ou B) sur les deux appareils.
La LED de statut sur les unités bébé et parentale est allumée en vert.
Lorsque le micro sensible de l‘unité bébé enregistre un bruit, l‘appareil lance la
transmission à l‘unité parents. En cas de réception de bruits, la LED de statut de
l‘unité parentale commence à clignoter en orange.
Si votre nourrisson est calme et que l‘unité bébé n‘enregistre plus de bruit, l‘appareil bascule automatique ment en mode stand-by (mode ECO). Dans ce mode,
plus aucun rayonnement n‘est émis par l‘unité bébé. L‘unité bébé ne recommence à émettre que dès que des bruits sont perçus.
Conseil Vous pouvez transporter l‘appareil à votre ceinture avec le clip de ceinture ou
bien l‘accrocher à une xation adéquate au mur.
39
Page 40

LED d‘état Power Ètat
vert marche l‘appareil est en marche
LED d‘état Power Ètat
vert marche l‘appareil est en marche
clignotant en orange marche des bruits sont transmis par l'unité bébé
clignotant en rouge marche les piles sont vides
LED d‘état unité bébé
LED d‘état unité parents
Fonctionnement de l‘unité parentale avec des piles
IMPORTANT: Avant de changer les piles, déconnectez l‘appareil du secteur et débranchez le
câble.
1 32
La LED de statut au-dessus du bouton marche/arrêt indique l‘état de l‘unité bébé.
La LED de statut au-dessus du bouton marche/arrêt indique l‘état de l‘unité parentale.
40
Page 41

FR
Conseils pour l‘extension de la zone de portée
Réglage du volume / unité parents
Nettoyage et entretien
La portée de l‘appareil dépend de l‘environnement et d‘autres facteurs qui peuvent
perturber ou bloquer le signal de transmission:
objets métalliques de grande taille comme réfrigérateurs, miroirs, armoires, portes en
métal ou béton armé
structures xes (murs) ou appareils radio, électriques et électroniques comme
téléviseurs, ordinateurs, téléphones mobiles ou variateurs (dimmer)
Débranchez toujours l‘appareil du secteur avant de le nettoyer. Utilisez toujours un chion
légèrement humide. Ne plongez pas l‘appareil dans l‘eau. N‘utilisez pas de nettoyants
chimiques.
Enlevez les piles de l‘appareil lorsque vous ne l‘utilisez pas pour un long moment. Ce
produit ne nécessite pas de maintenance spéciale. Les réparations de l‘appareil ne doivent
être faites que par un spécialiste.
Pour augmenter ou pour réduire le volume de l‘unité parents, veuillez tourner le bouton
vers le haut ou vers le bas.
REMARQUE: Lorsque vous tournez le réglage du volume tout en bas, la transmission n‘a
pas lieu.
REMARQUE: Nous recommandons de maintenir une distance d‘un mètre en l‘unité bébé
et les appareils interférents, voire d‘éteindre ces derniers. Lorsque la liaison est faible, nous
recommandons de placer l‘unité bébé ou l‘unité parents à un autre endroit de la pièce.
41
Page 42

Garantie
Instructions d‘élimination des déchets
Veuillez conserver la preuve d‘achat, le mode d‘emploi et le numéro d‘article.
Les droits à la garantie ou les réclamations en vertu de la garantie sont à dénir
exclusivement avec le commerçant.
Les caractéristiques techniques, les informations et les spécicités du produit dans ces
pages sont données de bonne foi, et répondent au stade actuel de la technique. Les
informations fournies par reer devraient être correctes et ables. La société reer ne peut
cependant assumer aucune responsabilité pour les possibles erreurs dans ce document
et elle se réserve le droit de procéder, sans préavis, à des modications du design ou
des caractéristiques du produit. Toute reproduction ou retransmission à tout tiers des
informations de ce document, protégé aux termes de la législation sur les droits d‘auteur,
sous quelque forme que ce soit, graphique, électronique ou mécanique, notamment
par photocopie, enregistrement sur bande ou stockage dans un système d‘interrogation
(même en extraits) nécessite l‘autorisation préalable par écrit de la société reer.
À la n de sa vie, ce produit ne doit pas être jeté avec les ordures ménagères,
mais il doit être porté à un point de collecte approprié pour le recyclage des
appareils électriques et électroniques. Ceci est indiqué par le symbole sur
le produit, dans le mode d‘emploi et sur l‘emballage. Les matériaux sont
recyclables en fonction de leur marquage. Ne jetez pas les piles usagées
avec les ordures ménagères, mais portez-les à une station de collecte du commerce
spécialisé. Par le recyclage des matières, la réutilisation ou d‘autres formes de valorisation
des anciens appareils, vous prenez part à la protection de notre environnement. Veuillez
vous adresser à l‘administration de votre commune pour connaître les centres compétents
pour le traitement des déchets.
42
Page 43

FR
Résolution des problèmes
La lampe d‘état LED ne s‘allume pas
Assurez-vous que les deux appareils sont allumés.
Contrôlez la connexion de l‘adaptateur avec la prise de courant et avec l‘appareil.
Remplacez les piles et/ou vérifiez la polarité.
Contrôlez le réglage des canaux (A ou B) de l‘émetteur et du récepteur.
La LED de statut clignote en orange
L‘unité parents reçoit des bruits. Éventuellement, augmentez le volume afin de mieux
entendre les bruits de votre enfant.
La LED de statut clignote en rouge
Les piles sont vides. Échangez les piles ou branchez l‘appareil au secteur.
Malgré une liaison active, pas de transmission de bruits
Veillez à ce que le réglage du volume ne soit pas tout en bas.
Vous pouvez entendre d‘autres participants
Comme le babyphone repose sur une technologie radio analogique, il se peut qu‘appa-
raissent des interférences avec d‘autres utilisateurs. Changez de canal.
Un fort sifflement se produit sur l‘unité parentale (rétroaction Larsen)
La distance entre l‘unité bébé et l‘unité parents est insuffisante. Augmentez la distance
entre l‘unité bébé et l‘unité parents.
Pas de liaison entre l‘unité parents et l‘unité bébé/grésillements/la liaison s‘interrompt
Assurez-vous que les deux appareils sont allumés.
Vérifiez la sélection des canaux ou changez de canal.
La portée maximum est dépassée. Placez le babyphone à un autre endroit ou réduisez
la distance entre l‘unité bébé et l‘unité parents.
L‘unité bébé/unité parents se trouve à proximité d‘appareils perturbants (p. ex. micro-on
des) ou d‘objets métalliques. Essayez de déterminer l‘origine de la perturbation et placez
les appareils à un autre endroit.
Les piles sont trop faibles. Échangez les piles ou branchez les appareils au secteur.
43
Page 44

Algemene veiligheidsaanwijzingen
Gefeliciteerd met de aankoop van uw nieuwe reer babyfoon. De intuïtieve babyfoon met
zijn zeer gevoelige microfoon draagt het geluid van uw baby duidelijk en betrouwbaar
over. Zodra uw kind rustig is, schakelt het apparaat zich automatisch in een „ECO-modus“.
In deze ECO-modus gaat van de babyeenheid geen straling meer uit. Het rustgevende
nachtlampje op de babyeenheid helpt uw kind bij het in slaap vallen en zodra uw kind
rustig is, schakelt het apparaat automatisch over naar de „ECO modus“. De babyeenheid
begint pas weer uit te zenden , zodra er geluiden ontvangen worden. Dankzij de optimale
werking van de batterij en een robuuste riemclip kan de handige babyfoon zowel stationair
als mobiel worden gebruikt. Wij zijn ervan overtuigd dat u lange tijd van de kwaliteit van
ons product zult genieten.
Neem een paar minuten de tijd om de veiligheidsaanwijzingen grondig te lezen. Alleen
als alle hier genoemde punten zijn gewaarborgd, kan de reer babyfoon zorgeloos worden
gebruikt. Bewaar deze gebruiksaanwijzing zorgvuldig voor een latere raadpleging.
! Controleer het apparaat voor ieder gebruik op zichtbare schade. Indien u schade
vastgesteld hebt, mag dit apparaat niet worden gebruikt.
! Gebruik uitsluitend meegeleverde oplader en voedingseenheid. Wees er zeker van dat
de bedrijfsspanning van het stopcontact overeenkomt met die van de voedingseenheid.
Controleer vooral bij een reis naar het buitenland of de lokale netspanning overeenkomt
met de aangegeven spanning op de apparaten of de voedingseenheden.
! De apparaten en voedingseenheden mogen, met uitzondering van het deksel op het
batterijvak, niet geopend worden, omdat dit tot elektrische schokken kan leiden. Als een
apparaat foutief functioneert, probeer het probleem dan NIET zelf te verhelpen. In dit
geval verzoeken we u om contact op te nemen met uw verkoper.
! De batterijen buiten het bereik van kinderen bewaren. Er bestaat risico van inslikken.
! Vermijd het contact van metalen voorwerpen met de batterij- of stroomaansluitcontacten
aan de apparaten.
! Dit product is geen speelgoed! Laat kinderen niet met het apparaat spelen.
AANWIJZING: Deze babyfoon is uitsluitend ontwikkeld als hulpmiddel voor het
observeren van uw baby. Het mag niet als vervanging voor de toezichtsplicht als ouders
of als medisch apparaat worden beschouwd!
44
Page 45

NL
Veiligheidsaanwijzing voor de installatie
! Plaats de babyeenheid altijd buiten het bereik van het kind (minimaal één meter afstand).
! Leg de babyfoon nooit in het baby- of kinderbed of de kinderbox.
! Zorg ervoor dat de kabel zich niet in de buurt van kinderen bevindt, om wurging te
vermijden. Gebruik geen verlengsnoeren.
! Om een zo goed mogelijke overdracht te waarborgen, moeten de apparaten altijd
rechtop en in een verhoogde positie worden neergezet.
! Plaats de ontvanger NIET in de buurt van zend- en ontvangstapparatuur of magnetrons.
De straling van deze apparaten kan de ontvangst sterk verminderen.
! Gebruik het apparaat niet in de buurt van water of op vochtige plaatsen. Dompel de
apparaten niet onder in water.Spoel het apparaat niet af onder stromend water.
! Bedek de babyfoon niet met een handdoek, een kledingstuk of deken.
! Vermijd extreme hitte en direct zonlicht.
Technische gegevens
• technologie: analoog
• zender: voeding met voedingseenheid
• ontvanger: voeding met
voedingseenheid of optioneel met 3 AAA
batterijen of accu´s (niet meegeleverd)
• input: 100 – 220V 50Hz 0.15 A max.
• output: 6V / 300mA max.
• zendvermogen: TX 50 mA , RX 130 mA
• frequentie: 40 MHz
• bereik: 200 m
• kabellengte: ca. 1,80 m
• werktemperatuur: 10°C - 40°C
• bewaartemperatuur: 0°C - 55°C
• standaards: EN 300 220-1, EN 301 489-1,
EN 301 489-3
45
Page 46

Leveringsomvang
Beschrijving van het apparaat
babyeenheid (zender)
met voedingseenheid
oudereenheid (ontvanger)
met voedingseenheid
gebruiksaanwijzing
OUDEREENHEID
BABYEENHEID
volumeregelaar
contactdoos voor
voedingseenheid
contactdoos voor
voedingseenheid
batterijvak
riemclip
riemclip
statusledlampje
statusledlampje
luidspreker
aan-uit-kanaal-
keuzeschakelaar
aan-uit-kanaal-
keuzeschakelaar
46
Page 47

NL
Ingebruikname
AANWIJZING: De oudereenheid kan naar keuze ook met twee AAA batterijen (niet
meegeleverd) werken.
Gebruik alleen de meegeleverde adapter (6V DC/300 mA).
1
3
2
4
Selecteer op beide apparaten hetzelfde kanaal (A of B).
Het statusledlampje van de baby- en de oudereenheid brandt groen.
Zodra de zeer gevoelige microfoon op de babyeenheid een geluid waarneemt, begint het apparaat met de overdracht naar de oudereenheid. Bij het ontvangen van
geluid begint het statusledlampje op de oudereenheid in oranje kleur te knipperen.
Als uw kind rustig is en de babyeenheid geen geluiden ontvangt, schakelt het
apparaat automatisch over naar de stand-bymodus (ECO-Modus). In deze modus gaat van de babyeenheid geen straling meer uit. De babyeenheid begint pas
weer uit te zenden , zodra er geluiden ontvangen worden.
TIP U kunt de apparaten met behulp van de riemclip aan uw riem bevestigen of met
geschikt bevestigingsmateriaal aan een wand ophangen.
47
Page 48

Statusledlampje Power Toestand
groen aan apparaat is ingeschakeld
Statusledlampje Power Toestand
groen
aan apparaat is ingeschakeld
oranje knipperend aan geluiden van de babyeenheid worden ontvangen
rood knipperend aan batterijen zijn leeg
Statusledlampje babyeenheid
Statusledlampje oudereenheid
De werking van de oudereenheid met de batterijen
BELANGRIJK: Schakel de apparaten uit en verwijder de netstekker voordat u de batterijen
vervangt.
1 32
Het statusledlampje boven de aan-/uitschakelaar geeft de toestand van de babyeenheid aan.
Het statusledlampje boven de aan-/uitschakelaar geeft de toestand van de oudereenheid aan.
48
Page 49

NL
Tips voor de uitbreiding van het ontvangstbereik
Volumeregelaar / oudereenheid
Reiniging en onderhoud
Het ontvangstbereik is afhankelijk van zowel de omgeving als van andere factoren, die het
zendsignaal kunnen storen of blokkeren:
grote metalen voorwerpen zoals koelkasten, spiegels, kasten, metalen deuren of
gewapend beton
vaste structuren (wanden) of zend- en ontvangstapparatuur, elektrische en elektro-
nische apparaten zoals televisies, computers, mobiele telefoons of dimschakelaars
Trek de voedingseenheden altijd uit het stopcontact voordat u het apparaat reinigt.
Gebruik uitsluitend een licht vochtige doek. Dompel het apparaat niet onder in water.
Gebruik geen chemische reinigingsmiddelen.
Verwijder de batterijen uit het apparaat als u het voor langere tijd niet gaat gebruiken.
Dit product vereist geen speciaal onderhoud. De reparaties van het apparaat mogen
uitsluitend door een specialist worden uitgevoerd.
Draai de geluidssterkteregelaar (= volume) naar boven of naar beneden om het
ontvangstvolume op de oudereenheid te verhogen of te verlagen.
AANWIJZING: Als u de volumeregelaar helemaal naar beneden draait, vindt er geen
geluidsoverdracht meer plaats.
AANWIJZING: Het wordt aanbevolen om minimaal één meter afstand tussen
de babyeenheid en de storende apparaten aan te houden of deze eventueel uit
te schakelen. Bij een zwakke verbinding wordt aanbevolen om de ouder- en/of
babyeenheid in de kamer op een andere plaats neer te zetten.
49
Page 50

Waarborg
Aanwijzingen voor de verwijdering
Gelieve het aankoopbewijs, de gebruikersaanwijzing en het artikelnummer te bewaren.
Garantieclaims of aanspraken voortvloeiende uit garantie moeten uitsluitend met de
handelaar geregeld worden.
Alle technische gegevens, informatie en eigenschappen van het in dit document
beschreven product zijn naar best weten samengesteld en stemmen overeen met de stand
bij de publicatie. De door reer verstrekte informatie moet nauwkeurig en betrouwbaar zijn.
De rma reer aanvaardt echter geen enkele aansprakelijkheid voor eventuele fouten in
dit document en behoudt zich het recht voor, om zonder voorafgaande kennisgeving,
de veranderingen aan het productdesign, resp. aan de specicaties uit te voeren.
Vermenigvuldiging en verspreiding van de informatie uit dit auteursrechtelijk beschermd
werk in enige vorm of op enige wijze, hetzij grasch, elektronisch of mechanisch, door
fotokopieën, opname op band of opslag in een datasysteem (ook een deel ervan) vereisen
de schriftelijke toestemming van de rma reer.
Dit product kan aan het einde van zijn levensduur niet via het normale
huishoudelijke afval verwijderd worden, maar moet worden ingeleverd op
een inzamelpunt voor de recyclage van elektrische toestellen. Het symbool
op het product, in de gebruikershandleiding of op de verpakking, wijst erop.
De materialen zijn overeenkomstig hun etikettering herbruikbaar. Gooi
geen lege batterijen in het huisvuil, maar bij het gevaarlijke afval of breng deze naar een
verzamelingsstation voor batterijen in een gespecialiseerde winkel. Met het hergebruik, het
recycleren van materialen of andere vormen van gebruik van oude toestellen levert u een
belangrijke bijdrage tot de bescherming van ons milieu. Vraag a.u.b. bij uw gemeentelijk
bestuur over de competente plaats voor het verzamelen van dit soort afval.
50
Page 51

NL
Probleemoplossing
Statusledlampje licht niet op
Wees er zeker van dat beide apparaten zijn ingeschakeld.
Controleer de verbinding van de voedingseenheid naar het stopcontact en naar het
apparaat.
Vervang de batterijen en/of controleer de polariteit.
Controleer de instelling van de kanalen (A of B) van de zender en de ontvanger.
Het statusledlampje knippert oranje
Oudereenheid ontvangt geluid. Verhoog eventueel het volume op de oudereenheid
om het geluid van uw kind beter te horen.
Het statusledlampje knippert rood
Batterijen zijn leeg. Vervang de batterijen op of sluit het apparaat aan op de stroomvoor-
ziening.
Geen geluidsoverdracht ondanks bestaande verbinding
Wees er zeker van dat de volumeregelaar niet helemaal naar beneden is gedraaid.
U kunt andere deelnemers van ontvangst- en verzendapparatuur horen
Omdat deze babyfoon is gebaseerd op analoge radiotechnologie, kan dit leiden tot
storingen door andere deelnemers. Wissel het kanaal.
U hoort dan een luidere fluittoon op de oudereenheid (terugkoppeling)
De afstand van baby- en oudereenheid is te klein. Verhoog de afstand tussen baby- en
oudereenheid.
Geen verbinding tussen ouder- en babyeenheid/ruis/verbinding wordt verbroken
Wees er zeker van dat beide apparaten zijn ingeschakeld.
Controleer de kanaalinstelling en/of wissel het kanaal.
Maximale reikwijdte is overschreden. Plaats de babyfoon op een andere plaats en/of
verkort de afstand tussen baby- en oudereenheid.
Baby- en oudereenheid bevinden zich in de buurt van storende apparaten (bijvoor-
beeld magnetron) of metalen voorwerpen. Probeer de storingsbron te vinden en plaats
de apparaten op een andere plaats.
Batterijen zijn te zwak. Vervang de batterijen op of sluit het apparaat aan op de stroom-
voorziening.
51
Page 52

Všeobecné bezpečnostní pokyny
Gratulujeme Vám k zakoupení Vaší nové dětské chůvičky reer. Intuitivní dětská chůvička se
svým vysoce citlivým mikrofonem přenáší jasně a spolehlivě zvuky Vašeho dítěte. Jakmile
je Vaše dítě klidné, přepne se přístroj automaticky do „režimu ECO“. V tomto režimu ECO
již nevychází z dětské jednotky žádné záření. Uklidňující noční světlo na dětské jednotce
pomáhá Vašemu dítěti při usínání a jakmile je dítě klidné, přístroj automaticky přejde do
„režimu ECO“. Dětská jednotka začne opět vysílat teprve tehdy, jakmile přijímá zvuky. Díky
volitelnému provozu na baterii rodičovské jednotky a pevné sponě na opasek můžete
praktickou dětskou chůvičku používat jak stacionárně, tak i mobilně. Jsme si jistí, že Vám
náš kvalitní výrobek bude sloužit dlouhou dobu.
Udělejte si prosím chvilku času a pozorně si přečtěte bezpečnostní pokyny. Pouze tehdy,
jsou-li splněny všechny uvedené body, můžete dětskou chůvičku bezpečně používat.
Pečlivě si uchovejte návod k použití pro pozdější nahlédnutí.
! Před každým použitím zkontrolujte, zda přístroj nemá zjevné známky poškození. Pokud
zjistíte poškození, nesmíte přístroj používat.
! Používejte pouze nabíječky a síťové zdroje poskytnuté jako součást dodávky. Zajistěte,
aby provozní napětí zásuvky odpovídalo napětí síťového zdroje. Zkontrolujte, obzvláště
na zahraniční cestě, jestli místní síťové napětí souhlasí s uvedeným napětím na přístrojích
popř. síťových zdrojích.
! S výjimkou víka přihrádky na baterie se nesmí přístroje a napájecí zdroje otevírat, jelikož
to může vést k úrazům elektrickým proudem. V případě, že by přístroj pracoval chybně,
nepokoušejte se problém odstranit sami. V takovém případě Vás žádáme o to, abyste se
obrátili na Vašeho prodejce.
! Uchovávejte baterie mimo dosah dětí. Hrozí nebezpečí spolknutí.
! Zabraňte styku kovových předmětů s kontakty baterií a elektrického napájení na
přístrojích.
! Tento výrobek není hračka! Nedovolte dětem hrát si s tímto přístrojem.
UPOZORNĚNÍ: Tato dětská chůvička byla vyvinuta výhradně jako pomůcka k monitorování
Vašeho dítěte. Nesmí být považována za náhradu povinnosti rodičovského dozoru, ani za
lékařský přístroj!
52
Page 53

CZ
Bezpečnostní pokyny k instalaci
! Vždy umístěte dětskou jednotku mimo dosah dětí (minimální vzdálenost 1 metr).
! Nikdy nepokládejte dětskou chůvičku do dětské postýlky, nebo dětské ohrádky.
! Pro zabránění uškrcení síťovým kabelem zabezpečte kabel mimo dosah dětí.Nepoužívejte
prodlužovací kabely.
! Pro zajištění co nejlepšího přenosu byste měli přístroje vždy umístit svisle a na vyvýšené
místo.
! Neumisťujte přijímač v blízkosti rádia nebo mikrovlnné trouby. Vyzařování těchto přístrojů
může silně rušit příjem.
! Nepoužívejte přístroje v blízkosti vody nebo na vlhkých místech. Neponořujte přístroje do
vody. Neumývejte přístroje pod tekoucí vodou.
! Nezakrývejte dětskou chůvičku ručníkem, oblečením nebo dekou.
! Nevystavujte zařízení extrémně vysokým teplotám a přímému slunečnímu záření.
Technické údaje
• technologie: analogová
• vysílač: napájení síťovým zdrojem
• přijímač: napájení síťovým zdrojem
nebo volitelně 3 AAA akumulátory nebo
bateriemi (nejsou součástí dodávky)
• vstup: 100 – 220V 50Hz 0.15 A max.
• výstup: 6V / 300mA max.
• vysílací výkon: TX 50 mA , RX 130 mA
• frekvence: 40 MHz
• dosah: 200 m
• délka kabelu: cca 1,80 m
• provozní teplota: 10°C - 40°C
• teplota skladování: 0°C - 55°C
• normy: EN 300 220-1, EN 301 489-1,
EN 301 489-3
53
Page 54

Obsah dodávky
Popis přístroje
dětská jednotka (vysílač)
se síťovým zdrojem
rodičovská jednotka (přijímač)
se síťovým zdrojem
návod kpoužití
RODIČOVSKÁ
JEDNOTKA
DĚTSKÁ
JEDNOTKA
regulace hlasitosti
přípojka síťového
zdroje
přípojka síťového
zdroje
přihrádka na baterii
spona na opasek
spona na opasek
kontrolka LED
kontrolka LED
reproduktor
spínač / vypínač /
přepínač kanálů
spínač / vypínač /
přepínač kanálů
54
Page 55

CZ
Uvedení do provozu
UPOZORNĚNÍ: Rodičovská jednotka může volitelně fungovat také se dvěma AAA
bateriemi (nejsou součástí dodávky).
Používejte pouze přibalené síťové zdroje, které jsou součástí dodávky (6V DC / 300 mA).
1
3
2
4
Zvolte u obou přístrojů stejný kanál (A nebo B).
Kontrolka LED na dětské a rodičovské jednotce svítí zeleně.
Jakmile vysoce citlivý mikrofon na dětské jednotce zachytí zvuk, začne přístroj s
přenosem na rodičovskou jednotku. Při zachycení zvuků začne kontrolka LED na
rodičovské jednotce blikat oranžově.
Když je Vaše dítě klidné a dětská jednotka nepřijímá žádné zvuky, přepne se
přístroj automaticky do režimu Standby (režim ECO). V tomto režimu již nevychází
z dětské jednotky žádné záření. Dětská jednotka začne opět vysílat teprve tehdy,
jakmile přijímá zvuky.
TIP Přístroj můžete upevnit pomocí spony na Váš opasek nebo zavěsit pomocí vhodných
upevňovacích prvků na zeď.
55
Page 56

Kontrolka LED Zapnuto Stav
zelená ano přístroj je zapnutý
Kontrolka LED Zapnuto Stav
zelená ano přístroj je zapnutý
oranžově blikající ano dětská chůvička přijímá zvuky
červeně blikající ano akumulátory jsou vybité
Kontrolka LED dětská jednotka
Kontrolka LED rodičovská jednotka
Provoz rodičovské jednotky s bateriemi
DŮLEŽITÉ: Před výměnou baterií vypněte zařízení a odpojte síťový kabel.
1 32
Kontrolka LED nad spínačem/vypínačem udává stav dětské jednotky.
Kontrolka LED nad spínačem/vypínačem udává stav rodičovské jednotky.
56
Page 57

CZ
Tipy k rozšíření oblasti příjmu
Regulace hlasitosti / rodičovská jednotka
Čištění a údržba
Oblast příjmu je závislá jak na okolí, tak i na jiných faktorech, které mohou narušovat nebo
blokovat přenos signálu:
velké kovové předměty jako např. ledničky, zrcadla, skříně, kovové dveře nebo
železobeton
pevné struktury (stěny) nebo rádia, elektrická a elektronická zařízení jako např. televize,
počítače, mobilní telefony nebo stmívače
Před čistěním přístroje vždy odpojte síťový zdroj z elektrické zásuvky. Používejte výhradně
lehce navlhčený hadřík. Neponořujte přístroj do vody. Nepoužívejte chemické čisticí
prostředky.
Vyjměte baterie z přístroje, pokud jej nebudete delší dobu používat. Tento výrobek
nevyžaduje žádnou zvláštní údržbu. Opravy přístroje smějí provádět pouze kvalikovaní
odborníci.
Otáčením ovladače hlasitosti (= Volume) nahoru nebo dolů můžete zvyšovat nebo
snižovat hlasitost přijímače na rodičovské jednotce.
UPOZORNĚNÍ: Pokud je ovladač hlasitosti otočen zcela dolů, neprobíhá žádný přenos zvuků.
UPOZORNĚNÍ: Doporučujeme dodržovat odstup minimálně jeden metr mezi
dětskou jednotkou a rušivými zařízeními, popř. je vypnout. V případě slabého spojení
doporučujeme umístit rodičovskou a/nebo dětskou jednotku v pokoji na jiné místo.
57
Page 58

Záruka
Vhodné způsoby likvidace
Uschovejte, prosím, doklad okoupi, návod kpoužití a číslo výrobku.
Záruční nároky nebo nároky v rámci garance je nutno řešit výlučně s prodejcem.
Všechny technické údaje, informace a vlastnosti výrobku popsaného v tomto návodu
odpovídají stavu našich znalostí v době jeho zveřejnění. Informace poskytnuté rmou
reer by měly být správné a spolehlivé. Přesto rma nepřebírá odpovědnost za případné
chyby vyskytující se v tomto dokumentu a vyhrazuje si právo změnit design výrobku,
resp. jeho specikace bez předchozího upozornění. Rozmnožování a šíření informací
ztohoto autorským zákonem chráněného dokumentu v jakékoliv formě nebo jakýmikoliv
prostředky, gracky, elektronicky či mechanicky, pořizováním fotokopií, nahrávek nebo
ukládáním do databází (a to ijen vpodobě výňatků) je podmíněno předchozím písemným
souhlasem rmy reer.
Tento výrobek se po skončení své životnosti nesmí odkládat do běžného
domovního odpadu. Uživatel má povinnost odevzdat vysloužilý výrobek na
sběrném místě určeném krecyklaci elektrospotřebičů. Na tuto povinnost
upozorňuje symbol uvedený na výrobku, vnávodu kpoužití a na obalu
výrobku. Materiály jsou dle jejich označení znovu použitelné. Nevyhazujte
použité baterie do komunálního odpadu, ale do zvláštního odpadu nebo do sběrné
stanice baterií v příslušných obchodech. Opakované používání, recyklace nebo jiné formy
využití vysloužilých spotřebičů představují důležitý příspěvek kochraně našeho životního
prostředí. Informace opříslušném sběrném místě Vám podá správa obce.
58
Page 59

CZ
Odstraňování problémů
Kontrolka LED nesvítí
Ujistěte se, že jsou oba přístroje zapnuté.
Zkontrolujte spojení síťového zdroje se zásuvkou a s přístrojem.
Vyměňte baterie a/nebo zkontrolujte polaritu.
Zkontrolujte nastavení kanálů (A nebo B) vysílače a přijímače.
Kontrolka LED bliká oranžově
Rodičovská jednotka přijímá zvuky. V případě nutnosti zvyšte hlasitost rodičovské jed-
notky, abyste lépe slyšeli zvuky Vašeho dítěte.
Kontrolka LED bliká červeně
Baterky jsou vybité. Vyměňte baterie nebo připojte zařízení ke zdroji napájení.
Žádný přenos zvuku i přes existující spojení
Ujistěte se, že ovládání hlasitosti není otočeno až dolů.
Jsou slyšet jiná bezdrátová zařízení
Jelikož je tato dětská chůvička založena na analogové rádiové technologii, může dojít k
rušení jinými bezdrátovými zařízeními. Změňte kanál.
Z rodičovské jednotky zní hlasitý pískavý zvuk (zpětná vazba)
Vzdálenost dětské a rodičovské jednotky je příliš malá. Zvětšete vzdálenost mezi dětskou
a rodičovskou jednotkou.
Žádné spojení mezi rodičovskou a dětskou jednotkou / šum / spojení je přerušeno
Ujistěte se, že jsou oba přístroje zapnuté.
Zkontrolujte nastavení kanálu a/nebo změňte kanál.
Maximální dosah překročen. Umístěte dětskou chůvičku na jiné místo a/nebo zmenšete
vzdálenost mezi dětskou a rodičovskou jednotkou.
Dětská/rodičovská jednotka se nachází v blízkosti rušivých zařízení (např. mikrovlnná
trouba) nebo kovových předmětů. Pokuste se najít zdroj rušení a umístěte přístroje na
jiné místo.
Baterie jsou příliš slabé. Vyměňte baterie a/nebo připojte zařízení ke zdroji napájení.
59
Page 60

Opšte bezbednosne informacije
Čestitamo Vam na kupovini novog Reer monitora za bebe. Intuitivni monitor za bebe sa
veoma osetljivim mikrofonom jasno i pouzdano prenosi zvuke Vaše bebe. Kada je vaše
dete mirno, ovaj uređaj se automatski prebacuje u „EKO režim“. U EKO režimu bebi jedinica
ne vrši nikakve emisije. Umirujuće noćno svetlo bebi jedinice pomaže vašem detetu pri
uspavljivanju i, čim se vaše dete smiri, uređaj automatski ulazi u „EKO režim“ i ostaje u
njemu dok god je dete mirno. Bebi jedinica započinje emitovanje čim detektuje zvuke.
Zahvaljujući opcionom baterijskom pogonu roditeljske jedinice i robusnoj štipaljki za kaiš,
ovaj praktični monitor za bebe može da se koristi i stacionarno i mobilno. Sigurni smo da
ćete dugo biti zadovoljni kvalitetom našeg proizvoda.
Molimo Vas da odvojite nekoliko minuta da biste temeljno pročitali informacije o
bezbednosti. Možete sigurno koristiti Reer bebi monitor samo kada su obezbeđene
(proverene) sve navedene stavke. Sačuvajte ovo uputstvo za upotrebu radi kasnijeg
korišćenja.
! Pre svakog korišćenja proverite da li postoje vidljiva oštećenja. Ukoliko ustanovite neko
oštećenje, nemojte koristiti ovaj uređaj.
! Koristite samo punjače i ispravljače koji se nalaze u sadržaju isporuke. Uverite se da radni
napon utičnice odgovara ispravljaču. Proverite, a naročito na putovanjima u inostranstvo,
da li napon lokalne električne mreže odgovara naponu koji je naveden na uređajima,
odnosno ispravljačima.
! Uređaji i ispravljači, osim poklopca odeljka za baterije, ne smeju da se otvaraju jer to može
dovesti do strujnog udara. Ukoliko uređaj nepravilno funkcioniše, NEMOJTE pokušavati
da sami rešite problem. U takvom slučaju obratite se svom prodavcu.
! Baterije čuvajte van domašaja dece. Postoji opasnost da se progutaju.
! Ne dodirujte metalnim predmetima kontakte baterija, odnosno kontakte za napajanje na
uređajima.
! Ovaj proizvod nije igračka! Nemojte dozvoliti deci da se igraju ovim uređajem.
NAPOMENA: Ovaj monitor za bebe je projektovan isključivo kao pomoćno sredstvo
za nadzor beba. Ne može se smatrati zamenom za nadzornu dužnost roditelja niti
medicinskim sredstvom!
60
Page 61

RS
Bezbednosne informacije za instalaciju
! Bebi jedinicu uvek postavite van domašaja deteta (najmanje 1 metar).
! Monitor za bebe nemojte nikada stavljati u kolevku, dečiji krevetac ili ogradicu za decu.
! Da bi se sprečilo davljenje kablom za napajanje, pobrinite se da kabl bude van domašaja
dece. Nemojte da koristite produžni kabl.
! Da bi se obezbedio najbolji mogući prenos, uređaje uvek treba postaviti uspravno i na
većoj visini.
! NEMOJTE da postavljate prijemnik u blizini radio uređaja ili mikrotalasnih pećnica.
Zračenje ovih uređaja može u velikoj meri da ometa prijem.
! Nemojte da koristite uređaje u blizini vode ili na vlažnim mestima. Nemojte da potapate
uređaje u vodu. Nemojte da perete uređaje pod mlazom vode.
! Nemojte da pokrivate monitor za bebe krpom, odećom ili ćebetom.
! Izbegavajte ekstremnu toplotu i direktno sunčevo zračenje.
Tehnički podaci
• tehnologija: analogna
• predajnik: električno napajanje preko
ispravljača
• prijemnik: električno napajanje preko
ispravljača ili, opciono, sa 3 baterije
veličine AAA ili punjive baterije (nije
sadržano u obimu isporuke)
• ulaz: 100 – 220V 50Hz 0.15 A max.
• izlaz: 6V / 300mA max.
• predajna snaga: TX 50 mA , RX 130 mA
• frekvencija: 40 MHz
• domet: 200 m
• dužina kabla: oko 1,80 m
• radna temperatura: 10°C - 40°C
• temperatura skladištenja: 0°C - 55°C
• standardi: EN 300 220-1, EN 301 489-1,
EN 301 489-3
61
Page 62

Obim isporuke
Opis uređaja
bebi jedinica (predajnik)
sa ispravljačem
roditeljska jedinica (prijemnik)
sa ispravljačem
uputstvo za upotrebu
RODITELJSKA
JEDINICA
BEBI JEDINICA
regulacija jačine zvuka
priključak za
ispravljač
priključak za
ispravljač
odeljak za baterije
štipaljka za kaiš
štipaljka za kaiš
statusna LED
lampica
statusna LED
lampica
zvučnik
prekidač za uključivanje/isključivanje/
izbor kanala
prekidač za uključi-
vanje/isključivanje/
izbor kanala
62
Page 63

RS
Pre prve upotrebe
NAPOMENA: Roditeljska jedinica opciono može da se napaja sa dve baterije veličine AAA
(nije sadržano u obimu isporuke).
Koristite samo ispravljače koji se nalaze u obimu isporuke (6 V DC / 300 mA).
1
3
2
4
Na oba uređaja izaberite isti kanal (A ili B).
Uključuju se zelene statusne LED lampice na bebi i roditeljskoj jedinici.
Čim visokoosetljivi mikrofon na bebi jedinici detektuje zvuk, uređaj započinje prenos ka roditeljskoj jedinici. Kada se prima zvuk, treperi narandžasta statusna LED
lampica roditeljskoj jedinici.
Kada je dete mirno i jedinica za bebe ne prima nikakav zvuk, uređaj se automatski
prebacuje u režim pripravnosti (EKO režim). U ovom režimu bebi jedinica ne vrši
nikakve emisije. Bebi jedinica započinje emitovanje čim detektuje zvuke.
SAVET Uređaje možete da pričvrstite na kaiš pomoću štipaljke za kaiš ili da ih zakačite
na zid koristeći odgovarajući pribor za pričvršćivanje.
63
Page 64

Statusna LED lampica Napajanje Status
zelena uključeno uređaj je uključen
Statusna LED lampica Napajanje Status
zelena uključeno uređaj je uključen
narandžasta treperi uključeno primaju se zvuci sa bebi jedinice
crvena treperi uključeno baterije su ispražnjene
Statusna LED lampica bebi jedinica
Statusna LED lampica roditeljska jedinica
Rad sa baterijama roditeljske jedinice
VAŽNO: Pre zamene baterija isključite uređaje i izvucite kabl za napajanje.
1 32
Statusna LED lampica iznad prekidača za uključivanje/isključivanje daje status bebi jedinice.
Statusna LED lampica iznad prekidača za uključivanje/isključivanje daje status roditeljske
jedinice.
64
Page 65

RS
Saveti za povećanje dometa prijemnika
Regulacija jačine zvuka / roditeljska jedinica
Čišćenje i održavanje
Domet prijema zavisi od okruženja, kao i od drugih faktora koji mogu da ometaju ili
blokiraju prenos signala:
veliki metalni predmeti, kao što su zamrzivači, ogledala, ormari, metalna vrata ili
armirani beton
ksne strukture (zidovi) ili radio, elektro i elektronski uređaji, kao što su npr. televizori,
računari, mobilni telefoni ili prekidači sa regulacijom intenziteta svetla
Pre čišćenja uređaja uvek izvucite ispravljač iz električne utičnice. Koristite isključivo vlažnu
krpu. Nemojte da potapate uređaj u vodu. Nemojte da koristite hemijska sredstva za
čišćenje.
Izvadite baterije iz uređaja ako nećete da ga koristite u dužem vremenskom periodu. Ovaj
proizvod ne zahteva posebno održavanje. Popravke na uređaju smeju da obavljaju samo
stručna lica.
Okrenite regulator jačine zvuka (volume) nagore ili nadole da biste povećali ili smanjili
jačinu zvuka prijemnika roditeljskoj jedinici.
NAPOMENA: Ako je regulator jačine zvuka okrenut do kraja nadole, ne čuje se prenos zvuka.
NAPOMENA: Preporučuje se da između bebi jedinice i infracrvenih uređaja postoji razmak
od najmanje jednog metra, odnosno da se takvi uređaji isključe. U slučaju da je veza slaba,
preporučuje se da se roditeljska i/ili bebi jedinica premeste na drugo mesto u sobi.
65
Page 66

Garancija
Uputstvo za odlaganje
Molimo zadržite dokaz o kupovini, uputstva i broj proizvoda.
Garancijska potraživanja ili potraživanja po osnovu bilo kakvih garancija rešavaju se
isključivo sa trgovcem.
Svi tehnički podaci, informacije i svojstva proizvoda opisanog u ovom dokumentu
su sastavljeni na osnovu naših saznanja i odgovaraju stanju u trenutku objavljivanja.
Informacije kompanije Reer trebalo bi da budu tačne i pouzdane. Ipak, kompanija Reer
ne prihvata nikakvu odgovornost za moguće greške u ovom dokumentu i zadržava
pravo na izmene u dizajnu proizvoda i izmene specikacija bez prethodnog obaveštenja.
Umnožavanje i distribuiranje informacija iz ovog autorskog dela, u celini ili u delovima,
u bilo kom obliku ili bilo kojim sredstvima, grački, elektronski ili mehanički, uključujući
fotokopiranje, snimanje na traku ili skladištenje na nosačima podataka nije dozvoljeno bez
prethodne pismene saglasnosti kompanije Reer.
Ovaj proizvod na kraju svog životnog veka ne može se odlagati sa običnim
kućnim otpadom, već se mora odložiti na sabirnom mestu za recikliranje
električne opreme. Pogledajte simbol na proizvodu, u uputstvu za
upotrebu ili na pakovanju koji ukazuje na to. Materijali se mogu reciklirati
u skladu sa oznakama. Istrošene baterije nemojte da bacate u kućni otpad,
već ih odložite u poseban otpad ili u mesto za sakupljanje baterija u specijalizovanim
prodavnicama. Ponovnim korišćenjem, reciklažom i drugim oblicima obrade dotrajalih
uređaja pružate važan doprinos zaštiti životne sredine. Od lokalnih vlasti zatražite
informaciju o odgovarajućem mestu za odlaganje.
66
Page 67

RS
Otklanjanje problema
Statusna LED lampica ne svetli
Proverite da li su uključena oba uređaja.
Proverite da li je ispravljač dobro priključen na utičnicu i uređaj.
Zamenite baterije i/ili proverite polaritet.
Proverite podešavanje kanala (A ili B) na predajniku i prijemniku.
Treperi narandžasta statusna LED lampica
Jedinica za roditelje prima zvuke. Ako je potrebno, povećajte jačinu zvuka na jedinici za
roditelje da biste bolje čuli zvuke deteta.
Treperi crvena statusna LED lampica
Baterije su ispražnjene. Zamenite baterije ili uključite uređaj u struju.
Zvuk se ne prenosi iako je veza uspostavljena
Proverite da li je regulator jačine zvuka okrenut do kraja nadole.
Možete da čujete druge razgovore
Budući da je monitor za bebe zasnovan na analognoj radio tehnologiji, može doći do
ometanja od strane drugih radio veza. Promenite kanal.
Čuje se jako pištanje iz roditeljske jedinice (povratna informacija)
Rastojanje između bebi i roditeljske jedinice je suviše malo. Povećajte rastojanje između
bebi i roditeljske jedinice.
Ne postoji veza između jedinice za roditelje i jedinice za bebe / šumovi / veza se prekida
Proverite da li su uključena oba uređaja.d.
Proverite podešavanje kanala i/ili promenite kanal.
Prekoračen je maksimalan domet. Monitor za bebe postavite na drugo mesto i/ili sman-
jite rastojanje roditeljske i bebi jedinice.
Jedinica za bebe / jedinica za roditelje se nalaze u blizini uređaja koji ih ometaju (npr. mi
krotalasne pećnice) ili metalnih predmeta. Pokušajte da pronađete izvor smetnji i posta vite uređaje na drugo mesto.
Baterije su suviše slabe. Zamenite baterije i/ili uključite uređaje u struju.
67
Page 68

Általános biztonsági tudnivalók
Gratulálunk az Ön új reer Babyphone készülékéhez. Az intuitív Babyphone nagy
érzékenységű mikrofonjának köszönhetően tisztán és megbízhatóan továbbítja a gyermek
által kiadott hangokat. Amint gyermeke megnyugszik, a készülék automatikusan „ECO
módba” kapcsol. ECO módban a gyermekegység nem sugároz. A gyermekegységen
található nyugtató fény segíti gyermekét az elalvásban, amint pedig gyermeke megnyugszik,
a készülék automatikusan „ECO módba” kapcsol. Amint az egység észleli a gyermek hangját,
automatikusan ismét adásra kapcsol. A szülői egység opcionális akkumulátoros üzemének
és a rugalmas övcsatnak köszönhetően a Babyphone rögzített és mobil üzemmódban
is használható. Biztosak vagyunk benne, hogy sokáig örömét fogja lelni termékeink
minőségében.
Kérjük, szánjon egy pár percet jelen biztonsági utasítás alapos átolvasására. A Babyphone
készülék gondtalan működtetése csak az itt leírtak betartása esetén biztosított. Őrizze meg
ezt a kezelési utasítást későbbi felhasználás céljából.
! A készülék minden használata előtt ellenőrizze az azon található látható sérüléseket.
Sérülések észlelése esetén ne használja a készüléket.
! Csak a mellékelt töltőt és hálózati csatlakozót használja. Győződjön meg róla, hogy az
üzemfeszültség megfelel-e a hálózati csatlakozó feszültségének. Utazáskor (különösen
külföldön) ellenőrizze, hogy a helyi hálózati feszültség megfelel-e a készülék és a
csatlakozó megadott feszültségének.
! Az eszközök és tápegységek az akkumulátorrekesz fedelét kivéve nem nyithatók fel,
mivel az áramütéshez vezethet. A készülék meghibásodása esetén Ne próbálja meg a
hibát saját maga elhárítani. Ilyen esetben lépjen kapcsolatba a kereskedővel.
! Ügyeljen arra, hogy az akkumulátor ne kerülhessen a gyermek kezébe. Fennáll a lenyelés
veszélye.
! Ne érintse a készülék akkumulátorát vagy a tápegység érintkezőit fém alkatrészekhez.
! A készülék nem játékszer! Ne hagyja gyermekét a készülékkel játszani!
TUDNIVALÓ: A BabyPhone kizárólagos célja gyermekének felügyelete. Nem helyettesíti a
szülő felügyeleti kötelezettségét és nem használható orvosi eszközként.
68
Page 69

HU
Biztonsági tudnivalók a telepítéshez
! A gyermekegységet úgy helyezze el, hogy azt a gyermek ne tudja elérni (legalább 1
méterre tőle).
! Soha ne helyezze a Babyphone készüléket a gyermekágyba vagy a járókába.
! Gondoskodjon arról, hogy a gyermek ne tekerhesse a kábelt a nyaka köré, rögzítse a
kábelt úgy, hogy ahhoz a gyermek ne férhessen hozzá. Ne használjon hosszabbítókábelt.
! A legjobb adatátvitel elérése érdekében a készüléket mindig függőleges és emelt
pozícióban kell felállítani.
! A vevőkészüléket NE helyezze rádió vagy mikrohullámú sütő alá. Ezeknek az eszközöknek
a sugárzása jelentősen ronthatja a vételt.
! Ne használja a készüléket víz közelében vagy nedves helyen. Ne merítse vízbe a
készülékeket. Ne öblítse a készüléket folyó víz alatt.
! Ne takarja le a Babyphone készüléket törülközővel, ruhával vagy takaróval.
! Kerülje az extrém meleget és a közvetlen napsugárzást.
Műszaki adatok
• technológia: Analóg
• adó: Áramellátás hálózati adapterrel
• vevő: Áramellátás hálózati adapterrel
vagy opcionálisan 3 db AAA méretű
elemmel vagy akkumulátorral (nincs
mellékelve)
• bemenet: 100 – 220V 50Hz 0.15 A max.
• kimenet: 6V / 300mA max.
• adó teljesítménye: TX 50 mA , RX 130 mA
• frekvencia: 40 MHz
• hatótávolság: 200 m
• kábelhossz: kb. 1,8 m
• üzemi hőmérsékle: 10°C - 40°C
• tárolási hőmérséklet: 0°C - 55°C
• szabványok: EN 300 220-1, EN 301 489-1,
EN 301 489-3
69
Page 70

Szállítási terjedelem
A készülék leírása
gyermekegység (adó)
hálózati adapterrel
szülői egység (vevő)
hálózati adapterrel
használati utasítás
SZÜLŐI EGYSÉG
GYERMEKEGYSÉG
hangerőszabályzás
hálózati adapter
csatlakozója
hálózati adapter
csatlakozója
akkumulátorrekesz
övcsat
övcsat
állapotjelző LED
állapotjelző LED
hangszóró
kapcsoló, illetve
csatornaváltó
kapcsoló, illetve
csatornaváltó
70
Page 71

HU
Üzembe helyezés
TUDNIVALÓ: A szülői egység ezen kívül opcionálisan két AAA méretű akkumulátorral is
működtethető (nincs mellékelve).
Kizárólag a mellékelt hálózati adaptert használja (6V DC / 300 mA).
1
3
2
4
Mindkét készüléken ugyanazt a csatornát (A vagy B) válassza ki.
A gyermek- és a szülői egységen lévő állapotjelző LED zöld fénnyel világít.
Amint a gyermekegység nagy érzékenységű mikrofonja hangot észlel, továbbítani kezdi azt a szülői egységre. A hang vételekor a szülői egységen lévő állapotjelző
LED narancssárga fénnyel villog.
Ha gyermeke nyugodt állapotban van és a gyermekegység nem észlel hangot, a
készülék automatikusan készenléti (ECO-) üzemmódba kerül. Ebben a módban
a gyermekegység nem bocsájt ki sugárzást. Amint az egység észleli a gyermek
hangját, automatikusan ismét adásra kapcsol.
TIPP A készülék az övcsat segítségével az övére rögzíthető, illetve megfelelő rögzítőa-
nyaggal a falra függeszthető.
71
Page 72

Állapotjelző LED Áramellátás Állapot
zöld be a készülék be van kapcsolva
Állapotjelző LED Áramellátás Állapot
zöld be a készülék be van kapcsolva
narancssárgán villog be hang érkezik a gyermekegységről
pirosan villog be az akkumulátorok le vannak merülve
Állapotjelző LED gyermekegység
Állapotjelző LED szülői egység
Szülői egység akkumulátoros üzeme
FONTOS: Az akkumulátor cseréje előtt kapcsolja ki a készüléket és távolítsa el a hálózati kábelt.
1 32
A kapcsoló fölötti állapotjelző LED a gyermekegység állapotát jelzi.
A kapcsoló fölötti állapotjelző LED a szülői egység állapotát jelzi.
72
Page 73

HU
Tippek a vételi terület kiterjesztéséhez
Hangerőszabályzás / szülői egység
Tisztítás és karbantartás
A vételi terület nagysága a környezeti és egyéb olyan tényezőktől függ, melyek az adásjelet
zavarhatják vagy akadályozhatják:
nagyméretű fémtárgyak, pl. hűtőszekrény, tükör, szekrények, fémajtók vagy vasbeton
rögzített struktúrák (falak) vagy rádiófrekvenciás, elektromos és elektronikai készülékek,
pl. tévé, számítógép, mobiltelefon vagy fokozatmentes kapcsolók
A készülék tisztítása előtt mindig húzza ki a hálózati adaptert a csatlakozóból. Kizárólag
enyhén nedvesített törlőkendőt használjon. Ne merítse vízbe a készüléket. Soha ne
használjon vegyi tisztítószereket.
Ha a készüléket hosszabb ideig nem használja, távolítsa el belőle az akkumulátort. A termék
nem igényel különleges karbantartást. A termék javítását kizárólag szakember végezheti.
Forgassa a hangerőszabályzót (Volume gomb) jobbra vagy balra a szülői egység vételi
hangerejének növeléséhez vagy csökkentéséhez.
TUDNIVALÓ: A hangerőszabályzó teljes bal oldali helyzetében a továbbított hang nem
hallható.
TUDNIVALÓ: Javasoljuk, hogy tartson legalább egy méteres távolságot a gyermekegység
és az interferáló készülékek között, vagy kapcsolja ki ezeket a készülékeket. Gyenge
kapcsolat esetén javasoljuk, hogy a szülői és/vagy gyermekegységet a szoba egy másik
pontján helyezze el.
73
Page 74

Garancia
Ártalmatlanítással kapcsolatos tudnivalók
Kérjük őrizze meg a vásárlást igazoló bizonylatot, a használati utasítást és a cikkszámot.
A garanciális igények vagy követelések kizárólag a kereskedőnél érvényesíthetők.
Valamennyi itt leírt műszaki adat, információ és terméktulajdonság a közzététel
időpontjában fennálló legjobb tudásunk szerinti. A reer látal megadott adatoknak helyesnek
és megbízhatóknak kell lenniük. A reer cég nem vállal felelőséget a dokumentumban
esetlegesen előforduló hibákért, és fenntartja a jogot, hogy előzetes értesítés nélkül
módosítsa a termék kivitelét és a kapcsolódó specikációt. Jelen jogvédett mű vagy annak
bármely részének bármilyen grakus, elektronikus formában történő sokszorosítása és
átadása (beleértve a fénymásolást a szalagon történő rögzítést, illetve az adatlekérdező
rendszeren történő tárolást) kizárólag a reer cég írásos engedélyével lehetséges.
A terméket az élettartam lejártát követően nem szabad normál szemétként
kezelni, hanem az elektromos készülékek újrahasznosítására létrehozott
helyeken le kell adni. Ezt a terméken, a használati utasításon vagy a
csomagoláson lévő jelzés jelzi. A felhasznált anyagok a címkézésnek
megfelelően ismét felhasználhatók. A használt akkumulátorokat ne dobja
a szemétbe, hanem tárolja külön, vagy adja le a szakkereskedőnél lévő akkumulátorgyűjtőhelyre. A régi készülékek újrafelhasználása, újrahasznosítása, vagy egyéb
hasznosítása révén jelentős mértékben hozzájárul a környezet védelméhez. A megfelelő
hulladéklerakóval kapcsolatos információkért forduljon a helyi hatóságokhoz.
74
Page 75

HU
Hibaelhárítás
Az állapotjelző LED nem világít.
Győződjön meg róla, hogy mindkét készülék be van kapcsolva.
Ellenőrizze a hálózati adapter csatlakozását a konnektorhoz és a készülékhez.
Cserélje ki az akkumulátorokat és/vagy ellenőrizze a polaritást.
Ellenőrizze a csatornabeállítást (A vagy B) az adó- és a vevőegységen.
Az állapotjelző LED narancssárgán villog
A szülői egység hangokat fogad. Hangosítsa fel igény szerint a hangerőt. hogy jobban
hallja gyermeke hangját.
Az állapotjelző LED vörösen villog
Az elemek le vannak merülve. Cserélje ki az akkumulátort vagy csatlakoztassa a készüléket
a hálózathoz.
A fennálló kapcsolat ellenére nincs hangátvitel
Győződjön meg róla, hogy a hangerő nincs-e túlságosan lehalkítva.
Másik rádióadást is hall
Mivel a Babyphone analóg rádiótechnológiát használ, ez zavart okozhat a többi rádiós
számára. Váltson csatornát.
A szülői egységen hangos sípoló hang hallható (visszacsatolás)
A gyermek- és a szülői egység távolsága túl kicsi. Növelje a gyermek- és a szülői egység
távolságát.
Nincs kapcsolat a szülői és a gyermekegység között / Zajok/a kapcsolat megszakad
Győződjön meg róla, hogy mindkét készülék be van kapcsolva.
Ellenőrizze a csatornabeállítást és/vagy váltson csatornát.
Túllépte a maximális hatótávolságot. Helyezze a Babyphone készüléket másik helyre és/
vagy csökkentse a távolságot a gyermek- és a szülői egység között.
A gyermek- vagy szülői egység zavaró készülékek (pl. mikrosütők) vagy fémtárgyak kö
zelében található. Kísérelje meg megkeresni az interferencia forrását és helyezze a kés
züléket másik helyre.
Az akkumulátorok túl gyengék. Cserélje ki az akkumulátorokat és/vagy csatlakoztassa a
készüléket a hálózathoz.
75
Page 76

Splošni varnostni napotki
Iskrene čestitke ob nakupu vaše nove elektronske varuške reer. Intuitivna elektronska
varuška s svojim zelo občutljivim mikrofonom jasno in zanesljivo opravlja prenos hrupa, ki
ga proizvaja vaš dojenček. Ko se vaš otrok umiri, se naprava samodejno preklopi na varčen
način delovanja. Dojenčkova enota v varčnem načinu preneha sevati. Pomirjajoča nočna
svetloba na dojenčkovi enoti vašemu otroku pomaga zaspati in takoj, ko je otrok miren,
se naprava samodejno preklopi v energetsko varčen način. Dojenčkova enota začne z
oddajanjem takoj, ko zazna hrup. Priročna elektronska varuška se zaradi izbirnega delovanja
na baterije starševske enote in robustne sponke za pas lahko uporablja tako stacionarno kot
tudi prenosno. Prepričani smo, da boste zelo dolgo zadovoljni s kakovostjo našega izdelka.
Vzemite si nekaj minut, da bi temeljito prebrali varnostne napotke. Samo, če so zagotovljene
vse tukaj navedene točke, je mogoče elektronsko varuško reer uporabljati brez pomislekov.
Navodila za uporabo shranite za poznejše naknadno branje.
! Pred vsako uporabo preverite, ali je naprava morebiti poškodovana. Če ugotovite
poškodbe, naprave ni dovoljeno uporabljati.
! Uporabljajte samo priložene polnilnike in napajalnike. Zagotovite, da napetost baterije
ustreza napetosti napajalnikov. Preverite, predvsem pri potovanju v tujino, ali se lokalna
omrežna napetost ujema z navedeno napetostjo na napravah oziroma na napajalnikih.
! Naprav in napajalnikov z izjemo pokrova na predalu za baterije, ni dovoljeno odpirati, ker
bi to lahko privedlo do električnih udarov. Če bi naprava delovala pomanjkljivo, težave
NE poskušajte odpraviti sami. V tem primeru vas prosimo, da se obrnete na svojega
prodajalca.
! Baterijo hranite izven dosega otrok. Obstaja nevarnost, da otrok napravo pogoltne.
! Preprečite dotik kovinskih predmetov s priključnimi kontakti baterije oziroma z
električnimi priključnimi kontakti na napravah.
! Ta izdelek ni igrača! Ne dovolite, da se otroci z njo igrajo.
OPOZORILO: Ta elektronska varuška je bila izključno razvita kot pripomoček za nadzor
otroka. Ne sme se uporabljati kot nadomestek za obveznost nadzora staršev niti kot
medicinski pripomoček!
76
Page 77

SI
Varnostni napotki za namestitev
! Dojenčkovo enoto namestite vedno izven dosega otroka (minimalni odmik 1 meter).
! Elektronske varuške nikoli ne položite v dojenčkovo ali otrokovo posteljo oziroma v stajico.
! Da bi preprečili zadušitev z električnim kablom, kabel pritrdite izven dosega otrok. Ne
uporabljajte podaljševalnih kablov.
! Da bi zagotovili najboljši prenos, morajo biti naprave postavljene pokončno in na višjem
mestu.
! Sprejemnika NE nameščajte v bližini radijskih sprejemnikov ali mikrovalovnih pečic.
Sevanje teh naprav lahko močno vpliva na sprejem.
! Naprave ne uporabljajte v bližini vode ali v vlažnih krajih. Naprave ne potopite v vodo!
Naprave ne izpirajte pod tekočo vodo!
! Elektronske varuške ne prekrivajte z brisačo, obleko ali odejo.
! Preprečite izjemno vročino in neposredno sončno sevanje.
Tehnični podatki
• tehnologija: Analogno
• oddajnik: napetostno napajanje z
napajalnikom
• sprejemnik: napetostno napajanje z
napajalnikom ali izbirno s tremi baterijami
AAA ali akumulatorji (ni v obsegu
dobave).
• input: 100 – 220V 50Hz 0.15 A max.
• output: 6V / 300mA max.
• moč oddajanja: TX 50 mA , RX 130 mA
• frekvenca: 40 MHz
• doseg: 200 m
• dolžina kabla: pribl. 1,80 m
• delovna temperatura: 10°C - 40°C
• skladiščna temperatura 0°C - 55°C
• standardi: EN 300 220-1, EN 301 489-1,
EN 301 489-3
77
Page 78

Obseg dobave
Opis naprave
dojenčkova enota (oddajnik)
z napajalnikom
starševska enota (sprejemnik)
z napajalnikom
navodila za uporabo
STARŠEVSKA
ENOTA
DOJENČKOVA
ENOTA
regulator glasnosti
priključek
napajalnika
priključek
napajalnika
predal za baterije
sponka za pas
sponka za pas
statusni LED
statusni LED
zvočnik
Izbirno stikalo
vklop/izklop
(ON/OFF)
izbirno stikalo
vklop/izklop
(ON/OFF)
78
Page 79

SI
Vklop
OPOZORILO: Starševska enota lahko izbirno deluje tudi z dvema baterijama AAA (ni v
obsegu dobave).
Uporabljajte samo priložen polnilec (6V DC/300 mA).
1
3
2
4
Na obeh napravah izberite isti kanal (A ali B).
Statusni LED na dojenčkovi in starševski enoti sveti zeleno.
Ko zelo občutljiv mikrofon na dojenčkovi enoti zazna hrup, naprava začne s prenosom starševski enoti. Statusni LED na starševski enoti ob prejemu hrupa utripa
oranžno.
Če je vaš otrok miren in dojenčkova enota ne prejema hrupa, se naprava samodejno preklopi v stanje pripravljenosti (energetsko varčen način). Dojenčkova enota
v energetsko varčnem načinu ne seva. Dojenčkova enota začne z oddajanjem
takoj, ko zazna hrup.
NASVET Naprave lahko s sponko za pas pritrdite na vaš pas ali s primernim pritrdilnim
materialom obesite na steno.
79
Page 80

Statusni LED Moč Stanje
zelena vklop naprava je vklopljena
Statusni LED Moč Stanje
zelena vklop naprava je vklopljena
utripajoča oranžna vklop prejemanje hrupa z dojenčkove enote
utripajoča rdeča vklop baterije so izpraznjene
Statusni LED dojenčkova enota
Statusni LED starševska enota
Delovanje starševske enote z baterijami
POMEMBNO: Izklopite naprave in odstranite električni kabel, preden zamenjate baterije.
1 32
Statusni LED nad stikalom ON/OFF navede stanje dojenčkove enote.
Statusni LED nad stikalom ON/OFF navede stanje starševske enote.
80
Page 81

SI
Nasvet za razširitev področja sprejemanja
Regulator glasnosti / starševska enota
Čiščenje in vzdrževanje
Področje sprejemanja je odvisno tako od okolice kot tudi od drugih dejavnikov, ki lahko
prenosni signal motijo ali blokirajo:
veliki kovinski predmeti, kot npr. hladilniki, ogledala, omare, kovinska vrata ali armiran
beton
ksne strukture (stene) ali radijske, električne in elektronske naprave, kot npr. televizor,
računalnik, mobilni telefoni ali zatemnilno stikalo
Vedno izvlecite napajalnik iz električne vtičnice, preden napravo očistite. Uporabljajte
izključno rahlo vlažno krpo. Naprave ne potopite v vodo. Ne uporabljajte kemičnih čistilnih
sredstev.
Odstranite baterije iz naprave, če je ne boste uporabljali dlje časa. Ta izdelek ne zahteva
posebnega vzdrževanja. Napravo sme popravljati le strokovnjak.
Regulator glasnosti (= Volume) obračajte navzgor ali navzdol, da bi povečali ali zmanjšali
glasnost prejemanja na starševski enoti.
OPOZORILO: Če je regulator glasnosti obrnjen navzdol, prenos hrupa ne deluje.
OPOZORILO: Priporočljivo je, da se upošteva vsaj en meter odmika med dojenčkovo
enoto in motilnimi napravami oziroma, da se le-te izklopijo. Pri slabi povezavi se priporoča,
da starševsko in/ali dojenčkovo enoto v sobi postavite na drugo mesto.
81
Page 82

Garancija
Napotki za odstranjevanje med odpadke
Prosimo, da shranite račun, navodila za uporabo in številko artikla.
Garancijske zahtevke ali zahtevke iz garancijske izjave je treba urejati s prodajalcem.
Vsi tehnični podatki, informacije in lastnosti izdelka, ki je opisan v tem priročniku, so bili
sestavljeni po najboljšem znanju in ustrezno stanju pri objavi. Informacije, ki jih da na voljo
reer, bi morale biti pravilne in zanesljive. Vendar podjetje reer ne prevzema odgovornosti
za možne napake v tem dokumentu in si pridržuje pravico, da brez vnaprejšnje napovedi
spremeni obliko izdelka ali specikacije. Razmnoževanje in posredovanje informacij iz
priročnika, zaščitenega z avtorskimi pravicami, v kakršnikoli obliki ali na kakršenkoli način,
gračno, elektronsko ali mehansko, s fotokopiranjem, snemanjem na trak ali shranjevanjem
v sistem odčitavanja podatkov (tudi z izvlečki) mora predhodno odobriti podjetje reer.
Ko poteče življenjska doba izdelka, se ta ne sme odvreči med gospodinjske
odpadke, ampak ga je treba oddati na zbirno mesto za recikliranje
električnih naprav. Na to opozarja simbol na izdelku, v navodilih za uporabo
ali na ovojnini. Surovine so v skladu z njihovo oznako ponovno uporabne.
Porabljenih baterij ne vrzite med gospodinjske odpadke, ampak med
posebne odpadke ali jih oddajte na zbirnem mestu za baterije v trgovini. Z recikliranjem, s
ponovno uporabo surovin ali z drugimi oblikami recikliranja stare opreme veliko prispevate
k zaščiti našega okolja. Prosimo, da pri vaši občinski upravi povprašate za pristojno službo
za predelavo odpadkov.
82
Page 83

SI
Odpravljanje težav
Statusni LED ne sveti
Zagotovite, da sta vklopljeni obe napravi.
Preverite povezavo napajalnika do vtičnice in naprave.
Zamenjajte baterije in/ali preverite polarnost.
Preverite nastavitev kanala (A ali B) sprejemnika in oddajnika.
Statusni LED utripa oranžno
Starševska enota prejema hrup. Po potrebi povečajte glasnost na starševski enoti, da bi
boljše slišali hrup vašega otroka.
Statusni LED utripa rdeče
Baterije so izpraznjene. Zamenjajte baterije ali priključite napravo na električno napajanje.
Ni prenosa hrupa kljub obstoječi povezavi
Zagotovite, da regulator glasnosti ni obrnjen popolnoma navzdol.
Lahko slišite druge radijske udeležence
Ker ta elektronska varuška temelji na analogni radijski tehnologiji, lahko pride do motenj
zaradi drugih radijskih udeležencev. Zamenjajte kanal.
Starševska enota glasno zapiska (povratna vezava)
Odmik med dojenčkovo in starševsko enoto je premajhen. Povečajte odmik med doje
nčkovo in starševsko enoto.
Ni povezave med starševsko in dojenčkovo enoto/šumenje/povezava se prekine
Zagotovite, da sta vklopljeni obe napravi.
Preverite nastavitev kanala in/ali zamenjajte kanal.
Maksimalen doseg je presežen. Elektronsko varuško postavite na drugo mesto in/ali
zmanjšajte odmik med dojenčkovo in starševsko enoto.
Dojenčkova/starševska enota se nahajata v bližini motilnih naprav (npr. mikrovalovna
pečica) ali kovinskih predmetov. Poskušajte najti vir motnje in naprave postavite na dru
go mesto.
Baterije so preslabe. Zamenjajte baterije in/ali priključite naprave na električno napajanje.
83
Page 84

reer GmbH
Muehlstr. 41 • 71229 Leonberg • Germany
www.reer.de
Rev. 015114
84
 Loading...