

Page 1
TYP: 1911 / 1912
Gebrauchsanleitung
WICHTIG:
Gebrauchsanweisung aufmerksam durchlesen
und für spätere Anfragen aufbewahren.
Hinweise und Anleitung unter:
www.wickeltisch-heizstrahler.de
230-50Hz
300/600W
D
Page 2
Unser Wickeltisch-Heizstrahler erzeugt behagliche Sofortwärme im Bereich von Wickeltischen. Er dient aber auch zur schnellen Erwärmung von Badezimmern, Hobbyräumen,
Dielen, geschützten Terrassen und Balkonen.
WICHTIGE HINWEISE:
- Bitte lesen Sie vor Inbetriebnahme die Betriebsanleitung aufmerksam durch.
- Bei Verwendung als Wickeltisch-Strahler darf das Gerät nie ohne Aufsicht benutzt
werden.
- Die maximale Bestrahlungsdauer darf 15 Minuten nicht überschreiten.
- Der Bestrahlungsabstand von 100 cm vom Heizstrahler zum Tisch ist
unbedingt einzuhalten.
- Vermeiden Sie zusätzliche Wärmeeinstrahlung, wie z.B. Sonnenlicht oder
zusätzliche Strahlungsquellen, denn dadurch kann die Körpertemperatur Ihres
Babys ansteigen.
- Kleinkinder mit erhöhter Temperatur dürfen nicht bestrahlt werden. Es besteht
die Gefahr der Körperüberhitzung.
- Das Schutzgitter bei Betrieb nicht berühren.
- Schliessen Sie keine automatische Zeitschaltuhr an das Gerät an, welche den
Heizstrahler automatisch einschaltet, da ein Brandrisiko besteht.
Achtung: Das Gerät ist auch nach dem Ausschalten noch heiß.
Wickeltisch-Heizstrahler nicht abdecken! Es besteht Brandgefahr.
MONTAGE:
• Der Wickeltisch-Heizstrahler darf nur
ortsfest und waagrecht an einer Wand
montiert werden.
Deckenanbringung ist nicht zulässig.
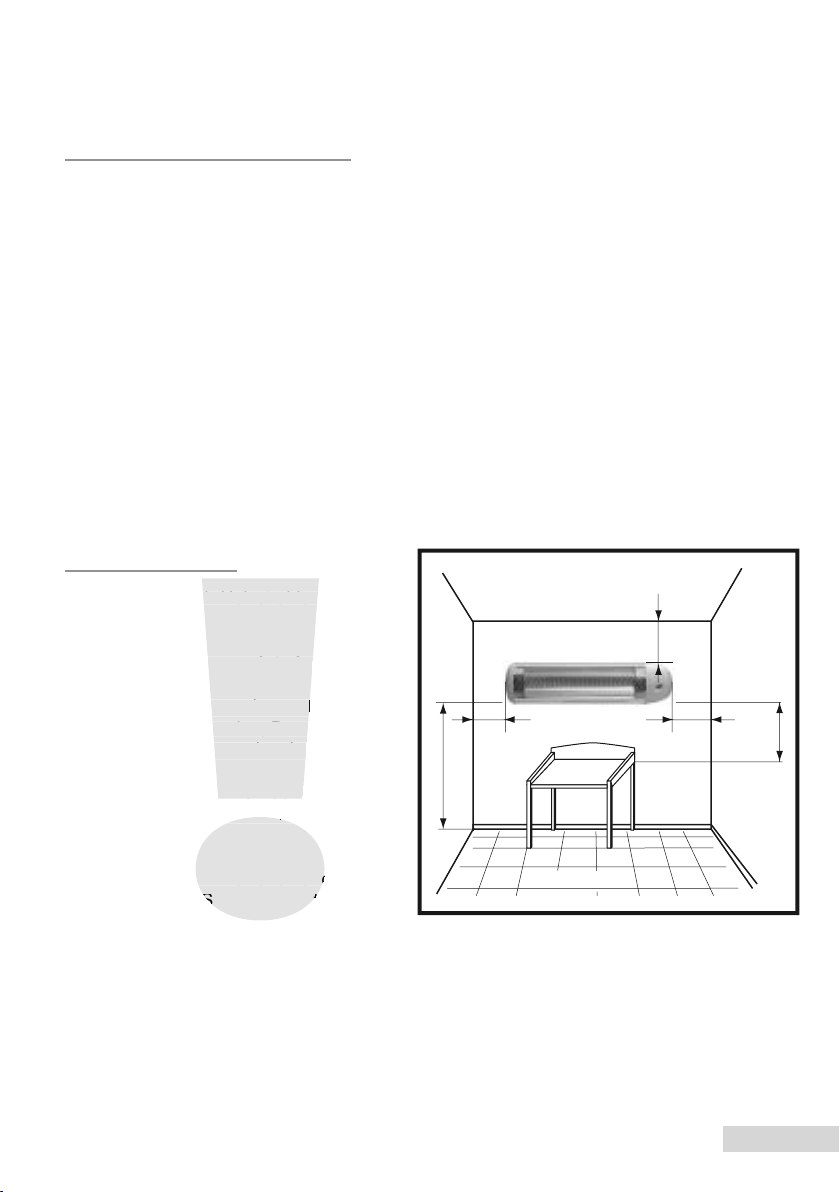
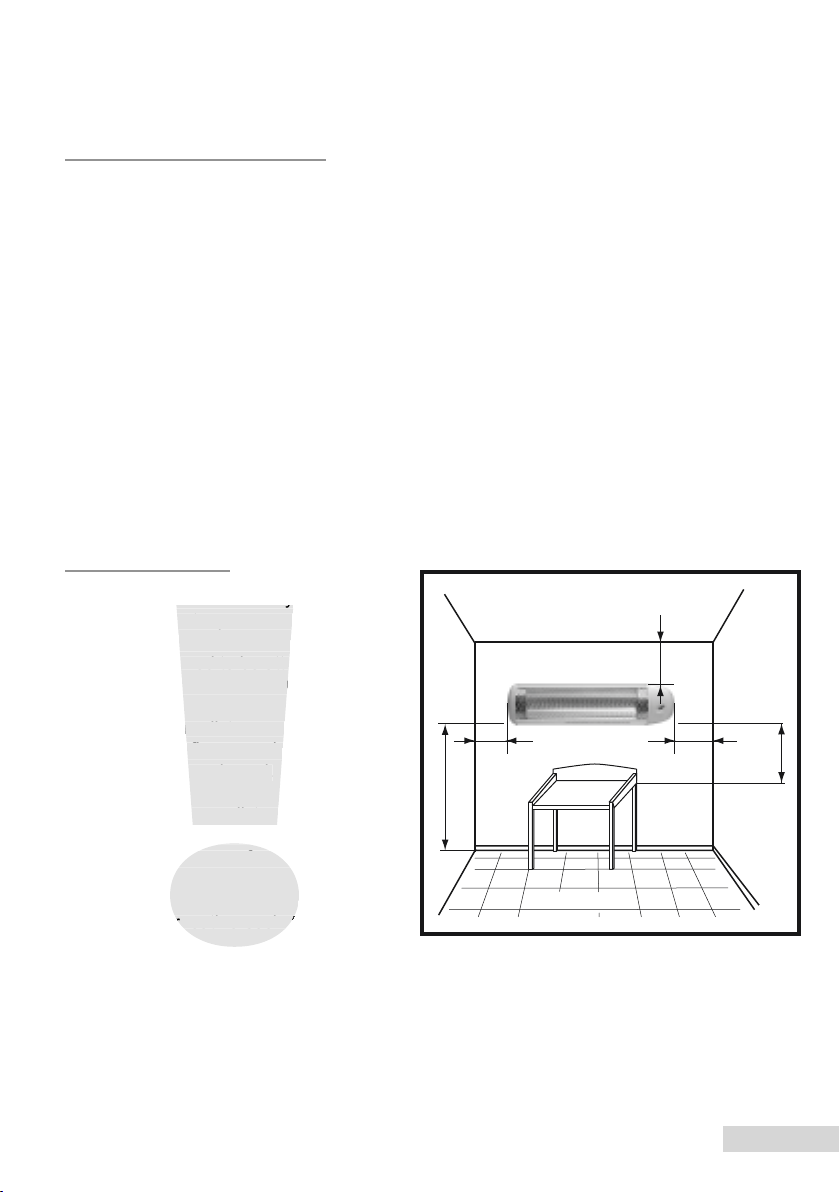
• Die in Abb.1 angegebenen Mindest abstände zu Wänden, Decken und
Fußböden müssen eingehalten werden.
• Mindestabstand von 65 cm zu brenn-
baren Materialien, wie Textilien, Holz usw.
einhalten. Es besteht Brandgefahr!
• Der Wickeltisch-Heizstrahler darf nicht
unterhalb einer Steckdose montiert werden.
Typ:1912
Der Heizstrahler verfügt über eine AUTOMATISCHE ABSCHALT-TECHNIK.
D.h. das Gerät schaltet sich automatisch nach 10 min. Betriebsdauer aus.
Bei Stromausfall oder einer defekten Sicherung startet die Abschaltautomatik, wenn der
Schalter auf EIN steht, automatisch für weitere 10 Minuten. Kontrollieren Sie immer ob sich
das Gerät nach Gebrauch oder Ablauf der Abschaltzeit in der Schalterstellung
AUS/0 befi ndet.
2
Boden
Decke
Mindestabstand
vom Ti
sch
Abb.1
35cm
20cm
20cm
160cm
100cm
Seitenwand
Wickeltisch
Page 3

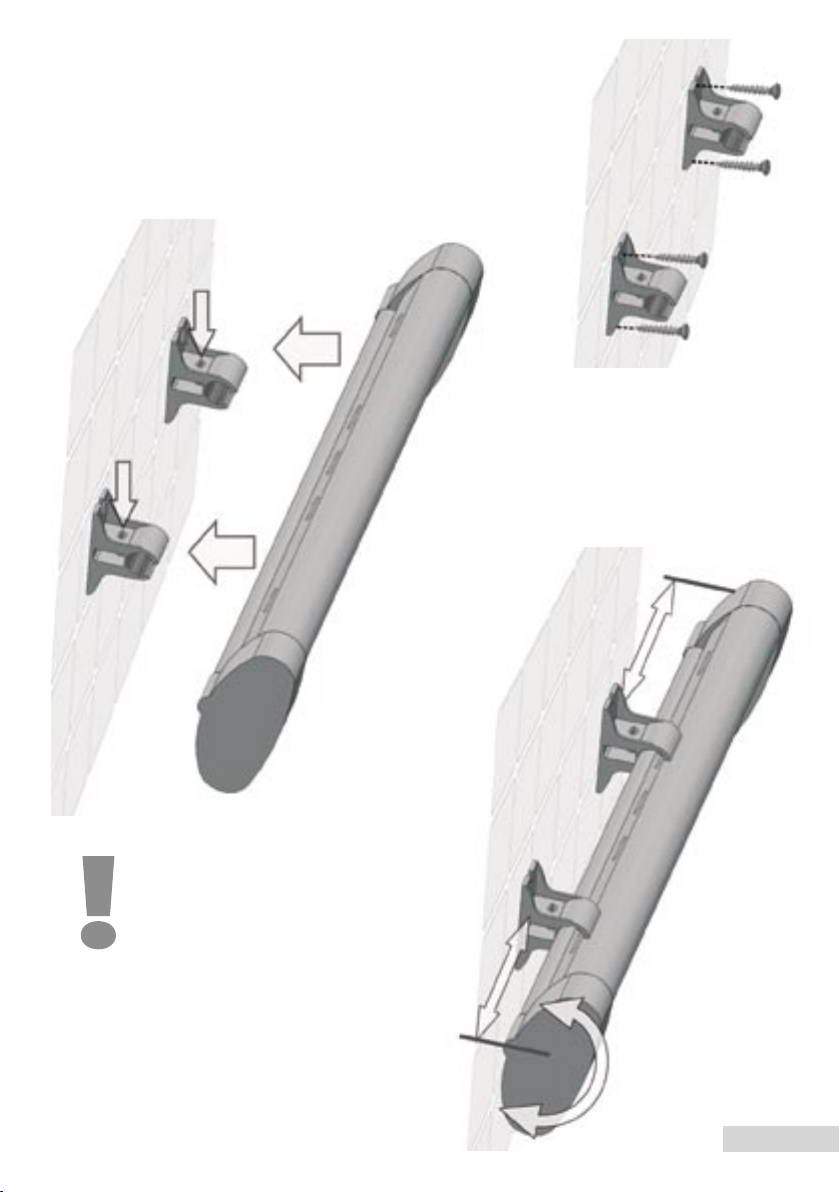
a) Unter Berücksichtigung der Mindestabstände
(Abb.1, Seite 2) die Dübelbohrungen der variablen
Wandhalterungen anzeichnen, Dübel setzen und
anschrauben (Achten Sie auf die Position der
Fixierschraube. Sie muss oben sein) (Abb.2).
Der Minimum Abstand zwischen den Wandhalterungen
beträgt 12cm, der Maximum Abstand 40cm.
So können Sie genau in den Fugen der Fließen bohren.
3
Abb.3
Abb.2
b) Den Heizstrahler mittig an die
Wandhalterung stecken (Abb.3).
Das Gerät hat eine stufenlose Winkel verstellung (Abb.5). Einfach in die
gewünschte Position drehen und
mittels der beiden Fixierschrauben
fi xieren (Abb.4).
Abb.4
Abb.4
Abb.5
Das Gerät muss zu den
Halterungen mittig gestellt sein
(d.H. gleicher Abstand links und
rechts) (Abb.6).
Die Fixierschrauben (Abb4)
müssen fest sein um sicher zu
gehen, dass das Gerät nicht aus
den Halterungen fällt.
Abb.6
Abb.6
Page 4
INBETRIEBNAHME:
Schalterstellung: 0 AUS
1 300W – rote LED leuchtet (Modell 1912)
2 600W – rote LED leuchtet (Modell 1912)
ACHTUNG:
Sie sollten das Gerät vor dem ersten Gebrauch bei guter Raumlüftung für ca. 10 min in
Betrieb nehmen. Bei der ersten Inbetriebnahme kann es zu Geruchsbildung führen.
Das Gerät während und einige Zeit nach Gebrauch NICHT berühren! (HITZEAUSSTRAHLUNG)
Netzstecker in die Steckdose stecken. Das Gerät ist jetzt betriebsbereit.
Achtung: Zuleitung nicht über das Gerät führen!
• Bei Installationen in Bade- oder Duschräumen sind die Vorschriften des
örtlichen EVU zu beachten. Der Strahler muß so positioniert werden, dass der
Zugschalter nicht von der Badewanne oder Dusche aus angefasst werden kann.
• Das Gerät darf nicht über der Badewanne montiert werden!
Dieses Gerät ist nicht dafür bestimmt, durch Personen (einschließlich Kinder) mit eingeschränkten physischen, sensorischen oder geistigen Fähigkeiten oder mangels Erfahrung
und/oder mangels Wissen benutzt zu werden, es sei denn, sie werden durch eine für ihre
Sicherheit zuständige Person beaufsichtigt oder erhielten von ihr Anweisungen, wie das Gerät
zu benutzen ist.
Kinder sollten beaufsichtigt werden, um sicherzustellen, dass sie nicht mit dem Gerät spielen.
REINIGUNG:
Bevor Sie mit der Reinigung beginnen, überzeugen Sie sich davon, dass das Gerät ausgeschaltet und abgekühlt ist (Netzstecker ziehen). Die Oberfläche mit einem trockenen oder
leicht angefeuchteten Tuch reinigen. Den Reflektor und Heizstab nur von einem Fachmann
reinigen lassen.
REPARATUR:
Reparaturen am Gerät dürfen nur von einem Fachmann durchgeführt werden.
4
Page 5
TECHNISCHE DATEN:
Nennspannung: 230 V
Leistung: 300/600 W
Montageart: Netzleitung
Schutzklasse: 1
Strahlungsbereich: 90°
Infrarotstrahlung und Temperaturverteilung nach
Medizinproduktstandard (IEC601-2-21) geprüft
Garantie
Dieses Gerät ist aus einwandfreiem Material und mit großer Sorgfalt hergestellt worden.
Die Firma Reer übernimmt daher eine Garantie von 2 Jahren ab Verkaufsdatum für alle
Material- und Fabrikationsfehler. Sollte sich dennoch ein derartiger Fehler einstellen, dann
füllen Sie bitte den gelben Garantieschein aus und wenden sich an Ihren Händler.
Kein Garantieanspruch besteht, wenn:
- das Gerät nicht sachgemäß benutzt wird
- die Anlage an falsche Spannung angeschlossen wird
- unbefugte Eingriffe vorgenommen werden
- der Garantieschein nicht ordnungsgemäß ausgefüllt ist
(Kassenbeleg bitte auch nicht vergessen)
REER GmbH, Riedwiesenstrasse 7, 71229 Leonberg, Germany
- - - - - - - - - - - - - - - - - - - - - - - - - - - - - - - - - - - - - - - - - - - - - -
Typ: 1911 / 1912
Verkaufsdatum:
Stempel und Unterschrift des Händlers:
5
Page 6
Radiant heater for changing unit
TYP: 1911 / 1912
User Manual
Important :
Please read user manual carefully
and keep it for further reference.
Tips and instructions under:
www.wickeltisch-heizstrahler.de
GB
230-50Hz
300/600W
Page 7
Our changing unit radiant heater provides comforting direct heat in the area of changing units.
It is also suitable for quick heating of bathrooms, hobby rooms, hallways, sheltered patios and
balconies though.
Important remarks :
• Please read the user manual carefully before putting it in use.
• If the radiant heater is used above a changing unit the device is never to be used
without supervision.
• The maximum irradiating duration must not exceed 15 minutes.
• Avoid additional warmth such as sunrays or other irradiating sources as the body
temperature of your baby can consequently go up very high.
• Young infants with increased temperatures are not allowed to be irradiated.
Danger of body overheating exists.
• Do not cover the radiant heater! Danger of fi re exists.
• Do not touch the protecting grid during operation.
• Do not use this heater with a programmer, timer or any other device that switches the
heater on automatically, since a fi re risk exists if the heater is covered or positioned
incorrectly.
Warning: it can still be hot after switching off.
The irradiation distance of 100 cm between child and changing unit radiant
heater must be kept.
Assembly:
• The radiant heater is only allowed to be
assembled at a permanent place on the
wall and in horizontal position.
It is not allowed to be attached to the
ceiling.as shown in Fig. 1 must be obeyed.
• The minimum distances to walls,
ceilings and fl oors as shown in
Fig. 1 must be obeyed.
• Keep a minimum distance of 65 cm to
infl ammable materials such as textiles,
wood etc. Danger of fi re exists!
• The radiant heater is not allowed to be
fi xed underneath a socket.
Typ:1912
The heater has a build-in automatic cut off function, i.e. the heater cuts off
automatically after 10 minutes.
In the event of a power failure or with defective fuses, automatic shutdown will automatically
be started for additional 10 minutes if the switch is in ON position. After use or expiration of
the turn-off time, please make sure the switch is in OFF/0 position.
7
35cm
20cm 20cm
160cm
100cm
ceiling
Fig.1
sidewall
changing unit
floor
minimum distance
to table
Page 8
8
a) Mark dowel positions of the variable wall holders
under consideration of the minimum clearances
(Fig.1, page 2). Insert dowels and tighten. (Please mind
the positions of the locating screw. They are to be used
for the upper holes) (Fig.2).The minimum clearance
between the wall holders is 12cm, the maximum
clearance is 40cm. Thus, it is possible to drill into the
gaps between the tiles.
Fig.3
Fig.2
b) Put the radiant heater onto the wall
holder (Fig.3). The device is provided
with a variable angle adjustment (Fig.5).
Simply place the device into the position
desired and tighten by means of the two
locating screws (Fig.4).
Fig.4
Fig.4
Fig.5
The device must be centrically
positioned towards the holders
(i.e. same distance on the left
and on the right) (Fig.6).
The locating screws (Fig. 4)
must be tightly screwed in to
ensure that the device does not
fall out of the holders.
Fig.6
Fig.6
Page 9

STARTING UP:
Switch setting: 0 OFF
1 300W The red LED glows (Typ 1912)
2 600W The red LED glows (Typ 1912)
Caution:
You should start up the device before the first use with a good ventilation of the room of
approx. 10 minutes. During the first start-up the device could cause odor accumulation.
DO NOT TOUCH the radiant heater during and shortly after use! (HEAT RADIATION)
Plug the heater into the socket-the heater is now ready for use
Caution: Do not place the power cord over the radiant heater!
• The local electrical regulations (EVU) must be complied with when installing the heater in
bathrooms and shower rooms. The heater must be positioned so that the pull switch
cannot be directly touched from the bathtub or shower.
• Device must not be installed above bathtub!
The device should not be used by children or people having physical, sensory or mental
limitations. People having insufficient experience and/or knowledge should be supervised and
instructed in order to guarantee the secure use of the device.
-Children playing with the device
Cleaning:
Before cleaning is begun, please ensure that the device is
switched off and cooled down (draw the plug).
Clean the surface with a dry or damp cloth.
The reflector and heating bar can only be cleaned by an expert.
Repair:
The device may only be repaired by an expert.
9
Page 10

Technical details :
Mains voltage : 230 V
Power : 300/600 W
Type of assembly: power plug in socket or fixed connection
Protection class: 1
Irradiating angle : 90°
Infrared radiation and temperature distribution proofed
according to the standard for medical products (IEC601-2-21)
Guarantee
This device has been produced with intact material and the utmost care. Therefore Reer
grants a guarantee period of 2 years after date of purchase against defective materials and
workmanship. In the unlikely event that you are confronted with such a defect, you should
complete the yellow warranty card and contact your dealer.
Warranty cannot be granted if:
- the device is used improperly and not for its intended purpose
- the device is connected to wrong mains voltage
- unauthorised repairs are made
- the warranty card is improperly completed.
(Do not forget to attach your sales slip.)
REER GmbH, Riedwiesenstrasse 7, 71229 Leonberg, Germany
- - - - - - - - - - - - - - - - - - - - - - - - - - - - - - - - - - - - - - - - - - - - - -
Type: 1911 / Type: 1912
Date of purchase:
Stamp and signature of dealer:
10
Page 11

TABLE A LANGER CHAUFFANTE
TYP: 1911 / 1912
Manuel
Important :
Lisez le manuel de près
et gardez-le pour des demandes à venir.
www.wickeltisch-heizstrahler.de
F
230-50Hz
300/600W
Page 12

Notre radiateur de chauffage pour la table à langer produit immédiatement une chaleur
agréable aux environs des tables à langer. Il sert aussi au échauffement rapide des salles de
bains, salles de loisirs, des vestibules, des terrasses protégées et des balcons.
Renseignements importants:
• Avant d’utiliser l’appareil lisez le manuel de près.
• En l’utilisant pour la table à langer, l’appareil ne doit jamais être utilisé sans
surveillance.
• La durée maximale de l’irradiation ne doit pas excéder 15 minutes.
• Evitez une irradiation de chaleur additionnelle, comme p.ex. la lumière de la soleil ou
autres sources de l’irradiation, car la température de votre enfant peut augmenter
beaucoup par cela.
• Des petits enfants avec une température plus élevée ne doivent pas être irradiés. Il
existe le danger d’une surchauffe du corps.
• Ne couvrez pas le radiateur de chauffage pour la table à langer !
Il existe le danger de feu.
• En l’utilisant ne touchez pas la grille de protection.
Attention : Elle est encore chaude après être arrêtée.
Observez absolument une distance de 100 cm entre l’enfant et le radiateur de
chauffage pour la table à langer.
Montage:
• Le radiateur de chauffage pour la table
à langer doit seulement être monté
fixement et horizontalement dans le
mur. Le montage dans le plafond n’est
pas permis.
• Des écarts minimums aux murs, aux
plafonds et aux sols, comme vous
pouvez voir à la figure 1, doivent être
observés.
• Observez un écart minimum de 65 cm
aux matériaux inflammables comme des
textiles, du bois, etc. Il existe le danger du feu.
• Le radiateur de chauffage pour la table
à langer ne doit pas être monté au dessous d’une prise de courant.
Typ:1912
Le radiateur chauffant a un interrupteur automatique, c‘est à dire que le radiateur se
couper après 10 minutes.
En cas de panne de courant ou d‘un fusible en panne, l‘automatisme de déclenchement
démarre automatiquement pour d’autres 10 minutes quand l’interrupteur est ACTIVE.
Contrôlez toujours si l’appareil se trouve en position d’interrupteur DECLENCHE/0 après
l’usage ou après la fin de l’intervalle de déclenchement.
12
35cm
20cm 20cm
160cm
100cm
Fig.1
Plafond
Ecart minimum
du table
Mur
Le radiateur de chauffage
pour la table à langer
Sol
Le radiateur de chauffage
pour la table à langer
Page 13

13
a) Notez l‘emplacement des chevilles de fi xation en
respectant les distances minimales autorisées (Fig.1, page 2).
Insérez les chevilles et serrez. (Veuillez noter les
emplacements des vis de positionnement. Ces dernières
devront être utilisées pour les trous supérieurs) (Fig.2).
La distance minimale entre les soutiens est de 12 cm,
la distance maximale de 40 cm. Il est ainsi possible de
percer des trous dans les espaces qui séparent les plaques.
Fig.3
Fig.2
b) Placez le radiateur sur son soutien
mural (Fig.3). Il est possible d‘ajuster
l‘angle de fi xation de l‘appareil. (Fig.5).
Placez simplement l‘appareil dans la
position désirée et serrez à l‘aide de
deux vis. (Fig.4)..
Fig.4
Fig.4
L’appareil doit être positionné au
centre des éléments de soutien.
(la distance doit être la même à
gauche et à droite) (Fig.6).
Les vis (Fig. 4) doivent être
fermement serrées afi n de
s’assurer que l’appareil ne
peut se détacher et tomber.
Fig.6
Fig.6
Fig.5
Page 14

MISE EN SERVICE :
Position de l`interrupteur : 0 DECLENCHEE
1 300W L’indicateur à DEL est au rouge (Typ 1912)
2 600W L’indicateur à DEL est au rouge (Typ 1912)
ATTENTION:
Cet appareil ne doit pas être utilisé par les enfants ou par toute personne victime de
troubles physiques, sensoriels ou mentaux. Toute personne possédant une expérience et/
ou une connaissance insuffisante doit être supervisée et guidée de manière à garantir une
utilisation sécurisée de cet appareil.-Les enfants jouant avec l‘appareil
Vous devez mettre en service l’appareil dans un local bien aéré pour environ 10 minutes
avant le premier usage. En effet la première mise en service de l’appareil peut causer la
formation d’odeurs.
Ne touchez pas l’appareil en l’utilisant et quelque temps plus tard! (Irradiation de la chaleur)
Mettez la fiche de contact dans la prise de courant. L’appareil est maintenant prêt à être mis
en service.
Attention : Ne conduisez pas le câble d’amenée au dessus de l’appareil!
• Chez installations à la salle de bains ou de douche, on doit observer les règles de
l’entreprise de l’alimentation en énergie locale. Le radiateur doit être installé en cette
façon qu’on ne peut pas toucher l’interrupteur à tirette de la baignoire ou de la douche.
• L’appareil ne doit pas être monte au-dessus de la baignoire !
Nettoyage:
Avant de commencer avec le nettoyage assurez-vous, que l’appareil est mis hors circuit et
qu’il est rafraîchi (Retirer la fiche du secteur.).
Nettoyez la surface avec un chiffon sec ou légèrement mouillé.
Laissez nettoyer le réflecteur et le tube de chauffage seulement par un spécialiste
Réparation:
Les réparations à l’appareil doivent être exécutées seulement par un spécialiste.
14
Page 15

Dates techniques :
Voltage nominal : 230 V
Puissance : 300/600 W
Mode de montage : Fil du secteur ou raccord fixe
Classe de protection : 1
Portée d’émission : 90°
Ondes infrarouges et distribution de la température
contrôlées selon le standard des produits médicaux (IEC601-2-21)
Garantie :
Cet appareil est fabriqué d’un matériel sans aucun défaut et avec grand soin. La firme
Reer se port garant de 2 ans à la date de vente pour toutes les fautes de matériel et de la
fabrication. S’il y a quand même une telle faute, remplissez s.v.p. le formulaire de garantie
jaune et adressez-vous à votre marchand ou envoyez l’appareil.
Il n’y a pas de droit de garantie si :
- l’appareil n’est pas utilisé adéquat.
- l’appareil est raccordé à un voltage faut.
- qn a mis la main dans l’appareil sans autorisation.
- le formulaire de garantie n’est pas rempli en bonne forme.
(N’oubliez pas la pièce de caisse s.v.p.)
REER GmbH, Riedwiesenstrasse 7, 71229 Leonberg, German
- - - - - - - - - - - - - - - - - - - - - - - - - - - - - - - - - - - - - - - - - - - - - -
Type: 1911 / Type: 1912
Date de vente:
Timbre et signature du marchand :
15
Page 16

RADIATORE PER FASCIATOIO
TYP: 1911 / 1912
ISTRUZIONI DI USO
Importante:
Legga attentamente le istruzioni di uso
e le custodisca per eventuali domande
www.wickeltisch-heizstrahler.de
I
230-50Hz
300/600W
Page 17

Il nostro riscaldatore di fasciatoio produce un calore immediato sopra il fasciatoio.
Ma anche serve per riscaldare pronto il bagno, la stanzer per hobby, l´atrio,
la terrazza chiusa e il balcone.
Avvisi importanti:
• Legga per favore le istruzioni di uso prima di mettere in funzione l´apparecchio.
• Mentre l´apparecchio si usa per riscaldare il fasciatoio, non sia mai senza
supervisione.
• La durazione massima dell´uso non deve oltrepassare 15 minuti.
• Eviti riscaldamento extra, come p.e. luce del sole o un radiatore, altrimenti la
temperatura di corpo del bimbo potrebbe aumentare troppo.
• Se il bimbo ha febbre o temperatura alta, non bisogna esporsi al riscaldatore: c´è il
rischio di surriscaldamento.
• Mai coprisca il riscaldatore: c´è il rischio di un incendio
• Non tocchi la grata di protezione mentre l´apparecchio sia in funzione.
Attenzione: la grata rimane calda dopo di spegnere.
Tra il riscaldatore e il fasciatoio bisogna guardare una distanza minima di 100
centimentri.
Montaggio:
• l riscaldatore di fasciatoio soltanto
deve essere montato in posizione
orizzontale e nella parete– non si
permette il montaggio nel soffitto.
• Si devono rispettare le distanze
minime con le pareti, il soffitto e il
pavimento come si indica in fig. 1.
• Distanza minima di 65 cm. con materiali
infiammabili, come tessuti, legno ecc.!
C´è il rischio di un incendio
• Non si deve montare sotto una
spina elettrica.
Typ:1912
L‘emettitore del heating ha una COMMUTAZIONE AUTOMATICA FUORI DI TECNOLOGIA.
L‘apparecchiatura si commuta automaticamente dopo 10 min.
In caso d’interruzione della corrente elettrica o di un interruttore di sicurezza difettoso, per
altri 10 minuti si avvia l‘automatismo di spegnimento, se l‘interruttore risulta ACCCESO.
Controlli sempre se l‘apparecchiatura dopo l‘uso o dopo il decorso dell‘intervallo di
spegnimento si trova nella posizione dell‘interruttore SPENTO/0.
17
35cm
20cm 20cm
160cm
100cm
Fig.1
soffitto
istanza minima
della tabella
parete
pavimento
fasciatoior
Page 18

a) Considerando le distanze minime, (immagine1, pagina 2)
segnare i fori dei tasselli dei supporti variabili a parete,
inserire i tasselli e avvitarli (fare attenzione alla posizione
della vite di fi ssaggio. Deve essere sopra) (immagine 2).
La distanza minima tra i supporti a parete ammonta a 12cm,
quella massima a 40cm. In questo modo Lei riesce a
forare esattamente le fughe delle piastrelle.
immagine.3
immagine.2
b) Fissare il radiatore sul supporto a
parete (immagine 3). L’apparecchio
ha una regolazione dell’angolo priva
di livelli (immagine 5). Girare
semplicemente nella posizione giusta
e fi ssare con le due viti di fi ssaggio
(immagine 4).
immagine.4
immagine.5
L’apparecchiatura va posizionata sul
punto intermedio dei supporti (ossia:
stessa distanza a sinistra e a destra)
(immagine 6).
Le viti di fi ssaggio (immagine 4)
devono essere fi sse per assicurarsi
che l’apparecchiatura non cada
dai supporti.
immagine.6
immagine.6
18
immagine.4
Page 19

ATTIVAZIONE:
Posizione dell‘interruttore : 0 SPENTA
1 300W Il LED lampeggia in rosso (Typ 1912)
2 600W Il LED lampeggia in rosso (Typ 1912)
ATTENZIONE:
L’apparecchiatura non può essere usato da bambini o da persone con limitazioni fisiche,
sensoriali o mentali. Inoltre promuovere l’uso sicuro dell’apparecchiatura da parte di
persone con mancanza di esperienza e/o conoscenze insufficienti in presenza di una
persona che le sorvegli e le istruisca. -Bambini che giocano con l’apparecchiatura.
Deve mettere in funzione l’apparecchiatura in un locale ben arieggiato per ca. 10 minuti
prima del primo uso. Infatti, la sua prima messa in funzione potrebbe causare la formazione
di odori.
Non tocchi l´appareccio durante la funzione e poco dopo (CALORE)
Connettere l´appareccio – si può mettere in servizi.
Attenzione:
Si assicuri che il cavo non abbia contatto con il riscaldatore.
• Installando nel bagno o presso alla doccia si devono rispetare le norme vigenti regionali.
Il riscaldatore deve essere in una posizione di modo che l´interruttore non sia alla portata
dalla vasca di bagno o la doccia
• L’apparecchio non va montato sopra la vasca da bagno!
PULIZIONE:
Prima di pulire l ápparecchio si assicuri che sia spento e freddo. Lo sconnetta.
Pulisca la superficie con un panno secco o leggermente bagnato.
Lasci la pulizione del reflettore e del serpentino bollitore a un esperto della materia.
RIPARAZIONI:
Soltanto un tecnico deve fare riparazioni dell´apparecchio.
19
Page 20

DATI TECNICI:
Voltagio: 230 V
Potenza: 300/600 W
Forma de montaggio: mendiante cavo o fisso
Categoria di sicurezza: 1
Angulo de radiazione: 90°
Raggi infrarossi e distribuzione della temperatura controllati
secondo lo standard dei prodotti medici (IEC601-2-21)
Garantia
Questo apparecchio è fatto di un material di prima classe e con molta accuratezza. Per
questo la ditta Reer si sommette a una garantia di 3 anni a partire dalla data di compra
per tutti i defetti di materiale e fabricazione. Nel caso di un defetto, p.f. riempia la carta di
garantia e si diriga al negoziante.
Non c´è garantia se:
- l´appareccio non è stato utilizzato appropriatamente
- il voltaggio era sbagliato
- si sono fatti ingranamenti inautorizzati
- la carta di garantia non è riempita di forma giusta.
Non dimentichi lo scontrino!
Reer GmbH, Riedwiesenstraße 7, 71229 Leonberg, German
- - - - - - - - - - - - - - - - - - - - - - - - - - - - - - - - - - - - - - - - - - - - - -
Typ: 1911 / 1912
Data de compra:
Timbro e firma del negoziante:
20
Page 21

ESTUFA CAMBIADOR
TYP: 1911 / 1912
INSTRUCCIONES DE USO
Importante:
Lea atentamente las instrucciones de uso
y guardelas para eventuales preguntas.
www.wickeltisch-heizstrahler.de
E
230-50Hz
300/600W
Page 22

Nuestro calefactor de envolvedor produce un calor inmediato encima del envolvedor. Pero
sirve también para calentar rápidamente el cuarto de baño, la habitación para hacer bricolaje,
el vestíbulo, terrazas cerradas y balcones.
Avisos importantes:
• Lea por favor las instrucciones de uso antes de poner en función el aparato.
• Cuando el aparato se usa para calentar el envolvedor, no debe ser jamás sin
supervisión.
• La duración máxima de uso no debe sobrepasar 15 minutos.
• Evite calefacción aparte, como p.e. luz del sol o un radiador, porque si no la
temperatura del cuerpo de su bebé podría subir demasiado.
• Bebés con fiebre o temperatura alta no deben exponerse al calefactor. Hay peligro de
sobrecalentamiento.
• No cubra el calefactor: hay riesgo de incendio.
• No toque las rejas de protección cuando el aparato está en función.
Atención: Siguen calientes luego de apagarse.
Entre calefactor y envolvedor hay que tener una distancia mínima de 100 centímetros.
Montaje:
• El calefactor de envolvedor sólo debe
montarse en posición horizontal y en
una pared – no se admite el montaje
en el techo.
• Se deben respetar las distancias
mínimas con paredes, techo y suelo
como se indican en fig. 1.
• Distancia mínima de 65 cm. con materiales
inflamables, como tejidos, madera etc.!
Hay peligro de incendios.
• No se debe montar debajo de un
enchufe eléctrico.
Typ:1912
El emisor de la calefacción tiene una CONMUTACIÓN AUTOMÁTICA DE TECNOLOGÍA.
El equipo se cambia automáticamente después de 10 Min.
El interruptor automático se conecta automáticamente por otros 10 minutos cuando el
interruptor está en EIN (encendido) en caso de que se vaya la corriente. Compruebe
siempre que el aparato se encuentre en la posición AUS/0 (apagado) después del uso o
una vez transcurrido el tiempo de desconexión.
22
35cm
20cm 20cm
160cm
100cm
Fig.1
techo
distancia mínima
de la tabla
pared
suelo
envolvedor
Page 23

a) Teniendo en cuenta las distancias mínimas (fi g.1, pág 2)
señalar los agujeros para los tacos de los soportes de
pared variables, colocar los tacos y atornillar (controle la
posición del tonillo de fi jación, que debe encontrarse
arriba) (fi g. 2).La distancia mínima entre los soportes de
pared es de 12cm, la distancia máxima es de 40cm. De
esta manera puede taladrar exactamente en las juntas
de los azulejos.
fi g.3
fi g.2
b) Conectar la estufa a los soportes de
pared (fi g.3). El aparato posee un
ajuste del ángulo continuo (fi g.5).
Simplemente girar hasta la posición
deseada y fi jar mediante ambos
tornillos de fi jación (fi g.4).
fi g.4
fi g.4
fi g.5
El aparato debe estar centrado
con respecto a los soportes
(esto es, igual distancia a
derecha e izquierda) (fi g.6).
Los tornillos de fi jación (fi g.4)
deben estar bien apretados para
asegurar que el aparato no se
pueda caer de los soportes.
fi g.6
fi g.6
23
Page 24

PUESTA EN SERVICIO:
Impostación del interruptor: 0 DESCONECTADA
1 300W El indicador LED se ilumina en rojo (Type 1912)
2 600W El indicador LED se ilumina en rojo (Type 1912)
ATENCIÓN:
El aparato no debe ser utilizado por niños o personas con limitaciones físicas, sensoriales
o mentales. Para garantizar el manejo seguro del aparato, las personas con falta de
experiencia o con conocimientos insuficientes deben ser supervisadas e instruidas.
-Niños que juegan con el aparato.
Antes de usar el aparato por primera vez, debe ponerlo en funcionamiento en un lugar bien
aireado durante 10 min. Durante la primera puesta en funcionamiento, el aparato puede
desprender olor.
No toque el aparato durante la función y poco después (CALOR)
Enchufar el aparato – se puede poner en marcha.
Atención:
Asegure que el cable no tenga contacto con el calefactor.
• Al instalarse en un cuarto de baño o ducha se deben respetar las normas vigentes
regionales. El calefactor tiene que estar en una posición de manera que el interruptor
no se alcance desde la bañera o la ducha.
¡El aparato no debe de ser montado sobre la bañera!
LIMPIEZA:
Antes de limpiar el aparato, asegúrese de que esté apagado y frío. Desconéctelo.
Limpie la superficie con un pañuelo seco o ligeramente mojado.
Deje la limpieza del reflector y del serpentín de calefacción a un experto de la materia.
REPARACIONES:
Sólo un experto debe hacer reparaciones del aparato.
24
Page 25

DATOS TÉCNICOS:
Voltaje: 230 V
Potencia: 300/600 W
Forma de montaje: mendiante cable o fijo
Categoría de seguridad: 1
Ángulo de radiación: 90°
Radiación infrarroja y distribución de la temperatura controladas según
el estándard de productos médicos (IEC601-2-21).
Garantía
Este aparato está hecho de un material de primera clase y con mucha diligencia. Por eso
la empresa Reer se somete a una garantía de 3 años a partir de la fecha de compra para
todos los defectos de material y fabricación. Por si se presenta tal defecto, p.f. llene la
tarjeta de garantía y dirígase al negociante.
No hay garantía si:
- el aparato no ha sido utilizado inadecuadamente
- el voltaje no fue el correcto
- se hicieron maniobras inautorizadas
- la tarjeta de garantía no está llenada de forma justa.
No olvide el comprobante!
Reer GmbH, Riedwiesenstraße 7, 71229 Leonberg, German
- - - - - - - - - - - - - - - - - - - - - - - - - - - - - - - - - - - - - - - - - - - - - -
Typ: 1911 / 1912
Fecha de compra:
Sello y firma del negociante:
25
Page 26

BABYCOMMODE VERWARMING
TYPE: 1911 / 1912
Gebruiksaanwijzing
Belangrijk :
Gebruiksaanwijzing aandachtig doorlezen
en bewaren voor latere vragen.
www.wickeltisch-heizstrahler.de
NL
230-50Hz
300/600W
Page 27

Ons straalkacheltje voor boven de aankleedcommode geeft behaaglijke directe warmte in
de omtrek van aankleedcommodes. U kunt hem echter ook voor het snelle opwarmen van
badkamers, hobbyruimtes, hallen, beschutte terrassen en balkons gebruiken.
Belangrijke opmerkingen:
• Lees de gebruiksaanwijzing alstublieft voor het in gebruik nemen aandachtig door.
• Indien u het straalkacheltje voor boven de aankleedcommode gebruikt, mag het
apparaat nóóit zonder toezicht worden gebruikt.
• De maximale bestalingsduur mag de 15 minuten niet overschrijden.
• Vermijd extra warmtestraling zoals bijvoorbeeld zonlicht of andere stralingsbronnen,
want daardoor kan de lichaamstemperatuur van uw kind erg hoog worden.
• Kleine kinderen met een verhoogde lichaamstemperatuur mogen niet bestraald
worden. Er bestaat gevaar van oververhitting van het lichaam.
• Het straalkacheltje voor boven de aankleedcommode dient niet te worden afgedekt!
Er ontstaat brandgevaar.
• Het beschermend traliewerk tijdens gebruik niet aanraken.
Let op: het is zelfs na het uitschakelen nog heet.
De bestralingsafstand van 100 cm tussen het kind en het straalkacheltje moet
te allen tijde worden aangehouden.
Montage:
• Het straalkacheltje voor boven de
aankleedcommode dient slechts op een
vaste plek en horizontaal aan een muur
te worden bevestigd. Het is niet toegestaan
om het straalkacheltje aan het plafond
op te hangen
• De in afb. 1 weergegeven minimale
afstanden ten opzichte van de muren,
het plafond en de vloer moeten worden
aangehouden.
• U dient ten opzichte van brandvattende
materialen (zoals textiel, hout etc.) een
minimale afstand van 65 cm aan te
houden. Er ontstaat anders brandgevaar!
• Het straalkacheltje mag niet onder een
stopcontact worden gemonteerd.
Typ:1912
De het verwarmen zender heeft een AUTOMATISCHE het UITSCHAKELEN TECHNOLOGIE.Het
materiaal schakelt zich automatisch na 10 min. Daadwerkelijke werktijd uit.
Bij stroomuitval of een defecte zekering start de automatische uitschakeling, wanneer de
schakelaar in de stand AAN staat, automatisch voor nog eens 10 minuten.
Controleer steeds of de schakelaar van het apparaat na gebruik of na afloop
van de uitschakeltijd in de positie UIT/0 staat.
27
35cm
20cm 20cm
160cm
100cm
Plafond
Minimum afstand
van de lijst
Afb.1
Zijmuur
Aankleedcommode
Vloer
Page 28

a) Met inachtneming van de minimale afstanden
(afb. 1, pagina 2) de plugboringen van de variabele
wandhouders met potlood markeren, pluggen aanbrengen
en vastschroeven (let op de positie van de fi xeerschroef –
deze moet boven liggen, afb. 2). De minimale afstand tussen
de wandhouders bedraagt 12 cm, de maximale afstand 40 cm.
Zo kunt u exact in de voegen van de tegels boren.
afb.3
afb.2
b) De verwarming op de wandhouder
steken (afb. 3). Het apparaat heeft
een traploze instelling van de hoek
(afb. 5). Eenvoudig in de gewenste
positie draaien en met behulp van
de beide fi xeerschroeven fi xeren (afb. 4).
afb.4
afb.4
afb.5
Het apparaat moet zich in het
midden tussen de houders
bevinden, d.w.z. dezelfde
afstand links en rechts (afb. 6).
De fi xeerschroeven (afb. 4)
moeten stevig aangetrokken
zijn om er zeker van te zijn dat
het apparaat niet uit de houders
valt.
afb.6
afb.6
28
Page 29

INGEBRUIKNAME:
Positie van de schakelaar: 0 UIT
1 300W rode LED brandt (Type 1912)
2 600W rode LED brandt (Type 1912)
ATTENTIE:
Het apparaat mag niet gebruikt worden door kinderen of personen met fysieke, zintuiglijke
of psychische beperkingen. Mensen met een gebrek aan ervaring en / of kennis dienen
worden omtrent het gebruik van het apparaat opgeleid en onderricht om de veilige omgang
van het apparaat te waarborgen. - Kinderen die spelen met het apparaat.
U moet het apparaat voor u het de eerste keer gebruikt met een goede ventilatie van
de ruimte ca. 10 min in werking stellen. Bij het eerste gebruik kan het reukontwikkeling
veroorzaken.
Het apparaat tijdens en enige tijd na gebruik NIET aanraken! (straalt nog hitte uit)
De stekker in het stopcontact stoppen. Het apparaat is nu gereed voor gebruik
Let op: Het snoer nóóit over het apparaat heen voeren!
• Bij het installeren in badkamers of douches dienen de locale voorschriften van de be
treffende instanties in acht te worden genomen. Het straalkacheltje dient zodanig
te worden aangebracht dat het treksnoer niet vanuit het bad of de douche aangeraakt
kan worden.
Niet oben de badkuip monteren!
Reiniging:
Voordat u met het schoonmaken begint, dient u zich
ervan te overtuigen dat het apparaat uit staat en
afgekoeld is (stekker eruit trekken).
Maak de buitenkant met een droge of beetje vochtige doek schoon.
De reflector en de gloeistaaf dienen slechts door een vakman gereinigd te worden.
Reparatie:
Reparaties mogen slechts door een vakman worden uitgeoefend.
29
Page 30

Technische gegevens:
Nominale spanning : 230 V
Vermogen: 300/600 W
Montagewijze kabel in stopcontact of aansluiting aan stroomvoorziening
Beschermingsklasse : 1
Stralingsbereik : 90°
Infraroodstraling en temperatuurverdeling volgens
de standaard van medische producten (IEC601-2-21) getest
Garantie:
Dit apparaat werd met de grootste zorg en intact materiaal vervaardigd. Reer verleent
2 jaar garantie vanaf de aankoopdatum op alle materiaal- en fabricatiemankementen.
Indien u desondanks een dergelijk mankement zou constateren, verzoeken wij u de gele
garantiekaart in te vullen en contact op te nemen met de winkel waar u het apparaat heeft
gekocht.
U heeft geen recht op garantie indien:
- het apparaat niet op de juiste manier wordt benut
- de installatie op verkeerde netspanning wordt aangesloten
- niet geoorloofde reparaties worden uitgevoerd
- de garantiekaart niet correct wordt ingevuld
(s.v.p. copie van de bon niet vergeten)
REER GmbH, Riedwiesenstrasse 7, 71229 Leonberg, Germany
- - - - - - - - - - - - - - - - - - - - - - - - - - - - - - - - - - - - - - - - - - - - - -
Type: 1911 / 1912
Verkoopdatum:
Stempel und handtekening van de winkelier:
30
 Loading...