

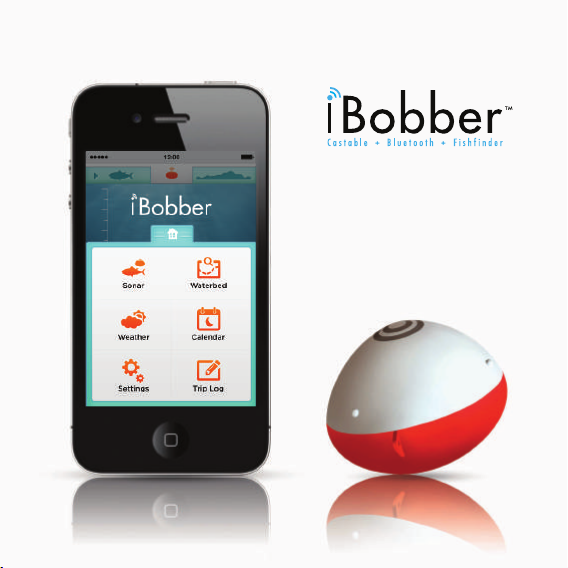
Product
Information
Guide
Fishfinder
PRODUCT INFORMATION GUIDE
Welcome to iBobber™. This guide will show you how to use the iBobber
to make shing more fun than it's ever been.
Please read this guide completely before using iBobber, and retain this
guide for future reference. Follow all instructions. For a downloadable
pdf version of this guide, please go to ReelSonar.com.
INCLUDED IN PACKAGE
iBobber
USB Charger
Carry Pouch
iBobber App Redemption Instructions
If you have any questions, or any items are damaged or missing,
please email info@reelsonar.com.
1

Fishfinder
Table of Contents
2
3 App Redemption
4 Charging the iBobber
6 Quick Overview
9 Settings
10 Personal
11 Syncing iBobber
14 Home
15 Sonar
16 Waterbed Mapping
18 Weather
19 Calendar
20 Trip Log / GPS Tag
22 Sonar Status Dashboard
23 Troubleshooting
25 Firmware Update
26 Warranty
27 Important Safety and Care Information
29 All Other Important Stu
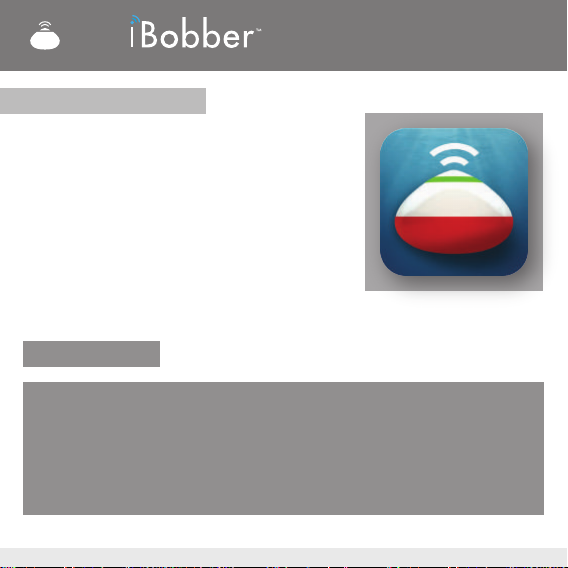
Fishfinder
App Redemption
The iBobber is available for, and syncs with
iPhone 4S, 5, 5C, 5S, iPad 2, 3, Mini and Air.
Note: iBobber is not currently available
for Android phones and tablets.
iPhone / iPad:
From your desktop or iOS device, go to the Apple App store and
search for iBobber or ReelSonar. Once you've found it, download
and install the iBobber App.
Install the app on to your iOS device, and launch the app.
3
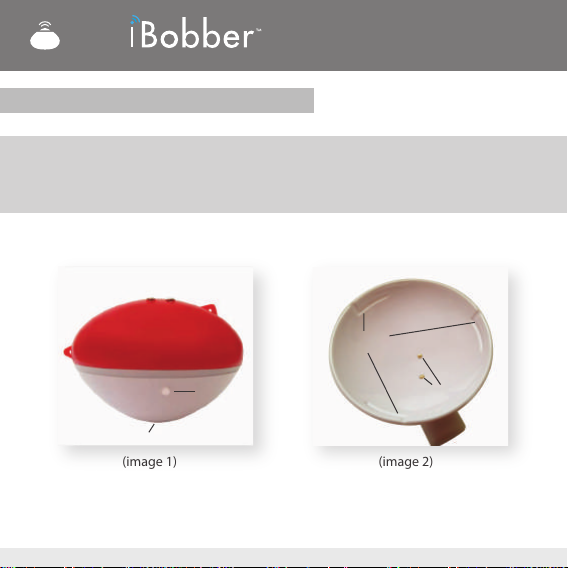
Fishfinder
Charging the iBobber (1 of 2)
Before you rst use the iBobber you'll need to charge it. It's very simple —
just align the "bumps" on the white side of the iBobber (image 1) with the
grooves in the charger cradle (image 2). Go to page 5.
grooves
4
bump
charging tip
(image 1) (image 2)
charging pins
Fishfinder
Charging the iBobber (2 of 2)
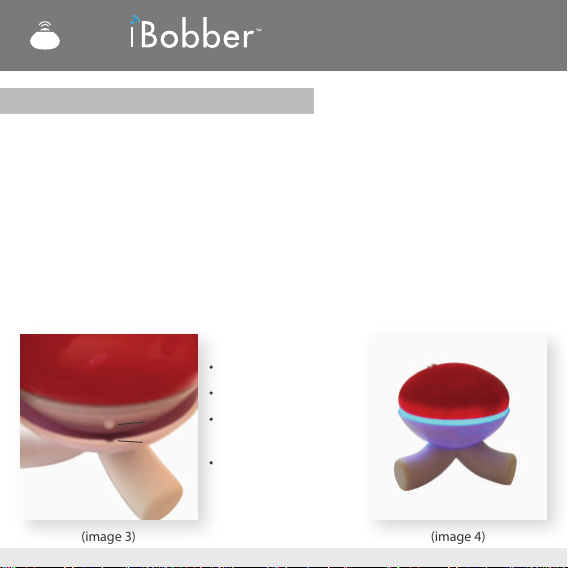
Gently push down the bobber into the charger (image 3) and gently twist
the bobber clockwise so the "bumps" slide horizontally through the grooves.
Plug the charging cable into your computer USB port, or using a USB adapter
into a standard household outlet (U.S.) and charging will start, indicated by a
blue light along the circumference of the iBobber (image 4). The light will
remain on until fully charged, and then will ash indicating a full charge.
Note: When fully charged, the iBobber turns on when disconnected from the
charger and remains on for 10 minutes. This is for when you need to update
the rmware (page 25). Please check for rmware update through the App
when intially charging the iBobber, and update if necessary.
bumps enter grooves
push down gently
bump
groove
(image 3) (image 4)
gently twist clockwise
to lock
unlock gently twist
counter clockwise
blue light = charging
5
Fishfinder
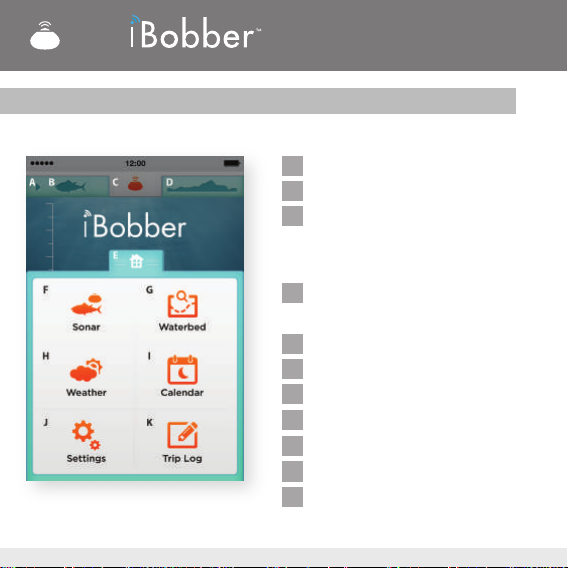
Quick Overview • iBobber App Dashboards / Screens
- Active Indicator (current screen)
A
- Sonar Screen Icon • Tap for Sonar
B
- Sonar Status & iBobber Status /
C
Orange means iBobber is active,
Tap for iBobber status
- Waterbed Mapping Icon • Tap
D
for Waterbed
- Home Dasboard
E
- Sonar Screen
F
- Waterbed
G
- Weather
H
- Calendar
I
- Settings
J
- Trip Log
K
6
Fishfinder
Quick Overview • iBobber App Dashboards / Screens
- iBobber Battery
L
- Water Temperature
M
- Fish Alarm (o/on)
N
- Strike Alarm (o/on/adjustable)
O
- iBobber LED Light (o/on)
P
7
Fishfinder
Quick Overview • iBobber App Dashboards / Screens
Home
This is the rst screen you'll
see. And before you can use
iBobber you'll need to
register it.
If you've avoided the initial
Registration Screen, tap
"Settings."
More on Home Screen and
features to follow.
(image 5)
8
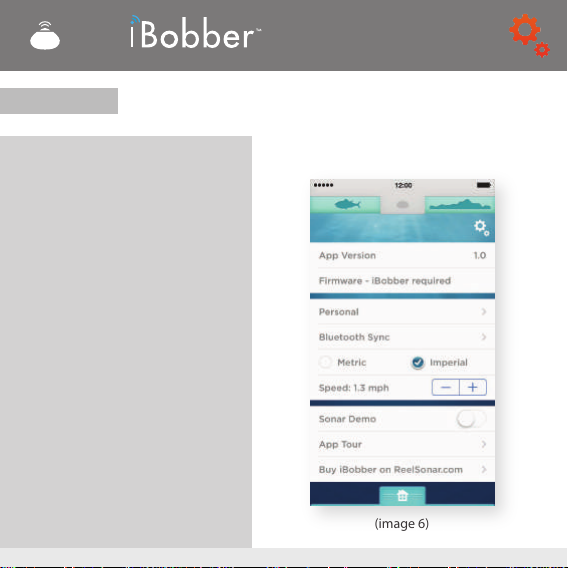
Settings
This is the rst screen of
Settings, and the only one
you need to register.
Choose your measurement
preference (tap a circle):
Imperial in the U.S., Metric
in the rest of the world.
Now tap Personal.
Fishfinder
(image 6)
9

Personal
Tap the nickname
eld and a keyboard
will open (image 8).
Input a nick name by
which you'd like your
bobber to be known,
then touch email and
enter your email
address (image 8).
Tap "Favorite Fish"
and tag all your
favorite sh (image 8).
Tap Save and you're
registered. Now tap
"Back" button.
10
Fishfinder
(image 7) (image 8)
Fishfinder
Syncing iBobber (1 of 3)
On the settings screen is where you sync your iOS device and the
iBobber. The iBobber turns on when it's in the water, so you'll want to be
prepared to sh when you sync it. Here's what you'll need to do when
you're ready to use the iBobber.
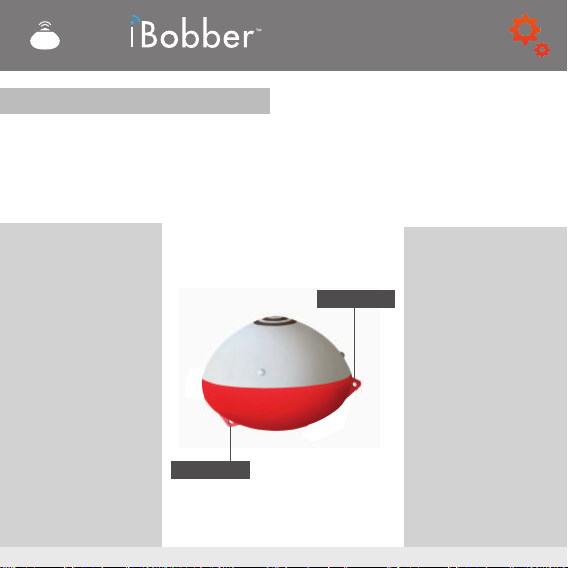
1) Attach the iBobber
to your shing line by
attaching your line
through the higher
of the two attachment points.
We suggest you use a
swivel and make sure
it's locked so the
iBobber doesn't
become separated
from the line. The
lower attachment
point is used to
attach a lure when
shing for small pan
sh.
Attach point
(image 9)
Attach point
2) Place the iBobber
into the water
nearby. The water
will activate the
iBobber, turning it
on. You're now
ready to sync.
Go to page 12.
11

Fishfinder
Syncing iBobber (2 of 3)
3) Tap Bluetooth Sync (image 10).
4) The iBobber will appear on your device, listed by its nickname. Tap the
circle next to your iBobber nickname (image 11). When the connection is
made, the Sonar icon in the top navigation between the sh and
waterbed sihouettes will turn orange (image 12). You're now ready to
nd sh up to 100' away. Note: Bluetooth ball continues to spin.
(image 10) (image 11) (image 12)
12

Fishfinder
Syncing iBobber (3 of 3)
Note 1:
The rst time you use the iBobber you'll pair the iBobber (nickname)
with your phone. If you and a bunch of friends are syncing for the rst
time, you'll need to do it separately — cast yours into the water, sync,
then your pal casts his, syncs, then another friend cast his, etc.
After your rst sync, your iBobber/app remembers your nickname so
activating the iBobbers together is not an issue.
Note 2:
While your phone will remember your iBobber, and your friends phone
will remember his iBobber, if you're out and forget your phone, or vice
versa, you can connect with your friends iBobber, or his with yours.
However, when connected to his, you won't be able to connect with his,
etc. Only one iBobber connects at a time to a device.
Note 3:
When fully charged, the iBobber turns on when disconnected from the
charger and remains on for 10 minutes. This is for when you need need
to update the rmware (page 25)
13

Home
This is your control center.
Open it by tapping Home
icon (little house).
Tap again and the home
screen will close.
From here you'll access:
Sonar, Weather, Settings,
Waterbed Mapping, Calendar,
14
Fishfinder
(image 13)

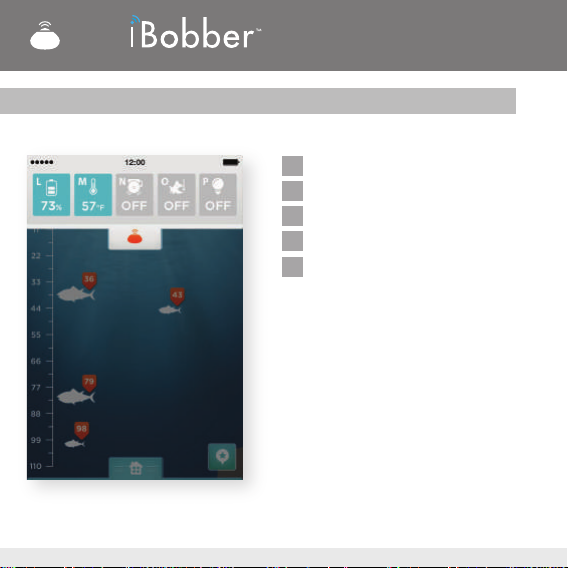
Sonar
Tap the Sonar icon to get
to the Sonar screen.
Fish are tagged with their
depth, and a depth gauge
is on the left.
The bottom of the screen
reects the waterbed
contour.
Note: Where you are in the
app, Sonar, is indicated by
the green sh in the left /
top navigation, with an
arrow indicating to it.
Note: the GPS Tag in the
lower right of the screen.
Tap to log your GPS
position and send it to the
trip log.
Fishfinder
(image 14)
15

Waterbed Mapping (1of 2)
Tap either Waterbed Mapping
Icon on the Home Screen or if
you're on the Sonar Screen, tap
the Waterbed silhouette (right /
top navigation).
Note: when you're in Waterbed
Mapping a green arrow points
to the Waterbed Silhouette
(image 15).
Once in Waterbed Mapping, the
CAST iBOBBER screen appears
(image 15) and you'll cast the
iBobber up to 100' away.
When you're ready to map the
waterbed contour between the
iBobber and you, tap OK (image
15). A count to three appears
(image 16) to nalize preparation. Go to page 17.
16
Fishfinder
(image 15)
(image 16)

Waterbed Mapping (2 of 2)
Once the count ends, the
Screen changes to REEL IN
iBOBBER. Reel in the iBobber,
slow and steady — you're now
mapping the waterbed
contour.
When you're done, tap OK
(image 17).
A map of the waterbed
contour will now appear with a
depth gauge on the left, and a
distance measurement along
the bottom (image 18).
Note: GPS Tag button in the
upper right. Tap to log your
GPS position, and send it to
the trip log.
Fishfinder
(image 17)
(image 18)
17

Weather
Tap either Weather icon on the
Home Screen, or from Water
bed Mapping tap the Sonar
icon (green sh / top navigation) then tap Home (little
house), then tap Weather icon.
You'll see the Weather —
Current Temperature, Daily
High/Low, Precipitation %,
Wind Speed/Direction,
Barometric Pressure.
18
Fishfinder
(image 19)

Calendar
Tap either Calendar
Icon on the Home
Screen, or from
Waterbed Mapping
tap Sonar (green sh).
Then tap Home icon,
then tap Weather
icon.
You'll see the
Calendar and Moon
phases by month
(image 20).
Tap today's date to
see Moon Rise, Moon
Set and Sun Rise and
Sunset (image 21).
Fishfinder
(image 20) (image 21)
19

Fishfinder
Trip Log / GPS Tag (1 of 2)
Tap either the Trip Log icon on the Home Screen, or from Waterbed
Mapping tap Sonar (green sh). Then tap Home icon, then tap the Trip
Log icon. You'll see the Trip Log (image 22). If you've tapped a GPS Tag on
any screen, Date, Time, and Location will have auto-lled (image 23). If
not, to Log a location/trip, tap the GPS icon just below the Sonar icon on
the top left of the screen (image 22). Now, touch the Title eld and a
keyboard will open. Enter the title of your adventure and the rest of the
elds, tapping one at a time to enter info you wish to save (images 23-24,
and 25-26 on next page). Tap Done when nished. Go to page 21.
(image 22) (image 23) (image 24)
20

Fishfinder
Trip Log / GPS Tag (2 of 2)
To Share via text, email, Twitter or Facebook (image 27), just tap the Share
Arrow next to the trip log icon to share.
Note: Tap Location to open the map detail associated with your GPS Tag.
(image 25) (image 26) (image 27)
21

Fishfinder
Sonar Status Dashboard
The Sonar status icon doubles as the access for the iBobber Status. Tap
the Sonar icon and the dashboard opens to reveal (from L to R) iBobber
Battery Indicator, Water Temperature, Sonar Fish Alarm (tap to turn
on/o), Strike Alarm (tap to turn on/o. Double tap to adjust sensitivity),
and iBobber light (tap to turn on/o). Tap the Sonar icon again, and the
dashboard closes.
(image 28) (image 29)
22

Fishfinder
Troubleshooting (1 of 2)
Q-1: Trouble Syncing to iBobber?
A-1: First, the iBobber may simply be powered o. It automatically
powers on when it connects with water. Note: When fully charged, the
iBobber turns on when disconnected from the charger and remains on
for 10 minutes. This is for when you need need to update rmware (page
25). Cast the iBobber into the water you're shing, or immerse it in any
other water (glass, sink, bathtub) and the iBobber sync should be visible
in Settings > Bluetooth Sync >.
A-2: The battery in the iBobber may be low. Recharge the iBobber in the
USB charger. Wait until it the iBobber is charged and you can return to
syncing the iBobber.
A-3
: The iBobber may not sync with your mobile device or tablet because
of a Bluetooth issue with your device. Completely shut o and restart
your device. This will clear the Bluetooth cache and should allow iBobber
to connect. You may need to do this a few times.
A-4: The iBobber may be too far from your mobile device (more than
100') or waves might be periodically blocking the Bluetooth signal, or
there may be obstructions in the way of the signal. Try reducing the
distance or remove the obstructions and you should be able to sync.
23

Fishfinder
Troubleshooting (2 of 2)
Q-2: Intermittent sonar view?
A-1
: You may be reeling in the iBobber at too great a speed, causing it to
"jump" on top of the water. Slow down the reeling of the iBobber.
1.3mph is recommended.
A-2: The iBobber may be too far from your mobile device (more than
100') or waves might be periodically blocking the Bluetooth signal,
or there may be obstructions in the way of the signal. Try reducing the
distance or remove the obstructions and you should be able to sync.
Q-3: Error Message accessing Calendar or Weather - Turn on iBobber
Location Service to allow us to determine your location.
A: The app requires a connection to the internet to fully operate. In your
mobile device settings, just enable location services for the iBobber as
well as cellular service. If this is not a solution, you may no longer in the
coverage zone of these services. Return to the coverage zone and try
again.
Q: The Map is blank, displaying only my current and saved locations.
A: Please refer to the answer for Q-3.
Q: Not able to Share from the Trip Log.
A: Please refer to the answer for Q-3.
24

Fishfinder
Firmware Update
Firmware updates provide improved performance for the iBobber. Here's
how to update the rmware in the iBobber.
1) Make sure you have the latest version of the iBobber App and that the
iBobber is fully charged.
2) Firmware updates require an internet connection. So make sure you
have an active internet connection, either Wi-Fi or 3G/4G. And that
cellular services for the iBobber is activated in your device settings.
3) Wet the iBobber and open Settings in the app. Tap Bluetooth Sync and
sync via bluetooth. Tap the Back button. If there's a green icon next to
Firmware Update it means that a rmware update is available. To update
tap the icon. The rmware update should begin automatically. Please
follow instructions on the screen. The update should take less than 5
minutes, and once completed the iBobber is ready to nd sh.
25

Fishfinder
1-YEAR LIMITED WARRANTY
This iBobber, as supplied and distributed by ReelSonar, Inc., and
delivered new, in the original carton to the original customer purchaser,
is warranted by ReelSonar, Inc. against manufacturing defects in
materials and workmanship for a period of 1 year. ReelSonar, Inc. will
repair or replace this product, at our option and at no charge with new
or reconditioned parts, if found to be defective during the limited
warranty period specied above.
In the case of a manufacture or workmanship defect, please contact us
at ReelSonar.com. If found to be a manufacture or workmanship defect
you will be issued a Return Authorization (RA) number, and instructions
for shipping. We do not accept returns without the RA number.
Purchaser is responsible for shipping to us. We will pay for the shipping
to you.
26

Fishfinder
IMPORTANT SAFETY AND CARE (1 of 2)
After use, wipe the iBobber and USB Charger with a clean, dry cloth and
store dry in the pouch provided. The iBobber brass pins on the bottom
must be rinsed with fresh water after exposure to salt water to prevent
corrosion. Do not place the iBobber in a wet area or on a metal surface
when not in use as water activates the iBobber. The iBobber could be
activated without your knowledge, draining the battery.
Keep the iBobber within acceptable temperatures. Operate and store
where the temperature is 0°F and 125°F. Keep away from heat and ame
sources such as heaters, stoves, radiators and other sources that
generated heat or ames. Do not store the iBobber in temperatures
above 125ºF.
iBobber should never be used as a navigational aid to prevent boat or
water craft damage, grounding, or personal injury. Use as a navigational
aid will void the warranty.
To reduce the risk of damage or injury, and to keep warranty compliant,
do not open the iBobber or the USB Charger. Never service the iBobber
yourself.
27

Fishfinder
IMPORTANT SAFETY AND CARE (2 of 2)
Never abuse, puncture, or step on the iBobber. This can damage the
exterior shell, compromise the waterproofness, render it inoperable, and
void the warranty.
Never place anything but the iBobber in the USB charger. Placing coins
or metal into the charger could cause those objects to heat and burn on
contact with skin.
Never cast iBobber in dangerous, hazardous, or areas where shing is not
permitted. Never cast iBobber into rocks.
Never use iBobber if the exterior shell has been compromised. Contact
reelsonar.com.
Always try to keep iBobber in sight when it's on the water. At night, use
the built-in light to ash the iBobber location.
Periodically examine iBobber for potential hazards such as a cracked or
damaged exterior shell.
28

Fishfinder
BATTERY WARNING
The iBobber contains a sealed, rechargeable Lithium Polymer battery.
Lithium Polymer batteries are extremely hazardous and liable to cause
serious injuries to persons or property. The user accepts liability for the use
of a Lithium Polymer battery. As the manufacturer and the distributor
cannot ensure the battery is used correctly (charging,discharging, storage,
etc.), they cannot be held liable for damages caused to persons or property.
In the event of battery leakage, avoid the liquid coming into contact with
skin and eyes. In case of contact with the skin, wash copiously with soap
and water. In case of contact with the eyes, rinse copiously with cold water
and consult a doctor. If you notice a suspicious smell or noise or observe
smoke around the iBobber or USB Charger, disconnect them immediately.
Never clean the iBobber charging pins with a solvent, denatured alcohol, or
other ammable solvents. Non-compliance with the instructions could
result in gas being given o, re, electric shock or an explosion.
BATTERY • iBOBBER DISPOSAL
Discarding iBobber and its batteries in your general household waste can
be harmful to the environment. Damaged or unusable iBobbers must be
disposed of in a container specially reserved for this purpose. When
disposing of the iBobber/battery, follow appropriate local guidelines and
regulations. For further information contact your local solid waste
authority.
29

Fishfinder
Software License
Use of iBobber is subject to the ReelSonar Software License Agreement found
at: ReelSonar.com.
Exclusions and Limitations (1of 2)
This warranty covers the normal and intended use of iBobber. It applies only
to the hardware product "iBobber" manufactured by or for ReelSonar, Inc.
that can be identied by the "ReelSonar" trademark, trade nameor logo
axed to it. The Limited Warranty does not apply to any non-ReelSonar
hardware product or any software, even if packaged or sold with the iBobber
hardware product. Refer to the software license agreement accompanying
the software for details of your rights with respect to its use. ReelSonar, Inc.
does not warrant that the operation of iBobber will be uninterrupted or
error-free. ReelSonar is not responsible for damage arising rom failure to
follow instructions relating to iBobber's use. This warranty does not apply to:
a) consumable parts, such as batteries, or protective coatings designed to
diminish over time unless failure has occurred due to a defect in materials or
workmanship; (b) damage caused by use with non-iBobber products; (c)
damage caused by accidents, misuse, abuse, neglect, misapplication, re;
lightning or other acts of nature; incorrect electrical line voltage, uctuations
or surges; damage caused by improper installation; product alteration or
modication; improperor unauthorized repair; exterior nish or cosmetic
damage; (d) damage caused by operating iBobber outside the intended
uses described by ReelSonar; (~defects caused by normal wear and tear or
otherwise due to the normal aging of the iBobber product.
30

Fishfinder
Exclusions and Limitations (2 of 2)
THERE ARE NO EXPRESS WARRANTIES OTHER THAN THOSE LISTED AND DESCRIBED
ABOVE, AND NO WARRANTIES WHETHER EXPRESS OR IMPLIED, INCLUDING, BUT NOT
LIMITED TO, ANY IMPLIED WARRANTIES OF MERCHANTABILITY OR FITNESS FOR A
PARTICULAR PURPOSE AND WARRANTIES AGAINST HIDDEN OR LATENT DEFECTS,
SHALL APPLY AFTER THE EXPRESS WARRANTY PERIOD STATED ABOVE, AND NO
OTHER EXPRESS WARRANTY OR GUARANTEE GIVEN BY ANY PERSON, FIRM OR
CORPORATION WITH RESPECT TOTHIS PRODUCT SHALL BE BINDING ON REELSONAR,
INC. EXCEPT AS PROVIDED IN THIS WARRANTY AND TO THE MAXIMUM EXTENT
PERMITIED BY LAW, REELSONAR, INC. IS NOT RESPONSIBLE FOR LOSS OF REVENUE OR
PROFITS, FAILURE TO REALIZE SAVINGS OR OTHER BENEFITS, LOSS OF OPPORTUNITY,
LOSS OF GOODWILL, LOSS OF REPUTATION, LOSS OF, DAMAGE TO, COMPROMISE OR
CORRUPTION OF DATA, OR ANY OTHER SPECIAL, INCIDENTAL OR CONSEQUENTIAL
DAMAGES CAUSED BY THE USE, MISUSE OR INABILITY TO USE THIS PRODUCT, OR
ANY BREACH OF ANY WARRANTY OR CONDITION REGARDLESS OF THE LEGAL
THEORY ON WHICH THE CLAIM IS BASED, AND EVEN IF REELSONAR, INC. HAS BEEN
ADVISED OFTHE POSSIBILITY OF SUCH DAMAGES. NOR SHALL RECOVERY OF ANY
KIND AGAINST REELSONAR, INC. BE GREATER IN AMOUNT THAN THE PURCHASE
PRICE OF iBOBBER. WITHOUT LIMITING THE FOREGOING, PURCHASER ASSUMES ALL
RISK AND LIABILITY FOR LOSS, DAMAGE OR INJURY TO PURCHASER AND
PURCHASER'S PROPERTY AND TO OTHERS AND THEIR PROPERTY ARISING OUT OF
THE USE, MISUSE OR INABILITY TO USE THIS PRODUCT SOLD BY REELSONAR, INC.
NOT CAUSED DIRECTLY BYTHE GROSS NEGLIGENCE OF REELSONAR, INC. THIS
LIMITED WARRANTY IS NONTRANSFERABLE AND STATES YOUR EXCLUSIVE REMEDY.
Some states do not allow limitations on how long an implied warranty lasts, or the
exclusion or limitation of incidental or consequential damages, so the above limitations
or exclusions may not apply to you. This warranty gives you specic legal rights and you
may also have other rights, which vary from state to state.
31

Fishfinder
Governing law and Arbitration
This Limited Warranty shall be governed by the laws of the State of
Washington without giving eect to any conict of laws principles that
may provide the application of the law of another jurisdiction. Any claim
or dispute in connection with this Limited Warranty shall be resolved in a
cost eective manner through binding non-appearance-based arbitration. The arbitration shall be initiated through an established alternative
dispute resolution provider mutually agreed upon by the parties. The
alternative dispute resolution provider and the parties must comply with
the following rules;
a) the arbitration shall be conducted by telephone, online and/or be
solely based on written submissions, the specic manner shall be chosen
by the party initiating the arbitration; b) the arbitration shall not involve
any personal appearance by the parties or witnesses unless otherwise
mutually agreed by the parties; and c) any judgment on the award
rendered by the arbitrator may be entered in any court of competent
jurisdiction. If the foregoing arbitration clause does not apply for any
reason, you agree to submit to the personal jurisdiction of the state
courts located within King County, Washington and the federal courts in
Seattle, Washington for the purpose of litigating all such claims or
disputes, which courts shall have exclusive jurisdiction of such claims or
disputes.
Notwithstanding the foregoing, ReelSonar, Inc. may seek injunctive or
other equitable relief to protect its intellectual property rights in any
court of competent jurisdiction.
32

Fishfinder
Changes to this Product Information Guide
The explanations and specications In this guide are given for information only and may be modied at any time without prior notice. The latest
version of this guide will be available from our website at ReelSonar.com.
The explanations and specications contained in this guide are correct at
the time of printing. ReelSonar, Inc. reserves the right to arrend or
improve the product design or user guide without any restrictions and
without any obligation to notify users. As part of our ongoing eort to
upgrade and improve our products. the product that you have purchased
may therefore dier slightly from the model described in this guide.
33

Fishfinder
End of Life Product Disposal
At end of life of iBobber and USB Charger, please do not dispose of these
products in your general household waste. Instead, in order to prevent
possible harm to the environment or human health from uncontrolled
waste disposal, please dispose of this product separately in accordance
with your local laws and regulation. For more information on the separate
collection systems for waste electrical and electronic equipment that are
available for consumers, near your home, free of charge, please contact
your local municipality authority. You can also contact the retailer from
which you purchased your iBobber - they might have put in place
recycling services or they may be part of a specic recycling program.
Packaging iBobber & USB Charger
Please separate paper from
plastic for recycling
34
Please separate plastic from
paper for recycling

Fishfinder
FCC WARNINGS
Changes or modications not expressly approved by the party responsible for compliance could void the
user’s authority to operate the equipment.
This equipment has been tested and found to comply with the limits for a Class B digital device, pursuant
to Part 15 of the FCC Rules. These limits are designed to provide reasonable protection against harmful
interference in a residential installation. This equipment generates uses and can radiate radio frequency
energy and, if not installed and used in accordance with the instructions, may cause harmful interference
to radio communications. However, there is no guarantee that interference will not occur in a particular
installation. If this equipment does cause harmful interference to radio or television reception, which can
be determined by turning the equipment o and on, the user is encouraged to try to correct the
interference by one or more of the following measures:
- Reorient or relocate the receiving antenna.
- Increase the separation between the equipment and receiver.
- Connect the equipment into an outlet on a circuit dierent from that to which the receiver is connected.
- Consult the dealer or an experienced radio/TV technician for help.
FCC Radiation Exposure Statement
The antennas used for this transmitter must be installed to provide a separation distance of at least 20 cm
from all persons and must be co‐located for operating in conjunction with any other antenna or
Canada:
This device complies with Industry Canada licence-exempt RSS standard(s). Operation is subject to
the following two conditions: (1) this device may not cause interference, and (2) this device must
accept any interference, including interference that may cause undesired operation of the device.
Le présent appareil est conforme aux CNR d’Industrie Canada applicables aux appareils radio
exempts de licence. L’exploitation est autorisée aux deux conditions suivantes : (1) l’appareil ne doit
pas produire de brouillage, et (2) l’utilisateur de l’appareil doit accepter tout brouillage radioé
lectrique subi, même si le brouillage est susceptible d’en compromettre le fonctionnement.
35

Fishfinder
APPLE
"Syncs with iPhone," and "Syncs with iPad" means that iBobber and the
iBobber app have been designed to connect specically to iPhone, or
iPad, respectively, and has been certied by the developer to meet Apple
performance standards. Apple is not responsible for the operation of this
device or its compliance with safety and regulatory standards. Please
note that the use of this accessory with iPhone, or iPad may aect
wireless performance. iPad, and iPhone are trademarks of Apple Inc.,
registered in the U.S. and other countries.
The Bluetooth word mark and logos are owned by the Bluetooth SIG,Inc.
and any use of such marks by ReelSonar,Inc. is underlicense.
Android™
Android™ is a trademark of Google Inc. Use of this trademark is subject to
GooglePermissions. Not all devices compatible. Check at ReelSonar.com
Software
Your ReelSonar, Inc. product can connect with special ReelSonar
copyrighted software to control its operation. Parts of this software may
contain copyrighted elements that are licensed under the GPL, MIT, and
Creative Common licenses among others. Additionally, your ReelSonar,
Inc. product contains proprietary rmware developed and copyrighted
by ReelSonar, Inc.
Copyright
Copyright© 2013 ReelSonar,Inc. All RightsReserved. Patents Pending.
36

®
iBobber™ is a trademark of ReelSonar, Inc.
©2013 ReelSonar, Inc. Seattle, WA
All rights reserved. Patents Pending
Customer Support • ReelSonar.com
Custom built in China. Designed by ReelSonar in Seattle.
"Syncs with iPhone," and "Syncs with iPad" means that iBobber and the iBobber
app have been designed to connect specifically to iPhone, or iPad, respectively, and
has been certified by the developer to meet Apple performance standards. Apple is
not responsible for the operation of this device or its compliance with safety and
regulatory standards. Please note that the use of this accessory with iPhone, or iPad
may affect wireless performance. iPad, and iPhone are trademarks of Apple Inc.,
registered in the U.S. and other countries. The Bluetooth word mark and logos are
owned by the Bluetooth SIG,Inc. and any use of such marks by ReelSonar,Inc. is
under license. Android™ is a trademark of Google Inc. Use of this trademark is
subject to GooglePermissions. Not all devices compatible. Check www.ReelSonar.com
IC: 11845A-IBOBBER
FCC ID: SGG- IBOBBER
MSRP $99.99
 Loading...