

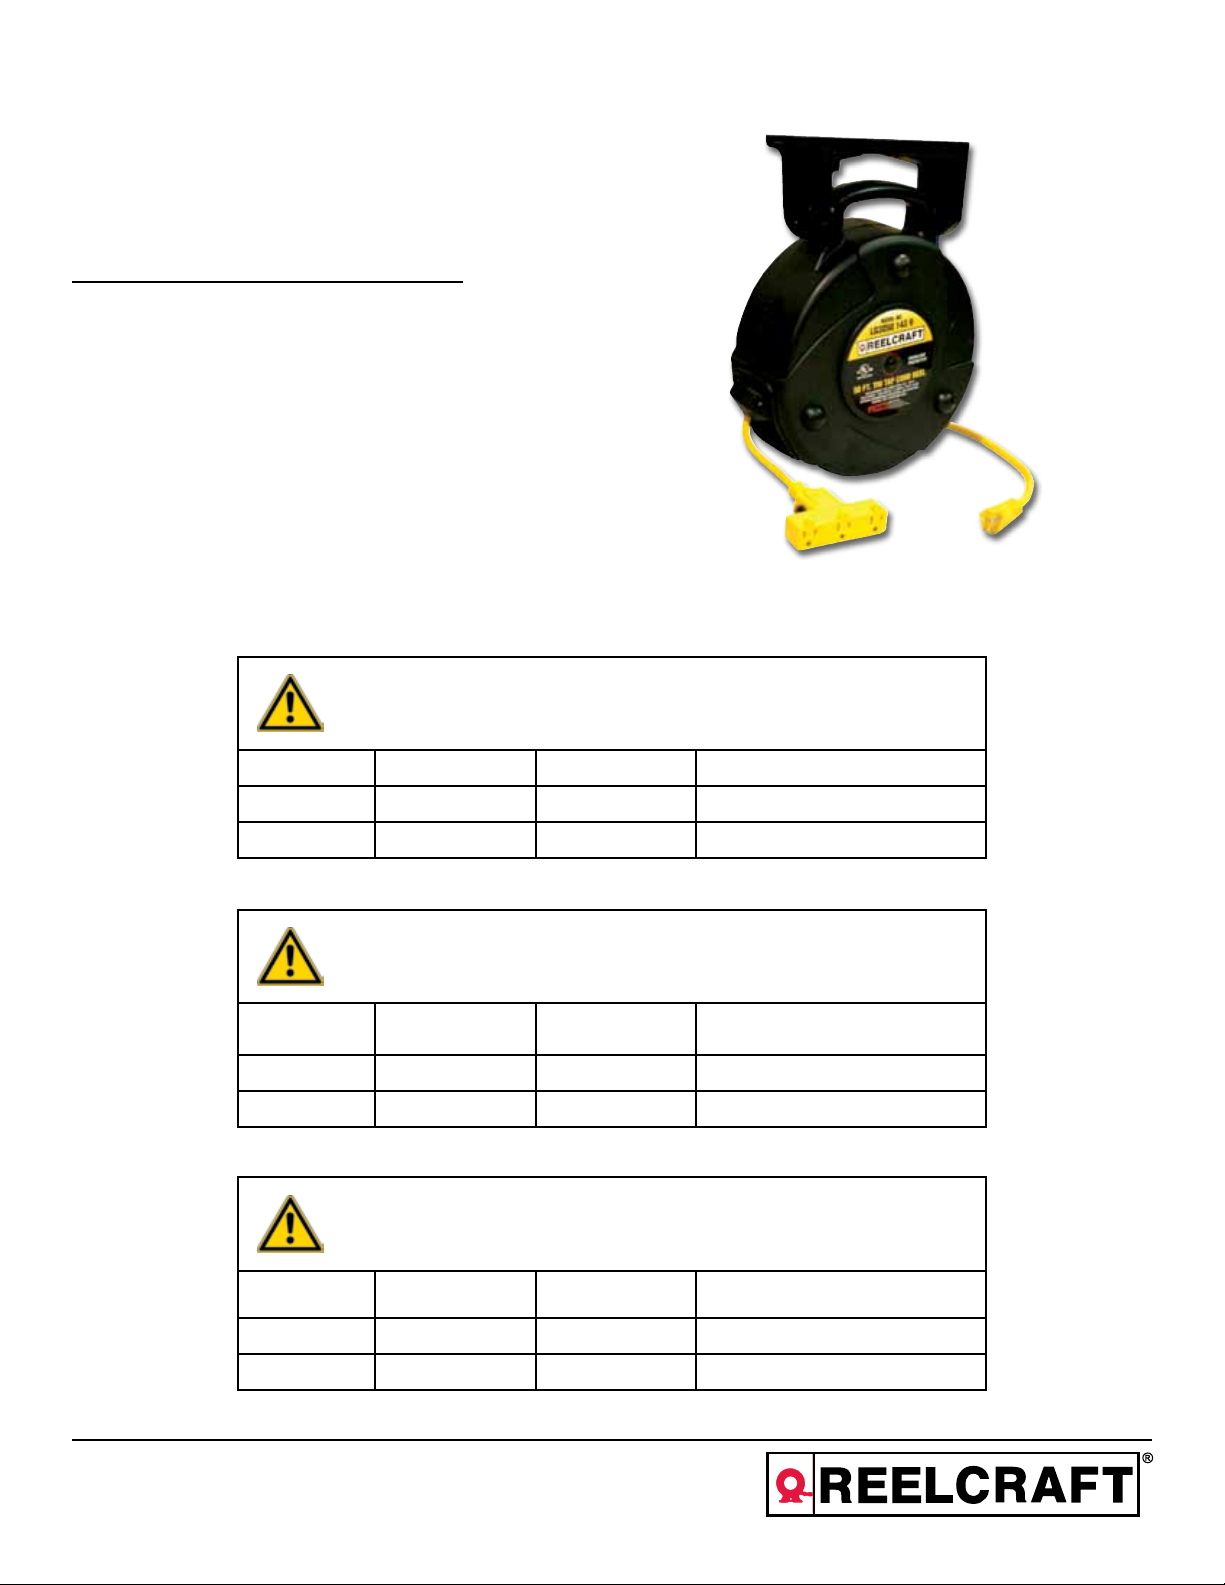
ReelCraft LG3040 123 9, LG3050 143 9 Owner's Instructions Manual
Operating Instructions
Spring Driven Power Cord Reels
Model Numbers:
LG3040 123 9 LG3050 143 9
ELECTRICAL RATINGS
WARNING: DO NOT OVERLOAD! Check the amperages of the tools or appliances to
be plugged into the outlets of the extension cord reel. Listed below are the maximum
amperage ratings.
Model Cord Length Cord Type / Gauge Maximum outlet rating
LG3040 123 9 40FT 12/3 SJTW 125V, 15AMP, 1875 Watts
LG3050 143 9 50FT 14/3 SJTW 125V, 13AMP, 1625 Watts
SPECIFICATION ELECTRIQUE
AVISO - NO SOBRECARGAR! Verifique los amperajes de las herramientas o de las
aplicaciones que se utilizarán antes de proceder con el uso del accesorio. Se enumera
abajo el grado máximo del amperaje para esta unidad.
Modelo Longitud de cable
LG3040 123 9 12m (40 Pies) 12/3 SJTW 125V, 15AMP, 1875 Watts
LG3050 143 9 15m (50 Pies) 14/3 SJTW 125V, 13AMP, 1625 Watts
Tipo de Cordon /
Calibre
Capacidad de Maximo
NOMINAL ELECTRIQUE
AVERTISEMENT: NE PAS SURCHARGER! Vérifiez l’ampérage des outils ou des ap-
pareil afin de se brancher la prise de dévidoir à cordon d’extension. Cidessous inscrits
sont les ratings de l’ampérage maximum..
Modèle Longueur
LG3040 123 9 12m (40 Pies) 12/3 SJTW 125V, 15AMP, 1875 Watts
Type de Cordon /
Calibre
Calibre total Max. du cordon
LG3050 143 9 15m (50 Pies) 14/3 SJTW 125V, 13AMP, 1625 Watts
Reelcraft Industries, Inc. • 2842 E Business Hwy 30, Columbia City, IN 46725
Ph: 800-444-3134 / 260-248-8188 • Fax: 800-444-4587 / 260-248-2605
Customer Service: 855-634-9109 • reelcraft@reelcraft.com • www.reelcraft.com
Rev: 11/2012
Spring Driven Power Cord Reel
Owner’s Instructions
Retractable Industrial
Extension Cord Reel
CAUTION: Read all instructions and warnings before operating!
SAVE THESE INSTRUCTIONS! READ ALL INSTRUCTIONS!
WARNING: To avoid serious injury or death from
electrical shock or fire.
1. DO NOT handle this fixture or try to plug it in when your hands are
wet or damp or when you are standing on a wet or damp surface or
in water.
2. This fixture MUST ALWAYS BE USED in accordance with all electri-
cal and safety codes and ordinances, including the most recent
National Electric Code (NEC) and with the Occupational Safety and
Health Act (OSHA) Volume 1 on General Industry Standards and
Interpretations.
3. ALWAYS make certain that the power source conforms to the
requirements on the fixture.
4. ALWAYS disconnect the power before servicing or inspecting the
fixture for any reason.
5. This fixture is ONLY FOR USE ON 110-125V and is equipped with
an approved 3 conductor cord with a 3-prong, grounded plug.
TO REDUCE THE RISK OF ELECTRICAL SHOCK, it should only be
plugged into a properly grounded 3-prong outlet.
6. FIXTURE IS NOT WATERPROOF and is not intended for use in showers, saunas or in potentially wet locations. ALWAYS keep this fixture
away from sinks, tubs, showers, etc. NEVER attempt to pick up
plugged-in power tools or appliances should they fall into standing
water. Fatal electrocution could result!
7. This fixture comes equipped with a 3-prong grounded plug. DO NOT
remove the 3rd prong or otherwise try to modify the plug. If it will
not fit the outlet, have the proper outlet installed by a qualified electrician. Improper connection of the grounding conductor can result
in a risk of electrical shock.
8. NEVER attempt to plug the fixture into a non-grounded outlet or
extension cord and ALWAYS be sure that the extension cord is in
good electrical condition.
9. This fixture is intended for use as a general indoor power source. DO
NOT use in potentially dangerous locations, such as in flammable or
explosive atmospheres.
10. Keep away from heating vents, radiators, or other sources of heat.
11. KEEP OUT OF REACH OF CHILDREN.
OPERATION
Plug power cord into any 110-125V standard wall outlet. Plug up to three
(3) electrical appliances into the Triple-Tap outlet. Pull cord out to desired
length and stop. If cord does not hold, continue to pull cord slowly, stopping every four inches. This will engage lock. To retract, pull cord out 2 to
4 inches and guide the cord slowly back into the reel.
NOTE:
1. Outlets are energized at all times. DO NOT OVERLOAD!
2. DO NOT pull on cord after cord is fully extended.
CAUTION: TO AVOID POSSIBLE INJURY - Do not allow cord to fly back
into the reel unrestricted. Guide cord slowly back into the reel.
CIRCUIT BREAKER OVERLOAD PROTECTION
The reset button for the circuit breaker is located on the side of tri-tap.
If unit is overloaded circuit breaker will trip (black reset button will pop
out). Remove overload, wait two minutes, then reset by pressing black
button.
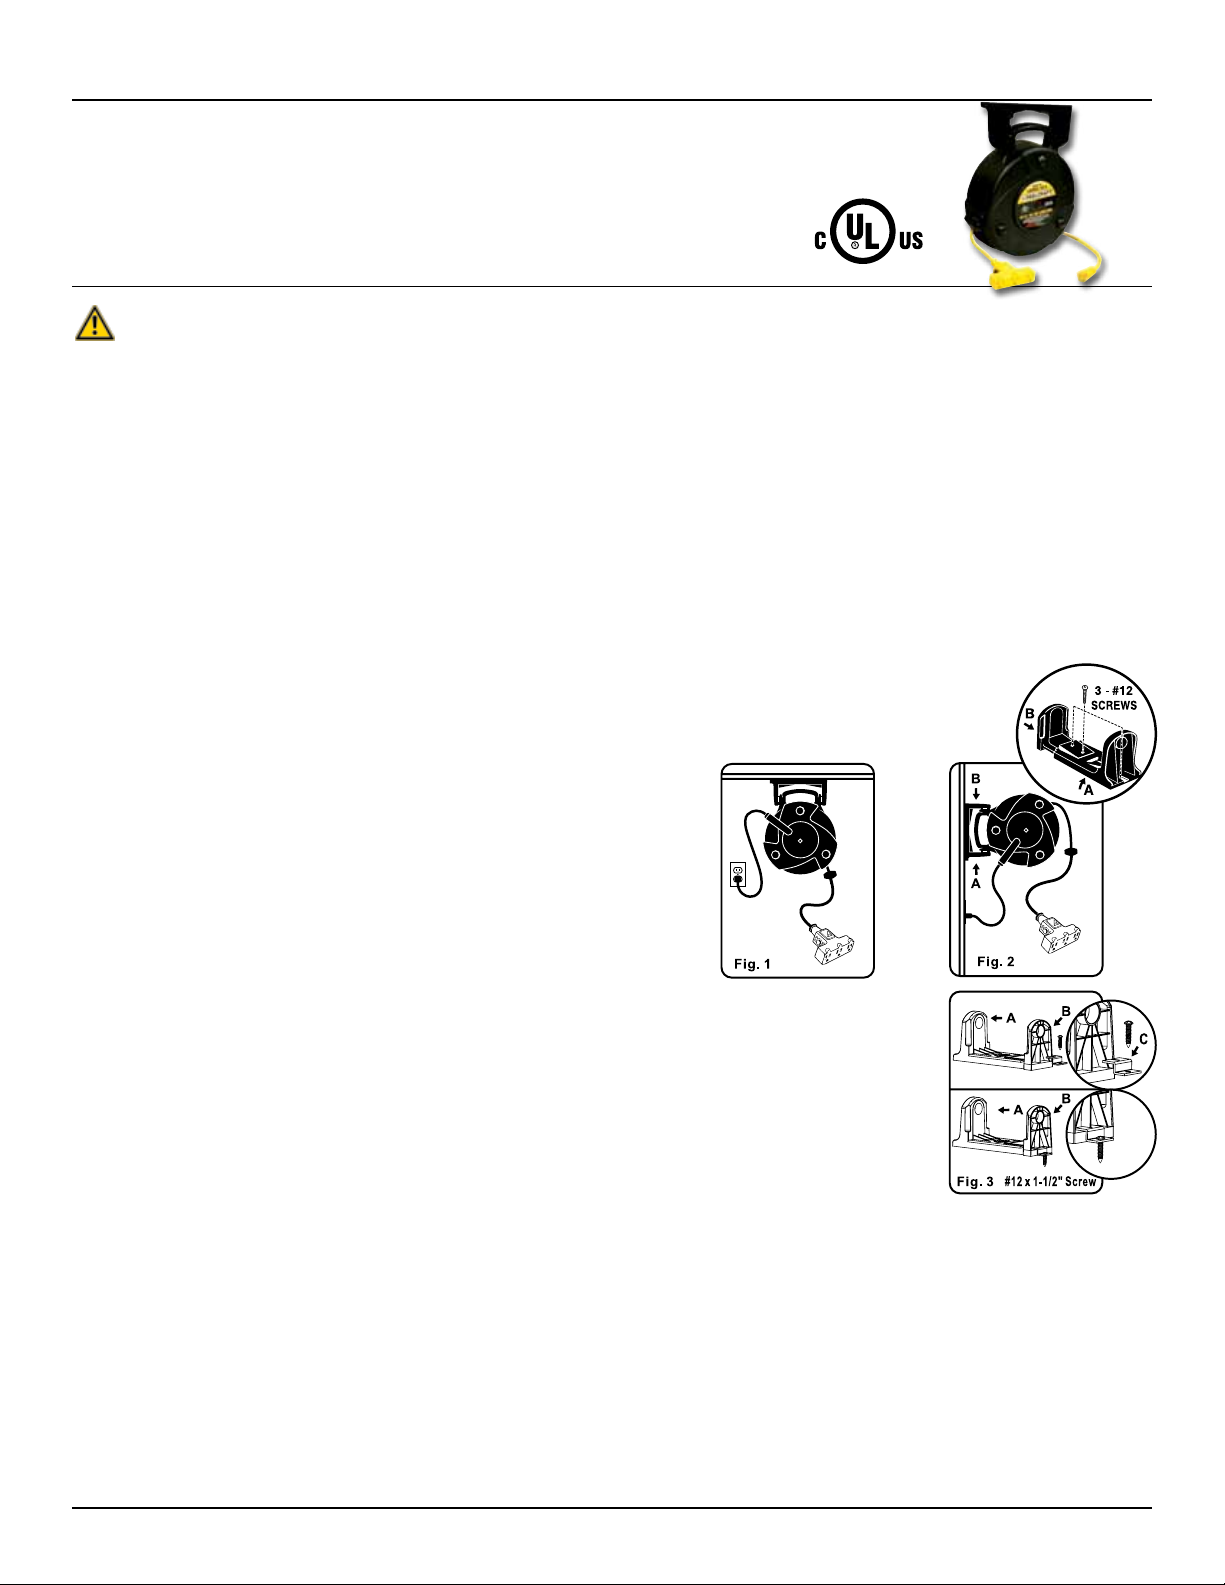
INSTALLATION
Ceiling or Wall Mount - 180° Side-to-Side Movement (Fig. 1 & Fig. 2)
1. Select location within 2 1/2 feet of an electrical outlet.
2. Secure bracket “A” to a stud or joist by the use of the 3 supplied #12
screws. CAUTION: All three screws MUST be used for security of
the bracket.
3. Place reel in the bracket “A”. Place the bracket part “B” into bracket
“A” until a click is heard. The reel is now securely locked in the
bracket.
4. To remove the reel from the bracket, depress
release button as indicated on the bracket.
This will allow bracket “B” to be slid out of
the way for removal of the reel.
Caution! When using bracket for ceiling
or wall mounting - Anti Tamper Support
Clip(C) must be installed. Install AntiTamper Support Clip(C) as shown in Fig 3.
Screw (#12 x 1-1/2”) is supplied for installation.
MAINTENANCE
WARNING: UNPLUG UNIT BEFORE
PERFORMING ANY MAINTENANCE.
Remove dirt and grime as soon as it accumulates. Use a soft, damp
cloth and a mild soap, if needed. Be sure not to get the electrical plug
wet. NEVER submerge any part of the cord reel in any solution to clean
it. DO NOT USE solvents such as gasoline, turpentine, etc. to clean unit.
Keep reel cord clean to assure smoothest automatic retraction. To clean,
simply pull cord to its full length and allow to retract through a dampened rag. Pull out full length again and allow to retract through clean rag
sprinkled with talcum powder. DRY THOROUGHLY BEFORE PLUGGING
BACK INTO OUTLET.
Page 2
www.reelcraft.com
 Loading...