

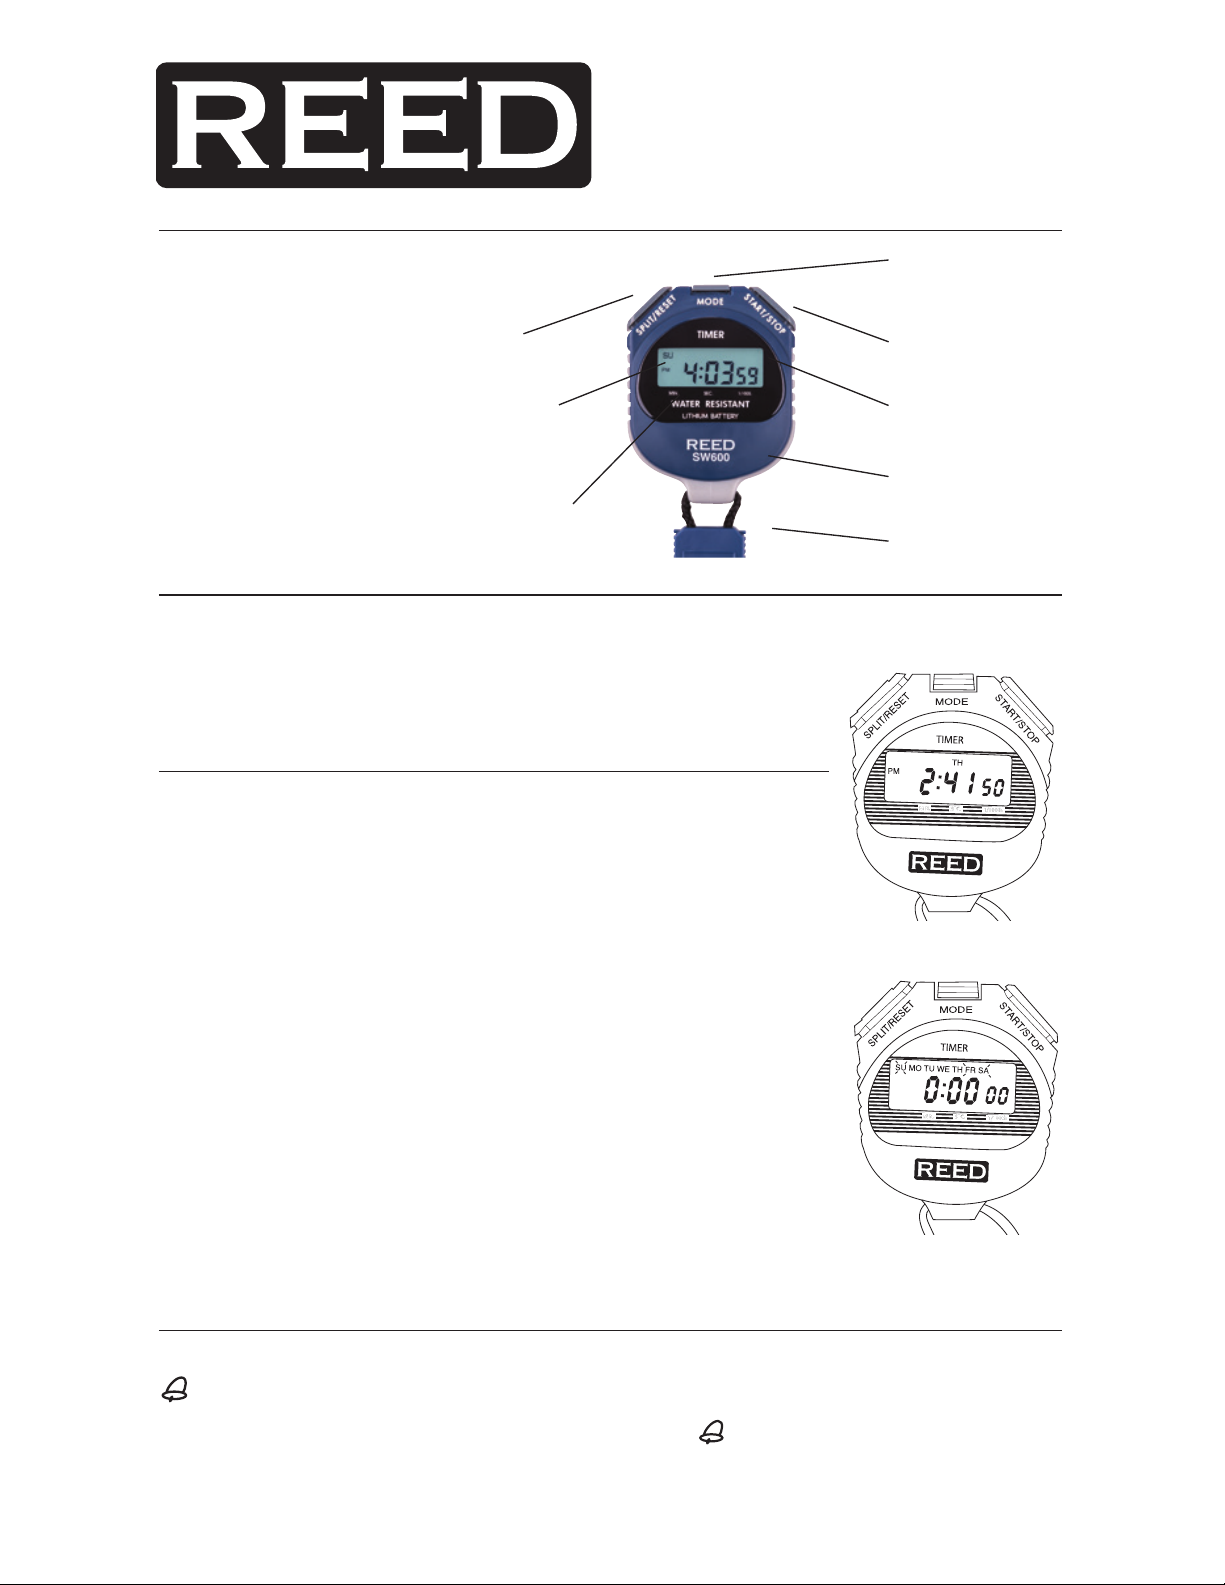
Model
SW600
Stopwatch
Features
• Stopwatch/chronograph
mode with 1/100th
second resolution
• Displays hour, minute,
second, and day of the
week
• Programmable alarm and
snooze functions
• High contrast digital
display
• Records real time and split
times
• 48" nylon lanyard
Normal time display mode
Shows minute, second and day of the week. It also allows you to turn the alarm on or off (see Alarm On/Off).
Lap reset
Day of the
week indication
Minutes, seconds
1/100th second display
Mode Selection
Start/stop/set
Alarm set indicator
Shock and water
resistant case
48" nylon lanyard
When you are in Normal Time Display mode (Figure 1), press
• SPLIT/RESET button to see the Alarm Time
• MODE button to change the Mode to Stopwatch Mode
• START/STOP button to show month, day of the week
Stopwatch function
Make sure stopwatch is in Normal Time Display mode. If the current display is not
the Normal Time Display mode, press the MODE button until SU, FR and SA starts
flashing together along the top of the LCD (Figure 2).
Accumulated elapsed time measurement:
Make sure the timer is reset back to 0:00:00 by pressing the SPLIT/RESET button.
1. Press the START/STOP button to start and stop the timer.
2. Press the SPLIT/RESET button to reset the timer back to 0:00 00.
Split time measurement:
Make sure the timer is reset back to 0:00:00 by pressing the SPLIT/RESET button.
1. Press START/STOP button to start the timer.
2. Press SPLIT/RESET button for split time.
3. Press SPLIT/RESET button again to release the split.
4. Press START/STOP button to stop the timer.
5. Press SPLIT/RESET button to reset the timer back to 0:00 00.
Measurement between two competitors:
Make sure the timer is reset back to 0:00:00.
1. Press START/STOP button to start the timer.
2. Press SPLIT/RESET button to start the split time.
3. Press START/STOP button to stop the split time.
4. Press SPLIT/RESET button to view the split time.
5. Press SPLIT/RESET button again to reset the timer back to 0:00 00.
Figure 1
Figure 2
Alarm on/off
To turn the alarm on, press the MODE button until the display returns to the Normal Time Display mode. Once the
Normal Time Display appears, press and hold the SPLIT/RESET and START/STOP buttons simultaneously. The
icon will appear which means the alarm is turned on.
To turn the alarm off, follow the same procedure as above until the
Find Quality Products Online at: sales@GlobalTestSupply.com
www.GlobalTestSupply.com
icon disappears.

Alarm Setting:
1. Press MODE button until MO and the hour digit(s) start flashing on the display.
2. Press START/STOP button to change the hour digit(s).
3. Press SPLIT/RESET button to confirm the hour selected. Then the minute digits will flash.
4. Press START/STOP button to change the minute digits.
5. Press MODE button to go back to the Normal Time Display.
Snooze Function
Snooze Function ON:
When the alarm is activated, press the SPLIT/RESET button to turn the alarm OFF.
After 5 minutes, the alarm will activate again.
Snooze Function OFF:
To deactivate snooze function, press the START/STOP button when the alarm goes off.
This turns the alarm and snooze functions OFF.
The alarm and snooze functions will turn OFF after one minute if no button is pressed.
Setting normal time display
1. Press the MODE button until you see TU and the second digits flashing (Figure 3).
2. Press the START/STOP button to set the second digits back to 00. To select the minute digit(s), press the SPLIT/
RESET button once, then press the START/STOP button to set the desired minutes.
3. Press and hold the START/STOP button to scroll through the minutes (Figure 4).
4. Press the SPLIT/RESET button to confirm the selected minutes and change the hour digit(s). You will see the
hour digit(s) flashing and one of the following letters on the right side of the LCD (where the seconds digits used
to be) (Figure 5):
• A – 12 hour clock, AM time
• P – 12 hour clock, PM time
• H – 24 hour clock
Figure 3
Figure 4
Figure 5
Changing the HOUR digit(s):
1. Press the START/STOP button or press and hold the START/STOP button to scroll to the desired hour digit.
2. For 12 Hour format, press the START/STOP button and set desired hours in AM (A) or PM (P).
3. For 24 Hour format, press the START/STOP button until 12 P has passed, and an “H” appears on the right
side of the LCD. Continue to press the START/STOP button and change hour figure.
Hour Chime (stop watch beeps once every hour on the hour)
To set the Hour Chime ON, press and hold SPLIT/RESET then press MODE (while continuing to hold SPLIT/
RESET) until the days of the week appear on the top of the LCD. To turn Hour Chime OFF press MODE (while
continuing to hold the SPLIT/RESET button) until the days of the week switch OFF.
Setting the date and day of the week
To change the day figure:
After setting the hour, press the SPLIT/RESET button again. The day will flash; change the day digit(s) by pressing
the START/STOP button.
To change the month figure:
Press the SPLIT/RESET button again. The month figure will flash; change the month digit(s) by pressing the
START/STOP button.
To change the day of the week:
Press the SPLIT/RESET button again. The day of week figure will flash; change the letter configuration by pressing
the START/STOP button. (Starting with “SU” – Sunday, at the very top left of the LCD).
To confirm all time and date settings, press the mode button
NOTE: To change any of the above, press the SPLIT/RESET button and follow all of the above procedures.
To view the date
Go back to the Normal Time mode display by pressing the MODE button. Press the START/STOP button to view the date.
Find Quality Products Online at: sales@GlobalTestSupply.com
www.GlobalTestSupply.com
 Loading...