

Page 1
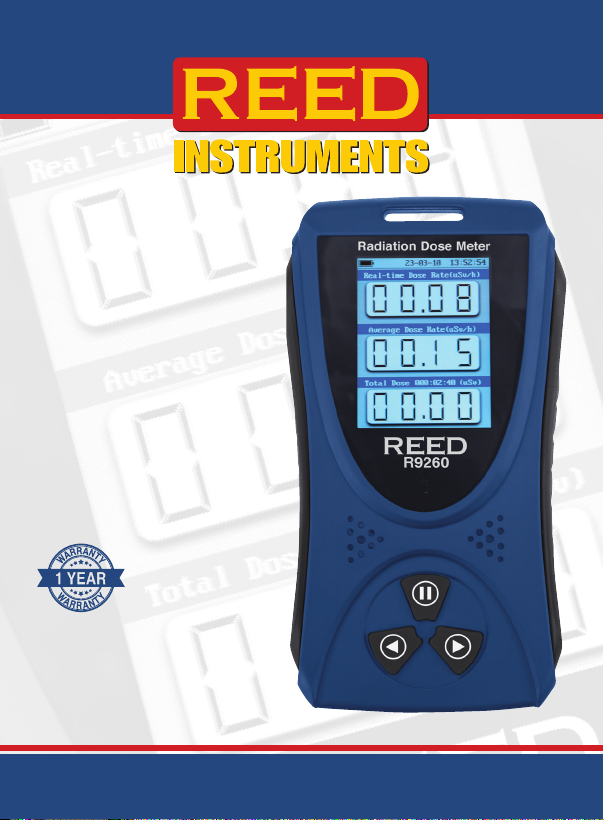
Radiation
Dose
Meter
Instruction
Manual
R9260
1 YEAR
1 AN
W
A
R
R
A
N
T
Y
W
A
R
R
A
N
T
Y
G
A
R
A
N
T
I
E
G
A
R
A
N
T
I
E
W
A
R
R
A
N
T
Y
W
A
R
R
A
N
T
Y
G
A
R
A
N
T
I
E
G
A
R
A
N
T
I
E
1 YEAR1AN
1-877-849-2127 | [email protected] | www.reedinstruments.com
REED Instruments
Page 2

Table of Contents
Introduction ................................................................................................ 3
Product Quality ........................................................................................... 3
Safety ......................................................................................................... 3
Features ...................................................................................................... 3
Included ...................................................................................................... 4
Specications ............................................................................................. 4
Instrument Description ............................................................................... 5
Display Description .................................................................................... 5
Operating Instructions ........................................................................... 6-11
How the Meter Detects Radiation ...................................................... 6
Power ON/OFF ................................................................................... 6
Measurement Interface Screen .......................................................... 6
Setup Mode ................................................................................... 7-11
Measurement Interface Screen (Measure) .................................. 7
Set Delayed Start/Measurement Time (Schedule) ...................7-8
View the Recorded Logs ............................................................. 8
Delete the Recorded Data ........................................................... 8
Set Alarm Values ......................................................................... 9
Select Unit of Measure ................................................................ 9
Set Alarm Frequency and Volume ..........................................9-10
Set the Date and time ............................................................... 10
Set Auto Power Off/Sleep Settings and Screen Brightness ....... 11
Charging the Battery ................................................................................ 12
Applications .............................................................................................. 12
Accessories and Replacement Parts ....................................................... 12
Product Care ............................................................................................ 12
Product Warranty ..................................................................................... 13
Product Disposal and Recycling .............................................................. 13
Product Support ....................................................................................... 13
1-877-849-2127 | [email protected] | www.reedinstruments.com
REED Instruments
Page 3

Introduction
Thank you for purchasing your REED R9260 Radiation Dose Meter.
Please read the following instructions carefully before using your
instrument. By following the steps outlined in this manual your meter will
provide years of reliable service.
Product Quality
This product has been manufactured in an ISO9001 facility and has been
calibrated during the manufacturing process to meet the stated
product specications.
Safety
• Do not leave the meter in temperatures over 100°F (38°C) or in direct
sunlight for an extended period of time.
• This meter may be sensitive to and may not operate properly in radio
frequency, microwave, electrostatic, and electromagnetic elds.
• Never attempt to repair or modify the instrument. Dismantling the
product, other than for the purpose of replacing batteries, may cause
damage that will not be covered under the manufacturer's warranty.
Servicing should only be provided by an authorized service center.
Features
• Detects Beta, Gamma, and X radiation
• Measures dose rate in real-time and records total doses
• Automatic selection of measurement range
• User-adjustable alarms (audio/visual indicators)
• Internal memory stores up to 10 groups of data internally
• Auto shut-off and low battery indicator
REED Instruments
1-877-849-2127 | [email protected] | www.reedinstruments.com
Page 4

Included
• Radiation Dose Meter
• USB Cable
• Lanyard
• Carrying Case
Specifications
Sensor Type: G-M Counter Tube
Measured Rays: Beta, Gamma, X
Radiation Dose Range: 0.05µSv/h to 50mSv/h
Accumulated Radiation Dose Value: 0.1µSv to 9999mSv
Accuracy: ≤25%
Energy Range: 80keV to 1.5MeV
Source: Cs-137
Response Time: ≤10 seconds
Display: 2" Color TFT LCD Display
Backlit Display: Yes
Adjustable Alarms: Yes (Audible/Visual Indicators)
Natural Environment Reading: 0 to 0.2µSv/h
Datalogging Capabilities: Yes
Real-Time Clock and Date Stamp: Yes
Internal Memory: Yes (up to 10 groups of data)
Power Supply: Built-in lithium battery
Battery life: Approx. 20 days (Fully Charged)
Product Certications: CE, UKCA, RoHS
Operating Temperature: 32 to 104°F (0 to 40°C)
Operating Humidity Range: 20 to 80%
Storage Temperature: 14 to 122°F (-10 to 50°C)
Storage Humidity Range: 20 to 70%
Dimensions: 4.7 x 2.6 x 1.0" (120 x 65 x 25mm)
Weight: 4.48oz (127g)
(3.7V 1800mAh)
1-877-849-2127 | [email protected] | www.reedinstruments.com
REED Instruments
Page 5
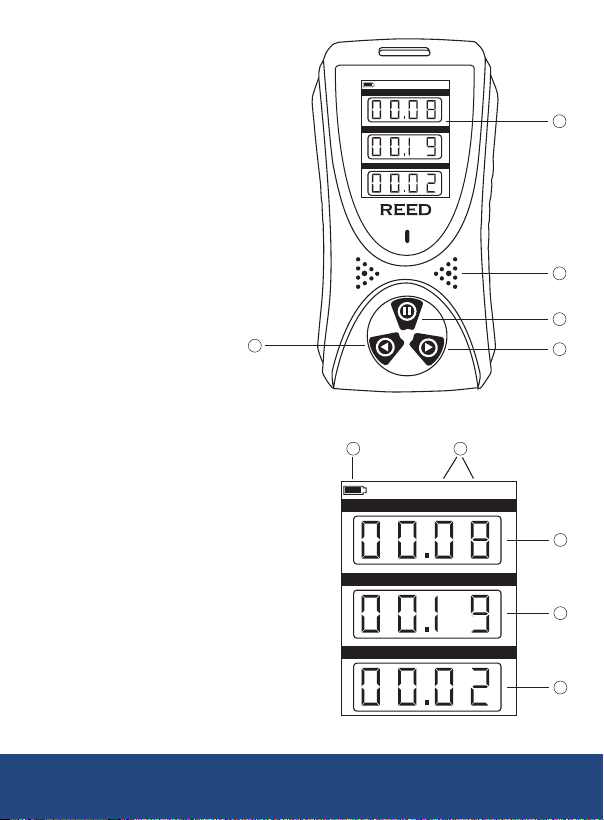
Instrument Description
1
3
4
2
R9260
Radiation Dose Meter
23-03-10
Real-time Dose Rate(uSv/h)
Average Dose Rate(uSv/h)
Total Dose 000:02:40 (uSv)
13:52:54
1. LCD Display
2. Geiger-Mueller Tube Screens
3. Power/Select Button
4. Right/Add Button
5. Left/Subtract Button
Radiation Dose Meter
13:52:54
23-03-10
Real-time Dose Rate(uSv/h)
Average Dose Rate(uSv/h)
Total Dose 000:02:40 (uSv)
R9260
1
2
Display Description
1. Battery Status Indicator
2. Date and Time Stamp
3. Real-Time Dose Rate
Measurement Value
4. Average Dose Rate
5
1 2
23-03-10
Real-time Dose Rate(uSv/h)
Average Dose Rate(uSv/h)
13:52:54
3
4
3
4
Measurement Value
5. Total Dose
Measurement Value
Total Dose 000:02:40 (uSv)
5
REED Instruments
1-877-849-2127 | [email protected] | www.reedinstruments.com
Page 6
Operating Instructions
The R9260 is intended to detect the radiation dose rate of
and X-rays radiated from an object and not the physical quantit
describing the radioactivity of an object/area.
How the Meter Detects Radiation
The meter uses a Geiger-Mueller counter tube to detect radiation. The
Geiger tube generates a pulse of electrical current each time radiation
passes through the halogen quenched tube. Each pulse is electronically
detected and registers as a count. The unit displays the counts in the
selected mode.
The number of counts detected by the unit varies from moment to
moment due to the random nature of radioactivity. A reading is expressed
more accurately as an average over time, and the average is more
accurate over a longer time period.
Power ON/OFF
To turn the meter ON or OFF, press and hold the
approximately 3 seconds.
Measurement Interface Screen
When the meter is powered on, the measurement interface screen
automatically appears which displays the real-time dose rate
(0.05uSv-50mSv), average dose rate (0.05uSv-50mSv) and total dose
(0.1uSv-9999mSv) of the test source/area.
button for
REED Instruments
1-877-849-2127 | [email protected] | www.reedinstruments.com
Page 7
Setup Mode
1. While in the measurement interface screen, press the button to
enter Setup Mode.
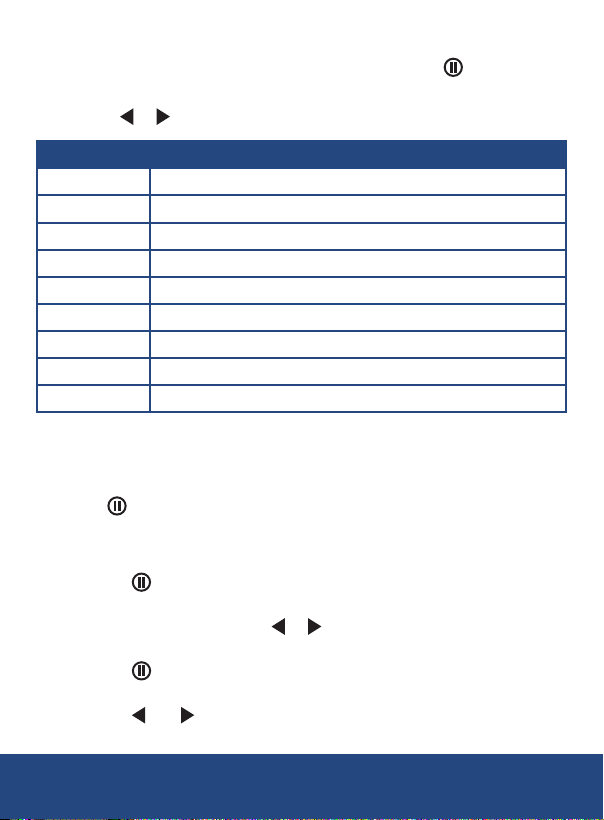
2. Use the or buttons to scroll through the following parameters:
Parameter Description
Measure Measurement Interface Screen
Schedule Set delayed start/measurement times
Records View recorded logs
Delete Delete recorded data
Alarm Set alarm values
Unit Select unit of measure
Sound Set alarm frequency and volume
Clock Set the date and time
Sleep Set auto power off, sleep settings and screen brightness
3. Once the appropriate parameter has been selected, follow the
instructions below.
Measurement Interface Screen (Measure)
Press the button when "Measure" is highlighted to return to the
measurement interface screen.
Set Delayed Start/Measurement Time (Schedule)
1. Press the button when "Schedule" is highlighted to set the delayed
start/measurement times.
2. While in this mode, press the or buttons to toggle through the
adjustable parameters for "Start Delay" and "Measurement Time".
3. Press the button to activate the desired parameter
(i.e. Hour/Minute/Second).
4. Press the and buttons to adjust the applicable value.
1-877-849-2127 | [email protected] | www.reedinstruments.com
REED Instruments
Page 8
5. Press the button to conrm selection and move on to the next
parameter, if required.
6. Once all parameters have been adjusted, select "Start Timing" and
press the button.
7. Press the button to conrm the scheduled delayed start/
measurement times or press the
"No" dialog box appears.
Note: The test will not start until the programmed delayed time has
elapsed (if applicable).
8. At any time, select "stop timing" to the end and press the button to
manually stop the measurement time.
9. When done, select "Return" and press the button to exit the
"Setting the Delayed Start/Measurement Times" screen and return to
the setup mode screen.
button to cancel, when the "Yes" or
View the Recorded Logs
1.
Press the button when "Records" is highlighted to view the
recorded logs.
2. Press the and buttons to scroll through the list of recorded log
les (if applicable).
3. Press the button to exit the "Viewing the Recorded Logs" screen
and return to the setup mode screen.
Delete the Recorded Data
1. Press the button when "Delete" is highlighted to delete any
stored data.
2. Press the and buttons to select between "Delete Current Data"
and "Delete History Data".
3. Press the button to activate the desired parameter.
4. Press the button to conrm deletion or press the button to cancel,
when the "Yes" or "No" dialog box appears.
5. When done, select "Return" and press the button to exit the
"Deleting the Recorded Data" screen recording time screen and return
to the setup mode screen.
continued...
REED Instruments
1-877-849-2127 | [email protected] | www.reedinstruments.com
Page 9
Set Alarm Values
1. Press the button when "Alarm" is highlighted to set the alarm values.
2. While in this mode, press the or buttons to toggle through the
adjustable parameters for "Dose Rate" and "Total Dose".
3. Press the button to activate the desired parameter.
4. Press the and buttons to adjust the applicable value within the
meters limit range.
5. Press the button to conrm selection and move on to the next
parameter if required.
6. When done, select "Return" and press the button to exit the
"Setting Alarm Values" screen and return to the setup mode screen.
Select Unit of Measure
1. Press the button when "Unit" is highlighted to set the
measurement unit.
2. While in this mode, press the or buttons to toggle to the
adjustable parameter for "Unit".
3. Press the button to activate the desired parameter.
4. Press the and buttons to toggle between the applicable
measurement unit.
5. Press the button to conrm selection and move on to the next
parameter if required.
6.
When done, select "Return" and press the button to exit the
"Selecting Unit of Measure" screen and return to the setup mode screen.
Set Alarm Frequency and Volume
1. Press the button when "Sound" is highlighted to set the alarm
frequency and volume.
2. While in this mode, press the or buttons to toggle through the
adjustable parameters for "Alarm Volume", "Alarm Times" and
"Particle Sounds".
3. Press the button to activate the desired parameter.
continued...
REED Instruments
1-877-849-2127 | [email protected] | www.reedinstruments.com
Page 10
4. For alarm volume, press the or buttons to toggle up and down
the alarm volume range between 0 and 9.
5. Press the button to conrm selection and move on to the next
parameter if required.
6. For alarm frequency, press the or buttons to toggle up and down
the frequency range between 1 and 10.
7. Press the button to conrm selection and move on to the next
parameter if required.
8. For particle sounds, press the or buttons to toggle between
ON or OFF.
9. Press the button to conrm selection.
10. When done, select "Return" and press the button to exit the
"Setting Alarm Frequency and Volume" screen and return to the setup
mode screen.
Set the Date and time
1. Press the button when "Clock" is highlighted to set the delayed
start/measurement times.
2. While in this mode, press the or buttons to toggle through the
adjustable parameters for "Date" and "Time".
3. Press the button to activate the desired parameter
(i.e. Year/Month/Day/Hour/Minute/Second).
4. Press the and buttons to adjust the applicable value.
5. Press the button to conrm selection and move on to the next
parameter if required.
6. When done, select "Return" and press the button to exit
the "Setting the Date and Time" screen and return to the
setup mode screen.
REED Instruments
1-877-849-2127 | [email protected] | www.reedinstruments.com
Page 11
Set Auto Power Off/Sleep Settings and Screen Brightness
1. Press the button when "Sleep" is highlighted to set the Auto Power
Off/sleep settings and screen brightness.
2. While in this mode, press the or buttons to toggle through the
adjustable parameters for "Screen Sleep", "Auto Shutdown" and
"Screen Brightness".
3. Press the button to activate the desired parameter.
4. For screen sleep timer, press the or buttons to toggle up and
down the sleep timer range between 1 and 9 minutes.
5. To disable this feature, select the icon located on the sleep
timer range.
6. Press the button to conrm selection and move on to the next
parameter if required.
7. For auto power off, press the or buttons to toggle up and down
the auto power off timer range between 1 and 9 hours.
8. To disable this feature, select the icon located on the auto power
off timer range.
9. Press the button to conrm selection and move on to the next
parameter if required.
10.
For screen brightness, press the or buttons to toggle between the
brightness range between 1 and 10.
11.
Press the button to conrm selection.
12
. When done, select "Return" and press the
"Auto Power Off/sleep settings and screen brightness" screen and
return to the setup mode screen.
button to exit the
REED Instruments
1-877-849-2127 | [email protected] | www.reedinstruments.com
Page 12

Charging the Battery
1. Connect the R9260 via the included cable to a USB port on your PC or
into a wall outlet using a USB Power Adapter (not included) to charge
the Li-ion battery.
2. Charge the meter until the battery indicator appears full and remove
the charging cable when done.
Applications
• Measure and monitor exposure to ionizing radiation
Accessories and Replacement Parts
CA-05A Medium Soft Carrying Case
Don't see your part listed here? For a complete list of all accessories and
replacement parts visit your product page on www.REEDInstruments.com.
Product Care
To keep your instrument in good working order we recommend the following:
• Store your product in a clean, dry place.
• Clean your product and accessories with biodegradable cleaner. Do not
spray the cleaner directly on the instrument. Use on external parts only.
REED Instruments
1-877-849-2127 | [email protected] | www.reedinstruments.com
Page 13
Product Warranty
REED Instruments guarantees this instrument to be free of defects in
material or workmanship for a period of one (1) year from date of shipment.
During the warranty period, REED Instruments will repair or replace, at no
charge, products or parts of a product that proves to be defective because
of improper material or workmanship, under normal use and maintenance.
REED Instruments total liability is limited to repair or replacement of the
product. REED Instruments shall not be liable for damages to goods,
property, or persons due to improper use or through attempts to utilize the
instrument under conditions which exceed the designed capabilities. In
order to begin the warranty service process, please contact us by phone at
1-877-849-2127 or by email at [email protected] to discuss the
claim and determine the appropriate steps to process the warranty.
Product Disposal and Recycling
Please follow local laws and regulations when disposing or recycling your
instrument. Your product contains electronic components and must be
disposed of separately from standard waste products.
Product Support
If you have any questions on your product, please contact your authorized
REED distributor or REED Instruments Customer Service by phone at
1-877-849-2127 or by email at [email protected].
Please visit www.REEDInstruments.com for the most
up-to-date manuals, datasheets, product guides and software.
Product specifications subject to change without notice.
All rights reserved. Any unauthorized copying or reproduction of
this manual is strictly prohibited without prior written permission
from REED Instruments.
REED Instruments
1-877-849-2127 | [email protected] | www.reedinstruments.com
Page 14
TEST & MEASURE
WITH CONFIDENCE
Access our
Product Catalog
Over 200 portable test and
measurement instruments
REED Instruments
1-877-849-2127 | [email protected] | www.reedinstruments.com
www.REEDInstruments.com
 Loading...