

Page 1
1 YEAR
1 AN
R
R
A
N
R
R
A
N
G
A
R
A
N
T
I
E
G
A
R
A
N
T
I
E
W
A
R
R
A
N
T
Y
W
A
R
R
A
N
T
Y
G
A
R
A
N
T
I
E
G
A
R
A
N
T
I
E
1 YEAR1 AN
Solar Power
Meter
R8180
T
A
Y
Instruction
Manual
1-877-849-2127 | [email protected] | www.reedinstruments.com
REED Instruments
W
W
Y
A
T
Page 2

Table of Contents
Introduction ................................................................................................ 3
Product Quality ........................................................................................... 3
Safety ......................................................................................................... 3
Features ...................................................................................................... 4
Included ...................................................................................................... 4
Specications ............................................................................................. 5
Instrument Description ............................................................................... 6
Display Description .................................................................................... 7
Operating Instructions ............................................................................. 8-9
Power ON/OFF ..................................................................................... 8
Solar Sensor ......................................................................................... 8
Unit of Measure Selection .................................................................... 8
Measurement Range Selection ............................................................ 8
MIN/MAX .............................................................................................. 8
Data Hold ............................................................................................. 9
Zero Adjustment ......................................................................................... 9
Typical Applications ............................................................................. 10-11
Measuring Car Headlights or Car Window Solar Insulation ............... 10
Measuring Residential/Commercial Window Solar Insulation ............ 11
Battery Replacement ................................................................................ 12
Applications .............................................................................................. 12
Accessories and Replacement Parts ....................................................... 12
Product Care ............................................................................................ 13
Product Warranty ..................................................................................... 13
Product Disposal and Recycling .............................................................. 13
Product Support ....................................................................................... 14
1-877-849-2127 | [email protected] | www.reedinstruments.com
REED Instruments
2
Page 3

Introduction
Thank you for purchasing your REED R8180 Solar Power Meter. Please
read the following instructions carefully before using your instrument. By
following the steps outlined in this manual your meter will provide years of
reliable service.
Product Quality
This product has been manufactured in an ISO9001 facility and has been
calibrated during the manufacturing process to meet stated product
specications. If a certicate of calibration is required, please contact the
nearest authorized REED distributor or authorized Service Center. Please
note an additional fee for this service will apply.
Safety
Never attempt to repair or modify your instrument. Dismantling your
product, other than for the purpose of replacing batteries, may cause
damage that will not be covered under the manufacturer's warranty.
Servicing should only be provided by an authorized service center.
1-877-849-2127 | [email protected] | www.reedinstruments.com
REED Instruments
3
Page 4

Features
• Measures the solar power and transmission up to 2000W/m²,
634BTU/(ft²xh)
• Easy-to-read display with remote sensor technology
• User Selectable W/m² or BTU/(ft²xh)
• Max/Min and Data Hold functions
• Overrange indicator
• Low battery indicator and auto shut-off
Included
• Solar Power Meter
• Sensor Cap
• Carrying Case
• Battery
1-877-849-2127 | [email protected] | www.reedinstruments.com
REED Instruments
4
Page 5

Specifications
Solar Power Meter
Measuring Range: 0 to 1999W/m²
0 to 634BTU/(ft²xh)
Accuracy: ±10W/m²
±3BTU/(ft²xh)
or ±5%
whichever is greater in sunlight
Additional temperature included error
± 0.38W/m²/°C
±0.12BTU/(ft²xh)/°F (°C)
from 77°F (25°C)
Angular Accuracy: Cosine corrected <5%
for angles <60°
Resolution: 0.1, 1
Response Time: 250mS
Display: 3½-Digit, LCD
Data Hold: Yes
Min: Yes
Max: Yes
Auto Zero: Yes (Adjustment Screw)
Overrange Indicator: Yes ("OL")
Tripod Mountable: Yes
Power Supply: 9V Battery
Product Certications:
Conforms to EN61326-1
Operating Temperature: 41 to 104°F (5 to 40°C)
Storage Temperature: 14 to 140°F (-10 to 60°C)
Operating Humidity Range: 10 to 80%
Dimensions: 5.2 x 2.4 x 1.5" (132 x 60 x 38mm)
Weight: 5.3oz (150g)
CE, EMC Compliant,
1-877-849-2127 | [email protected] | www.reedinstruments.com
REED Instruments
5
Page 6
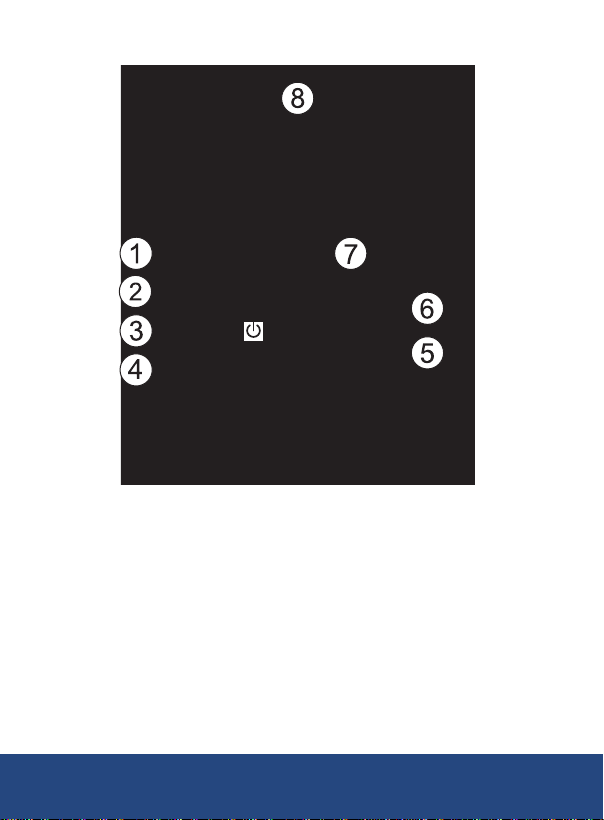
Instrument Description
MIN D-H MAX
R8180
1. LCD Display
2. Max/Min Button
3. POWER Button
4. BTU/W/m2 Unit of Measure Button
5. Range Button
6. Data Hold Button
7. Zero Adjustment Potentiometer
8. Solar Sensor
1-877-849-2127 | [email protected] | www.reedinstruments.com
REED Instruments
6
Page 7
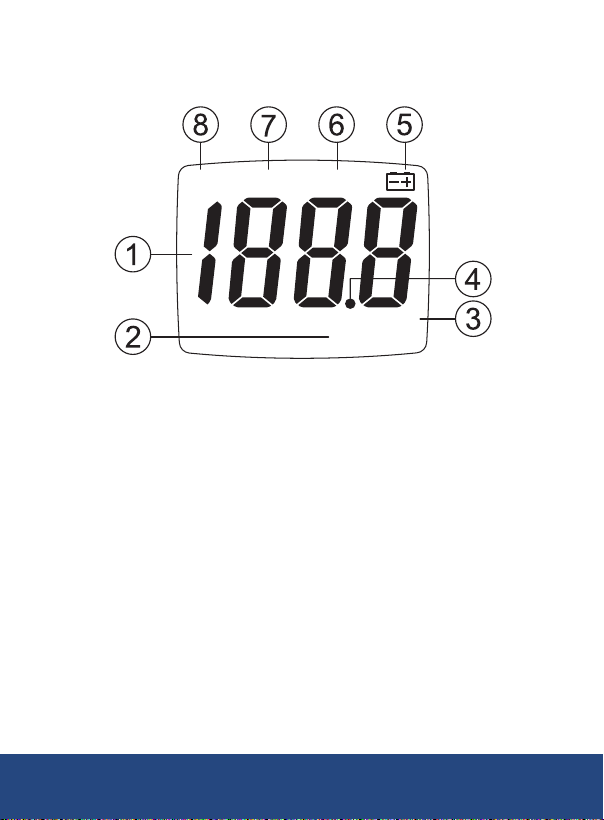
Display Description
MIN D-H MAX
W/m2
Btu/(ft
2
•h)
1. Measurement Value
2. BTU (ft2xh) Unit of Measure
3. W/m² Unit of Measure
4. Decimal Point
5. Low Battery Indicator
6. Maximum Value Indicator
7. Data Hold Indicator
8. Minimum Value Indicator
1-877-849-2127 | [email protected] | www.reedinstruments.com
REED Instruments
7
Page 8

Operating Instructions
W/BR
W/B
M-H D-H
W/BR
D-H
W/BR
Power ON/OFF
Press the
Solar Sensor
1. The solar sensor is permanently attached to the meter.
2. Remove the protective cap to expose the solar sensor. When the
sensor's protective cap is removed, the solar sensor will begin to
capture light. For maximum accuracy, allow the light under test to fall
directly on the sensor as perpendicular as possible to avoid any
false readings.
Unit of Measure Selection
Press the
of measurement.
Measurement Range Selection
Press the
available ranges are: 199.9 or 1999.
MIN/MAX
1. Press the
2. The "MAX" indicator will appear on the display.
3. Under this function the maximum solar value is displayed and
updated when a new maximum data value has been taken.
4. Press the
the display.
5. Under this function the minimum light value is displayed and updated
when a new minimum data value has been taken.
6. To exit the MIN/MAX function and resume normal operation, press
and hold the MIN/MAX button for approx. 2 seconds.
button to turn the meter ON or OFF.
button to toggle between BTU (ft2xh) and W/m² units
R
button to select the preferred measuring range. The
button to enter the MIN/MAX function.
M-H
button again and the "MIN" indicator will appear on
continued...
1-877-849-2127 | [email protected] | www.reedinstruments.com
REED Instruments
8
Page 9

Data Hold
W/BR
W/BR
1. While taking a measurement, press the
current readings on the display.
2. While in this mode a "D-H" symbol will appear.
3. Press the
D-H
button again to resume normal operation.
D-H
button to freeze the
Zero Adjustment
1. Before taking a light measurement, cover the solar sensor with the
provided protective cap.
2. If the LCD display does not show a value of zero, locate the zero
adjustment potentiometer screw on the side of the meter as
indicated by "0’ ADJ".
3. With a mini athead screwdriver, ne-tune the zero adjustment
potentiometer screw until the LCD displays "00.0".
4. Remove the protective cap and begin measuring.
continued...
1-877-849-2127 | [email protected] | www.reedinstruments.com
REED Instruments
9
Page 10
Typical Applications
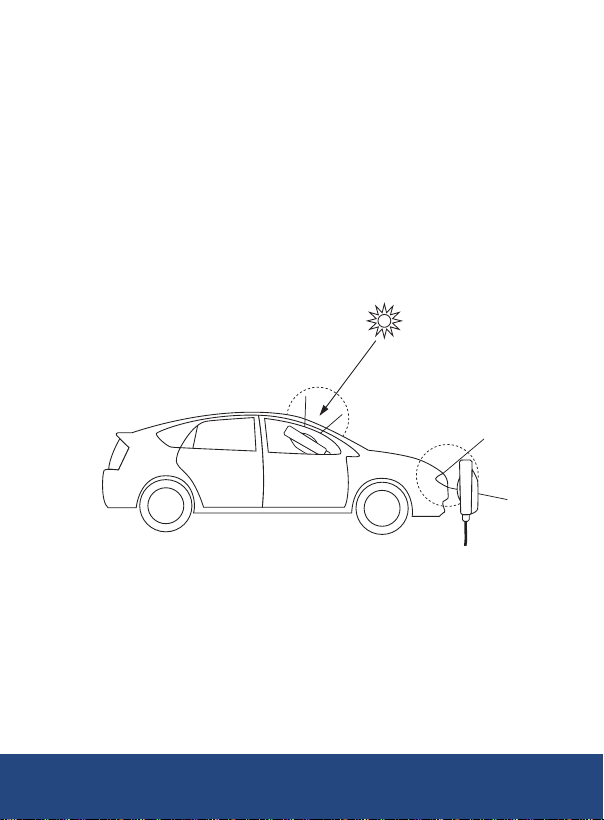
Measuring Car Headlights or Car Window
Solar Insulation (Fig. 1)
1. Turn ON car headlights.
2. Power the meter ON.
3. Place the sensor up close to the headlight and allow the headlight
under test to fall directly on the sensor as perpendicular and as close
as possible to avoid any false readings.
4. Switch between high and low beams.
5. Note the results.
Note: Both the right and left headlights must be tested.
Figure 1
6. For car window solar insulation, place the sensor up close to the
window and allow the sun rays to fall directly on the sensor while the
windows are closed and as perpendicular as possible to avoid any
false readings.
7. Open the window and aim the solar sensor at the sun.
8. Compare both values to verify the efciency of the window’s
solar lm.
1-877-849-2127 | [email protected] | www.reedinstruments.com
REED Instruments
10
Page 11
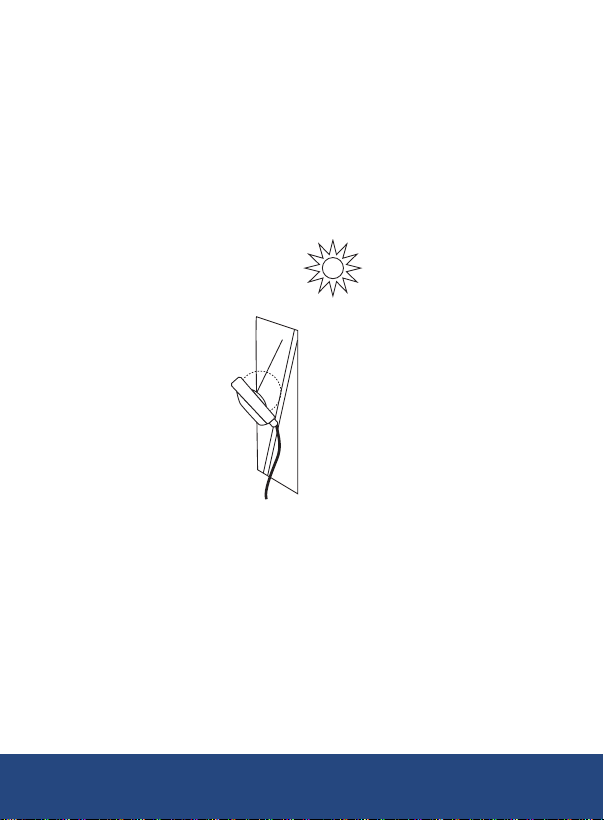
Measuring Residential/Commercial Window Solar Insulation
(Fig. 2)
1. Make sure the window being tested is closed.
2. Place the sensor up close to the window and allow the sun rays
to fall directly on the sensor while the windows are closed and as
perpendicular as possible to avoid any false readings.
3. Open the window and aim the solar sensor at the sun.
4. Compare both values to verify the windows heat efciency.
Figure 2
1-877-849-2127 | [email protected] | www.reedinstruments.com
REED Instruments
11
Page 12

Battery Replacement
Battery Replacement
When the low battery indicator appears on the display, the battery should
be replaced. Remove the battery cover on the back and insert a new
9V battery.
Applications
• Calculation and verication of the heating or heat reduction in windows
caused by direct sunlight
• Solar radiation measurements
• Solar power research for location of the solar panels or solar
water heater
• Physics and optical laboratories
• Meteorology
• Agriculture
Accessories and Replacement Parts
CA-05A Medium Soft Carrying Case
Don't see your part listed here? For a complete list of all accessories and
replacement parts visit your product page on www.REEDInstruments.com.
1-877-849-2127 | [email protected] | www.reedinstruments.com
REED Instruments
12
Page 13

Product Care
To keep your instrument in good working order we recommend the following:
• Store your product in a clean, dry place.
• Change the battery as needed.
• If your instrument isn’t being used for a period of one month or longer
please remove the battery.
• Clean your product and accessories with biodegradable cleaner. Do not
spray the cleaner directly on the instrument. Use on external parts only.
Product Warranty
REED Instruments guarantees this instrument to be free of defects
in material or workmanship for a period of one (1) year from date of
shipment. During the warranty period, REED Instruments will repair or
replace, at no charge, products or parts of a product that proves to be
defective because of improper material or workmanship, under normal
use and maintenance. REED Instruments total liability is limited to repair
or replacement of the product. REED Instruments shall not be liable for
damages to goods, property, or persons due to improper use or through
attempts to utilize the instrument under conditions which exceed the
designed capabilities. In order to begin the warranty service process,
please contact us by phone at 1-877-849-2127 or by email at
[email protected] to discuss the claim and determine the
appropriate steps to process the warranty.
Product Disposal and Recycling
Please follow local laws and regulations when disposing or recycling your
instrument. Your product contains electronic components and must be
disposed of separately from standard waste products.
1-877-849-2127 | [email protected] | www.reedinstruments.com
REED Instruments
13
Page 14

Product Support
If you have any questions on your product, please contact your authorized
REED distributor or REED Instruments Customer Service by phone at
1-877-849-2127 or by email at [email protected].
Please visit www.REEDInstruments.com for the most
up-to-date manuals, datasheets, product guides and software.
Product specifications subject to change without notice.
All rights reserved. Any unauthorized copying or reproduction of this
manual is strictly prohibited without prior written permission from
REED Instruments.
1-877-849-2127 | [email protected] | www.reedinstruments.com
REED Instruments
14
Page 15

Page 16

TEST & MEASURE
WITH CONFIDENCE
Access our
Product Catalog
Over 200 portable test and
measurement instruments
1-877-849-2127 | [email protected] | www.reedinstruments.com
REED Instruments
 Loading...