

Page 1
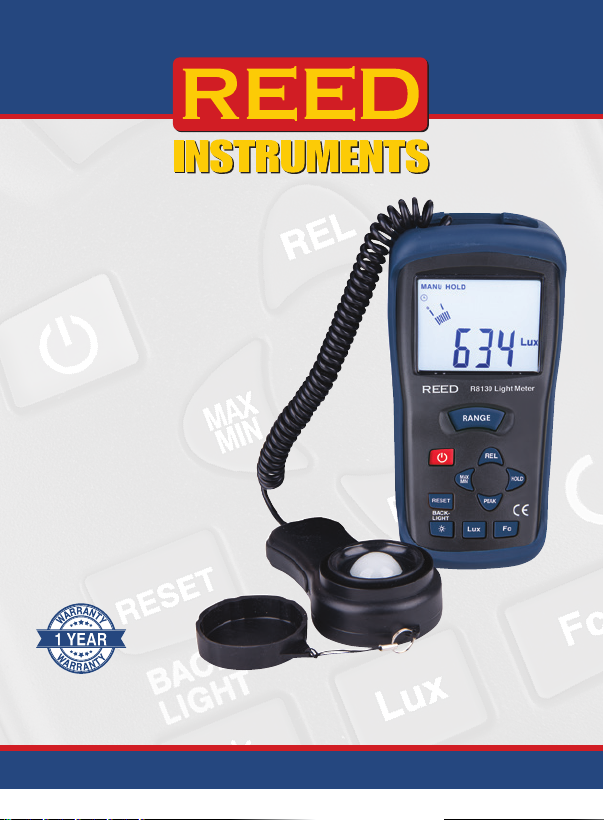
Light
Meter
R8130
Instruction Manual
www.GlobalTestSupply.com
Page 2

Table of Contents
Introduction ................................................................................................ 3
Product Quality ........................................................................................... 3
Safety ......................................................................................................... 3
Features ...................................................................................................... 3
Included ...................................................................................................... 3
Specications ............................................................................................. 4
Instrument Description ............................................................................... 5
Display Description .................................................................................... 5
Operating Instructions ............................................................................. 6-8
Light Sensor ........................................................................................... 6
Power On/Off ......................................................................................... 6
Unit of Measure Selection ...................................................................... 6
Measurement Range Selection .............................................................. 6
MAX/MIN ............................................................................................6-7
Data Hold ............................................................................................... 7
Peak Hold ............................................................................................... 7
Relative Mode ........................................................................................ 7
RESET .................................................................................................... 8
Backlight ................................................................................................ 8
Battery Replacement .................................................................................. 8
Applications ................................................................................................ 8
Appendix A: Recommended Light Levels by Application. .................... 9-10
Product Care ............................................................................................ 10
Product Warranty ..................................................................................... 10
Product Disposal and Recycling .............................................................. 11
Product Support ....................................................................................... 11
www.GlobalTestSupply.com
2
Page 3

Introduction
Thank you for purchasing your REED R8130 Light Meter. Please read
the following instructions carefully before using your instrument. By
following the steps outlined in this manual your meter will provide years
of reliable service.
Product Quality
This product has been manufactured in an ISO9001 facility and has been
calibrated during the manufacturing process to meet the stated product
specications. If a certicate of calibration is required please contact the
nearest authorized REED distributor or authorized Service Center. Please
note an additional fee for this service will apply.
Safety
Never attempt to repair or modify your instrument. Dismantling your
product, other than for the purpose of replacing batteries, may cause
damage that will not be covered under the manufacturer's warranty.
Servicing should only be provided by an authorized service center.
Features
• Wide measuring range (up to 40,000 fc or 400,000 lx)
• Easy-to-read backlit LCD display
• 42-segment digital analog bargraph
• Min/Max and Relative Mode functions
• Peak and Data Hold
• Low battery indicator and auto shut off
Included
• Sensor Cover
• Protective Holster
• Carrying Case
• Battery
www.GlobalTestSupply.com
3
Page 4

Specifications
Measuring Range(s): lx: 0 to 400,000
fc: 0 to 40,000
Accuracy: ±(5% rdg.+ 0.5% Full Scale)
Repeatability: ±3%
Resolution: lx/fc: 0.01 (Max resolution)
Response Time: Bargraph: 13.3 times/second
Numeric display: 1.3 times/second
Sensor Type: Photo diode with spectral response lter
Spectral Response:
Spectral Accuracy: CIE Vλ function f1'≤6%
Cosine Response: f2' ≤2%
Display: 3 3/4" (3999) digit LCD
Digital Analog Bargraph: Yes (42 segment)
Backlit Display: Yes
Data Hold: Yes
Min, Max and
Relative Mode: Yes
Peak Hold: Yes
Overrange Indicator: Yes
Auto Shut-Off: Yes (after 30 mins)
Kick Stand: Yes
Tripod Mountable: Yes
Low Battery Indicator: Yes
Power Supply: 9V battery
Product Certications: CE
Operating Temperature: 32 to 104°F (0 to 40°C)
Storage Temperature: 14 to 140°F (-10 to 50°C)
Operating Humidity Range: 10 to 80%
Dimensions: 7.4 x 2.5 x 1" (188 x 64.5 x 24.5mm)
Weight: 14.2oz (403g)
CIE Photopic (CIE Human Response Curve)
www.GlobalTestSupply.com
4
Page 5
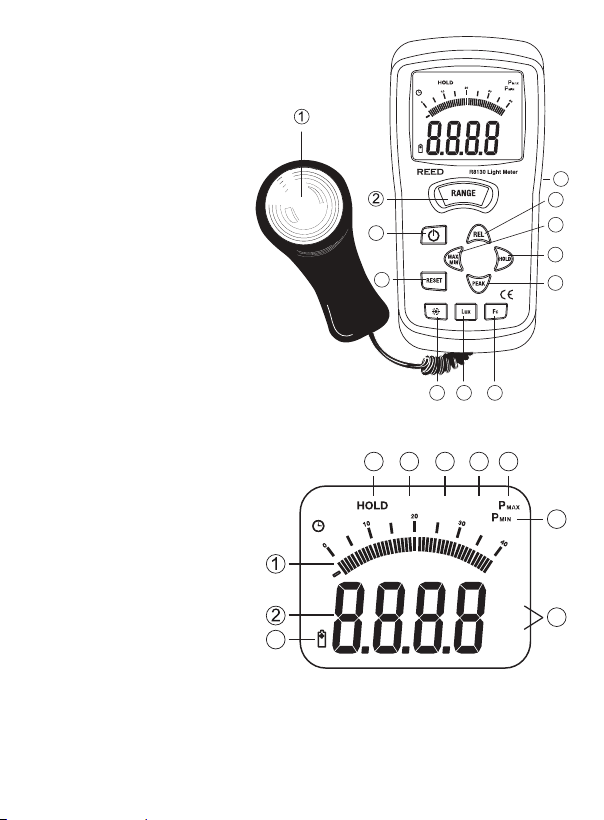
Instrument Description
1. Light Sensor
2. Range Button
3. Power Button
4. Reset Button
5. Backlight Button
6. Lux Button
7. Foot-candle Button
8. Peak Button
9. Data Hold Button
10. Max/Min Button
11. Relative Mode Button
12. Protective Holster
Display Description
1. Digital Analog Bargraph
2. Measured Value
3. Battery Capacity Indicator
4. Unit of Measure
5. Peak Min Indicator
6. Peak Max Indicator
7. MIN Indicator
8. MAX Indicator
9.
Relative Mode Indicator
10. Data Hold Indicator
3
3
4
10
REL MAX MIN
BACKLIGHT
5
89
REL MAX MIN
6
7
Lux
Fc
Lux
Fc
67
12
11
10
9
8
5
4
www.GlobalTestSupply.com
5
Page 6

Operating Instructions
Light Sensor
1. The light sensor is permanently attached to the meter.
2. Remove the protective cap to expose the light sensor. When the
sensor's protective cap is removed, the light sensor will begin to
capture light.
Power On/Off
Press the Power button to turn power on or off.
Unit of Measure Selection
Press the Lux button to measure in lx units and the Fc to measure
in Foot-candles.
Measurement Range Selection
1. Remove the protective cap from the sensor. For overhead lighting,
the sensor can be placed on a desk or table top.
2. The display will indicate the light level in "Fc" or "Lux".
3. Press the RANGE button to select the range that provides the
maximum resolution. If the 'OL' appears the light measurement is
out of range. To scroll through the measuring ranges press the
RANGE button.
4. Press the
MAX/MIN
Press the MAX/MIN button to display the Maximum and Minimum light
level values recorded during the measurement process.
1. Press the MAX/MIN button to enter the MAX/MIN function. The
"MAX" symbol will appear on the LCD display and hold only the
highest reading. The display will update only when a higher reading
is measured.
2. Press the MAX/MIN button. The "MIN" symbol will appear on the
LCD display and hold only the lowest reading. The display will
update only when a lower reading is measured.
3. Press the MAX/MIN button again. The "MAX MIN" symbol will
appear ashing and the meter will now display the current reading,
but will continue to record the highest and lowest values.
Backlight
button to illuminate the LCD display if needed.
www.GlobalTestSupply.com
continued...
6
Page 7

4. Press the MAX/MIN button again to toggle between "MAX" and
"MIN" displays.
5. To exit the "MAX MIN" mode, press and hold the MAX/MIN button
until the MAX and MIN symbols disappear.
Data Hold
Press the HOLD button to freeze the displayed reading. The "MANU
HOLD" symbol will appear on the LCD display. Press the HOLD button
again to resume normal operation. When the "Data Hold" function is
enabled the analog bargraph will continue to display level changes.
Peak Hold
The Peak Hold feature allows the meter to captures light pulses that rise
or fall down to 10μs.
1. Press and hold the PEAK button until "CAL" appears on the
LCD display.
2. Momentarily press the PEAK button. The 'PMAX' symbol will
appear on the LCD display. The meter will then measure and
display any light pulses. The display will hold the results until a
higher pulse appears.
3. Press the PEAK button again to display the "PMIN" values.
4. To exit the "Peak Hold" mode, press and hold the PEAK button until
the 'PMAX' or 'PMIN' symbol disappears.
Relative Mode
Measurements can be displayed as a difference between the measured
light level and a stored reference value.
1. To store a reading as a reference, press the REL button when the
desired reference measurement is on the LCD display.
2. All subsequent displayed readings will be "relative" to the stored
reference value. For example, if the reference value is 1000 and the
actual light level is 1250, the meter will display 250.
3. To view the reference value, press the REL button again so that
the "REL" symbol begins to ash. The displayed value will be the
reference value.
4. To exit the Relative mode, press and hold the REL button until the
"REL" symbol disappears.
continued...
www.GlobalTestSupply.com
7
Page 8

RESET
Press the RESET button to clear internal memory and exit from REL,
HOLD, PEAK and MAX/MIN. The RESET button will also reset the auto
power off timer.
Backlight
Press the Backlight button to turn the backlight on. Press the button again
to turn it off.
Battery Replacement
When the low battery icon appears on the LCD display, the battery will
need to be replaced. In order to replace the battery, proceed with the
following steps.
1. Turn off the meter.
2. Remove the Phillips-head screw located on the battery compartment.
3. Remove the battery cover.
4. Replace the 9V battery.
5. Reinstall the battery cover.
Applications
• OSHA work environment compliance
• Cinematography and photography applications
• Museum exhibits
• Lighting system installation
• Environmental monitoring
• Interior design projects
• Industrial applications
www.GlobalTestSupply.com
8
Page 9

Appendix A: Recommended Light Levels
by Application
1 fc = 10.76 lx
LOCATIONS lx fc
OFFICE Conference,
Reception Room
Clerical Work 700~1,500 65~140
Typing Drafting 1,000~2,000 93~186
FACTORY Production Line 300~750 28~70
Inspection Station 750~1,500 70~140
Electronic parts
assembly line
Packing Work,
Entrance
HOTEL Public Space 100~200 9~18
Reception 200~500 18~47
Cashier 750~1,000 70~93
STORE Indoor Stair
Corridors
Show Window,
Packing Table
HOSPITAL Patient Room,
Warehouse
Medical
Examination Room
Operating Room 750~1,500 70~140
200~750 18~70
1,500~3,000 140~279
150~300 14~28
150~200 14~18
750~1,500 70~140
100~200 9~18
300~750 28~70
www.GlobalTestSupply.com
continued...
9
Page 10

SCHOOL Auditorium, Indoor
Gymnasium
Classroom 200~750 18~70
Laboratory, Library 500~1,500 47~140
100~300 9~28
Product Care
To keep your instrument in good working order we recommend the following:
• Store your product in a clean, dry place.
• Change the battery as needed.
• If your instrument isn't being used for a period of one month or longer
please remove the battery.
• Clean your product and accessories with biodegradable cleaner. Do not
spray the cleaner directly on the instrument. Use on external parts only.
Product Warranty
REED Instruments guarantees this instrument to be free of defects in
material or workmanship for a period of one (1) year from date of shipment.
During the warranty period, REED Instruments will repair or replace, at no
charge, products or parts of a product that proves to be defective because
of improper material or workmanship, under normal use and maintenance.
REED Instruments total liability is limited to repair or replacement of the
product. REED Instruments shall not be liable for damages to goods,
property, or persons due to improper use or through attempts to utilize the
instrument under conditions which exceed the designed capabilities. In
order to begin the warranty service process, please contact us by phone at
1-877-849-2127 or by email at [email protected] to discuss the
claim and determine the appropriate steps to process the warranty.
www.GlobalTestSupply.com
10
Page 11

Product Disposal and Recycling
Please follow local laws and regulations when disposing or recycling your
instrument. Your product contains electronic components and must be
disposed of separately from standard waste products.
Product Support
If you have any questions on your product, please contact your authorized
REED distributor or REED Instruments Customer Service by phone at
1-877-849-2127 or by email at [email protected].
Please visit www.REEDInstruments.com for the most
up-to-date manuals, datasheets, product guides and software.
Product specifications subject to change without notice.
All rights reserved. Any unauthorized copying or reproduction of
this manual is strictly prohibited without prior written permission
from REED Instruments.
www.GlobalTestSupply.com
11
Page 12

TEST & MEASURE
WITH CONFIDENCE
CHECK OUT OUR LATEST PRODUCTS!
www.GlobalTestSupply.com
 Loading...