

Page 1
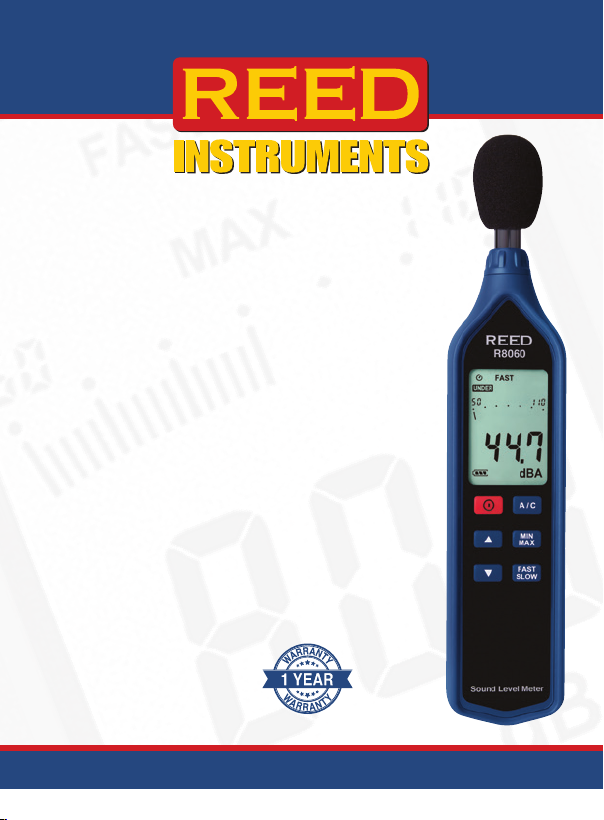
Sound
Level Meter
R8060
Instruction
Manual
www.GlobalTestSupply.com
Page 2

Table of Contents
Introduction ................................................................................................ 2
Product Quality ........................................................................................... 3
Safety ......................................................................................................... 3
Features ...................................................................................................... 3
Included ...................................................................................................... 3
Specications ............................................................................................. 4
Instrument Description ............................................................................... 5
Display Description .................................................................................... 5
Operating Instructions ............................................................................. 6-7
MIN/MAX Hold ...................................................................................... 6
Auto Power OFF .................................................................................... 7
Calibration Procedure ............................................................................ 7
Battery Replacement .................................................................................. 8
AC/DC Signal Output Jack ......................................................................... 8
Applications ................................................................................................ 9
Accessories and Replacement Parts ......................................................... 9
Product Care .............................................................................................. 9
Product Warranty ..................................................................................... 10
Product Disposal and Recycling .............................................................. 10
Product Support ....................................................................................... 10
Introduction
Thank you for purchasing your REED R8060 Sound Level Meter. Please
read the following instructions carefully before using your instrument. By
following the steps outlined in this manual your meter will provide years of
reliable service.
www.GlobalTestSupply.com
2
Page 3

Product Quality
This product has been manufactured in an ISO9001 facility and has been
calibrated during the manufacturing process to meet stated product
specications. If a certicate of calibration is required please contact the
nearest authorized REED distributor or authorized Service Center. Please
note an additional fee for this service will apply.
Safety
Never attempt to repair or modify your instrument. Dismantling your
product, other than for the purpose of replacing batteries, may cause
damage that will not be covered under the manufacturer's warranty.
Servicing should only be provided by an authorized service center.
Features
• High accuracy of ±1.4dB meets Type 2 standards
• Triple range measurement (60dB dynamic range)
• A & C frequency weighting
• Fast & Slow time weighting
• Large, easy-to-read LCD display
• Digital analog bargraph
• Min/Max hold
• AC/DC output signal for use with dataloggers
• Tripod mount for long-term monitoring
• Low battery indicator and auto shut off
Included
• Windshield Ball
• Soft Carrying Case
• Battery
www.GlobalTestSupply.com
3
Page 4

Specifications
Measuring Ranges: 30 to 130dB
Low: 30 to 90dB
Med: 50 to 110dB
High: 70 to 130dB
Dynamic Range: 60dB (in each range)
Accuracy: ±1.4dB
Resolution: Digital: 0.1dB
Analog: 2dB
Response Time: Digital: 500ms
Analog: 100ms
Frequency Range: 20Hz to 8kHz
Frequency Weighting: A, C
Time Weighting: Fast/Slow (125ms and 1s)
Microphone: 0.5" (12.7mm) electret condenser
Digital Analog Bargraph: Yes (30 segment)
Display: 4-digit LCD
Min: Yes
Max: Yes
Alarm Indicators: Under and Over (visual on-screen)
Auto Shut-off: Yes (after 30 minutes/off)
Tripod Mountable: Yes
Low Battery Indicator: Yes
Power Supply: 9V battery
Output: Yes (AC/DC)
Battery Life: Approx 50 hours
Product Certications: CE, IEC 61672-1 Class 2
Operating Temperature: 32 to 104°F (0 to 40°C)
Storage Temperature: 14 to 140°F (-10 to 60°C)
Operating Humidity Range: 10 to 90%
Dimensions: 10.2 x 2.2 x 1" (258 x 55 x 25mm)
Weight: 6.5oz (185g)
www.GlobalTestSupply.com
4
Page 5

Instrument Description
1. Windscreen
2. Display
3. Power Button
4. Up Arrow
(Level Range Increase)
5. Down Arrow
(Level Range Decrease)
6. Frequency Weighting
Button
7. MIN/MAX Hold Button
8. Time Weighting Button
9. Microphone
10. AC/DC Output Terminal
11. Tripod Mounting Screw
12. Battery Cover
Display Description
Auto Power Off Indicator
Under Range Indicator
Bar Graph Indicator
Fast Response Indicator
Slow Response Indicator
Over Range Indicator
Minimum/Maximum
Value Hold Indicator
Calibration Mode Indicator
Reading Indicator
Battery Capacity Indicator
C-Weighting Indicator
A-Weighting Indicator
5
www.GlobalTestSupply.com
Page 6

Operating Instructions
1. Turn the meter on by pressing the Power Button.
2. Press the Time Weighting Button to select the desired Response
Time. If the sound source consists of short bursts, set the response
to FAST. To measure average sound level, select SLOW.
3. Press the Frequency Weighting Button to select the Frequency. Select
"A" Weighting for a general noise sound level, or "C" Weighting for
measuring high level noise. "C" Weighting is a standard weighting of the
audible frequencies commonly used for the measurement of Peak Sound
Pressure Level. If the "C" Weighted level is much higher than the "A"
Weighted level, then there will be a large amount of low-frequency noise.
4.
Press the UP and
a dB range in which the measured level is registering approximately in
the middle of the bar graph. If the over range indicator appears during
your measurement, the upper limit of the selected dB range has been
exceeded. Adjust the selected dB range until the over range indicator
disappears from the screen. Furthermore, if the under range indicator
appears during your measurement, the lower limit of the selected dB
range is too high to register your measurement. Adjust the selected
dB range until the under range indicator disappears.
5. Hold the instrument comfortably in one hand (away from your
body) or position it on a tripod for long-term monitoring. Point the
microphone in the direction of the noise to take a measurement.
Note: Direct contact with strong winds or blowing air on the microphone
may cause measurement errors. These effects can be reduced by using
the included windscreen.
MIN/MAX Hold
Press the MIN/MAX Hold button to display the Maximum and Minimum
sound level values recorded during the measurement process.
1. Press the MIN/MAX Hold Button once to display the maximum value.
2. Press the button again to display the minimum value.
3. Press and hold the button once more to resume normal operation.
DOWN
arrows to select the desired dB range. Choose
www.GlobalTestSupply.com
continued...
6
Page 7

Auto Power OFF
To preserve battery life, the meter is programmed to turn itself off after 30
minutes of inactivity. To turn this function off, while the meter is off, press
and hold the Time Weighting Button while turning the meter on. When the
meter turns on release both the Time Weighting Button and Power button.
The Auto Power Off indicator will not appear on the display, conrming
this feature is now disabled. If the meter is turned off then back on, the
"Auto Power Off" feature will be enabled again.
Calibration Procedure
R8090
(1KHz)
94dB
OFF
Sound Level Calibrator
114dB
In order to calibrate the R8060 an external calibrator that can provide a
94.0dB signal is required (REED R8090). If the meter has been exposed
to extreme conditions or has not been used in a long period of time the
meter should be calibrated by following steps 1 through 6 below.
1. Remove windshield ball.
2. While the meter is off, press and hold the MIN /MAX Hold button
while turning the meter on.
3. When the meter turns on, release both the MIN/MAX Hold and Power
button to enter calibration mode as indicated on-screen by "CAL 94dB".
4. Insert the microphone into the calibrator.
5. Press the UP and DOWN arrow buttons to increase or decrease the
dB level to match the Sound Calibrator output.
6. Once the desired dB level has been attained press the MIN/MAX
button to save the setting and exit the calibration mode.
Note: Press the Power button to exit the calibration mode at any time.
IEC 942 CLASS 2
www.GlobalTestSupply.com
7
Page 8
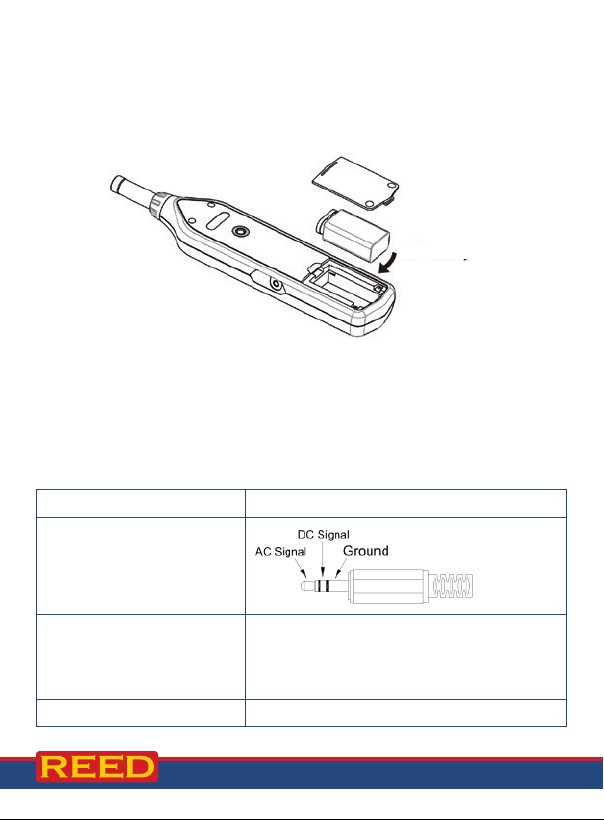
Battery Replacement
Pile 9V
Periodically check the Battery Indicator on the display. When there are no
more bars on the Battery Indicator the batteries will need to be replaced.
Remove the battery cover on the back and insert a new 9V Battery.
9V Battery
AC/DC Signal Output Jack
The meter is equipped with an AC/DC output jack to connect and
integrate with external systems. For example, the AC output can be used
with a frequency analyzer or oscilloscope to identify the frequency level
during a measurement. The DC output is used to identify the dB level
during a measurement.
AC/DC Output Connector 3.5mm Sub-Miniature Phone Jack
Connector Diagram
AC Output Voltage Range 1Vrms at FS (full scale)
(FS refers to the upper limit of the selected
dB level range. For example if 30-90dB is
the selected level range, 1Vrms = 90dB)
DC Output Voltage Range 10mV/dB
www.GlobalTestSupply.com
8
Page 9

Applications
• Preventative Maintenance
• Industrial Machinery/Equipment
• Construction Sites
• Ensuring Safe Working Conditions
• Public Venues / Concerts
• Code Enforcement
• Trafc
• Appliance Noise Testing
Accessories and Replacement Parts
SB-01 Replacement Windshield Ball
CA-05A Soft Carrying Case
R8888 Deluxe Hard Carrying Case
R8090 Sound Level Calibrator
R1500 Tripod
Don't see your part listed here? For a complete list of all accessories and
replacement parts visit your product page on www.REEDInstruments.com.
Product Care
To keep your instrument in good working order we recommend the following:
• Store your product in a clean, dry place.
• Change the battery as needed.
• If your instrument isn't being used for a period of one month or longer
please remove the battery.
• Clean your product and accessories with biodegradable cleaner. Do not
spray the cleaner directly on the instrument. Use on external parts only.
www.GlobalTestSupply.com
9
Page 10

Product Warranty
REED Instruments guarantees this instrument to be free of defects in
material or workmanship for a period of one (1) year from date of shipment.
During the warranty period, REED Instruments will repair or replace, at no
charge, products or parts of a product that proves to be defective because
of improper material or workmanship, under normal use and maintenance.
REED Instruments total liability is limited to repair or replacement of the
product. REED Instruments shall not be liable for damages to goods,
property, or persons due to improper use or through attempts to utilize the
instrument under conditions which exceed the designed capabilities. In
order to begin the warranty service process, please contact us by phone
at 1-877-849-2127 or by email at [email protected] to discuss
the claim and determine the appropriate steps to process the warranty.
Product Disposal and Recycling
Please follow local laws and regulations when disposing or recycling
your instrument. Your product contains electronic components and
must be disposed of separately from standard waste products.
Product Support
If you have any questions on your product, please contact your authorized
REED distributor or REED Instruments Customer Service by phone at
1-877-849-2127 or by email at [email protected].
Please visit www.REEDInstruments.com for the most
up-to-date manuals, datasheets, product guides and software.
Product specifications subject to change without notice.
All rights reserved. Any unauthorized copying or reproduction of this
manual is strictly prohibited without prior written permission from
REED Instruments.
10
www.GlobalTestSupply.com
Page 11
TEST & MEASURE
WITH CONFIDENCE
Access our
Product Catalog
Over 200 portable test and
measurement instruments
www.GlobalTestSupply.com
Page 12

TEMPERATURE
& HUMIDITY
SOUND
MOISTURE
www.GlobalTestSupply.com
AIR VELOCITY
ELECTRICAL
 Loading...