


Portable
Radiation
Disometer
R8008
Instruction
Manual
www.GlobalTestSupply.com

Table of Contents
Introduction .......................................................................................................3
Product Quality ..................................................................................................3
Safety ................................................................................................................3
Features .............................................................................................................3
Specications ....................................................................................................4
Included .............................................................................................................5
Instrument Description ......................................................................................5
Display Description ...........................................................................................5
Software Installation ..........................................................................................6
Operating Instructions ................................................................................. 6-10
Power ON/OFF .............................................................................................6
Ray Selection Switch ............................................................................... 6-7
Backlight .......................................................................................................7
Unit Conversion for Dose Rate .....................................................................7
Dose Accumulation Rate .......................................................................... 7-8
Setting Dose Accumulation Time .................................................................8
Pulse Counting .............................................................................................9
Data Storage .......................................................................................... 9-10
Bluetooth Recording Mode ........................................................................10
Battery Life Indicator ..................................................................................10
Setup Menu ............................................................................................... 10-12
Set Date .....................................................................................................10
Set Time .....................................................................................................11
Setting Alarm Threshold .............................................................................11
Enabling/Disabling Pulse Sound .......................................................... 11-12
Setting Average Measurement Time ..........................................................12
Turning Bluetooth Data Transmission ON/OFF ..........................................12
Battery Replacement .......................................................................................13
Accessories and Replacement Parts ..............................................................13
Product Care ...................................................................................................13
Product Warranty ............................................................................................13
Product Disposal and Recycling .....................................................................14
Product Support ..............................................................................................14
www.GlobalTestSupply.com

Introduction
Thank you for purchasing your REED R8008 Portable Radiation Disometer.
Please read the following instructions carefully before using your instrument.
By following the steps outlined in this manual your meter will provide years
of reliable service.
Product Quality
This product has been manufactured in an ISO 9001 facility and has been
calibrated during the manufacturing process to meet stated
product specications.
Safety
Never attempt to repair or modify your instrument. Dismantling your product,
other than for the purpose of replacing batteries, may cause damage that will
not be covered under the manufacturer's warranty. Servicing should only be
provided by an authorized service center.
Features
• Detects Alpha, Beta, Gamma, and X radiation
• Automatic selection of measurement range
• Average time and pulse counting functions
• Large backlit LCD display with bargraph indicator
• Accumulation of radiation detection values and conversions between
different measurement units
• User-adjustable alarms (audio/visual indicators)
• Internal memory stores up to 4000 groups of data internally
• Bluetooth connectivity wirelessly streams data to computer via software
• Low battery indicator and auto shut off
www.GlobalTestSupply.com

Specifications
Measured Rays: Alpha, Beta, Gamma, X
Radiation Dose Range: 0.0001 to 1000µSv/h
Pulse Dose Rate Range: 0 to 4000cpm/cps
Accumulated Radiation Dose Value: 0.001µSv to 9999Sv
Accumulated Pulse Dose Rate: 0 to 9999
Sensitivity: When an environment background of
energy is equal to 1Sv/h (Cobalt-60 ray),
the pulses would equal 108 or
1000 CPM/mR/hr
Alpha: From 4.0 MeV
Beta: From 0.2 MeV
Gamma: From 0.02 MeV
X: From 0.2 MeV
Accuracy: <10% (less than 500µSv/h)
<20% (less than 600µSv/h)
Display: Dual LCD
Backlit Display: Yes
Digital Bargraph Indicator: Yes
Adjustable Alarms: Yes (Audible/Visual Indicators)
Average Time Function: 2 to 120 seconds
Natural Environment Reading: 0 to 0.2µSv/h
Datalogging Capabilities: Yes
Real-Time Clock and Date Stamp: Yes
Internal Memory: Yes (up to 4000 groups of data)
Auto Shut-Off: Yes (after 10 minutes/off)
Low Battery Indicator: Yes
Power Supply: 4 AA Batteries
PC Connectivity: Yes (Wireless via Bluetooth)
Software: Yes (Included)
Product Certications: CE
Operating Temperature: 32 to 122°F (0 to 50°C)
Storage Temperature: 14 to 140°F (-10 to 60°C)
Operating Humidity Range: 10 to 80%
Dimensions: 7.9 x 2.8 x 1.9" (200 x 70 x 45mm)
Weight: 7.3oz (206g)
www.GlobalTestSupply.com
Included
• Software CD
• Hard Carrying Case
• Batteries
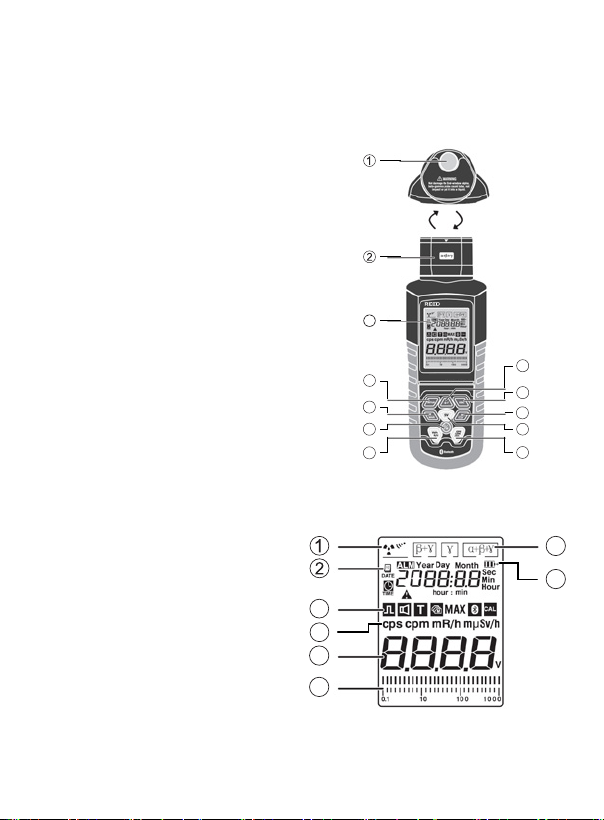
Instrument Description
1. Sensor Window of G.M.
Geiger Counter Tube
2. Ray Selection Switch
3. LCD Display
4. Setup Button
5. Data Storage/Down Arrow
6. Power/Backlight Button
7. Unit Button
8. Enter Button
9. ESC Button
10. Battery/Up Arrow
11. Dose Button
12. Pulse Button
Display Description
1. Boot Nuclear Radiation
Measuring Icon
2. Date/Time Icon
3. Setup Menu Indicators
4.
Measuring Function Indicators
5. Measurement and
Unit Indicator
6. Bar Measurement Reading
7. Ray Type Indicator
8. Battery Level Indicator
Radiation Detector
R8008
8
9
10
11
12
3
4
5
6
7
7
8
3
4
5
6
www.GlobalTestSupply.com
Software Installation
Install the included software by placing the supplied program disc in the
PC's CD-ROM drive. If the installation program does not automatically start,
open and browse the CD-ROM drive from your computer. Double click on
the setup le and follow the on-screen prompts to install the software.
If your computer does not have a CD drive please visit
www.reedinstruments.com/software to download the latest R8008 software.
Full specications and operating system compatibility can be found on
the product page at www.reedinstruments.com.
If you have specic questions related to your application and/or questions
related to software setup and functionality please contact the nearest
authorized distributor or customer service at info@reedinstruments.com
or 1-877-849-2127.
Operating Instructions
The R8008 is intended to detect the radiation dose rate of
α+β+γ and X-rays radiated from an object and not the physical
quantity describing the radioactivity of an object/area.
Power ON/OFF
Press and hold the button for 2 seconds to turn the meter on.
It will beep and the LCD screen will activate indicating it has turned on.
Press and hold the
the meter off properly or loss of data may occur.
Ray Selection Switch
Rotate the ray selection either clockwise or counter clockwise to select
the ray you wish to measure. Be careful when rotating the switch to avoid
damage to the sensor.
Note: The meter will detect x-rays in any of the three positions selected below.
button again to turn the meter off. Be sure to turn
www.GlobalTestSupply.com
continued...
The ray types you can measure are as follows:
• Gamma rays only as indicated by the y symbol on the ray selection switch.
Note: With the switch in gamma rays position, an aluminium plate screens
the counter tube window against alpha and beta rays.
• Gamma and Beta rays as indicated by the ß + y symbols on the ray
selection switch.
Note: With the switch in the gamma and beta rays position an aluminium
foil now screens the counter tube window against alpha rays.
• Alpha, Beta and Gamma rays as indicated by the α + ß + y symbols on
the ray selection switch.
Note: With the switch in the alpha, gamma and beta rays position the
counter tube window is now open to all three types of rays.
Backlight
When the meter is on, press the button to activate or deactivate the
LCD backlight. The backlight will automatically turn off after 1 minute.
Unit Conversion for Dose Rate
When the meter is powered ON the default unit of measurement is set to
μSv/h. Press the
Note: The conversion is based on the formula: 10μSv/h = 1mRem/h.
button to convert the unit of measurement to mRem/h.
Dose Accumulation Rate
The absorbed dose is the radiation energy absorbed per unit mass
of human tissue and organs and is calculated in Sv or mSv.
1. Press the SV button to enter the innite dose accumulation mode,
and the icon "μSv" will appear on the display. This mode calculates
the dose accumulation rate for no set amount of time.
2. To enter the timed dose accumulation mode press the SV button a
second time.
Note: The default set time is 60 minutes. To modify the set time, refer to
Setting Timed Dose Accumulation.
www.GlobalTestSupply.com
continued...

3. Press the SV button a third time to stop the timed measurement and
the accumulated value will appear on the LCD display.
4. Press the SV button again to return to innite dose mode.
Note: At any time, you can press the ESC or UNIT buttons to exit the
dose accumulation mode and resume normal operation.
Setting Dose Accumulation Time
1. While in dose accumulation time mode press and hold the SV
button for 2 seconds.
2. The icons "μSv" and "min" will appear on the LCD display along with
060 (default set time) which indicates 60 minutes of set time.
Note: The maximum set time value that can be set is 999 minutes.
3. Make sure to start with the leftmost digit.
4. To toggle between digits press the
digit or press the ESC button to return to the previous digit.
5. When ready, press the and arrows to adjust the ashing digit.
6. Press the button to conrm your selection and proceed to the
next digit.
7. When the last digit has been selected and conrmed, the set time
will no longer be ashing.
Note: The selected set time is automatically congured for pulse
counting time.
8. Press the
button to begin measuring the dose accumulation for
the set amount of time.
9. Throughout the measurement process, the "TIME" icon will blink on
the LCD display.
10. The meter will beep when the set time is up and the accumulated
dose value will appear on the screen.
11. At any time, you can press the SV button to pause the timer, and
press it again to resume the measurement process. Press and hold
the SV button to re-enter the timing setup mode if required.
Note: The instrument will exit the timed dose setup after approximately
15 seconds of inactivity.
button to move to the next
www.GlobalTestSupply.com
continued...
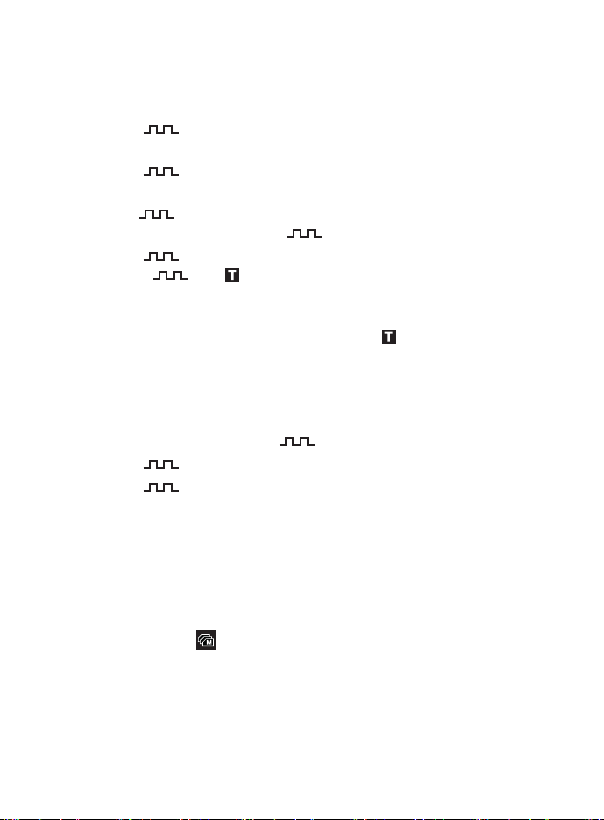
Pulse Counting
This meter can be used as a geiger counter, displaying received cumulative
pulses on the LCD. In this mode the meter will only record received pulses
and calculated pulses, which will not be converted to Sv.
1. Press the button to activate "Pulse Counting" mode as
indicated by cps (Pulse/Second) on the LCD display.
2. Press the button again to switch from cps (Pulse/Second) to
cpm (Pulse/Minute).
3. Press the button a third time to resume "Pulse Counting" mode for
no set amount of time while the icon will appear on the LCD display.
4. Press the button a fourth time to enter "Pulse Counting Time"
mode. The and icons will appear on the LCD display.
Note: The default set time is 60 minutes. To modify the set time, refer to
Setting Dose Accumulation Time for details.
5. Throughout the measurement process, the
icon will blink on the
LCD display.
6. The meter will beep when the set time is up and the cumulative pulse
count value will appear on the screen.
Note: The meter can only record up to 4000 pulses.
7. At any time, you can press the button to end the timed pulse count.
8. Press the button again to return to the CPS function.
9. Press the button a fth time to stop pulse counting and press it
once more to return to "CPS Pulse Counting" mode.
Note: At any time, you can press the ESC or UNIT buttons to exit the
"Dose Accumulation" mode and resume normal operation.
Data Storage
1. When taking a measurement, press the SAVE button to enter the
data storage mode.
2.
The data storage icon will appear on the LCD display.
www.GlobalTestSupply.com
continued...

3.
A measurement will be saved every minute which can then be
downloaded to the included software via Bluetooth when testing
is completed.
4. The instrument can hold up to a maximum of 4000 groups of data.
Note: When the memory is full the meter will automatically record over the
rst measurements.
5. Press the SAVE button again to exit recording mode.
Bluetooth Recording Mode
When the meter's Bluetooth functionality is turned on, all measurements
can be transmitted in real time through the software over Bluetooth. Refer
to Setting Bluetooth Data Transmission for details.
Battery Life Indicator
1. To check on the meter's battery status, press the button.
2. The meter will now indicate the remaining internal battery voltage
3. Press the ESC button to resume normal operation.
Setup Menu
You can adjust the following preferences in the Setup Menu:
• Date & Time
• Alarm Threshold
• Pulse Sound
• Average Measurement Time
• Bluetooth Data Transmission
Set Date
1. Press the SETUP button to enter the set up mode.
2. Press the and arrows to select "DATE".
3. Press the button to enter the Date Setup screen.
4. Press the and arrows to adjust the Year which is the rst
ashing value.
5. Press the button to proceed to the next value.
6. Repeat steps 4 and 5 to set the "Month" and "Day" values.
7. Press the ESC button to exit the Setup Menu and resume
normal operation.
continued...
www.GlobalTestSupply.com
Set Time
1. Press the SETUP button to enter the set up mode.
2. Press the and arrows to highlight the icon.
3. Press the button to enter the "Time Setup" screen.
4. Press the and arrows to adjust the Hour digit which is the rst
ashing value.
5. Press the button to proceed to the next value.
6. Repeat steps 4 and 5 to set the "min" and "sec" values.
7. Press the ESC button to exit the setup menu and resume normal operation.
Setting Alarm Threshold
An alarm will sound when the measured value is greater than the Alarm
Threshold. The default alarm is set at 205μSv/h. Follow the steps below to
set the alarm threshold.
1. Press the SETUP button to enter the set up mode.
2. Press the
3. Press the button to the "Alarm Threshold Setup" screen.
4. Make sure to start with the leftmost digit.
5. To toggle between digits press the enter button to move to the next
digit or press the ESC button to return to the previous digit.
6. When ready, press the and arrows to adjust the ashing digit.
7. Press the button to conrm your selection and proceed to the
next digit.
8. When the last digit has been selected and conrmed, press the ESC
button to exit the setup menu and resume normal operation.
and arrows to highlight the "ALM" icon.
Enabling/Disabling Pulse Sound
When radiation is detected the meter will make a "ticking" sound. The
stronger the radiation signal the faster the "ticking" sound will be. Follow
the steps below to enable/disable the pulse sound.
1. Press the SETUP button to enter the set up mode.
2. Press the
3. Press the button to enter the pulse sound setup screen.
and arrows to highlight " ".
continued...
www.GlobalTestSupply.com

4. Press the and arrows to select either "ON" or "OFF".
5. Press the
6. Press the ESC button to exit the setup menu and resume normal operation.
button to conrm the value.
Setting Average Measurement Time
The processing measurement time can be set from 8 to 120 seconds.
Note: An increase of radiation will automatically and proportionally reduce
the average measurement time. When the time is set to 8 seconds and the
radiation strength is more than 5μSv/h, the response time will be adjusted
to 2 seconds. The factory default time is set to 30 seconds. Follow the
steps below to set the average measurement time.
1. Press the SETUP button to enter the set up mode.
2. Press the
3. Press the button to enter the average measurement time
setup screen.
4. Make sure to start with the leftmost digit.
5. To toggle between digits press the button to move to the next
digit or press the ESC button to return to the previous digit.
6. When ready, press the and arrows to adjust the ashing digit.
7. Press the button to conrm your selection and proceed to the
next digit.
8. When the last digit has been selected and conrmed press the ESC
button to exit the setup menu and resume normal operation.
and arrows to highlight the icon.
Turning Bluetooth Data Transmission ON/OFF
1. Press the SETUP button to enter the set up mode.
2. Press the and arrows to highlight .
3. Press the button to enter the Bluetooth data transmission
activation screen.
4. Press the and arrows to select either "ON" or "OFF".
5. Press the button to conrm the value.
6. Press the ESC button to exit the setup menu and resume normal operation.
7. The icon will appear on the main screen conrming.
www.GlobalTestSupply.com

Battery Replacement
When the low battery icon appears on the LCD display, you will need to
replace the batteries. Remove the battery cover using a Phillips head
screwdriver, insert 4 x new "AA" batteries and secure the cover.
Accessories and Replacement Parts
• CA-05A Soft Carrying Case
Don't see your part listed here? For a complete list of all accessories and
replacement parts visit your product page on www.reedinstruments.com.
Product Care
To keep your instrument in good working order we recommend the following:
• Store your product in a clean, dry place.
• Change the battery as needed.
• If your instrument isn't being used for a period of one month or longer
please remove the battery.
• Clean your product and accessories with biodegradable cleaner. Do not
spray the cleaner directly on the instrument. Use on external parts only.
Product Warranty
REED Instruments guarantees this instrument to be free of defects in
material or workmanship for a period of one (1) year from date of shipment.
During the warranty period, REED Instruments will repair or replace, at no
charge, products or parts of a product that proves to be defective because
of improper material or workmanship, under normal use and maintenance.
REED Instruments total liability is limited to repair or replacement of the
product. REED Instruments shall not be liable for damages to goods,
property, or persons due to improper use or through attempts to utilize the
instrument under conditions which exceed the designed capabilities. In
order to begin the warranty service process, please contact us by phone at
1-877-849-2127 or by email at info@reedinstruments.com to discuss the
claim and determine the appropriate steps to process the warranty.
www.GlobalTestSupply.com

Product Disposal and Recycling
Please follow local laws and regulations when disposing or recycling your
instrument. Your product contains electronic components and must be
disposed of separately from standard waste products.
Product Support
If you have any questions on your product, please contact your authorized
REED distributor or REED Instruments Customer Service by phone at
1-877-849-2127 or by email at info@reedinstruments.com.
Please visit www.REEDINSTRUMENTS.com for the most
up-to-date manuals, datasheets, product guides and software.
Product specifications subject to change without notice.
All rights reserved. Any unauthorized copying or reproduction of
this manual is strictly prohibited without prior written permission
from REED Instruments.
www.GlobalTestSupply.com

TEST & MEASURE
WITH CONFIDENCE
www.GlobalTestSupply.com

www.GlobalTestSupply.com
 Loading...