

Page 1
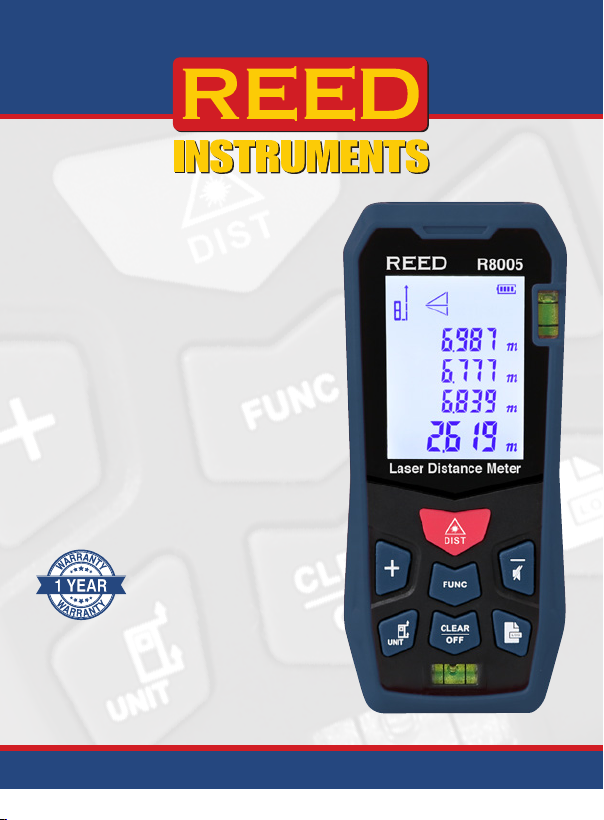
Laser
Distance
Meter
R8005
Instruction
Manual
www.REEDInstruments.com
www.GlobalTestSupply.com
Page 2

Table of Contents
Introduction ................................................................................................ 3
Product Quality ........................................................................................... 3
Safety ......................................................................................................... 4
Features ...................................................................................................... 5
Applications ................................................................................................ 5
Specications ............................................................................................. 6
Instrument Description ............................................................................... 7
Display Description .................................................................................... 7
Operating Instructions ............................................................................. 8-9
Power ON/OFF ...................................................................................... 8
Backlight ................................................................................................ 8
Calibration Procedure ............................................................................ 8
Reference Point Setting ........................................................................ 9
Setting the Unit of Measure ................................................................... 9
Measurement Units ............................................................................... 9
Distance, Area, Volume, Pythagorean, Cumulative and
Regressive Measurement ......................................................................9-14
Single Measurement .............................................................................. 9
Continuous Measurement ................................................................... 10
Area Measurement .............................................................................. 10
Volume Measurement .......................................................................... 10
Inderect Measurement ...................................................................11-12
Cumulative Mode (Single Measurement Mode) .................................. 13
Subtraction Mode (Single Measurement Mode) .................................. 13
Cumulative Mode (Area Measurement Mode) ..................................... 13
www.REEDInstruments.com
www.GlobalTestSupply.com
continued...
2
Page 3

Subtraction Mode (Area Measurement Mode) .................................... 14
Cumulative Mode (Volume Measurement Mode) ................................ 14
Subtraction Mode (Volume Measurement Mode) ................................ 14
Saving Measurement Values .................................................................... 14
Browse/Delete Saved Measurement Values ............................................ 15
Battery Replacement ................................................................................ 15
Troubleshooting Error Codes.................................................................... 15
Product Warranty ..................................................................................... 16
Product Disposal and Recycling .............................................................. 16
Product Support ....................................................................................... 16
Introduction
Thank you for purchasing your REED R8005 Laser Distance Meter. Please
read the following instructions carefully before using your instrument. By
following the steps outlined in this manual your meter will provide years of
reliable service.
Product Quality
This product has been manufactured in an ISO9001 facility and has been
calibrated during the manufacturing process to meet stated product
specications. If a certicate of calibration is required please contact the
nearest authorized REED distributor or authorized Service Center. Please
note an additional fee for this service will apply.
www.REEDInstruments.com
www.GlobalTestSupply.com
3
Page 4

Safety
• Never attempt to repair or modify your
instrument. Dismantling your product,
other than for the purpose of replacing
batteries, may cause damage that will
not be covered under the manufacturer's
warranty. Servicing should only be
provided by an authorized service center.
• Use extreme caution when the laser beam is turned on.
• Do not let the beam enter your eye, another person's eye or the eye of
an animal.
• Be careful not to point the beam off a reective surface and strike
your eye.
• Do not allow the laser light beam to impinge on any gas which
can explode.
www.REEDInstruments.com
www.GlobalTestSupply.com
4
Page 5

Features
• Designed for one-handed operation
• User selectable unit of measure (imperial/metric)
• Laser target pointer
• Reference point selection (front or rear of instrument)
• Quick, self calculation with real-time readout
• Backlit multi-line LCD display
• Area, Volume and Max/Min functions
• Addition, Subtraction and indirect 2/3 point (Pythagoras) calculations
• Integrated bubble level (Horizontal and vertical)
• Continuous measurement mode
• Internal memory saves up to 99 readings
• Low battery indicator and auto shut off
• Includes carrying case and batteries
Applications
• Measuring conduit and wire lengths
• Light Retrotting Projects
• Piping/exhausts/ventilation and equipment installation
• Conduit layout and installation
• Air ventilation and duct work positioning
• Air volume calculations
• Hot/cold water piping locations
• Determining wire length and duct sizing
• Floor plans
• Network room layout
www.REEDInstruments.com
www.GlobalTestSupply.com
5
Page 6

Specifications
Measuring Range: 164' (50m)
Accuracy: ±(2.0mm + d x 0.005%)
Measuring Units: m, ft, in, ft + in
Sensor Type: Laser
Laser Type: 630 to 670nm, <1mW
Display: LCD (multi-line)
Backlit Display: Yes
Start Point Selection: Yes (Front/Back)
Reading Mode: 2 (Single/Continuous)
Maximum and
Minimum Functions: Yes
Calculation Functions: Addition, Subtraction, Area, Volume,
Sum of Lengths, 2 point indirect
(pythagoras), 3 point indirect
Internal Memory: Yes (up to 99 readings)
Response Time: 2 seconds
Auto Shut-off: Yes (after 3 minutes)
Low Battery Indicator: Yes
Power Supply: 2 x AAA Batteries
Laser Class: Class II
Product Certications: CE, RoHS
Operating Temperature: 32 to 104°F (0 to 40°C)
Storage Temperature: -4 to 140°F (-20 to 60°C)
Operating Humidity Range: <85% RH
Dimensions: 4.8 x 2.05 x 1.16" (122 x 52 x 29.5mm)
Weight: 3.5oz (100g)
www.REEDInstruments.com
www.GlobalTestSupply.com
6
Page 7
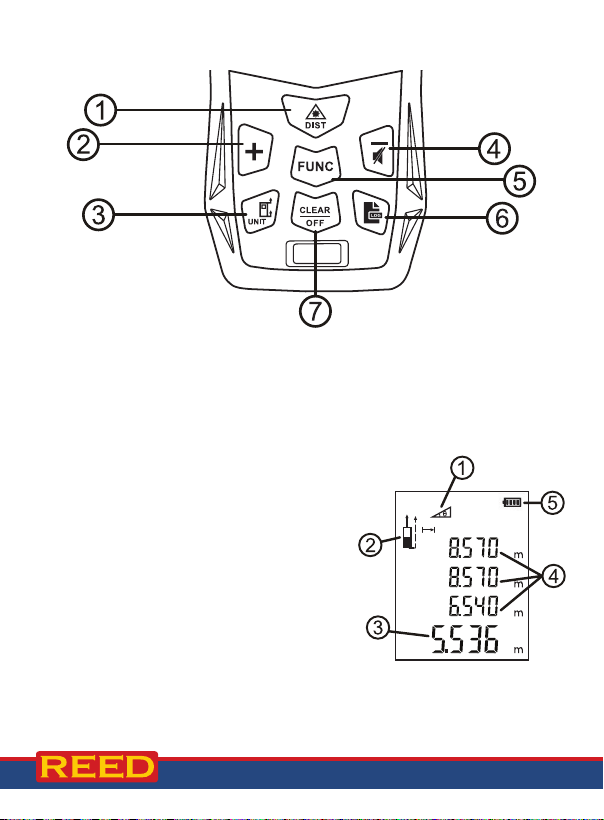
Instrument Description
1. Power/Measure Button
2. Plus (+) Button
3. Measurement Point/Unit
Selection Button
4. Minus (-)/Audible On/Off
Button
Display Description
1. Measurement Mode Indicator
2. Laser Emission Indicator
3. Main Measurement Display Area
4. Secondary Measurement
Display Area
5. Battery Status Indicator
www.REEDInstruments.com
www.GlobalTestSupply.com
5. Function Button
6. Log Button
7. Power OFF/Clear Button
7
Page 8
Operating Instructions
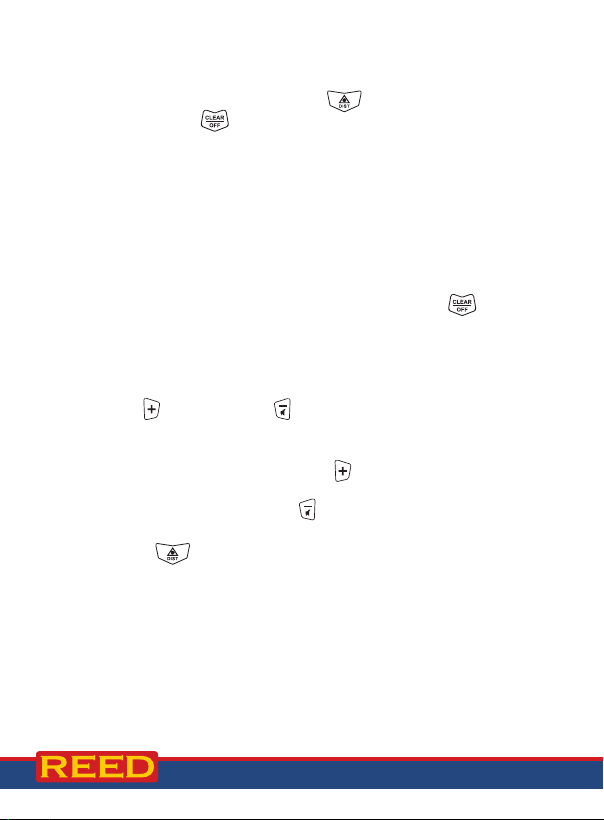
Power ON/OFF
To turn the meter on, press and hold the button. To turn the meter
off, press and hold the button for approx. 3 seconds. The device will
power off automatically after idling for 180 seconds.
Backlight
The backlight will turn on after pressing any button, and turn off after 15
seconds of idling to save battery life.
Calibration Procedure
The R8005 includes a self-calibration mode to ensure measurement
accuracy.
1. While the meter is powered off, press and hold the button
while turning the meter on.
2. Release both buttons when "CAL" and a ashing number
appear on the display indicating that the meter is now in
self-calibration mode.
3. Use the button and the button to adjust error value. The
adjustment range is -9 to 9mm.
For example, if the meter appears to be measuring 2mm lower
than the actual distance, press the to increase the calibration
value by 2mm. If the meter appears to be measuring 3mm above
the actual distance, press the button to decrease the calibration
value by 3mm.
4. Press the button to save the set calibration result and resume
normal operation.
www.REEDInstruments.com
www.GlobalTestSupply.com
continued...
8
Page 9
Reference Point Setting
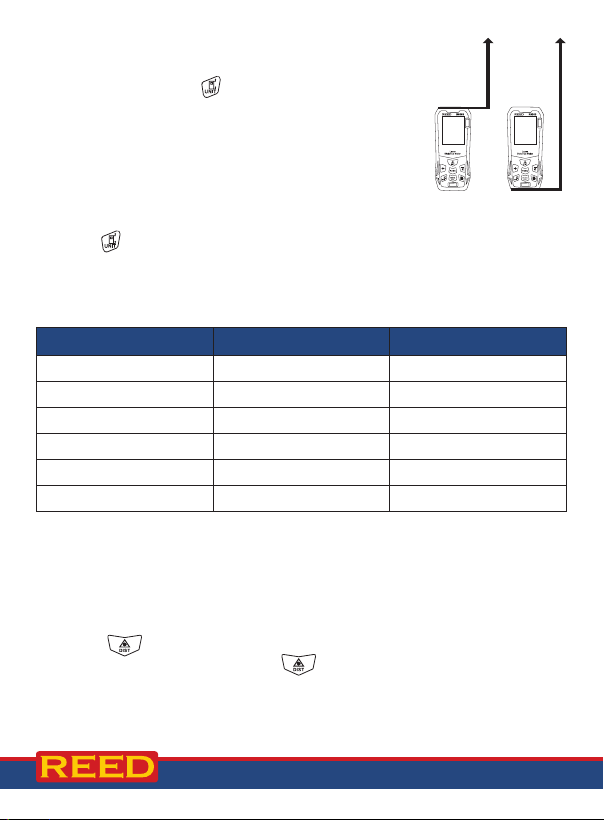
The default reference point setting is from the bottom
of the meter. Press the button to toggle between
the bottom and top reference points of the meter. A
beep will emit whenever the reference setting
is changed.
Note: The meter does not automatically save the
selected reference point when turned off.
Setting the Unit of Measure
Hold the button to toggle between units of measure while in a
measurement mode. The default unit of measure is 0.000m. There are a
total of 4 selectable units.
Measurement Units
Length Area Volume
0.000m 0.000m² 0.000m³
0.00m 0.00m² 0.00m³
0.0in 0.00in² 0.00ft³
0 1/16 in 0.00ft² 0.00ft³
0'00" 1/16 0.00ft² 0.00ft³
0.00ft 0.00ft² 0.00ft³
Distance, Area, Volume, Pythagorean,
Cumulative and Regressive Measurement
Single Measurement
Press the button in measurement mode to emit laser and lock
the measurement point. Press the button again for single distance
data
measurement. Measurement result will be displayed on the main
display area.
www.REEDInstruments.com
www.GlobalTestSupply.com
continued...
9
Page 10
Continuous Measurement
Hold the button on measurement mode to enter continuous
measurement mode. Secondary display area will display the maximum/
minimum measurement values during continuous measurement mode.
Main display area will display the current measurement value. Press the
button or the button to exit continuous measurement mode.
Area Measurement
Press the button and the display will show a rectangle. One side of
the rectangle will ash. Complete the following operations:
1. Press the button to measure the rst side (length)
2. Press the button to measure the second side (width)
The device will calculate the area automatically and the result will be
shown on the main display area.
Secondary display area shows the measurement values of the rectangle's
length and width.
During measurement, use the
and restart measurement.
Press the
button twice to exit area measurement mode.
button to clear the measurement result
Volume Measurement
Press the button twice to enter volume measurement mode and
a square will ash on the display. One side of the rectangle will ash.
Complete the following operations:
1. Press the button to measure the rst side (length)
2. Press the
3. Press the
The device will automatically calculate the volume and the result will be
shown in the main display area.
Secondary display area shows the measurement values of the square's
length, width, and height.
During measurement, use the
and restart measurement.
button to measure the second side (width)
button to measure the third side (height)
button to clear the measurement result
www.REEDInstruments.com
www.GlobalTestSupply.com
continued...
10
Page 11
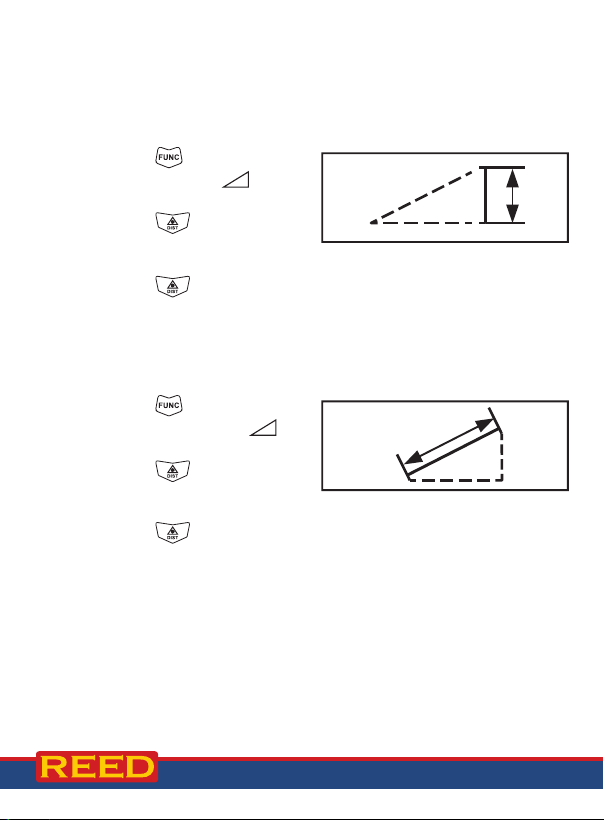
Indirect Measurement
b
c
a
x
b
a
x
b
c
a
x
b
c
a
x
This meter has four modes that use the Pythagorean Theorem to measure
the distance of one side of a triangle, which helps users perform indirect
measurements in complex situations.
Indirect Measurement 1
1. Press the
2. The hypotenuse of will
ash on the display.
3. Press the
measure the length of the
dotted hypotenuse (a) as indicated on the LCD display.
4. Press the button to measure the length of the dotted angle
side (base) (b) as indicated on the LCD display.
5. The meter will automatically calculate the length of the solid
right-angle side (x).
Indirect Measurement 2
1. Press the
2. The right-angle side of will
ash on the display.
3. Press the button to
measure the length of the
dotted leg (a) as indicated on the LCD display.
4. Press the button to measure the length of the dotted
base-side (b) as indicated on the LCD display.
5. The meter will automatically calculate the length of
the hypotenuse (x).
button 3 times.
button to
button 4 times.
a
x
b
x
a
b
www.REEDInstruments.com
www.GlobalTestSupply.com
continued...
11
Page 12
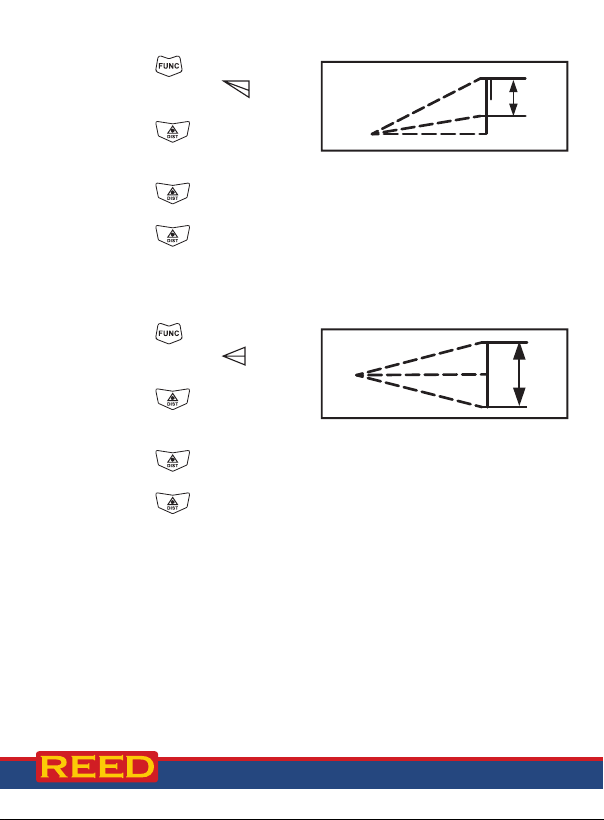
Indirect Measurement 3
b
c
a
x
1. Press the button 5 times.
2. The hypotenuse of will
ash on the display.
3. Press the button to
measure the length of the
dotted hypotenuse (a) as indicated on the LCD display.
4. Press the button to measure the length of the other dotted
hypotenuse (b) as indicated on the LCD display.
5. Press the button to measure the length of the dotted
base-side (c) as indicated on the LCD display.
6. The meter will automatically calculate the length of the leg (x).
Indirect Measurement 4
button 6 times.
1. Press the
2. The hypotenuse of will ash
on the display.
3. Press the button to
measure the length of the
dotted hypotenuse (a) as indicated on the LCD display.
4. Press the button to measure the length of the dotted
base-side (b) as indicated on the LCD display.
5. Press the button to measure the length of the other dotted
hypotenuse (c) as indicated on the LCD display.
6. The meter will automatically calculate the length of the leg (x).
Note: In the Pythagorean measurement mode, the length of the right-angle
side must be less than the hypotenuse, or a calculation error will be
shown on the display. To ensure measurement accuracy, measurement
must be taken from the same starting point followed by the hypotenuse,
then the angle side.
a
a
c
x
b
c
b
x
www.REEDInstruments.com
www.GlobalTestSupply.com
continued...
12
Page 13
Cumulative Mode (Single Measurement Mode)
1. After obtaining a single distance measurement reading, press
the button to enter the cumulative mode.
2. The "+" symbol appears in the secondary measurement display
area conrming you are now ready to proceed.
3. Press the
4. The main measurement display area will now display the sum of
both measurements.
button to measure another single distance.
Subtraction Mode (Single Measurement Mode)
1. After obtaining a single distance measurement reading, press
the button to enter the subtraction mode.
2. The "-" symbol appears in the secondary measurement
display area.
3. Press the
4. The main measurement display area will now display the difference
between both measurements.
button to measure another single distance.
Cumulative Mode (Area Measurement Mode)
1. After obtaining an area measurement reading, press the button
to enter the cumulative mode.
2. The "+" symbol appears in the secondary measurement display
area conrming you are now ready to proceed.
3. Measure another area.
4. The main measurement display area will now display the sum of
both area measurements.
www.REEDInstruments.com
www.GlobalTestSupply.com
continued...
13
Page 14

Subtraction Mode (Area Measurement Mode)
1. After obtaining an area measurement reading, press the button
to enter the subtraction mode.
2. The "-" symbol appears in the secondary measurement display
area conrming you are now ready to proceed.
3. Measure another area.
4. The main measurement display area will now display the difference
between both area measurements.
Cumulative Mode (Volume Measurement Mode)
1. After obtaining a volume measurement reading, press the button
to enter the cumulative mode.
2. The "+" symbol appears in the secondary measurement display
area conrming you are now ready to proceed.
3. Measure another area.
4. The main measurement display area will now display the sum of
both area measurements.
Subtraction Mode (Volume Measurement Mode)
1. After obtaining a volume measurement reading, press the button
to enter the subtraction mode.
2. The "-" symbol appears in the secondary measurement display
area conrming you are now ready to proceed.
3. Measure another area.
4. The main measurement display area will now display the difference
between both area measurements.
Saving Measurement Values
To save a measured value in the meter, press and hold the button for
approx. 2 seconds. The meter will emit a beep and automatically store
the current measurement value. While in area, volume or Pythagorean
measurement modes, the log function can only be activated when all
measurements are completed.
www.REEDInstruments.com
www.GlobalTestSupply.com
14
Page 15
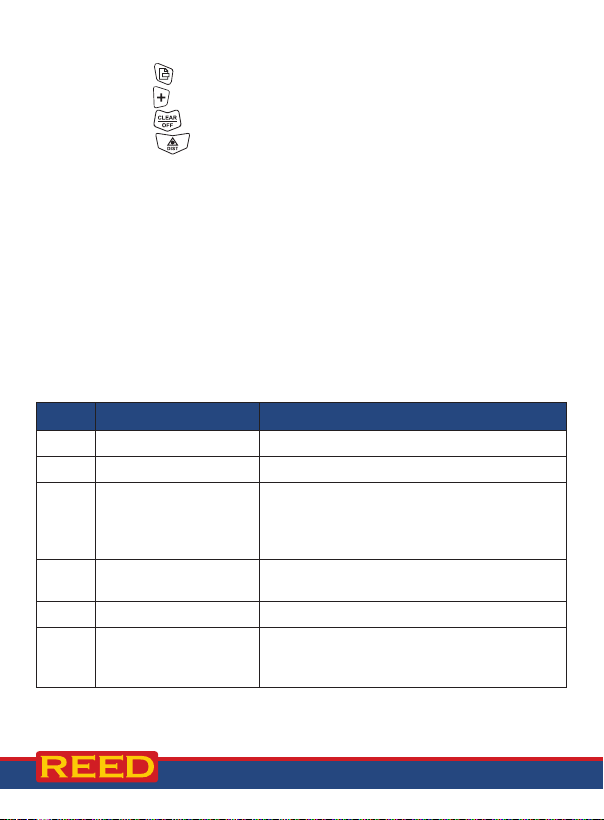
Browse/Delete Saved Measurement Values
1. Press the button to enter the saved measurement values screen.
2. Press the button to move up the list of saved measurement values.
3. Press the
button to clear the selected saved measurement value.
4. Press the button to exit the saved measurement values
screen and resume normal operation.
Battery Replacement
1. When the low battery symbol appears on the display, replace
the batteries.
2. Remove the battery cover on the back and insert two new
AAA batteries.
Note: If the unit will not be used for a long period of time, remove the
batteries to avoid battery leakage and corrosion of the battery contacts.
Troubleshooting Error Codes
Code Problems Solutions
204 Calculation error Follow the instructions and operate again
220 Low battery Please replace the battery or charge it
The reected light
255
256
261 Over range Please measure within the range
500 Hardware malfunction
received is weak, or
the measurement time
is too long
The received signal is
too strong
Please improve the reflective surface (use a
reflector, white paper, etc.)
Please improve the reflective surface (use a
reflector, or do not aim at strong light)
If it still appears after the meter has been
turned on/off multiple times, please contact
your dealer.
www.REEDInstruments.com
www.GlobalTestSupply.com
15
Page 16
Product Warranty
REED Instruments guarantees this instrument to be free of defects in
material or workmanship for a period of one (1) year from date of shipment.
During the warranty period, REED Instruments will repair or replace, at no
charge, products or parts of a product that proves to be defective because
of improper material or workmanship, under normal use and maintenance.
REED Instruments total liability is limited to repair or replacement of the
product. REED Instruments shall not be liable for damages to goods,
property, or persons due to improper use or through attempts to utilize
the instrument under conditions which exceed the designed capabilities.
In order to begin the warranty service process, please contact us by email
at 1-877-849-2127 or [email protected] to discuss the claim and
determine the appropriate steps to process the warranty.
Product Disposal and Recycling
Please follow local laws and regulations when disposing or recycling your
instrument. Your product contains electronic components and must be
disposed of separately from standard waste products.
Product Support
If you have any questions on your product, please contact your authorized
REED distributor or REED Instruments Customer Service by phone at
1-877-849-2127 or by email at [email protected].
Please visit www.REEDInstruments.com for the most
up-to-date manuals, datasheets, product guides and software.
Product specifications subject to change without notice.
All rights reserved. Any unauthorized copying or reproduction of
this manual is strictly prohibited without prior written permission
from REED Instruments.
www.REEDInstruments.com
www.GlobalTestSupply.com
16
Page 17

TEST & MEASURE
WITH CONFIDENCE
CHECK OUT OUR LATEST PRODUCTS!
www.REEDInstruments.com
www.GlobalTestSupply.com
Page 18
www.REEDInstruments.com
www.GlobalTestSupply.com
 Loading...