

Page 1
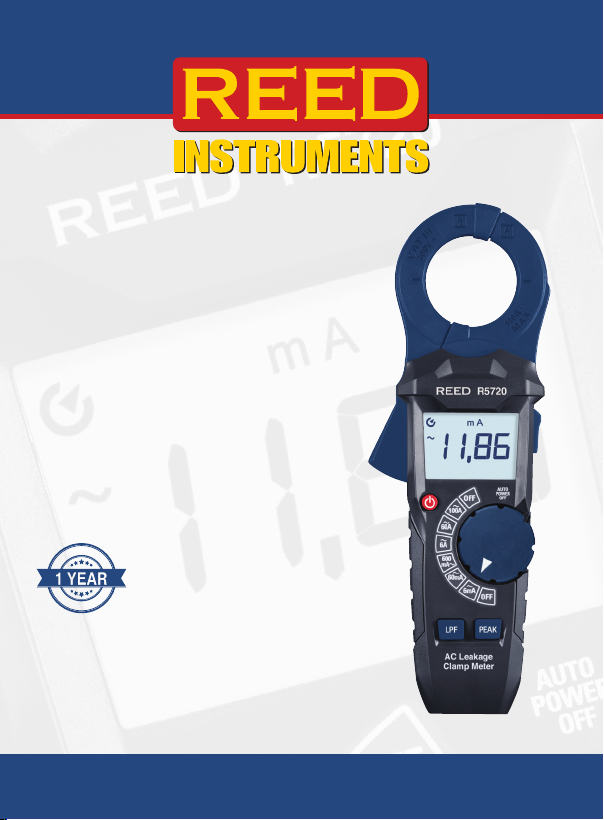
AC Leakage
Clamp Meter
Instruction
Manual
R5720
1 YEAR
1 AN
W
A
R
R
A
N
T
Y
W
A
R
R
A
N
T
Y
G
A
R
A
N
T
I
E
G
A
R
A
N
T
I
E
W
A
R
R
A
N
T
Y
W
A
R
R
A
N
T
Y
G
A
R
A
N
T
I
E
G
A
R
A
N
T
I
E
1 YEAR1AN
1-877-849-2127 | [email protected] | www.reedinstruments.com
REED Instruments
Page 2

Table of Contents
Introduction ................................................................................................ 3
Product Quality ........................................................................................... 3
Safety ......................................................................................................3-4
Features ...................................................................................................... 5
Included ...................................................................................................... 5
Specications .......................................................................................... 6-7
Electrical Symbols ...................................................................................... 6
Instrument Description ............................................................................... 8
Display Description .................................................................................... 9
Operating Instructions ......................................................................... 10-14
Power ON/OFF
AC Current Measurement .............................................................10-11
Measuring Leakage Current of a Single or Three Phase
Load Conductor
Measuring Leakage Current of a Single or
Three Phase System
Low-Pass Filter (LPF) Mode ............................................................... 13
Data Hold ........................................................................................... 13
Peak Mode ......................................................................................... 13
Auto Power Off ................................................................................... 14
Function Dial Backlight ....................................................................... 14
Flashlight ............................................................................................ 14
Battery Replacement ................................................................................ 14
Applications .............................................................................................. 14
Product Care ............................................................................................ 15
Product Warranty ..................................................................................... 15
Product Disposal and Recycling .............................................................. 15
Product Support ....................................................................................... 16
................................................................................... 10
................................................................................. 11
........................................................................... 12
1-877-849-2127 | [email protected] | www.reedinstruments.com
REED Instruments
Page 3

Introduction
Thank you for purchasing your REED R5720 AC Leakage Clamp Meter.
Please read the following instructions carefully before using your
instrument. By following the steps outlined in this manual your meter will
provide years of reliable service.
Product Quality
This product has been manufactured in an ISO9001 facility and has been
calibrated during the manufacturing process to meet the stated product
specications. If a certicate of calibration is required please contact the
nearest authorized REED distributor or authorized Service Center. Please
note an additional fee for this service will apply.
Safety
• Never attempt to repair or modify your instrument. Dismantling your
product, other than for the purpose of replacing batteries may cause
damage that will not be covered under the manufacturer's warranty.
Servicing should only be provided by an authorized service center.
• Do not exceed the maximum allowable input range specied for
any function.
• Turn the function switch to OFF when the meter is not in use.
• Remove the battery if the meter is stored for over 60 days.
• Always set the function switch to the correct position before measuring.
• Avoid touching exposed metal parts, unused measuring terminals, or
circuits to prevent accidental contact.
• Improper use of this meter may result in damage, electric shock, injury,
or death. Follow all safety instructions.
• Carefully read and fully understand this user manual before operating
the meter.
• Inspect the meter and test leads for any signs of damage before use.
Repair or replace damaged components as needed.
continued...
REED Instruments
1-877-849-2127 | [email protected] | www.reedinstruments.com
Page 4
• Exercise extreme caution when measuring voltages exceeding 25V AC
CAT III
RMS or 35V DC. These voltage levels are considered hazardous and
pose a risk of electric shock.
• Do not touch the test circuit when no measurement is being made.
• Using the equipment in ways not specied by the manufacturer may
compromise the meter's safety protections.
• This instrument is designed for environments with a pollution level of 2.
It is suitable for Current measurement applications and devices rated
for CAT III 300V.
Electrical Symbols
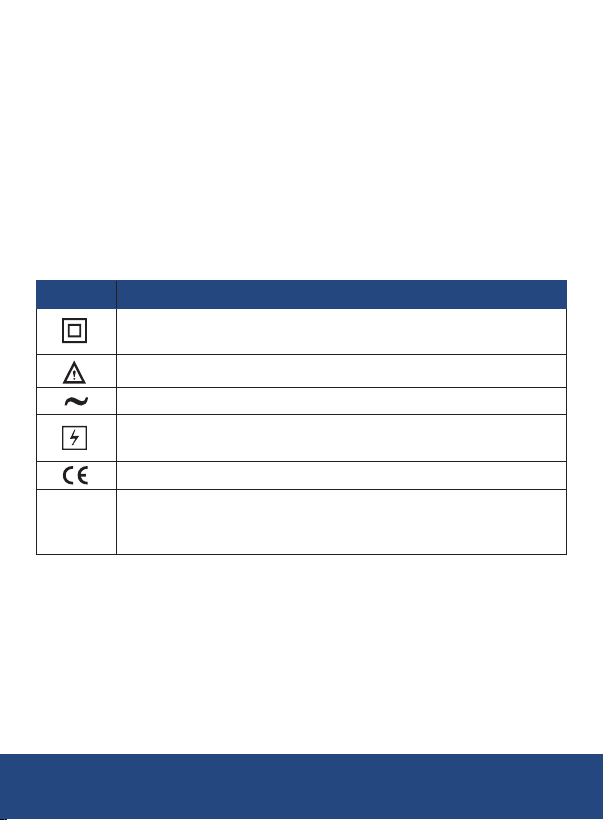
Symbol Description
Equipment protected throughout by double insulation or
reinforced insulation
Warning or Caution
Alternating current
Application around and removal from uninsulated
hazardhous live conductors is permitted
Complies with European Union Standards
It is applicable to testing and measuring circuits connected
to the distribution part of the building's low-voltage
mains installation
REED Instruments
1-877-849-2127 | [email protected] | www.reedinstruments.com
Page 5

Features
• Measures AC current from 6mA to 100A
• 6000 count backlit LCD display
• 1.26" (32mm) jaw size opening
• True RMS AC measurements
• Built-in LED ashlight
• Low battery and over range indicators
• Cat. III 300V
Included
• AC Leakage Clamp Meter
• Carrying Case
• Batteries
REED Instruments
1-877-849-2127 | [email protected] | www.reedinstruments.com
Page 6

Specifications
AC TRMS Current
Range: 100.0A, 60.00A, 6.000A, 600.0mA,
Accuracy (50/60Hz): 100.0A, 60.00A: ±(1.5% rdg. +8 dgt.)
Accuracy (>60Hz<1kHz): 100.0A: ±(3.5% rdg. +8 dgt.)
Resolution: 100mA, 10mA, 1mA, 0.1mA, 10µA, 1µA
AC TRMS Current with Low Pass Filter (LPF)
Range: 100.0A, 60.00A, 6.000A, 600.0mA,
Accuracy (50/60Hz): 100.0A: ±(2.0% rdg. +8 dgt.)
Resolution: 100mA, 10mA, 1mA, 0.1mA, 10µA, 1µA
General Specifications
AC Frequency 50Hz to 1kHz
Range Selection Manual
Over Range Indication Yes ("OL")
True RMS Yes
Low Pass Filter (LPF) Yes
Display 6000 count LCD display
Backlit Display Yes
Display Hold Yes
Peak Max/Min Yes
Integrated Flashlight Yes
1-877-849-2127 | [email protected] | www.reedinstruments.com
60.00mA, 6.000mA
6.000A, 600.0mA, 60.00mA:
±(1.0% rdg. +5 dgt.)
6.000mA: ±(1.0% rdg. +8 dgt.)
60.00A: ±(3.0% rdg. +8 dgt.)
6.000A, 600.0mA, 60.00mA:
±(3.0% rdg. +5 dgt.)
6.000mA: ±(3.0% rdg. +8 dgt.)
60.00mA, 6.000mA
60.00A, 6.000A, 600.0mA, 60.00mA,
6.000mA: ±(1.5% rdg. +8 dgt.)
REED Instruments
continued...
Page 7

Autoshut off Yes (after 15 mins)
Power Supply 3 x AAA Batteries
Low Battery Indicator Yes
Jaw Opening 1.26" (32mm)
Overvoltage Category CAT. III 300V
Product Certications CE
Operating Temperature 41 to 104°F (5 to 40°C)
Storage Temperature -4 to 140°F (-20 to 60°C)
Dimensions 9.1 x 3.0 x 1.5" (232 x 77 x 39 mm)
Weight 9.6oz (271g)
REED Instruments
1-877-849-2127 | [email protected] | www.reedinstruments.com
Page 8
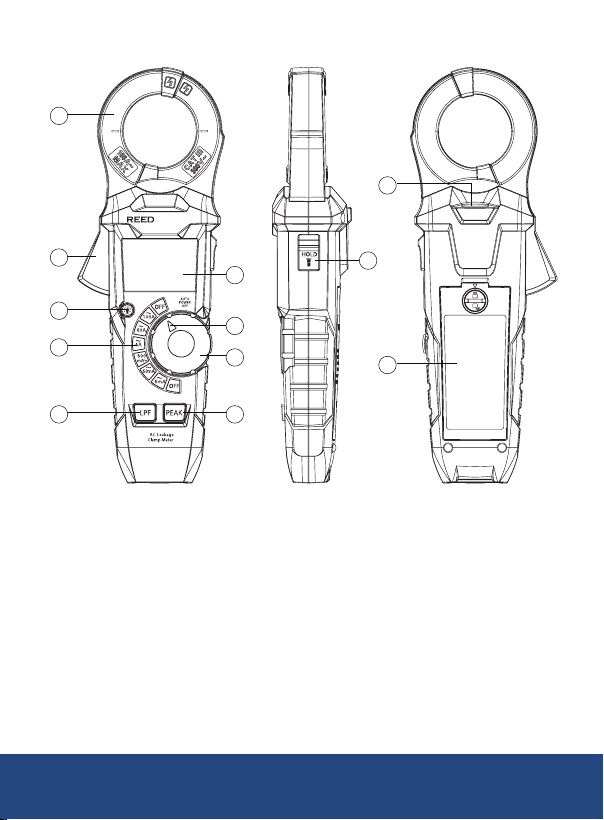
Instrument Description
1
2
3
4
56
7
8
9
10
12
11
R5720
1. Clamp Jaw
2. Trigger
3. BACKLIGHT Button
4. Measurement Functions
5. LPF Button
6. PEAK Button
7. Function Dial
8. Function Indicator Light
9. LCD Display
10. HOLD/FLASHLIGHT Button
11. Flashlight
12. Battery Cover
REED Instruments
1-877-849-2127 | [email protected] | www.reedinstruments.com
Page 9
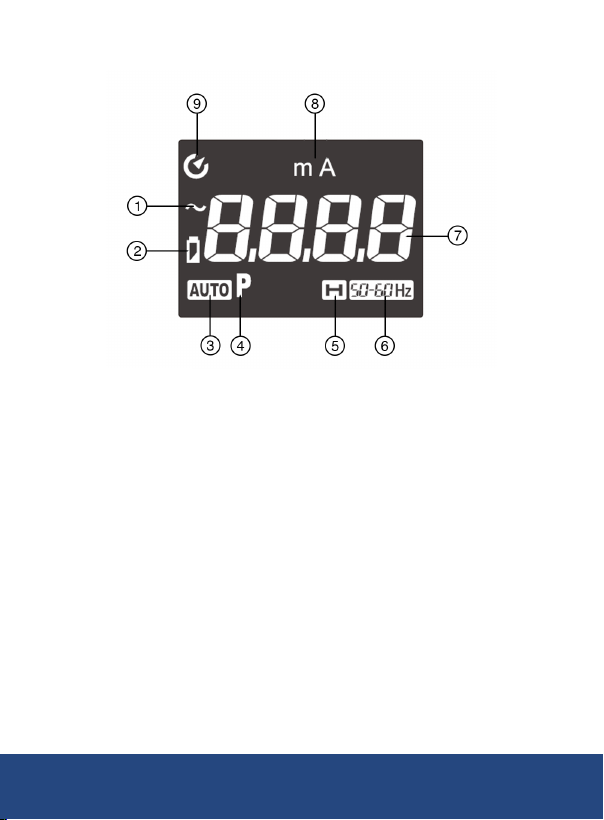
Display Description
1. Alternating Current Indicator
2. Low Battery Status Indicator
3. Auto Range Indicator
4. Peak Status Indicator
5. Data Hold Indicator
6. Low Pass Filter (LPF)
Status Indicator
7. Measured Value
8. Current Measurement Indicator
9. Auto Power OFF Indicator
REED Instruments
1-877-849-2127 | [email protected] | www.reedinstruments.com
Page 10
Operation Instructions
R5720
R5720
Power ON/OFF
Rotate the function dial to any position to power on the meter. If the meter
does not turn on, check the batteries. For details on battery replacement,
refer to section "Battery replacement" for details.
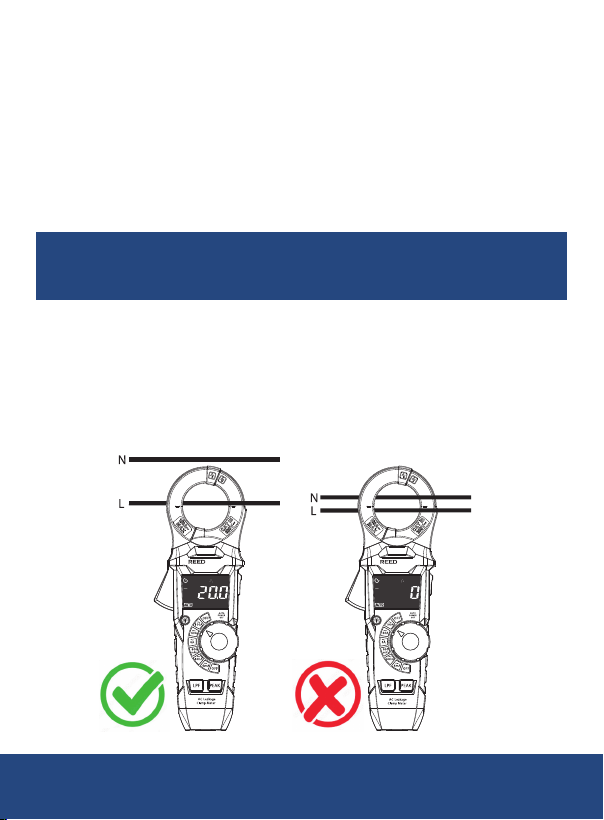
AC Current Measurement
1. Set the function dial to the appropriate measurement range: 6mA,
60mA, 600mA, 6A, 60A, or 100A.
Note: The current to be measured should fall within the selected range.
If unsure, start with the highest range, then move to lower ranges for
more precise readings.
2. Press the trigger to open the clamp jaws.
3. Fully enclose only one conductor in the clamp jaws. For optimal
accuracy, ensure the conductor is centered within the jaws.
4. The measured AC current will be displayed on the clamp meter's
LCD screen.
5. Adjust ranges or settings as needed for clarity or accuracy.
continued...
REED Instruments
1-877-849-2127 | [email protected] | www.reedinstruments.com
Page 11
Additional Notes: Avoid clamping multiple conductors simultaneously,
R5720
as this may affect the accuracy of the measurement.
Ensure the jaws are fully closed and properly aligned around the
conductor for consistent results.
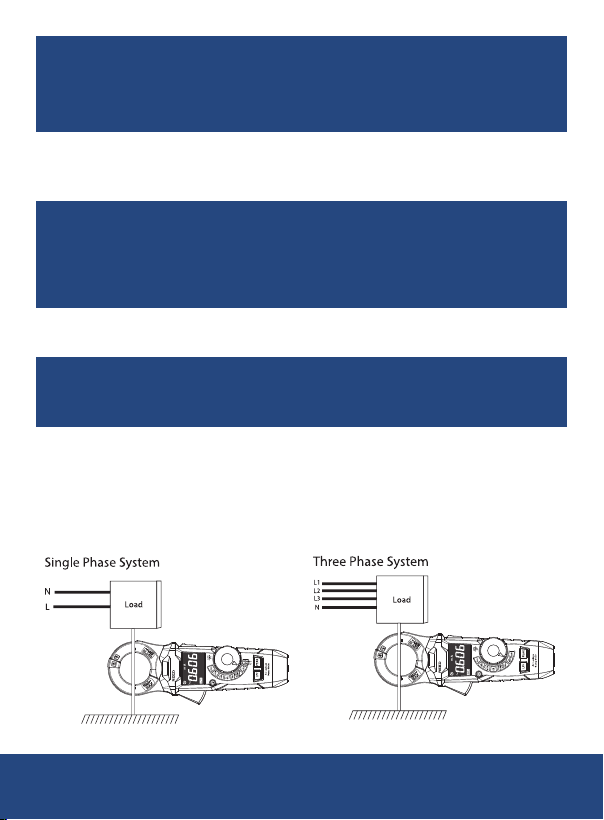
Measuring Leakage Current of a Single or Three Phase
Load Conductor
Leakage current may be measured on a ground conductor and through
the vector sum on multiconductors. Clamp around the two or three
conducting legs (not the ground conductor) on a grounded system. The
vector sum of the load currents will cancel out, leaving the leakage
current measured.
1. Set the function dial to the appropriate measurement range: 6mA,
60mA, or 600mA.
Note: The current to be measured should fall within the selected range.
If unsure, start with the highest range, then move to lower ranges for
more precise readings.
2. Press the trigger to open the clamp jaws.
3. Fully enclose the load conductor in the clamp jaws. For optimal
accuracy, ensure the conductor is centered within the jaws.
4. The LCD will display the measured leakage current.
5. Adjust ranges or settings as needed for clarity or accuracy.
R5720
R5720
REED Instruments
1-877-849-2127 | [email protected] | www.reedinstruments.com
Page 12
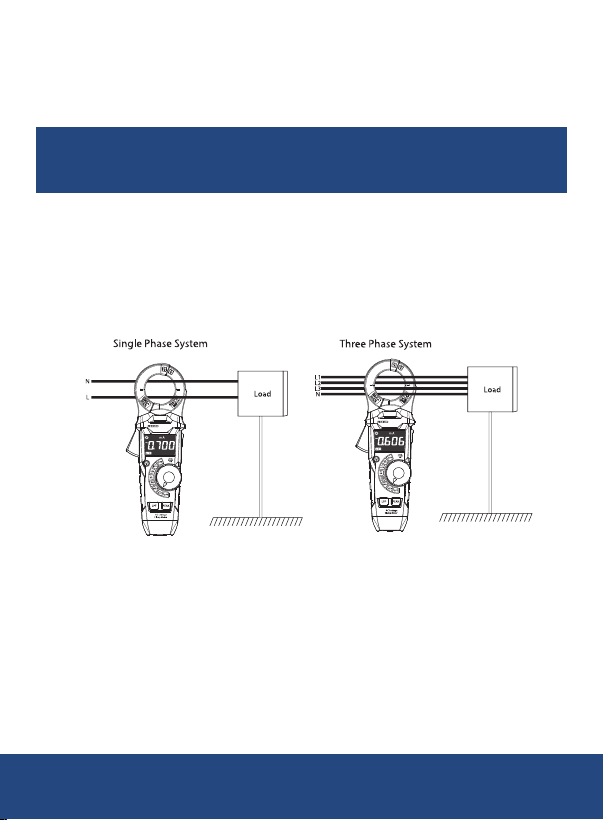
Measuring Leakage Current of a Single or Three
R5720
R5720
Phase System
1. Set the function dial to the appropriate measurement range: 6mA,
60mA, or 600mA.
Note: The current to be measured should fall within the selected range.
If unsure, start with the highest range, then move to lower ranges for
more precise readings.
2. Press the trigger to open the clamp jaws.
3.
Fully enclose the live and neutral conductors in the clamp jaws. For
optimal accuracy, ensure the conductors are centered within the jaws.
4. The LCD will display the measured leakage current.
5. Adjust ranges or settings as needed for clarity or accuracy.
R5720
R5720
REED Instruments
1-877-849-2127 | [email protected] | www.reedinstruments.com
Page 13

Low-Pass Filter (LPF) Mode
The Low-Pass Filter (LP) mode allows the meter to ignore all currents
except those at 50/60 Hz. When activated, only the fundamental
signal is measured.
To activate and use LPF mode:
1. Press the LPF Button to activate the Low-Pass Filter function.
2. The display will show "50-60 Hz", indicating that the meter is in
LPF mode.
3. To exit LPF mode and return to normal operation, press the LPF
Button again.
Note: While the meter is in LPF mode, the Auto Power-Off function
will be disabled.
Data Hold
1. While taking a measurement, press the HOLD button to freeze the
current reading on the display.
2. While in this mode, an "H" symbol will appear.
3. Press the HOLD button again to exit and resume normal operation.
Peak Mode
Use this feature to monitor the highest and lowest current levels
during testing.
Press the PEAK Button to activate the peak measurement function. The
device will measure and display the AC current's peak maximum and
minimum values.
REED Instruments
1-877-849-2127 | [email protected] | www.reedinstruments.com
Page 14

Auto Power Off
1. To preserve battery life, the meter is programmed to turn off after
approx. 15 minutes of inactivity.
2. To turn this function off, press and hold the LPF button while
powering on the meter.
3. If the meter is turned off then back on, the "Auto Power Off" feature
will be enabled again.
Function Dial Backlight
1. The function dial backlight turns on automatically when the meter is
powered on.
2. To toggle the function dial backlight, press the BACKLIGHT button
once to turn the backlight off.
3. Press the BACKLIGHT button again to turn the backlight on.
Flashlight
Press and hold the HOLD/Flashlight button to turn the ashlight on or off.
Battery Replacement
1. When the low battery status indicator appears on the LCD, you will
need to replace the batteries.
2. Rotate the Battery Door Lock 180 degrees to open the battery door.
3. Replace the 3x1.5V AAA batteries.
4. Secure the battery compartment back into place.
Applications
• Measuring leakage current in electrical circuits and systems
REED Instruments
1-877-849-2127 | [email protected] | www.reedinstruments.com
Page 15
Product Care
To keep your instrument in good working order we recommend the following:
• Store your product in a clean, dry place.
• Change the battery as needed.
• If your instrument isn't being used for a period of one month or longer
please remove the battery.
• Clean your product and accessories with biodegradable cleaner. Do not
spray the cleaner directly on the instrument. Use on external parts only.
Product Warranty
REED Instruments guarantees this instrument to be free of defects in
material or workmanship for a period of one (1) year from date of shipment.
During the warranty period, REED Instruments will repair or replace, at no
charge, products or parts of a product that proves to be defective because
of improper material or workmanship, under normal use and maintenance.
REED Instruments total liability is limited to repair or replacement of the
product. REED Instruments shall not be liable for damages to goods,
property, or persons due to improper use or through attempts to utilize the
instrument under conditions which exceed the designed capabilities. In
order to begin the warranty service process, please contact us by phone
at 1-877-849-2127 or by email at [email protected] to discuss
the claim and determine the appropriate steps to process the warranty.
Product Disposal and Recycling
Please follow local laws and regulations when disposing or recycling
your instrument. Your product contains electronic components and
must be disposed of separately from standard waste products.
REED Instruments
1-877-849-2127 | [email protected] | www.reedinstruments.com
Page 16

Product Support
If you have any questions on your product, please contact your authorized
REED distributor or REED Instruments Customer Service by phone at
1-877-849-2127 or by email at [email protected].
Please visit www.REEDInstruments.com for the most
up-to-date manuals, datasheets, product guides and software.
Product specifications subject to change without notice.
All rights reserved. Any unauthorized copying or reproduction of this
manual is strictly prohibited without prior written permission from
REED Instruments.
REED Instruments
1-877-849-2127 | [email protected] | www.reedinstruments.com
 Loading...