

Model
Pantone 534 Blue
Pantone 123 Yellow
Pantone 485 Red
Pantone 123 Yellow
Pantone 534 Blue
Black
R5007
True RMS Digital
Multimeter
Instruction
Manual
www
reedinstruments
www.GlobalTestSupply.com
com

Pantone 534 Blue
Pantone 123 Yellow
Pantone 485 Red
Pantone 123 Yellow
Pantone 534 Blue
Black
Rich Black -
20/20/20/100
Blue - 100/80/30/5
Yellow - 0/27/100/0
Red - 10/100/100/5
Yellow - 0/27/100/0
Blue - 100/80/30/5
Table of Contents
Safety ............................................................................................ 3
Features .........................................................................................3
Specications .............................................................................3-5
Instrument Description .................................................................. 6
Operating Instructions ..............................................................7-11
AC/DC Voltage Measurements ...................................................7
Resistance Measurements .......................................................... 7
Circuit On/Off Measurement ....................................................... 8
Diode Measurements .................................................................. 8
Capacitance Measurements ....................................................... 8
Frequency/Duty Ratio Measurements ......................................... 9
Temperature Measurements ....................................................... 9
AC/DC Current Measurements ................................................... 9
Current Clamp Measurements .................................................. 10
Non-Contact AC Voltage Sensing ............................................. 10
Max/Min Display ....................................................................... 10
Relative Measurements ............................................................. 10
Display Hold .............................................................................. 10
Auto Power Off ......................................................................... 11
Battery Replacement ................................................................... 11
www
www.GlobalTestSupply.com
reedinstruments
com
2

Pantone 534 Blue
Pantone 123 Yellow
Pantone 485 Red
Pantone 123 Yellow
Pantone 534 Blue
Black
Rich Black -
20/20/20/100
Blue - 100/80/30/5
Yellow - 0/27/100/0
Red - 10/100/100/5
Yellow - 0/27/100/0
Blue - 100/80/30/5
Safety
• Designed in compliance with the following: IEC/EN61010-1, Pollution
Grade II, Overvoltage CATIII600V and Double Insulation
• Take caution when measuring Voltages above 60DC or 30AC RMS
Features
• Measures AC/DC Voltage, AC/DC Current, Variable Frequency
Voltage (VFC), Resistance, Capacitance, Frequency Ratio,
Non-Contact AC Voltage Sensing (NCV), Clamp Meter
measurements (with optional clamp meter) and Temperature
• Auto and Manual Range
• Auto Power Off and Backlight
• Max/Min, Relative Mode, and Data Hold
Specifications
LCD Display: 6000 Count, 58 × 36 mm
Bandwidth: 45 to 1kHz
Duty Cycle: 0.1 to 99.9%
Diode: Around 3V
Battery Test: 1.5V / 9V
Auto Power Off: Around 15 Minutes
Input Protection: 600V RMS
Input Impedance for DCV: 1GΩ Max
Power Supply: 2 x AA 1.5V Batteries
Weight: 370g
Dimensions: 175 x 80 x 48.5 mm
Includes: Test Leads and Type K Temperature Probe
Optional Accessories: Magnetic Hanger with Strap (R5900)
www
www.GlobalTestSupply.com
reedinstruments
com
3
Pantone 534 Blue
Pantone 123 Yellow
Pantone 485 Red
Pantone 123 Yellow
Pantone 534 Blue
Black
Rich Black -
20/20/20/100
Blue - 100/80/30/5
Yellow - 0/27/100/0
Red - 10/100/100/5
Yellow - 0/27/100/0
Blue - 100/80/30/5
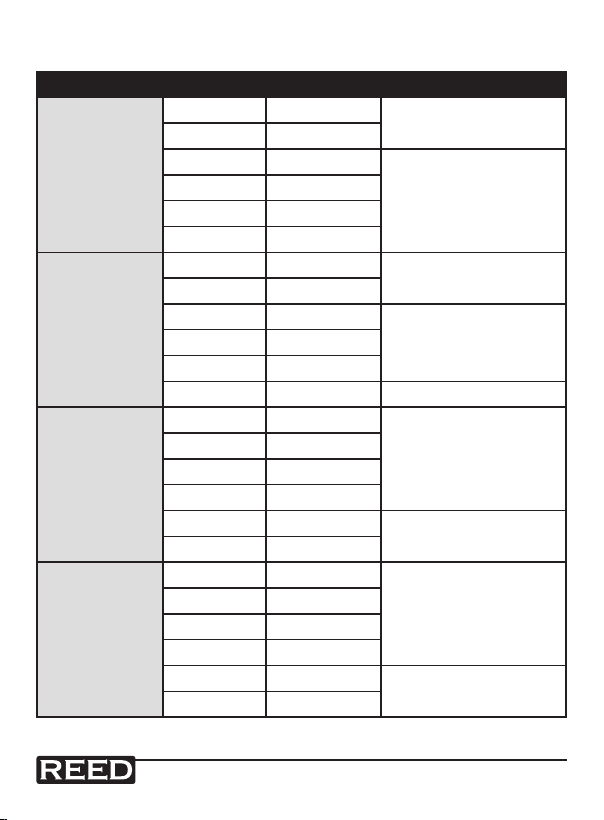
Measurement Specifications
Function Range Resolution Accuracy
DC Voltage
AC Voltage
DC Current
AC Current
60.00mV 10µV
600.0mV 0.1mV
6.000V 1mV
60.00V 10mV
600.0V 0.1V
600V 1V
60.00mV 10µV
600.0mV 0.1mV
6.000V 1mV
60.00V 10mV
600.0V 0.1V
600V 1V ±(1.0% rdg + 3 dgts)
600.0µA 0.1µA
6000µA 1µA
60.00mA 10µA
600.0mA 0.1mA
6.000A 1mA
10.00A 10mA
600µA 0.1µA
6000µA 1µA
60.00mA 10µA
600.0mA 0.1mA
6.000A 1mA
10.00A 10mA
www
www.GlobalTestSupply.com
reedinstruments
±(0.5% rdg + 2 dgts)
±(0.7% rdg + 3 dgts)
±(1.0% rdg + 3 dgts)
±(0.8% rdg + 3 dgts)
±(0.7% rdg + 2 dgts)
±(1.0% rdg + 3 dgts)
±(1.0 rgd + 3 dgts)
±(1.2% rdg + 3 dgts)
com
4
Pantone 534 Blue
Pantone 123 Yellow
Pantone 485 Red
Pantone 123 Yellow
Pantone 534 Blue
Black
Rich Black -
20/20/20/100
Blue - 100/80/30/5
Yellow - 0/27/100/0
Red - 10/100/100/5
Yellow - 0/27/100/0
Blue - 100/80/30/5
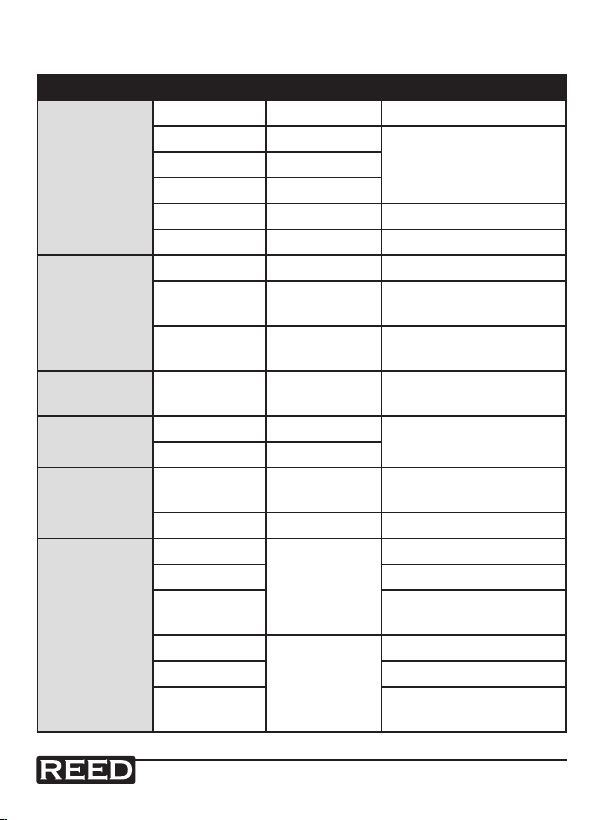
Measurement Specifications Cont.
Function Range Resolution Accuracy
600.0Ω 0.1Ω ±(1.0% rdg + 2 dgts)
6.000KΩ 1Ω
Resistance
Capacitance
VFC
Battery
Capacity
Frequency
Temperature
600.0KΩ 100Ω
6.000MΩ 1kΩ ±(1.2% rdg + 3 dgts)
60.00MΩ 10KΩ ±(1.5% rdg + 5 dgts)
9.999nF 1pF Under REL (±4%+10)
99.99nF to
999.9µF
9.999mF to
99.99mF
200.0V to
600V
10pF to 0.1µF ±(4% rdg + 5 dgts)
1µF to 10µF ±10% rdg (≤2mF)
0.1/1V ±(4.0% rdg + 3 dgts)
1.500V 1mV
9.00V 10mV
9.999Hz to
9.999MHz
0.001Hz to
0.001MHz
1 to 99.9% 0.10% Not dened
-40 to 0°C
>0 to 100°C ±(1.0% rdg + 3 dgts)
1°C
>100 to
1000°C
-40 to 32°F
>32 to 212°F ±(1.5% rdg + 5 dgts)
>212 to
1832°F
www
reedinstruments
www.GlobalTestSupply.com
1°F
±(0.8% rdg + 2 dgts)60.00KΩ 10Ω
±5%
±(0.1% rdg + 4 dgts)
±3
±(2.0% rdg + 3 dgts)
±5
±(2.5% rdg + 5dgts)
com
5
Pantone 534 Blue
Pantone 123 Yellow
Pantone 485 Red
Pantone 123 Yellow
Pantone 534 Blue
Black
Rich Black -
20/20/20/100
Blue - 100/80/30/5
Yellow - 0/27/100/0
Red - 10/100/100/5
Yellow - 0/27/100/0
Blue - 100/80/30/5
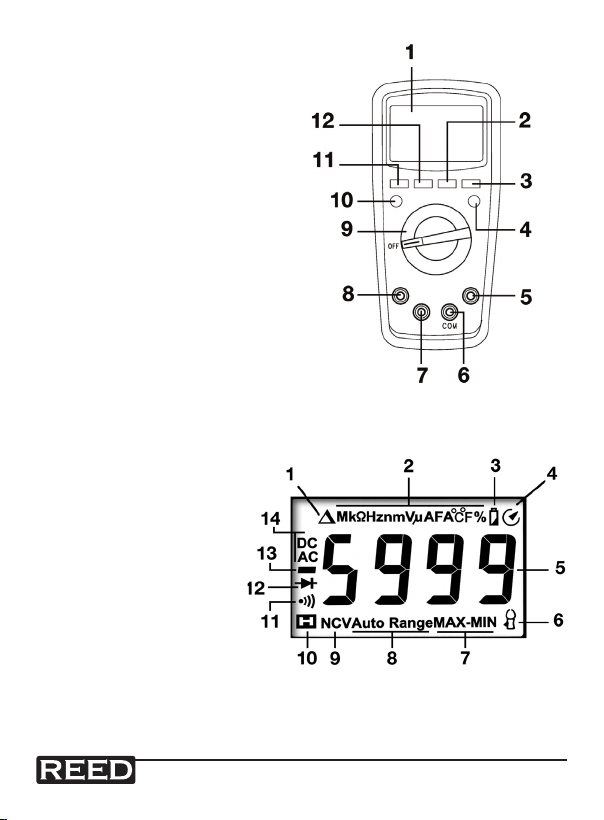
Instrument Description
1. LCD Screen
2. REL Button
3. HZ/% Button
4. SELECT/VFC Button
5. VΩHz Input
6. COM Input
7. mAµA Input
8. A Input
9. Function Switch
10. HOLD/LIGHT Button
11. RANGE Button
12. MAX/MIN Button
Display Description
1. Relative Icon
2. Units of Measurement
3. Low Battery Icon
4. Auto-Power Off
5. 6000 Count Display
6. Current Clamp Icon
7. MAX/MIN Icon
8. Auto-Range Icon
9. Non-Contact
Voltage Icon
10. Data Hold Icon
11. Circuit On/Off Icon
12. Diode Icon
13. Negative Reading
14. AC/DC Icon
www
www.GlobalTestSupply.com
reedinstruments
com
6
Pantone 534 Blue
Pantone 123 Yellow
Pantone 485 Red
Pantone 123 Yellow
Pantone 534 Blue
Black
Rich Black -
20/20/20/100
Blue - 100/80/30/5
Yellow - 0/27/100/0
Red - 10/100/100/5
Yellow - 0/27/100/0
Blue - 100/80/30/5
Operating Instructions
AC/DC Voltage Measurements
1. Set the Function Switch to the V or mV position.
2. Insert the Red test lead to the VΩHz% Input and the Black test
lead in the COM Input.
3. Press the RANGE Button to select the range manually. Start from
a higher range if you are not sure about the ow under test.
4. Connect the test leads to the power under test. Read the results
on the LCD.
Resistance Measurements
1. Set the Function Switch to the Ω position.
2. Insert the Red test lead to the VΩHz% Input and the Black test
Lead in the COM Input.
3. Press the RANGE Button to select the range manually. Start from
a higher range if you are not sure about the ow under test.
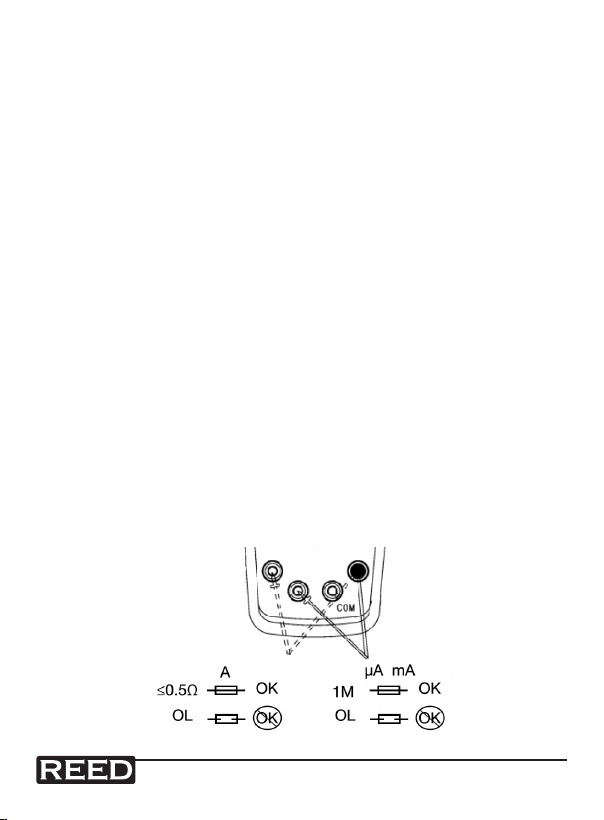
4. Completely discharge all capacitors before taking a measurement.
5. Connect the test leads to the load under test. Read the results
on the LCD. Measurements ≥10μF will take several seconds to
stabilize. To avoid damage or injury do not apply voltages above
60 DC or 30 AC RMS.
6. To check the built-in fuse, see the image below.
www
www.GlobalTestSupply.com
reedinstruments
com
7

Pantone 534 Blue
Pantone 123 Yellow
Pantone 485 Red
Pantone 123 Yellow
Pantone 534 Blue
Black
Rich Black -
20/20/20/100
Blue - 100/80/30/5
Yellow - 0/27/100/0
Red - 10/100/100/5
Yellow - 0/27/100/0
Blue - 100/80/30/5
Circuit On/Off Measurement
1. Set the Function Switch to the Ω position.
2. Insert the Red test lead to the VΩHz% Input and the Black test
lead in the COM Input.
3. Turn the circuit power off and discharge all residual charges to
ensure accuracy.
4. Connect the test leads to the two terminals under test. The meter
will beep if the resistance is ≤10Ω. If the resistance is ≥150Ω the
meter will not beep.
Diode Measurements
1. Set the Function Switch to the Ω position.
2. Insert the Red test lead to the VΩHz% Input and the Black test
lead in the COM Input.
3. Turn the circuit power off and discharge all residual charges to
ensure accuracy.
4. Connect the test leads to the circuit under test. “OL” will appear
on the LCD if the diode is an open circuit or if polarity is reversed.
Capacitance Measurements
1. Set the Function Switch to the Ω position.
2. Insert the Red test lead to the VΩHz% Input and the Black test
lead in the COM Input. The LCD will display a measurement,
which is the internal xed capacitance value. When measuring
small range gear capacitance, that value needs to be subtracted
from the measured value to ensure accuracy. The REL function
can be used to automatically subtract the value.
3. Connect the test leads to the circuit under test. Measurements
≥10μF will take several seconds to stabilize. To avoid damage or
injury do not apply voltages above 60 DC or 30 AC RMS.
www
www.GlobalTestSupply.com
reedinstruments
com
8

Pantone 534 Blue
Pantone 123 Yellow
Pantone 485 Red
Pantone 123 Yellow
Pantone 534 Blue
Black
Rich Black -
20/20/20/100
Blue - 100/80/30/5
Yellow - 0/27/100/0
Red - 10/100/100/5
Yellow - 0/27/100/0
Blue - 100/80/30/5
Frequency/Duty Ratio Measurements
1. Set the Function Switch to the HZ position. Press the Hz/%
button for Frequency measurements.
2. Insert the Red test lead to the VΩHz% Input and the Black test
lead in the COM Input.
3. Connect the test leads to the load under test. Read the results on
the LCD. To avoid damage or injury do not apply voltages above
60 DC or 30 AC RMS.
Temperature Measurements
1. Set the Function Switch to the °C position.
2. Insert the Red wire into the VΩHz% Input and the Black wire into
the COM Input.
3. Touch the probe to the item under test. Read the results on the
LCD. Temperature Measurements can only be taken by a Type K
Thermocouple Probe. Do not exceed temperatures of
230°C/446°F.
AC/DC Current Measurements
1. Set the Function Switch to the µA, mA, or A position.
2. Insert the Red test lead to the mAµA Input and the Black test lead
to the COM Input. Cut off the current before connecting the meter
to the loop.
3. Press the RANGE button select the range. Start from a higher
range if you are not sure about the current ow under test.
4. Connect the test leads to the load under test. Read the results
on the LCD. Press the HZ/% button to display the AC online
frequency/duty ratio.
www
www.GlobalTestSupply.com
reedinstruments
com
9

Pantone 534 Blue
Pantone 123 Yellow
Pantone 485 Red
Pantone 123 Yellow
Pantone 534 Blue
Black
Rich Black -
20/20/20/100
Blue - 100/80/30/5
Yellow - 0/27/100/0
Red - 10/100/100/5
Yellow - 0/27/100/0
Blue - 100/80/30/5
Current Clamp Measurements
Note, the Optional Clamp Meter is required to make Current Clamp
Measurements.
1. Set the Function Switch to the 60A position.
2. Insert the Red wire into from the Clamp Meter into the VΩHz%
Input and the Black wire into the COM Input.
3. Press the jaw trigger on the Clamp Meter and place it around one
wire to be measured. Read the results on the LCD.
Non-Contact AC Voltage Sensing
1. Set the Function Switch to the NCV position.
2. Place the front end of the meter near the object to be sensed.
3. Critical voltage will be displayed as “-”. Varied buzzing sounds
and line marks on the LCD will appear in accordance with the level
of sensed Voltage.
Max/Min Display
While taking a measurement, press the MAX/MIN button to display
the Maximum measured value. Press the button again to display the
Minimum measured value. Press the button a third time to resume normal
measuring.
Relative Measurements
While taking a measurement, press the REL button to use the displayed
value as a reference point. The displayed measured value will be the
difference between what is being measured and the reference point. Press
the button again to resume normal measuring.
Display Hold
Press the HOLD Button to freeze the displayed value. Press the button
again to resume normal measuring.
www
www.GlobalTestSupply.com
reedinstruments
com
10

Pantone 534 Blue
Pantone 123 Yellow
Pantone 485 Red
Pantone 123 Yellow
Pantone 534 Blue
Black
Rich Black -
20/20/20/100
Blue - 100/80/30/5
Yellow - 0/27/100/0
Red - 10/100/100/5
Yellow - 0/27/100/0
Blue - 100/80/30/5
Auto Power Off
This meter will automatically turn off after 15 minutes of inactivity. One
minute before turning off the meter will beep. The meter will beep again
when it goes into Auto Power Off mode. Press any button to turn the unit
back on. Press and hold the SELECT button to turn the feature off. The
feature will turn back on the next time it is powered on.
Battery Replacement
1. Turn the function switch to the OFF position, remove any test
leads, and remove the protective case from the meter.
2. Unscrew the rear cover and remove from the meter. Replace the
dead batteries with new ones. Be sure to fully reassemble the
meter before turning it on.
For service (repairs or calibration) on this or any other REED product
or information on other REED products, contact REED Instruments at
info@reedinstruments.com
Notes _________________________________________
________________________________________________
________________________________________________
________________________________________________
________________________________________________
________________________________________________
________________________________________________
www
www.GlobalTestSupply.com
reedinstruments
com
11

Pantone 534 Blue
Pantone 123 Yellow
Pantone 485 Red
Pantone 123 Yellow
Pantone 534 Blue
Black
Rich Black -
20/20/20/100
Blue - 100/80/30/5
Yellow - 0/27/100/0
Red - 10/100/100/5
Yellow - 0/27/100/0
Blue - 100/80/30/5
Notes _________________________________________
________________________________________________
________________________________________________
________________________________________________
________________________________________________
________________________________________________
________________________________________________
________________________________________________
________________________________________________
________________________________________________
________________________________________________
________________________________________________
________________________________________________
________________________________________________
________________________________________________
________________________________________________
________________________________________________
________________________________________________
www
www.GlobalTestSupply.com
reedinstruments
com
12
 Loading...