

Page 1
Rich Black -
20/20/20/100
Blue - 100/80/30/5
Yellow - 0/27/100/0
Red - 10/100/100/5
Yellow - 0/27/100/0
Blue - 100/80/30/5
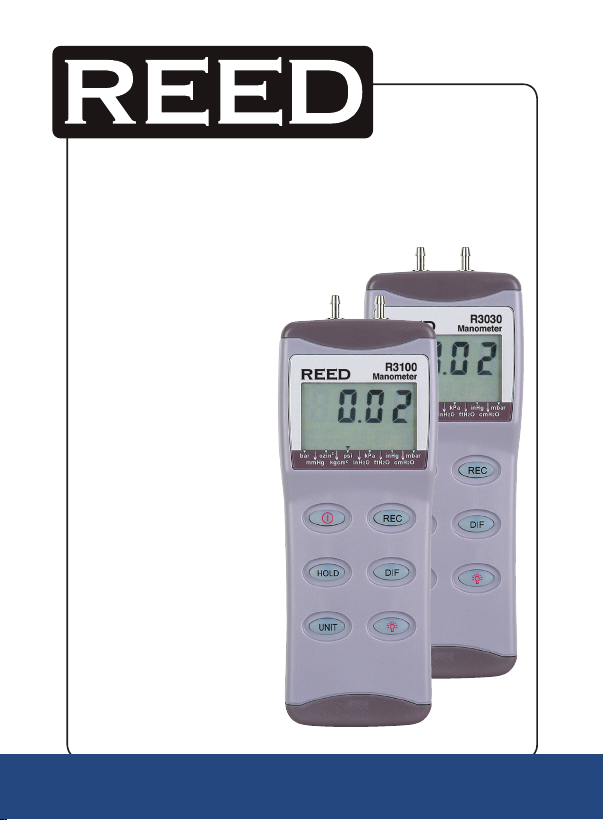
Model
R3030/R3100
Digital Manometer
Instruction
Manual
1-877-849-2127 | [email protected] | www.reedinstruments.com
REED Instruments
Page 2

Rich Black -
20/20/20/100
Blue - 100/80/30/5
Yellow - 0/27/100/0
Red - 10/100/100/5
Yellow - 0/27/100/0
Blue - 100/80/30/5
Table of Contents
Features ......................................................................................... 3
Specications .............................................................................3-4
Instrument Controls & Indicators ................................................4-5
Operating Instructions ................................................................5-9
Auto Power-Off ........................................................................... 5
Mode Options ..........................................................................5-7
Calibration Mode .....................................................................7-8
Calibration Point Reference ......................................................... 8
Manual Zero Setting .................................................................... 9
Troubleshooting ........................................................................9-10
Battery Replacement ................................................................... 10
Maintenance ................................................................................ 11
REED Instruments
1-877-849-2127 | [email protected] | www.reedinstruments.com
Page 3
Rich Black -
20/20/20/100
Blue - 100/80/30/5
Yellow - 0/27/100/0
Red - 10/100/100/5
Yellow - 0/27/100/0
Blue - 100/80/30/5
Features
• Portable, battery-operated pressure measuring device
• Measures gauge pressure (a measure of pressure in psi that is refer-
ence to ambient pressure) and differential pressure (a measure of the
difference between two pressures)
• 11 selectable pressure units: bar, mmHg, ozin
2
, kgcm2, psi, inH2O,
kPa, ftH2O, inHg, cmH2O, mbar
• Primary LCD readout displays currrent pressure reading while secondary readout displays real time clock
• Not suitable for absolute pressure measurement
Specifications
Range: R3030: 0~30 psi; 830 inH2O; 2068 mbar; 2.10 kg/cm
R3100: 0~100 psi; 2768 inH2O; 6895 mbar; 7.03 kg/cm
Accuracy: 0.3% of full scale at 25°C
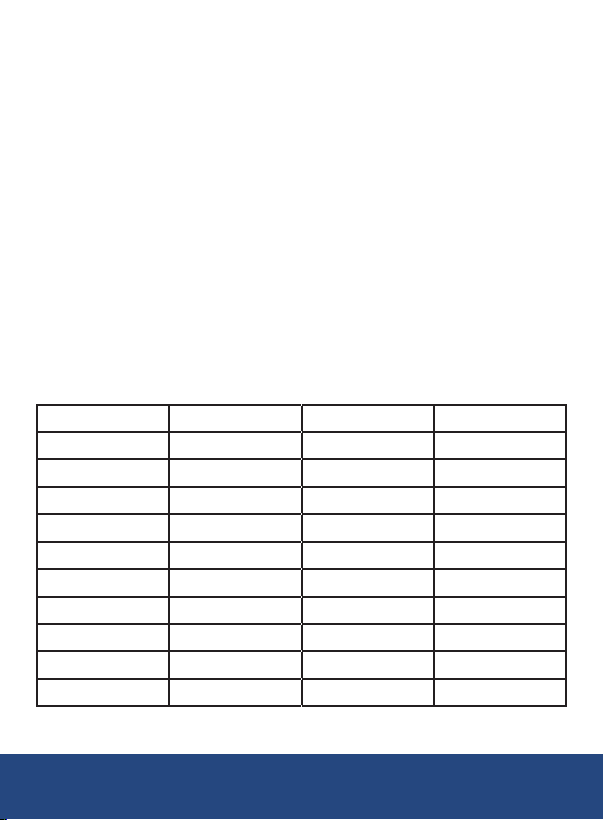
Resolution:
Unit Range Model R3030 Model R3100
psi 1.000000 0.02 0.1
O 27.680517 0.5 2
inH
2
bar 0.068948 0.002 0.004
mbar 68.948253 2 4
mmHg 51.712016 1 3
ozin
kg/cm
2
2
16.000844 0.3 1
0.070309 0.002 0.004
kPa 6.894859 0.2 0.4
O 2.306719 0.04 0.2
ftH
2
O 70.309000 2 4
cmH
2
1-877-849-2127 | [email protected] | www.reedinstruments.com
www
reedinstruments
REED Instruments
com
2
2
continued ...
3
Page 4
Rich Black -
20/20/20/100
Blue - 100/80/30/5
Yellow - 0/27/100/0
Red - 10/100/100/5
Yellow - 0/27/100/0
Blue - 100/80/30/5
Response Time: 0.5 seconds
Format: Baud Rate: 2400 bit/sec; Data Bit: 8, Stop Bit: 1
Compensated Temp.
Range: 0~50°C
Operating Temperature: 0~50°C
Operating Humidity: ≤80% RH
Storage Temperature: -20~55°C
Power Supply: Single 9V battery
Dimensions: 72 x 182 x 30 mm
Weight: Approx. 220 g (with battery)
Includes: 2 x connection hose (4mm x 6mm (ID x OD)),
battery, hard carrying case, and user manual
Instrument Controls & Indicators
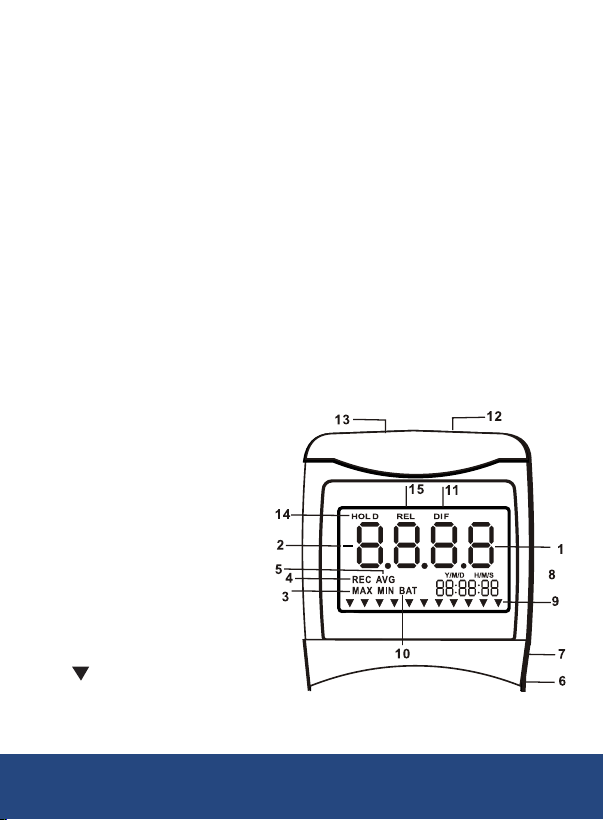
1. LCD screen displays pressure
value
2. “-” Negative pressure display
3. MAX/MIN presssure
4. REC internal recording
mode displays max./min.
pressure*
5. DC power input jack
6. Y/M/D H/M/S Real-time
clock 88:88:88 displays data
Year/Month/Day, Hour/Minute/
Second
7. Pressure unit indication
8. BAT Low battery indicator
9. DIF Differential pressure mode
1-877-849-2127 | [email protected] | www.reedinstruments.com
REED Instruments
continued ...
Page 5
Rich Black -
20/20/20/100
Blue - 100/80/30/5
Yellow - 0/27/100/0
Red - 10/100/100/5
Yellow - 0/27/100/0
Blue - 100/80/30/5
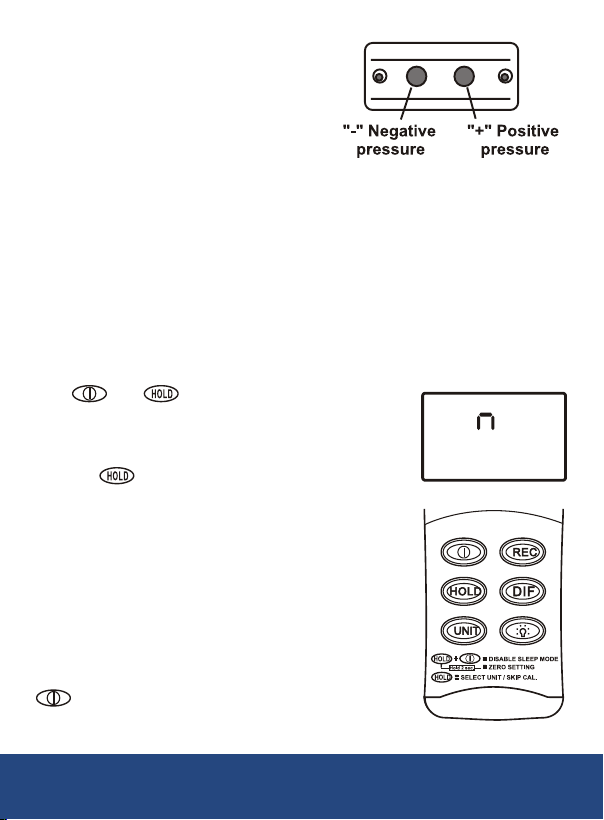
10. “-” Negative pressure hose connection
11. “+” Positive pressure hose connection
12. HOLD Freezes pressure reading
13. REL Establishes a relative zero
for the primary screen information
*Record mode does not act as a data logger but will capture single max/min data points
Operating Instructions
Note: This meter is fitted with two 4.8mm lugs. Before you connect the
meter to a pressure source, carefully check the security of all fittings.
Auto Power-Off (Sleep function)
1. This instrument shuts off automatically after
approx. 20 minutes of inactivity.
2. For operating over longer periods of time,
you can disable the sleep mode by pressing
and simultaneously before
powering on.
3. An “n” will appear in the middle of the
screen at which time you can release
the
button. (See Fig. A)
4. The disabled sleep mode will be invalid
after power off.
Mode Options
There are six function keys for mode selection as
well as measurement operation.
For your convenience, the meter defaults to the
setting used in the last operation.
Fig. A
The following lists the operation for each function key.
Turns instrument on (Default setting) and off.
continued ...
REED Instruments
1-877-849-2127 | [email protected] | www.reedinstruments.com
Page 6
Rich Black -
20/20/20/100
Blue - 100/80/30/5
Yellow - 0/27/100/0
Red - 10/100/100/5
Yellow - 0/27/100/0
Blue - 100/80/30/5
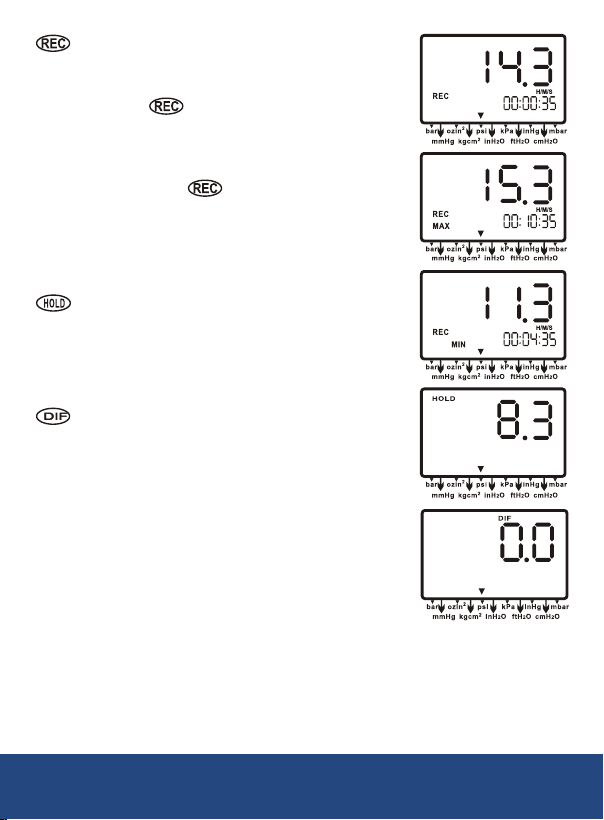
Press to enter recording. A counter will
begin and REC will show up on screen
indicating you have begun recording.
Press the
button again and the
unit will cycle through the MAX (Fig. C)
and MIN (Fig. D) measurements
captured during the recording mode.
Press and hold
for 3 seconds to
turn off the record function and to return
to normal mode.
Press momentarily to freeze the current
pressure reading. (See Fig. E)
Press momentarily, DIF appears on top
of the LCD and the display indicates the
relative zero (Relative zero causes the
value of the display to show as “0.0”);
only the amount of pressure change will
be indicated. Press momentarily again
and the unit returns to the normal mode
of pressure differential (See Fig. F).
Fig. B
Fig. C
Fig. D
Fig. E
Fig. F
Note: Differential Pressure is a measure of the difference between two
pressures, i.e. use differential pressure sensor to measure gauge pressure
by leaving one process connection open to atmosphere and connecting
the second sensor port to your system.
continued ...
REED Instruments
1-877-849-2127 | [email protected] | www.reedinstruments.com
Page 7
Rich Black -
20/20/20/100
Blue - 100/80/30/5
Yellow - 0/27/100/0
Red - 10/100/100/5
Yellow - 0/27/100/0
Blue - 100/80/30/5
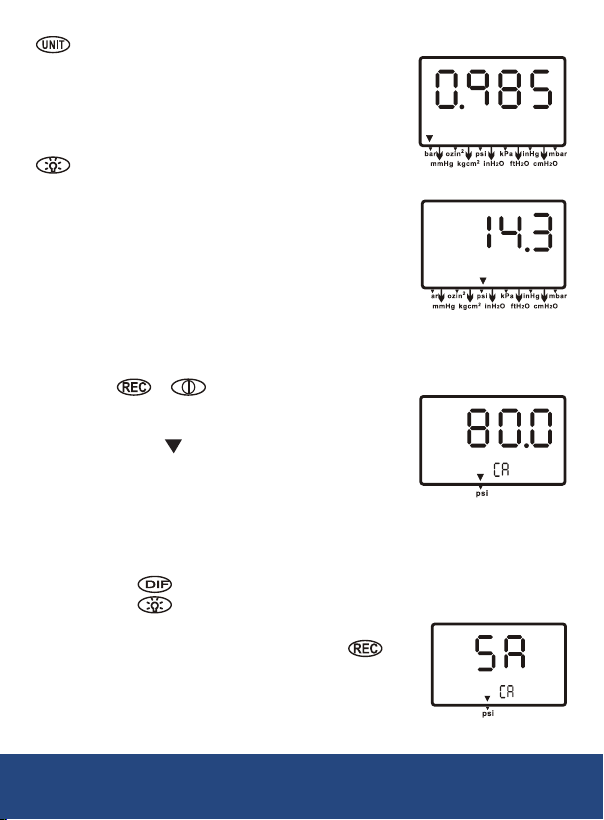
Press momentarily and the unit will cycle
Fig. G
through “bar”, “mmHg”, ”ozin2”, ”kgcm2”,
”psi”, ”inH2O”, ”kPa”, ”ftH2O”, ”inHg”,
”cmH2O”, ”mbar” which is indicated on
the bottom of the display (Fig. G & H).
Press momentarily and the backlight
illuminates for approx. 30 seconds then turns
Fig. H
off automatically. Or press momentarily to
decrease the time when calibration is being
performed.
Calibration Mode
1. Manually set the display to zero (no pressure
applied to the connector), refer to Manual Zero
procedure.
2. Turn the meter off.
3. Press
& simultaneously, ”CA”
Fig. I
appears on the display (See Fig. I ). When the
meter is in calibration mode, make sure the
arrow mark “
“ is positioned under the “psi”
pressure unit to start positive (+) pressure
calibration.
4. The meter defaults to a 80 psi calibration point,
the adjustable pressure range is from 78.0 to
82.0 psi. If the calibration pressure source is
not at 80 psi, increase the figure by
pressing
pressing
button or decrease the figure by
button, to set calibration point
Fig. J
as required.
5. Save the calibration point by pressing
button, “SA” and small “CA” appears
on the display (See Fig. J).
continued ...
REED Instruments
1-877-849-2127 | [email protected] | www.reedinstruments.com
Page 8
Rich Black -
20/20/20/100
Blue - 100/80/30/5
Yellow - 0/27/100/0
Red - 10/100/100/5
Yellow - 0/27/100/0
Blue - 100/80/30/5
The meter auto-skips to the negative pressure
(-) point for the next calibration mode.
6. Follow the same procedure as outlined in
Step 4 for the negative pressure calibration
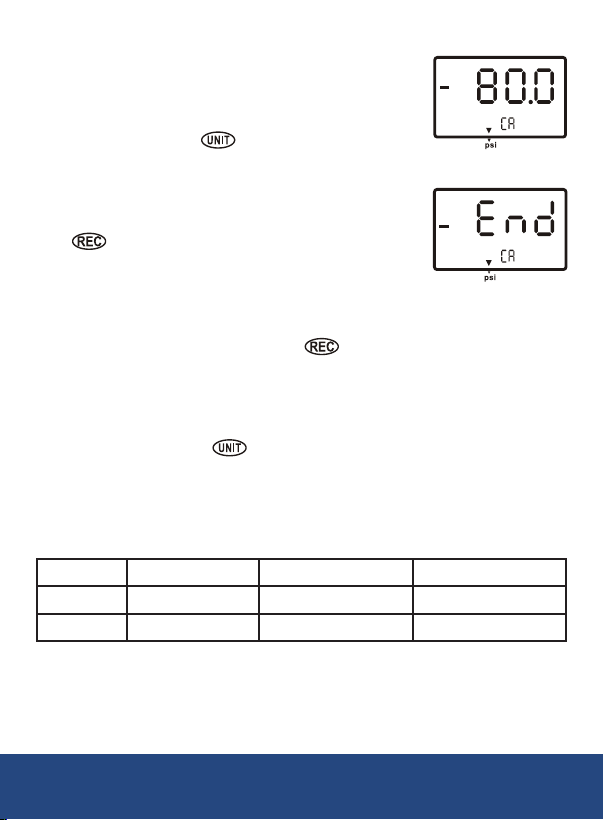
point by pressing
button, the LCD
now displays ”-80.0“ and small ”CA”
(See Fig. K ). To set the necessary calibration
gure refer to your pressure standard if needed.
7. Again save the calibration point by pressing
button, “SA” and “CA” appears in 2
seconds and then “End” and “CA” appears
in another 2 seconds, the meter returns
to normal mode (See Fig. L ).
Fig. K
Fig. L
Note: If you cannot save by pressing
button, i.e. no “SA” appeared,
please check: (a) that the calibration pressure source is between 75.0 and
85.0, or check (b) if you entered the right positive pressure (+) or negative
(-) pressure.
If you want to skip positive (+) calibration procedure when entered into
Calibration mode, press
button to skip to negative (-) calibration
point. Above calibration is an example for Model R3100, i.e. the pressure range is from 0 to +100psi (positive pressure ) or from 0 to -100 psi
(negative pressure).
Calibration Point Reference
Model PSI Range Calibration Point Recommended
R3030 0~±30 ±24.00 ±23.40~24.60
R3100 0~±100 ±80.00 ±78.00~82.00
REED Instruments
1-877-849-2127 | [email protected] | www.reedinstruments.com
Page 9
Rich Black -
20/20/20/100
Blue - 100/80/30/5
Yellow - 0/27/100/0
Red - 10/100/100/5
Yellow - 0/27/100/0
Blue - 100/80/30/5
Manual Zero Setting
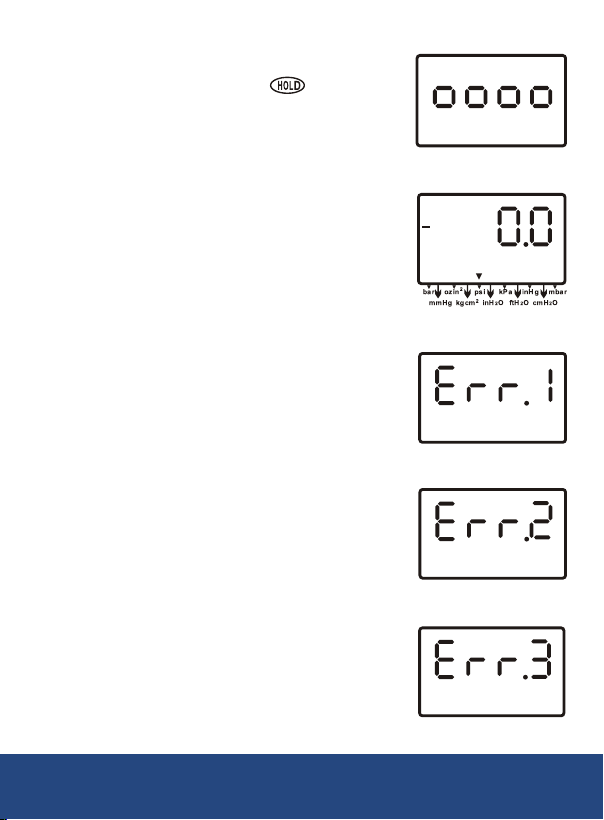
Fig. M
When you set the display to zero (no pressure
applied to the connector), press
button
for 2 seconds, the meter displays “0.0.0.0”
from right to left (See Fig.M) and then
delete each “0” from left back to right, the
LCD display shows a normal mode (See Fig.N).
Fig. N
Troubleshooting
• Power on but no display. Checkthatthebattery
isproperlyinstalledensuringthatcontactwith
terminalsandpolarityarecorrect,replacewitha
newbatteryorattachoptionalACadapter.
• BAT indication. Replace with a new battery when
LCD displays BAT at the middle bottom of screen.
• No display. Make sure that the battery is not
drained, if the display disappears, verify if
sleep mode is active. Refer to the Disable
sleep mode function for long term measurement.
Check that the tubing is tightly connected to
the meter.
• Err.1. If the pressure value exceeds the range
maximum, “Err.1“ appears on the display (See
Fig. O), it is recommended to use a meter with a
higher range, otherwise, the meter will be
damaged in use.
• Err.2. If the pressure value is less than the range
minimum, “Err.2“ appears on the display (See
Fig. P), it is recommended to use a meter with
a lower range to ensure measurement accuracy.
• Err.3. While operating the DIF function, if
the differential pressure value is larger than
maximum display digit, Err.3 appears on the
display (See Fig.Q ).
REED Instruments
1-877-849-2127 | [email protected] | www.reedinstruments.com
Fig. O
Fig. P
Fig. Q
continued ...
Page 10

Rich Black -
20/20/20/100
Blue - 100/80/30/5
Yellow - 0/27/100/0
Red - 10/100/100/5
Yellow - 0/27/100/0
Blue - 100/80/30/5
• Err.4. When you set zero, ensure you
Fig. R
have disconnected the tubing and that no
pressure is applied to the connector. If Err.4
appears on the display, it means the sensor
or the meter are damaged (See Fig.R). Return
the unit to point of purchase for repair.
Err.4 will also appear when the tube or the
hose is connected during setting zero mode.
Battery Replacement
Replace the battery when
• The BAT icon appears on the left side of the display screen
• The meter will not power on
• Use of the backlight causes the BAT icon to appear
Even if the battery was recently replaced, check its voltage level if you
get no response from your instrument.
To replace the battery:
1. Remove the tubing of the instrument.
2. Lay the instrument face-down on a clean, at surface.
3. Remove the battery with a screwdriver and observe indicated polarity
and close the cover after replacing with a new battery.
Note: Remove battery from instrument if you do not plan to use for a
month or more.
Do not leave battery in instrument.
REED Instruments
1-877-849-2127 | [email protected] | www.reedinstruments.com
Page 11

Rich Black -
20/20/20/100
Blue - 100/80/30/5
Yellow - 0/27/100/0
Red - 10/100/100/5
Yellow - 0/27/100/0
Blue - 100/80/30/5
Maintenance
• The meter is factory calibrated before shipping.
• To maintain the meter in the good condition for use, we recommend
you calibrate the meter after long term continuous use.
• When properly maintained, the meter will maintain an accuracy
specification, to ensure your meter is performing at its peak, send it
to the factory or a qualified instrument calibration facility for annual
calibration.
• We recommend that you always set the instrument to zero before
measurement. Refer to the zero setting procedure on page 9.
Cleaning
Use a damp cloth and mild soap to clean the case of the Manometer. Do
not use harsh detergents or abrasives as these may mar the finish or damage the unit’s case with an adverse chemical reaction.
Notes
________________________________________________
________________________________________________
________________________________________________
________________________________________________
________________________________________________
________________________________________________
________________________________________________
________________________________________________
1-877-849-2127 | [email protected] | www.reedinstruments.com
REED Instruments
Page 12

Rich Black -
20/20/20/100
Blue - 100/80/30/5
Yellow - 0/27/100/0
Red - 10/100/100/5
Yellow - 0/27/100/0
Blue - 100/80/30/5
________________________________________________
________________________________________________
________________________________________________
________________________________________________
________________________________________________
________________________________________________
________________________________________________
________________________________________________
________________________________________________
________________________________________________
________________________________________________
________________________________________________
________________________________________________
________________________________________________
________________________________________________
________________________________________________
________________________________________________
For service on this or any other REED product or information on other
REED products, contact REED Instruments at [email protected]
1-877-849-2127 | [email protected] | www.reedinstruments.com
REED Instruments
 Loading...