

Page 1
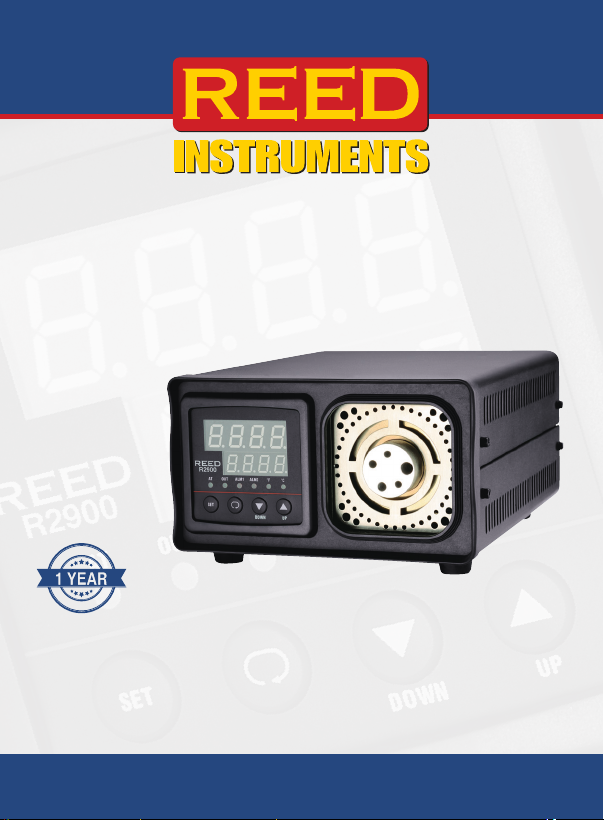
Dry Block
Calibrator
Instruction
Manual
R2900
1 YEAR
1 AN
W
A
R
R
A
N
T
Y
W
A
R
R
A
N
T
Y
G
A
R
A
N
T
I
E
G
A
R
A
N
T
I
E
W
A
R
R
A
N
T
Y
W
A
R
R
A
N
T
Y
G
A
R
A
N
T
I
E
G
A
R
A
N
T
I
E
1 YEAR1AN
1-877-849-2127 | [email protected] | www.reedinstruments.com
REED Instruments
Page 2

Table of Contents
Introduction ................................................................................................ 3
Product Quality ........................................................................................... 3
Safety ......................................................................................................3-4
Features ...................................................................................................... 5
Included ...................................................................................................... 5
Specications ............................................................................................. 6
Instrument Description ............................................................................... 7
Status Indicator Description ....................................................................... 8
Keypad Description .................................................................................... 9
Operating Instructions ........................................................................... 9-12
Initial Start Up ........................................................................................ 9
Turning Off the Calibrator .................................................................... 10
Selecting Temperature Unit of Measure .............................................. 10
Setting the Temperature Set-Point ...................................................... 10
Setting Overload Alarms 1 & 2 ............................................................ 11
Enabling/Disabling the Heating Power ................................................ 11
Keypad Lock/Unlock ........................................................................... 12
Replacing the Fuses ................................................................................. 12
Accessories and Replacement Parts ....................................................... 13
Applications .............................................................................................. 13
Product Care ............................................................................................ 13
Product Warranty ..................................................................................... 14
Product Disposal and Recycling .............................................................. 14
Product Support ....................................................................................... 15
1-877-849-2127 | [email protected] | www.reedinstruments.com
REED Instruments
2
Page 3

Introduction
Thank you for purchasing your REED R2900 Dry Block Calibrator. Please
read the following instructions carefully before using your instrument. By
following the steps outlined in this manual your meter will provide years of
reliable service.
Product Quality
This product has been manufactured in an ISO9001 facility and has been
calibrated during the manufacturing process to meet the stated product
specications. If a certicate of calibration is required please contact the
nearest authorized REED distributor or authorized Service Center. Please
note an additional fee for this service will apply.
Safety
• Never attempt to repair or modify your instrument.
• Dismantling your instrument other than for the purpose of replacing
fuses may cause damage that will not be covered under the
manufacturer's warranty. Servicing should only be provided by an
authorized Service Center
• Use this instrument only for temperature calibration as specied in the
instruction manual.
• Operate indoors and in environments listed in the instruction manual.
• Inspect the instrument for damage before each use. Do not use if
damaged or malfunctioning.
• Handle the instrument and thermometer probes with care to prevent
drops, shocks, or overheating.
• Only trained personnel should operate this equipment.
• Before initial use, after transport, or after storage in humid conditions,
energize the instrument for 2 hours to ensure it meets IEC 1010-1 safety
requirements. Remove any moisture beforehand.
• Allow at least 6 inches (15 cm) of clearance around the instrument for
air circulation.
continued...
1-877-849-2127 | [email protected] | www.reedinstruments.com
REED Instruments
3
Page 4

• Do not operate near ammable materials or under overhead structures.
• Avoid fully unattended operation.
• Do not touch the well-access surface or hot components.
• Avoid turning off the instrument above 100°C. Cool to below 100°C
before shutting down.
• Probes and inserts should only be removed when the temperature is
below 50°C.
• High-temperature operation (300°C and above) requires caution to
prevent burns or re.
• Use only grounded and polarized power cords with properly
grounded outlets.
•
Replace fuses with ones of the same rating, voltage, and type if needed.
• High voltage is present. Turn off and disconnect power before
performing internal maintenance.
• Keep the well and inserts clean; do not use uids for cleaning or
introduce foreign materials into the probe hole.
• Handle probes carefully to prevent calibration errors from shocks
or damage.
• Always carry the instrument upright to prevent probe sleeves from
falling out.
• Avoid excessively wet, oily, dusty, or dirty environments during
operation or storage.
• Turn off the instrument during mains power uctuations. Wait for power
to stabilize before re-energizing.
• Allow for probe expansion during heating. Ensure probe handle
temperature limits are not exceeded.
• Extended operation at high temperatures can shorten
component lifespan.
REED Instruments
1-877-849-2127 | [email protected] | www.reedinstruments.com
Page 5

Features
• Designed to calibrate RTDs, thermocouples, and small
bimetal thermometers
• Dual LED display allow simultaneous monitoring of set and
actual temperatures
• Accommodates multiple probe sizes with Ø3.5mm (x2), Ø4.2mm,
Ø5mm, and Ø6.8mm apertures
• User selectable °F or °C
Included
• Dry Block Calibrator
• Power Cord
continued...
1-877-849-2127 | [email protected] | www.reedinstruments.com
REED Instruments
5
Page 6

Specifications
Temperature Range: 91 to 572°F (33 to 300°C)
Accuracy: ≤212°F (≤100°C): ±1.6°F (0.8°C)
212 to 392°F (100 to 200°C):
±3.2°F (1.6°C) 392 to 572°F
(200 to 300°C): ±5.6°F (2.8°C)
Stability: ≤212°F (≤100°C): ±0.2°F (0.1°C)
Resolution: 0.1°F (0.1°C)
Heating Time: Approx. 30 mins from 91 to 572°F
(33 to 300°C)
Cooling Time: Approx. 30 mins from 572 to 122°F
(300 to 100°C)
Well Depth: 3.54" (90mm )
Aperture Diameter: Ø3.5mm(2), Ø4.2mm, Ø5mm, Ø6.8mm
Display: Dual LED
Power Supply: 110VAC, 2.5A
Product Certications: CE
Operating Temperature: 41 to 95°F (5 to 35°C)
Storage Temperature: -4 to 140°F (-20 to 60°C)
Operating Humidity Range: 15-80%
Dimensions: 7.1 x 4.5 x 8.8" (180 x 114 x 233mm)
Weight: 6.6lbs (3kg)
212 to 392°F (100 to 200°C): ±0.4°F (0.2°C)
392 to 572°F (200 to 300°C):±0.8°F (0.4°C)
1-877-849-2127 | [email protected] | www.reedinstruments.com
REED Instruments
6
Page 7
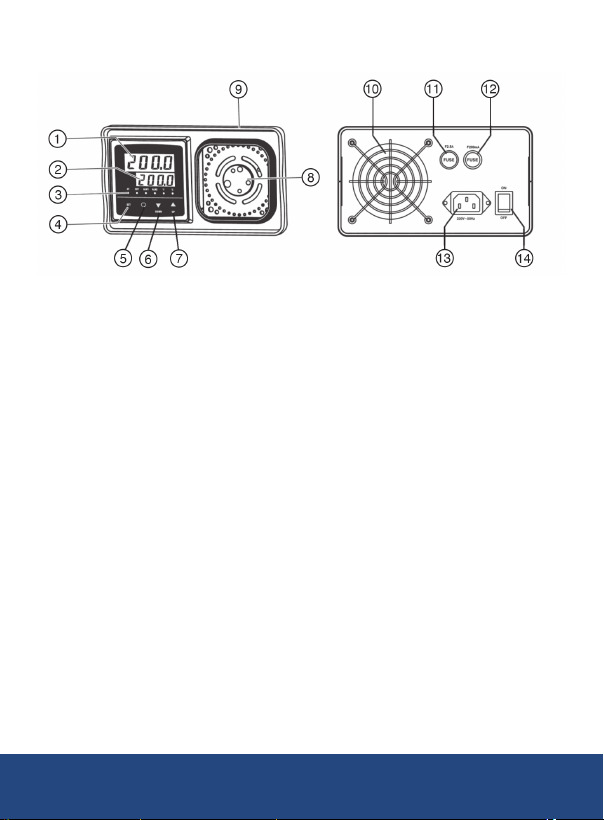
Instrument Description
1. Temperature Indicator
(Red LED)
2. Set Temperature Indicator
(Green LED)
3. Status Indicators
4. SET Button
5. Return Button
6. Down Arrow Button
7. Up Arrow Button
8. Dry-Block Heat Sources
9. RTD Reference Well
10. Fan
11. Heating System Fuse
12. Control System Fuse
13. Power Socket
14. Power Switch
REED Instruments
1-877-849-2127 | [email protected] | www.reedinstruments.com
Page 8

Note: The fan inside the calibrator has two speeds and runs continuously
when the unit is in operation. The fan runs slow for heating and
maintaining operation and runs fast for rapid cooling. The area around the
calibrator must be kept clear to allow adequate ventilation. The airow is
directed out the front and can be extremely hot.
Status Indicator Description
Note: Using any other parameter other than the ones described in this
manual will affect performance and could damage the calibrator.
AT
OUT
ALM1
ALM2
°F/°C
Auto-Tuning Parameter Adjustment (For Authorized Service
Centers Only)
Heating Output Power Indicator
Overload Alarm indicates that the Calibrator temperature
exceeds the set temperature. To set the alarm, refer to
Setting Overload Alarms 1 & 2 for details.
Note: When triggered the heating output power is turned off.
Overload Alarm indicates that the Calibrator temperature
exceeds the set temperature. To set the alarm, refer to
Setting Overload Alarm 1 & 2 for details.
Note: When triggered, the rapid cooling process will begin.
Temperature unit of measure.
REED Instruments
1-877-849-2127 | [email protected] | www.reedinstruments.com
Page 9
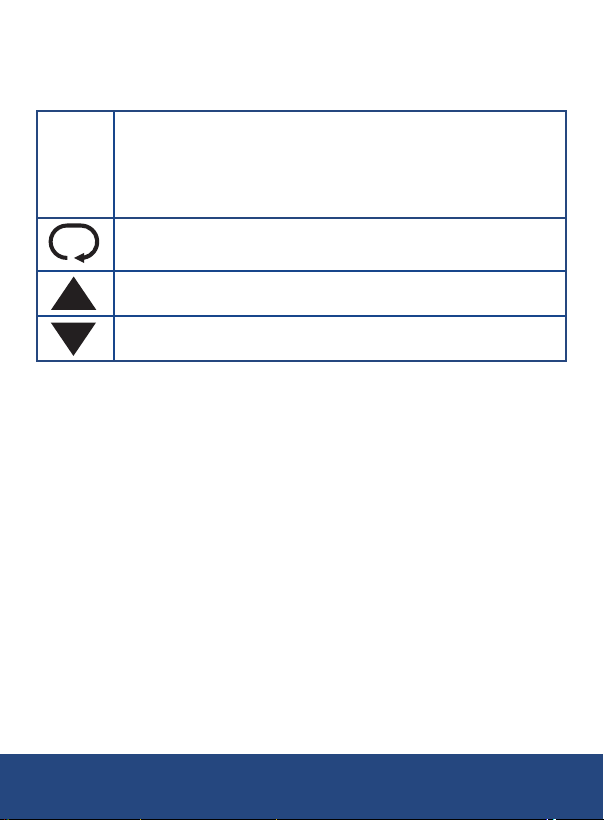
Keypad Description
The four-button keypad allows for easy set-point temperature. The
temperature set-point can be set to a resolution of 0.1°F or °C.
The SET button is used to conrm the selected value within
the parameter and to exit the set up mode and resume
SET
normal operation.
Note: At any time, you can press the SET button to exit the
Setup mode and resume normal operation.
The enter button is used to scroll through parameters.
The up arrow is used to increase temperature values and to
toggle between menu options within the selected parameter.
The down arrow is used to decrease temperature values and to
toggle between menu options within the selected parameter.
Operation Instructions
Initial Start up
1. Place the calibrator on a at surface with at least 8" of free space
around the instrument.
2. Connect the included power cord and plug into a power outlet.
3. Turn the calibrator on by toggling the power switch to ON.
4. The fan should begin blowing air through the instrument.
5. After a brief 3-second self-test, the calibrator will begin normal
operation by displaying both the current target surface temperature
and the last registered set temperature.
Note: When the calibrator is rst powered ON, the default set temperature
is set to 50°C. Refer to “Setting the Temperature Set-Point” for details.
6.
The calibrator will now heat up to reach the registered set temperature.
Note: The top display (Green LED) will continue to update the current
temperature until the set temperature is reached.
1-877-849-2127 | [email protected] | www.reedinstruments.com
REED Instruments
9
Page 10
Turning Off the Calibrator
It is recommended to select a set-point less than 140°F (60°C) and allow
the unit to cool down before turning it off.
Warning: Do not turn the instrument off at a temperature higher than
212°F (100°C). Lower the temperature below 212°F (100°C)
before powering OFF.
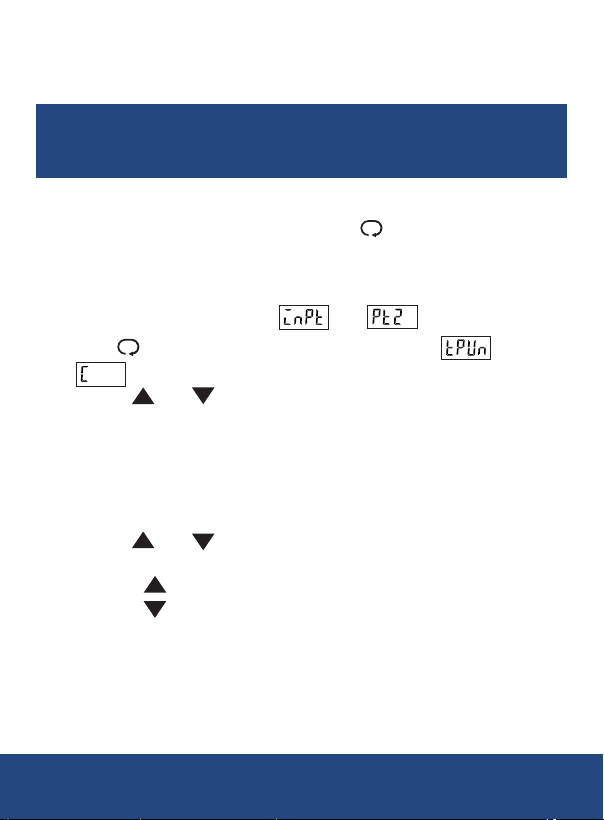
Selecting the Temperature Unit of Measure
1. To unlock, hold down both the SET and buttons simultaneously
and release when the display indicates ‘’At’’ & ‘’oFF’’ conrming that
the parameters are now unlocked.
2. Press the SET button for three seconds and release to enter the
setup mode as indicated by and
3. Press button once and the display will indicate and
which conrms the current temperature scale.
4. Use the and buttons to select between °C and °F which will
ash until conrmed.
5. Press the SET button to conrm selection.
6. Press the SET button again to exit set up mode and resume
normal operation.
Setting the Temperature Set-Point
1. Use the and buttons to increase or decrease the temperature
set-point value.
2. Press the button to increase the temperature value.
3. Press the button to decrease the temperature value.
Note: The values will adjust by 0.1° at every click and will adjust by 1°
if pressed and held.
4. Press the SET button to conrm the new temperature set-point.
5. Press the SET button again to exit set up mode and resume
normal operation.
1-877-849-2127 | [email protected] | www.reedinstruments.com
REED Instruments
10
Page 11
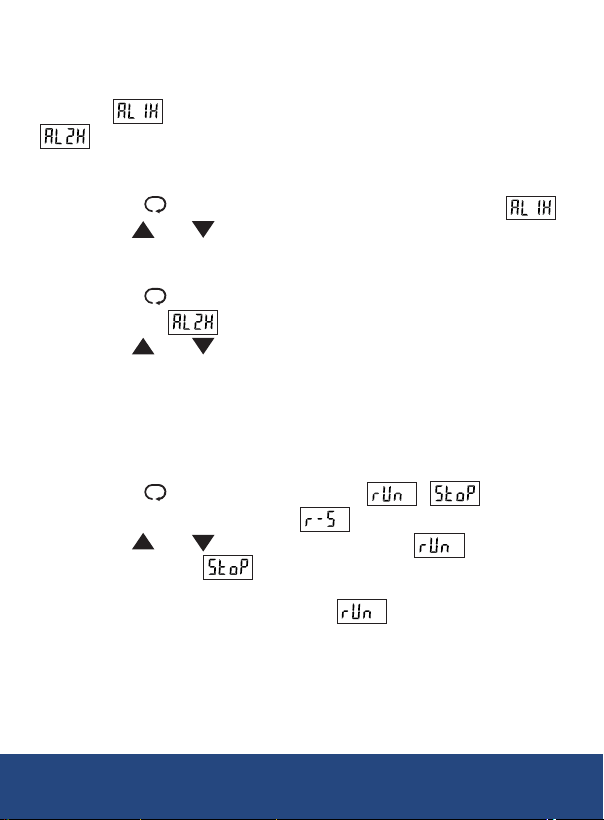
Setting Overload Alarms 1 & 2
The calibrator allows a user to set overload alarms to trigger when the
IR block temperature is over the temperature set-point. When set and
triggered, will turn off the heating power. When set and triggered,
will turn the cooling fan on.
Note: The default high overload alarms are set to 5°C (8°F).
These alarms can be set by following the steps below:
1. Press the button two times until the top screen displays .
2. Use the and buttons to change the temperature value which
will ash until conrmed.
3. Press the SET button to conrm the new high overload alarm 1
4. Press the button once to switch to high overload alarm 2 as
indicated by .
5. Use the and buttons to change the temperature value which
will ash until conrmed.
6. Press the SET button to conrm the new high overload alarm 2.
7. Press the SET button again to exit set up mode and resume
normal operation.
Enabling/Disabling the Heating Power
1. Press the button once to display the / heating
power function as indicated by .
2. Use the and buttons to select between (enable
heating power) or (disable heating power) which will ash
until conrmed.
Note: The default heating power is set to
3. Press the SET button to conrm selection.
4. Press the SET button again to exit set up mode and resume
normal operation.
1-877-849-2127 | [email protected] | www.reedinstruments.com
REED Instruments
11
Page 12
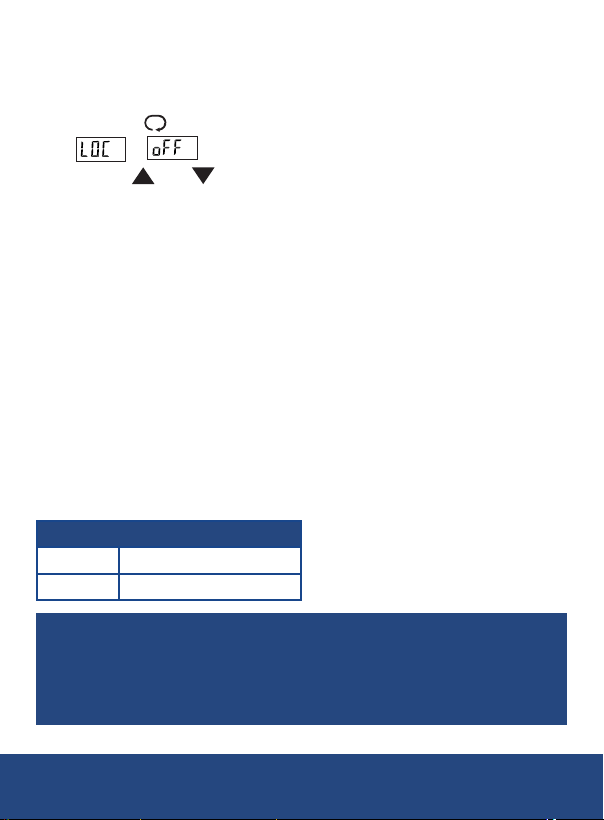
Keypad Lock/Unlock
The calibrator allows a user to lock/unlock the keypad to avoid unwanted
changes to the settings. Follow the steps below to lock or unlock the
keypad.
1. Press the button four times until the screen displays
& .
2. Use the and buttons to select between LoC1, LoC2 & oFF
which will ash until conrmed.
Note: LoC1 will lock all of the keypad buttons, while LoC2 will only
lock the button allowing the user to continue to modify/conrm the set
temperature if required.
3. Press the SET button to conrm selection.
4. Press the SET button again to exit set up mode and resume
normal operation.
Replacing the Fuses
The calibrator must be switched off before attempting to replace fuses.
To replace fuses:
1. Open the faulty fuse compartment by rotating it counter clockwise.
2. Gently slide out the fuse.
3. Replace with the appropriate fuse (see Specications below) and
tighten the compartment back into place.
Fuse Specifications
Fuse 1
Fuse 2
2.5A/250V
200mA/250V
This instrument is equipped with operator-accessible fuses. If a
fuse blows, it may be due to a power surge or failure of an internal
component. Replace the fuse once. If the fuse blows again, it is likely
caused by failure of an internal component, and you should contact an
Authorized REED Service Center.
1-877-849-2127 | [email protected] | www.reedinstruments.com
REED Instruments
12
Page 13

Accessories and Replacement Parts
R8888 Deluxe Hard Carrying Case
Applications
• Calibrating thermocouples and RTDs to ensure precise temperature
control in manufacturing and production machinery
• Maintaining accurate temperature conditions for experiments in
research and testing environments by calibrating sensors
• Verifying and calibrating temperature-sensitive equipment for
compliance in food safety and quality control processes
• Ensuring efcient heating and cooling operations by calibrating
thermocouples and RTDs used in HVAC systems
• Validating temperature accuracy in drug production and storage
through calibration of critical sensors
• Supporting the calibration of temperature sensors used in power
generation and utilities for operational consistency
Product Care
To keep your instrument in good working order we recommend the following:
• Store your product in a clean, dry place.
• Change the battery as needed.
• If your instrument isn't being used for a period of one month or longer
please remove the battery.
• Clean your product and accessories with biodegradable cleaner. Do not
spray the cleaner directly on the instrument. Use on external parts only.
1-877-849-2127 | [email protected] | www.reedinstruments.com
REED Instruments
13
Page 14
Product Warranty
REED Instruments guarantees this instrument to be free of defects in
material or workmanship for a period of one (1) year from date of shipment.
During the warranty period, REED Instruments will repair or replace, at no
charge, products or parts of a product that proves to be defective because
of improper material or workmanship, under normal use and maintenance.
REED Instruments total liability is limited to repair or replacement of the
product. REED Instruments shall not be liable for damages to goods,
property, or persons due to improper use or through attempts to utilize the
instrument under conditions which exceed the designed capabilities. In
order to begin the warranty service process, please contact us by phone
at 1-877-849-2127 or by email at [email protected] to discuss
the claim and determine the appropriate steps to process the warranty.
Product Disposal and Recycling
Please follow local laws and regulations when disposing or recycling
your instrument. Your product contains electronic components and
must be disposed of separately from standard waste products.
1-877-849-2127 | [email protected] | www.reedinstruments.com
REED Instruments
14
Page 15

Product Support
If you have any questions on your product, please contact your authorized
REED distributor or REED Instruments Customer Service by phone at
1-877-849-2127 or by email at [email protected].
Please visit www.REEDInstruments.com for the most
up-to-date manuals, datasheets, product guides and software.
Product specifications subject to change without notice.
All rights reserved. Any unauthorized copying or reproduction of this
manual is strictly prohibited without prior written permission from
REED Instruments.
1-877-849-2127 | [email protected] | www.reedinstruments.com
REED Instruments
15
Page 16
TEST & MEASURE
WITH CONFIDENCE
Access Our
Product Guide
www.REEDInstruments.com
1-877-849-2127 | [email protected] | www.reedinstruments.com
REED Instruments
 Loading...