

Page 1
R2340
1 YEAR
1 AN
R
R
A
N
R
R
A
N
G
A
R
A
N
T
I
E
G
A
R
A
N
T
I
E
W
A
R
R
A
N
T
Y
W
A
R
R
A
N
T
Y
G
A
R
A
N
T
I
E
G
A
R
A
N
T
I
E
1 YEAR1 AN
Professional Infrared
Thermometer
T
A
Y
W
W
Y
A
T
Instruction
Manual
1-877-849-2127 | [email protected] | www.reedinstruments.com
REED Instruments
Page 2

Table of Contents
Introduction ................................................................................................ 4
Product Quality ........................................................................................... 4
Safety ......................................................................................................... 4
Features ...................................................................................................... 5
Included ...................................................................................................... 5
Specications .......................................................................................... 6-7
Instrument Description ............................................................................... 8
Display Description .................................................................................... 9
Distance & Spot Size ................................................................................ 10
Operating Instructions ......................................................................... 11-12
Power ON/OFF ................................................................................... 11
External Contact Probe Measuring Procedure ................................... 11
Non-Contact (Infrared) Temperature Measurement ........................... 11
Continuous Temperature Measurement (Trigger Lock) ...................... 12
Turning Laser ON/OFF ........................................................................ 12
Measurement Modes ..........................................................................13-14
General Mode ..................................................................................... 13
Infrared Reference Mode ................................................................... 13
Thermal Conduction ........................................................................... 14
Dew Point Mode ................................................................................. 14
Thermocouple Mode .......................................................................... 14
Setup Menu ......................................................................................... 15-22
Set the Time and Date ...................................................................15-16
Select the Temperature Unit of Measure ............................................ 16
Set the High and Low Temperature Alarms................................... 16-17
Adjust Emissivity ................................................................................. 17
continued...
1-877-849-2127 | [email protected] | www.reedinstruments.com
REED Instruments
2
Page 3

User scheduled Measurement Recording Interface (Set Rec.) .......... 17
View Interval Recordings (Inquiry) ...................................................... 18
Format ................................................................................................ 18
Set Recording Intervals ................................................................. 18-20
View/Format Recorded Logs .............................................................. 20
View Interval Recordings .................................................................... 20
Format ................................................................................................ 20
System Settings ................................................................................. 21
Enabling/Disabling Audible Alarm ...................................................... 21
Adjusting LCD Brightness Level ......................................................... 21
Set Trigger Lock Time ........................................................................ 22
Set Auto Power OFF .......................................................................... 22
Factory Reset ..................................................................................... 22
System Info ........................................................................................ 22
Data Logging ............................................................................................ 23
Saving Measurement Logs ................................................................. 23
Transfer Files to a PC ......................................................................... 23
Charging the Battery ................................................................................ 24
Applications .............................................................................................. 24
Accessories .............................................................................................. 24
Appendix: Emissivity Chart .................................................................25-26
Troubleshooting ........................................................................................ 27
Product Care ............................................................................................ 28
Product Warranty ..................................................................................... 28
Product Disposal and Recycling .............................................................. 28
Product Support ....................................................................................... 29
1-877-849-2127 | [email protected] | www.reedinstruments.com
REED Instruments
3
Page 4

Introduction
Thank you for purchasing your REED R2340 Professional Infrared
Thermometer. Please read the following instructions carefully before using
your instrument. By following the steps outlined in this manual your meter
will provide years of reliable service.
Product Quality
This product has been manufactured in an ISO9001 facility and has been
calibrated during the manufacturing process to meet stated product
specications. If a certicate of calibration is required, please contact the
nearest authorized REED distributor or authorized Service Center. Please
note an additional fee for this service will apply.
Safety
• Never attempt to repair or modify the
instrument. Dismantling the product,
other than for the purpose of replacing
batteries, may cause damage that will
not be covered under the manufacturer's
warranty. Servicing should only be
provided by an authorized
service center.
• Use extreme caution when the laser beam is turned on.
• Do not let the beam enter someone's eye, another person's eye or the
eye of an animal.
• Be careful not to point the beam off a reective surface and strike
someone's eye.
• Do not allow the laser light beam to impinge on any gas which
can explode.
1-877-849-2127 | [email protected] | www.reedinstruments.com
REED Instruments
4
Page 5

Features
• Infrared thermometer with integral type K thermocouple input for
contact measurement
• Built-in laser pointer identies target area
• User-selectable °F or °C
• 55:1 Distance to Spot size ratio
• Rechargeable li-ion battery
• High resolution TFT color LCD
• Digitally adjustable emissivity
• Max, Min, Average and Differential readings
• Ambient air temperature, humidity, dew point and wet bulb
temperature measurement
• Surface heat conduction, dew point and temperature comparison
detection modes
• Audible adjustable alarm
• Internal memory stores up to 999 datapoints
• Trigger lock for continuous monitoring
• Low battery indication and auto shut off
Included
• Professional Infrared Thermometer
• USB Cable
• Type K Bead Thermocouple
• Hard Carrying Case
1-877-849-2127 | [email protected] | www.reedinstruments.com
REED Instruments
5
Page 6

Specifications
IR Temperature
Measuring Range: -58.0°F to 3362°F (-50°C to 1850°C)
Accuracy: -58.0°F to 32°F (-50°C to 0°C):
± 2.0°F + 0.1°F/°F (±1.0°C + 0.1°C/°C)
32°F to 3362°F (0°C to 1850°C):
±2.0°F or ±0.01 × t°F
(Whichever is greater)
(±1.0°C or ±0.01 × t°C
(Whichever is greater))
Resolution: 0.1°F (0.1°C)
Contact Temperature (Type K)
Measuring Range: -58.0°F to 2498°F (-50°C to 1370°C)
Accuracy: -58.0°F to 2498°F (-50°C to 1370°C):
±0.005 × t + 3.0°F (±0.005 × t + 1.5°C)
Ambient Temperature Measurement
Measuring Range: 14°F to 122°F (-10°C to 50°C)
Accuracy: 14°F to 32°F (-10°C to 0°C):
±2.0°F (±1.0°C)
32°F to 104°F (0°C to 40°C):
±1.0°F (±0.5°C)
104°F to 122°F (40°C to 50°C):
±2.0°F (±1.0°C)
Resolution: 0.1°F (0.1°C)
Relative Humidity
Measuring Range: 10% RH to 90% RH
Accuracy: ±5% RH
General Specifications
Optical Resolution (D:S): 55:1
Spectral Response: 8 to 14µm
Emissivity: 0.1 to 1.0 (Adjustable)
Response Time: 250ms
REED Instruments
1-877-849-2127 | [email protected] | www.reedinstruments.com
continued...
6
Page 7

Display Type: 2.4" TFT LCD
Display Resolution : 320 x 240 pixels
Display Hold: Yes
High/Low Alarms: Yes
Max/Min: Yes
Average and Differential: Yes
Data Storage: Yes (Up to 999 groups)
F/C Switchable: Yes
Trigger Lock: Yes
Auto Shut-off: Yes (adjustable from 1 to 30 mins)
Laser Type: Class II
Low Battery Indicator: Yes
PC Connectivity: Yes
Power Supply: 3.7V 2600mAh rechargeable
Li-ion battery
Battery Life: Approx. 20 hours (Fully Charged)
Charging System: USB-C
Charge Time: 3 hours
Product Certications: CE, RoHS, UKCA
Operating Temperature: 14 to 122°F (-10 to 50°C)
Storage Temperature: -4 to 140°F (-20 to 60°C)
Operating Humidity Range: 10 to 90%
Maximum Operating Altitude: 6561' (2000m)
Maximum Storage Altitude: 39.370' (12.000m)
Dimensions: 8.07 x 4.88 x 2.56"
(205 x 124 x 65mm)
Weight: 0.82lbs (375g)
1-877-849-2127 | [email protected] | www.reedinstruments.com
REED Instruments
7
Page 8
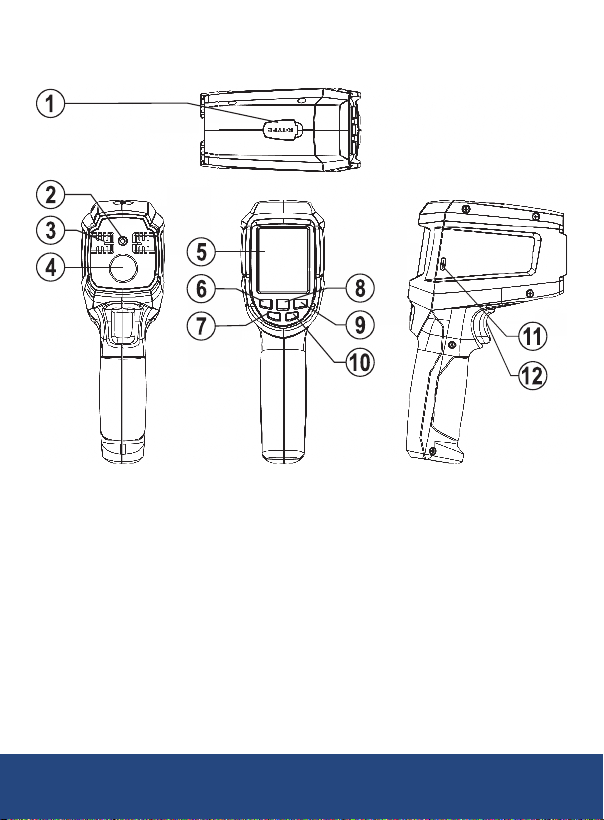
Instrument Description
1. Thermocouple Input Jack
2. Laser Pointer Beam
3. Temperature and
Humidity Sensor
4. IR Sensor
5. LCD Display
6. Left Button
7. Power Button
8. OK Button
9. Right Button
10. Back Button
11. USB-C Interface
12. Trigger
1-877-849-2127 | [email protected] | www.reedinstruments.com
REED Instruments
8
Page 9
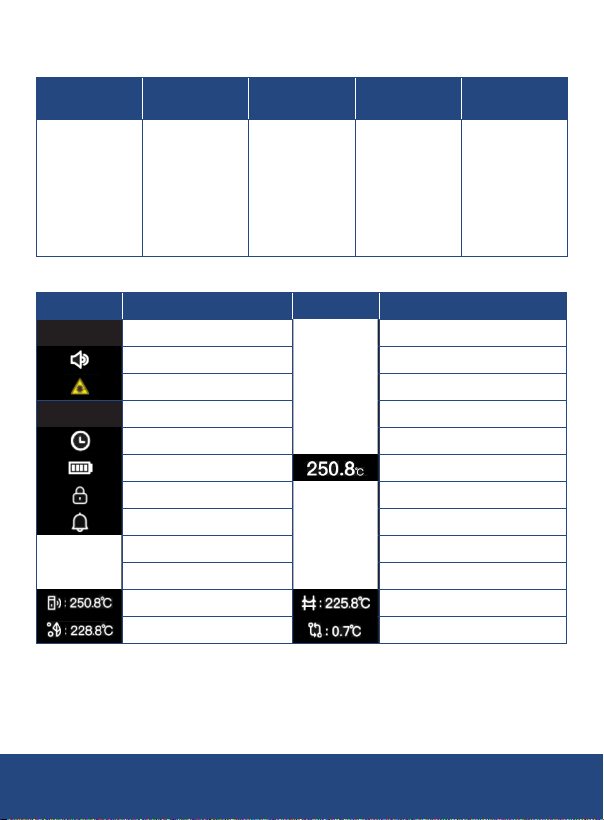
Display Description
General
Mode
Infrared
Mode
Thermal
Bridge
Dew Point
Mode
Item Description Item Description
10:25 AM 2021.07.21
SCAN
Date and time Ambient temperature
Audio alarm Relative humidity
Laser Dew point temperature
Temperature measurement Wet bulb temperature
Appointment Type K thermocouple temperature
Battery status Infrared temperature
Lock measurement Maximum
Alarm Minimum
Range bar Average
Reference temperature (IR-Ref) Difference
Difference (IR-Ref) Difference (IR-AT)
Difference (IR-DP) Difference (comparison mode)
Comparison
Mode
1-877-849-2127 | [email protected] | www.reedinstruments.com
REED Instruments
9
Page 10

Distance & Spot Size
The light spot diameter represents 90%
of the energy of the circle.
D
1-877-849-2127 | [email protected] | www.reedinstruments.com
REED Instruments
10
Page 11

Operating Instructions
Power ON/OFF
To turn the meter ON or OFF press and hold the POWER button for
approx. 3 seconds.
External Contact Probe Measuring Procedure
This meter accepts K-type thermocouples with a mini
plug. The probe can be used simultaneously while the
thermometer is taking non-contact measurements.
The probe readings are shown below the
non-contact measurements.
1. Turn the meter on and connect the
provided thermocouple.
2. Pull the trigger to begin taking contact
probe measurements.
3. The LCD will display the measured contact temperature value.
Note: To take a measurement, make direct contact with the surface being
tested. If a thermocouple probe is not connected to the meter, the LCD
will display "---.-°F or °C".
Non-Contact (Infrared) Temperature Measurement
1. Pull and hold the trigger after aiming at the target. The SCAN icon
will ash, indicating that the target temperature is being measured.
2. When the trigger is released, the HOLD icon will appear indicating
that measurement has stopped and the last measured value will
remain on-screen until the next measurement has been taken or the
instrument turns off.
Note: Each time the trigger is pulled an internal log is created which
captures the following information:
a) IR temperature
b) Thermocouple temperature
(if connected)
c) Emissivity
REED Instruments
1-877-849-2127 | [email protected] | www.reedinstruments.com
d) Min/Max/Avg/Dif (if either Min/
Max or Avg/Dif is enabled)
e) Date/Time
continued...
11
Page 12

Continuous Temperature Measurement (Trigger Lock)
The instrument allows for continuous temperature measurement to be set
from 1 minute to 24 hours. Refer to "Trigger Lock Setup" for details.
Note: This function is applicable for processes that require regular
monitoring of temperature.
1. Once the trigger lock function is enabled, pull and hold the trigger
after aiming at the target. The SCAN icon will ash, indicating that
the target temperature is being measured.
2. Press the
screen to turn the continuous temperature measurement
function ON.
3. Release the trigger and the
and the SCAN icon will ash.
4. When the set continuous time for temperature measurement has
been reached, both the
HOLD icon will appear. The thermometer will now hold the last
measured value until the next measurement value has been taken or
the instrument turns off.
Note: The continuous temperature measurement function can also be
turned OFF by pulling the trigger again before time is reached.
button when the icon appears in the lower right of the
icon will now appear on the display
and SCAN icons will disappear and the
Turning Laser ON/OFF
When the trigger is pulled, press the button to turn
the laser indicator function ON and OFF. When turned
on, the laser indicator will be displayed on the LCD,
while the red laser beam will indicate the position
being measured.
1-877-849-2127 | [email protected] | www.reedinstruments.com
REED Instruments
12
Page 13

Measurement Modes
1. While the meter is powered ON and in HOLD status, press
the button to enter the measurement MODE selection screen.
2. Press the or buttons to scroll through each mode as shown
in Figure 1.
3. Once the desired mode has been highlighted, press the OK button to
conrm selection.
Note: At any time, press the BACK button or pull the trigger to exit the
measurement MODE selection screen and resume normal operation.
General Mode
This mode is suitable for most users and can measure ambient
temperature, relative humidity, dew point temperature, wet bulb
temperature, type K thermocouple (contact) temperature and infrared
(non-contact) temperature. (Figure 2)
Infrared Reference Mode
In this mode, a measured reading can be compared to a reference
temperature. If the reference temperature needs to be changed, press
the BACK button to clear it and measure again. When ready, measure
the temperature of the detected object. The thermometer automatically
calculates the difference (IR-Ref) by subtracting the temperature of the
object being measured (IR) from the reference temperature as shown
in Figure 3.
Figure 1
Figure 2
REED Instruments
1-877-849-2127 | [email protected] | www.reedinstruments.com
Figure 3
continued...
13
Page 14

Thermal Conduction
In this mode, the thermometer automatically calculates the difference
between the temperature of the object being measured and the current
ambient temperature as shown in Figure 4.
Dew Point Mode
In this mode, the thermometer automatically calculates the difference by
subtracting the temperature of the object being measured from the current
dew point temperature as shown in Figure 5.
Thermocouple Mode
In this mode, the thermometer automatically calculates the difference by
subtracting the temperature of the object being measured from the type K
thermocouple temperature as shown in Figure 6.
Figure 4 Figure 5 Figure 6
1-877-849-2127 | [email protected] | www.reedinstruments.com
REED Instruments
14
Page 15
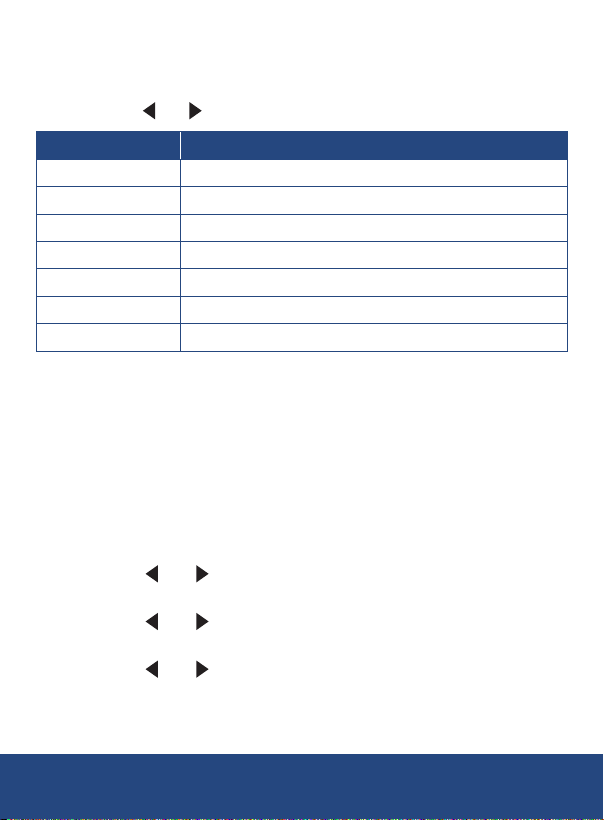
Setup Menu
1. While in the instrument is ON, press the OK button to enter the
Menu screen.
2. Press the or buttons to scroll through the following parameters.
Parameter Description
Time and Date Set the time and date
Temperature Unit Select the temperature unit of measure
HI/Lo Alarms Set the high and low temperature alarms
Emissivity Adjust emissivity
Set Rec. User scheduled Measurement Recording Interface
Storage View/Format Recorded Logs
System Settings System Settings Interface
3. Once the appropriate parameter has been selected, follow the
instructions below.
Note: At any time, press the BACK button or pull the trigger to exit the
Setup Menu screen and resume normal operation.
Set the Time and Date
1. Press the OK button when "Time and Date" is highlighted to enter
the appropriate function.
2. Press the OK button again to activate the time format selection
(if applicable).
3. Press the and buttons to select between 12H and 24H.
4. Press the OK button to conrm selection.
5. Press the and buttons to highlight the next parameter.
6. Press the OK button to activate the Hour digits.
7. Press the and buttons to adjust the Hour as indicated by "00:".
8. Press the OK button to conrm selection.
9. Repeat steps 6, 7 and 8 to adjust the minutes time stamp as
indicated by ":00".
REED Instruments
1-877-849-2127 | [email protected] | www.reedinstruments.com
continued...
15
Page 16
10. Press the and buttons to highlight the next parameter.
11. Press the OK button to activate the year digits as indicate
by "YYYY".
12. Press the and buttons to adjust the Year.
13. Press the OK button to conrm selection and activate the month
digits as indicated by "MM".
14. Press the and buttons to adjust the Month.
15. Press the OK button to conrm selection and activate the day digits
as indicated by "DD".
16. Press the and buttons to adjust the Day.
17. Press the OK button to conrm selection.
18. Press the BACK button to return to the Setup Menu Screen.
Note: At any time, press the BACK button or pull the trigger to exit the
Setup Menu screen and resume normal operation.
Select the Temperature Unit of Measure
1. Press the OK button when "Temperature unit" is highlighted to enter
the appropriate function.
2. Press the and buttons to select between °F and °C.
3. Press the OK button to conrm selection.
4. Press the BACK button to return to the Setup Menu Screen.
Note: At any time, press the BACK button or pull the trigger to exit the
Setup Menu screen and resume normal operation.
Set the High and Low Temperature Alarms
1. Press the OK button when "HI/LO Alarms" is highlighted to enter the
appropriate function.
2. Press the
3. Press the OK button to activate the applicable temperature alarm.
4. Press the button to select "-" or "+".
5. Press the
6. Press the button to set the temperature value.
1-877-849-2127 | [email protected] | www.reedinstruments.com
and buttons to select the desired temperature alarm.
button to conrm selection and jump to the rst digit.
continued...
REED Instruments
16
Page 17

7. Press the button to conrm selection and jump to the next digit.
8. Repeat steps 6 and 7 to adjust the other temperature values
(if applicable).
9. When done, press the OK button to conrm selection.
10. Press the BACK button to return to the Setup Menu Screen.
Note: At any time, press the BACK button or pull the trigger to exit the
Setup Menu screen and resume normal operation.
Adjust Emissivity
1. Press the OK button when "Emissivity" is highlighted to enter the
appropriate function.
2. Press the or buttons to select between adjusting the emissivity
manually and selecting from the preset emissivity table.
3. Press the OK button to activate the applicable selection.
4. If manual emissivity adjustment is selected, press the or
buttons adjust the emissivity value.
5. Press the OK button to conrm selection.
6. If the pre-set emissivity table is selected, press the or buttons
to select the desired emissivity value.
7. When done, press the OK button to conrm selection.
8. Press the BACK button to return to the Setup Menu Screen.
Note: At any time, press the BACK button or pull the trigger to exit the
Setup Menu screen and resume normal operation.
User scheduled Measurement Recording Interface
(Set Rec.)
1. Press the OK button when "Set Rec." is highlighted to enter the
appropriate function.
2. Press the and buttons to scroll through the following parameters
within the User scheduled Measurement Recording Interface.
a) View Interval Recordings
b) Format
Follow the instructions below to adjust each setting.
REED Instruments
1-877-849-2127 | [email protected] | www.reedinstruments.com
c) Set Recording Intervals
continued...
17
Page 18
View Interval Recordings (Inquiry)
1. Press the OK button when "Inquiry" appears on the LCD.
2. Press the and buttons to scroll through the list of recorded log
les (if applicable).
3. While in a recorded log le, press the OK button to delete the
desired le.
4. Press the BACK button to return to the "User scheduled
Measurement Recording Interface" screen.
Note: At any time, press the BACK button twice or pull the trigger to exit
the Setup Menu screen and resume normal operation.
Format
1. Press the OK button when "Format" is highlighted to enter the
appropriate function.
2. Press the or buttons to select between "Yes" and "No".
3. If "Yes" is selected, the meter will format/erase all recorded les.
4. When complete, the meter will automatically return to the "User
scheduled Measurement Recording Interface" screen.
Note: At any time, press the BACK button twice or pull the trigger to exit
the Setup Menu screen and resume normal operation.
Set Recording Intervals
1. Press the OK button when "Set Recording Intervals" is highlighted to
enter the appropriate function.
2. Press the OK button again to "OPEN"/Enable the "set recording
intervals" menu screen.
3. Press the OK button a third time to activate the "Start Date" selection.
4. Press the and buttons to set the Year (YYYY).
5. Press the OK button to conrm selection and activate the month
digits as indicated by "MM".
6. Press the and buttons to adjust the Month.
7. Press the OK button to conrm selection and activate the day digits
as indicated by "DD".
8. Press the and buttons to adjust the Day.
REED Instruments
1-877-849-2127 | [email protected] | www.reedinstruments.com
continued...
18
Page 19
9. Press the OK button to conrm selection.
10. Press the and buttons to highlight the next parameter.
11. Press the OK button to activate the "Start Time" Hour digits.
12. Press the and buttons to adjust the Hour as indicated by "00:".
13. Press the OK button to conrm selection activate the "Start Time"
minute digits.
14. Press the and buttons to adjust the minutes as indicated
by "00:".
15. Press the OK button to conrm selection.
16. Press the and buttons to highlight the next parameter.
17. Press the OK button to activate the recording intervals Hour digits.
Note: Recording intervals can be set anywhere between 1 minute and
24 Hours.
18. Press the
19. Press the OK button to conrm selection and activate the minutes
digits as indicated by "mm".
20. Press the and buttons to adjust the minutes as indicated
by ":00".
21. Press the OK button to conrm selection.
22. Press the and buttons to highlight the next parameter.
23. Press the OK button to activate the rst digit of the
"Frequency" selection.
Note: Up to 999 recordings/logs can be set at one time.
24. Press the
25. Press the OK button to conrm selection and jump to the next digit.
26. Press the and buttons to adjust the second digit if applicable.
27. Press the OK button to conrm selection and jump to the next digit.
28. Press the and buttons to adjust the third digit if applicable.
29. Press the OK button to conrm selection.
30. To disable this feature, the "Close" selection box must be selected
by pressing the OK button when highlighted.
1-877-849-2127 | [email protected] | www.reedinstruments.com
and buttons to adjust the Hour as indicated by "00:".
and buttons to adjust the rst digit if applicable.
continued...
REED Instruments
19
Page 20
31. Press the BACK button to return to the Setup Menu Screen.
Note: At any time, press the BACK button twice or pull the trigger to exit
the Setup Menu screen and resume normal operation.
View/Format Recorded Logs
1. Press the OK button when "Storage" is highlighted to enter the
appropriate function.
2. Press the and buttons to scroll through the following
parameters within the Storage interface.
a) View Interval Recordings
b) Format
Follow the instructions below to adjust each setting.
View Interval Recordings
1. Press the OK button when "Inquiry" appears on the LCD.
2. Press the and buttons to scroll through the list of interval
recorded log les (if applicable).
3. While in a recorded log le, press the OK button to delete the
desired le.
4. Press the BACK button to return to the "Memory Storage
Interface" screen.
Note: At any time, press the BACK button twice or pull the trigger to exit
the Setup Menu screen and resume normal operation.
Format
1. Press the OK button when "Format" is highlighted to enter the
appropriate function.
2. Press the or buttons to select between "Yes" and "No".
3. If "Yes" is selected, the meter will format/erase all interval recorded
log les.
4. When complete, the meter will automatically return to the "Memory
Storage Interface" screen.
Note: At any time, press the BACK button twice or pull the trigger to exit
the Setup Menu screen and resume normal operation.
continued...
1-877-849-2127 | [email protected] | www.reedinstruments.com
REED Instruments
20
Page 21
System Settings
1. Press the OK button when "System Settings" is highlighted to enter
the appropriate function.
2. Press the and buttons to scroll through the following
parameters within the "System Settings" interface.
a) Audible Alarm
b) Brightness
c) Lock time
d) Auto Power Off
e) Factory Reset
f) System Info
Enabling/Disabling Audible Alarm
1. Press the OK button when "Audible Alarm" is highlighted to enter the
appropriate function.
2. Press the or buttons to select between "ON" and "OFF".
3. Press the BACK button to return to the "System Settings" screen.
Note: At any time, press the BACK button twice or pull the trigger to exit
the Setup Menu screen and resume normal operation.
Adjusting LCD Brightness Level
1. Press the OK button when "Brightness" is highlighted to enter the
appropriate function.
2. Press the or buttons to select between "High", "Medium" and
"Low" brightness levels.
3. Press the OK button to conrm selection.
4. Press the BACK button to return to the "System Settings" screen.
Note: At any time, press the BACK button twice or pull the trigger to exit
the Setup Menu screen and resume normal operation.
continued...
1-877-849-2127 | [email protected] | www.reedinstruments.com
REED Instruments
21
Page 22
Set Trigger Lock Time
1. Press the OK button to activate the "Lock time" Hour digits.
2. Press the and buttons to adjust the Hour as indicated by "00:"
if applicable.
3. Press the OK button to conrm selection and activate the "Lock
time" minute digits.
4. Press the and buttons to adjust the minutes as indicated by "00:".
5. Press the OK button to conrm selection.
Note: At any time, press the BACK button twice or pull the trigger to exit
the Setup Menu screen and resume normal operation.
Set Auto Power OFF
1. Press the OK button to activate the "Auto Power off" minutes digits.
2. Press the and buttons to adjust the minutes as indicated
by "00".
3. Press the OK button to conrm selection.
Note: At any time, press the BACK button twice or pull the trigger to exit
the Setup Menu screen and resume normal operation.
Factory Reset
1. Press the OK button when "Factory Reset" is highlighted to enter the
appropriate function.
2. Press the or buttons to select between "Yes" and "No".
3. When complete, the meter will automatically return to the "System
Settings" screen.
Note: At any time, press the BACK button twice or pull the trigger to exit
the Setup Menu screen and resume normal operation.
System Info
1. Press the OK button when "System Info" is highlighted to view the
device information.
2. Press the BACK button to return to the "System Settings" screen.
Note: At any time, press the BACK button twice or pull the trigger to exit
the Setup Menu screen and resume normal operation.
1-877-849-2127 | [email protected] | www.reedinstruments.com
REED Instruments
22
Page 23
Data Logging
Saving Measurement Logs
1. Pull the trigger to take a measurement.
2. Release the trigger to stop the measurement and
return to HOLD measurement status.
3. Press the button to save the current
measurement log.
4. Press the or button to select the sequence
number to be saved.
5. Press the OK button to conrm selection.
Transfer files to a PC
To transfer recorded information to a PC, connect the included USB cable
to the instrument and a computer.
1. Plug the USB cable into the USB-C interface and turn the
instrument on.
2. Press the OK button to enter the MENU screen.
3. Press the
4. Press the OK button to conrm selection.
5. After the table is generated, the computer will automatically
recognize the meter as a removable device and open the drive to
view the generated logs in PDF/CSV formats.
Note: No software is necessary to view saved data. Simply click and drag
data from the device on to a computer's desktop or open directly from
any of the folders.
or buttons to select "Generate table".
1-877-849-2127 | [email protected] | www.reedinstruments.com
REED Instruments
23
Page 24

Charging the Battery
1. Connect the R2340 via the included cable to a USB port on a PC or
into a wall outlet using a USB Power Adapter (not included).
2. Charge the meter until the battery indicator appears full and remove
the charging cable when complete.
Applications
• Verify mechanical (bearings, motors) or electrical (circuit breaker
boxes) equipment
• Calibration and control of heater and oven temperatures
• Monitoring materials in processes involving heating and/or cooling
• Quality control monitoring
• Research and development applications
• Automotive diagnostics
• Conduct HVAC/R energy audits
Accessories
R8888 Medium Hard Carrying Case
Don't see your part listed here? For a complete list of all accessories and
replacement parts visit your product page on www.REEDInstruments.com.
1-877-849-2127 | [email protected] | www.reedinstruments.com
REED Instruments
24
Page 25
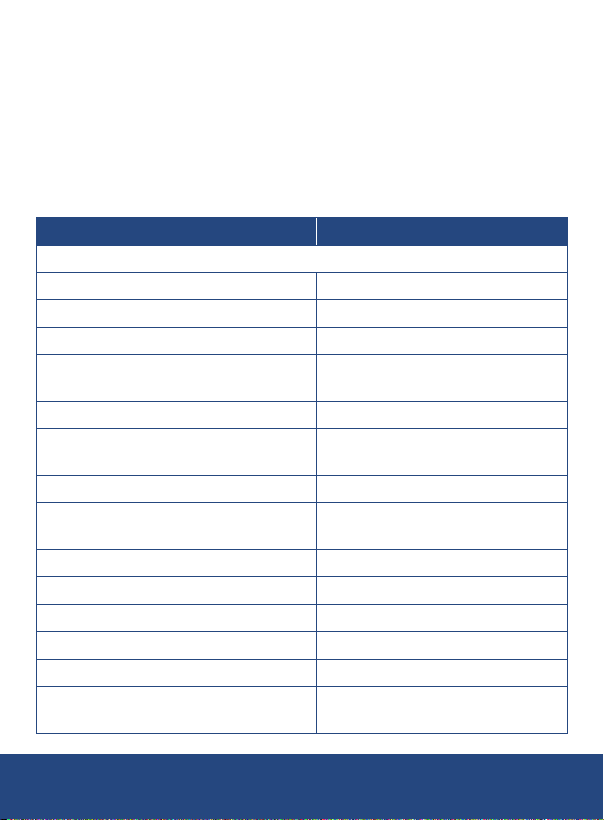
Appendix: Emissivity Chart
Emissivity is a term used to describe the energy-emitting characteristics of
materials. Most (90% of typical applications) organic materials and painted
or oxidized surfaces have an emissivity of 0.95. Inaccurate readings will
result from measuring shiny or polished metal surfaces. To compensate,
cover the surface to be measured with masking tape or at black paint.
Allow time for the tape to reach the same temperature as the material
underneath it. Measure the temperature of the tape or painted surface.
Measured Surfaces Emmisivity
Metal
Aluminum: Oxidization 0.2-0.4
A3003 Alloy: Oxidization, Rough 0.3, 0.1-0.3
Brass: Burnishing, Oxidization 0.3, 0.5
Copper: Oxidization Electric Terminal
Board
Hastelloy: Alloy 0.3-0.8
Inconel: Oxidization Sand-Blasting,
Electro Burnishing
Iron: Oxidization Rusting 0.5-0.9, 0.5-0.7
Iron (Casting): Oxidization,
Non-Oxidization, Casting
Iron (Forging): Passivation 0.9
Lead: Rough, Oxidization 0.4, 0.2-0.6
Molybdenum: Oxidization 0.2-0.6
Nickel: Oxidization 0.2-0.5
Platimun: Black 0.9
Steel: Cold Rolling, Steel PlateBurnishing, Steel Plate Rubbing
REED Instruments
1-877-849-2127 | [email protected] | www.reedinstruments.com
0.4-0.8, 0.6
0.7-0.95, 0.3-0.6, 0.15
0.6-0.95, 0.2, 0.2-0.3
0.7-0.9, 0.4-0.6, 0.1
continued...
25
Page 26
Measured Surfaces Emmisivity
Zinc: Oxidization 0.1
Non-Metal
Asbestos 0.95
Asphalt 0.95
Basalt 0.7
Carbon: Non-Oxidization, Graphite,
Silicone Carbide
Ceramics 0.95
Clay 0.95
Concrete 0.95
Cloth 0.9
Glass: Convex, Smooth, Lead-Boron 0.76-0.8, 0.92-0.94, 0.78-0.82
Plates 0.96
Stone Products
Plaster 0.8-0.95
Ice 0.98
Limestone 0.98
Paper 0.95
Plastics 0.95
Water 0.93
Soil 0.9-0.98
Wood 0.9-0.95
0.8-0.9, 0.7-0.8, 0.9
0.93
1-877-849-2127 | [email protected] | www.reedinstruments.com
REED Instruments
26
Page 27

Troubleshooting
Symptom Problem Action
"OL" appears
on display when
measuring
"-OL" appears
on display when
measuring
"Err" appears
when booting
Low battery
indicator ashes
Display "Er0"
(startup)
Inaccurate
measurement
Measured value
is greater than the
maximum range
Measured value
is less than the
minimum range
Exceeding the
minimum or
maximum operating
ambient temperature
Low Battery Charge the meter
Internal
product damage
Wrong emissivity
setting, measured
distance is too far,
measured target
diameter is less than
20mm, etc.
Stop measuring
Stop measuring
Place the thermometer in
a 32 to 122°F (0 to 50°C)
environment and resume
operation after 30 minutes
Restart the product or
charge and then turn it on.
If it is still not functioning
properly, it needs to be
returned for service
Refer to Field of View, D:S
and other instructions in
this manual
1-877-849-2127 | [email protected] | www.reedinstruments.com
REED Instruments
27
Page 28
Product Care
To keep your instrument in good working order we recommend the following:
• Store your product in a clean, dry place.
• Change the battery as needed.
• If your instrument isn't being used for a period of one month or longer
please remove the battery.
• Clean your product and accessories with biodegradable cleaner. Do not
spray the cleaner directly on the instrument. Use on external parts only.
Product Warranty
REED Instruments guarantees this instrument to be free of defects
in material or workmanship for a period of one (1) year from date of
shipment. During the warranty period, REED Instruments will repair or
replace, at no charge, products or parts of a product that proves to be
defective because of improper material or workmanship, under normal
use and maintenance. REED Instruments total liability is limited to repair
or replacement of the product. REED Instruments shall not be liable for
damages to goods, property, or persons due to improper use or through
attempts to utilize the instrument under conditions which exceed the
designed capabilities. In order to begin the warranty service process,
please contact us by phone at 1-877-849-2127 or by email at
[email protected] to discuss the claim and determine the
appropriate steps to process the warranty.
Product Disposal and Recycling
Please follow local laws and regulations when disposing or recycling your
instrument. Your product contains electronic components and must be
disposed of separately from standard waste products.
1-877-849-2127 | [email protected] | www.reedinstruments.com
REED Instruments
28
Page 29

Product Support
If you have any questions on your product, please contact your authorized
REED distributor or REED Instruments Customer Service by phone at
1-877-849-2127 or by email at [email protected].
Please visit www.REEDInstruments.com for the most
up-to-date manuals, datasheets, product guides and software.
Product specifications subject to change without notice.
All rights reserved. Any unauthorized copying or reproduction of this
manual is strictly prohibited without prior written permission from
REED Instruments.
1-877-849-2127 | [email protected] | www.reedinstruments.com
REED Instruments
29
Page 30

Notes:
________________________________________________
________________________________________________
________________________________________________
________________________________________________
________________________________________________
________________________________________________
________________________________________________
________________________________________________
________________________________________________
________________________________________________
________________________________________________
________________________________________________
________________________________________________
________________________________________________
________________________________________________
________________________________________________
________________________________________________
________________________________________________
________________________________________________
1-877-849-2127 | [email protected] | www.reedinstruments.com
REED Instruments
30
Page 31

Page 32

TEST & MEASURE
WITH CONFIDENCE
Access our
Product Catalog
Over 200 portable test and
measurement instruments
1-877-849-2127 | [email protected] | www.reedinstruments.com
REED Instruments
 Loading...