

Page 1
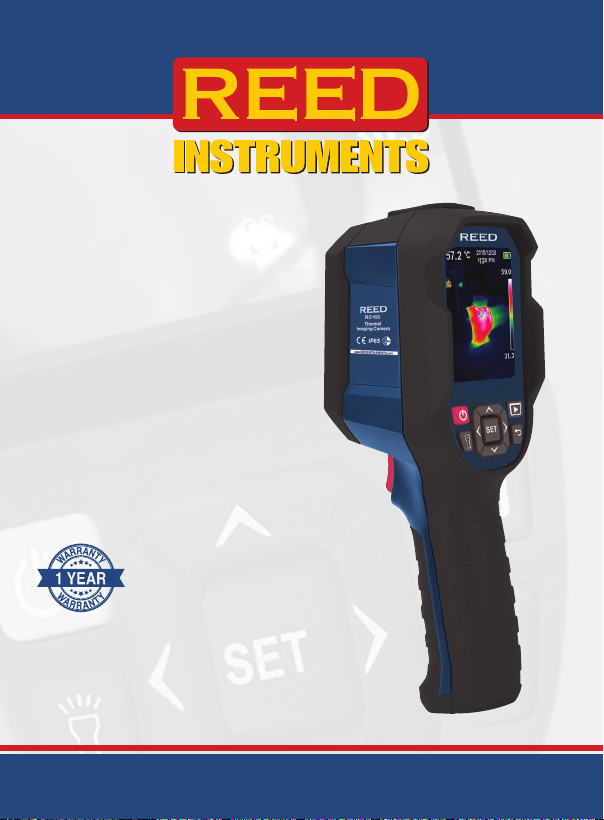
Thermal
Imaging
Camera
Instruction
Manual
R2165
1 YEAR
1 AN
W
A
R
R
A
N
T
Y
W
A
R
R
A
N
T
Y
G
A
R
A
N
T
I
E
G
A
R
A
N
T
I
E
W
A
R
R
A
N
T
Y
W
A
R
R
A
N
T
Y
G
A
R
A
N
T
I
E
G
A
R
A
N
T
I
E
1 YEAR1AN
1-877-849-2127 | [email protected] | www.reedinstruments.com
REED Instruments
Page 2

Table of Contents
Introduction ................................................................................................ 3
Product Quality ........................................................................................... 3
Safety ......................................................................................................3-4
Features ...................................................................................................... 4
Included ...................................................................................................... 5
Specications .......................................................................................... 5-6
Instrument Description ............................................................................... 7
Display Description
Emissivity .................................................................................................... 9
Software Installation ................................................................................. 10
Operating Instructions ......................................................................... 10-19
Power ON/OFF .................................................................................... 10
Main Menu ......................................................................................10-13
Enable/Disable Center Point, High/Low Temperature Spots
or Region of Interest (ROI) ........................................................... 11
Color Palette Selection ..............................................................11-12
Enable/Disable Temperature Points ............................................ 12-13
Select Image Mode ......................................................................... 13
Advanced Settings Menu ............................................................... 14-19
Setting the Language ....................................................................... 14
Setting the Date and Date Format .................................................... 14
Switching the Unit of Measure (°F/°C).............................................. 15
Setting the High/Low Alarm Values .................................................. 15
Adjusting Emissivity .......................................................................... 16
Setting the LCD Brightness .............................................................. 16
Enabling/Disabling Auto Power OFF ........................................... 16-17
Changing USB Mode ....................................................................... 17
Enable/Disable Auto Save ................................................................ 17
System Settings ............................................................................... 18
Device Information ........................................................................... 18
Factory Reset ................................................................................... 18
Formatting the SD Card ................................................................... 19
Turning the LED Flashlight ON/OFF ......................................................... 19
.................................................................................... 8
1-877-849-2127 | [email protected] | www.reedinstruments.com
REED Instruments
Page 3

Saving, Viewing & Deleting Images .......................................................... 19
Charging the Battery ................................................................................ 20
Applications .............................................................................................. 20
Accessories and Replacement Parts ....................................................... 21
Product Care ............................................................................................ 21
Product Warranty ..................................................................................... 21
Product Disposal and Recycling .............................................................. 21
Product Support ....................................................................................... 22
Introduction
Thank you for purchasing your REED R2165 Thermal Imaging Camera.
Please read the following instructions carefully before using your instrument.
By following the steps outlined in this manual your meter will provide years
of reliable service.
Product Quality
This product has been manufactured in an ISO9001 facility and has been
calibrated during the manufacturing process to meet the stated product
specications. If a certicate of calibration is required please contact the
nearest authorized REED distributor or authorized Service Center. Please
note an additional fee for this service will apply.
Safety
• Never attempt to repair or modify your instrument. Dismantling your
product, other than for the purpose of replacing batteries, may cause
damage that will not be covered under the manufacturer's warranty.
Servicing should only be provided by an authorized service center.
• Do not point the thermal imager (with or without the lens cover) at
intensive energy sources as this can damage the thermal imager.
•
Do not use the thermal imager in a temperature higher than 122°F (50°C).
• Always charge the battery between 32 to 122°F (0 to 50°C).
• Clean the case with a damp cloth and a diluted soap solution.
• Do not use abrasives, isopropyl alcohol, or solvents to clean the
instrument, lens or screen.
1-877-849-2127 | [email protected] | www.reedinstruments.com
REED Instruments
Page 4

• Do not clean the infrared lens too vigorously, this can damage the
anti-reective coating.
• Store the thermal imager in cool and dry environment.
• Please use the correct emissivity to obtain accurate
temperature measurements.
• To ensure accuracy, please let the instrument warm up for 10 minutes
before taking a measurement if it has not been used for a long time.
• When being charged, the internal temperature of the product will
rise, which will lead to inaccurate temperature measurement, it is not
recommendedto take measurements during or right after charging
the instrument.
Features
• 160 x 120 infrared resolution (19,200 pixels)
• 2.8" color TFT Display
• Built-in LED ashlight
• Choice of 7 color palettes
• Intuitive on-screen measurement tools
• 3 image modes (Thermal, Visual Image, Thermal Blending)
• High and Low temperature spot and alarm indicators
• IP65 and 6.5' (2m) drop tested
• Rechargeable li-ion battery
• Tripod mountable for continuous long-term monitoring
• View, analyze stored data and generate reports or project in real-time
• Low battery indication and auto shut-off
REED Instruments
1-877-849-2127 | [email protected] | www.reedinstruments.com
Page 5

Included
• Thermal Imaging Camera
• USB Cable
• 32GB Micro SD Card
• Soft Carrying Case
• Power Adapter
Specifications
Imaging and Optical Specifications
Field of View (FOV): 56 x 42°
Optimal Focal Distance: 0.25m (0.82')
Spatial Resolution: (IFOV) 6.1 mrad
Thermal Sensitivity (NETD): <0.05°C (50mK)
Image Capture Frequency: 9Hz
Focus: Fixed
Measurement
Temperature Range: 14 to 752°F (-10 to 400°C)
Accuracy: ±3.6°F (2°C) or ±2% of reading,
Resolution: 0.1°F/°C
Detector Specifications
Detector Type: Uncooled microbolometer,
Spectral Range: 8 to 14μm
IR Resolution: 160 x 120 (19,200 pixels)
Image Presentation and Measurement Analysis
Display: 2.8" color TFT
Color Palettes: 7 (Ironbow/Rainbow/Rainbow(HC)/
Image Modes:
On-Screen Temperature Markers: 7 (Center / High Temp / Low Temp /
for ambient temperature at 77°F (25°C)
Focal plane array (UFPA)
Lava/Red-Hot/White-Hot/Black-Hot)
Thermal, Visual Image, Thermal Blending
Region of Interest / Up to 3 points)
1-877-849-2127 | [email protected] | www.reedinstruments.com
REED Instruments
Page 6

Center Spot: Yes
Emissivity: Adjustable (0.01 to 0.99)
Temperature Alarm Indicators: High/Low (User adjustable)
Automatic Hot/Cold Detection: Auto hot or cold spot-meter markers
General Specifications
Digital Camera: Yes
Digital Camera Resolution: 640 x 480 pixels
Display Resolution: 320 x 240 pixels
Image Format: BMP
LED Flashlight: Yes
External Memory: Micro SD card
Auto Shut-off: Yes (user adjustable 5/10/30 minutes)
Tripod Mountable: Yes
Low Battery Indicator: Yes
Power Supply: 3.7V/5000mAh rechargeable
Battery Life: Approx. 6 hours
Charging System: In Camera
Charge Time: 4 hours
PC Connectivity: USB Cable (Type-C)
Software: Yes (download from website)
Software Functionality: Image Analysis / Report Generation /
Software OS Compatibility: Windows 7/8/10/11
Supported Languages: English and French
Product Certications: CE, IP65, 6.5' (2m) drop test
Operating Temperature: 32 to 122°F (0 to 50°C)
Storage Temperature: -4 to 140°F (-20 to 60°C)
Operating/Storage Humidity Range:
Maximum Operating Altitude: 6561' (2000m)
Dimensions: 9.3 x 3 x 3.4" (236 x 76 x 86mm)
Weight: 1lbs (454g)
Li-ion battery
Live Camera Feed
10 to 90%
1-877-849-2127 | [email protected] | www.reedinstruments.com
REED Instruments
Page 7
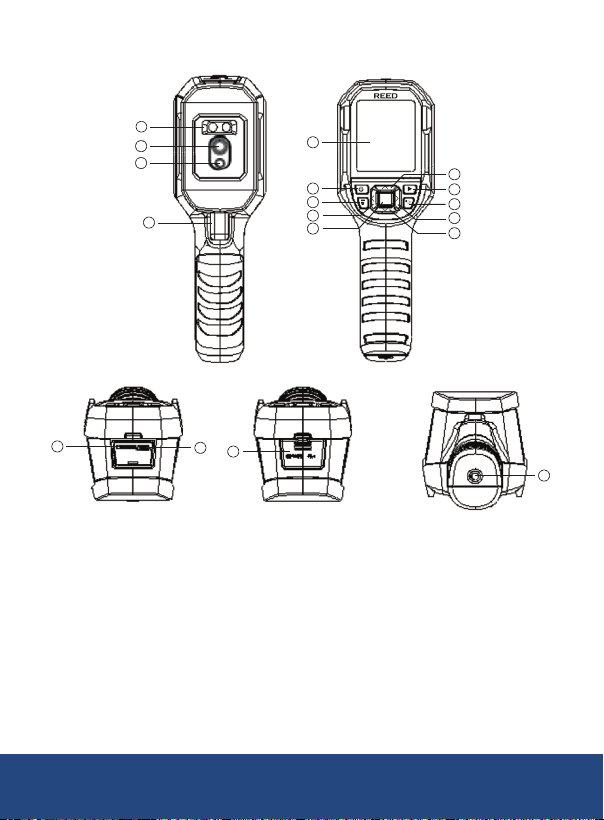
Instrument Description
4
5
6
7
1
2
1. Micro SD Card Slot
2. USB Interface
3. Interface Cover
4. LED Lights
5. Infrared camera lens
6. Visual light camera lens
7. Trigger
8. LCD display
9. Power button
8
9
10
11
12
3
SET
13
14
15
16
17
18
10. Flashlight button
11. Left button
12. Down button
13. Up button
14. Replay button
15. Right button
16. Back button
17. SET button
18. Tripod mounting hole
1-877-849-2127 | [email protected] | www.reedinstruments.com
REED Instruments
Page 8
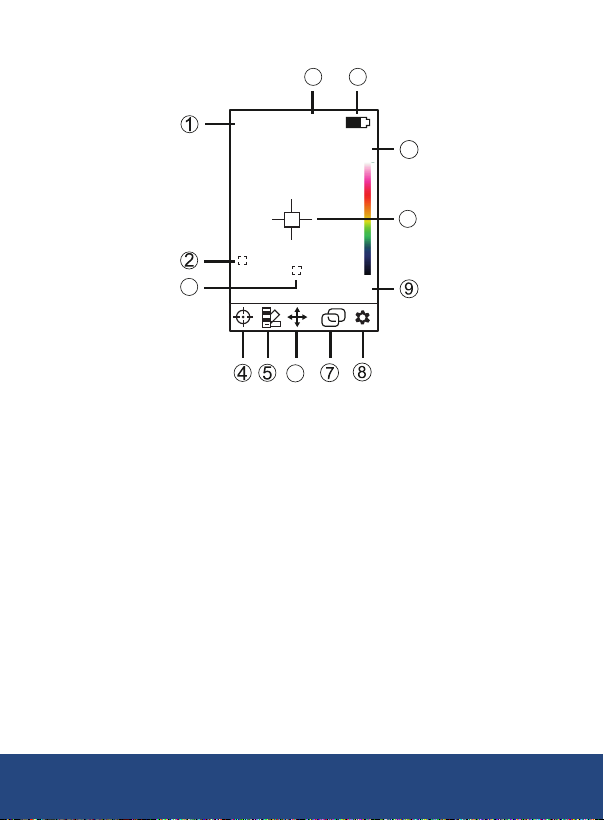
Display Description
3
37.0°C
28.7
13
2020/03/02
09:39
43.1
6
12
43.1
28.7
11
10
1. Center Spot Temperature
2. Minimum Spot Temperature
3. Maximum Spot Temperature
4. Center Spot Menu Settings
5. Color Palette Menu Settings
6. Spot Menu Settings
8. Advanced Menu Settings
9. Minimum Spot Temperature
10. Center Spot
11. Maximum Spot Temperature
12. Battery Status Indicator
13. Date & Time
7. Image Mode Menu Settings
REED Instruments
1-877-849-2127 | [email protected] | www.reedinstruments.com
Page 9
Emissivity
This thermal imager measures infrared energy from the surface of the
object and uses this data to calculate an estimated temperature value.
Surfaces that are good at radiating energy (high emissivity), the emissivity
factor is ≥0.90. Shiny surfaces or unpainted metals are not good at
radiating energy (low emissivity) have an emissivity of <0.6. To more
accurately measure materials with a low emissivity, an emissivity correction
is necessary. Emissivity is set directly as a value or from a list of emissivity
values for some common materials.
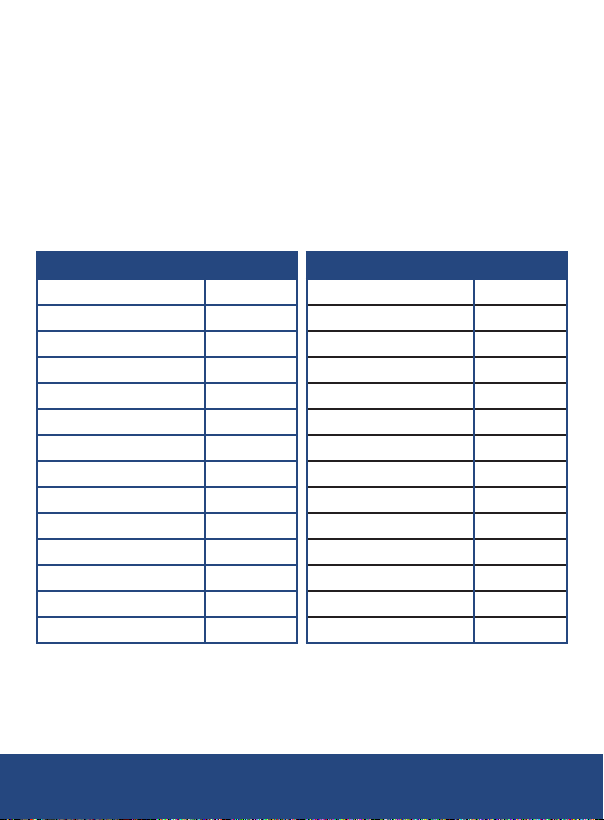
The following table gives typical emissivity of some materials:
Material Emissivity
Asphalt 0.95
Concrete 0.95
Hard plaster 0.90
Wood (natural) 0.93
Lime Stone 0.98
Ballast chipping 0.95
Paper (every color) 0.95
Plastics non lm 0.95
Tissue (fabric) 0.95
Sand 0.90
Glass wool 0.90
Melted asphalt 0.93
Screed/pavement 0.93
Foamed polystyrene 0.94
Material Emissivity
Drywall 0.95
Render 0.94
Smoothing cement 0.90
Lacquer 0.92
Latex paint 0.97
Wallpaper 0.93
Tilling 0.93
Parquet oor 0.90
Laminate 0.90
PVC-Floor 0.92
Brick 0.93
Cliff 0.97
Roong cardboard 0.93
Stucco 0.91
REED Instruments
1-877-849-2127 | [email protected] | www.reedinstruments.com
Page 10
Software Installation
2020/03/02
37.0°C
43.1
28.7
09:39
28.7
43.1
10
11
12
13
Visit www.REEDInstruments.com/software to
download the R2165 software.
Full specications and Operating System compatibility can be found on
the product page at www.REEDInstruments.com.
If you have specic questions related to your application and/or questions
related to software setup and functionality please contact the nearest
authorized distributor or Customer Service at [email protected]
or 1-877-849-2127.
Operating Instructions
Power ON/OFF
Press and hold the POWER button for 3 seconds to power on.
Main Menu
1. Press the SET button to enter the main menu.
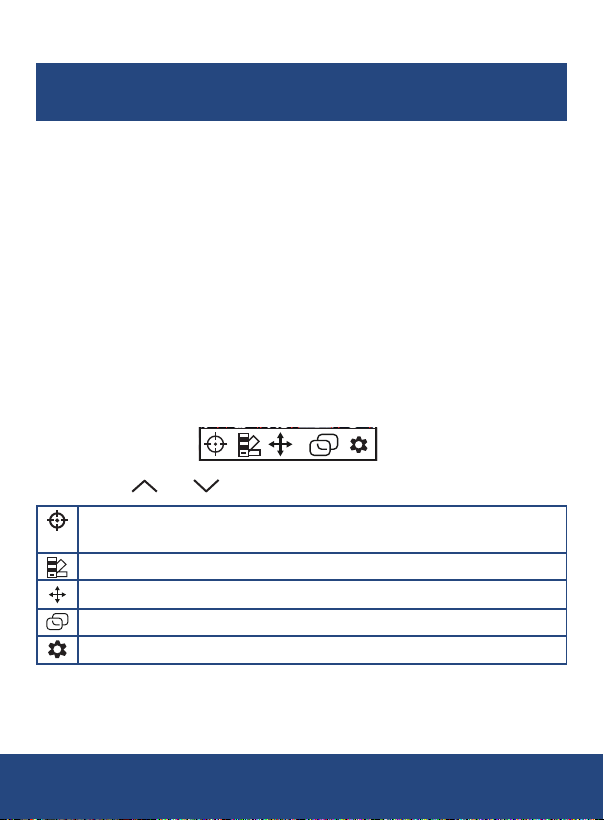
2. Use the and buttons to scroll through the list of parameters.
Enable/Disable Center Point, High/Low Temperature Spots or
Region of Interest (ROI)
Select Color Palette
Enable/Disable Temperature Points
Select Image Mode
Advanced Settings Menu
3. Follow the instructions below to adjust each parameter.
1-877-849-2127 | [email protected] | www.reedinstruments.com
REED Instruments
Page 11
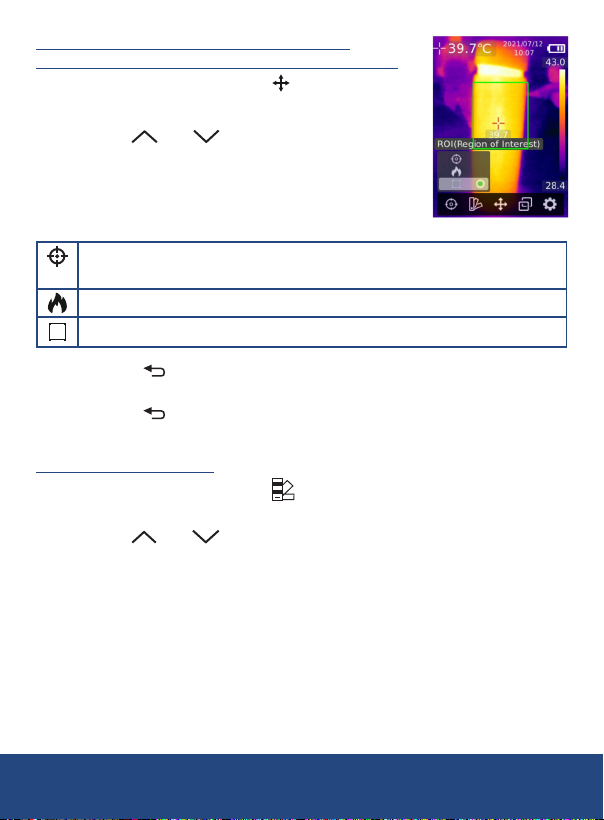
Enable/Disable Center Point, High/Low
Temperature Spots or Region of Interest (ROI)
1. Press the SET button when is highlighted to
access the sub-menu.
2. Use the and buttons to toggle between
the options and press the SET button to enable/
disable the following features:
Fig. 1
Display Center Spot Temperature (when enabled the Center
Spot temperature will appear in the top left corner of the screen)
Display Hi/Lo Spot Temperatures
Display Region of Interest (Fig. 1)
3. Press the button to conrm selection and return to the main
menu.
4. Press the button again to exit the main menu and resume normal
operation.
Color Palette Selection
1. Press the SET button when is highlighted to access the
sub-menu.
2. Use the and buttons to scroll through the list of color
palettes (Fig. 2).
3. Press the SET button to select the desired color palette between
Iron (Fig. 3)
Rainbow (Fig. 4)
White Hot (Fig. 5)
Red Hot (Fig. 6)
Black Hot (Fig. 7)
Lava (Fig. 8)
Rainbow HC (Fig. 9).
1-877-849-2127 | [email protected] | www.reedinstruments.com
REED Instruments
Page 12
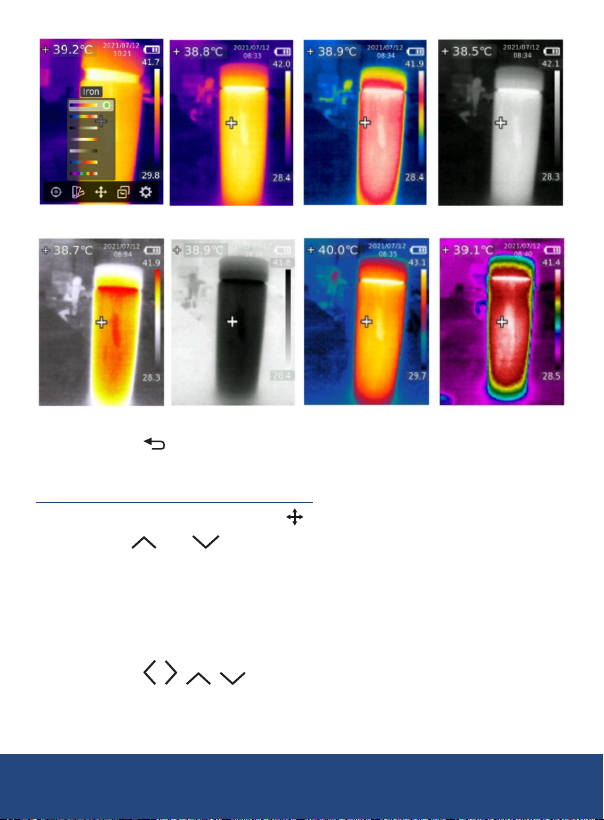
Fig. 2 Fig. 4 Fig. 5
Fig. 3
Fig. 6
Fig. 7 Fig. 8 Fig. 9
4. Press the button to exit the main menu and resume normal
operation.
Enable/Disable Temperature Points
1.
Press the SET button when is highlighted to access the sub-menu.
2. Use the and buttons to toggle through the list of temperature
points (Fig. 10).
3. Press the SET button to enable or disable the selected
temperature point.
4. When enable, the meter will exit the main menu and resume normal
operation.
5. Press the buttons to move the temperature point to
the desired area (Fig. 11).
REED Instruments
1-877-849-2127 | [email protected] | www.reedinstruments.com
Page 13
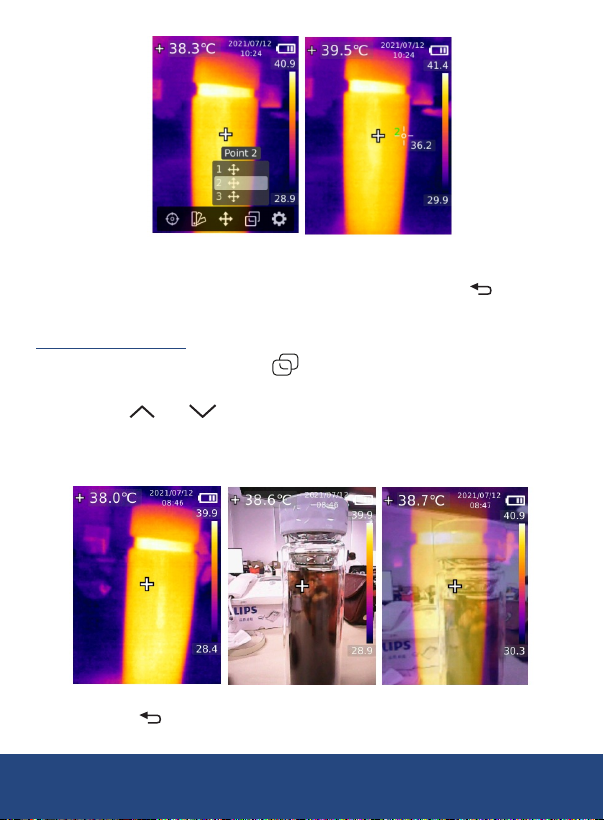
Fig. 10 Fig. 11
6.
Repeat steps 1 through 5 to enable up to a total of 3 temperature points.
7. When disabling any active temperature point, press the button
twice to exit the main menu and resume normal operation.
Select Image Mode
1. Press the SET button when is highlighted to access
the sub-menu.
2.
Use the and buttons to toggle through the list of image modes.
3. Press the SET button to select the desired image mode between
Thermal (Infrared Image) (Fig. 12), Digital (Visual Light Image)
(Fig. 13), and Fusion (Image Blending) (Fig. 14).
Fig. 12 Fig. 13 Fig. 14
4.
Press the button to exit the main menu and resume normal operation.
1-877-849-2127 | [email protected] | www.reedinstruments.com
REED Instruments
Page 14
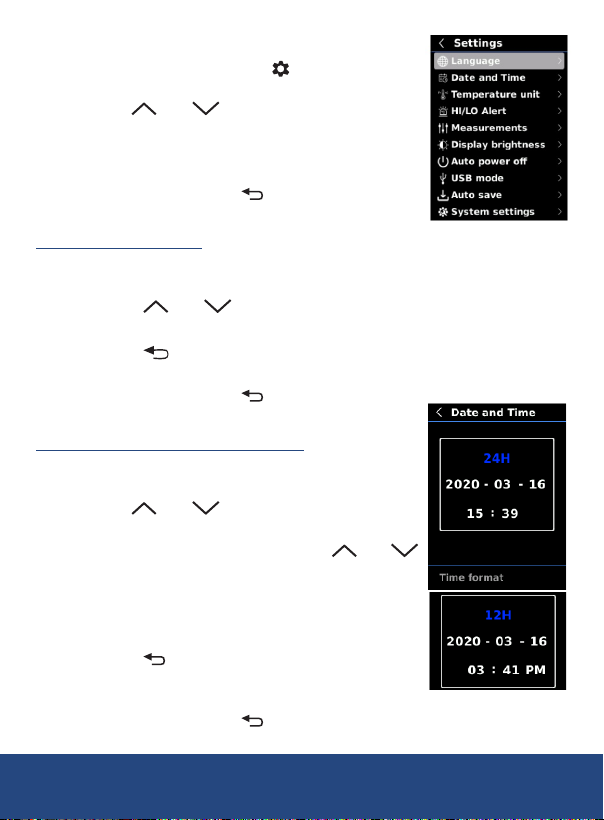
Advanced Settings Menu
1. Press the SET button when is highlighted to
enter the sub-menu.
2. Use the and buttons to toggle between
the features listed (Fig. 15).
3. Once the appropriate parameter has been
selected follow the associated instructions below.
Note: At any time, press the button twice to
exit and resume normal operation.
Setting the Language
1. Press the SET button when "Language" is highlighted to enter the
appropriate function.
2. Press the and buttons to scroll through the list of languages.
3. Press the SET button to conrm selection.
4. Press the button to exit the "Language" function and return to
advanced settings.
Note: At any time, press the button twice to
exit and resume normal operation.
Setting the Date and Date Format
1. Press the SET button when "Date & Time" is
highlighted to enter the appropriate function.
2. Use the and buttons to select the
parameter to be adjusted.
3.
Press the SET button followed by the and
buttons to adjust the selected parameter (Fig. 16).
4. Press the SET button again to conrm selection.
5. Repeat steps 2 through 4 for each
required parameter.
6. Press the button to exit the "Date & Time"
function when complete and return to
advanced settings.
Note: At any time, press the button twice to
exit and resume normal operation.
Fig. 15
Fig. 16
1-877-849-2127 | [email protected] | www.reedinstruments.com
REED Instruments
Page 15
Switching the Unit of Measure (°F/°C)
1. Press the SET button when "Temperature Unit" is highlighted to
enter the appropriate function.
2. Use the and buttons to select between °C or °F.
3. Press the SET button to conrm selection.
4. Press the button to exit the "Temperature Unit" function when
complete and return to advanced settings.
Note: At any time, press the button twice to
exit and resume normal operation.
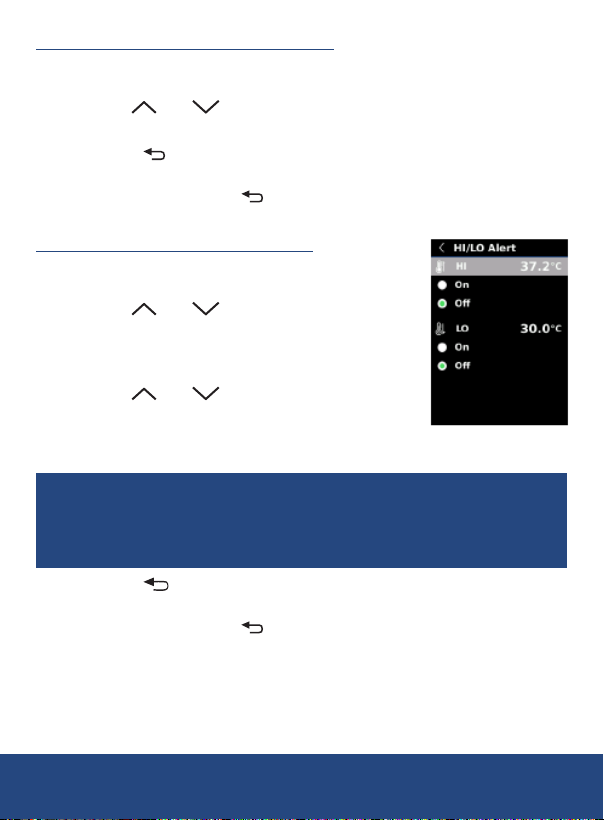
Setting the High/Low Alarm Values
1. Press the SET button when "HI/LO Alert" is
highlighted to enter the appropriate function.
2. Use the and buttons to select the alarm
value to be adjusted or to Enable (On) or Disable
(Off) the applicable temperature alerts (Fig. 17).
3. Press the SET button to conrm selection.
4. Use the and buttons to increase or
decrease the alarm values when applicable.
5. Press the SET button to conrm selection.
6. Repeat steps 2 through 5 for each parameter.
HI – When triggered an alarm icon in Red will appear on the display.
LO – When triggered an alarm icon in Green will appear on the display.
LED Alert – When the HI alarm is triggered, the Dual LED flashlight
will blink on and off repeatedly.
7. Press the button to exit the "HI/LO Alert" function and return to
advanced settings.
Note: At any time, press the button twice to exit and resume
normal operation.
Fig. 17
REED Instruments
1-877-849-2127 | [email protected] | www.reedinstruments.com
Page 16
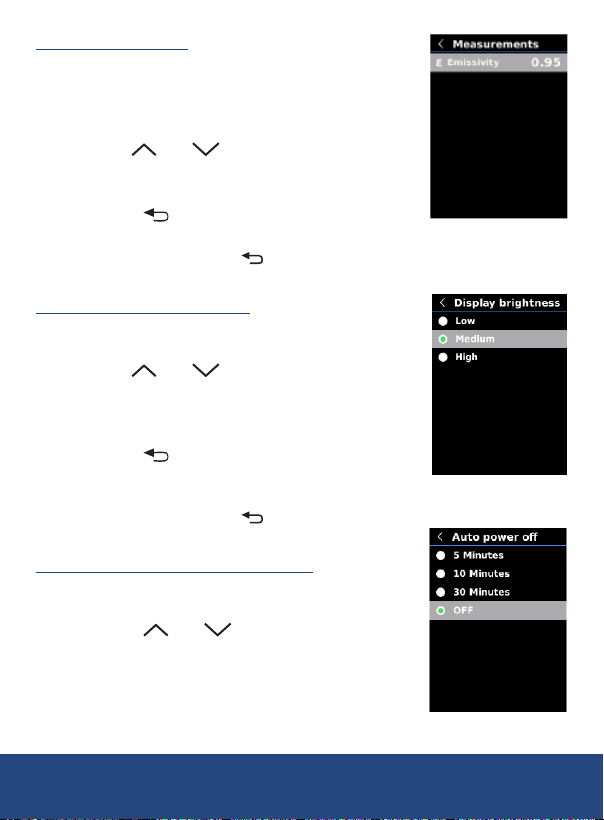
Adjusting Emissivity
1. Press the SET button when "Measurements" is
highlighted to enter the appropriate function.
2. Press the SET button again to adjust the
selected emissivity (Fig. 18).
3. Use the and buttons to increase or
decrease the emissivity values.
4. Press the SET button to conrm selection.
5. Press the button to exit the "Measurements"
function and return to advanced settings.
Note: At any time, press the button twice to
exit and resume normal operation.
Setting the LCD Brightness
1. Press the SET button when "Display Brightness"
is highlighted to enter the appropriate function.
3. Use the and buttons to select the
desired brightness level between "Low",
"Medium" or "High" (Fig. 19).
4. Press the SET button to conrm selection.
5. Press the button to exit the "Display
Brightness" function and return to
advanced settings.
Note: At any time, press the button twice to
exit and resume normal operation.
Enabling/Disabling Auto Power OFF
1. Press the SET button when "Auto Power Off" is
highlighted to enter the appropriate function.
2. Press the and buttons to select the
desired Auto Power Off option between "Off", "5
Min", "10 Min" or "30 Min" (Fig. 20).
3. Press the SET button to conrm selection.
Fig. 18
Fig. 19
Fig. 20
1-877-849-2127 | [email protected] | www.reedinstruments.com
REED Instruments
Page 17
4. Press the button to exit the "Auto Power Off" function and return
to advanced settings.
Note: At any time, press the button twice to exit and resume
normal operation.
Changing USB Mode
1. Press the SET button when "USB mode" is highlighted to enter the
appropriate function.
2. Press the and buttons to select the desired USB mode
between "File Transfer" and "Live Projection".
File Transfer – This USB mode should be selected when transferring files
between the camera and PC.
Live Projection – This USB mode should be selected when the camera is
being used to project real-time measurements on a PC.
Note: The desired USB Mode should be selected prior to connecting the
camera to a PC.
3. Press the SET button to conrm selection.
4. Press the button to exit the "USB mode" function and return to
advanced settings.
Note: At any time, press the button twice to exit and resume
normal operation.
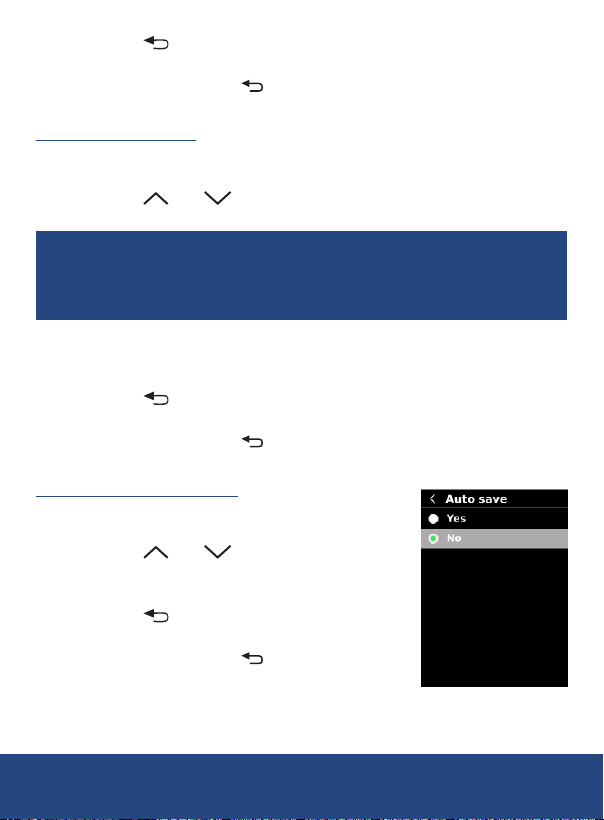
Enable/Disable Auto Save
1. Press the SET button when "Auto save" is
highlighted to enter the appropriate function.
2. Press the and buttons to Enable (Yes)
or Disable (No) the auto save function (Fig. 21).
3. Press the SET button to conrm selection.
4.
Press the button to exit the "Auto save"
function and return to advanced settings.
Note: At any time, press the button twice to
exit and resume normal operation.
Fig. 21
REED Instruments
1-877-849-2127 | [email protected] | www.reedinstruments.com
Page 18
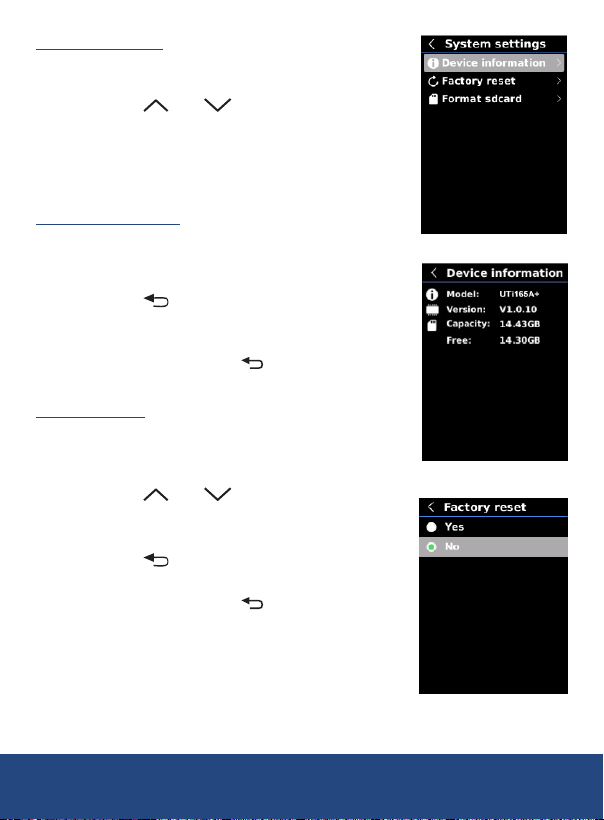
System Settings
1. Press the SET button when "System settings"
is highlighted to enter the appropriate function.
2. Press the and buttons to scroll
through the list of parameters (Fig. 22).
3. Once the appropriate parameter has been
selected follow the associated
instructions below.
Device Information
1. Press the SET button when "Device
information" is highlighted to view detailed
information of the device (Fig. 23).
2. Press the button to exit the "Device
information" function and return to
advanced settings.
Note: At any time, press the button twice to
exit and resume normal operation.
Factory Reset
1. Press the SET button when "Factory reset"
is highlighted to view detailed information
of the device.
2. Press the and buttons to
select between "Yes" or "No" (Fig. 24).
3. Press the SET button to conrm selection.
4. Press the button to exit the "Factory reset"
function and return to advanced settings.
Note: At any time, press the
exit and resume normal operation.
button twice to
Fig. 22
Fig. 23
Fig. 24
REED Instruments
1-877-849-2127 | [email protected] | www.reedinstruments.com
Page 19
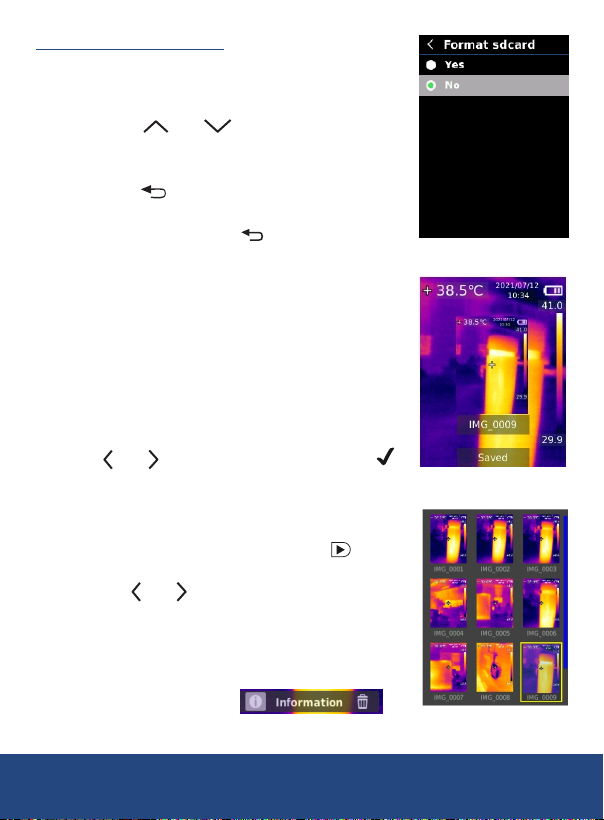
Formatting the SD Card
1. Press the SET button when "Format sdcard" is
highlighted to view detailed information of
the device.
2. Press the and buttons to select
between "Yes" or "No" (Fig. 25).
3. Press the SET button to conrm selection.
4.
Press the button to exit the "Format sdcard"
function and return to advanced settings.
Note: At any time, press the button twice to
exit and resume normal operation.
Fig. 25
Turning the LED Flashlight ON/OFF
The camera is equipped with Dual LED ashlights.
Press and hold the LED Light button to turn the
ashlight on and off.
Saving, Viewing & Deleting Images
While in normal operation, multiple images can be
saved to the Micro SD card (Fig. 26).
1. To save an image, pull the trigger and use
the and buttons to discard (X) or save
the image.
Note: While in auto save mode, the image will
automatically be saved to the SD card.
2. To display a saved image, press the button
to enter the saved pictures gallery.
3. Use the and buttons to scroll through the
list of saved images if applicable (Fig. 27).
4. Press the SET button to select an image and
view in full screen.
5. Press the SET button to enter the saved picture
toolbar as indicated by
.
Fig. 26
Fig. 27
continued...
REED Instruments
1-877-849-2127 | [email protected] | www.reedinstruments.com
Page 20
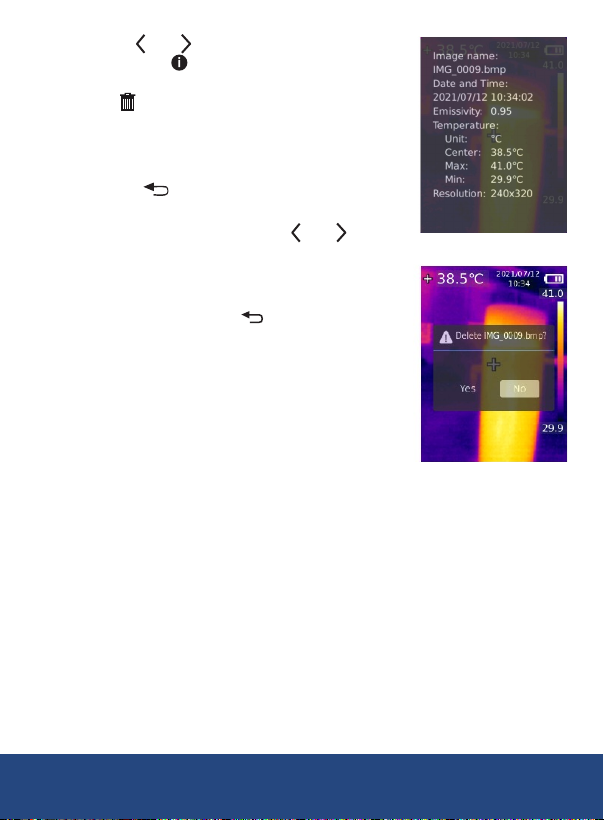
6. Use the and buttons to select between
"Information" to view all relevant information
on the saved image or "Delete" the saved
image .
7. Press the SET button to conrm your selection.
8. If "Information" is selected, the display will
appear as shown in Fig. 28.
8. Press the button to return to the saved
pictures screen.
9. If "Delete" is selected, use the and buttons
to select between "Yes" or "No" as shown
in Fig. 29.
10. Press the SET button to conrm your selection.
Note: At any time, press the button twice to
exit and resume normal operation.
Charging the Battery
1. Connect the R2165 via the included cable to
a USB port on your PC or into a wall outlet
using a USB Power Adapter (not included) to
charge the Li-ion battery.
2. Charge the meter until the battery indicator
appears full and remove the charging
cable when done.
Applications
• Home and Building Inspection
• Plant and General Maintenance
• Electrical and Mechanical Inspection
• Predictive Maintenance
• HVAC/R & Plumbing
• Equine & Veterinary
• Road Construction
Fig. 28
Fig. 29
1-877-849-2127 | [email protected] | www.reedinstruments.com
REED Instruments
Page 21
Accessories and Replacement Parts
R8888 Medium Hard Carrying Case
R1500 Tripod
RSD-16GB Micro SD Memory Card w/Adapter, 16GB
Don't see your part listed here? For a complete list of all accessories and
replacement parts visit your product page on www.REEDInstruments.com.
Product Care
To keep your instrument in good working order we recommend the following:
• Store your product in a clean, dry place.
• Clean your product and accessories with biodegradable cleaner. Do not
spray the cleaner directly on the instrument. Use on external parts only.
Product Warranty
REED Instruments guarantees this instrument to be free of defects in
material or workmanship for a period of one (1) year from date of shipment.
During the warranty period, REED Instruments will repair or replace, at no
charge, products or parts of a product that proves to be defective because
of improper material or workmanship, under normal use and maintenance.
REED Instruments total liability is limited to repair or replacement of the
product. REED Instruments shall not be liable for damages to goods,
property, or persons due to improper use or through attempts to utilize the
instrument under conditions which exceed the designed capabilities. In
order to begin the warranty service process, please contact us by phone at
1-877-849-2127 or by email at [email protected] to discuss the
claim and determine the appropriate steps to process the warranty.
Product Disposal and Recycling
Please follow local laws and regulations when disposing or recycling your
instrument. Your product contains electronic components and must be
disposed of separately from standard waste products.
REED Instruments
1-877-849-2127 | [email protected] | www.reedinstruments.com
Page 22

Product Support
If you have any questions on your product, please contact your authorized
REED distributor or REED Instruments Customer Service by phone at
1-877-849-2127 or by email at [email protected].
Please visit www.REEDInstruments.com for the most
up-to-date manuals, datasheets, product guides and software.
Product specifications subject to change without notice.
All rights reserved. Any unauthorized copying or reproduction of
this manual is strictly prohibited without prior written permission
from REED Instruments.
REED Instruments
1-877-849-2127 | [email protected] | www.reedinstruments.com
Page 23

TEST & MEASURE
WITH CONFIDENCE
Access our
Product Catalog
Over 200 portable test and
measurement instruments
REED Instruments
1-877-849-2127 | [email protected] | www.reedinstruments.com
www.REEDInstruments.com
Page 24

www.REEDInstruments.com
1-877-849-2127 | [email protected] | www.reedinstruments.com
REED Instruments
 Loading...