

Model
8906
Thermo-Anemometer
Instruction
Manual
www.GlobalTestSupply.com

Table of Contents
Features .........................................................................................3
Specications ............................................................................ 3-4
Instrument Description ..................................................................5
Operating Instructions ..............................................................6-11
Single Point Air Velocity (fpm)......................................................6
Continuous Moving Average ....................................................... 6
MIN/MAX/AVG Reading on a Single Point ..................................7
Multipoint Air Velocity Average .................................................7-8
Auto Power OFF ......................................................................... 8
Default unit setting (Imperial or Metric) ........................................ 9
RS232 Output........................................................................... 10
Measuring fpm, MPH, Knot (km/hour) ...................................... 10
Direct Single Point Air Flow Measure (cfm)...........................10-11
Multipoint Air Flow Average (cfm) .............................................. 11
MIN/MAX/AVG for Single Point Air Volume ............................... 11
Battery Replacement ................................................................... 12
Troubleshooting ........................................................................... 12
www.GlobalTestSupply.com
2

Features
• Integral rotary vane sensor for one hand operation
• Simultaneous display or air velocity and temperature
• Continuous moving air velocity averaging of measurements
for up to 2 hours
• Displays Min/Max/Avg velocity with temperature values
• Multi-point averaging up to 8 points
• Calculate average velocity values in seconds
• Selectable wind speed units: fpm, m/s, mph, km/h, knots
• Calculate air volume by keying in area dimension
• High-contrast, 4-digit LCD readout
• RS-232 interface
• Data hold and auto power off
Specifications
Type: Vane
Measuring Ranges: fpm: 80 to 6900
m/s: 0.4 to 35
km/h: 1.4 to 126
mph: 0.9 to 78
knots: 0.8 to 68
Temp.: 14 to 122°F (-10 to 50°C)
Accuracy: Air Velocity: ±(2% rdg. + 0.2m/s)
Temp.: ±1.2°F (0.6°C)
Resolution: fpm: 1
m/s: 0.01
km/h, mph, knot: 0.1
Temperature: 0.1°F/°C
Vane Diameter: 2.8" (70mm)
Response Time: <1 sec.
continued ...
www.GlobalTestSupply.com
3

Display: 4-digit, Dual LCD Display
Data Hold: Yes
Min: Yes
Max: Yes
Average: Yes
Air Volume Calculation (CFM): Yes
Datalogging Capabilities: Yes
Sampling Rate: 1 time/sec.
Internal Memory: Yes
Auto Shut-off: Yes (after 20 mins)
Low Battery Indicator: Yes
Power Supply: 9V battery
Battery Life: 400 hours
Product Certications: CE
Operating Temperature: 32 to 122°F (0 to 50°C)
Storage Temperature: 14 to 140°F (-10 to 60°C)
Operating Humidity Range: 10-80%
Dimensions: 7.1 x 2.8 x 1.4" (181 x 76 x 45mm)
Weight: 5.6oz (160g)
Includes: 9V Battery, Hard Carrying Case
www.GlobalTestSupply.com
4
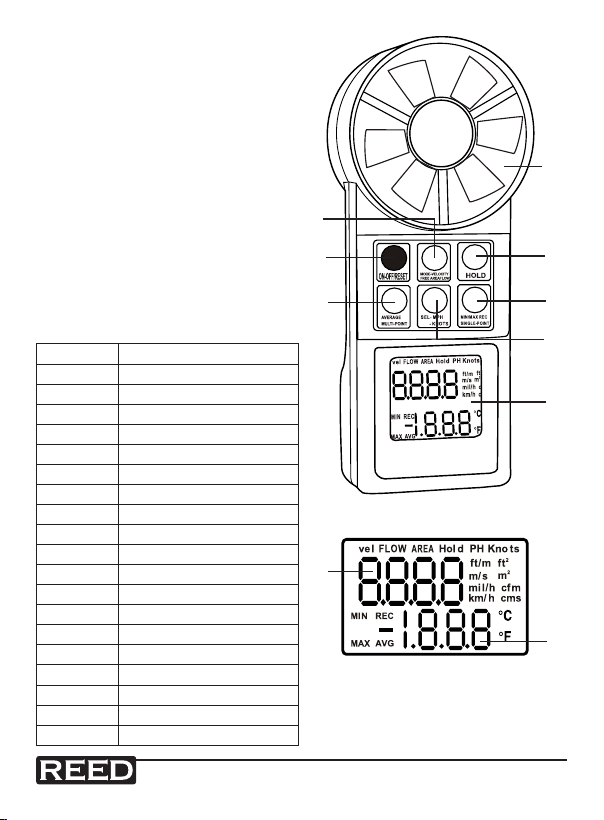
Instrument Description
1. Power Button
2. Mode Button
3. Hold Button
4. Average Button
5. Unit Button
6. Max. / Min. Button
7. Air Flow Sensor
8. LCD Display
9. Primary Readout: Air velocity/
Air volume/Free area
10. Secondary Readout:
Temperature or Records number
SYMBOL
vel Air velocity
FLOW Air flow/volume
AREA Free area
Hold Freezes the reading
ft/m Feet per minute
2
ft
2
m
cfm Cubic feet per minute
cms
°C Celsius unit
°F Fahrenheit unit
REC Record and saved
AVG Average
MIN Minimum
MAX Maximum
- Negative temperature
Knots
Mil/h
Km/h
FUNCTION
Square feet
Square meter
Cubic meter per second
(KN)=1850m/h or 1.15Mil/h
Miles per hours (Imperial)
Kilometer per hour (metric)
2
1 3
4
9
7
6
5
8
10
www.GlobalTestSupply.com
5

Operating Instructions
For the best results when using your instrument,
make sure the airstream and the sensor are aligned
as shown (±20 degrees maximum) and wait 3
seconds for the reading to stabilize.
Single Point Air Velocity (fpm)
1. Press the Power button to turn the meter on.
The meter will show the full display for the
initial 5 seconds.
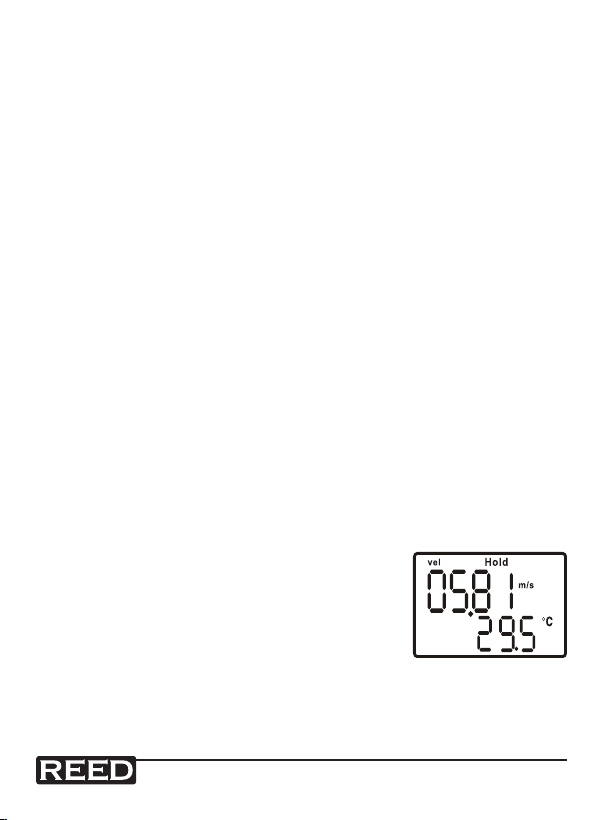
2. The instrument is ready for use when
the LCD display shows "vel" in the upper
left corner and temperature in the lower
right corner.
Continuous Moving Average
The meter has the ability to display continuous moving
average for up to two (2) hours.
1. Turn the power ON.
2. Place the sensor in front of the air
flow source.
3. Press the Max. / Min. button. An "AVG" and
"REC" will appear in the lower left corner of
the display to confirm the meter is in continuous moving average
measurement mode. The display will update every few seconds.
www.GlobalTestSupply.com
6
MIN/MAX/AVG Reading on a Single Point
1. Turn the power ON.
2. Place the sensor in front of the air flow source.
3. Press the Max. / Min. button. The unit will begin to record the
readings. The meter displays the average velocity by default. Each
press of the Max. / Min. button cycles the display through:
• Real-time readings
• MIN velocity
• MAX velocity
• AVG velocity
4. To revert to normal measurement mode or clear the current MIN,
MAX and AVG readings, turn OFF the meter, then turn it ON again
or press and hold the Max. / Min. button until the meter beeps
twice, then release.
5. Note: Feet Per Minute (fpm) readings can be converted to Cubic
Feet per Minute (cfm) readings by following the instructions below:
• Press the Hold button to store the readings before moving the
meter away from an airflow source
• Press the Mode button to enter area setting. After setting the
area, press the Mode button again to convert fpm into cfm.
Multipoint Air Velocity Average
1. Turn the meter ON and position the vane at
the first point to be measured. As soon as
the first measurement is completed press
the Hold button, (you will hear a single
beep), and release. The display will show
Hold above the reading.
www.GlobalTestSupply.com
continued ...
7
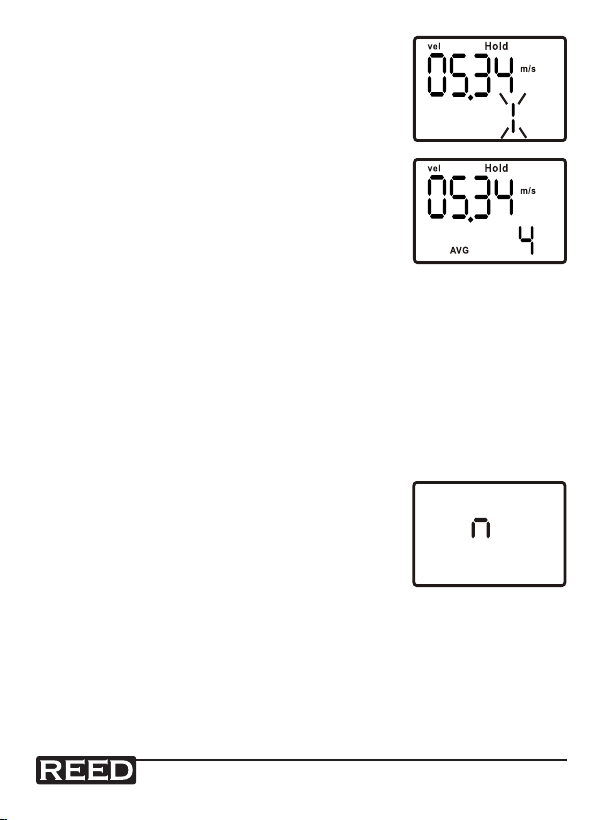
2. Press the Max. / Min. button, (you will hear
a single beep), and release, (the display will
show a digit 1-8). This number represents
the point number which has been recorded.
3. Repeat the above procedure until all desired
points have been measured and recorded.
A maximum of 8 points may be recorded at
one time.
4. Once all the measurements have been
recorded, press the Average button to view
the average air velocity reading and the
number of points which are recorded.
5. Press the Hold button to revert to normal measurement mode.
6. To clear multi-point average memory, press and hold the Average
button until the unit beeps twice, then release.
Auto Power OFF
The unit will turn off automatically after 20 minutes to save the battery.
This will be preceded by 3 beeps.
To disable auto power off:
1. Turn the power OFF.
2. Press the power button and the Hold
buttonat the same time and then release
the Power button only. When an "n"
appears on the LCD, you can release the
Hold button. The instrument will remain on
until the Power button is pressed.
www.GlobalTestSupply.com
8

Default unit setting (Imperial or Metric)
The default measuring units can be changed by following the steps below.
The unit should be turned off before starting.
1. Press and hold the Average button, then
press the Power button once to turn the
unit ON. When the LCD displays "ft/m",
"ms", "°C" and "°F", release the Average
button.
2. To choose the metric units, press the Hold button. The LCD
should display "m/s" and "°C".
To choose the imperial units, press the Average button. The LCD
should display "ft/m" and "°F".
3. Press the Max. / Min. button. The LCD should display "S".
Then press the Hold button. The LCD will display 2400 or 1200
(pre-setting).
4. Press the Max. / Min. button again, the LCD
should display "S" again. Then press the
Hold button, the LCD will revert to a normal
measurement display. The default setting is
now completed.
www.GlobalTestSupply.com
9

RS232 Output
1. Following Step 3 of Default unit setting, you
will see a "2400" (default) number on the
screen. The 2400 is the default setting of
Baud Rate for RS232 output. You can
change the setting to "1200" by pressing
the Hold button and to "2400" by pressing
the Average button.
2. Please remember to save your changes by pressing the
Max. / Min. button. An "S" will display on the LCD. Press the
Hold button to confirm and save the changed value. The meter
will return to air velocity mode automatically.
3. Plug the earphone jack of the cable VZRS232M into the RS232
socket on the meter and connect the 9-pin D-sub to the computer's COM1 or COM2. Press ON to start measurement.
Measuring ft/m, MPH, Knot (km/hour)
In imperial, press SEL:.MPH. KNOT, the reading will change from ft/m,
mil/h, knot in turns.
In metric, press SEL:.MPH. KNOT, the reading will change from m/s ,
km/h, knot in turns.
Direct Single Point Air Flow Measure (cfm)
Air Velocity measurement is calculated by multiplying the air velocity
readings by the free area dimensions. You must first determine the free
area of the air source before entering it into the meter.
1. Turn the power ON.
2. Press the Mode button once. The LCD will
display "AREA" and "1.111" will appear.
The first digit will flash.
3. Press the Hold button to increase
the number.
www.GlobalTestSupply.com
continued ...
10

4. Press the Average button to advance to next number. Follow Step
3 and repeat to input the free area size.
5. Press the Mode button once all digits have been entered. The
word "FLOW" will appear. The meter is now ready to measure air
flow (cfm).
Multipoint Air Flow Average (cfm)
1. Follow Step 1 to 4 of Multipoint Air Velocity Average.
2. Press the Mode button once and confirm the correct free area setting is locked into the instrument. (If the free area setting must be
adjusted, make the necessary changes now.)
3. If the free area setting is correct, press the Mode button again to
enter air flow mode.
4. Unit will now display the average air flow reading and the number
of points measured.
MIN/MAX/AVG for Single Point Air Volume
1. Turn the power ON, select the mode as FLOW and the place the
sensor in front of the air flow source.
2. Press the Max. / Min. button, the unit will begin to record the reading. Press the Max. / Min. button to read the real time value, the
MIN, the MAX and the AVG in turns. Long press the Max. / Min.
button to clear the average readings.
www.GlobalTestSupply.com
11

Battery Replacement
If the LCD display is ashing or there is no display, replacement of the
battery is needed.
1. Remove the screw from the lower back of the meter, open the
battery cover and remove the battery.
2. Replace with a 9V battery and reinstall the cover.
Troubleshooting
Error E6
If the instruments' display shows E6, it indicates the related circuits or
parts of the thermistor have failed. Send them back to the store where
you bought the instrument for repair.
Sensor's fan will not turn
This indicates the sensor fan is damaged, purchase a new sensor probe.
For service on this or any other REED product or information on other REED
products, contact REED Instruments at info@reedinstruments.com
www.GlobalTestSupply.com
12
 Loading...