

REECON M and E GLDF24RVF User Manual
WARNING: If the area in which the heater may be operated does not meet the required volume for
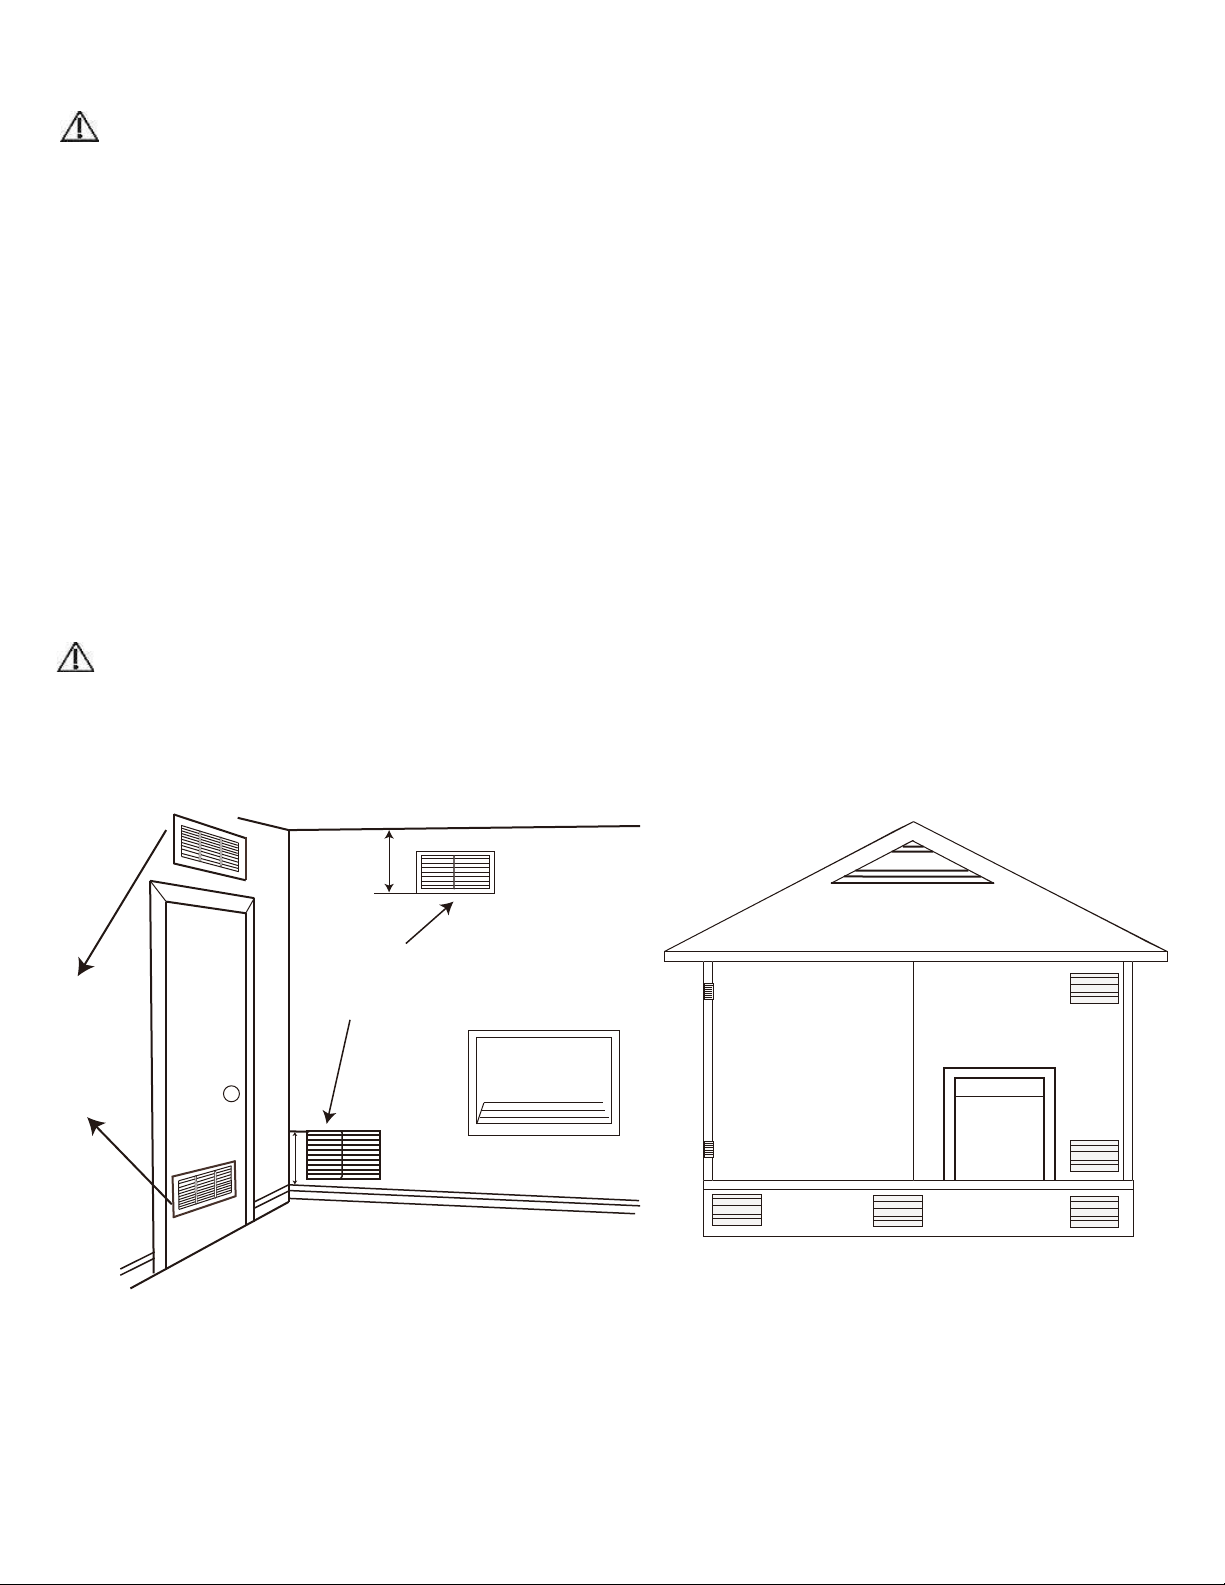
Figure 3 - Ventilation Air from Inside Building
Figure 4 - Ventilation Air from Outdoors
indoor combustion air, combustion and ventilation air shall be provided by one of the methods
described in the National Fuel Gas Code, ANSI Z223.1/NFPA 54, the International Fuel Gas Code, or
applicable local codes.
Ventilation Air from Inside Building
This fresh air would come from an adjoining unconfined space. When ventilating to an adjoining
unconfined space, you must provide tw
o permanent openings: one within 12 inches of the ceiling and one
within 12 inches of the floor on the wall connecting the two spaces (Figure 3). You can also remove the
door into adjoining room (see option 3, Figure 3). Follow the National Fuel Gas Code. ANSI Z223.1/NFPA
54, Air for Combustion and Ventilation for required size of ventilation grills or ducts.
Ventilation Air from Outdoors
Provide extra fresh air by using ventilation grills or ducts. You must provide
two permanent openings: one
within 12 inches of the ceiling and one within 12 inches of the floor. Connect these items directly to the
outdoors or spaces open to the outdoors. These spaces include attics and crawl spaces. Follow the
National Fuel Gas Code, ANSI Z223.1/ NFPA 54, Air for Combustion and Ventilation for required size of
ventilation grills or ducts.
IMPORTANT: Do not provide openings for inlet or outlet air into attic if attic has a
thermostat-controlled
power vent. Heated air entering the attic will activate the power vent. Rework
worksheet, adding the space of the adjoining unconfined space. The combined spaces must have
enough fresh air to supply all appliances in both spaces.
12"
Or
Ventilation
Grills Into
Adjoining
Room,
Option 1
NOTE: Base not included. Not for use in bedrooms or bathrooms.
Remove
Door into
Adjoining
Room,
Option 3
12"
Ventilation Grills
Into Adjoining Room
Option 2
Outlet
Air
Inlet
Air
Outlet
Air
Inlet Air
Ventilated
Attic
To Attic
To
Crawl
Space
Ventilated
Crawl Space
10

11
INSTALLATION CONSIDERATIONS
This heater is intended for use as supplemental heat.
Use this heater along with your primary heating system. Do not install this heater as your primary heat
source. If you have a central heating system, you may run system’s circulating blower while using heater.
This will help circulate the heat throughout the house. In the event of a power outage, you can use this
heater as your primary heat source.
WARNING: A qualified service person must install heater. Follow all local codes.
WARNING: Never install the heater:
in a recreational vehicle
where curtains, furniture, clothing, or other flammable objects are less than 36 inches from the
front, top, or sides of the heater
in high traffic areas
in windy or drafty areas
CAUTION: This heater creates warm air currents. These currents move heat to wall surfaces next
to heater. Installing heater next to vinyl or cloth wall coverings or operating heater where impurities (such
as tobacco smoke, aromatic candles, cleaning fluids, oil or kerosene lamps, etc.) in the air exist, may
cause walls to discolor.
IMPORTANT: Vent-free heaters add moisture to the air. Although this is beneficial, installing
heater in rooms without enough ventilation air may cause mildew to form too much moisture. See Air for
Combustion and Ventilation.
Check Gas Type
Be sure your gas supply is right for your heater. Otherwise,
call dealer where you bought the heater from for proper type
heater.
Clearances to Combustibles
Carefully follow the instructions below. This heater is a
freestanding floor seated unit.
WARNING: Maintain the minimum clearances shown
in Figure 5. If you can, provide greater clearances
from floor, ceiling, and joining wall.
Figure 5 – Minimum Clearance to Combustibles

Figure 6 – Minimum Clearance Above
Combustible Flooring.
Figure 7 – Minimum Clearance Above
Material Installed at Base of Fireplace.
Figure 8 - Damper
Heater in Fireplace
or Firebox
Combustible
Material
Heater in Fireplace
or Firebox
Combustible
Material
3
1
Minimum"
8
This distance
May now be
less than
3
1
14”Minimum
"
8
Combustible Flooring with Noncombustible
The gas log heater must be installed at least 1 3/8” above any combustible flooring material, such as
carpeting or tile, which is closer than 14” to the base of the fireplace. The minimum distance must be
maintained from the top surface of carpeting, tile, etc. See Figure 6.
OR
The gas log heater may be installed nearer to the floor if a minimum of 14” of noncombustible material
such as a slate or marble is installed between the base of the fire place and the combustible flooring. See
Figure 7.
When installing your log set as a vent free installation the damper clamp can be used to eliminate the
potential for odors when burning the logs for the first time.
Note: When the appliance is installed directly on carpeting, tile or other combustible material, other than
wood flooring, the appliance shall be installed on a metal or wood panel extending the full width and
depth of the appliance.
Installing Damper Clamp:
Remove all ashes or other debris from the
fireplace. If the fireplace is equipped with an ash
dump be sure to seal the door with furnace
cement or high temperature silicone. Be sure to
check the damper for proper operation and
verify that the flue passageway is open.
Place the clamp over the lip of the damper and
tighten the hold down bold until the clamp is
securely attached to the damper. This will
prevent the damper from accidentally closing.
M
anual and millivolt controlled gas logs may be
installed as a vented decorative log set in
compliance with ANSI Z21.11.2-2013 and
12
 Loading...