

Page 1
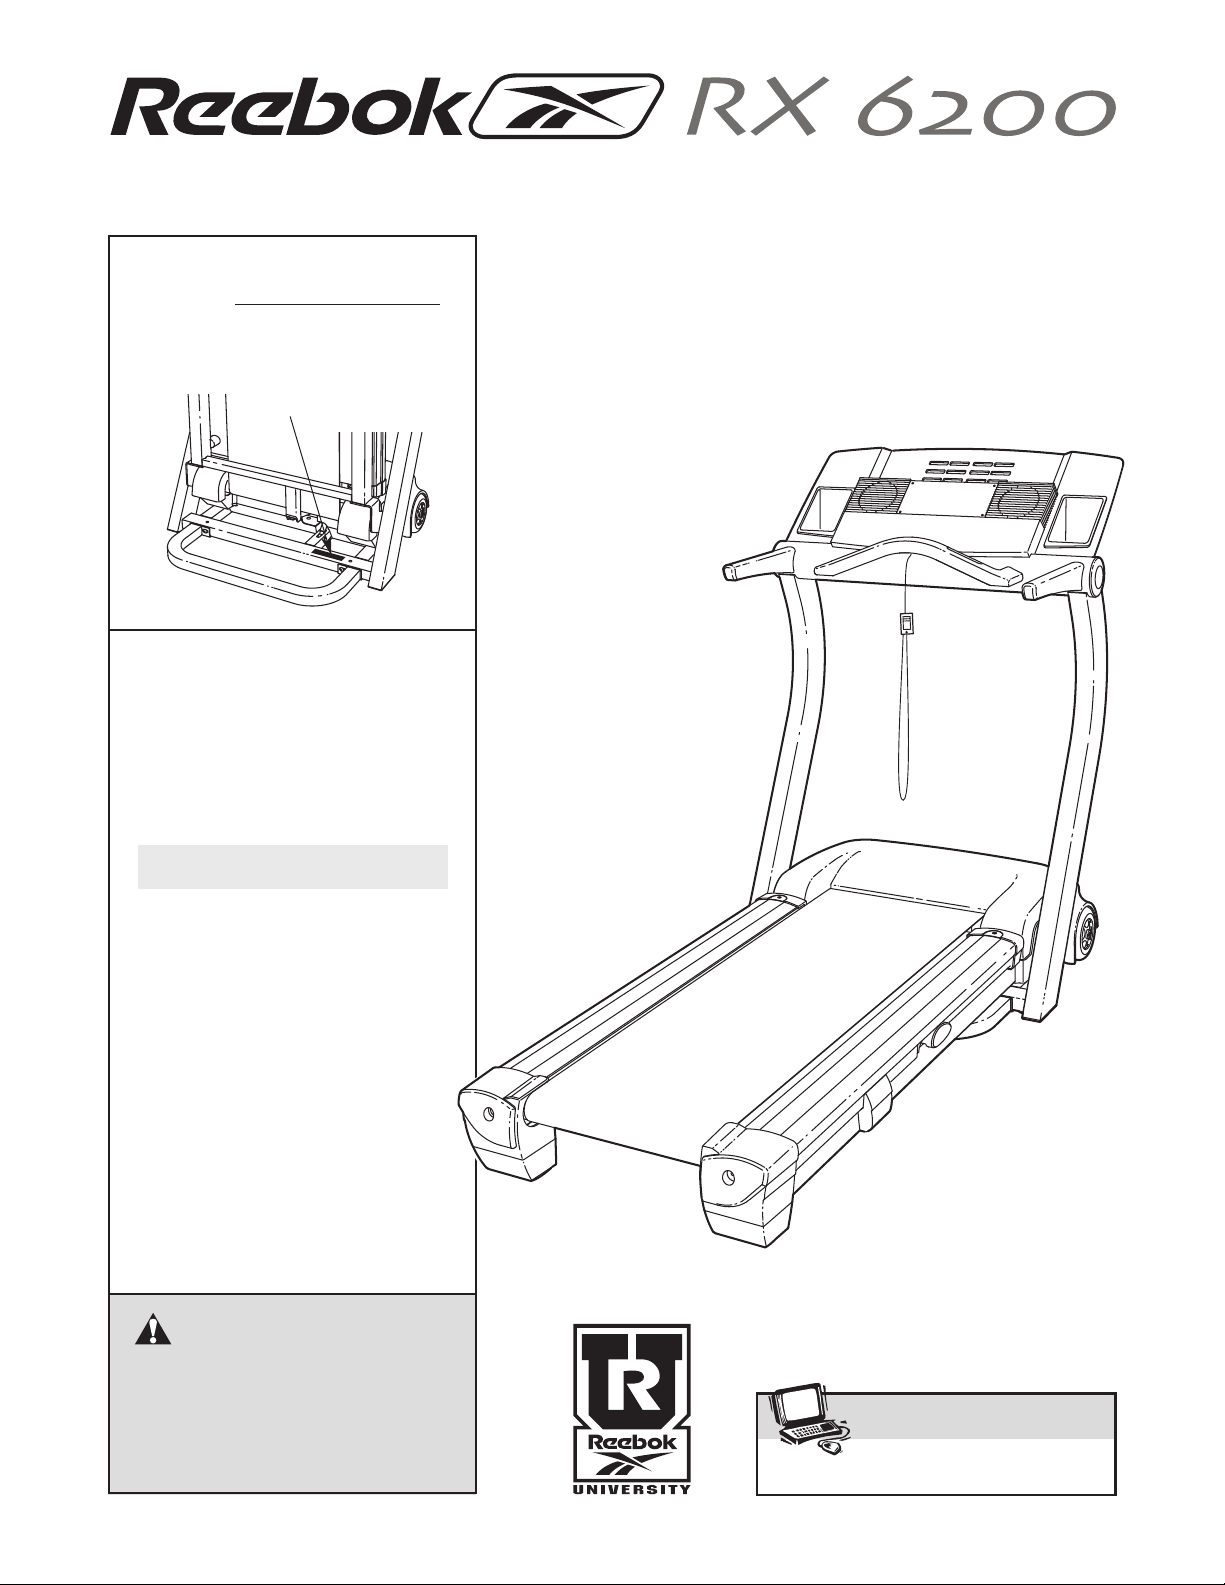
Model No. RCTL12921
®
www.reebokfitness.com
Visit our website at
®
®
Serial No.
Write the serial number in the space
above for future reference.
Serial Number Decal
QUESTIONS?
As a manufacturer, we are committed to providing complete
customer satisfaction. If you
have questions, or if there are
missing parts, please call:
USER’S MANUAL
1-888-936-4266
Mon.–Fri. 8h00 until 18h30 EST
(excluding holidays).
CAUTION
Read all precautions and instructions in this manual before using
this equipment. Save this man
ual for future reference.
-
Page 2

®
TABLE OF CONTENTS
IMPORTANT PRECAUTIONS . . . . . . . . . . . . . . . . . . . . . . . . . . . . . . . . . . . . . . . . . . . . . . . . . . . . . . . . . . . . . . . . .3
BEFORE YOU BEGIN . . . . . . . . . . . . . . . . . . . . . . . . . . . . . . . . . . . . . . . . . . . . . . . . . . . . . . . . . . . . . . . . . . . . . . .5
ASSEMBLY . . . . . . . . . . . . . . . . . . . . . . . . . . . . . . . . . . . . . . . . . . . . . . . . . . . . . . . . . . . . . . . . . . . . . . . . . . . . . . .6
TREADMILL OPERATION . . . . . . . . . . . . . . . . . . . . . . . . . . . . . . . . . . . . . . . . . . . . . . . . . . . . . . . . . . . . . . . . . . . .8
HOW TO FOLD AND MOVE THE TREADMILL . . . . . . . . . . . . . . . . . . . . . . . . . . . . . . . . . . . . . . . . . . . . . . . . . .21
TROUBLESHOOTING . . . . . . . . . . . . . . . . . . . . . . . . . . . . . . . . . . . . . . . . . . . . . . . . . . . . . . . . . . . . . . . . . . . . . .23
REEBOK UNIVERSITY . . . . . . . . . . . . . . . . . . . . . . . . . . . . . . . . . . . . . . . . . . . . . . . . . . . . . . . . . . . . . . . . . . . . .25
EXERCISE GUIDELINES . . . . . . . . . . . . . . . . . . . . . . . . . . . . . . . . . . . . . . . . . . . . . . . . . . . . . . . . . . . . . . . . . . .27
PART LIST . . . . . . . . . . . . . . . . . . . . . . . . . . . . . . . . . . . . . . . . . . . . . . . . . . . . . . . . . . . . . . . . . . . . . . . . . . . . . . .30
HOW TO ORDER REPLACEMENT PARTS . . . . . . . . . . . . . . . . . . . . . . . . . . . . . . . . . . . . . . . . . . . . . . . . . . . . .31
LIMITED WARRANTY . . . . . . . . . . . . . . . . . . . . . . . . . . . . . . . . . . . . . . . . . . . . . . . . . . . . . . . . . . . . . . .Back Cover
Note: An EXPLODED DRAWING is attached in the center of this manual.
REEBOK and the Vector Logo are registered trademarks and service marks of Reebok. This product is
manufactured and distributed under license from Reebok International.
2
Page 3

IMPORTANT PRECAUTIONS
WARNING: To reduce the risk of burns, fire, electric shock, or injury to persons, read the
following important precautions and information before operating the treadmill.
1. It is the responsibility of the owner to ensure
that all users of this treadmill are adequately
informed of all warnings and precautions.
2. Use the treadmill only as described in this
manual.
3. Place the treadmill on a level surface, with at
least 2 m (8 ft.) of clearance behind it and 0.5
m (2 ft.) on each side. Do not place the treadmill on any surface that blocks air openings.
To protect the floor or carpet from damage,
place a mat under the treadmill.
4. Keep the treadmill indoors, away from moisture and dust. Do not put the treadmill in a
garage or covered patio, or near water.
5. Do not operate the treadmill where aerosol
products are used or oxygen is administered.
6. Keep children under the age of 12 and pets
away from the treadmill at all times.
7. The treadmill should not be used by persons
weighing more than 114 kg (250 lbs.). Never
allow more than one person on the treadmill at
a time.
8. Wear appropriate exercise clothes when
using the treadmill. Do not wear loose clothes
that could become caught in the treadmill.
Athletic support clothes are recommended
for both men and women.
letic shoes. Never use the treadmill with bare
feet, wearing only stockings, or in sandals.
9. When connecting the power cord (see page 8),
plug the power cord into a surge suppressor
(not included) and plug the surge suppressor
into a grounded circuit capable of carrying 15
or more amps. No other appliance should be on
the same circuit. Do not use an extension cord.
Use only a CUL-listed surge suppressor of 450
10.
joules minimum surge dissipation with voltage
rating of 400 volts or less, rated at 15 amps,
with a 1 mm
less in length. Do not use an extension cord.
2
(14-gauge) cord of 1.5 m (5 ft.) or
Always wear ath-
11. Failure to use a properly functioning surge
suppressor could result in damage to the control system of the treadmill. If the control system is damaged, the walking belt may change
speed or stop unexpectedly, which may result
in a fall and serious injury.
12. Keep the power cord and the surge suppressor away from heated surfaces.
13. Never move the walking belt while the power
is turned off. Do not operate the treadmill if
the power cord or plug is damaged, or if the
treadmill is not working properly. (See
BEFORE YOU BEGIN on page 5 if the treadmill is not working properly.)
14. Never start the treadmill while you are standing on the walking belt. Always hold the
handrails while using the treadmill.
15. The treadmill is capable of high speeds.
Adjust the speed in small increments to avoid
sudden jumps in speed.
16. The pulse sensors are not medical devices.
Various factors, including the user’s movement, may affect the accuracy of heart rate
readings. The pulse sensors are intended
only as exercise aids in determining heart
rate trends in general.
17. Never leave the treadmill unattended while it
is running. Always remove the key, unplug
the power cord, and move the reset/off circuit
breaker to the off position when the treadmill
is not in use. (See the drawing on
the location of the reset/off circuit breaker.)
18. Do not attempt to raise, lower, or move the
treadmill until it is properly assembled. (See
ASSEMBLY on page 6, and HOW
AND MOVE THE TREADMILL on page 21.)
You must be able to safely lift 45 pounds (20
kg) to raise, lower, or move the treadmill.
When folding or moving the treadmill, make
19.
sure that the storage latch is fully closed.
page 5 for
FOLD
TO
3
Page 4
20. When using iFIT.com CD’s and videos, an
electronic “chirping” sound will alert you
when the speed and/or incline of the treadmill
is about to change. Always listen for the
“chirp” and be prepared for speed and/or incline changes. In some instances, the speed
and/or incline may change before the personal trainer describes the change.
21. When using iFIT.com CD’s and videos, you
can manually override the speed and incline
settings at any time by pressing the speed and
incline buttons. However, when the next
“chirp” is heard, the speed and/or incline will
change to the next settings of the CD or video
program.
22. Always remove iFIT.com CD’s and videos
from your CD player or VCR when you are not
using them.
23. Inspect and properly tighten all parts of the
treadmill every three months.
Never drop or insert any object into any open-
24.
ing.
25.
DANGER: Always unplug the power
cord immediately after use, before cleaning
the treadmill, and before performing the maintenance and adjustment procedures described in this manual. Never remove the
motor hood unless instructed to do so by an
authorized service representative. Servicing
other than the procedures in this manual
should be performed by an authorized service
representative only.
26. The treadmill is intended for in-home use
only. Do not use the treadmill in any
commercial, rental, or institutional setting.
WARNING: Before beginning this or any exercise program, consult your physician. This
is especially important for persons over the age of 35 or persons with pre-existing health problems.
Read all instructions before using. ICON assumes no responsibility for personal injury or property
damage sustained by or through the use of this product.
SAVE THESE INSTRUCTIONS
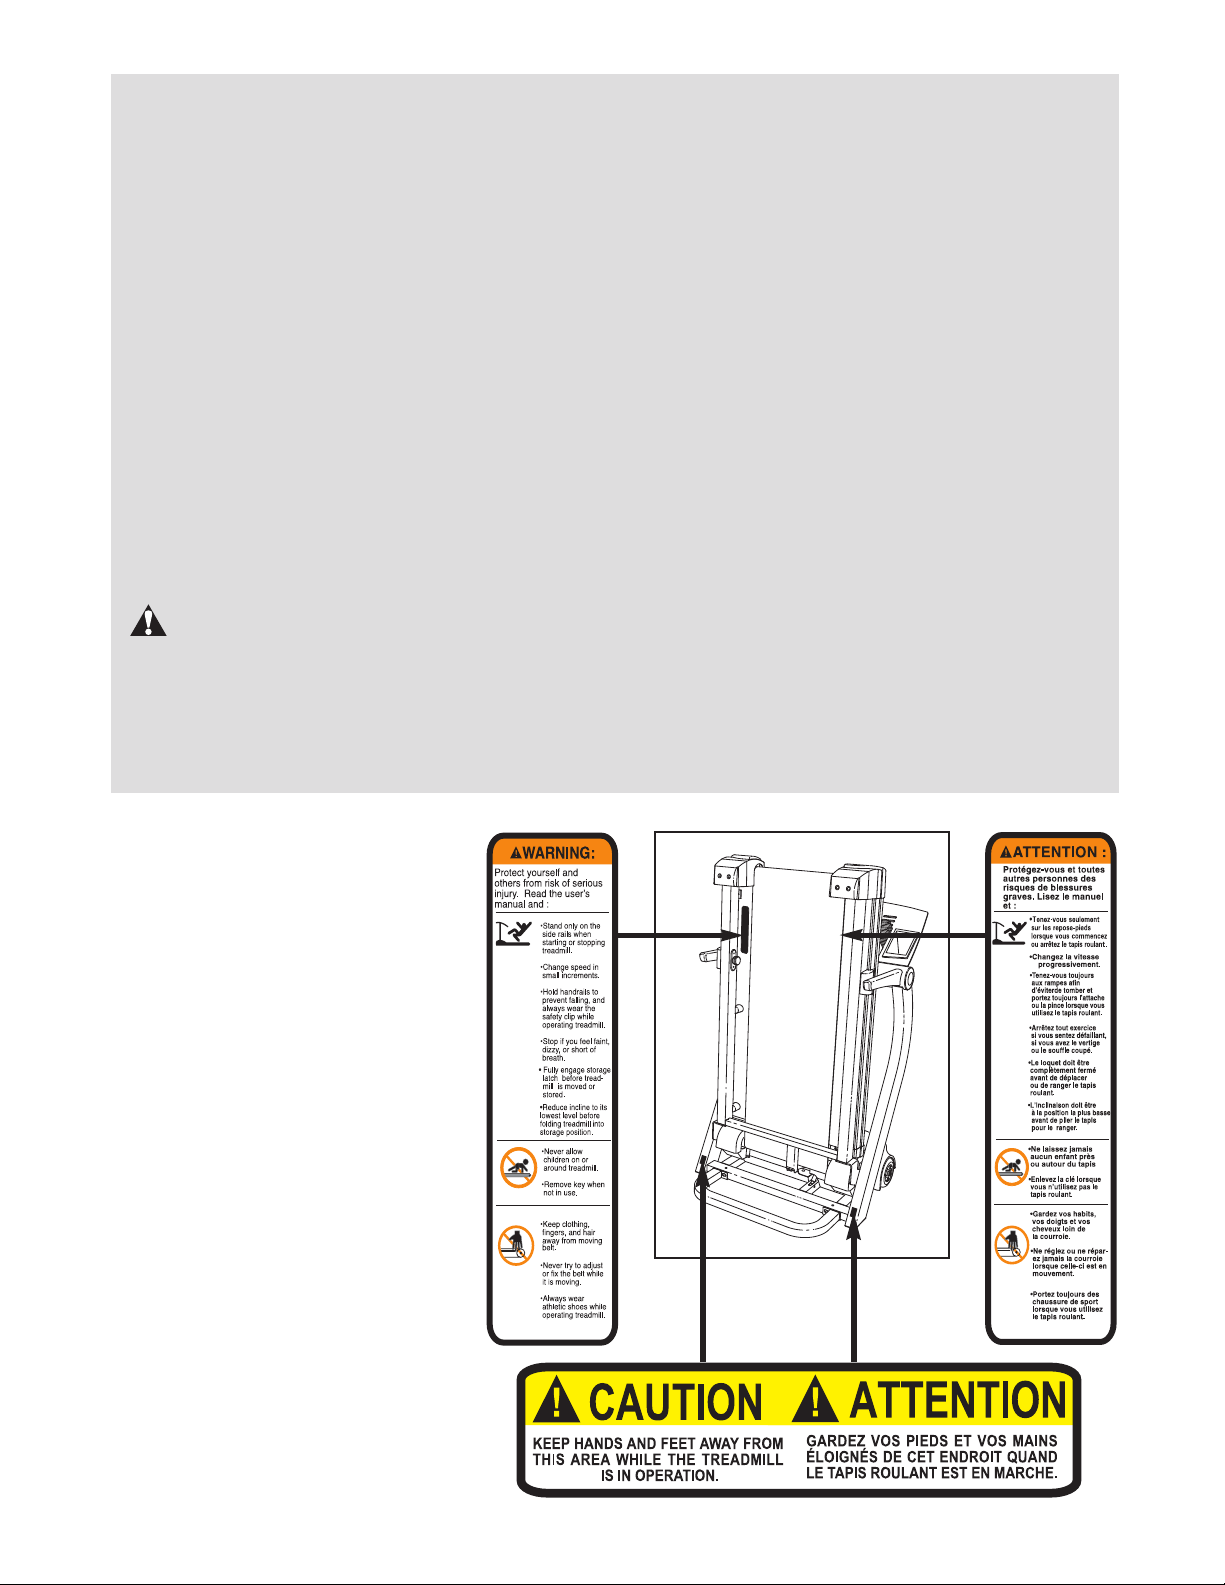
The decals shown below have
been placed on your treadmill. If
the decal is missing, or if it is not
legible, please call our Customer
Service Department, toll-free, to
order a free replacement decal
(see ORDERING REPLACEMENT
PARTS
decal in the location shown. Note:
The decals are not shown at actual size.
on page 31). Apply the
4
Page 5
BEFORE YOU BEGIN
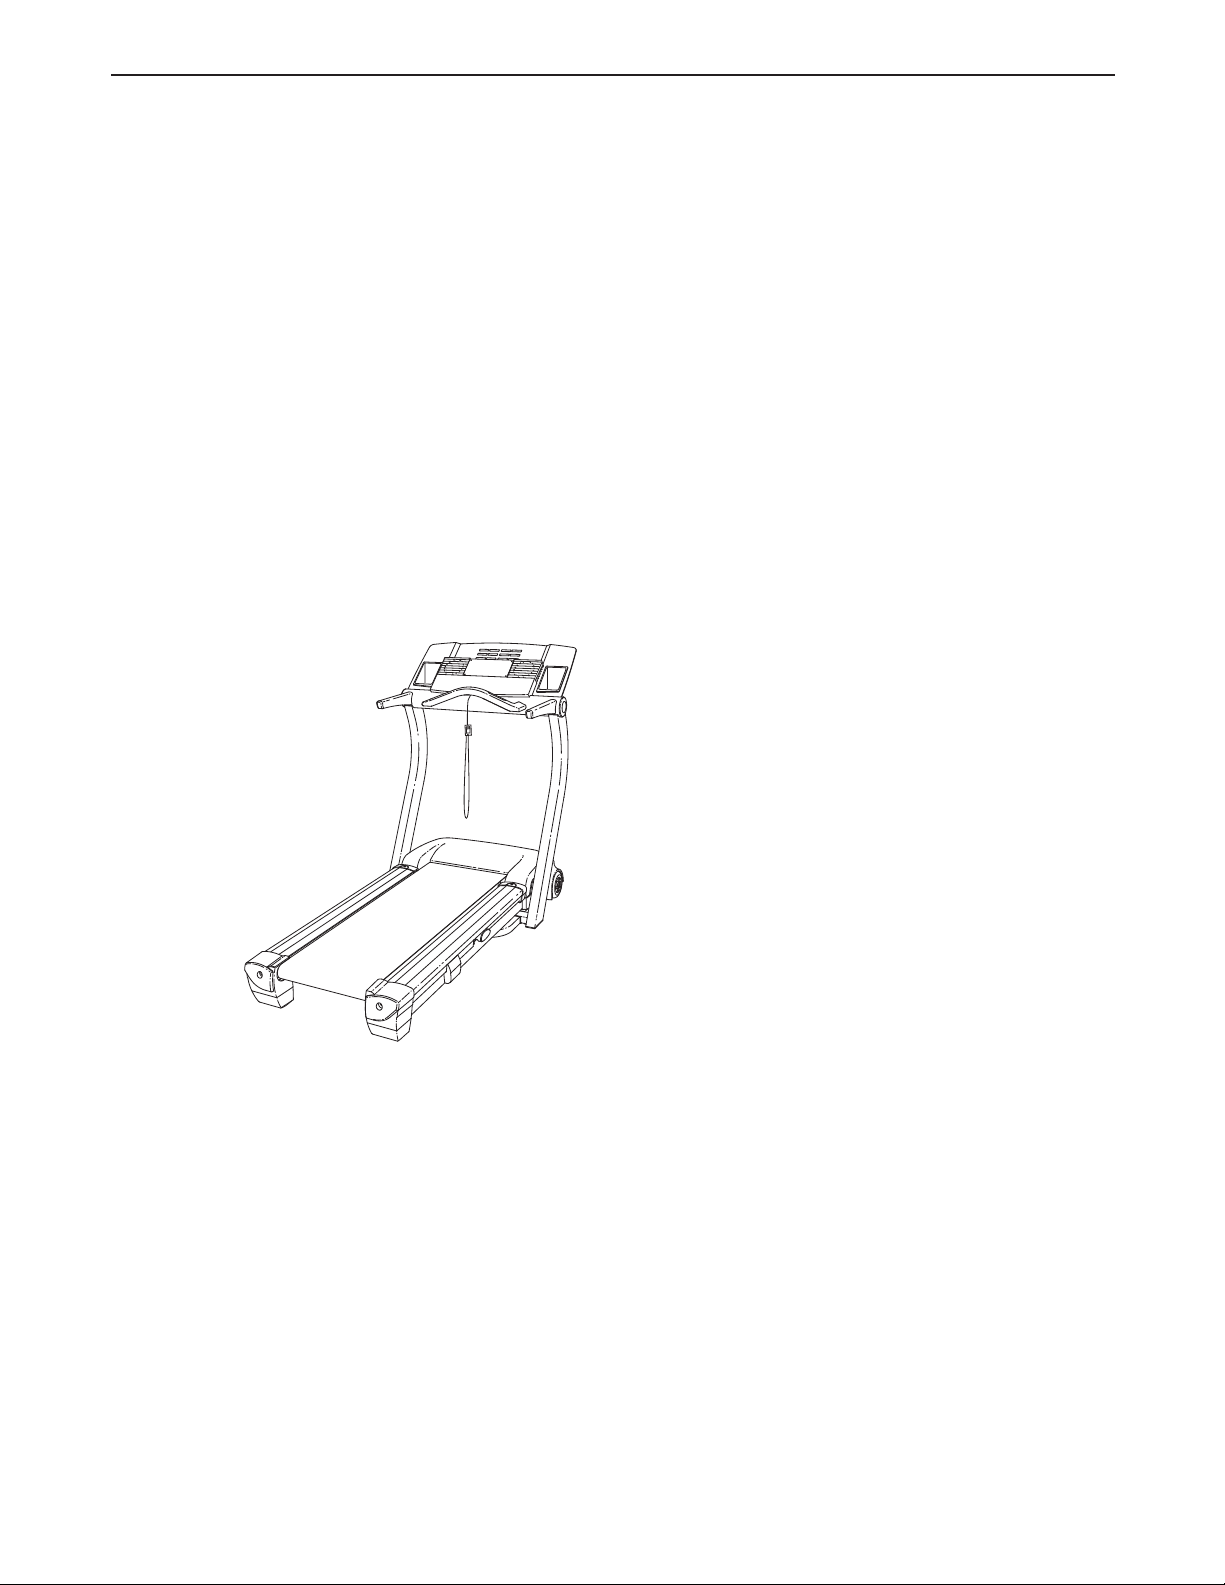
Thank you for selecting the new REEBOK®RX 6200
treadmill. The RX 6200 treadmill combines advanced
technology with innovative design to help you get the
most from your exercise program in the convenience of
your home. And when you’re not exercising, the unique
RX 6200
floor space of other treadmills.
For your benefit, read this manual carefully before
using the treadmill
ing this manual, please call our Customer Service
can be folded up, requiring less than half the
. If you have questions after read-
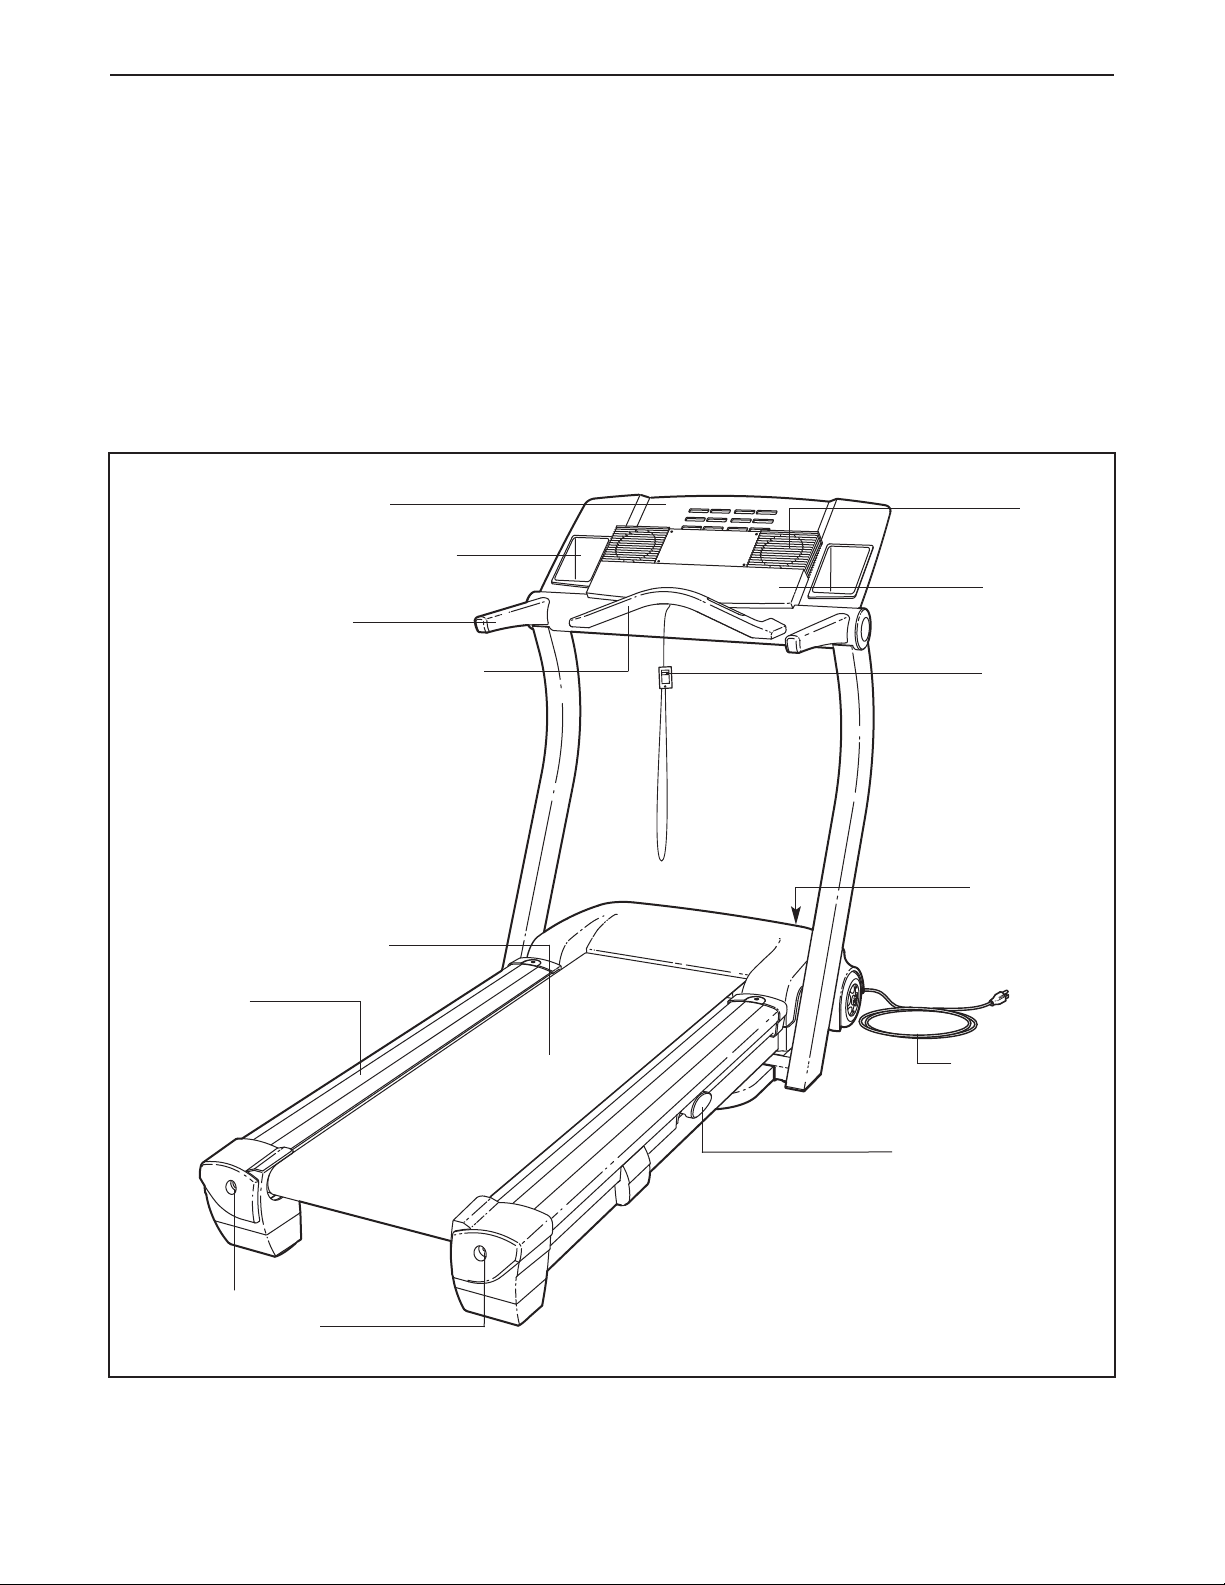
Book Holder
Water Bottle Holder*
Handrail
Handgrip Pulse Sensor
Department toll-free at 1-888-936-4266, Monday
through Friday, 8h00. until 18h30 Eastern Time (excluding holidays). To help us assist you, please note
the product model number and serial number before
calling. The model number of the treadmill is
RCTL12921. The serial number can be found on a
decal attached to the treadmill (see the front cover of
this manual for the location).
Before reading further, please review the drawing
below and familiarize yourself with the labeled parts.
Fan
Console
Key/Clip
Walking Belt
Foot Rail
BACK
Rear Roller
Adjustment Bolts
Reset/Off
Circuit Breaker
Power Cord
Adjustable Cushioned
Walking Platform
(See page 20)
RIGHT SIDE
*No water bottle is included
5
Page 6
ASSEMBLY
Assembly requires two people. Place the treadmill in a cleared area and remove all packing materials. Do not
dispose
Note: The underside of the treadmill walking belt is coated with high-performance lubricant. During shipping, a
small amount of lubricant may be transferred to the top of the walking belt, the sides of the walking platform, or
the shipping carton. This does not affect treadmill performance. If there is lubricant on top of the walking belt or
on the sides of the walking platform, wipe off the lubricant with a soft cloth and a mild, non-abrasive cleaner.
Assembly requires your own phillips screwdriver , rubber mallet , wire
cutters , and adjustable wrench .
of the packing materials until the treadmill is assembled.
1. For help identifying small parts, refer to the PART
IDENTIFICATION CHART on page 31.
Cut the plastic ties (not shown) from the sides of the
treadmill. With the help of a second person, carefully
raise the Uprights (65) until the Wheels (not shown) are
resting on the floor.
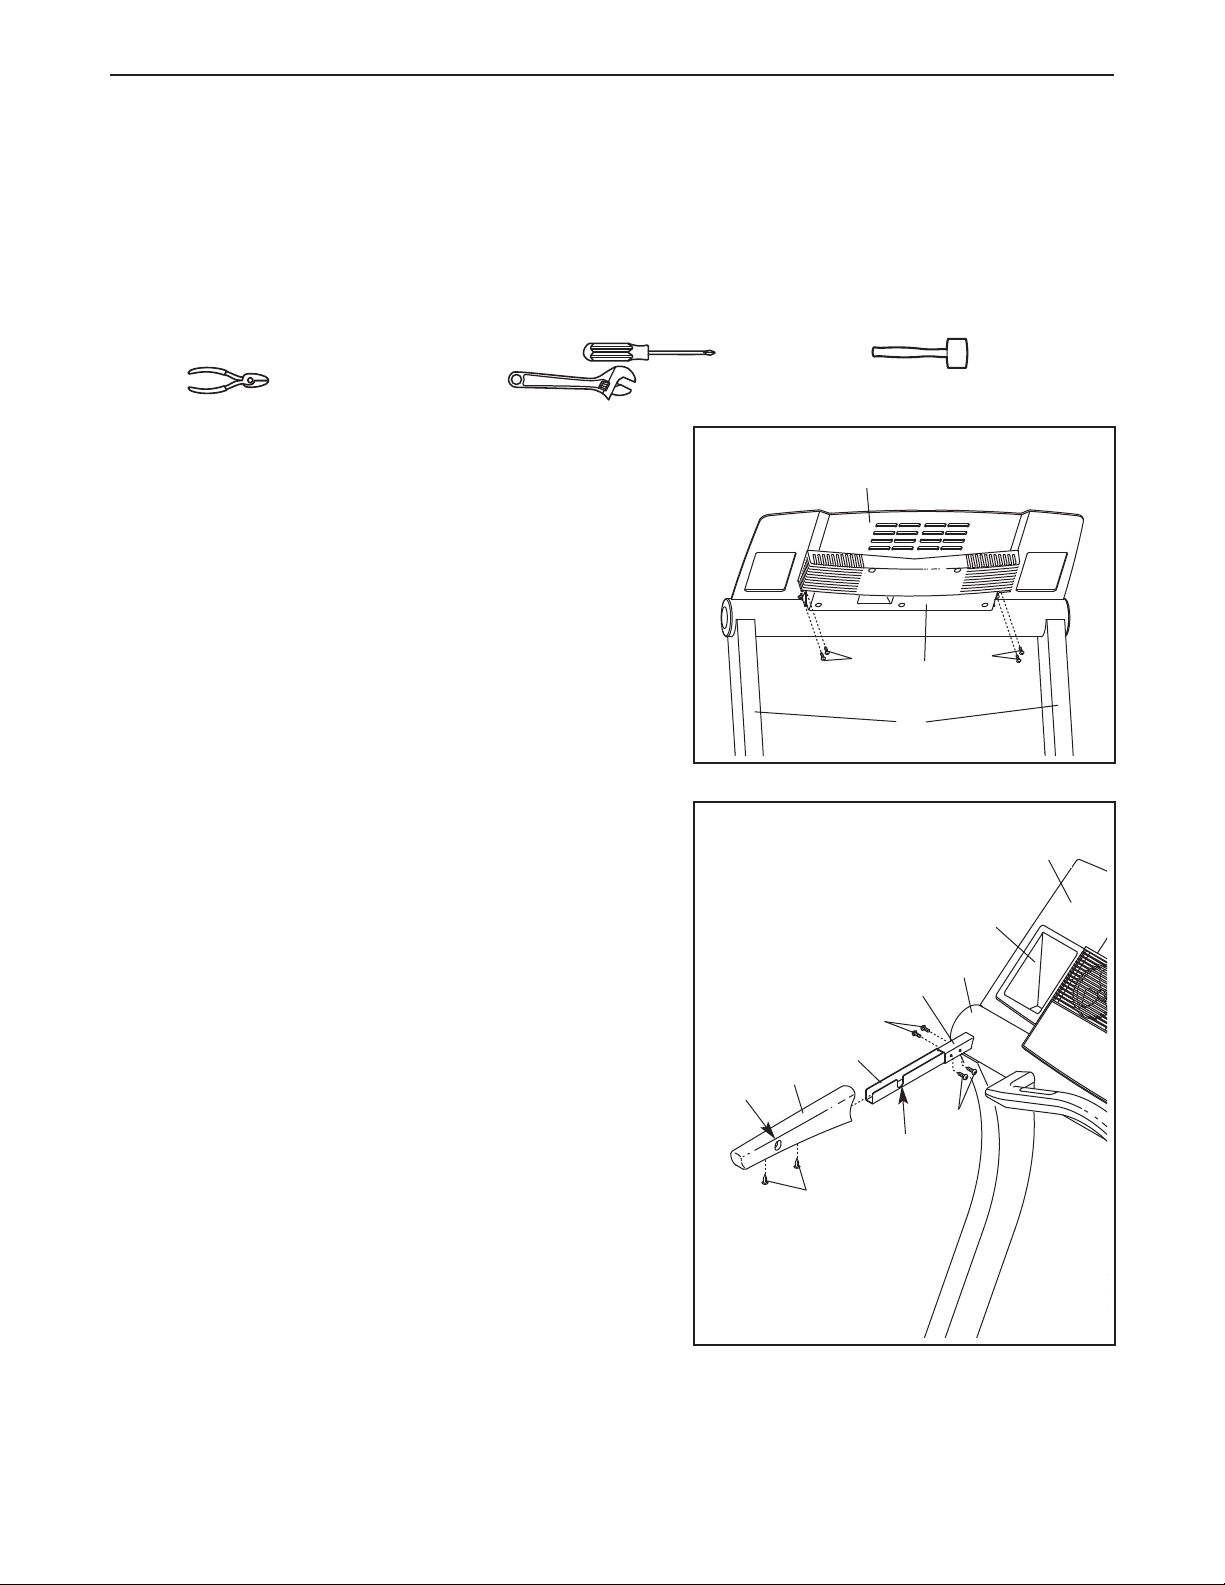
Hold the Book Plate (114) against the back of the
Console Back (117) and the Upright (65) as shown.
Attach the Book Plate with four 3/4” Screws (101).
2. Insert one of the Handrail Extensions (76) into the square
post on the left Upright (65). Make sure that the notch in
the Handrail Extension is in the position shown. Align
the small holes in the Handrail Extension with the holes in
the post. If necessary, use a rubber mallet to fully insert the
Handrail Extension. Attach the Handrail Extension with four
Extension Screws (50).
Identify the Left Foam Grip (62), which has a hole in the
right side. Slide the Left Foam Grip as far as possible onto
the Handrail Extension (76) and the post. (Note: It may be
helpful to apply soapy water to the Handrail Extension.)
Press two Plastic Fasteners (75) into the bottom of the Left
Foam Grip and the Handrail Extension. Note: It may be
helpful to tap on the Plastic Fasteners with a rubber mallet.
1
2
Hole
62
76
114
101
50
101
117
65
114
81
65
Post
50
Notch
Attach the other Handrail Extension (not shown) and the
Right Foam Grip (not shown) to the post on the right
Upright (65) in the same way. Note: There is not a hole in
the side of the Right Foam Grip.
Press the Left Cup Holder (81) into the Book Plate (114).
Press the other Cup Holder (not shown) into the other side
of the Book Plate.
6
75
Page 7

3. (Note: The parts shown in this step may be preassembled
but may need to be adjusted.) With the help of a second person, raise the Frame (55) and hold it. Insert the Left Frame
Guide (68) into the left side of the Frame. Remove the Lock
Knob (67) from the Lock Pin (72). Be sure the Lock Pin
Collar (70) and the Spring (69) are on the Lock Pin. Insert
the Lock Pin into the Frame and the Left Frame Guide.
Press the Latch Insert (5) onto the Frame, with the Lock Pin
in the center hole. Tighten the Lock Knob onto the Lock Pin.
Align the Lock Pin (72) with the hole in the Left Foam Grip
(62) by sliding the Left Frame Guide (68) up or down.
Make sure that the Lock Pin can be inserted fully into the
hole. Hold the Left Frame Guide in place and tighten two
1/2” Screws (10) into the Latch Insert and the Left Frame
Guide. Note: It may be necessary to pull the Lock Knob
(67) to access and tighten the Screws.
3
72
55
70
69
10
5
67
68
Hole
62
4. Raise the treadmill to the storage position (see HOW TO
FOLD THE TREADMILL FOR STORAGE on page 21).
Have a second person hold the treadmill in the upright posi
tion. Position the U-base (20) against the base of the
Uprights (65) as shown,
U-base. Finger tighten two 2” Bolts (26) with Base
Washers (35) into the base of the Uprights and the U-base.
Then, attach the U-base with two 3” Bolts (23), two Base
Washers (35), and two Nuts (13). Tip the treadmill forward if
necessary. Tighten the two 2” Bolts.
5. Make sure that all parts are properly tightened before
you use the treadmill. Place a mat beneath the treadmill to protect the floor. For your benefit, familiarize your-
self with the information on pages 23 and 24.
If you purchase the optional chest pulse sensor (see page
20), follow the steps below to install the receiver and the
short jumper wire included with the chest pulse sensor.
1. Make sure that the power cord is unplugged. Remove the
indicated Screws (40) from the Console Back (117). Remove
the Console Back.
with the Bumpers (98) under the
-
4
1
35
26
98
23
20
98
65
13
35
26
13
23
2. Connect the Short Jumper Wire (A) to the wire on the
Receiver (B). Connect the other end of the Short Jumper
Wire to the PULSE jack on the back of the Console (80).
Turn the Receiver (B) so the cylinder is on the side
shown, and hold the Receiver against the back of the
Console (80). Attach the Receiver with the two Small
Screws (C) included with the receiver.
Make sure that no wires are pinched. See step 1.
Reattach the Console Back (117) with the Screws (40). You
may discard the other wires included with the receiver.
117
40
2
80
A
C
40
Cylinder
B
7
Page 8
TREADMILL OPERATION
THE PERFORMANT LUBE™WALKING BELT
Your treadmill features a walking belt coated with
PERFORMANT LUBE
IMPORTANT: Never apply silicone spray or other
substances to the walking belt or the walking platform. Such substances will deteriorate the walking
belt and cause excessive wear.
HOW TO PLUG IN THE POWER CORD
™
, a high-performance lubricant.
DANGER: Improper connection
of the equipment-grounding conductor can
result in an increased risk of electric shock.
Check with a qualified electrician or serviceman if you are in doubt as to whether the
product is properly grounded. Do not modify
the plug provided with the product—if it will
not fit the outlet, have a proper outlet
installed by a qualified electrician.
Your treadmill, like any other type of sophisticated
electronic equipment, can be seriously damaged by
sudden voltage changes in your home’s power.
Voltage surges, spikes, and noise interference can
result from weather conditions or from other appliances
being turned on or off. To decrease the possibility of
your treadmill being damaged, always use a surge
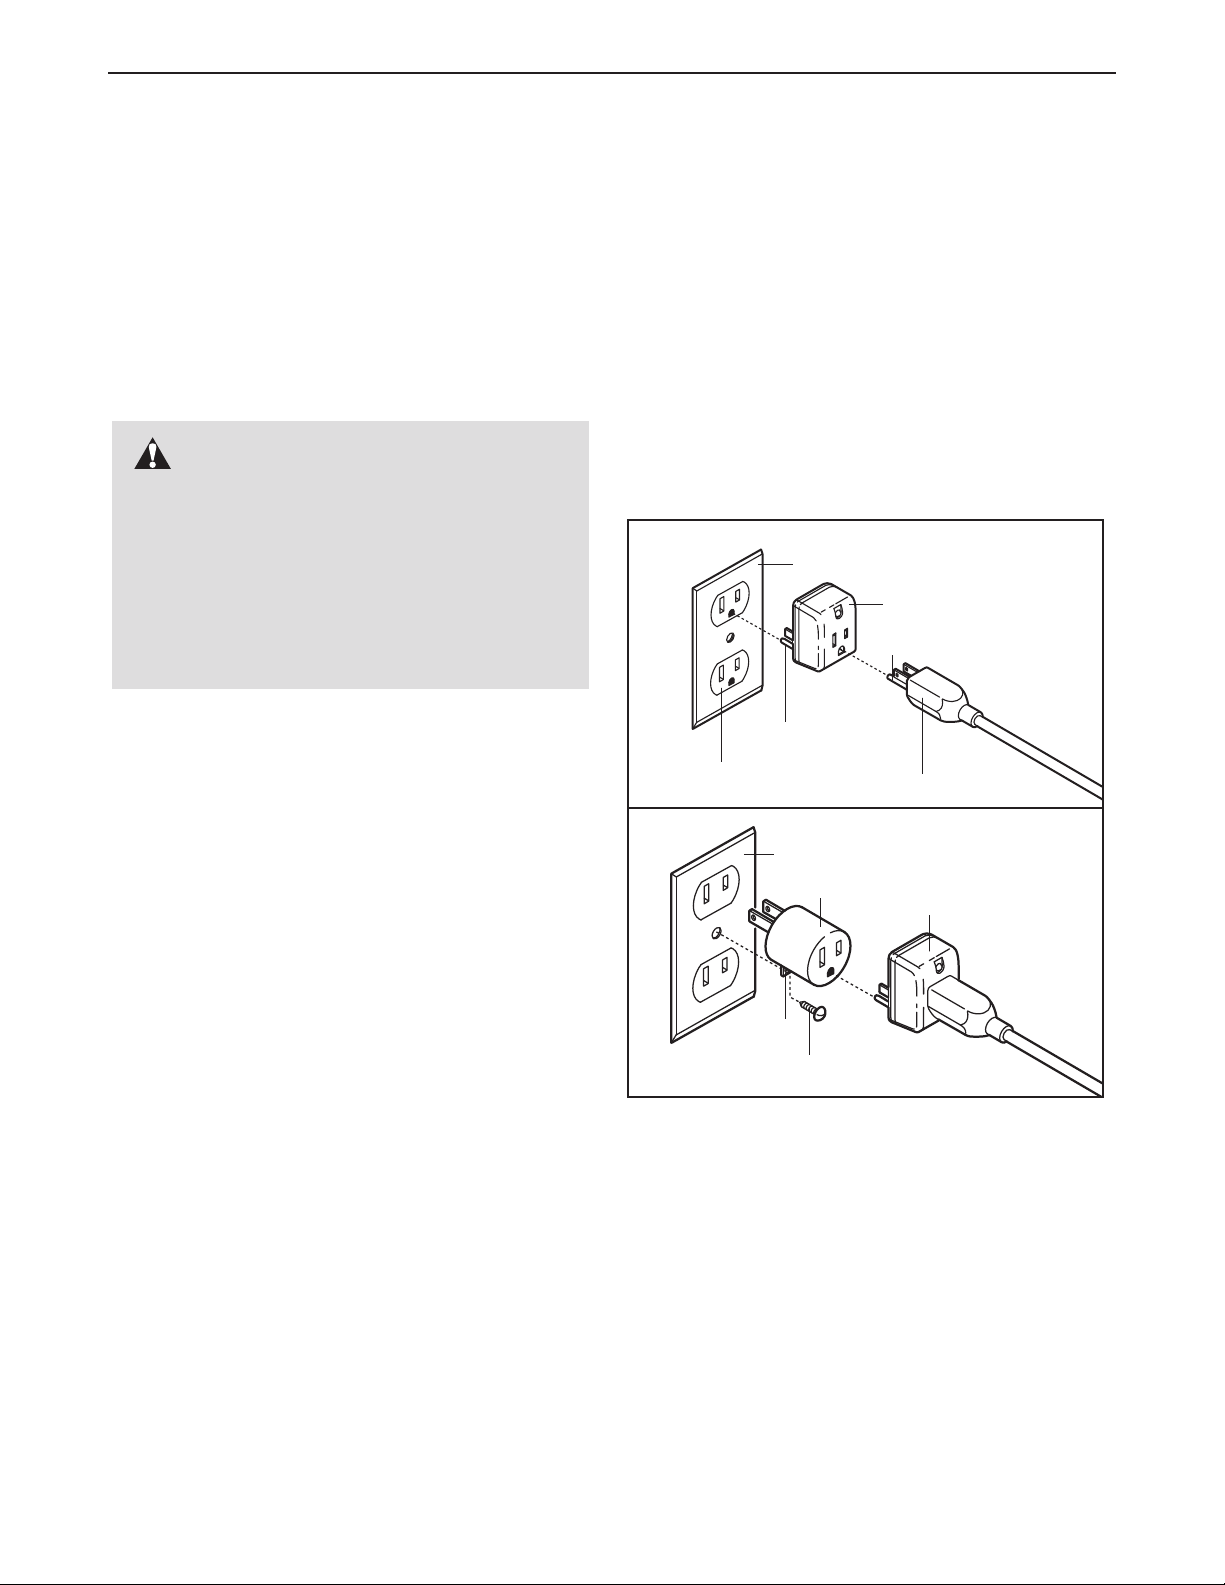
suppressor with your treadmill (see drawing 1 at
the right).
plug.
Plug the power cord into a surge suppressor,
and plug the surge suppressor into an appropriate
outlet that is properly installed and grounded in
accordance with all local codes and ordinances.
Important: The treadmill is not compatible with
GFCI-equipped outlets.
This product is for use on a nominal 120-volt circuit,
and has a grounding plug that looks like the plug illustrated in drawing 1 below. A temporary adapter that
looks like the adapter illustrated in drawing 2 may be
used to connect the surge suppressor to a 2-pole
receptacle as shown in drawing 2 if a properly
grounded outlet is not available.
1
Grounded Outlet Box
Surge Suppressor
Grounding Pin
Grounding Pin
Grounded Outlet
2
Grounded Outlet Box
Adapter
Grounding Plug
Surge Suppressor
Use only a single-outlet surge suppressor that is
UL 1449 listed as a transient voltage surge suppressor (TVSS). The surge suppressor must have a
UL suppressed voltage rating of 400 volts or less
and a minimum surge dissipation of 450 joules.
The surge suppressor must be electrically rated
for 120 volts AC and 15 amps. There must be a
monitoring light on the surge suppressor to indicate whether it is functioning properly. Failure to
use a properly functioning surge suppressor could
result in damage to the control system of the
treadmill. If the control system is damaged, the
walking belt may change speed or stop unexpectedly, which may result in a fall and serious injury.
This product must be grounded. If it should malfunc
tion or break down, grounding provides a path of least
resistance for electric current to reduce the risk of elec
tric shock. This product is equipped with a cord having
an equipment-grounding conductor and a grounding
Lug
Metal Screw
The temporary adapter should be used only until a
properly grounded outlet (drawing 1) can be installed
by a qualified electrician.
The green-colored rigid ear, lug, or the like extending
from the adapter must be connected to a permanent
ground such as a properly grounded outlet box cover.
Whenever the adapter is used it must be held in place
-
by a metal screw.
covers are not grounded. Contact a qualified elec-
-
trician to determine if the outlet box cover is
grounded before using an adapter.
Some 2-pole receptacle outlet box
8
Page 9
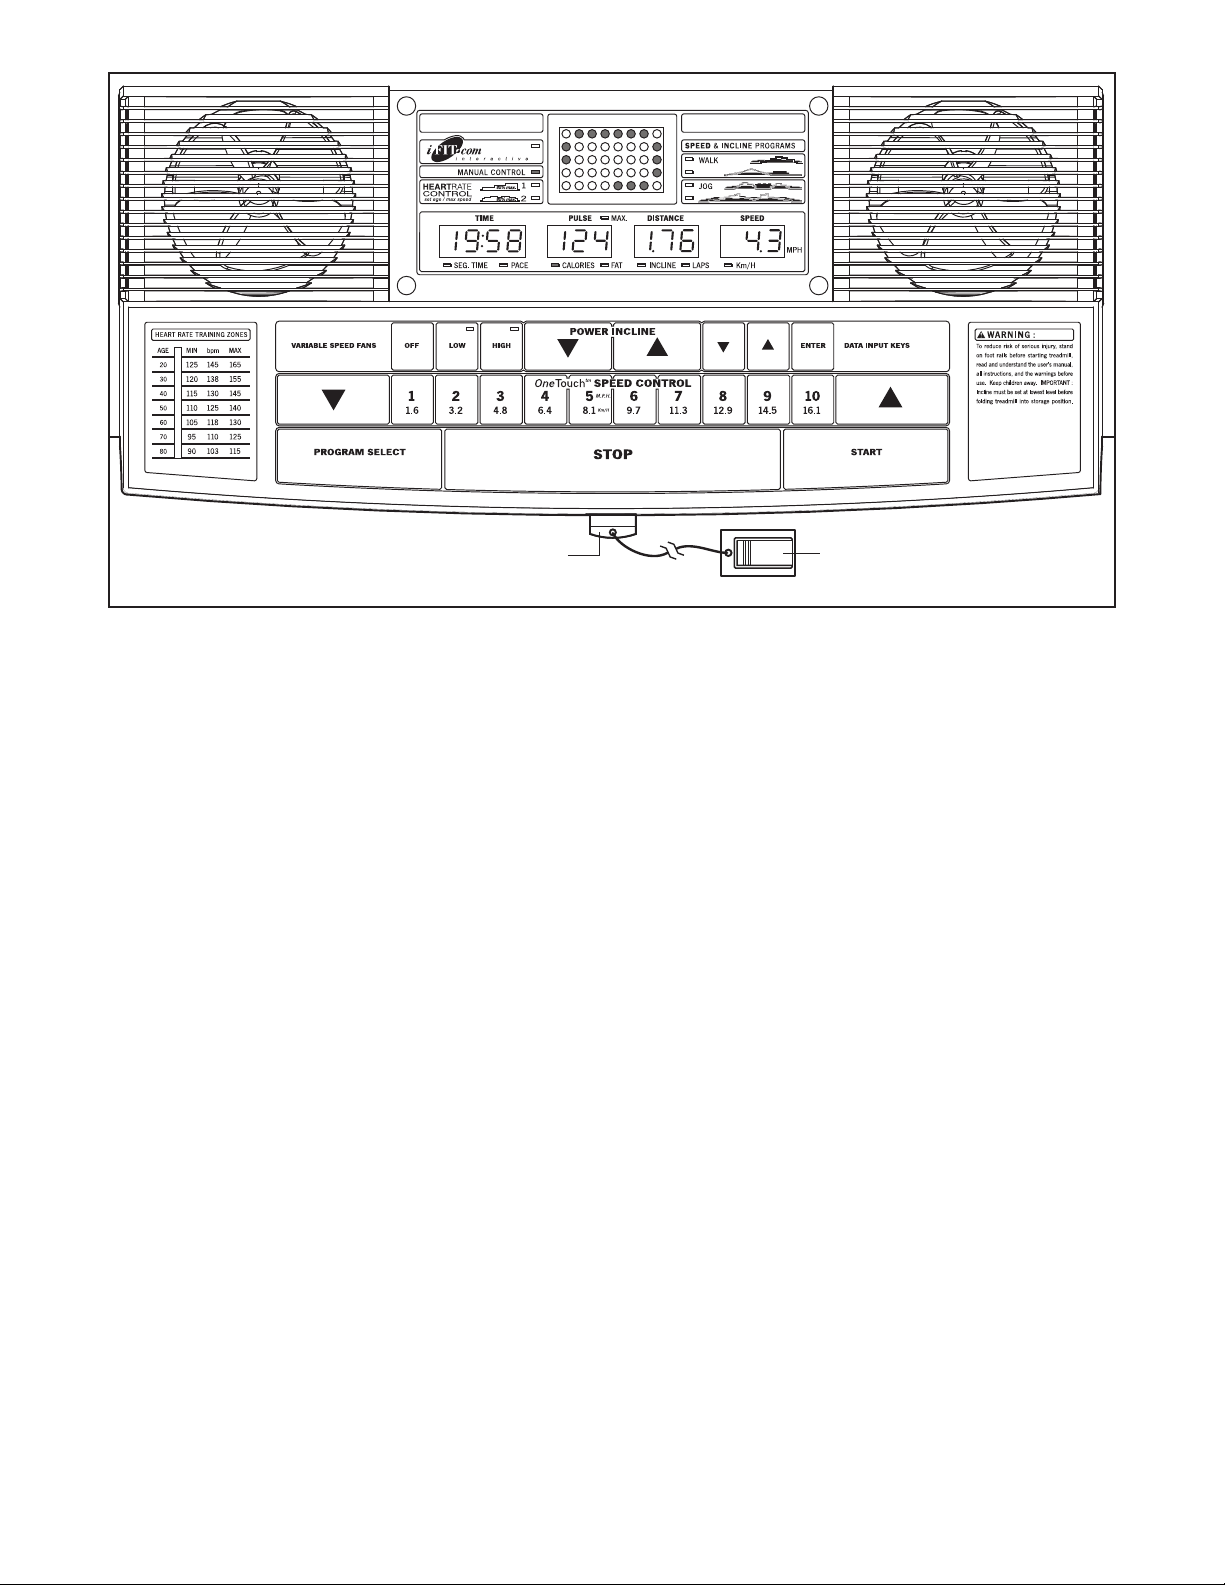
Note: If there is a thin sheet of clear
plastic on the console, remove it.
Key
Clip
FEATURES OF THE CONSOLE
The treadmill console offers an impressive array of
features designed to make your workouts more effective.
When the manual mode of the console is selected, the
speed and incline of the treadmill can be changed with
the touch of a button. As you exercise, the console will
display instant exercise feedback. You can even measure your heart rate using the handgrip pulse sensor.
Note: See page 20 for information about an optional
chest pulse sensor.
In addition, the console offers four preset workout programs. Each program automatically controls the speed
and incline of the treadmill as it guides you through an
effective workout. Two heart rate programs are also offered. Each program automatically adjusts the speed
and incline of the treadmill to keep your heart rate within
a preset range while you exercise.
The console also features new iFIT.com interactive
technology. Having iFIT.com technology is like having a
personal trainer in your home. Using the included audio
cable, you can connect the treadmill to your home
stereo, portable stereo, computer, or VCR and play
special iFIT.com CD and video programs (iFIT.com
CDs and videocassettes are available separately).
iFIT.com CD and video programs automatically control
the speed and incline of the treadmill as a personal
trainer coaches you through every step of your workout. High-energy music provides added motivation. To
purchase iFIT.com CDs or videocassettes, call tollfree 1-888-936-4266.
With the treadmill connected to your computer, you
can also go to our Web site at www.iFIT.com and access programs directly from the internet. Additional options are soon to be available. See www.iFIT.com for
more information.
To use the manual mode of the console, follow the
steps beginning on page 10. To use preset workout
programs, see page 12. To use heart rate programs,
see page 13. To use iFIT.com CD or video
programs, see page 17. To use iFIT.com programs
directly from our Web site, see page 19.
9
Page 10
HOW TO TURN ON THE POWER
Plug in the power cord (see page 8).
1
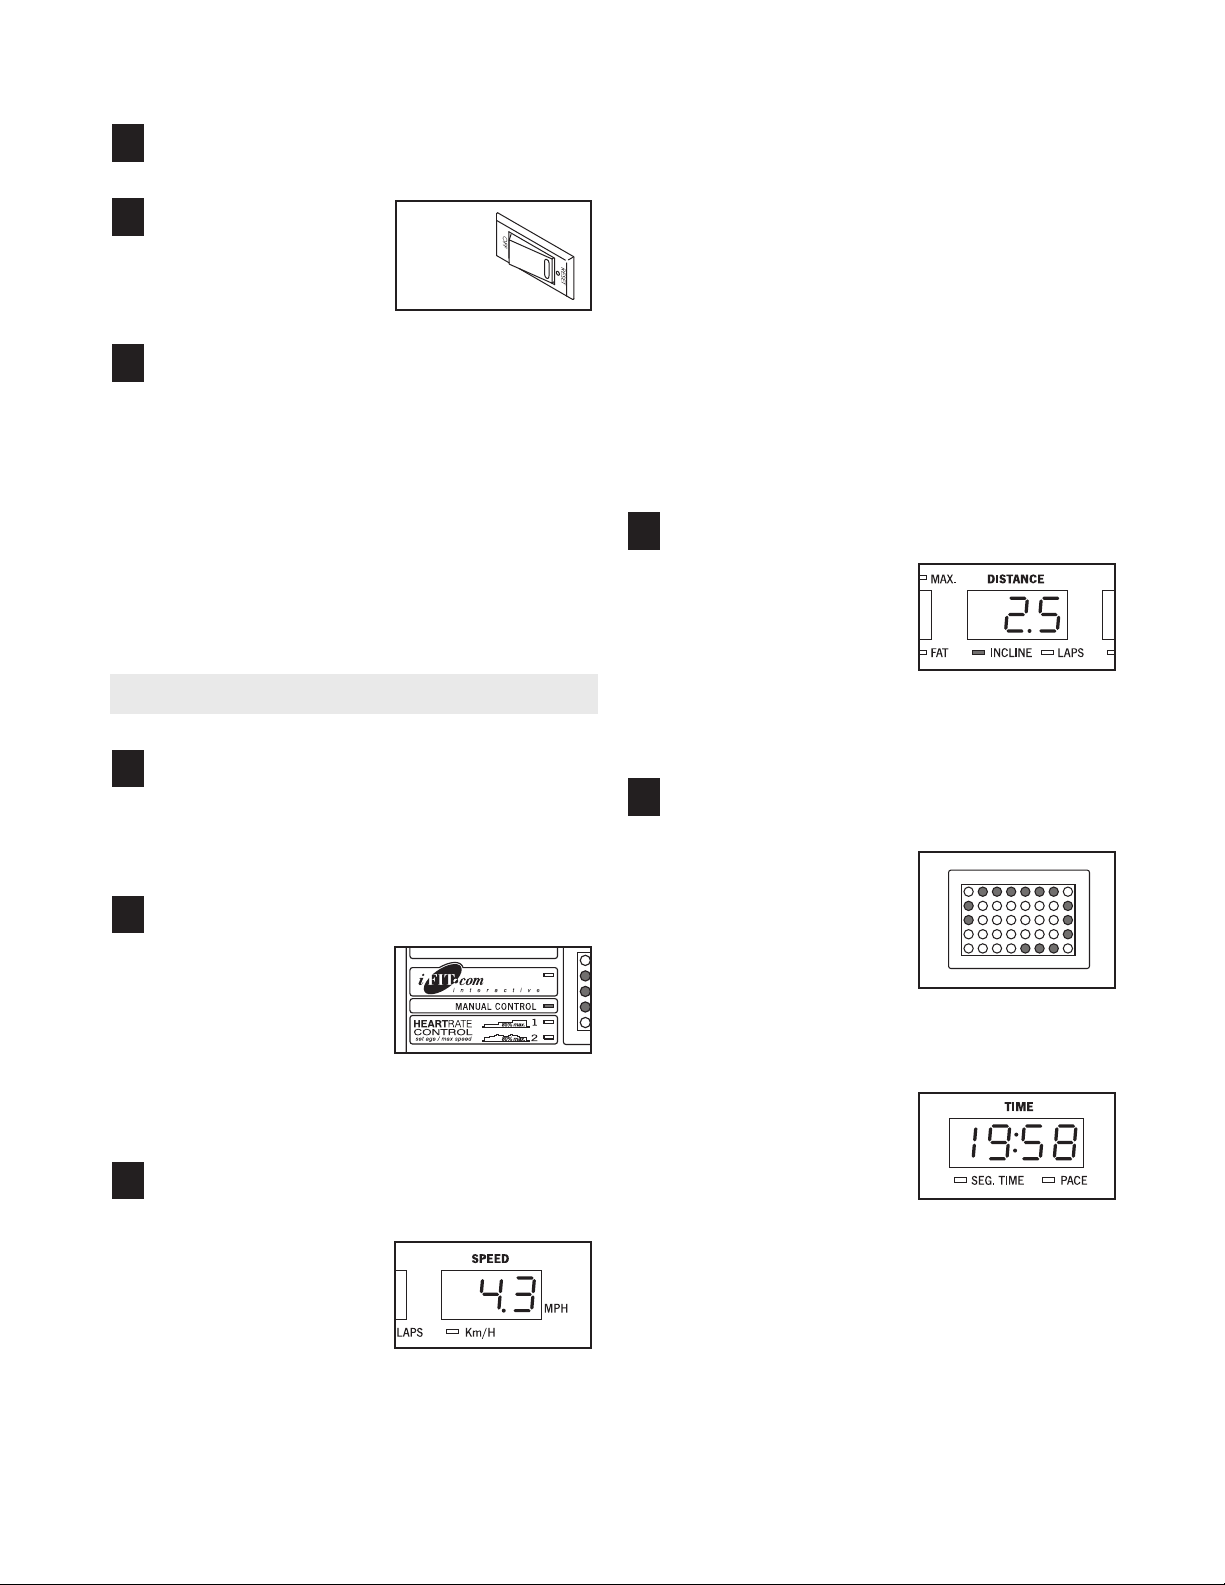
Locate the circuit
2
breaker near the
power cord. Make
sure the breaker is in
the reset position.
Stand on the foot rails of the treadmill. Find the clip
3
attached to the key (see the drawing on page 9)
and slide the clip onto the waistband of your
clothes. Next, route the cord attached to the clip
under the handgrip pulse sensor, and insert the
key into the console. After a moment, the displays
and various indicators will light.
carefully taking a few steps backward until the
key is pulled from the console. If the key is not
pulled from the console, adjust the position of
the clip.
HOW TO USE THE MANUAL MODE
Insert the key fully into the console.
Reset
Position
Test the clip by
1
See HOW TO TURN ON THE POWER above.
Note: Be sure to route the cord attached to the clip
under the handgrip pulse sensor.
Select the manual mode.
2
When the key is inserted, the manual
mode will be selected
and the Manual Control
indicator will light. If a
program has been
selected, press the Program Select button repeat
edly to reselect the manual mode.
Press the Start button or the Speed
3
start the walking belt.
A moment after the button is pressed, the
walking
move at 1 mph. Hold
the handrails
walking. As you exer
cise, change the speed of the walking belt as desired by pressing the Speed
belt will begin to
and begin
-
t
t
and
ss
s
s
buttons.
button to
Each time a button is pressed, the speed setting
will change by 0.1 mph; if a button is held down,
the speed setting will change in increments
mph. To change the speed setting quickly, press
the OneTouch Speed buttons. Note: The console
can display speed and distance in either miles
or kilometers. For simplicity, all instructions in
this section refer to miles.
To stop the walking belt, press the Stop button.
The Time/Segment Time/Pace display will begin
to flash. To restart the walking belt, press the Start
button or the Speed
Note: The first time the treadmill is used, observe
the alignment of the walking belt, and align the
walking belt if necessary (see page 24).
Change the incline of the treadmill as desired.
button.
s
s
of 0.5
4
To change the incline of
the treadmill, press the
Incline buttons. Each time
a button is pressed, the
incline will change by
0.5%. Note: After the buttons are pressed, it may take a moment for the
treadmill to reach the selected incline setting.
Follow your progress with the LED matrix and
5
the displays.
The LED matrix—When
the manual mode or the
iFIT.com mode is selected, the LED matrix
will show a track representing 1/4 mile. As you
exercise,
around the track will light, one at a time, until you
have completed 1/4 mile. A new lap will then begin.
-
Time/Segment Time/
Pace display
manual mode or the
iFIT.com mode is selected, this display will
show the elapsed time
and your current pace (pace is measured in min-
utes per mile
number to the other every few seconds.
preset program or a heart rate program is se
lected, the display will show the time
the program, the time remaining in the current seg
ment of the program, and your current pace.
the indicators
—When the
). The display will change from one
When a
-
remaining in
-
10
Page 11
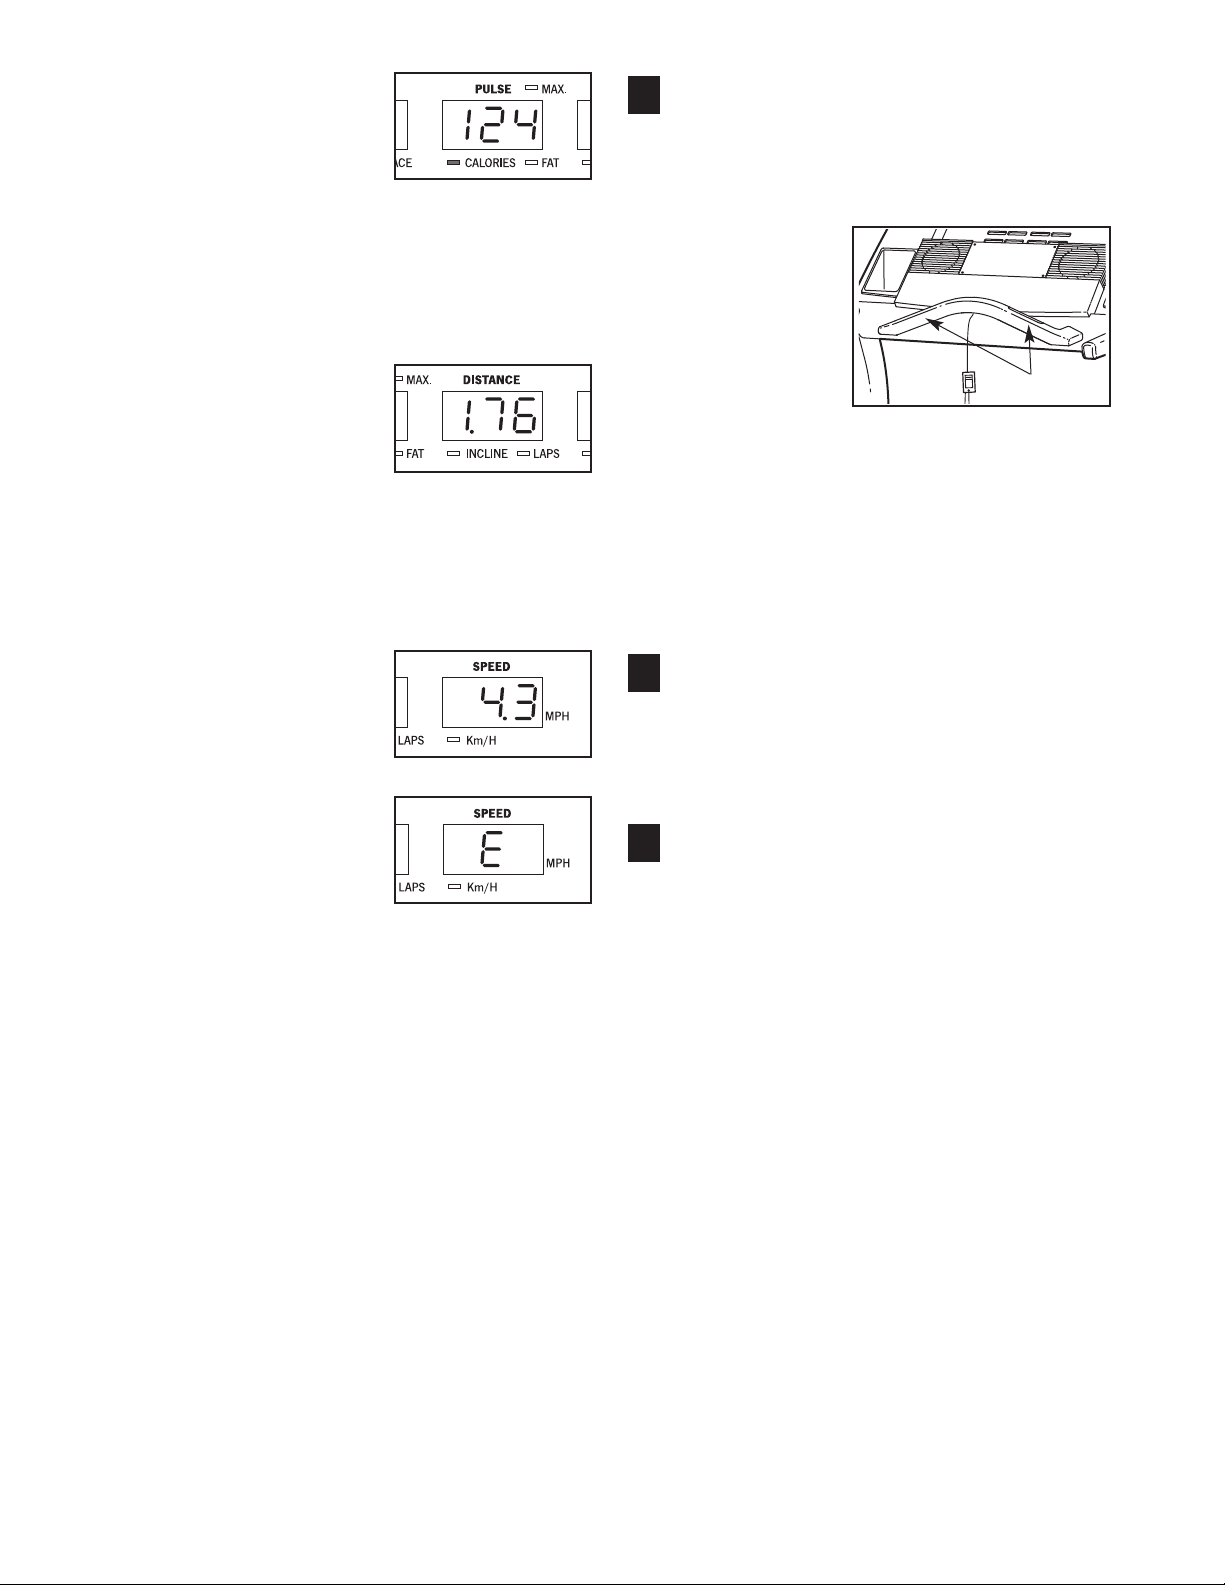
Pulse/Calories/Fat
Calories display—This
display shows the ap
proximate numbers of
calories and fat calories
you have burned (see
FAT BURNING on page 27). The display will
change from one number to the other every few
seconds. The display will also show your heart
rate when you use the handgrip pulse sensor or
the optional chest pulse sensor.
Distance/Incline/Laps
display—This display
shows the distance that
you have walked, the incline level of the treadmill, and the number of
1/4-mile laps you have completed. The display will
change from one number to the next every few
seconds. Note: Each time the incline changes, the
display will show the incline setting for several
seconds.
-
Measure your heart rate if desired.
6
You can measure your heart rate using either the
handgrip pulse sensor or the optional chest pulse
sensor.
To use the
handgrip pulse
sensor, first
make sure that
your hands are
clean. Next,
stand on the
foot rails and
place your
hands on the metal contacts on the handgrip
pulse sensor. Your palms should be resting on the
upper contacts. Avoid moving your hands. When
your pulse is detected, two dashes (– –) will appear in the Pulse/Calories/Fat Calories display,
and then your heart rate will be shown.
most accurate heart rate reading, continue to
hold the contacts for about 15 seconds.
Sensors
For the
Speed display—This
display shows the speed
of the walking belt.
Note: When the Km/H indicator is lit, the console
will display speed and
distance in kilometers;
when the Km/H indicator
is not lit, the console will
display speed and distance in mile
the unit of measurement, first hold down the Stop
button while inserting
“E” for English miles or an “M” for metric kilometers
will appear in the Speed display. Press the Speed
ss
button to change the unit of measurement.
When the desired unit of measurement is selected,
remove the key and then reinsert it.
To reset the displays, press the Stop button, remove the key, and then reinsert the key.
the key into the console. An
s. To change
Turn on the fans if desired.
7
To use the fans, press the Low or High button. To
turn off the fans, press the Off button. Note: Any
time that the walking belt is stopped for a few minutes, the fans will automatically turn off.
When you are finished exercising, remove the
8
key from the console.
Step onto the foot rails, press the Stop button, and
adjust the incline of the treadmill to the lowest
setting. The incline must be at the lowest setting
when the treadmill is folded to the storage position or the treadmill will be damaged.
move the key from the console and put it in a secure place. Note: If the displays and various indi-
cators on the console remain lit after the key is
removed, the console is in the “demo” mode.
See page 20 and turn off the demo mode.
When you are finished using the treadmill, switch
the reset/off circuit breaker to the off position and
unplug the power cord.
Next, re
-
1
1
Page 12
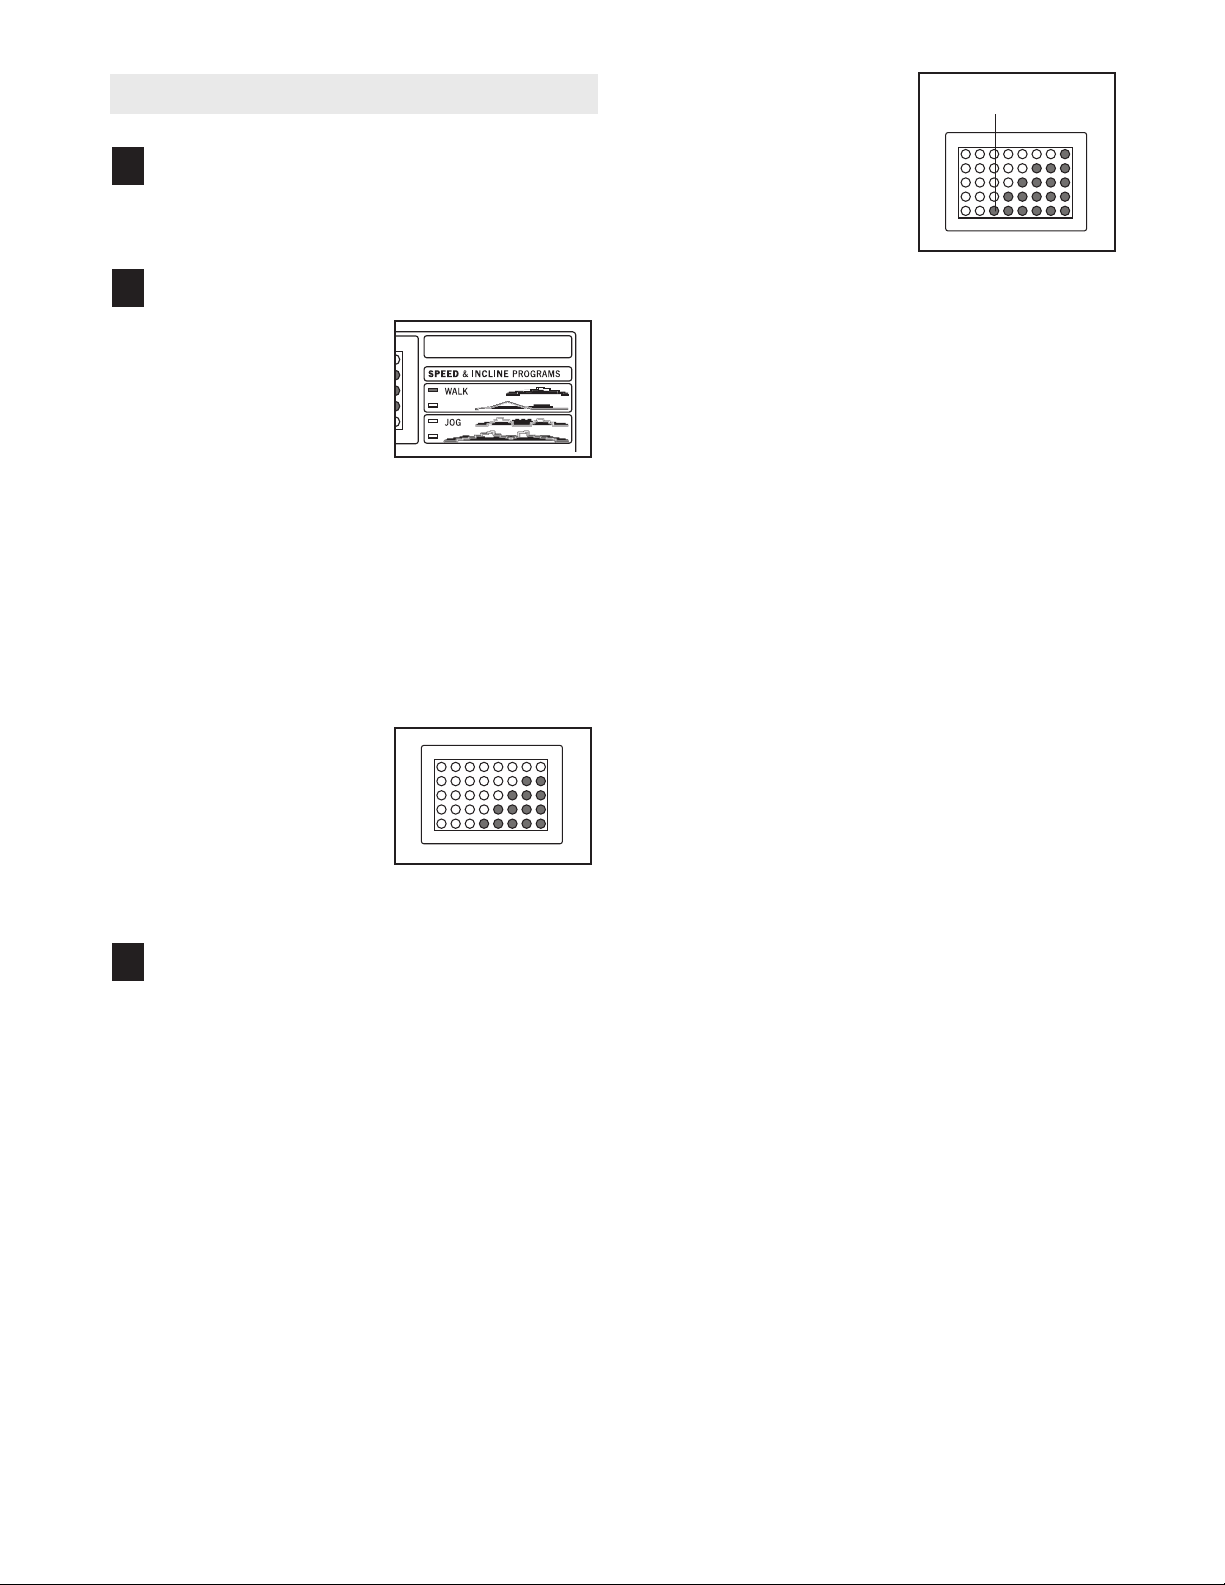
HOW TO USE PRESET WORKOUT PROGRAMS
Insert the key fully into the console.
1
See HOW TO TURN ON THE POWER on page
10.
Select one of the preset workout programs.
2
When the key is inserted, the manual
mode will be selected.
To select a preset
workout program, press
the Program Select button repeatedly until one
of the Walk or Jog indicators lights.
When a preset workout program is selected, the
Distance/Incline/Laps display will flash the maxi
mum incline setting of the program, and the
Speed display will flash the maximum speed setting, for six seconds. The Time/Segment Time/
Pace display will show how long the program will
last.
The LED matrix will
show the first five
speed settings of the
program. The profiles
on the right side of the
LED matrix show how
the speed and incline
of the treadmill will change during the programs.
Press the Start button or the Speed
3
the program.
start
A moment after the button is pressed, the treadmill will automatically adjust to the first speed and
incline settings of the program. Hold the handrails
and begin walking.
Each program is divided into several time segments of different lengths. (The Time/Segment
Time/Pace display will show both the time remaining in the program and the time remaining in the
current segment of the program.) One speed set
ting and one incline setting are programmed for
each segment. (The same speed and/or incline
setting may be programmed for consecutive seg
ments.)
button to
ss
The speed setting for
the first segment is
shown in the flashing
Current Segment column of the LED matrix.
(The incline settings are
not shown in the matrix.)
The speed settings for
the next five segments
are shown in the columns to the right.
When only three seconds remain in the first segment of the program, both the Current Segment
column and the column to the right will flash and a
series of tones will sound. In addition, if the speed
and/or incline of the treadmill is about to change,
the Speed display and/or the Distance/Incline/
Laps display will flash to alert you. When the first
segment is completed, all speed settings will move
one column to the left. The speed setting for the
-
-
-
second segment will then be shown in the flashing
Current Segment column and the treadmill will automatically adjust to the speed and incline settings
for the second segment. Note: If all of the indicators in the Current Segment column are lit after the
speed settings have moved to the left, the speed
settings will move downward so that only the highest indicators appear in the LED matrix. If some of
the indicators in the Current Segment column are
not lit when the speed settings move to the left
again, the speed settings will move back up.
The program will continue in this way until the
speed setting for the last segment is shown in the
Current Segment column and no time remains in
the program. The walking belt will then stop.
If the speed or incline setting is too high or too low
during the program, you can manually override
the setting by pressing the Speed or Incline but
tons. Every few times a Speed button is pressed,
an additional indicator will light or darken in the
Current Segment
to the right of the Current Segment column have
the same number of lit indicators as the Current
Segment column, an additional indicator may light
or darken in those columns as well.)
manually override the speed or incline setting,
when the next segment begins, the treadmill
will automatically adjust to the speed and in
cline settings for the next segment.
column. (If any of the columns
Current Segment
-
Note: If you
-
12
Page 13
To stop the program temporarily, press the Stop
button. The Time/Segment Time/Pace display will
begin to
Start button or the Speed
program, press the Stop button, remove the key,
and then reinsert the key.
Follow your progress with the displays.
flash. To restart the program, press the
s
s
button. To end the
4
See step 5 on page 10.
Measure your heart rate if desired.
5
See step 6 on page 11.
Turn on the fans if desired.
6
See step 7 on page 11.
When the program is finished, remove the key
7
from the console.
HOW TO USE HEART RATE PROGRAMS
CAUTION: If you have heart prob-
lems, or if you are over 60 years of age and
have been inactive, do not use the heart rate
programs. If you are taking medication regularly, consult your physician to find whether the
medication will affect your exercise heart rate.
Follow the steps below to use a heart rate program.
Note: You must wear the optional chest pulse sensor (see page 20) to use a heart rate program.
Put on the optional chest pulse sensor.
1
Refer to the instructions included with the optional
chest pulse sensor.
When the program has ended, make sure that
the incline of the treadmill is at the lowest setting. Next, remove the key from the console and
put it in a safe place.Note: If the displays and
various indicators on the console remain lit
after the key is removed, the console is in the
“demo” mode. Refer to page 20 and turn off the
demo mode.
When you are finished using the treadmill, switch
the reset/off circuit breaker to the off position and
unplug the power cord.
Insert the key fully into the console.
2
See HOW TO TURN ON THE POWER on page
10.
Select a heart rate program.
3
When the key is inserted, the manual
mode will be selected.
To select a heart rate
program, press the
Program Select button
repeatedly until one of the heart rate program indicators lights.
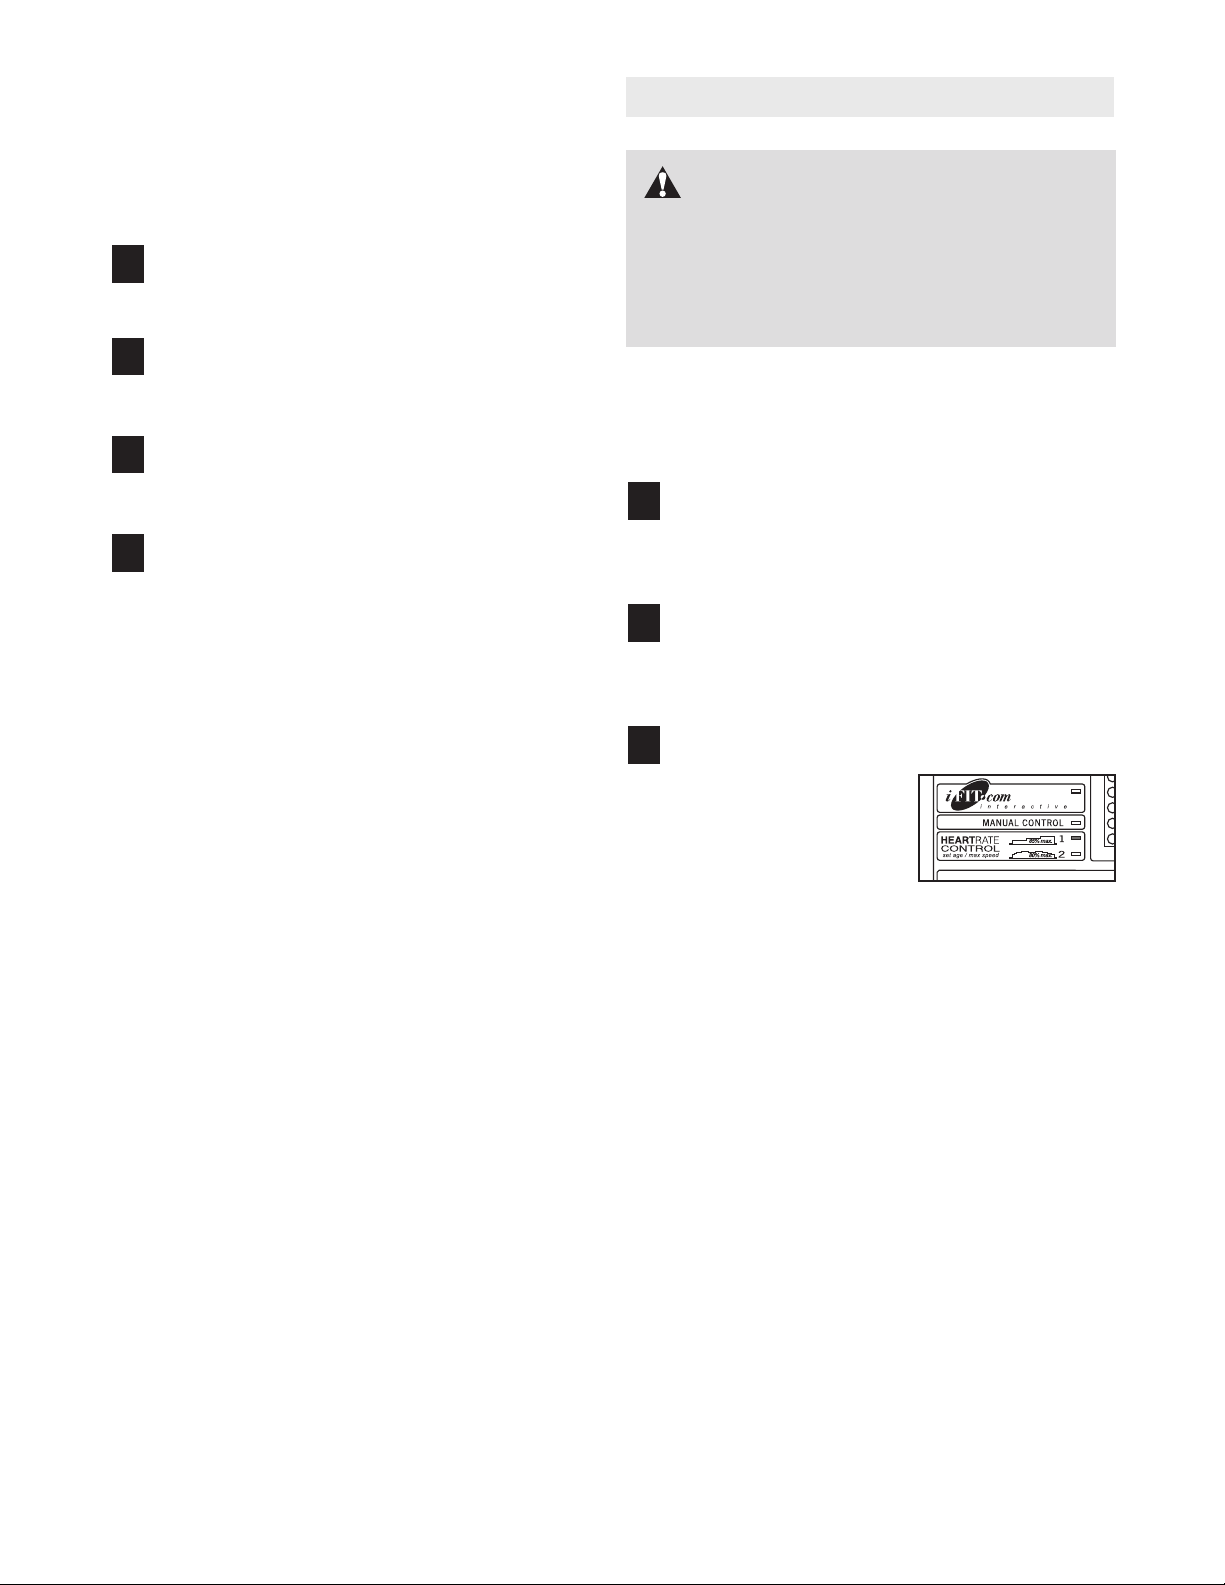
The two profiles on the left side of the LED matrix
show how the target heart rate will change during
the programs. During heart rate program 1, your
heart rate will reach approximately 85% of your
estimated maximum heart rate; during heart rate
program 2, your heart rate will reach approximately 80% of your estimated maximum heart
rate. Note: Your estimated maximum heart rate is
determined by subtracting your age from 220. For
example, if you are 30 years old, your estimated
maximum heart rate is 190 beats per minute
(220 – 30 = 190).
13
Page 14
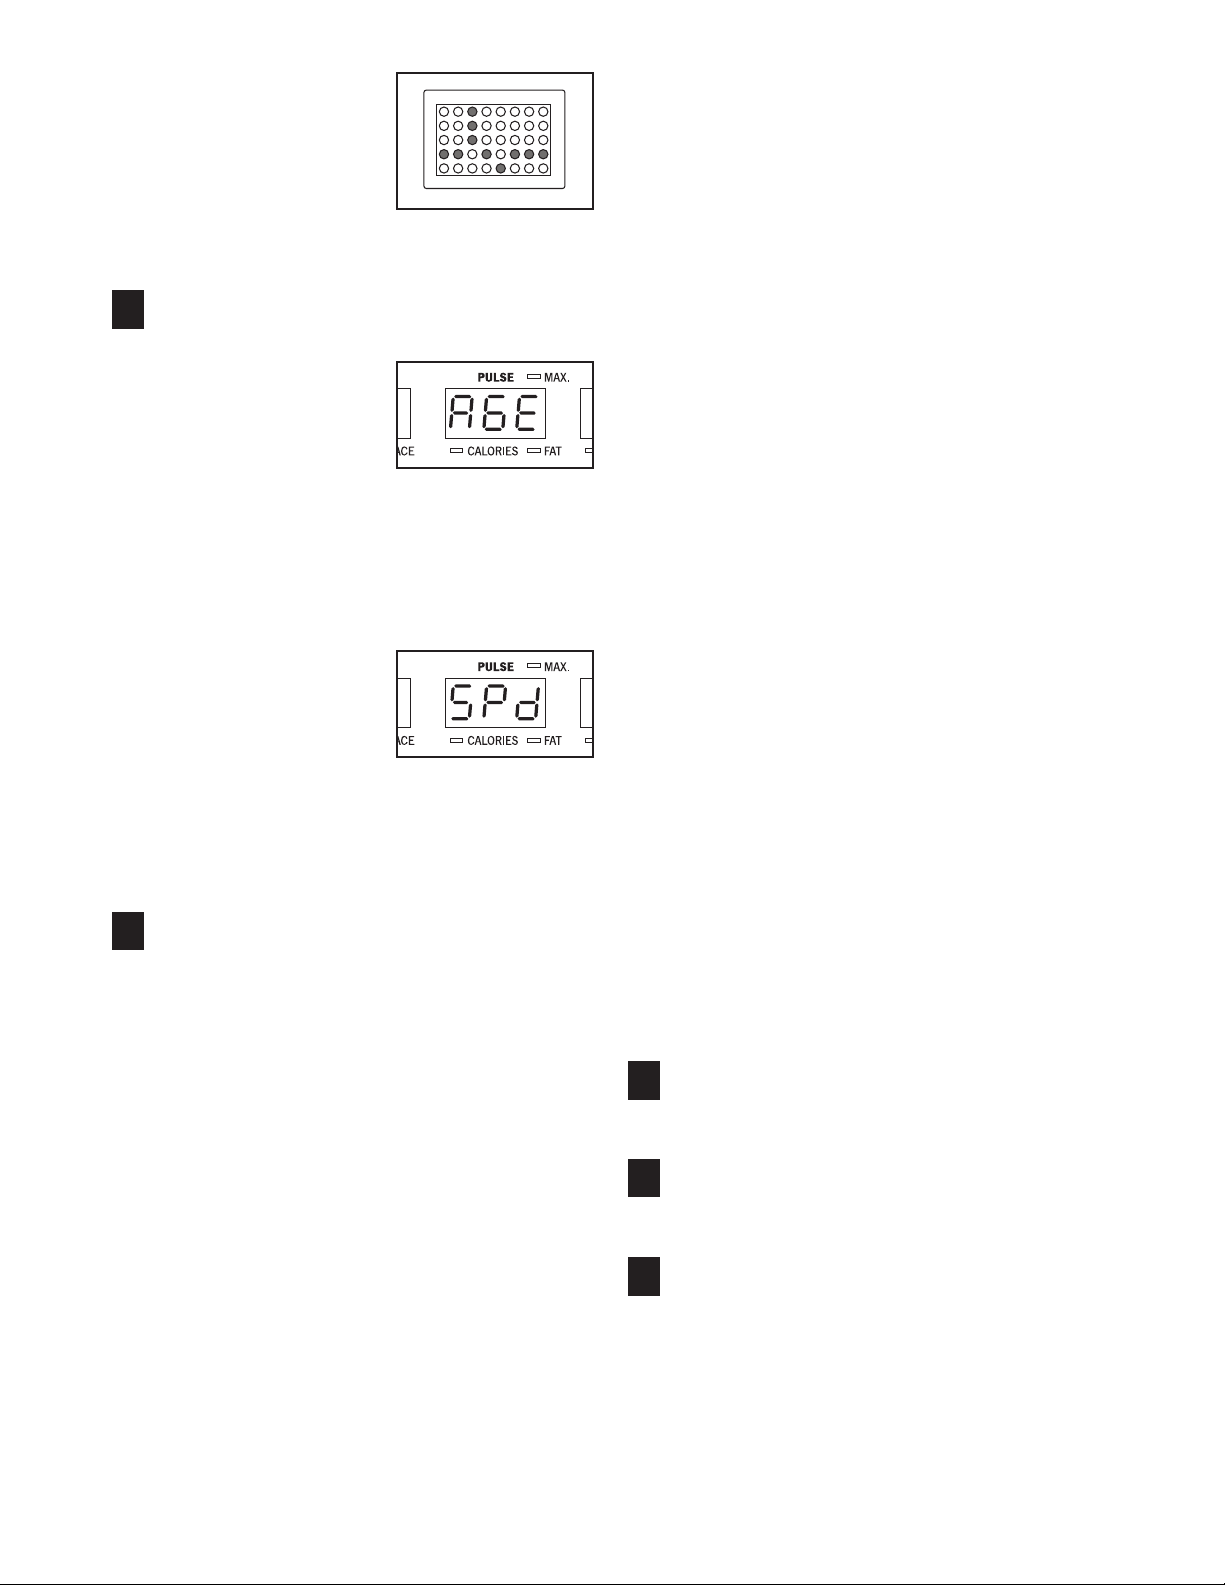
During heart rate programs, the LED matrix
will show a graphic that
represents your heart
rate. Each time a heart
beat is detected, an additional peak will appear.
the treadmill will automatically increase or decrease to bring your heart rate closer to the target
heart rate setting. If the speed reaches the maxi
mum speed setting of the program (see step 4 at
-
the left) and your heart rate is still too far below
the current target heart rate setting, the incline of
the treadmill will also increase to bring your heart
rate closer to the target heart rate setting.
-
Enter your age and a maximum speed setting
4
for the program.
When a heart rate program is selected, the
word “AGE” and the
current age setting will
flash in the Pulse/
Calories/Fat Calories
display. If you have already entered your age,
simply press the Enter button. If you have not en-
s
t
s
tered your age, press the
the Enter button to enter your age. Then, press
the Enter button.
After you have entered
your age, the letters
“SPd” and the maximum speed setting of
the program will flash in
the Pulse/Calories/Fat
Calories display. If desired, press the
tons beside the Enter button to adjust the maximum speed setting. When the desired setting is
shown, press the Enter button.
and
t
buttons beside
and
s
s
t
t
but-
During the last three seconds of each segment, a
series of tones will sound and the Distance/
Incline/Laps display and the Speed display will
flash.
The program will continue until no time remains in
the program. The walking belt will then slow to a
stop.
If the speed or incline setting is too high or too low
during the program, you can adjust the setting
with the Speed or Incline buttons. However, each
time the console compares your heart rate to the
current target heart rate setting, the speed and/or
incline of the treadmill may automatically change
to bring your heart rate closer to the target heart
rate setting.
If your pulse is not detected during the program,
the letters “PLS” will flash in the Pulse/Calories/
Fat Calories display and the speed and incline of
the treadmill may automatically decrease until
your pulse is detected. If this occurs, refer to the
instructions included with the optional chest pulse
sensor.
Press the Start button or the Speed
5
start the program.
A moment after the button is pressed, the tread
mill will automatically adjust to the first speed and
incline settings of the program. Hold the handrails
and begin walking.
Each heart rate program is divided into several time
segments of different lengths
Time/Pace display will show both the time remaining in the program and the time remaining in the
current segment of the program.) One target heart
rate setting is programmed for each segment.
During each segment, the console will regularly
compare your heart rate to the current target heart
rate setting. If your heart rate is too far below or
above the target heart rate setting, the speed of
. (The Time/Segment
ss
button to
To stop the program at any time, press the Stop
button. Heart rate programs should not be stopped
-
temporarily and then restarted. To use a heart rate
program again, reselect the program and start it at
the beginning.
Follow your progress with the displays.
6
See step 5 on page 10.
Turn on the fans if desired.
7
See step 7 on page 11.
When the program is finished, remove the key
8
from the console.
See step 7 on page 13.
14
Page 15

If the speed or incline settings are too high or too
low, you can manually override the settings at any
time by pressing the Speed or Incline buttons on
the console. However,
heard, the speed and/or incline will change
the next settings of the CD or video program.
To stop the walking belt at any time, press the
Stop button on the console. The Time/Segment
Time/Pace display will begin to flash. To restart
the program, press the Start button or the Speed
button. After a moment, the walking belt will
s
s
begin to move at 1 mph. When the next “chirp”
is heard, the speed and incline will change to
the next settings of the CD or video program
When the CD or video program is completed, the
walking belt will stop and the Time/Segment
Time/Pace display will begin to flash. Note: To
use another CD or video program, press the Stop
button or remove the key and go to step 1 on
page 17.
Note: If the speed or incline of the treadmill
does not change when a “chirp” is heard:
when the next “chirp” is
to
.
• Make sure that the audio cable is properly
connected, that it is fully plugged in, and that
it is not wrapped around a power cord.
• If you are using your portable CD player and
the CD skips, set the CD player on the floor or
another flat surface instead of on the console.
Follow your progress with the LED track and
5
the displays.
See step 5 on page 10.
Measure your heart rate if desired.
6
Refer to step 6 on page 11.
Turn on the fans if desired.
7
See step 7 on page 11.
When the program is completed, remove the
8
key.
See step 7 on page 13.
• Make sure that the iFIT.com indicator is lit and
that the Time/Segment Time/Pace display is
not flashing. If the Time/Segment Time/Pace
display is flashing, press the Start button or
the Speed
• Adjust the volume of your CD player or VCR.
If the volume is too high or too low, the console may not detect the program signals.
button on the console.
s
s
CAUTION: Always remove iFIT.com CD’s and
videocassettes from your CD player or VCR
when you are finished using them.
18
Page 16
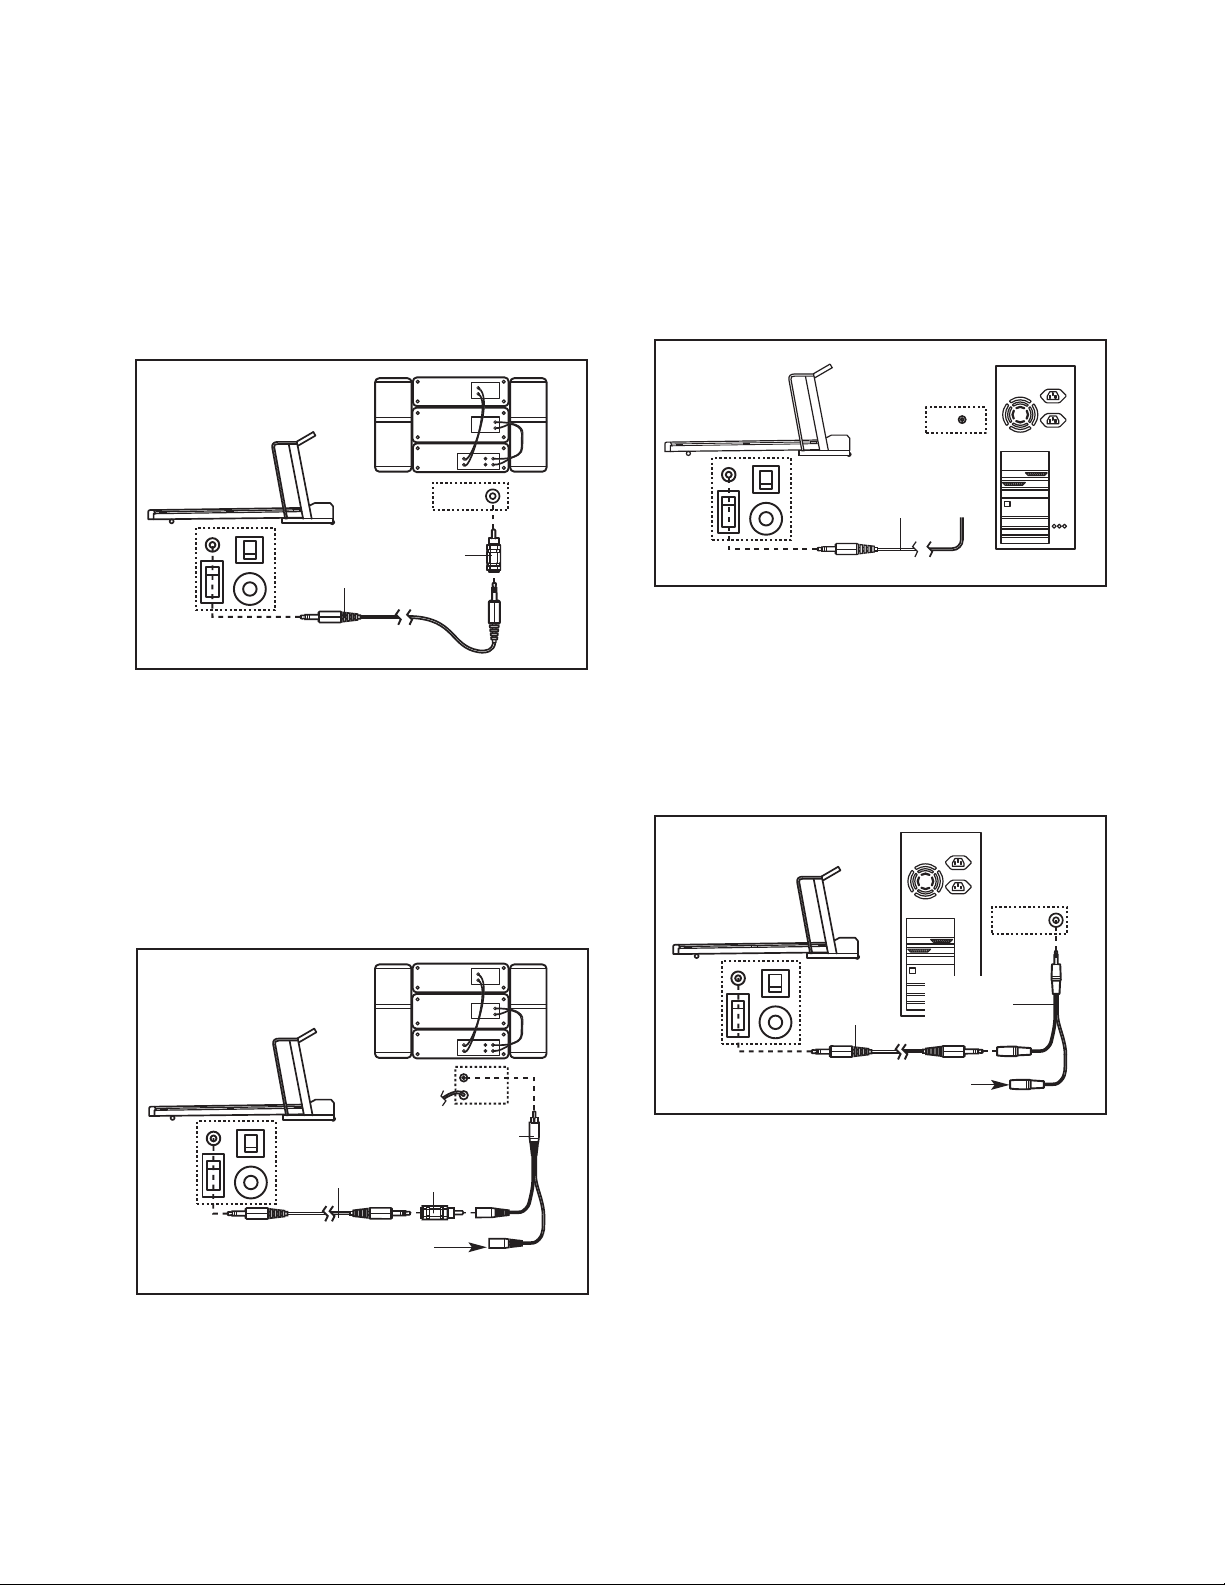
HOW TO CONNECT YOUR HOME STEREO
LINE OUT
CD
VCR
Amp
LINE OUT
LINE OUT
A
LINE OUT
CD
VCR
Amp
LINE OUT
CD
VCR
Amp
LINE OUT
A
PHONES
LINE OUT
HOW TO CONNECT YOUR COMPUTER
Note: If your stereo has an unused LINE OUT jack,
see instruction A below. If the LINE OUT jack is
being used, see instruction B.
A. Plug one end of the audio cable into the jack on the
front of the treadmill near the power cord. Plug the
other end of the cable into the included adapter.
Plug the adapter into the LINE OUT jack on your
stereo.
A
Audio
Adapter
Cable
B. Plug one end of the audio cable into the jack on the
front of the treadmill near the power cord. Plug the
other end of the cable into the included adapter.
Plug the adapter into an RCA Y-adapter (available
at electronics stores). Next, remove the wire that is
currently plugged into the LINE OUT jack on your
stereo and plug the wire into the unused side of the
Y-adapter. Plug the Y-adapter into the LINE OUT
jack on your stereo.
If your computer has a 3.5mm LINE OUT jack,
Note:
see instruction A. If your computer has only a
PHONES jack, see instruction B.
A. Plug one end of the audio cable into the jack on the
front of the treadmill near the power cord. Plug the
other end of the cable into the LINE OUT jack on
your computer.
A
Audio
Cable
B. Plug one end of the audio cable into the jack on the
front of the treadmill near the power cord. Plug the
other end of the cable into a 3.5mm Y-adapter
(available at electronics stores). Plug the Y-adapter
into the PHONES jack on your computer. Plug your
headphones or speakers into the other side of the
Y-adapter.
B
B
Audio
Cable
3.5mm
Y-adapter
Headphones/Speakers
RCA Y-adapter
Audio
Cable
Adapter
Wire removed from
LINE OUT jack
16
Page 17
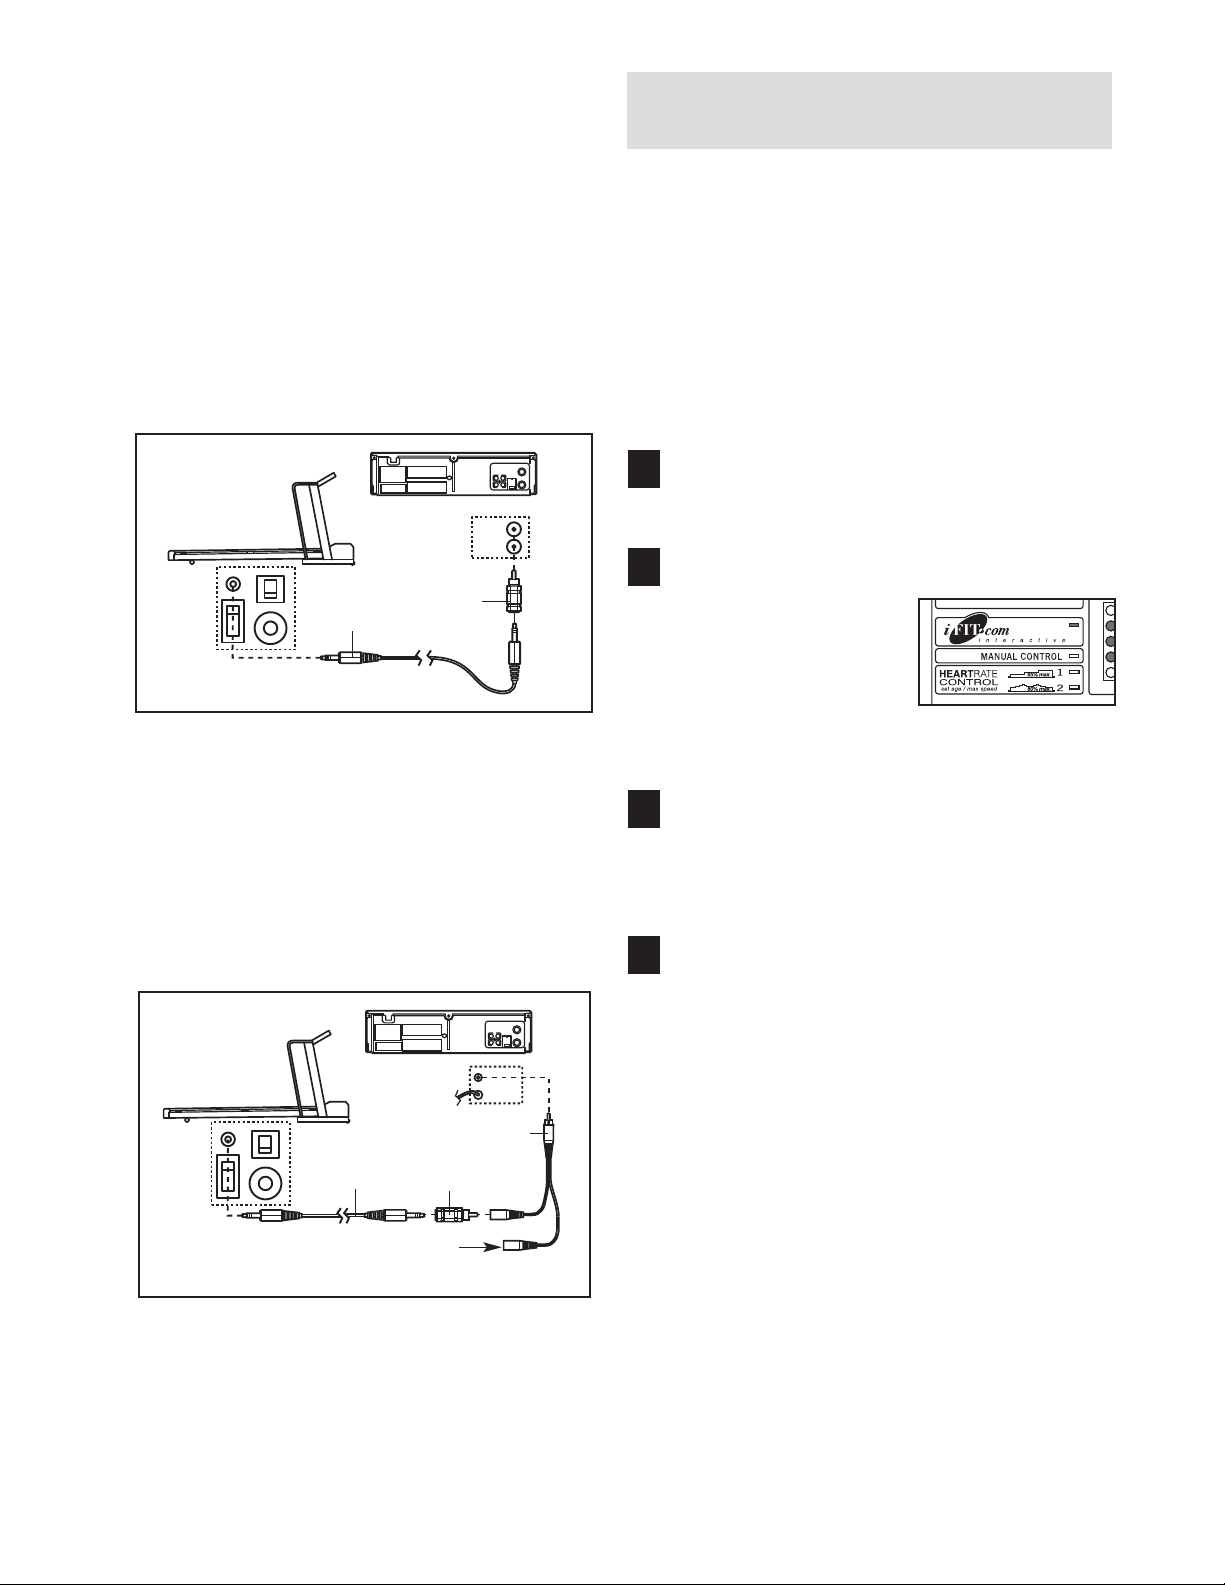
HOW TO CONNECT YOUR VCR
AUDIO OUT
RIGHT
LEFT
VIDEO AUDIO
ANT
. IN
RF OUT
IN
OUT
CH
3
4
A
AUDIO OUT
RIGHT
LEFT
VIDEO AUDIO
ANT
. IN
RF OUT
IN
OUT
CH
34
VIDEO
AUDIO
ANT
. IN
RF OUT
IN
OUT
CH
3
4
Note: If your VCR has an unused AUDIO OUT jack,
see instruction A below. If the AUDIO OUT jack is
being used, see instruction B. If you have a TV
with a built-in VCR, see instruction B. If your VCR
is connected to your home stereo, see HOW TO
CONNECT YOUR HOME STEREO on page 16.
A. Plug one end of the audio cable into the jack on the
front of the treadmill near the power cord. Plug the
other end of the cable into the included adapter.
Plug the adapter into the AUDIO OUT jack on your
VCR.
HOW TO USE IFIT.COM CD AND VIDEO
PROGRAMS
To use iFIT.com CD’s or videocassettes, the treadmill
must be connected to your portable CD player, portable
stereo, home stereo, computer with CD player, or
VCR. See HOW TO CONNECT THE TREADMILL TO
YOUR CD PLAYER, VCR, OR COMPUTER on page
Note: To purchase iFIT.com CD’s or iFIT.com
15.
videocassettes, call toll-free 1-888-936-4266.
Follow the steps below to use an iFIT.com CD or video
program.
A
Audio
Adapter
Cable
B. Plug one end of the audio cable into the jack on the
front of the treadmill near the power cord. Plug the
other end of the cable into the included adapter.
Plug the adapter into an RCA Y-adapter (available
at electronics stores). Next, remove the wire that is
currently plugged into the AUDIO OUT jack on your
VCR and plug the wire into the unused side of the
Y-adapter. Plug the Y-adapter into the AUDIO OUT
jack on your VCR.
B
RCA Y-adapter
Audio
Cable
Adapter
Insert the key into the console.
1
See HOW TO TURN ON THE POWER on page 10.
Select the iFIT.com mode.
2
When the key is inserted, the manual
mode will be selected.
To use iFIT.com CD’s or
videocassettes, press
the Program Select button repeatedly until the iFIT.com indicator lights.
Insert the iFIT.com CD or videocassette.
3
If you are using an iFIT.com CD, insert the CD into
your CD player. If you are using an iFIT.com videocassette, insert the videocassette into your VCR.
Press the PLAY button on your CD player or
4
VCR.
A moment after the button is pressed, your personal trainer will begin guiding you through your
workout. Simply follow your personal trainer’s
instructions. Note:
display is flashing, press the Start button or the
s
Speed
s
button on the console. The treadmill will
not respond to a CD or video program when the
Time/Segment Time/Pace display is flashing.
If the Time/Segment Time/Pace
Wire removed from
AUDIO OUT jack
During the CD or video program, an electronic
“chirping” sound will alert you when the speed
and/or incline of the treadmill is about to change.
CAUTION: Always listen for the “chirp” and be
prepared for speed and/or incline changes. In
some instances, the speed and/or incline may
change before the personal trainer describes
the change.
17
Page 18
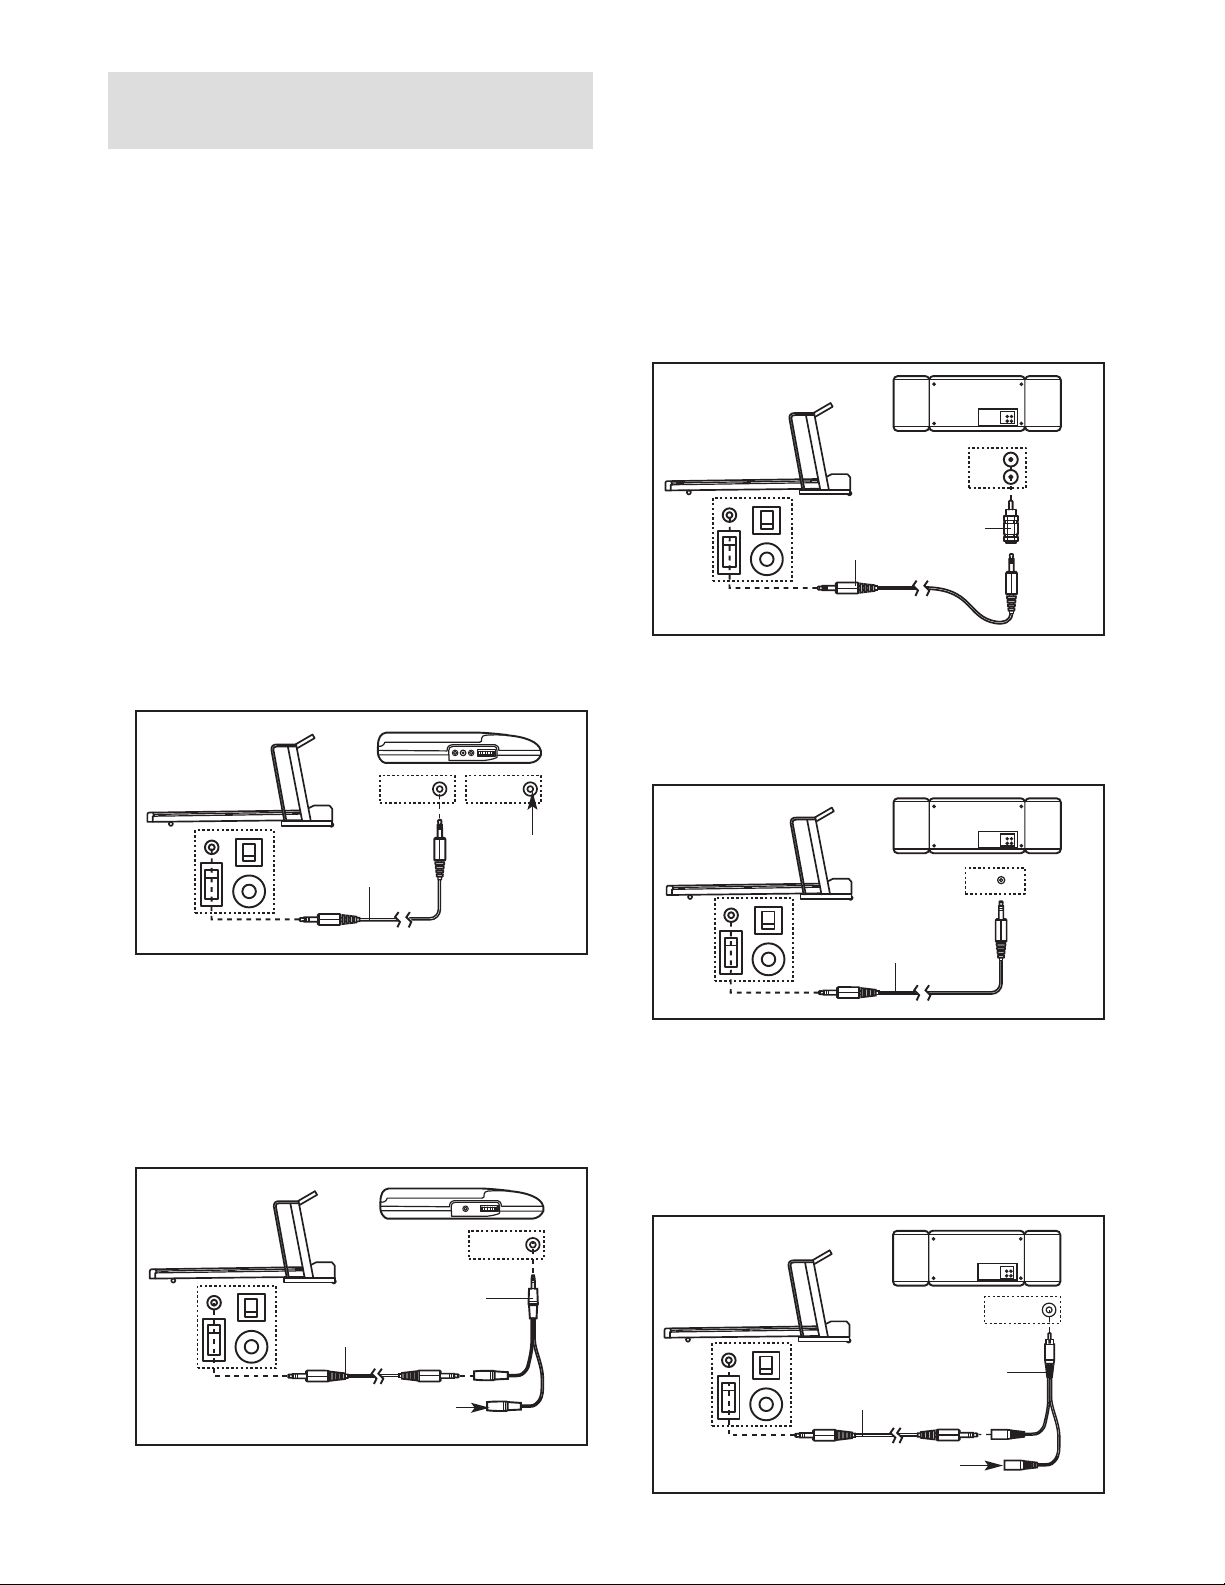
HOW TO CONNECT THE TREADMILL TO
A
LINE OUT
AUDIO OUT
RIGHT
LEFT
A
LINE OUT
PHONES
LINE OUT
PHONES
PHONES
PHONES
LINE OUT
PHONES
LINE OUT
PHONES
AUDIO OUT
RIGHT
LEFT
A
PHONES
LINE OUT
B
AUDIO OUT
RIGHT
LEFT
YOUR CD PLAYER, VCR, OR COMPUTER
To use iFIT.com CD’s
, the treadmill must be connected to your portable CD player, portable stereo,
home stereo, or computer with CD player. See pages
15 and 16 for connecting instructions.
To use iFIT.com
videocassettes, the treadmill must be connected to
your VCR. See page 17 for connecting instructions. To
use iFIT.com programs directly from our Web site,
the treadmill must be connected to your home computer. See page 16 for connecting instructions.
HOW TO CONNECT YOUR PORTABLE CD PLAYER
Note: If your CD player has separate LINE OUT and
PHONES jacks, see instruction A below. If your CD
player has only one jack, see instruction B.
A. Plug one end of the audio cable into the jack on the
front of the treadmill near the power cord. Plug the
other end of the cable into the LINE OUT jack on
your CD player. Plug your headphones into the
PHONES jack.
A
HOW TO CONNECT YOUR PORTABLE STEREO
Note: If your stereo has an RCA-type AUDIO OUT
jack, see instruction A below. If your stereo has a
3.5mm LINE OUT jack, see instruction B. If your
stereo has only a PHONES jack, see instruction C.
A. Plug one end of the audio cable into the jack on the
front of the treadmill near the power cord. Plug the
other end of the cable into the included adapter. Plug
the adapter into an AUDIO OUT jack on your stereo.
A
Audio
Adapter
Cable
B. Plug one end of the audio cable into the jack on the
front of the treadmill near the power cord. Plug the
other end of the cable into the LINE OUT jack on
your stereo.
Plug one end of the audio cable into the jack on the
B.
front of the treadmill near the power cord. Plug the
other end of the cable into a 3.5mm Y-adapter
(available at electronics stores). Plug the Y-adapter
Audio
Cable
Head-
phones
into the PHONES jack on your CD player. Plug your
headphones into the other side of the Y-adapter.
B
Audio
Cable
Headphones
3.5mm
Y-adapter
B
Audio
Cable
C. Plug one end of the audio cable into the jack on the
front of the treadmill near the power cord. Plug the
other end of the cable into a 3.5mm Y-adapter
(available at electronics stores). Plug the Y-adapter
into the PHONES jack on your stereo. Plug your
headphones into the other side of the Y-adapter.
C
Audio
Cable
3.5mm
Y-adapter
15
Headphones
Page 19
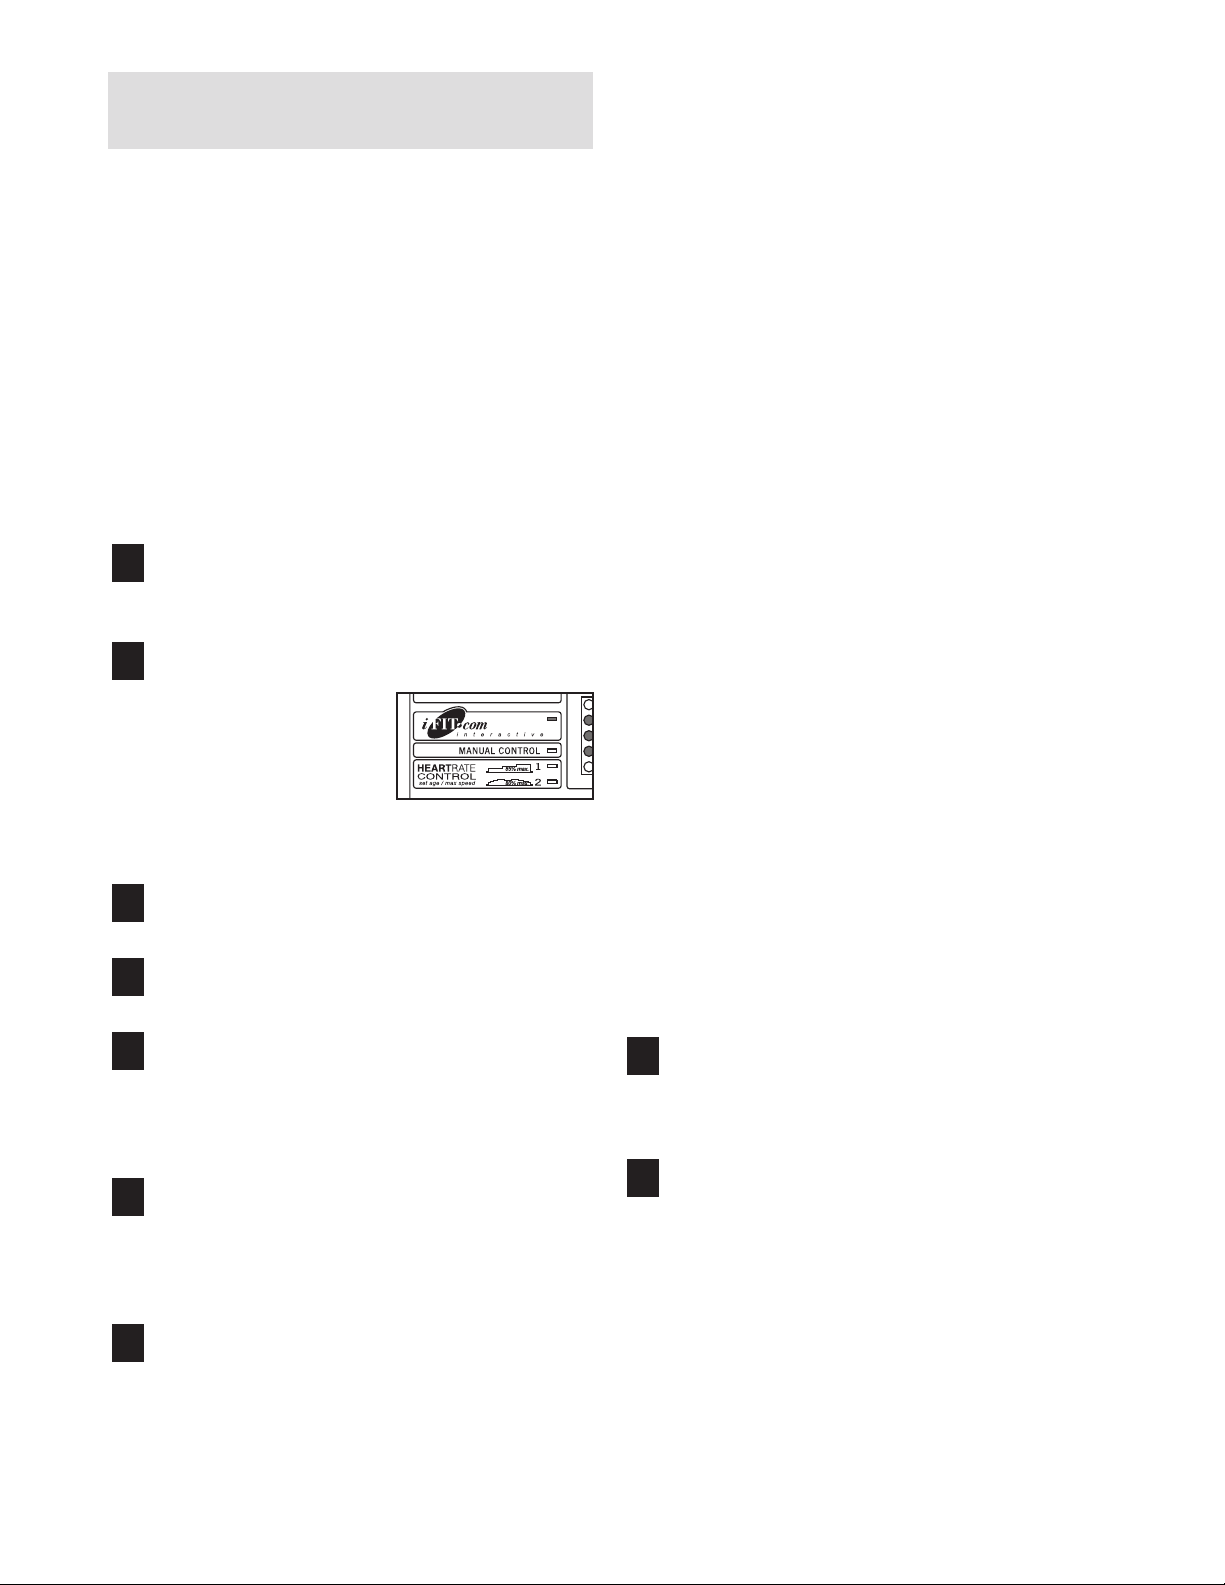
HOW TO USE PROGRAMS DIRECTLY FROM
OUR WEB SITE
Our Web site at www.iFIT.com allows you to access
basic programs, audio programs, and video programs
directly from the internet. Additional options are soon to
be available. See www.iFIT.com for details.
When the on-screen countdown ends, the program
will begin and the walking belt will begin to move.
Hold the handrails, step onto the walking belt, and
begin walking. D
“chirping” sound will alert you when the speed
and/or incline of the treadmill is about to change.
CAUTION: Always listen for the “chirp” and be
prepared for speed and/or incline changes.
uring the program, an electronic
To use programs from our Web site, the treadmill must
be connected to your home computer. See HOW TO
CONNECT YOUR COMPUTER on page 16. In
addition, you must have an internet connection and
an internet service provider. A list of specific system requirements are found on our Web site.
Follow the steps below to use a program from our
Web site.
Insert the key into the console.
1
See HOW TO TURN ON THE POWER on page 10.
Select the iFIT.com mode.
2
When the key is inserted, the manual
mode will be selected.
To use a program from
our Web site, press the
Program Select button
repeatedly until the iFIT.com indicator lights.
Go to your computer and start an internet
3
connection.
Start your web browser, if necessary, and go to
4
our Web site at www.iFIT.com.
If the speed or incline settings are too high or too
low, you can manually override the settings at any
time by pressing the Speed or Incline buttons on
the console. However, when the next “chirp” is
heard, the speed and/or incline will change to
the next settings of the program.
To stop the walking belt at any time, press the
Stop button on the console. The Time/Segment
Time/Pace display will begin to flash. To restart
the program, press the Start button or the Speed
button. After a moment, the walking belt will
s
s
begin to move at 1 mph. When the next “chirp”
is heard, the speed and incline will change to
the next settings of the program.
When the program is completed, the walking belt
will stop and the Time/Segment Time/Pace display
will begin to flash. Note: To use another program,
press the Stop button and go to step 5.
Note: If the speed or incline of the treadmill
does not change when a “chirp” is heard, make
sure that the iFIT.com indicator is lit and that
the Time/Segment Time/Pace display is not
flashing. In addition, make sure that the audio
cable is properly connected, that it is fully
plugged in, and that it is not wrapped around a
power cord.
Follow the desired links on our Web site to se-
5
lect a program.
Read and follow the on-line instructions for using a
program.
Follow the on-line instructions to start the
6
program.
When you start the program, an on-screen count
down will begin.
Return to the treadmill and stand on the foot
7
pads. Find the clip attached to the key and slide
the clip onto the waistband of your clothes.
Follow your progress with the LED track and
8
the displays.
See step 5 on page 10.
When the program has ended, remove the key.
9
See step 7 on page 13.
-
19
Page 20
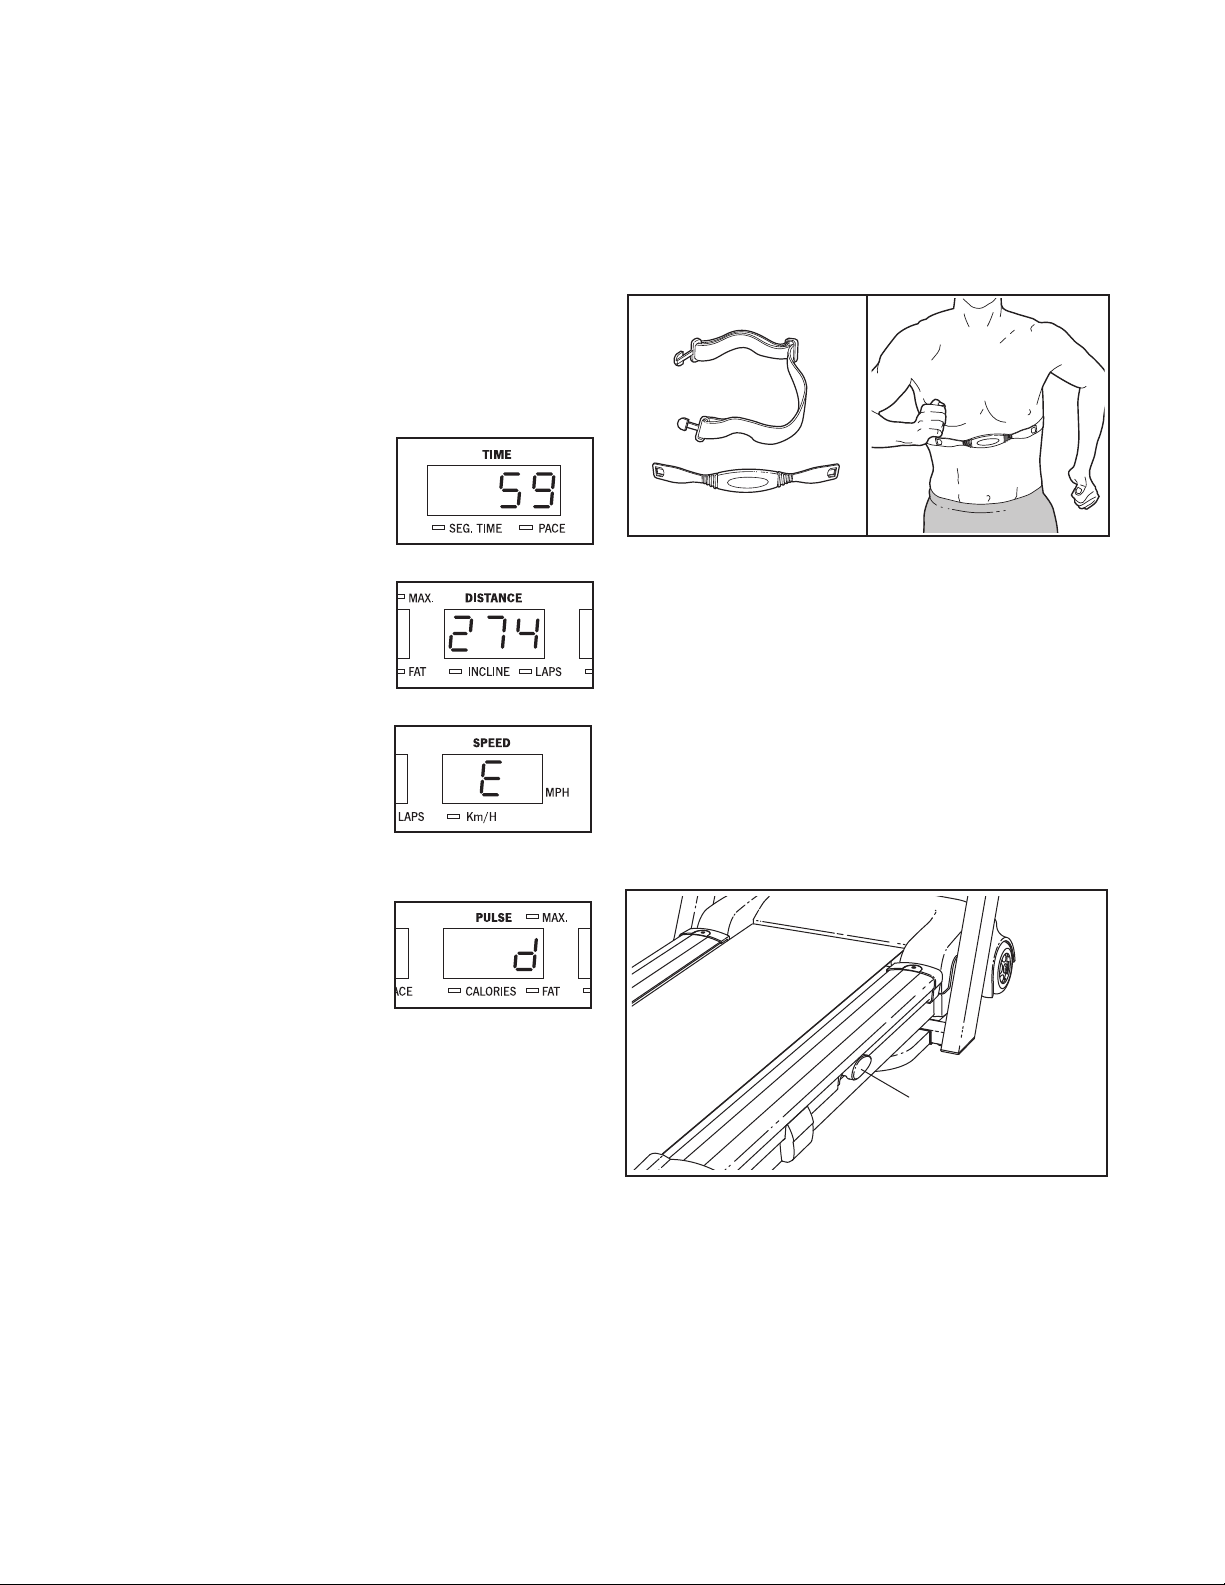
THE INFORMATION MODE/DEMO MODE
THE OPTIONAL CHEST PULSE SENSOR
The console features an information mode that keeps
track of the total number of hours that the treadmill has
been operated and the total number of miles that the
walking belt has moved. The information mode also allows you to switch the console from miles per hour to
kilometers per hour. In addition, the information mode
allows you to turn on and turn off the demo mode.
To select the information mode, hold down the Stop
button while inserting the key into the console. When
the information mode is selected, the following information will be shown:
The Time/Segment Time/
Pace display will show the
total number of hours the
treadmill has been used.
The Distance/Incline/Laps
display will show the total
number of miles (or kilometers) that the walking belt
has moved.
An “E” for english miles or
an “M” for metric kilometers
will appear in the Speed dis-
ss
play. Press the Speed
button to change the unit of
measurement.
An optional chest pulse sensor adds even more
features to the console. The chest pulse sensor provides
hands-free operation and continuously monitors your
heart rate during your workouts. To purchase the
optional chest pulse sensor, call toll-free 1-888936-4266.
HOW TO ADJUST THE FIRMNESS OF THE
CUSHIONING SYSTEM
The treadmill features a cushioning system that reduces
the impact as you walk or run on the treadmill. The
firmness of the cushioning system is controlled with
the adjustable isolators on each side of the treadmill.
To increase the firmness, slide the isolators towards
the back of the treadmill. Make sure that both isolators
are in the same position. Note: The faster you run on
the treadmill, or the heavier your weight, the firmer
the cushioning system should be.
IMPORTANT: The Pulse/
Calories/Fat Calories display should be blank.
If a
“d” appears in the display,
the console is in the “demo”
mode. This mode is intended
to be used only when a treadmill is displayed in a store.
When the console is in the demo mode, the power cord
can be plugged in, the key can be removed from the
console, and the displays and indicators on the console
will automatically light in a preset sequence; the but-
operate.
tons on the
Pulse/Calories/Fat Calories display when the in
the
console will
formation mode is selected, press the Speed
not
If a “d” appears in
but-
t
t
ton so the display is blank.
To exit the information mode, remove the key from the
console.
Adjustable Isolator
-
20
Page 21
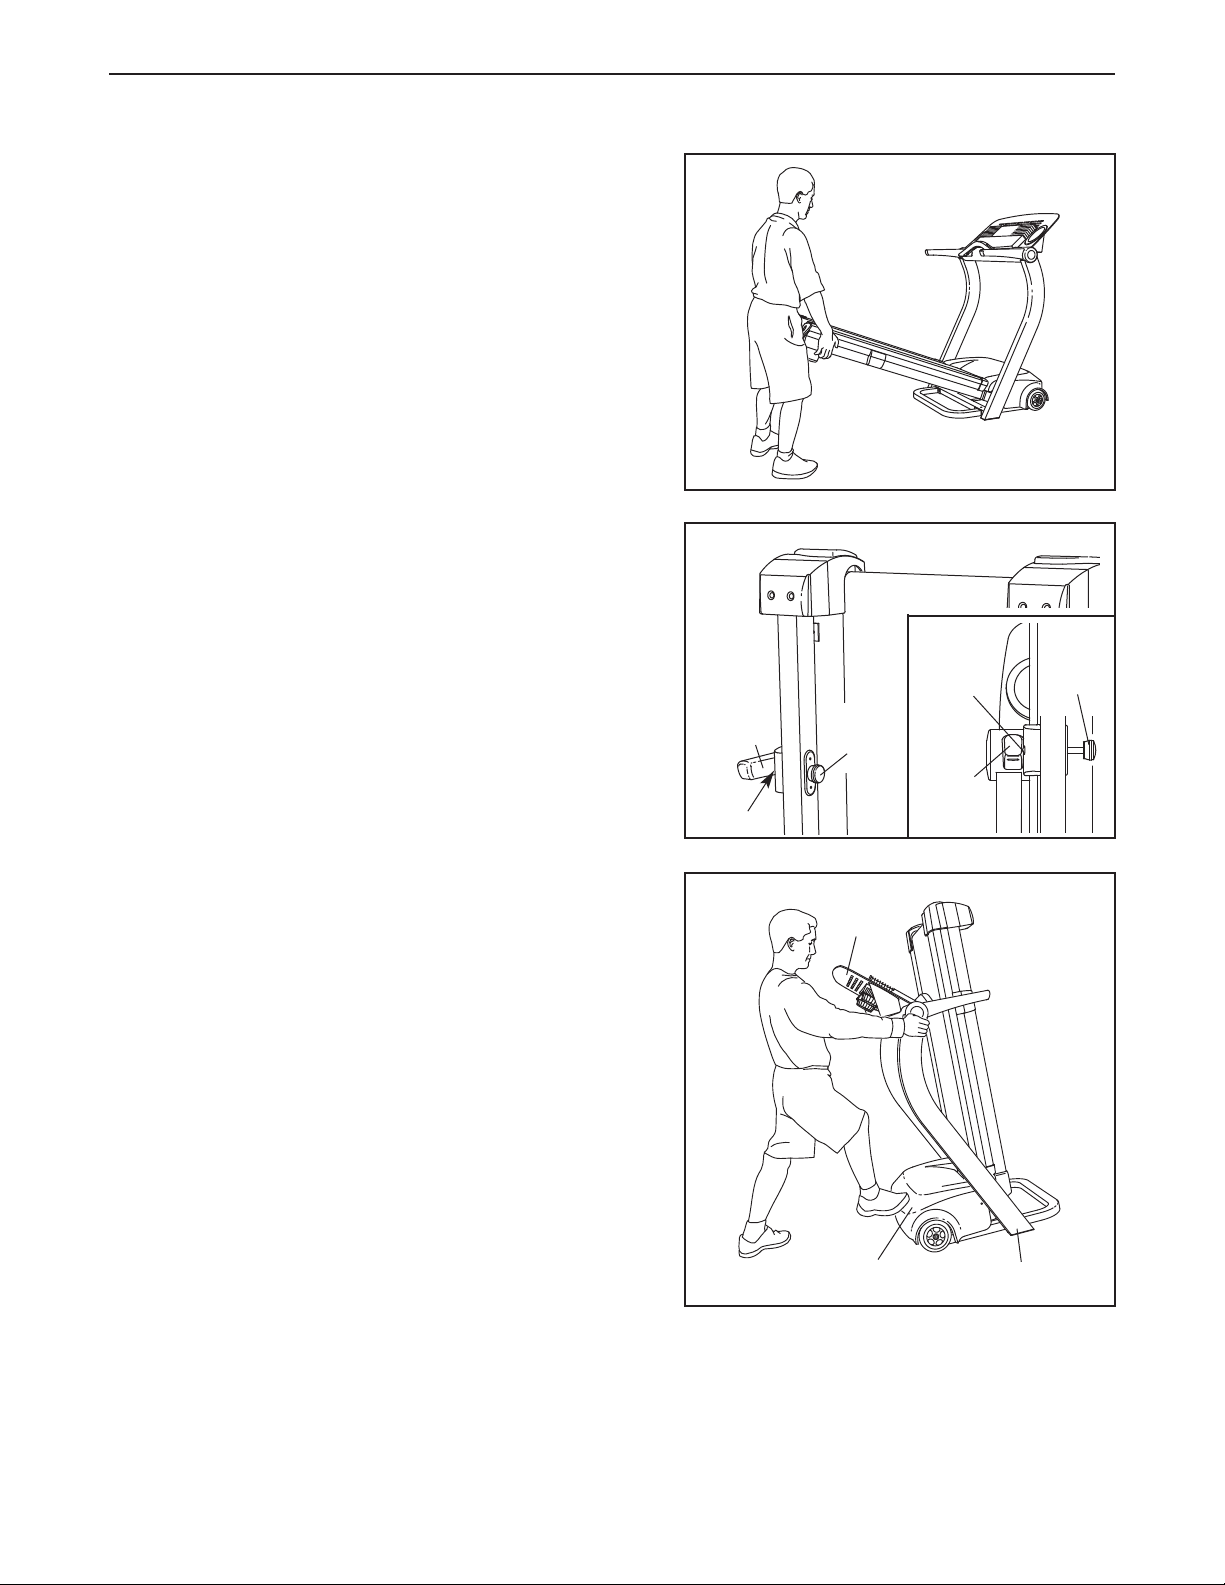
HOW TO FOLD AND MOVE THE TREADMILL
HOW TO FOLD THE TREADMILL FOR STORAGE
Before folding the treadmill, adjust the incline to the
lowest position. If this is not done, the treadmill may be
permanently damaged. Next, unplug the power cord.
CAUTION: You must be able to safely lift 45 pounds (20
kg) to raise, lower, or move the treadmill.
1. Hold the treadmill frame with your hands in the locations
shown at the right. CAUTION: To decrease the possibil-
ity of injury, bend your legs and keep your back
straight. As you raise the treadmill, make sure to lift
with your legs rather than your back. Raise the tread-
mill about halfway to the vertical position.
Hold the treadmill firmly with your left hand. Using your
2.
right hand, pull the lock knob to the right and hold it.
Raise the treadmill until the pin on the lock knob is
aligned with the hole in the left foam grip. Then, release
the lock knob.
leased so that the pin is fully inserted into the hole in
the left foam grip.
To protect the floor or carpet from damage, place a
mat under the treadmill. Keep the treadmill out of
direct sunlight. Do not leave the treadmill in the storage position in temperatures above 30º C (85° F).
Make sure that the lock knob is fully re-
1
2
Foam
Pin
Grip
Lock
Knob
Pin
Foam
Grip
Lock
Knob
HOW TO MOVE THE TREADMILL
Before moving the treadmill, convert the treadmill to the storage position as described above. Make sure that the lock-
ing pin is inserted into the left handrail.
1. Hold the handrails as shown and place one foot against
the hood only in the location shown. Do not hold or
push on the book holder.
2. Tilt the treadmill back until it rolls freely on the wheels.
Carefully move the treadmill to the desired location. Never
move the treadmill without tipping it back. To reduce
the risk of injury, use
the treadmill.
over an uneven surface.
3. Place one foot on the hood and carefully lower the tread-
mill until it is resting in the storage position.
Do not attempt to move the treadmill
extreme caution while moving
Book
Holder
Hood
Base
21
Page 22
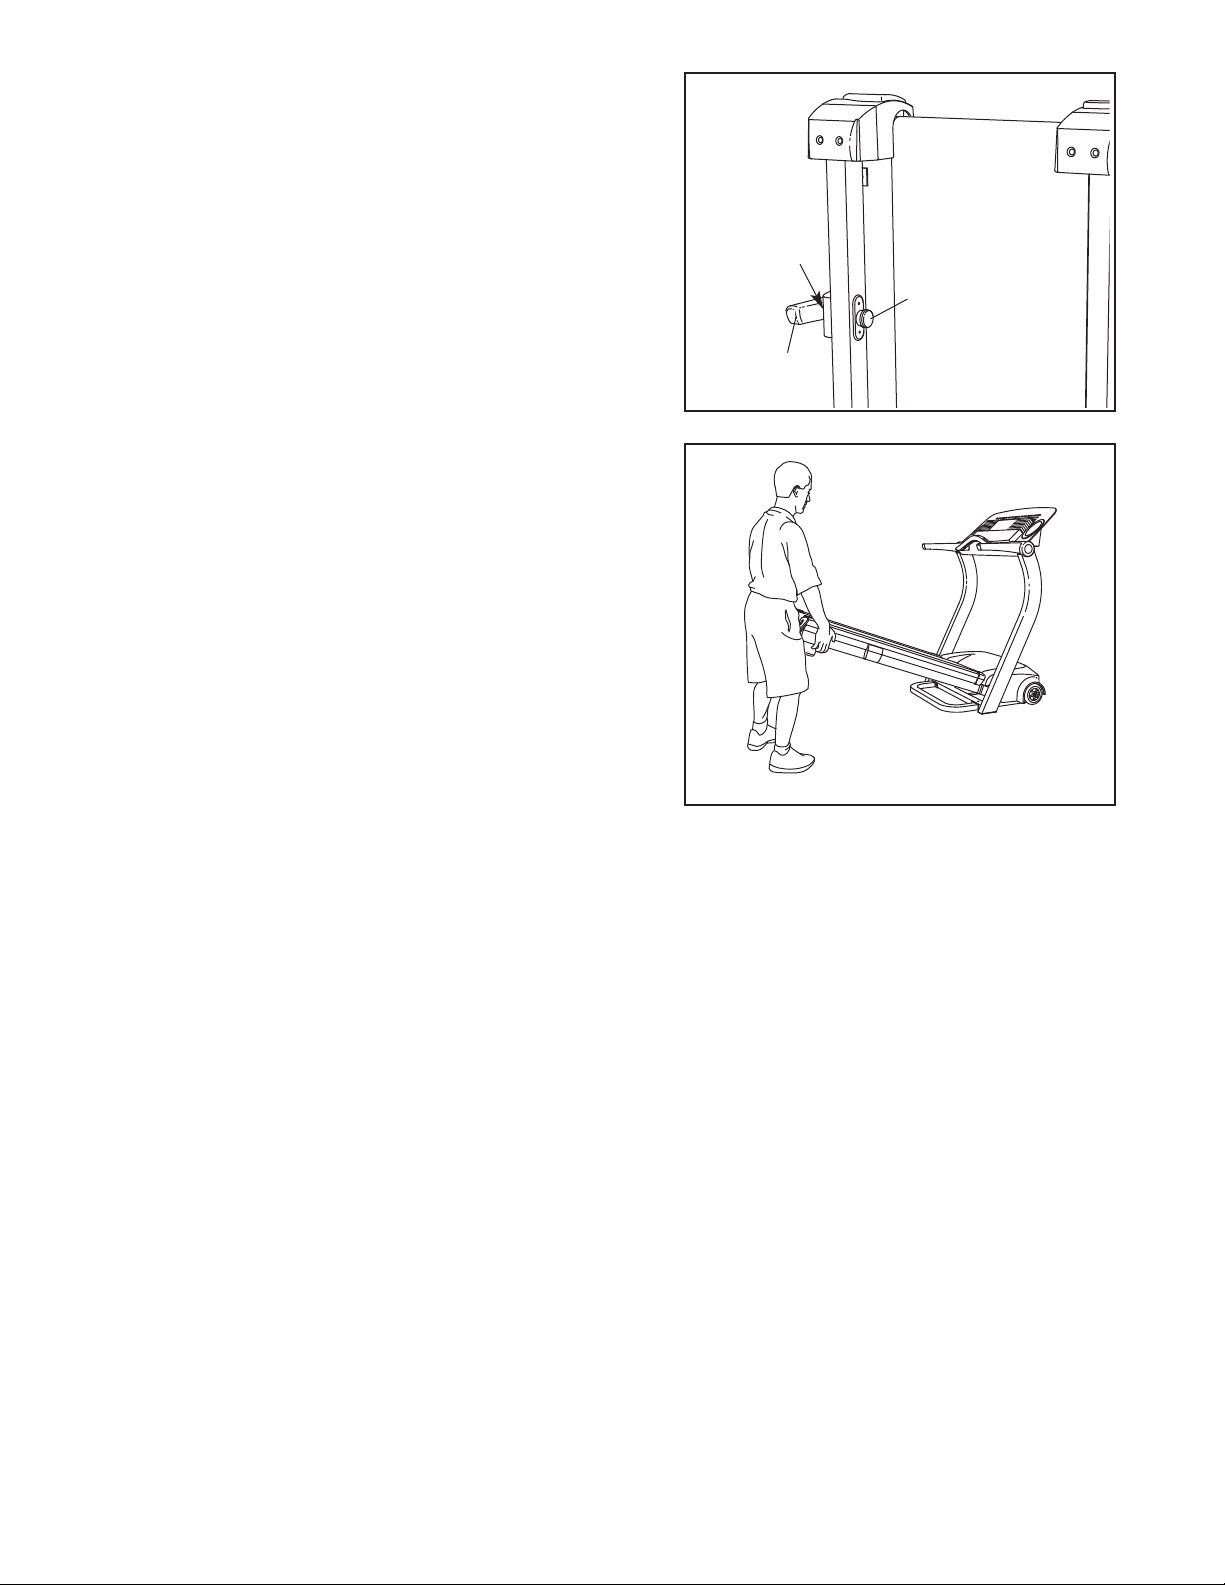
HOW TO LOWER THE TREADMILL FOR USE
1. Hold the treadmill firmly with your left hand. Pull the lock
knob to the right. Pivot the treadmill down until the pin on
the lock knob is below the foam grip. Slowly release the
lock knob.
2. Hold the treadmill firmly with both hands, and lower the
treadmill to the floor. To decrease the possibility of in-
jury, bend your legs and keep your back straight.
Pin
Lock
Knob
Foam
Grip
22
Page 23
TROUBLESHOOTING
Most treadmill problems can be solved by following the steps below. Find the symptom that applies, and
follow the steps listed. If further assistance is needed, please call our Customer Service Department tollfree at 1-888-936-4266.
PROBLEM: The power does not turn on
SOLUTION: a. Make sure that the power cord is plugged into a surge suppressor, and that the surge suppressor
is plugged into a properly grounded outlet (see page 8). Use only a single-outlet surge suppressor
that meets all of the specifications described on page 8. Important: The treadmill is not compatible
with GFCI-equipped outlets.
b. Make sure that the key is fully inserted into the console.
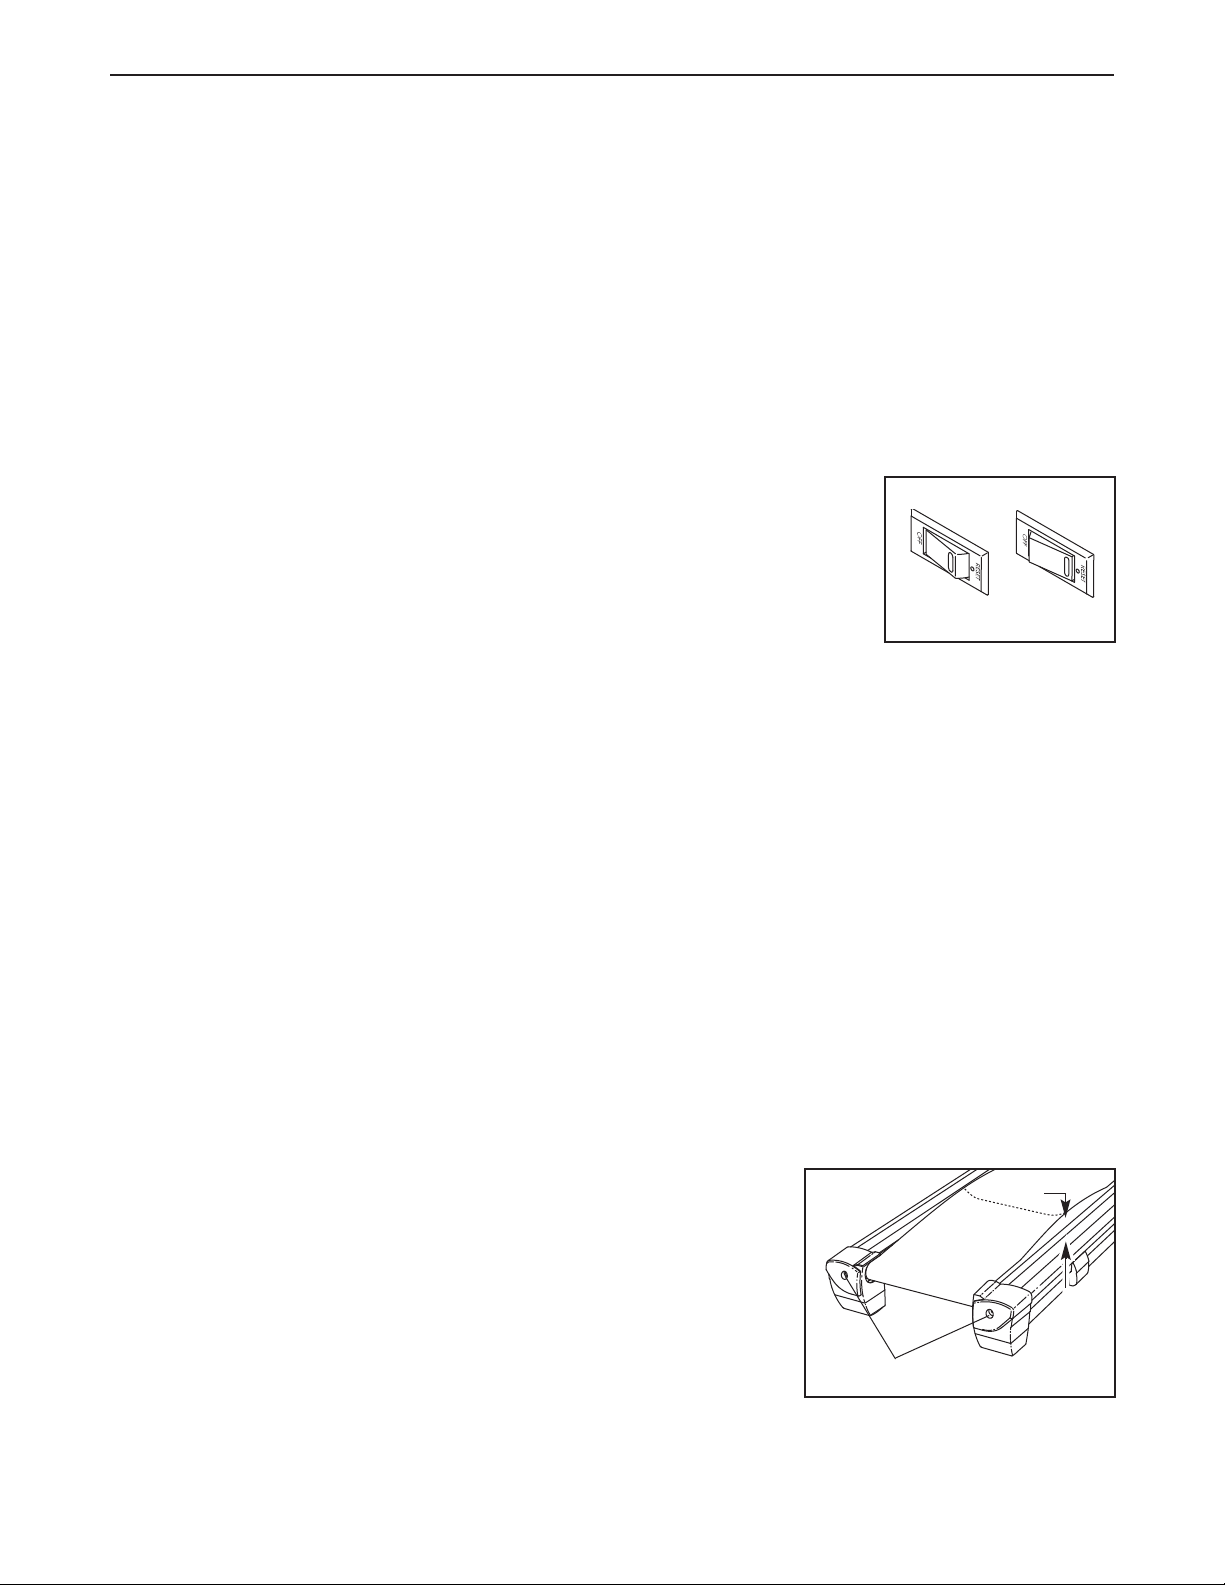
c. Check the reset/off circuit breaker located on the frame near the
power cord. If the breaker protrudes as shown, the circuit breaker
has tripped. To reset the circuit breaker, wait for five minutes and
then press the breaker back in.
PROBLEM: The power turns off during use
SOLUTION: a. Check the reset/off circuit breaker located on the treadmill frame near the power cord (see 1. c.
above). If the circuit breaker has tripped, wait for five minutes and then press the switch back in.
b. Make sure that the power cord is plugged in. If the power cord is plugged in, unplug it, wait for
five minutes, and then plug it back in.
c. Remove the key from the console and then reinsert it.
PROBLEM: The incline of the treadmill does not change correctly or does not change when iFIT.com
CD’s and videos are played
SOLUTION: a. With the key inserted in the console, press one of the Incline buttons. While the incline is
changing,
cally rise to the maximum incline level and then return to the minimum level. This will recalibrate
the incline.
remove the key.
After a few seconds, re-insert the key. The treadmill will automati
c
Tripped
Reset
-
PROBLEM:
SOLUTION:
The walking belt slows when walked on
a. Use only a single-outlet surge suppressor that meets all of the specifications described on page 8.
b. If the walking belt is overtightened, treadmill performance
may decrease and the walking belt may be permanently
damaged. Remove the key and
CORD. Using the included allen wrench, turn both rear
roller adjustment bolts counterclockwise 1/4 of a turn.
When the walking belt is properly tightened, you should
be able to lift the edges of the walking belt 3 to 4 inches
off the walking platform. Be careful to keep the walking
belt centered. Plug in the power cord, insert the key and
run the treadmill for a few minutes. Repeat until the walking belt is properly tightened.
UNPLUG THE POWER
b
Rear Roller Adjustment Bolts
3–4”
23
Page 24
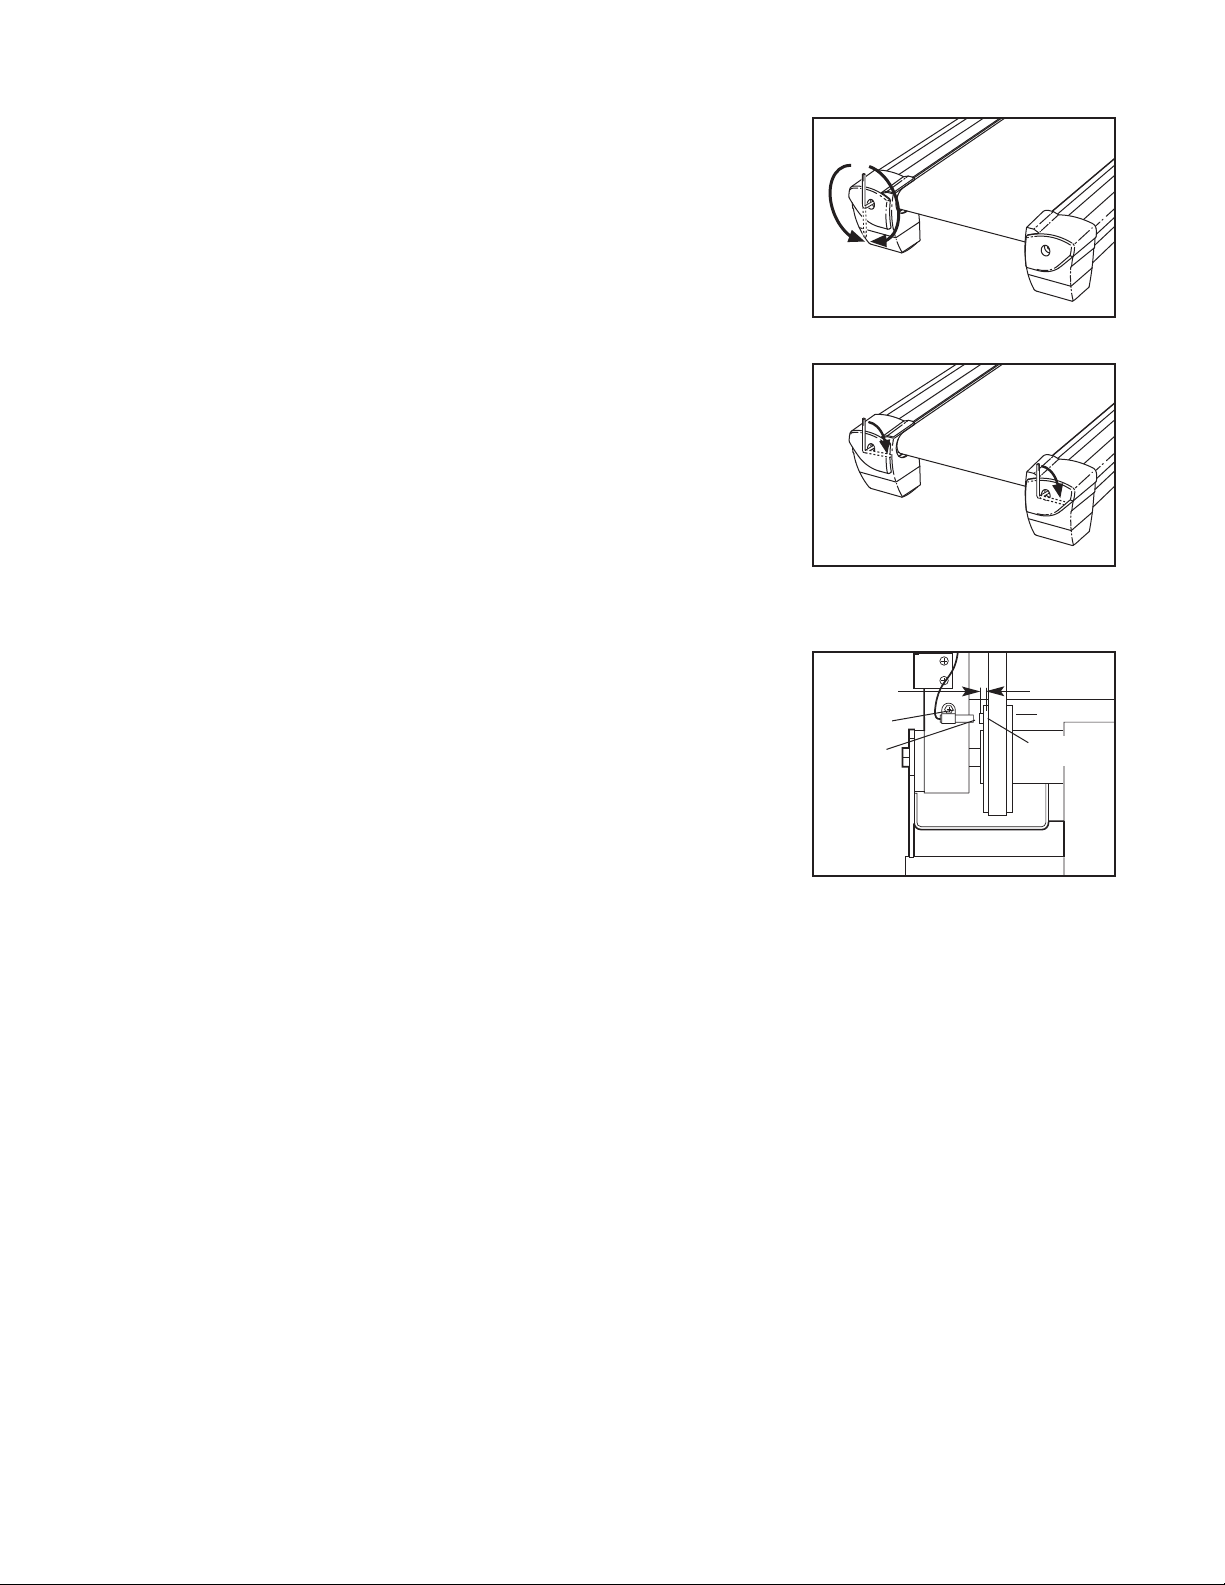
PROBLEM: The walking belt is off-center or slips when walked on
If the walking belt is off-center, first remove the key and
SOLUTION:
a.
UNPLUG THE POWER CORD. If the walking belt has
shifted to the left, use the
rear roller bolt clockwise 1/2 of a turn;
has shifted to the right, turn the left bolt counterclockwise 1/2 of a turn. Be careful not to overtighten the walking belt. Plug in the power cord, insert the key and run the
treadmill for a few minutes. Repeat until the walking belt is
centered.
allen wrench to turn the left
if the walking belt
a
b. If the walking belt slips when walked on, first remove the
key and UNPLUG THE POWER CORD. Using the allen
wrench, turn both rear roller bolts clockwise 1/4 of a turn.
When the walking belt is correctly tightened, you should
be able to lift each side of the walking belt 3 to 4 inches off
the walking platform. Be careful to keep the walking belt
centered. Plug in the power cord, insert the key, and walk
on the treadmill for a few minutes. Repeat until the walking belt is properly tightened.
PROBLEM: The displays of the console do not function properly
SOLUTION: a. Remove the key from the console and UNPLUG THE
POWER CORD. Next, remove the screws from the hood
and carefully remove the hood. Locate the Reed Switch
(17) and the Magnet (12) on the left side of the Pulley (11).
Turn the Pulley until the Magnet is aligned with the Reed
Switch. Make sure that the gap between the Magnet and
the Reed Switch is about 1/8”. If necessary, loosen the
indicated Screw (44) and move the Reed Switch slightly.
Retighten the Screw. Re-attach the hood and run the treadmill for a few minutes to check for a correct speed reading.
b
a
1/8”
44
17
Top
View
11
12
24
Page 25
REEBOK UNIVERSITY
Reebok University was launched in 1993 to fulfill a
vision to establish a “university without walls” that
develops quality, researched, state-of-the-art fitness
programming for the fitness industry throughout the
world.
Working with the world’s best professionals, Reebok
University has created a host of original programs,
such as Step Reebok
®
, Walk ReebokSM, Slide Reebok
and Reebok City JamSM. The industry has adopted
Reebok programming as the “gold” standard. Our
guidelines and terminology are used by fitness professionals and participants around the world, and our
exceptional programming has been approved in the
United States by AFAA and ACE for continuing education credits.
WALKING AND CARDIORESPIRATORY
ENDURANCE
Scientific studies confirm that
walking at a moderate to brisk
pace can enhance aerobic fitness. Rippe and
his colleagues1found
that of 500 subjects
tested, 67% of the men
and 90% of the women
were able to reach their
target heart rates by
walking 4 to 4.5 miles
per hour.
WALKING AND REDUCED RISK FOR CARDIOVASCULAR DISEASE
Several studies have found that regular walking at any
speed can increase HDL-C cholesterol (a high-density
lipoprotein which removes excess cholesterol from the
body) and can lower concentrations of blood triglycerides (a storage form of fat), thus reducing the risk for
SM
cardiovascular disease.
Duncan and his colleagues3concluded that exercise
does not have to be vigorous to reduce cardiovascular
risk factors. In other words, people who choose to
stroll rather than walk briskly can reduce their risk for
cardiovascular disease.
After studying the physical activity patterns of 17,000
Harvard alumni over a 20-year period, Paffenbarger
and his colleagues4concluded that walking as little as
five city blocks per day can reduce the risk of cardiovascular disease, and walking 2 miles per day can
reduce the risk of a heart attack by 28% or more.
Therefore, while walking at a fast pace will improve
aerobic fitness, walking at any speed (slow or fast) can
reduce a person’s risk for heart disease.
WALKING AND WEIGHT REDUCTION
Walking is an excellent activity for burning calories.
The steeper the incline and/or the faster the speed, the
more calories are burned. For example, a 150-pound
person walking at 3.5 miles per hour on flat ground will
burn about 300 calories per hour. This same person
will burn 400 calories per hour on a gentle 4% incline
and 500 calories per hour on a steeper 10% incline. If
this person speeds the pace up to 4 miles per hour on
level ground, 350 calories will be burned in one hour.
5
Pollock and his colleagues2found that middle-aged
men who walked at a pace of 3.5 to 4.5 miles per hour
for 40 minutes four times per week had the same car
diovascular improvements as men the same age who
jogged for 30 minutes three times per week. Although
the intensity of exercise was lower for the walkers than
the runners, the increased duration and frequency of
walking provided the walkers with similar aerobic benefits as the runners.
On the basis of current research, it seems clear that
walking at a moderate to brisk pace can be an excellent aerobic activity.
It should be noted that participants who do not wish to
walk at faster speeds can burn a comparable number
-
of calories by walking for longer periods of time.
WALKING AND BONE DENSITY
Osteoporosis is a major health problem in the United
States, affecting an estimated 15 to 30 million people.
An age-related disorder, osteoporosis reduces the
density of bones. This disease can be life-threatening
since many older people die as a result of complications suffered from broken bones. Adequate calcium in
the diet and weight-bearing exercises seem to reduce
the risk of osteoporosis.
25
Page 26

Several studies have reported that regular walking at
moderate to brisk speeds appears to increase bone
6
density. Specifically, Fradin and his colleagues
found
that 70-year-old subjects who walked at least 30 minutes per day had higher bone mineral content than
subjects who walked less than 30 minutes per day.
Jones and his colleagues7reported that sedentary
women (aged 30 to 61 years old) who began a regular
walking program and continued for one year increased
their bone density.
Since walking can be comfortably performed by people
of any age, walking appears to be practical and effective in reducing a person’s risk for developing osteoporosis.
WALKING AND STRESS REDUCTION
During a 24-week study, not one of 59 participants
who walked five days a week at speeds between 3 and
5 miles per hour sustained a walking-related injury that
necessitated consulting with a physician. Carroll and
his colleagues10reported that 14% of the elderly sub
jects participating in a walking study suffered trainingrelated orthopedic injuries, mostly to the lower leg and
foot. The majority of injuries occurred in the group assigned to “fast walking.”
It is important to note that all forms of exercise have
some degree of risk associated with the activity.
Generally, the less mechanical stress on the musculoskeletal system, the less risk of becoming injured.
Because of the low-impact nature of walking, the incidence of injury appears to be low when compared to
other high-impact activities.
There are many stressors in today’s society, including
economic concerns, work-related pressures and the
need to balance career goals with home responsibilities. People who are unable to cope with these types
of stressors are often tense and anxious, and may
even become physically or psychologically ill.
Researchers have found that exercise is one way to
help people reduce stress. For example, subjects who
engaged in a regular aerobic conditioning program and
who altered their diets experienced significant gains in
self-concept, feelings of well-being and reduced
depression.
8
Cramer and his colleagues9specifically examined the
effect of brisk walking on mildly obese sedentary
women and found that walking improved general psychological well-being. Walking therefore appears to be
an effective tool for improving psychological well-being.
WALKING AND INJURIES
Walking is often associated with a low injury rate.
Walking is considered to be a “low impact” activity because one foot remains in contact with the ground at
all times. Walking at speeds of 3 miles per hour pro
duces vertical impact forces that are around 1.25 times
body weight, whereas running at 7 miles per hour in
creases vertical impact forces to more than 2.5 times
body weight.
REFERENCES
1. Rippe, J., Ross, J., et. al. “Cardiovascular effects of walking.”
(Abstract), Proceedings of the Second International Conference
on Physical Activity, Aging and Sports, July, 1985, p. 47.
2. Pollock, M., Miller, H. Jr., et. al. “Effects of walking on body composition and cardiovascular function of middle-aged men.”
Journal of Applied Physiology, 1971, 30:126–130.
3. Duncan, J., Gordon, N., et. al. “Women walking for health and fitness. How much is enough?” Journal of the American Medical
Association, 1991, 266(23):3295–9.
4. Paffenbarger, R., Hyde, R., et.al. “Physical activity, all-cause
mortality and longevity of college alumni.” New England Journal
of Medicine, 1986, 314:605–613.
5. “Better walking workouts.” University of California at Berkeley
Wellness Letter, 1992, 8(12):4–5.
6. Fradin, K. Grimby, G., et. al. “Walking habits and health-related
factors in a 70-year-old population,” Gerontology, 1991,
37(5):281–8.
7. Jones, P., Hardman, A., et. al. “Influence of brisk walking on the
broadband ultrasonic attenuation of the calcaneus in previously
sedentary women aged 30–61 years.” Calcified Tissue
International, 1991, 49(2):112–5.
8. Blair, S., Collingwood, T., et. al. “Health Promotion for Educators:
Impact on Health Behaviors, Satisfaction, and General WellBeing,” American Journal of Public Health, 1984, 74:147–49.
Cramer, S., Nieman D., et. al. “The effects of moderate exercise
9.
training on psychological well-being and mood state in women.”
Journal of Psychosomatic Research, 1991, 35(4–5):437–49.
10. Carroll, J., Pollack, M., et. al. “Incidence of injury during moderate and high intensity walking in the elderly.” Journal of
Gerontology, 1992, 47(3):M61–6.
26
Page 27
EXERCISE GUIDELINES
WARNING: Before beginning this
or any exercise program, consult your physician. This is especially important for individuals over the age of 35 or individuals with preexisting health problems.
uses easily accessible carbohydrate calories for energy. Only after the first few minutes does your body
begin to use stored fat calories for energy. If your goal
is to burn fat, adjust the speed or incline of the treadmill until your heart rate is near the lowest number in
your training zone.
The pulse sensors are not medical devices.
Various factors, including the user’s movement, may affect the accuracy of heart rate
readings. The pulse sensors are intended
only as exercise aids in determining heart
rate trends in general.
The following guidelines will help you to plan your exercise program. For more detailed exercise information, obtain a reputable book or consult your physician.
EXERCISE INTENSITY
Whether your goal is to burn fat or to strengthen your
cardiovascular system, the key to achieving the
desired results is to exercise with the proper intensity.
The proper intensity level can be found by using your
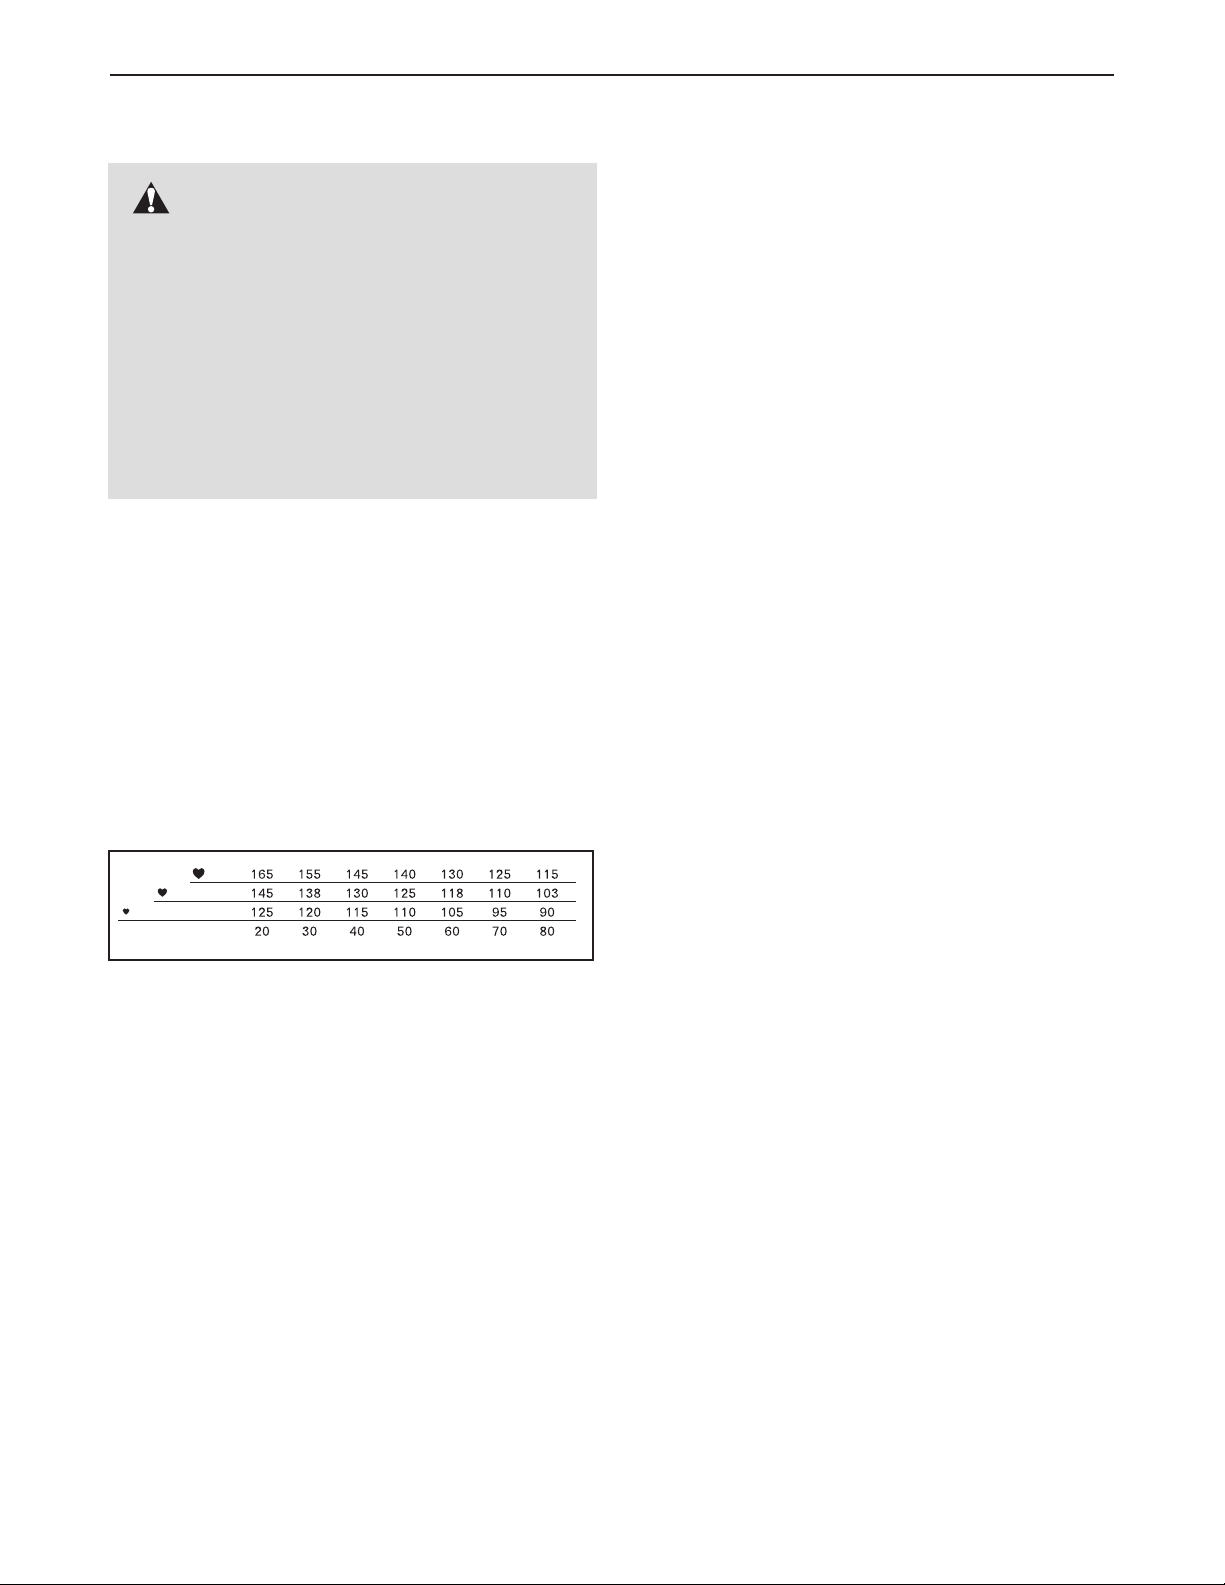
heart rate as a guide. The chart below shows recommended heart rates for fat burning and aerobic exercise.
For maximum fat burning, adjust the speed or incline
of the treadmill until your heart rate is near the middle
number in your training zone.
Aerobic Exercise
If your goal is to strengthen your cardiovascular system, your exercise must be “aerobic.” Aerobic exercise
is activity that requires large amounts of oxygen for
prolonged periods of time. This increases the demand
on the heart to pump blood to the muscles, and on the
lungs to oxygenate the blood. For aerobic exercise,
adjust the speed or incline of the treadmill until your
heart rate is near the highest number in your training
zone.
WORKOUT GUIDELINES
Each workout should include the following three parts:
A Warm-up—Start each workout with 5 to 10 minutes
of stretching and light exercise. A proper warm-up increases your body temperature, heart rate and circulation in preparation for exercise.
To find the proper heart rate for you, first find your age
near the bottom of the chart (ages are rounded off to
the nearest ten years). Next, find the three numbers
above your age. The three numbers define your “training zone.” The lower two numbers are recommended
heart rates for fat burning; the highest number is the
recommended heart rate for aerobic exercise.
To measure your heart rate during exercise, use the
handgrip pulse sensor or the chest pulse sensor. If
your heart rate is too high or too low, adjust the speed
or incline of the treadmill.
Fat Burning
To burn fat effectively, you must exercise at a relatively
low intensity level for a sustained period of time.
During the first few minutes of exercise, your body
Training Zone Exercise—After warming up, increase
the intensity of your exercise until your pulse is in your
training zone for 20 to 60 minutes. (During the first few
weeks of your exercise program, do not keep your
pulse in your training zone for longer than 20 minutes.)
Breathe regularly and deeply as you exercise—never
hold your breath.
A Cool-down—Finish each workout with 5 to 10 minutes of stretching to cool down. This will increase the
flexibility of your muscles and will help prevent post-exercise problems.
EXERCISE FREQUENCY
To maintain or improve your condition, complete three
workouts each week, with at least one day of rest between workouts. After a few months, you may complete up to five workouts each week if desired. The key
to success is to make exercise a regular and enjoyable
part of your everyday life.
27
Page 28
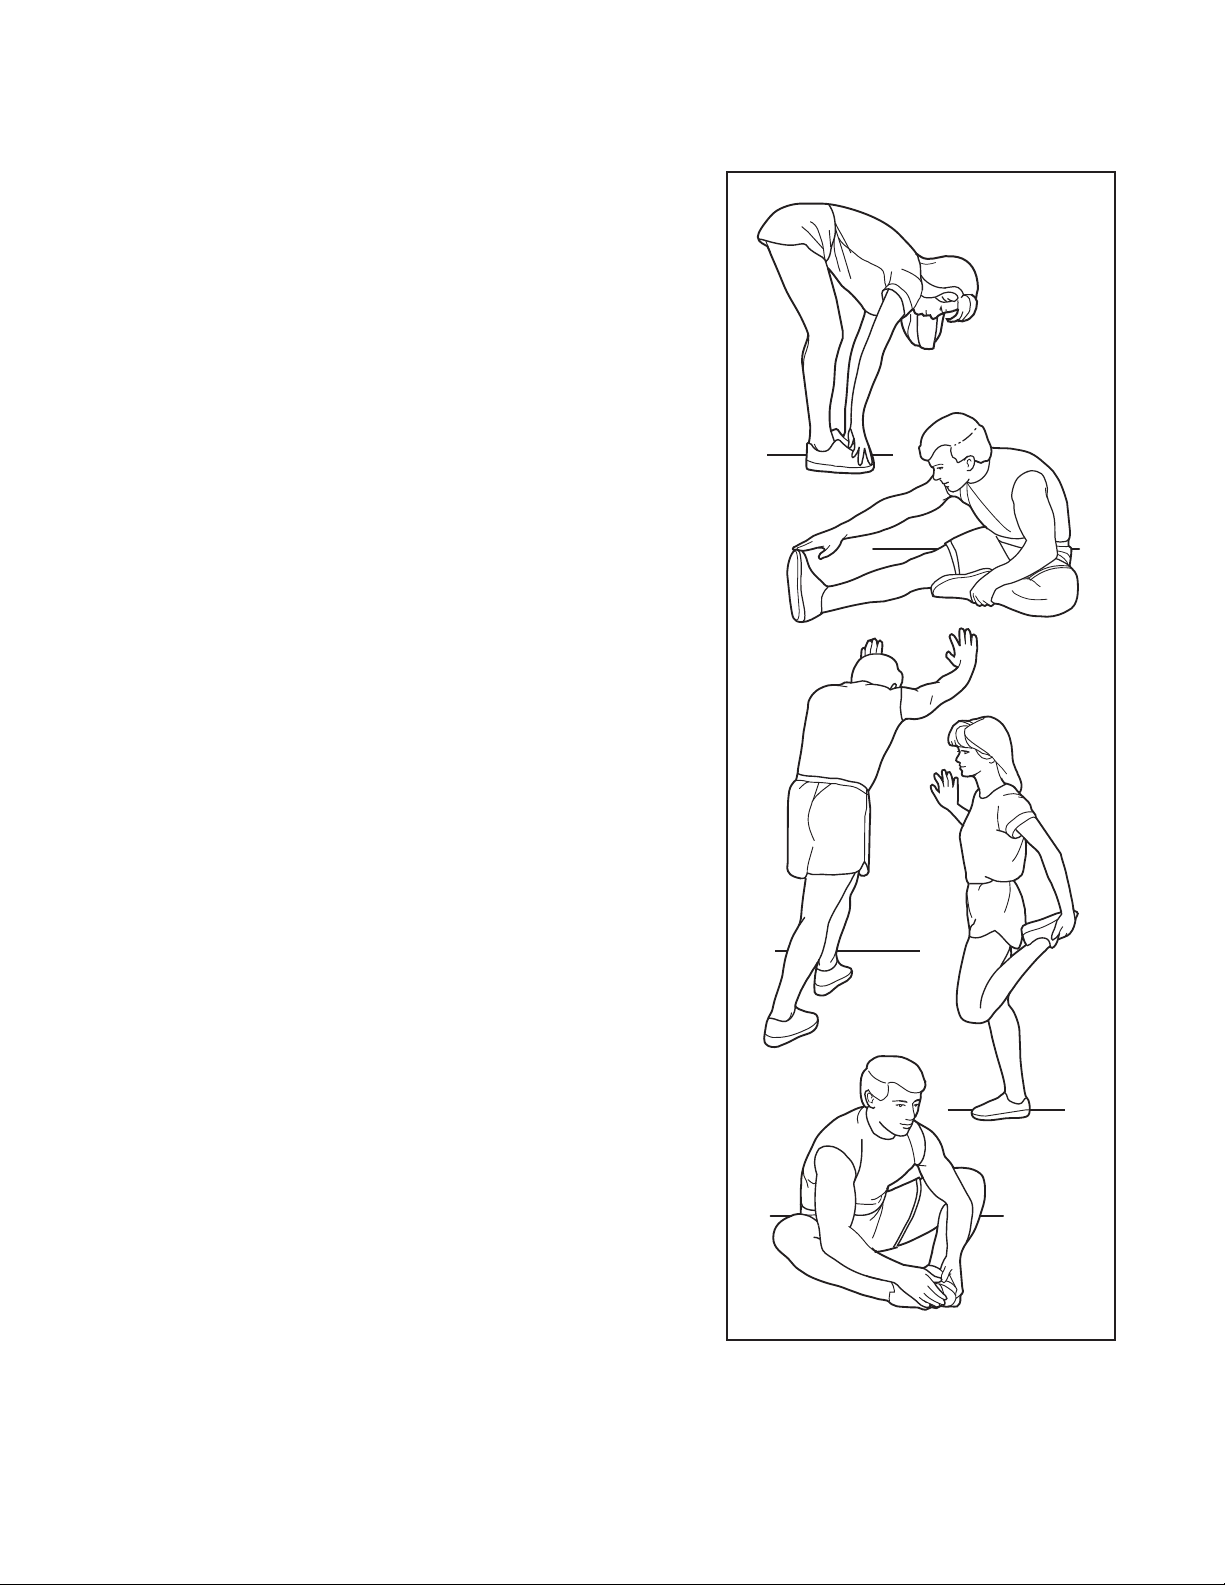
SUGGESTED STRETCHES
The correct form for several basic stretches is shown at the right. Move slowly as you stretch—never bounce.
1. Toe Touch Stretch
Stand with your knees bent slightly and slowly bend forward from
your hips. Allow your back and shoulders to relax as you reach
down toward your toes as far as possible. Hold for 15 counts,
then relax. Repeat 3 times. Stretches: Hamstrings, back of knees
and back.
2. Hamstring Stretch
Sit with one leg extended. Bring the sole of the opposite foot toward you and rest it against the inner thigh of your extended leg.
Reach toward your toes as far as possible. Hold for 15 counts,
then relax. Repeat 3 times for each leg. Stretches: Hamstrings,
lower back and groin.
3. Calf/Achilles Stretch
With one leg in front of the other, reach forward and place your
hands against a wall. Keep your back leg straight and your back
foot flat on the floor. Bend your front leg, lean forward and move
your hips toward the wall. Hold for 15 counts, then relax. Repeat
3 times for each leg. To cause further stretching of the achilles
tendons, bend your back leg as well. Stretches: Calves, achilles
tendons and ankles.
4. Quadriceps Stretch
1
2
3
4
With one hand against a wall for balance, reach back and grasp
one foot with your other hand. Bring your heel as close to your
buttocks as possible. Hold for 15 counts, then relax. Repeat 3
times for each leg. Stretches: Quadriceps and hip muscles.
5. Inner Thigh Stretch
Sit with the soles of your feet together and your knees outward.
Pull your feet toward your groin area as far as possible. Hold for
15 counts, then relax. Repeat 3 times. Stretches: Quadriceps
and hip muscles.
5
28
Page 29

NOTES
29
Page 30

PART LIST—Model No. RCTL12921 R0504A
To locate the parts listed below, refer to the EXPLODED DRAWING attached in the center of this manual.
Key No. Qty. Description Key No. Qty. Description
1 1 Left Foot Rail
2 1 Motor Flywheel
3 1 Audio Wire
4 2 Isolator
5 1 Latch Insert
6 1 Walking Platform
7 4 Walking Platform Screw
8 1 Walking Belt
9 2 Frame Pivot Bolt
10 2 1 1/4” Screw
11 1 Front Roller/Pulley
12 1 Magnet
13 6 Nut
14 1 English Latch Warning Decal
15 2 Frame Pivot Spacer
16 1 Reed Switch Clip
17 1 Reed Switch
18 1 Lift Frame
19 2 Foot Rail Insert
20 1 U-base
21 1 Front Roller Bolt
22 1 Motor Belt
23 2 3” Bolt
24 1 Motor
25 1 Transformer
26 2 2” Bolt
27 2 Hood Bracket
28 1 Ground Wire
29 4 Washer
30 1 Right Rear Endcap
31 2 Lift Motor Bolt
32 1 Motor Pivot Bolt
33 2 Cushion Cover Bumper
34 2 Wheel Washer
35 4 Base Washer
36
37 1 Controller
38 1 Electronics Bracket
39 1 Hood
40 11 Screw
41 1 Motor Belly Pan
42
43 16 3/4” Tek Screw
44 15 Electronics Screw
45
46 1 Right Front Endcap
47
48 1 Right Rear Foot
49 1 Console Ground Wire
50 4 Extension Screw
51 1
52 3 Roller Adj. Washer
53 2 Rear Roller Adjustment Bolt
54 1 Left Rear Endcap
55 1 Frame
56 1
2
2
1
1
Caution Decal
Belt Guide
Left Front Endcap
Left Rear Foot
Right Cup Holder
Allen Wrench
57 2 Rear Platform Screw
58 1 Rear Roller
59* 1 Motor Assembly
60 1 Audio Wire Nut
61 1 Pulse Bar
62 1 Left Foam Grip
63 1 Motor Tension Nut
64 1 Motor Tension Washer
65 1 Upright
66 8 Pulse Bar Screw
67 1 Lock Knob
68 1 Left Frame Guide
69 1 Lock Knob Spring
70 1 Lock Pin Collar
71 1 Pin Clip
72 1 Lock Pin
73 1 Right Frame Guide
74 1 Latch Assembly
75 4 Plastic Fastener
76 2 Handrail Extension
77 2 Front Wheel
78 2 Wheel Bolt
79 1 Motor Tension Bolt
80 1 Console
81 1 Left Cup Holder
82 2 Fan
83 1 Key/Clip
84 20 Belly Pan Screw/Hood Screw
85 1 Upright Wire Harness
86 1 Shock
87 2 Round Upright Endcap
88 2 Upright Endcap
89 1 Filter Wire
90 1 French Latch Warning Decal
91 1 Incline Motor
92
93 8 Fan Screw
94 2 Adjustable Cushion
95 2 Tie Holder
96 1 Tie
97 5 8” Cable Tie
98
99 1 Motor Pivot Nut
100 1 Circuit Breaker
101
102 1 Power Cord
103
104 2 Wheel Spacer
105 1 Incline Motor Shield
106 1 Jack
107
108
109 2 Cushion Slide
110
111 16 Cushion Guide Screw
112
2
6
4
1
1
1 Grommet
1 Right Foot Rail
2
Cushion Guide
Bumper
3/4” Screw
Power Cord Grommet
iFIT.com Audio Cable
Lift Motor Screw
30
Page 31
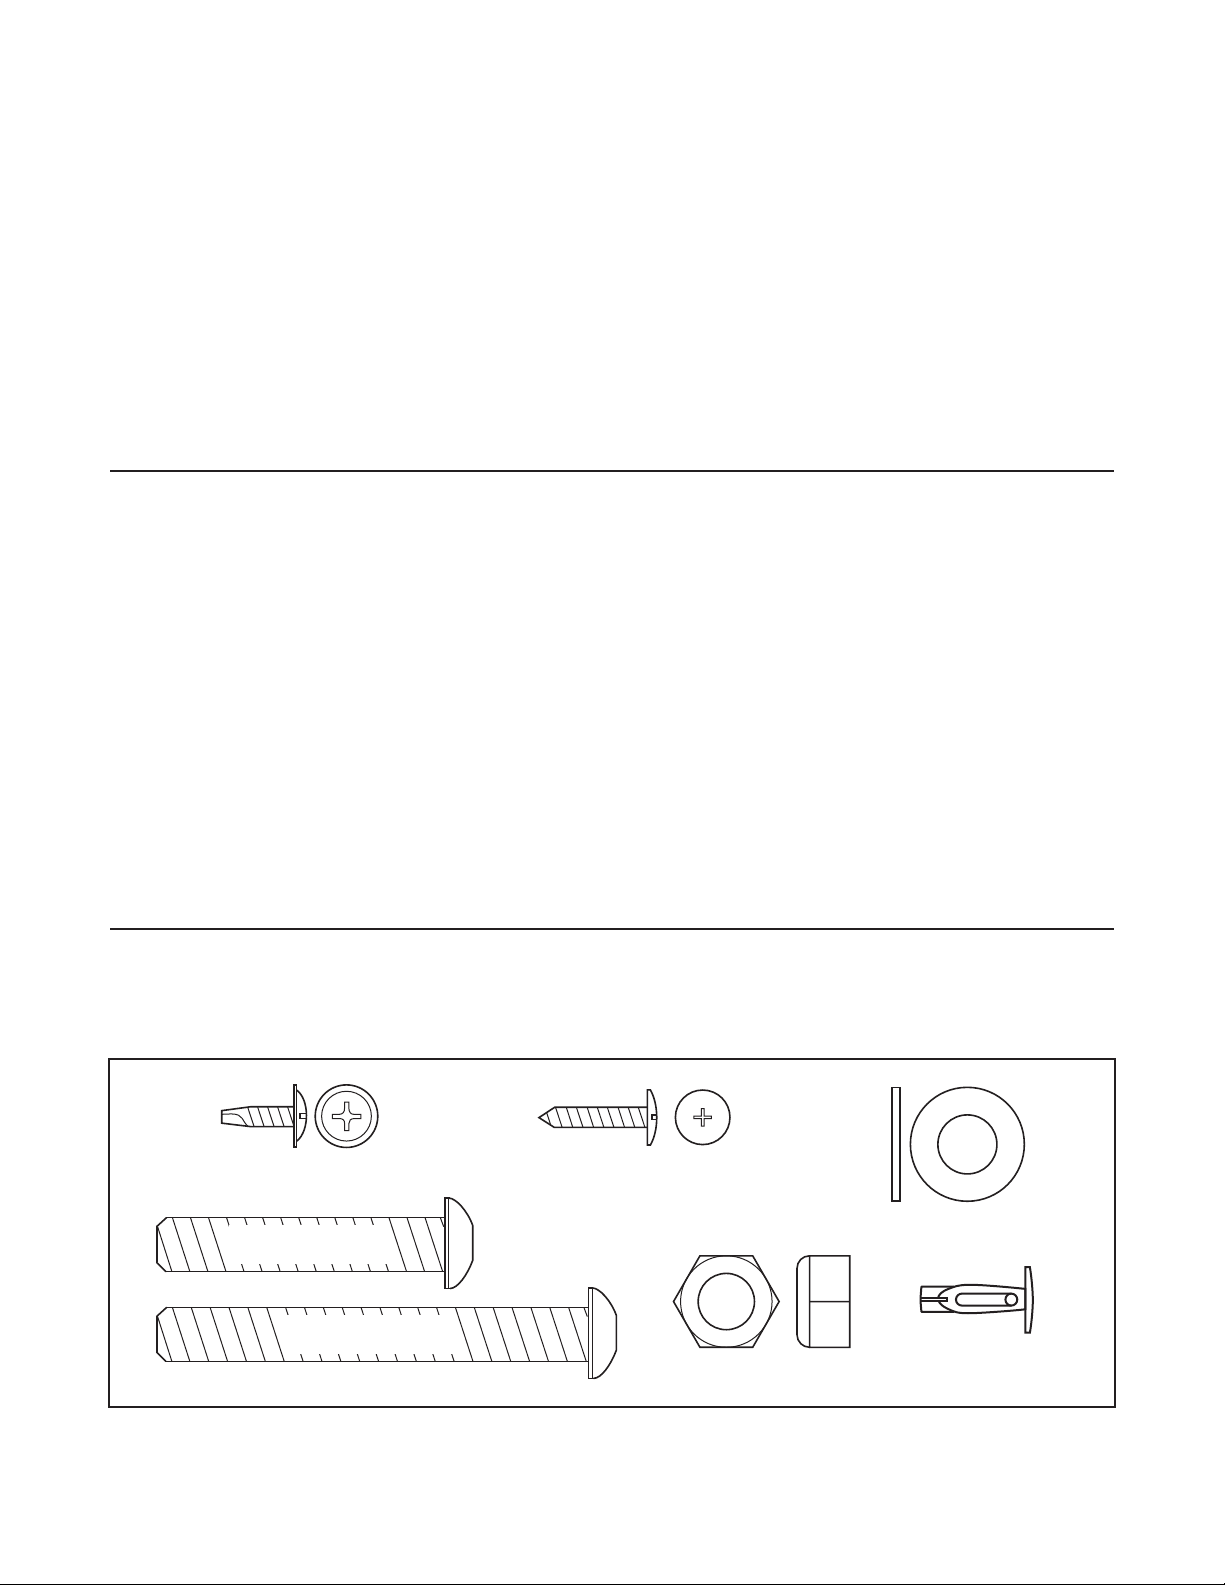
Upright Bolt (65)–4
3/4” Screw (13)–13
1/2” Silver Screw (97)–2
1/4” Washer (57)–4
Wheel Bolt (36)–2
3/4”
Tek Screw
(102)–2
1 1/4” Tek Screw (87)–2
1” Bolt (8)–10
5/16” Washer (57)–2
Star Washer (9)–6
(May be an internal Star Washer)
Silver Ground
Screw (96)–1
2 1/2” Bolt (53)–2
Nut (13)–2
3/4” Screw (101)–4
Base Washer (35)–4
Extension Screw (50)–8
Plastic Fastener
(75)–4
2” Bolt (26)–2
3” Bolt (23)–2
Key No. Qty. Description Key No. Qty. Description
113 2 Static Decal
114 1 Book Plate
115 2 Hood Mounting Screw
116 1 Right Foam Grip
117
118*
119 1 Right Fan Cover
120 1 Left Fan Cover
121 2 Cushion Cover
122 2 Ball Detent
123 1 Hand Pulse Wire
124 1 Incline Bracket
125 2 Incline Motor Nut
1 Console Back
1 Latch Assembly
126 4 Console Screw
127 4 Belt Guide Screw
# 1 8” Blue Wire, 2 F
# 1 4” Blue Wire, 2 F
#
#
# 1 12” Green Wire, 2 Ring
# 1 User’s Manual
* Includes all parts shown in the box
# These parts are not illustrated
Specificaitions are subject to change without notice.
1 4” Red Wire, M/F
1 4” Black Wire, M/F
HOW TO ORDER REPLACEMENT PARTS
To order replacement parts, call our Customer Service Department toll-free at 1-888-936-4266, Monday through
Friday, 8h00 until 18h30 Eastern Time (excluding holidays). When ordering parts, please be prepared to give the
following information:
• The MODEL NUMBER of the product (RCTL12921)
• The NAME of the product (Reebok®RX 6200 treadmill)
• The SERIAL NUMBER of the product (see the front cover of this manual)
• The KEY NUMBER and DESCRIPTION of the part(s) (see the PART LIST on pages 30 and 31)
PART IDENTIFICATION CHART
Use the chart below to identify small parts during assembly.
31
Page 32

LIMITED WARRANTY
WHAT IS COVERED—The entire Reebok®RX 6200 treadmill (“Product”) is warranted to be free of all defects in material and workmanship.
WHO IS COVERED—The original purchaser or any person receiving the Product as a gift from the original purchaser.
HOW LONG IS IT COVERED—ICON Health & Fitness, Inc. (“ICON”), extends a 5 year warranty on the frame. The
motor is covered for one year after the date of purchase. The belt and deck are covered for one year after the date of
purchase. All mechanical components are covered for one year after the date of purchase. All electrical components
are covered for one year after the date of purchase. Labor is covered for one year.
WHAT WE DO TO CORRECT COVERED DEFECTS—We will ship to you, without charge, any replacement part or
component, providing the repairs are authorized by ICON first and are performed by an ICON trained and authorized
service provider, or, at our option, we will replace the Product.
WHAT IS NOT COVERED—Any failures or damage caused by unauthorized service, misuse, accident, negligence, improper assembly or installation, alterations, modifications without our written authorization or by failure on your part to
use, operate, and maintain as set out in your User’s Manual (“Manual”). This warranty does not extend to products used
for commercial or rental purposes or to products used as store display modules.
WHAT YOU MUST DO—Always retain proof of purchase, such as your bill of sale; store, operate, and maintain the
Product as specified in the Manual; notify our Customer Service Department of any defect within 10 days after discovery of the defect; as instructed, return any defected part for replacement or, if necessary, the entire product, for repair.
USER’S MANUAL—It is VERY IMPORTANT THAT YOU READ THE MANUAL before operating the Product.
Remember to do the periodic maintenance requirements specified in the Manual to assure proper operation and your
continued satisfaction.
HOW TO GET PARTS AND SERVICE—Simply call our Customer Service Department at 1-888-936-4266 and tell them
your name and address and the serial number of your Product. They will tell you how to get a part replaced, or if necessary, arrange for service where your Product is located or advise you how to ship the Product for service. Before shipping, always obtain a Return Authorization Number (RA No.) from our Customer Service Department; securely pack
your Product (save the original shipping carton if possible); put the RA No. on the outside of the carton and insure the
product. Include a letter explaining the product or problem and a copy of your proof of purchase if you believe the service is covered by warranty.
ICON is not responsible or liable for indirect, special or consequential damages arising out of or in connection with the
use or performance of the product or damages with respect to any economic loss, loss of property, loss of revenues or
profits, loss of enjoyment or use, costs of removal, installation or other consequential damages of whatsoever nature.
Some provinices do not allow the exclusion or limitation of incidental or consequential damages. Accordingly, the above
limitation may not apply to you.
The warranty extended hereunder is in lieu of any and all other warranties and any implied warranties of merchantability
or fitness for a particular purpose is limited in its scope and duration to the terms set forth herein. Some provinices do
not allow limitations on how long an implied warranty lasts. Accordingly, the above limitation may not apply to you.
No one is authorized to change, modify or extend the terms of this limited warranty.
This warranty gives you specific legal rights and you may have other rights which vary from provinice to provinice.
ICON OF/DU CANADA, INC., 900 de l‘Industrie, St-Jérôme, QC, J7Y 4B8
Part No. 218730 R0804A
Printed in CANADA
© 2004 ICON IP, Inc.
Page 33
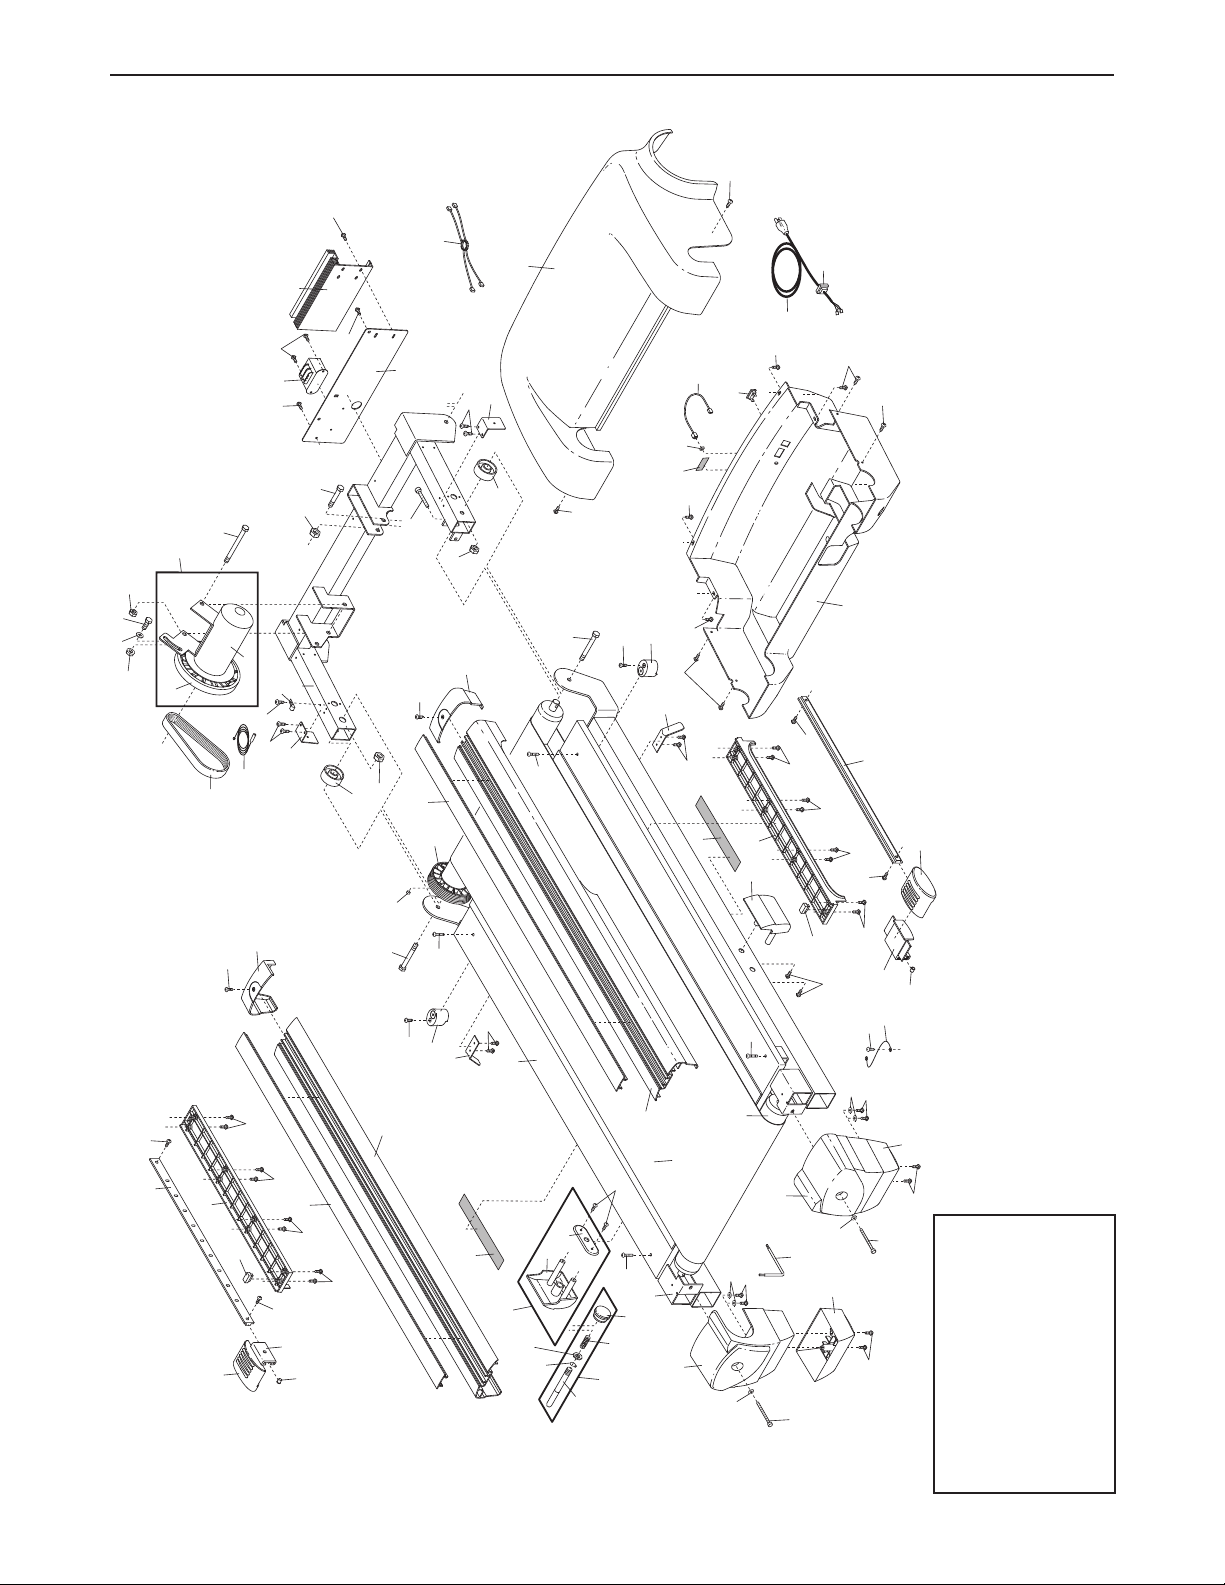
56
9
15
13
89
18
17
44
16
115
39
115
9
12
7
57
127
42
53
52
7
57
43
48
47
54
110
10
55
11
6
58
27
44
19
45
19
8
46
44
28
1
15
13
44
27
90
30
4
43
53
52
43
42
127
125
31
68
5
10
73
43
100
3
60
113
84
84
84
43
43
84
103
102
4
43
72
71
67
118*
70
69
41
21
43
74*
84
29
84
29
111
121
92
84
84
94
122
92
94
122
111
84
121
111
111
111
84
111
111
111
109
109
33
33
44
38
44
25
44
37
44
32
59*
99
63
64
79
2
24
22
14
EXPLODED DRAWING—Model No. RCTL12921 R0804A
To identify the
parts shown on
this EXPLODED
DRAWING,
refer to the
PART LIST on
pages 30 and
31.
Page 34
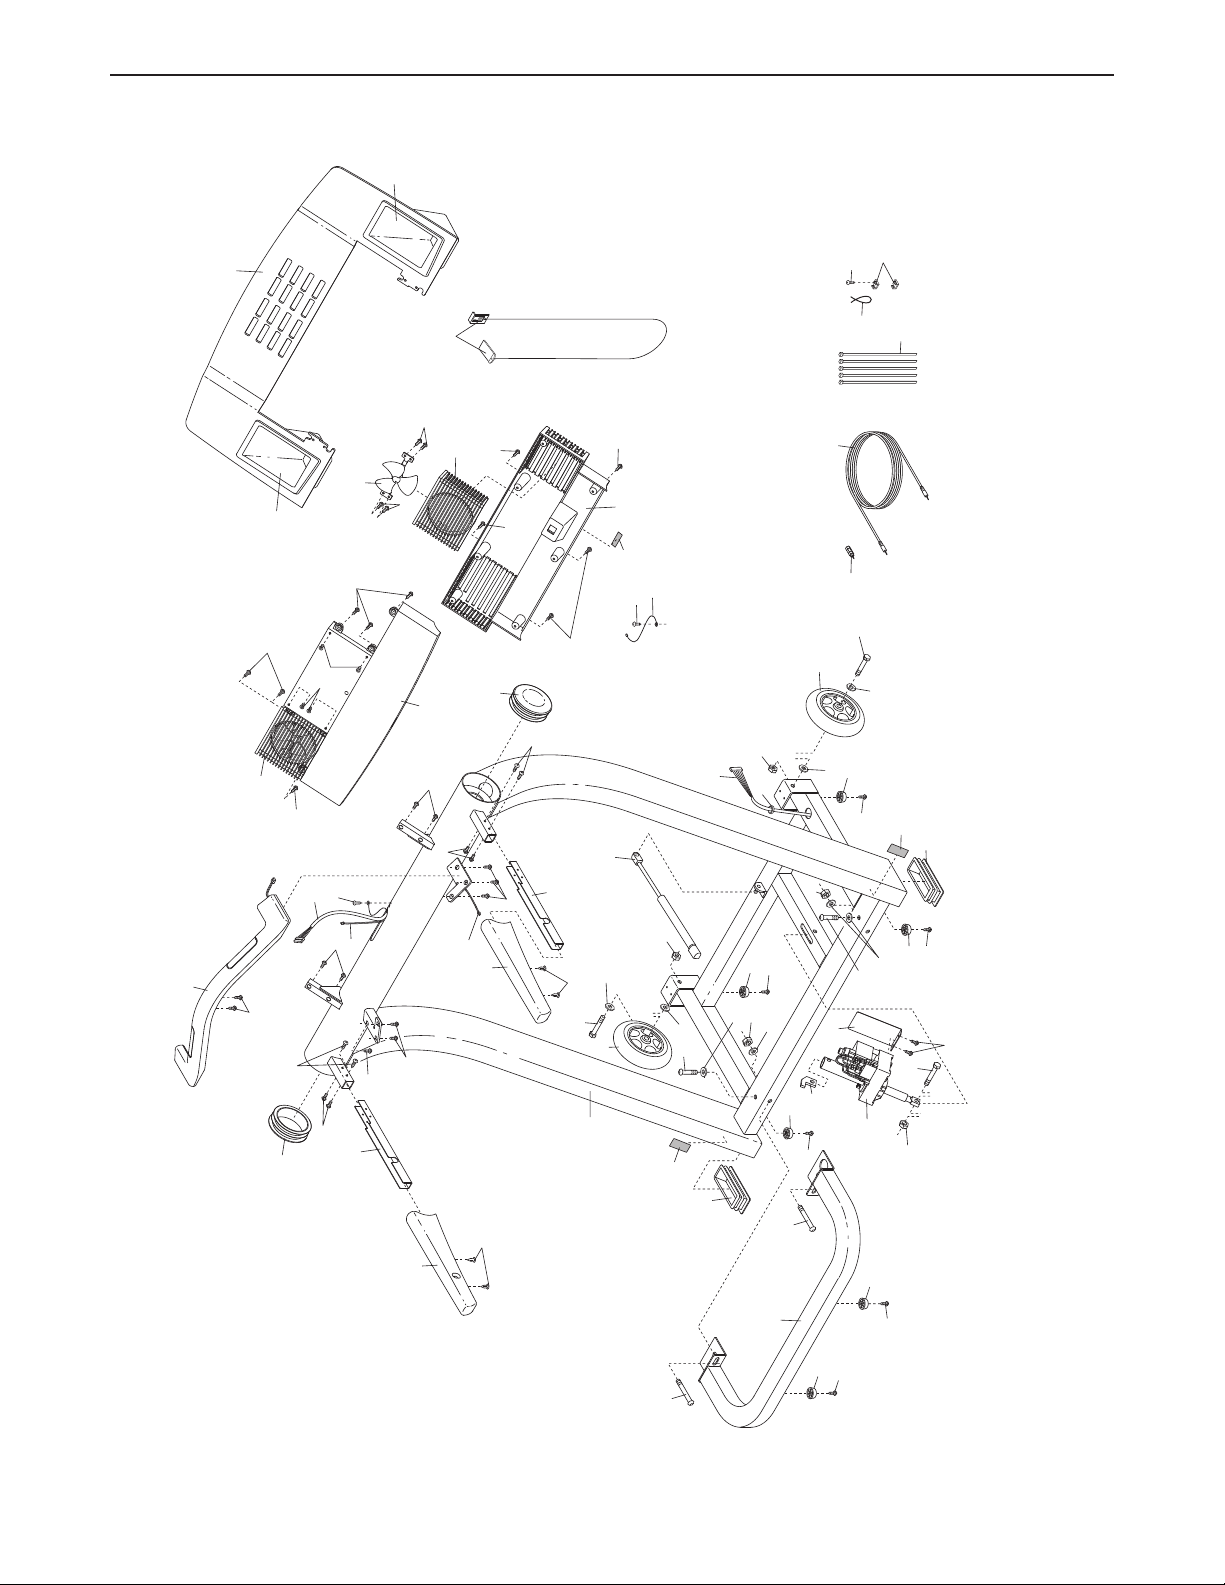
83
44
95
97
96
106
107
13
13
77
78
98
84
86
88
88
62
116
65
117
80
113
85
40
40
40
40
93
93
82
40
40
40
120
61
43
101
87
87
76
76
50
50
66
66
50
50
66
119
126
44
44
49
123
75
75
125
91
31
124
98
84
36
26
26
23
23
20
98
84
98
84
98
84
98
84
105
112
108
36
123
35
35
13
13
35
51
81
114
104
104
34
34
77
78
66
85
EXPLODED DRAWING—Model No. RCTL12921 R0804A
 Loading...