

Reebok ASTRORIDE A4.0 Treadmill User Manual

ASTRORIDE
A4.0 TREADMILL
USER MANUAL
EU: 240V DC
USA: 120V DC

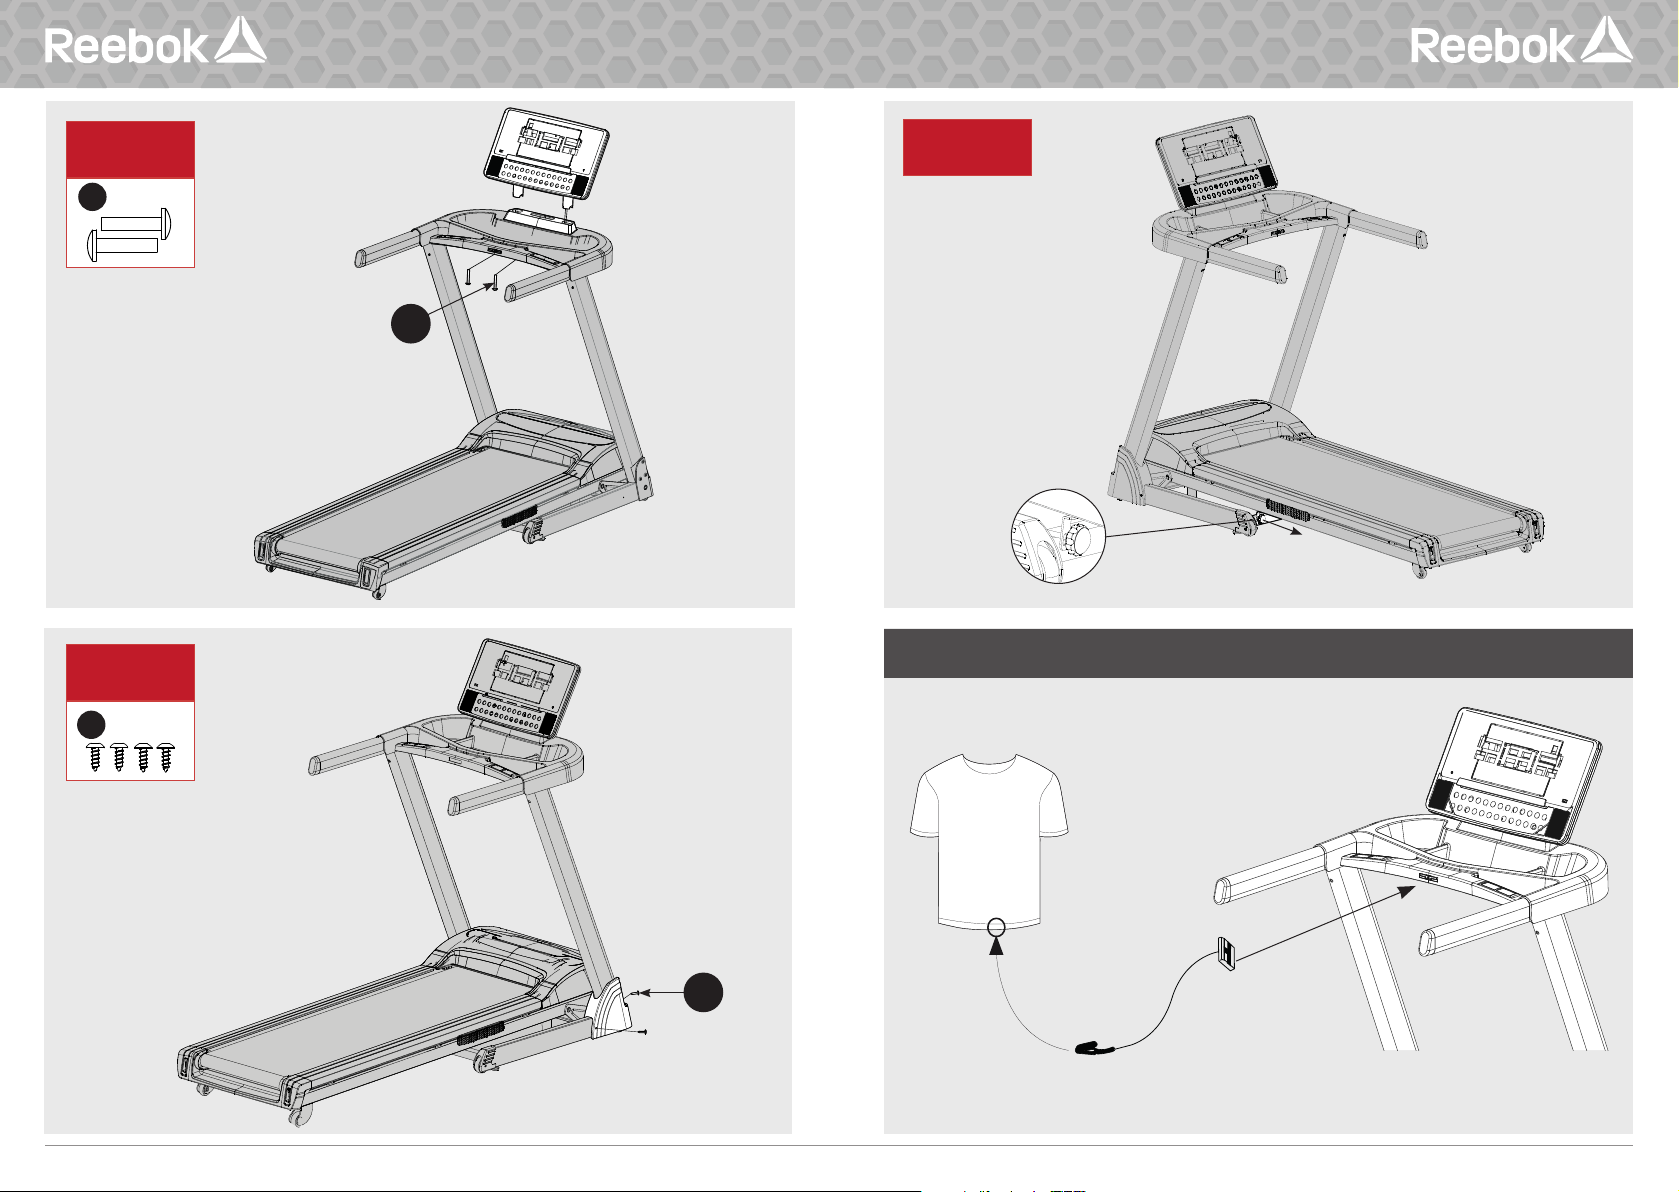
HARDWARE PACK
Screwdriver x1
936
M8x35 x2
915
1
Screw x6
202
x1
202
Allen Key x1
T-Shaped Allen Wrench x1
PARTS
Console Base
x1
Console x1
915
M8x50 x6
915
924
ST4x20 x4
Upright
Tube Cover
x2
Left Upright Tube
x1
917
M8x15L x4
917
B
Right Upright
Tub e
x1
917
x2
2
Screw x4
x2
915
207
x1
206
x1
x1
917
205
Safety Key x1
Main Frame x1
2 ASTRORIDE A4.0 Treadmill - User Manual www.reebokfitness.info 3
936
924
3
Screw x2
4
Screw x4
5
936
Safety Key
924
Important: This appliance can be used by children aged from 12 years and above and persons with reduced physical, sensory or mental
capabilities or lack of experience and knowledge if they have been given supervision or instruction concerning use of the appliance in a
safe way and understand the hazards involved. Children shall not play with the appliance. Cleaning and user maintenance shall not be
made by children without supervision.
4 ASTRORIDE A4.0 Treadmill - User Manual www.reebokfitness.info 5

Running
Belt
Lubricating the treadmill.
Running
Deck
Moving the treadmill.
* Every 3-6 months
** See User Guide for more info
Allow for a minimum space of 2m
around the treadmill when in operation.
Treadmill Weight
2m
kg
65.5kg
2m 2m
2m
167.5cm (L) x 76.5cm (W) x 140cm (H)
Serial no.
Serial no. is located on the
base of the treadmill.
Example:
Serial No.: RVAR-10421SL/0718/000001
Manufacture Date: July 2018
Serial No.: RVAR-10421SL/0718/000001
Manufacture Date: July 2018
This product is suitable
for user’s weight of 130kg.
130
kg
WEEE logo this symbol on a product means that the product is covered by European
Hereby, RFE international declares that this product is in compliance with the essential
requirements and other relevant provisions of Directive 2014/53/EU.
www.reebokfitness.info/product-support
6 ASTRORIDE A4.0 Treadmill - User Manual www.reebokfitness.info 7
Directive 2012/19/EU.

SPARE PARTS LIST
924
304
915
913
913
307
914
406
905
905
907
305
308
306
907
905
911
403
935
906
804
908
906
935
917
903
917
907
905905
604
916
915
301
302
303
905
919
702
915
915
302
602
603
601
907
701
702
919
202
207
421
401
415
905
802
205
206
917
407
414
909
801
417
416
901
927
803
902
405
923
922
408
402
203
211
932
509
928
413
925
409
906
412
204
210
420
925
209
927
411
905
410
908
ITEM DESCRIPTION QT Y.
101 Panel Board (Display) 1 PCS
503
922
912
404
922
505
926
928
920
501
508
504
419
922
933
418
911
921
502
509
934
507
923
503
921
201
102
111
925
110
208
924
936
105
103
108
112
109
106
104
115
101
114
113
107
112
115
102 Panel Board (Rear Cover) 1 PCS
103 Spring (Safety Key) 1 PCS
104 Display Frame 2 PCS
105 Pallet 1 PCS
106 Keyboard 1 PCS
107 Mounting Panel (Safety Key) 1 PCS
108 Drawing Piece (Safety Key) 1 PCS
109 Key Sticker 1 PCS
110 Hand Pulse Steel Disc 4 PCS
111 Display Sticker 1 PCS
112 Mesh Enclosure (Speaker) 2 PCS
113 Safety Key 1 PCS
114 MP3 Wire 1 PCS
115 Speaker 2 PCS
201 Console Frame 1 PCS
202 Upright Post 2 PCS
203 Hollow Pipe Plug 2 PCS
204 Foam Grip 2 PCS
205 Communication Line 1 PCS
206 Communication Line 1 PCS
207 Communication Line 1 PCS
208 Console Shell 1 PCS
209 PVC Cover Plate I 1 PCS
210 PVC Cover Plate III 2 PCS
211 PVC Cover Plate II 1 PCS
301 Base Frame 1 PCS
302 Open Waist Drum Sleeve 2 PCS
303 Wheel 2 PCS
304 Taper Cushion (Conductive Rubber) 4 PCS
305 Base Cover (L) 1 PCS
306 Base Cover (R) 1 PCS
307 Communcation Wire 1 PCS
308 Wire Protector 1 PCS
401 Main Frame 1 PCS
402 Front Roller 1 PCS
403 Rear Roller 1 PCS
404 Incline Motor 1 PCS
405 Motor Belt 1 PCS
406 Wheel 2 PCS
407 Decorative Block 2 PCS
408 Switch 1 PCS
409 Fuse (with Wire) 1 PCS
410 Computer Tail Socket 1 PCS
411 Power Cord 1 PCS
412 Power Cord 1 PCS
413 Power Cord 1 PCS
414 Power Cord 1 PCS
415 Cable Clamp 2 PCS
416 Magnet Ring 2 PCS
417 British Triple-flat Computer Tail 1 PCS
418 3601CA Controller 1 PCS
419 Filter 1 PCS
420 Inductance 1 PCS
421 Handle Knob 1 PCS
ITEM DESCRIPTION QT Y.
501 Running Desk 1 PCS
502 Running Belt 1 PCS
503 Side Rail 2 PCS
504 Cover 1 PCS
505 Square Cushion (20x40xT18) 6 PCS
506 Circular Side Rail Guider 8 PCS
507 Rear Cover 1 PCS
508 Cover Decorative Block (L) 1 PCS
509 Cover Decorative Block (R) 1 PCS
601 Cylinder 1 PCS
602 Ezfit Linking Parts 1 PCS
603 Spring 1 PCS
604 Double Pipe Plug 1 PCS
701 Incline Frame 2 PCS
702 Powder Metallurgical Sleeve 2 PCS
801 Motor 1 PCS
802 Spraying Parts (Motor Mounting Seat) 1 PCS
803 Speed Sensor 1 PCS
804 Square Cushion 4 PCS
901 Top Motor Bolt Welding Piece 1 PCS
902 Lock Washer 3 PCS
903 Spring Washer 2 PCS
904 Flat Washer 6 PCS
905 Flat Washer 6 PCS
906 Flat Washer 3 PCS
907 Hex Self-Locking Nut M8 6 PCS
908 Hex Self-Locking Nut M10 6 PCS
909 Hex Full Thread Screw M8x75 1 PCS
910 Allen Screw M8x15 2 PCS
911 Sllen Screw M8x75 3 PCS
912 Allen Screw M8x40x20 1 PCS
913 Allen Screw M8x90x45 2 PCS
914 Allen Screw M8x40x20 2 PCS
915 Allen Screw M8x50x20 9 PCS
916 Allen Screw M8x30x20 1 PCS
917 Allen Screw M8x15 8 PCS
918 Allen Screw M10x35x20 1 PCS
919 Allen Screw M10x35x20 2 PCS
920 Hex Screw M6x55x16 6 PCS
921 Philips Screw M5x10 2 PCS
922 Philips Scew M4x10 7 PCS
923 Philips ST4x16 7 PCS
924 Philips ST4x20 4 PCS
925 Philips ST4x12 38 PCS
926 Plastic Flat Cusion 6 PCS
927 Philips Screw ST3x10 4 PCS
928 Philips Screw ST4x15 8 PCS
929 L-Type Wrench 1 PCS
930 T-Type Wrench 1 PCS
931 Cross Opening Wrench 1 PCS
932 Elastic Washer 3 PCS
933 Philips Screw ST4x16 6 PCS
934 Philips Screw M5x10 5 PCS
935 Plastic Flat Cushion 2 PCS
936 Allen Screw M8x20 2 PCS
8 ASTRORIDE A4.0 Treadmill - User Manual www.reebokfitness.info 9

INCLINE / DISTANCE
A
TIME / CALORIES SPEED / PULSE
G
B
BUTTON FUNCTIONS
A
PROGRAM
Selects the desired program (P0-P36, U01-U03,
FAT, HR1-HR3).
B
MODE
To select countdown mode for distance, calories
and time.
C
START
Press to start treadmill, the running belt will start
moving.
D
STOP
Press to stop treadmill, the running belt will slow
before stopping completely.
OPERATION PROCEDURE
MPH TO KPH CONVERSION
In Standby mode, remove the safety key and press
PROGRAM and MODE at the same time.
Speed will show ‘0.6’ for MPH or ‘1.0’ for KPH.
Repeat the above process to change again.
SAFETY KEY
The machine will not operate unless the red safety
key is inserted. If the safety key is out of place the
machine will shut down immediately. The screen will
display ‘E-07’ with a warning tone. The clip on the end
of the safety key must be attached to the user at all
ENGLISH
F
FH
D
E
SPEED
F
QUICK SPEED
G
INCLINE
H
QUICK INCLINE
times during your workout to ensure the machine stops
immediately in the event of emergency.
P0 MANUAL PROGRAM
• Press PROGRAM to highlight ‘P0’.
• Press MODE to change the countdown to TIME,
DISTANCE or CALORIES. These set parameters can
be adjusted using the +/-.
• Press START to begin the exercise.
E
C
Increase/decrease speed during workout.
Adjust parameters time/distance/calories.
Use this to select a different speed whilst running.
Increase / decrease incline during the workout.
Use this to select a different incline whilst running.
MP3 INPUT
P1-P36 PROGRAMS
These are preset programs in which the machine will
change the speed and incline automatically during the
workout.
(NOTE: If the speed/incline is changed during this
program by the user the program will revert back to the
preset speed/incline in the next segment.)
• From the standby screen, press PROGRAM to select
the required program.
• Press START to select and begin using the preset
time. The default time is 30 minutes but this can be
adjusted using +/-.
• During the program the speed and incline settings
are split into 16 segments. The time of each segment
depends on the overall time selected. For example,
16 minute program = 16 segments of 1 minute.
Therefore speed/incline would alter every 1 minute.
• The console will count down and beep for 3 seconds
each time the speed/incline is changed.
U01-U03
On these programs the user can define the speed and
incline for a customised workout.
• From standby press PROGRAM until U01, U02 or U03
are displayed.
ENGLISH
• Press MODE to enter the first segment of the
program.
• Press +/- to adjust the speed for this segment. Press
MODE to continue.
• Repeat for all the 16 segments of the program.
• Once data has been entered into all segments press
START to begin.
When inputted the program will be saved within the
selected user number (U01, U02 or U03).
BODY FAT FUNCTION
• Press PROGRAM until FAT is displayed.
• Press MODE to confirm the selection and to begin
inputting the user parameters.
• The TIME window will display the below parameters
that can be changed using +/-.
F1 - Gender will be displayed, Press +/- to switch
between 1 (male) and 2 (female). Press MODE to
confirm.
F2 - Age will be displayed. Press +/- to adjust (preset is
25 years). Press MODE to confirm.
F3 - Height will be displayed. Press +/- to adjust (preset
is 170cm). Press MODE to confirm.
F4 - Weight will be displayed. Press +/- to adjust
(preset is 70kg). Press MODE to confirm.
F5 will be displayed, at this stage the user must place
both hands on the pulse sensors for approximately 8
seconds. The test results will be displayed as below:
=< 19 Underweight
20-25 Normal weight
26-29 Over weight
30 or above Obese
POWER SAVING
This product is manufactured in compliance with the
Erp Regulations and is fitted with a power saving
mode which will activate if the Treadmill is inactive for
a period of 4 minutes. To restart the treadmill simply
remove and reattach the safety key.
10 ASTRORIDE A4.0 Treadmill - User Manual www.reebokfitness.info 11

FRANÇAIS FRANÇAIS
INCLINAISON / DISTANCE
DURÉE / CALORIES VITESSE / POULS
G
B
A
FONCTIONS DES BOUTONS
A
PROGRAMME
Sélection du programme voulu (P0-P36, U01-U03,
FAT, HR1-HR3)
B
MODE
Pour sélectionner le mode décompte pour la
distance, les calories et la durée.
C
DÉMARRAGE
Appuyez pour lancer la machine, le tapis de
course va commencer à tourner.
D
ARRÊT
Appuyez pour arrêter la machine, le tapis de
course va ralentir avant de s’arrêter complètement.
PROCÉDURE DE FONCTIONNEMENT
CONVERSION M/H EN KM/H
• En mode veille, retirez la clé de sécurité et appuyez
simultanément sur PROGRAMME et MODE.
• La vitesse affichée sera de «0,6» en M/h ou de «1»
en Km/h.
• Répétez la procédure ci-dessus pour modifier à
nouveau le paramètre.
CLÉ DE SÉCURITÉ
La machine ne fonctionnera pas tant que la clé de
sécurité rouge n’est pas insérée. Si la clé de sécurité
est mal insérée, la machine va immédiatement s’arrêter.
L’écran affichera «E-07» et une sonorité d’alerte sera
émise. Le clip au bout de la clé de sécurité doit être
F
FH
D
E
VITESSE
F
VITESSE RAPIDE
G
INCLINAISON
H
INCLINAISON RAPIDE
fixé à l’utilisateur à tout moment pendant la séance
d’entraînement, afin que la machine puisse s’arrêter
immédiatement en cas d’urgence.
PROGRAMME MANUEL P0
• Appuyez sur PROGRAMME pour mettre «P0» en
surbrillance.
• Appuyez sur MODE pour modifier le décompte
TEMPS, DISTANCE ou CALORIES. Ces paramètres
définis peuvent être réglés à l’aide du bouton +/-.
• Appuyez sur DÉMARRAGE pour commencer.
PROGRAMMES P1-P36
Il s’agit de programmes prédéfinis où la machine
modifie la vitesse et l’inclinaison automatiquement
pendant la séance.
E
C
Augmente/diminue la vitesse pendant l’entraînement. Ajuste les paramètres de durée/distance/
calories.
Utilisez ce bouton pour sélectionner une vitesse
différente pendant la course.
Augmente/diminue l’inclinaison pendant l’entraînement.
Utilisez ce bouton pour sélectionner une inclinaison différente pendant la course.
ENTRÉE MP3
(REMARQUE: si la vitesse/l’inclinaison est modifiée au
cours du programme par l’utilisateur, le programme
reviendra à la vitesse/l’inclinaison prédéfinie au
segment suivant.)
• À partir de l’écran de veille, appuyez sur
PROGRAMMME pour sélectionner le programme
voulu.
• Appuyez sur DÉMARRAGE pour sélectionner le
programme et commencer la séance pour la durée
prédéfinie. La durée par défaut est de 30 minutes,
mais vous pouvez la régler à l’aide du bouton +/-.
• Pendant le programme les paramètres de vitesse
et d’inclinaison sont divisés en 16 segments. La
durée de chaque segment dépend de la durée totale
sélectionnée. Par exemple, pour un programme de
16 minutes = 16 segments d’1 minute. Ainsi, la vitesse
/l’inclinaison changera au bout d’1 minute.
• La console va effectuer le décompte et biper
pendant 3 secondes à chaque changement de la
vitesse/l’inclinaison.
U01-U03
Dans ces programmes, l’utilisateur peut définir la
vitesse et l’inclinaison, pour une séance personnalisée.
• Depuis le mode veille, appuyez sur PROGRAMME
jusqu’à ce que U01, U02 ou U03 s’affichent.
• Appuyez sur MODE pour saisir le premier segment du
programme.
• Appuyez sur +/- pour régler la vitesse et l’inclinaison
pour ce segment. Appuyez sur MODE pour continuer.
• Recommencez pour les 16 segments du programme.
Une fois les informations saisies pour tous les
segments, appuyez sur DÉMARRAGE pour commencer.
Une fois toutes les informations saisies, le programme
sera enregistré sous le numéro d’utilisateur sélectionné
(U01, U02 ou U03).
FONCTION MASSE ADIPEUSE
• Appuyez sur PROGRAMME jusqu’à l’affichage de FAT.
• Appuyez sur MODE pour confirmer la sélection et
commencer à saisir les paramètres utilisateur.
• La fenêtre TIME va afficher les paramètres ci-
dessous, qui peuvent être modifiés à l’aide du bouton
+/-.
F1 - Affichage du sexe. Appuyez sur +/- pour passer
de 1 (homme) à 2 (femme). Appuyez sur MODE pour
confirmer.
F2 - Affichage de l’âge. Appuyez sur +/- pour l’ajuster
(il est prédéfini sur 25 ans). Appuyez sur MODE pour
confirmer.
F3 - Affichage de la taille. Appuyez sur +/- pour l’ajuster
(elle est prédéfinie sur 170 cm). Appuyez sur MODE
pour confirmer.
F4 - Affichage du poids. Appuyez sur +/- pour l’ajuster
(il est prédéfini sur 70 kg). Appuyez sur MODE pour
confirmer.
F5 va s’afficher. Là l’utilisateur doit placer les deux
mains sur les capteurs de pouls pendant environ 8
secondes. Les résultats du test vont s’afficher comme
suit:
=< 19 insuffisance pondérale
20-25 Poids normal
26-29 Surpoids
30 ou plus Obésité
ÉCONOMIES D’ÉNERGIE
Ce produit a été fabriqué en conformité avec la
réglementation des établissements recevant du
public (ERP). Il est équipé d’un mode d’économie
d’énergie qui s’active si le tapis de course reste
inutilisé pendant 4 minutes. Pour redémarrer le tapis de
course, il suffit de retirer et de remettre en
place la clé de sécurité.
12 ASTRORIDE A4.0 Treadmill - User Manual www.reebokfitness.info 13
 Loading...