

Page 1
Thank
Grace
pedal.
We are sure that by following
the simple instructions outlined
in the next few pages you will
enjoy years of squishy, compressed
goodness.
Please read on to discover
how to get the best from her.
Be sure to peruse the section
about pedal registration.
Simply register online and
automatically gain the extended
warranty - plus you’ll be in to win
some truly excellent prizes.....
Bliss!
Best Regards,
Ben Fulton
(Owner and inventor)
you
for choosing
- our lovely compression
Initial Charging......
Such a simple process......
Step One
Locate a DC, 9 volt power
adapter with the tip negative
(Boss PSA, Voodoo Labs Pedal
Power II, Godlyke Power All pretty much any 9v guitar
power supply), connect the
2.1mm plug to the power
socket on the left hand side of
Grace.
Step Two
The LED closest to the top of
the pedal should be glowing
red.
Leave her charging for
12 hours - the LED will change
from red to green - indicating
that charging is complete.
Following this initial long
charge she will only need 4 6 hours for future charging
cycles.
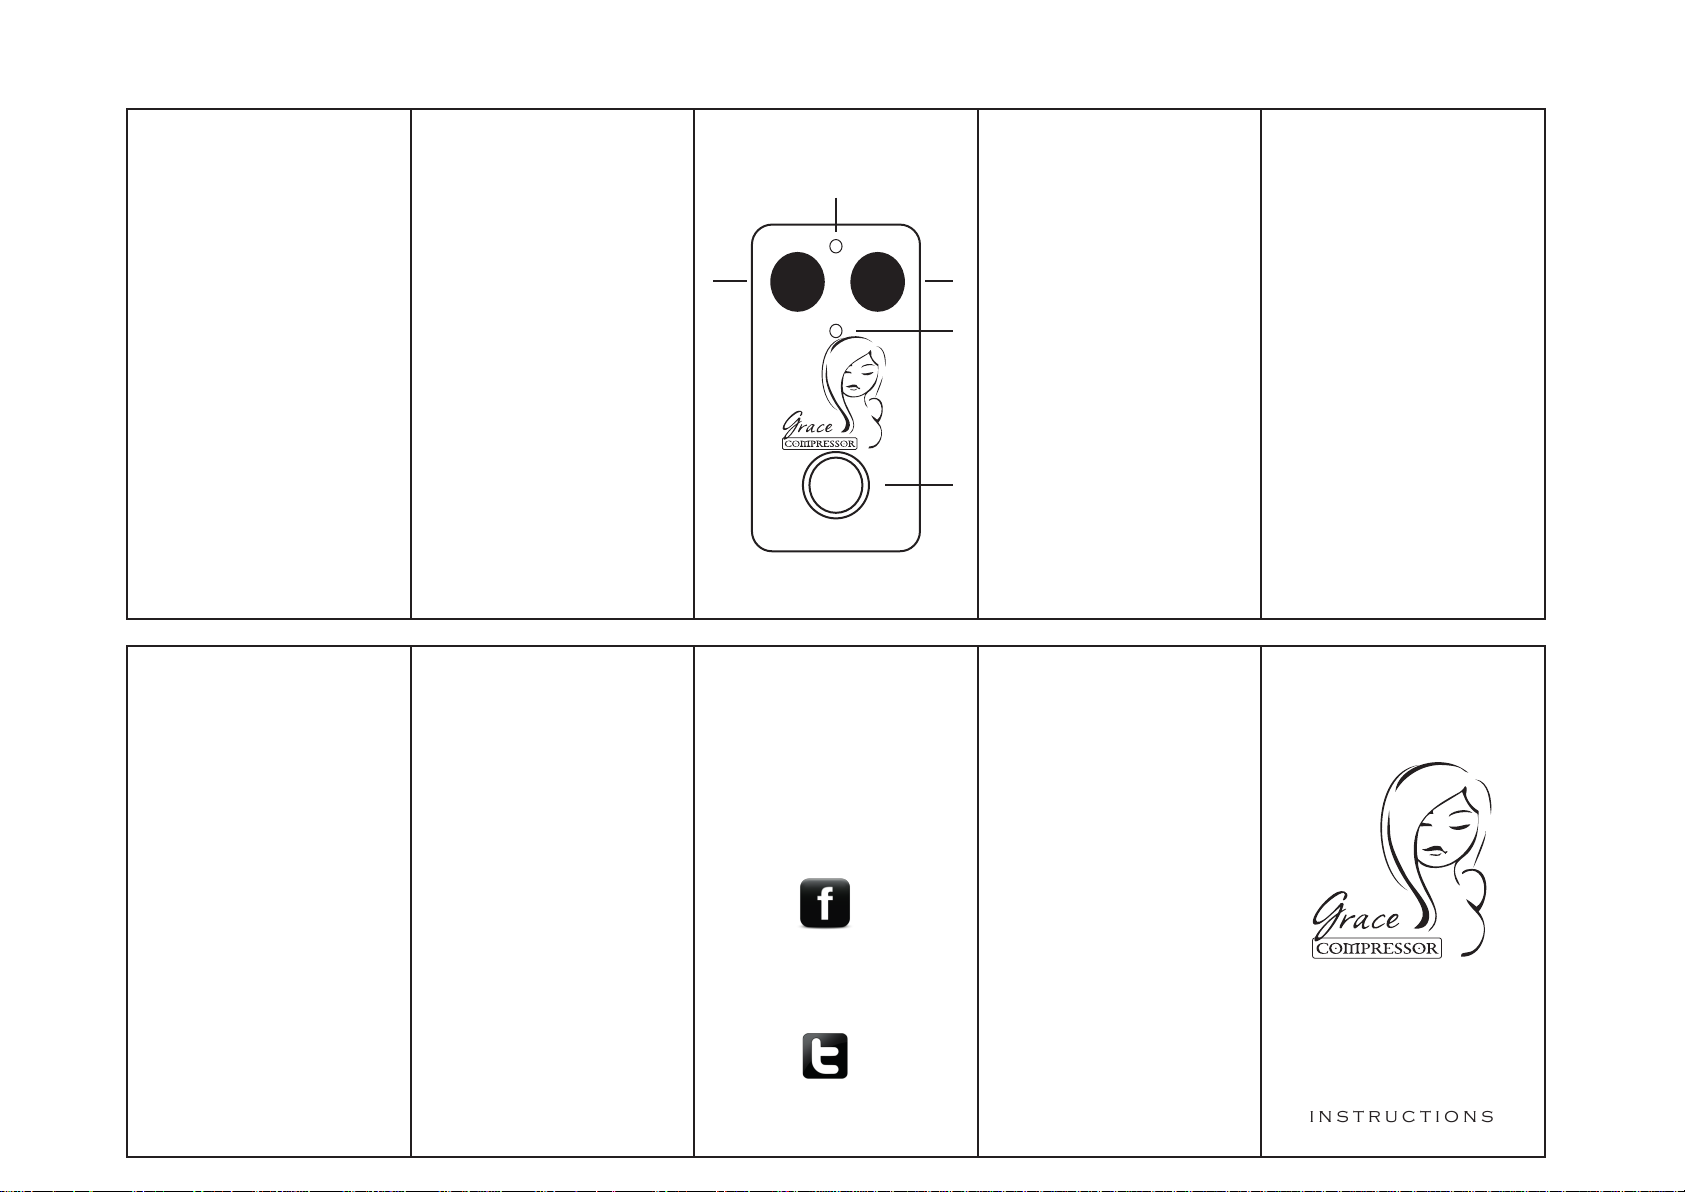
The Controls......
B C D
A
vol comp
H
-Volume control - this
A
sets her overall volume.
-Output socket.
B
-Charge indicator LED
C
Red = charging
Green = charged
E
Flashing = battery failure
(replace battery
immediately).
F
-
Input Socket.
D
E
-
Comp - this sets the
compression level.
-
Status LED
F
Red = pedal engaged.
-
True bypass footswitch
G
G
Stomp on here to
engage the pedal.
-
Power input - 2.1mm
H
9 volt DC, tip negative
You can run Grace with
the adapter plugged in.
First time......
(After completing the initial
12 hour charge)
Plug your guitar into the
input socket (D on Diagram).
Plug your amp into the
output socket (B on Diagram).
Set Vol at 1 o’clock position
and Comp at 5 o’clock
position.
Step back.
Step on Footswitch.
COMPRESSORAMA!!!
Dial up your own preferred
blend of squishy satisfaction!
Note : Always pull the plug
out of the input socket when
not in use - this turns off the
battery = weeks and weeks of
battery life from one charge!
Caring for Grace......
Clean her with a soft cloth,
allow no abrasives near her
lovely body.
Over time her art work may
wear off, be prepared for this:
Ensure you have enough
canned goods and fresh
drinking water.
The Lithium ion battery inside
her should last around 2 years.
To change the battery, simply
remove the four screws on the
back plate, unclip the old
battery and plug in the new
one. Replacement batteries
are available from your
favorite Red Witch store.
Do not treat her rough - this
includes immersing her in
beverages, rewiring her,
setting her on fire or using her
as a weapon.
She’s tough, but everything
lasts longer with a little love.
Warranty......
All electronics carry a lifetime
warranty providing the owner
purchases the pedal new and retains
proof of purchase.
All switches, jacks, potentiometers
and other mechanical parts are
warranted for one year after the
date of purchase or for four years
if the pedal is registered online (see
last page of this manual). This is non
transferable.
All external fixtures, finish, lettering
and knobs are not warranted.
Damage or failure of product due to
misuse will void the warranty.
All repairs must be made by
Red Witch authorized repair agents
only.
No user serviceable parts inside.
Unauthorized repair/modification will
render warranty void - in the
unlikely event that she has a
problem - let us fix her!
warranty@redwitchanalogpedals.com
Register her......
Simply go online and register
your pedal to gain an instant
4 year extended warranty.
www.redwitchanalogpedals.com
By registering you gain access
to our members only Red Witch
forum and the opportunity to
win free pedals & other treats!
That sounds rather good? Yes!!
Be sure to join “like” us on
Facebook - more opportunities
to win free pedals, stickers,
t-shirts and other delightful
goodies.
http://www.facebook.com/RedWitchPedals
We’re on Twitter:
http://twitter.com/RedWitchPedals
instructions
 Loading...