

Red Sound Systems Federation BPM FX PRO Owner's Manual

Owners Manual
Issue 2
FEDERATION
BPM FX - PRO
TM

CONTENTS
Introduction ..............................................................................................................................
Front Panel .............. .............................
...... .........................................................
Front Panel-Features ..........................................................................................
Rear Panel ...........................................................................................................
C
onnections - All Effects Mode .........................................................................
Connections - Single Effects Mode ...................................................................
Quick Start
Operation .........................................................................
Effects
Getting Started / ....
nput Level .....................................................................................
I ......................
BPM Display
...........................................................................................................
..........................................................
Configuration .........................................................................................
Synchronisation Source ............... ....................................
........................................................................................................
Synchronisation Indicator .................................................................................
Activating The Effects - Master ON/OFF ........................................
..................
SUPERKILL .........................................................................................................
FILTER/LFO .........................................................................................................
FLANGER ............................................................................................................
CUTTER ...............................................................................................................
DELAY ..................................................................................................................
PANNING .............................................................................................................
Setting The BEATS .................................................
TAP/Clear
.............................................................................................................
NUDGE Control ............................................................
............................................
.......................................
FX Mixer Joystick Control .................................................................................
PROGRAMS
USER BEATS ..........................................................
UTILITY ................................................................
........................................................................................................
............................................
................................................
MIDI control ........................................................................................................
Audio to MIDI sync .............................................................................................
Headphone Monitoring ...........................................................
...........................
Hints & Tips ........................................................................................................
Specification ......................................................................................................
MIDI Implementation .........................................................................................
1
2
3
4
5
6
7
8
8
8
9
9
10
11
11
12
14
15
17
18
21
22
23
25
28
29
35
40
41
42
42
43
44
This operation manual uses the following symbols for identifying indicator conditions:
= INDICATOR ON
= FLASHINGINDICATOR
www.redsound.com
Copyright / Software Copyright / Design Right 2001RED Sound Systems Ltd.
Printed in England - Issue 2
Front Panel Features
WELCOME TO THE FEDERATION
Congratulations! By purchasing the FEDERATION BPM FX, you have joined an exclusive new club of musicians,
remixers and Djs who have discovered a new level of power and control over the effects in their music. Previously,
to make effects happen in time with music was a matter of painstaking analysis of the source signal and timeconsuming tweaking of parameters on effects units to make sure that the tempo inherent in the effects did not clash
with or break up the tempo of the music.
In one fell swoop the FEDERATION does away with all that tedious messing about (matching milliseconds to BPMs
and hooking multiple effects units together) by assembling everything you need in one unit to filter/flange, gate,
delay and pan in perfect synchronisation with your music.
At the heart of the FEDERATION is Red Sound's acclaimed ‘V2’ BPM Analysis Engine (developed through groundbreaking products like the Voyager 1 and Micro-BPM), which shoulders the responsibility of calculating the tempo
of the music. This leaves you free to concentrate on the real-time controls of the simultaneous effects the
FEDERATION offers.
Introduction
Four of these effects have been available in various forms before, but never in such an easy-to-use and innovative
form. By triggering the filter in time with the music, you can seriously alter the harmonic shape of the sound without
destroying the beat, or perhaps choose the radical flanger, for a classic sweep that’s right out there. The cutter
makes gating and shaping the overall volume of the music in time a breeze but perhaps the greatest timesaving is
in the automatic synchronization of delays to the tempo of the music. No more look-up tables for BPM equivalents
in milliseconds, or complicated formulas that need a calculator. You just decide which beats you want to hear the
delays coincide with and then you can move on to more creative decisions such as whether the delays should
sound like a clinical 90's digital delay, a warm 60's tape delay or a more extreme ‘grunge’.
But even the unique combination of these facilities is dwarfed by the FEDERATION's ability to split the audio input
into three bands (Low, Mid and High) which can then be panned around independently in the stereo field. Patented
under the name of Spatial Panning System (SPS), this is a genuine first and will enable entirely new effect textures
and beat-related movements in the music of the future.
In addition, the innovative SUPERKILL feature lets you take re-mixing to new dimensions with advanced DSP
phase shift vocal elimination, with or without bass kill.
This manual is designed (like the FEDERATION itself) to get you using the effects and sync'ing them to the music
as quickly as possible. The simple real-time operation of the effects parameters and beat assignment is described
in detail, but at no time does it try and define how these effects should be used. We tell you how the FEDERATION
BPM FX PRO works but never how to use it. That's down to you!
OPERATING CRITERIA
This product has been designed to operate most effectively with dance music - i.e. music based on strong regular
beats and patterns. However, as the range of pre-recorded dance material is virtually limitless (and the audio mix of
individual tracks unknown) we cannot guarantee the performance of the FEDERATION BPM FX with every style of
dance music.
The FEDERATION’s synchronisation performance may be affected if the beat information is either unavailable or
indefinable within the audio track. Please note this when selecting your audio material.
OWNERS MANUAL
OWNERS MANUAL
PAGE
PAGE
1
1
Front Panel
13
14
15
16
12
Max
Min
Max
www.redsound.com
INPUT
LEVEL
SPS PANNING
INPUT
LEVEL
CUTTER
INPUT
LEVEL
DELAY
Min
MONITOR
USER
2/1
1/1
SPEED
3/4
2/3
1/2
DEPTH
1/3
1/4
SHAPE
POS
LGH/BAR
11
BEATS
3
3
8
8
12
12
BPM
ACTIVATE
PUSH
OK
PULL
SET(EDIT)
CUTTER
UTILITY
T
U
C
R
E
SYNCHRONISATION
Whole
Triplet
9
BAR LOOP
PROGRAM
USER
2/1
1/1
3/4
2/3
ON/OFF
MASTER
BEATS
8
7
6
10
USER
SPEED
(X-OVER 2)
2/1
1/1
Mid-Hi
Lo-Mid
Full
Off
G
D
2-WAY SPLIT
SPS
N
(DIRECTION)
(X-OVER 1)
I
N
N
A
P
Y
A
L
E
3/4
BEATS
2/3
1/2
1/3
1/4
FX MIXER
Lo-Hi
2-Way
R
E
T
T
L
I
F
SET (EDIT)
ACTIVATE
PANNING
LIVE (REC)
2
1
BASS
8
7
6
5
USER BEATS
PROG
4
17
18
INPUT
(ALL FX)
FILTER/FLANGER
LEVEL
Sound
Red
the colour of music
BPM FX - PRO
FEDERATION
SPEED
(MASTER)
Max
ENV MOD
Off
(FILTERTYPE)
RESONANCE
FREQUENCY
(FILTER/FLANGER)
USER
2/1
1/1
3/4
2/3
1/2
1/3
1/4
SUPERKILL
PATTERN SET
Set Quantize
Set Pattern Length
FAZED
3
1/2
5
2
2/1
SPEED
1/1
3/4
Max
BEATS
ACTIVATE
FILTER/
SET (EDIT)
FLANGER
Vintage Tape
1
Min
Grunge
Digital
[Wet]
[Dry]
REPEAT
MIX
(REPRO)
2/3
1/2
1/3
1/4
BEATS
ACTIVATE
SET (EDIT)
2
1
PATT
DELAY
BPM
+/UP
PUSH
PULL
3
BPM
-/DOWN
1/3
1/4
NUDGE
TA P
EXIT UTILITY)
(CLEAR BPM /
4
FEDERATION BPM FX
PAGE
2

Front Panel Features
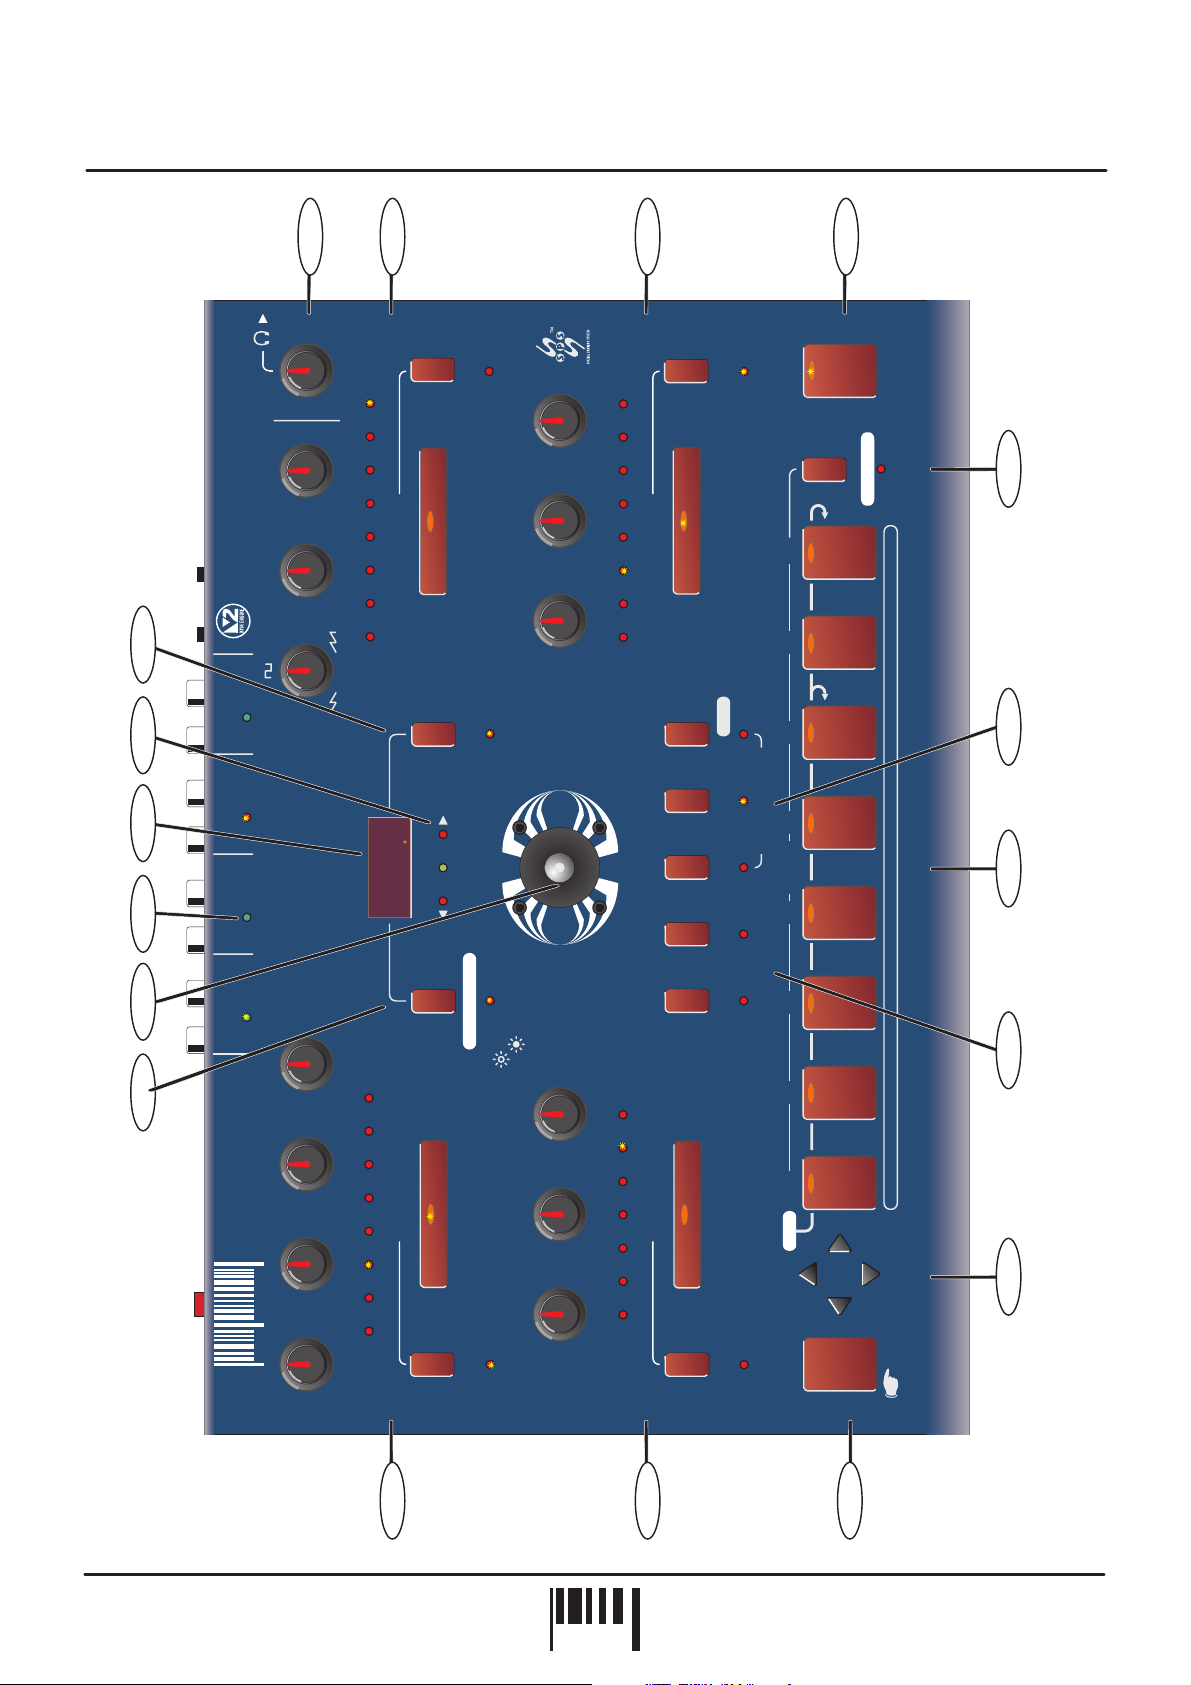
FRONT PANEL FEATURES
1.
FILTER/LFO (FLANGER):
controls for the filter/flanger effects. The ACTIVATE button switches the effect on and off. The SET button can be
used to change the BEATS trigger value or access the edit features of the FILTER/FLANGER.
2.
DELAY:
ACTIVATE button switches this effect on and off. The SET button can be used to change the BEATS trigger value or
access the edit features of the DELAY.
3.
TAP (CLEAR BPM):
4.
NUDGE:
trigger sync point. Also used for general data entry.
5.
SUPERKILL:
6.
BEATS:
setting of the effects. In Program mode they are used to recall, compare and save the effect programs. In Pattern
Record mode they are used to record, delete and edit events.
This section features LEVEL (REPRO), REPEAT and SPEED controls for the delay effect. The
These buttons are used to make fine, manual adjustments to the BPM value and shift the audio/effect
These two buttons select the DSP Fazed and Bass filtering.
This section features 8 buttons. In Select mode, they are used to set the BEATS synchronisation
This section features FREQUENCY, RESONANCE, ENVELOPE MOD and SPEED
This button is used to manually ‘tap’ in a tempo or clear the current BPM reading.
7.
USER BEATS:
W
hen the ‘LIVE’ button is selected, the TAP button can be used to manually trigger effects ‘on the fly’.
8.
PROGRAM (BAR LOOP):
BEATS record mode, this button also selects BAR LOOP mode.
9.
MASTER ON/OFF:
10.
PANNING:
ACTIVATE button switches this effect on and off. The SET button can be used to change the BEATS trigger value or
access the edit features of the PANNER.
11.
CUTTER:
button switches this effect on and off. The SET button is used to change the BEATS trigger value of the CUTTER.
12.
MONITOR:
check the effects setup before committing it to the master output. The MONITOR control adjusts the output level.
13.
UTILITY:
MIDI Channel etc.
14.
SYNCHRONISATION:
15.
BPM Display:
displayed in Pattern, Program, Utility and Effect edit modes.
This section features 3 buttons. Buttons 1 and 2 store and recall the custom user patterns.
This button is used to select Program mode and MIDI clock control mode . In USER
This button is used to switch the activated (or cued) effects on and off.
This section features SPS, 2-WAY SPLIT and SPEED controls for the panning effect. The
This section features SHAPE, DEPTH and SPEED controls for the cutter effect. The ACTIVATE
This feature lets you monitor the activated effects at the pre-Master on stage, allowing you to
This button lets you access utility parameters such as Input Gain, Effects Configuration, BPM range,
This 3-way indicator shows any audio/effect synchronisation adjustments.
The four digit BPM reading of the audio signal will be displayed here. Also, information will be
16.
INPUT LEVEL:
17.
FX MIXER:
position, all activated effects will be heard equally. Moving the joystick about its axis will vary the balance of the
activated effects.
18.
PATTERN SET:
(LED flashing) and SET QUANTIZE (LED on).
The four bi-colour input indicators are used to check the audio input level status.
This joystick control
In USER BEATS record pause mode, this button selects between SET PATTERN LENGTH
adjusts the relative balance between the activated effects. At the centre
OWNERS MANUAL
PAGE
3
Rear Panel
OFF
Patents Pending
ON
MADE IN ENGLAND
POWER
-
9v DC
+
FEDERATION
BPM FX - PRO
Red
the colour of music
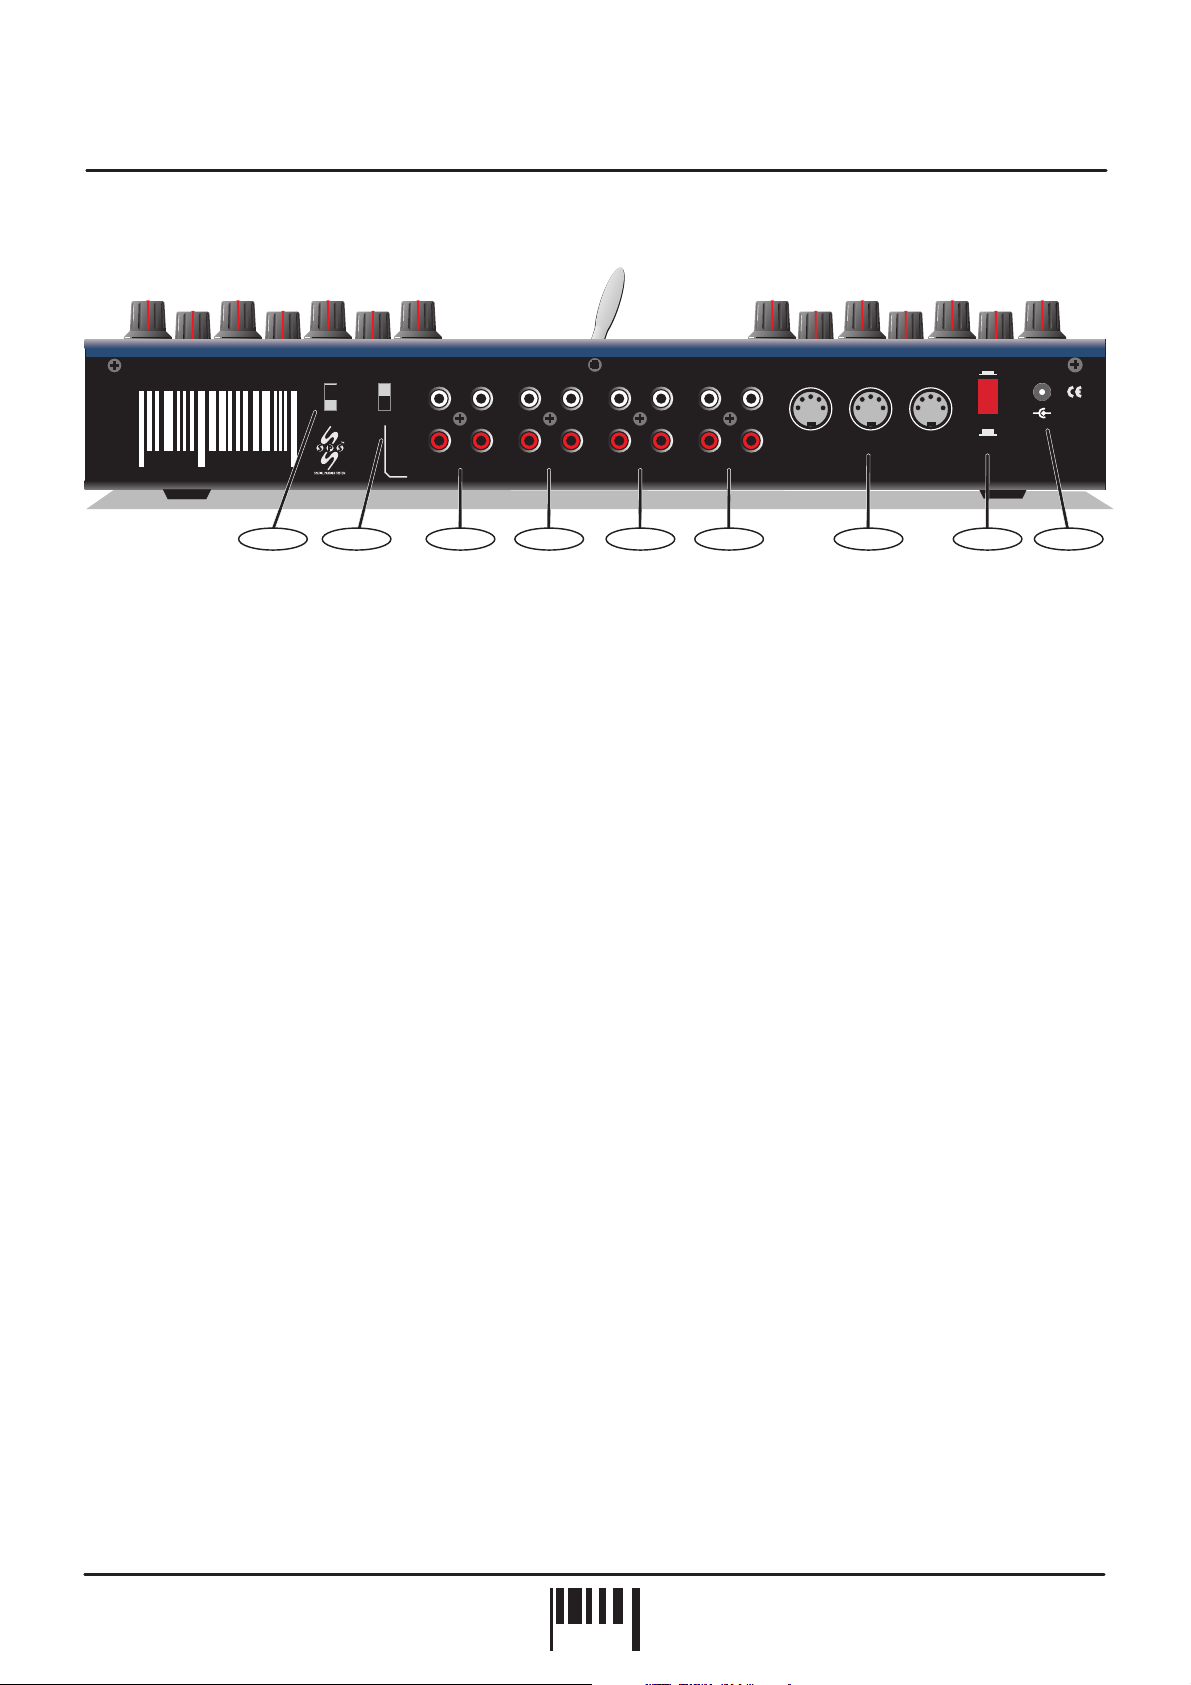
1.
SYNC - Switch
SYNC
IN/OUT
MIDI SINGLE FX
L
ALL FX
AUDIO
R
Sound
12 34 5 6
IN
BPM analysis
www.redsound.com
FILTER/LFODELAYCUTTERPANNING
(ALL FX)
MIDI
Red Sound Systems Ltd
OUTOUTOUTOUT INININ
CAUTION: DO NOT OPEN CASE. REFER TOQUALIFIED SERVICE PERSONNEL. NO USER SERVICEABLE PARTS INSIDE
OUT INTHRU
789
This switch selects AUDIO or MIDI synchronisation.
2.
IN/OUT - Switch
This switch selects ALL FX(DJ MODE) or SINGLE FX input/output operation.
3.
PANNING - Connectors
When the IN/OUT switch is set to ‘SINGLE FX’, use these connectors to process a signal through the PANNING
effect only. When the IN/OUT switch is set to ‘ALL FX’, the IN connectors can be used to analyse beat information
from a separate source to that which is being processed by the effects (effects can be used to process non beat
related sounds such as vocals etc. whilst the BPM is derived from drummers beat information in real-time)
4.
CUTTER - Connectors
When the IN/OUT switch is set to SINGLE FX, use these connectors to process a signal through the CUTTER
effect only. The terminals will be inoperative when the IN/OUT switch is set to ‘ALL FX’.
5.
DELAY - Connectors
When the IN/OUT switch is set to SINGLE FX, use these connectors to process a signal through the DELAY effect
only. The terminals will be inoperative when the IN/OUT switch is set to ‘ALL FX’.
6.
FILTER/LFO (ALL FX) - Connectors
When the IN/OUT switch is set to ‘ALL FX’, use these connectors to process a master audio signal through all four
effects modules. When the IN/OUT switch is set to SINGLE FX, use these connectors to process a signal through
the FILTER/LFO or FLANGER effects only.
7.
MIDI IN/OUT/THRU - Connectors
MIDI data will be transmitted and received by these connectors.
8.
POWER - Switch
This turns the power on and off.
9.
DC POWER IN - Connector
Only use the PSU supplied with the FEDERATION to power the unit.
FEDERATION BPM FX
PAGE
4
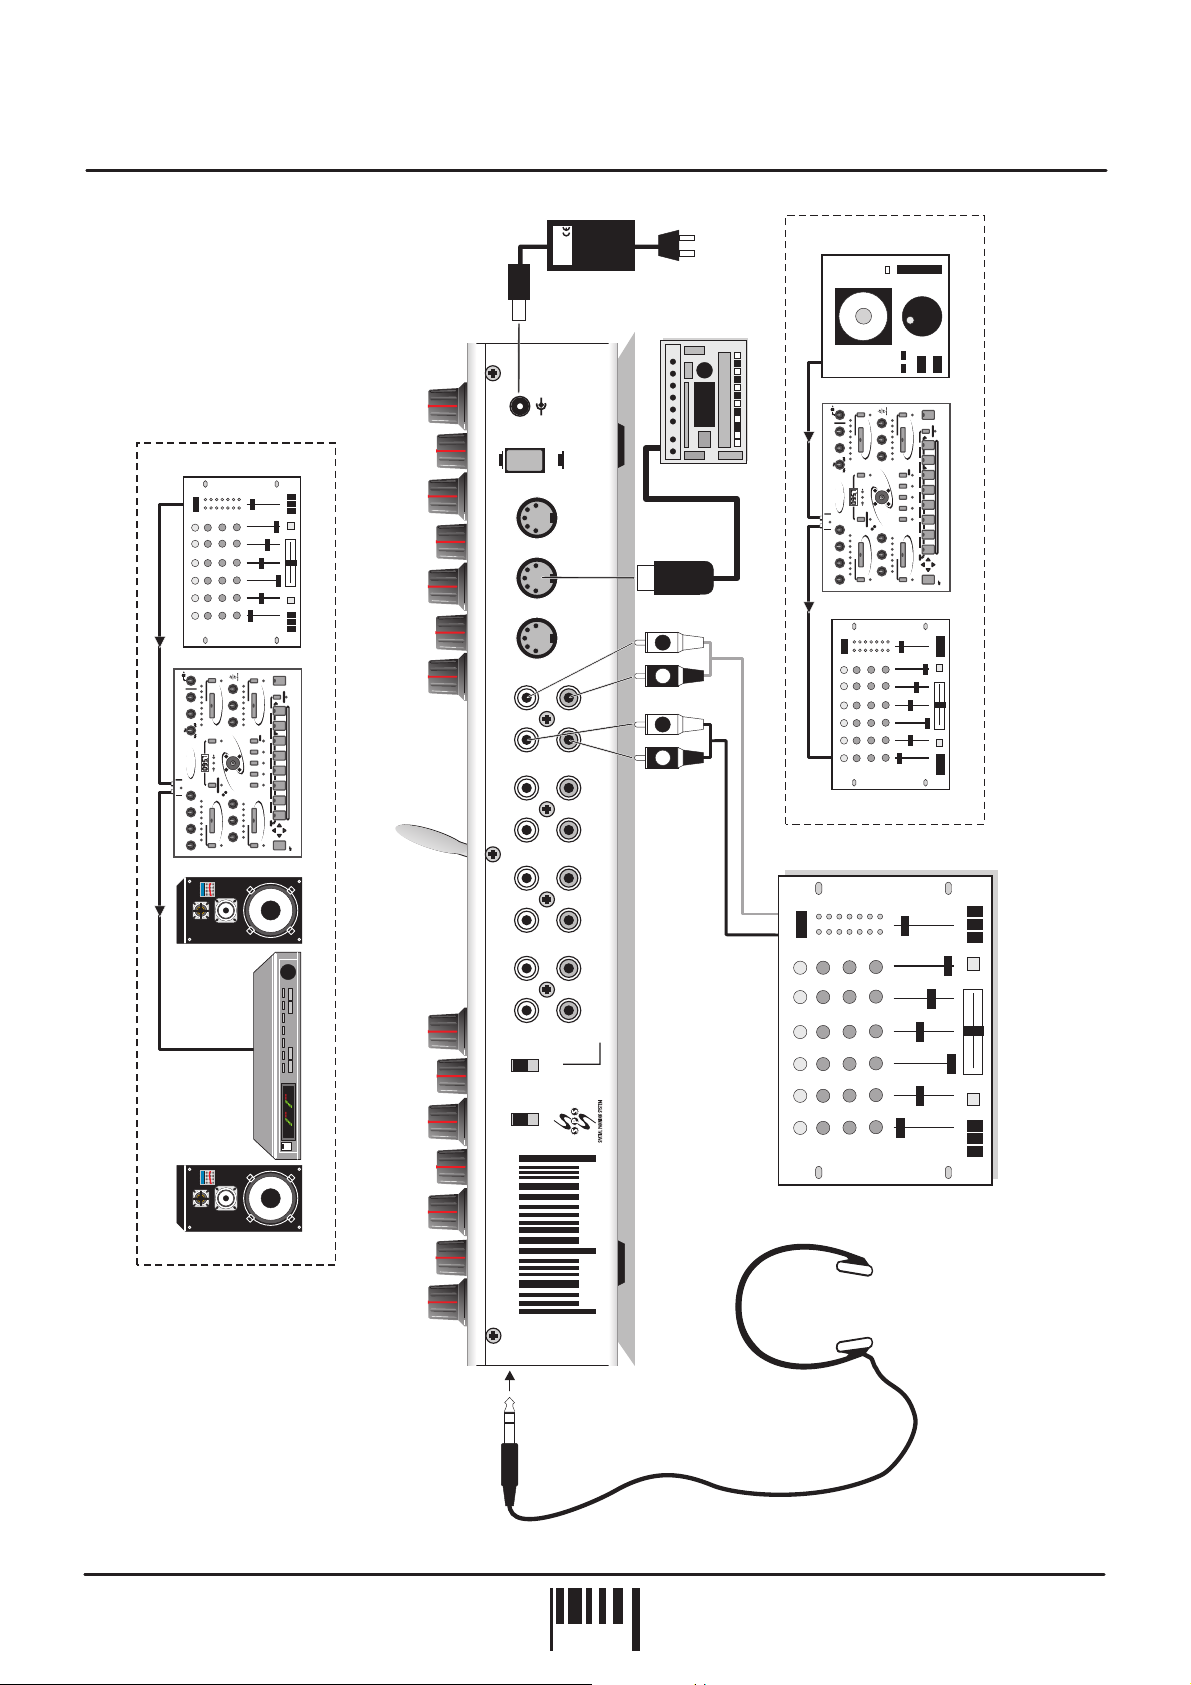
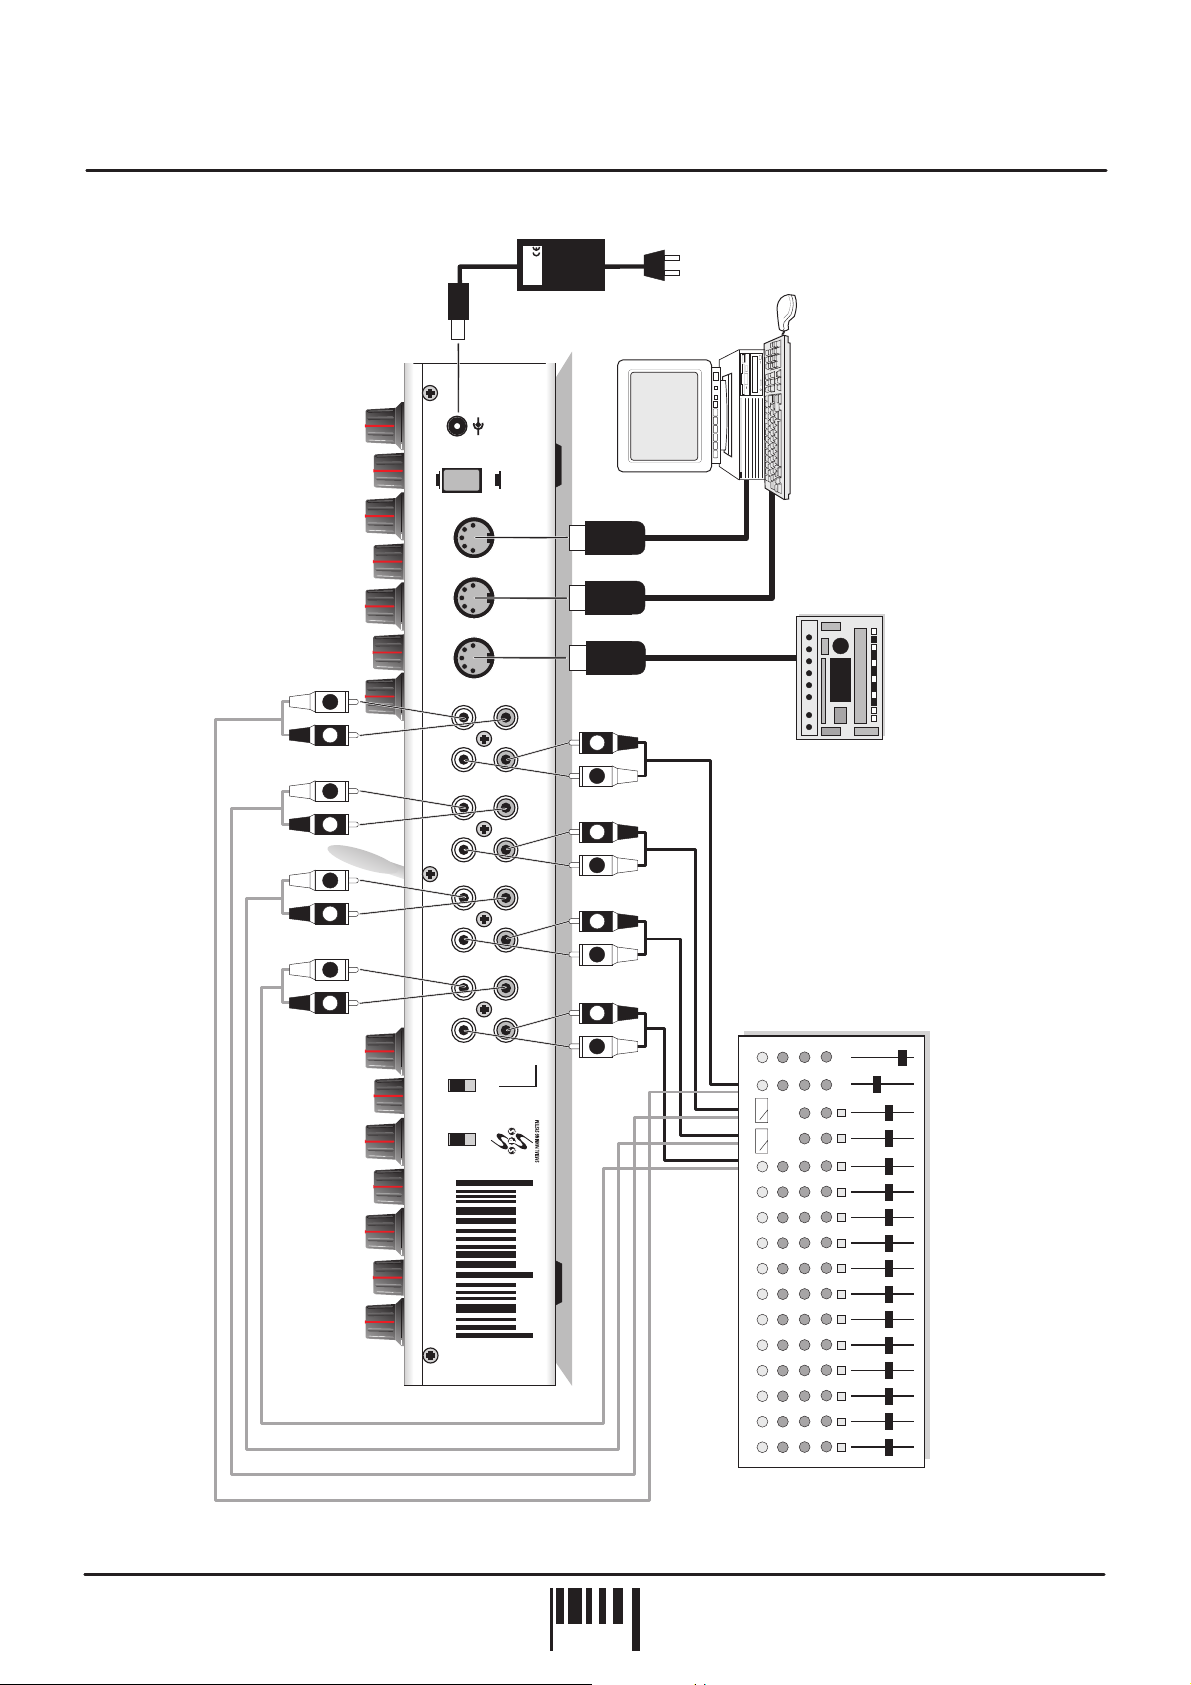
Connections - All FX Mode
MASTER OUTPUT
IN
INPUT
LEVEL
OUT/IN
OUT
www.redsound.com
PSU
RED
TO
SOCKET
AC WALL
LINE LEVEL OUTPUT
POWER
ON
MIDI
+
-
9v DC
OFF
IN
OUT
MIDI IN
MIDI SEQUNECER
IN
OUT
INPUT
LEVEL
OUT/IN
www.redsound.com
M
T
Max
SET
MONITOR
Min
USER
USER
SPEED
2/1
2/1
1/1
1/1
SPEED
Mid-Hi
3/4
3/4
Lo-Hi
BEATS
BEATS
2/3
2/3
Max
ACTIVATE
2-WAYSPLIT
CUTTER
Lo-Mid
1/2
1/2
DEPTH
Full
Min
1/3
1/3
SPS
2-Way
1/4
1/4
Off
SHAPE
UTILITY
-DJ
PUSH
POS
FX
OKPULL
PM
BPM
B
FXMIXER
LGH/BAR
SYNCHRONISATION
FEDERATION
RED
SetQuantize
PATTERNSET
SetPatternLength
SPEED
(MASTER)
2/1
SPEED
2/1 USER
Max
1/1
1/1
3/4
ENVMOD
Off
3/4
2/3
BEATS
BEATS
REPEAT
2/3
ACTIVATE
1/2
FILTER/LFO
1/2
1/3
RESONANCE
1/3
1/4
LEVEL
1/4
SET(SPEED)
FREQUENCY
CD/TAPE - LINE LEVEL ONLY.
SET
ACTIVATE
PANNING
LIVE(REC)
4
3
USERBEATS
2
1
ACTIVATE
DELAY
SET
UNSUITABLE FOR PHONO LEVEL
ON/OFF
MASTER
PROG.
BARLOOP
Whole
8
USER
7
2/1
Triplet
6
1/1
5
3/4
BEATS
4
2/3
3
1/2
FEDERATION
2
1/3
1
1/4
PATT
PUSH
BPM
-/DOWN
BPM
NUDGE
+/UP
PULL
)
BPM
TAP
(CLEAR
ALTERNATIVE SETUP 2
DJ MIXING DESK
THRU
M
T
Max
SET
MONITOR
Min
SPEED
Max
DEPTH
Min
SHAPE
-DJ
POS
FX
BPM
LGH/BAR
FEDERATION
RED
SPEED
(MASTER)
Max
ENVMOD
Off
RESONANCE
FREQUENCY
SET
ON/OFF
MASTER
USER
SPEED
2/1 USER
2/1
1/1
1/1
PROG.
BARLOOP
Mid-Hi
3/4
3/4
Whole
Lo-Hi
BEATS
BEATS
2/3
2/3
ACTIVATE
ACTIVATE
8
2-WAYSPLIT
CUTTER
1/2
1/3
2-Way
1/4
UTILITY
PUSH
OK
BPM
PULL
SYNCHRONISATION
SetQuantize
PATTERNSET
SetPatternLength
USER
2/1
1/1
3/4
BEATS
2/3
ACTIVATE
FILTER/LFO
1/2
1/3
1/4
SET(SPEED)
USER
PANNING
Lo-Mid
1/2
Full
1/3
SPS
7
1/4
2/1
Off
Triplet
6
1/1
LIVE(REC)
4
5
3/4
3
BEATS
FXMIXER
4
USERBEATS
2/3
2
1
3
1/2
FEDERATION
2
1/3
2/1
SPEED
1/1
1
3/4
1/4
2/3
BEATS
REPEAT
ACTIVATE
PATT
DELAY
PUSH
1/2
BPM
-/DOWN
1/3
BPM
NUDGE
+/UP
PULL
1/4
LEVEL
TAP
SET
(CLEARBPM)
(ALL FX)
FILTER/LFO
DELAY
RED Sound Systems Ltd
OUT
IN
OUT
IN
L
R
L
R
CHANNEL INPUT
DJ MIXING DESK
MASTER INPUT
SOUND SYSTEM
OUT
FX RETURN
ALTERNATIVE SETUP 1
CUTTER
PANNING
L
IN/OUT
SINGLE FX
MIDI
SYNC
ALL FX
AUDIO
R
(DJ MODE)
TM
IN
OUT
IN
FX SEND
BPM Analysis
DJ MIXING DESK
Sound
Red
BPM FX - PRO
FEDERATION
the colour of music
HEADPHONES
OWNERS MANUAL
PAGE
5
Connections - Single FX Mode
PSU
RED
+
-
POWER
ON
MIDI
9v DC
OFF
IN
OUT
THRU
RED Sound Systems Ltd
L
ALL FX
AUDIO
R
(DJ MODE)
TM
OUT
IN
OUT
IN
OUT
IN
OUT
IN
R
L
R
L
R
L
R
BPM Analysis
L
R
(ALL FX)
FILTER/LFO
L
R
DELAY
L
R
CUTTER
L
R
PANNING
L
IN/OUT
SINGLE FX
MIDI
SYNC
TO
SOCKET
AC WALL
MIDI OUT
CHANNEL INSERTS OR SEND/RETURNS
MIDI SEQUENCER
MIDI IN
MIDI IN
OTHER MIDI DEVICE
FEDERATION BPM FX
BPM FX - PRO
FEDERATION
Sound
Red
the colour of music
PAGE
STUDIO MIXING DESK
6

Quick Start
QUICK START
If you want to quickly try out the performance of the FEDERATION, please read the following points carefully:
CONNECTIONS:
Connect the power supply (included) to the ‘power in’ socket on the rear panel of the FEDERATION and plug it into
a suitable AC outlet. Connect the audio cables for a basic system setup as shown on page 5.
TURNING ON THE POWER:
mixing desk and amplifier system are turned completely down. Press the rear panel power switch on the
FEDERATION. Turn on the power of the mixing desk and then turn on the power of the amplifier system.
START UP INDICATIONS:
version and then change to show four illuminated centre bars. If this does not happen, check the power supply is of
the correct type and the unit is switched on as above.
SELECTING A PROGRAM:
select one of the eight factory presets, press and hold down the ‘PROG’ button (LED on) and then press one of the
main BEATS/PROG buttons marked 1-8.
SYNCHRONISATION:
switch on the rear panel is set to the ‘ALL FX’ position and the SYNC switch is set to ‘AUDIO’.
INPUT LEVELS:
playback on the connected sound source and check the status of the front panel bi-colour level indicator marked
‘FILTER/LFO (ALL FX)’. The audio inputs of the FEDERATION are set to work with normal line level output signals
therefore, the level indicator should now be coloured green, occasionally flashing red. If the indicator is off or
constantly red, adjust the gain and/or output levels on the mixing desk. (Also see the “Input Gain” section in
UTILITY mode on page 35)
Before making any connections, make sure that the power on all your equipment is turned OFF.
Make sure all connections have been made correctly and the volume controls on the
When the FEDERATION is powered up, the BPM display will briefly show the software
We’ve already stored a selection of typical effects setups in the FEDERATION. To
For this quick start, set the FEDERATION to operate in ‘ALL FX’ mode. Ensure the IN/OUT
Select a suitable audio track (dance orientated music with defined beat information), start the
ACTIVATING THE EFFECTS:
beats per minute.
Press the ‘MASTER ON/OFF’ button. The audio signal will now be processed through the effects as defined by the
selected program.
Try adjusting the controls on the activated effect (LED on within ‘Activate’ buttons) to hear how they alter the sound
in real-time. To change a ‘BEATS’ trigger setting, simply press the ‘SET’ button (LED on) of the desired effect and
then press one of the main ‘BEATS’ buttons near the front of the main panel (also used to select programs). The
timing of the effect triggering will instantly change to the new setting. Try the whole range of preset timings to hear
the way they can completely change the feel or ‘groove’ of the music (always press the SET button first before
attempting to select a new BEATS setting).
Now try editing the other effects in a similar manner (use the ACTIVATE buttons to select or de-select each effect)
and, when you’re ready, activate all four at once with different BEATS trigger settings.
As a final touch, try moving the FX MIXER joystick about it’s axis to hear the effects blend into each other and
interact in a myriad of combinations.
Please read the following “OPERATION” section fully to totally appreciate the range of features and facilities the
FEDERATION BPM FX-PRO has to offer.
The BPM display should now be reading the tempo of the selected audio track in
OWNERS MANUAL
PAGE
7

Operation
EFFECTS CONFIGURATION
DJ Mode (FX in series)
For those who are new to the world of digital FX, or will be using the FEDERATION in a high-pressure situation
such as live gigs, this is probably the best mode to start with. All four effects are chained together into a single
signal path, automatically taking the output of the first effect and feeding it to the second, the second to third etc.
We have arranged the effects in a logical order; Filter, Cutter, Delay, Panning. This means that you are unlikely to
end up with a later effect upsetting what you have already setup for an earlier one in the chain (if you are worried
about this restricting your creativity, read "Setting the effects configuration" in the “UTILITY” section on page 35).
DJ Mode is also the simplest way to hook the FEDERATION into your sound system. Simply take the FX send of
your mixer and plug this into the pair of inputs labelled ‘ALL FX IN’ on the rear panel of the FEDERATION. Then
connect the outputs back to the FX return on the mixing desk - see page 5 for full details. Now all the effects are
connected together and you can use whichever combination you like straight away. Alternatively, you can connect
the FEDERATION in-line between a single sound source (line level only) and the mixing desk input. With this setup,
the effects will only operate on the single sound source - see ‘Alternative Setup’ on page 5.
Producer Mode (FX in parallel)
In the recording studio, where getting a great effect setup isn't under such intensive time pressure as in a DJ'ing or
live gig situation, you may want to use the FEDERATION effects selectively on different elements in your music.
For example, you may wish to add the Filter to the bass line, Cutter to the percussion, Delay to the vocals and SPS
Panning to the ambient synthesizer sounds. For this reason the FEDERATION-PRO model gives you 4 separate
stereo inputs and outputs so that you can access each effect independently.
To use the FEDERATION-PRO in Producer Mode, it is best to have a mixing desk with (up to) 4 effect send/return
paths (if your desk has less than four then you won't be able to access all four effects independently). Connect
each stereo input/output to a separate send/return loop on your desk and note down which send corresponds to
which FEDERATION effect. This will allow you to send different groupings of sounds to each of the effects. If you
don't have enough send/returns, but you do have insert loops on your desk, then you can use these to apply the
effects independently to individual sources coming in, but not to mixable groups of sources as you can with aux
send/returns.
If you don't have either send/returns or insert loops, then you can feed the signal from individual instruments
directly into the separate stereo inputs of the FEDERATION and then mix the separate outputs through a simple
line mixer.
GETTING STARTED / SYNCHRONISATION SOURCE
After connecting the FEDERATION to your system as detailed above, press the power switch on the rear panel to
turn the power on. The version of software fitted to your unit will now be shown briefly on the main display:
LGH/BAR POS
Software version = 1.05
BPM
Afterwards, the four centre bars will illuminate to indicate the ‘IDLE’ status of the BPM engine or MIDI clock input.
LGH / BAR POS
Four static centre bars
indicate no beat detected
‘IDLE’ condition
BPM
The FEDERATION BPM FX-PRO has two main operating modes for synchronising the effects to the audio. In the
first mode the BPM analysis ‘engine’ is used to calculate the tempo of the incoming audio. This mode can be used
for live DJ or studio applications alike. The second mode uses incoming MIDI clock data to constantly define the
BPM value which will appeal more to the studio user.
FEDERATION BPM FX
PAGE
8

Operation
To engage the FEDERATION’s BPM engine, set the rear panel ‘SYNC’ switch to the ‘AUDIO’ position (down). Any
incoming MIDI clock data will now be ignored. To dis-engage the FEDERATION’s BPM engine, set the rear panel
SYNC switch to the ‘MIDI’ position (up). The tempo of the incoming audio will NOT be used to control the tempo of
the FEDERATION’s effects.
NOTE: If you want to individually process vocals, instruments etc. from non-MIDI based music (no MIDI clock
available for synchronisation), use the inputs marked ‘BPM ANALYSIS’ (PANNER section - ‘ALL FX’ mode
selected) to feed in beat information from the drum or backing track for correct BPM calculation. This input works in
parallel with the master input when ALL FX mode is selected.
INPUT LEVELS
The four bi-colour ‘INPUT LEVEL’ indicators at the top edge of the front panel monitor the input levels for each
effect when ‘SINGLE FX’ mode is selected. When ‘ALL FX’ mode is selected, only the ‘FILTER/LFO (ALL FX)’
indicator will be in use. Each indicator can show three input level conditions as follows:
OFF - No signal / low signal level
BRIGHT GREEN - Normal line level signal present RED - Overloaded signal - Level too high
Ideal working level
ALL FX: (IN/OUT switch set to ‘ALL FX’)
With the FEDERATION connected to your DJ system as detailed on page 5, play a suitable upbeat track on any
connected sound source and ensure the mixing desk’s gain/level controls are set correctly (0dB).
If you have connected the FEDERATION to the master outputs of a mixing desk, move the desk’s master output
fader to it’s normal working position (0dB indication on output level meters) and observe the FEDERATION’s input
level indicator. The indicator should be illuminated GREEN, occasionally flashing RED. If the level indication is
incorrect, adjust the FEDERATION’s Master input gain up or down accordingly - see UTILITY mode 1 on page 35.
SINGLE FX: (IN/OUT switch set to ‘SINGLE FX’)
With the FEDERATION connected to your studio system as detailed on page 6, play a suitable track on the
connected multi-track sound source and ensure the gain/level controls for each channel are set correctly (0dB).
Turn up the Aux send controls on the relevant channels and observe the FEDERATION’s input level indicator(s) for
the connected effect. e.g. If the channel 2 insert/aux send on your mixing desk is connected to the CUTTER
in/outs, observe the input level indicator in the CUTTER section whilst adjusting the channel 2 send level. The
indicator(s) should illuminate GREEN, occasionally flashing RED at peak signal levels. If the indicator(s) show a
different condition, check and adjust the send levels on your mixing desk.
NOTE1: The UTILITY mode ‘GAIN’ adjustment has no function when SINGLE FX mode is selected i.e. all four
channels are setup to receive +4dB line level signals.
NOTE2: If the input level is set incorrectly, the performance of the BPM engine and audio quality may be affected.
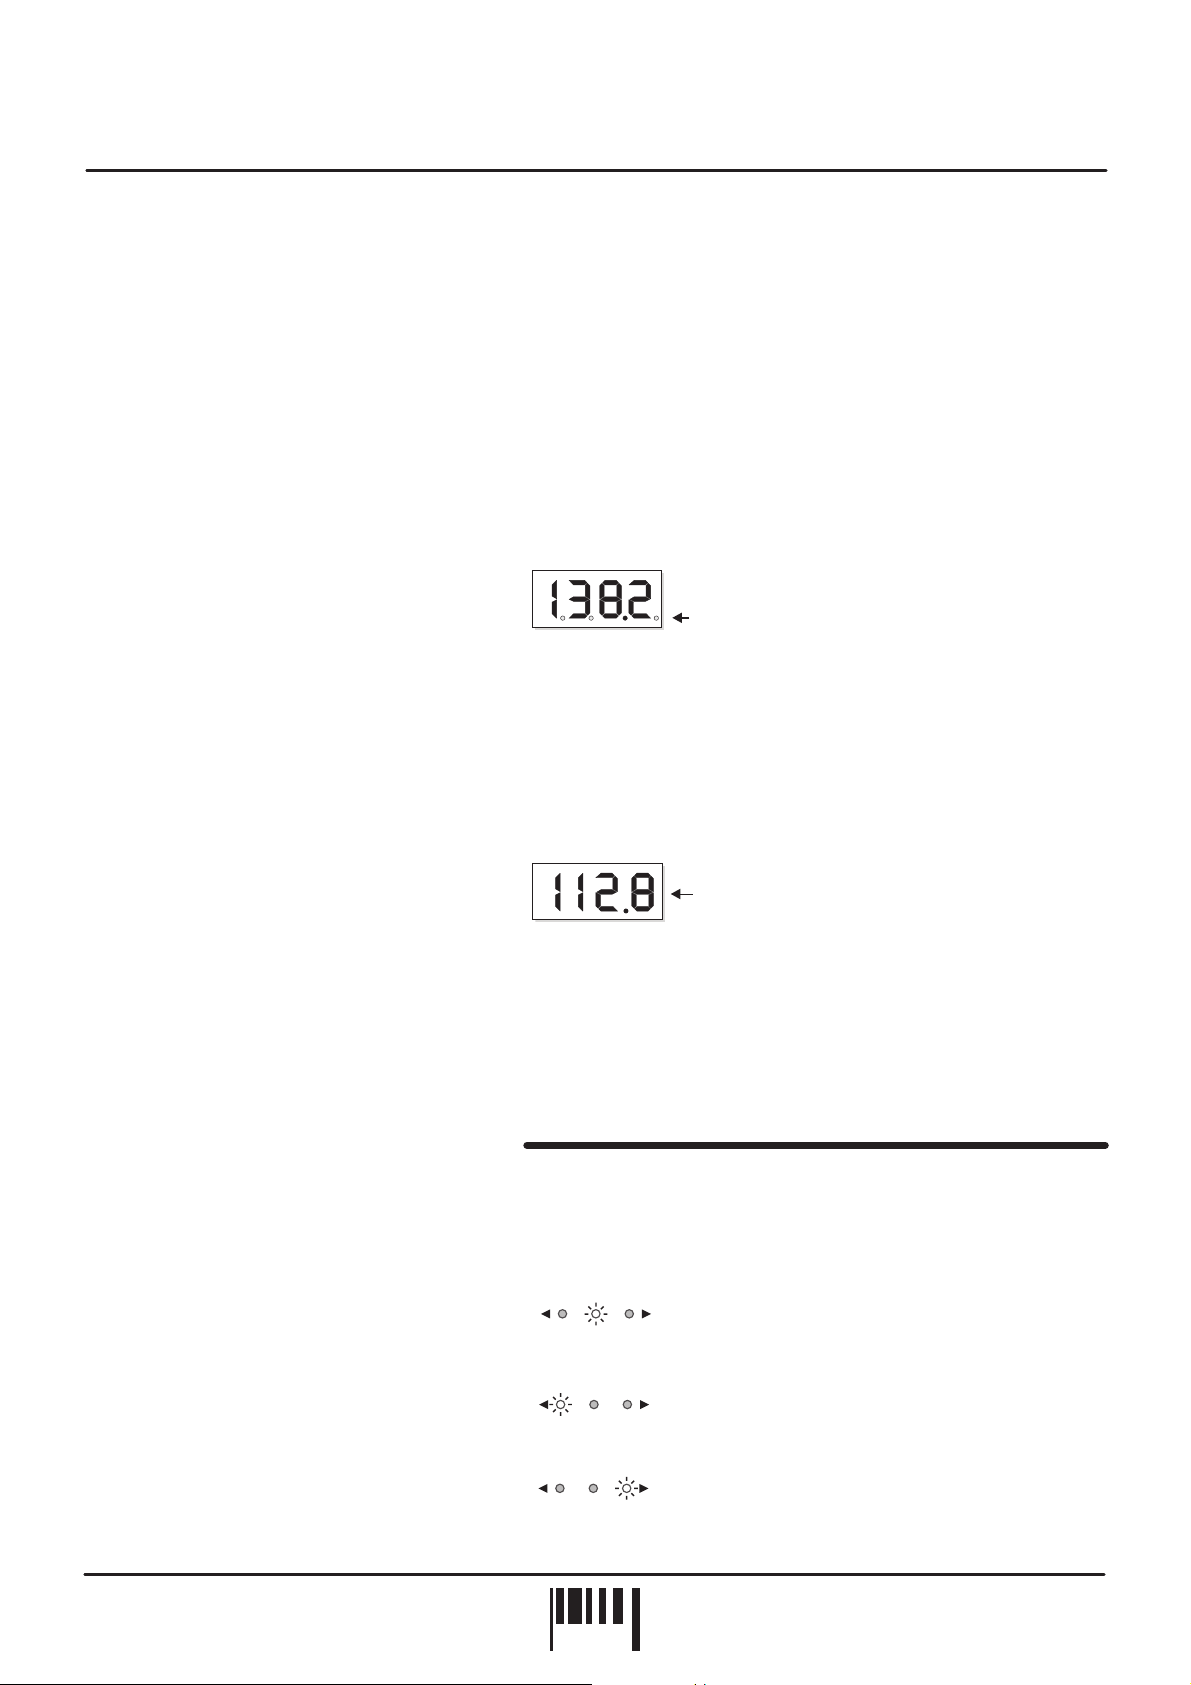
BPM DISPLAY
SYNC = AUDIO mode (rear panel SYNC switch ‘down’):
definable beat information).The BPM display should now show the tempo of the track in beats per minute as in the
following example:
The indicator in the MASTER ON/OFF button (and any selected ACTIVATE buttons) will now flash at the detected
BPM rate to indicate ‘PAUSE’ mode.
LGH / BAR POS
Start the playback of a suitable audio track (containing
Example reading = 138.2 BPM
BPM
OWNERS MANUAL
PAGE
9
Operation
NOTE: If the BPM engine has picked up on the off-beat information in the track (LEDs flashing on the off-beats)
from a prominent Hi-Hat etc., you can use the NUDGE control’s Pull/Push feature to adjust the synchronisation to
the on-beat position - for further information see page 23.
During tempo analysis of the audio track, the right-hand digit in the display may fluctuate slightly as the BPM
reading is constantly updated in real-time. Any major shift in tempo (changing the playback speed using a CD/vinyl
deck’s pitch control) will be tracked and displayed by the FEDERATION.
IMPORTANT NOTE: In this mode, the FEDERATION’s BPM engine will continue triggering the effects indefinitely
at the last detected BPM rate if the strong regular beats in the audio track become unavailable. This feature allows
the effects to continue operating through quite passages in the audio track.
If the strong regular beats in the audio track become unavailable, the 3 remaining decimal point indicators in the
BPM display will flash continuously, as shown in the following example:
This will occur approximately 5 seconds after the last valid BPM reading was taken to warn you that the
FEDERATION is now 'free-wheeling' and the BPM display is no longer being updated from the audio track. When
the strong regular beats in the audio track return, the FEDERATION will automatically detect the BPM information
and make any necessary adjustments, at which time the flashing decimal point indicators will go out to indicate a
'locked-in' condition.
LGH/BAR POS
BPM
3 flashing decimal points indicate
'free-wheeling' condition
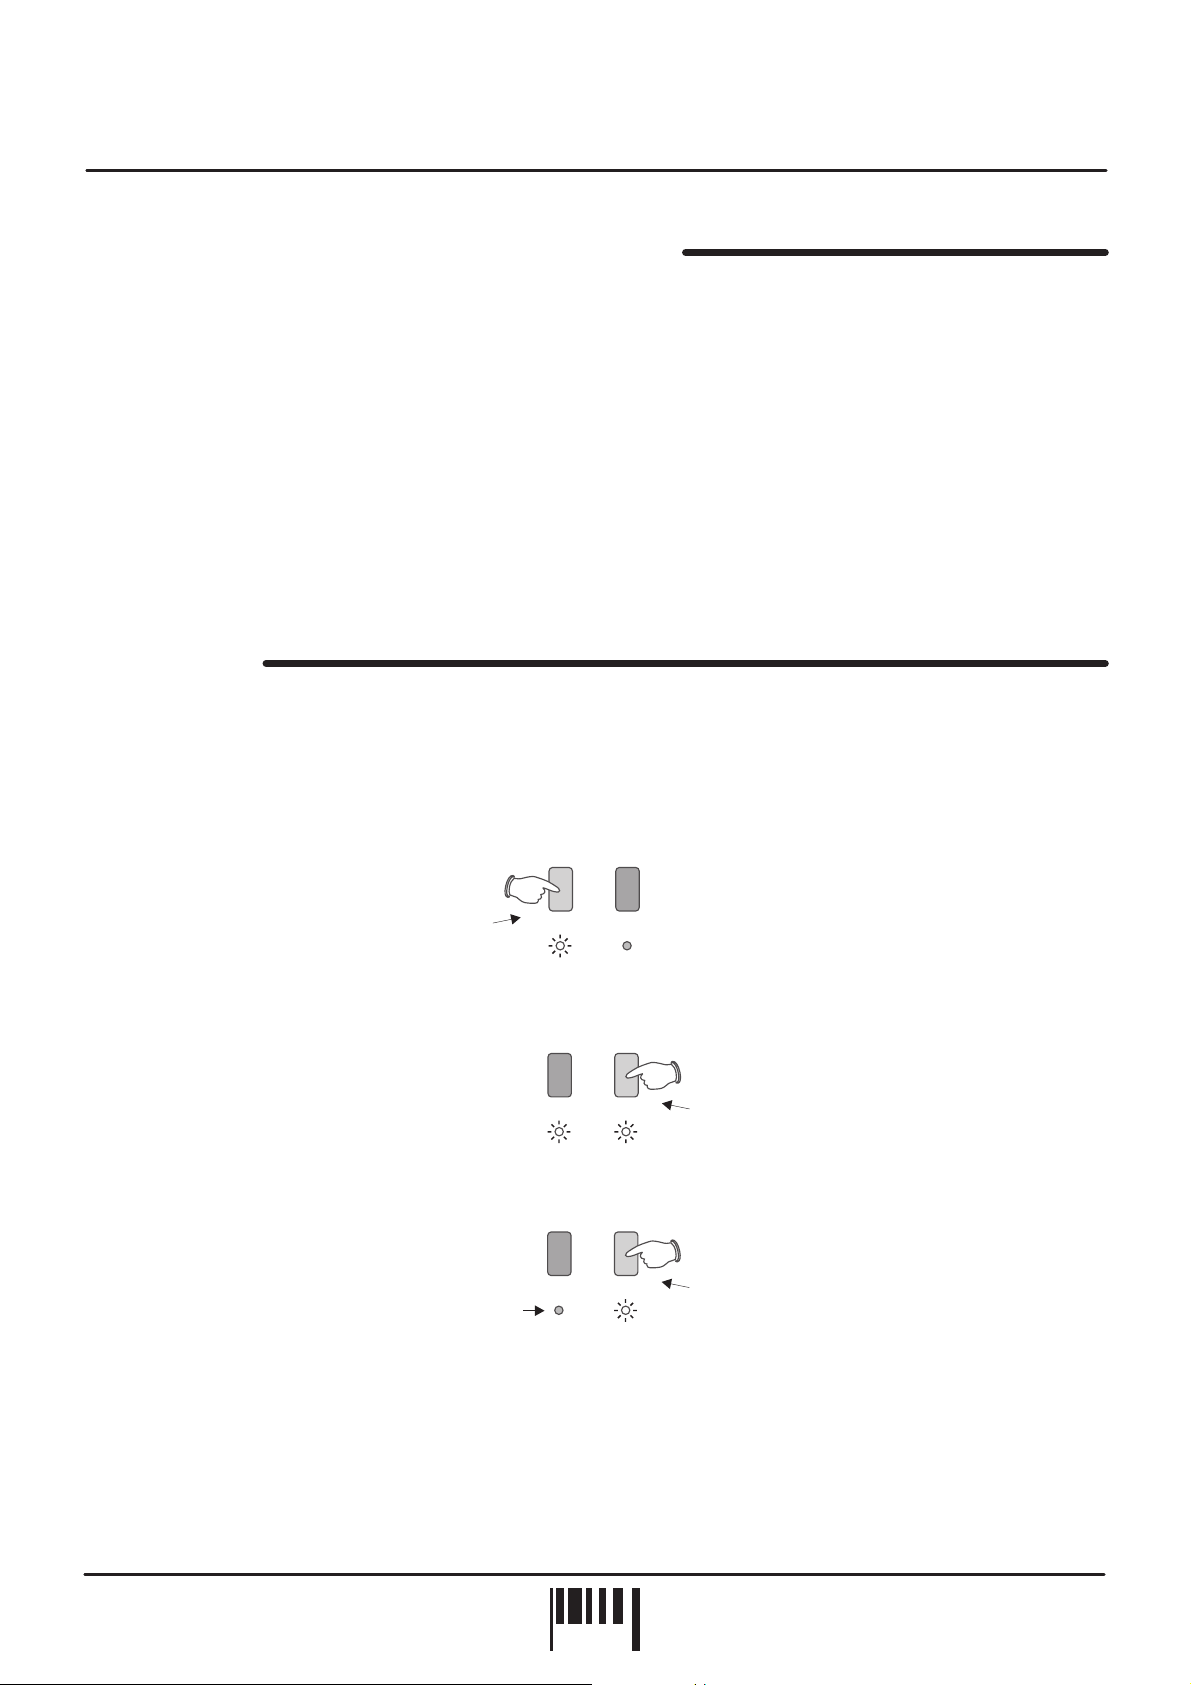
SYNC = MIDI mode(rear panel SYNC switch ‘up’):
Start the connected MIDI sequencer. The BPM display should
now show the tempo of the MIDI sequencer in beats per minute, as in the following example:
LGH/BAR POS
Example reading = 112.8 BPM
BPM
The indicator in the MASTER ON/OFF button (and any selected ACTIVATE buttons) will flash at the BPM rate to
indicate ‘PAUSE’ mode.
In MIDI sync mode, the BPM display and timing of the FEDERATION will simply reflect the tempo setting of the
connected MIDI sequencer regardless of any musical content. Changes in tempo (master tempo changes within a
MIDI composition etc) will be instantly tracked and displayed by the FEDERATION.
SYNCHRONISATION INDICATOR
This 3-way indicator shows the synchronisation status between the audio and effect beat position. The BPM engine
constantly analyses the accuracy of the relative downbeat positions and will either 'PULL' or 'PUSH' the effect
triggering to maintain the synchronisation.
When the audio and effects are the green 'OK' indicator will light, as follows:
If the effects are of the audio, the red 'PULL' indicator will light, as follows:
ahead
synchronised
OKPULL PUSH
SYNCHRONISATION
OKPULL PUSH
SYNCHRONISATION
If the effects are the audio, the red 'PUSH' indicator will light, as follows:
behind
OKPULL PUSH
SYNCHRONISATION
NOTE: The synchronisation display will show a constant ‘OK’ indication when SYNC mode is set to ‘MIDI’.
FEDERATION BPM FX
PAGE
10
Operation
ACTIVATING THE EFFECTS - MASTER ON/OFF
Each effect can be selected independently or collectively using the 4 ACTIVATE buttons and the MASTER ON/OFF
button.
To cue the effect(s), press the ACTIVATE button(s) once in PAUSE mode (BPM detected, MASTER ON/OFF
indicator flashing at BPM rate). The indicator(s) in the ACTIVATE button(s) will now also flash at the BPM rate.
Press the MASTER ON/OFF button once to output the activated effects. The indicators in the ACTIVATE buttons
will stay ON when the MASTER button is set to ‘ON’ and flash when set to ‘PAUSE’. To switch the effects on
individually, first press the MASTER ON/OFF button (LED on) and then press the desired ACTIVATE button(s) to
output the effects.
The functionality of the MASTER ON/OFF button depends on the rear panel SYNC switch setting. In mode,
AUDIO
this button acts as a Start, Pause and Continue control for the internal USER BEATS patterns as well as switching
the effects on and off. In mode, the MASTER ON/OFF button simply switches the effects on and off, the
MIDI
USER BEATS patterns now being controlled by the external MIDI sequencer connected to MIDI IN.
SUPERKILL
The SuperKill section allows you to radically alter audio with or without the main effects in operation
independent of the BPM engine)
. By phase inverting the stereo signal, the vocal/instrument levels in the audio are
(totally
dramatically remixed, often revealing previously unheard elements within the music. You can choose between full
FAZED kill, BASS kill or even FAZED WITH BASS kill which adds the rhythmical bass frequencies back into the
FAZED mix to keep the groove going.
For Fazed Bass kill, select ‘FAZED’ button:
with
Press once = ‘Fazed with Bass’ kill
FAZED
SUPERKILL
BASS
For full Fazed kill, now select ‘BASS’ button:
FAZED
BASS
SUPERKILL
Press once (with FAZED selected i.e. LED on )
= full ‘Fazed’ kill
For Bass kill only, select ‘BASS’ button:
FAZED
‘Fazed’ kill not selected i.e. LED off
BASS
SUPERKILL
Press once = ‘Bass’ kill
To de-select the SuperKill function, simply press the relevant button again (LED off). The SuperKill settings can be
stored with each program.
NOTE 1: SuperKill requires a mixed STEREO input signal for satisfactory operation.
NOTE 2: SuperKill will be disabled when the rear panel ‘IN/OUT’ switch is set to the ‘SINGLE FX’ position.
OWNERS MANUAL
PAGE
11
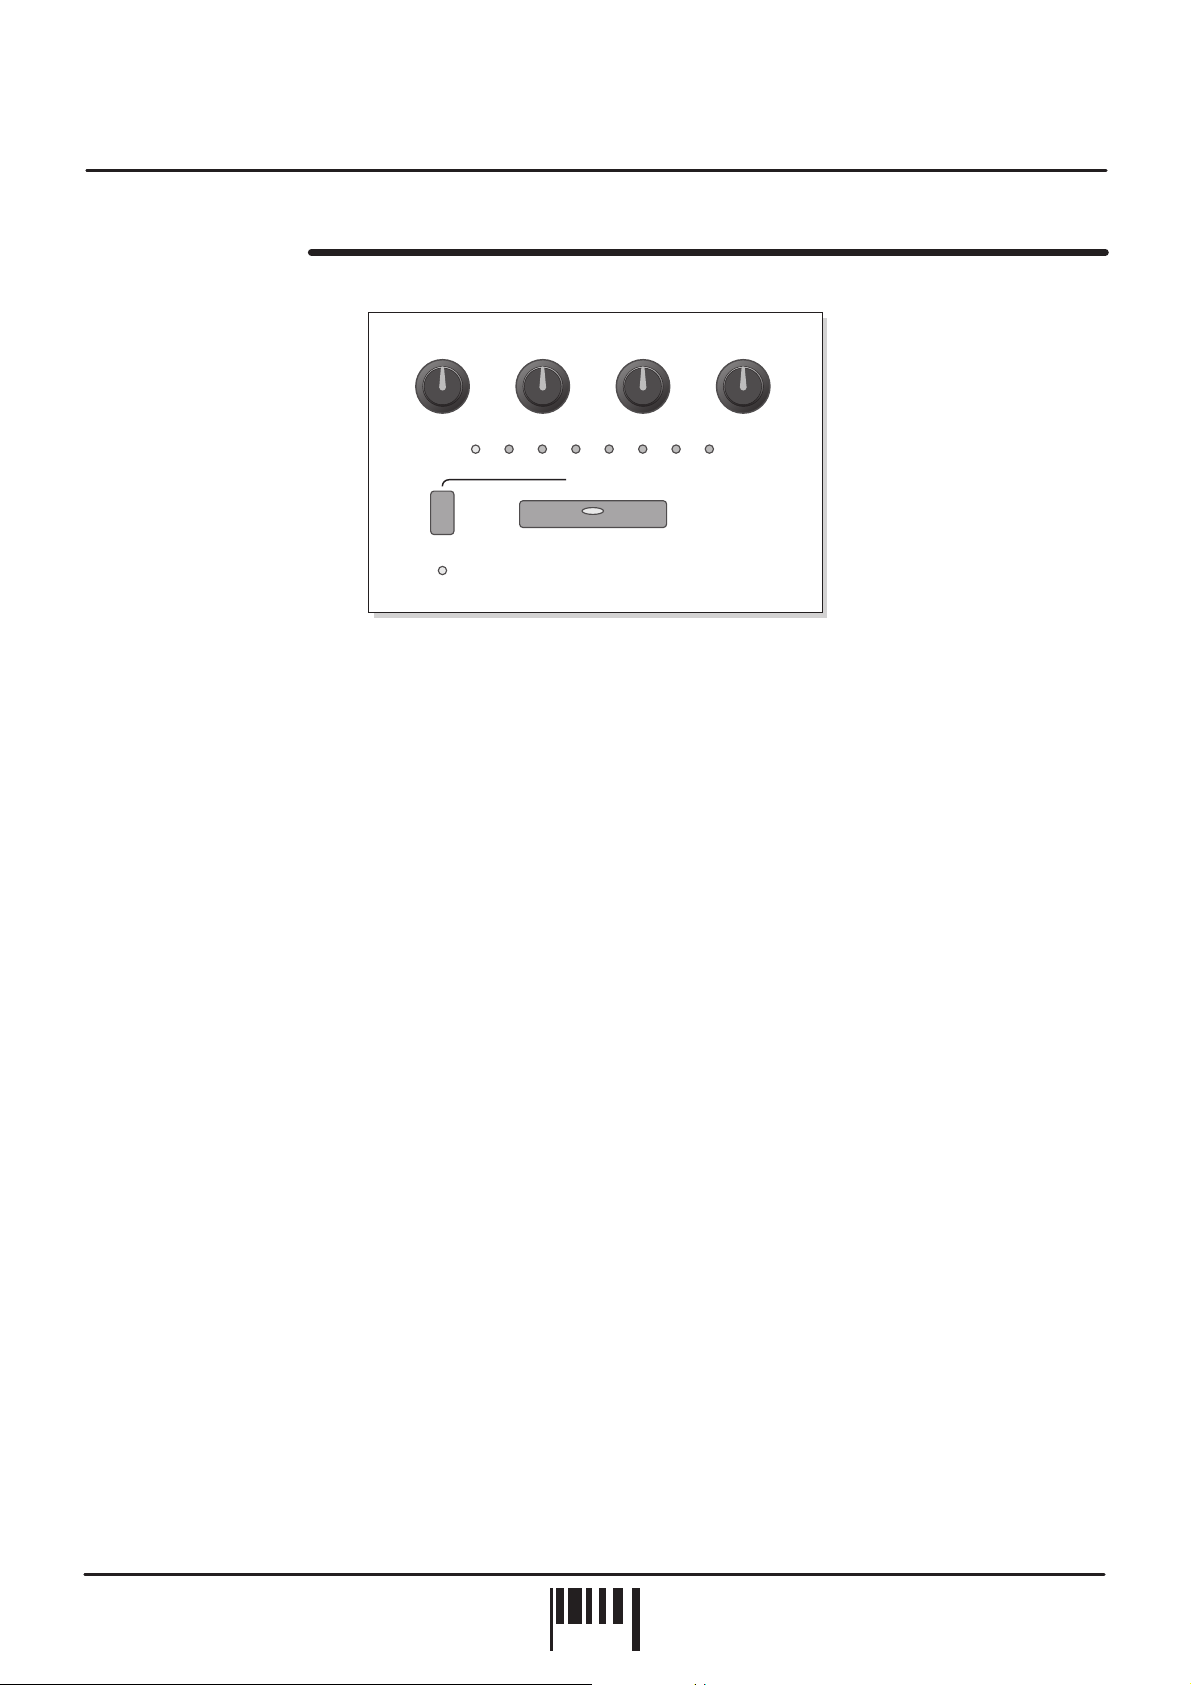
Effects
THE FILTER /LFO
(FILTER/FLANGER) (FILTERTYPE) (LFO SHAPE)
SET(EDIT)
RESONANCEFREQUENCY SPEEDENV MOD
BEATS
ACTIVATE
FILTER/LFO
FLANGER
MaxOff
(MASTER)
1/13/4 2/1 USER2/31/21/31/4
This effect recreates the most essential part (for many dance music producers and remixers) of a classic analogue
synthesizer, the filter, and puts it under the direct control of the tempo of the source music via the synchronised
Low Frequency Oscillator (LFO).
The Filter allows you to remove or accentuate frequencies in the source signal, the Frequency knob controlling the
frequencies to which the changes will be applied. Resonance allows you to boost the frequencies around the
current cut-off Frequency, accentuating the action of the Filter, especially under the control of the LFO. This can be
set to subtly emphasise the movement or exaggerate it into a squealing monster. Envelope Mod controls the
amount of change to the cut-off frequency when under LFO control. The greater the Envelope Mod amount, the
more the filter is quickly opened from and closed back to the Frequency knob setting at each trigger from the BPM
analyser. If the Frequency knob is set closed (fully anti-clockwise) and the Env Mod to max (fully clockwise) this will
produce the most marked effect, especially if Resonance is set fairly high as well.
FREQUENCY
This control has two functions determined by the Filter’s SET button.
(FILTER/FLANGER)
(EDIT)
Under normal operating conditions (when the SET button is pressed down) this control sets the basic
(EDIT)
NOT
cut-off frequency of the filter. The affect this has on the sound depends on the type of filter selected (low, band or
high-pass), as detailed in the next section titled ‘RESONANCE’.
When the SET button is pressed and held down (LED flashing), this control can be used to select the filter
(EDIT)
(also selects the Flanger effects - please see page 14 for further details). As the control is moved between the fully
anti-clockwise and 12 o’clock position the Filter will be selected.
RESONANCE
This control has two functions determined by the Filter’s SET button.
Under normal operating conditions (when the SET button is pressed down) this control sets the boost
(FILTER TYPE)
(EDIT)
(EDIT)
NOT
level of the frequencies around the cut-off point as set by the FREQUENCY control. At the fully anti-clockwise
position there is no boost. As the control is moved in a clockwise direction the frequencies will be gradually
boosted. At the fully clockwise position, the resonance will reach self-oscillation producing a new pitched element
similar to acoustic feedback.
When the SET button is pressed and held down (LED flashing) this control sets the filter type. There are three
(EDIT)
filter types to choose from, each having their own individual characteristics and subsequent affect on the music.
LOW-PASS:
the FREQUENCY control is moved .
This type of filter allows the low frequency elements to pass whilst reducing the higher frequencies as
anti-clockwise
FEDERATION BPM FX
PAGE
12

Effects
BAND-PASS:
This type of filter allows a limited band of frequencies to pass whilst reducing the remaining high and
low frequencies, the filtered frequency band being set by the position of the FREQUENCY control. Try positioning
the control to isolate parts of the music such as vocals, bass etc.
HIGH-PASS:
the FREQUENCY control is moved
This type of filter allows the high frequency elements to pass whilst reducing the lower frequencies as
clockwise.
Between the fully anti-clockwise and 10 o’clock positions, the LOW-PASS filter type will be selected. Between the
10 o’clock and 2 o’clock positions, the BAND-PASS filter type will be selected. Between the 2 o’clock and fully
clockwise positions, the HIGH-PASS filter type will be selected. The main BPM display will indicate the settings as
follows:
LGH/BAR
BPM
POS
LGH/BAR
BPM
POS
LGH/BAR
BPM
POS
ENVELOPE MOD
This control has two functions determined by the Filter’s SET button.
Under normal operating conditions (when the SET button is pressed down) this control sets the amount
(EDIT)
(EDIT)
NOT
of change (depth) of the cut-off frequency as set by the FREQUENCY control. At the fully anti-clockwise ‘Off’
position there will be no change to the filter cut-off frequency which is useful for making ‘manual’ sweeps with the
filter’s FREQUENCY and RESONANCE controls. As the control is moved in a clockwise direction the filter will be
increasingly opened by the audio modulation.
When the SET button is pressed and held down (LED flashing) this control sets the LFO wave shape. There
(EDIT)
are four types to choose from, each having their own individual characteristics and subsequent affect on the music.
Between the fully anti-clockwise and 10 o’clock positions, the TRIANGLE shape will be selected. Between the 10
o’clock and 12 o’clock positions, the FALLING SAWTOOTH shape will be selected. Between the 12 o’clock and 2
o’clock positions, the RISING SAWTOOTH shape will be selected. Between the 2 o’clock and fully clockwise
positions, the PULSE shape will be selected. The main BPM display will indicate the settings as follows:
SPEED
LGH/BARLGH/BAR
(MASTER)
POSPOS
BPMBPM
This control has two functions determined by the Filter’s SET button.
Under normal operating conditions (when the SET button is pressed down) this control can be used to
(EDIT)
LGH/BAR
(EDIT)
BPM
NOT
POS
LGH/BAR
BPM
POS
manually set the trigger rate of the LFO. To override any of the preset BEATS settings, simply turn the SPEED
control to make the necessary adjustment. The BEATS indicators will light in sequence as this control is moved
past each preset value, with two LEDs on indicating a speed setting between any two values.
The Speed control can be used to set the LFO to much slower, synchronised rates than the maximum preset
BEATS trigger of every other beat (2/1). When the 2/1 setting is passed, all indicators in the BEATS display will be
off and the special ‘slow sync’d’ feature will be introduced. The knob movement is thereafter divided into preset
‘zones’, each related to musical bars derived from the current BPM value. The settings will be shown briefly on the
main display as follows:
LFO sweep period=1bar
LGH/BAR LGH/BAR LGH/BARPOS POS POS
Etc. up to max
setting 16 bars
BPM BPM BPM
RANGE = 01, 02, 03, 04, 08, 12, 16 BARS. The LFO can be re-started from the beginning of the wave shape each
time the MASTER or filter ACTIVATE button is pressed.
OWNERS MANUAL
PAGE
13
 Loading...