


RedSound Soundbite XL User manual

NOW ITS EASY TO GET IN THE LOOP
In the twenty-five years since the first commercially available
sampler hit the market (namely the Fairlight, costing a
cool £25,000), the increase in the quality and length of
sampling available has been matched by a decrease
in the amount of time required to process and create
loops from this sampled material.
In 1977, an 8kB 8-bit at 8kHz sample sounded
dreadful, lasted about half a second and took
about half an hour to get a poor quality loop
with (on a £25,000 machine). In 1987, a 256kB
12-bit sample at 32kHz sounded a fair bit better,
lasted 3 or 4 seconds and could be looped by
an expert in about five minutes (and only cost
a couple of thousand pounds). By 1992, things
were a lot better; a 1MB16-bit stereo sample at
44.1kHz sounded pretty damn good, lasted 6
seconds and only took a couple of minutes to
loop well (although the machine to do it on was
now three thousand pounds). Ten years ago,
major price breakthroughs brought the cost of a
similar machine to around the thousand pound
mark and DJs & producers used them by the
thousands in studios to re-mix tracks in just a few
hours.
Introduction
Today however, because of your decision to purchase a
SoundBITE XL, you are in a position to make 24-bit
loop samples (at 96kHz) in real-time at the touch of a button
without missing a beat! What's more, you can automatically
sync together up to six loops with equal ease and apply filter sweeps
to them in real-time. SoundBITE XL will definitely transform your live
performance or studio re-mix and you paid less than two hundred pounds
for the privilege.
Welcome to the world of "cyclic sampling", now you're really on top of synchronized looping and one last thing:
don't worry, you can't go wrong…SoundBITE XL won't let you!
OWNERS MANUAL
PAGE
1
Top/Front Panels
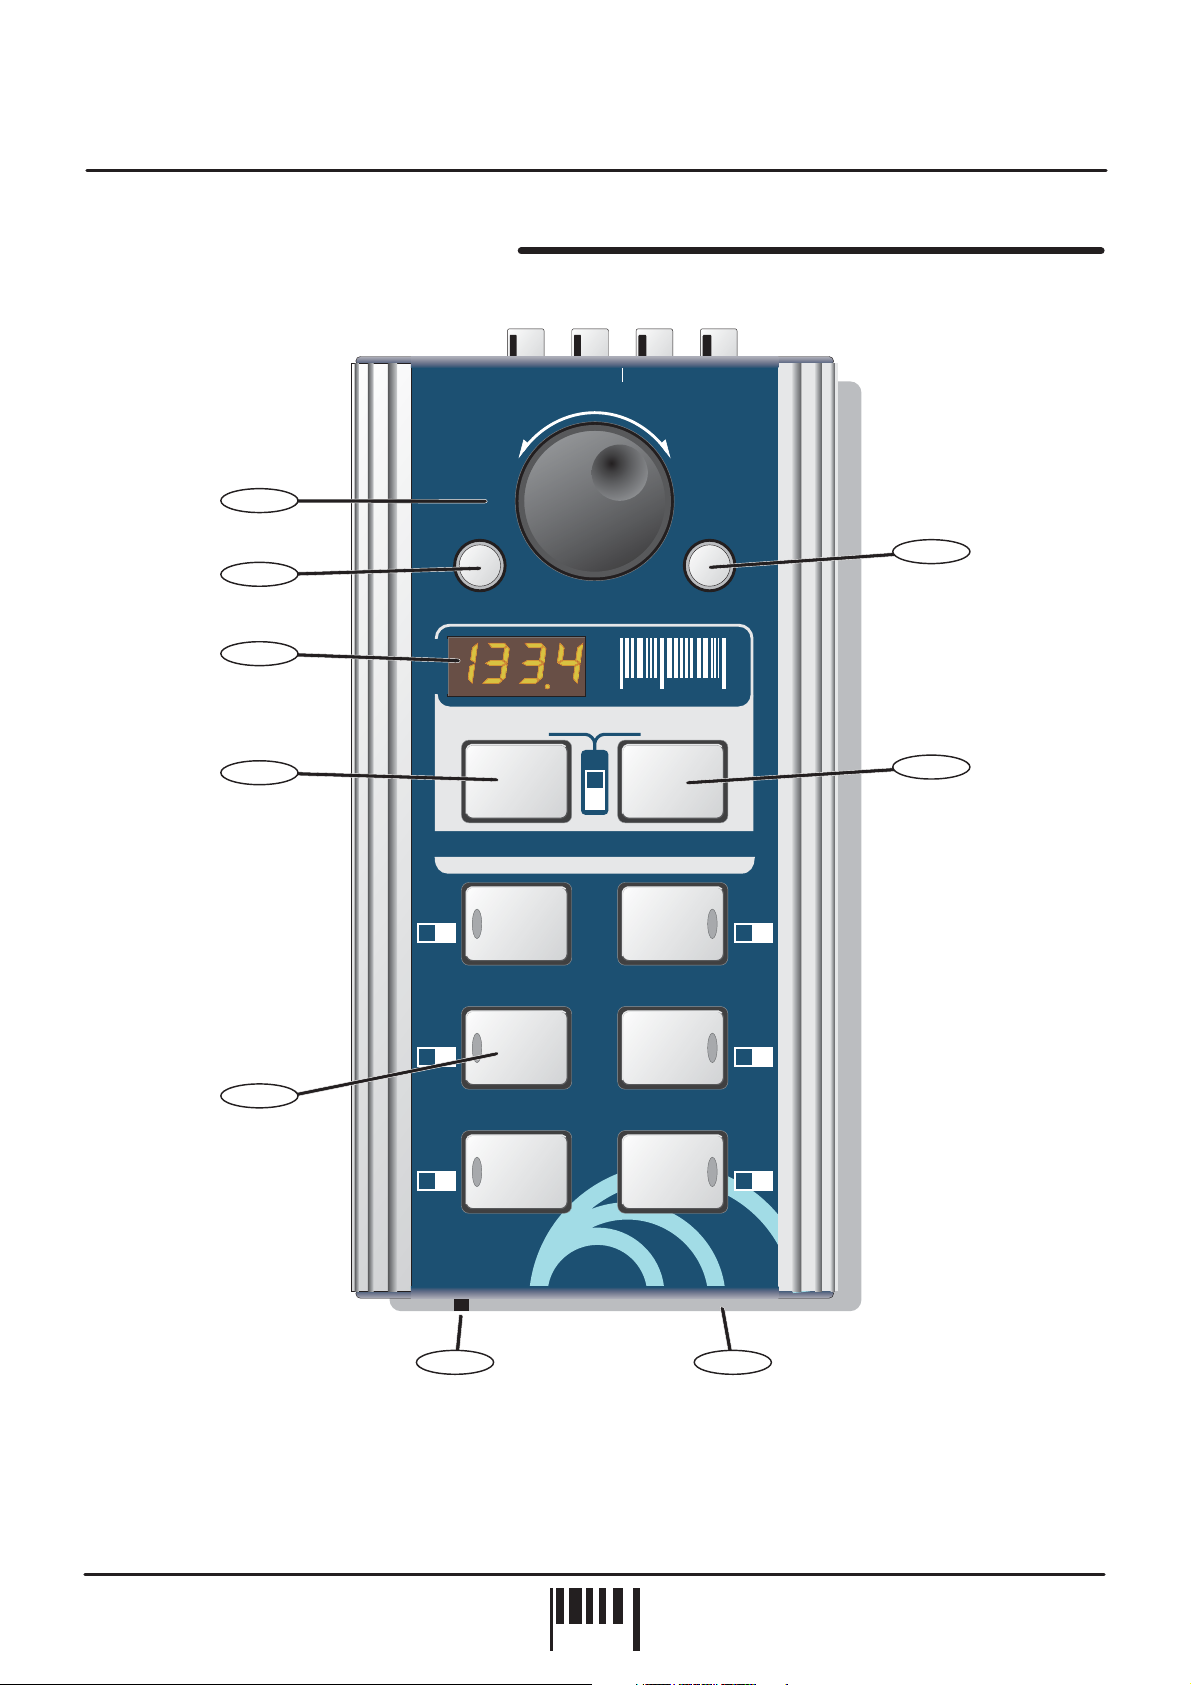
TOP/FRONT PANEL FEATURES
9
2
3
INPUTPOWER
[-/down]
LOOPS OUT
FWDREV
[+/up]
1
8
DISENGAGE
ENGINE
EDIT
BPM
ERASE ALL RE-SAMPLE
(SELECT) (VIEW)
1
2
3
GROUP
TAP/CLEAR
(*BPM RANGE)
Sound
Red
the colour of music
7
SoundBITE
AUTO - LOOP MODULE
XL
1
1/4
1/4
BEATS
2
1/2
1/2
BEATS
4
1
BEATS
1
4
4
BEATS
4
4
816
8
4
BEATS
SAMPLE MODE
CYCLIC /
FILTER /REVERSE
56
1. EDIT: This knob can be used to manually set a BPM value if no beat information is detected and also to adjust
the synchronisation point of all the recorded loops relative to the audio input source. In LOOP EDIT mode this knob
can be used to adjust the synchronisation point of recorded loops relative to the audio input source and
individual
also set the output level of each loop [+6/-20dB]. In FILTER mode, this knob can be used to change the loop
playback sound (or straight-thru audio sound) by filtering elements of the output signal in real-time.
SoundBITE XL - DJ Loop Sampler
PHONES
16
32
BEATS
PAGE
2

Top/Front Panel Features
2. BPM DISPLAY:
will be displayed in LOOP EDIT, FILTER EDIT and BPM EDIT modes.
3. ERASE ALL:
GROUP. This button also selects STRAIGHT-THRU FILTER mode allowing filter effects to be applied to the
incoming audio in real-time.
4. LOOPS:
choose from. In these groups, each button has a pre-determined sample length in musical ‘beats’ e.g.
Grp1 = 1, 2, 4, 4, 8 and 16 preset beat loops.
These six buttons are used to record and playback the loop samples. There are three loop ‘groups’ to
5. SAMPLE MODE:
loop generation + filter effects) and REVERSE (auto-loop generation + filter effects with playback in reverse)
6. HEADPHONE OUTPUT:
source, so connect your headphones to this socket for normal DJ monitoring purposes.
7. RE-SAMPLE:
loop GROUP setting.
8. TAP/CLEAR [BPM RANGE]:
no defined beat information available. Also, when pressed and held down, the [EDIT] jog dial selects the active
range for the BPM engine (60 >120, 90 >180 and 115 >230BPM range settings are available).
9. DISENGAGE ENGINE:
can also be used to set the filter RESONANCE level.
The four digit BPM reading of the audio input signal will be displayed here. Also, information
This button is used to erase ALL six loops simultaneously and to [SELECT] the preferred loop
This switch selects the three loop modes: CYCLIC (auto-loop generation), FILTER (auto-
SoundBITE XL uses the headphone output on your mixing desk for its’ audio input
This button is used to over-record any pre-recorded loop samples and also [VIEW] the current
This button is used to clear the BPM reading and tap in a tempo if there is
This button is used to disengage and re-engage the BPM engine. In FILTER mode it
REAR PANEL FEATURES
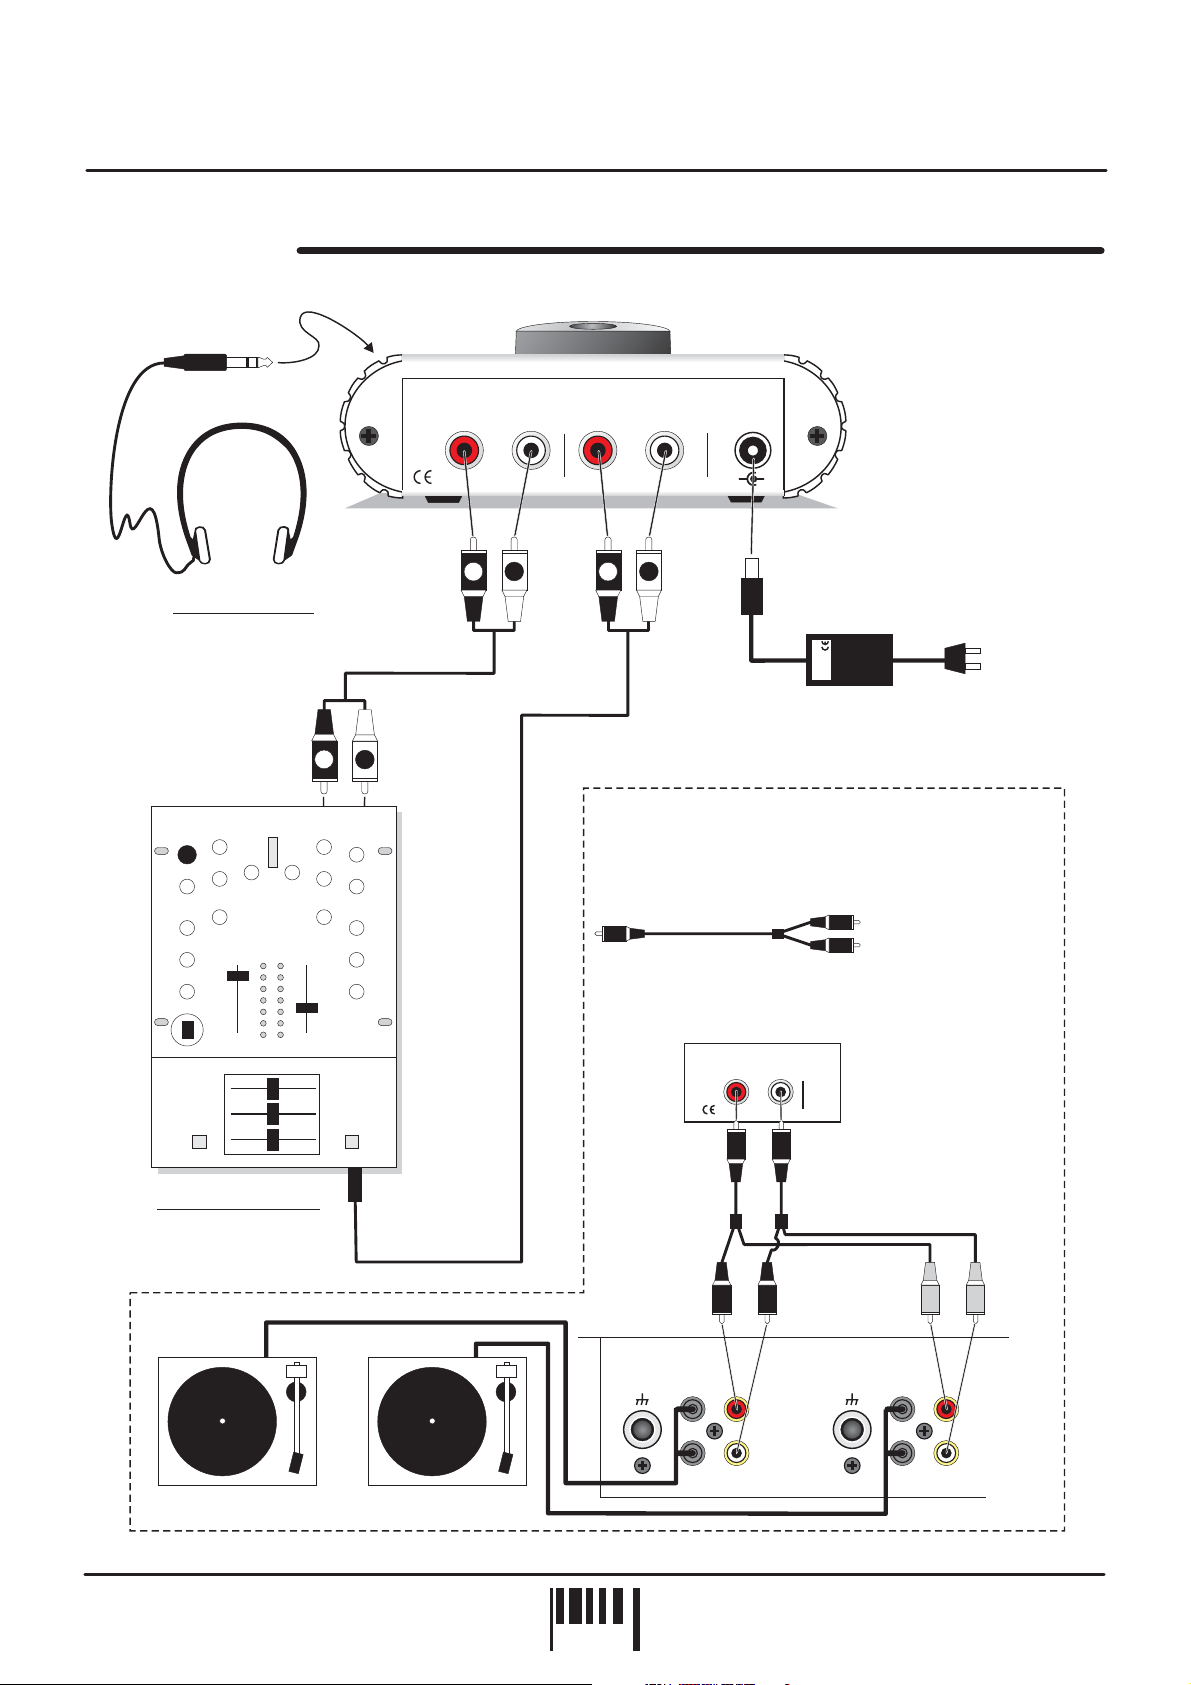
1. LOOPS OUT:
channel on your mixing desk.
2. INPUT:
desk to SoundBITE XL’s audio input.
3. 9vDC POWER IN:
Use the supplied cables [1 into 2 RCA] to connect SoundBITE XL’s output to a spare input
Use the supplied cable [1/4 jack to RCA] to connect the headphone monitor output from your mixing
Only use the RED Sound PSU supplied with SoundBITE XL to power the unit.
SoundBITE
AUTO - LOOP MODULE
LOOPS OUT INPUT POWER
RRLL
XL
-
[ 9vDC ]
+
12 3
OWNERS MANUAL
PAGE
3
Connections
CONNECTIONS
CONNECT TO
FRONT PANEL
SOCKET
SoundBITE
AUTO - LOOP MODULE
LOOPS OUT
R
INPUT POWER
RL
L
XL
-
[ 9vDC ]
+
HEADPHONES
STEREO RCA TO RCA
CONNECT TO
SPARE INPUT
CHANNEL ON
MIXING DESK
DJ MIXING DESK
R
L
HEADPHONE
MONITOR
OUTPUT
L
R
L
R
TO
PSU
RED
AC WALL
SOCKET
INPUT CABLE [SUPPLIED] -
6.3mm TO RCA STEREO
ALTERNATIVE ‘LOOPS OUT’ CONNECTION
FOR USE WITH 2 CHANNEL MIXING DESK +
VINYL RECORD DECK SYSTEM
2 x OUTPUT CABLES [SUPPLIED] -
1 x RCA TO TWIN RCA
LOOPS OUT
R
L
The unused CD/line
inputs on a 2 channel
desk + vinyl deck
system can be
connected to the
[LOOPS OUT] sockets
using the special 1 into
2 RCA cables supplied.
In this way, the loops
can always be brought
in on the crossfader by
switching the cue
channel to CD/Line.
ANALOG TURNTABLE ANALOG TURNTABLE
SoundBITE XL - DJ Loop Sampler
CHANNEL 2 CHANNEL 1
PHONO PHONOCD/LINE CD/LINE
SIGNAL
GND
R
PAGE
4
SIGNAL
GND
R
LL
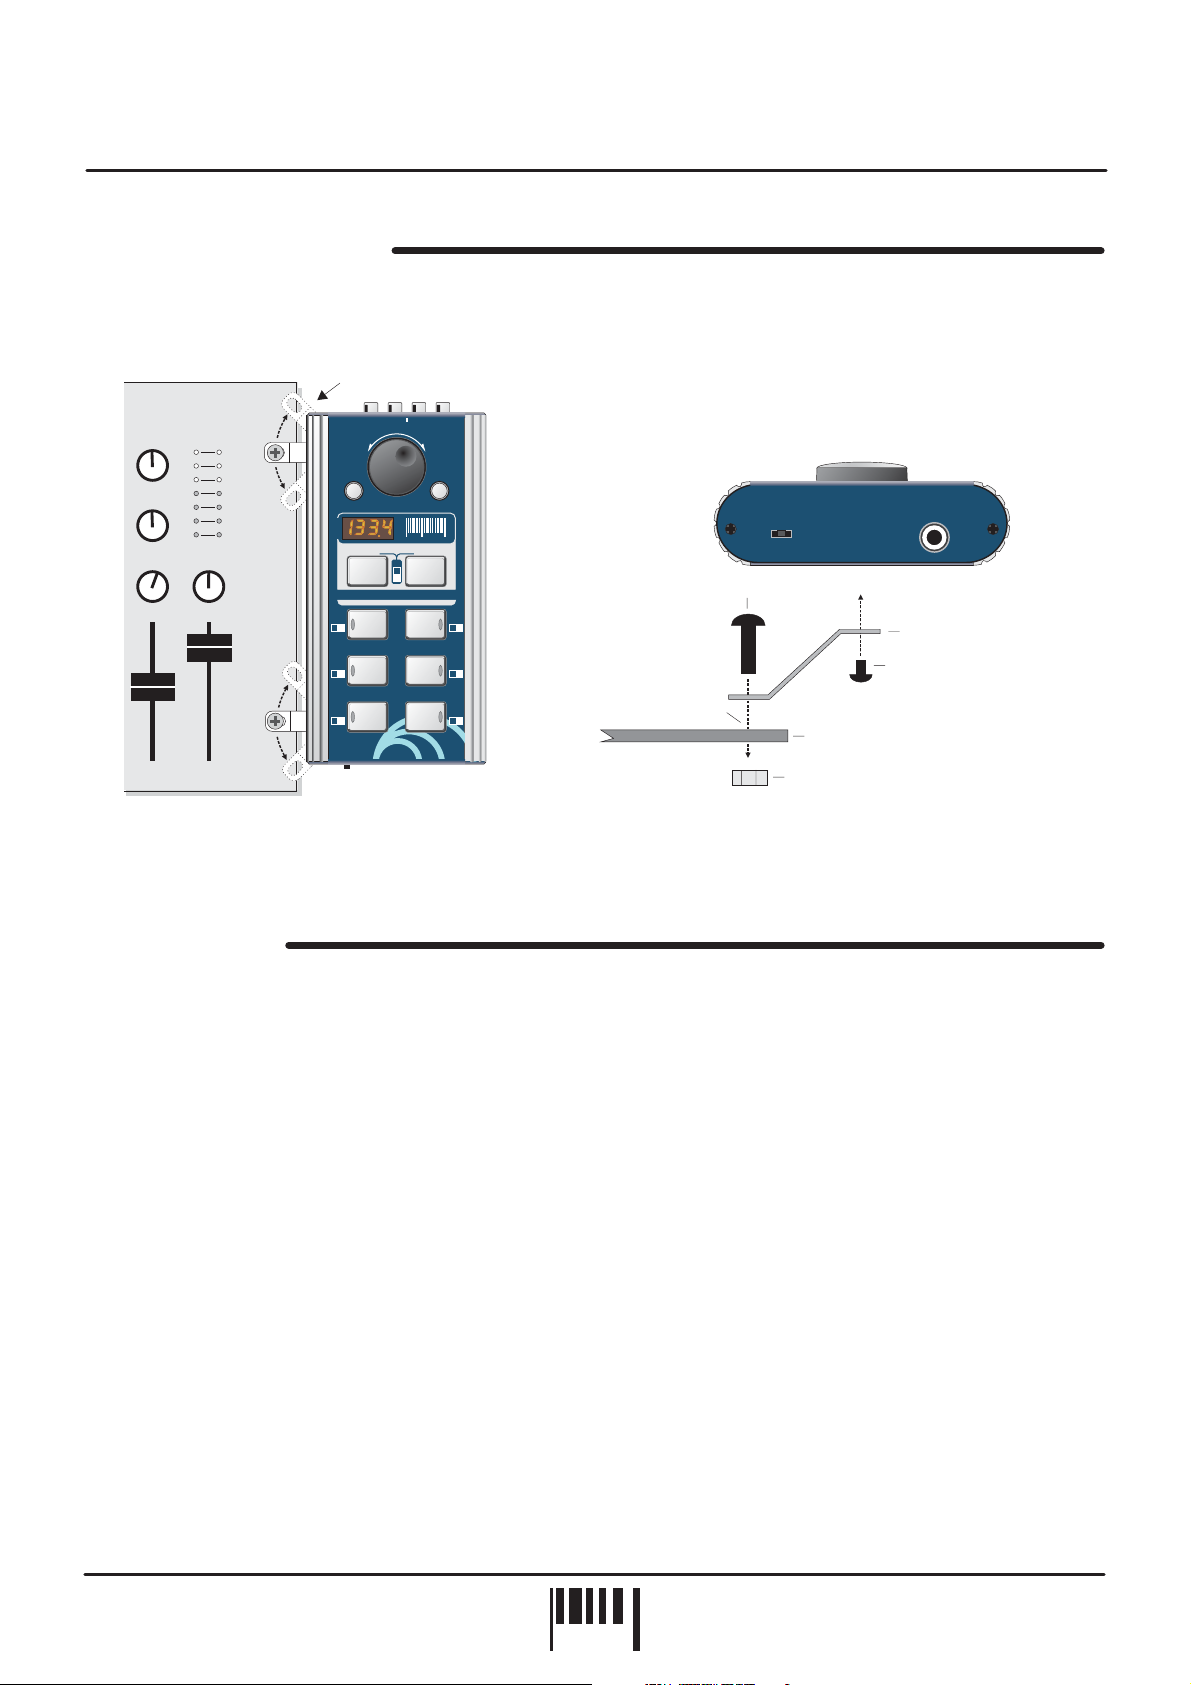
MOUNTING OPTIONS
Rotate the chrome brackets to lineup with the 19” rack mounting holes
on your mixing desk.
Operation
LOOPSOUT
INPUTPOWER
EDIT
GROUP
Red
the colour of music
1
2
3
FWDREV
[+/up]
TAP/CLEAR
(*BPM RANGE)
Sound
PHONES
XL
1/2
BEATS
4
BEATS
16
BEATS
M6 SCREW
2
1/2
4
4
32
19” RACK MOUNT HOLE
BRACKET
M3 SCREW
(LENGTH = 6mm MAX)
DJ MIXING DESK TOP PANEL
19” RACK
Hole pitch
range =
Min 90mm
Max 240mm
[-/down]
DISENGAGE
ENGINE
BPM
ERASE ALL RE-SAMPLE
(SELECT) (VIEW)
SoundBITE
AUTO - LOOP MODULE
1
1/4
1/4
BEATS
4
1
1
BEATS
816
8
4
BEATS
SAMPLE MODE
CYCLIC/
FILTER/ REVERSE
M6 NUT
MIXING DESK
Alternatively, you can use the supplied rubber feet or double-sided sticky pads to flat-mount SoundBITE XL in any
convenient location.
QUICK START
If you want to quickly try out the basic performance of SoundBITE XL, please read the following points carefully:
CONNECTIONS:
Before making any connections, make sure that the power on all your equipment is turned OFF.
Connect the audio cables for a basic system setup as shown on page 4.
TURNING ON THE POWER:
Make sure all connections have been made correctly and that the volume controls on
the mixing desk and amplifier system are completely turned down. Connect the power supply (included) to the
‘power in’ socket on the rear panel of SoundBITE XL and plug it into a suitable AC outlet. Turn on the power of the
mixing desk and then turn on the power to the amplifier system.
START-UP INDICATIONS:
When SoundBITE XL is first powered up, the display will briefly show the current
sample mode setting (as defined by the position of the [SAMPLE MODE] switch) and then show four illuminated
centre bars. If this does not happen, check the power supply is of the correct type and the unit is connected
correctly as shown on page 4.
SETTING UP:
Select a suitable audio track (dance orientated music with defined beat information), start the
playback on the connected sound source and route this signal to the headphone monitor output on the mixing desk
(check this using the headphones now connected to the headphone output on SoundBITE XL). The input level is
automatically set by SoundBITE’s AGC (automatic gain control). The main BPM display should now show the BPM
value of the audio track.
RECORDING/PLAYING BACK LOOPS:
Ensure the [SAMPLE MODE] switch is set to the [CYCLIC] position. Now
simply press one of the six loop buttons whenever you want to start recording - the display will show ‘rEC’ and
count down the number of beats as the loop is recorded. If for instance, you pressed the [4 BEATS] loop button, the
display would count down 4-3-2-1 and then instantly playback the 4 beat loop. To mute the loop, simply press the
same loop button again [this button now switches the loop on/off].
OWNERS MANUAL
PAGE
5
Operation
Now try recording some of the other loops and playing them back in combination. To clear all the loops press the
[ERASE ALL] button once. To replace a single loop, press the [RE-SAMPLE] button once, then press the desired
loop button to start the re-sample recording process. Try changing the [SAMPLE MODE] setting to FILTER (rotate
the [EDIT] jog dial to alter the sound) and REVERSE to see the effect they have on the loop playback.
Please read the following “OPERATION” section fully to appreciate the range of features and facilities SoundBITE
XL has to offer.
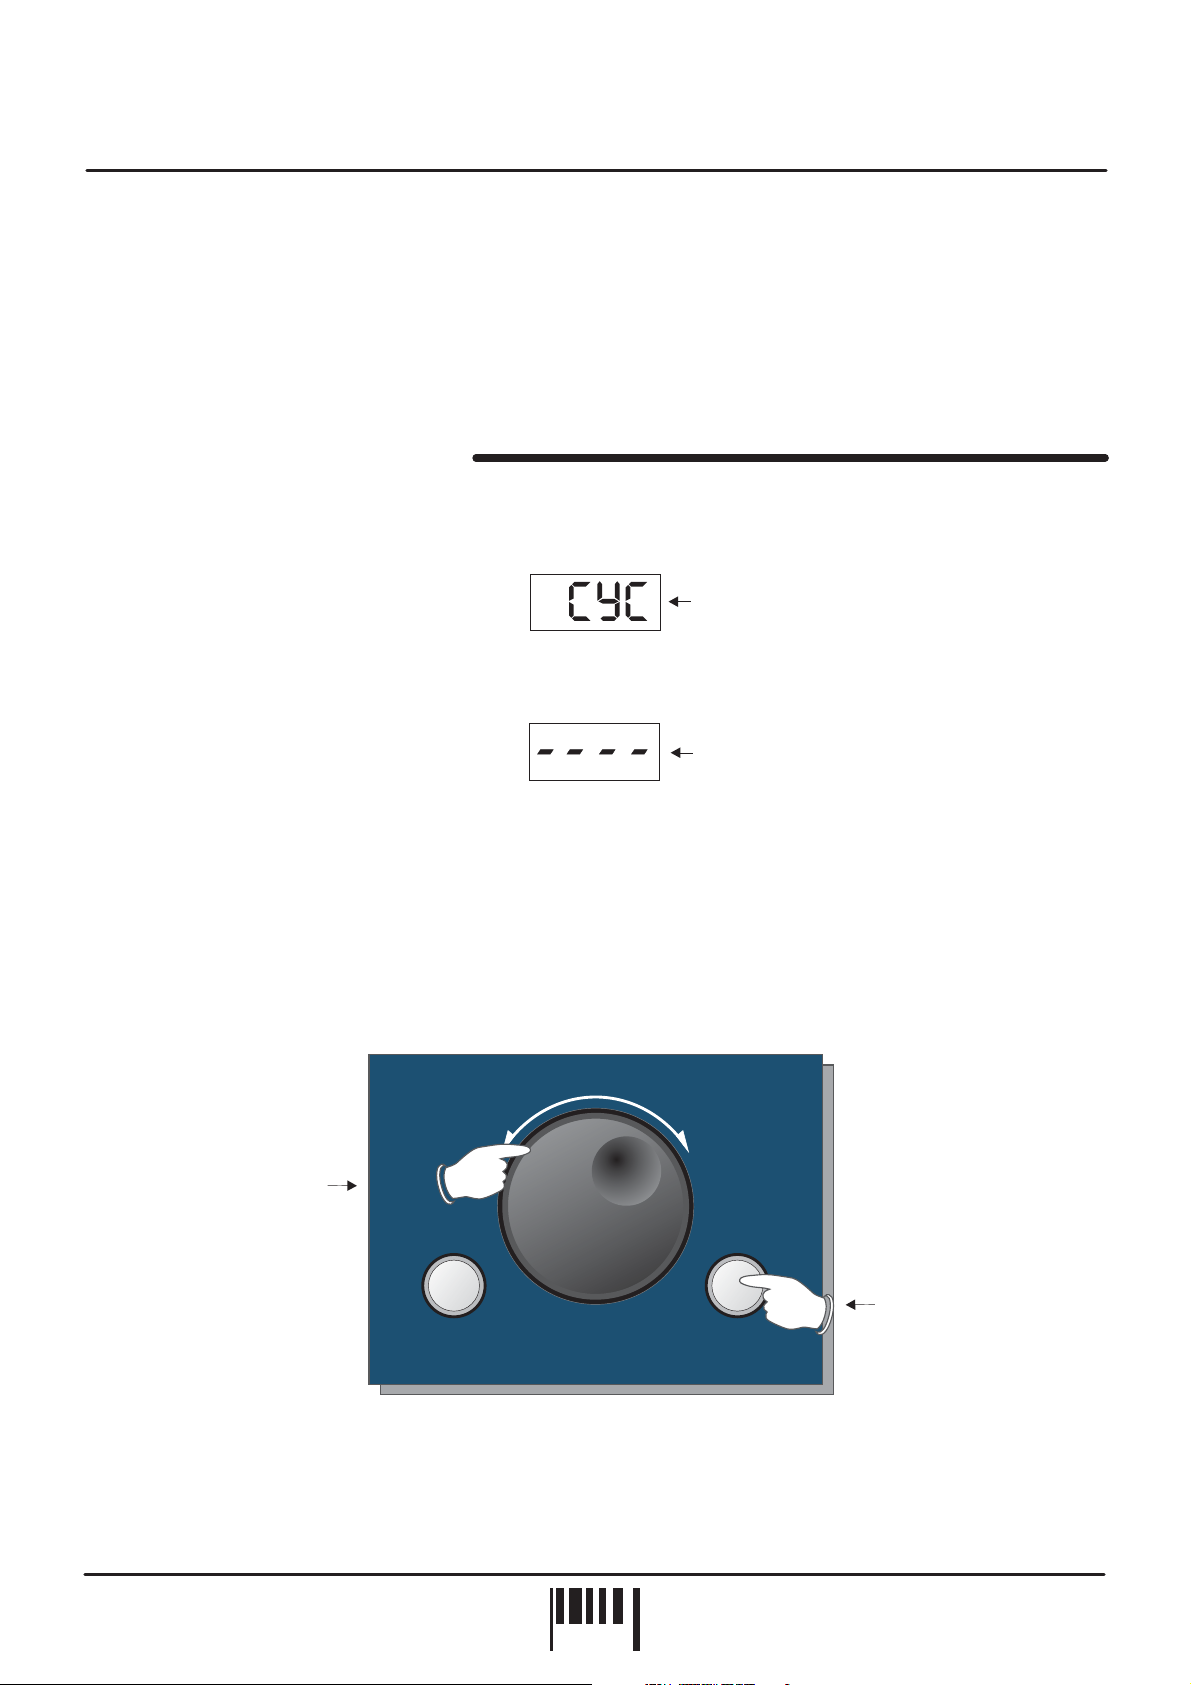
BPM DISPLAY & CONTROLS
After connecting SoundBITE XL to your system as detailed on page 4, plug in the power connector on the rear
panel to turn the power on. The [SAMPLE MODE] switch setting will now be shown briefly on the main display:
Example = [SAMPLE MODE] is CYCLIC mode
BPM
Afterwards, the four centre bars will illuminate to indicate the ‘IDLE’ status of the BPM engine.
BPM
Four static centre bars
indicate no beat detected
‘IDLE’ condition
SoundBITE XL is now ready to use!
BPM RANGE
This is where you set the working range of the BPM engine. There are three individual operating ranges covering a
total range of 60 - 230 BPM. This allows SoundBITE XL to work with most current dance music styles, from the
slowest Soul to the fastest Drum & Bass. The range setting can be changed using the front panel [TAP/CLEAR]
button and the [EDIT] jog dial, as shown in the following example:
FWDREV
2. Rotate to
change BPM
range
DISENGAGE
ENGINE
EDIT
[+/up][-/down]
1. Press & hold
TAP/CLEAR
(*BPM RANGE)
The display will scroll through the three range settings as follows:
RANGE DISPLAY
60-120BPM 90 BPM
90-180BPM 135 BPM
115-230BPM 172.5 BPM
SoundBITE XL - DJ Loop Sampler
PAGE
6