


05/18
electronic bagpipes
®
Operating manual

© copyright redpipes Rolf Jost 08/2018
all rights reserved
redpipe – a revolution in electronic piping
The redpipe is an electronic bagpipe with various sounds and fingerings. The redpipe family is modeled
on original bagpipes from Scotland, France, Germany, Sweden and Spain. It is a bagpipe without tuning
problems.
Connected to a standard amplifier the redpipe is a full instrument, which proved all its advantages on
stage. Sound is produced by applying pressure to the bag under your arm, just like the original
thing. Optimised sensors provide for authentic chanter fingering.
The redpipe´s pneumatic sound system control provides for an unprecedented overall effect.
We did not manipulate these sounds in any way so you have the possibility to create your own sound with
the help of a multi-effect guitar-pedal and add some chorus, reverb or other effects to your redpipe
sound. So you will reach the perfect authentic sound you wish.
Microprocessor technology provides optimal simulation of the Great Highland Bagpipe and Scottish
Smallpipe and various other European bagpipes.
And now, have fun with your redpipe
Regards

1 Precautions
2 Getting started
3 Light-emitting diode (LED)
4 Start and stop the sound
5 Starting the redpipe with blowing function
6 Loudness and switching between the different instruments
7 Key – tuning – metronome
8 Basic tune - tuning system - drones tuning
9 Fingering mode – overblow
Fingering tables
10 Minimal - open
11 GHB - standard - half open
12 GHB extended overblow
13 Medieval Bagpipe - minor
14 shepherdpipe/french bagpipe (Bechonnet by Remy Dubois)
15 Gaita standard
16 Gaita extended 1 ½ Oktaven
17 Renaissance - Hümmelchen, Dudey and Recorder – chromat
18 Preset Memory
19 OpticalTouch chanter
21 reset to defaults - Factory settings
22 Modes - mixolydian/ionian
23 MIDI
25 Batteries
26 Technical data/ trouble shooting
Contents

1
Precautions
The redpipe chanter will give you years of reliable service if you follow the simple precautions below:
Safe-Keeping
Keep the instrument away from locations where it might be exposed to high temperatures (such as direct sunlight) or
humidity. Also avoid locations which are subject to excessive dust accumulation vibrations, which can lead to
mechanical damages.
The bag is finest leatherwork. Like with clothes you have to be careful about fluids and dirt. Direct sunlight can have an
impact on the colour of the bag.
Handle the redpipe with care
Although the redpipe has been constructed to withstand the rigors of normal use for optimum sturdiness and reliability,
avoid subjecting it to strong physical shocks (such as dropping or hitting it). Just handle the redpipe as you would
handle a precision-made musical instrument.
SWITCH OFF THE CHANTER BEFORE PLUGGING OR UNPLUGGING CABLES
To prevent damage, always switch the Chanter off before plugging or unplugging cables or headphones.
DON’T OPEN THE CASE OR TRY TO REPAIR THE INSTRUMENT YOURSELF
The chanter contains no user-serviceable parts. Never open the case or tamper with the internal circuitry in any way,
since doing so may result in damage to the instrument. Contact your dealer or the manufacturer for services.
redpipes will not be held responsible for any damage caused by handling or operation. Opening the case voids
warranty.

2
Getting started
Insert the batteries
The redpipe works with three 1,5 V alkaline (AA, Mignon, LR6, AM3, MN1500) batteries or
rechargeable 1,2 V NiMH batteries.
If the batteries are getting low the the red LED display starts to blink.
The battery compartment is accessible by removing the lid. Just use a coin. The positive pole of the
batteries has to be on top.
Before having an important gig –always change the batteries before!
Connecting headphones
Connect the headphones to the 3,5 mm phonesjack . It is possible to connect all standard headphones as used for example
with portable disc players. Always use a stereo plug as mono plugs cause a short circuit which may damage the
instrument.
Connecting PA
LINE OUT, this audio jack (6,3 mm) can be connected to the line in of an amplifier (line in of an amplifier, active
speakers or a mixer). Use mono plugs, because stero plugs just use one channel. Some amplifiers generate glitches. In
such a case use radio transmission, a DI Box, or ground the amplifier.
Customizing of the chanter position
The chanter is adjustable. Hold it with your left hand and turn the chanter with your right hand.
Please do this absolutely carefully, otherwise you risk to damage the chanter totally.

3
Power ON
Use the slide switch to switch on the redpipe. The green indicator LED lights up for 2 seconds and then starts blinking
continuously. If the redpipe has not been operated for a longer period there is a humming sound indicating the
activation of the pressure sensors. Then the redpipe is ready for playing. If the redpipe is switched on but not in use it
will move to a power-saving mode after approximately 2 hours. To restart the instrument switch it off and on again.
IMPORTANT: Even in the power-saving mode the redpipe consumes a little power. To lengthen the lifetime of the
batteries, use the slide switch to power off the chanter after using it.
green indicator (LED)
The upper green LED shows the operating status of redpipe. The following information is displayed:
Display green LED Function
off the redpipe is switched off or in power-save mode
one flash per second the redpipe is ready for playing
continuous light
(short interruption shows activity)
The chanter is active
The green LED blinks with the beat of the Metronome Metronome
Shut-off control elements
Block control buttons (to avoid unintentional change of settings)
ON - press the SOUND, MET and + and then switch on the redpipe
OFF - press the SOUND, MET and - and then switch on the redpipe
Change used batteries before a new public appearance!

4
Start and stop the sound
Press the bag and the redpipe starts playing. The drones start first and the green LED lights up. Press the bag stronger
and the chanter starts to play. The green LED flickers a bit. How much pressure you have to apply can be tuned by
yourself. Press the bag. If you feel comfortable with the level of pressure, press KEY for three seconds. The green LED
will light up for a second and the redpipe is tuned. To store this setting, reduce the the pressure until there is no more
sound. The setting will be kept if you change batteries.
Continuous Playing Mode:
If you do not want to press the bag permanently while playing you can switch on the continuous playing mode.
To activate this mode press DRONES and KEY simultaneously while switching on the redpipe.
For starting the redpipe put the right hand on the chanter and press the bag until the drones
come up. To add the chanter put the left hand on the chanter. Press once again and the sound stops.
To stop the continuous playing mode press DRONES and MET simultaneously while switching on your redpipe.

5
Starting the redpipe with blowing function
First switch on the redpipe and take the bag under your arm. Fill the bag with air for about two-thirds. Then – just like
with the acoustic bagpipe you start the drones by pressing the bag. If you press a little more the chanter will also start to
play. By still more pressure on the bag one can pull 1 tone upward (bending)
Adjusting the pressure level
Press the bag with the redpipe switched on until you get the desired pressure for playing comfortably. Then
press the KEY-button for 4 seconds – the LED expires shortly. After that the new setting is stored
and will remain even after the changing of batteries. It has only to be renewed after a factory setup.
Air-Management
The air-pressure is measured by sensors that decide when the drones and the chanter start.
The amount of air, that is dissipated while playing is regulated by a valve and can be adjusted to personal needs.
avalon, merlin, gallega, epona, camelot
Push the bass-drone together or pull them apart to open or close the air-exit.
caledonia
Open or close the valve at the bass-drone.
classic air/Goose
Adjust the valve at the blowpipe
The bag is made of a functional synthetic textile that lets the water vapor through (similar to some outdoor or sports
clothing. Due to fact that with a redpipe you only need a fractional amount of air the bag needs no maintenance.

6
Volume (+ -)
The volume should be adjusted for the headphone or the built - in loudspeaker (option) with the buttons +
or -. When the headphone is connected, the built-in speaker switches off.
The volume settings do not affect the line out output.
Avoid using headphones at very high volume levels.
Volume of the drones
To adjust the drone volume, hold down the DRONES key and then adjust with the + and - keys. The drone volume can
be adjusted separately for the different instrument sounds. Drones can be shut down by setting the volume on a
minimum.
Switching between different instruments
The instrument to be activated can be chosen over the SOUND button. The green LED starts blinking.
1. blink GHB
2. blinks Medieval Bagpipe (shepherd pipe)
3. blinks Gaita
4. blinks Smallpipe/Huemmelchen
Drones additional
The drones can be adjusted for each instrument separately.
Press the DRONES button together with the SOUND button. The green LED blinks.
1. blink : dronestuning basic note and octav
2. blinks : dronestuning basic note and quint
3. blinks : dronestuning basic note and quart

7
Changing the key (KEY)
The key can be adjusted by semitones with the + and - keys while holding the KEY button. Holding the KEY button and
pressing the + and - key at the same time resets the pitch to the default pitch. The keys are stored individually for the different
instruments. The key is retained if the KEY button is held while changing the instrument (SOUND).
Pitch (TUNE)
The redpipe factory setup for the standard pitch is 440 Hz.. If necessary, due to playing together with other instruments
The redpipe can be tuned easily with the + and - keys while holding both the KEY and DRONES keys. Drones can be tuned
by pressing + and – while holding the DRONES and the MET keys.
The tuning is global and independent of the selected instrument.
Drones fine tuning
Press DRONES and MET buttons and fine tune by pressing + or –
The sensitivity of the chanter sensors
(Only for sensors with gold contacts - for OpticalTouch chanter See page 19 and 20)
The reaction rate of the sensors can be tuned. Touch the upper three sensors without touching the thumb hole sensor
Press any button from + to SOUND Pressing the + button results in the lowest reaction rate, pressing the SOUND button in the
highest. Pressing any other button generates reaction times in between. The factory set up is represented by pressing the
DRONES button. Very dry fingers in combination with high reaction rates my lead to problems. To avoid these
reduce the reaction rate by pressing the respective buttons.
The metronome (MET)
The built-in metronome is started by pressing the MET button twice. After pressing the button the first time, the metronome
waits for two seconds for a second press. If the MET button is pressed during this time, the metronome clicks on, using this
time interval. To stop the metronome, simply press the MET button once. If the metronome is stopped, press and hold the MET
button for three seconds to restart the metronome with the same speed as used last time.

8
Basic tune
The basic pitch is switched in combination with the fingering table
GHB basic pitch B (b flat) sheppertpipe/french pipe basic pitch G
Gaita basic pitch C Hümmelchen and Dudey basic pitch C
Medieval pipe basic pitch A minor
Tuning System
equally tempered scale - press ‘key and +` and then switch on the Redpipe
Modern pianos are tuned on an equally tempered scale.
just scale press ‘key and –‘ and then switch on the Redpipe.
This tuning system is typical for bourdon music.
Standard guitar tuner are normally not capable of checking a just scaled tuned Instrument.
Drones tuning relative to the keynote
Drones tones can be retuned to specific tones of the scale of each instrument
to make different keys in major/minor available.
Switch on the redpipe
Press the KEY and DRONES buttons and Tune the drones by pressing the SOUND button
The fingering table refers to the basic pitch of the implemented fingerings.
Green LED Gaita Medieval French/Bechonnet Renaissance
blinks 1x standard C- major A-minor G- major C- major
blinks 2x F- major D- major C- major F- major
blinks 3x D- minor H- minor A- minor D- minor
blinks 4x - G- maj F- minor -

9
Fingering mode
The redpipe chanter offers 8 choices of fingering.
Press when switching on the redpipe following button
1. + GHB standard GHB half open and vibrato
2. - Gaita Gallega standard 1 oktave overblow
3. DRONES GHB extended chromatic, extended pitch range, vibrato, overblowing
4. KEY Medieval Pipes minor
5. MET Bechonnet only french model with additional thumb hole, chromatic
6. SOUND Renaissance Huemmelchen, Dudey or recorder –
7. SOUND and MET open open, no vibrato
8. SOUND and KEY Gaita extended 1 ½ Oktaven overblow
Factory setup is GHB STANDARD.
Overblow
The fingering tables of the pages 15-20 allow overblowing. Open the upper thumb hole in such a way can
one up to a 1/2 octave more highly play
Bending/ Glissando
By pressing the bag you can raise the tone up to one note

10
Minimal fingering
open
closed
open
Holes
C-major
&/=
Q
Q
Q
Q
Q
Q
Q
Q
b c d e f a b c
low
low high high
Q
g
mixolydian
a
a
left handright hand
I
I

11
GHB standard fingering
half open
closed
open
vibrato
Holes
left handright hand
GHB
a=466 Hz
Scottish
mixolydian
denomination
heard
ionian
I
&
=
G B C
D E F
G
G
low
High
Sharp
Q
Q
B
b
Q
Q
Q
Q
G C C
d f
f
g
a
I
C
natural
F
natural
A
high
I
d
I
g
I
I
Q
Q
Q
I
Q
Q
Q
A
a
a
B
b
A
b
b

12
GHB extended fingering
closed
open
vibrato
open or
overblow
holes
&
=
G
B C
Q
Linke Hand
rechte Hand
I
gB D
I
F gIa b
Q
Q
Q
Q
Q
I
Q
I
C
I
DID E
F
I
I
I
I
I
Q
Q
Q
Q
Q
Q
Q
Q
B
b
=
c
I
d
I
f
I
c
I
dId e
Q
Q
Q
Q
Q
Q
b
b
b
I
Q
b
Q
(G)
13
left hand
Right hand
A-minor
&
=
Q
Q
G A H c d f fis g
Q
e
mixolydian
g
G
I
I
a
Q
Q
Q
Q
Q
Q
Q
I
h
c
Q
I
Q
Medieval bagpipe fingering
closed
open
vibrato
Holes

14
Shepherdpipe/french bagpipe Bechonnet-fingering by Remy Dubois only french modell
closed
open
Holes
left hand
Right hand
&
G
I
e f fis b ba
Q
b
Q
Q
Q
Q
Q
Q
Q
g c
b
&
=
Q
Q
Q
Q
F G A B B cis D disC
b
Q
Q
Q
Q
I
I
b
Q
cis cis
Q
I
Q
I

15
left hand
right hand
Gaita-fingering
closed
open
&
=
B
C E E F
Q
Q
Q
Q
Q
Q
Q
A
D F
G
A
c
B
Q
Q
Q
Q
Q
b
b
b
I
Q
I
b
b
B
b
C

16
Left hand
Right hand
Gaita-extended fingering
1 1/2 oktave overblow
closed
open
&
=
B
C
E E F
Q
Q
Q
Q
Q
Q
Q
A
C
F
G
c
B
Q
Q
Q
Q
Q
Q
b
b
b
I
Q
I
b
B
Q
Q
Q
I
D
b
I
Q
Q
Q
I
b
Q
I
C
not relevantly
d
f
e
g
b
c
I
f
I
e
c
Q
G
I

17
left hand
right hand
Renaissance fingering
chromatic
closed
open
Holes
&
=
C D E F G
Q
Q
Q
Q
Q
Q
Q
I
c
Q
F
I
GIA Bbb cId
Q
Q
Q
Q
I
Q
I
I
I
I
C
e f
I
f g
Q
Q
Q
Q
I

18
Preset memory (optional)
You can adjust nearly every parameter that the redpipe offers with the preset storage which is optional for each redpipe
model.
Thus you are able to access your settings during a concert by using the ten-channel turn-switch.
Your settings will impact either only the channel you have chosen or globally every channel (see list below).
Programming oft the presets
Turn the switch to the desired channel. Adjust your settings while playing the pipe. When you stop to press the bag and
the sound stops your new settings are stored on the chosen channel. When you start to play again these settings are
active. Now you can adjust the next preset channel. When you change the settings of a programmed channel again the
old settings get overwritten.
You can save any channel against unintended changes by using the shut-off function: shut-off on is activated by
switching on the redpipe and holding the Sound, Met and “+" button simultaneously.
You deactivate the shut-off-function by switching on the redpipe and pressing Sound, Met and “–“
All settings oft the list below can be adjusted.

19
19
front
back
slide switch
LED
hole button
Adjustments of the OpticalTouch Chanter
These instructions refers only to the OpticalTouch Chanter
(not to the electronics in the bag of the redpipe)
The chanter is delivered with a factory set-up. This set-up is working fine and
you can start to play immediately.
It is not necessary to calibrate the redpipe each time you play. It is recommended to
recalibrate if you haven’t used the redpipes for a while or when you change
environment. Overall, if you feel that any one of the sensors is behaving erratically,
then recalibrate.
Some players like to adapt the chanter to their special wishes and this is quite simple
as we will show you now:
A. Calibrating the sensors to your fingers
This setting is used to determine the distance between the fingers and the
tonehole so that the sensor system detects a tonehole as closed.
1. Turn on the redpipe
2. Take the match (picture) and press it in the small hole above the LED indicator
on the front of the Chanter
3. Push the match until the LED flashes up continuously.
4. Take away the match – the control light flashes slowly.
5. Put your fingers and your thumb within 3 seconds on the chanter holes as if you want to play.
It is important that the holes are closed completely – otherwise the calibration will fail.
6. Hold your fingers in that position until the LED flashes several times. Now the sensors have
been adjusted to the physical conditions of your fingers (i.e. character of your skin) and the
actual environment.

20
For more playing comfort you can now adjust the general sensitivity for the optical sensors inside the chanter.
B. Sensitivity of the chanter
This function allows you to change the point where the sensors consider the hole closed and open
Briefly press the match into the hole above the control light
The red LED flashes 1-5 times. 1 time is near, 5 times is further away from the tonehole
We prefer level 2
Factory set-up for the chanter
If you wish to return to the setup as it was when the redpipe was delivered to you – this is how it goes:
1. push the match into the hole above the LED. After five seconds first - the LED indicator light is lit
continuously
2. hold the match pressed - until after about 15 seconds the LED start to flash up.
Now your chanter is calibrated again with the Factoy set-up.
Do you want your future to your own settings, proceed as described in A.
If the calibration button is pressed too long (about 30 seconds) your own and the factory calibration will be erased,
the LED on the chanter will flash quickly and also the switching on of the Redpipe. The chanter does not work
anymore and needs to be recalibrated A. If you are then satisfied with the calibration, press the factory settings
again. Now your current calibration is taken over as factory setting.
Cleaning the sensor window
Dilute dishwashing liquid 1: 4 with water and clean the sensors from time to time with a soft cloth or
a Q-tip.
Videoclip calibrating chanter
english: https://vimeo.com/215353113 french: https://vimeo.com/215353981

21
Reset to defaults
To reset to default values for
Drones:
1. Press and hold DRONES
2. Press + and - to reset the drone volume and activate the octave drones.
Key:
1. Press and hold KEY
2. Press + and - to reset the key to the standard setup.
Tuning:
1. Press both DRONES and KEY
2. Press + and - to reset the tuning to default of a 440 Hz.
Reset to factory settings:
(Applies only to the electronic sound in the bag, the Optical Touch chanter see page 19)
1. Switch off the slide switch and wait at least 2 seconds
2. Press and hold + and - button
3. Switch on the slide switch

22
Modi (mixolydian (GHB)/ Ionian)
By pressing the drones and the – button a switch between myxolydiyn and ionian is
available. (reduced seventh and sharp-G)
The settings are valid for all fingering tables
The Mixolydian mode is a musical mode or diatonic scale. It has the same series of tones and
semitones as the major scale, except the fifth (dominant) note is taken as the tonic or starting
(beginning) pitch of the scale. It may also be considered a major scale with the leading tone
moved down by a semitone.Incidentally, the order of Mixolydian tones and semitones is
identical to the Dominant 7th scale. In other words, the C Mixolydian mode and the C
Dominant 7th scale are identical.
The Ionian mode is a musical mode of diatonic scale. It was part of the music theory of
ancient Greece, and was based around the relative natural scale in C (that is, the same as
playing all the 'white notes' of a piano from C to C).
The G in the Myxolydian mode (High-G and Low_G) is normally one full tone below the basic
tone A (reduced seventh)
Turn off the redpipe. Press minus and drones. Hold the buttons and turn on the
redpipe. The scale switches from mixolydian to ionian.
with repetition of the procedure, the scale switches back.

23
The MIDI OUT
MIDI stands for Musical Instrument Digital Interface. No sound is transmitted through the MIDI interface, only data.
Sound is generated by the connected MIDI tone equipment. You may play the chanter with any sound the conneced
equipment is capable of producing.
The DIN plug meets the MIDI standards and may be connected to any MIDI equipment (also personal computers which
are equipped with a MIDI interface).
A single MIDI interface is capable of transmitting 16 MIDI channels. The redpipe uses channel 1 for the chanter data,
and channels 2 to 4 for the Drones.
MIDI-Channel
Note Number
1 chanter (see fingering-charts)
2 58 (Tenor Drones)
3 46 (Bass Drone)
4 53 (Baritone Drone)
To prevent missing Note-Off signals, always stop the sound before switching off the slide switch.
e-pippes on press SOUND and - and then switch on the redpipe
e-pippes off press SOUND and + and then switch on the redpipe

24
Volume (MIDI)
There is no volume control when MIDI output is connected. Volume must be adjusted using the volume control of the
connected equipment. The drone volume is the same as used for the PHONES output.
Switching between the Well-Tempered and just Scale
The scale of the bagpipe chanter does not use the modern “well-tempered” scale mostly used for today’s musical
instruments. The chanter uses a just scale to fit every note perfectly to the drones. MIDI equipment is generally
unable to produce a justscale on its own. The chanter, however, is able to generate the just scale by sending
pitch bend data to the connected equipment. To work correctly, the pitch bend range of the connected equipment must
be set to two semitones. Since this is the default value of most MIDI equipment, it is rarely necessary to make any
adjustments.
It is sometimes better to play the well-tempered scale, especially when playing together with other instruments. The
Chanter only sends pitch bend data when the sound is switched to Highland Pipe. Switching to Smallpipe stops sending
pitch bend data and returns to the standard tempered scale.

25
Maintenance
After intensive playing it is advisable to take off the blowpipe and the bass-drone to let
them dry. Redpipes with a Synthetic Bag need no further maintenance.
Disposal of used batteries
You, as the end user, are legally obliged (Battery Ordinance) to return all flat batteries and
rechargeable batteries. Disposal in the household waste is prohibited.
Batteries/rechargeable batteries containing hazardous substances are marked by the symbols
alongside. These symbols also indicate that it is prohibited to dispose of these batteries in the
household waste.
You can return flat batteries/rechargeable batteries free of charge to the collection points in your
community, at our branches or anywhere else where batteries/rechargeable batteries are sold.
Disposal of the device
If the device has reached the end of its operational life, please dispose of it in
accordance with the applicable statutory regulations.

26
Technical Data
Power supply 3x AA Mignon alkaline or rechargeable NiMh batteries
Batteries lifetime approx. 20 h. using alkaline batteries (depending on the connected
equipment). With built-in speakers depending on volume about 2 hours
Ouput LINE OUT non balanced jack 6,3 mm nominallevel +4 dBu
Headphone non balanced jack 3,5 mm
MIDI Out
Weight 1,3kg
Trouble Shooting
Problem
Possible Cause
Solution
· No sound over headphone
connection or Line out, no LED
display or non-stop LED
display
No batteries or empty batteries Insert new batteries
Adjustment for volume is too low Increase the volume
Not enough pressure in the bag Applying more pressure
Headphones defective or not
connected properly
Check headphones and contacts
The internal microprocessor is in an
undefined state
Switch off the slide switch, wait
for at least 10 seconds and
power on again
Others Contact your dealer or the
manufacturer
· No sound from the connected
MIDI device
No batteries or empty batteries See above, also check if the
Chanter works with earphones
Cables not connected properly Check cables
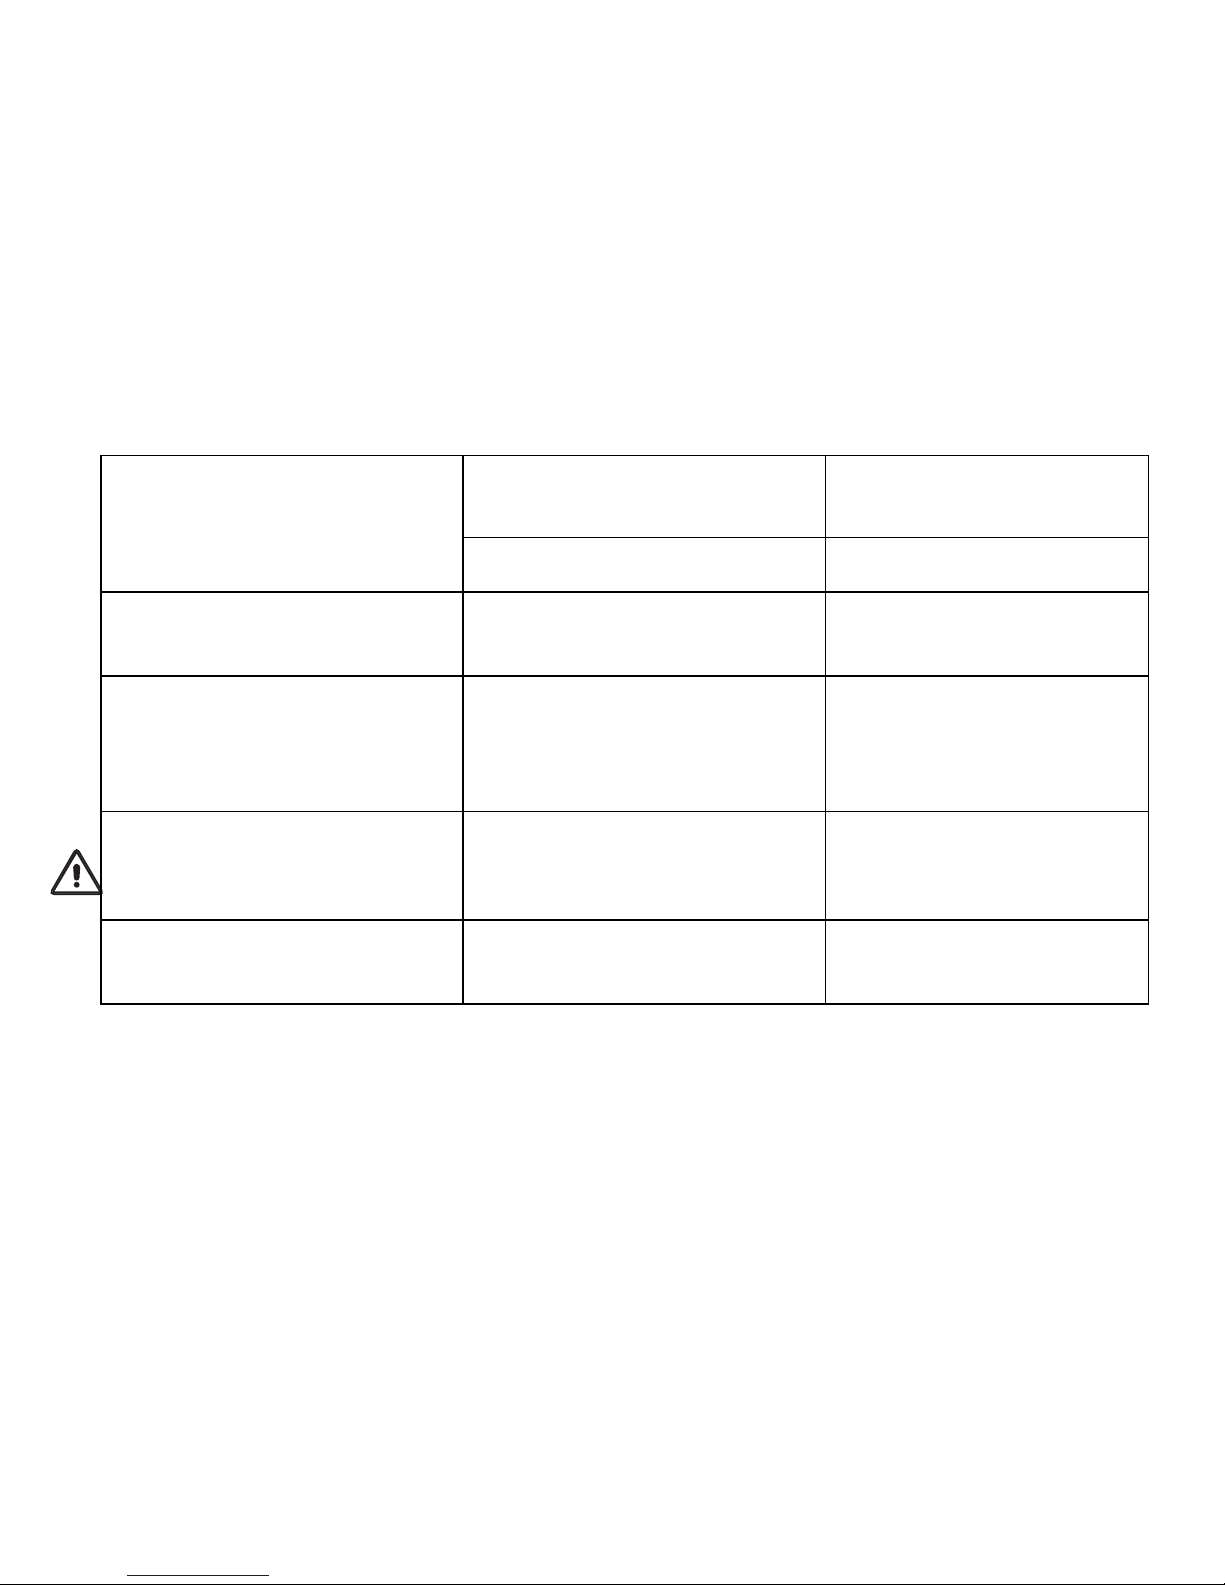
27
The connected MIDI devices are
not adjusted to receive on MIDI
channel 1 or volume too low
Check adjustment at the MIDI
device, check corresponding
owners manual
The internal microprocessor is in an
undefined state
See above
· Sensors respond delayed or not
at all
Dry skin Use hand cream to increase the
circuit capacity of the hand
· Wrong addressing of the
sensors at stage.
Ground potential is missing at the
amplifier
Some amplifiers generate
glitches. In such a case use
radio transmission, a DI Box, or
ground the amplifier.
· Sensors seem to ‘hang’, i.e.
after take the finger away
nothing happens
The chanter is moist or dirty Dry or clean the sensor area
carefully. If necessary use a bit
soap and water. (clean the
sensor area all around)
· Adjustments are lost after
switching off
The sound was not stopped before
switching off
Always stop the sound before
switching of the slide switch

This Product complies with the requirements of the EMC Directive
89/336/EEC, and carries the CE marking accordingly.
redpipes
electronic bagpipes
Rolf Jost
Untere Muehle 2
71706 Markgroeningen
Germany
Phone.: +49 (0) 7145 90 00 47
info@redpipes.eu
www.redpipes.eu
 Loading...