

Page 1

Before you start
Further information
This getting started guide enables you to set up your 950AP in order
to connect Bluetooth devices to it wirelessly. For more advanced
information, refer to the 950AP User Guide on the Red-M website,
www.red-m.com.
The getting started guide describes how to complete the installation of
typical corporate and home configurations. Follow the procedures that
most closely describe your setup.
Requirements
To complete the installation of your 950AP, you need:
• An IP Ethernet network.
• Category 5 Ethernet cables with RJ-45 plugs.
• The DC 12 V power adapter (included).
• If mounting to a wall or ceiling:
- Two screws
- A mounting bracket (included)
- A screwdriver
Note: Some jurisdictions require special wiring if installing
cables into a ceiling cavity. They may also have special
conditions about installing products on a ceiling or installing the
power adapter. If in doubt, contact your local authority.
Installing the 950AP
Decide where you want to position your 950AP(s). We recommend
installing to a wall for superior Bluetooth coverage (see Figure 3). For
optimum Bluetooth performance, install the 950AP in direct line-ofsight with connecting devices, avoiding obstacles such as walls or
partitions. Ensure your wall (or ceiling) can support the 950AP’s
weight (around 200g or 7oz.).
Next, install the power cable and the Ethernet cable to connect to the
950AP(s). Cabling requirements depend on whether you have a single
950AP connected to an Ethernet port or multiple 950APs connected in
a star-wire configuration. Complete the cable installation before you
fix the 950AP to a wall or ceiling.
The 950AP is powered by a 12V adapter connected to the mains
electricity. You may need to consider this when positioning the 950AP
and installing the cables.
Corporate installations
To connect a single 950AP to the LAN
1. Connect a Category 5 Ethernet cable to the 950AP’s Network port using RJ-45 connectors.
2. Connect the other end of the cable to the Ethernet port on your LAN.
Page 2
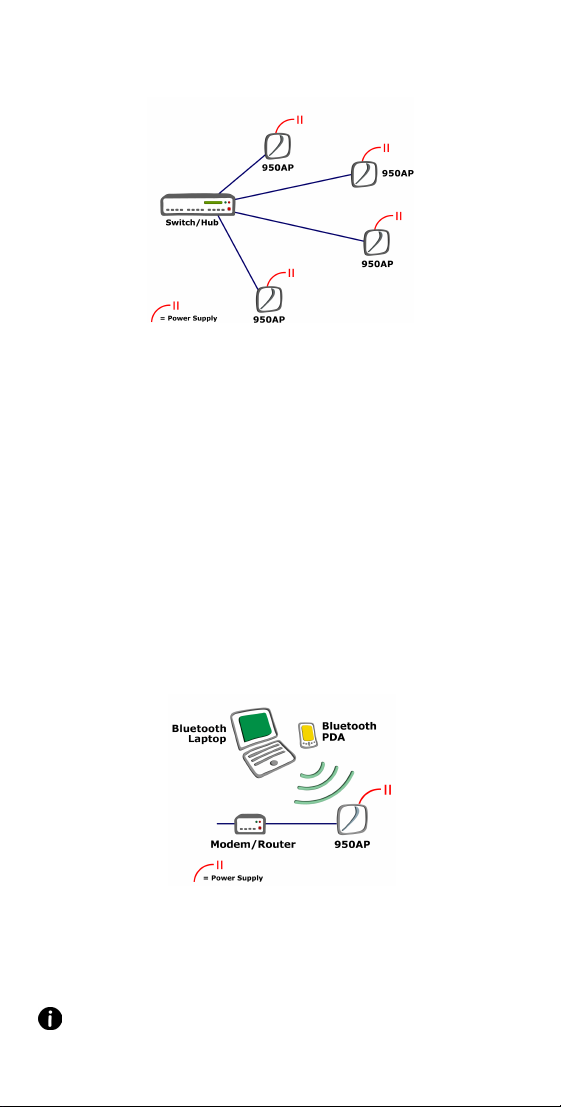
Star-wire installations
A star-wire connection for multiple 950APs uses an Ethernet switch or
hub to connect 950APs to the LAN.
Figure 1: Star-wire configuration
To connect to the LAN in a star-wire configuration
1. Connect Category 5 Ethernet cables to the Network port of each 950AP using RJ-45 connectors.
2. Connect the other end of each cable into an Ethernet hub/switch.
Home installation
To connect a single 950AP for home use
1. Connect a Category 5 Ethernet cable to the 950AP’s Network port using RJ-45 connectors.
2. Connect the other end of the cable to your ADSL/ISDN/cable
modem or Broadband router. Refer to your device’s
documentation for more information
- If you’re only going to use a Bluetooth-enabled device, such
as a PDA or laptop, to configure and manage your 950AP,
the 950AP will be set up as shown in Figure 2. See To
configure the 950AP using Bluetooth for more information.
.
Figure 2: Home setup with a Bluetooth -enabled PDA or laptop
- If you have a Home Gateway or router with a built-in hub,
we recommend connecting the 950AP directly to the hub.
This allows you to manage the 950AP with either your PC or
Bluetooth-enabled device.
Note: If your ISP only provides one IP address, you must have
NAT enabled on the 950AP or on your router/modem. See Initial
Configuration for home installation to enable NAT on the 950AP.
Page 3
Connecting power
The 950AP is connected to the mains electricity supply via a 12V d.c.
power adapter and country-specific power cable (both supplied).
Depending on your building configuration, you may need to fit the
adapter and cable inside a wall or ceiling cavity when you install the
950AP.
1. Connect the power cable to your mains electricity supply and to the 12V adapter.
2. When you are ready to configure the 950AP, insert the end of the
12V adapter cable into the its power port. The 950AP’s LED
indicator will light and display the LED boot sequence (see
Reading the LED for more information.
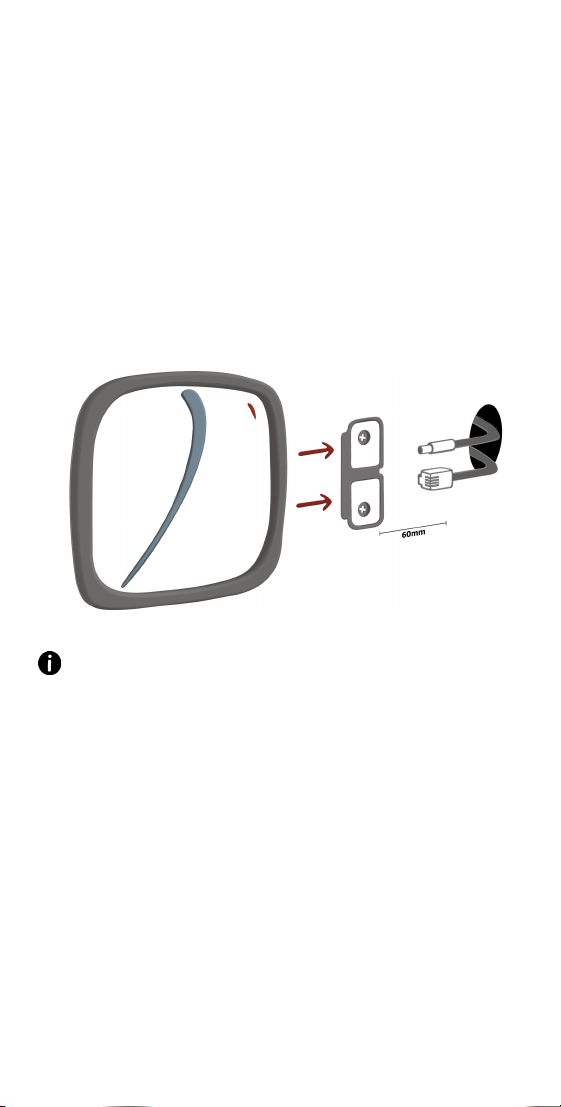
Mounting to a wall (or ceiling)
The 950AP has a mounting bracket that can be attached to a wall or
ceiling using suitable screws and fastenings. See Installing the 950AP
for information on where to position the 950AP for optimum
performance.
Figure 3: Mounting the 950AP to a wall or ceiling
Note: The following instructions assume that you have
completed the necessary Ethernet and power cable installation
explained previously.
To mount to a wall or ceiling
1. Use the mounting bracket as a template to mark out drill positions.
2. Drill two holes 43 mm apart using a 5.5 mm drill bit. The holes
must be 75 mm from where the cabling emerges in the wall or
ceiling to ensure a flush fitting (or 60 mm from the mounting
bracket’s edge).
3. Insert suitable fastenings such as wall plugs into the holes.
4. Position the mounting bracket over the two holes and insert the appropriate screws.
5. Connect the cables from the hole in the wall/ceiling to the 950AP.
6. Slide the 950AP over the mounting bracket until it fits into the
groove. Continue sliding until it locks into place.
Page 4
Configuring the 950AP
950APs are configured and managed via a web browser. Up to 32
users and 32 devices can be configured to connect securely to the
950AP, with up to seven devices connecting simultaneously.
Once you have installed the 950AP, you can begin the short
configuration process. You can complete the setup over Bluetooth
or using an Ethernet connection.
To configure the 950AP using Bluetooth:
1. Make a note of the 950AP’s Bluetooth address, which is displayed on a label underneath the unit.
2. Perform a device discovery on your Bluetooth-enabled PDA or
laptop. Refer to your device’s documentation for more
information.
3. Look for the 950AP’s Bluetooth address and connect to it.
4. Launch your web browser and enter the 950AP’s default IP
address ‘http://192.168.1.1’. The Initial Configuration screen
appears.
Note: Your 950AP is supplied to you in initial configuration
mode. This means you can only initially connect a Bluetooth
device to complete the Initial Configuration. Once this is
completed, you can set up Bluetooth connectivity for other
devices.
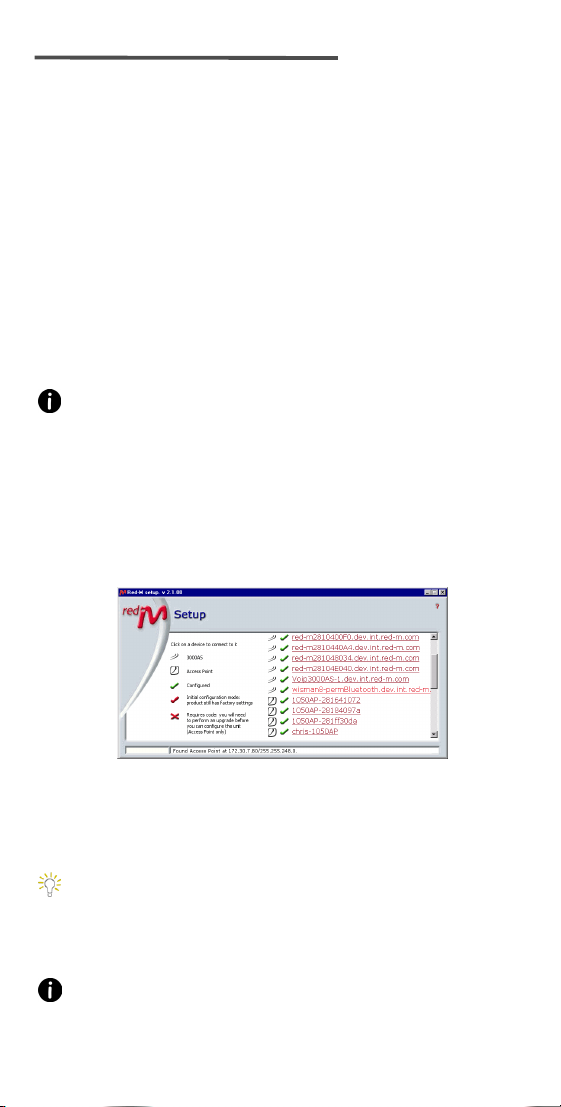
To configure a 950AP using an Ethernet connection:
1. Visit www.red-m.com and to download the Red-M Setup application from the support area.
2. Install and run Red-M Setup. This finds the 950AP’s IP address and provides a link to it.
Figure 4: Red-M Setup screen
3. Look for your 950AP’s Bluetooth address in the list of access
points displayed by Red-M Setup. A new 950AP has a red tick by
its name while previously configured 950APs have a green tick.
An 950AP’s name will be in the format: 950AP-xxxxxxxx x.
Hint: The 950AP’s Bluetooth address is displayed on a label
underneath the unit.
4. Click on the 950AP’s address. Your web browser window opens
and displays the 950AP management interface.
5. Complete the Initial Configuration process (see below).
Note: By default, the 950AP uses a DHCP server to obtain an IP
address. If there is no DHCP server on your LAN or the 950AP
cannot find one, you must configure the 950AP using Bluetooth
and the default IP address, 192.168.1.1.
Page 5

Initial Configuration
The first time you access the 950AP’s management interface, you
need to set the administrator password, specify how IP addresses will
be assigned and set the security level on the Initial Configuration
screen. You can complete this with an Ethernet connection or
wirelessly using Bluetooth.
Figure 5: Initial Configuration screen
Initial Configuration for corporate installation
1. Enter a name for the 950AP if you want to easily recognize it.
2. Enter an administrator password (16 characters maximum) and then confirm the password.
3. Enable/disable Network Address Translation (NAT) for the
950AP. By default NAT is enabled. Clear the checkbox if you do
not need to use NAT.
4. Select the WAN port (Network port) configuration:
-Select DHCP if your 950AP receives its IP addresses from a
DHCP server. If you select DHCP and turn NAT off, the
950AP uses the DHCP server for its WAN port IP address and
to assign IP addresses to Bluetooth devices.
-Select Static if you use static IP addresses. If you select
Static and turn NAT off, enter the Static IP Parameters on
page 2, including at least seven addresses in the Bluetooth
address pool (see Figures 6 and 7). The addresses must be
on the same IP network as your LAN but must not conflict
with existing addresses.
Page 6

5. Select a security level for your 950AP. If you select Secure, the
unit will be discoverable, but only manually configured devices
will be able to connect. Select Insecure to have the 950AP
automatically authorize any device.
Note: If you configure the 950AP using a Bluetooth device and
select Secure, the device is automatically added to the Devices
list and authorized to connect. See the the 950AP User Guide on
the Red-M website for more information.
6. Page 2 of the Initial Configuration depends on your selection in
step 4. If you selected DHCP, page 2 does not appear.
-If you selected Static and NAT is enabled, you must enter
the Static IP Parameters.
Figure 6: Initial Configuration Page 2 with Static IP Parameters
-If you selected Static and cleared the NAT checkbox, you
must enter the Static IP Parameters and Bluetooth address
pool.
Figure 7: Page 2 with Static IP Parameters and Bluetooth address pool
7. Click OK to complete the 950AP’s configuration.
If you completed the configuration of your 950AP using a Bluetooth
device, the device is automatically added to your device list and
authorized to connect.
For more detailed information on IP address configuration and
security, refer to the 950AP User Guide on the Red-M website.
Hint: To access the online help about completing the Initial
Configuration process, click .
Page 7

Initial Configuration for home installation
Refer to Figure 5 for the Initial Configuration screen.
1. Enter a name for the 950AP if you want to easily recognize it.
2. Enter an administrator password (16 characters maximum) and then confirm the password.
3. Ensure Network Address Translation (NAT) for the 950AP is selected. By default NAT is enabled.
Note: NAT must be enabled in a home environment to translate
IP addresses over a Wide Area Network (WAN). This function
may be provided by a router/switch connected to your modem.
4. Select the WAN port (Network port) configuration:
-Select DHCP if your 950AP receives its IP address from a
DHCP server. If you select DHCP and NAT is enabled,
Bluetooth device IP addresses are assigned by the 950AP’s
internal DHCP server while it obtains its WAN port IP
address from the DHCP server.
-Select Static if you use static IP addresses. If you select
Static and NAT is enabled, enter the 950AP’s Static IP
Parameters on page 2 of the Initial Configuration. The
950AP will assign IP addresses to Bluetooth devices.
-Select PPPoE if your ISP requires you to use it. NAT must be
enabled to use PPPoE (Point-to-Point Protocol over
Ethernet). Enter your username, Service name and
5. Select a security level for your 950AP. If you select Secure, the
6. Page 2 of the Initial Configuration depends on your selection in
password on page 2 of the Initial Configuration.
unit will be discoverable, but only manually configured devices
will be able to connect. Select Insecure to have the 950AP
automatically authorize any device.
step 4. If you selected DHCP, page 2 does not appear.
-If you selected Static, you must enter the Static IP
Parameters (see Figure 6).
-If you enabled PPPoE, you must complete the PPPoE details.
Figure 8: Initial Configuration Page 2 with PPPoE details
7. Click OK to complete the 950AP’s configuration.
Note: If you complete the configuration of your 950AP using a
Bluetooth device, that device is automatically added to your
device list and authorized to connect.
For more detailed information on IP address configuration and
security, refer to the 950AP User Guide on the Red-M website.
Hint: To access the online help about completing the Initial
Configuration, click .
Page 8

Reading the LED
The 950AP has a multi-color LED indicator to show the unit’s status
and locate it in Identify mode.
LED startup sequence
1. When you connect to a power source, the 950AP’s LED is orange
for about a second to indicate it is receiving power.
2. The LED flashes orange for a few seconds to indicate that the
950AP is starting up and conducting self-tests. If any tests fail,
the LED changes to steady orange to indicate a fatal error.
3. The LED is steady red after startup to indicate normal operation.
If there is a fatal error at any time, the LED is steady orange. If it
remains in this state for more than a second, try disconnecting and
reconnecting power to the 950AP. Otherwise, contact Red-M technical
support.
LED indicator status chart
Status Meaning
Steady red Normal operation
Steady orange Fault mode
Flashing orange Startup and self-testing
Flashing red No IP address, or code upgrade needed
Rapid flashing red Upgrading software
Flashing red and
orange
(setup.exe will display a red cross)
Identify mode
950AP Diagram
1
2
3
4
5
1. Mounting cavity. Use the mounting cavity to mount the 950AP to
a wall or ceiling. See the section Mounting to a ceiling (or wall).
2. Reset button. Use the reset button to reset the 950AP to its
factory settings. See the 950AP User Guide on the Red-M website for
more information.
3. Power port. Use the power port to connect the supplied DC 12 V
adapter to the 950AP.
4. Network port and indicator. Use the Netw ork port to connect to
an Ethernet port. See Installing the 950AP for more information.
5. LED indicator. The LED indicator shows the 950AP’s status and
can be used to identify the 950AP. See the section Reading the LED
for more information.
Page 9

Contact information
Visit www.red-m.com/support to obtain technical support and information.
Regulatory information
The following regulatory statements apply to the 950AP LAN access point.
North America
By attaching the mark to this product, we confirm:
This equipment complies with Part 15 of the FCC rules. Operation is subject to
the following two conditions:
(1) this device may not cause harmful interference, and (2) this device must
accept any interference received, including interference that may cause
undesirable operation.
To conform with FCC rules regarding RF exposure, this equipment should be installed a minimum of 20 cm away
from any personnel and should not be co-located or operated in conjunction with any other antenna or transmitter.
Any changes or modifications not expressly approved by the manufacturer could
void the user’s authority to operate the equipment.
This device has been designed to operate with an antenna that has a maximum
gain of 0 dB. Antennae that have a higher gain are strictly prohibited as per
regulations of Industry Canada. The required antenna impedance is 50 ohms.
To reduce potential radio interference to other users, the antenna type and its
gain should be so chosen that the equivalent isotropically radiated power (EIRP)
is not more than that required for successful communication.
To prevent radio interference to the licensed service in Canada, this device is
intended to be operated indoors and away from windows to provide maximum
shielding. Equipment (or its transmit antenna) that is installed outdoors is subject
to licensing.
Europe (EEA)
This product is designed to connect to "Bluetooth" compatible radio interfaces
using the 2.4 GHz frequency band in all EEA Member States with the exception of
France where the use of the following frequencies is restricted:
2.4000 - 2.4460 GHz - Use Excluded - Military Band
2.4540 - 2.4835 GHz - Limited to indoor video applications
[Member States of the EEA are: Austria, Belgium, Denmark, Finland, France,
Germany, Greece, Iceland, Ireland, Italy, Luxembourg, Liechtenstein,
Netherlands, Norway, Portugal, Spain, Sweden, Switzerland, United Kingdom.]
Trad e m ark s
Red-M, the Red-M logo, Genos and the curvilinear device are trademarks, and in
some jurisdictions may be registered trademarks, of Red-M (Communications)
Limited. Bluetooth is a trademark owned by Bluetooth SIG Inc USA and used by
Red-M under license. Other trademarks appearing in this document are the
property of their respective owners.
© Copyright 2002 Red-M. All Rights Reserved.
Page 10

Power supply information
ή
ς
English
CAUTION: Only use this product with a power source tha t meets the "Limited Power Source"
requirements of IEC 60 950 or equivalent safety standards. Use the power supply provided (if
applicable) or contact Red-M for a list of suitable power sources.
Dansk
ADVARSEL: Dette produkt må kun anvendes sammen med strømkilder, der opfylder kravene
vedrørende "Limited Power Source" i IEC 60950 eller tilsvarende sikkerhedsstanda rder. Anvend
den medfølgende strømforsyning (hvis muligt), eller kontakt Red-M og få en liste over godkendte
strømkil der.
Deutsch
WARNUNG: Verwenden Sie dieses Produkt nur mit einer Stromquelle, die die Anforderungen
bezüglich "begrenzter Stromquellen" gemäß IEC 60950 oder entsprechender Sicherheitsnormen
erfüllt. Verwenden Sie da s im Lie ferumfang en thaltene Netztei l (sofern zutref fend), oder for dern
Sie bei Red-M eine Liste der geeigneten Stromquellen an.
Español
PRECAUCI ÓN: Emp lee este producto ún icament e con un a fuente d e alime ntación que cumpl a la
norma de seguridad IEC 60950 de alimentación limitada, o equivalen te. Utilice la fuente de
alimentación suministrada, si es el caso, o consulte a Red-M para obtener una lista de fuentes de
alimentación aprop iadas.
Flemish
OPGELET: gebruik dit product enkel met een voedingsbron die voldoet aan de "Minimum
voedingsbron"-vereisten van IEC 6 0950 of evenwaardige ve iligheidsvoorschriften. Gebruik
bijhorende voedingsbron (indien deze geschikt is) of neem contact op met RED-M voor een lijst
van geschikte voedingsbronnen.
Français
ATTENTION: n'utilisez ce produ it qu'avec une source d'én ergie conforme à la norm e IEC 60950 en
matière de « source d'énergie limitée », ou autre norme de sécurité équivalente. Utilisez
l'alimentation en courant fournie (si applicable) ou bien contactez Red-M pour obtenir une liste des
sources d'énergie a déquates.
Íslenska
VARÚÐ: N otið þes sa vör u eingön gu með aflgjaf a sem stenst k röfur í kaflanum um "a flgjafa m eð
takmarkað afl" í IEC 609 50 (ÍST EN 60950) eða sambæ rilegra öryggisstaðla. Notið a flgjafann sem
fylgir (ef viðeigandi) eða fáið lista yfir nothæfa aflgjafa hjá umboðsaðila vörunnar.
Italiano
ATTENZIONE: Utilizzare questo prodotto solo con sorgenti di alimentazione che soddisfano i
requisiti di sicurezza IEC 60950 o equivalenti. Utilizzare l'alime ntatore fornito (ove applicabile) o
contattare Red-M per ottenere un elenco delle sorgenti di alimentazione adeguate.
Nederlands
WAARSCHUWING: Gebruik dit product alleen met een voedingsbron die voldoet aan de "Minimum
voedingsbron"-vereisten van IEC 6 0950 of evenwaardige ve iligheidsvoorschriften. Gebruik de
bijbehorende voedingsbron (indien van toepassing) of neem contact op met Red-M voor een lijst
van geschikte voedingsbronnen.
Norsk
FORSIKTIG: Dette produktet skal bare brukes med en strømkilde som tilfredsstiller kravene til
"Begrenset strømkilde" i IEC 60950 eller tilsvarende sikkerhetsstandard. Bruk den medfølgende
strømforsyni ngen (hvis en slik finnes) eller kontakt Red -M for å få en oversikt over pas sende
strømkil der.
Português
Advertênc ia: Utilize este produto apen as com um a fonte de energia que respeite os requisitos
definidos em "Fontes de Energia Limitadas" da norma IEC 60950 ou dos padrões de segurança
equivalentes. Utilize a fonte de alimentação fornecida (se aplicável) ou contacte Red-M para obter
uma lista de fontes adequadas.
Suomi
MUISTUTUS : Käytä tätä tuotetta vain sellaise n virtalähte en yhteydessä, joka tä yttää standardin
60950 "rajoitetun virtalähteen " tai muiden vastaavien standardien asettamat
turvallisuusvaatimu kset. Kä ytä toi mitettua virtaläh dettä ( jos asianmukais ta) tai o ta yhte ys
RedM:ään sopivien virtalähteiden luettelon saamiseksi.
Svensk
FÖRSIK TIGT! D enna produkt få r bara a nvändas med e n effektkälla so m uppf yller krave n för
"Begränsad effektkälla" i IEC 60950 eller motsvarande säkerhetsnormer. Använd medföljande
effektkälla (i fö rekommande fall) elle r begär en lista över lä mpliga effektkällor från Red-M.
Σλληνικά
ΠΡΟΣΟΧΗ : Χρησιµοπ οιήστε αυ τό το π ροϊόν µ όνο µε πηγή ενέργειας που είναι σύµφω νη µε την
οδηγία του IΕC 60950 περί «Περιορισµένης Πηγής Ενέργειας» ή αντίστοιχ ων προδιαγ ραφών
ασφαλείας. Χρησιµοποι ήστε την πηγή ενέργειας που παρέχεται (αν είναι κατάλληλη) ή
επικοινων
στε µε την Red-M για να σας προµηθεύσει µε κατάλογο συµβατών πηγών ενέργεια
Page 11

 Loading...