

Redlion 2RLAG-1L Owner's Manual
EN
ENGLISH
ENGINE-DRIVEN
ALUMINUM WATER PUMP
Owner's Manual
Table Of Contents
Safety Instructions ............................................................................... 2
Introduction ..........................................................................................4
Application ........................................................................................... 4
Specifications ....................................................................................... 4
Pump Placement ................................................................................. 5
redlionproducts.com
Operation ..............................................................................................5
Maintenance ......................................................................................... 7
Cleaning ................................................................................................7
Draining the Pump .............................................................................. 8
Transporting the Pump .......................................................................8
Storage .................................................................................................8
Troubleshooting ...................................................................................9
Replacement Parts .............................................................................10
Limited Warranty .................................................................................11
SAFETY INSTRUCTIONS
Hazard Messages
This manual includes safety precautions and other important
information in the following formats:
Indicates an imminently hazardous situation
which, if not avoided, will result in death or
serious injury..
Indicates a potentially hazardous situation
which, if not avoided, could result in death or
serious injury..
Indicates a potentially hazardous situation
which, if not avoided, could result in minor or
moderate personal injury.
Indicates a potentially hazardous situation
which, if not avoided could result in damage
to equipment or other property..
IMPORTANT: Identifies information that controls correct assembly and
operation of the product.
NOTE: Identifies helpful or clarifying information.
This symbol alerts the user to the presence of dangerous voltage
inside the product that might cause harm or electrical shock.
This symbol alerts the user to the presence of hot surfaces that
might cause fire or personal injury.
Before Getting Started
This equipment should be installed and serviced by technically qualified
personnel. Failure to comply with national and local electrical codes and
within Red Lion recommendations may result in electrical shock or fire
hazard, unsatisfactory performance, or equipment failure.
This product includes an owner's manual from the pump manufacturer
and an owner's manual from the engine manufacturer. Read and follow
instructions carefully to avoid injury and property damage. Do not
disassemble or repair unit unless described in this manual. If either
manual was not provided, do not install or operate the product until a
replacement manual has been obtained and carefully read.
Failure to follow installation/operation procedures and all applicable codes
may result in the following hazards:
Risk of death, personal injury, or property
damage.
• Do not use to pump flammable or explosive fluids such as
gasoline, fuel oil, kerosene, etc.
• Do not use in explosive atmospheres or hazardous locations as
classified by the NEC, ANSI/NFPA70.
• When operating, the engine on this pump produces carbon
monoxide, an odorless, colorless, poisonous gas that can
cause asphyxiation and kill you in minutes. Breathing carbon
monoxide can cause nausea, fainting, or death. Operate this
pump ONLY outdoors in a well-ventilated area. Do not operate
the pump inside any building, confined area such as a tunnel or
trench, or enclosed area such as basement, garage, or similar
locations, even if doors and windows are open.
Risk of bodily injury or equipment damage.
• This equipment must not be used by children or persons with
reduced physical, sensory or mental abilities, or lacking in
experience and expertise, unless supervised or instructed.
Children may not use the equipment, nor may they play with
the unit or in the immediate vicinity.
• Do not use this pump for pumping any liquid intended for
human consumption.
• Operation of this equipment requires detailed installation and
operation instructions provided in this manual for use with this
product.
• Read entire manual before starting installation and operation.
• Keep work area clean, well-lit, and uncluttered.
• Keep safety labels clean and in good condition.
• Do not wear loose clothing, jewelry, or anything that may
be caught in the rotating parts. Tie up long hair and remove
jewelry.
• Wear the following Personal Protective Equipment (PPE) while
installing, operating or servicing this pump:
• Close-fitting work clothes that do not hinder movement
• Safety glasses with side shields
• Hearing protection
• Safety-toed footwear.
Refer to product data plate(s) for additional operating instructions and
specifications.
Product Specific Precautions
Rental companies and private owners who rent or lend this pump to
others: All persons to whom you rent or lend this pump must have
access to and read the product’s owner's manuals. Keep the manuals
with the pump at all times and advise all persons who will operate the
pump to read them. You must also provide personal instruction on how
to safely operate the pump, and you must be available to answer any
questions that the renter or borrower might have.
Risk of severe injury or death.
• Internal combustion engines present special hazards during
operation and fueling. Failure to follow all the warnings and
safety guidelines could result in severe injury or death. Refer to
and follow all instructions in the engine manufacturer's owner's
manual as well as all instructions in this manual.
• Do not attempt to start the engine with the spark plug removed.
Unintentional sparking can result in fire or electric shock. Ensure
that the spark plug, muer, fuel cap, and air cleaner are in
place.
• Do not use in mobile equipment or marine applications.
• If fuel is spilled, avoid starting engine or creating any source of
ignition until the fuel evaporates or is cleaned up and any fuel
vapors have dissipated.
Risk of bodily injury or equipment damage.
• Rapid retraction (kickback) of the starter cord can pull your hand
and arm toward the engine faster than you can let go. Broken
bones, fractures, bruises, or sprains could result. To minimize
the occurrence of kickback, pull the starter cord slowly until
resistance is felt, then pull rapidly to start the engine.
• Do not use this pump for pumping any liquid intended for
human consumption.
• Do not modify the pump in any way. Use the pump only for its
intended uses.
• Avoid hot exhaust gases and do not touch hot surfaces.
• Do not tip the pump at an angle that causes fuel to spill.
• Never start or operate a pump known or suspected to be
damaged, defective or malfunctioning.
Risk of damage to equipment or other
property.
• C
ode of Federal Regulation (CFR) Title 36 Parks, Forests, and
Public Property require equipment powered by an internal
combustion engine to have a spark arrester, maintained in
eective working order, complying to USDA Forest service
standard 5100-1C or later revision. In the State of California, a
spark arrester is required under section 4442 of the California
Public resources code. Other states may have similar laws.
• Do not use this pump for pumping sea water, beverages, acids,
chemical solutions, or any other liquid that promotes corrosion
as this can result in damage to the pump.
3

INTRODUCTION
This is an engine-driven transfer pump for use in general de-watering applications and is suitable for pumping clear water. Do not use the pump in
applications where sewage or any other debris (gravel, sand, floating debris, etc.) or corrosives are present.
This instruction sheet provides you with the information required to safely own and operate your product. Retain these instructions for future reference.
The product you have purchased is of the highest quality workmanship and material, and has been engineered to give you long and reliable service. This
product has been carefully tested, inspected, and packaged to ensure safe delivery and operation. Please examine your item(s) carefully to ensure that no
damage occurred during shipment. If damage has occurred, please contact the place of purchase. They will assist you in replacement or repair, if required.
APPLICATION
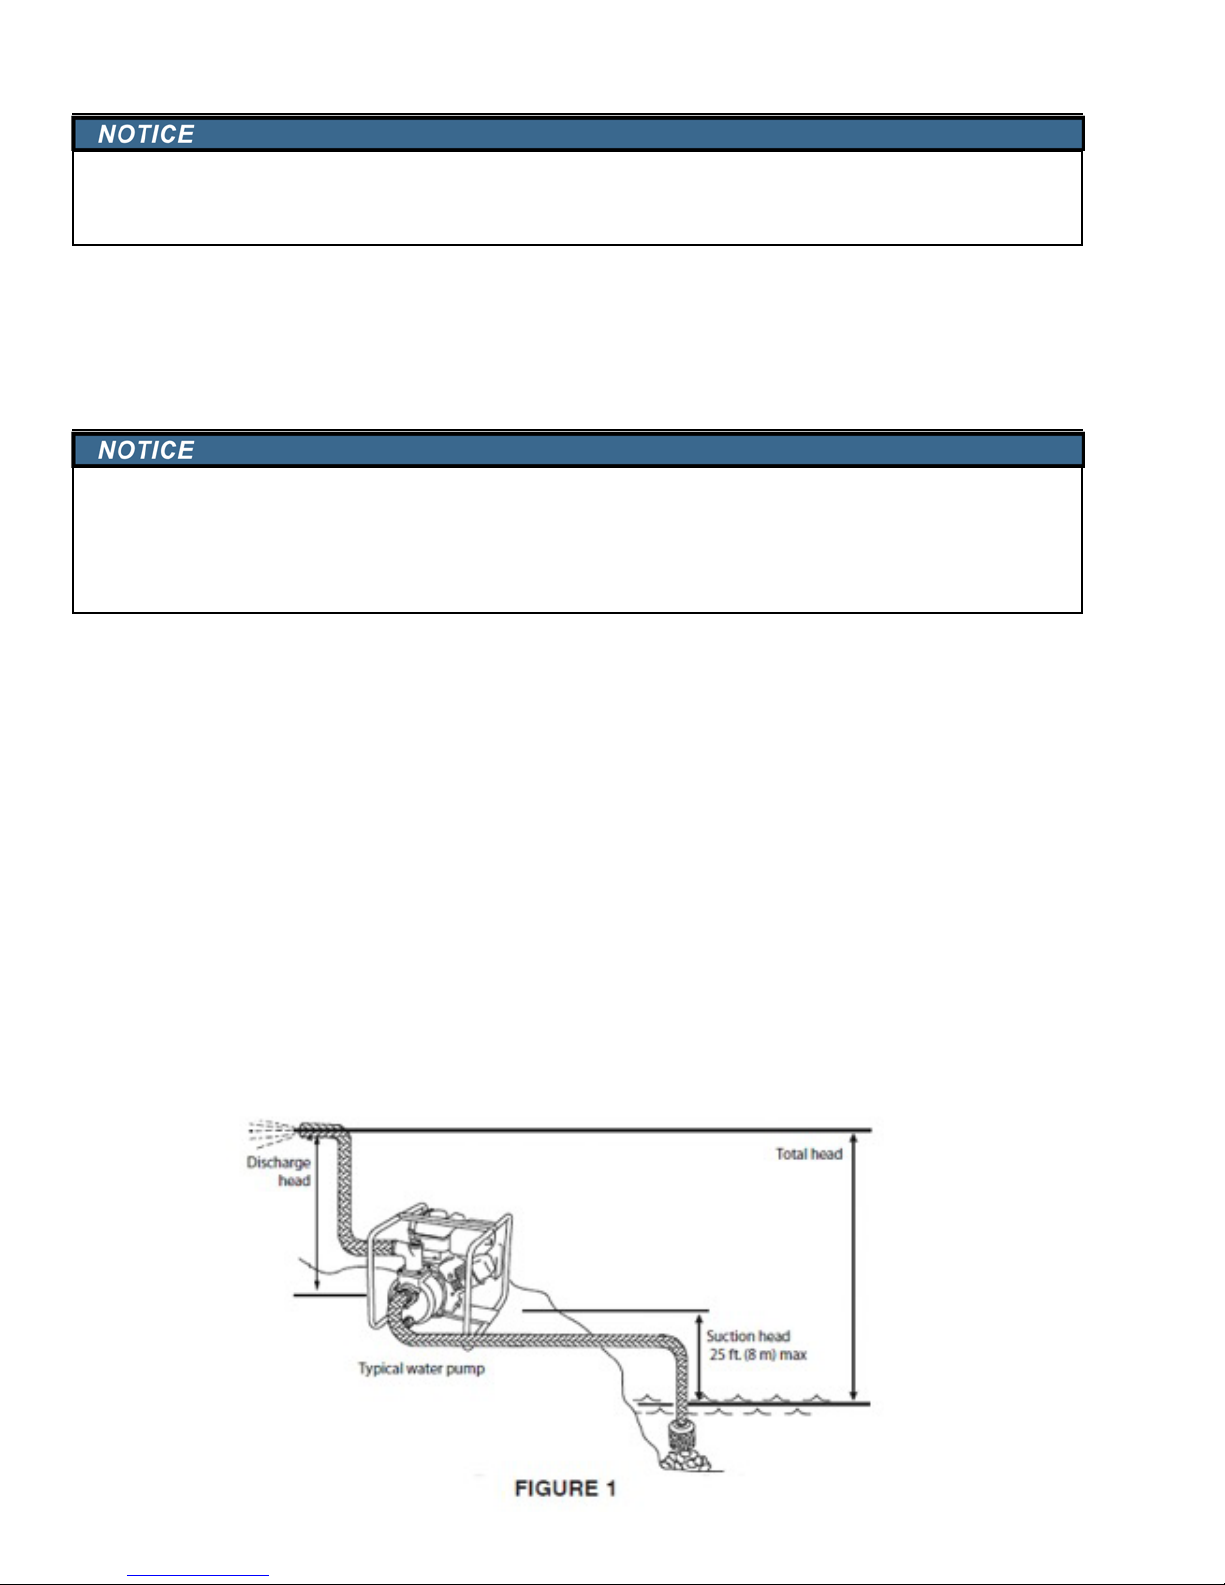
Use this pump for water only, where the vertical suction head from the water level is 25 ft (8m) or less. Do not exceed the maximum suction head.
Head refers to the height of a column of water that can be delivered by the discharge of the pump (Figure 1). Suction head (or suction lift) is the
vertical distance between the center of the pump and the surface of the liquid on the suction side of the pump. Discharge head is the vertical distance
between the pump's discharge port and the point of discharge. Total head is the sum of the suction head and the discharge head. The elevation above
sea level and friction losses must be taken into consideration.
SPECIFICATIONS
Model 2RLAG-1L
Engine Air Cooled, 4 Stroke, OHV, 79cc
Performance 2.1 HP @ 3600 rpm
Fuel Type Refer to engine manufacturer's owner's manual
Oil Type Refer to engine manufacturer's owner's manual
Shut O 79 ft (24.1 m)
Suction head (max.) 25 ft (7.6 m)
Intake Size 1.5" MNPT (3.8 cm)
Discharge Size 1.5" MNPT (3.8 cm)
Maximum Flow 60 GPM (227 LPM)
Weight 43 Lb (19.5 kg)
Height 17.75" (45.1 cm)
Width 14" (35.6 cm)
Length 20.75" (52.7 cm)
4
PUMP PLACEMENT
Risk of injury or property damage from re.
• The pump must be at least 5 feet from structures having combustible walls and/or other combustible materials such as leaves, grass, and
brush.
• Reflective exhaust heat may damage the fuel tank, causing fire. Keep at least 3 feet of clearance on all sides of the pump for adequate
cooling, maintenance, and servicing.
1. Locate the pump outdoors in a well-ventilated place on a flat, level surface.
2. Place pump on a rigid, level foundation to prevent the pump from tipping, rolling, sliding or creeping while operating. If the pump is not
stable, the weight of liquid-filled hoses could cause the unit to tip over.
3. Use a non-collapsible hose on the suction side of the pump and keep the suction hose as short as possible. A collapsed, kinked, obstructed or
long suction hose will reduce priming and pumping performance, and may contribute to loss of prime which can cause pump overheating.
4. Use a suction hose the same size as the suction port on the pump. If the suction hose is long, increase it by one size to improve flow.
5. Slope the suction hose upwards to the pump to avoid air pockets in the hose and hard priming.
6. If the suction hose is oriented vertically, use an elbow on the suction hose-to-pump connection to prevent kinking.
7. Keep the discharge hose as short as possible to allow the pump to have the greatest output.
8. Use thread compound on all pipe joints and double clamps on all hose joints. Connections must be air-tight.
9. A strainer basket must be installed on the end of the suction hose to filter debris and abrasives. Never operate the pump without the strainer
basket installed.
10. Position the end of the discharge hose where you want to discharged water to be pumped. Secure/anchor the discharge hose to avoid whipping.
IMPORTANT: One of the main causes of pumping problems is a leak in the suction line. Even a very small leak will reduce priming and pumping
performance greatly.
OPERATION
Preparing the Engine
Refer to and follow the engine manufacturer's instructions for preparing the engine before operating, for example oil level, air filter, fuel level, etc.
Risk of severe injury or death.
• Fuel and its vapors are extremely flammable and explosive. Fire or explosions can cause severe burns or death. Do not add fuel indoors. Do
not add fuel when the engine is running or hot. Do not light cigarettes or smoke when adding fuel. Keep fuel away from furnaces, stoves,
water heaters, clothes dryers, or other appliances that have a pilot light or other ignition source (heat, flame, sparks, lit cigarette, etc.)
because they can ignite fuel vapors.
• When adding fuel, ensure that the pump is outdoors on a flat, level surface. Do not add fuel to pump while indoors. Turn the pump
OFF and let it cool at least 2 minutes before removing the fuel cap. Loosen the cap slowly to relieve pressure in tank. Refer to the engine
manufacturer's instructions for recommended fuel type and proper procedure for adding fuel.
• If fuel is spilled, avoid starting engine or creating any source of ignition until the fuel evaporates or is cleaned up and any fuel vapors have
dissipated.
Risk of damage to equipment.
• Do not attempt to start the engine before it has been filled properly with the recommended type and amount of oil. Failure to follow
these instructions will void the warranty and cause damage to the engine. Refer to the engine manufacturer's instructions for oil type and
proper procedure for adding oil. Check the engine oil level before every use and add as needed.
5
Priming the Pump
Risk of damage to equipment.
• Do not operate the pump without priming it. Water is required to lubricate the pump seal. Operating the pump dry will permanently
damage the pump seal. Be sure pump housing is completely filled with water before starting the engine.
1. Remove the priming plug.
2. Fill the pump housing completely with water.
3. Replace the priming plug and tighten securely.
NOTE: If the pump is below the level of the water that will be pumped (flooded suction), the pump will automatically fill up when the valves are open.
Operating the Pump
Risk of damage to equipment.
• Do not allow this pump to operate unattended. If you leave the pump for any reason, always turn the engine o.
• Do not allow vehicles to drive over suction or discharge hoses. If a hose must be positioned across a roadway, use planking on each side of
the hose to protect the hose and allow vehicles to pass over without obstructing or collapsing hose. Driving over an unprotected discharge
hose while pump is operating may cause damage to pump housing.
1. Ensure that the pump is on a flat, level surface.
2. Do not block or restrict inlet or discharge hoses. Remove kinks from inlet and discharge hoses before starting pump. Operation with a blocked
inlet or discharge hose can cause water inside pump to overheat.
3. Refer to the engine manufacturer's instructions for proper procedure for starting and stopping the engine.
4. In a flooded suction situation, the pump will discharge water almost immediately. If the suction hose is above the water level being pumped,
it will take a few minutes to lift the water to the pump housing and then to discharge it. If the suction hose is long, the pump may overheat
before the water in the suction hose reaches the pump. If this occurs:
a) Turn the engine o and remove the drain plug and priming plug to drain the pump housing.
b) Wait a few minutes for the seal in the pump housing to cool. If the overheated housing is filled while hot, damage to the seal will occur.
c) Replace the drain plug and refill the housing with water.
d) Replace the priming plug and tighten securely.
e) Restart the engine following the engine manufacturer's instructions.
5. If the pump does not perform as specified, check the Installation, Maintenance and Troubleshooting sections carefully.
6. When finished pumping, turn o the engine following the engine manufacturer's instructions.
7. Allow unit to cool completely.
8. After cooling, remove the priming plug and drain plug from the pump housing and allow it to drain completely.
6
MAINTENANCE
Risk of severe injury or property damage from re or projectiles.
• Never start or operate a pump known or suspected to be damaged, defective or malfunctioning.
• Do not make adjustments or repairs to the pump or engine while engine is operating.
• Complete all scheduled maintenance in a timely manner per the manufacturer’s recommendations. Correct any issues before operating
the pump. Improper maintenance will void the pump's warranty.
Preventative maintenance and a pre-operation inspection is to be performed before each use by knowledgeable, experienced owners or certified
service dealers.
A poorly maintained pump can become a safety hazard! For the pump to operate safely and properly throughout its product lifecycle, periodic
maintenance and occasional repairs are necessary.
1. Refer to and follow instructions in the engine manufacturer's owner's manual for recommended engine maintenance.
2. Turn engine o.
3. Allow unit to cool completely.
4. To prevent accidental starting, remove and ground the spark plug wire before performing any service.
5. Check for any loose nuts, bolts, and attachments and retighten as required.
6. Check the engine, pump and its components for damage. If there is visible damage, do not operate the engine or pump! Contact the engine or
pump manufacturer immediately for assistance.
7. Check the engine for oil and/or fuel leaks. If a leak is found, do not operate the engine! Contact the engine manufacturer immediately for assistance.
8. Inspect for water leaks between pump and engine as well as all other sealing interfaces and have serviced as required. If water is leaking, the
seal inside pump is worn or damaged. Continued operation may cause water damage to engine.
9. Inspect motor and pump mounts for damage and replace as required.
10. Clean pump per the “Cleaning the Pump” Section of this manual.
CLEANING
Risk of injury or damage to equipment.
• Do not remove priming plug, drain plug, pump housing or inlet or discharge hose fittings when pump is hot. Hot water and/or vapor
inside could be pressurized.
• Do not spray engine with water. Water can contaminate the fuel system.
Clean inside of pump housing after every use.
1. Allow the unit to cool completely.
2. After the unit has cooled, remove drain plug and priming plug from pump housing and drain any water left in the pump.
3. Remove the (4) bolts securing the pump housing and save for reuse. Remove pump housing.
4. Remove volute insert.
5. Clean out dirt and debris.
6. Inspect impeller and volute insert for wear. The impeller may develop sharp edges after use. Use care when cleaning around impeller to avoid
getting cut. Replace impeller and/or volute insert if wear is significant.
7. After cleaning, inspection and replacements if necessary, reinstall the volute insert, pump housing (using bolts removed earlier), drain plug
and priming plug.
7
DRAINING THE PUMP
Risk of injury or damage to equipment.
• Do not remove priming plug, drain plug, pump housing or inlet or discharge hose fittings when pump is hot. Hot water and/or vapor
inside could be pressurized.
If the pump is subject to freezing temperatures, pump housing must be thoroughly drained of any water to prevent damage from freezing.
1. Allow the unit to cool completely.
2. After the unit has cooled, remove drain plug and priming plug from pump housing and drain any water left in the pump.
3. Make sure the suction and discharge lines are free of water.
4. After draining, reinstall the drain plug and priming plug.
TRANSPORTING THE PUMP
1. Allow unit to cool completely.
2. Empty the fuel tank or close the fuel valve.
3. Disconnect the spark plug wire from the spark plug and place the wire where it cannot contact the plug.
4. Make sure that the pump is kept level to reduce the possibility of oil or fuel leakage.
5. Ensure that the pump is securely strapped down in the transport vehicle to prevent it from sliding or tipping.
6. Do not refuel the pump in or on the transport vehicle. Move the pump to its operating location and then fill the fuel tank.
STORAGE
Risk of injury or damage to equipment.
• Do not remove priming plug, drain plug, pump housing or inlet or discharge hose fittings when pump is hot. Hot water and/or vapor inside
could be pressurized.
• Store the pump in a well-ventilated area away from furnaces, stoves, water heaters, clothes dryers, or other appliances that have a pilot
light or other ignition source (heat, flame, sparks, etc.) because they can ignite fuel vapors.
If pump is being stored for more than 30 days:
1. Allow the unit to cool completely.
2. After the unit has cooled, remove drain plug and priming plug from pump housing and drain any water left in the pump.
3. Clean inside of pump housing per the “Cleaning” section of this manual.
4. Coat inside of pump with a light film of oil to reduce corrosion.
5. Tape up suction and discharge ports to prevent anything from accidentally entering the pump.
6. Refer to and follow instructions in the engine manufacturer's owner's manual for engine storage.
7. Cover pump and engine and store in a clean, dry area.
8
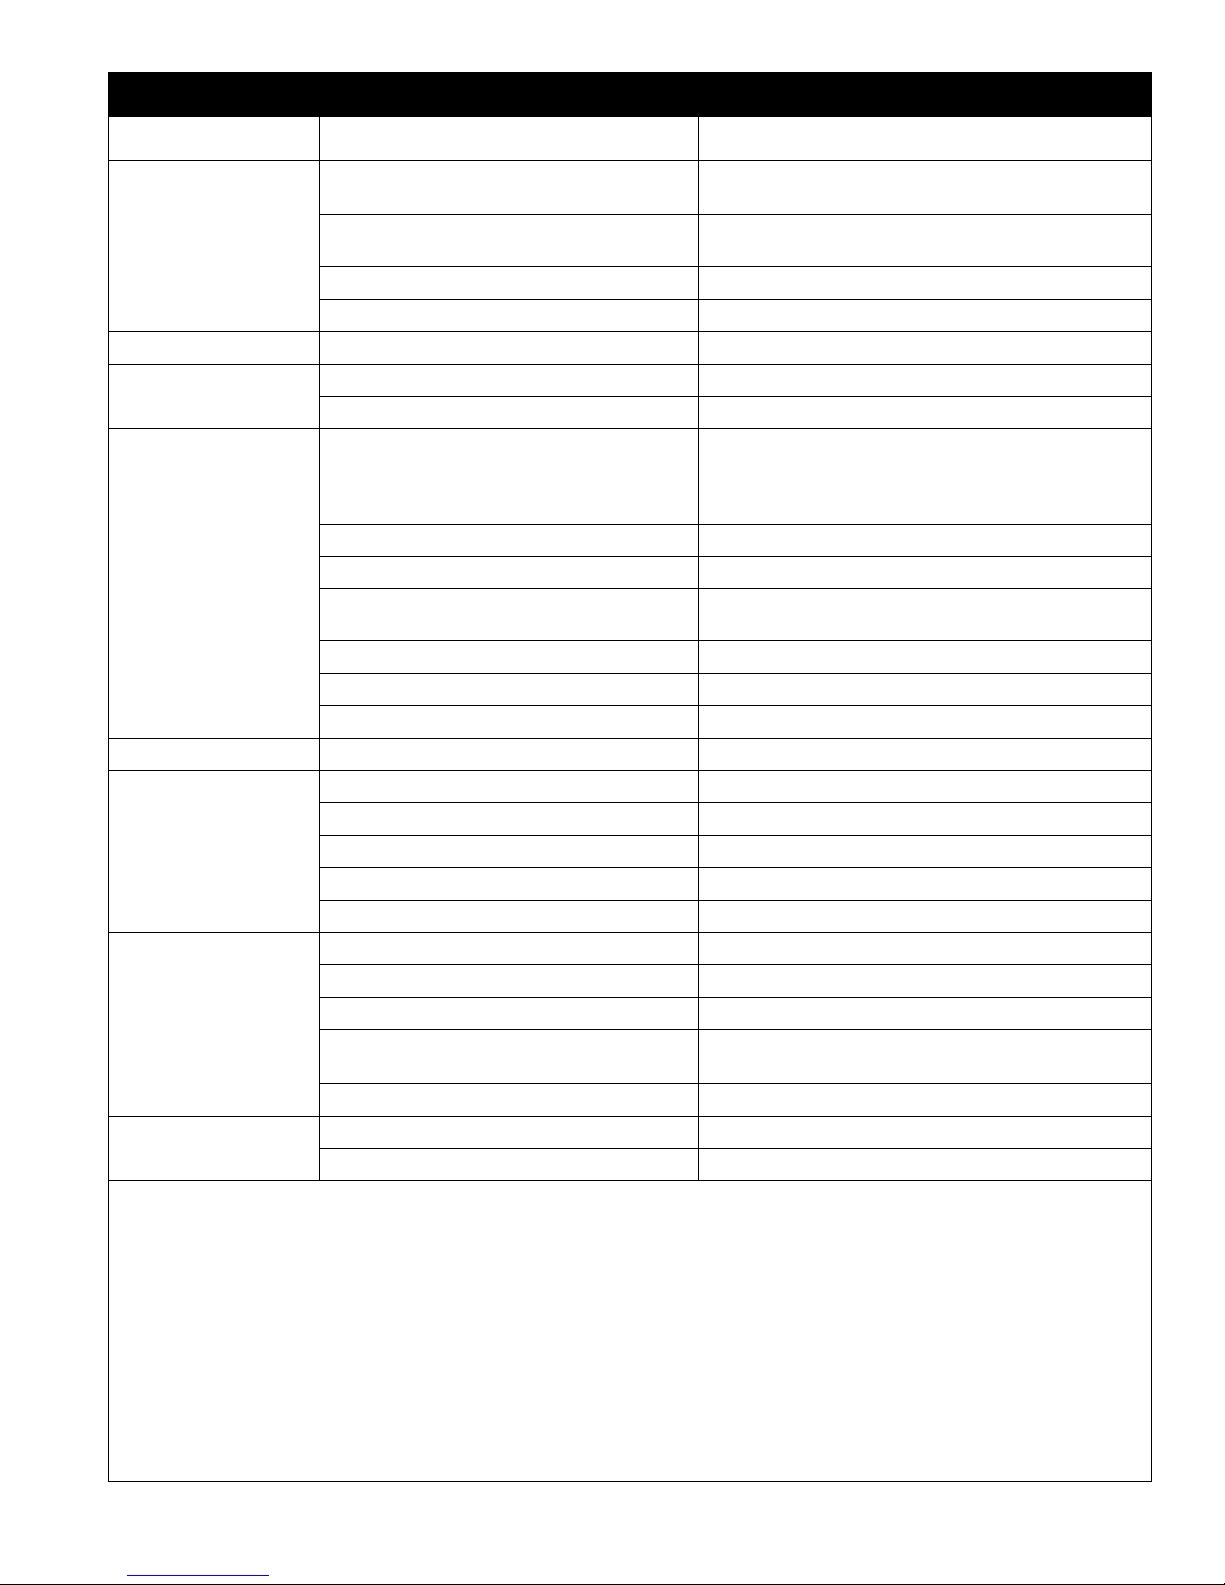
Troubleshooting
Problems Causes Solutions
Air leak in suction hose
Pump will not pump
Pump will not prime Excessive suction lift (*1) Move the pump closer to liquid source
Priming takes a long time
Pump does not perform as well as
it should
Pump loses prime Water level drops below the end of the suction hose The end of the suction hose must be submerged
Pump will not start
Pump starts, but runs roughly
Pump shuts down during operation
*1. Excessive suction lift must take into consideration:
a. Excessive suction lift must take into consideration:
b. Pipe Fitting
c. Elevation above sea level
Including all the above, we recommend that the total suction head not exceed 25 ft.
*2. An excessively worn impeller is mainly caused from cavitation, which is caused by several situations, such as:
a. Restricted suction
b. Excessive suction lift
*3. The seal may be damaged due to:
a. Normal Wear
b. Overheating
c. Pumping chemicals or abrasives that this seal is not designed for.
For technical assistance for pump operation, call 1.888.885.9254. For assistance with engine components, please refer to the engine manual or contact an LCT® engine authorized service depot for
further assistance. For more information visit www.lctusa.com/service/
LCT® is a registered trademark of Liquid Combustion Technology, LLC.
The suction and/or discharge hose(s) may be blocked,
or the valve(s) are closed, faulty and/or blocked
The end of the suction hose is not submerged The end of the suction hose must be submerged
Total head is too high for this pump to work against Reduce total head or use a higher head pump
Suction hose is quite long Refer to PUMP PLACEMENT section
Air pockets or leaks in the suction hose Check the hose for loose connections
Flow is restricted due to:
a) Debris build-up
b) Faulty or semi-open valve(s)
c) Pipe or hose used is smaller than the thread sizes on the pump
Insucient submergence of the end of suction hose The end of the suction hose must be submerged
Excessively worn impeller (*2) Replace impeller
Seal is damaged (*3). Liquid will be leaking through the middle of
the adapter
Air pockets or leaks in the suction hose Check the hose for loose connections
Clogged impeller Remove casing to clean out
Engine throttle is in SLOW position Move throttle to FAST position
No fuel Add fuel per engine manufacturer’s instructions
Faulty spark plug Replace spark plug
Fuel valve lever is in the OFF position Turn the fuel valve lever to the ON position
Ignition switch is in the OFF position Turn the ignition switch to the ON position
Choke is in the wrong position Slide choke lever to the START position
Choke is in the wrong position Slide choke lever to the RUN position
Spark plug wire is loose Attach wire to spark plug securely
Faulty spark plug Replace spark plug
Fuel is contaminated (water, debris, etc.)
Low oil level Add oil per engine manufacturer’s instructions
No fuel Add fuel per engine manufacturer’s instructions
Low oil level Add oil per engine manufacturer’s instructions
Make sure suction hose is double clamped at joints, clamps are tight, fittings have
thread compound and are tight, with no nicks or cuts in hose
Check to see that the hoses and valves are in good working order
a) Clean the hoses and fittings
b) Check to see that the valves are in good working order
c) Increase the size of hose or pipe to reduce friction losses
Replace the seal
Allow engine to cool for 2 minutes, then drain fuel tank and carburetor
Fill tank with fresh fuel
9
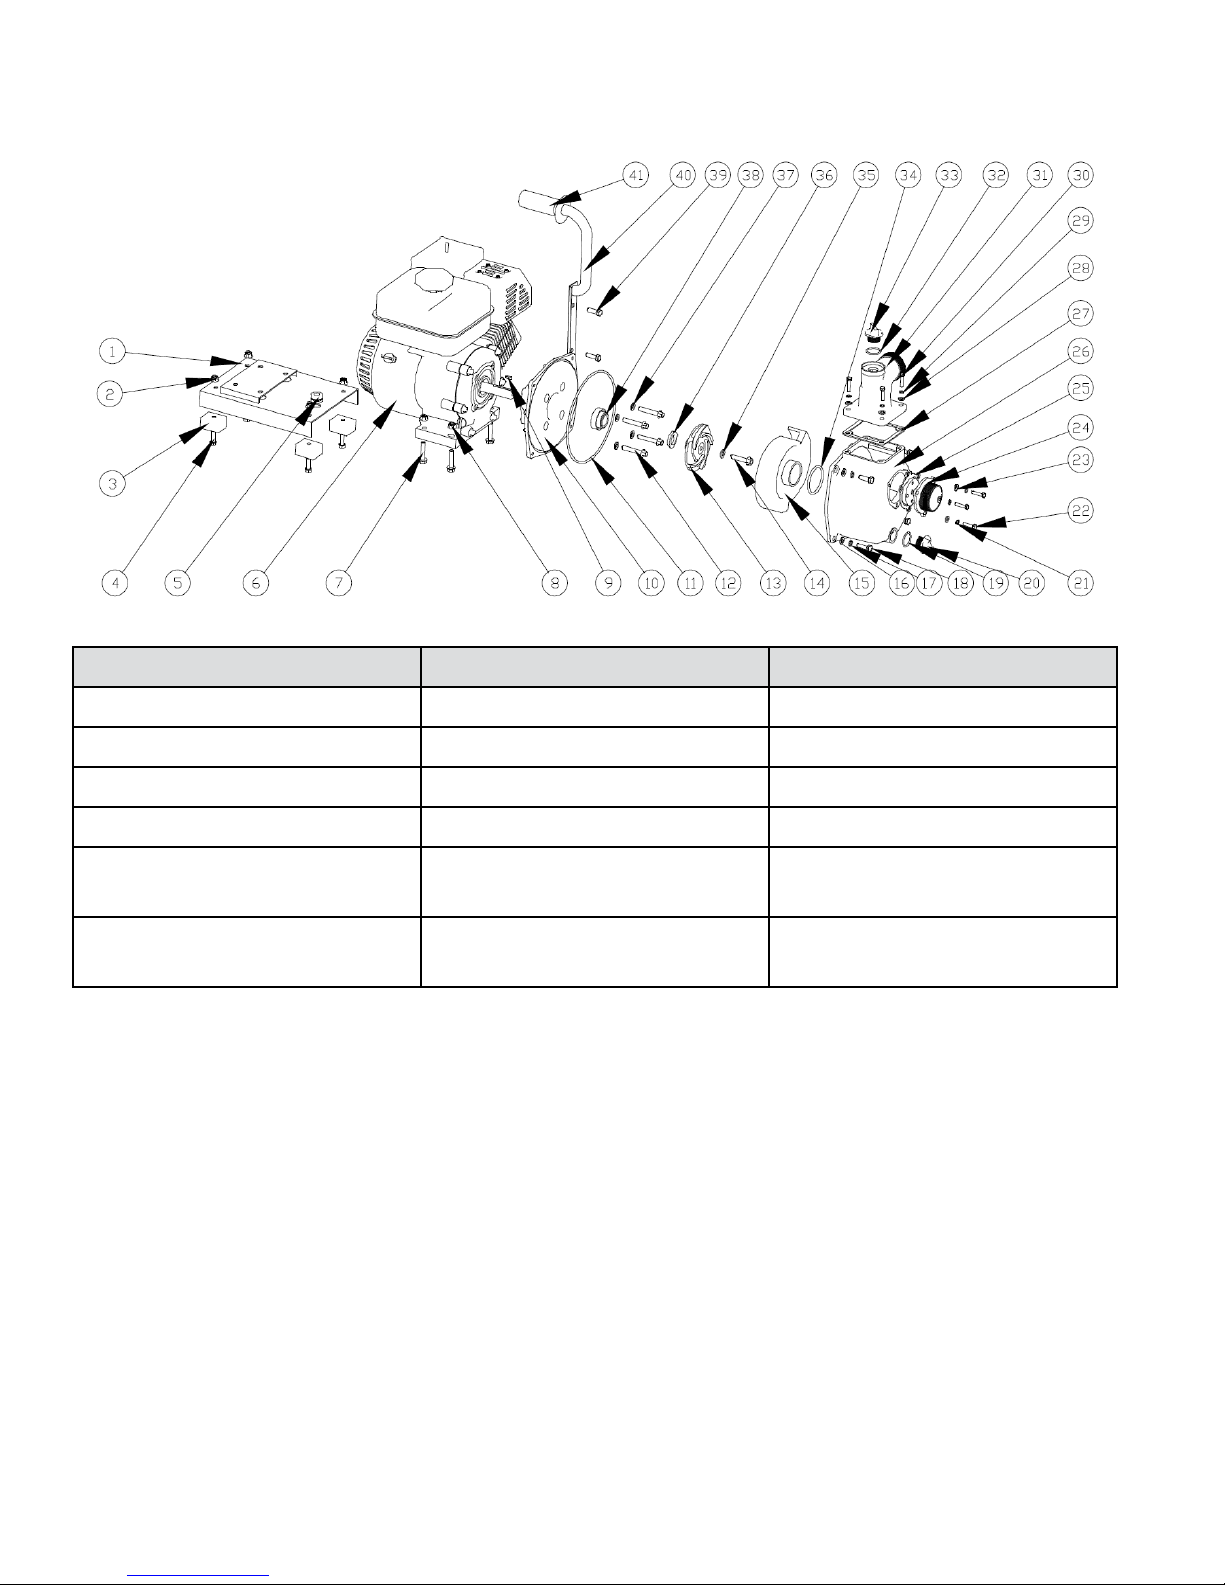
REPLACEMENT PARTS
Item Description Contents
617300 2RLAG-1L Minor Repair Kit 11, 34, 35, 36, 37, 38
617310 2RLAG-1L Major Repair Kit 9, 11, 13, 14, 15, 34, 35, 36, 37, 38
617320 2RLAG-1L Casing Kit 10, 11, 12, 16, 17, 18, 26, 37
617330 2RLAG-1L Accessory Kit 32, 33
617340 2RLAG-1L Suction and
Discharge Flange Kit
617350 2RLAG-1L Handle/Base
Assembly
24, 25, 27, 28, 29, 30, 31, 32, 33
1, 2, 3, 4, 5, 7, 8, 39, 40, 41
10

LIMITED WARRANTY
THIS WARRANTY SETS FORTH THE BRAND’S SOLE OBLIGATION AND PURCHASER’S EXCLUSIVE REMEDY FOR DEFECTIVE PRODUCT.
Engine and Emissions Control System (ECS): The Red Lion brand (hereafter “the Brand”) is not liable for the ECS or related components. Please refer to the engine manufacturer’s
owner’s manual for details regarding the engine and emissions control system (ECS) warranties. Follow the instructions in the engine manufacturer’s owner’s manual for obtaining
warranty service for the engine and/or engine-related components.
The Brand warrants that the products accompanied by this warranty are free from defects in materials or workmanship of the Brand that exist at the time of sale by the Brand
and which occur or exist within the applicable warranty period. Any distributor, sub-distributor, recipient, end-user and/or consumer agrees that by accepting the receipt of the
products, the distributor, sub-distributor, recipient, end user and/or consumer expressly agrees to be bound by the terms of the warranty set forth herein.
I. Applicable Warranty Period
The products accompanied by this warranty shall be covered by this Limited Warranty for a period of 24 months from the date of original purchase by the consumer. In the absence
of suitable proof of purchase date, the warranty period of this product will begin to run on the product's date of manufacture.
II. Instructions Applicable to this Limited Warranty
1. Consumers wishing to submit a warranty claim must call the Technical Service line at 888-885-9254.
2. Upon discovery of a defect, any personal injury, property damage or any other type of resulting damage, if applicable, shall be reasonably mitigated to the
extent possible.
3. At its discretion, the Brand may inspect products either at its facilities or in the field, and after determination of a warranty claim, will, at its option, repair or replace
defective parts. Repaired or replaced parts will be returned freight prepaid by the Brand.
4. This warranty policy does not cover any labor or shipping charges. The Brand shall not be liable for any costs or charges attributable to any product testing, maintenance,
installation, repair or removal, or for any tools, supplies, or equipment needed to install, repair, or remove any product.
III. Limitations Applicable to this Limited Warranty
THIS WARRANTY DOES NOT APPLY TO ANY OF THE FOLLOWING:
1. Any product that is not installed, applied, maintained and used in accordance with the Brand's published instructions, applicable codes, applicable ordinances and/or
with generally accepted industry standards.
2. Any product that has been subject to misuse, misapplication, neglect, alteration, accident, abuse, tampering, acts of God (including lightning), acts of terrorism, acts of
war, fire, improper storage or installation, improper use, improper maintenance or repair, damage or casualty, or to an excess of the recommended maximums as set
forth in the product instructions.
3. Any product that is operated with any accessory, equipment, component, or part not specifically approved by the Brand.
4. Use of replacement parts not sold by the Brand, the unauthorized addition of non-Brand products to other Brand products, and the unauthorized alteration of Brand
products.
5. Products damaged by normal wear and tear, normal maintenance services and the parts used in connection with such service, or any other conditions beyond the
control of the Brand.
6. Any product that has been used for purposes other than those for which it was designed and manufactured.
7. Any use of the product where installation instructions and/or instructions for use were not followed.
8. Products where the suction port was exposed to any of the following: sand, gravel, cement, grease, plaster, mud, tar, hydrocarbons, hydrocarbon derivatives (oil,
gasoline, solvents, etc.), driveway sealants or other abrasive or corrosive substances.
9. Products in which the pump has been used for pumping of liquids above 140°F.
10. Products in which the pump was allowed to operate dry (fluid supply cut o).
The Brand reserves the right at any time, and from time to time, to make changes in the design and/or improvements upon its product without thereby imposing any obligation
upon itself to make corresponding changes or improvements in or upon its products already manufactured and/or previously sold. The Brand further reserves the right to substitute
parts or components of substantially equal quality in any warranty service required by operation of this Limited Warranty.
This written Limited Warranty is the entire warranty authorized and oered by the Brand. There are no warranties or representations beyond those expressed in this document.
THIS WARRANTY AND REMEDY IS IN LIEU OF ALL OTHER WARRANTIES AND REMEDIES INCLUDING WITHOUT LIMITATION, WARRANTIES OF MERCHANTABILITY AND/OR FITNESS FOR A
PARTICULAR PURPOSE, WHICH ARE HEREBY SPECIFICALLY DISCLAIMED AND EXPRESSLY EXCLUDED. CORRECTION OF NON-CONFORMITIES, IN THE MANNER AND FOR THE PERIOD OF TIME AS
SET FORTH ABOVE, SHALL CONSTITUTE FULFILLMENT OF ALL LIABILITY OF THE BRAND TO THE PURCHASER WHETHER BASED ON CONTRACT, NEGLIGENCE, OR OTHERWISE.
11
 Loading...