

Page 1

Red Hat GFS
Installing and Configuring
Oracle9i RAC with GFS 6.0
Page 2

Red Hat GFS: Installing and Configuring Oracle9i RAC with GFS 6.0
Copyright © 2004, 2005 Red Hat, Inc.
Red Hat, Inc.
1801 Varsity Drive
Raleigh NC 27606-2072 USA
Phone: +1 919 754 3700
Phone: 888 733 4281
Fax: +1 919 754 3701
PO Box 13588
Research Triangle Park NC 27709 USA
rh-gfsog(EN)-6.0-Print-RHI (2005-10-13T14:56)
Copyright © 2005 by Red Hat, Inc. This material may be distributedonly subject to the terms and conditions set forth in the
Open Publication License, V1.0 or later (the latest version is presentlyavailableat http://www.opencontent.org/openpub/).
Distribution of substantively modified versions of this document is prohibitedwithout the explicit permission of the copyright
holder.
Distribution of the work or derivative of the work in any standard (paper)book form for commercial purposes is prohibited
unless prior permission is obtained from the copyright holder.
Red Hat and the Red Hat "Shadow Man" logo are registered trademarks of Red Hat, Inc. in the United States and other
countries.
All other trademarks referencedherein are the property of their respective owners.
The GPG fingerprint of the security@redhat.comkey is:
CA 20 86 86 2B D6 9D FC 65 F6 EC C4 21 91 80 CD DB 42 A6 0E
Page 3

Table of Contents
Introduction.......................................................................................................................................... i
1. Audience ................................................................................................................................ i
2. Related Documentation .......................................................................................................... i
3. Document Conventions .......................................................................................................... i
4. More to Come ...................................................................................................................... iv
4.1. Send in Your Feedback ......................................................................................... iv
5. Activate Your Subscription .................................................................................................. iv
1. Overview ...........................................................................................................................................1
1.1. Sample Cluster ....................................................................................................................1
1.2. Requirements ......................................................................................................................5
1.3. Prerequisites ........................................................................................................................5
2. Installing and Configuring GFS .....................................................................................................7
2.1. Installation and Configuration Procedure ...........................................................................7
2.2. Installing GFS .....................................................................................................................7
2.3. Configuring Pools ...............................................................................................................8
2.4. Setting Up the GFS Configuration ....................................................................................10
2.5. Starting the Lock Servers ..................................................................................................15
2.6. Creating and Mounting GFS File Systems .......................................................................15
3. Installing and Configuring Oracle9i RAC ...................................................................................17
3.1. Installation and Configuration Procedure .........................................................................17
3.2. Setting Up a Compatibility Environment..........................................................................17
3.2.1. Installing Libraries .............................................................................................17
3.2.2. Setting Up GCC .................................................................................................17
3.3. Preparing Oracle Nodes ....................................................................................................18
3.4. Installing and Configuring Oracle Components ...............................................................21
3.4.1. Installing Oracle Cluster Manager .....................................................................22
3.4.2. Patching the Cluster Manager ............................................................................23
3.4.3. Modifying the $ORACLE_HOME/oracm/admin/cmcfg.ora File ...................23
3.4.4. Enabling oracm CDPN......................................................................................24
3.4.5. Configuring Cluster Manager ............................................................................24
3.4.6. Starting Oracle Cluster Manager .......................................................................25
3.4.7. Installing Oracle RDBMS ..................................................................................25
3.4.8. Patching the RDBMS Server .............................................................................26
3.5. Creating an Oracle Database.............................................................................................26
3.5.1. Creating Network Configuration Files...............................................................26
3.5.2. Enabling network CDPN .................................................................................28
3.5.3. Setting Up the Cluster Configuration File .........................................................29
3.5.4. Setting Up the Database .....................................................................................29
Index....................................................................................................................................................33
Colophon............................................................................................................................................. 35
Page 4

Page 5

Introduction
Welcome to Red Hat GFS: Installing and Configuring Oracle9i RAC with GFS 6.0.
This manual provides information about installing and configuring Oracle9i Real Application Clusters
(RAC) for use with Red Hat GFS 6.0. The document contains procedures for a sample cluster that can
be used as a reference for your cluster.
HTML and PDF versions of all the Red Hat Enterprise Linux manuals and Release Notes are available
online at http://www.redhat.com/docs/.
1. Audience
This manual is intended primarily for Oracle database administrators and Linux system administrators
who are familiar with the following activities:
• Oracle database administration procedures
• Linux system administration procedures, including kernel configuration
• Installing and configuring shared-storage networks, such as Fibre Channel SANs
2. Related Documentation
For additional information, refer to the following documentation:
• Red Hat GFS Administrator’s Guide for Red Hat GFS 6.0
• Red Hat GFS product release notes for Red Hat GFS 6.0
• Relevant Oracle9i RAC documentation
3. Document Conventions
In this manual, certain words are represented in different fonts, typefaces, sizes, and weights. This
highlighting is systematic; different words are represented in the same style to indicate their inclusion
in a specific category. The types of words that are represented this way include the following:
command
Linux commands (and other operating system commands, when used) are represented this way.
This style should indicate to you that you can type the word or phrase on the command line
and press [Enter] to invoke a command. Sometimes a command contains words that would be
displayed in a different style on their own (such as file names). In these cases, they are considered
to be part of the command, so the entire phrase is displayed as a command. For example:
Use the cat testfile command to view the contents of a file, named testfile, in the current
working directory.
file name
File names, directory names, paths, and RPM package names are represented this way. This style
indicates that a particular file or directory exists with that name on your system. Examples:
The .bashrc file in your home directory contains bash shell definitions and aliases for your own
use.
Page 6

ii Introduction
The /etc/fstab file contains information about different system devices and file systems.
Install the webalizer RPM if you want to use a Web server log file analysis program.
application
This style indicates that the program is an end-user application (as opposed to system software).
For example:
Use Mozilla to browse the Web.
[key]
A key on the keyboard is shown in this style. For example:
To use [Tab] completion, type in a character and then press the [Tab] key. Your terminal displays
the list of files in the directory that start with that letter.
[key]-[combination]
A combination of keystrokes is represented in this way. For example:
The [Ctrl]-[Alt]-[Backspace] key combination exits your graphical session and returns you to the
graphical login screen or the console.
text found on a GUI interface
A title, word, or phrase found on a GUI interface screen or window is shown in this style. Text
shown in this style indicates that a particular GUI screen or an element on a GUI screen (such as
text associated with a checkbox or field). Example:
Select the Require Password checkbox if you would like your screensaver to require a password
before stopping.
top level of a menu on a GUI screen or window
A word in this style indicates that the word is the top level of a pulldown menu. If you click on
the word on the GUI screen, the rest of the menu should appear. For example:
Under File on a GNOME terminal, the New Tab option allows you to open multiple shell prompts
in the same window.
Instructions to type in a sequence of commands from a GUI menu look like the following example:
Go to Applications (the main menu on the panel) => Programming => Emacs Text Editor to
start the Emacs text editor.
button on a GUI screen or window
This style indicates that the text can be found on a clickable button on a GUI screen. For example:
Click on the Back button to return to the webpage you last viewed.
computer output
Text in this style indicates text displayed to a shell prompt such as error messages and responses
to commands. For example:
The ls command displays the contents of a directory. For example:
Desktop about.html logs paulwesterberg.png
Mail backupfiles mail reports
The output returned in response to the command (in this case, the contents of the directory) is
shown in this style.
Page 7

Introduction iii
prompt
A prompt, which is a computer’s way of signifying that it is ready for you to input something, is
shown in this style. Examples:
$
#
[stephen@maturin stephen]$
leopard login:
user input
Text that the user types, either on the command line or into a text box on a GUI screen, is
displayed in this style. In the following example, text is displayed in this style:
To boot your system into the text based installation program, you must type in the text command at the boot: prompt.
<replaceable>
Text used in examples that is meant to be replaced with data provided by the user is displayed in
this style. In the following example, <version-number> is displayed in this style:
The directory for the kernel source is /usr/src/kernels/<version-number>/, where
<version-number> is the version and type of kernel installed on this system.
Additionally, we use several different strategies to draw your attention to certain pieces of information.
In order of urgency, these items are marked as a note, tip, important, caution, or warning. For example:
Note
Remember that Linux is case sensitive. In other words, a rose is not a ROSE is not a rOsE.
Tip
The directory /usr/share/doc/ contains additional documentation for packages installed on your
system.
Important
If you modify the DHCP configuration file, the changes do not take effect until you restart the DHCP
daemon.
Page 8

iv Introduction
Caution
Do not perform routine tasks as root — use a regular user account unless you need to use the root
account for system administration tasks.
Warning
Be careful to remove only the necessary par titions. Removing other partitions could result in data
loss or a corrupted system environment.
4. More to Come
Red Hat GFS: Installing and Configuring Oracle9i RAC with GFS 6.0 is part of Red Hat’s growing
commitment to provide useful and timely support to users of Red Hat products. As new releases are
made available, this guide will continue to expand.
4.1. Send in Your Feedback
If you spot a typo in Red Hat GFS: Installing and Configuring Oracle9i RAC with GFS 6.0, or if you
have thought of a way to make this manual better, we would love to hear from you! Please submit a
report in Bugzilla (http://www.redhat.com/bugzilla) against the component rh-gfsog.
Be sure to mention the manual’s identifier:
rh-gfsog(EN)-6.0-Print-RHI (2005-10-13T14:56)
If you mention this manual’s identifier, we will know exactly which version of the guide you have.
If you have a suggestion for improving the documentation, try to be as specific as possible. If you have
found an error, please include the section number and some of the surrounding text so we can find it
easily.
5. Activate Your Subscription
Before you can access service and software maintenance information, and the support documentation included in your subscription, you must activate your subscription by registering with Red Hat.
Registration includes these simple steps:
• Provide a Red Hat login
• Provide a subscription number
• Connect your system
You can complete the Red Hat registration process online at:
http://www.redhat.com/register/
A Red Hat login enables your access to:
• Software updates, errata and maintenance via Red Hat Network
Page 9

Introduction v
• Red Hat technical support resources, documentation, and Knowledgebase
If you have forgotten your Red Hat login, you can search for your Red Hat login online at:
https://rhn.redhat.com/help/forgot_password.pxt
Good luck, and thank you for choosing Red Hat GFS!
The Red Hat Documentation Team
Page 10

vi Introduction
Page 11

Chapter 1.
Overview
This manual provides information about installing and configuring Oracle9i Real Application Clusters
(RAC) Release 2 on a Linux cluster that uses Red Hat GFS 6.0. It contains procedures for a sample
cluster that can be used as a reference for your cluster. You should use this manual in conjunction with
the appropriate guides for installing and maintaining Oracle9i RAC on a Linux cluster, and the Red
Hat GFS Administrator’s Guide for Red Hat GFS 6.0.
This chapter provides an introduction to the sample cluster used in the manual, requirements based on
the sample cluster, and prerequisites for installing and configuring Oracle9i RAC on a Linux cluster
with Red Hat GFS 6.0. The chapter consists of the following sections:
• Section 1.1 Sample Cluster
• Section 1.2 Requirements
• Section 1.3 Prerequisites
1.1. Sample Cluster
The sample cluster used in this manual consists of the following components (refer to Figure 1-1 and
Figure 1-2):
• A Red Hat GFS 6.0 cluster with four GFS nodes and three external lock servers
• Three WTI network power switches (NPS)
• A QLogic switch
• An HP StorageWorks 1000 Modular Smart Array (MSA1000)
• A private network (via a NETGEAR switch)
Page 12
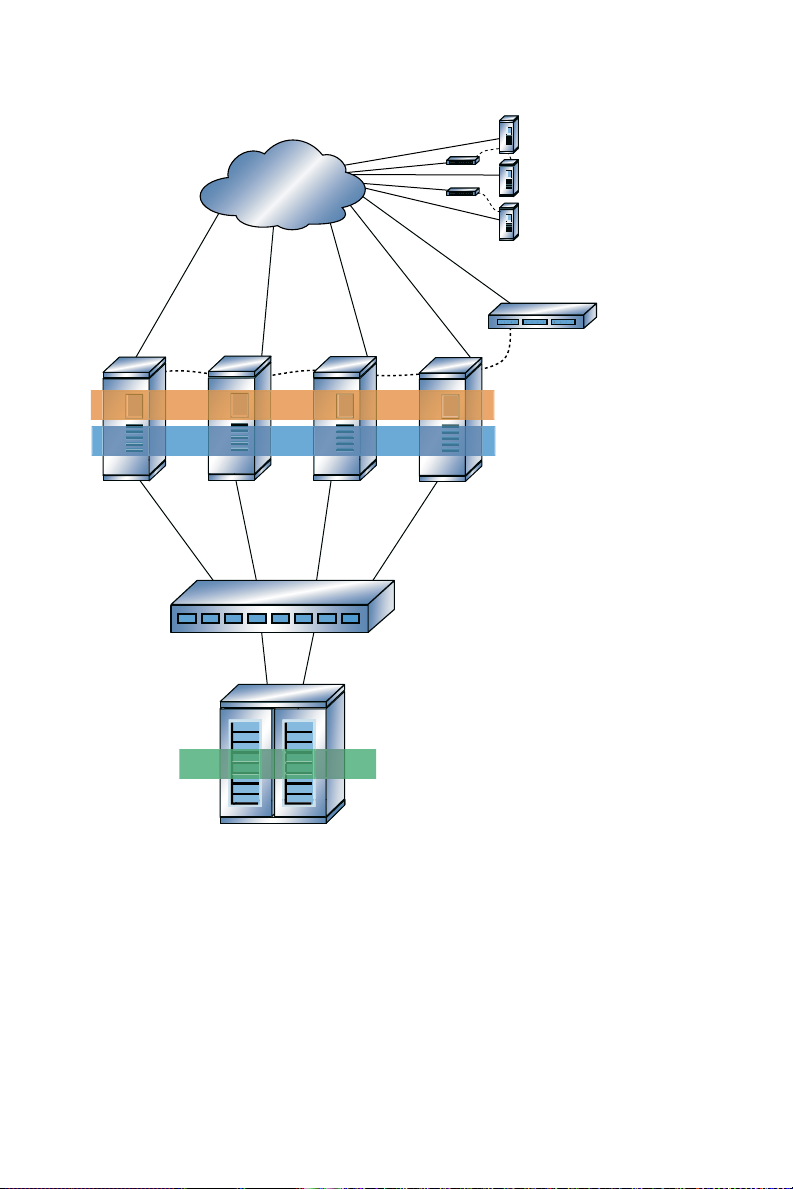
2 Chapter 1. Overview
Private network,
Netgear switch
QLogic switch
Shared Files
Red Hat GFS
Oracle9i RAC
HP StorageWorks
MSA1000:
- sda
- sdb
- sdc
- sdd
WTI NPS wti1
Four-node
Red Hat GFS cluster
with Oracle9i RAC
rac1/
racpvt1
rac4/
racpvt4
rac2/
racpvt2
rac3/
racpvt3
External lock
servers: lock1,
lock2, and lock3
WTI NPS:
wti2, wti3
Figure 1-1. Sample Cluster: Red Hat GFS Nodes
Page 13

Chapter 1. Overview 3
Private network,
Netgear switch
WTI
NPS wti1
Four-node
Red Hat GFS
cluster with
Oracle9i RAC
WTI NPS wti2
WTI NPS wti3
Lock server
lock1
Lock server
lock3
Lock server
lock2
Figure 1-2. Sample Cluster: External Lock Servers
The GFS nodes are attached to the MSA1000 array via the QLogic switch. Also, the GFS nodes and
the external lock-server nodes are connected to the WTI network power switches (NPS) for fencing.
One power switch is connected to the GFS nodes, another power switch is connected to lock servers
lock1 and lock2, and another power switch is connected to lock server lock3. The MSA1000 array is
configured as follows:
• Four 120-gigabyte LUNs (RAID 0)
• Seven disks, each at 15,000 RPM
• Twenty-eight spindles, total (over 2 shelves)
Table 1-1 lists the GFS node names and IP addresses for the public network and the private network.
Table 1-2 lists the lock-server node names and IP addresses. Table 1-3 lists the network power switch
node names, IP addresses, and nodes controlled. Table 1-4 lists the GFS pools required, showing pool
name, size, function, disk, and location.
Public Network:
Node Name
rac1 10.10.10.101 racpvt1 192.168.100.101
rac2 10.10.10.102 racpvt2 192.168.100.102
rac3 10.10.10.103 racpvt3 192.168.100.103
Public Network: IP
Address
Private Network:
Node Name
Private Network: IP
Address
rac4 10.10.10.104 racpvt4 192.168.100.104
Table 1-1. Sample Cluster: GFS Node Names and IP Addresses
Page 14

4 Chapter 1. Overview
Note
The procedures in this manual are based on the assumption that you are using a private network for
your Oracle cluster software, and that the Oracle management node is rac1/racpvt1.
Node Name IP Address
lock1 192.168.100.201
lock2 192.168.100.202
lock3 192.168.100.203
Table 1-2. Sample Cluster: Lock-Server Node Names and IP Addresses
Node Name IP Address Node Controlled
wti1 192.168.100.211 rac1/racpvt1
rac2/racpvt2
rac3/racpvt3
rac4/racpvt4
wti2 192.168.100.212 lock1
lock2
wti3 192.168.100.213 lock3
Table 1-3. Sample Cluster: Network Power Switch Node Names, IP Addresses, and Nodes Controlled
Pool Name Size Function Disk Location
oraraw1.pool 100 MB Oracle quorum disk sda1 /dev/pool/raw1
oraraw2.pool 100 MB Oracle cluster
sda2 /dev/pool/raw2
configuration
ccs_archive.pool 10 MB GFS cluster archive sda3
oracle_base.pool 20 GB Oracle binaries, logs, and
sda4 /dev/pool/oracle_base
related files
oraundo.pool 98 GB Oracle undo tablespace sdb1 /dev/pool/oraundo
oraindex.pool 98 GB Oracle index files sdc1 /dev/pool/oraindex
oradata.pool 60 GB Oracle data files sdd1 /dev/pool/oradata
Table 1-4. Sample Cluster: Storage Configuration
Page 15

Chapter 1. Overview 5
1.2. Requirements
This section provides hardware requirements (Table 1-5), software requirements (Table 1-6), and sample disk layout information (Table 1-7) for the sample cluster used in this manual.
Requirement Description
Memory A minimum of 2 GB of RAM on each node; more if Java VM is used
Swap space Disk space equal to system’s physical memory or 1 GB, whichever is
Disk space 6 GB to 10 GB
Servers With dual NICs, a Fibre Channel HBA, external SCSI, or a gigabit
Table 1-5. Hardware Requirements
Requirement Description
Operating system Red Hat Enterprise Linux 3, Update 5
DBMS Oracle9i R2 and 9.2.0.4 patch
Cluster file system Red Hat GFS 6.0
Table 1-6. Software Requirements
greater
Ethernet card
Mount Purpose
/mnt/oracle ORACLE_BASE, ORACLE_HOME
/mnt/oradata Data files
/mnt/oraindex Index files
/mnt/oraundo Undo/redo log files
/oraraw1, /oraraw2 Each with 100 MB size raw partitions (quorum pools)
Table 1-7. Sample Disk Layout
Note
For information about setting up the file systems, configuration files, and for required processes (for
example, ccsd and lock_gulmd), refer to the Red Hat GFS Administrator’s Guide for GFS 6.0.
1.3. Prerequisites
Ensure that your servers can connect to each other. Your /etc/hosts file should look similar to the
one in Example 1-1.
Page 16

6 Chapter 1. Overview
Tip
You can use the ping command with FQDNs to make sure that each node can see the other nodes.
#
# hosts This file describes a number of hostname-to-address
# mappings for the TCP/IP subsystem. It is mostly
# used at boot time, when no name servers are running.
# On small systems, this file can be used instead of a
# "named" name server.
# Syntax:
#
# IP-Address Full-Qualified-Hostname Short-Hostname
#
10.10.10.101 rac1.example.com rac1
10.10.10.102 rac2.example.com rac2
10.10.10.103 rac3.example.com rac3
10.10.10.104 rac4.example.com rac4
192.168.100.101 racpvt1.example.com racpvt1
192.168.100.102 racpvt2.example.com racpvt2
192.168.100.103 racpvt3.example.com racpvt3
192.168.100.104 racpvt4.example.com racpvt4
192.168.100.201 lock1.example.com lock1
192.168.100.202 lock2.example.com lock2
192.168.100.203 lock3.example.com lock3
Example 1-1. Sample File: /etc/hosts
If your private network is secure, you may want to allow for unrestricted access to the other nodes.
Also, you may want to set up unrestricted access to the nodes through the private network.
The sample configuration used in this manual uses a RAID array in a RAID-0 configuration. If possible, use an array that allows multiple LUNs to be exported. If your array supports only one LUN, then
partition the array according to Table 1-8.
Partition Quantity Size
GFS cluster archive 1 10 MB
Oracle Quorum disk 1 100 MB
Oracle cluster configuration data 1 100 MB
Oracle binaries, logs, trace files, etc. 1 10 GB
Oracle data files 1 20 GB (minimum)
Oracle index files 1 10 GB (minimum)
Oracle undo tablespaces (and redo logs) 1 10 GB (minimum)
Table 1-8. Partitions If Using One LUN
Page 17

Chapter 2.
Installing and Configuring GFS
This chapter describes installing and configuring Red Hat GFS 6.0 for use with Oracle9i RAC, using
the sample cluster described in Chapter 1 Overview. This chapter consists of the following sections:
• Section 2.1 Installation and Configuration Procedure
• Section 2.2 Installing GFS
• Section 2.3 Configuring Pools
• Section 2.4 Setting Up the GFS Configuration
• Section 2.5 Starting the Lock Servers
• Section 2.6 Creating and Mounting GFS File Systems
2.1. Installation and Configuration Procedure
Installing and configuring GFS consists of the following steps:
1. Installing GFS
2. Configuring pools
3. Setting up the GFS configuration
4. Starting the lock servers
5. Creating and mounting GFS file systems
2.2. Installing GFS
To install GFS, follow these steps:
1. Install Red Hat GFS 6.0 RPMs according to the directions in the Red Hat GFS Administrator’s
Guide for GFS 6.0 (refer to http://www.redhat.com/docs/manuals/csgfs/admin-guide/).
2. Follow the directions in the Red Hat GFS Administrator’s Guide for GFS 6.0 to prepare and set
up the servers to use GFS. In particular, make sure to install any additional packages required for
GFS that may not be available with the your distribution (for example, perl-Net-Telnet).
Example 2-1 shows setting up prerequisite software and installing GFS for an SMP kernel.
3. Proceed to Section 2.3 Configuring Pools.
Page 18

8 Chapter 2. Installing and Configuring GFS
# up2date perl-Net-Telnet <-- Installs/updates latest
. perl-Net-Telnet (required for fencing)
.
.
# chkconfig ntpd on <-- Turns on network time server for next reboot
# service ntpd start <-- Starts network time server now
ntpd: Synchronizing with time server: [ OK ]
Starting ntpd: [ OK ]
# ls -al /usr/sbin/stunnel <-- Checks for stunnel (for RILOE fencing only)
-rwxr-xr-x 1 root root 60032 Apr 10 2003 /usr/sbin/stunnel
# up2date GFS-modules-SMP <-- Installs/updates latest GFS modules
.
.
.
# modprobe pool |
# modprobe lock_gulm |--- Loads GFS modules
# modprobe gfs |
Note: Red Hat GFS 6.0 releases for Red Hat Enterprise Linux 3 Update 5 and later do not require
running the depmod -a command before running the modprobe commands.
Example 2-1. Installing Red Hat GFS 6.0 for an SMP Kernel
2.3. Configuring Pools
Configuring pools (GFS volumes) consists of creating pool configuration files for the GFS Cluster
Configuration Archive (CCA) and the Oracle files, creating disk partitions for the pools, creating each
pool (running the pool_tool -c for each pool), and activating the pools. For reliability, striping
across multiple RAID arrays is preferred to single drives.
Note
The CCA is the repository for the GFS Cluster Configuration System (CCS) configuration files. For
more information about CCS and CCA, refer to the Red Hat GFS Administrator’s Guide for GFS 6.0.
Example configuration files provided in this procedure are based on Table 1-4, and can be adapted to
the hardware environment on which your GFS is being deployed.
To configure the pools, follow these steps:
1. Create and save pool configuration files for the Oracle cluster and server control software (this
supports the cluster manager and is not used for the database). Suggested names for the pools
are oraraw1 and oraraw2, with corresponding pool configuration files, oraraw1.pool and
oraraw2.pool (refer to Example 2-2 and Example 2-3). For the sample cluster in this manual,
the size of each of these pools is 100 MB.
poolname oraraw1
subpools 1
subpool 0 0 1 gfs_data
pooldevice 0 0 /dev/sda1
Example 2-2. oraraw1.pool
Page 19

Chapter 2. Installing and Configuring GFS 9
poolname oraraw2
subpools 1
subpool 0 0 1 gfs_data
pooldevice 0 0 /dev/sda2
Example 2-3. oraraw2.pool
2. Create and save a pool configuration file for the GFS CCA. The suggested name for the pool is
ccs_archive, with the corresponding pool configuration file, ccs_archive.pool (refer to
Example 2-4). The recommended size of this pool is relatively small — for example, 8 MB. For
the sample cluster in this manual, the size of this pool is 10 MB.
poolname ccs_archive
subpools 1
subpool 0 0 1 gfs_data
pooldevice 0 0 /dev/sda3
Example 2-4. ccs_archive.pool
3. Create and save a pool configuration file for the $ORACLE_HOME directory. The suggested
name for the pool is oracle_base, with the corresponding pool configuration file,
oracle_base.pool (refer to Example 2-5). The recommended size of this pool is at least 10
GB. For the sample cluster in this manual, the size of this pool is 20 GB.
poolname oracle_base
subpools 1
subpool 0 0 1 gfs_data
pooldevice 0 0 /dev/sda4
Example 2-5. oracle_base.pool
4. Create pool configuration files for the undo and index tablespace data files. Suggested names
for the pools are oraundo and oraindex, with the corresponding pool configuration files,
oraundo.pool and oraindex.pool (refer to Example 2-6 and Example 2-7). The recom-
mended size of each pool is greater than 10 GB. For the sample cluster in this manual, the size
of each of these pools is 98 GB.
poolname oraundo
subpools 1
subpool 0 0 1 gfs_data
pooldevice 0 0 /dev/sdb1
Example 2-6. oraundo.pool
poolname oraindex
subpools 1
subpool 0 0 1 gfs_data
pooldevice 0 0 /dev/sdc1
Example 2-7. oraindex.pool
Page 20

10 Chapter 2. Installing and Configuring GFS
5. Create and save a pool configuration file for Oracle system and data files. The suggested name
for the pool is oradata, with the corresponding pool configuration file, oradata.pool (refer
to Example 2-8). For the sample cluster in this manual, the size of this pool is 60 GB.
poolname oradata
subpools 1
subpool 0 0 1 gfs_data
pooldevice 0 0 /dev/sdd1
Example 2-8. oradata.pool
6. Create disk partitions according to Table 1-4. For example, start creating the disk partitions as
follows:
# fdisk /dev/sda
# fdisk /dev/sdb
# fdisk /dev/sdc
# fdisk /dev/sdd
7. Create the required GFS pools using the GFS pool_tool -c command. You just need to do
this from one node in the cluster. Refer to Example 2-9.
rac1 # pool_tool -c oraraw1.pool
Pool label written successfully from oraraw1.pool.
rac1 # pool_tool -c oraraw2.pool
Pool label written successfully from oraraw2.pool.
rac1 # pool_tool -c ccs_archive.pool
Pool label written successfully from ccs_archive.pool.
rac1 # pool_tool -c oracle_base.pool
Pool label written successfully from oracle_base.pool.
rac1 # pool_tool -c oraundo.pool
Pool label written successfully from oraundo.pool.
rac1 # pool_tool -c oraindex.pool
Pool label written successfully from oraindex.pool.
rac1 # pool_tool -c oradata.pool
Pool label written successfully from oradata.pool.
Example 2-9. Creating GFS Pools
8. Allow your systems to see the pools that were created in the previous step by running the
pool_assemble command on all nodes. Example 2-10 shows running the pool_assemble
command on node rac1:
rac1 # pool_assemble
ccs_archive assembled.
oracle_base assembled.
oradata assembled.
oraindex assembled.
oraraw1 assembled.
oraraw2 assembled.
oraundo assembled.
Example 2-10. Assembling Pools
9. Proceed to Section 2.4 Setting Up the GFS Configuration.
Page 21

Chapter 2. Installing and Configuring GFS 11
2.4. Setting Up the GFS Configuration
Setting up the GFS configuration consists of creating the GFS CCS configuration files, creating a CCA
from the configuration files, and starting the CCS daemon, ccsd, for each node. This section describes
how to create the configuration files, create the CCA for each node, and how to start ccsd. The files
to be created and placed into a CCA are cluster.ccs, fence.ccs, and nodes.ccs.
Note
When saving the configuration files, use the file name extension, .ccs. Keywords, case, and quotation
marks are significant in the configuration files. Refer to the Red Hat GFS Administrator’s Guide for
GFS 6.0 for syntax rules.
For the sample cluster in this manual (refer to Section 1.1 Sample Cluster), the configuration files are
archived into a CCA that is either on shared storage or local storage, depending on whether a node is
a GFS node or a lock-server node. For the GFS nodes (rac1, rac2, rac3, and rac4) the CCA is located
in ccs_archive.pool on the shared storage. For the lock-server nodes (lock1, lock2, and lock3) the
CCA is located in local.cca on the local storage of each lock-server node. (The lock-server nodes
are not attached to the shared storage, and therefore cannot access the CCA on shared storage.)
This configuration has the following key characteristics:
• Number of GFS nodes — 4, nodes rac1, rac2, rac3, and rac4
• Number of lock server nodes — 3, nodes lock1, lock2, and lock3
• Locking protocol — RLM, using LOCK_GULM
• Fencing devices — 3 network power switches, each a WTI NPS
• Cluster name — gfsrac
For more information about the cluster components, refer to Section 1.1 Sample Cluster .
To set up the GFS configuration, follow these steps:
1. Set up a temporary directory (for example, /root/GFS/ccstemp/) for the configuration files.
2. Create the following cluster.ccs file (refer to Example 2-11) and save it to the temporary
directory.
#### cluster.ccs #####################################
cluster {
name = "gfsrac"
lock_gulm {
servers = ["lock1.example.com","lock2.example.com","lock3.example.com"]
}
}
Example 2-11. cluster.ccs File
3. Create the following fence.ccs file (refer to Example 2-12) and save it to the temporary directory.
Page 22

12 Chapter 2. Installing and Configuring GFS
### fence.ccs ########################################
fence_devices {
wti1 {
agent = "fence_wti"
ipaddr = "192.168.100.211"
login = "root"
passwd = "password"
}
wti2 {
agent = "fence_wti"
ipaddr = "192.168.100.212"
login = "root"
passwd = "password"
}
wti3 {
agent = "fence_wti"
ipaddr = "192.168.100.213"
login = "root"
passwd = "password"
}
}
Example 2-12. fence.ccs File
4. Create the following nodes.ccs file (refer to Example 2-13) and save it to the temporary directory.
#### nodes.ccs ######################################
nodes {
rac1.example.com {
ip_interfaces {
eth0 = "192.168.100.101"
}
fence {
power {
wti1 {
port = 1
}
}
}
}
rac2.example.com {
ip_interfaces {
}
fence {
}
rac3.example.com {
ip_interfaces {
}
}
fence {
eth0 = "192.168.100.102"
power {
}
eth0 = "192.168.100.103"
power {
wti1 {
port = 9
}
wti1 {
port = 10
Page 23

Chapter 2. Installing and Configuring GFS 13
}
rac4.example.com {
ip_interfaces {
}
lock1.example.com {
ip_interfaces {
}
lock2.example.com {
ip_interfaces {
}
lock3.example.com {
ip_interfaces {
}
}
}
}
fence {
}
}
fence {
}
}
fence {
}
}
fence {
}
Example 2-13. nodes.ccs File
}
eth0 = "192.168.100.104"
power {
}
eth0 = "192.168.100.201"
power {
}
eth0 = "192.168.100.202"
power {
}
eth0 = "192.168.100.203"
power {
}
}
wti1 {
port = 2
}
wti2 {
port = 1
}
wti2 {
port = 5
}
wti3 {
port = 4
}
Page 24

14 Chapter 2. Installing and Configuring GFS
5. For the GFS nodes (rac1, rac2, rac3, and rac4), create a CCA on shared storage. At any GFS
node, run the ccs_tool create command with the source as the configuration files in
the temporary directory (for example, /root/GFS/ccstemp/) and the destination as
/dev/pool/ccs_archive on the shared storage. For example:
rac1 # ccs_tool create /root/GFS/ccstemp/ /dev/pool/ccs_archive
6. Start the CCS daemon, ccsd, on the GFS nodes as follows:
rac1 # ccsd -d /dev/pool/ccs_archive
rac2 # ccsd -d /dev/pool/ccs_archive
rac3 # ccsd -d /dev/pool/ccs_archive
rac4 # ccsd -d /dev/pool/ccs_archive
7. To store the CCA on the lock-server nodes, perform the following steps:
a. At each lock-server node, make a /root/GFS/ directory. For example:
# mkdir /root/GFS/
b. Using the scp command (or rsync), transfer cluster.ccs, fence.ccs, and
nodes.ccs to /root/GFS/ in each lock-server node.
c. At each lock-server node, make a CCS build directory as follows:
# mkdir -p /etc/sistina/ccs-build/
8. At each lock-server node, create a local CCA file, local.cca, from the configuration files in
/root/GFS as follows:
# ccs_tool create /root/GFS/ /etc/sistina/ccs-build/local.cca
9. At each lock-server node, start ccsd using the CCA file,
/etc/sistina/ccs-build/local.cca, as follows:
# ccsd -f /etc/sistina/ccs-build/local.cca
Note
If the CCA device on shared storage is updated, you must update the local CCA files in the
lock-server nodes, and restart the lock-server nodes.
Note
This example configuration uses local CCA files for the lock-server nodes because those nodes
do not have access to shared storage, where the CCA is maintained for the GFS nodes. As an
alternative to using the local archive files in the lock-server nodes, you can export the CCA from
the shared-storage CCA to the lock-server nodes. For additional information about configuring
the CCA for external lock-server nodes that do not have access to shared storage, refer to the
Red Hat GFS Administrator’s Guide for GFS 6.0 and the ccsd(8) man page for Red Hat GFS
6.0.
10. Proceed to Section 2.5 Starting the Lock Servers.
Page 25

Chapter 2. Installing and Configuring GFS 15
2.5. Starting the Lock Servers
Starting the lock servers consists of running lock_gulmd at each node as follows:
1. Run lock_gulmd on the GFS nodes (rac1, rac2, rac3, rac4) and the lock-server nodes (lock1,
lock2, and lock3):
rac1 # lock_gulmd
rac2 # lock_gulmd
rac3 # lock_gulmd
rac4 # lock_gulmd
lock1 # lock_gulmd
lock2 # lock_gulmd
lock3 # lock_gulmd
2. Proceed to Section 2.6 Creating and Mounting GFS File Systems.
2.6. Creating and Mounting GFS File Systems
The procedure in this section describes how to create and mount GFS file systems using the GFS pools
oracle_base, oraundo, oraindex, and oradata. In addition, the procedure describes how to bind
raw devices to the GFS pools oraraw1 and oraraw2.
1. Create GFS file systems as follows:
rac1 # gfs_mkfs -p lock_gulm -t gfsrac:oracle_base -j 4 /dev/pool/oracle_base
rac1 # gfs_mkfs -p lock_gulm -t gfsrac:oraundo -j 4 /dev/pool/oraundo
rac1 # gfs_mkfs -p lock_gulm -t gfsrac:oraindex -j 4 /dev/pool/oraindex
rac1 # gfs_mkfs -p lock_gulm -t gfsrac:oradata -j 4 /dev/pool/oradata
Note
The file systems need only be created from one node in the cluster.
2. Make mount points for the file systems on each node that mounts the file systems. Example 2-14
shows making mount points on node rac1:
rac1 # cd /mnt
rac1 # mkdir oracle_base oraundo oraindex oradata
Example 2-14. Making Mount Points on node rac1
3. Mount the GFS file systems on each node in the cluster that accesses GFS file systems.
Example 2-15 shows mounting the GFS file systems on node rac1:
rac1 # mount -t gfs /dev/pool/oracle_base /mnt/oracle_base
rac1 # mount -t gfs /dev/pool/oraundo /mnt/oraundo
rac1 # mount -t gfs /dev/pool/oraindex /mnt/oraindex
rac1 # mount -t gfs /dev/pool/oradata /mnt/oradata
Example 2-15. Mounting the GFS File Systems on Node rac1
Page 26

16 Chapter 2. Installing and Configuring GFS
4. Set up the following raw devices on each node:
• /dev/raw/raw1
• /dev/raw/raw2
Note
Oracle9i RAC requires two raw devices: one for the quorum file and one for the shared configuration file.
5. Bind the raw devices on each node to the GFS pool raw devices; that is, bind /dev/raw/raw1 to
/dev/pool/oraraw1 and bind /dev/raw/raw2 to /dev/pool/oraraw2. In addition, make
the bindings persistent by including the bindings in the /etc/sysconfig/rawdevices configuration file. (Including the binding in that file causes the bindings to be recreated during
reboot.) To bind the raw devices and make the bindings persistent, follow these sub-steps:
a. Bind the raw devices to the GFS pool raw devices by editing the
/etc/sysconfig/rawdevices configuration file according to Example 2-16. Editing
the file makes the binding persistent.
# raw device bindings
# format: <rawdev> <major> <minor>
# <rawdev> <blockdev>
# example: /dev/raw/raw1 /dev/sda1
# /dev/raw/raw2 8 5
/dev/raw/raw1 /dev/pool/oraraw1 <--- Added statement
/dev/raw/raw2 /dev/pool/oraraw2 <--- Added statement
Example 2-16. Editing the /etc/sysconfig/rawdevices File
b. Make the binding take effect by running the following command at each node:
# service rawdevices restart
To check that the binding has taken effect, run the following command at each node:
# raw -qa
To make sure that raw devices are active upon reboot, run the chkconfig command as
shown in Example 2-17 and verify that init levels 3, 4, and 5 indicate "on":
# chkconfig --list rawdevices
rawdevices 0:off 1:off 2:off 3:on 4:on 5:on 6:off
Example 2-17. Checking for Active status of Raw Devices
6. Proceed to Chapter 3 Installing and Configuring Oracle9i RAC.
Page 27

Chapter 3.
Installing and Configuring Oracle9i RAC
This chapter describes how to install and configure Oracle9i RAC for use with Red Hat GFS 6.0, using
the sample cluster described in Chapter 1 Overview. This chapter consists of the following sections:
• Section 3.1 Installation and Configuration Procedure
• Section 3.2 Setting Up a Compatibility Environment
• Section 3.3 Preparing Oracle Nodes
• Section 3.4 Installing and Configuring Oracle Components
• Section 3.5 Creating an Oracle Database
3.1. Installation and Configuration Procedure
Installing and configuring Oracle 9i RAC consists of the following steps:
1. Setting Up a compatibility environment
2. Preparing Oracle nodes
3. Installing and configuring Oracle components
4. Creating an Oracle database
3.2. Setting Up a Compatibility Environment
Setting up a compatibility environment consists of installing libraries and setting up GCC.
3.2.1. Installing Libraries
The following compatibility libraries are required on your system to install Oracle Database 9.2:
• compat-gcc
• compat-libstdc++
• compat-libstdc++-devel
• compat-gcc-c++
1. Check to see if the libraries are installed by running the rpm -q command as follows:
# rpm -q compat-gcc compat-libstdc++ compat-libstdc++-devel compat-gcc-c++
2. Install any missing libraries using up2date.
3. Proceed to Section 3.2.2 Setting Up GCC.
Page 28

18 Chapter 3. Installing and Configuring Oracle9i RAC
3.2.2. Setting Up GCC
Installing Oracle Database 9.2 requires using GCC 2.96 rather the default GCC 3.2 that ships with
Red Hat Enterprise Linux 3. Before installing Oracle, set GCC 2.9.6 as the default GCC as follows:
1. Rename gcc to gcc32 and make gcc296 the default GCC:
# which gcc
/usr/bin/gcc
# cd /usr/bin
# mv gcc gcc32
# ln -s gcc296 gcc
2. Use the gcc --version command to verify that you are using GCC 2.9.6 (gcc296):
# gcc --version
The resultant output from the command indicates the GCC level as follows:
gcc (GCC) 2.9.6 ...
3. Proceed to Section 3.3 Preparing Oracle Nodes.
3.3. Preparing Oracle Nodes
To prepare the Oracle nodes, follow these steps:
1. At each node, create the oracle group. For example:
# groupadd dba -g 501
2. Make the oracle user’s home directory. For example:
# mkdir -p /home/oracle
3. At each node, create the oracle user. Make sure that the oracle user primary group is the dba
group. For example:
# useradd -c "Oracle Software Owner" -g dba -u 101 -m -d
/home/oracle -s /bin/bash oracle
Note
All text on the preceding lines should appear as one continuous line. It has been broken up
because of print limitations.
4. Change ownership of /home/oracle to oracle.dba. For example:
# chown oracle.dba /home/oracle
5. Grant unlimited ulimit to oracle.
6. Make sure that oracle:dba owns the following mount points and quorum pool devices:
• /dev/raw/raw1
• /dev/raw/raw2
• /mnt/oracle_base
• /mnt/oraundo
• /mnt/oraindex
• /mnt/oradata
Page 29

Chapter 3. Installing and Configuring Oracle9i RAC 19
7. Adjust kernel parameters to the values shown in Table 3-1.
Note
The kernel parameter values are for the example cluster in this manual and may be different
for your environment.
Kernel Parameter Setting
fs.aio-max-size 1048576
fs.aio-max-nr 1048576
net.ipv4.ip_local_port_range 1024 65000
net.ipv4.ip_forward 0
shmmax 2147483648
shmmni 4096
semmsl 250
semmns 32000
semopm 100
semmni 128
Table 3-1. Kernel Parameter Values
a. Specify the kernel parameters by modifying the /etc/sysctl.conf file according to
Example 3-1. Specifying the parameters in the sysctl.conf file causes the parameters
to be set upon reboot.
# Kernel sysctl configuration file for Red Hat Linux
#
# For binary values, 0 is disabled, 1 is enabled. See sysctl(8) and
# sysctl.conf(5) for more details.
fs.aio-max-size = 1048576
fs.file-max = 327680
fs.aio-max-nr = 1048576
net.ipv4.ip_local_port_range = 1024 65000
net.ipv4.ip_forward = 0
kernel.shmmax = 2147483648
kernel.shmmni = 4096
kernel.sem = 250 32000 100 128
Example 3-1. Kernel Parameters
Page 30

20 Chapter 3. Installing and Configuring Oracle9i RAC
b. After modifying the sysctl.conf file, set the parameters with the sysctl -p command
as follows:
# sysctl -p
fs.aio-max-size = 1048576
fs.file-max = 327680
fs.aio-max-nr = 1048576
net.ipv4.ip_local_port_range = 1024 65000
net.ipv4.ip_forward = 0
kernel.shmmax = 2147483648
kernel.shmmni = 4096
kernel.sem = 250 32000 100 128
8. Create libcwait.c.
a. As user oracle, in the oracle user’s home directory, create a file named libcwait.c
with the following contents:
#include <errno.h>
#include <sys/syscall.h>
#include <sys/types.h>
#include <sys/wait.h>
pid_t
__libc_wait (int *status)
{
int res;
asm volatile ("pushl %%ebx\n\t"
return res;
}
"movl %2, %%ebx\n\t"
"movl %1, %%eax\n\t"
"int $0x80\n\t"
"popl %%ebx"
: "=a" (res)
: "i" (__NR_wait4), "0" (WAIT_ANY), "c" (status), "d" (0),
"S" (0));
b. Compile the file in the oracle user’s home directory:
# gcc -O2 -shared -o $HOME/libcwait.so -fpic $HOME/libcwait.c
9. Establish environment variables for the oracle user.
a. Set the following Oracle environment variables (Table 3-2):
Environment
Suggested Value
Variable
ORACLE_BASE For example: /mnt/oracle_base
ORACLE_HOME For example: $ORACLE_BASE/product/920
ORACLE_TERM Xterm
ORA_NLS33 $ORACLE_HOME/ocommon/nls/admin/data
PATH $ORACLE_HOME/bin:/usr/bin/X11/:/usr/local/bin
and any other items you require in your PATH
DISPLAY ip-address:0.0 (Note: Comment out if installing
remotely. Remember to use the ssh -X user@hostname
command. For example, use ssh -X oracle@rac1 for the
rac1 node.)
Page 31

Chapter 3. Installing and Configuring Oracle9i RAC 21
Environment
Suggested Value
Variable
TMPDIR Set a temporary directory path for TMPDIR with at least 100
MB of free space to which the OUI has write permission.
ORACLE_SID Set this to what you will call your database instance. This
should be a unique value on each node.
umask 022
LD_ASSUME_KERNEL 2.4.19
LD_LIBRARY_path $ORACLE_HOME/lib:/usr/lib
LD_PRELOAD $HOME/libcwait.so
LD_LIBRARY_path $ORACLE_HOME/lib:/usr/lib
Table 3-2. Environment Variables for the oracle User
b. Save the environment values listed in Table 3-2 to .bashrc, .login, or .profile for
user oracle and user root. By saving the environment values to one of those files, you do
not have to set the environment values each time you log in.
c. Create the directory /var/opt/oracle and set ownership to the user oracle if it does not
exist. For example:
$ mkdir /var/opt/oracle
$ chown oracle.dba /var/opt/oracle
10. Proceed to Section 3.4 Installing and Configuring Oracle Components .
3.4. Installing and Configuring Oracle Components
Installing and configuring Oracle components consists of the following tasks:
• Section 3.4.1 Installing Oracle Cluster Manager
• Section 3.4.2 Patching the Cluster Manager
• Section 3.4.3 Modifying the $ORACLE_HOME/oracm/admin/cmcfg.ora File
• Section 3.4.4 Enabling oracm CDPN
• Section 3.4.5 Configuring Cluster Manager
• Section 3.4.6 Starting Oracle Cluster Manager
• Section 3.4.7 Installing Oracle RDBMS
• Section 3.4.8 Patching the RDBMS Server
Page 32

22 Chapter 3. Installing and Configuring Oracle9i RAC
3.4.1. Installing Oracle Cluster Manager
Installing Oracle Cluster Manager includes using the Red Hat GFS CDPN (Context Dependent Path
Name) for the following directories:
• $ORACLE_HOME/network
• $ORACLE_HOME/oracm
• Database’s archive directory
To install the Cluster Manager, follow these steps:
1. At the Oracle management node, log in to the Oracle account.
Note
This step is performed only from one node, the Oracle management node.
2. Set up rsh on all nodes for user oracle and add private and public hostnames.
3. Run the Oracle Universal Installer from a CD-ROM or from stage directories.
a. From CD-ROM — Change directories and run the installation program. For example :
$ cd /home/oracle
$ /cdrom/runInstaller
b. From stage directories — Change directories and run the installation program. For exam-
ple:
$ cd /stage/Disk1
$ ./runInstaller
4. Running the Oracle Universal Installer causes a Welcome dialog box to be displayed. Click
Next. Clicking Next causes the Inventory Location dialog box to be displayed.
5. At the What would you like as the base directory? dialog box, verify that the base directory is
set to the $ORACLE_BASE directory from your environment variable. If so, click OK. Clicking
OK causes the UNIX Group Name dialog box to be displayed.
6. At the UNIX Group Name dialog box, enter the group name, dba (created in Step
1 of Section 3.3 Preparing Oracle Nodes) and click Next. Clicking Next may cause
an Oracle Universal Installer dialog box to be displayed that prompts you to run
/tmp/orainstRoot.sh. In another terminal window, log in as root, and run the command as
stated in the dialog box. After running the command, click Continue in the Oracle Universal
Installer dialog box. Clicking Continue causes the File Locations dialog box to be displayed.
7. At the File Locations dialog box, under Destination..., verify that the ORACLE_HOME directory
path is correct. At Name, type a name (for example, ora9i) and click Next. Clicking Next
causes the Available Products dialog box to be displayed.
8. At the Available Products dialog box, select Oracle Cluster Manager 9.2.0.4.0 (for this man-
ual) and click Next. Clicking Next causes the Public Node Information dialog box to be displayed.
9. At the Public Node Information dialog box, type the public hostnames for all nodes. Click
Next. Clicking Next causes the Private Node Information dialog box to be displayed.
10. At the Private Node Information dialog box, type the private hostnames for all nodes.
Click Next. Clicking Next causes the Quorum Disk Information dialog box to be displayed.
Page 33

Chapter 3. Installing and Configuring Oracle9i RAC 23
11. At the Quorum Disk Information dialog box, type the full name of the raw device that has
been mapped to the oraraw1 quorum disk (in the example configuration, /dev/raw/raw1).
Click Next. Clicking Next causes a Summary dialog box to be displayed.
12. If the summary information is correct, click Install. If the summary information is incorrect,
click Previous and perform the preceding step.
13. Upon completion of installation, the End of Installation dialog box is displayed. Click Exit
and proceed to Section 3.4.2 Patching the Cluster Manager .
3.4.2. Patching the Cluster Manager
Acquire the 9.2.0.4 patch for the Cluster Manager. Use the Oracle Universal Installer to apply the
patch. Proceed to Section 3.4.3 Modifying the $ORACLE_HOME/oracm/admin/cmcfg.ora File.
3.4.3. Modifying the $ORACLE_HOME/oracm/admin/cmcfg.ora File
After you have installed and patched the Cluster Manager software, modify the
$ORACLE_HOME/oracm/admin/cmcfg.ora file as follows:
1. Check to see that your system has a cmcfg.ora file. If there is no cmcfg.ora file, copy
cmcfg.ora.tmp to cmcfg.ora.
2. If the hangcheck-timer module is not yet loaded, load it on each node:
rac1 # insmod hangcheck-timer hangcheck_tick=30 hangcheck_margin=180
rac2 # insmod hangcheck-timer hangcheck_tick=30 hangcheck_margin=180
rac3 # insmod hangcheck-timer hangcheck_tick=30 hangcheck_margin=180
rac4 # insmod hangcheck-timer hangcheck_tick=30 hangcheck_margin=180
In addition, at each node, add the following insmod command (same as in the preceding text)
to etc/modules.conf to load the hangcheck-timer during reboot:
insmod hangcheck-timer hangcheck_tick=30 hangcheck_margin=180
3. Move to the $ORACLE_HOME/oracm/admin directory and make the following modifications to
the cmcfg.ora file:
a. Add a HeartBeat variable set to 15000.
b. Add a PollInterval variable set to 1000.
c. Raise the MissCount variable to 215.
d. If the WatchDog timer is present, delete it.
e. Add a new variable, KernelModuleName=hangcheck-timer (a replacement for
the WatchDog timer).
f. Add HostName, using public network name.
Note
The reason for replacing the WatchDog timer with hangcheck-timer is that the Cluster Manager software uses the much improved GPL hangcheck-timer.
Refer to Example 3-2 for a sample modified cmcfg.ora file:
Page 34

24 Chapter 3. Installing and Configuring Oracle9i RAC
### CMCFG.ORA ###
HeartBeat=15000 <--------- Added HeartBeat parameter
ClusterName=Oracle Cluster Manager, version 9i
PollInterval=1000 <--------- Added PollInterval parameter
MissCount=215 <--------- Raised to 215
PrivateNodeNames=racpvt1 racpvt2 racpvt3 racpvt4
PublicNodeNames=rac1 rac2 rac3 rac4
ServicePort=9998
KernelModuleName=hangcheck-timer <-- Added, replacing Watchdog timer
CmDiskFile=/dev/raw/raw1
HostName=rac1 <--------- Added HostName, using public network name
Example 3-2. Sample cmcfg.ora File
4. Proceed to Section 3.4.4 Enabling oracm CDPN.
3.4.4. Enabling oracm CDPN
After modifying the cmcfg.ora file, create a Context Dependent Path Name (CDPN) as follows:
1. At any node in the network, change to the $ORACLE_HOME directory and make directories as
follows:
# cd $ORACLE_HOME
# mkdir rac1 rac2 rac3 rac4
2. Run the following script from $ORACLE_HOME:
$ for i in ‘ls -d rac*‘; do cp -r oracm $i; done
3. Move the oracm directory to oracm.orig using the following command:
$ mv oracm oracm.orig
4. To create the CDPN, enter the following:
$ ln -s @hostname/oracm oracm
5. Proceed to Section 3.4.5 Configuring Cluster Manager.
3.4.5. Configuring Cluster Manager
To configure the Cluster Manager, follow these steps for each node:
1. Change to the $ORACLE_HOME/oracm/admin directory.
2. Check the cmcfg.ora file to make sure that the HostName= parameter is included in the
file. If the HostName= parameter is not present, add the parameter with its value equal to
the private interface hostname of that node. For example, if the private interface hostname
of the node was set to racpvt1 (during installation of the Oracle Cluster Manager,
Section 3.4.1 Installing Oracle Cluster Manager), then the HostName= parameter should be
set to racpvt1.
Example 3-3 shows the cmcfg.ora file of the node with the private interface hostname of
racpvt1. The HostName= parameter has been set to racpvt1.
Page 35

Chapter 3. Installing and Configuring Oracle9i RAC 25
### CMCFG.ORA ###
HeartBeat=15000
ClusterName=Oracle Cluster Manager, version 9i
PollInterval=1000
MissCount=215
PrivateNodeNames=racpvt1 racpvt2 racpvt3 racpvt4
PublicNodeNames=rac1 rac2 rac3 rac4
ServicePort=9998
KernelModuleName=hangcheck-timer
CmDiskFile=/dev/raw/raw1
HostName=racpvt1 <-- Hostname= set to racpvt1
Example 3-3. Hostname= Set to racpvt1
3. Proceed to Section 3.4.6 Starting Oracle Cluster Manager.
3.4.6. Starting Oracle Cluster Manager
1. At each node, log in as the root user and run the following:
# . ~oracle/.bash_profile
# cd $ORACLE_HOME/oracm/bin
# ./ocmstart.sh
2. Check for oracm processes.
3. Proceed to Section 3.4.7 Installing Oracle RDBMS.
3.4.7. Installing Oracle RDBMS
To install Oracle RDBMS, follow these steps:
1. Start the Oracle Universal Installer from a CD-ROM or from stage directories.
a. From CD-ROM — Change directories and run the installation program. For example :
$ cd /home/oracle
$ /cdrom/runInstaller
b. From stage directories — Change directories and run the installation program. For exam-
ple:
$ cd /stage/Disk1
$ ./runInstaller
2. At the Cluster Node Selection dialog box, select the master node and click Next.
Note
Because you are using a shared ORACLE_HOME, you only need to select the master node.
3. Navigate to the Available Products dialog box, select Oracle9i Database 9.2.0.4.0, and click
Next. Clicking Next causes the Installation Types dialog box to be displayed.
4. At the Installation Types dialog box, click Custom and Next.
Page 36

26 Chapter 3. Installing and Configuring Oracle9i RAC
5. At the Available Product Components dialog box, ensure that Oracle9i Real Application
Cluster 9.2.0.4.0 is selected. Check other components for which you are licensed and click
Next. Clicking Next causes the Component Locations dialog box to be displayed. At that
dialog box, click Next. (The Component Locations dialog box shows which components have
been selected.)
6. At the Shared Configuration File Name dialog box, enter the second raw file pointing to the
second quorum pool oraraw2 (in the example configuration, /dev/raw/raw2) and click Next.
7. At the Summary dialog box, ensure that it shows that the Real Application Cluster software
installs. Click Install.
8. At the Setup Privileges dialog box (resulting from the previous step), you are asked to log in to
each node as the root user and run $ORACLE_HOME/root.sh. Click OK after you have verified
that the file /var/opt/oracle/srvConfig.loc exists, and that it points to the quorum pool
oraraw2.
9. At the End of Installation dialog box, click Exit. You have completed the installation of software.
10. Proceed to Section 3.4.8 Patching the RDBMS Server.
3.4.8. Patching the RDBMS Server
Acquire the 9.2.0.4 patch for the RDBMS server. Use the Oracle Universal Installer to apply the patch.
Proceed to Section 3.5 Creating an Oracle Database.
3.5. Creating an Oracle Database
Creating an Oracle database for use with Red Hat GFS 6.0 consists of the following tasks:
• Section 3.5.1 Creating Network Configuration Files
• Section 3.5.2 Enabling network CDPN
• Section 3.5.3 Setting Up the Cluster Configuration File
• Section 3.5.4 Setting Up the Database
3.5.1. Creating Network Configuration Files
Creating the network configuration files consists of creating the following Oracle TNS-related files:
listener.ora, tnsnames.ora, and sqlnet.ora.
Note
The $TNS_ADMIN directory should reside in CDPN, assuming that the default directory for $TNS_ADMIN
is $ORACLE_HOME/network/admin.
To create the network configuration files, follow these steps:
1. Create the listener.ora file; refer to Example 3-4 for a sample file.
2. Create the tnsnames.ora file; refer to Example 3-5 for a sample file.
Page 37

Chapter 3. Installing and Configuring Oracle9i RAC 27
3. Create the sqlnet.ora file; refer to Example 3-6 for a sample file.
4. Proceed to Section 3.5.2 Enabling network CDPN.
listener_rac1=
(DESCRIPTION_LIST =
(DESCRIPTION =
(ADDRESS_LIST =
(ADDRESS = (PROTOCOL = IPC)(KEY = EXTPROC))
)
(ADDRESS_LIST =
(ADDRESS = (PROTOCOL = TCP)(HOST = rac1.example.com)(PORT = 1521))
)
)
)
SID_LIST_LISTENER_RAC1 =
(SID_LIST =
(SID_DESC =
(SID_NAME = PLSExtProc)
(ORACLE_HOME = /mnt/oracle_base/product/9ir2)
(PROGRAM = extproc)
)
(SID_DESC =
(GLOBAL_DBNAME = swing)
(ORACLE_HOME = /mnt/oracle_base/product/9ir2)
(SID_NAME = rac1)
)
)
Example 3-4. Sample File: listener.ora
MYDB.EXAMPLE.COM
(DESCRIPTION =
(LOAD_BALANCE = ON)
(FAILOVER = ON)
(ADDRESS_LIST=
(ADDRESS=(PROTOCOL=TCP)(HOST=RAC1.EXAMPLE.COM)(PORT=1521))
(ADDRESS=(PROTOCOL=TCP)(HOST=RAC2.EXAMPLE.COM)(PORT=1521))
(ADDRESS=(PROTOCOL=TCP)(HOST=RAC3.EXAMPLE.COM)(PORT=1521))
(ADDRESS=(PROTOCOL=TCP)(HOST=RAC4.EXAMPLE.COM)(PORT=1521))
)
(CONNECT_DATA=
(SERVICE_NAME=MYDB.EXAMPLE.COM)
(failover_mode =
(type = select)
(method=basic)
(retries=5)
(delay=2)
)
)
)
rac1 =
(DESCRIPTION =
(ADDRESS_LIST=
Page 38

28 Chapter 3. Installing and Configuring Oracle9i RAC
(ADDRESS=(PROTOCOL=TCP)(HOST=rac1.example.com)(PORT=1521))
)
(CONNECT_DATA=
(SID = rac1)
)
)
rac2 =
(DESCRIPTION =
(ADDRESS_LIST=
(ADDRESS=(PROTOCOL=TCP)(HOST=rac2.example.com)(PORT=1521))
)
(CONNECT_DATA=
(SID = rac2)
)
)
rac3 =
(DESCRIPTION =
(ADDRESS_LIST=
(ADDRESS=(PROTOCOL=TCP)(HOST=rac3.example.com)(PORT=1521))
)
(CONNECT_DATA=
(SID = rac3)
)
)
rac4 =
(DESCRIPTION =
(ADDRESS_LIST=
(ADDRESS=(PROTOCOL=TCP)(HOST=rac4.example.com)(PORT=1521))
)
(CONNECT_DATA=
(SID = rac4)
)
)
Example 3-5. Sample File: tnsnames.ora
NAMES.DEFAULT_DOMAIN = example.com
NAMES.DIRECTORY_PATH= (TNSNAMES)
Example 3-6. Sample File: sqlnet.ora
3.5.2. Enabling network CDPN
To enable CDPN, follow these steps:
1. At any node in the network, change to the $ORACLE_HOME directory and create your CDPN
directories as follows:
$ for i in ‘ls -d rac*‘; do cp -r network $i; done
2. Move the network directory to network.orig using the following command:
$ mv network network.orig
3. To create the CDPN, enter the following:
$ ln -s @hostname/network network
Page 39

Chapter 3. Installing and Configuring Oracle9i RAC 29
4. At each node, navigate to the $ORACLE_HOME/network/admin directory and edit the
listener.ora file to reflect the node-specific information.
5. After you have edited the node-specific information in the listener.ora file, start your listener and test your configuration. If they all respond with OK, your network configuration is
done; stop the listener. Examples of starting and stopping a listener are shown as follows:
$ lsnrctl start listener_mydb <--- Starting a listener
$ lsnrctl stop listener_mydb <--- Stopping a listener
6. Make sure that the 9.2.0.4 patch properly sets the permissions for the dbsnmp file in the
$ORACLE_HOME/bin directory. It should be owned by oracle and the permissions set at 750.
7. Proceed to Section 3.5.3 Setting Up the Cluster Configuration File.
3.5.3. Setting Up the Cluster Configuration File
To set up the cluster configuration file, follow these steps:
1. At each node, if the srvconfig.loc file does not exist in the /var/opt/oracle directory,
log in as root, change directories, and run the rootadd.sh script as follows:
# cd $ORACLE_HOME/srvm/utl
# ./rootadd.sh
Note
This step adds the srvconfig.loc file to the /var/opt/oracle directory. If it fails, run the
commands in the script manually. Make sure to perform this step on each node.
2. As user oracle on the master node, configure the Oracle cluster information device as follows:
$ srvconfig -init
$ gsdctl start
$ srvctl add database -d mydb -o /mnt/oracle_base/product/9ir2
$ srvctl add instance -d mydb -i mydb1 -n rac1
$ srvctl add instance -d mydb -i mydb2 -n rac2
$ srvctl add instance -d mydb -i mydb3 -n rac3
$ srvctl add instance -d mydb -i mydb3 -n rac3
3. Start the network listener on the master node as follows:
$ lsnrctl start listener_mydb1
4. At each node, issue the following commands:
$ gsdctl start
$ agentctl start
5. Proceed to Section 3.5.4 Setting Up the Database.
3.5.4. Setting Up the Database
Before setting up the database, check the following:
• All the Oracle-required environment variables are set.
• ORACLE_SID is set to the instance name.
• Unset the LANG environment variable.
Page 40

30 Chapter 3. Installing and Configuring Oracle9i RAC
You can create a database either manually or by using the Oracle DBCA (Database Configuration
Assistant). Create the database from the master node only. To set up the database follow these steps:
1. In the init.ora file, use the pound sign (#) to comment out the local_listener parameter
of each node except the one from which you are working. Refer to Example 3-7 for a sample of
an init.ora file that has been edited for working from the node named mydb1.
...
...
cluster_database_instances = 4
...
cluster_database=true
mydb1.instance_name=mydb1
mydb1.instance_number=1
mydb1.local_listener=LISTENER_MYDB1
mydb1.local_listener=mydb1.example.com
mydb1.thread=1
mydb1.undo_tablespace=UNDOTBS1
mydb2.instance_name=mydb2
mydb2.instance_number=2
#mydb2.local_listener=LISTENER_MYDB2 <-- mydb2 local_listener commented out
mydb2.local_listener=mydb2.example.com
mydb2.thread=2
mydb2.undo_tablespace=UNDOTBS2
mydb3.instance_name=mydb3
mydb3.instance_number=3
#mydb3.local_listener=LISTENER_MYDB3 <-- mydb3 local_listener commented out
mydb3.local_listener=mydb3.example.com
mydb3.thread=3
mydb3.undo_tablespace=UNDOTBS3
mydb4.instance_name=mydb4
mydb4.instance_number=4
#mydb4.local_listener=LISTENER_MYDB4 <-- mydb4 local_listener commented out
mydb4.local_listener=mydb4.example.com
mydb4.thread=4
mydb4.undo_tablespace=UNDOTBS4
...
...
Example 3-7. Sample File: init.ora
2. Set the environment variables. For example:
$ export ORACLE_BASE=</mnt/oracle>
$ export ORACLE_HOME =$ORACLE_BASE/product/9iR2
$ unset LANG
$ export ORACLE_SID=mydb1
3. Assuming that your database conforms to the Oracle Optimal Flexible Architecture (OFA)
guidelines, and that bdump, udump, cdump, pfile, and any other relevant directories are under
$ORACLE_BASE/admin, put $ORACLE_BASE/admin in CDPN:
$ cd $ORACLE_BASE
$ for i in ‘ls -d product/9ir2/rac*‘; do cp -r admin $i; done
$ mv admin admin.orig
$ ln -s product/9ir2/@hostname/admin admin
4. Create the password files, spfiles, from the respective nodes/directories.
Page 41

Chapter 3. Installing and Configuring Oracle9i RAC 31
5. Start the database instances from the respective nodes using srvctl (the preferred method) or
SQL*Plus. For example:
a. srvctl
$ srvctl start instance -d mydb -i mydb2
b. SQL*Plus
$ sqlplus /nolog
SQL> connect / as sysdba
SQL> startup
ORACLE instance started.
Total System Global Area 252777144 bytes
Fixed Size 451256 bytes
Variable Size 218103808 bytes
Database Buffers 33554432 bytes
Redo Buffers 667648 bytes
Database mounted.
Database opened.
6. Start the listeners from the respective nodes.
Page 42

32 Chapter 3. Installing and Configuring Oracle9i RAC
Page 43

Index
A
audience, i
I
installing GFS, 7, 7
procedures, 7
introduction, i
intended audience, i
C
cluster, sample, 1
configuration
setting up, 11
configuring GFS, 7
procedures, 7
conventions
document, i
D
Database
creating an Oracle database, 26
cluster configuration file setup, 29
creating network configuration files, 26
enabling network CDPN, 28
set up, 29
documentation, related, i
F
feedback, iv
file systems
creating, 15
mounting, 15
G
GFS
configuring, 7
procedures, 7
installing, 7, 7
procedures, 7
H
hangcheck-timer
loading, 23
hardware requirements table, 5
L
lock server
starting, 15
O
Oracle9i RAC
compatibility environment
setting up, 17
configuring, 17
procedure, 17
configuring components, 21
Cluster Manager, 24
creating a database, 26
cluster configuration file setup, 29
creating network configuration files, 26
enabling network CDPN, 28
set up, 29
installing, 17
procedure, 17
installing components, 21
Cluster Manager, 22
enabling oracm CDPN, 24
installing patches, 23, 26
modifying configuration file, 23
Oracle RDBMS, 25
starting Oracle Cluster Manager, 25
nodes
preparing, 18
overview, 1
prerequisites, 5
requirements, 5
sample cluster, 1
P
partitions if using one LUN table, 6
pool configuration, 8
prerequisites, 5
R
requirements, 5
Page 44

34
S
sample cluster GFS node names and IP addresses table, 3
sample cluster lock-server node names and IP addresses table, 4
sample cluster network power switch node names and
IP addresses table, 4
sample cluster storage table, 4
sample disk layout table, 5
software requirements table, 5
T
tables
hardware requirements, 5
partitions if using one LUN, 6
sample cluster GFS node names and IP addresses,
3
sample cluster lock-server node names and IP addresses, 4
sample cluster network power switch node names
and IP addresses, 4
sample cluster storage, 4
sample disk layout, 5
software requirements, 5
Page 45

Colophon
The manuals are written in DocBook SGML v4.1 format. The HTML and PDF formats are produced
using custom DSSSL stylesheets and custom jade wrapper scripts. The DocBook SGML files are
written using Emacs with the help of PSGML mode.
Garrett LeSage created the admonition graphics (note, tip, important, caution, and warning). They
may be freely redistributed with the Red Hat documentation.
The Red Hat Product Documentation Team consists of the following people:
Sandra A. Moore — Primary Writer/Maintainer of the Red Hat Enterprise Linux Installation Guide
for x86, Itanium™, AMD64, and Intel® Extended Memory 64 Technology (Intel® EM64T); Primary
Writer/Maintainer of the Red Hat Enterprise Linux Installation Guide for the IBM® POWER Archi-
tecture; Primary Writer/Maintainer of the Red Hat Enterprise Linux Installation Guide for the IBM®
S/390® and IBM® eServer™ zSeries® Architectures
John Ha — Primary Writer/Maintainer of the Red Hat Cluster Suite Configuring and Managing a
Cluster; Co-writer/Co-maintainer of the Red Hat Enterprise Linux Security Guide; Maintainer of cus-
tom DocBook stylesheets and scripts
Edward C. Bailey — Primary Writer/Maintainer of the Red Hat Enterprise Linux Introduction to Sys-
tem Administration; Primary Writer/Maintainer of the Release Notes; Contributing Writer to the Red
Hat Enterprise Linux Installation Guide for x86, Itanium™, AMD64, and Intel® Extended Memory
64 Technology (Intel® EM64T)
Karsten Wade — Primary Writer/Maintainer of the Red Hat SELinux Guide; Contributing Writer to
the Red Hat Enterprise Linux System Administration Guide
Andrius T. Benokraitis — Primary Writer/Maintainer of the Red Hat Enterprise Linux Reference
Guide; Co-writer/Co-maintainer of the Red Hat Enterprise Linux Security Guide; Contributing Writer
to the Red Hat Enterprise Linux System Administration Guide
Paul Kennedy — Primary Writer/Maintainer of the Red Hat GFS Administrator’s Guide; Contributing
Writer to the Red Hat Cluster Suite Configuring and Managing a Cluster
Mark Johnson — Primary Writer/Maintainer of the Red Hat Desktop Deployment Guide; Contributing
Writer of Red Hat Network documentation
Melissa Goldin — Primary Writer/Maintainer of the Red Hat Enterprise Linux Step By Step Guide;
Contributing Writer of Red Hat Network Documentation
Lucy Ringland — Red Hat GFS Documentation Editor.
The Red Hat Localization Team consists of the following people:
Amanpreet Singh Alam — Punjabi translations
Jean-Paul Aubry — French translations
David Barzilay — Brazilian Portuguese translations
Runa Bhattacharjee — Bengali translations
Chester Cheng — Traditional Chinese translations
Verena Fuehrer — German translations
Kiyoto Hashida — Japanese translations
N. Jayaradha — Tamil translations
Michelle Jiyeen Kim — Korean translations
Yelitza Louze — Spanish translations
Noriko Mizumoto — Japanese translations
Page 46

36
Ankitkumar Rameshchandra Patel — Gujarati translations
Rajesh Ranjan — Hindi translations
Nadine Richter — German translations
Audrey Simons — French translations
Francesco Valente — Italian translations
Sarah Wang — Simplified Chinese translations
Ben Hung-Pin Wu — Traditional Chinese translations
Tongjie Tony Fu — Simplified Chinese Translations
Manuel Ospina — Spanish Translations
 Loading...