

Page 1

Red Hat Network
User Reference Guide 1.3
Page 2

ISBN: ISBN: N/A
Red Hat, Inc.
2600 Meridian Parkway
Durham, NC 27713 USA
+1 919 547 0012 (Voice)
+1 919 547 0024 (FAX)
888 733 4281 (Voice)
P.O. Box 13588
Research Triangle Park, NC 27709 USA
© 2001 Red Hat, Inc.
RHNurg(EN)-1.3-Print-RHI (2001-01-29T10:47-0400)
Copyright © 2001 by Red Hat, Inc. This material may be distributed only subject to the terms and con-
ditions set forth in the Open Publication License, V1.0 or later (the latest version is presently available
at http://www.opencontent.org/openpub/).
Distribution of substantively modified versions of this document is prohibited without the explicit permission of the copyright holder.
Distribution of the work or derivative of the work in any standard (paper) book form for commercial
purposes is prohibited unless prior permission is obtained from the copyright holder.
Red Hat, Red Hat Network, the Red Hat "Shadow Man" logo, RPM, Maximum RPM, the RPM logo,
Linux Library, PowerTools, Linux Undercover, RHmember, RHmember More, Rough Cuts, Rawhide
and all Red Hat-based trademarks and logos are trademarks or registered trademarks of Red Hat, Inc.
in the United States and other countries.
Linux is a registered trademark of Linus Torvalds.
Motif and UNIX are registered trademarks of The Open Group.
Compaq and the names of Compaq products referenced herein are either trademarks and/or service
marks or registered trademarks and/or service marks of Compaq.
Netscape is a registered trademarkofNetscapeCommunications Corporation in the United States and
other countries.
Windows is a registered trademark of Microsoft Corporation.
All other trademarks and copyrights referred to are the property of their respective owners.
Printed in Canada, Ireland, and Japan
ii
Page 3

Contents
Red Hat Network
Introduction.............. ..................... ..................... ..................... ...... v
Document Conventions.................................................................... v
More to Come .............................................................................. viii
Chapter 1 What is Red Hat Network?. ..................... .............. 11
1.1 Automatic Notifications........................................................... 12
1.2 Security, Quality Assurance, and Red Hat Network .......................... 12
1.3 Before You Begin ................................................................. 13
Chapter 2 Registration............. ..................... ..................... ...... 15
2.1 Starting the Red Hat Network Registration Client............................. 15
2.2 Registering a User Account ..................................................... 17
2.3 Registering a System Profile .................................................... 21
2.4 Finishing Registration ............................................................ 25
2.5 Text Mode RHN Registration Client............................................. 27
Chapter 3 Red Hat Update Agent Configuration............ ...... 29
3.1 Configuring the Red Hat Update Agent ........................................ 29
3.2 General Settings.................................................................. 29
3.3 Retrieval/Installation Settings ................................................... 30
3.4 Package Exceptions Settings ................................................... 32
Chapter 4 Red Hat Update Agent..... ..................... ................. 35
4.1 Starting the Red Hat Update Agent ............................................ 35
4.2 Choosing Packages to Update.................................................. 37
4.3 Installing Updated Packages.................................................... 40
4.4 Update Agent Finished........................................................... 41
4.5 Command Line Mode Red Hat Update Agent................................. 42
4.6 Syncronizing Your System Profile............................................... 45
iii
Page 4

Chapter 5 Red Hat Network Web Application................... .... 47
5.1 Logging into Red Hat Network Web Application .............................. 47
5.2 Viewing Your Notifications ....................................................... 47
5.3 Adding a System Profile ......................................................... 48
5.4 Viewing Your Network Group.................................................... 50
5.5 Viewing Individual System Pages............................................... 51
5.6 Downloading Updated Packages ............................................... 52
5.7 Customizing Preferences........................................................ 52
5.8 Searching Errata.................................................................. 54
5.9 Viewing Online Help.............................................................. 55
5.10 Navigation......................................................................... 55
Chapter 6 Red Hat Network Daemon.... ..................... ............ 59
Chapter 7 Using Red Hat Network with Red Hat Linux 6.2.61
Chapter 8 Frequently Asked Questions..... ..................... ...... 63
iv
Page 5

Section 0.1:Document Conventions v
Introduction
Welcome to the Red Hat Network User Reference Guide 1.3.
The Red Hat Network User Reference Guide will guide you through registering your system for Red
Hat Network and using its many features. Depending on which version of Red Hat Linux you have
installed, the Red Hat Network Registration Client and the Red Hat Update Agent might be
different than the ones described in this manual as new features are added. All version of this manual
are available at http://www.redhat.com/support/manuals/. Once you use Red Hat Network to update
these applications, you can use the latest version of this manual.
For a more detailed, technical overview of Red Hat Network, please refer to the Red Hat Network
Whitepaper and the Red Hat Network Technical Paper available at http://www.redhat.com/products/network/.
Document Conventions
When you read this manual, you’ll see that certain words are represented in different fonts, typefaces,
sizes and weights. This highlighting is systematic; different words are represented in the same style to
indicate their inclusion in a specific category. The types of words that are represented this way include
the following:
command
Linux commands (and other operating system commands, when used) are represented this way.
This style should indicate to you that you can type in the word or phrase on the command line
and press
[Enter] to invoke a command. Sometimes a command contains words that would be
displayed in a different style on their own (e.g., filenames). In these cases, they are considered
to be part of the command, so the entire phrase will be displayed as a command. For example:
Use the cat testfile command to view the contents of a file, named testfile, in the
current working directory.
filename
Filenames, directory names, paths and RPM package names are represented this way. This style
should indicate that a particular file or directory exists by that name on your Red Hat Linux
system. Examples:
The .bashrc file in your home directory contains bash shell definitions and aliases for your
own use.
The /etc/fstab file contains information about different system devices and filesystems.
The /usr/share/doc directory contains documentation for various programs.
Page 6

vi Introduction
Install the webalizer RPM if you want to use a Web server log file analysis program.
application
This style should indicate to you that the program named is an end-user application (as opposed
to system software). For example:
Use Netscape Navigator to browse the Web.
[key]
A key on the keyboard is shown in this style. For example:
To use
[Tab]
completion, type in a character and then press the [Tab] key. Your terminal will
display the list of files in the directory that start with that letter.
[key]-[combination]
A combination of keystrokes is represented in this way. For example:
The
[Ctrl]-[Alt]-[Backspace] key combination will restart the X Window System.
text found on a GUI interface
A title, word or phrase found on a GUI interface screen or window will be shown in this style.
When you see text shown in this style, it is being used to identify a particular GUI screen or an
element on a GUI screen (e.g., text associated with a checkbox or field). Examples:
On the GNOME
Control Center screen, you can customize your GNOME window manager.
Select the
Require Password checkbox if you’d like your screensaver to require a password
before stopping.
top level of a menu on a GUI screen or window
When you see a word in this style, it indicates that the word is the top levelof a pull-down menu.
If you click on the word on the GUI screen, the rest of the menu should appear. For example:
Under
Settings on a GNOME terminal, you’ll see the following menu items: Preferences,
Reset Terminal, Reset and Clear, and Color selector.
If you need to type in a sequence of commands from a GUI menu, they’ll be shown like the
following example:
Click on
Programs=>Applications=>Emacs to start the Emacs text editor.
button on a GUI screen or window
This style indicates that the text will be found on a clickable button on a GUI screen. For example:
Click on the
Back button to return to the Web page you last viewed.
Page 7

Section 0.1:Document Conventions vii
computer output
When you see text in this style, it indicates text displayed by the computer on the command line.
You’ll see responses to commands you typed in, error messages and interactive promptings for
your input during scripts or programs shown this way. For example:
Use the ls to display the contents of a directory:
$ls
Desktop axhome logs paulwesterberg.gif
Mail backupfiles mail reports
The output returned in response to the command (in this case, the contents of the directory) is
shown in this style.
prompt
A prompt, which is a computer’s way of signifying that it is ready for you to input something,
will be shown in this style. Examples:
$
#
[stephen@maturin stephen]$
leopard login:
user input
Text that the user has to type, either on the command line, or into a text box on a GUI screen,
is displayed in this style. In the following example, text and windows are displayed in this
style:
To boot your system into the text based installation program, you will need to type in the text
command at the boot: prompt.
Another example, with the word root displayed as something the user needs to type in:
If you need to log in as root when you first log into your system, and you are using the graphical
login screen, at the Login prompt, type root. At the Password prompt, type in the root
password.
glossary entry
A word that appears in the glossary will be shown in the body of the document in this style. For
example:
The lpd daemon handles printing requests.
Page 8
viii Introduction
In this case, the style of the word daemon should indicate to you that a definition of the term is
available in the glossary.
Additionally, we use severaldifferentstrategies to draw your attention to certain pieces of information.
In order of how critical the information is to your system, these items will be marked as a tip, a note,
important, a caution or a warning. For example:
Note
Remember that Linux is case sensitive. In other words, a rose is not a ROSE
is not a rOsE.
CAUTION
Don’t do routine tasks as root -- use a regular user account unless you need
to use the root account to administer your system.
WARNING
If you choose not to partition manually, a server-class installation will
remove all existing partitions on all installed hard drives. Don’t choose
this installation class unless you’re sure you have no data you need to
save.
More to Come
The Red Hat Network User Reference Guide is constantly expanding as newRed Hat Network features
and service plans are launched.
Send in Your Feedback
If you’d like to make suggestions about the Red Hat Network User Reference Guide, please mention
this guide’s identifier:
RHNurg(EN)-1.3-Print-RHI (2001-01-29T10:47-0400)
You can send mail to:
Page 9

Section 0.2:More to Come ix
rhn-feedback@redhat.com
Page 10

x Introduction
Page 11

What is Red Hat Network? 11
1 What is Red Hat Network?
Have you ever read about a new version of a software package and wanted to install it but could not
find it?
Haveyou ever tried to find an RPM through an Internet search engine or an RPM Repository and been
linked to a site that you have never heard of?
Have you ever tried to find an RPM but instead you are only able to find the source files that you have
to compile yourself?
Haveyou everspent hours or even days visiting different websites to see if you have the latest packages
installed on your system, only to have to do it again in a few months?
Those days are over with Red Hat Network (RHN). RHN provides the solution to all your system
software management needs.
Launched in September 2000 with Red Hat Linux 7.0, Red Hat Network is an Internet solution for
managing a Red Hat Linux system or a network of Red Hat Linux systems. All security patches, bug
fixes, and software package enhancements can be downloaded directly from Red Hat using the Red
Hat Update Agent standalone application or through a Web browser using the Red Hat Network
Web Application.
The three main components of Red Hat Network are as follows:
• The Red Hat Network Registration Client
• The Red Hat Network user interface
• The Red Hat Network Daemon
The Red Hat Network Registration Client allows you to create a unique RHN user name and password and probes the hardware and software on your system to create a System Profile. The System
Profile is sent to RHN and RHN returns a unique System ID to your system (see Chapter 2, Registra-
tion for further information).
You can use either of the two Red Hat Network user interfaces:
• The Red Hat Network Web Application
• The Red Hat Update Agent
Both the Red Hat Network Web Application and the Red Hat Update Agent allow you to view
all security alerts, bug fixes, and package enhancements included in the Red Hat errata list. Only
packages relevant to your system are shown. The Red Hat Network Web Application and Red Hat
Page 12

12 Chapter 1:What is Red Hat Network?
Update Agent can also be configuredto verify packages once downloaded. Red Hat Update Agent
allows for a few basic configuration options such as choosing to ignore update notifications for certain
packages. The Red Hat Network Web Application includes more features such as viewing up to
five systems simultaneously, viewing package details before downloading them, and adding a system
to your group without using the Red Hat Network Registration Client.
Red Hat Update Agent is a standalone application that runs locally on your system. All the software
dependencies it requires are shipped with Red Hat Linux 7. The Red Hat Network WebApplication
runs inside a SSL-enabled Web browser such as Netscape and does not have software dependencies.
The Red Hat Network Daemon (rhnsd) runs in the background as a service and probes the Red Hat
Network for notifications and updates at set time intervals (see Chapter 6, Red Hat Network Daemon
for further information).
1.1 Automatic Notifications
During registration, you can configure Red Hat Network to send you email notifications of new and
updated software packages. Automated notifications of the latest updates
• Reduce the time and effort required by system administrators to stay on top of the Red Hat errata
list
• Minimize security vulnerabilities in your network by providing the patches as soon as Red Hat
releases them
• Filter out package updates not relevant to your network
• Provide a reliable method of managing multiple systems with similar configurations
1.2 Security, Quality Assurance, and Red Hat
Network
Red Hat Network provides significant benefits to your network including security and quality assurance. All transactions made between you and Red Hat Network are encrypted, and all RPM packages
are signed with Red Hat’s GNU Privacy Guard (GPG) signature to ensure authenticity.
Red Hat Network incorporates the following security measures:
1. The Red Hat Network Web Application is only accessible with the correct user name and password.
2. A DigitalCertificatestored on theclient system inthe file /etc/sysconfig/rhn/systemid
after registration is used to authenticate the system during each transaction between the client and
Red Hat Network.
Page 13

Section 1.3:Before You Begin 13
3. All notifications and information messages are signed by Red Hat with an electronic signature using GPG. The rpm utility can be used to verify the authenticity of the package before it is installed.
4. All transactions are encrypted using a Secure Sockets Layer (SSL) connection.
5. All packages are tested and verified by the Red Hat Quality Assurance Teambefore they are added
to the Red Hat errata list and Red Hat Network.
1.3 Before You Begin
Red Hat Network is available for Red Hat Linux 6.2. Refer to Chapter 7, Using Red Hat Network with
Red Hat Linux 6.2 for details on installing the necessary packages.
By default, all the software packages you need to use Red Hat Network are installed with Red Hat
Linux 7. However, if you chose not to install them during the installation process or performed an
upgrade to Red Hat Linux 7, you might not have the Red Hat Network Registration Client or the Red
Hat Update Agent installed. To verify that the Red Hat Network Registration Client is installed, type
the following command:
rpm -q rhn_register
If the Red Hat Network Registration Client is installed, it will return something similar to
rhn_register-1.0-7
The version number might differ slightly if you have a newer version installed.
If you do not have Red Hat Network Registration Client installed, the command will return
package rhn_register is not installed
Perform this check for every package in Table 1–1, Red Hat Network Packages. If you do not want to
use the graphical versions, you do not have to install the two packages ending in gnome.
Table 1–1 Red Hat Network Packages
Package Name Description
rhn_register Provides the Red Hat Network Registration Client program and the text
mode interface
rhn_register-gnome Provides the GNOME interface (graphical version) for the Red Hat
Network Registration Client; runs if the X Window System is available
Page 14

14 Chapter 1:What is Red Hat Network?
Package Name Description
up2date Provides the Red Hat Update Agent command line version and the Red
Hat Network Daemon
up2date-gnome Provides the GNOME interface (graphical version) for the Red Hat
Update Agent; runs if the X Window System is available
Ifthe packages are not installed, they can be found on theRed Hat Linux 7 CD1 in theRedHat/RPMS
directory or downloaded from the Red Hat FTP site available at ftp://ftp.redhat.com (or from a Red
Hat FTP mirror available at http://www.redhat.com/mirrors.html). Always check the Red Hat errata
page, available at http://www.redhat.com/errata, for package updates.
Page 15

Section 2.1:Starting the Red Hat Network Registration Client 15
2 Registration
Before you begin using Red Hat Network, you need to create a user name, password, and System
Profile. The Red Hat Network Registration Client will walk you through this process.
2.1 Starting the Red Hat Network Registration Client
You must be root to register a system with RHN. If you start the Red Hat Network Registration
Client as a standard user, you will be prompted to enter the root password before proceeding. To start
the Red Hat Network Registration Client in Red Hat Linux 6.2 or higher, use one of the following
methods:
1. On the GNOME desktop, go to the
Main Menu Button (on the Panel) => Programs => System
=> RHN Registration
2. On the KDE desktop, go to the
Main Menu Button (on the Panel) => Red Hat => System => RHN
Registration
3. Type the command rhn_register at a shell prompt (for example an xterm or gnome-terminal)
4. If you are not running the X Window System, type the command rhn_register at a virtual
console or remote terminal. Please refer to Section 2.5, Text Mode RHN Registration Client for
further details.
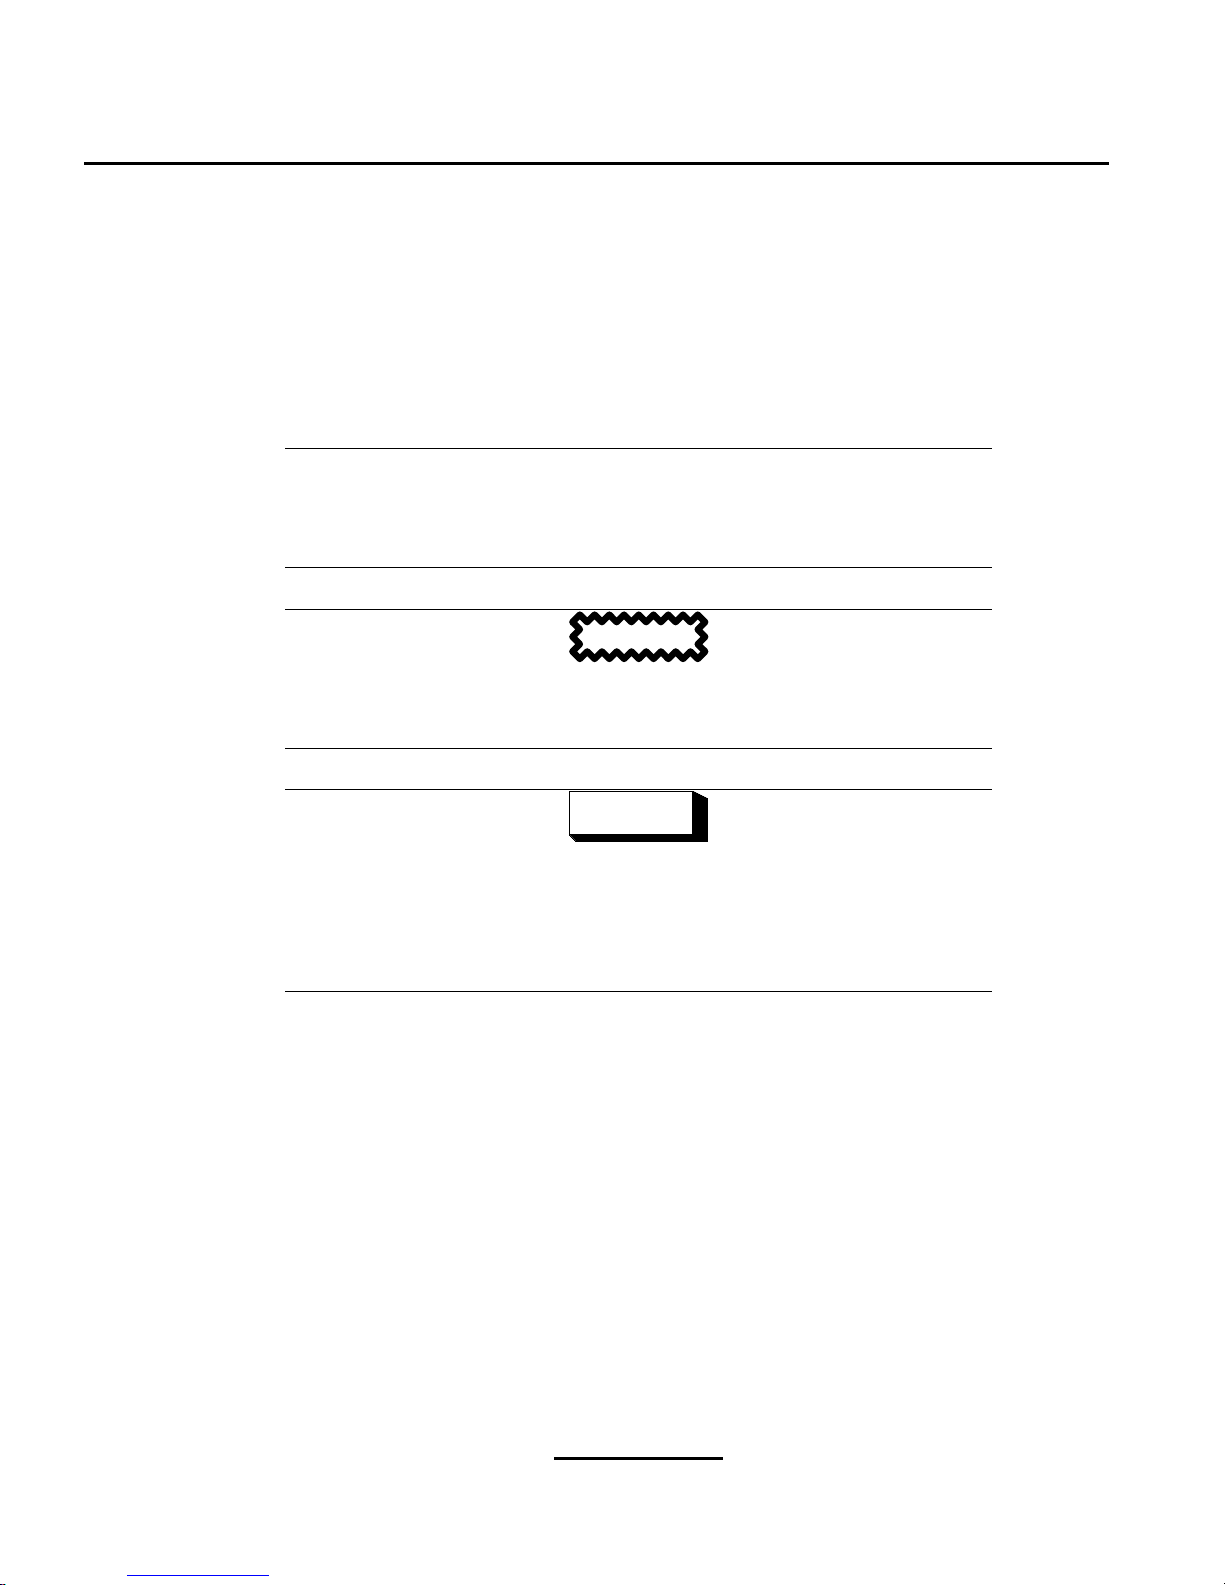
CAUTION
You must use Python 1.5.2-24 or later with Secure Sockets Layer (SSL)
support. If not, the information you transfer will not be encrypted. If you
have an earlier version of Python, you will see the message shown in Figure 2–1, Use Python 1.5.2-24 or later. To determine the version of Python
on your system, use the command rpm -q python. It is strongly recommended you use Python 1.5.2-24 or later.
Page 16
16 Chapter 2:Registration
Figure 2–1 Use Python 1.5.2-24 or later
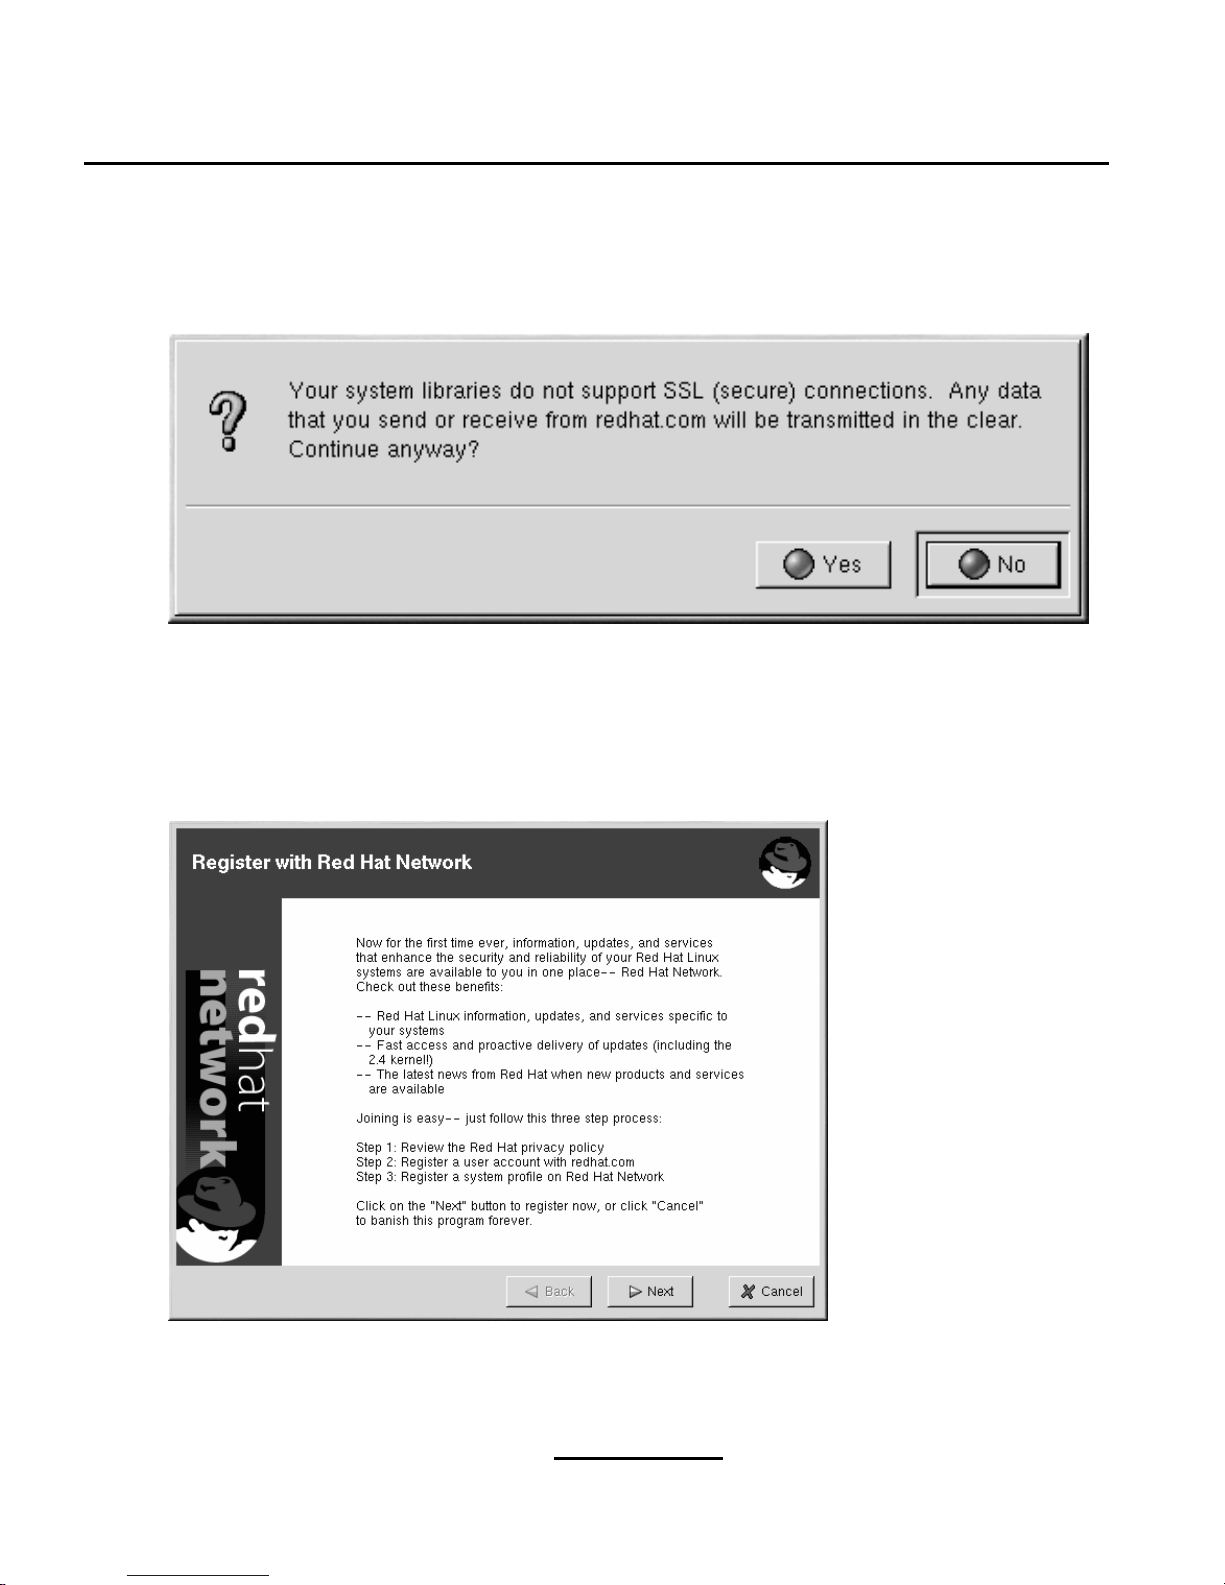
The opening screen for the Red Hat Network Registration Client gives you a brief overview of the
services available and the steps required to register (see Figure 2–2, Welcome Screen). Click
Next to
continue with the registration process. If you click
Cancel, the registration process will end and no
information will be sent.
Figure 2–2 Welcome Screen
Page 17

Section 2.2:Registering a User Account 17
Red Hat is committed to protecting your privacy (see Figure 2–3, Red Hat Privacy Statement. The informationgathered during the Red Hat NetworkRegistrationprocess is used to create a System Profile.
The System Profile is essential if you wish to receive update notifications about your system. If you
have any questions about how your information is being used, please contact us at feedback@red-
hat.com.
Figure 2–3 Red Hat Privacy Statement
2.2 Registering a User Account
Before you can create a System Profile, you must create a user account. The only required information
in this section is a unique user name and password.
2.2.1 Required User Account Information
In the screen shown in Figure 2–6, Create a Unique User Name and Password, you must choose a
user name and password. Once logged into Red Hat Network, you can to modify your preferences,
view your existing System Profile, or obtain the lastest Red Hat software packages. You must choose
a unique user name. If you enter one already in use, you will see an error message (see Figure 2–4,
Page 18
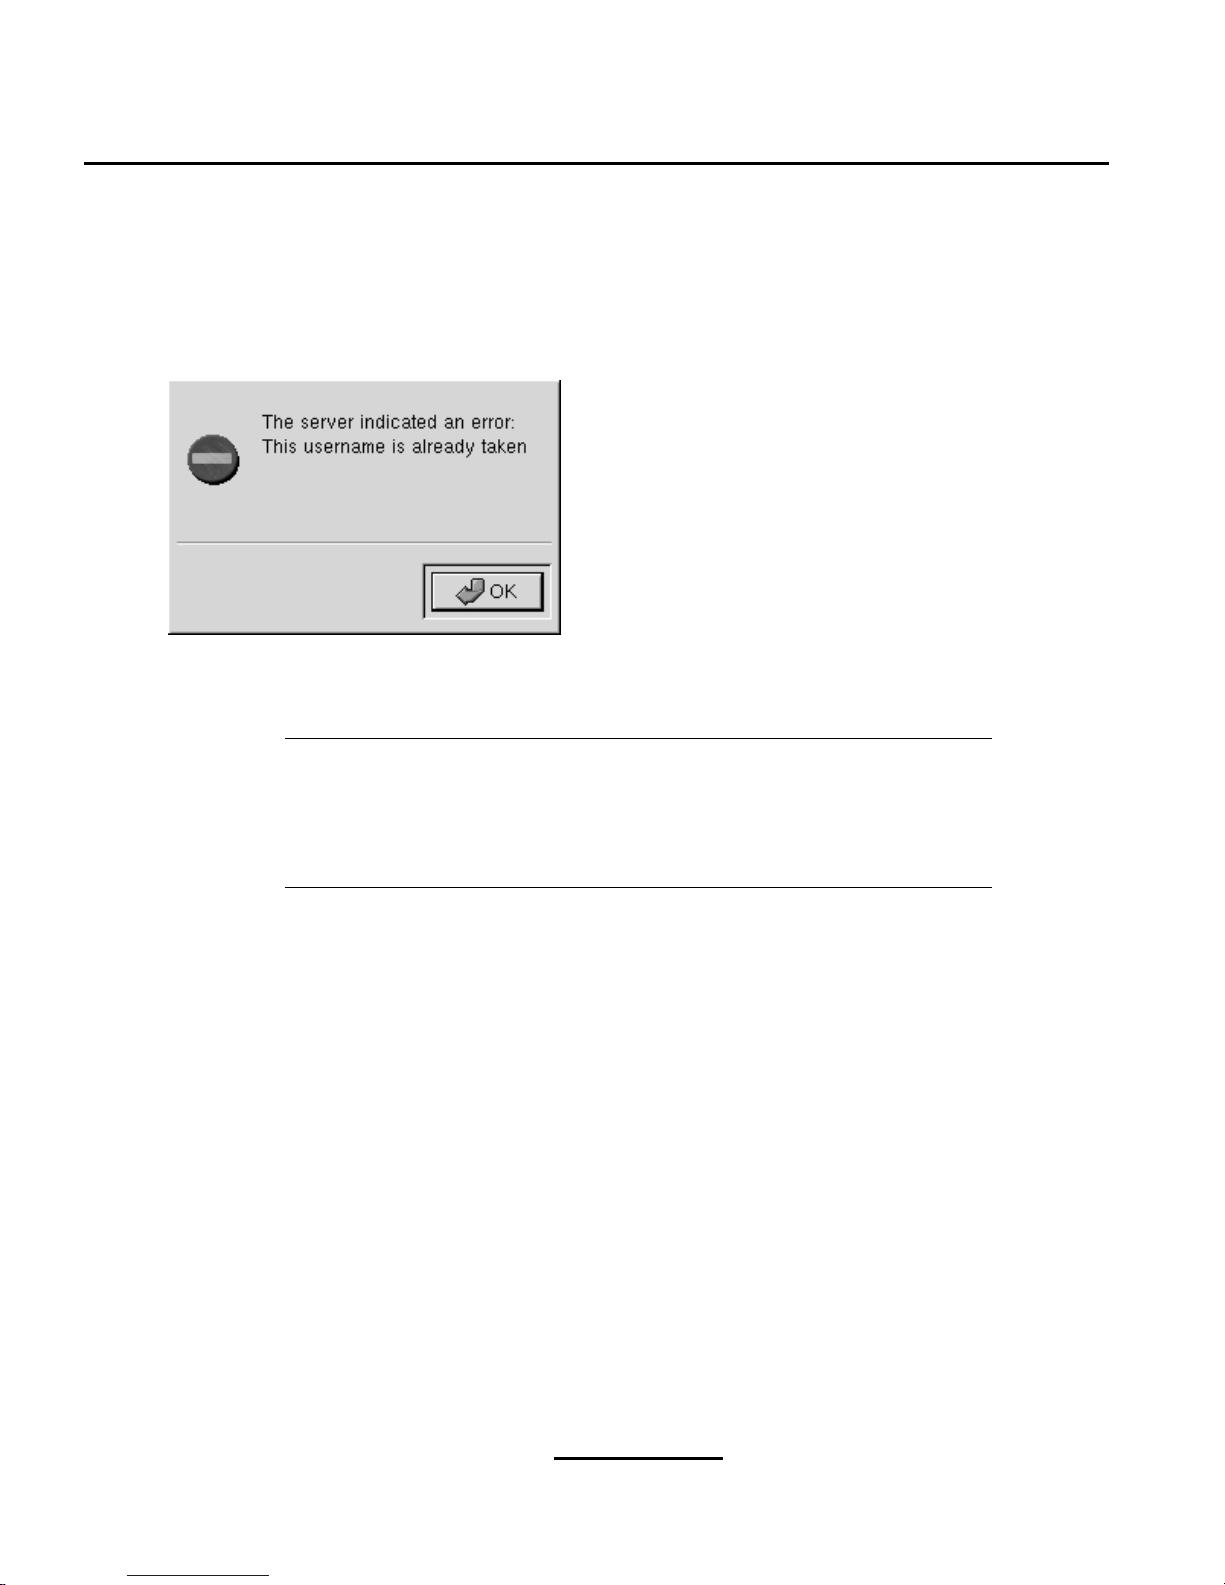
18 Chapter 2:Registration
Error: Username AlreadyExists) until you havesuccessfully chosen a unique user name and password
combination.
Figure 2–4 Error: Username Already Exists
Note
If you are already a member of redhat.com, you can use the same user name
and password. However, you will still need to continue with the registration
process to create your System Profile.
Your user name and password have the following restrictions:
• Must be at least four characters long
• Are case-insentitive
• Can not contain any spaces
• Can not contain any tabs
• Can not contain any line feeds
• Can not contain the characters &, +, %, or ’
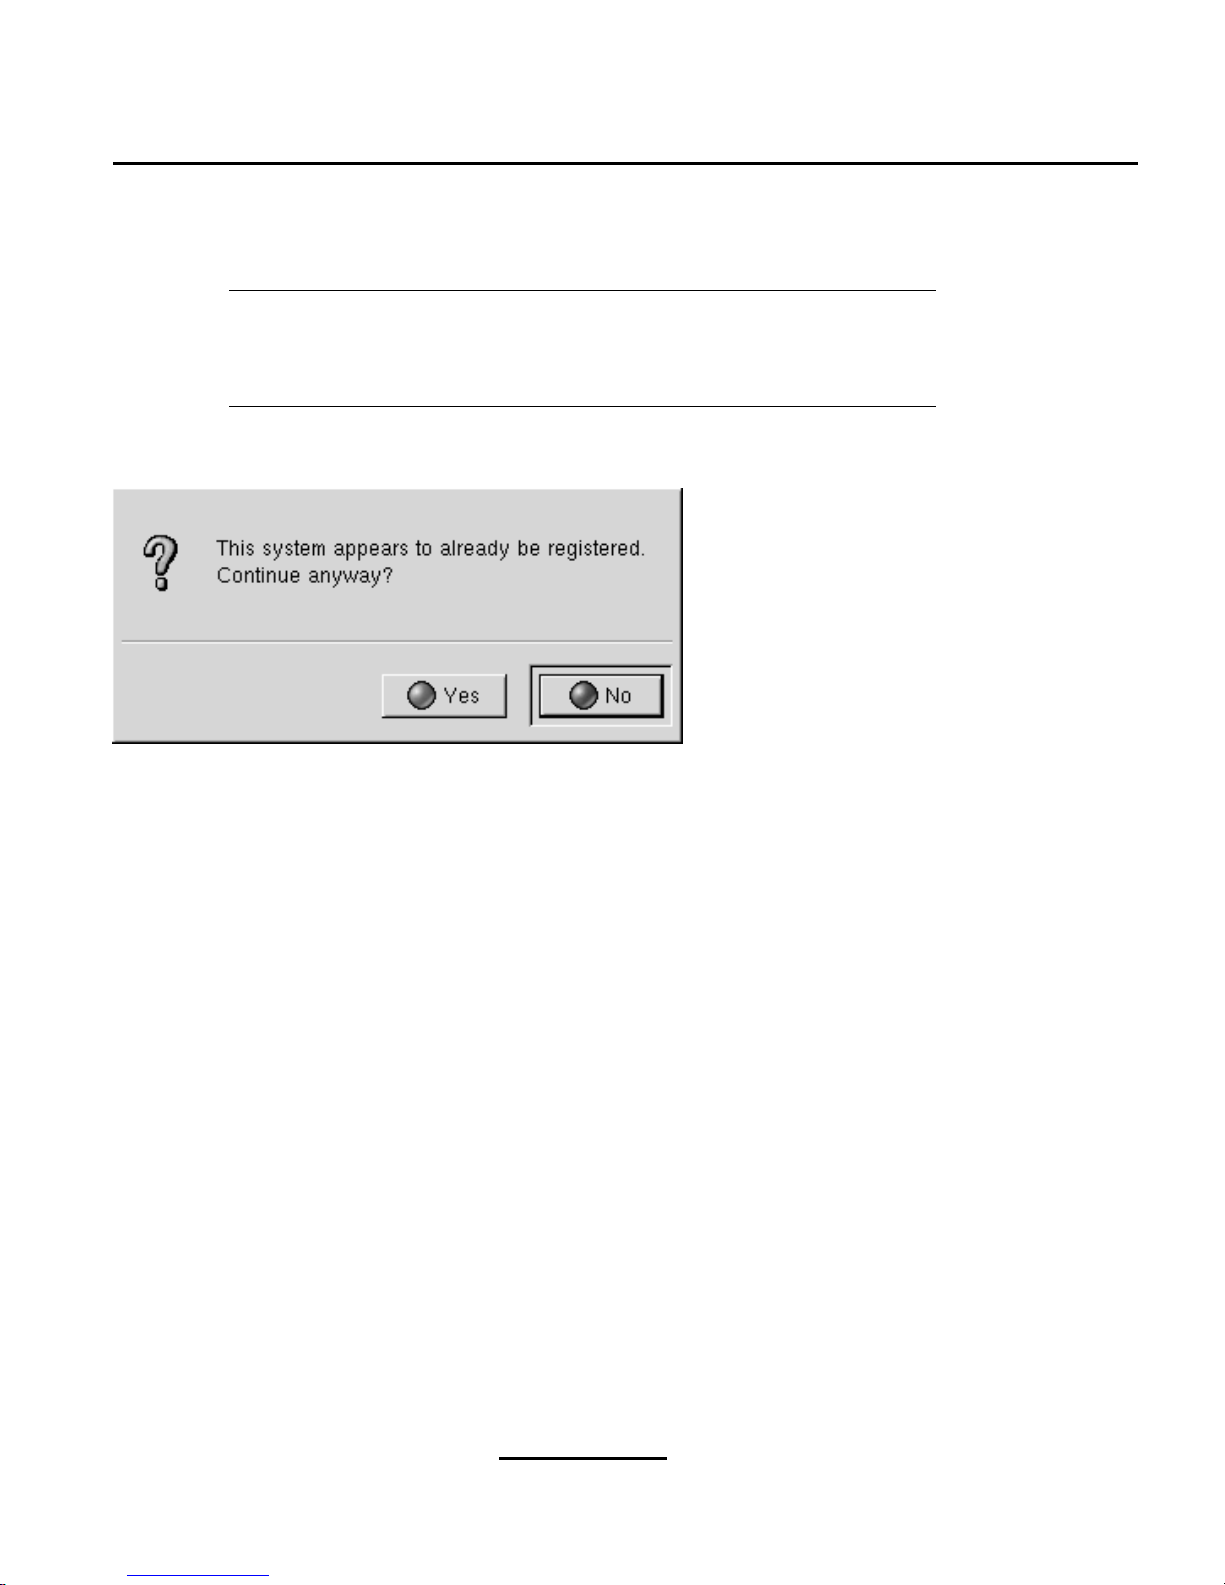
If you have already registered and wish to update your System Profile, you can run the Red Hat
Network Registration Client again and enter your existing user name and password. If you choose
to do this, the dialog box shown in Figure 2–5, Warning: This System Already Registered will appear.
Click
Yes to start the Red Hat Network Registration Client and update your System Profile.
Page 19
Section 2.2:Registering a User Account 19
Use your existing user name and password. If you do not, a new user account
will be created, and the new user account you create will not have the same
support Service Plan for which you have already registered.
Figure 2–5 Warning: This System Already Registered
If you have already registered a machine and created a System Profile, you can add a new machine to
your System Profile. Run the Red Hat Network Registration Client on the new machine you wish
to add and enter your existing Red Hat Network user name and password. The new machine will be
added to your existing System Profile, and you can log into the Red Hat Network Web Application
with your user name and password to view all your systems simultaneously.
Currently, you are allowed to add up to five machines. Once again, it is important to use your existing
user name and password combination when registering an additional system. If you do not you will
not have the same Service Plan for which you registered and you will not be able to login with one
user name to view all your systems.
Page 20

20 Chapter 2:Registration
Figure 2–6 Create a Unique User Name and Password
2.2.2 Optional User Account Information
You can also choose whether to receive email notifications about updates relevant to your system by
selecting the box next titled
I want to receive email notification for updates to my System Profiles.
When selected, the
Email address:
text area will no longer be shaded and you can enter the email
address where notifications will be sent. The email address can be changed at any time.
If you purchased Red Hat Linux 7, Deluxe Workstation,or Professional Server,enteryour Registration
Number to activate your Free Support Services Trial.
Click
Next to continue creating a User Account.
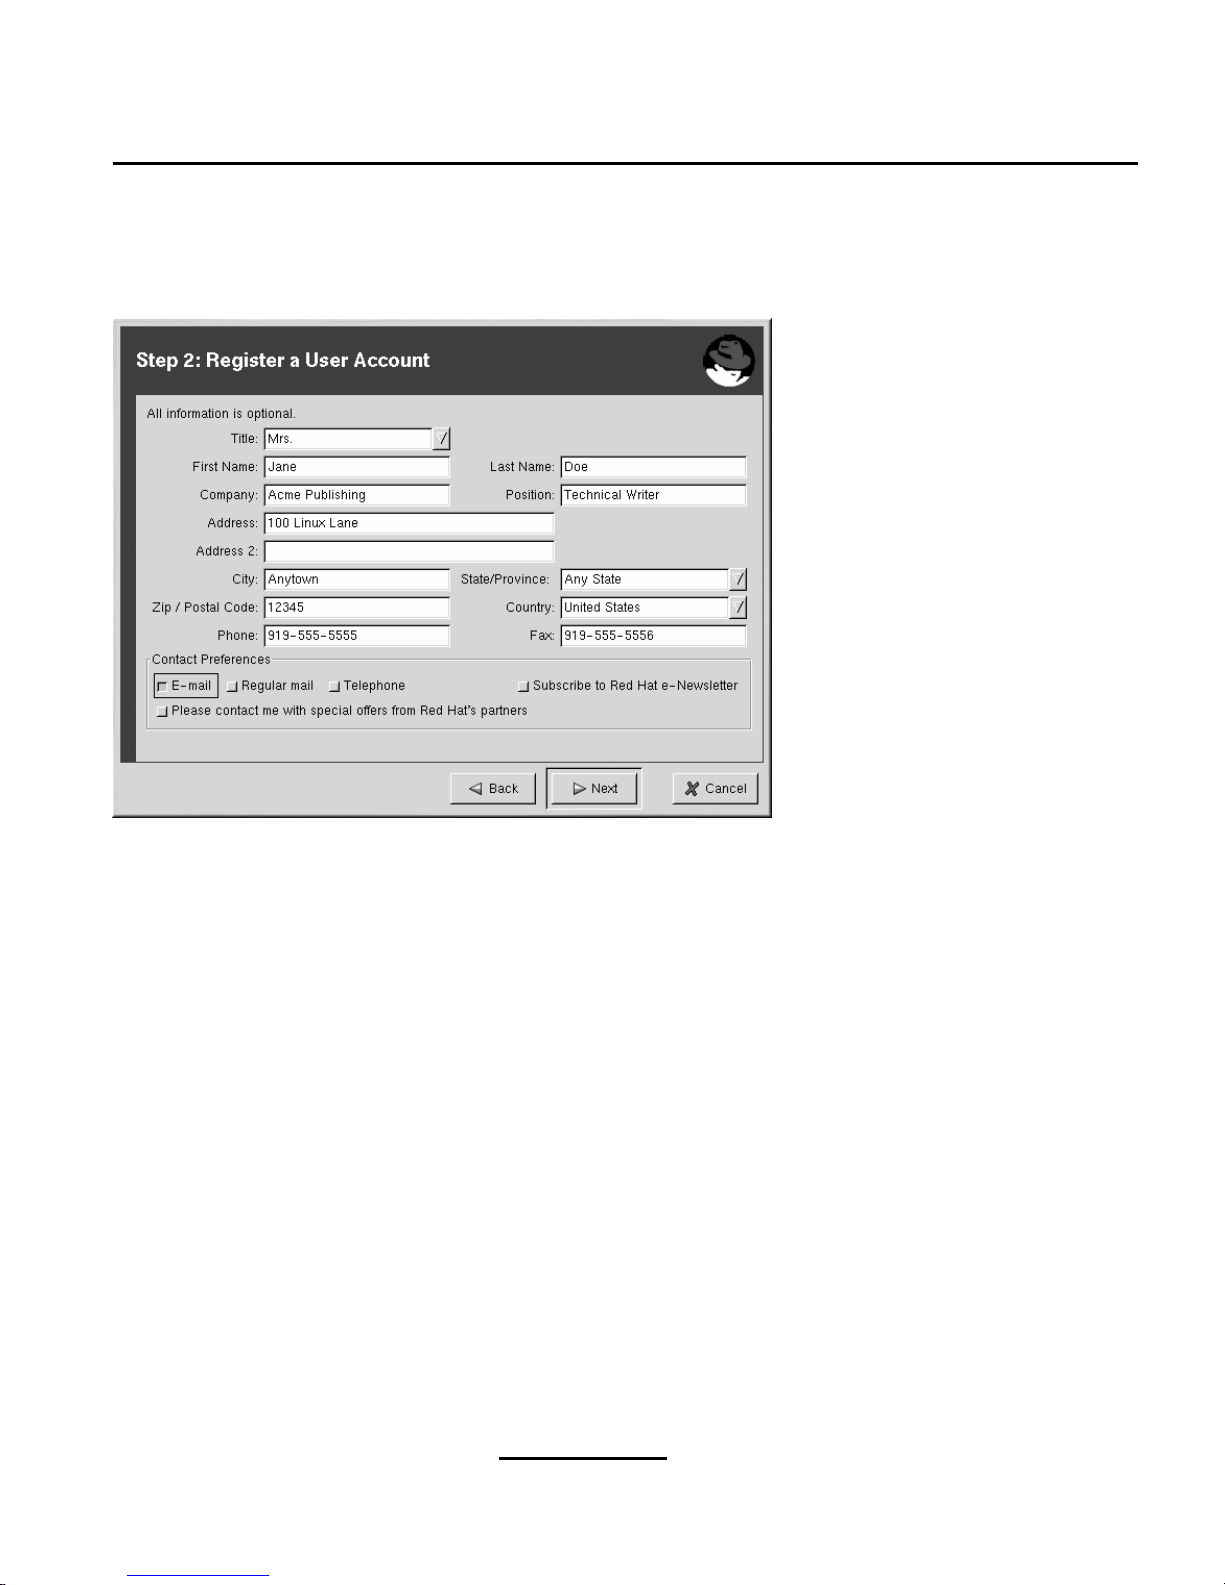
After successfully creating a user name and password, you are prompted for your contact information.
This information is optional. If you would like to receive information about special offers from Red
Hat’s partners or receive the Red Hat e-Newsletter, please fill out the relevant information (see Figure
2–7, Optional User Account Information).
Page 21
Section 2.3:Registering a System Profile 21
Figure 2–7 Optional User Account Information
2.3 Registering a System Profile
Now that you have a user account, you can create a System Profile that consists of hardware and
software information about your Red Hat Linux system. The software System Profile information is
used by Red Hat Network to determine what software update notifications you receive.
2.3.1 Hardware System Profile
After creating a user name and password for your Red Hat Network account, the Red Hat Network
Registration Client probes your system for the following information:
• Red Hat Linux version
• Hostname
• IP address
• CPU model
• CPU speed
Page 22

22 Chapter 2:Registration
• Amount of RAM
• PCI devices
• Disk sizes
• Mount points
The next step is choosing a profile name for your system as shown in Figure 2–8, System Profile -
Hardware. This name is used to identify the system in the Red Hat Network Web Application. The
default value is the hostname for the system. You may modify this to be a more descriptive string such
as Email Server for Support Team if you find it more helpful.
If you do not wish to include information about your hardware or network in your System Profile,
deselect
Include information about hardware and network (see Figure 2–8, System Profile - Hard-
ware).
Click
Next to continue with the registration process.
Figure 2–8 System Profile - Hardware
Page 23

Section 2.3:Registering a System Profile 23
2.3.2 Software System Profile
The software System Profile consists of a list of RPM packages for which you wish to receive notifications. The Red Hat Network Registration Client shows you a list of all RPM packages listed in
the RPM database on your system and then allows you to customize the list by deselecting packages.
Gathering RPM Database Information
Only those packages you choose during this part of the registration will be included in in your System
Profile, and you will only receive notifications about the packages in your System Profile. Thus, if
you use an older version of a package and deselect it from the list, it will not be replaced with a newer
version. This RPM list can be modifed later by running the Red Hat Network Registration Client
again, by using the Red HatNetwork Web Application, or by using the Red Hat Update Agent.As
shownin Figure 2–9, RegistrationWizard, querying the RPM database may take some time depending
on your system.
Figure 2–9 Registration Wizard
Once the RPM package list is built, the list will be displayed as shown in Figure 2–10, RPM Package
Information. Deselecting Include RPM Packages installed on this system in my System Profile
will omit this information from your System Profile.
Page 24

24 Chapter 2:Registration
Figure 2–10 RPM Package Information
Choosing Which RPM Packages to Exclude from the System Profile
By default, all RPM packages in your RPM database are included in your System Profile to be updated
by Red HatNetwork. Toexcludeapackage, uncheck the package from the list by clicking theX beside
the package name. For example, Figure 2–11, Choose which RPM Packages to Exclude from System
Profile shows that the
procmail, procps, and psgml packages have been omitted from the package
list.
Choose which packages to exclude from the system profile, and click
Next to continue with the regis-
tration process.
Page 25

Section 2.4:Finishing Registration 25
Figure 2–11 Choose which RPM Packages to Exclude from System Profile
2.4 Finishing Registration
As seen in Figure 2–12, Finished Collecting Information forSystem Profile, the last step of registration
is to confirm that you want to send your System Profile to the Red Hat Network. If you choose
Cancel
at this point, no information will be sent. Clicking Next will send your profile.
Page 26

26 Chapter 2:Registration
Figure 2–12 Finished Collecting Information for System Profile
Figure 2–13, Send System Profile to Red Hat Network shows the progress bar you will see while your
profile is being sent. This process may take some time depending on your connection speed.
Figure 2–13 Send System Profile to Red Hat Network
You will know your System Profile has been successfully sent when you see the Registration Finished
screen (Figure 2–14, Registration Finished). Click Finish to exit the Red Hat Network Registration
Client.
After completing registration, visit http://www.redhat.com/networkto verify your System Profile and
make any changes.
Page 27

Section 2.5:Text Mode RHN Registration Client 27
Figure 2–14 Registration Finished
2.5 Text Mode RHN Registration Client
The screens for the Text Mode Red Hat Network Registration Client are almost identical to the
screens for the graphical version of Red Hat Network Registration Client. Some of the text in the
text mode version is more concise due to lack of space in the interface. However, there is an equal
number of screens and fields in both versions. Thus, if you are using the text mode version, you can
still follow the instructions that begin in Section 2.1, Starting the Red Hat Network RegistrationClient.
Page 28

28 Chapter 2:Registration
Figure 2–15 Text Mode Welcome Screen
Page 29

Section 3.2:General Settings 29
3 Red Hat Update Agent Configuration
Before using the Red Hat Update Agent, you should configure the settings. This can be done with
the Red Hat Update Agent Configuration Tool.
3.1 Configuring the Red Hat Update Agent
You must be root to run the Red Hat Update Agent Configuration Tool. If you start the Red Hat
UpdateAgent Configuration Toolas a standard user,you will beprompted to enter the root password
before proceeding. The Red Hat Update Agent Configuration Tool can be started using one of the
following methods:
• On the GNOME desktop, go to the
Main Menu Button (on the Panel) => Programs => System
=> RHN Configuration (or Update Agent Configuration for older versions of Red Hat Update
Agent)
• On the KDE desktop, go to the
Main Menu Button (on the Panel) => Red Hat => RHN Configu-
ration
(or Update Agent Configuration for older versions of Red Hat Update Agent)
• Type the command up2date-config at a shell prompt (for example, an xterm or a gnometerminal)
3.2 General Settings
The General tab allows you to enable an HTTP Proxy Server. If your network connection requires
you to use an HTTP Proxy Server to make HTTP connections, select the
Enable HTTP Proxy option
and type your Proxy server in the text field.
Page 30

30 Chapter 3:Red Hat Update Agent Configuration
Figure 3–1 General Settings
3.3 Retrieval/Installation Settings
The Retrieval/Installation tab allows you to customize your software package retrieval and package
installation preferences.
Note
Even if you set the Red Hat Update Agent to install the packages automatically, it will only download the RPM packages required for new versions of
the kernel. New kernels are not installed automatically.
Page 31

Section 3.3:Retrieval/Installation Settings 31
Figure 3–2 Retrieval/Installation Settings
The following retrieval options can be selected (see Figure 3–2, Retrieval/Installation Settings):
•
Do not install packages after retrieval — download selected RPM packages to desired directory
and ignore the installation preferences
•
Display all packagesavailable, not only those installed on system — ignore Software System
Profile preferences and show all new RPM packages available
•
Do not display packages when local configuration file has been modified
— if the configuration file has been modified for a package such as Apache and Squid, do not display them in the
list of available packages
•
Retrieve source RPM along with binary package
— download both the source (*.src.rpm) and
the binary (*.[architecture].rpm) files
The following installation options are configurable (see Figure 3–2, Retrieval/Installation Settings):
•
After installation, keep binary packages on disk — save binary packages in desired directory
instead of deleting them after installing them
•
Use GPG to verify package integrity — before installing the packages, verify Red Hat’s GPG
signature
Page 32

32 Chapter 3:Red Hat Update Agent Configuration
The following additional options are configurable from this tab:
•
Overrideversion stored in System Profile— override the Red Hat Linux version in your System
Profile
•
Package storage directory — change the directory where packages are downloaded
3.4 Package Exceptions Settings
The Package Exceptions tab allows you to define which packages to exclude from the list of updated
RPM packages according to the package name or file name (see Figure 3–3, Package Exceptions Set-
tings).
To define a set of packages to be excluded according to the package name, click the
Add button next
to the Package Names to Skip section and enter a character string including wild cards (*). A wild
card (*) at the end of the character string means all packages beginning with the character string will
be excluded from the list. A wild card (*) at the beginning of the character string means any packages
that end with the character string will be excluded from the list.
Forexample, if the string kernel* in the
PackageNames to Skip section, the Red Hat Update Agent
will not display any packages beginning with kernel.
To exclude packages by file name, follow the same rules except click the
Add button next to the File
Names to Skip
section.
Page 33

Section 3.4:Package Exceptions Settings 33
Figure 3–3 Package Exceptions Settings
Page 34

34 Chapter 3:Red Hat Update Agent Configuration
Page 35

Section 4.1:Starting the Red Hat Update Agent 35
4 Red Hat Update Agent
After configuring the settings for the Red Hat Update Agent using the instructions in Chapter 3,
Red Hat Update Agent Configuration, you can use the Red Hat Update Agent to retrieve the latest
software packages from Red Hat. Using this tool will allow you to always have the most up-to-date
Red Hat Linux system with all security patches, bug fixes, and software package enhancements.
If you are not running the X Windows System or prefer the command-line version of Red Hat Update
Agent, skip to Section 4.5, Command Line Mode Red Hat Update Agent.
4.1 Starting the Red Hat Update Agent
You must be root to run the Red Hat Update Agent. If you start the Red Hat Update Agent as
a standard user, you will be prompted to enter the root password before proceeding. The Red Hat
Update Agent can be started using one of the following methods:
• On the GNOME desktop, go to the
Main Menu Button (on the Panel) => Programs => System
=> RHN Update Agent
• On the KDE desktop, go to the
Main Menu Button (on the Panel) => Red Hat => RHN Update
Agent
• Type the command up2date at a shell prompt (for example, an xterm or gnome-terminal)
If you choose the last option and start the application from a shell prompt, you can specify options to
the graphical version of Red Hat Update Agent.
Table 4–1 Graphical Update Agent Options
Argument Description
-a, --allpackages Show/make available all packages related to your release of Red
Hat Linux, not just those installed on your system.
-d, --download Download packages only, do not install them. This argument
will override the configuraton option
Do not install packages
after retrieval.
-i, --install Install packages after they are downloaded. This argument will
override the configuraton option
Do not install packages after
retrieval.
--nosig Do not use GPG to check package signatures.
Page 36

36 Chapter 4:Red Hat Update Agent
Argument Description
-r, --register Register as an anonymous user with Red Hat Network. You can
register as a full user later by running rhn_register.
--tmpdir=directory Override the configured package directory. The default location
is /var/spool/up2date.
The first time you run the Red Hat Update Agent, the dialog window in Figure 4–1, Install GPG
Key will prompt you to install the Red Hat GPG key. This is used to verify the RPM packages you
download for security purposes. Click
Yes to install the key, and you will not see this message again.
Figure 4–1 Install GPG Key
After installing the Red Hat GPG key, the screen in Figure 4–2, Welcome Screen will appear. It appears
every time you start the Red Hat Update Agent. Click Next to continue.
Page 37

Section 4.2:Choosing Packages to Update 37
Figure 4–2 Welcome Screen
4.2 Choosing Packages to Update
Afterclicking Next on the WelcomeScreen,the dialog box in Figure 4–3, Retrieve Update Information
will appear. This means that a connection to Red Hat Network is being established and that your
customized list of updates is being retreived. This might take some time, depending on the speed of
your connection and the number of packages you have installed.
Figure 4–3 Retrieve Update Information
While you see this dialog box, Red Hat Update Agent uses your unique Digital Certificate
(/etc/sysconfig/rhn/systemid) to determine if there are any updated packages available
Page 38

38 Chapter 4:Red Hat Update Agent
for your system. If there are no updated packages available for your system, the dialog box in Figure
4–4, No new packages needed appears. Click
Ok to exit Red Hat Update Agent.
Figure 4–4 No new packages needed
If your system is not up-to-date, your customized list of available updated packages is displayed as
shown in Figure 4–5, List of Available Updates.
Figure 4–5 List of Available Updates
By default, no packages are selected for download. If you highlight each package, the package description is displayed in the
Package Information section at the bottom of the screen. To select the
package for download (and installation if you chose that option), click the checkbox as shown in Figure 4–6, Choose Updates to Retrieve. You can select all the packages listed by clicking the button
next to
Select all packages. Click Next when you are finished selecting packages.
Page 39

Section 4.2:Choosing Packages to Update 39
Figure 4–6 Choose Updates to Retrieve
Red Hat Update Agent shows the progress of each package retrieval as shown in Figure 4–7, Re-
trieval Finished. When they have all been retrieved, the message
All finished. is displayed at the
bottom of the screen. Click
Next to continue. If you did not chose to install the packages automati-
cally, skip the next section and go to Section 4.4, Update Agent Finished.
Page 40

40 Chapter 4:Red Hat Update Agent
Figure 4–7 Retrieval Finished
4.3 Installing Updated Packages
If you chose to have all the packages installed automatically (see Chapter 3, Red Hat Update Agent
Configuration), the selected packages are installed. The progress of installing each package, as well
as the total progress, is displayed.
When the packages have been installed, as seen in Figure 4–8, Installation Finished, click
Next to
continue.
Page 41

Section 4.4:Update Agent Finished 41
Figure 4–8 Installation Finished
4.4 Update Agent Finished
When the Red Hat Update Agent has finished downloading the desired packages (and installing
them if you chose the install option), you will see the screen in Figure 4–9, Update Agent Finished.
Click
Finish to exit the Red Hat Update Agent.
Page 42

42 Chapter 4:Red Hat Update Agent
Figure 4–9 Update Agent Finished
4.5 Command Line Mode Red Hat Update Agent
If you are not running X, you can still run the Red Hat Update Agent from a virtual console or
remote terminal. The command line version of the Red Hat Update Agent accepts the following
arguments:
Table 4–2 Update Agent Command Line Arguments
Argument Description
-a, --allpackages Show/make available all packages related to your release of Red
Hat Linux, not just those installed on your system.
--configure Graphically configure Red Hat Update Agent options through
the Red Hat Update Agent Configuration Tool.
Page 43

Section 4.5:Command Line Mode Red Hat Update Agent 43
Argument Description
-d, --download Download packages only, do not install them. This argument
will override the configuraton option
Do not install packages
after retrieval.
-i, --install Install packages after they are downloaded. This argument will
override the configuraton option
Do not install packages after
retrieval.
-l, --list List packages available for retrieval/installation.
--nosig Do not use GPG to check package signatures.
-p, --packages Update the packages list associated with your System Profile
on Red Hat Network. Use this argument to keep your System
Profile current if you have installed, updated, or removed
packages from your system without using the Red Hat Update
Agent. Your RPM package list will be updated on the Red Hat
Network servers.
-r, --register Register as an anonymous user with Red Hat Network. You can
register as a full user later by running rhn_register.
--tmpdir=directory Override the configured package directory. The default location
is /var/spool/up2date.
-u, --update Download all packages relevant to my system and install if
preferences set through up2date-config has
Do not install
packages after retrieval
unchecked.
packagename Only download packagename and install if preferences set
through up2date-config has
Do not install packages after
retrieval
unchecked.
-v, --version Show program version information.
-h, --help Show list of available command line arguments.
4.5.1 Installing the Red Hat GPG key
The first time you run the graphical version of Red Hat Update Agent, it prompts you to install
the Red Hat GPG key. This key is required to authenticate the packages downloaded from Red Hat
Network. If you do not have X installed, you need to install the Red Hat GPG key manually. If you
do not have it installed, you will see the following message:
Page 44

44 Chapter 4:Red Hat Update Agent
Your GPG keyring does not contain the Red Hat, Inc. public key.
Without it, you will be unable to verify that packages Update Agent downloads
are securely signed by Red Hat.
Your Update Agent options specify that you want to use GPG. Aborting.
To install the Red Hat GPG key, use the following steps:
Note
GPG keys must be installed for each user. To install the key to use with Red
Hat Network, import the key while logged in as root.
1. Cut and paste the following into a file and save it as redhat2.asc or download it from
http://www.redhat.com/about/contact/.
Type bits/keyID Date User ID
pub 1024D/DB42A60E 1999-09-23 Red Hat Software, Inc. (security@redhat.com)
sub 2048g/961630A2 1999-09-23
-----BEGIN PGP PUBLIC KEY BLOCK----Version: GnuPG v1.0.0 (GNU/Linux)
Comment: For info see http://www.gnupg.org
mQGiBDfqVDgRBADBKr3Bl6PO8BQ0H8sJoD6p9U7Yyl7pjtZqioviPwXP+DCWd4u8
HQzcxAZ57m8ssA1LK1Fx93coJhDzM130+p5BG9mYSWShLabR3N1KXdXQYYcowTOM
GxdwYRGr1Spw8QydLhjVfU1VSl4xt6bupPbWJbyjkg5Z3P7BlUOUJmrx3wCgobNV
EDGaWYJcch5z5B1of/41G8kEAKii6q7Gu/vhXXnLS6m15oNnPVybyngiw/23dKjS
ZVG7rKANEK2mxg1VB+vc/uUc4k49UxJJfCZg1gu1sPFV3GSa+Y/7jsiLktQvCiLP
lncQt1dV+ENmHR5BdIDPWDzKBVbgWnSDnqQ6KrZ7T6AlZ74VMpjGxxkWU6vV2xsW
XCLPA/9P/vtImA8CZN3jxGgtK5GGtDNJ/cMhhuv5tnfwFg4b/VGo2Jr8mhLUqoIb
E6zeGAmZbUpdckDco8D5fiFmqTf5+++pCEpJLJkkzel/32N2w4qzPrcRMCiBURES
PjCLd4Y5rPoU8E4kOHc/4BuHN903tiCsCPloCrWsQZ7UdxfQ5LQiUmVkIEhhdCwg
SW5jIDxzZWN1cml0eUByZWRoYXQuY29tPohVBBMRAgAVBQI36lQ4AwsKAwMVAwID
FgIBAheAAAoJECGRgM3bQqYOsBQAnRVtg7B25Hm11PHcpa8FpeddKiq2AJ9aO8sB
XmLDmPOEFI75mpTrKYHF6rkCDQQ36lRyEAgAokgI2xJ+3bZsk8jRA8ORIX8DH05U
lMH27qFYzLbT6npXwXYIOtVn0K2/iMDj+oEB1Aa2au4OnddYaLWp06v3d+XyS0t+
5ab2ZfIQzdh7wCwxqRkzR+/H5TLYbMG+hvtTdylfqIX0WEfoOXMtWEGSVwyUsnM3
Jy3LOi48rQQSCKtCAUdV20FoIGWhwnb/gHU1BnmES6UdQujFBE6EANqPhp0coYoI
hHJ2oIO8ujQItvvNaU88j/s/izQv5e7MXOgVSjKe/WX3s2JtB/tW7utpy12wh1J+
JsFdbLV/t8CozUTpJgx5mVA3RKlxjTA+On+1IEUWioB+iVfT7Ov/0kcAzwADBQf9
E4SKCWRand8K0XloMYgmipxMhJNnWDMLkokvbMNTUoNpSfRoQJ9EheXDxwMpTPwK
ti/PYrrL2J11P2ed0x7zm8v3gLrY0cue1iSba+8glY+p31ZPOr5ogaJw7ZARgoS8
BwjyRymXQp+8Dete0TELKOL2/itDOPGHW07SsVWOR6cmX4VlRRcWB5KejaNvdrE5
Page 45

Section 4.6:Syncronizing Your System Profile 45
4XFtOd04NMgWI63uqZc4zkRa+kwEZtmbz3tHSdRCCE+Y7YVP6IUf/w6YPQFQriWY
FiA6fD10eB+BlIUqIw80VgjsBKmCwvKkn4jg8kibXgj4/TzQSx77uYokw1EqQ2wk
OZoaEtcubsNMquuLCMWijYhGBBgRAgAGBQI36lRyAAoJECGRgM3bQqYOhyYAnj7h
VDY/FJAGqmtZpwVp9IlitW5tAJ4xQApr/jNFZCTksnI+4O1765F7tA==
=3AHZ
-----END PGP PUBLIC KEY BLOCK-----
2. At the shell prompt, import the key with the following command:
gpg --import redhat2.asc
The resulting message tells you that the key was processed. Tocheck that the key was added, type
gpg --list-keys. You will see the key you just downloaded from Red Hat, as well as your
own keys.
4.6 Syncronizing Your System Profile
If you configured the Red Hat Update Agent to install the latest packages automatically, then your
System Profile stored by Red Hat Network will be updated automatically also. However, if you only
download the latest RPM packages using the Red Hat Update Agent or the Red Hat Network Web
Application and upgrade or install the packages yourself, your System Profile will not be updated
automatically. If you remove packages, you need to update your RPM package list in your System
Profile.
To syncronize the RPM package list on your local system and on Red Hat Network run the command
up2date -p
After running this command, your System Profile on Red Hat Network as viewed from the Red Hat
Network Web Application will reflect the latest software versions installed on your system.
Page 46

46 Chapter 4:Red Hat Update Agent
Page 47

Section 5.2:Viewing Your Notifications 47
5 Red Hat Network Web Application
You can use the Red Hat Network Web Application to manage up to five Red Hat Linux systems
simultaneously. The Red Hat Network Web Application runs in a Web browser such as Netscape,
differing from the Red Hat Update Agent which runs as a standalone application.
Red Hat Network Web Application features include:
1. The Red Hat Network Web Application can download a list of selected packages with one
mouse click. After browsing the individual systems in your network and choosing which packages to install on each of them, you can go to your
Download List page and download packages
for your systems at one time. This allows you to choose your updates without waiting for each
package to download for each system. It also allows you to download each package once instead
of downloading the same package multiple times for various systems.
2. The
Search Errata tab allows you to generate custom reports detailing the health and security of
your Network Group.
3. System administrators can quickly determine if their systems require updating and what type of
updates are available by viewing the System Overview page.
4. The Red Hat Network Web Application will only display errata relevant to your network.
5.1 Logging into Red Hat Network Web Application
If you have not registered a system yet or do not have a redhat.com account, create a new account by
clicking the
Sign Up button on the left side of the page.
If you registeredyour system with Red Hat Network through the Red Hat Network RegistrationClient,
use the same username/password combination to log into the Red Hat Network Web Application.
After creating a new account or using your existing redhat.com account, enter your username and
password on www.redhat.com/network/ and click the
Log In button.
5.2 Viewing Your Notifications
After logging into the Red Hat Network WebApplication, click on the Main button on the top navigation bar. Depending on your preferences, this page displays all security alerts, bug fixes, and package
enhancements (referred to as errata) for all registered systems in your network group (see Figure 5–1,
Main Page).
Click the
View All button to view the details for the errata related to your network group. You can also
view the errata page for your network by clicking the
Your Network button on the top navigation bar
and then the
Errata tab.
Page 48

48 Chapter 5:Red Hat Network Web Application
Figure 5–1 Main Page
5.3 Adding a System Profile
Chapter 2, Registration discusses registering your system using the Red Hat Network Registration
Client. The Red Hat Network Registration Client steps you through the process and allows you to
customize your system profile. You can also register a system using the Red Hat Network Web Application and the Red Hat Network Daemon. The Red Hat Network WebApplication only allows you
to define a system name, choose your system architecture, and choose whether or not to include hardware and software information in your system profile. After saving a Digital Certificate from the Red
Hat Network Web Application, the Red Hat Network Daemon initiates a connection from the client
to Red Hat Network to send the desired information to the servers. After this information is sent, the
system appears in your network group. You can then login to the Red Hat Network Web Application
to customize your perferences such as receiving email notifications and excluding packages from your
system profile.
Page 49

Section 5.3:Adding a System Profile 49
Note
For more control over the registration process and your system profile, use
the Red Hat Network Registration Client to register a new system (see Chapter 2, Registration).
To register a system through the Red Hat Network Web Application use the following steps:
1. Login to the Red Hat Network Web Application, click the
Main button on the top navigation bar
and click the
Add System link.
2. Enter a system name, choose your architecture (currently only i386, i586, and i686 are available),
and choose whether to include hardware and software information in your system profile.
3. Click the
Download Digital Certificate button. This will take you to a second Add System Profile
page.
4. Next, you will receive a prompt to download the file named systemid. Save this file in your
home directory or somewhere you can find it easily. If you are not prompted to save the file, click
the Save button under step 2 and save it as the filename systemid.
5. Open a shell prompt (for example an xterm or gnome-terminal) and log in as root. Copy the sys-
temid file that you downloaded in the previous step to /etc/sysconfig/rhn/systemid.
6. No hardware or software information is gathered through the Red Hat Network Web Application.
The Red Hat Network Daemon on the client side must initiate a connect to Red Hat Network and
send this information. For this to happen, make sure the Red Hat Network Daemon is running
by typing the command /sbin/service rhnsd status. If you see the message rhnsd
(pid 958) is running... (the pid will vary depending on your system), skip to the next
step. If you see the message rhnsd is stopped, you will need to start the daemon. As root,
open a shell prompt and type the command /sbin/service rhnsd start.
7. Click the
Finish button.
8. The newly registered system will not appear in your network group immediately. The next time
the daemon connects to Red Hat Network, it will send the information necessary to generate a
system profile, and the system will appear in your account. This can take up to thirty minutes (or
longer if you increased the time interval for your Red Hat Network Daemon).
Page 50

50 Chapter 5:Red Hat Network Web Application
5.4 Viewing Your Network Group
After logging into the Red Hat Network Web Application, click the Your Network button on the top
navigation bar.
Figure 5–2 Systems Overview Tab
As shown in Figure 5–2, Systems Overview Tab, clicking on Your Network shows the status of your
entire network so you can quickly determine the health and security of each system. This page shows
you an overview of the systems in your network and errata for every system in your network.
In the
Systems Overview tab, each row represents a system in your network group. Currently, you
can register up to five systems. To add a new system, click the
Add New System link on the first
available row (see Section 5.3, Adding a System Profile).
Visual alerts provide a quick summary of the types of errata that are available for each system. De-
pending on your notification preference settings, individual systems may be flagged with
bug fix,
security alert,or package enhancement icons. Click on the individual system name to view
the detailed profile information and specific notifications (see Section 5.5, Viewing Individual System
P ages). The New Packages column displays the total number or errata reports availablefor the system.
Page 51

Section 5.5:Viewing Individual System Pages 51
To change the sorting order of the Systems Overview list, click on the column header names. A bold
column header indicates the current sort order.
Click on the
Errata tab to view the errata for every system in Your Network Group. If an errata has
been issued on any package in your system profile, you can view it here. The status column alerts you
to errata reports you have not yet viewed. Clicking on the errata report gives you a quick summary
of the issues, tells you which of your systems are affected, and presents any new packages. You can
download the relevant packages immediately or add them to your Download List. TO change the
sorting order of errata, click on the column header names. A bold column header indicates the current
sort order.
5.5 Viewing Individual System Pages
After logging into the Red Hat Network Web Application, click the Your Network button on the top
navigation bar and then click on the desired system name.
The
System Detail tab provides basic system information. Your Architecture, OS, and Version infor-
mation determine which notifications you receive.
The
Errata tab shows you errata for a currently selected system. If an errata has been issued on any
package in your system profile, you can learn about it here. The
Status column alerts you to errata
reports you have not yet viewed. Click on the Errata Report link to display a quick summary of the
issues, to view which of your systems are affected, and to view any new packages. You can download
the relevant packages immediately or add them to your
Download List. Change the sorting order of
errata by clicking on the column header names. A bold column header indicates the current sort order.
The
Packages tab allows you to browse all packages included in your system profile. Only Official
Red Hat Packages are included in your package profile, so this list may differ from your actual system
package list. Officialpackages are any packages included on the Red Hat Linux, Powertools, or Linux
Application CDs distributed by Red Hat. Navigate specific packages by category, or view all packages
at once. Click the package name link to view details on package information, dependencies, change
log, file lists and other systems in your network group that have that package. Change the sorting order
of packages by clicking on the column header names. A bold column header indicates the current sort
order. If you have created a profile but either exclude packages from the profile or have not started the
Red Hat Network daemon on your local system yet, the Package view will be empty.
The
Hardware tab lists the hardware devices and settings for the currently selected system. This in-
formation assists the Red Hat Technical Support Team in providing faster and better service. If you
exclude hardware from your system profile, the
Hardware tab will be empty.
Page 52

52 Chapter 5:Red Hat Network Web Application
5.6 Downloading Updated Packages
If you have not configured your Retrieval/Installation Settings to proactively download and install
the most recent Red Hat packages (see Section 3.3, Retrieval/Installation Settings), you can download
them through the Red Hat Network Web Application.
From the
Errata tab, click the errata summary link under the Errata Report. This takes you to a list of
packages required to fix the errata. Select the packages you wish to download. After choosing which
packages to download, you have three options:
• Click the
Download Now button to download the RPM files immediately.
• Click the
Download Later button to add it to your Download List. All RPM packages added to
your Download List remain there until they are downloaded or deleted from the list. When you
are ready to download the packages in your download list, click the
Your Download List link
in the upper right hand corner of your screen. (This link will not appear if you do not have any
packages in your download list.) From the Download List page, you can download the packages
stored in your list or deleted packages from your list.
• Click the
Queue Delivery button to let Red Hat Network deliver your packages through the Red
Hat Update Agent and Red Hat Network Daemon. The next time the daemon connects to Red Hat
Network the queued packages will be downloaded automatically (and installed if preferences set
through up2date-config has
Do not install packages unchecked).
5.7 Customizing Preferences
After logging into the Red Hat Network Web Application, click the
Preferences button on the top
navigation bar.
5.7.1 Main Page
From the Main Page tab of the Preferences page you can customize the information displayed when
you login the Red Hat Network Web Application.
Ifyou select
Latest Errata underthe Status Windowssection, thethree most recent errata, the number
of affected systems, and the number of new packages they include will be listed on the Main Page as
soon as you log into the Red Hat Network Web Application. Click the
Update button at the bottom
of the page to apply the changes.
There is also a customizable list of Favorite Guides and Favorite Forums on the Main Page. Under
Favorite Guides and Favorite Forums on the Preferences page, choose which guides amd forums
you want to appear in this list. Click the
Update button at the bottom of the page to apply the changes.
Page 53

Section 5.7:Customizing Preferences 53
5.7.2 General Preferences
Click on the General tab to customize the date/time format to use, your session timeout value, and
your session security preference.
Under the
Date/Time section, you have the option to select the following date formats:
• mm/dd/yy
• mmmm d, yyyy
• dd-mm-yy
You can also choose whether to display the time in the 24 hour or 12 hour (AM/PM) format.
Click the
Update button to apply the changes.
For security purposes, you can set a timeout value under the
Session Timeout section. If a timeout
valueis set, you will be automatically logged out of your RHN session at the end of the timeout period.
If your session times out, you will be prompted to enter your password again before continuing.
If you choose
Never Timeout, your session will stay open until you log out by clicking the Log Out
button in the upper right hand corner of your screen.
Click the
Update button to apply the changes.
Under the
Session Security, choose whether you want use the regular login page (non-encrypted) or
the SSL login page.
Click the
Update button to apply the changes.
5.7.3 Notifications
Under the Visual Alerts section, select the visual alerts you want to see for all the systems in your
network group. You can set alerts to appear whenever a new security alert, bug fix, or package enhancement errata has been issued for one of your systems (see Figure 5–3, Visual Alerts).
Page 54

54 Chapter 5:Red Hat Network Web Application
Figure 5–3 Visual Alerts
If you wish to receive email notifications about system updates
1. Click the
Yes checkbox under the Email notifications section.
2. Type your email address in the box labeled
Send Email to:.
3. Choose the errata for which you wish to receive notifications. You can choose the registered systems for which you wish to receive email notifications. You can also choose to receive email
concerning all errata for Red Hat Linux 7 (or other Red Hat Linux releases).
4. You can further customize your email notifications by excluding software package categories. By
default, all packages are selected.
5. Click the
Update button to apply the changes and start receiving email notifications.
5.8 Searching Errata
After logging into the Red Hat Network Web Application, click the Search Errata button on the top
navigation bar.
The
Search Errata tab allows you to search all available errata including errata not related to the
system in your network. You can also narrow down your search to search only the systems in your
network group, selected Red Hat Linux releases, selected types of errata, or from a specified time
period (see Figure 5–4, Search Errata).
Page 55

Section 5.10:Navigation 55
Figure 5–4 Search Errata
5.9 Viewing Online Help
In addition to this User Reference Guide, the following help is available by clicking the Help Desk
button on the top navigation bar:
• Security and Privacy statement
•FAQs
• Contact Customer Service
• Support Forums
5.10 Navigation
Below is an outline of the Red Hat Network Web Application. Use it to help you navigate through
the application and become familar with all its features.
Page 56

56 Chapter 5:Red Hat Network Web Application
The System Overview page summarizes all relevant notifications for your Network Group. You can
view more details by selecting an individual system in the group. Within the individual system page,
you can view a list of new packages available for the system, errata reports relevant to the system, the
hardware profile for the system, and the history of events performed on the system while using the
Red Hat Network Web Application.
• RHN Main Page
• Your Network
– Add System Profile
– System Overview
⇒ System Detail
⇒ Update System Profile
⇒ New Packages
⇒ Errata
⇒ History
– New Packages
⇒ Package Info
⇒ Errata Report
– Errata
⇒ Errata Report
– History
• Resources
– ErrataReport
– Package Report
Page 57

Section 5.10:Navigation 57
⇒ Package Info
⇒ Dependencies
⇒ Change Log
⇒ File List
⇒ Systems
– Download List
• Search
• Preferences
• Help Desk
– Your RHN Account
– Privacy and Security
–FAQs
– Page Help
Page 58

58 Chapter 5:Red Hat Network Web Application
Page 59

Red Hat Network Daemon 59
6 Red Hat Network Daemon
The Red Hat Network Daemon periodically connects to the Red Hat Network to check for updates
and notifications. The default interval time is two hours (120 minutes). This can be configured in
the /etc/sysconfig/rhn/rhnsd file by specifying the time interval in minutes. If you modify
the configuration file, you must (as root) restart the daemon with the command service rhnsd
restart or /etc/rc.d/init.d/rhnsd restart.
Note
The minimum time interval allowed is one hour (60 minutes). If you set the
interval below one hour, it will default to two hours (120 minutes).
You can view the status of the rhnsd by typing the command service rhnsd status or
/etc/rc.d/init.d/rhnsd status at a shell prompt.
To disable the daemon, (as root) run the ntsysv utility and uncheck rhnsd. You can also (as root)
execute the command chkconfig rhnsd off. Using these two methods will only disable the
service the next time the system is started. To stop the service immediately, use the command ser-
vice rhnsd stop or /etc/rc.d/init.d/rhnsd stop.
The same rules you configured for the Red Hat Update Agent apply to the Red Hat Network Daemon
(see Section 3.1, Configuring the Red Hat Update Agent).
Page 60

60 Chapter 6:Red Hat Network Daemon
Page 61

Using Red Hat Network with Red Hat Linux 6.2 61
7 Using Red Hat Network with Red Hat
Linux 6.2
Red Hat Linux 6.2 shipped with a program named Red Hat Update Agent (up2date). However,
this version of Red Hat Update Agent can not be used to connect to Red Hat Network to receive
package updates. You need a new version of the Red Hat Update Agent and the Red Hat Network
Registration Client to use Red Hat Network on a Red Hat Linux 6.2 system.
To download and install these programs, use the following steps:
1. In a shell prompt, login as root and execute the command mkdir rhnpackages to create a
new directory in which to download the packages.
2. In the same shell prompt, execute the command cd rhnpackages to change to the new directory.
3. Download the following packages in the new rhnpackages directory: (You might need hold
down the
[Shift] key and then left-click on the filename to save it or right-click the file and choose
Save.)
• http://www.redhat.com/network/service/RHL_62/RPMS/up2date-2.1.7-0.6.x.i386.rpm
• http://www.redhat.com/network/service/RHL_62/RPMS/python-xmlrpc-1.2.1-
0.6.x.i386.rpm
• http://www.redhat.com/network/service/RHL_62/RPMS/python-1.5.2-27.6.x.i386.rpm
• http://www.redhat.com/network/service/RHL_62/RPMS/rhn_regis-
ter-1.0.2-0.6.x.noarch.rpm
• http://www.redhat.com/network/service/RHL_62/RPMS/openssl-0.9.5a-2.6.x.i386.rpm
• http://www.redhat.com/network/service/RHL_62/RPMS/rpm-4.0.1-0.6x.i386.rpm
• http://www.redhat.com/network/service/RHL_62/RPMS/rpm-python-4.0.1-0.6x.i386.rpm
If you want to use the graphical versions of the Red Hat Network Registration Client and the
Red Hat Update Agent, you will also need the following packages. If you are not running the X
Window System, do not download these packages:
• http://www.redhat.com/network/service/RHL_62/RPMS/up2date-gnome-2.1.7-
0.6.x.i386.rpm
• http://www.redhat.com/network/service/RHL_62/RPMS/rhn_register-gnome-1.0.2-
0.6.x.noarch.rpm
Page 62

62 Chapter 7:Using Red Hat Network with Red Hat Linux 6.2
• http://www.redhat.com/network/service/RHL_62/RPMS/usermode-1.37-1.6.src.rpm
4. Go back to the shell prompt in the rhnpackages directory (you must still be root) and execute
the command rpm -Uvh * to upgrade the exist Red Hat Update Agent to the version that works
with Red Hat Network. The Red Hat Network Registration Client will also be installed with this
command along with other packages your system needs to run the Red Hat Network programs.
5. After they are installed, run the Red Hat Network Registration Client (rhn_register)to
registeryoursystem. DO NOTentera Product ID during the registrationprocess. It is not required.
See Chapter 2, Registration for details.
Page 63

Frequently Asked Questions 63
8 Frequently Asked Questions
The following contains answers to common questions about Red Hat Network.
Q: What does RHN stand for?
A: RHN stands for Red Hat Network.
Q: What is the Red Hat Network?
A: Red Hat Network is an automated solution for managing a network of Red Hat Linux systems. It
uses a System Profile to alert the system adminstrator of a Red Hat Linux system of security alerts,
bug fixes, and package enhancements available for the system. All packages updates not relevant to
the system are filtered out.
Q: How is the Red Hat Network different from redhat.com?
A: The Red Hat Network is a platform for managing systems and distributing software. It is a personal
servicethat brings information to to you. You don’t havetogo find it. It providessophisticatedfiltering
to bring you information that is relevantto your systems and preferences. It is a systems management
service that works for you. You don’t have to manually troll for packages and install them on dozens
of systems. redhat.com is a destination for Linux and open source solutions of which the Red Hat
Network is a key piece.
Q: How do I sign up for Red Hat Network?
A: If you are a member of redhat.com, you are automatically a member of RHN. Using the Red Hat
Network Registration Client or the Red Hat Network Web Application with your redhat.com user
name and password, you can create a System Profile for the system you wish to register with RHN.
If you are not a member of redhat.com, you can use the Red Hat Network Registration Client to
create a unique user name and password and register a Red Hat Linux system. It can be installed from
the Red Hat Linux 7 distribution.
Q: Do I need to use Red Hat Linux to benefit from Red Hat Network?
A: Yes. Currently, you must be running Red Hat Linux 7 to utilize Red Hat Network. Support for Red
Hat Linux 6.2 is coming soon.
Q: What is so important about RHN anyway? Will it improve my life?
A: The main benefit of using RHN is its ability to send you automatic notification of all security
alerts, bug fixes, and package enhancements available for your Red Hat Linux system. Automatic
notifications:
• Reduce the time and effort required by system administrators to stay on top of the Red Hat errata
list
Page 64

64 Chapter 8:Frequently Asked Questions
• Minimize security vulnerabilities in your network by providing security alerts as soon as Red Hat
releases them
• Filter out package updates not relevant to your network
• Provide a reliable method of managing multiple systems with similar configurations
Q: Does it do something I can’t already do today?
A:Yes, the Red Hat Networkbrings together, in one place, notificationsand packages for your Red Hat
Linux systems. You can stop filtering through email lists and web pages for security alerts, bug fixes,
and enhancements for the software running on your systems, the Red Hat Network does it for you.
The Red Hat Network also brings package updates to you so you can spend your time downloading
not searching.
Q: What’s the difference between Red Hat Linux and the Red Hat Network?
A: Red Hat Linux is a custom Linux operating system. Red Hat Network is a service that allows users
of Red Hat Linux to keep their system healthy and secure by installing all the latest security patches,
bug fixes, and package enhancements.
Q: Do I need to be a Linux expert to use the Red Hat Network?
A: No. All components of Red Hat Network are designed to be user-friendly with minimal Linux
expertise. If you need help, detailed information is provided in the Red Hat Network User Reference
Guide.
Q: I am a system administrator; is this just another time sink?
A: If used properly, Red Hat Network will actually save time for system administrators. They will no
longer have to search the Red Hat errata list for relevant package updates or try and find a good place
to download the latest RPM software packages. It is designed to reduce the time and effort used by
system administrators to maintain Red Hat Linux systems.
Q: I’ve been running Linux for years; is this for me?
A: Yes. RHN is for everyone. Home users can configure RHN to install the latest package enhance-
ments such as the lastest version of Netscape or their favorite email client. System administrators can
use it to ensure all the latest security patches and bug fixes are installed.
Q: This is cool. How do I convince my boss who thinks this is a waste of time?
A: Refer him to the Red Hat Network Technical Overview. It explains the technology, privacy and
security benefits, and features in great detail including the future of RHN.
Q: This sounds great. Who’s using it?
A: Everyone from the home user who wants to have the latest version of Abiword and Netscape to the
system administrator of large corporations concerned primarily with security and bug fixes.
Page 65

Frequently Asked Questions 65
Q: How does the Red Hat Network work?
A: Each registered system has a System Profile that contains hardware and software information about
the system. RHN uses this information to alert you of security alerts, bug fixes, and package enhancements from the Red Hat errata List via email notifications. The Red Hat Network Web Application
can also be used to view and download the lastest software packages.
Q: What is a System Profile and how do I create one?
A: A System Profile contains hardware and software information about a registered Red Hat Linux
system. This profile is used to send you notification about updates relevant to your system. It eliminates all Red Hat errata Reports not applicable to your system. A System Profile can be created with
the Red Hat Network Registration Client or with the Red Hat Network Web Application.
Q: What are errata and who writes them?
A: The Red Hat errata list contains all security alerts, bug fixes, and package enhancements for Red
Hat Linux. Security issues and bug fixes are submitted by Red Hat engineers as well as the Linux
community around the world through Bugzilla. The tickets are then evaluated and resolved by the
Red Hat engineering. After being tested by the Red Hat quality assurance team, the package updates
are released as part of the Red Hat errata list. Notifications received from RHN include all Red Hat
errata.
Q: How secure is Red Hat Network?
A: Red Hat Network uses the following levels of security:
• The Red Hat Network Web Application is only accessible with the correct user name and password
• A Digital Certificate is stored on the client system (/etc/sysconfig/rhn/systemid) after registration
and is used to authenticate the system during each transaction between the client and Red Hat
Network
• All notifications and information messages are signed by Red Hat with an electronic signature
using GNU Privacy Guard (GPG). RPM can be used to verify the authenticity of the package
before it is installed
• All transactions are encrypted using a Secure Sockets Layer (SSL) connection
• All packages are tested and verified by the Red Hat Quality Assurance Teambefore they are added
to the official Red Hat errata list and Red Hat Network
Q: Why do you need to know so much personal information about my system?
A: Red Hat makes everyeffort to allow our customers to define the relationship they will havewith us.
We require your personal information so that we can contact you easily if issues arise affecting the
security of your information or systems. In addition, sharing this information with us makes it harder
Page 66

66 Chapter 8:Frequently Asked Questions
for someone to steal your identity. If you should forget your Red Hat login, you can call Customer
Service to access your account. This information will help protect your account from unauthorized
access.
Your system hardware and package profiles are required to give you the most relevant information
about what affects your systems. Withoutthese profiles, you’ll haveto sift through tons of information
to find what you need.
Q: Who will be using my information?
A: Your personal information is yours, not ours. Tell us how you would like us to use it, and we will
listen.
We never sell our customers’ personal information or provide it to others without making it clear that
we intend to do so at the time the information is collected. If you receive any sort of communication
from Red Hat that you find intrusive, whether via phone, email, or regular mail, let us know so we can
make sure it doesn’t happen again.
Q: What happens if I do not give my personal information?
A: You can still use the RHN service. RHN only needs to know which version of Red Hat Linux you
are running, the architecture of your system, and which packages you want to receive notifications
about. RHN does not require any personal information. Even your email address is optional.
However, you can not receive email notifications if you do not supply an email address. And you’ll
need to provide additional information to access the Red Hat Network web site. We ask for this information to help us better support you and protect your security.
Q: What will the Network be in 6 months? What are your plans for the Network?
A: The Red Hat Network available now is just the beginning of our plans for it. Beginning in Decem-
ber 2000, some of the new RHN features include unlimited system registration and system groups,
multiple administration levels, quality of service monitoring for Internet applications, security evaluation and analysis, product discounts, and kickstart replication technology.
In Early 2001, expect to see application configuration and management, system health monitoring,
high performance file and messaging proxies, certified ISV applications, and network-enabled system
replication.
Q: I forgot my username and password. How do I access my account?
A: Go to the Red Hat Network web site. In the Member Login section is a "Forgot Your Password"
link. Click the link and complete the form. Your password will be sent to your email address.
If you didn’t provide and email address during registration or have forgotten your username and email
address, call our customer service desk. Be prepared to provide lots of details on your self and your
systems. We don’t want your identity falling into the wrong hands.
Page 67

Frequently Asked Questions 67
Q: Can I use RHN to upgrade from Red Hat Linux 6.2 to Red Hat Linux 7?
A: RHN currently does not support any verion below Red Hat Linux 7. Support for Red Hat 6.2 will
be available soon and can be used to update all packages on your system.
Q: Can I get new software from RHN?
A: Yes. You can download enhancements and updates to the official Red Hat packages installed on
your systems directly from the Red Hat Network. If you’re looking for additional packages, check out
our Download site at http://www.redhat.com/download.
Q: Will Red Hat Network update packages that were not installed with the Red Hat distribution?
A: No. Red Hat Network currently supports all RPM packages installed from the Red Hat Linux CD,
Red Hat PowerTools CD, and the Red Hat Linux Applications CD.
Q: What version of Red Hat Linux do I have to run to be able to receive updates from Red Hat Net-
work?
A: Currently, you must be running Red Hat Linux 7.0 or above.
Q: What is an RPM package?
A: Developed by Red Hat, RPM stands for RPM Package Manager. RPM is a powerful package
manager that can be used to build, install, query, verify, update, and uninstall individual software
packages. Please refer to http://rpm.redhat.com/ for more details.
Q: How do I change my email address for notifications?
A: Logon to Red Hat Network from http://www.redhat.com/network, go to Preferences => Notifica-
tion Delivery. Under the
Email Notifications section, edit the Send Email to: field.
Q: What is the difference between the Red Hat Update Agent and the Red Hat Network Web
Application?
A: Both allowyou to retrievethe latest software packages for a registeredsystem from RHN. However,
the Red Hat Network Web Application allows you to manage more than one registered system at
the same time through a Web interface and is more customizable.
Q: Why is something called rhnsd running on my system and what does it do?
A: rhnsd is the Red Hat Network Daemon. Every thirty minutes, it sends a request to Red Hat Net-
work asking for any notifications or updates and works in coordination with the Red Hat Network
Web Application to schedule automated tasks. It only sends information to Red Hat Network requested by you. If you add a new system using the Red Hat Network Web Application, the next
time the Red Hat Network Daemon probes Red Hat Network it receives a request to return the information you requested as part of your System Profile such as what package versions are installed on
your system.
Page 68

68 Chapter 8:Frequently Asked Questions
Q: I downloaded just the RPM files and installed them myself. Can I update my System Profile to
reflect the changes?
A: Yes. Type the command up2date -p at a shell prompt. It will update your RPM package list
stored on the Red Hat Network servers. Use this command whenever you install, upgrade, or remove
packages without using the Red Hat Update Agent.
Page 69

Index 69
Index
D
Digital Certificate............................ 12
F
FAQs.................... ......................63
Frequently Asked Questions ................ 63
G
GNU Privacy Guard ......................... 12
I
Introduction
document .................................. 11
N
Notifications
Automatic.................................. 12
Viewing with RHN Web Application ... 47
Q
Quality Assurance ........................... 12
R
Red Hat Linux 6.2
Using Red Hat Network with ....... .....61
Red Hat Network Daemon.............. 12, 59
Disable..................................... 59
Status....................................... 59
Red Hat Network Registration Client ...... 11
Red Hat Network Web Application .... 11, 47
Adding a System Profile.................. 48
Download Digital Certificate ....... .....49
Download List............................. 52
Download Update Packages.............. 52
Errata....................................... 51
Logging In................................. 47
Main page.................................. 47
Navigation................................. 55
Online Help................................ 55
Preferences ................................ 52
General.................................. 53
Main Page............................... 52
Notifications............................ 53
Search Errata ........ ......................54
System Detail.............................. 51
Systems Overview ........................ 50
Visual Alerts............................... 50
Your Network Group ..................... 50
Your Notifications......................... 47
Red Hat Update Agent .................. 11,35
Command Line Arguments .............. 42
Configuration.............................. 29
Registration............. ......................15
Email notification......................... 17
Hardware System Profile................. 21
Password................................... 17
RPM Package List ........................ 23
Software System Profile.................. 23
System Profile....... .................. 17,21
User name ................................. 17
rhn_register.............................. .....15
rhnsd ...................................... 49, 59
S
Secure Sockets Layer........................ 13
Security....................................... 12
System Profile................................ 21
Updating on Server ....................... 45
U
up2date
( See Red Hat Update Agent )
 Loading...