

Page 1
Red Hat Network 4.0
Client Configuration Guide
Page 2

Red Hat Network 4.0: Client Configuration Guide
Copyright © 2001 - 2005 Red Hat, Inc.
Red Hat, Inc.
1801 Varsity Drive
Raleigh NC 27606-2072 USA
Phone: +1 919 754 3700
Phone: 888 733 4281
Fax: +1 919 754 3701
PO Box 13588
Research Triangle Park NC 27709 USA
RHNclient-config(EN)-4.0-RHI (2005-04-20T13:40)
Copyright © 2005 by Red Hat, Inc. This material may be distributedonly subject to the terms and conditions set
forth in the Open PublicationLicense, V1.0 or later (the latest version is presently available at
http://www.opencontent.org/openpub/).
Distribution of substantively modified versions of this document is prohibitedwithout the explicit permission of
the copyright holder.
Distribution of the work or derivative of the work in any standard (paper)book form for commercial purposes is
prohibited unless prior permission is obtained from the copyrightholder.
Red Hat and the Red Hat "Shadow Man" logo are registered trademarks of Red Hat, Inc. in the United States
and other countries.
All other trademarks referencedherein are the property of their respective owners.
The GPG fingerprint of the security@redhat.comkey is:
CA 20 86 86 2B D6 9D FC 65 F6 EC C4 21 91 80 CD DB 42 A6 0E
Page 3

Table of Contents
1. Introduction.................................................................................................................... 1
2. Client Applications.........................................................................................................3
2.1. Deploying the Latest Red Hat Network Client RPMs ......................................3
2.2. Configuring the Client Applications .................................................................4
2.2.1. Registering with Activation Keys ......................................................5
2.2.2. Using the --configure Option .......................................................5
2.2.3. Updating the Configuration Files Manually ......................................8
2.2.4. Implementing Server Failover............................................................9
2.3. Configuring the Red Hat Network Alert Notification Tool with Satellite...10
3. SSL Infrastructure.......................................................................................................13
3.1. A Brief Introduction To SSL...........................................................................13
3.2. The RHN SSL Maintenance Tool.................................................................14
3.2.1. SSL Generation Explained...............................................................15
3.2.2. RHN SSL Maintenance Tool Options ...........................................16
3.2.3. Generating the Certificate Authority SSL Key Pair .........................21
3.2.4. Generating Web Server SSL Key Sets.............................................22
3.3. Deploying the CA SSL Public Certificate to Clients ......................................23
3.4. Configuring Client Systems ............................................................................23
4. Importing Custom GPG Keys.....................................................................................25
5. Using RHN Bootstrap ..................................................................................................27
5.1. Preparation ......................................................................................................27
5.2. Generation.......................................................................................................28
5.3. Script Use........................................................................................................29
5.4. RHN Bootstrap Options ................................................................................30
6. Manually Scripting the Configuration .......................................................................33
7. Implementing Kickstart ..............................................................................................35
A. Sample Bootstrap Script.............................................................................................37
Index..................................................................................................................................43
Page 4

Page 5

Chapter 1.
Introduction
This best practices guide is intended to help customers of RHN Satellite Server and RHN
Proxy Server configure their client systems more easily.
By default, all Red Hat Network client applications are configured to communicate with
central Red Hat Network Servers. When connecting clients to RHN Satellite Server or
RHN Proxy Server instead, many of these settings must be altered. Altering client settings
for a system or two may be relatively simple. A large enterprise environment, containing
hundreds or thousands of systems, will likely benefit from the mass reconfiguration steps
described here.
Due to the complexity of this undertaking, customers may utilize a pre-populated script
that automates many of the tasks necessary to access their Satellite or Proxy server; refer
to Chapter 5 Using RHN Bootstrap for details. Red Hat believes that understanding the
implications fo these changes is helpful and therefore describes the manual steps for reconfiguration in the opening chapters. Use your best judgement in determining the ideal
solution for your organization.
Although many of the commands provided within this guide can be applied as they appear, it is impossible to predict all potential network configurations adopted by customers.
Therefore, Red Hat encourages you to use these commands as references that must take
into account your organization’s individual settings.
Note
Unix client configuration information may be found in the RHN 4.0 Reference Guide in the
Unix Support chapter.
Page 6

2 Chapter 1. Introduction
Page 7

Chapter 2.
Client Applications
In order to utilize most enterprise-class features of Red Hat Network, such as registering
with a RHN Satellite, configuration of the latest client applications is required. Obtaining
these applications before the client has registered with Red Hat Network can be difficult.
This paradox is especially problematic for customers migrating large numbers of older
systems to Red Hat Network. This chapter identifies techniques to resolve this dilemma.
Important
Red Hat strongly recommends that clients connected to a RHN Proxy Server or RHN
Satellite Server be running the latest update of Red Hat Enterprise Linux to ensure proper
connectivity.
2.1. Deploying the Latest Red Hat Network Client RPMs
Red Hat Update Agent (up2date) and Red Hat Network Registration Client
(rhn_register) are prerequisites for using much of Red Hat Network’s enterprise
functionality. It is crucial to install them on client systems before attempting to use RHN
Proxy Server or RHN Satellite Server in your environment.
There are several sensible approaches to accomplish this update of the RHN client software. One of which involves storing the RPMs in a location that is accessible by all client
systems and deploying the packages with the simplest command possible. In nearly all
cases, a manual deployment of up2date and rhn_register (if RHEL 2.1) do not need
to be performed. Those client tools should have no issues connecting to your RHN Satellite
or Proxy environment. These discussion below assumes that the "out of box" up2date and
rhn_register are not the latest and do not work for your environment.
Remember, only systems running Red Hat Enterprise Linux 2.1 must use the Red Hat
Network Registration Client to register with RHN. Systems running Red Hat Enterprise
Linux 3 and later can use the registration functionality built into the Red Hat Update
Agent.
This document presumes that the customer has installed at least one RHN Satellite Server
and/or RHN Proxy Server on their network. The example below demonstrates a simple approach of deploying up2date and rhn_register for the first time by an administrator assuming the machines don’t already have a working RHN. The administrator has populated
the /var/www/html/pub/ directory with a copy of the up2date and rhn_register
(for RHEL 2.1 systems) RPMs that his client systems need, and then has simply deployed
Page 8

4 Chapter 2. Client Applications
those RPMs onto his client systems with a simple rpm -Uvh command. Run from a client,
this command installs the RPMs to that client, assuming the domain name, paths, and RPM
versions are correct:
rpm -Uvh \
http://your_proxy_or_sat.your_domain.com/p ub/rhn_register-2.9.12-1.2.1AS.i386.rpm \
http://your_proxy_or_sat.your_domain.com/p ub/rhn_register-gnome-2.9.12-1.2.1AS.i386.rpm \
http://your_proxy_or_sat.your_domain.com/p ub/up2date-2.9.14-1.2.1AS.i386.rpm \
http://your_proxy_or_sat.your_domain.com/p ub/up2date-gnome-2.9.14-1.2.1AS.i386.rpm
Note the inclusion of the associated gnome RPMs. Keep in mind, the architecture (in this
case, i386) may need to be altered depending on the systems to be served.
2.2. Configuring the Client Applications
Not every customer must connect securely to a RHN Satellite Server or RHN Proxy Server
within their organization. Not every customer needs to build and deploy a GPG key for custom packages. (Both of these topics are explained in detail later.) Every customer who uses
RHN Satellite Server or RHN Proxy Server must reconfigure the Red Hat Update Agent
(up2date) and possibly the Red Hat Network Registration Client (rhn_register) to
redirect it from Red Hat Network to their RHN Satellite Server or RHN Proxy Server.
Important
Although this is not configurable, note that the port used by the Red Hat Update Agent
is 443 for SSL (HTTPS) and 80 for non-SSL (HTTP). By default, up2date uses SSL
only. For this reason, users should ensure that their firewalls allow connections over
port 443. To bypass SSL, change the protocol for serverURL from https to http in
/etc/sysconfig/rhn/up2date. Similarly, to use RHN’s Monitoring feature and probes
requiring the Red Hat Network Monitoring Daemon, note that client systems must allow
connections on port 4545 (or port 22, if using sshd instead).
By default, the Red Hat Network Registration Client and the Red Hat Update Agent
refer to the main Red Hat Network Servers. Users must reconfigure client systems to refer
to their RHN Satellite Server or RHN Proxy Server.
Note that the latest versions of the Red Hat Update Agent can be configured to accommodate several RHN Servers, thereby providing failover protection in case the primary server
is inaccessible. Refer to Section 2.2.4 Implementing Server Failover for instructions on enabling this feature.
The next sections describe three methods of configuring the client systems to access
your RHN Satellite Server or RHN Proxy Server: using an Activation Key, up2date
Page 9

Chapter 2. Client Applications 5
--configure, and manually updating the configuration files.( To see how virtually all
reconfiguration can be scripted, see Chapter 6 Manually Scripting the Configuration.)
2.2.1. Registering with Activation Keys
Red Hat recommends using activation keys for registering and configuring client systems
that access RHN Proxy Server or RHN Satellite Server. Activation keys can be used to
register, entitle, and subscribe systems in a batch. Refer to the Activation Keys section of
the Red Hat Update Agent chapter within the RHN Management Reference Guide for
instructions on use.
Registering with an activation key has four basic steps:
1. Generate an Activation Key as described in the Activation Keys section of the Red
Hat Update Agent chapter within the RHN Management Reference Guide
2. Import custom GPG keys.
3. Download and install the SSL Certificate RPM from the /pub/ directory of the RHN
Proxy Server or RHN Satellite Server. The command for this step could look something like this:
rpm -Uvh\
http://your-satellite.com/pub/rhn-org-tru sted-ssl-cert-1.0-1.noarch.rpm
4. Register the system with your RHN Proxy Server or RHN Satellite Server. The command for this step could look something like:
rhnreg_ks --activationkey mykey --serverUrl https://your-satellite.com/XMLRPC
Alternatively, most of the above steps can be combined in a shell script that includes the
following lines:
wget -0 - http://your-satellite-DQDN/pub/boots trap.sh | bash \
&& rhnreg_ks --activation-key my_key --serverUrl \
https://your-satellite-FQDN/XMLRPC
The bootstrap script, generated at installation and available for both RHN Satellite Server
and RHN Proxy Server, is such a script. The script and the RHN Bootstrap that generates
it are discussed in detail in Chapter 5 Using RHN Bootstrap.
Warning
Systems running Red Hat Enterprise Linux 2.1 and versions of Red Hat Linux prior to 8.0
may experience problems using Activation Keys to migrate SSL certificate settings from
rhn_register to up2date. Therefore, the SSL certificate information on those systems
must be set manually. All other settings, such as the server URL, transfer properly.
Page 10

6 Chapter 2. Client Applications
2.2.2. Using the --configure Option
Both the Red Hat Network Registration Client and the Red Hat Update Agent that ship
with Red Hat Enterprise Linux provide interfaces for configuring various settings. For full
listings of these settings, refer to the chapters dedicated to the applications in the RHN
Management Reference Guide.
Each application offers a graphical user interface (GUI) for configuration that enables you
to change the settings required by RHN Proxy Server or RHN Satellite Server. The GUI
requires that the client system run the X Window System. The command to launch the GUI
configuration interface will look like:
application_filename --configure
To reconfigure the Red Hat Update Agent, issue the following command as root:
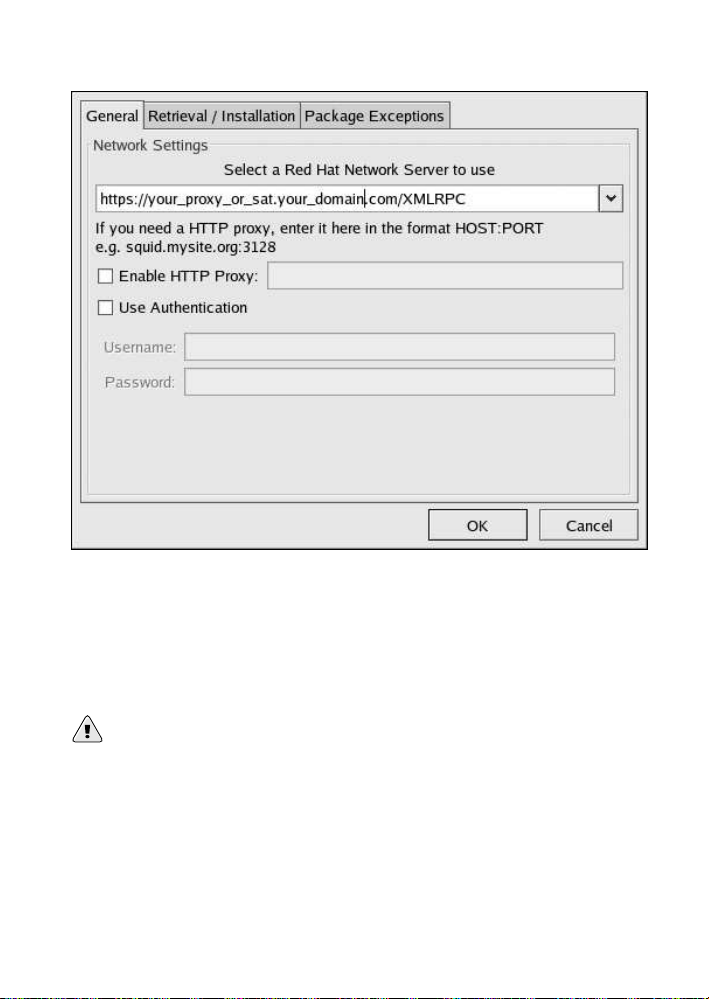
up2date --configure
You are presented with a dialog box offering various settings that may be
reconfigured. In the General tab, under Select a Red Hat Network
Server to use replace the default value with the fully qualified domain
name (FQDN) of the RHN Satellite Server or RHN Proxy Server, such as
https://your_proxy_or_sat.your_domain.com/XMLRPC. Retain the
/XMLRPC at the end. When finished, click OK.
Page 11
Chapter 2. Client Applications 7
Figure 2-1. Red Hat Update Agent GUI Configuration
Make sure you enter the domain name of your RHN Satellite Server or RHN
Proxy Server correctly. Entering an incorrect domain or leaving the field blank
may prevent up2date --configure from launching. This may be resolved,
however, by editing the value in the up2date configuration file. Refer to
Section 2.2.3 Updating the Configuration Files Manually for precise instructions.
Warning
Systems running Red Hat Enterprise Linux 3 or newer have registration functionality built
into the Red Hat Update Agent and therefore do not install the Red Hat Network Regis-
tration Client. Systems running Red Hat Enterprise Linux 2.1 (and versions of Red Hat
Linux prior to 8.0) must reconfigure and use the Red Hat Network Registration Client,
as well as the Red Hat Update Agent.
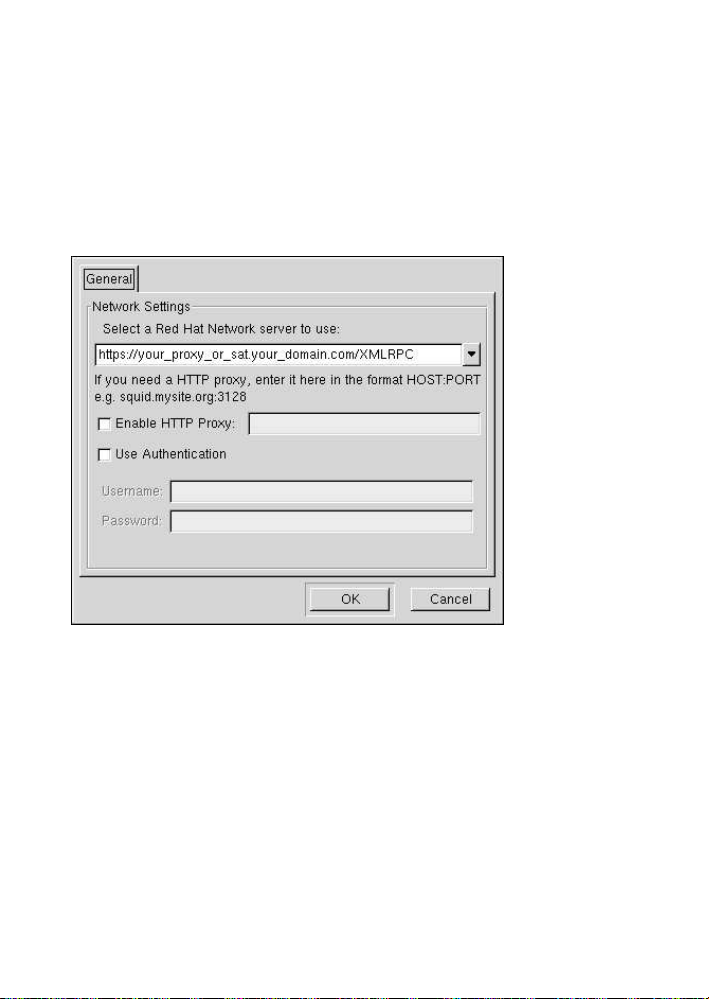
To reconfigure the Red Hat Network Registration Client, perform an almost identical set
of steps. As root, run the following command:
Page 12
8 Chapter 2. Client Applications
/usr/bin/rhn_register --configure
You are presented with a dialog box offering basic settings that may be reconfigured.
Under Select a Red Hat Network server to use replace the default value with
the fully qualified domain name (FQDN) of the RHN Satellite Server or RHN Proxy
Server, such as https://your_proxy_or_sat.your_domain.com/XMLRPC.
Retain the /XMLRPC at the end. Click OK when finished.
Figure 2-2. Red Hat Network Registration Client GUI Configuration
If your version of rhn_register does not display the server field, and you cannot
upgrade to a later version, you may enter the domain name of your RHN Satellite Server
or RHN Proxy Server directly into the rhn_register configuration file. Refer to
Section 2.2.3 Updating the Configuration Files Manually for precise instructions.
2.2.3. Updating the Configuration Files Manually
As an alternative to the GUI interface described in the previous section, users may also
reconfigure the Red Hat Network Registration Client and the Red Hat Update Agent
by editing the applications’ configuration files.
To configure Red Hat Update Agent on the client systems connecting to the RHN Proxy
Server or RHN Satellite Server, edit the values of the serverURL and noSSLServerURL
Page 13

Chapter 2. Client Applications 9
settings in the /etc/sysconfig/rhn/up2date configuration file (as root). Replace the
default Red Hat Network URL with the fully qualified domain name (FQDN) for the RHN
Proxy Server or RHN Satellite Server. For example:
serverURL[comment]=Remote server URL
serverURL=https://your_primary.your_domain .com/XMLRPC
noSSLServerURL[comment]=Remote server URL without SSL
noSSLServerhttp://your_primary.your_domain .com/XMLRPC
Warning
The httpProxy setting in /etc/sysconfig/rhn/up2 date does not refer to the RHN
Proxy Server. It is used to configure an optional HTTP proxy for the client. With an RHN
Proxy Server in place, the httpProxy setting must be blank (not set to any value).
Skip this section if you are running Red Hat Enterprise Linux 3 or later on the client system.
Note
You must use version 2.7.11 or higher of rhn_register on client systems so they can
recognize new cer tificates. This RPM should be available in /var/spool/up2date on
your proxy system after running up2date for the Proxy.
To configure the Red Hat Network Registration Client on the client systems connecting
to the RHN Proxy Server or RHN Satellite Server, edit the values of the serverURL and
noSSLServerURL options in the /etc/sysconfig/rhn/rhn_register configuration
file (as root). Replace the default Red Hat Network URL with the fully qualified domain
name (FQDN) for the RHN Proxy Server or RHN Satellite Server. For example:
serverURL[comment]=Remote server URL
serverURL=https://your_proxy_or_sat.your_d omain.com/XMLRPC
noSSLServerURL[comment]=Remote server URL without SSL
noSSLServerURL=http://your_proxy_or_sat.yo ur_domain.com/XMLRPC
Page 14

10 Chapter 2. Client Applications
2.2.4. Implementing Server Failover
Beginning with up2date-4.2.38, the Red Hat Update Agent can be configured to seek
updates from a series of RHN Servers. This can be especially helpful in sustaining constant
updates if your primary RHN Proxy Server or RHN Satellite Server may be taken offline.
To use this feature, first ensure that you are running the required version of up2date. Then
manually add the secondary servers to the serverURL and noSSLServerURL settings in
the /etc/sysconfig/rhn/up2date configuration file (as root). Add the fully qualified
domain names (FQDN) for the Proxy or Satellite immediately after the primary server,
separated by a semicolon (;). For example:
serverURL[comment]=Remote server URL
serverURL=https://your_primary.your_domain .com/XMLRPC; \
https://your_secondary.your_domain.com/XML RPC;
noSSLServerURL[comment]=Remote server URL without SSL
noSSLServerhttp://your_primary.your_domain .com/XMLRPC; \
https://your_secondary.your_domain.com/XML RPC;
Connection to the servers is attempted in the order provided here. You can include as many
servers as you wish. You may list the central RHN Servers, as well. This makes sense,
however, only if the client systems can reach the Internet.
2.3. Configuring the Red Hat Network Alert Notification
Tool with Satellite
The Red Hat Network Alert Notification Tool, the round icon in the panel of your Red
Hat desktop, can be configured on systems running Red Hat Enterprise Linux 3 or later
to recognize updates available from custom channels on your RHN Satellite Server. You
must ensure the RHN Satellite Server is configured to support this feature. (RHN Proxy
Server supports the applet without modification of client or server.) The steps to configure
the Red Hat Network Alert Notification Tool are as follows:
1. Ensure that your RHN Satellite Server is version 3.4 or later and that you have the
rhns-applet package installed on the Satellite. The package can be found in the
RHN Satellite software channel for versions 3.4 and newer.
2. Retrieve the rhn-applet-actions package with up2date or through the Red Hat
Network Tools software channel. Install the package on all Red Hat Enterprise Linux
3 and newer client systems to be notified of custom updates with the Red Hat Net-
work Alert Notification Tool. The client systems must be entitled to the Management or Provisioning service levels.
Page 15

Chapter 2. Client Applications 11
3. Within the Satellite’s version of the RHN website, go to the System Details page for
each system and click the link within the RHN Applet area to redirect the Red Hat
Network Alert Notification Tool to the Satellite.
The next time the applet is started, it will apply its new configuration and connect to the
RHN Satellite Server for updates.
Page 16

12 Chapter 2. Client Applications
Page 17

Chapter 3.
SSL Infrastructure
For Red Hat Network customers, security concerns are of the utmost importance. One of
the strengths of Red Hat Network is its ability to process every single request over Secure
Sockets Layer, or SSL. To maintain this level of security, customers installing Red Hat
Network within their infrastructures must generate custom SSL keys and certificates.
Manual creation and deployment of SSL keys and certificates can be quite involved. Both
the RHN Proxy Server and the RHN Satellite Server allow you to build your own SSL keys
and certificates based on your own private Certificate Authority (CA) during installation.
In addition, a separate command line utility, the RHN SSL Maintenance Tool, exists for
this purpose. Regardless, these keys and certificates must then be deployed to all systems
within your managed infrastructure. In many cases, deployment of these SSL keys and
certificates is automated for you. This chapter describes efficient methods for conducting
all of these tasks.
Please note that this chapter does not explain SSL in depth. The RHN SSL Maintenance
Tool was designed to hide much of the complexity involved in setting up and maintaining this public-key infrastructure (PKI). For more information, please consult some of the
many good references available at your nearest bookstore.
3.1. A Brief Introduction To SSL
SSL, or Secure Sockets Layer, is a protocol that enables client-server applications to pass
information securely. SSL uses a system of public and private key pairs to encrypt communication passed between clients and servers. Public certificates can be left accessible,
while private keys must be secured. It’s the mathematical relationship (a digital signature)
between a private key and its paired public certificate that makes this system work. Through
this relationship, a connection of trust is established.
Note
Throughout this document we discuss SSL private keys and public certificates. Technically both can be referred to as keys (public and private keys). But it is convention, when
discussing SSL, to refer to the public half of an SSL key pair (or key set) as the SSL public
certificate.
An organization’s SSL infrastructure is generally made up of these SSL keys and certificates:
Page 18

14 Chapter 3. SSL Infrastructure
• Certificate Authority (CA) SSL private key and public certificate — only one set per
organization generally generated. The public certificate is digitally signed by its private
key. The public certificate is distributed to every system.
• Web server SSL private key and public certificate — one set per application server. The
public certificate is digitally signed by both its private key and the CA SSL private key.
We often refer to a Web server’s key set; this is because there is an intermediary SSL
certificate request that is generated. The details of what this is used for are not important
to this discussion. All three are deployed to an RHN Server.
Here’s a scenario: If you have one RHN Satellite Server and five RHN Proxy Servers, you
will generate one CA SSL key pair and six Web server SSL key sets. The CA SSL public
certificate is distributed to all systems and used by all clients to establish a connection to
their respective upstream servers. Each server has its own SSL key set that is specifically
tied to that server’s hostname and generated using its own SSL private key and the CA SSL
private key in combination. This establishes a digitally verifiable association between the
Web server’s SSL public certificate and the CA SSL key pair and server’s private key. The
Web server’s key set cannot be shared with other web servers.
Important
The most critical portion of this system is the CA SSL key pair. From that private key and
public certificate an administrator can regenerate any Web server’s SSL key set. This CA
SSL key pair must be secured. It is highly recommended that once the entire RHN infrastructure of servers is set up and running, you archive the SSL build directory generated
by this tool and/or the installers onto separate media, write down the CA password, and
secure the media and password in a safe place.
3.2. The RHN SSL Maintenance Tool
Red Hat Network provides a command line tool to ease management of your secure
infrastructure: the RHN SSL Maintenance Tool, commonly known by its command
rhn-ssl-tool. This tool is available as part of the rhns-certs-tools package.
This package can be found within the software channels for the the latest RHN Proxy
Server and RHN Satellite Server (as well as the RHN Satellite Server ISO). RHN SSL
Maintenance Tool enables you to generate your own Certificate Authority SSL key pair,
as well as Web server SSL key sets (sometimes called key pairs).
This tool is only a build tool. It generates all of the SSL keys and certificates that are
required. It also packages the files in RPM format for quick distribution and installation on
all client machines. It does not deploy them, however. That is left to the administrator, or
in many cases, automated by the RHN Satellite Server.
Page 19

Chapter 3. SSL Infrastructure 15
Note
The rhns-certs-tools, which contains rhn-ssl-tool, can be installed and run on any
current Red Hat Enterprise Linux system with minimal requirements. This is offered as
a convenience for administrators who wish to manage their SSL infrastructure from their
workstation or another system other than their RHN Server(s).
Here are the cases in which the tool is required:
• When updating your CA public certificate - this is rare.
• When installing an RHN Proxy Server version 3.6 or later that connects to the central
RHN Servers as its top-level service - the hosted service, for security reasons, cannot be
a repository for your CA SSL key and certificate, which is private to your organization.
• When reconfiguring your RHN infrastructure to use SSL where it previously did not.
• When adding RHN Proxy Servers of versions prior to 3.6 into your RHN infrastructure.
• When adding multiple RHN Satellite Servers to your RHN infrastructure - consult with
a Red Hat representative for instructions regarding this.
Here are the cases in which the tool is not required:
• During installation of an RHN Satellite Server - all SSL settings are configured during
the installation process. The SSL keys and certificate are built and deployed automatically.
• During installation of an RHN Proxy Server version 3.6 or later if connected to an RHN
Satellite Server version 3.6 or later as its top-level service - the RHN Satellite Server
contains all of the SSL information needed to configure, build and deploy the RHN
Proxy Server’s SSL keys and certificates.
The installation procedures of both the RHN Satellite Server and the RHN Proxy Server
ensure the CA SSL public certificate is deployed to the /pub directory of each server.
This public certificate is used by the client systems to connect to the RHN Server. Refer to
Section 3.3 Deploying the CA SSL Public Certificate to Clients for more information.
In short, if your organization’s RHN infrastructure deploys the latest version of RHN Satellite Server as its top-level service, you will likely have little need to use the tool. Otherwise,
become familiar with its usage.
3.2.1. SSL Generation Explained
The primary benefits of using the RHN SSL Maintenance Tool are security, flexibility,
and portability. Security is achieved through the creation of distinct Web server SSL keys
and certificates for each RHN server, all signed by a single Certificate Authority SSL key
pair created by your organization. Flexibility is supplied by the tool’s ability to work on
Page 20

16 Chapter 3. SSL Infrastructure
any machine that has the rhns-certs-tools package installed. Portability exists in a
build structure that can be stored anywhere for safe keeping and then installed wherever
the need arises.
Again, if your infrastructure’s top-level RHN Server is the most current RHN Satellite
Server, the most you may have to do is restore your ssl-build tree from an archive to
the /root directory and utilize the configuration tools provided within the RHN Satellite
Server’s website.
To make the best use of the RHN SSL Maintenance Tool, complete the following high-
level tasks in roughly this order. Refer to the remaining sections for the required details:
1. Install the rhns-certs-tools package on a system within your organization, perhaps but not necessarily the RHN Satellite Server or RHN Proxy Server.
2. Create a single Certificate Authority SSL key pair for your organization and install
the resulting RPM or public certificate on all client systems.
3. Create a Web server SSL key set for each of the Proxies and Satellites to be deployed
and install the resulting RPMs on the RHN Servers, restarting the httpd service
afterwards:
/sbin/service httpd restart
4. Archive the SSL build tree - consisting of the primary build directory and all subdirectories and files - to removable media, such as a floppy disk. (Disk space requirements are insignificant.)
5. Verify and then store that archive in a safe location, such as the one described for
backups in the Additional Requirements sections of either the Proxy or Satellite installation guide.
6. Record and secure the CA password for future use.
7. Delete the build tree from the build system for security purposes, but only once the
entire RHN infrastructure is in place and configured.
8. When additional Web server SSL key sets are needed, restore the build tree on a
system running the RHN SSL Maintenance Tool and repeat steps 3 through 7.
3.2.2. RHN SSL Maintenance Tool Options
The RHN SSL Maintenance Tool offers a plethora of command line options for
generating your Certificate Authority SSL key pair and managing your server SSL
certificates and keys. The tool offers essentially three command line option help listings:
rhn-ssl-tool --help (general), rhn-ssl-tool --gen-ca --help (Certificate
Authority), and rhn-ssl-tool --gen-server --help (Web server). The manual
page for rhn-ssl-tool is also quite detailed and available to assist: man rhn-ssl-tool.
The two tables below break down the options by their related task, either CA or Web server
SSL key set generation.
Page 21

Chapter 3. SSL Infrastructure 17
This set of options must be preceded by the --gen-ca argument:
Option Description
--gen-ca Generate a Certificate Authority (CA)
key pair and public RPM. This must
be issued with any of the remaining
options in this table.
-h, --help Display the help screen with a list of
base options specific to generating
and managing a Certificate Authority.
-f, --force Forcibly create a new CA private key
and/or public certificate.
-p=, --password=PASSWORD The CA password. You will be
prompted for this if it’s missing.
Record it in a safe manner.
-d=, --dir=BUILD_DIRECTORY Required for most commands - The
directory where certificates and
RPMs are built. The default is
./ssl-build.
--ca-key=FILENAME The CA private key filename. The
default is
RHN-ORG-PRIVATE-SSL-KEY.
--ca-cert=FILENAME The CA public certificate filename.
The default is
RHN-ORG-TRUSTED-SSL-CERT.
--cert-expiration=CA_CERT_EXPIRE The expiration date of the public CA
certificate. The default is the number
of days until one day prior to epoch
rollover (or 01-18-2038).
--set-country=COUNTRY_CODE The two-letter country code. The
default is US.
--set-state=STATE_OR_PROVINCE The state or province of the CA. The
default is ”.
--set-city=CITY_OR_LOCALITY The city or locality. The default is ”.
--set-org=ORGANIZATION The company or organization, such as
Red Hat. The default is Example
Corp. Inc.
Page 22

18 Chapter 3. SSL Infrastructure
Option Description
--set-org-unit=SET_ORG_UNIT The organizational unit, such as
RHN. The default is ”.
--set-common-name=HOSTNAME Not typically set for the CA. - The
common name.
--set-email=EMAIL Not typically set for the CA. - The
email address.
--rpm-packager=PACKAGER Packager of the generated RPM, such
as "RHN Admin
(rhn-admin@example.com)."
--rpm-vendor=VENDOR Vendor of the generated RPM, such
as "IS/IT Example Corp."
-v, --verbose Display verbose messaging.
Accumulative - added "v"s result in
increasing detail.
--ca-cert-rpm=CA_CERT_RPM Rarely changed - RPM name that
houses the CA certificate (the base
filename, not
filename-version-release.noarch.rpm).
--key-only Rarely used - Generate only a CA
private key. Review --gen-ca
--key-only --help for more
information.
--cert-only Rarely used - Generate only a CA
public certificate. Review --gen-ca
--cert-only --help for more
information.
--rpm-only Rarely used - Generate only an RPM
for deployment. Review --gen-ca
--rpm-only --help for more
information.
--no-rpm Rarely used - Conduct all CA-related
steps except RPM generation.
Table 3-1. SSL Certificate Authority (CA) Options (rhn-ssl-tool --gen-ca
--help)
The following set of options must be preceded by the --gen-server argument:
Page 23

Chapter 3. SSL Infrastructure 19
Option Description
--gen-server Generate the Web server’s SSL key
set, RPM and tar archive. This must
be issued with any of the remaining
options in this table.
-h, --help Display the help screen with a list of
base options specific to generating
and managing a server key-pair.
-p=, --password=PASSWORD The CA password. You will be
prompted for this if it’s missing.
Record it in a safe manner.
-d=, --dir=BUILD_DIRECTORY Required for most commands - The
directory where certificates and
RPMs are built. The default is
./ssl-build.
--server-key=FILENAME The Web server’s SSL private key
filename. The default is
server.key.
--server-cert-req=FILENAME The Web server’s SSL certificate
request filename. The default is
server.csr.
--server-cert=FILENAME The Web server’s SSL certificate
filename. The default is
server.crt.
--startdate=YYMMDDHHMMSSZ The start date for server certificate
validity in the example format: year,
month, date, hour, minute, second
(two characters per value). Z stands
for Zulu and is required. The default
is one week before generation.
--cert-expiration=SERVER_CERT_EXPIRE The expiration date of the server
certificate. The default is the number
of days until one day prior to epoch
rollover (or 01-18-2038).
--set-country=COUNTRY_CODE The two-letter country code. The
default is US.
--set-state=STATE_OR_PROVINCE The state or province. The default is
North Carolina.
Page 24

20 Chapter 3. SSL Infrastructure
Option Description
--set-city=CITY_OR_LOCALITY The city or locality. The default is
Raleigh.
--set-org=ORGANIZATION The company or organization, such as
Red Hat. The default is Example
Corp. Inc.
--set-org-unit=SET_ORG_UNIT The organizational unit, such as
RHN. The default is unit.
--set-hostname=HOSTNAME The hostname of the RHN Server to
receive the key. The default is
dynamically set to the build
machine’s hostname.
--set-email=EMAIL The email address of the certificate
contact. The default is
admin@example.corp.
--rpm-packager=PACKAGER Packager of the generated RPM, such
as "RHN Admin
(rhn-admin@example.com)."
--rpm-vendor=VENDOR Vendor of the generated RPM, such
as "IS/IT Example Corp."
-v, --verbose Display verbose messaging.
Accumulative - added "v"s result in
increasing detail.
--key-only Rarely used - Generate only a server
private key. Review --gen-server
--key-only --help for more
information.
--cert-req-only Rarely used - Generate only a server
certificate request. Review
--gen-server --cert-req-only
--help for more information.
--cert-only Rarely used - Generate only a server
certificate. Review --gen-server
--cert-only --help for more
information.
--rpm-only Rarely used - Generate only an RPM
for deployment. Review
--gen-server --rpm-only
--help for more information.
Page 25

Chapter 3. SSL Infrastructure 21
Option Description
--no-rpm Rarely used - Conduct all
server-related steps except RPM
generation.
--server-rpm=SERVER_RPM Rarely changed - RPM name that
houses the Web server’s SSL key set
(the base filename, not
filename-version-release.noarch.rpm).
--server-tar=SERVER_TAR Rarely changed - Name of .tar archive
of the Web server’s SSL key set and
CA public certificate that is used
solely by the hosted RHN Proxy
Server installation routines (the base
filename, not
filename-version-release.tar).
Table 3-2. SSL Web Server Options (rhn-ssl-tool --gen-server --help)
3.2.3. Generating the Certificate Authority SSL Key Pair
Before creating the SSL key set required by the Web server, you must generate a Certificate
Authority (CA) SSL key pair. A CA SSL public certificate is distributed to client systems
of the Satellite or Proxy. The RHN SSL Maintenance Tool allows you to generate a CA
SSL key pair if needed and re-use it for all subsequent RHN server deployments.
The build process automatically creates the key pair and public RPM for distribution to
clients. All CA components end up in the build directory specified at the command line,
typically /root/ssl-build (or /etc/sysconfig/rhn/ssl for older Satellites and
Proxies). To generate a CA SSL key pair, issue a command like this:
rhn-ssl-tool --gen-ca --password=MY_CA_PASSWOR D --dir="/root/ssl-build" \
--set-state="North Carolina" --set-city="Raleigh" --set-org="Example Inc." \
--set-org-unit="SSL CA Unit"
Replace the example values with those appropriate for your organization. This will result
in the following relevant files in the specified build directory:
• RHN-ORG-PRIVATE-SSL-KEY — the CA SSL private key
• RHN-ORG-TRUSTED-SSL-CERT — the CA SSL public certificate
Page 26

22 Chapter 3. SSL Infrastructure
• rhn-org-trusted-ssl-cert-VER-REL.noarch.rpm — the RPM prepared for dis-
tribution to client systems. It contains the CA SSL public certificate (above) and installs
it in this location: /usr/share/rhn/RHN-ORG-TRUSTED-SSL-CERT
• rhn-ca-openssl.cnf — the SSL CA configuration file
• latest.txt — always lists the latest versions of the relevant files.
Once finished, you’re ready to distribute the RPM to client systems. Refer to
Section 3.3 Deploying the CA SSL Public Certificate to Clients.
3.2.4. Generating Web Server SSL Key Sets
Although you must have a CA SSL key pair already generated, you will likely generate
web server SSL key sets more frequently, especially if more than one Proxy or Satellite is
deployed. Note that the value for --set-hostname is different for each server. In other
words, a distinct set of SSL keys and certificates must be generated and installed for every
distinct RHN server hostname.
The server certificate build process works much like CA SSL key pair generation with
one exception: All server components end up in subdirectories of the build directory that
reflect the build system’s machine name, such as /root/ssl-build/MACHINE_NAME. To
generate server certificates, issue a command like this:
rhn-ssl-tool --gen-server --password=MY_CA_PASSWORD --dir="/root/ssl-build" \
--set-state="North Carolina" --set-city="Raleigh" --set-org="Example Inc." \
--set-org-unit="IS/IT" --email="admin@example.com" \
--set-hostname="rhnbox1.example.com
Replace the example values with those appropriate for your organization. This will result
in the following relevant files in a machine-specific subdirectory of the build directory:
• server.key — the Web server’s SSL private server key
• server.csr — the Web server’s SSL certificate request
• server.crt — the web server’s SSL public certificate
• rhn-org-httpd-ssl-key-pair-MACHINE_NAME-VER-REL.noarch.rpm —
the RPM prepared for distribution to RHN Servers. Its associated src.rpm file is
also generated. This RPM contains the above three files. It will install them in these
locations:
• /etc/httpd/conf/ssl.key/server.key
• /etc/httpd/conf/ssl.csr/server.csr
• /etc/httpd/conf/ssl.crt/server.crt
Page 27

Chapter 3. SSL Infrastructure 23
• rhn-server-openssl.cnf — the Web server’s SSL configuration file
• latest.txt — always lists the latest versions of the relevant files.
Once finished, you’re ready to distribute and install the RPM on its respective RHN Server.
Note that the httpd service must be restarted after installation:
/sbin/service httpd restart
3.3. Deploying the CA SSL Public Certificate to Clients
Both the RHN Proxy Server and RHN Satellite Server installation processes make client
deployment relatively easy by generating a CA SSL public certificate and RPM. These
installation processes make those publicly available by placing a copy of one or both into
the /var/www/html/pub/ directory of the RHN Server.
This public directory can be inspected easily by simply browsing to it via any web browser:
http://proxy-or-sat.example.com/pub/.
The CA SSL public certificate in that directory can be downloaded to a client system using
wget or curl. For example:
curl -O http://proxy-or-sat.example.com/pub/RH N-ORG-TRUSTED-SSL-CERT
wget http://proxy-or-sat.example.com/pub/RHN-ORG-TRUSTED-SSL-CERT
Alternatively, if the CA SSL public certificate RPM resides in the /pub directory, it can be
installed on a client system directly:
rpm -Uvh \
http://proxy-or-sat.example.com/pub/rhn-or g-trusted-ssl-cert- VER-REL.noarch.rpm
Confirm the actual name of the certificate or RPM before running these commands.
3.4. Configuring Client Systems
Once the RPM or raw certificate has been deployed to a client system, the administrator of
that system must then alter the configuration files of the Red Hat Update Agent and the
Red Hat Network Registration Client (if necessary) to use the new CA SSL public certificate file and connect to the appropriate RHN Proxy Server or RHN Satellite Server. The
generally accepted location for that CA SSL public certificate is in the /usr/share/rhn
directory.
The RHN Proxy Server and RHN Satellite Server both have RHN Bootstrap installed
by default, which can greatly reduce these repetitive steps and simplify the process of
Page 28

24 Chapter 3. SSL Infrastructure
registering and configuring client systems. Please refer Chapter 5 Using RHN Bootstrap
for details.
Page 29

Chapter 4.
Importing Custom GPG Keys
For customers who plan to build and distribute their own RPMs securely, it is strongly
recommended that all custom RPMs are signed using GNU Privacy Guard (GPG). Generating GPG keys and building GPG-signed packages are covered in the Red Hat Network
Channel Management Guide.
Once the packages are signed, the public key must be deployed on all systems importing
these RPMs. This task has two steps: first, create a central location for the public key so
that clients may retrieve it, and second, adding the key to the local GPG keyring for each
system.
The first step is common and may be handled using the website
approach recommended for deploying RHN client applications. (Refer to
Section 2.1 Deploying the Latest Red Hat Network Client RPMs.) To do this, create a
public directory on the Web server and place the GPG public signature in it:
cp /some/path/YOUR-RPM-GPG-KEY /var/www/html/pub/
The key can then be downloaded by client systems using Wget:
wget -O- -q http://your_proxy_or_sat.your_doma in.com/pub/YOUR-RPM-GPG-KEY
The -O- option sends results to standard output while the -q option sets Wget to run in
quiet mode. Remember to replace the YOUR-RPM-GPG-KEY variable with the filename
of your key.
Once the key is available on the client file system, import it into the local GPG keyring.
Different operating systems require different methods.
For Red Hat Enterprise Linux 3 or newer, use the following command:
rpm --import /path/to/YOUR-RPM-GPG-KEY
For Red Hat Enterprise Linux 2.1, use the following command:
gpg $(up2date --gpg-flags) --import /path/to/YOUR-RPM-GPG-KEY
Once the GPG key has been successfully added to the client, the system should be able to
validate custom RPMs signed with the corresponding key.
Page 30

26 Chapter 4. Importing Custom GPG Keys
Page 31

Chapter 5.
Using RHN Bootstrap
Red Hat Network provides a tool that automates much of the manual reconfiguration described in previous chapters: RHN Bootstrap. This tool plays an integral role in the RHN
Satellite Server Installation Program, enabling generation of the bootstrap script during
installation.
RHN Proxy Server customers and customers with updated Satellite settings require a bootstrap tool that can be used independently. RHN Bootstrap, invoked with the command
/usr/bin/rhn-bootstrap, serves that purpose and comes installed by default on both
RHN Satellite Server and RHN Proxy Server.
If used correctly, the script this tool generates can be run from any client system to conduct
the following tasks:
• Redirect client applications to the RHN Proxy or Satellite
• Import custom GPG keys
• Install SSL certificates
• Register the system to RHN and particular system groups and channels with the help of
activation keys
• Perform miscellaneous post-configuration activities, including updating packages, per-
forming reboots, and altering RHN configuration
Customers should note, however, the inherent risks of using a script to conduct configuration. Security tools such as SSL certificates are installed by the script itself; therefore they
do not yet exist on the systems and cannot be used to process transactions. This allows
for the possibility of someone impersonating the Satellite and transmitting bad data. This
is mitigated by the fact that virtually all Satellites and client systems operate behind customer firewalls and are restricted from outside traffic. Registration is conducted via SSL
and is therefore protected.
The bootstrap script bootstrap.sh is automatically placed in the
/var/www/html/pub/bootstrap/ directory of the RHN Server. From there
it can be downloaded and run on all client systems. Note that some preparation and
post-generation editing is required, as identified in the following sections. Refer to
Section 5.4 RHN Bootstrap Options for the tool’s complete list of options. Finally, refer
to the Appendix A Sample Bootstrap Script for an example script.
Page 32

28 Chapter 5. Using RHN Bootstrap
5.1. Preparation
Since RHN Bootstrap (rhn-bootstrap) depends on other components of the Red Hat
Network infrastructure to properly configure client systems, those components must be
prepared before script generation. The following list identifies suggested initial measures:
• Generate activation keys to be called by the script(s). Activation keys can be used to
register Red Hat Enterprise Linux systems, entitle them to an RHN service level, and
subscribe them to specific channels and system groups, all in one action. Note that you
must have Management entitlements available to use an activation key, while inclusion
of multiple activation keys at once requires Provisioning entitlements. Generate activation keys through the Activation Keys page within the Systems category of the RHN
website (either the central RHN Servers for Proxy or the fully qualified domain name
of the Satellite). Refer to the Red Hat Update Agent and RHN Website chapters of the
RHN Reference Guide for instructions on creation and use.
• Red Hat recommends your RPMs be signed by a custom GNU Privacy Guard
(GPG) key. Make the key available so you may refer to it from the script.
Generate the key as described in the RHN Channel Management Guide and
place the key in the /var/www/html/pub/ directory of the RHN Server, per
Chapter 4 Importing Custom GPG Keys.
• If you wish to use the script to deploy your CA SSL public certificate, have the
certificate or the package (RPM) containing that certificate available on that RHN
Server and include it during script generation with the --ssl-cert option. Refer to
Chapter 3 SSL Infrastructure for details.
• Have the values ready to develop one or many bootstrap scripts, depending on the variety
of systems to be reconfigured. Since RHN Bootstrap provides a full set of reconfiguration options, you may use it to generate different bootstrap scripts to accommodate each
type of system. For instance, bootstrap-web-servers.sh might be used to reconfigure your Web servers, while bootstrap-app-servers.sh can handle the application
servers. Consult Section 5.4 RHN Bootstrap Options for the complete list.
5.2. Generation
Now that all of the necessary components are in place, you may use RHN Bootstrap to
generate the required scripts. Log into your RHN Satellite Server or RHN Proxy Server as
root and issue the rhn-bootstrap command followed by the desired options and
values. If no options are included, a bootstrap.sh file is created in the bootstrap/
subdirectory that contains the essential values derived from the server, including
hostname, the SSL certificate, it if exists, SSL and GPG settings, and a call for the
client-config-overrides.txt file.
At a minimum, Red Hat strongly recommends your scripts also accommodate activation
keys, GPG keys, and advanced configuration options in the following manner:
Page 33

Chapter 5. Using RHN Bootstrap 29
• Use the --activation-keys option to include keys, taking into account the entitle-
ment requirements identified in Section 5.1 Preparation.
• Use the --gpg-key option to identify the key path and filename during script genera-
tion. Otherwise, use the --no-gpg option to turn off this verification on client systems.
Red Hat recommends retaining this security measure.
• Include the --allow-config-actions flag to enable remote configuration manage-
ment on all client systems touched by the script. This feature is useful in reconfiguring
multiple systems simultaneously.
• Include the --allow-remote-commands flag to enable remote script use on all client
systems. Like configuration management, this feature aids in reconfiguring multiple systems.
When you’re done, your command will look something like this:
rhn-bootstrap --activation-keys KEY1,KEY2 \
--gpg-key /var/www/html/pub/MY_CORPORATE_PUBLIC_KEY \
--allow-config-actions \
--allow-remote-commands
Obviously, include the actual key names. Refer to Section 5.4 RHN Bootstrap Options for
the complete list of options.
5.3. Script Use
Finally, when you’re finished preparing the script for use, you are ready to run
it. Log into the RHN Satellite Server or RHN Proxy Server, navigate to the
/var/www/html/pub/bootstrap/ directory and run the following command, altering
the hostname and name of the script as needed to suit the system type:
cat bootstrap-EDITED-NAME.sh | ssh root@CLIENT_MACHINE1 /bin/bash
A less secure alternative is to use either wget or curl to retrieve and run the script from every client system. Log into each client machine and issue the following command, altering
script and hostname accordingly:
wget -qO - \
https://your-satellite.example.com/pub/boo tstrap/bootstrap-EDITED-NAME.sh \
| /bin/bash
Or with, curl:
curl -Sks \
https://your-satellite.example.com/pub/boo tstrap/bootstrap-EDITED-NAME.sh \
| /bin/bash
Page 34

30 Chapter 5. Using RHN Bootstrap
When this script has been run on each client system, all should be configured to use the
RHN Server.
5.4. RHN Bootstrap Options
The RHN Bootstrap offers many command line options for creating client boostrap
scripts. Although descriptions of these options can be found within the following table,
ensure that they are available in the version of the tool installed on your RHN Server by
issuing the command rhn-bootstrap --help or reviewing its man page.
Option Description
-h, --help Display the help screen with a list
--activation-keys=ACTIVATION_KEYS activation key(s) as defined in the
--overrides=OVERRIDES Configuration overrides filename.
--script=SCRIPT The bootstrap script filename.
--hostname=HOSTNAME The fully qualified domain name
--ssl-cert=SSL_CERT The path to your organization’s
--gpg-key=GPG_KEY The path to your organization’s
of options specific to generating
the bootstrap script.
RHN website with multiple
entries separated by a comma and
no space
The default is
client-config-overrides.txt.
The default is bootstrap.sh.
(FQDN) of the server to which
client systems will connect.
public SSL certificate, either a
package or a raw certificate. It
will be copied to the
--pub-tree option. A value of
"" will force a search of
--pub-tree.
public GPG key, if used. It will be
copied to the location specified by
the --pub-tree option.
Page 35

Chapter 5. Using RHN Bootstrap 31
Option Description
--http-proxy=HTTP_PROXY The HTTP proxy setting for the
client systems in the form
hostname:port. A value of
"" disables this setting.
--http-proxy-username=HTTP_PROXY_USERNAMEIf using an authenticating HTTP
proxy, specify a username. A
value of "" disables this setting.
--http-proxy-password=HTTP_PROXY_PASSWORDIf using an authenticating HTTP
proxy, specify a password.
--allow-config-actions Boolean; including this option
sets the system to allow all
configuration actions via RHN.
This requires installing certain
rhncfg-* packages, possibly
through an activation key.
--allow-remote-commands Boolean; including this option
sets the system to allow arbitrary
remote commands via RHN. This
requires installing certain
rhncfg-* packages, possibly
through an activation key.
--no-ssl Not recommended - Boolean;
including this option turns SSL
off on the client system.
--no-gpg Not recommended - Boolean;
including this option turns GPG
checking off on the client system.
--no-up2date Not recommended - Boolean;
including this option ensures
up2date will not run once the
system has been bootstrapped.
--pub-tree=PUB_TREE Change not recommended - The
public directory tree where the
CA SSL certificate and package
will land; the bootstrap directory
and scripts. The default is
/var/www/html/pub/.
Page 36

32 Chapter 5. Using RHN Bootstrap
Option Description
--force Not recommended - Boolean;
including this option forces
bootstrap script generation
despite warnings.
-v, --verbose Display verbose messaging.
Accumulative; -vvv causes
extremely verbose messaging.
Table 5-1. RHN Bootstrap Options
Page 37

Chapter 6.
Manually Scripting the Configuration
Note that this chapter provides an alternative to using RHN Bootstrap to generate the
bootstrap script. With these instructions, you should be able to create your own bootstrap
script from scratch.
All of the initial techniques have shared a common theme: the deployment of necessary
files in a centralized location to be retrieved and installed using simple, scriptable commands run on each client. In this chapter, we explore putting all of these pieces together to
create a single script that can be invoked by any system in your organization.
When we combine all of the commands from the previous chapters in the most sensible
order, we get the following script. Keep in mind, rhn_register does not exist on Red
Hat Enterprise Linux 3 or later:
# First, install the latest client RPMs to the system.
rpm -Uvh \
http://proxy-or-sat.example.com.com/pub/ rhn_register-2.8.27-1.7.3.i386.rpm \
http://proxy-or-sat.example.com.com/pub/ rhn_register-gnome-2.8.27-1.7.3.i386.rpm \
http://proxy-or-sat.example.com.com/pub/ up2date-3.0.7-1.i386.rpm \
http://proxy-or-sat.example.com.com/pub/ up2date-gnome-3.0.7-1.i386.rpm
# Second, reconfigure the clients to talk to the correct server.
perl -p -i -e ’s/s/www\.rhns\.redhat\.com/prox y-or-sat\.example\.com/g’ \
/etc/sysconfig/rhn/rhn_register \
/etc/sysconfig/rhn/up2date
# Third, install the SSL client certificate for your company’s
# RHN Satellite Server or RHN Proxy Server.
rpm -Uvh http://proxy-or-sat.example.com/pub/r hn-org-trusted-ssl-cert-* .noarch.rpm
# Fourth, reconfigure the clients to use the new SSL certificate.
perl -p -i -e ’s/^sslCA/#sslCA/g;’ \
/etc/sysconfig/rhn/up2date /etc/sysconfig/rhn/rhn_register
echo "sslCACert=/usr/share/rhn/RHN-ORG-TRUSTED-SSL-CERT" \
>> /etc/sysconfig/rhn/up2date
echo "sslCACert=/usr/share/rhn/RHN-ORG-TRUSTED-SSL-CERT" \
>> /etc/sysconfig/rhn/rhn_register
# Fifth, download the GPG key needed to validate custom packages.
wget -O - -q http://proxy-or-sat.example.com.c om/pub/YOUR-RPM-GPG-KEY
# Sixth, import that GPG key to your GPG keyring.
rpm --import /path/to/YOUR-RPM-GPG-KEY
Page 38

34 Chapter 6. Manually Scripting the Configuration
Remember, the sixth step is documented here as it pertains to systems running Red Hat
Linux 3 or newer. For Red Hat Enterprise Linux 2.1, use the following command instead:
gpg $(up2date --gpg-flags) --import /path/to/YOUR-RPM-GPG-KEY
This script comprises a clean and repeatable process that should fully configure any potential Red Hat Network client in preparation for registration to an RHN Proxy Server or RHN
Satellite Server. Remember, key values, such as the URL of your RHN Server, its public
directory, and your actual GPG key must be inserted into the placeholders listed within the
script. Also, depending on your environment, additional modifications may be required.
Although this script may work nearly verbatim, it should be used as a guide.
Like its components, this script may be centrally located. By placing this script in the
/pub/ directory of the server, running wget -O- on it, and piping the output to a shell
session, one may run the entire bootstrap process with a single command from each client:
wget -O - http://proxy-or-sat.example.com.com/ pub/bootstrap_script | bash
Warning
Running a shell script directly from input piped in over a Web connection obviously has
some inherent security risks. Therefore, it is vital to ensure the security of the source
server in this instance.
This one-line command may then be invoked across all of the systems on a network. If the
administrator has SSH access to all of the systems in question, it would be a simple task
to iterate over a list of these systems and run the command remotely on all of them. This
script would also be a perfect addition to the %post section of an existing kickstart script.
Page 39

Chapter 7.
Implementing Kickstart
Obviously, the best time to make configuration changes to a system is when that system
is first being built. For customers who already use kickstart effectively, the bootstrapping
script is an ideal addition to that process.
Once all of the configuration issues have been resolved, a system may also register with the
local Red Hat Network Servers using the rhnreg_ks utility that comes with the up2date
and rhn_register RPMs. This chapter discusses the proper use of rhnreg_ks to register systems.
The rhnreg_ks utility uses activation keys to register, entitle, and subscribe systems to
specified channels in one swift motion. To find out more about activation keys, refer to the
Red Hat Update Agent and RHN Website chapters of the Red Hat Network Management
Reference Guide.
The following commented kickstart file is an ideal example of how a system can be configured from start to finish using Red Hat Network.
# Generic 7.2 kickstart for laptops in the Widget Corporation (widgetco)
# Standard kickstart options for a network-based install. For an
# explanation of these options, consult the Red Hat Linux Customization
# Guide.
lang en_US
langsupport --default en_US en_US
keyboard defkeymap
network --bootproto dhcp
install
url --url ftp://ftp.widgetco.com/pub/redhat/linux/7.2/en/os/i386
zerombr yes
clearpart --all
part /boot --size 128 --fstype ext3 --ondisk hda
part / --size 2048 --grow --fstype ext3 --ondisk hda
part /backup --size 1024 --fstype ext3 --ondisk hda
part swap --size 512 --ondisk hda
bootloader --location mbr
timezone America/New_York
rootpw --iscrypted $1$78Jnap82Hnd0PsjnC8j3sd2Lna/Hx4.
auth --useshadow --enablemd5 --krb5realm .COM --krb5kdc auth.widgetco.com \
--krb5adminserver auth.widgetco.com
mouse --emulthree genericps/2
xconfig --card "S3 Savage/MX" --videoram 8192 --resolution 1024x768 \
--depth 16 --defaultdesktop=GNOME --startxonboot --noprobe \
--hsync 31.5-48.5 --vsync 40-70
Page 40

36 Chapter 7. Implementing Kickstart
reboot
# Define a standard set of packages. Note: Red Hat Network client
# packages are found in Base. This is quite a minimal set of packages;
# your mileage may vary.
%packages
@ Base
@ Utilities
@ GNOME
@ Laptop Support
@ Dialup Support
@ Software Development
@ Graphics and Image Manipulation
@ Games and Entertainment
@ Sound and Multimedia Support
# Now for the interesting part.
%post
( # Note that we run the entire %post section as a subshell for logging.
# Remember that nifty one-line command for the bootstrap script that we
# went through? This is an ideal place for it. And assuming that the
# script has been properly configured, it should prepare the system
# fully for usage of local Red Hat Network Servers.
wget -O- http://proxy-or-sat.example.com/pub/bootstrap_script | /bin/bash
# The following is an example of the usage of rhnreg_ks, the kickstart
# utility for rhn_register. This demonstrates the usage of the
# --activationkey flag, which describes an activation key. For example,
# this activation key could be set up in the Web interface to join this
# system to the "Laptops" group and the local Widgetco "Laptop Software"
# channel. Note that this section applies only to Proxy users, as this
# step is handled by the Satellite bootstrap script.
#
# For more information about activation keys, consult the Red Hat Network
# Management Reference Guide.
/usr/sbin/rhnreg_ks --activationkey=6c933ea74b9b002f3ac7eb99619d3374
# End the subshell and capture any output to a post-install log file.
) 1>/root/post_install.log 2>&1
Page 41

Appendix A.
Sample Bootstrap Script
The /var/www/html/pub/bootstrap/bootstrap.sh script generated by the RHN
Satellite Server installation program provides the ability to reconfigure client systems to
access your RHN Server easily. It is available to both RHN Satellite Server and RHN
Proxy Server customers through the RHN Bootstrap tool. After modifying the script for
your particular use, it can be run on each client machine.
Review the sample and its comments, beginning with a hash mark (#), for additional details. Follow the steps in Chapter 5 Using RHN Bootstrap to prepare the script for use.
#!/bin/bash
echo "RHN Server Client bootstrap script v3.6"
# This file was autogenerated. Minor manual editing of this script (and
# possibly the client-config-overrides.txt file) may be necessary to complete
# the bootstrap setup. Once customized, the bootstrap script can be triggered
# in one of two ways (the first is preferred):
#
# (1) centrally, from the RHN Server via ssh (i.e., from the
# RHN Server):
# cd /var/www/html/pub/bootstrap/
# cat bootstrap-<edited_name>.sh | ssh root@<client-hostname> /bin/bash
#
# ...or...
#
# (2) in a decentalized manner, executed on each client, via wget or curl:
# wget -qO# https://<hostname>/pub/bootstrap/bootstrap-<edited_name>.sh \
# | /bin/bash
# ...or...
# curl -Sks
# https://<hostname>/pub/bootstrap/bootstrap-<edited_name>.sh \
# | /bin/bash
# SECURITY NOTE:
# Use of these scripts via the two methods discussed is the most expedient
# way to register machines to your RHN Server. Since "wget" is used
# throughout the script to download various files, a "Man-in-the-middle"
# attack is theoretically possible.
#
# The actual registration process is performed securely via SSL, so the risk
# is minimized in a sense. This message merely serves as a warning.
# Adminitrators need to appropriately weigh their concern against the
# relative security of their internal network.
Page 42

38 Appendix A. Sample Bootstrap Script
# PROVISIONING/KICKSTART NOTE:
# If provisioning a client, ensure the proper CA SSL public certificate is
# configured properly in the post section of your kickstart profiles (the
# RHN Satellite or hosted web user interface).
# UP2DATE/RHN_REGISTER VERSIONING NOTE:
# This script will not work with very old versions of up2date and
# rhn_register.
echo
echo
echo "MINOR MANUAL EDITING OF THIS FILE MAY BE REQUIRED!"
echo
echo "If this bootstrap script was created during the initial installation"
echo "of an RHN Satellite, the ACTIVATION_KEYS, and ORG_GPG_KEY values will"
echo "probably *not* be set (see below). If this is the case, please do the"
echo "following:"
echo " - copy this file to a name specific to it’s use."
echo " (e.g., to bootstrap-SOME_NAME.sh - like bootstrap-web-servers.sh.)"
echo " - on the website create an activation key or keys for the system(s) to"
echo " be registered."
echo " - edit the values of the VARIABLES below (in this script) as"
echo " appropriate:"
echo " - ACTIVATION_KEYS needs to reflect the activation key(s) value(s)"
echo " from the website. XKEY or XKEY,YKEY"
echo " - ORG_GPG_KEY needs to be set to the name of the corporate public"
echo " GPG key filename (residing in /var/www/html/pub) if appropriate."
echo
echo "Verify that the script variable settings are correct:"
echo " - CLIENT_OVERRIDES should be only set differently if a customized"
echo " client-config-overrides-VER.txt file was created with a different"
echo " name."
echo " - ensure the value of HOSTNAME is correct."
echo " - ensure the value of ORG_CA_CERT is correct."
echo
echo "Enable this script: comment (with #’s) this block (or, at least just"
echo "the exit below)"
echo
exit 1
# can be edited, but probably correct (unless created during initial install):
# NOTE: ACTIVATION_KEYS *must* be used to bootstrap a client machine.
ACTIVATION_KEYS=insert_activation_key_here
ORG_GPG_KEY=insert_org_gpg_pub_key_here
# can be edited, but probably correct:
CLIENT_OVERRIDES=client-config-overrides.t xt
HOSTNAME=your_rhn_server_host.example.com
Page 43

Appendix A. Sample Bootstrap Script 39
ORG_CA_CERT=RHN-ORG-TRUSTED-SSL-CERT
ORG_CA_CERT_IS_RPM_YN=0
USING_SSL=1
USING_GPG=1
REGISTER_THIS_BOX=1
ALLOW_CONFIG_ACTIONS=0
ALLOW_REMOTE_COMMANDS=0
FULLY_UPDATE_THIS_BOX=1
#
# --------------------------------------------------------------------- -------# DO NOT EDIT BEYOND THIS POINT ---------------------------- ------------------# --------------------------------------------------------------------- -------#
# an idea from Erich Morisse (of Red Hat).
# use either wget *or* curl
if [ -x /usr/bin/wget ] ; then
FETCH="/usr/bin/wget -q -r -nd"
else
if [ -x /usr/bin/curl ] ; then
FETCH="/usr/bin/curl -SksO"
fi
fi
HTTP_PUB_DIRECTORY=http://${HOSTNAME}/pub
HTTPS_PUB_DIRECTORY=https://${HOSTNAME}/pu b
if [ $USING_SSL -eq 0 ] ; then
HTTPS_PUB_DIRECTORY=${HTTP_PUB_DIRECTORY}
fi
echo
echo "UPDATING RHN_REGISTER/UP2DATE CONFIGURATION FILES"
echo "-------------------------------------------------"
echo "* downloading necessary files"
echo " client_config_update.py..."
rm -f client_config_update.py
$FETCH ${HTTPS_PUB_DIRECTORY}/bootstrap/client_config_update.py
echo " ${CLIENT_OVERRIDES}..."
rm -f ${CLIENT_OVERRIDES}
$FETCH ${HTTPS_PUB_DIRECTORY}/bootstrap/${CLIENT_OVERRIDES}
if [ ! -f "client_config_update.py" ] ; then
echo "ERROR: client_config_update.py was not downloaded"
exit 1
fi
if [ ! -f "${CLIENT_OVERRIDES}" ] ; then
echo "ERROR: ${CLIENT_OVERRIDES} was not downloaded"
Page 44

40 Appendix A. Sample Bootstrap Script
exit 1
fi
echo "* running the update scripts"
if [ -f "/etc/sysconfig/rhn/rhn_register" ] ; then
echo " . rhn_register config file"
/usr/bin/python -u client_config_update.py /etc/sysconfig/rhn/rhn_register \
${CLIENT_OVERRIDES}
fi
echo " . up2date config file"
/usr/bin/python -u client_config_update.py /etc/sysconfig/rhn/up2date \
${CLIENT_OVERRIDES}
if [ ! -z "$ORG_GPG_KEY" ] ; then
echo
echo "* importing organizational GPG key"
rm -f ${ORG_GPG_KEY}
$FETCH ${HTTPS_PUB_DIRECTORY}/${ORG_GPG_KEY}
# get the major version of up2date
res=$(rpm -q --queryformat ’%{version}’ up2date | sed -e ’s/\..*//g’)
if [ $res -eq 2 ] ; then
gpg $(up2date --gpg-flags) --import $ORG_GPG_KEY
else
rpm --import $ORG_GPG_KEY
fi
fi
echo
echo "* attempting to install corporate public CA cert"
if [ $USING_SSL -eq 1 ] ; then
if [ $ORG_CA_CERT_IS_RPM_YN -eq 1 ] ; then
rpm -Uvh ${HTTP_PUB_DIRECTORY}/${ORG_CA_CERT}
else
rm -f ${ORG_CA_CERT}
$FETCH ${HTTP_PUB_DIRECTORY}/${ORG_CA_CERT}
mv ${ORG_CA_CERT} /usr/share/rhn/
fi
fi
echo
echo "REGISTRATION"
echo "------------"
# Should have created an activation key or keys on the RHN Server’s
# website and edited the value of ACTIVATION_KEYS above.
#
# If you require use of several different activation keys, copy this file and
# change the string as needed.
#
if [ -z "$ACTIVATION_KEYS" ] ; then
echo "*** ERROR: in order to bootstrap RHN clients, an activation key or keys"
echo " must be created in the RHN web user interface, and the"
Page 45

Appendix A. Sample Bootstrap Script 41
echo " corresponding key or keys string (XKEY,YKEY,...) must be mapped to"
echo " the ACTIVATION_KEYS variable of this script."
exit 1
fi
if [ $REGISTER_THIS_BOX -eq 1 ] ; then
echo "* registering"
/usr/sbin/rhnreg_ks --force --activationkey "$ACTIVATION_KEYS"
echo
echo "*** this system should now be registered, please verify ***"
echo
else
echo "* explicitely not registering"
fi
echo
echo "OTHER ACTIONS"
echo "------------------------------------------------------"
if [ $FULLY_UPDATE_THIS_BOX -eq 1 ] ; then
echo "up2date up2date; up2date -p; up2date -uf (conditional)"
else
echo "up2date up2date; up2date -p"
fi
echo "but any post configuration action can be added here. "
echo "------------------------------------------------------"
if [ $FULLY_UPDATE_THIS_BOX -eq 1 ] ; then
echo "* completely updating the box"
else
echo "* ensuring up2date itself is updated"
fi
/usr/sbin/up2date up2date
/usr/sbin/up2date -p
if [ $FULLY_UPDATE_THIS_BOX -eq 1 ] ; then
/usr/sbin/up2date -uf
fi
echo "-bootstrap complete-"
Page 46

42 Appendix A. Sample Bootstrap Script
Page 47

Index
Symbols
--configure
use of, 6
A
activation keys
registering with, 5
B
bootstrap.sh
preparation and use, 27
sample file, 37
C
client applications
configuration of, 4
installation of, 3
client configuration
Red Hat Network Registration Client, 7
Red Hat Update Agent, 6
configuration
manual, 8
scripting completely, 33
server failover, 10
G
GPG keys
importing of, 25
R
Red Hat Network Alert Notification Tool
configuration for Satellite, 10
Red Hat Network Registration Client
configuring to use RHN Proxy Server or
RHN Satellite Server, 9
Red Hat Update Agent
configuring to use RHN Proxy Server or
RHN Satellite Server, 8
RHN Bootstrap
command line options, 30
generating the script, 28
preparing, 28
using, 27
using the script, 29
RHN SSL Maintenance Tool
generating the CA, 21
generating the server certificate, 22
generation explained, 15
options, 16
rhn-ssl-tool, 14
rhn-ssl-tool
generating the CA, 21
generating the server certificate, 22
generation explained, 15
options, 16
RHN SSL Maintenance Tool, 14
S
SSL (Secure Sockets Layer)
introduction, 13
SSL certificates
configuration of, 23
generating, 14
installation of, 23
K
kickstart
use of, 35
Page 48

 Loading...