

Redhat LVM ADMINISTRATOR FOR RHEL User Manual
LVM Administrator's Guide for RHEL 4.5
Configuration and
Administration
4.5
Cluster_Logical_Volume_Manager
ISBN: N/A
Publication date: July 2008

LVM Administrator's Guide for RHEL 4.5
This book describes the LVM logical volume manager, including information on running LVM in
a clustered environment. The content of this document is specific to the LVM2 release in Red
Hat Enterprise Linux Release 4.5.

LVM Administrator's Guide for RHEL 4.5: Configuration and
Administration
Copyright © 2008 Red Hat, Inc.
Copyright © 2008 Red Hat, Inc. This material may only be distributed subject to the terms and conditions set forth in the
Open Publication License, V1.0 or later with the restrictions noted below (the latest version of the OPL is presently
available at http://www.opencontent.org/openpub/).
Distribution of substantively modified versions of this document is prohibited without the explicit permission of the
copyright holder.
Distribution of the work or derivative of the work in any standard (paper) book form for commercial purposes is
prohibited unless prior permission is obtained from the copyright holder.
Red Hat and the Red Hat "Shadow Man" logo are registered trademarks of Red Hat, Inc. in the United States and other
countries.
All other trademarks referenced herein are the property of their respective owners.
The GPG fingerprint of the security@redhat.com key is:
CA 20 86 86 2B D6 9D FC 65 F6 EC C4 21 91 80 CD DB 42 A6 0E
1801 Varsity Drive
Raleigh, NC 27606-2072
USA
Phone: +1 919 754 3700
Phone: 888 733 4281
Fax: +1 919 754 3701
PO Box 13588
Research Triangle Park, NC 27709
USA

LVM Administrator's Guide for RHEL 4.5

Introduction ...............................................................................................................ix
1. Audience .......................................................................................................ix
2. Software Versions ..........................................................................................ix
3. Related Documentation ..................................................................................ix
4. Document Conventions ...................................................................................x
5. Feedback ......................................................................................................xi
1. The LVM Logical Volume Manager .......................................................................... 1
1. New and Changed Features ........................................................................... 1
2. Logical Volumes ............................................................................................ 1
3. LVM Architecture Overview ............................................................................ 2
4. Running LVM in a Cluster ............................................................................... 3
5. Document Overview ....................................................................................... 5
2. LVM Components .................................................................................................. 7
1. Physical Volumes ........................................................................................... 7
1.1. LVM Physical Volume Layout ............................................................... 7
1.2. Multiple Partitions on a Disk ................................................................. 8
2. Volume Groups .............................................................................................. 9
3. LVM Logical Volumes ..................................................................................... 9
3.1. Linear Volumes ................................................................................... 9
3.2. Striped Logical Volumes .....................................................................12
3.3. Mirrored Logical Volumes ...................................................................13
3.4. Snapshot Volumes .............................................................................14
3. LVM Administration Overview ................................................................................17
1. Creating LVM Volumes in a Cluster ................................................................17
2. Logical Volume Creation Overview .................................................................17
3. Growing a File System on a Logical Volume ...................................................18
4. Logical Volume Backup .................................................................................18
5. Logging ........................................................................................................19
4. LVM Administration with CLI Commands ................................................................21
1. Using CLI Commands ...................................................................................21
2. Physical Volume Administration .....................................................................23
2.1. Creating Physical Volumes .................................................................23
2.2. Displaying Physical Volumes ..............................................................24
2.3. Preventing Allocation on a Physical Volume .........................................25
2.4. Resizing a Physical Volume ................................................................25
2.5. Removing Physical Volumes ...............................................................26
3. Volume Group Administration ........................................................................26
3.1. Creating Volume Groups ....................................................................26
3.2. Adding Physical Volumes to a Volume Group .......................................27
3.3. Displaying Volume Groups ..................................................................27
3.4. Scanning Disks for Volume Groups to Build the Cache File ...................28
3.5. Removing Physical Volumes from a Volume Group ..............................29
3.6. Changing the Parameters of a Volume Group ......................................29
3.7. Activating and Deactivating Volume Groups .........................................30
3.8. Removing Volume Groups ..................................................................30
3.9. Splitting a Volume Group ....................................................................30
v

LVM Administrator's Guide for RHEL 4.5
3.10. Combining Volume Groups ...............................................................31
3.11. Backing Up Volume Group Metadata .................................................31
3.12. Renaming a Volume Group ...............................................................31
3.13. Moving a Volume Group to Another System .......................................32
3.14. Recreating a Volume Group Directory ................................................33
4. Logical Volume Administration .......................................................................33
4.1. Creating Logical Volumes ...................................................................33
4.2. Persistent Device Numbers .................................................................38
4.3. Resizing Logical Volumes ...................................................................38
4.4. Changing the Parameters of a Logical Volume Group ...........................38
4.5. Renaming Logical Volumes .................................................................39
4.6. Removing Logical Volumes .................................................................39
4.7. Displaying Logical Volumes ................................................................39
4.8. Growing Logical Volumes ...................................................................40
4.9. Extending a Striped Volume ................................................................41
4.10. Shrinking Logical Volumes ................................................................43
5. Creating Snapshot Volumes ..........................................................................43
6. Controlling LVM Device Scans with Filters ......................................................44
7. Online Data Relocation ..................................................................................45
8. Activating Logical Volumes on Individual Nodes in a Cluster ............................46
9. Customized Reporting for LVM ......................................................................47
9.1. Format Control ...................................................................................47
9.2. Object Selection .................................................................................49
9.3. Sorting LVM Reports ..........................................................................56
9.4. Specifying Units .................................................................................57
5. LVM Configuration Examples .................................................................................59
1. Creating an LVM Logical Volume on Three Disks ............................................59
1.1. Creating the Physical Volumes ............................................................59
1.2. Creating the Volume Group .................................................................59
1.3. Creating the Logical Volume ...............................................................59
1.4. Creating the File System .....................................................................60
2. Creating a Striped Logical Volume .................................................................60
2.1. Creating the Physical Volumes ............................................................60
2.2. Creating the Volume Group .................................................................61
2.3. Creating the Logical Volume ...............................................................61
2.4. Creating the File System .....................................................................61
3. Splitting a Volume Group ...............................................................................62
3.1. Determining Free Space .....................................................................62
3.2. Moving the Data .................................................................................63
3.3. Splitting the Volume Group .................................................................63
3.4. Creating the New Logical Volume ........................................................64
3.5. Making a File System and Mounting the New Logical Volume ...............64
3.6. Activating and Mounting the Original Logical Volume ............................64
4. Removing a Disk from a Logical Volume .........................................................64
4.1. Moving Extents to Existing Physical Volumes .......................................65
4.2. Moving Extents to a New Disk .............................................................66
6. LVM Troubleshooting ............................................................................................69
vi

1. Troubleshooting Diagnostics ..........................................................................69
2. Displaying Information on Failed Devices .......................................................69
3. Recovering from LVM Mirror Failure ...............................................................71
4. Recovering Physical Volume Metadata ...........................................................74
5. Replacing a Missing Physical Volume ............................................................76
6. Removing Lost Physical Volumes from a Volume Group ..................................76
7. Insufficient Free Extents for a Logical Volume .................................................76
7. LVM Administration with the LVM GUI ....................................................................79
A. The Device Mapper ..............................................................................................81
B. The LVM Configuration Files .................................................................................83
1. The LVM Configuration Files ..........................................................................83
2. Sample lvm.conf File .....................................................................................83
C. LVM Object Tags ..................................................................................................91
1. Adding and Removing Object Tags ................................................................91
2. Host Tags .....................................................................................................91
3. Controlling Activation with Tags .....................................................................92
D. LVM Volume Group Metadata ...............................................................................93
1. The Physical Volume Label ...........................................................................93
2. Metadata Contents ........................................................................................94
3. Sample Metadata ..........................................................................................94
Index .......................................................................................................................97
vii

viii

Introduction
This book describes the Logical Volume Manager (LVM), including information on running LVM
in a clustered environment. The content of this document is specific to the LVM2 release.
1. Audience
This book is intended to be used by system administrators managing systems running the Linux
operating system. It requires familiarity with Red Hat Enterprise Linux and GFS file system
administration.
2. Software Versions
Software Description
RHEL4 refers to RHEL4 and higher
GFS refers to GFS 6.1 and higher
Table 1. Software Versions
3. Related Documentation
For more information about using Red Hat Enterprise Linux, refer to the following resources:
• Red Hat Enterprise Linux Installation Guide — Provides information regarding installation of
Red Hat Enterprise Linux.
• Red Hat Enterprise Linux Introduction to System Administration — Provides introductory
information for new Red Hat Enterprise Linux system administrators.
• Red Hat Enterprise Linux System Administration Guide — Provides more detailed information
about configuring Red Hat Enterprise Linux to suit your particular needs as a user.
• Red Hat Enterprise Linux Reference Guide — Provides detailed information suited for more
experienced users to reference when needed, as opposed to step-by-step instructions.
• Red Hat Enterprise Linux Security Guide — Details the planning and the tools involved in
creating a secured computing environment for the data center, workplace, and home.
For more information about Red Hat Cluster Suite for Red Hat Enterprise Linux, refer to the
following resources:
• Red Hat Cluster Suite Overview — Provides a high level overview of the Red Hat Cluster
Suite.
ix

Introduction
• Configuring and Managing a Red Hat Cluster — Provides information about installing,
configuring and managing Red Hat Cluster components.
• Global File System: Configuration and Administration — Provides information about installing,
configuring, and maintaining Red Hat GFS (Red Hat Global File System).
• Using GNBD with Global File System — Provides an overview on using Global Network Block
Device (GNBD) with Red Hat GFS.
• Linux Virtual Server Administration — Provides information on configuring high-performance
systems and services with the Linux Virtual Server (LVS).
• Red Hat Cluster Suite Release Notes — Provides information about the current release of
Red Hat Cluster Suite.
Red Hat Cluster Suite documentation and other Red Hat documents are available in HTML and
PDF versions online at the following location:
http://www.redhat.com/docs
4. Document Conventions
Certain words in this manual are represented in different fonts, styles, and weights. This
highlighting indicates that the word is part of a specific category. The categories include the
following:
Courier font
Courier font represents commands, file names and paths, and prompts .
When shown as below, it indicates computer output:
Desktop about.html logs paulwesterberg.png
Mail backupfiles mail reports
bold Courier font
Bold Courier font represents text that you are to type, such as: service jonas start
If you have to run a command as root, the root prompt (#) precedes the command:
# gconftool-2
italic Courier font
Italic Courier font represents a variable, such as an installation directory:
x

Feedback
/bin/
bold font
Bold font represents application programs and text found on a graphical interface.
When shown like this: OK , it indicates a button on a graphical application interface.
Additionally, the manual uses different strategies to draw your attention to pieces of information.
In order of how critical the information is to you, these items are marked as follows:
Note
A note is typically information that you need to understand the behavior of the
system.
Tip
A tip is typically an alternative way of performing a task.
Important
Important information is necessary, but possibly unexpected, such as a
configuration change that will not persist after a reboot.
Caution
A caution indicates an act that would violate your support agreement, such as
recompiling the kernel.
Warning
A warning indicates potential data loss, as may happen when tuning hardware
for maximum performance.
5. Feedback
xi

Introduction
If you spot a typo, or if you have thought of a way to make this manual better, we would love to
hear from you. Please submit a report in Bugzilla (http://bugzilla.redhat.com/bugzilla/) against
the component rh-cs.
Be sure to mention the manual's identifier:
rh-clvm(EN)-4.5 (2008-07-31T15:15)
By mentioning this manual's identifier, we know exactly which version of the guide you have.
If you have a suggestion for improving the documentation, try to be as specific as possible. If
you have found an error, please include the section number and some of the surrounding text
so we can find it easily.
xii

Chapter 1.
The LVM Logical Volume Manager
This chapter provides a high-level overview of the components of the Logical Volume Manager
(LVM), and includes a summary of new and changed LVM features in Red Hat Enterprise Linux
4.5.
1. New and Changed Features
This section lists new and changed features included with the initial release of Red Hat
Enterprise Linux 4.5.
• Red Hat Enterprise Linux 4.5 supports mirrored logical volumes in a cluster. For information
on creating and modifying mirrors, see Section 4.1.3, “Creating Mirrored Volumes”.
• Documentation for Red Hat Cluster Suite for Red Hat Enterprise Linux 4.5 has been
expanded and reorganized. For information on the available documents, see Section 3,
“Related Documentation”.
2. Logical Volumes
Volume management creates a layer of abstraction over physical storage, allowing you to
create logical storage volumes. This provides much greater flexibility in a number of ways than
using physical storage directly.
A logical volume provides storage virtualization. With a logical volume, you are not restricted to
physical disk sizes. In addition, the hardware storage configuration is hidden from the software
so it can be resized and moved without stopping applications or unmounting file systems. This
can reduce operational costs.
Logical volumes provide the following advantages over using physical storage directly:
• Flexible capacity
When using logical volumes, file systems can extend across multiple disks, since you can
aggregate disks and partitions into a single logical volume.
• Resizeable storage pools
You can extend logical volumes or reduce logical volumes in size with simple software
commands, without reformatting and repartitioning the underlying disk devices.
• Online data relocation
To deploy newer, faster, or more resilient storage subsystems, you can move data while your
system is active. Data can be rearranged on disks while the disks are in use. For example,
you can empty a hot-swappable disk before removing it.
1

Chapter 1. The LVM Logical Volume Manager
• Convenient device naming
Logical storage volumes can be managed in user-defined groups, which you can name
according to your convenience.
• Disk striping
You can create a logical volume that stripes data across two or more disks. This can
dramatically increase throughput.
• Mirroring volumes
Logical volumes provide a convenient way to configure a mirror for your data.
• Volume Snapshots
Using logical volumes, you can take device snapshots for consistent backups or to test the
effect of changes without affecting the real data.
The implementation of these features in LVM is described in the remainder of this document.
3. LVM Architecture Overview
For the RHEL 4 release of the Linux operating system, the original LVM1 logical volume
manager was replaced by LVM2, which has a more generic kernel framework than LVM1. LVM2
provides the following improvements over LVM1:
• flexible capacity
• more efficient metadata storage
• better recovery format
• new ASCII metadata format
• atomic changes to metadata
• redundant copies of metadata
LVM2 is backwards compatible with LVM1, with the exception of snapshot and cluster support.
You can convert a volume group from LVM1 format to LVM2 format with the vgconvert
command. For information on converting LVM metadata format, see the vgconvert(8) man
page.
The underlying physical storage unit of an LVM logical volume is a block device such as a
partition or whole disk. This device is initialized as an LVM physical volume (PV).
To create an LVM logical volume, the physical volumes are combined into a volume group (VG).
This creates a pool of disk space out of which LVM logical volumes (LVs) can be allocated. This
2
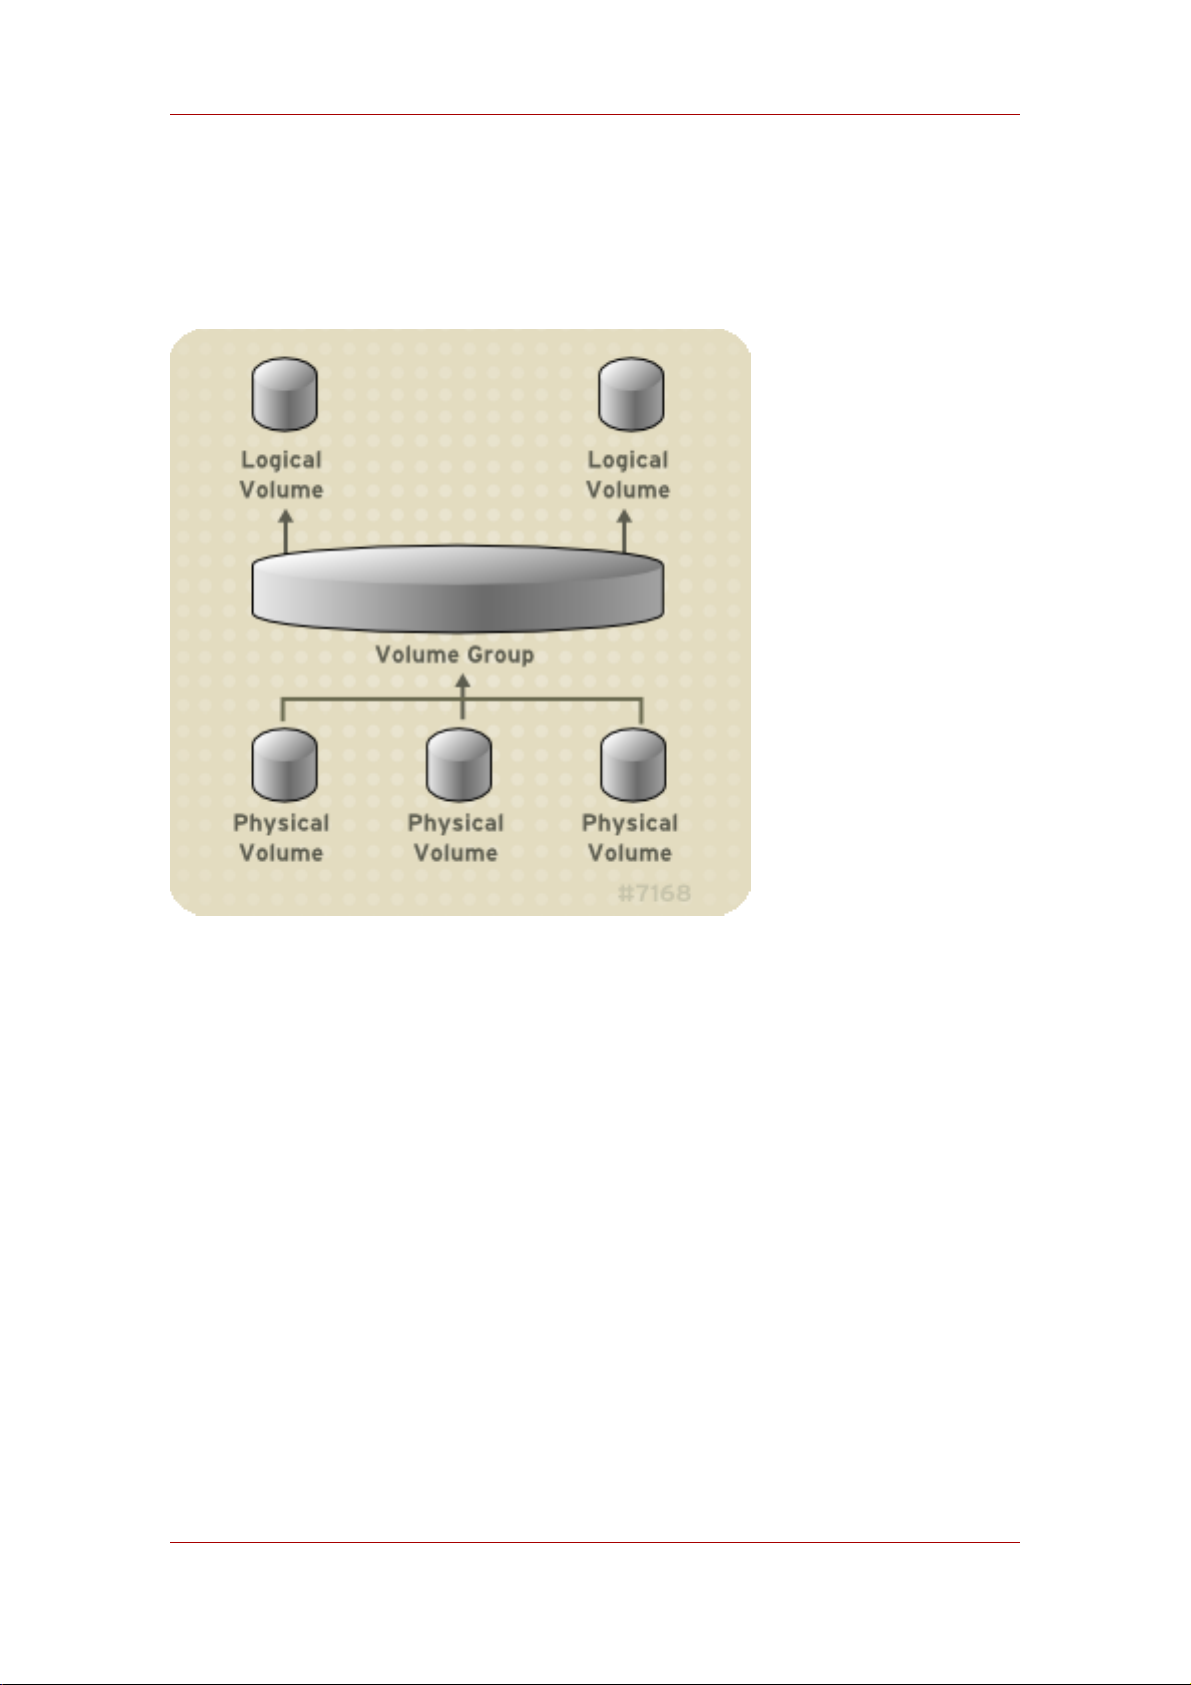
Running LVM in a Cluster
process is analogous to the way in which disks are divided into partitions. A logical volume is
used by file systems and applications (such as databases).
Figure 1.1, “LVM Logical Volume Components” shows the components of a simple LVM logical
volume:
Figure 1.1. LVM Logical Volume Components
For detailed information on the components of an LVM logical volume, see Chapter 2, LVM
Components.
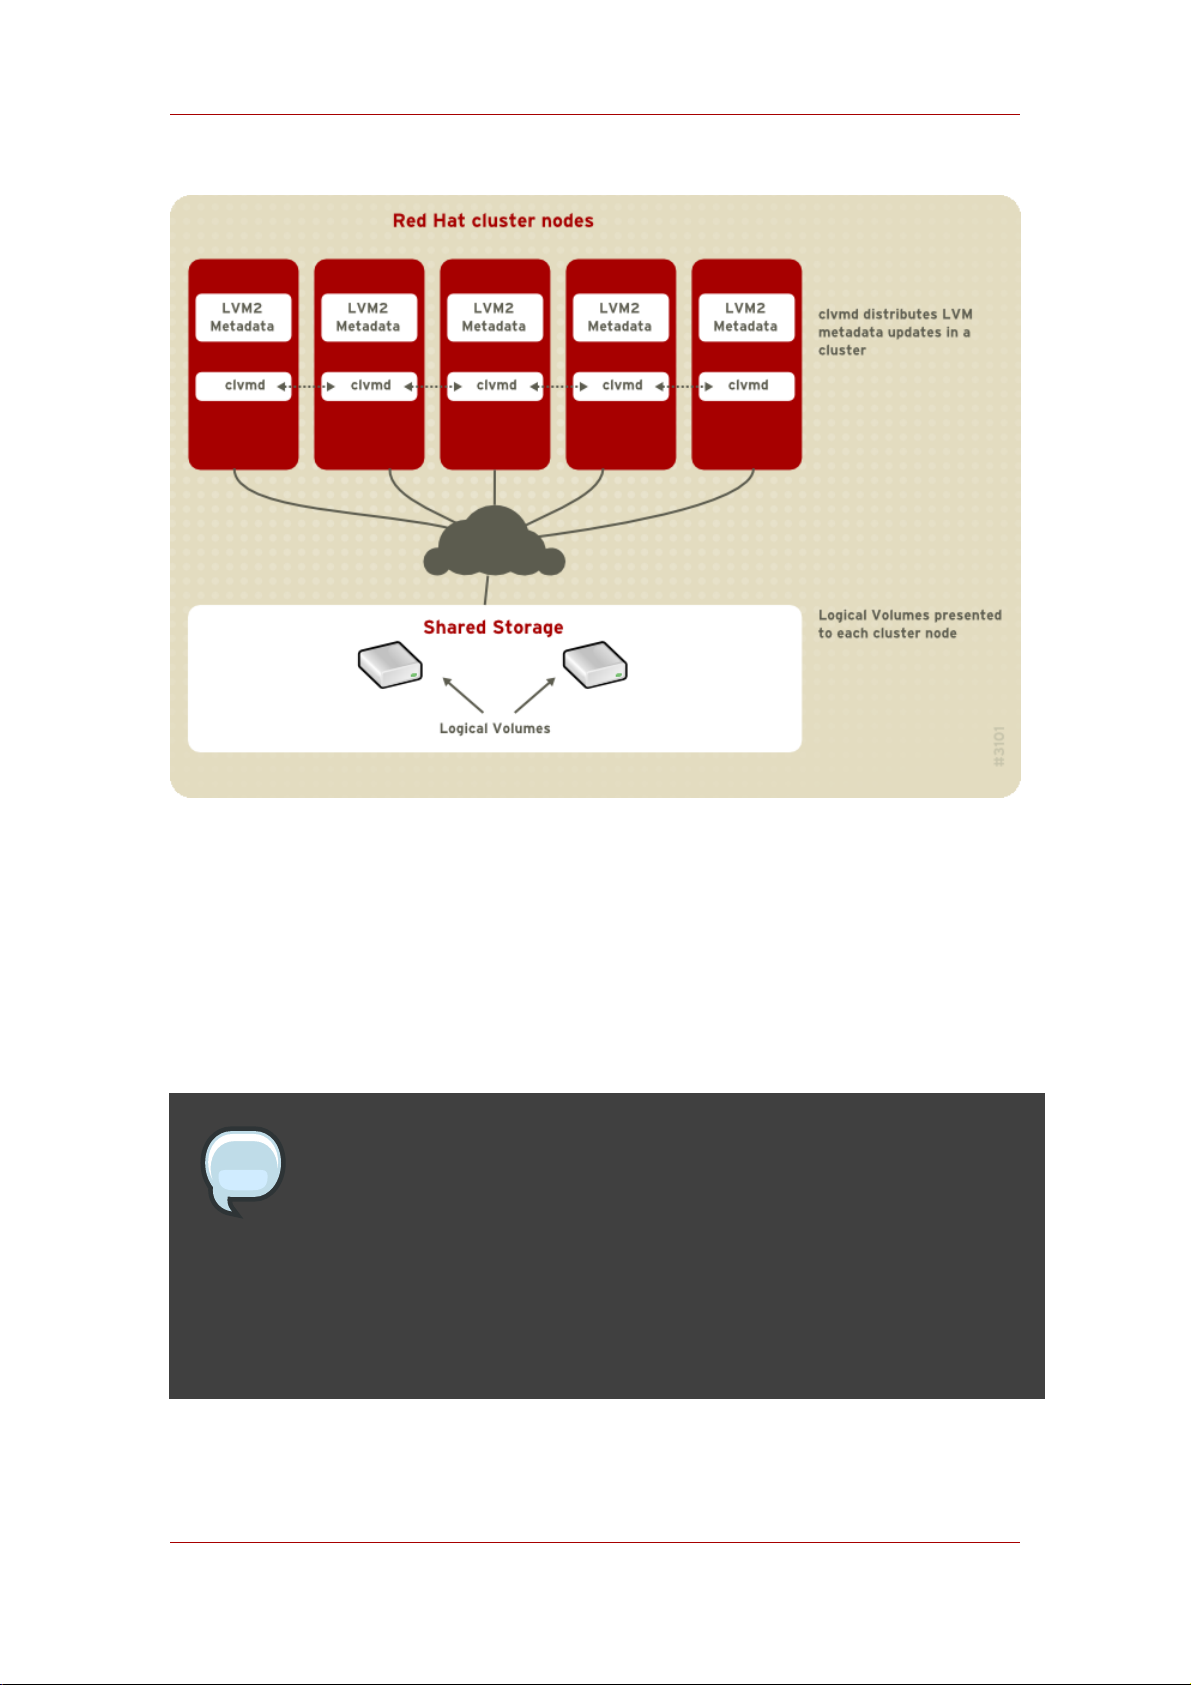
4. Running LVM in a Cluster
The Clustered Logical Volume Manager (CLVM) is a set of clustering extensions to LVM. These
extensions allow a cluster of computers to manage shared storage (for example, on a SAN)
using LVM.
The clmvd daemon is the key clustering extension to LVM. The clvmd daemon runs in each
cluster computer and distributes LVM metadata updates in a cluster, presenting each cluster
computer with the same view of the logical volumes.
Figure 1.2, “CLVM Overview” shows a CLVM overview in a Red Hat cluster.
3
Chapter 1. The LVM Logical Volume Manager
Figure 1.2. CLVM Overview
Logical volumes created with CLVM on shared storage are visible to all computers that have
access to the shared storage.
CLVM allows a user to configure logical volumes on shared storage by locking access to
physical storage while a logical volume is being configured. CLVM uses the locking services
provided by the high availability symmetric infrastructure.
Note
Shared storage for use in Red Hat Cluster Suite requires that you be running the
cluster logical volume manager daemon (clvmd) or the High Availability Logical
Volume Management agents (HA-LVM). If you are not able to use either the
clvmd daemon or HA-LVM for operational reasons or because you do not have
the correct entitlements, you must not use single-instance LVM on the shared
disk as this may result in data corruption. If you have any concerns please
contact your Red Hat service representative.
4

Document Overview
Note
CLVM requires changes to the lvm.conf file for cluster-wide locking. For
information on configuring the lvm.conf file to support CLVM, see Section 1,
“Creating LVM Volumes in a Cluster”.
You configure LVM volumes for use in a cluster with the standard set of LVM commands or the
LVM graphical user interface, as described in Chapter 4, LVM Administration with CLI
Commands and Chapter 7, LVM Administration with the LVM GUI.
For information on installing LVM in a Red Hat Cluster, see Configuring and Managing a Red
Hat Cluster.
5. Document Overview
This remainder of this document includes the following chapters:
• Chapter 2, LVM Components describes the components that make up an LVM logical
volume.
• Chapter 3, LVM Administration Overview provides an overview of the basic steps you perform
to configure LVM logical volumes, whether you are using the LVM Command Line Interface
(CLI) commands or the LVM Graphical User Interface (GUI).
• Chapter 4, LVM Administration with CLI Commands summarizes the individual administrative
tasks you can perform with the LVM CLI commands to create and maintain logical volumes.
• Chapter 5, LVM Configuration Examples provides a variety of LVM configuration examples.
• Chapter 6, LVM Troubleshooting provide instructions for troubleshooting a variety of LVM
issues.
• Chapter 7, LVM Administration with the LVM GUI summarizes the operating of the LVM GUI.
• Appendix A, The Device Mapper describes the Device Mapper that LVM uses to map logical
and physical volumes.
• Appendix B, The LVM Configuration Files describes the LVM configuration files.
• Appendix C, LVM Object Tags describes LVM object tags and host tags.
• Appendix D, LVM Volume Group Metadata describes LVM volume group metadata, and
includes a sample copy of metadata for an LVM volume group.
5

6

Chapter 2.
LVM Components
This chapter describes the components of an LVM Logical volume.
1. Physical Volumes
The underlying physical storage unit of an LVM logical volume is a block device such as a
partition or whole disk. To use the device for an LVM logical volume the device must be
initialized as a physical volume (PV). Initializing a block device as a physical volume places a
label near the start of the device.
By default, the LVM label is placed in the second 512-byte sector. You can overwrite this default
by placing the label on any of the first 4 sectors. This allows LVM volumes to co-exist with other
users of these sectors, if necessary.
An LVM label provides correct identification and device ordering for a physical device, since
devices can come up in any order when the system is booted. An LVM label remains persistent
across reboots and throughout a cluster.
The LVM label identifies the device as an LVM physical volume. It contains a random unique
identifier (the UUID) for the physical volume. It also stores the size of the block device in bytes,
and it records where the LVM metadata will be stored on the device.
The LVM metadata contains the configuration details of the LVM volume groups on your
system. By default, an identical copy of the metadata is maintained in every metadata area in
every physical volume within the volume group. LVM metadata is small and stored as ASCII.
Currently LVM allows you to store 0, 1 or 2 identical copies of its metadata on each physical
volume. The default is 1 copy. Once you configure the number of metadata copies on the
physical volume, you cannot change that number at a later time. The first copy is stored at the
start of the device, shortly after the label. If there is a second copy, it is placed at the end of the
device. If you accidentally overwrite the area at the beginning of your disk by writing to a
different disk than you intend, a second copy of the metadata at the end of the device will allow
you to recover the metadata.
For detailed information about the LVM metadata and changing the metadata parameters, see
Appendix D, LVM Volume Group Metadata.
1.1. LVM Physical Volume Layout
Figure 2.1, “Physical Volume layout” shows the layout of an LVM physical volume. The LVM
label is on the second sector, followed by the metadata area, followed by the usable space on
the device.
Note
7
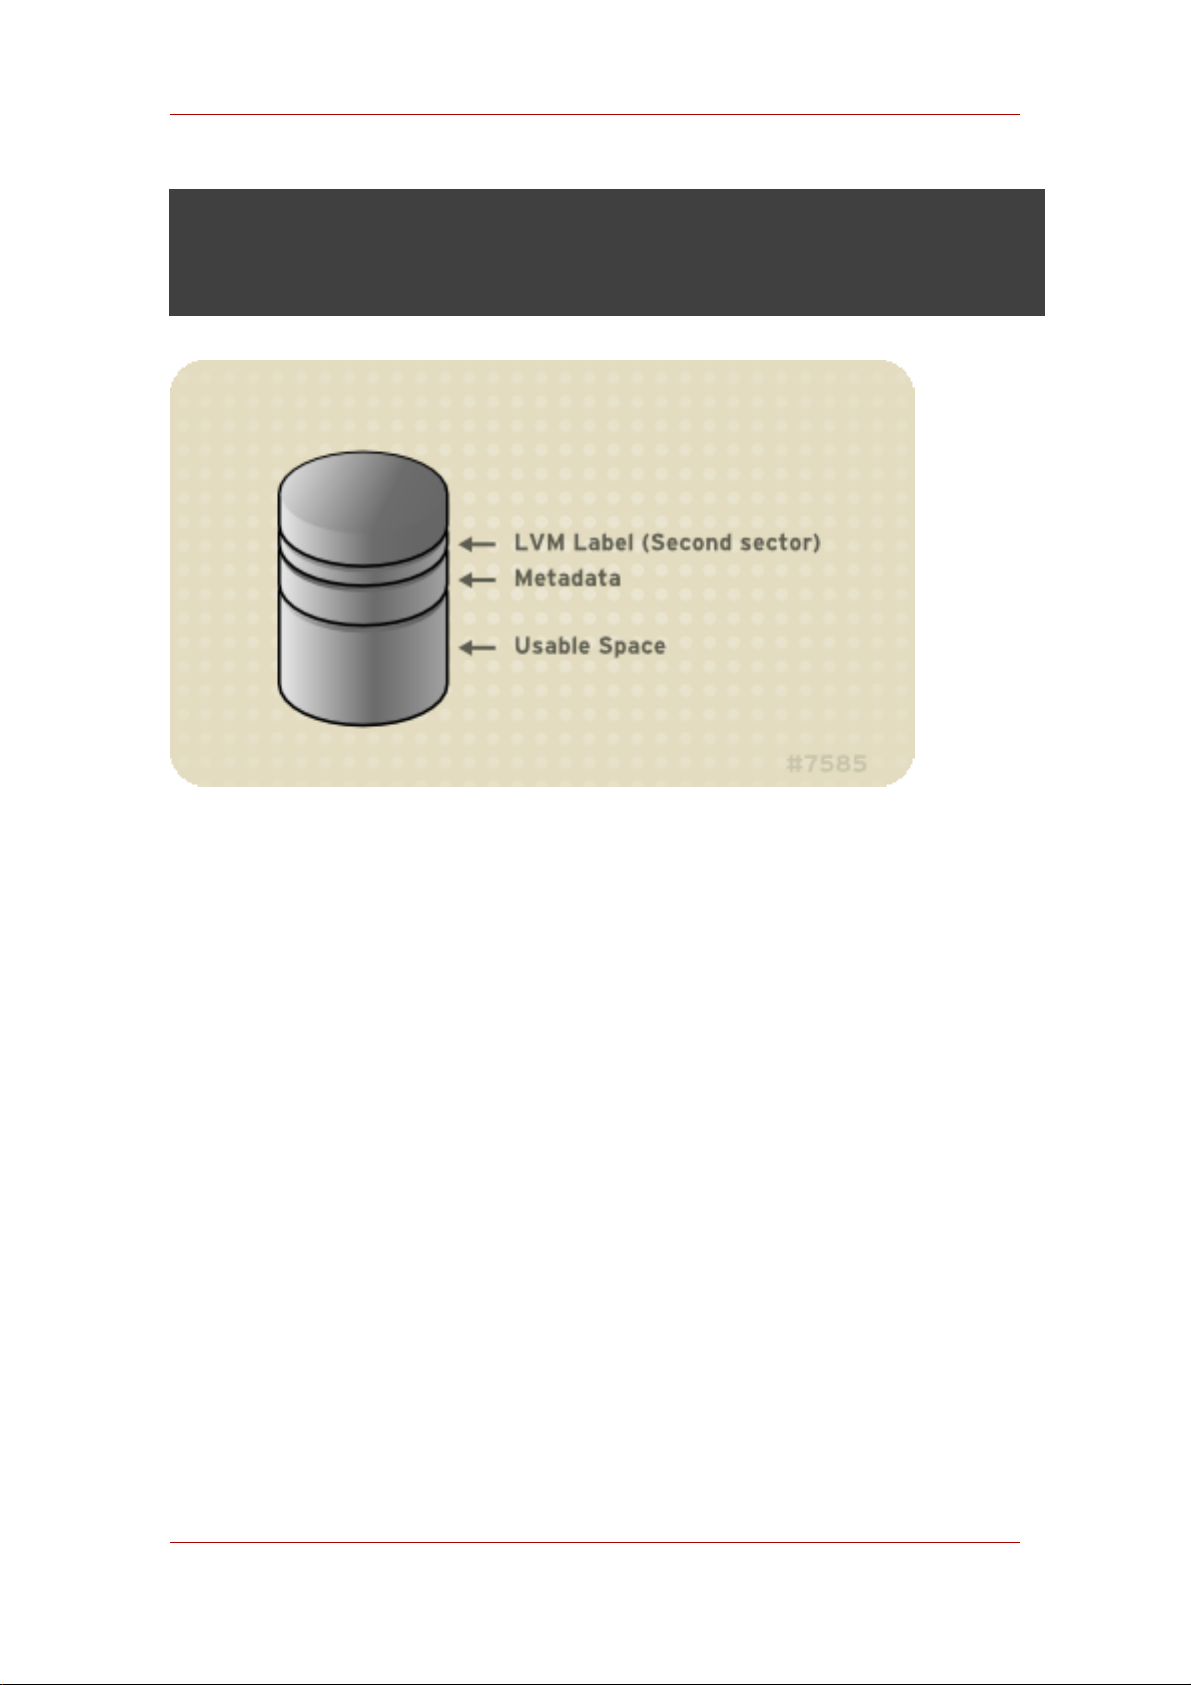
Chapter 2. LVM Components
In the Linux kernel (and throughout this document), sectors are considered to be
512 bytes in size.
Figure 2.1. Physical Volume layout
1.2. Multiple Partitions on a Disk
LVM allows you to create physical volumes out of disk partitions. It is generally recommended
that you create a single partition that covers the whole disk to label as an LVM physical volume
for the following reasons:
• Administrative convenience
It is easier to keep track of the hardware in a system if each real disk only appears once. This
becomes particularly true if a disk fails. In addition, multiple physical volumes on a single disk
may cause a kernel warning about unknown partition types at boot-up.
• Striping performance
LVM can not tell that two physical volumes are on the same physical disk. If you create a
striped logical volume when two physical volumes are on the same physical disk, the stripes
could be on different partitions on the same disk. This would result in a decrease in
performance rather than an increase.
Although it it is not recommended, there may be specific circumstances when you will need to
divide a disk into separate LVM physical volumes. For example, on a system with few disks it
8

Volume Groups
may be necessary to move data around partitions when you are migrating an existing system to
LVM volumes. Additionally, if you have a very large disk and want to have more than one
volume group for administrative purposes then it is necessary to partition the disk. If you do
have a disk with more than one partition and both of those partitions are in the same volume
group, take care to specify which partitions are to be included in a logical volume when creating
striped volumes.
2. Volume Groups
Physical volumes are combined into volume groups (VGs). This creates a pool of disk space out
of which logical volumes can be allocated.
Within a volume group, the disk space available for allocation is divided into units of a fixed-size
called extents. An extent is the smallest unit of space that can be allocated, Within a physical
volume, extents are referred to as physical extents.
A logical volume is allocated into logical extents of the same size as the physical extents. The
extent size is thus the same for all logical volumes in the volume group. The volume group
maps the logical extents to physical extents.
3. LVM Logical Volumes
In LVM, a volume group is divided up into logical volumes. There are three types of LVM logical
volumes: linear volumes, striped volumes, and mirrored volumes. These are described in the
following sections.
3.1. Linear Volumes
A linear volume aggregates multiple physical volumes into one logical volume. For example, if
you have two 60GB disks, you can create a 120GB logical volume. The physical storage is
concatenated.
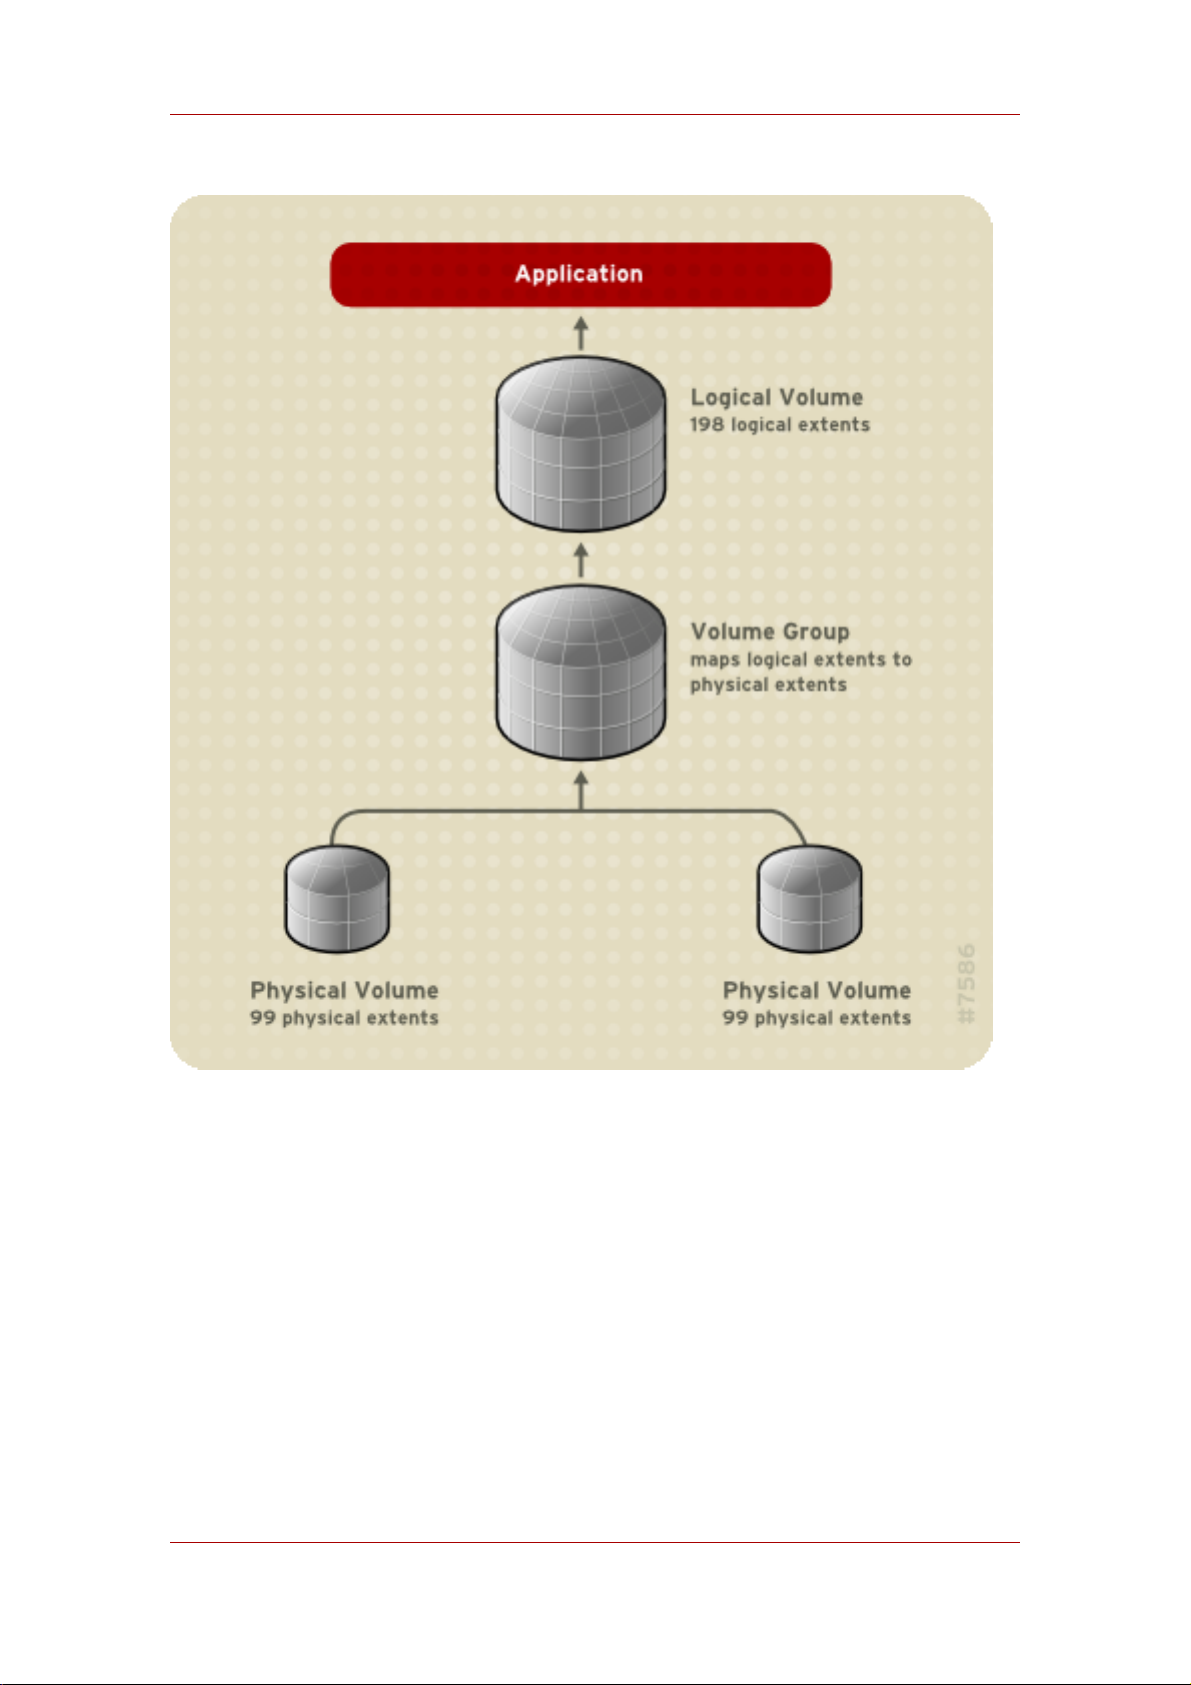
Creating a linear volume assigns a range of physical extents to an area of a logical volume in
order. For example, as shown in Figure 2.2, “Extent Mapping” logical extents 1 to 99 could map
to one physical volume and logical extents 100 to 198 could map to a second physical volume.
From the point of view of the application, there is one device that is 198 extents in size.
9
Chapter 2. LVM Components
Figure 2.2. Extent Mapping
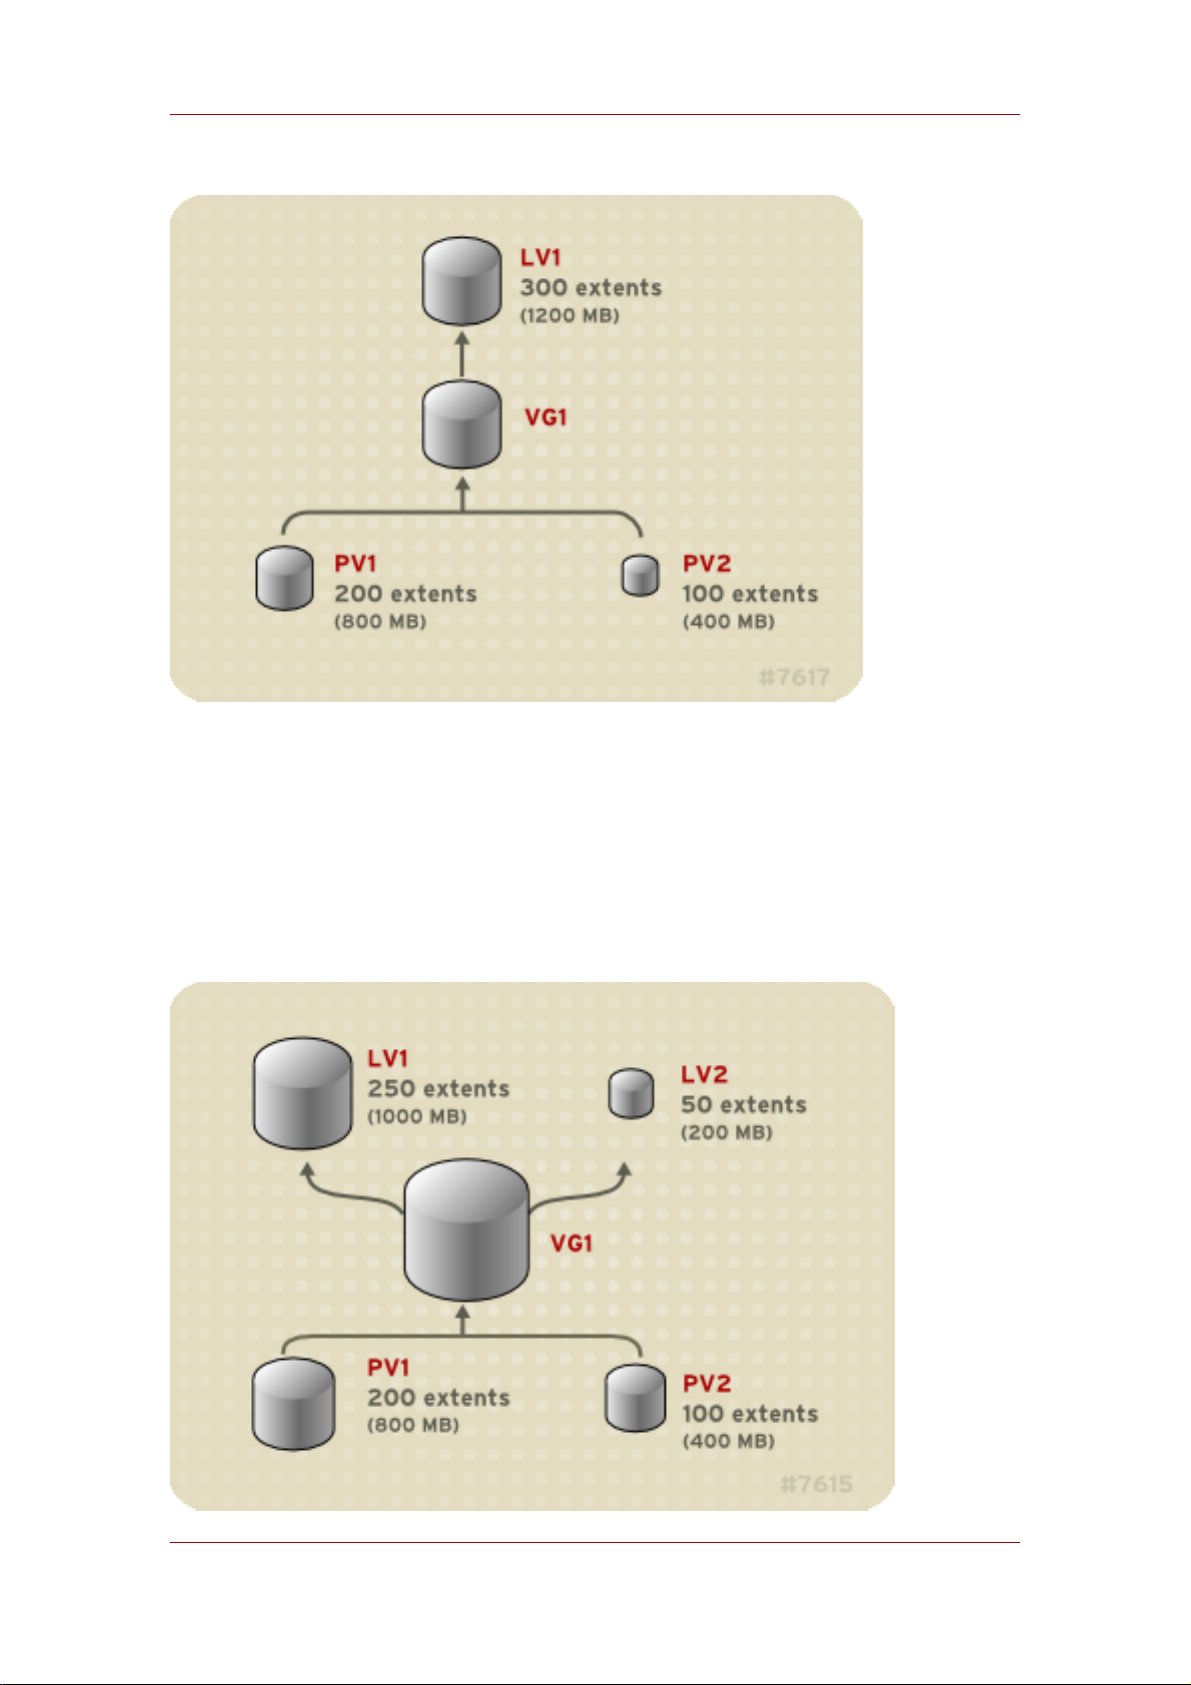
The physical volumes that make up a logical volume do not have to be the same size.
Figure 2.3, “Linear Volume with Unequal Physical Volumes” shows volume group VG1 with a
physical extent size of 4MB. This volume group includes 2 physical volumes named PV1 and
PV2. The physical volumes are divided into 4MB units, since that is the extent size. In this
example, PV1 is 100 extents in size (400MB) and PV2 is 200 extents in size (800MB). You can
create a linear volume any size between 1 and 300 extents (4MB to 1200MB). In this example,
the linear volume named LV1 is 300 extents in size.
10
Linear Volumes
Figure 2.3. Linear Volume with Unequal Physical Volumes
You can configure more than one linear logical volume of whatever size you desire from the
pool of physical extents. Figure 2.4, “Multiple Logical Volumes” shows the same volume group
as in Figure 2.3, “Linear Volume with Unequal Physical Volumes”, but in this case two logical
volumes have been carved out of the volume group: LV1, which is 250 extents in size (1000MB)
and LV2 which is 50 extents in size (200MB).
11

Chapter 2. LVM Components
Figure 2.4. Multiple Logical Volumes
3.2. Striped Logical Volumes
When you write data to an LVM logical volume, the file system lays the data out across the
underlying physical volumes. You can control the way the data is written to the physical volumes
by creating a striped logical volume. For large sequential reads and writes, this can improve the
efficiency of the data I/O.
Striping enhances performance by writing data to a predetermined number of physical volumes
in round-round fashion. With striping, I/O can be done in parallel. In some situations, this can
result in near-linear performance gain for each additional physical volume in the stripe.
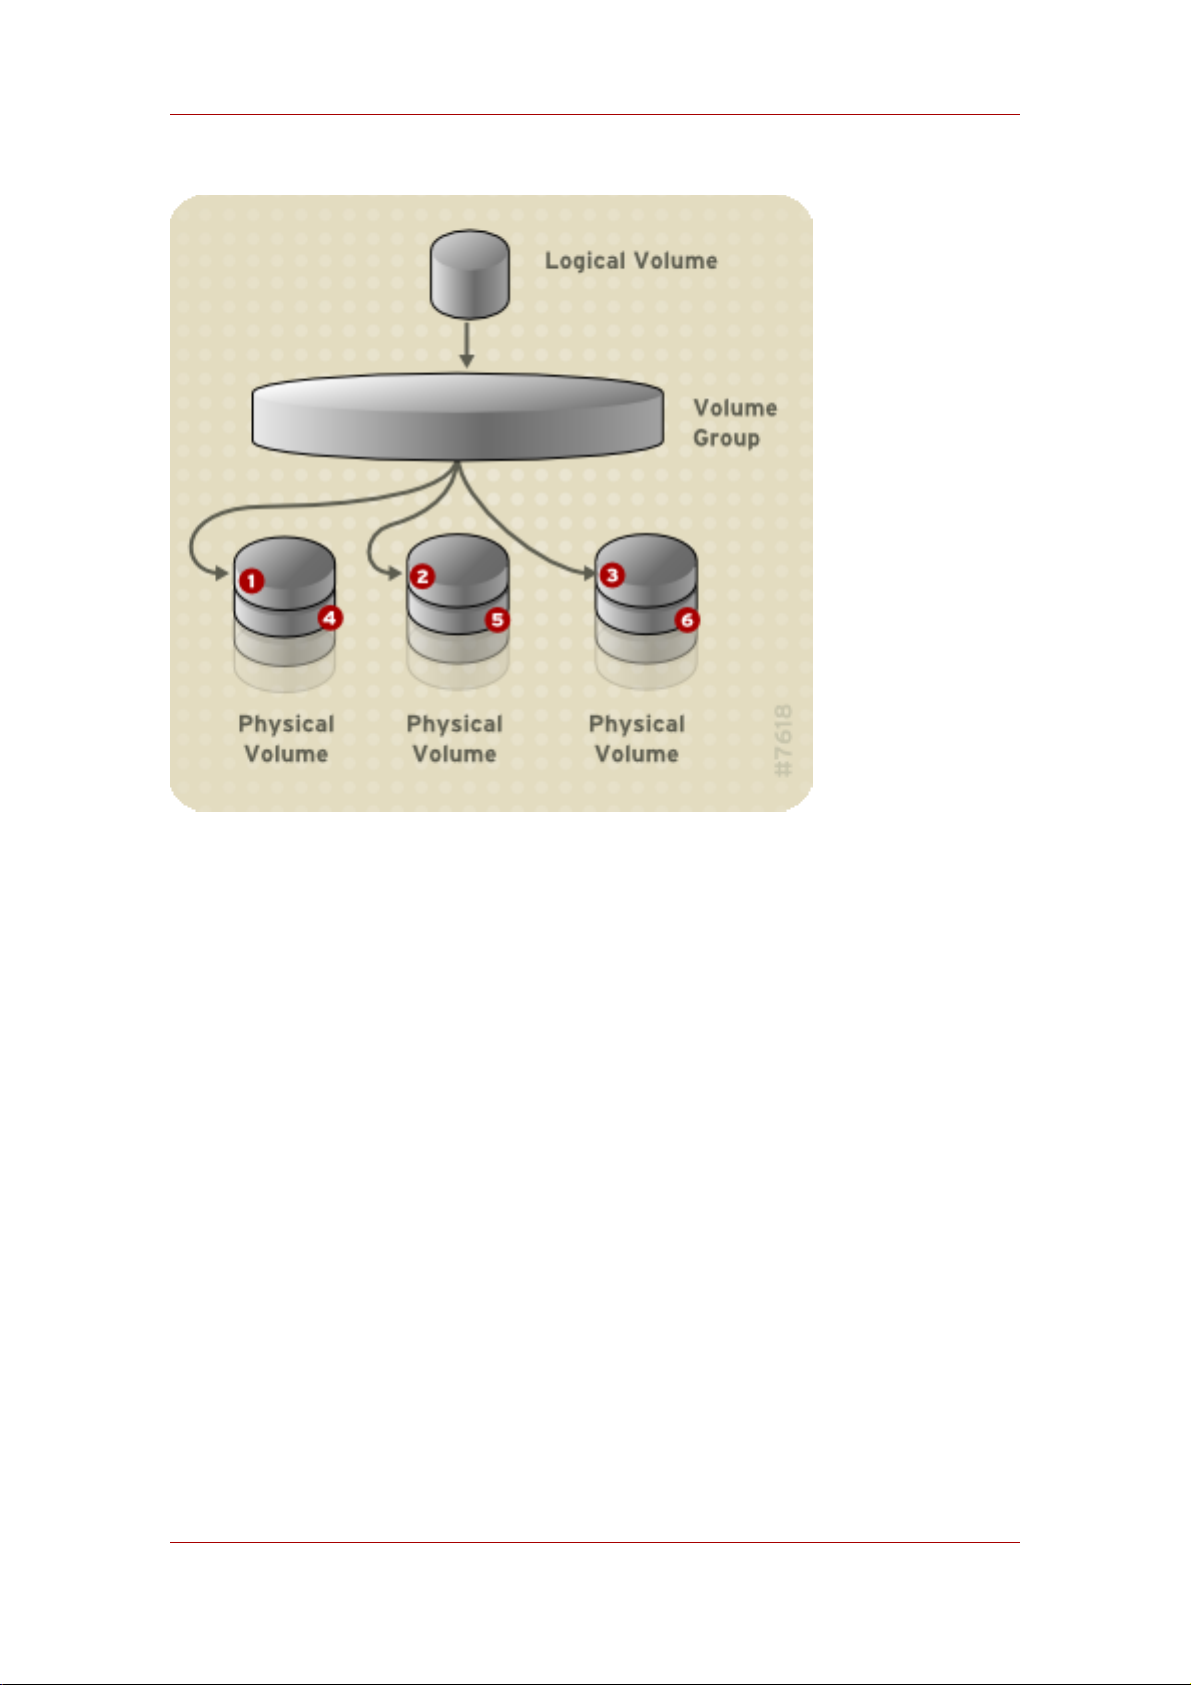
The following illustration shows data being striped across three physical volumes. In this figure:
• the first stripe of data is written to PV1
• the second stripe of data is written to PV2
• the third stripe of data is written to PV3
• the fourth stripe of data is written to PV1
In a striped logical volume, the size of the stripe cannnot exceed the size of an extent.
12
Mirrored Logical Volumes
Figure 2.5. Striping Data Across Three PVs
Striped logical volumes can be extended by concatenating another set of devices onto the end
of the first set. In order extend a striped logical volume, however, there must be enough free
space on the underlying physical volumes that make up the volume group to support the stripe.
For example, if you have a two-way stripe that uses up an entire volume group, adding a single
physical volume to the volume group will not enable you to extend the stripe. Instead, you must
add at least two physical volumes to the volume group. For more information on extending a
striped volume, see Section 4.9, “Extending a Striped Volume”.
3.3. Mirrored Logical Volumes
A mirror maintains identical copies of data on different devices. When data is written to one
device, it is written to a second device as well, mirroring the data. This provides protection for
device failures. When one leg of a mirror fails, the logical volume becomes a linear volume and
can still be accessed.
LVM supports mirrored volumes. When you create a mirrored logical volume, LVM ensures that
data written to an underlying physical volume is mirrored onto a separate physical volume. With
LVM, you can create mirrored logical volumes with multiple mirrors.
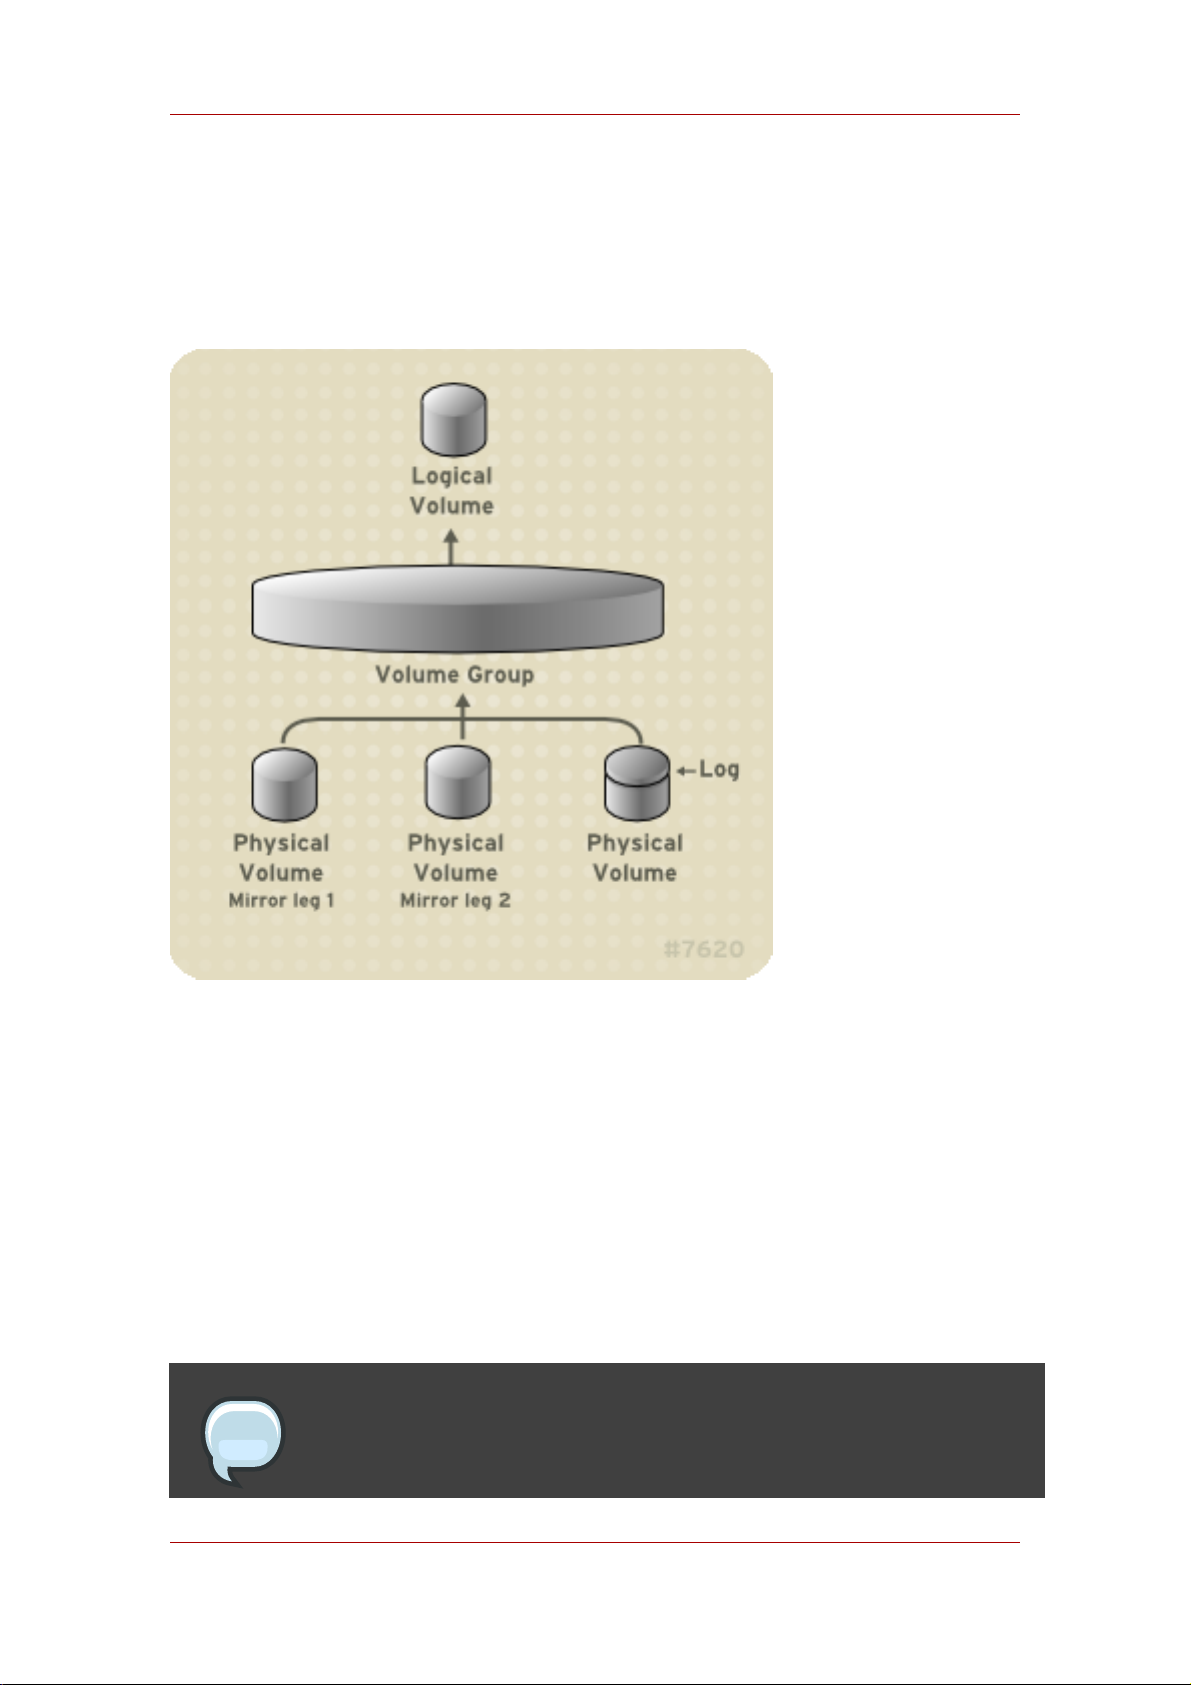
An LVM mirror divides the device being copied into regions that are typically 512KB in size.
LVM maintains a small log which it uses to keep track of which regions are in sync with the
13
Chapter 2. LVM Components
mirror or mirrors. This log can be kept on disk, which will keep it persistent across reboots, or it
can be maintained in memory.
Figure 2.6, “Mirrored Logical Volume” shows a mirrored logical volume with one mirror. In this
configuration, the log is maintained on disk.
Figure 2.6. Mirrored Logical Volume
For information on creating and modifying mirrors, see Section 4.1.3, “Creating Mirrored
Volumes”.
3.4. Snapshot Volumes
The LVM snapshot feature provides the ability to create virtual images of a device at a particular
instant without causing a service interruption. When a change is made to the original device (the
origin) after a snapshot is taken, the snapshot feature makes a copy of the changed data area
as it was prior to the change so that it can reconstruct the state of the device.
Note
LVM snapshots are not supported across the nodes in a cluster.
14

Snapshot Volumes
Because a snapshot copies only the data areas that change after the snapshot is created, the
snapshot feature requires a minimal amount of storage. For example, with a rarely updated
origin, 3-5 % of the origin's capacity is sufficient to maintain the snapshot.
Note
Snapshot copies of a file system are virtual copies, not actual media backup for a
file system. Snapshots do not provide a substitute for a backup procedure.
If a snapshot runs full, the snapshot is dropped. This is to be sure that there is enough space for
the origin file system. You should regularly monitor the size of the snapshot. Snapshots are fully
resizeable, however, so if you have the storage capacity you can increase the size of the
snapshot volume to prevent it from getting dropped. Conversely, if you find that the snapshot
volume is larger than you need, you can reduce the size of the volume to free up space that is
needed by other logical volumes.
When you create a snapshot file system, full read and write access to the origin stays possible.
If a chunk on a snapshot is changed, that chunk is marked and never gets copied from the
original volume.
There are several uses for the snapshot feature:
• Most typically, a snapshot is taken when you need to perform a backup on a logical volume
without halting the live system that is continuously updating the data.
• You can execute the fsck command on a snapshot file system to check the file system
integrity and determine whether the original file system requires file system repair.
• Because the snapshot is read/write, you can test applications against production data by
taking a snapshot and running tests against the snapshot, leaving the real data untouched.
• You can create volumes for use with the Xen virtual machine monitor. You can use the
snapshot feature to create a disk image, snapshot it, and modify the snapshot for a particular
domU instance. You can then create another snapshot and modify it for another domU
instance. Since the only storage used is chunks that were changed on the origin or snapshot,
the majority of the volume is shared.
15

16

Chapter 3.
LVM Administration Overview
This chapter provides an overview of the administrative procedures you use to configure LVM
logical volumes. This chapter is intended to provide a general understanding of the steps
involved. For specific step-by-step examples of common LVM configuration procedures, see
Chapter 5, LVM Configuration Examples.
For descriptions of the CLI commands you can use to perform LVM administration, see
Chapter 4, LVM Administration with CLI Commands. Alternately, you can use the LVM GUI,
which is described in Chapter 7, LVM Administration with the LVM GUI.
1. Creating LVM Volumes in a Cluster
Creating LVM logical volumes in a cluster environment is identical to creating LVM logical
volumes on a single node. There is no difference in the LVM commands themselves, or in the
LVM GUI interface. In order to enable the LVM volumes you are creating in a cluster, the cluster
infrastructure must be running and the cluster must be quorate.
Note
Shared storage for use in Red Hat Cluster Suite requires that you be running the
cluster logical volume manager daemon (clvmd) or the High Availability Logical
Volume Management agents (HA-LVM). If you are not able to use either the
clvmd daemon or HA-LVM for operational reasons or because you do not have
the correct entitlements, you must not use single-instance LVM on the shared
disk as this may result in data corruption. If you have any concerns please
contact your Red Hat service representative.
For information on how to set up the cluster infrastructure, see Configuring and Managing a Red
Hat Cluster.
2. Logical Volume Creation Overview
The following is a summary of the steps to perform to create an LVM logical volume.
1. Initialize the partitions you will use for the LVM volume as physical volumes (this labels
them).
2. Create a volume group.
3. Create a logical volume.
After creating the logical volume you can create and mount the file system. The examples in this
document use GFS file systems.
17

Chapter 3. LVM Administration Overview
1. Create a GFS file system on the logical volume with the gfs_mkfs command.
2. Create a new mount point with the mkdir command. In a clustered system, create the mount
point on all nodes in the cluster.
3. Mount the file system. You may want to add a line to the fstab file for each node in the
system.
Alternately, you can create and mount the GFS file system with the LVM GUI.
Creating the LVM volume is machine independent, since the storage area for LVM setup
information is on the physical volumes and not the machine where the volume was created.
Servers that use the storage have local copies, but can recreate that from what is on the
physical volumes. You can attach physical volumes to a different server if the LVM versions are
compatible.
3. Growing a File System on a Logical Volume
To grow a file system on a logical volume, perform the following steps:
1. Make a new physical volume.
2. Extend the volume group that contains the logical volume with the file system you are
growing to include the new physical volume.
3. Extend the logical volume to include the new physical volume.
4. Grow the file system.
If you have sufficient unallocated space in the volume group, you can use that space to extend
the logical volume instead of performing steps 1 and 2.
4. Logical Volume Backup
Metadata backups and archives are automatically created on every volume group and logical
volume configuration change unless disabled in the lvm.conf file. By default, the metadata
backup is stored in the /etc/lvm/backup file and the metadata archives are stored in the
/etc/lvm/archive file. How long the the metadata archives stored in the /etc/lvm/archive
file are kept and how many archive files are kept is determined by parameters you can set in the
lvm.conf file. A daily system backup should include the contents of the /etc/lvm directory in
the backup.
Note that a metadata backup does not back up the user and system data contained in the
logical volumes.
You can manually back up the metadata to the /etc/lvm/backup file with the vgcfgbackup
command. You can restore metadata with the vgcfgrestore command. The vgcfgbackup and
18
 Loading...