

Page 1

Red Hat Linux 7.1
The Official Red Hat Linux iSeries Installation
Guide
Page 2

ISBN: N/A
Red Hat, Inc.
2600 Meridian Parkway
Durham, NC 27713 USA
+1 919 547 0012 (Voice)
+1 919 547 0024 (FAX)
888 733 4281 (Voice)
P.O. Box 13588
Research Triangle Park, NC 27709 USA
© 2001 Red Hat, Inc.
rhl-ig-iseries(EN)-7.1-Print-RHI (2001-03-14T12:41-0500)
Copyright © 2001 by Red Hat, Inc. This material may be distributed only subject to the terms and conditions set forth in the Open Publication License, V1.0 or later (the latest version is presently available
at http://www.opencontent.org/openpub/).
Distribution of substantively modified versions of this document is prohibited without the explicit permission of the copyright holder.
Distribution of the work or derivative of the work in any standard (paper) book form for commercial
purposes is prohibited unless prior permission is obtained from the copyright holder.
Red Hat, Red Hat Network, the Red Hat "Shadow Man" logo, RPM, Maximum RPM, the RPM logo,
Linux Library, PowerTools, Linux Undercover, RHmember, RHmember More, Rough Cuts, Rawhide
and all Red Hat-basedtrademarks and logos are trademarks orregisteredtrademarks of Red Hat, Inc.
in the United States and other countries.
Linux is a registered trademark of Linus Torvalds.
Motif and UNIX are registered trademarks of The Open Group.
Compaq and the names of Compaq products referenced herein are either trademarks and/or service
marks or registered trademarks and/or service marks of Compaq.
Netscape is a registered trademark of Netscape Communications Corporation in the United States and
other countries.
Windows is a registered trademark of Microsoft Corporation.
SSH and Secure Shell are trademarks of SSH Communications Security, Inc.
FireWire is a trademark of Apple Computer Corporation.
IBM and iSeries are trademarks of IBM.
All other trademarks and copyrights referred to are the property of their respective owners.
Printed in Canada, Ireland, and Japan
ii
Page 3

Contents
Red Hat Linux 7.1
Chapter 1 Introduction............... ..................... ..................... .... 5
1.1 Documentation Conventions .................................................... 5
1.2 How to Use This Manual......................................................... 7
Chapter 2 Steps to Get You Started.............. ..................... .... 9
2.1 Checking For Additional Hardware-Specific Documentation................. 9
2.2 Where to Find Other Red Hat Linux Manuals ................................. 9
2.3 iSeries Hardware Preparation for Installation.................................. 9
2.4 Do You Have Enough Disk Space?............................................. 10
2.5 Which Installation Class is Best For You?...................................... 11
Chapter 3 Installing Red Hat Linux ....... ..................... ............ 17
3.1 The Installation Program User Interface ....................................... 17
3.2 Booting the Installation Program................................................ 19
3.3 Using the Driver Disk............................................................. 20
3.4 Language Selection .............................................................. 21
3.5 Welcome to Red Hat Linux ...................................................... 21
3.6 Install Options..................................................................... 22
3.7 Disk Partitioning .................................................................. 23
3.8 Partitioning Your System......... ..................... ..................... ...... 26
3.9 Partitioning with fdisk............................................................. 31
3.10 Formatting Partitions ............................................................. 33
3.11 Network Configuration ........................................................... 34
3.12 Hostname Configuration......................................................... 35
3.13 Firewall Configuration............................................................ 37
3.14 Mouse Configuration ............................................................. 40
3.15 Language Support Selection .................................................... 40
3.16 Time Zone Configuration ........................................................ 41
3.17 Account Configuration ........................................................... 42
iii
Page 4

3.18 Authentication Configuration .................................................... 46
3.19 Package Group Selection........................................................ 48
3.20 Preparing to Install ............................................................... 51
3.21 Installing Packages............................................................... 53
3.22 Installation Complete............................................................. 53
3.23 Using the Installation Disks in Rescue Mode.................................. 55
3.24 Special Considerations for Accessing the SCSI Utilities from Rescue
Mode............................................................................... 56
Appendix A Getting Technical Support . ..................... .............. 57
A.1 Remember to Sign Up ........................................................... 57
A.2 An Overview of Red Hat Support............................................... 57
A.3 Scope of Red Hat Support ...................................................... 58
A.4 How to Get Technical Support .................................................. 59
A.5 Questions for Technical Support................................................ 60
A.6 Support Frequently Asked Questions (FAQ)................................... 61
Appendix B Troubleshooting Your Installation of Red Hat
Linux
B.1 Trouble During the Installation .................................................. 63
B.2 Problems After Installation....................................................... 65
................ ..................... ..................... .............. 63
Appendix C Re-installationof Red Hat Linux and Preserving
Existing Data
C.1 Preservation of Existing Data on an iSeries Red Hat Linux Logical
Partition............................................................................ 67
C.2 Additional Considerations: iSeries Virtual Disks .............................. 67
................ ..................... ..................... . 67
iv
Page 5

Section 1.1:Documentation Conventions 5
1 Introduction
Welcome to the Official Red Hat Linux iSeries Installation Guide.
The Official Red Hat Linux iSeries Installation Guide contains useful information to assist you during
the installation of Red Hat Linux. From fundamental concepts such as installation preparation (gathering information about your current system) to the step-by-step installation procedure, this book will
be a valuable resource as you install Red Hat Linux.
This manual will walk you through a typical installation using the Red Hat Linux CD-ROMs. Once
you have completed the installation as outlined in this manual, you will have a fully functioning Red
Hat Linux desktop system.
WARNING
In order to complete the installation process, you must follow all steps as
given in Section 3.22, Installation Complete. If these steps are not appropriately followed, you will not have a fully functioning Red Hat Linux
iSeries installation.
1.1 Documentation Conventions
When you read this manual, you will see that certain words are represented in different fonts, typefaces, sizes and weights. This highlighting is systematic; different words are represented in the same
style to indicate their inclusion in a specific category. The types of words that are represented this way
include the following:
command
Linux commands (and other operating system commands, when used) are represented this way.
This style should indicate to you that you can type in the word or phrase on the command line
and press
displayed in a different style on their own (like filenames). In these cases, they are considered
to be part of the command, so the entire phrase will be displayed as a command. For example:
Use the cat testfile command to view the contents of a file, named testfile, in the
current working directory.
filename
[Enter] to invoke a command. Sometimes a command contains words that would be
Page 6

6 Chapter 1:Introduction
Filenames, directory names, paths, and RPM package names are represented this way. This
style should indicate that a particular file or directory exists by that name on your Red Hat
Linux system. Examples:
The .bashrc file in your home directory contains bash shell definitions and aliases for your
own use.
The /etc/fstab file contains information about different system devices and filesystems.
The /usr/share/doc directory contains documentation for various programs.
Install the webalizer RPM if you want to use a Web server log file analysis program.
application
This style should indicate to you that the program named is an end-user application (as opposed
to system software). For example:
Use Netscape Navigator to browse the Web.
[key]
A key on the keyboard is shown in this style. For example:
[Tab]
To use
completion, type in a character and then press the [Tab] key. Your terminal will
display the list of files in the directory that start with that letter.
Combinations of keystrokes
A combination of keystrokes is represented like this:
[Ctrl]-[Alt]-[Backspace] key combination will restart the X Window System.
The
[key]-[key]. For example:
Sequences of commands in Graphical User Interface (GUI) menus
If you need to type in a sequence of commands from a GUI menu, they’ll be shown similar to
the following example:
Click on
Programs=>Applications=>Emacs to start the Emacs text editor.
Additionally,we use several different strategies to draw your attention to certain pieces of information.
In order of how critical the information is to your system, these items will be marked as a note, a
caution, or a warning. For example:
Note
Remember that Linux is case sensitive. In other words, a rose is not a ROSE
is not a rOsE.
Page 7
Section 1.2:How to Use This Manual 7
CAUTION
Do not do routine tasks as root — use a regular user account unless you need
to use the root account to administer your system.
WARNING
If you choose not to partition manually, a server-class installation will
remove all data on hard drives assigned to the Linux logical partition
you are installing on. See Appendix C, Re-installation of Red Hat Linux
and Preserving Existing Data for information regarding saving existing
databeforereinstalling,or consider a differentinstallation class that will
preserve your data.
1.2 How to Use This Manual
This manual focuses on a CD-ROM based installation, so it is ideal for users (both new and old) who
want a quick and simple installation solution. It will help you prepare your system, walk you through
the installation, and assist you in the configuration of Red Hat Linux.
If you are an experienced user who wants to perform a Red Hat Linux CD-ROM installation, and you
do not need a review of the basics, you can skip ahead to Chapter 3, Installing Red Hat Linux to begin
the installation process.
Tip
Refer to the Red Hat Frequently Asked Questions for answers to questions
and problems that may occur before, during, or after the installation. You
will find the FAQ online at:
http://www.redhat.com/support/docs/faqs/rhl_general_faq/FAQ.html
Page 8

8 Chapter 1:Introduction
Page 9

Section 2.3:iSeries Hardware Preparation for Installation 9
2 Steps to Get You Started
Before you install Red Hat Linux, you will need to perform the following steps:
2.1 Checking For Additional Hardware-Specific
Documentation
The installation process assumes basic familiarity with the IBM iSeries platform and makes
reference to IBM’s Configuring Linux in a Guest Partition. In general, this section assumes
that you have read the Configuring Linux in a Guest Partition document ( http://publib.boulder.ibm.com/pubs/html/as400/v5r1/ic2924/info/rzalm/rzalmlinuxkickoff.htm) in its entirety.
2.1.1 Additional Resources
For more information on iSeries hardware, refer to the following resources.
Useful Websites
• Configuring Linux in a Guest Partition — http://publib.boulder.ibm.com/pubs/html/as400/v5r1/ic2924/info/rzalm/rzalmlinuxkickoff.htm
• Linux for iSeries — http://www-1.ibm.com/servers/eserver/iseries/linux/
2.2 Where to Find Other Red Hat Linux Manuals
If your particular boxed set did not include all of the printed Red Hat Linux manuals, you can find
them online or on the Red Hat Linux Documentation CD.
To find the manuals in both HTML and PDF formats online, visit http://www.redhat.com/support/manuals.
2.3 iSeries Hardware Preparation for Installation
In order to prepare your iSeries system for installation, you should follow the instructions in the Planning to run Linux on a logical partition and Creating a logical partition to run Linux sections of the
Configuring Linux in a Guest Partition document.
The virtual LAN interface may be configured for DHCP or a static IP address. Consult your OS/400
command documentation for information on configuring the OS/400 facilities. The partition may be
configured for IPL type A, B, or *NWSSTG. If IPL type *NWSSTG is used, a 4 MB PReP Boot
(primary, active) partition is required on the first virtual disk.
Page 10

10 Chapter 2:Steps to Get You Started
2.4 Do You Have Enough Disk Space?
Nearly every modern-day operating system (OS) uses disk partitions, and Red Hat Linux is no exception. When you install Red Hat Linux, you may have to work with disk partitions. If you have not
worked with disk partitions before (or need a quick review of the basic concepts) read An Introduction
to Disk Partitions in the appendix of the Official Red Hat Linux Reference Guide before proceeding.
You must ensure that Red Hat Linux has enough available disk space on the hard drive(s) for this
installation.
These disks, especially virtual disks, must be made large enough for your maximum needs before the
installation. For the iSeries, it is not necessary to share these disks with other Linux partitions or with
other operating systems. Plan your disk space accordingly for the partitions where Red Hat Linux will
be installed.
Before you start the installation process, one of the following conditions must be met:
• Your computer must have enough unpartitioned disk space for the installation of Red Hat Linux.
• You must have one or more partitions that may be deleted, thereby freeing up enough disk space
to install Red Hat Linux.
2.4.1 Installation Disk Space Requirements
Workstation-class
A workstation-class installation, choosing to install GNOME or KDE, requires at least 1.2 GB
of free space. Choosing both GNOME and KDE requires at least 1.5 GB of free disk space.
Server-class
A server-class installation requires 650 MB for a minimal installation and at least 1.2 GB of free
space if every package is selected.
Custom-class
A custom-class installation requires 300 MB for a minimal installation and at least 2.4 GB of
free space if every package is selected.
Note
To use automatic partitioning, you must have enough free disk space available (1.2 GB or more); if you do not have enough free disk space available,
this option will not appear during your installation.
Page 11

Section 2.5:Which Installation Class is Best For You? 11
If you are not sure that you meet these conditions, or if you want to know how to create free disk space
for your Red Hat Linux installation, please refer to the partitioning appendix in the Official Red Hat
Linux Reference Guide. Sections relating to LILO and Intel-specific BIOS issues can be ignored.
2.5 Which Installation Class is Best For You?
Usually,Red Hat Linux is installed on its own disk partition or set of partitions, or over another installation of Linux.
WARNING
Installing Red Hat Linux over another installation of Linux (including
Red Hat Linux) does not preserve any information (files or data) from
a prior installation. Make sure you save any important files! If you are
installing this way, and you want to preserve the current data, refer to
Appendix C, Re-installation of Red Hat Linux and Preserving Existing
Data.
For the iSeries platforms, Red Hat Linux provides three different classes, or types, of installations:
Workstation
A workstation-class installation is most appropriate for a desktop system user. This option is
not recommended for iSeries systems.
Server
A server-class installation is most appropriate for you if you would like your system to function
as a Linux-based server, and you do not want to heavily customize your system configuration.
The server-class installation is the preferred type of installation for iSeries systems.
Custom
A custom-class installation allows you the greatest flexibility during your installation. You
choose your partitioning scheme, which packages you want and more. Custom-class installations are most appropriate for those users more familiar with Red Hat Linux installations.
These classes give you the option of simplifying the installation process (with some potential for loss
of configuration flexibility), or retaining flexibility with a slightly more complex installation process.
Next, take a detailed look at each class, so you can see which one is right for you.
Page 12

12 Chapter 2:Steps to Get You Started
2.5.1 Workstation-Class Installations
Most suitable for new users, the workstation-class installation will install your choice of the GNOME
or KDE desktop environments, or both, and the X Window System.
WARNING
A workstation-class installation will erase all information in all Linuxrelated hardfile (disk) partitions assigned to that Linux Logical partition.
Refer to Appendix C, Re-installation of Red Hat Linux and Preserving
Existing Data foroptions that will allow youto save existing data on your
system.
Below are the minimum recommended disk space requirements for a workstation-class installation.
• Workstation choosing GNOME: 1.2 GB
• Workstation choosing KDE: 1.2 GB
• Workstation choosing both GNOME and KDE, and games: 1.5 GB
If you plan to choose all group packages (for example, GNOME is a group of packages), as well as
select additional individual packages, you may want to allow yourself 1.5 GB or more of disk space.
If you provide this extra space, you will have room for additional data, if needed.
Note
Unlike workstation-class installations previous to Red Hat Linux 7.0, performing a Red Hat Linux 7.1 workstation-class installation will not install
the network daemon xinetd (inet services). When xinetd is not installed,
you will have a more secure installation. However,in-boundnetwork-related
services such as finger, telnet, talk, and FTP will not work.
these types of services, please go back and choose a server- or a custom-class
installation.
1
For example, you can telnet out to other systems, but other systems cannot telnet in to your system.
1
If you require
Page 13

Section 2.5:Which Installation Class is Best For You? 13
What a Workstation-Class Installation Will Do
If you choose automatic partitioning, a workstation-class installation removes all Linux-related partitions on all installed hard drives (and uses all free unpartitioned disk space) to create the following
partitions:
• A 64 MB swap partition.
• An 8 MB PReP Boot partition in which the Linux kernel or the boot loader resides.
• A variable-sized root partition (mounted as /) in which all other files are stored (the exact size of
this partition is dependent on your available disk space).
2.5.2 Server-Class Installations
A server-class installation is most appropriate for you if you would like your system to function as a
Linux-based server, and you do not want to heavily customize your system configuration.
The minimum recommended disk space requirements for a server-class installation are as follows:
• Server (minimum): 650 MB
• Server (choosing everything): 1.2 GB
If you plan to choose all group packages, as well as select additional individual packages, you may
want to allow yourself 1.2 GB or more of disk space.
At this point, you should have already planned your disk space requirements so that you know how
much additional space is needed beyond what the Red Hat installation program requires. You should
have also determined where that space will come from, whether from a virtual disk, a physical disk,
or a combination of the two. Once you have completed the installation, altering the sizes of your
partitions can be disruptive.
WARNING
A server-class installation will erase all disk data (physical or virtual) that
is assigned to the Linux Logical partition being installed. Refer to Appen-
dix C, Re-installation of Red Hat Linux and Preserving Existing Data for
options that will allow you to preserve your existing data.
What a Server-Class Installation Will Do
During the server-class installation, the X Window System is not configuredand no GUI will be loaded
when the system boots, unless you choose to install the appropriate packages during package selection.
Page 14

14 Chapter 2:Steps to Get You Started
If you choose automatic partitioning, the installation program deletes all data in all existing partitions
of any kind and decides how to partition the disk for the new version.
If you choose automatic partitioning, a server-class installation removes ALL existing partitions on
ALL installed hard drives, so choose this installation class only if you are sure you have nothing you
want saved! When the installation is complete, you will find the following partitions:
• A 256 MB swap partition.
• A 256 MB partition (mounted as /).
• A partition of at least 512 MB (mounted as /usr).
• A partition of at least 512 MB (mounted as /home).
• A 256 MB partition (mounted as /var).
• An 8 MB PReP Boot partition in which the Linux kernel or the boot loader resides.
This disk partitioning scheme results in a reasonably flexible filesystem configuration for most server-
class tasks.
2.5.3 Custom-Class Installations
The custom-class installation allows you the most flexibility during your installation. The workstation-class and server-class installations automatically go through the installation process for you and
omit certain steps. During a custom-class installation, you must decide how disk space should be partitioned. You have complete control over the packages that will be installed on your system.
The minimum recommended disk space requirements for a custom-class installation are as follows:
• Custom (minimum): 300 MB
• Custom (choosing everything): 2.4 GB
At this point, you should have already planned your disk space requirements so that you know how
much additional space is needed beyond what the Red Hat installation program requires. You should
have also determined where that space will come from, whether from a virtual disk, a physical disk,
or a combination of the two. Once you have completed the installation, altering the sizes of your
partitions can be disruptive.
What a Custom-Class Installation Will Do
As you might guess from the name, a custom-class installation puts the emphasis on flexibility. During
a custom-class installation, you can choose how disk space should be partitioned. You have complete
control over which packages will be installed on your system.
The following list may help those of you who are trying to decide which installation class will better
suit your needs. If you think you will have trouble performing any of the tasks on this list, you should
Page 15

Section 2.5:Which Installation Class is Best For You? 15
not perform a custom-class installation without reading through this manual and clarifying any questions you may have.
• Selecting and Installing Packages — This step is performed after your partitions have been configured and selected for formatting. You are allowed to select groups of packages, individual
packages, a combination of the two, or choose an
Everything install.
• AuthenticationConfiguration — During a custom-class installation, you can set up network passwords using authentication configuration.
Choosing between automatic or manual partitioning is an important choice. In choosing automatic
partitioning, a custom-class installation erases all disk storage related to that Linux LPAR and re-allocates the space to the following partitions:
• A 64 MB swap partition.
• An 8 MB PReP Boot partition in which the Linux kernel or the boot loader resides.
• A variable-sized root partition (mounted as /) in which all other files are stored (the exact size of
this partition is dependent on your available disk space).
In choosing manual partitioning, you have more control and can preserve portions of existing disks
(hard disk partitions). This can be a strong reason to choose manual partitioning within a custom-class
installation when performing a reinstall of an iSeries Linux Logical partition installation.
Page 16

16 Chapter 2:Steps to Get You Started
Page 17

Section 3.1:The Installation Program User Interface 17
3 Installing Red Hat Linux
This chapter explains how to install Red Hat Linux from the CD-ROM. The following topics will be
discussed:
• Getting familiar with the installation program’s user interface
• Booting the installation program
• Configuration steps during the installation (language, keyboard, mouse, etc.)
• Finishing the installation
3.1 The Installation Program User Interface
This release of Red Hat Linux features a text-based installation. A graphical, mouse-based installation
is not available at this time.
The Red Hat Linux text mode installation program uses a screen-based interface that includes most
of the on-screen "widgets" commonly found on graphical user interfaces. Figure 3–1, Installation
Program Widgets as seen in
Disk Druid
in
illustrate the screens you will see.
Configure TCP/IP and Figure 3–2, Installation Program Widgets as seen
Figure 3–1 Installation Program Widgets as seen in Configure TCP/IP
Page 18
18 Chapter 3:Installing Red Hat Linux
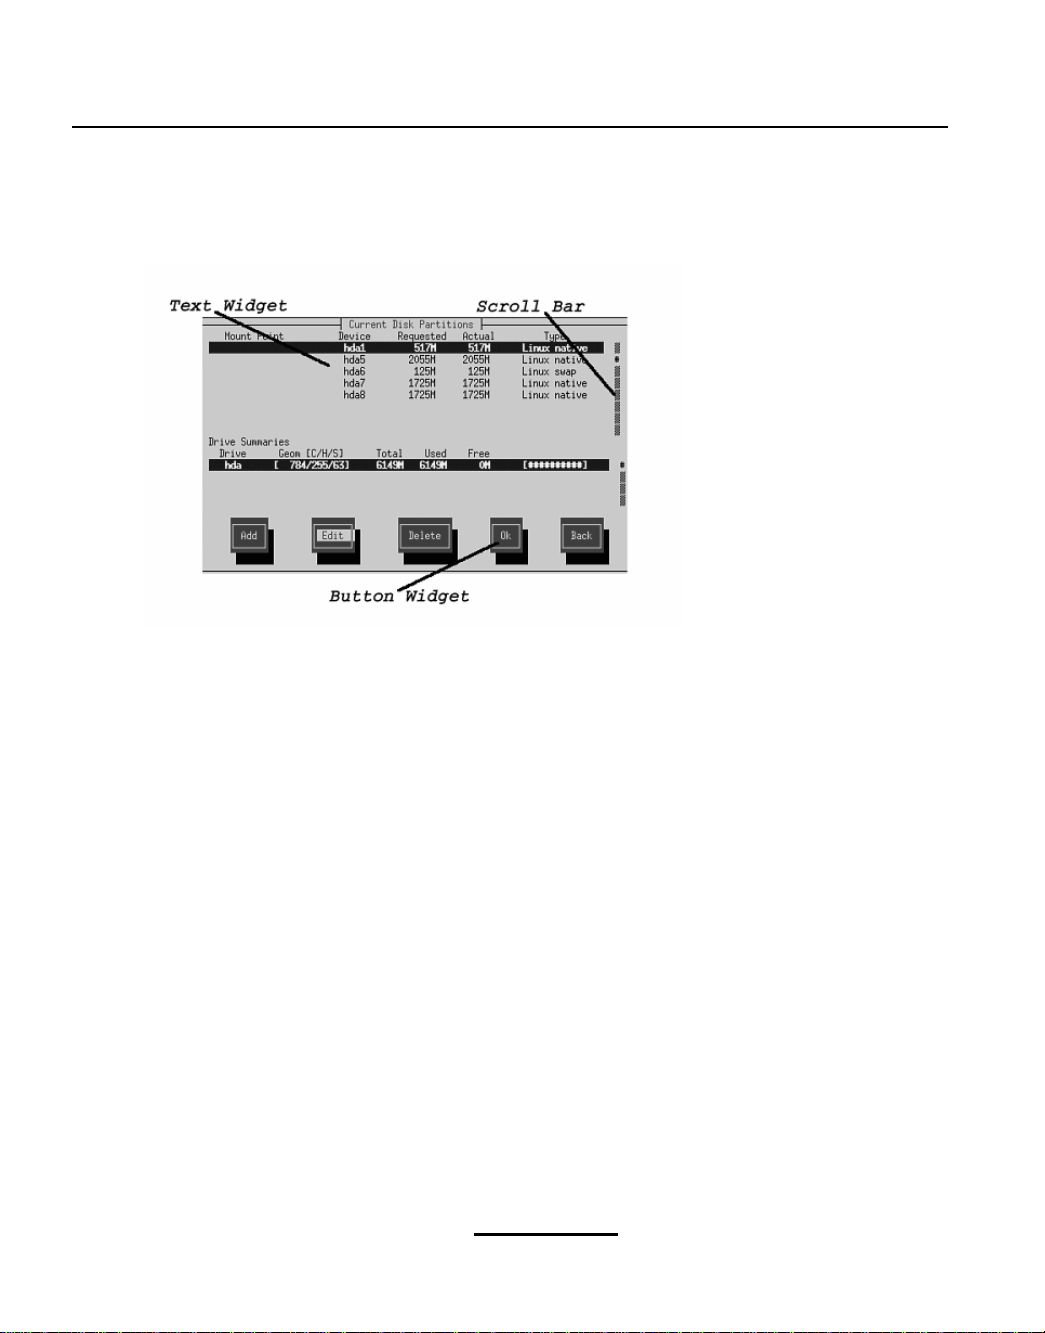
Figure 3–2 Installation Program Widgets as seen in Disk Druid
Here is a list of the most important widgets shown in Figure 3–1, Installation Program Widgets as
seen in
Configure TCP/IP and Figure 3–2, Installation Program Widgets as seen in
• Window — windows (usually referred to as dialogs in this manual) will appear on your screen
throughout the installation process. At times, one window may overlayanother; in these cases, you
can only interact with the window on top. When you are finished in that window, it will disappear,
allowing you to continue working in the window underneath.
• Text Input — text input lines are regions where you can enter information required by the installation program. When the cursor rests on a text input line, you may enter and/or edit information
on that line.
• Checkbox — checkboxes allow you to select or deselect a feature. The box displays either an
asterisk (selected) or a space (unselected). When the cursor is within a checkbox, press
select an unselected feature or to deselect a selected feature.
• Text widget — text widgets are regions of the screen for the display of text. At times, text widgets
may also contain other widgets, such as checkboxes. If a text widget contains more information
than can be displayed in the space reserved for it, a scroll bar appears; if you position the cursor
within the text widget, you can then use the
[Up] and [Down] arrow keys to scroll through all the
information available. Your current position is shown on the scroll bar by a
moves up and down the scroll bar as you scroll.
Disk Druid
# character, which
:
[Space] to
Page 19

Section 3.2:Booting the Installation Program 19
• Button widget — button widgets are the primary method of interacting with the installation program. You progress through the windows of the installation program by navigating these buttons,
using the
• Cursor— although not a widget, the cursor is used to select (and interact) with a particular widget.
As the cursor is moved from widget to widget, it may cause the widget to change color, or you may
only see the cursor itself positioned in or next to the widget. In Figure 3–1, Installation Program
Widgets as seen in
Installation Program Widgets as seen in
[Tab] and [Enter] keys. Buttons can be selected when they are highlighted.
Configure TCP/IP, the cursor is positioned on the OK button. Figure 3–2,
Disk Druid
shows the cursor on the Edit button.
3.1.1 Using the Keyboard to Navigate
Navigation through the installation dialogs is performed through a simple set of keystrokes. To move
the cursor, use [Left], [Right], [Up], and [Down] arrow keys. Use [Tab], and [Alt]-[Tab] to cycle forward
or backward through each widget on the screen. Along the bottom, most screens display a summary
of available cursor positioning keys.
To "press" a button, position the cursor over the button (using
or [Enter]. To select an item from a list of items, move the cursor to the item you wish to select and
press [Enter]. To select an item with a checkbox, move the cursor to the checkbox and press
to select an item. To deselect, press [Space] a second time.
Pressing
the
[F12] accepts the current values and proceeds to the next dialog; it is equivalent to pressing
OK
button.
[Tab], for example) and press [Space]
[Space]
CAUTION
Unless a dialog box is waiting for your input, do not press any keys during
the installation process (doing so may result in unpredictable behavior).
3.2 Booting the Installation Program
Insert the installation CD into the CD-ROM drive. Determine the volume name by which OS/400
refers to the CD. This can be found by executing the command wrklnk ’/qopt/*’ at the OS/400
command line. Unless there is another CD with the same label in another drive, the volume name will
be Red_Hat. Note, if the volume name includes a timestamp (as it does when there are name conflicts), ejecting and re-inserting the CD will cause the volume name to change and you must determine
what it is again.
If you will be installing to SCSI disks, you must have a copy of the ibmsis driver CD-ROM. If you
have multiple CD-ROM drives available to the target LPAR, you must determine which CD-ROM
Page 20

20 Chapter 3:Installing Red Hat Linux
drive will be the first CD-ROM drive (/dev/vcda) for the LPAR. Refer to IBM documentation for
information how to determine this. You will place the driver disk into the first CD-ROM drive when
instructed by the installation program.
Vary off the NWS.
Edit the NWS description. Set the IPL source option to
/QOPT/
Set the IPL stream file option to
RED_HAT
*STMF.
/PPC/ISERIES/VMLINUX (case is not sig-
nificant), where RED_HAT is the name of the CD volume as it appears under /QOPT.
Set the IPL parameters option to
set the option to
*NONE.
’dd’ (including quotes) if you will be using a driver disk. Otherwise,
Use a telnet client to connect to the virtual console of the LPAR. When prompted, select the partition
you want to work with and then enter the OS/400 service tools userid and password.
Vary on the NWS. You should see the boot sequence begin on the virtual console in a few seconds.
The installation program will begin automatically.
3.3 Using the Driver Disk
You may be asked if you have a driver disk. If you are not asked about a driver disk, skip to Section
3.4, Language Selection.
If you no not need to load a driver from a driver disk, answer No to the driver disk question and skip
to Section 3.4, Language Selection.
If you have specified a driver disk (IPL parameters set to
driver disk. Answer yes to this question. When the the installation programs tells you to insert the
driver disk, put it in the first CD-ROM, then select
removethe driver disk, take it out of the CD-ROM drive and re-insert the installation disk if necessary,
then select
OK.
’dd’), you will first be asked if you have a
OK. When the installation program tells you to
CAUTION
If you removed the installation disk to insert the driver disk, re-insert the
installation disk when you are prompted to remove the driver disk, before
you select
OK.
Page 21
Section 3.5:Welcome to Red Hat Linux 21
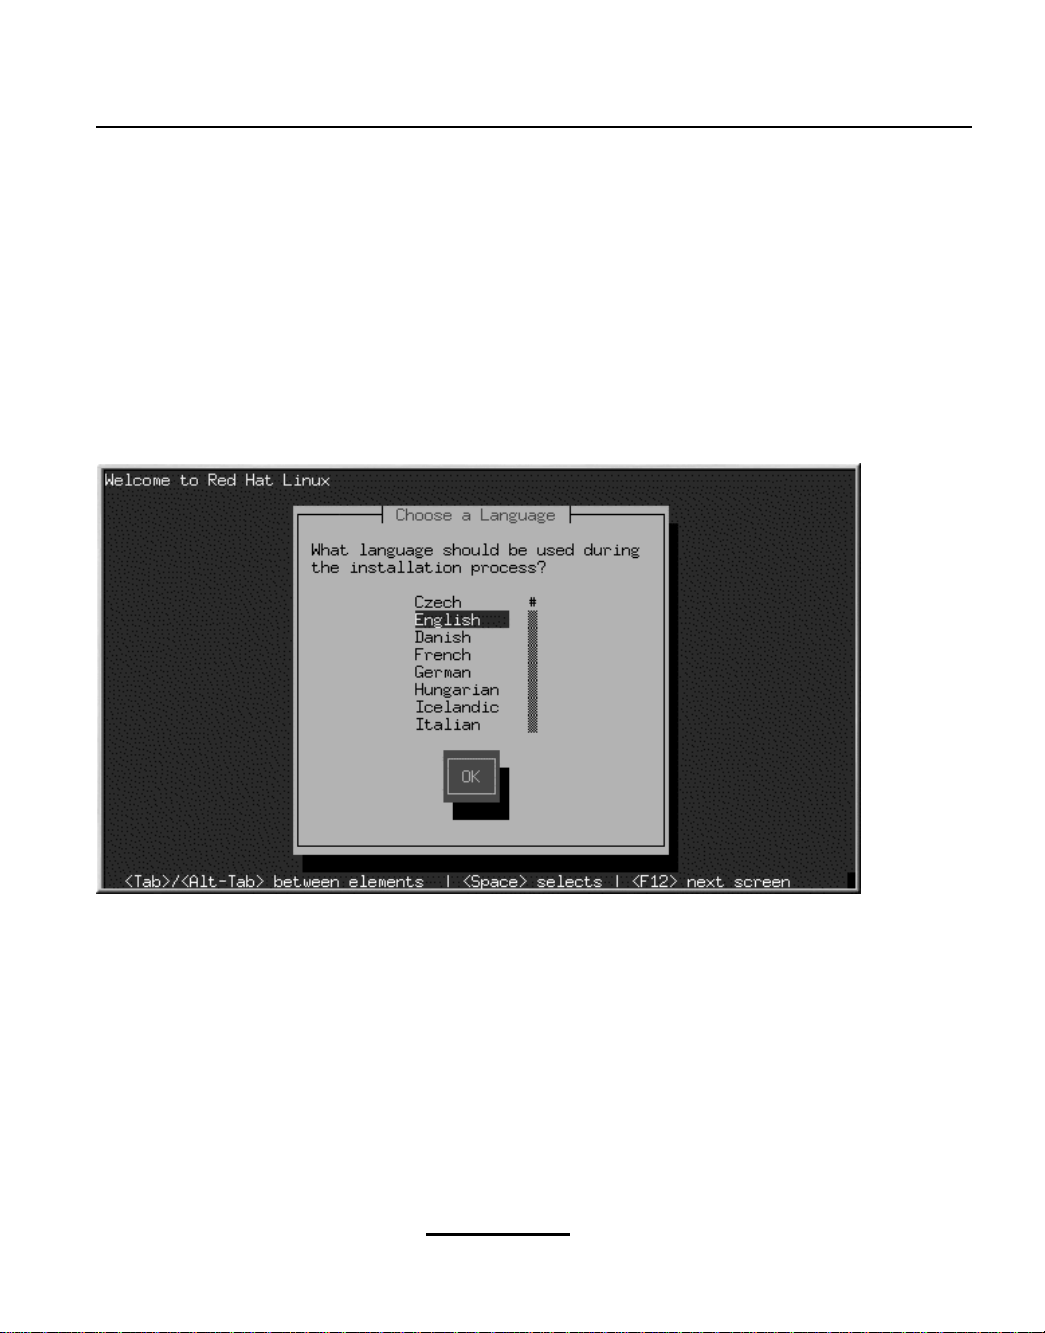
3.4 Language Selection
Using the [Up] and [Down] arrow keys, select the language you would prefer to use for the installation
and as the system default (see Figure 3–3, Language Selection).
Selecting the appropriate language will also help target your time zone configuration later in the installation. The installation program will try to define the appropriate time zone based on what you
specify on this screen.
Figure 3–3 Language Selection
Once you have made your selection, press [Enter].
A scroll bar appears to the right of the list. This indicates that there are more entries than can be
displayed in the available space at once. You’ll see other scroll bars like this throughout the installation
program.
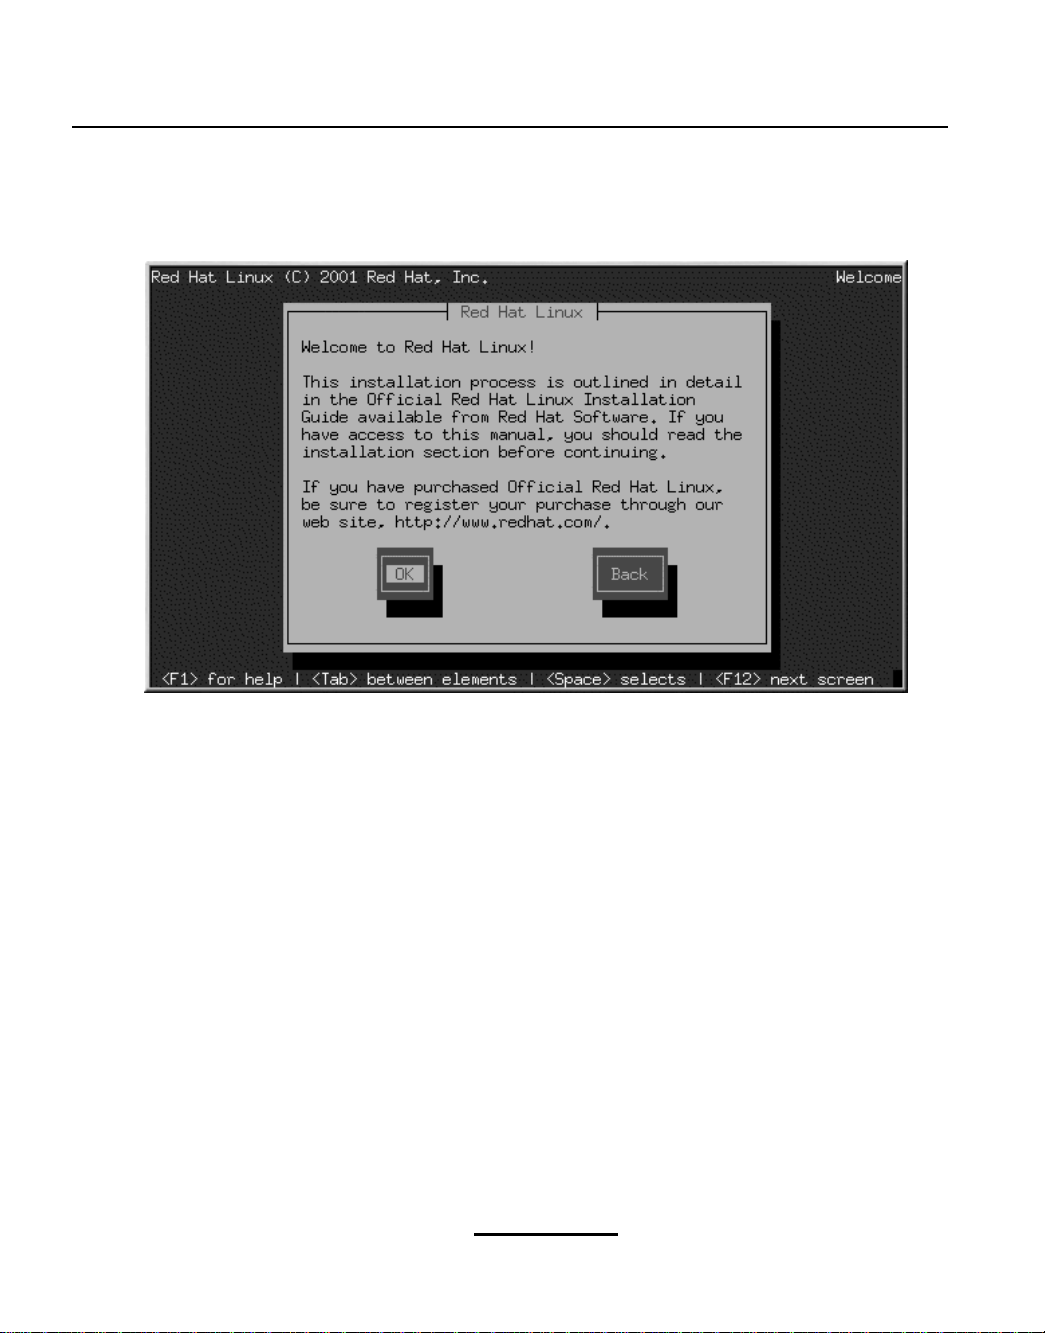
3.5 Welcome to Red Hat Linux
The Welcome screen does not prompt you for any input.
Page 22
22 Chapter 3:Installing Red Hat Linux
Figure 3–4 Welcome Screen
Select the OK button and press [Enter] to continue.
3.6 Install Options
Red Hat Linux allows you to choose the installation type that best fits your needs. Your options are
Workstation, Server,orCustom.
Page 23

Section 3.7:Disk Partitioning 23
Figure 3–5 Choosing Install or Upgrade
3.7 Disk Partitioning
Automatic partitioning allows you to perform an installation without having to partition your drive(s)
yourself. If you do not feel comfortable with partitioning your system, it is recommended that do not
choose to partition manually and instead let the installation program partition for you.
If you are not sure how you want your system to be partitioned, please read Appendix C, Re-installa-
tion of Red Hat Linux and Preserving Existing Data and then read An Introduction to Disk Partitions
in the Official Red Hat Linux Reference Guide. Sections relating to LILO and Intel-specific BIOS
issues can be ignored.
Page 24

24 Chapter 3:Installing Red Hat Linux
Figure 3–6 Disk Partitioning
WARNING
A workstation- or custom-class installation using automatic partitioning will remove all data on all Linux disk partitions within the virtual or
physical disks associated with the current Linux LPAR. Topreservethis
data, refer to Appendix C, Re-installation of Red Hat Linux and Preserv-
ing Existing Data.
Page 25

Section 3.7:Disk Partitioning 25
WARNING
A server-class installation using automatic partitioning will remove all
data on all disk storage (virtual or physical) associated with current
Linux LPAR. To preserve this data, refer to Appendix C, Re-installation
of Red Hat Linux and Preserving Existing Data.
Note:
If the Automatic Partitioning option does not appear, then you do not have
enough free space available for this installation option. You can either exit
out of the installation program and make space available, or you can partition
manually.
If you chose automatic partitioning, skip ahead to Section 3.11, Network Configuration.
If you do not choose automatic partitioning, it is highly recommended that you choose to use Disk
Druid in the disk partitioning section.
If you prefer to use fdisk, there are some rules you must follow.
• The root partition must be the first partition on the first disk.
• If *NWSSTG IPL is to be used, the first disk must have a primary partition of type PReP Boot,
marked bootable (active). The PReP Boot partition should be 8 MB.
If you choose manual partitioning, you will see a screen allowing you to choose between two partitioning tools, Disk Druid or fdisk (see Figure 3–7, Disk Partitioning).
If you do not want to lose some or all of your data, choose to partition manually or choose a different
installation class.
Page 26

26 Chapter 3:Installing Red Hat Linux
Figure 3–7 Disk Partitioning
3.8 Partitioning Your System
If you chose Automatic Partitioning, please skip ahead to Section 3.11, Network Configuration.
If you chose
At this point, you must tell the installation program where to install Red Hat Linux. This is done by
defining mount points for one or more disk partitions in which Red Hat Linux will be installed. You
may also need to create and/or delete partitions at this time (refer to Figure 3–8, Partitioning with Disk
Druid).
Manually partition with fdisk, please skip ahead to Section 3.9, Partitioning with
Note
If you have not yet planned how you will set up your partitions, refer to Appendix C, Re-installation of Red Hat Linux and Preserving Existing Data
and the partitioning appendix in the Official Red Hat Linux Reference Guide.
Sections relating to LILO and Intel-specific BIOS issues can be ignored.
fdisk
.
Page 27

Section 3.8:Partitioning Your System 27
Figure 3–8 Partitioning with Disk Druid
The partitioning tool used in Red Hat Linux 7.1 is Disk Druid. With the exception of certain esoteric
situations, Disk Druid can handle the partitioning requirements for a typical Red Hat Linux installation.
3.8.1 Partition Fields
Eachline in the Partitions section represents a disk partition. Each line in this section has fivedifferent
fields:
Mount Point
•
exists; the volume is "mounted" at this location. This field indicates where the partition will be
mounted. If a partition exists, but is not set, then you need to define its mount point. Double-click
on the partition or click the
Device: This field displays the partition’s device name.
•
Requested: This field shows the partition’s original size. To redefine the size of a partition, you
•
must delete the current partition and recreate it using the
Actual: This field shows the space currently allocated to the partition.
•
Type: This field shows the partition’s type (for example, Linux Native or DOS).
•
: A mount point is the location within the directory hierarchy at which a volume
Edit button.
Add
button.
Page 28

28 Chapter 3:Installing Red Hat Linux
3.8.2 Recommended Partitioning Scheme
Unless you have a reason for doing otherwise, we recommend that you create the following partitions:
• A swap partition (twice your RAM) — swap partitions are used to support virtual memory. In
other words, data is written to a swap partition when there is not enough RAM to store the data
your system is processing. If your computer has 16 MB of RAM or less, you must create a swap
partition. Even if you have more memory, a swap partition is still recommended. The minimum
size of your swap partition should be equal to your computer’s RAM. However,it is recommended
that the swap be two times the amount of RAM on your system. In Disk Druid, the partition field
for swap should look similar to the following:
<Swap> hda6 64M 64M Linux swap
•Aroot partition (1.2-2.4 GB) — this is where "/" (the root directory) will be located. In this
setup, all files are on the root partition. An 1.2 GB root partition will permit the equivalent of a
workstation-class installation (with very little free space), while a 2.4 GB root partition will let
you install every package. In Disk Druid, the partition field for / should look similar to:
/ hda5 3734M 3734M Linux native
3.8.3 Problems When Adding a Partition
If you attempt to add a partition and Disk Druid cannot handle your request, you will see a dialog
box listing partitions that are currently unallocated, along with the reason they could not be allocated.
Unallocated partition(s) are also displayed on Disk Druid’s main screen (though you may have to
scroll through the
As you scroll through the
message in red text, followed by one or more partitions. A common reason for this is a lack of sufficient free space for the partition. In any case, the reason the partition remains unallocated will be
displayed after the partition’s requested mount point.
To fix an unallocated requested partition, you must move the partition to another drive which has the
available space, resize the partition to fit on the current drive, or delete the partition entirely. Make
changes using the
Partitions section to see them).
Partitions section, you might see an Unallocated Requested Partition
Edit button.
3.8.4 Drive Summaries
Each line in the Drive Summaries section represents a hard disk on your system. Each line has the
following fields:
Page 29

Section 3.8:Partitioning Your System 29
• Drive: This field shows the hard disk’s device name.
Geom [C/H/S]: This field shows the hard disk’s geometry. The geometry consists of three numbers
•
representing the number of cylinders, heads, and sectors as reported by the hard disk.
Total: This field shows the total available space on the hard disk in megabytes.
•
Used: These fields show how much of the hard disk’s space is currently allocated to partitions,
•
in megabytes and percentage.
•
Free: This field shows how much of the hard disk’s space is still unallocated, in megabytes.
Drive Summaries section is displayed only to indicate your computer’s disk configuration. It is
The
not meant to be used as a means of specifying the target hard drive for a given partition; to do that,
use the
Allowable Drives field in Section 3.8.6, Adding Partitions.
3.8.5 Disk Druid’s Buttons
These buttons control Disk Druid’s actions. They are used to add and delete partitions, and to change
partition attributes. Buttons on this screen are also used to accept the changes you have made, or to
exit Disk Druid. For further explanation, take a look at each button in order.
Add: Used to request a new partition. When selected, a dialog box will appear containing fields
•
(such as mount point and size) that must be filled in.
•
Edit: Used to modify attributesof the partition currently selected in the
Edit will open up a dialog box. Some or all of the fields can be edited, depending on whether
ing
the partition information has already been written to disk.
Delete: Used to remove the partition currently highlighted in the Current Disk Partitions section.
•
You will be asked to confirm the deletion of any partition.
Ok: Used to accept the current settings and more forward in the installation process.
•
•
Back: Used to move to the previous screen without saving current changes.
Partitions section. Select-
3.8.6 Adding Partitions
To add a new partition, select the Add button. A dialog box will appear.
Note
You will need to dedicate at least two partitions to Red Hat Linux (/ (root)
and swap), and optionally more. This is discussedmore completely in An In-
troduction to Disk Partitions in the Official Red Hat Linux Reference Guide.
Page 30

30 Chapter 3:Installing Red Hat Linux
• Mount Point: Highlight and enter the partition’s mount point. For example, if this partition should
be the root partition, enter /.
Size (Megs): Enter the size (in megabytes) of the partition. Note this field starts with a "1" in it;
•
unless changed you will end up with a 1 MB partition.
Use remaining space: This checkbox indicates whether the size you entered in the previous field
•
is to be considered the partition’s exact size, or its minimum size. When selected, the partition
will grow to fill all available space on the hard disk. The partition’s size will increase and decrease
as other partitions are modified. You can make multiple partitions growable; if you do, the additional free space will be shared among all growable partitions. The final partition sizes will not be
permanent until you select
•
Partition Type: This field contains a list of different partition types (such as Linux Native or
DOS).
Allowable Drives: This field contains a list of the hard disks installed on your system. If a hard
•
disk’s box is highlighted, then a desired partition can be created on that hard disk. If the box is not
checked, then the partition will never be created on that hard disk. By using different checkbox
settings, you can have Disk Druid place partitions as you see fit, or let Disk Druid decide where
partitions should go.
Ok: Select Ok once you are satisfied with the settings and wish to create the partition.
•
OK to create the partitions.
Cancel: Select Cancel if you do not want to create the partition.
•
3.8.7 Editing Partitions
To edit a partition, select the Edit button or double-click on the existing partition.
Note
If the partition already existed on your hard disk, you will only be able to
change the partition’s mount point. If you want to make any other changes,
you will need to delete the partition and recreate it.
3.8.8 Deleting a Partition
To delete a partition, highlight it in the Partitions section and click the Delete button. You will be
asked to confirm the deletion.
Skip to Section 3.10, Formatting Partitions for further installation instructions.
Page 31

Section 3.9:Partitioning with fdisk 31
3.9 Partitioning with fdisk
This section applies only if you chose to use fdisk to partition your system. If are not using fdisk,
please skip to Section 3.7, Disk Partitioning for automatic partitioning or Section 3.8, Partitioning
Your System for partitioning with Disk Druid.
If you prefer to use fdisk, there are some rules you must follow.
• The root partition must be the first partition on the first disk.
• If *NWSSTG IPL is to be used, the first disk must have a primary partition of type PReP Boot,
marked bootable (active). The PReP Boot partition should be 8 MB.
CAUTION
Unless you have previously used
not recommend that you use it.
Disk Druid is easier to understand than fdisk. To exit fdisk, click
return to the previous screen, deselect fdisk, and then click
If you have chosen to use fdisk, the next screen will prompt you to select a drive to partition using
fdisk.
fdisk
and understand how it works, we do
Next.
Back to
Page 32

32 Chapter 3:Installing Red Hat Linux
Figure 3–9 Partitioning with fdisk
Once you have chosen which drive to partition, you will be presented with the fdisk command screen.
If you do not know what command to use, type [m] at the prompt for help.
When you are finished making partitions, type
back to the original fdisk screen where you can choose to partition another drive or continue with your
installation.
[w] to save your changes and quit. You will be taken
Note
None of the changes you make take effect until you save them and exit fdisk
using the w command. Youcan quit fdisk at any time without saving changes
using the q command.
Page 33

Section 3.10:Formatting Partitions 33
CAUTION
Unlike and Intel system, an iSeries Linux partition should be booted from a
PReP Boot partition. The PReP Boot partition must be created and be made
active with the a option. Failure to do so may leave the resulting system
unbootable, even if the installation completes successfully.
After you have partitioned your drive(s), click Next. Then you will need to use Disk Druid to assign
mount points to the partitions you just created with fdisk.
You will not be able to add new partitions using Disk Druid, but you will be able to edit mount points
for the partitions you have already created.
For each partition you created with fdisk, click on the
for that partition from the pulldown menu, and click on
Edit button, choose the appropriate mount point
OK.
3.10 Formatting Partitions
After you have created partitions, you will need to format them. Choose the partitions that you would
like to format. All newly created partitions should be formatted. In addition, any existing partitions
that contain data you no longer need should be formatted. However, partitions such as /home or
/usr/local must not be formatted if they contain data you wish to keep (see Figure 3–10, Choosing
Partitions to Format).
Page 34

34 Chapter 3:Installing Red Hat Linux
Figure 3–10 Choosing Partitions to Format
Note
It is never necessary to check for bad blocks on a virtual disk.
If you wish to check for bad blocks while formatting each filesystem, please make sure to select the
Check for bad blocks while formatting checkbox. Checking for bad blocks can help prevent data
loss by locating the bad blocks on a drive and making a list of them to prevent using them in the future.
3.11 Network Configuration
If you do not have a physical LAN card or virtual LAN, you will not see this screen. Please skip ahead
to the next section, Section 3.16, Time Zone Configuration.
Ifyou haveaphysical LAN card or virtualLAN, and you have not already configured your networking,
you now have the opportunity (as shown in Figure 3–11, Network Configuration).
If there is more than one LAN interface allocated to the LPAR, this dialog configures the primary
interface. This will enable tools such as setup to configure the others later. Other network interfaces
can be configured after installation, using the setup command.
Page 35

Section 3.12:Hostname Configuration 35
Choose whether you would like to configure your IP address using bootp/dhcp. If you do not have
DHCP client access or you are unsure what to provide here, please contact your network administrator.
In this case, an existing server on your LAN dynamically supplies network-related information needed
to add this system to the network at connect-time. (Note that if you do this, the remaining fields in
this dialog will be disabled, as DHCP and BOOTP essentially "fill in the blanks" for you.)
If you do not use
(IP)
, Primary nameserver, Secondary nameserver, and Ternary nameserver. If you are unsure of
any of these, please contact your network administrator.
The information you enter here is static network information. In this case, the network information
you supply is assigned permanently to this computer.
bootp/dhcp, enter, where applicable, the IP Address,
Netmask, Default gateway
Figure 3–11 Network Configuration
3.12 Hostname Configuration
The Hostname Configuration dialog prompts you to enter a name for your computer (called a hostname).
Page 36

36 Chapter 3:Installing Red Hat Linux
Figure 3–12 Hostname Configuration
If you have a network card in your computer, enter a fully-qualified domain name in this format:
hostname.domain.name
In this example, hostname is the name you’ve chosen for your computer and domain.name is the
TCP/IP domain. (A domain name may contain more nodes: for example, eastcoast.mainserver.red-
hat.com and westcoast.mainserver.redhat.com.)
Even if your computer is not part of a network, you can enter a hostname for your system. Take this
opportunity to enter in a name; if you do not, your system will be known as localhost.
Tip
To change your hostname once you have rebooted your system, first become
root. In a terminal at the root prompt, type hostname
newname is what you want the hostname to be. If you just want to have the
hostname echoed onto the display, type hostname and it will display the
system’s hostname.
newname
, where
Page 37

Section 3.13:Firewall Configuration 37
3.13 Firewall Configuration
Red Hat Linux also offers you firewall protection for enhanced system security. A firewall exists
between your computer and the network, and determines which resources on your computer remote
users on the network can access. A properly configured firewall can greatly increase the security of
your system.
Choose the appropriate security level for your system.
Figure 3–13 Firewall Configuration
High
If you choose High, your system will not accept connections (other than the default settings)
that are not explicitly defined by you. By default, only the following connections are allowed:
• DNS replies
• DHCP — so any network interfaces that use DHCP can be properly configured
If you choose
• Active mode FTP (passive mode FTP, used by default in most clients, should still work)
High, your firewall will not allow the following:
Page 38

38 Chapter 3:Installing Red Hat Linux
• IRC DCC file transfers
• Secure Shell (SSH)
• Remote X Window System clients
If you are connecting your system to the Internet, but do not plan to run a server,this is the safest
choice. If additional services are needed, you can choose
Customize to allow specific services
through the firewall.
Medium
If you choose Medium, your firewall will not allow remote machines to have access to certain
resources on your system. By default, access to the following resources are not allowed:
• Ports lower than 1023 — the standard reserved ports, used by most system services, such as
FTP, SSH, telnet, and HTTP
• The NFS server port (2049)
• The local X Window System display for remote X clients
• The X Font server port (by default, xfs does not listen on the network, it is disabled in the
font server)
If you want to allow resources such as the Secure Shell (SSH), while still blocking access to
normal system services, choose
Medium and then select Customize to allow specific services
through the firewall.
No Firewall
No firewall provides complete access to your system and does no security checking. Security
checking is the disabling of access to certain services. It is recommended that this only be
selected if you are running on a trusted network (not the Internet), or if you plan to do more
detailed firewall configuration later.
Choose
Trusted Devices
Customize to add trusted devices or to allow additional incoming services.
Selecting any of the Trusted Devices allows access to your system for all traffic from that
device; it is excluded from the firewall rules. For example, if you are running a local network,
but are connected to the Internet via a PPP dialup, you can check
from your local network will be allowed. Selecting
eth0 as trusted means all traffic over the
eth0 and any traffic coming
Ethernet is allowed, put the ppp0 interface is still firewalled. If you want to restrict trafficon an
interface, leave it unchecked.
It is not recommended that you make any device that is connected to public networks, such as
the Internet, a
Trusted Device.
Page 39

Section 3.13:Firewall Configuration 39
Allow Incoming
Enabling these options allow the specified services to pass through the firewall. Note, during a
workstation-class installation, the majority of these services are not installed on the system.
DHCP
If you allow incoming DHCP queries and replies, you allow any network interface that
uses DHCP to determine its IP address. DHCP is normally enabled. If DHCP is not
enabled, your computer can no longer get an IP address.
SSH
Secure SHell (SSH) is a suite of tools for logging into and executing commands on a
remote machine. If you plan to use SSH tools to access your machine through a firewall,
enable this option. You need to have the openssh-server package installed in order
to access your machine remotely, using SSH tools.
Telnet
Telnet is a protocol for logging into remote machines. Telnet communications are unencrypted, and provide no security from network snooping. Allowing incoming Telnet
access is not recommended. If you do want to allow inbound Telnetaccess, you will need
to install the telnet-server package.
WWW (HTTP)
The HTTP protocol is used by Apache (and by other Web servers) to serve Web pages. If
you plan on making your Web server publicly available, enable this option. This option
is not required for viewing pages locally or for developing Web pages. You will need to
install the apache package if you want to serve Web pages.
Mail (SMTP)
If you want to allow incoming mail delivery through your firewall, so that remote hosts
can connect directly to your machine to deliver mail, enable this option. You do not need
to enable this if you collect your mail from your ISP’s server using POP3 or IMAP, or if
you use a tool such as fetchmail. Note that an improperly configured SMTP server can
allow remote machines to use your server to send spam.
FTP
The FTP protocol is used to transfer files between machines on a network. If you plan
on making your FTP server publicly available, enable this option. You need to install the
wu-ftpd (and possibly the anonftp) package for this option to be useful.
Other ports
Page 40

40 Chapter 3:Installing Red Hat Linux
You can allow access to ports which are not listed here, by listing them in Other ports
field. Use the following format: port:protocol. For example, if you want to allow
IMAP access through your firewall, you can specify imap:tcp. You can also explicitly
specify numeric ports; to allow UDP packets on port 1234 through the firewall, enter
1234:udp. To specify multiple ports, separate them with commas.
3.14 Mouse Configuration
Figure 3–14 Mouse Selection
You will be prompted to select a mouse type. Please select none.
3.15 Language Support Selection
Red Hat Linux can install and support multiple languages for use on your system.
You must select a language to use as the default language. The default language will be used on your
Red Hat Linux system once installation is complete. If you choose to install other languages, you can
change your default language after the installation.
Page 41

Section 3.16:Time Zone Configuration 41
Figure 3–15 Language Support Selection
If you are only going to use one language on your system, selecting only that language will save
significant disk space. The default language is the language you selected to use during the installation.
However, if you select only one language, you will only be able to use that specified language after
the Red Hat Linux installation is complete.
To use more than one language on your system, choose specific languages to be installed or select all
languages to have all available languages installed on your Red Hat Linux system.
Use the
you selected for use during the installation will be installed.
Reset button to cancel your selections. Resetting will revert to the default; only the language
3.16 Time Zone Configuration
You can set your time zone by selecting your computer’s physical location.
Page 42

42 Chapter 3:Installing Red Hat Linux
Figure 3–16 Configuring the Time Zone
If you wish to set the hardware (CMOS) clock to GMT (Greenwich Mean Time, also known as UTC,
or Universal Coordinated Time), select
system will properly handle daylight-saving time, if your time zone uses it.
Select your time zone from the list and press
Hardware clock set to GMT. Setting it to GMT means your
[Enter].
Tip
If you wish to change your time zone configuration after you have booted
your Red Hat Linux system, become root and use the /usr/sbin/time-
config command.
3.17 Account Configuration
The Root Password screen allows you to set your root password (see Figure 3–17, Root Password).
Page 43

Section 3.17:Account Configuration 43
Figure 3–17 Root Password
Setting up a root account and password is one of the most important steps during your installation.
Your root account is similar to the administrator account used on Windows NT machines. The root
account is used to install packages, upgrade RPMs and perform most system maintenance. Logging
in as root gives you complete control over your system.
Use the root account only for system administration. Create a non-root account for your general use
and su -toroot when you need to fixsomethingquickly. These basic rules willminimize the chances
of a typo or an incorrect command doing damage to your system.
1
The installation program will prompt you to set a root password
for your system. You must enter a
root password. The installation program will not let you proceed to the next section without entering
a root password.
The root password must be at least six characters long; the password you type is not echoed to the
screen. Youmust enter the password twice; ifthe two passwords do not match, the installation program
will ask you to enter them again.
1
A root password is the administrative password for your Red Hat Linux system. Youshould only log in as root
when needed for system maintenance. The root account does not operate within the restrictions placed on normal
user accounts, so changes made as root can have implications for your entire system.
Page 44

44 Chapter 3:Installing Red Hat Linux
You should make the root password something you can remember, but not something that is easy
for someone else to guess. Your name, your phone number, qwerty, password, root, 123456, and
anteater are all examples of bad passwords. Good passwords mix numerals with upper and lower case
letters and do not contain dictionary words: Aard387vark or 420BMttNT, for example. Remember
that the password is case-sensitive. If you write down your password, keep it in a secure place. However, it is recommended that you do not write down this or any password you create.
Note
Do not use one of the example passwords offered in this manual. Using one
of these passwords could be considered a security risk.
Note
The root user (also known as the superuser) has complete access to the entire
system; for this reason, loggingin as the root user isbest done only to perform
system maintenance or administration.
3.17.1 Setting Up User Accounts
If you choose to create a user account now,you will have an account to log in to once the installation
has completed. This allows you to safely and easily log into your computer without having to be root
to create your user account.
Enter an account name (user name). Then enter and confirm a password for that user account. Enter
the full name ofthe account user. Once the information has been entered properly,selectthe
and press
[Enter].
OK button
Page 45

Section 3.17:Account Configuration 45
Figure 3–18 Add User
Once the account has been set up, you will be presented with the User Account Setup screen which
will display the account you just entered.
Page 46

46 Chapter 3:Installing Red Hat Linux
Figure 3–19 User Account Setup
Choose Add to create a new user account.
You can also
Edit or Delete the user accounts you have created or no longer want.
3.18 Authentication Configuration
If you are performing a workstation- or server installation, please skip ahead to Section 3.19, Package
Group Selection.
You may skip this section if you will not be setting up network passwords. If you do not know whether
you should do this, please ask your system administrator for assistance.
Unless you are setting up
are selected (see Figure 3–20, Authentication Configuration). We recommend you use both to make
your machine as secure as possible.
To configure the NIS option, you must be connected to an NIS network. If you are not sure whether
you are connected to an NIS network, please ask your system administrator.
NIS authentication, you will notice that only MD5 and shadow passwords
Page 47

Section 3.18:Authentication Configuration 47
Figure 3–20 Authentication Configuration
• Enable shadow passwords provides a secure method for retaining passwords. The passwords
are stored in /etc/shadow, which can only be read by root.
Enable MD5 passwords allows a long password to be used (up to 256 characters), instead of the
•
standard eight letters or less.
Enable NIS allows you to run a group of computers in the same Network Information Service
•
domain with a common password and group file. You can choose from the following two options:
NIS Domain allows you to specify the domain or group of computers your system belongs to.
–
NIS Server
–
causes your computer to use a specific NIS server, rather than broadcasting a
message to the local area network asking for any available server to host your system.
Enable LDAPtells your computer to use LDAP for some or all authentication. LDAP consolidates
•
certaintypes of information within your organization. For example, allof the different lists of users
within your organization can be merged into one LDAP directory. For more information about
LDAP, refer to Official Red Hat Linux Reference Guide, Lightweight Directory Access Protocol
(LDAP). You can choose from the following options:
LDAPServer — allows you to access a a specified server (by providing an IP address) running
–
the LDAP protocol.
Page 48

48 Chapter 3:Installing Red Hat Linux
– LDAP Base DN — allows you to look up user information by its Distinguished Name (DN).
Use TLS connections (Transport Layer Security)
–
lookups — this option allows LDAP to
send encrypted user names and passwords to an LDAP server before authentication.
Enable Kerberos — Kerberos is a secure system for providing network authentication services.
•
For more information about Kerberos, see Using Kerberos 5 on Red Hat Linux in the Official Red
Hat Linux Reference Guide. There are three options to choose from here:
Realm — this option allows you to access a network that uses Kerberos, composed of one or
–
a few servers (also known as KDCs) and a potentially large number of clients.
KDC — this option allows you access to the Key Distribution Center (KDC), a machine that
–
issues Kerberos tickets (sometimes called a Ticket Granting Server or TGS).
Admin Server — this option allows you to access a server running kadmind.
–
3.19 Package Group Selection
After your partitions have been selected and configured for formatting, you are ready to select packages for installation.
Note
Unless you choose a custom-class installation, the installation program will
automatically choose most packages for you.
You can select components, which group packages together according to function (for example, C
Development
the two.
To select a component, click on the checkbox beside it (see Figure 3–21, Package Group Selection).
, Networked Workstation
,orWeb Server), individual packages, or a combination of
Page 49

Section 3.19:Package Group Selection 49
Figure 3–21 Package Group Selection
Select each component you wish to install. Selecting Everything (at the end of the component list)
during a custom-class installation installs all packages included with Red Hat Linux. If you select
every package, you will need approximately 1.7 GB of free disk space.
To select packages individually,check the
Select Individual Packagesboxat the bottom of the screen.
3.19.1 Selecting Individual Packages
After selecting the components you wish to install, you can select or deselect individual packages (see
Figure 3–22, Selecting Individual Packages).
Page 50

50 Chapter 3:Installing Red Hat Linux
Figure 3–22 Selecting Individual Packages
To see the list of packages in the Applications/Editors category, for example, use the arrow keys to
select this group and press
(open) and a list of packages in this category appears. An
Press the
To see a description of a particular package, make sure that package is highlighted and press
[Enter] or [Space] keys to select or deselect package
[Enter] or [Space]. When you do, the + sign (closed) changes to a - sign
* appears beside currently selected packages.
[F1].
Note
Some packages (such as the kernel and certain libraries) are required for every Red Hat Linux system and are not available to select or deselect. These
base packages are selected by default.
3.19.2 Unresolved Dependencies
Many software packages, in order to work correctly, depend on other software packages that must be
installed on your system. For example, many of the graphical Red Hat system administration tools
require the python and pythonlib packages. To make sure your system has all the packages it
Page 51

Section 3.20:Preparing to Install 51
needs in order to be fully functional, Red Hat Linux checks these package dependencies each time
you install or remove software packages.
If any package requires another package which you have not selected to install, the program presents a
list of these unresolved dependencies and gives you the opportunity to resolve them (see Figure 3–23,
Unresolved Dependencies).
Unresolved Dependencies screen will only appear if you are missing packages that are needed
The
by the packages you have selected. At the bottom of the screen, under the list of missing packages, an
Install packages to satisfy dependencies checkbox is selected by default. If you leave this checked,
the installation program will resolve package dependencies automatically by adding all required packages to the list of selected packages.
Figure 3–23 Unresolved Dependencies
3.20 Preparing to Install
You will now see a screen preparing you for the installation of Red Hat Linux.
Page 52

52 Chapter 3:Installing Red Hat Linux
Figure 3–24 Installation to Begin
WARNING
If, for some reason, you would rather not continue with the installation
process, this is your last opportunity to safely cancel the process and reboot your machine. Once you press the
Next button, partitions will be
written and packages will be installed. If you wish to abort the installation, you should reboot now before your hard drive(s) are rewritten.
To cancel this installation process, use the OS/400 console to vary off the LPAR. It may also be necessary to perform an immediate power down of the system.
For your reference, a complete log of your installation can be found in /tmp/install.log once
you reboot your system.
Page 53

Section 3.22:Installation Complete 53
3.21 Installing Packages
At this point there is nothing left for you to do until all the packages have been installed (see Figure
3–25, Installing Packages). How quickly this happens depends on the number of packages you have
selected and your computer’s speed.
Figure 3–25 Installing Packages
3.22 Installation Complete
Your Red Hat Linux 7.1 installation is almost complete.
When the installation program is done, you will be prompted to press the
Installation Complete. The LPAR will then reboot with the installed Red Hat Linux OS.
[Enter] key (see Figure 3–26,
Page 54

54 Chapter 3:Installing Red Hat Linux
CAUTION
In order to reboot properly you must save the kernel image and kernel command line arguments into your IPL source. Log in to Linux and follow the
appropriate instructions below.
If you haveinstalled onto virtual disks and have no SCSI disks, use these two
commands:
/sbin/installkernel prep
/sbin/installcmdline prep
If you haveboth virtual and SCSI disks, and want to IPL from the PReP Boot
partition on the first virtual disk, use these two commands:
/sbin/installkernel prep
/sbin/installcmdline prep
If you have SCSI disks (with or without virtual disks) and want to IPL from
the A or B side, use these two commands:
/sbin/installkernel a
/sbin/installcmdline a
substituting b for the a argument in each command to install the kernel and
command line on the B side.
Note:
It may take a minute or longer for the /sbin/installkernel command
to complete.
Now you may shutdown Linux and vary off the LPAR. Before you vary on again, you must set the
IPL source to for the LPAR to
Remember that the only place you can log in as root is at the console or other devices as listed in
/etc/securetty. If you want to log in as root from remote systems, use ssh.
*NWSSTG, A,orB.
Page 55

Section 3.23:Using the Installation Disks in Rescue Mode 55
Figure 3–26 Installation Complete
3.23 Using the Installation Disks in Rescue Mode
You can use the installation disks in rescue mode, in case your LPARwill not boot. Rescue mode gives
you access to the disk partitions on your LPARso you can make any changes necessary to rescue your
installation.
To boot in rescue mode, follow the instructions for booting the installation program, with this change:
In the NWS Description, set the IPL parameters option to ’rescue’ (including the quotes), or to
’dd rescue’ if you need to load the SCSI driver.
After the Language Selection screen (see Section 3.4, Language Selection), the installation program
will attempt to mount the disk partitions on your LPAR. It will then present you with a shell prompt
where you can make the changes you need. These changes may include storing the kernel and command line into the IPL source, as described in the Installation Complete section (see Section 3.22,
Installation Complete).
When your changes are complete, you can exit the shell using exit 0. This will cause a reboot from
C side. To reboot from the A or B side or from *NWSSTG, you should vary off the LPAR instead
the
of exiting the shell.
Page 56

56 Chapter 3:Installing Red Hat Linux
3.24 Special Considerations for Accessing the SCSI
Utilities from Rescue Mode
If your LPAR uses Native DASD disks, you may need access to the SCSI utilities from rescue mode.
These utilities are located on the driver disc CD. The driver disc CD cannot be mounted from rescue
mode unless special steps are taken. These steps are described below.
If you have a second CD-ROM drive assigned to your Linux LPAR,you can mount the driver disc CD
in the second drive.
If you have only one CD-ROM drive, you will need to set up an NFS boot, using the following steps:
1. Copy /qopt/red_hat/ppc/iSeries/vmlinux to theIFS of the iSeries system containing
your Linux LPAR. You can do this with a command like:
COPY OBJ (’/qopt/red_hat/ppc/iseries/vmlinux’) TODIR(’/tmp’)
Note that /tmp can be replaced with any location on your IFS.
2. Copy the first installation disc onto a filesystem of another Linux LPAR or other Linux system.
3. Make this copy of the installation disc available through NFS or FTP.
4. Vary off or power down the LPAR you need to rescue. Set its IPL parameters as instructed for
booting the Installation discs in rescue mode, except that the IPL source should point to the copy
vmlinux on your IFS (from step 1, above).
of
5. Make sure the installation disk is not in your CD-ROM drive.
6. IPL the Linux LPAR.
7. Follow the prompts as decribed in Section 3.23, Using the Installation Disks in Rescue Mode.You
will see an additonal prompt for the installation source. Select NFS or FTP (as appropriate) and
complete the following network configuration screen.
8. When the Linux LPARhas booted into rescue mode, the CD-ROM drivewill be available and you
can mount the driver disk to access the SCSI utilities.
Page 57

Section A.2:An Overview of Red Hat Support 57
A Getting Technical Support
A.1 Remember to Sign Up
If you have an official edition of Red Hat Linux 7.1, please remember to sign up for the benefits you
are entitled to as a Red Hat customer.
You will be entitled to any or all of the following benefits, depending upon the Official Red Hat Linux
product you purchased:
• OfficialRed Hat support — Get help with your installation questions from Red Hat, Inc.’s support
team.
• Red Hat Network — Easily update your packages and receive security notices that are customized
for your system. Go to https://www.redhat.com/network for details.
• Priority FTP access — No more late-night visits to congested mirror sites. Owners of Red Hat
Linux 7.1 receive free access to priority.redhat.com, Red Hat’s preferred customer FTP service,
offering high bandwidth connections day and night.
• Under the Brim: The Official Red Hat E-Newsletter — Every month, get the latest news and
product information directly from Red Hat.
To sign up, go to http://www.redhat.com/apps/activate/. You will find your Product ID on the Registration Information Card in your Official Red Hat Linux boxed set.
A.2 An Overview of Red Hat Support
Red Hat provides installation assistance for Official Red Hat Linux boxed set products and covers
installation on a single computer. This assistance is intended to help customers successfully install
Red Hat Linux. Assistance with installation is offered via telephone and the Web.
Red Hat Support will attempt to answer any questions you may have before the installation process is
initiated. This includes the following:
• Hardware compatibility questions
• Basic hard drive partitioning strategies
Red Hat, Inc. Support can also provide assistance during the installation process:
• Getting supported hardware recognized by the Red Hat Linux operating system
• Assistance with drive partitioning
We can also help you with basic post-installation tasks, such as:
Page 58

58 Appendix A:Getting Technical Support
• Successfully configuring the X Window System using Xconfigurator
• Configuring a local parallel port printer to print text
• Configuring a mouse
Our installation assistance service is designed to get Red Hat Linux running on your system as quickly
and as easily as possible. However, there are many other things that you may want to do with your Red
Hat Linux system, from compiling a custom kernel to setting up a Webserver, which are not covered.
For assistance with these tasks, there is a wealth of on-line information available in the form of
HOWTO documents, Linux-related websites, and commercial publications. The various Linux
HOWTO documents are included with Red Hat Linux on the Documentation CD in the /HOWTOS
directory. These HOWTOS are provided in text files that can easily be read from within Red Hat
Linux and other operating systems.
A large number of Linux-related websites are available. The best starting point for finding information
on Red Hat Linux is the Red Hat, Inc. website:
http://www.redhat.com/
Many Linux-related books are available. If you are new to Linux, a book that covers Linux basics will
be invaluable. We can recommend several titles: Using Linux, by Bill Ball; Linux Clearly Explained,
by Bryan Pfaffenberger; Linux for Dummies, by Jon "maddog" Hall; and Learning Red Hat Linux,by
Bill McCarty.
Red Hat also offers various incident-based support plans to assist with configuration issues and tasks
that are not covered by installation assistance. Please see the Red Hat Support website for more information. The Red Hat technical support website is located at the following URL:
http://www.redhat.com/support/
A.3 Scope of Red Hat Support
Red Hat, Inc. can only provide installation assistance to customers who have purchased an Official
Red Hat Linux boxed set. If you have obtained Linux from any other company,you must contact that
company for support. Examples of such companies are as follows:
• Macmillan
• Sams/Que
• Linux Systems Labs (LSL)
• Mandrake
• CheapBytes
Page 59

Section A.4:How to Get Technical Support 59
Additionally, Red Hat Linux obtained via any of the following methods does not qualify for support
from Red Hat:
• Red Hat Linux PowerTools Archive
• Downloaded via FTP on the Internet
• Included in a package such as Motif or Applixware
• Copied or installed from another user’s CD
A.4 How to Get Technical Support
In order to receive technical support for your Official Red Hat product, you must first sign up.
EveryOfficialRedHatproductcomes with a Product Identificationcode: a 16-characteralphanumeric
string. The Product ID for Red Hat Linux 7.1 is located on the Registration Information Card that can
be found inside the box. Your Product ID is on a perforated card that you can punch out and keep in
a safe place. You need this code, so do not lose the card!
Note
Do not throw away the card with your Product ID. You need the Product ID
to get technical support. If you lose the certificate, you may not be able to
receive support.
The Product ID is the code that will enable your technical support and any other benefits or services
thatyou purchased from Red Hat, depending upon which Red Hatproduct you purchased. The Product
ID may also enable priority FTP access, depending on the product that you purchased, for a limited
amount of time.
A.4.1 Signing up for Technical Support
To sign up for technical support, you will need to:
1. Create a customer profile at http://www.redhat.com/apps/activate/. You may have already completedthis step; if you have,continue to the next step. If you do not already have a customer profile
on the Red Hat website, please create a new one.
2. Using your login name and password you created during the customer profile, please login at the
Red Hat Support website at http://www.redhat.com/support.
3. Update your contact information if necessary.
Page 60

60 Appendix A:Getting Technical Support
Note
Ifyour email address is not correct, communications regarding your technical support requests CANNOT be delivered to you, and you will not be
able to retrieve your login and password by email. Be sure that you give
us your correct email address.
If you are worried about your privacy, please see Red Hat’s privacy statement at http://www.redhat.com/legal/privacy_statement.html.
4. Add a product to your profile. Please enter the following information:
• The Product ID for your boxed set product
• A description of the hardware on which the Red Hat Linux product will be installed
• The Support Certificate Number or Entitlement Number if the product is a contract
5. Set your customer preferences.
6. Answer the optional customer questionnaire.
7. Submit the form.
If the previous steps were completed successfully, you can now login at http://www.redhat.com/sup-
port and open a new technical service request. However, you must still use your Product ID in order
to obtain technical support via telephone (if the product you purchased came with phone support).
Please do not lose your Product ID, or you might not be able to receive support.
A.5 Questions for Technical Support
Technical support is both a science and a mystical art form. In most cases, support technicians must
rely on customer observations and communications with the customer in order to diagnose and solve
the problem. Therefore, it is extremely important that you are as detailed and clear as possible when
you state your questions and report your problems. Examples of what you should include are:
• Symptoms of the problem (for example: "Linux is not able to access my CD-ROM drive. When
it tries, I get timeout errors.")
• When the problem began (for example: "My system was working fine until yesterday, when a
lightning storm hit my area.")
• Any changes you made to your system (for example: "I added a new hard driveand used Partition
Wizzo to add Linux partitions.")
Page 61

Section A.6:Support Frequently Asked Questions (FAQ) 61
• Other information that may be relevant to your situation, such as the installation method (CDROM, NFS, HTTP)
• Specific hardware devices that may be relevant to your problem (for example: If you cannot setup
networking, what kind of NIC do you have?)
A.5.1 How to Send Support Questions
Please login at http://www.redhat.com/support and open a new service request, or call the phone
number for support. If your product came with phone support, or you have purchased a phone support
contract, the phone number you will need to call will be provided to you during the sign up process.
For more information on using Red Hat’s online support system go to http://www.redhat.com/support/services/access.html.
A.6 Support Frequently Asked Questions (FAQ)
A.6.1 Q: Email Messages to support@redhat.com Bounce
I send email to support@redhat.com but my messages bounce back to me. What is the problem?
A.6.2 A: support@redhat.com Is Not Used at This Time
To better serve our customers, Red Hat is re-engineering our email support process. At this time, the
support@redhat.com address is not functional. In the meantime, please use support via the Web or by
telephone.
A.6.3 Q: System Will Not Allow Login
I know that I have already signed up, but the system will not let me log in.
A.6.4 A: Old Logins and Passwords Will Not Work
You could be trying to use an old login and password, or simply mistyping your login or password.
Refer to Section B.2.3, Problems When You Try to Log In for more information.
Page 62

62 Appendix A:Getting Technical Support
Page 63

Section B.1:Trouble During the Installation 63
B Troubleshooting Your Installation of
Red Hat Linux
This appendix discusses some common installation problems you could encounter and provides solutions to these problems.
B.1 Trouble During the Installation
B.1.1 Do You Not See the Automatic Partitioning Screen?
If the Automatic Partitioning screen does not appear during your installation, you probably do not
have enough free space in which to install Red Hat Linux.
If you do not want to partition manually,you should exit out of the installation (remove any diskettes
and/or CD-ROMs from their respective drives and reboot your system). Then you can re-allocate
space for your installation.
B.1.2 Partition Creation Problems
If you are having trouble creating a partition (for example, a root (/) partition, make sure you are
setting its partition type to Linux Native.
B.1.3 Using Remaining Space
You have a swap and a / (root) partition created, and you have selected the root partition to use the
remaining space, but it does not fill the hard drive.
B.1.4 Other Partitioning Problems
If you are using Disk Druidto create partitions, but cannot moveto the next screen, you probably have
not created all the partitions necessary for Disk Druid’s dependencies to be satisfied.
You must have the following partitions as a bare minimum:
•A/ (root) partition of type Linux native
• A <swap> partition of type Linux swap
Page 64

64 Appendix B:Troubleshooting Your Installation of Red Hat Linux
Tip
When defining a partition’s type as Linux swap, you do not have to assign it
a mount point. Disk Druid automatically assigns the mount point for you.
B.1.5 Are You Seeing Python Errors?
During some upgrades or installations of Red Hat Linux, the installation program (also known as
Anaconda) may fail with a Python or traceback error. This error may occur after the selection of
individual packages or while trying to save the upgrade log in /tmp. The error may look similar to:
Traceback (innermost last):
File "/var/tmp/anaconda-7.1//usr/lib/anaconda/iw/progress_gui.py",
line 20, in run
rc = self.todo.doInstall ()
File "/var/tmp/anaconda-7.1//usr/lib/anaconda/todo.py", line 1468, in
doInstall
self.fstab.savePartitions ()
File "fstab.py", line 221, in savePartitions
sys.exit(0)
SystemExit: 0
Local variables in innermost frame:
self: <fstab.GuiFstab instance at 8446fe0>
sys: <module ’sys’ (built-in)>
ToDo object:
(itodo
ToDo
p1
(dp2
S’method’
p3
(iimage
CdromInstallMethod
p4
(dp5
S’progressWindow’
p6
<failed>
Page 65

Section B.2:Problems After Installation 65
This error occurs in some systems where links to /tmp are symbolic to other locations or have been
changed since creation. These symbolic or changed links are invalid during the installation process,
so the installation program cannot write information and fails.
If you experience such an error, first try to download any available errata for Anaconda. Errata can
be found at http://www.redhat.com/support/errata.
You can also search for bug reports related to this problem. To search Red Hat’s bug tracking system,
go to http://bugzilla.redhat.com/bugzilla.
Finally, if you are still facing problems related to this error, register your product and contact our
support team. To register your product, go to http://www.redhat.com/apps/activate.
B.2 Problems After Installation
B.2.1 Unable to IPL from *NWSSTG
If you are experiencing difficulties when trying to IPL from *NWSSTG, you may not have created a
PReP Boot partition set as active.
B.2.2 Problems with Server Installations and X
If you performed a server installation and you are having trouble getting X to start, that is because the
X Window System is not installed during a server-class installation.
If you want the X Window System, but you did a server-class installation, you can perform an upgrade
to install X. During the upgrade, select the X Window System packages, and choose GNOME, KDE,
or both.
Alternatively, you can install the XFree86 RPMs. For more information, refer to http://www.redhat.com/support/docs/howto/XFree86-upgrade/XFree86-upgrade.html.
B.2.3 Problems When You Try to Log In
If you did not create a user account during the installation you will need to log in as root and use the
password you assigned to root.
If you cannot remember your user account password, you must become root. Tobecome root, type su
- and enter your root password when prompted. Then, type passwd <username>. This allows
you to enter a new password for the specified user account.
B.2.4 Does Netscape Navigator Crash on JavaScript Pages?
If Netscape Navigator continuously crashes on pages that contain JavaScripts, you may need to edit
your ~/.mailcap file.
Page 66

66 Appendix B:Troubleshooting Your Installation of Red Hat Linux
Edit the file using pico by typing pico ~/.mailcap at the prompt in a terminal window. (You
may use any text editor.)
Remove the following lines from the file:
application/x-javascript;;\
x-mozilla-flags=save
You can also turn off JavaScript within Netscape Navigator itself. Click on
Edit=>Preferences=>Advanced and make sure the Enable JavaScript checkbox is not selected.
If these do not help, you can also try to use a newer version of Netscape Navigatorif available. Check
the Red Hat Linux errata website under security advisories for more information.
Page 67

Section C.2:Additional Considerations: iSeries Virtual Disks 67
C Re-installation of Red Hat Linux and
Preserving Existing Data
C.1 Preservation of Existing Data on an iSeries Red
Hat Linux Logical Partition
Generally speaking, installing Red Hat Linux over a prior installation (including Red Hat Linux) will
destroysome and often all the data on the disks (virtual and physical) attatched to that Logical Partition
(LPAR). If these disks contain data which is important to you, the data should be protected. There are
a variety of ways to do this, some of which are unique to the iSeries environment.
1. The data can be saved and removed from the system before the (re)installation. This would be the
ordinary and traditional Linux means of preserving data (tarballs, etc.).
2. Moving or copying the data (via FTP, NFS, etc.) to another Logical Partition, either OS/400 or
Linux. Since each iSeries Logical Partition is independent, one Logical Partition’s data is unaffected by a reinstall in a different Logical Partition.
3. Removing the disks from the Logical Partitionduringtheinstallation. If your Red Hat Linux installation contains more than one disk (virtual or physical) and that disk does not contain data from the
Red Hat installation (e.g. is mounted at /home/myuserid, mounted as the directories containing the data base data) it can be removed from the Logical Partition for the duration of the reinstall,
andthen added back in after the installation is complete. See the Configuring Linux in a Guest Par-
tition document ( http://publib.boulder.ibm.com/pubs/html/as400/v5r1/ic2924/info/rzalm/rzalmlinuxkickoff.htm) for details on how these functions are performed.
4. Adding disks, copying the data, and then removing the new disks during the installation. If you
have data to spare on an OS/400 partition, creating a new virtual disk, mounting it, copying the
data, and then removing it during the installation is another way of obtaining the benefits of step
3, even if you did not initially plan for it. After the installation, the disk can be added back and
permanently mounted, or simply copied back and the new disk deleted. A similar procedure could
be used for a spare physical disk.
C.2 Additional Considerations: iSeries Virtual Disks
When planning a new installation, the flexibility of virtual disks enable strategies not commonplace
in today’s world of large physical disks. If you plan on using virtual disks, having one large enough
to hold the Red Hat Linux distribution and another holding applications and application data is one
strategy worth considering. Another strategy might be a single partition on a virtual disk holding a
particular application.
Page 68

68 Appendix C:Re-installation of Red Hat Linux and Preserving Existing Data
Since virtual disks are not bound by physical boundaries, theycan be sized in any manner that is useful
and culled out during a Red Hat Linux re-installation to preserve them over the installation.
Page 69

Index 69
Index
A
adding partitions ............................. 29
additional resources
websites...................................... 9
authentication
configuration .............................. 46
Kerberos ........................... .....46
LDAP .............................. .....46
MD5 passwords ........................ 46
NIS ...................................... 46
shadow passwords...................... 46
automatic partitioning ....................... 23
server....................................... 23
workstation .......... ...................... 23
B
booting
the installation program .................. 19
C
class
installation................................. 22
clock .......................................... 41
configuration
clock ....................................... 41
hostname................................... 35
network .................................... 34
time.................................... ..... 41
time zone .................................. 41
D
deleting partitions............................ 30
dependencies
installing packages........................ 50
Disk Druid
adding partitions .......................... 29
buttons ..................................... 29
deleting partitions......................... 30
drive summaries........................... 28
editing partitions .......................... 30
partitions.............................. .....26
problems adding partitions ............... 28
disk partitioning.............................. 23
disk space..................................... 10
disk space requirements ..................... 10
custom-class......... ...................... 14
server-class .......... ...................... 13
workstation-class.......................... 12
documentation conventions ...................5
driver disks .............................. ..... 20
E
editing partitions ............................. 30
F
fdisk...................................... ..... 31
formatting partitions......................... 33
fsck ........................................... 33
H
hardware
iSeries
preparation for installation ..............9
hostname
configuration .............................. 35
how to use this manual ........................7
I
installation
CD-ROM/secondary> .................... 17
choosing .............................. ..... 11
class ................................... .....22
Page 70

70 Index
custom-class........ ....................... 14
disk space............................. ..... 10
keyboard navigation ...................... 19
partitioning ........................... .....26
program
booting .................................. 19
driver disks ............................. 20
rescue mode ............................ 55
text mode user interface .......... ..... 17
user interface .... ....................... 17
server-class ......... ....................... 13
text mode
user interface .... ....................... 17
workstation-class.......................... 12
installation class
choosing .............................. ..... 11
installing packages........................... 48
introduction..................................... 5
iSeries hardware
preparation for installation .................9
websites...................................... 9
K
keyboard
navigating the installation program
using.................................. 19
L
language
selecting ................................... 21
support for multiple languages........... 40
M
mouse
configuring ........................... .....40
selecting ................................... 40
N
network
configuration .............................. 34
P
packages
groups................ ...................... 48
selecting................................. 48
individual .................................. 49
installing................................... 48
selecting ................................... 48
partitioning ................................... 26
automatic .................................. 23
problems................................... 28
recommended ............................. 28
with fdisk.................................. 31
password
setting root................................. 42
user accounts .............................. 44
preservation of existing data ........... .....67
R
re-installation of Red Hat Linux............ 67
recovery CD-ROM
( See rescue mode )
recursion
( See recursion )
Red Hat FAQ ............................ .......7
rescue mode .................................. 55
SCSI utilities access ...................... 56
root / partition ......... ...................... 28
root password ................................ 42
S
SCSI Utilities
access
rescue mode ............................ 56
SCSI utilities access
( See rescue mode )
selecting
Page 71

Index 71
packages ................................... 48
steps
choosing an installation class ............ 11
disk space............................. ..... 10
support, technical
( See technical support )
swap........................................... 28
workstation auto-partition............ 13, 15
T
technical support............................. 57
FAQ ........................................ 61
how to send questions for ................ 61
how to state problems for................. 60
not provided for other companies’
products .............................. 58
policy overview ........................... 57
registering online.......................... 59
signing up for.............................. 59
time zone
configuration .............................. 41
troubleshooting.......................... .....63
after the installation....................... 65
logging in ......... ...................... 65
Netscape Navigator ................... 65
server-class installations and X ....... 65
during the installation..................... 63
automatic partitioning ................. 63
completing partitions .................. 63
creating partitions ...................... 63
Python errors ..... ...................... 64
unable to IPL from
*NWSSTG........ 65
using remaining hard drive space..... 63
creation .................................... 44
setting up .................................. 44
user interface
installation program.................. .....17
text mode installation..................... 17
V
virtual disks .................................. 67
U
unallocated partition(s)...................... 28
unresolved dependencies
full installation ............................ 50
user accounts
 Loading...