

Page 1

Global File System
Red Hat Global File
System
5.2
Global_File_System
ISBN: N/A
Publication date: May 2008
Page 2

This book provides information about installing, configuring, and maintaining Red Hat GFS (Red
Hat Global File System) for Red Hat Enterprise Linux 5.2.
Global File System
Page 3

Global File System: Red Hat Global File System
Copyright © 2008 Red Hat, Inc.
Copyright © 2008 Red Hat, Inc. This material may only be distributed subject to the terms and conditions set forth in the
Open Publication License, V1.0 or later with the restrictions noted below (the latest version of the OPL is presently
available at http://www.opencontent.org/openpub/).
Distribution of substantively modified versions of this document is prohibited without the explicit permission of the
copyright holder.
Distribution of the work or derivative of the work in any standard (paper) book form for commercial purposes is
prohibited unless prior permission is obtained from the copyright holder.
Red Hat and the Red Hat "Shadow Man" logo are registered trademarks of Red Hat, Inc. in the United States and other
countries.
All other trademarks referenced herein are the property of their respective owners.
The GPG fingerprint of the security@redhat.com key is:
CA 20 86 86 2B D6 9D FC 65 F6 EC C4 21 91 80 CD DB 42 A6 0E
1801 Varsity Drive
Raleigh, NC 27606-2072
USA
Phone: +1 919 754 3700
Phone: 888 733 4281
Fax: +1 919 754 3701
PO Box 13588
Research Triangle Park, NC 27709
USA
Page 4

Global File System
Page 5

Introduction .............................................................................................................. vii
1. Audience ...................................................................................................... vii
2. Related Documentation ................................................................................. vii
3. Document Conventions ................................................................................ viii
4. Feedback ......................................................................................................ix
1. GFS Overview ....................................................................................................... 1
1. New and Changed Features ........................................................................... 2
2. Performance, Scalability, and Economy ........................................................... 2
2.1. Superior Performance and Scalability ................................................... 2
2.2. Economy and Performance .................................................................. 3
3. GFS Software Components ............................................................................ 5
4. Before Setting Up GFS ................................................................................... 6
2. Getting Started ...................................................................................................... 7
1. Prerequisite Tasks ......................................................................................... 7
2. Initial Setup Tasks .......................................................................................... 7
3. Managing GFS ...................................................................................................... 9
1. Creating a File System ................................................................................... 9
2. Mounting a File System .................................................................................13
3. Unmounting a File System .............................................................................16
4. Displaying GFS Tunable Parameters ..............................................................16
5. GFS Quota Management ...............................................................................18
5.1. Setting Quotas ...................................................................................18
5.2. Displaying Quota Limits and Usage .....................................................19
5.3. Synchronizing Quotas ........................................................................21
5.4. Disabling/Enabling Quota Enforcement ................................................22
5.5. Disabling/Enabling Quota Accounting ..................................................23
6. Growing a File System ..................................................................................25
7. Adding Journals to a File System ...................................................................27
8. Direct I/O ......................................................................................................29
8.1. O_DIRECT ...........................................................................................30
8.2. GFS File Attribute ...............................................................................30
8.3. GFS Directory Attribute .......................................................................31
9. Data Journaling .............................................................................................32
10. Configuring atime Updates ..........................................................................33
10.1. Mount with noatime ..........................................................................34
10.2. Tune GFS atime Quantum ...............................................................35
11. Suspending Activity on a File System ...........................................................35
12. Displaying Extended GFS Information and Statistics ......................................36
12.1. Displaying GFS Space Usage ...........................................................36
12.2. Displaying GFS Counters ..................................................................37
12.3. Displaying Extended Status ..............................................................40
13. Repairing a File System ...............................................................................42
14. Context-Dependent Path Names ..................................................................44
Index .......................................................................................................................47
v
Page 6

vi
Page 7

Introduction
The Global File System Configuration and Administration document provides information about
installing, configuring, and maintaining Red Hat GFS (Red Hat Global File System). A GFS file
system can be implemented in a standalone system or as part of a cluster configuration. For
information about Red Hat Cluster Suite refer to Red Hat Cluster Suite Overview and
Configuring and Managing a Red Hat Cluster.
HTML and PDF versions of all the official Red Hat Enterprise Linux manuals and release notes
are available online at http://www.redhat.com/docs/.
1. Audience
This book is intended primarily for Linux system administrators who are familiar with the
following activities:
• Linux system administration procedures, including kernel configuration
• Installation and configuration of shared storage networks, such as Fibre Channel SANs
2. Related Documentation
For more information about using Red Hat Enterprise Linux, refer to the following resources:
• Red Hat Enterprise Linux Installation Guide — Provides information regarding installation of
Red Hat Enterprise Linux 5.
• Red Hat Enterprise Linux Deployment Guide — Provides information regarding the
deployment, configuration and administration of Red Hat Enterprise Linux 5.
For more information about Red Hat Cluster Suite for Red Hat Enterprise Linux 5, refer to the
following resources:
• Red Hat Cluster Suite Overview — Provides a high level overview of the Red Hat Cluster
Suite.
• Configuring and Managing a Red Hat Cluster — Provides information about installing,
configuring and managing Red Hat Cluster components.
• LVM Administrator's Guide: Configuration and Administration — Provides a description of the
Logical Volume Manager (LVM), including information on running LVM in a clustered
environment.
• Using Device-Mapper Multipath — Provides information about using the Device-Mapper
Multipath feature of Red Hat Enterprise Linux 5.
vii
Page 8

• Using GNBD with Global File System — Provides an overview on using Global Network Block
Device (GNBD) with Red Hat GFS.
• Linux Virtual Server Administration — Provides information on configuring high-performance
systems and services with the Linux Virtual Server (LVS).
• Red Hat Cluster Suite Release Notes — Provides information about the current release of
Red Hat Cluster Suite.
Red Hat Cluster Suite documentation and other Red Hat documents are available in HTML,
PDF, and RPM versions on the Red Hat Enterprise Linux Documentation CD and online at
http://www.redhat.com/docs/.
3. Document Conventions
Certain words in this manual are represented in different fonts, styles, and weights. This
highlighting indicates that the word is part of a specific category. The categories include the
following:
Courier font
Courier font represents commands, file names and paths, and prompts .
When shown as below, it indicates computer output:
Desktop about.html logs paulwesterberg.png
Mail backupfiles mail reports
bold Courier font
Bold Courier font represents text that you are to type, such as: service jonas start
If you have to run a command as root, the root prompt (#) precedes the command:
# gconftool-2
italic Courier font
Italic Courier font represents a variable, such as an installation directory:
install_dir/bin/
bold font
Bold font represents application programs and text found on a graphical interface.
When shown like this: OK , it indicates a button on a graphical application interface.
Introduction
viii
Page 9

Additionally, the manual uses different strategies to draw your attention to pieces of information.
In order of how critical the information is to you, these items are marked as follows:
Note
A note is typically information that you need to understand the behavior of the
system.
Tip
A tip is typically an alternative way of performing a task.
Important
Important information is necessary, but possibly unexpected, such as a
configuration change that will not persist after a reboot.
Caution
A caution indicates an act that would violate your support agreement, such as
recompiling the kernel.
Warning
A warning indicates potential data loss, as may happen when tuning hardware
for maximum performance.
4. Feedback
If you spot a typo, or if you have thought of a way to make this manual better, we would love to
hear from you. Please submit a report in Bugzilla (http://bugzilla.redhat.com/bugzilla/) against
the component rh-cs.
Be sure to mention the manual's identifier:
Feedback
ix
Page 10

Bugzilla component: Documentation-cluster
Book identifier: Global_File_System(EN)-5.2 (2008-05-21T15:10)
By mentioning this manual's identifier, we know exactly which version of the guide you have.
If you have a suggestion for improving the documentation, try to be as specific as possible. If
you have found an error, please include the section number and some of the surrounding text
so we can find it easily.
Introduction
x
Page 11

GFS Overview
The Red Hat GFS file system is a native file system that interfaces directly with the Linux kernel
file system interface (VFS layer). A GFS file system can be implemented in a standalone system
or as part of a cluster configuration. When implemented as a cluster file system, GFS employs
distributed metadata and multiple journals.
A GFS file system can be created on an LVM logical volume. A logical volume is an aggregation
of underlying block devices that appears as a single logical device. For information on the LVM
volume manager, see the LVM Administrator's Guide.
GFS is based on a 64-bit architecture, which can theoretically accommodate an 8 EB file
system. However, the current supported maximum size of a GFS file system is 25 TB. If your
system requires GFS file systems larger than 25 TB, contact your Red Hat service
representative.
When determining the size of your file system, you should consider your recovery needs.
Running the fsck command on a very large file system can take a long time and consume a
large amount of memory. Additionally, in the event of a disk or disk-subsytem failure, recovery
time is limited by the speed of your backup media.
When configured in a Red Hat Cluster Suite, Red Hat GFS nodes can be configured and
managed with Red Hat Cluster Suite configuration and management tools. Red Hat GFS then
provides data sharing among GFS nodes in a Red Hat cluster, with a single, consistent view of
the file system name space across the GFS nodes. This allows processes on different nodes to
share GFS files in the same way that processes on the same node can share files on a local file
system, with no discernible difference. For information about Red Hat Cluster Suite refer to
Configuring and Managing a Red Hat Cluster.
LVM logical volumes in a Red Hat Cluster suite are managed with CLVM, which is a
cluster-wide implementation of LVM, enabled by the CLVM daemon, clvmd running in a Red
Hat Cluster Suite cluster. The daemon makes it possible to use LVM to manage logical volumes
across a cluster, allowing all nodes in the cluster to share the logical volumes. to any directory
on your system. For information on the LVM volume manager, see the LVM Administrator's
Guide.
This chapter provides some basic, abbreviated information as background to help you
understand GFS. It contains the following sections:
• Section 1, “New and Changed Features”
• Section 2, “Performance, Scalability, and Economy”
• Section 3, “GFS Software Components”
• Section 4, “Before Setting Up GFS”
Chapter 1.
1
Page 12

1. New and Changed Features
This section lists new and changed features included with the initial release of Red Hat
Enterprise Linux 5.
• GULM (Grand Unified Lock Manager) is not supported in Red Hat Enterprise Linux 5. If your
GFS file systems use the GULM lock manager, you must convert the file systems to use the
DLM lock manager. This is a two-part process.
• While running Red Hat Enterprise Linux 4, convert your GFS file systems to use the DLM
lock manager.
• Upgrade your operating system to Red Hat Enterprise Linux 5, converting the lock manager
to DLM when you do.
For information on upgrading to Red Hat Enterprise Linux 5 and converting GFS file systems
to use the DLM lock manager, see Configuring and Managing a Red Hat Cluster.
• Documentation for Red Hat Cluster Suite for Red Hat Enterprise Linux 5 has been expanded
and reorganized. For information on the available documents, see Section 2, “Related
Documentation”.
2. Performance, Scalability, and Economy
You can deploy GFS in a variety of configurations to suit your needs for performance,
scalability, and economy. For superior performance and scalability, you can deploy GFS in a
cluster that is connected directly to a SAN. For more economical needs, you can deploy GFS in
a cluster that is connected to a LAN with servers that use GNBD (Global Network Block Device).
The following sections provide examples of how GFS can be deployed to suit your needs for
performance, scalability, and economy:
• Section 2.1, “Superior Performance and Scalability”
• Section 2.2, “Economy and Performance”
Note
The deployment examples in this chapter reflect basic configurations; your needs
might require a combination of configurations shown in the examples.
2.1. Superior Performance and Scalability
You can obtain the highest shared-file performance when applications access storage directly.
Chapter 1. GFS Overview
2
Page 13

The GFS SAN configuration in Figure 1.1, “GFS with a SAN” provides superior file performance
for shared files and file systems. Linux applications run directly on GFS nodes. Without file
protocols or storage servers to slow data access, performance is similar to individual Linux
servers with directly connected storage; yet, each GFS application node has equal access to all
data files. GFS supports up to 125 GFS nodes.
Figure 1.1. GFS with a SAN
2.2. Economy and Performance
Multiple Linux client applications on a LAN can share the same SAN-based data as shown in
Figure 1.2, “GFS and GNBD with a SAN”. SAN block storage is presented to network clients as
block storage devices by GNBD servers. From the perspective of a client application, storage is
accessed as if it were directly attached to the server in which the application is running. Stored
data is actually on the SAN. Storage devices and data can be equally shared by network client
applications. File locking and sharing functions are handled by GFS for each network client.
Note
Clients implementing ext2 and ext3 file systems can be configured to access
their own dedicated slice of SAN storage.
Economy and Performance
3
Page 14
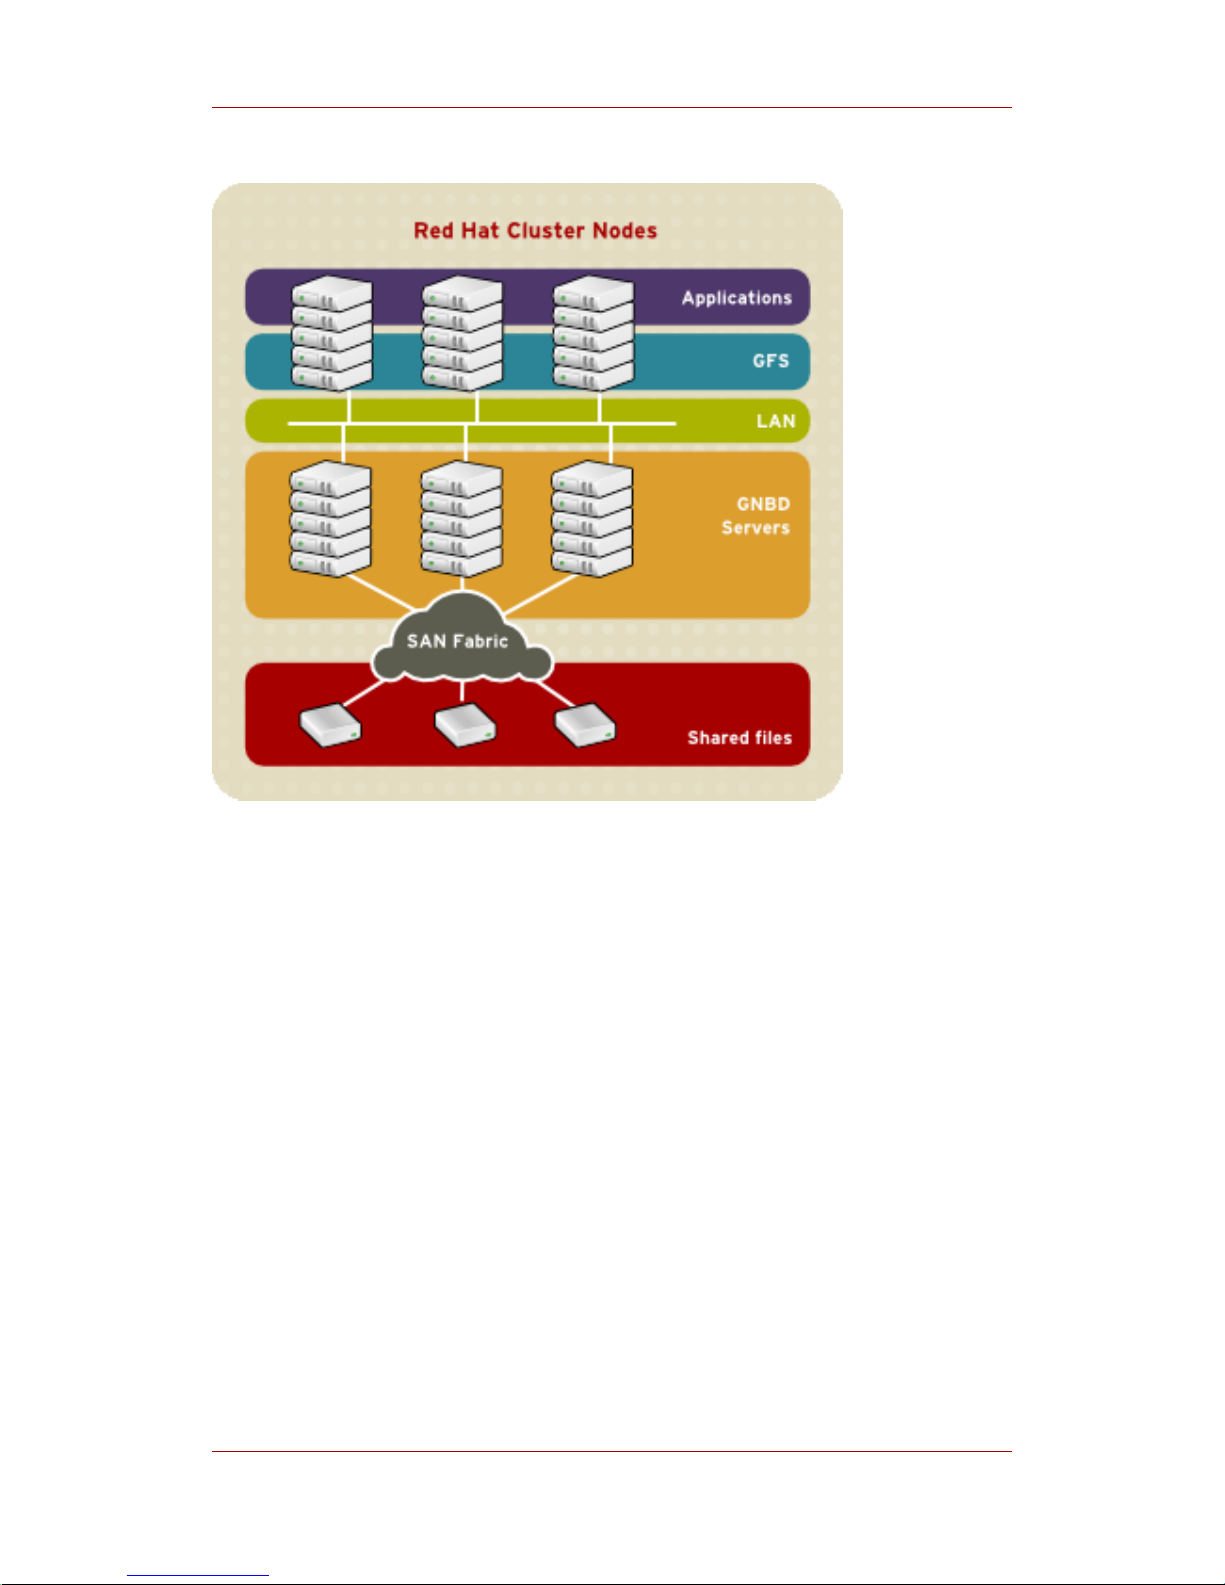
Figure 1.2. GFS and GNBD with a SAN
Figure 1.3, “GFS and GNBD with Directly Connected Storage” shows how Linux client
applications can take advantage of an existing Ethernet topology to gain shared access to all
block storage devices. Client data files and file systems can be shared with GFS on each client.
Application failover can be fully automated with Red Hat Cluster Suite.
Chapter 1. GFS Overview
4
Page 15

Figure 1.3. GFS and GNBD with Directly Connected Storage
3. GFS Software Components
Table 1.1, “GFS Software Subsystem Components” summarizes the GFS software
components.
Software Component Description
gfs.ko Kernel module that implements the GFS file system and is
loaded on GFS cluster nodes.
lock_dlm.ko A lock module that implements DLM locking for GFS. It
plugs into the lock harness, lock_harness.ko and
communicates with the DLM lock manager in Red Hat
Cluster Suite.
lock_nolock.ko A lock module for use when GFS is used as a local file
system only. It plugs into the lock harness,
lock_harness.ko and provides local locking.
Table 1.1. GFS Software Subsystem Components
GFS Software Components
5
Page 16

4. Before Setting Up GFS
Before you install and set up GFS, note the following key characteristics of your GFS file
systems:
GFS nodes
Determine which nodes in the Red Hat Cluster Suite will mount the GFS file systems.
Number of file systems
Determine how many GFS file systems to create initially. (More file systems can be added
later.)
File system name
Determine a unique name for each file system. Each file system name is required in the
form of a parameter variable. For example, this book uses file system names mydata1 and
mydata2 in some example procedures.
File system size
GFS is based on a 64-bit architecture, which can theoretically accommodate an 8 EB file
system. However, the current supported maximum size of a GFS file system is 25 TB. If
your system requires GFS file systems larger than 25 TB, contact your Red Hat service
representative.
When determining the size of your file system, you should consider your recovery needs.
Running the fsck command on a very large file system can take a long time and consume
a large amount of memory. Additionally, in the event of a disk or disk-subsytem failure,
recovery time is limited by the speed of your backup media.
Journals
Determine the number of journals for your GFS file systems. One journal is required for
each node that mounts a GFS file system. Make sure to account for additional journals
needed for future expansion, as you cannot add journals dynamically to a GFS file system.
GNBD server nodes
If you are using GNBD, determine how many GNBD server nodes are needed. Note the
hostname and IP address of each GNBD server node for setting up GNBD clients later. For
information on using GNBD with GFS, see the Using GNBD with Global File System
document.
Storage devices and partitions
Determine the storage devices and partitions to be used for creating logical volumes (via
CLVM) in the file systems.
Chapter 1. GFS Overview
6
Page 17

Getting Started
This chapter describes procedures for initial setup of GFS and contains the following sections:
• Section 1, “Prerequisite Tasks”
• Section 2, “Initial Setup Tasks”
1. Prerequisite Tasks
Before setting up Red Hat GFS, make sure that you have noted the key characteristics of the
GFS nodes (refer to Section 4, “Before Setting Up GFS”). Also, make sure that the clocks on the
GFS nodes are synchronized. It is recommended that you use the Network Time Protocol (NTP)
software provided with your Red Hat Enterprise Linux distribution.
Note
The system clocks in GFS nodes must be within a few minutes of each other to
prevent unnecessary inode time-stamp updating. Unnecessary inode time-stamp
updating severely impacts cluster performance.
2. Initial Setup Tasks
Initial GFS setup consists of the following tasks:
1. Setting up logical volumes
2. Making a GFS files system
3. Mounting file systems
Follow these steps to set up GFS initially.
1. Using LVM, create a logical volume for each Red Hat GFS file system.
Note
You can use init.d scripts included with Red Hat Cluster Suite to automate
activating and deactivating logical volumes. For more information about init.d
scripts, refer to Configuring and Managing a Red Hat Cluster.
Chapter 2.
7
Page 18

2. Create GFS file systems on logical volumes created in Step 1. Choose a unique name for
each file system. For more information about creating a GFS file system, refer to Section 1,
“Creating a File System”.
You can use either of the following formats to create a clustered GFS file system:
gfs_mkfs -p lock_dlm -t ClusterName:FSName -j Number BlockDevice
mkfs -t gfs -p lock_dlm -t LockTableName -j NumberJournals BlockDevice
You can use either of the following formats to create a local GFS file system:
gfs_mkfs -p lock_nolock -j NumberJournals BlockDevice
mkfs -t gfs -p lock_nolock -j NumberJournals BlockDevice
For more information on creating a GFS file system, see Section 1, “Creating a File System”.
3. At each node, mount the GFS file systems. For more information about mounting a GFS file
system, see Section 2, “Mounting a File System”.
Command usage:
mount BlockDevice MountPoint
mount -o acl BlockDevice MountPoint
The -o aclmount option allows manipulating file ACLs. If a file system is mounted without
the -o acl mount option, users are allowed to view ACLs (with getfacl), but are not allowed
to set them (with setfacl).
Note
You can use init.d scripts included with Red Hat Cluster Suite to automate
mounting and unmounting GFS file systems. For more information about init.d
scripts, refer to Configuring and Managing a Red Hat Cluster.
Chapter 2. Getting Started
8
Page 19

Managing GFS
This chapter describes the tasks and commands for managing GFS and consists of the
following sections:
• Section 1, “Creating a File System”
• Section 2, “Mounting a File System”
• Section 3, “Unmounting a File System”
• Section 5, “GFS Quota Management”
• Section 6, “Growing a File System”
• Section 7, “Adding Journals to a File System”
• Section 8, “Direct I/O”
• Section 9, “Data Journaling”
• Section 10, “Configuring atime Updates”
• Section 11, “Suspending Activity on a File System”
• Section 12, “Displaying Extended GFS Information and Statistics”
• Section 13, “Repairing a File System”
• Section 14, “Context-Dependent Path Names”
1. Creating a File System
You can create a GFS file system with the gfs_mkfs command. A file system is created on an
activated LVM volume. The following information is required to execute the gfs_mkfs
command:
• Lock protocol/module name. The lock protocol for a cluster is lock_dlm. The lock protocol
when GFS is acting as a local file system (one node only) is lock_nolock.
• Cluster name (when running as part of a cluster configuration).
• Number of journals (one journal required for each node that may be mounting the file
systema.) Make sure to account for additional journals needed for future expansion, as you
cannot add journals dynamically to a GFS file system.
When creating a GFS file system, you can use the gfs_mkfs directly, or you can use the mkfs
command with the -t parameter specifying a filesystem of type gfs, followed by the gfs file
Chapter 3.
9
Page 20

system options.
Usage
When creating a clustered GFS filesystem, you can use either of the following formats:
gfs_mkfs -p LockProtoName -t LockTableName -j NumberJournals BlockDevice
mkfs -t gfs -p LockProtoName -t LockTableName -j NumberJournals BlockDevice
When creating a local filesystem, you can use either of the following formats:
gfs_mkfs -p LockProtoName -j NumberJournals BlockDevice
mkfs -t gfs -p LockProtoName -j NumberJournals BlockDevice
Warning
Make sure that you are very familiar with using the LockProtoName and
LockTableName parameters. Improper use of the LockProtoName and
LockTableName parameters may cause file system or lock space corruption.
LockProtoName
Specifies the name of the locking protocol to use. The lock protocol for a cluster is
lock_dlm. The lock protocol when GFS is acting as a local file system (one node only) is
lock_nolock.
LockTableName
This parameter is specified for GFS filesystem in a cluster configuration. It has two parts
separated by a colon (no spaces) as follows: ClusterName:FSName
• ClusterName, the name of the Red Hat cluster for which the GFS file system is being
created.
• FSName, the file system name, can be 1 to 16 characters long, and the name must be
unique among all file systems in the cluster.
NumberJournals
Specifies the number of journals to be created by the gfs_mkfs command. One journal is
Chapter 3. Managing GFS
10
Page 21

required for each node that mounts the file system. (More journals than are needed can be
specified at creation time to allow for future expansion.)
BlockDevice
Specifies a volume.
Examples
In these examples, lock_dlm is the locking protocol that the file system uses, since this is a
clustered file system. The cluster name is alpha, and the file system name is mydata1. The file
system contains eight journals and is created on /dev/vg01/lvol0.
[root@ask-07 ~]# gfs_mkfs -p lock_dlm -t alpha:mydata1 -j 8 /dev/vg01/lvol0
This will destroy any data on /dev/vg01/lvol0.
Are you sure you want to proceed? [y/n] y
Device: /dev/vg01/lvol0
Blocksize: 4096
Filesystem Size: 136380192
Journals: 8
Resource Groups: 2082
Locking Protocol: lock_dlm
Lock Table: alpha:mydata1
Syncing...
All Done
[root@ask-07 ~]# mkfs -t gfs -p lock_dlm -t alpha:mydata1 -j 8
/dev/vg01/lvol0
This will destroy any data on /dev/vg01/lvol0.
Are you sure you want to proceed? [y/n] y
Device: /dev/vg01/lvol0
Blocksize: 4096
Filesystem Size: 136380192
Journals: 8
Resource Groups: 2082
Locking Protocol: lock_dlm
Lock Table: alpha:mydata1
Syncing...
All Done
In these examples, a second lock_dlm file system is made, which can be used in cluster alpha.
The file system name is mydata2. The file system contains eight journals and is created on
/dev/vg01/lvol1.
Examples
11
Page 22

gfs_mkfs -p lock_dlm -t alpha:mydata2 -j 8 /dev/vg01/lvol1
mkfs -t gfs -p lock_dlm -t alpha:mydata2 -j 8 /dev/vg01/lvol1
Complete Options
Table 3.1, “Command Options: gfs_mkfs” describes the gfs_mkfs command options.
Flag Parameter Description
-b BlockSize Sets the file system block size to BlockSize.
Default block size is 4096 bytes.
-D Enables debugging output.
-h Help. Displays available options.
-J MegaBytes Specifies the size of the journal in megabytes.
Default journal size is 128 megabytes. The
minimum size is 32 megabytes.
-j Number
Specifies the number of journals to be created by
the gfs_mkfs command. One journal is required for
each node that mounts the file system.
Note: More journals than are needed can be
specified at creation time to allow for future
expansion.
-p LockProtoName
Specifies the name of the locking protocol to use.
Recognized locking protocols include:
lock_dlm — The standard locking module,
required for a clustered file system.
lock_nolock — Used when GFS is acting as a
local file system (one node only).
-O Prevents the gfs_mkfs command from asking for
confirmation before writing the file system.
-q Quiet. Do not display anything.
-r MegaBytes Specifies the size of the resource groups in
megabytes. Default resource group size is 256
megabytes.
-s Blocks Specifies the journal-segment size in file system
blocks.
Chapter 3. Managing GFS
12
Page 23

Flag Parameter Description
-t LockTableName
Used in a clustered file system. This parameter has
two parts separated by a colon (no spaces) as
follows: ClusterName:FSName.
ClusterName is the name of the Red Hat cluster for
which the GFS file system is being created. The
cluster name is set in the
/etc/cluster/cluster.conf file via the Cluster
Configuration Tool and displayed at the Cluster
Status Tool in the Red Hat Cluster Suite cluster
management GUI.
FSName, the file system name, can be 1 to 16
characters in length, and the name must be unique
among all file systems in the cluster.
-V Displays command version information.
Table 3.1. Command Options: gfs_mkfs
2. Mounting a File System
Before you can mount a GFS file system, the file system must exist (refer to Section 1,
“Creating a File System”), the volume where the file system exists must be activated, and the
supporting clustering and locking systems must be started (refer to Chapter 2, Getting Started
and Configuring and Managing a Red Hat Cluster. After those requirements have been met, you
can mount the GFS file system as you would any Linux file system.
To manipulate file ACLs, you must mount the file system with the -o acl mount option. If a file
system is mounted without the -o acl mount option, users are allowed to view ACLs (with
getfacl), but are not allowed to set them (with setfacl).
Usage
Mounting Without ACL Manipulation
mount BlockDevice MountPoint
Mounting With ACL Manipulation
mount -o acl BlockDevice MountPoint
Mounting a File System
13
Page 24

-o acl
GFS-specific option to allow manipulating file ACLs.
BlockDevice
Specifies the block device where the GFS file system resides.
MountPoint
Specifies the directory where the GFS file system should be mounted.
Example
In this example, the GFS file system on /dev/vg01/lvol0 is mounted on the /mydata1
directory.
mount /dev/vg01/lvol0 /mydata1
Complete Usage
mount BlockDevice MountPoint -o option
The -o option argument consists of GFS-specific options (refer to Table 3.2, “GFS-Specific
Mount Options”) or acceptable standard Linux mount -o options, or a combination of both.
Multiple option parameters are separated by a comma and no spaces.
Note
The mount command is a Linux system command. In addition to using
GFS-specific options described in this section, you can use other, standard,
mount command options (for example, -r). For information about other Linux
mount command options, see the Linux mount man page.
Table 3.2, “GFS-Specific Mount Options” describes the available GFS-specific -o option
values that can be passed to GFS at mount time.
Option Description
acl Allows manipulating file ACLs. If a file system is
mounted without the acl mount option, users are
allowed to view ACLs (with getfacl), but are not
allowed to set them (with setfacl).
Forces GFS to treat the file system as a multihost
Chapter 3. Managing GFS
14
Page 25

Option Description
ignore_local_fs
Caution: This option should not be used
when GFS file systems are shared.
file system. By default, using lock_nolock
automatically turns on the localcaching and
localflocks flags.
localcaching
Caution: This option should not be used
when GFS file systems are shared.
Tells GFS that it is running as a local file system.
GFS can then turn on selected optimization
capabilities that are not available when running in
cluster mode. The localcaching flag is
automatically turned on by lock_nolock.
localflocks
Caution: This option should not be used
when GFS file systems are shared.
Tells GFS to let the VFS (virtual file system) layer
do all flock and fcntl. The localflocks flag is
automatically turned on by lock_nolock.
lockproto=LockModuleName Allows the user to specify which locking protocol to
use with the file system. If LockModuleName is not
specified, the locking protocol name is read from
the file system superblock.
locktable=LockTableName For a clustered file system, allows the user to
specify which locking table to use with the file
system.
oopses_ok
This option allows a GFS node to not panic when
an oops occurs. (By default, a GFS node panics
when an oops occurs, causing the file system used
by that node to stall for other GFS nodes.) A GFS
node not panicking when an oops occurs
minimizes the failure on other GFS nodes using the
file system that the failed node is using. There may
be circumstances where you do not want to use
this option — for example, when you need more
detailed troubleshooting information. Use this
option with care.
Note: This option is turned on automatically if
lock_nolock locking is specified; however, you
can override it by using the ignore_local_fs
option.
upgrade Upgrade the on-disk format of the file system so
that it can be used by newer versions of GFS.
Table 3.2. GFS-Specific Mount Options
Unmounting a File System
15
Page 26

3. Unmounting a File System
The GFS file system can be unmounted the same way as any Linux file system — by using the
umount command.
Note
The umount command is a Linux system command. Information about this
command can be found in the Linux umount command man pages.
Usage
umount MountPoint
MountPoint
Specifies the directory where the GFS file system should be mounted.
4. Displaying GFS Tunable Parameters
There are a variety of parameters associated with a GFS file system that you can modify with
the gfs_tool settune command. Some of these parameters are used to administer GFS
quotas: quota_quantum, quota_enforce, quota_account, and atime_quantum. These
parameters are described in Section 5, “GFS Quota Management”, along with examples of how
to modify them.
Parameters that you set with the gfs_tool settune command must be set on each node each
time the file system is mounted. These parameters are not persistent across mounts.
Note
The majority of the tunable parameters are internal parameters. They are
intended for development purposes only and should not be changed.
The gfs_tool gettune command displays a listing of the current values of the GFS tunable
parameters.
Usage
Display Tunable Parameters
Chapter 3. Managing GFS
16
Page 27

gfs_tool gettune MountPoint
MountPoint
Specifies the directory where the GFS file system is mounted.
Examples
In this example, all GFS tunable parameters for the file system on the mount point /mnt/gfs are
displayed.
[root@tng3-1]# gfs_tool gettune /mnt/gfs
ilimit1 = 100
ilimit1_tries = 3
ilimit1_min = 1
ilimit2 = 500
ilimit2_tries = 10
ilimit2_min = 3
demote_secs = 300
incore_log_blocks = 1024
jindex_refresh_secs = 60
depend_secs = 60
scand_secs = 5
recoverd_secs = 60
logd_secs = 1
quotad_secs = 5
inoded_secs = 15
glock_purge = 0
quota_simul_sync = 64
quota_warn_period = 10
atime_quantum = 3600
quota_quantum = 60
quota_scale = 1.0000 (1, 1)
quota_enforce = 1
quota_account = 1
new_files_jdata = 0
new_files_directio = 0
max_atomic_write = 4194304
max_readahead = 262144
lockdump_size = 131072
stall_secs = 600
complain_secs = 10
reclaim_limit = 5000
entries_per_readdir = 32
prefetch_secs = 10
statfs_slots = 64
max_mhc = 10000
greedy_default = 100
greedy_quantum = 25
greedy_max = 250
rgrp_try_threshold = 100
Examples
17
Page 28

statfs_fast = 0
5. GFS Quota Management
File-system quotas are used to limit the amount of file system space a user or group can use. A
user or group does not have a quota limit until one is set. GFS keeps track of the space used by
each user and group even when there are no limits in place. GFS updates quota information in
a transactional way so system crashes do not require quota usages to be reconstructed.
To prevent a performance slowdown, a GFS node synchronizes updates to the quota file only
periodically. The "fuzzy" quota accounting can allow users or groups to slightly exceed the set
limit. To minimize this, GFS dynamically reduces the synchronization period as a "hard" quota
limit is approached.
GFS uses its gfs_quota command to manage quotas. Other Linux quota facilities cannot be
used with GFS.
5.1. Setting Quotas
Two quota settings are available for each user ID (UID) or group ID (GID): a hard limit and a
warn limit.
A hard limit is the amount of space that can be used. The file system will not let the user or
group use more than that amount of disk space. A hard limit value of zero means that no limit is
enforced.
A warn limit is usually a value less than the hard limit. The file system will notify the user or
group when the warn limit is reached to warn them of the amount of space they are using. A
warn limit value of zero means that no limit is enforced.
Limits are set using the gfs_quota command. The command only needs to be run on a single
node where GFS is mounted.
Usage
Setting Quotas, Hard Limit
gfs_quota limit -u User -l Size -f MountPoint
gfs_quota limit -g Group -l Size -f MountPoint
Setting Quotas, Warn Limit
gfs_quota warn -u User -l Size -f MountPoint
Chapter 3. Managing GFS
18
Page 29

gfs_quota warn -g Group -l Size -f MountPoint
User
A user ID to limit or warn. It can be either a user name from the password file or the UID
number.
Group
A group ID to limit or warn. It can be either a group name from the group file or the GID
number.
Size
Specifies the new value to limit or warn. By default, the value is in units of megabytes. The
additional -k, -s and -b flags change the units to kilobytes, sectors, and file system blocks,
respectively.
MountPoint
Specifies the GFS file system to which the actions apply.
Examples
This example sets the hard limit for user Bert to 1024 megabytes (1 gigabyte) on file system
/gfs.
gfs_quota limit -u Bert -l 1024 -f /gfs
This example sets the warn limit for group ID 21 to 50 kilobytes on file system /gfs.
gfs_quota warn -g 21 -l 50 -k -f /gfs
5.2. Displaying Quota Limits and Usage
Quota limits and current usage can be displayed for a specific user or group using the
gfs_quota get command. The entire contents of the quota file can also be displayed using the
gfs_quota list command, in which case all IDs with a non-zero hard limit, warn limit, or value
are listed.
Usage
Displaying Quota Limits for a User
Displaying Quota Limits and Usage
19
Page 30

gfs_quota get -u User -f MountPoint
Displaying Quota Limits for a Group
gfs_quota get -g Group -f MountPoint
Displaying Entire Quota File
gfs_quota list -f MountPoint
User
A user ID to display information about a specific user. It can be either a user name from the
password file or the UID number.
Group
A group ID to display information about a specific group. It can be either a group name from
the group file or the GID number.
MountPoint
Specifies the GFS file system to which the actions apply.
Command Output
GFS quota information from the gfs_quota command is displayed as follows:
user User: limit:LimitSize warn:WarnSize value:Value
group Group: limit:LimitSize warn:WarnSize value:Value
The LimitSize, WarnSize, and Value numbers (values) are in units of megabytes by default.
Adding the -k, -s, or -b flags to the command line change the units to kilobytes, sectors, or file
system blocks, respectively.
User
A user name or ID to which the data is associated.
Group
A group name or ID to which the data is associated.
LimitSize
Chapter 3. Managing GFS
20
Page 31

The hard limit set for the user or group. This value is zero if no limit has been set.
Value
The actual amount of disk space used by the user or group.
Comments
When displaying quota information, the gfs_quota command does not resolve UIDs and GIDs
into names if the -n option is added to the command line.
Space allocated to GFS's hidden files can be left out of displayed values for the root UID and
GID by adding the -d option to the command line. This is useful when trying to match the
numbers from gfs_quota with the results of a du command.
Examples
This example displays quota information for all users and groups that have a limit set or are
using any disk space on file system /gfs.
[root@ask-07 ~]# gfs_quota list -f /gfs
user root: limit: 0.0 warn: 0.0 value: 0.2
user moe: limit: 1024.0 warn: 0.0 value: 0.0
group root: limit: 0.0 warn: 0.0 value: 0.2
group stooges: limit: 0.0 warn: 0.0 value: 0.0
This example displays quota information in sectors for group users on file system /gfs.
[root@ask-07 ~]# gfs_quota get -g users -f /gfs -s
group users: limit: 0 warn: 96 value: 0
5.3. Synchronizing Quotas
GFS stores all quota information in its own internal file on disk. A GFS node does not update
this quota file for every file system write; rather, it updates the quota file once every 60 seconds.
This is necessary to avoid contention among nodes writing to the quota file, which would cause
a slowdown in performance.
As a user or group approaches their quota limit, GFS dynamically reduces the time between its
quota-file updates to prevent the limit from being exceeded. The normal time period between
quota synchronizations is a tunable parameter, quota_quantum, and can be changed using the
gfs_tool command. By default, the time period is 60 seconds. Also, the quota_quantum
parameter must be set on each node and each time the file system is mounted. (Changes to the
quota_quantum parameter are not persistent across unmounts.)
To see the current values of the GFS tunable parameters, including quota_quantum, you can
use the gfs_tool gettune, as described in Section 4, “Displaying GFS Tunable Parameters”.
Synchronizing Quotas
21
Page 32

You can use the gfs_quota sync command to synchronize the quota information from a node
to the on-disk quota file between the automatic updates performed by GFS.
Usage
Synchronizing Quota Information
gfs_quota sync -f MountPoint
MountPoint
Specifies the GFS file system to which the actions apply.
Tuning the Time Between Synchronizations
gfs_tool settune MountPoint quota_quantum Seconds
MountPoint
Specifies the GFS file system to which the actions apply.
Seconds
Specifies the new time period between regular quota-file synchronizations by GFS. Smaller
values may increase contention and slow down performance.
Examples
This example synchronizes the quota information from the node it is run on to file system /gfs.
gfs_quota sync -f /gfs
This example changes the default time period between regular quota-file updates to one hour
(3600 seconds) for file system /gfs on a single node.
gfs_tool settune /gfs quota_quantum 3600
5.4. Disabling/Enabling Quota Enforcement
Enforcement of quotas can be disabled for a file system without clearing the limits set for all
users and groups. Enforcement can also be enabled. Disabling and enabling of quota
Chapter 3. Managing GFS
22
Page 33

enforcement is done by changing a tunable parameter, quota_enforce, with the gfs_tool
command. The quota_enforce parameter must be disabled or enabled on each node where
quota enforcement should be disabled/enabled. Each time the file system is mounted,
enforcement is enabled by default. (Disabling is not persistent across unmounts.)
To see the current values of the GFS tunable parameters, including quota_enforce, you can
use the gfs_tool gettune, as described in Section 4, “Displaying GFS Tunable Parameters”.
Usage
gfs_tool settune MountPoint quota_enforce {0|1}
MountPoint
Specifies the GFS file system to which the actions apply.
quota_enforce {0|1}
0 = disabled
1 = enabled
Comments
A value of 0 disables enforcement. Enforcement can be enabled by running the command with
a value of 1 (instead of 0) as the final command line parameter. Even when GFS is not
enforcing quotas, it still keeps track of the file system usage for all users and groups so that
quota-usage information does not require rebuilding after re-enabling quotas.
Examples
This example disables quota enforcement on file system /gfs.
gfs_tool settune /gfs quota_enforce 0
This example enables quota enforcement on file system /gfs.
gfs_tool settune /gfs quota_enforce 1
5.5. Disabling/Enabling Quota Accounting
By default, quota accounting is enabled; therefore, GFS keeps track of disk usage for every
user and group even when no quota limits have been set. Quota accounting incurs unnecessary
overhead if quotas are not used. You can disable quota accounting completely by setting the
Disabling/Enabling Quota Accounting
23
Page 34

quota_account tunable parameter to 0. This must be done on each node and after each mount.
(The 0 setting is not persistent across unmounts.) Quota accounting can be enabled by setting
the quota_account tunable parameter to 1.
To see the current values of the GFS tunable parameters, including quota_account, you can
use the gfs_tool gettune, as described in Section 4, “Displaying GFS Tunable Parameters”.
Usage
gfs_tool settune MountPoint quota_account {0|1}
MountPoint
Specifies the GFS file system to which the actions apply.
quota_account {0|1}
0 = disabled
1 = enabled
Comments
To enable quota accounting on a file system, the quota_account parameter must be set back
to 1. Afterward, the GFS quota file must be initialized to account for all current disk usage for
users and groups on the file system. The quota file is initialized by running: gfs_quota init -f
MountPoint.
Note
Initializing the quota file requires scanning the entire file system and may take a
long time.
To see the current values of the GFS tunable parameters, including quota_account, you can
use the gfs_tool gettune, as described in Section 4, “Displaying GFS Tunable Parameters”.
Examples
This example disables quota accounting on file system /gfs on a single node.
gfs_tool settune /gfs quota_account 0
This example enables quota accounting on file system /gfs on a single node and initializes the
quota file.
Chapter 3. Managing GFS
24
Page 35

# gfs_tool settune /gfs quota_account 1
# gfs_quota init -f /gfs
6. Growing a File System
The gfs_grow command is used to expand a GFS file system after the device where the file
system resides has been expanded. Running a gfs_grow command on an existing GFS file
system fills all spare space between the current end of the file system and the end of the device
with a newly initialized GFS file system extension. When the fill operation is completed, the
resource index for the file system is updated. All nodes in the cluster can then use the extra
storage space that has been added.
The gfs_grow command must be run on a mounted file system, but only needs to be run on
one node in a cluster. All the other nodes sense that the expansion has occurred and
automatically start using the new space.
To verify that the changes were successful, use the gfs_grow command with the -T (test) and
-v (verbose) flags. Running the command with those flags displays the current state of the
mounted GFS file system.
Usage
gfs_grow MountPoint
MountPoint
Specifies the GFS file system to which the actions apply.
Comments
Before running the gfs_grow command:
• Back up important data on the file system.
• Display the volume that is used by the file system to be expanded by running a df
MountPoint command.
• Expand the underlying cluster volume with LVM. For information on administering LVM
volumes, see the LVM Administrator's Guide
The gfs_grow command provides a -T (test) option that allows you to see the results of
executing the command without actually expanding the file system. Using this command with
the -v provides additional information.
Growing a File System
25
Page 36

After running the gfs_grow command, you can run a df MountPoint command on the file
system to check that the new space is now available in the file system.
Examples
In this example, the underlying logical volume for the file system file system on the /mnt/gfs
directory is extended, and then the file system is expanded.
[root@tng3-1 ~]# lvextend -L35G /dev/gfsvg/gfslv
Extending logical volume gfslv to 35.00 GB
Logical volume gfslv successfully resized
[root@tng3-1 ~]# gfs_grow /mnt/gfs
FS: Mount Point: /mnt/gfs
FS: Device: /dev/mapper/gfsvg-gfslv
FS: Options: rw,hostdata=jid=0:id=196609:first=1
FS: Size: 5341168
DEV: Size: 9175040
Preparing to write new FS information...
Done.
Complete Usage
gfs_grow [Options] {MountPoint | Device} [MountPoint | Device]
MountPoint
Specifies the directory where the GFS file system is mounted.
Device
Specifies the device node of the file system.
Table 3.3, “GFS-specific Options Available While Expanding A File System” describes the
GFS-specific options that can be used while expanding a GFS file system.
Option Description
-h Help. Displays a short usage message.
-q Quiet. Turns down the verbosity level.
-T Test. Do all calculations, but do not write any data to the disk and
do not expand the file system.
-V Displays command version information.
-v Turns up the verbosity of messages.
Table 3.3. GFS-specific Options Available While Expanding A File System
Chapter 3. Managing GFS
26
Page 37

7. Adding Journals to a File System
The gfs_jadd command is used to add journals to a GFS file system after the device where the
file system resides has been expanded. Running a gfs_jadd command on a GFS file system
uses space between the current end of the file system and the end of the device where the file
system resides. When the fill operation is completed, the journal index is updated.
The gfs_jadd command must be run on mounted file system, but it only needs to be run on one
node in the cluster. All the other nodes sense that the expansion has occurred.
To verify that the changes were successful, use the gfs_jadd command with the -T (test) and
-v (verbose) flags. Running the command with those flags displays the current state of the
mounted GFS file system.
Usage
gfs_jadd -j Number MountPoint
Number
Specifies the number of new journals to be added.
MountPoint
Specifies the directory where the GFS file system is mounted.
Comments
Before running the gfs_jadd command:
• Back up important data on the file system.
• Run a df MountPoint command to display the volume used by the file system where
journals will be added.
• Expand the underlying cluster volume with LVM. For information on administering LVM
volumes, see the LVM Administrator's Guide
You can find out how many journals are currently used by the filesystem with the gfs_tool df
MountPoint command. In the following example, the file system mounted at /mnt/gfs uses 8
journals.
[root@tng3-1 gfs]# gfs_tool df /mnt/gfs
/mnt/gfs:
SB lock proto = "lock_dlm"
SB lock table = "tng3-cluster:mydata1"
SB ondisk format = 1309
Usage
27
Page 38

SB multihost format = 1401
Block size = 4096
Journals = 8
Resource Groups = 76
Mounted lock proto = "lock_dlm"
Mounted lock table = "tng3-cluster:mydata1"
Mounted host data = "jid=0:id=196609:first=1"
Journal number = 0
Lock module flags = 0
Local flocks = FALSE
Local caching = FALSE
Oopses OK = FALSE
Type Total Used Free use%
-----------------------------------------------------------------------inodes 33 33 0 100%
metadata 38 2 36 5%
data 4980077 178 4979899 0%
After running the gfs_jadd command, you can run the gfs_tool df MountPoint command
again to check that the new journals have been added to the file system.
Examples
In this example, one journal is added to the file system that is mounted at the /mnt/gfs
directory. The underlying logical volume for this filesystem is extended before the journal can be
added.
[root@tng3-1 ~]# lvextend -L35G /dev/gfsvg/gfslv
Extending logical volume gfslv to 35.00 GB
Logical volume gfslv successfully resized
[root@tng3-1 ~]# gfs_jadd -j1 /mnt/gfs
FS: Mount Point: /mnt/gfs
FS: Device: /dev/mapper/gfsvg-gfslv
FS: Options: rw,hostdata=jid=0:id=196609:first=1
FS: Size: 5242877
DEV: Size: 9175040
Preparing to write new FS information...
Done.
In this example, two journals are added to the file system on the /mnt/gfs directory.
[root@tng3-1 ~]# fs_jadd -j2 /mnt/gfs
FS: Mount Point: /mnt/gfs
FS: Device: /dev/mapper/gfsvg-gfslv
FS: Options: rw,hostdata=jid=0:id=196609:first=1
FS: Size: 5275632
DEV: Size: 9175040
Preparing to write new FS information...
Done.
Chapter 3. Managing GFS
28
Page 39

Complete Usage
gfs_jadd [Options] {MountPoint | Device} [MountPoint | Device]
MountPoint
Specifies the directory where the GFS file system is mounted.
Device
Specifies the device node of the file system.
Table 3.4, “GFS-specific Options Available When Adding Journals” describes the GFS-specific
options that can be used when adding journals to a GFS file system.
Flag Parameter Description
-h Help. Displays short usage message.
-J MegaBytes Specifies the size of the new journals in megabytes.
Default journal size is 128 megabytes. The minimum
size is 32 megabytes. To add journals of different
sizes to the file system, the gfs_jadd command
must be run for each size journal. The size specified
is rounded down so that it is a multiple of the
journal-segment size that was specified when the file
system was created.
-j Number Specifies the number of new journals to be added by
the gfs_jadd command. The default value is 1.
-T Test. Do all calculations, but do not write any data to
the disk and do not add journals to the file system.
Enabling this flag helps discover what the gfs_jadd
command would have done if it were run without this
flag. Using the -v flag with the -T flag turns up the
verbosity level to display more information.
-q Quiet. Turns down the verbosity level.
-V Displays command version information.
-v Turns up the verbosity of messages.
Table 3.4. GFS-specific Options Available When Adding Journals
8. Direct I/O
Complete Usage
29
Page 40

Direct I/O is a feature of the file system whereby file reads and writes go directly from the
applications to the storage device, bypassing the operating system read and write caches.
Direct I/O is used only by applications (such as databases) that manage their own caches.
An application invokes direct I/O by opening a file with the O_DIRECT flag. Alternatively, GFS
can attach a direct I/O attribute to a file, in which case direct I/O is used regardless of how the
file is opened.
When a file is opened with O_DIRECT, or when a GFS direct I/O attribute is attached to a file, all
I/O operations must be done in block-size multiples of 512 bytes. The memory being read from
or written to must also be 512-byte aligned.
One of the following methods can be used to enable direct I/O on a file:
• O_DIRECT
• GFS file attribute
• GFS directory attribute
8.1. O_DIRECT
If an application uses the O_DIRECT flag on an open() system call, direct I/O is used for the
opened file.
To cause the O_DIRECT flag to be defined with recent glibc libraries, define _GNU_SOURCE at the
beginning of a source file before any includes, or define it on the cc line when compiling.
8.2. GFS File Attribute
The gfs_tool command can be used to assign (set) a direct I/O attribute flag, directio, to a
GFS file. The directio flag can also be cleared.
You can use the gfs_tool stat filename to check what flags have been set for a GFS file.
The output for this command includes a Flags: at the end of the display followed by a listing of
the flags that are set for the indicated file.
Usage
Setting the directio Flag
gfs_tool setflag directio File
Clearing the directio Flag
gfs_tool clearflag directio File
Chapter 3. Managing GFS
30
Page 41

File
Specifies the file where the directio flag is assigned.
Example
In this example, the command sets the directio flag on the file named datafile in directory
/mnt/gfs.
gfs_tool setflag directio /mnt/gfs/datafile
The following command checks whether the directio flag is set for /mnt/gfs/datafile. The
output has been elided to show only the relevant information.
[root@tng3-1 gfs]# gfs_tool stat /mnt/gfs/datafile
mh_magic = 0x01161970
...
Flags:
directio
8.3. GFS Directory Attribute
The gfs_tool command can be used to assign (set) a direct I/O attribute flag,
inherit_directio, to a GFS directory. Enabling the inherit_directio flag on a directory
causes all newly created regular files in that directory to automatically inherit the directio flag.
Also, the inherit_directio flag is inherited by any new subdirectories created in the directory.
The inherit_directio flag can also be cleared.
Usage
Setting the inherit_directio flag
gfs_tool setflag inherit_directio Directory
Clearing the inherit_directio flag
gfs_tool clearflag inherit_directio Directory
GFS Directory Attribute
31
Page 42

Directory
Specifies the directory where the inherit_directio flag is set.
Example
In this example, the command sets the inherit_directio flag on the directory named
/mnt/gfs/data.
gfs_tool setflag inherit_directio /mnt/gfs/data
This command displays the flags that have been set for the /mnt/gfs/data directory. The full
output has been truncated.
[root@tng3-1 gfs]# gfs_tool stat /mnt/gfs/data
...
Flags:
inherit_directio
9. Data Journaling
Ordinarily, GFS writes only metadata to its journal. File contents are subsequently written to disk
by the kernel's periodic sync that flushes file system buffers. An fsync() call on a file causes
the file's data to be written to disk immediately. The call returns when the disk reports that all
data is safely written.
Data journaling can result in a reduced fsync() time, especially for small files, because the file
data is written to the journal in addition to the metadata. An fsync() returns as soon as the
data is written to the journal, which can be substantially faster than the time it takes to write the
file data to the main file system.
Applications that rely on fsync() to sync file data may see improved performance by using data
journaling. Data journaling can be enabled automatically for any GFS files created in a flagged
directory (and all its subdirectories). Existing files with zero length can also have data journaling
turned on or off.
Using the gfs_tool command, data journaling is enabled on a directory (and all its
subdirectories) or on a zero-length file by setting the inherit_jdata or jdata attribute flags to
the directory or file, respectively. The directory and file attribute flags can also be cleared.
Usage
Setting and Clearing the inherit_jdata Flag
Chapter 3. Managing GFS
32
Page 43

gfs_tool setflag inherit_jdata Directory
gfs_tool clearflag inherit_jdata Directory
Setting and Clearing the jdata Flag
gfs_tool setflag jdata File
gfs_tool clearflag jdata File
Directory
Specifies the directory where the flag is set or cleared.
File
Specifies the zero-length file where the flag is set or cleared.
Examples
This example shows setting the inherit_jdata flag on a directory. All files created in the
directory or any of its subdirectories will have the jdata flag assigned automatically. Any data
written to the files will be journaled. This example also shows the gfs_tool stat command you
can use to verify what flags are set for a directory; the output has been elided to show only the
relevant information.
[root@tng3-1]# gfs_tool setflag inherit_jdata /mnt/gfs/data
[root@tng3-1]# gfs_tool stat /mnt/gfs/data
...
Flags:
inherit_jdata
This example shows setting the jdata flag on a file. The file must have a size of zero when you
set this flag. Any data written to the file will be journaled. This example also shows the
gfs_tool stat command you can use to verify what flags are set for a file; the output has been
elided to show only the relevant information.
[root@tng3-1]# gfs_tool setflag jdata /mnt/gfs/datafile
[root@tng3-1]# gfs_tool stat /mnt/gfs/datafile
...
Flags:
jdata
10. Configuring atime Updates
Examples
33
Page 44

Each file inode and directory inode has three time stamps associated with it:
• ctime — The last time the inode status was changed
• mtime — The last time the file (or directory) data was modified
• atime — The last time the file (or directory) data was accessed
If atime updates are enabled as they are by default on GFS and other Linux file systems then
every time a file is read, its inode needs to be updated.
Because few applications use the information provided by atime, those updates can require a
significant amount of unnecessary write traffic and file-locking traffic. That traffic can degrade
performance; therefore, it may be preferable to turn off atime updates.
Two methods of reducing the effects of atime updating are available:
• Mount with noatime
• Tune GFS atime quantum
10.1. Mount with noatime
A standard Linux mount option, noatime, can be specified when the file system is mounted,
which disables atime updates on that file system.
Usage
mount BlockDevice MountPoint -o noatime
BlockDevice
Specifies the block device where the GFS file system resides.
MountPoint
Specifies the directory where the GFS file system should be mounted.
Example
In this example, the GFS file system resides on the /dev/vg01/lvol0 and is mounted on
directory /gfs with atime updates turned off.
mount /dev/vg01/lvol0 /gfs -o noatime
Chapter 3. Managing GFS
34
Page 45

10.2. Tune GFS atime Quantum
When atime updates are enabled, GFS (by default) only updates them once an hour. The time
quantum is a tunable parameter that can be adjusted using the gfs_tool command.
Each GFS node updates the access time based on the difference between its system time and
the time recorded in the inode. It is required that system clocks of all GFS nodes in a cluster be
synchronized. If a node's system time is out of synchronization by a significant fraction of the
tunable parameter, atime_quantum, then atime updates are written more frequently. Increasing
the frequency of atime updates may cause performance degradation in clusters with heavy
work loads.
To see the current values of the GFS tunable parameters, including atime_quantum, you can
use the gfs_tool gettune, as described in Section 4, “Displaying GFS Tunable Parameters”.
The default value for atime_quantum is 3600 seconds.
The gfs_tool settune command is used to change the atime_quantum parameter value. It
must be set on each node and each time the file system is mounted. The setting is not
persistent across unmounts.
Usage
Changing the atime_quantum Parameter Value
gfs_tool settune MountPoint atime_quantum Seconds
MountPoint
Specifies the directory where the GFS file system is mounted.
Seconds
Specifies the update period in seconds.
Example
In this example, the atime update period is set to once a day (86,400 seconds) for the GFS file
system on mount point /gfs.
gfs_tool settune /gfs atime_quantum 86400
11. Suspending Activity on a File System
You can suspend write activity to a file system by using the gfs_tool freeze command.
Suspending write activity allows hardware-based device snapshots to be used to capture the file
system in a consistent state. The gfs_tool unfreeze command ends the suspension.
Suspending Activity on a File System
35
Page 46

Usage
Start Suspension
gfs_tool freeze MountPoint
End Suspension
gfs_tool unfreeze MountPoint
MountPoint
Specifies the file system.
Examples
This example suspends writes to file system /gfs.
gfs_tool freeze /gfs
This example ends suspension of writes to file system /gfs.
gfs_tool unfreeze /gfs
12. Displaying Extended GFS Information and Statistics
You can use the gfs_tool command to gather a variety of details about GFS. This section
describes typical use of the gfs_tool command for displaying space usage, statistics, and
extended status.
The gfs_tool command provides additional action flags (options) not listed in this section. For
more information about other gfs_tool flags, refer to the gfs_tool man page.
12.1. Displaying GFS Space Usage
You can use the df flag of the gfs_tool to display a space-usage summary of a given file
system. The information is more detailed than a standard df.
Usage
gfs_tool df MountPoint
Chapter 3. Managing GFS
36
Page 47

MountPoint
Specifies the file system to which the action applies.
Example
This example reports extended file system usage about file system /mnt/gfs.
[root@ask-07 ~]# gfs_tool df /mnt/gfs
/gfs:
SB lock proto = "lock_dlm"
SB lock table = "ask_cluster:mydata1"
SB ondisk format = 1309
SB multihost format = 1401
Block size = 4096
Journals = 8
Resource Groups = 605
Mounted lock proto = "lock_dlm"
Mounted lock table = "ask_cluster:mydata1"
Mounted host data = "jid=0:id=786433:first=1"
Journal number = 0
Lock module flags = 0
Local flocks = FALSE
Local caching = FALSE
Oopses OK = FALSE
Type Total Used Free use%
-----------------------------------------------------------------------inodes 5 5 0 100%
metadata 78 15 63 19%
data 41924125 0 41924125 0%
12.2. Displaying GFS Counters
You can use the counters flag of the gfs_tool to display statistics about a file system. If the -c
option is used, the gfs_tool command continues to run, displaying statistics once per second.
Note
The majority of the GFS counters reflect the internal operation of the GFS
filesystem and are for development purposes only.
The gfs_tool counters command displays the following statistics.
locks
Displaying GFS Counters
37
Page 48

The number of gfs_glock structures that currently exist in gfs.
locks held
The number of existing gfs_glock structures that are not in the UNLOCKED state.
freeze count
A freeze count greater than 0 means the file system is frozen. A freeze count of 0 means
the file system is not frozen. Each gfs_tool freeze command increments this count. Each
gfs_tool unfreeze command decrements this count.
incore inodes
The number of gfs_inode structures that currently exist in gfs.
metadata buffers
The number of gfs_bufdata structures that currently exist in gfs.
unlinked inodes
The gfs_inoded daemon links deleted inodes to a global list and cleans them up every 15
seconds (a period that is tunable). This number is the list length. It is related to the number
of gfs_unlinked structures currently in gfs.
quota IDs
The number of gfs_quota_data structures that currently exist in gfs.
incore log buffers
The number of buffers in in-memory journal log (incore log), before they are flushed to disk.
log space used
The the percentage of journal space used.
meta header cache entries
The number of gfs_meta_header_cache structures that currently exist in gfs.
glock dependencies
The number of gfs_depend structures that currently exist in gfs.
glocks on reclaim list
The number of glocks on the reclaim list.
log wraps
The number of times journal has wrapped around.
outstanding LM calls
obsolete
outstanding BIO calls
obsolete
fh2dentry misses
The number of times an NFS call could not find a dentry structure in the cache.
Chapter 3. Managing GFS
38
Page 49

glocks reclaimed
The number of glocks which have been reclaimed.
glock dq calls
The number of glocks released since the file system was mounted.
glock prefetch calls
The number of glock prefetch calls.
lm_lock calls
The number of times the lock manager has been contacted to obtain a lock.
lm_unlock calls
The number of times the lock manager has been contacted to release a lock.
lm callbacks
The number of times the lock manager has been contacted to change a lock state.
address operations
The number of address space call operations (readpage, writepage, directIO,
prepare_write, and commit_write)
dentry operations
The number of times a seek operation has been performed on the vfs dentry structure.
export operations
The number of times a seek operation has been performed on the nfs dentry structure.
file operations
The number of file operations that have been invoked (read, write, seek, etc).
inode operations
The number of inode operations that have been invoked (create, delete, symlink, etc.).
super operations
The number of super block operations.
vm operations
The number of times the mmap function has been called. mmap call count
block I/O reads
obsolete
block I/O writes
obsolete
Usage
gfs_tool counters MountPoint
Displaying GFS Counters
39
Page 50

MountPoint
Specifies the file system to which the action applies.
Example
This example reports statistics about the file system mounted at /mnt/gfs.
[root@tng3-1 gfs]# gfs_tool counters /mnt/gfs
locks 165
locks held 133
freeze count 0
incore inodes 34
metadata buffers 5
unlinked inodes 0
quota IDs 0
incore log buffers 0
log space used 0.05%
meta header cache entries 5
glock dependencies 5
glocks on reclaim list 0
log wraps 0
outstanding LM calls 0
outstanding BIO calls 0
fh2dentry misses 0
glocks reclaimed 345
glock nq calls 11632
glock dq calls 11596
glock prefetch calls 84
lm_lock calls 545
lm_unlock calls 237
lm callbacks 782
address operations 1075
dentry operations 374
export operations 0
file operations 1428
inode operations 1451
super operations 21239
vm operations 0
block I/O reads 0
block I/O writes 0
12.3. Displaying Extended Status
You can use the stat flag of the gfs_tool to display extended status information about a GFS
file.
Chapter 3. Managing GFS
40
Page 51

Note
The information that the gfs_tool stat command displays reflects internal file
system information. This information is intended for development purposes only.
Usage
gfs_tool stat File
File
Specifies the file from which to get information.
Example
This example reports extended file status about file /gfs/datafile.
[root@tng3-1 gfs]# gfs_tool stat /gfs/datafile
mh_magic = 0x01161970
mh_type = 4
mh_generation = 3
mh_format = 400
mh_incarn = 1
no_formal_ino = 66
no_addr = 66
di_mode = 0600
di_uid = 0
di_gid = 0
di_nlink = 1
di_size = 503156
di_blocks = 124
di_atime = 1207672023
di_mtime = 1207672023
di_ctime = 1207672023
di_major = 0
di_minor = 0
di_rgrp = 17
di_goal_rgrp = 17
di_goal_dblk = 371
di_goal_mblk = 44
di_flags = 0x00000000
di_payload_format = 0
di_type = 1
di_height = 1
di_incarn = 0
di_pad = 0
di_depth = 0
Displaying Extended Status
41
Page 52

di_entries = 0
no_formal_ino = 0
no_addr = 0
di_eattr = 0
di_reserved =
00 00 00 00 00 00 00 00 00 00 00 00 00 00 00 00
00 00 00 00 00 00 00 00 00 00 00 00 00 00 00 00
00 00 00 00 00 00 00 00 00 00 00 00 00 00 00 00
00 00 00 00 00 00 00 00
13. Repairing a File System
When nodes fail with the file system mounted, file system journaling allows fast recovery.
However, if a storage device loses power or is physically disconnected, file system corruption
may occur. (Journaling cannot be used to recover from storage subsystem failures.) When that
type of corruption occurs, you can recover the GFS file system by using the gfs_fsck
command.
Caution
The gfs_fsck command must be run only on a file system that is unmounted
from all nodes.
Note
The gfs_fsck command has changed from previous releases of Red Hat GFS in
the following ways:
• You can no longer set the interactive mode with Ctrl-C. Pressing Ctrl-C now
cancels the gfs_fsck command. Do not press Ctrl-C unless you want to
cancel the command.
• You can increase the level of verbosity by using the -v flag. Adding a second
-v flag increases the level again.
• You can decrease the level of verbosity by using the -q flag. Adding a second
-q flag decreases the level again.
• The -n option opens a file system as read-only and answers no to any queries
automatically. The option provides a way of trying the command to reveal
errors without actually allowing the gfs_fsck command to take effect.
Refer to the gfs_fsck man page, gfs_fsck(8), for additional information about
Chapter 3. Managing GFS
42
Page 53

other command options.
Usage
gfs_fsck -y BlockDevice
-y
The -y flag causes all questions to be answered with yes. With the -y flag specified, the
gfs_fsck command does not prompt you for an answer before making changes.
BlockDevice
Specifies the block device where the GFS file system resides.
Example
In this example, the GFS file system residing on block device /dev/gfsvg/gfslv is repaired. All
queries to repair are automatically answered with yes. Because this example uses the -v
(verbose) option, the sample output is extensive and repetitive lines have been elided.
[root@tng3-1]# gfs_fsck -v -y /dev/gfsvg/gfslv
Initializing fsck
Initializing lists...
Initializing special inodes...
Validating Resource Group index.
Level 1 check.
92 resource groups found.
(passed)
Setting block ranges...
Creating a block list of size 9175040...
Clearing journals (this may take a while)Clearing journal 0
Clearing journal 1
Clearing journal 2
...
Clearing journal 10
Journals cleared.
Starting pass1
Checking metadata in Resource Group 0
Checking metadata in Resource Group 1
...
Checking metadata in Resource Group 91
Pass1 complete
Starting pass1b
Looking for duplicate blocks...
No duplicate blocks found
Pass1b complete
Usage
43
Page 54

Starting pass1c
Looking for inodes containing ea blocks...
Pass1c complete
Starting pass2
Checking directory inodes.
Pass2 complete
Starting pass3
Marking root inode connected
Checking directory linkage.
Pass3 complete
Starting pass4
Checking inode reference counts.
Pass4 complete
Starting pass5
...
Updating Resource Group 92
Pass5 complete
Writing changes to disk
Syncing the device.
Freeing buffers.
14. Context-Dependent Path Names
Context-Dependent Path Names (CDPNs) allow symbolic links to be created that point to
variable destination files or directories. The variables are resolved to real files or directories
each time an application follows the link. The resolved value of the link depends on the node or
user following the link.
CDPN variables can be used in any path name, not just with symbolic links. However, the
CDPN variable name cannot be combined with other characters to form an actual directory or
file name. The CDPN variable must be used alone as one segment of a complete path.
Usage
For a Normal Symbolic Link
ln -s TargetLinkName
Target
Specifies an existing file or directory on a file system.
LinkName
Specifies a name to represent the real file or directory on the other end of the link.
For a Variable Symbolic Link
ln -s VariableLinkName
Chapter 3. Managing GFS
44
Page 55

Variable
Specifies a special reserved name from a list of values (refer to Table 3.5, “CDPN Variable
Values”) to represent one of multiple existing files or directories. This string is not the name
of an actual file or directory itself. (The real files or directories must be created in a separate
step using names that correlate with the type of variable used.)
LinkName
Specifies a name that will be seen and used by applications and will be followed to get to
one of the multiple real files or directories. When LinkName is followed, the destination
depends on the type of variable and the node or user doing the following.
Variable Description
@hostname This variable resolves to a real file or directory named with the
hostname string produced by the output of the following command:
echo `uname -n`
@mach This variable resolves to a real file or directory name with the
machine-type string produced by the output of the following
command: echo `uname -m`
@os This variable resolves to a real file or directory named with the
operating-system name string produced by the output of the
following command: echo `uname -s`
@sys This variable resolves to a real file or directory named with the
combined machine type and OS release strings produced by the
output of the following command: echo `uname -m`_`uname -s`
@uid This variable resolves to a real file or directory named with the
user ID string produced by the output of the following command:
echo `id -u`
@gid This variable resolves to a real file or directory named with the
group ID string produced by the output of the following command:
echo `id -g`
Table 3.5. CDPN Variable Values
Example
In this example, there are three nodes with hostnames n01, n02 and n03. Applications on each
node uses directory /gfs/log/, but the administrator wants these directories to be separate for
each node. To do this, no actual log directory is created; instead, an @hostname CDPN link is
created with the name log. Individual directories /gfs/n01/, /gfs/n02/, and /gfs/n03/ are
created that will be the actual directories used when each node references /gfs/log/.
Example
45
Page 56

n01# cd /gfs
n01# mkdir n01 n02 n03
n01# ln -s @hostname log
n01# ls -l /gfs
lrwxrwxrwx 1 root root 9 Apr 25 14:04 log -> @hostname/
drwxr-xr-x 2 root root 3864 Apr 25 14:05 n01/
drwxr-xr-x 2 root root 3864 Apr 25 14:06 n02/
drwxr-xr-x 2 root root 3864 Apr 25 14:06 n03/
n01# touch /gfs/log/fileA
n02# touch /gfs/log/fileB
n03# touch /gfs/log/fileC
n01# ls /gfs/log/
fileA
n02# ls /gfs/log/
fileB
n03# ls /gfs/log/
fileC
Chapter 3. Managing GFS
46
Page 57

Index
A
adding journals to a file system, 27
atime, configuring updates, 33
mounting with noatime, 34
tuning atime quantum, 35
audience, vii
C
CDPN variable values table, 45
configuration, before, 6
configuration, initial, 7
prerequisite tasks, 7
creating a file system, 9
D
data journaling, 32
direct I/O, 29
directory attribute, 31
file attribute, 30
O_DIRECT, 30
displaying extended GFS information and
statistics, 36
displaying GFS counters, 37
displaying GFS extended status, 40
displaying GFS space usage, 36
DLM (Distributed Lock Manager), 2
F
features, new and changed, 2
feedback, ix, ix
file system
adding journals, 27
atime, configuring updates, 33
mounting with noatime, 34
tuning atime quantum, 35
context-dependent path names (CDPNs),
44
creating, 9
data journaling, 32
direct I/O, 29
directory attribute, 31
file attribute, 30
O_DIRECT, 30
growing, 25
mounting, 13
quota management, 18
disabling/enabling quota accounting, 23
disabling/enabling quota enforcement,
22
displaying quota limits, 19
setting quotas, 18
synchronizing quotas, 21
repairing, 42
suspending activity, 35
unmounting, 16
G
GFS
atime, configuring updates, 33
mounting with noatime, 34
tuning atime quantum, 35
direct I/O, 29
directory attribute, 31
file attribute, 30
O_DIRECT, 30
displaying counters, 37
displaying extended information and
statistics, 36
displaying extended status, 40
displaying space usage, 36
managing, 9
quota management, 18
disabling/enabling quota accounting, 23
disabling/enabling quota enforcement,
22
displaying quota limits, 19
setting quotas, 18
synchronizing quotas, 21
GFS file system maximum size, 1, 6
GFS software components, 5
GFS software components table, 5
GFS-specific options for adding journals table,
29
GFS-specific options for expanding file
systems table, 26
gfs_mkfs command options table, 12
growing a file system, 25
GULM (Grand Unified Lock Manager), 2
47
Page 58

I
initial tasks
setup, initial, 7
introduction, vii
audience, vii
M
managing GFS, 9
maximum size, GFS file system, 1, 6
mount table, 14
mounting a file system, 13
O
overview, 1
configuration, before, 6
economy, 2
features, new and changed, 2
GFS software components, 5
performance, 2
scalability, 2
P
parameters, GFS tunable, 16
path names, context-dependent (CDPNs), 44
preface (see introduction)
prerequisite tasks
configuration, initial, 7
Q
quota management, 18
disabling/enabling quota accounting, 23
disabling/enabling quota enforcement, 22
displaying quota limits, 19
setting quotas, 18
synchronizing quotas, 21
R
repairing a file system, 42
S
setup, initial
initial tasks, 7
suspending activity on a file system, 35
T
tables
CDPN variable values, 45
GFS software components, 5
GFS-specific options for adding journals, 29
GFS-specific options for expanding file
systems, 26
gfs_mkfs command options, 12
mount options, 14
tunable parameters, GFS, 16
U
unmounting a file system, 16
Index
48
 Loading...