

Page 1
Red Hat GFS 6.1
Administrator’s Guide
Page 2

Red Hat GFS 6.1: Administrator’s Guide
Copyright © 2004, 2005 by Red Hat, Inc.
Red Hat, Inc.
1801 Varsity Drive
Raleigh NC 27606-2072 USA
Phone: +1 919 754 3700
Phone: 888 733 4281
Fax: +1 919 754 3701
PO Box 13588
Research Triangle Park NC 27709 USA
rh-gfsg(EN)-6.1-Print-RHI (2007-01-05T17:28)
Copyright © 2005 by Red Hat, Inc. This material may be distributedonly subject to the terms and conditions set
forth in the Open PublicationLicense, V1.0 or later (the latest version is presently available at
http://www.opencontent.org/openpub/).
Distribution of substantively modified versions of this document is prohibitedwithout the explicit permission of
the copyright holder.
Distribution of the work or derivative of the work in any standard (paper) book form for commercial purposes is
prohibited unless prior permission is obtained from the copyrightholder.
Red Hat and the Red Hat "Shadow Man" logo are registered trademarks of Red Hat, Inc. in the United States
and other countries.
All other trademarks referencedherein are the property of their respective owners.
The GPG fingerprint of the security@redhat.comkey is:
CA 20 86 86 2B D6 9D FC 65 F6 EC C4 21 91 80 CD DB 42 A6 0E
Page 3

Table of Contents
Introduction........................................................................................................................ i
1. Audience .............................................................................................................. i
2. Document Conventions........................................................................................ i
3. More to Come .................................................................................................... iv
3.1. Send in Your Feedback ....................................................................... iv
4. Activate Your Subscription ..................................................................................v
4.1. Provide a Red Hat Login.......................................................................v
4.2. Provide Your Subscription Number .................................................... vi
4.3. Connect Your System.......................................................................... vi
5. Recommended References................................................................................. vi
1. GFS Overview ................................................................................................................1
1.1. New and Changed Features...............................................................................1
1.2. Performance, Scalability, and Economy ...........................................................3
1.2.1. Superior Performance and Scalability ...............................................3
1.2.2. Performance, Scalability, Moderate Price..........................................4
1.2.3. Economy and Performance ................................................................5
1.3. GFS Functions ..................................................................................................6
1.4. GFS Software Subsystems................................................................................7
1.5. Before Setting Up GFS .....................................................................................9
2. System Requirements ..................................................................................................11
2.1. Platform Requirements ...................................................................................11
2.2. Red Hat Cluster Suite......................................................................................11
2.3. Fencing............................................................................................................12
2.4. Fibre Channel Storage Network......................................................................12
2.5. Fibre Channel Storage Devices.......................................................................12
2.6. Network Power Switches................................................................................13
2.7. Console Access ...............................................................................................13
3. Installing GFS ..............................................................................................................15
3.1. Installing the Red Hat Cluster Suite Packages................................................15
3.1.1. Automatic RPM Installation ............................................................16
3.1.2. Custom RPM Installation.................................................................17
4. Getting Started .............................................................................................................27
4.1. Prerequisite Tasks ...........................................................................................27
4.2. Initial Setup Tasks...........................................................................................27
5. Managing GFS .............................................................................................................29
5.1. Making a File System .....................................................................................29
5.1.1. Usage................................................................................................29
5.1.2. Examples..........................................................................................30
5.1.3. Complete Options ............................................................................31
5.2. Mounting a File System ..................................................................................32
5.2.1. Usage................................................................................................32
Page 4

5.2.2. Example ...........................................................................................33
5.2.3. Complete Usage ...............................................................................33
5.3. Unmounting a File System .............................................................................35
5.3.1. Usage................................................................................................35
5.4. GFS Quota Management.................................................................................36
5.4.1. Setting Quotas ..................................................................................36
5.4.2. Displaying Quota Limits and Usage ................................................37
5.4.3. Synchronizing Quotas ......................................................................39
5.4.4. Disabling/Enabling Quota Enforcement ..........................................40
5.4.5. Disabling/Enabling Quota Accounting............................................41
5.5. Growing a File System....................................................................................42
5.5.1. Usage................................................................................................43
5.5.2. Comments ........................................................................................43
5.5.3. Examples..........................................................................................43
5.5.4. Complete Usage ...............................................................................44
5.6. Adding Journals to a File System ...................................................................44
5.6.1. Usage................................................................................................45
5.6.2. Comments ........................................................................................45
5.6.3. Examples..........................................................................................45
5.6.4. Complete Usage ...............................................................................46
5.7. Direct I/O ........................................................................................................47
5.7.1. O_DIRECT ........................................................................................47
5.7.2. GFS File Attribute............................................................................47
5.7.3. GFS Directory Attribute ..................................................................48
5.8. Data Journaling ...............................................................................................49
5.8.1. Usage................................................................................................49
5.8.2. Examples..........................................................................................50
5.9. Configuring atime Updates ...........................................................................50
5.9.1. Mount with noatime.......................................................................50
5.9.2. Tune GFS atime Quantum .............................................................51
5.10. Suspending Activity on a File System ..........................................................52
5.10.1. Usage..............................................................................................52
5.10.2. Examples........................................................................................53
5.11. Displaying Extended GFS Information and Statistics ..................................53
5.11.1. Usage..............................................................................................53
5.11.2. Examples........................................................................................54
5.12. Repairing a File System ................................................................................54
5.12.1. Usage..............................................................................................55
5.12.2. Example .........................................................................................55
5.13. Context-Dependent Path Names ...................................................................55
5.13.1. Usage..............................................................................................55
5.13.2. Example .........................................................................................57
Page 5

6. Using GNBD with Red Hat GFS ................................................................................59
6.1. GNBD Driver and Command Usage ..............................................................59
6.1.1. Exporting a GNBD from a Server ...................................................60
6.1.2. Importing a GNBD on a Client ........................................................61
6.2. Running GFS on a GNBD Server Node .........................................................61
A. Upgrading GFS ...........................................................................................................63
Index..................................................................................................................................67
Colophon...........................................................................................................................71
Page 6

Page 7

Introduction
Welcome to the Red Hat GFS Administrator’s Guide. This book provides information
about installing, configuring, and maintaining Red Hat GFS (Red Hat Global File System). Red Hat GFS depends on the cluster infrastructure of Red Hat Cluster Suite. For
information about Red Hat Cluster Suite refer to Red Hat Cluster Suite Configuring and
Managing a Cluster.
HTML and PDF versions of all the official Red Hat Enterprise Linux manuals and release
notes are available online at http://www.redhat.com/docs/.
1. Audience
This book is intended primarily for Linux system administrators who are familiar with the
following activities:
• Linux system administration procedures, including kernel configuration
• Installation and configuration of shared storage networks, such as Fibre Channel SANs
2. Document Conventions
In this manual, certain words are represented in different fonts, typefaces, sizes, and
weights. This highlighting is systematic; different words are represented in the same style
to indicate their inclusion in a specific category. The types of words that are represented
this way include the following:
command
Linux commands (and other operating system commands, when used) are represented
this way. This style should indicate to you that you can type the word or phrase on
the command line and press [Enter] to invoke a command. Sometimes a command
contains words that would be displayed in a different style on their own (such as file
names). In these cases, they are considered to be part of the command, so the entire
phrase is displayed as a command. For example:
Use the cat testfile command to view the contents of a file, named testfile,
in the current working directory.
file name
File names, directory names, paths, and RPM package names are represented this
way. This style indicates that a particular file or directory exists with that name on
your system. Examples:
Page 8

ii Introduction
The .bashrc file in your home directory contains bash shell definitions and aliases
for your own use.
The /etc/fstab file contains information about different system devices and file
systems.
Install the webalizer RPM if you want to use a Web server log file analysis program.
application
This style indicates that the program is an end-user application (as opposed to system
software). For example:
Use Mozilla to browse the Web.
[key]
A key on the keyboard is shown in this style. For example:
To use [Tab] completion, type in a character and then press the [Tab] key. Your terminal displays the list of files in the directory that start with that letter.
[key]-[combination]
A combination of keystrokes is represented in this way. For example:
The [Ctrl]-[Alt]-[Backspace] key combination exits your graphical session and returns
you to the graphical login screen or the console.
text found on a GUI interface
A title, word, or phrase found on a GUI interface screen or window is shown in this
style. Text shown in this style indicates that a particular GUI screen or an element on
a GUI screen (such as text associated with a checkbox or field). Example:
Select the Require Password checkbox if you would like your screensaver to require
a password before stopping.
top level of a menu on a GUI screen or window
A word in this style indicates that the word is the top level of a pulldown menu. If you
click on the word on the GUI screen, the rest of the menu should appear. For example:
Under File on a GNOME terminal, the New Tab option allows you to open multiple
shell prompts in the same window.
Instructions to type in a sequence of commands from a GUI menu look like the following example:
Go to Applications (the main menu on the panel) => Programming => Emacs Text
Editor to start the Emacs text editor.
Page 9

Introduction iii
button on a GUI screen or window
This style indicates that the text can be found on a clickable button on a GUI screen.
For example:
Click on the Back button to return to the webpage you last viewed.
computer output
Text in this style indicates text displayed to a shell prompt such as error messages and
responses to commands. For example:
The ls command displays the contents of a directory. For example:
Desktop about.html logs paulwesterberg.png
Mail backupfiles mail reports
The output returned in response to the command (in this case, the contents of the
directory) is shown in this style.
prompt
A prompt, which is a computer’s way of signifying that it is ready for you to input
something, is shown in this style. Examples:
$
#
[stephen@maturin stephen]$
leopard login:
user input
Text that the user types, either on the command line or into a text box on a GUI screen,
is displayed in this style. In the following example, text is displayed in this style:
To boot your system into the text based installation program, you must type in the
text command at the boot: prompt.
replaceable
Text used in examples that is meant to be replaced with data provided by the user
is displayed in this style. In the following example,
version-numberis dis-
played in this style:
The directory for the kernel source is /usr/src/kernels/
version-numberis the version and type of kernel installed on this
where
version-number/,
system.
Additionally, we use several different strategies to draw your attention to certain pieces of
information. In order of urgency, these items are marked as a note, tip, important, caution,
or warning. For example:
Page 10
iv Introduction
Note
Remember that Linux is case sensitive. In other words, a rose is not a ROSE is not a
rOsE.
Tip
The directory /usr/share/doc/ contains additional documentation for packages installed
on your system.
Important
If you modify the DHCP configuration file, the changes do not take effect until you restart
the DHCP daemon.
Caution
Do not perform routine tasks as root — use a regular user account unless you need to
use the root account for system administration tasks.
Warning
Be careful to remove only the necessary partitions. Removing other partitions could result
in data loss or a corrupted system environment.
3. More to Come
The Red Hat GFS Administrator’s Guide is part of Red Hat’s growing commitment to
provide useful and timely support to Red Hat Enterprise Linux users.
Page 11

Introduction v
3.1. Send in Your Feedback
If you spot a typo in the Red Hat GFS Administrator’s Guide, or if you have thought of a
way to make this manual better, we would love to hear from you! Please submit a report in
Bugzilla (http://www.redhat.com/bugzilla) against the component rh-gfsg.
Be sure to mention the manual’s identifier:
rh-gfsg(EN)-6.1-Print-RHI (2007-01-05T17:28)
If you mention this manual’s identifier, we will know exactly which version of the guide
you have.
If you have a suggestion for improving the documentation, try to be as specific as possible.
If you have found an error, please include the section number and some of the surrounding
text so we can find it easily.
4. Activate Your Subscription
Before you can access service and software maintenance information, and the support documentation included in your subscription, you must activate your subscription by registering with Red Hat. Registration includes these simple steps:
• Provide a Red Hat login
• Provide a subscription number
• Connect your system
The first time you boot your installation of Red Hat Enterprise Linux, you are prompted to
register with Red Hat using the Setup Agent. If you follow the prompts during the Setup
Agent, you can complete the registration steps and activate your subscription.
If you can not complete registration during the Setup Agent (which requires network
access), you can alternatively complete the Red Hat registration process online at
http://www.redhat.com/register/.
4.1. Provide a Red Hat Login
If you do not have an existing Red Hat login, you can create one when prompted during
the Setup Agent or online at:
https://www.redhat.com/apps/activate/newlogin.html
A Red Hat login enables your access to:
• Software updates, errata and maintenance via Red Hat Network
Page 12

vi Introduction
• Red Hat technical support resources, documentation, and Knowledgebase
If you have forgotten your Red Hat login, you can search for your Red Hat login online at:
https://rhn.redhat.com/help/forgot_password.pxt
4.2. Provide Your Subscription Number
Your subscription number is located in the package that came with your order. If your
package did not include a subscription number, your subscription was activated for you
and you can skip this step.
You can provide your subscription number when prompted during the Setup Agent or by
visiting http://www.redhat.com/register/.
4.3. Connect Your System
The Red Hat Network Registration Client helps you connect your system so that you can
begin to get updates and perform systems management. There are three ways to connect:
1. During the Setup Agent — Check the Send hardware information and Send sys-
tem package list options when prompted.
2. After the Setup Agent has been completed — From Applications (the main menu
on the panel), go to System Tools, then select Red Hat Network.
3. After the Setup Agent has been completed — Enter the following command from
the command line as the root user:
• /usr/bin/up2date --register
5. Recommended References
For additional references about related topics, refer to the following table:
Topic Reference Comment
Shared Data Clustering and
File Systems
Shared Data Clusters by
Dilip M. Ranade. Wiley,
2002.
Provides detailed technical
information on cluster file
system and cluster
volume-manager design.
Page 13

Introduction vii
Topic Reference Comment
Storage Area Networks
(SANs)
Applications and High
Availability
Table 1. Recommended References Table
Designing Storage Area
Networks: A Practical
Reference for Implementing
Fibre Channel and IP
SANs, Second Edition by
Tom Clark.
Addison-Wesley, 2003.
Building SANs with
Brocade Fabric Switches by
C. Beauchamp, J. Judd, and
B. Keo. Syngress, 2001.
Building Storage Networks,
Second Edition by Marc
Farley.
Osborne/McGraw-Hill,
2001.
Blueprints for High
Availability: Designing
Resilient Distributed
Systems by E. Marcus and
H. Stern. Wiley, 2000.
Provides a concise
summary of Fibre Channel
and IP SAN Technology.
Best practices for building
Fibre Channel SANs based
on the Brocade family of
switches, including
core-edge topology for
large SAN fabrics.
Provides a comprehensive
overview reference on
storage networking
technologies.
Provides a summary of
best practices in high
availability.
Page 14

viii Introduction
Page 15

Chapter 1.
GFS Overview
Red Hat GFS is a cluster file system that is available with Red Hat Cluster Suite. Red
Hat GFS nodes are configured and managed with Red Hat Cluster Suite configuration and
management tools. Red Hat GFS provides data sharing among GFS nodes in a Red Hat
cluster. GFS provides a single, consistent view of the file-system name space across the
GFS nodes in a Red Hat cluster. GFS allows applications to install and run without much
knowledge of the underlying storage infrastructure. GFS is fully compliant with the IEEE
POSIX interface, allowing applications to perform file operations as if they were running
on a local file system. Also, GFS provides features that are typically required in enterprise
environments, such as quotas, multiple journals, and multipath support.
GFS provides a versatile method of networking your storage according to the performance,
scalability, and economic needs of your storage environment. This chapter provides some
very basic, abbreviated information as background to help you understand GFS. It contains
the following sections:
• Section 1.1 New and Changed Features
• Section 1.2 Performance, Scalability, and Economy
• Section 1.3 GFS Functions
• Section 1.4 GFS Software Subsystems
• Section 1.5 Before Setting Up GFS
1.1. New and Changed Features
This section lists new and changed features included with the initial release of Red Hat
Red Hat GFS 6.1 and Red Hat GFS 6.1 for Red Hat Enterprise Linux 4 Update 2.
For information about upgrading from GFS 6.0 to GFS 6.1, refer to Appendix A Upgrading
GFS.
Note
Multipath GNBD is not available with Red Hat GFS 6.1. That is, device mapper multipath
(dm-multipath) cannot use GNBD. GNBD without multipath is available.
New and Changed Features with the Initial Release of Red Hat GFS 6.1
Page 16

2 Chapter 1. GFS Overview
• Cluster infrastructure provided by Red Hat Cluster Suite — This release of Red Hat
GFS uses the cluster infrastructure of Red Hat Cluster Suite, taking advantage of the
Red Hat Cluster Suite configuration file and cluster graphical user interface (GUI),
system-config-cluster. For information about configuring and managing Red Hat
Cluster Suite, refer to Red Hat Cluster Suite Configuring and Managing a Cluster. Previous versions of Red Hat GFS provided a cluster infrastructure that was exclusive to
GFS (even though used with Red Hat Cluster Suite). Additionally, configuration files in
earlier versions of Red Hat GFS were created and maintained via text editors only (that
is, no GUI was available).
• Red Hat Cluster Suite lock architectures — Via Red Hat Cluster Suite, GFS can use the
following lock architectures:
• DLM (Distributed Lock Manager), new for Red Hat GFS 6.1 — DLM provides lock
management throughout a Red Hat cluster, requiring no nodes to be configured as
lock management nodes (contrasted to GULM, which does require certain nodes to
be configured as lock management nodes).
• GULM (Grand Unified Lock Manager) — A client/server lock architecture that is
compatible with Red Hat GFS 6.0.
• Nolock — For single node operation only.
• New volume manager, LVM2 — The pool volume manager in earlier releases of Red
Hat GFS is replaced with LVM2 for this release. LVM2 is used in conjunction with
CLVM (Cluster Logical Volume Manager). This release provides a tool to convert GFS
6.0 pool volumes to the LVM2 format. For information about converting pool volumes
to the LVM2 format, refer to Appendix A Upgrading GFS.
• Enhanced gfs_fsck performance and changes to the gfs_fsck command — The
gfs_fsck function performs 10 times as fast as gfs_fsck in earlier GFS releases.
(This enhancement has been included in a recent update to Red Hat GFS 6.0, also.) In
addition, the enhanced gfs_fsck function includes changes to certain command options. For more information about changes to the command options, refer to Section
5.12 Repairing a File System.
• Withdraw individual mount points — Allows individual GFS mount points to gracefully
discontinue operations on a node without causing that node to panic. This feature provides the ability to continue operations with unaffected file systems on that node. The
feature can be overridden to allow a node to panic, thereby providing more information for troubleshooting. For more information, refer to the mount command option,
oopses_ok, in Table 5-2
• Increased storage supported — Red Hat GFS supports 8 terabytes of storage per GFS
file system. For more information about Red Hat GFS requirements, refer to Chapter 2
System Requirements
Page 17

Chapter 1. GFS Overview 3
New and Changed Features with Red Hat GFS 6.1 for Red Hat Enterprise Linux 4
Update 2
Red Hat GFS 6.1 for Red Hat Enterprise Linux 4 Update 2 supports iSCSI and multipath
iSCSI. That is, device mapper multipath (dm-multipath) can use iSCSI.
1.2. Performance, Scalability, and Economy
You can deploy GFS in a variety of configurations to suit your needs for performance,
scalability, and economy. For superior performance and scalability, you can deploy GFS in
a cluster that is connected directly to a SAN. For more economical needs, you can deploy
GFS in a cluster that is connected to a LAN with servers that use GNBD (Global Network
Block Device). (For more information about GNBD, refer to Chapter 6 Using GNBD with
Red Hat GFS.)
The following sections provide examples of how GFS can be deployed to suit your needs
for performance, scalability, and economy:
• Section 1.2.1 Superior Performance and Scalability
• Section 1.2.2 Performance, Scalability, Moderate Price
• Section 1.2.3 Economy and Performance
Note
The deployment examples in this chapter reflect basic configurations; your needs might
require a combination of configurations shown in the examples.
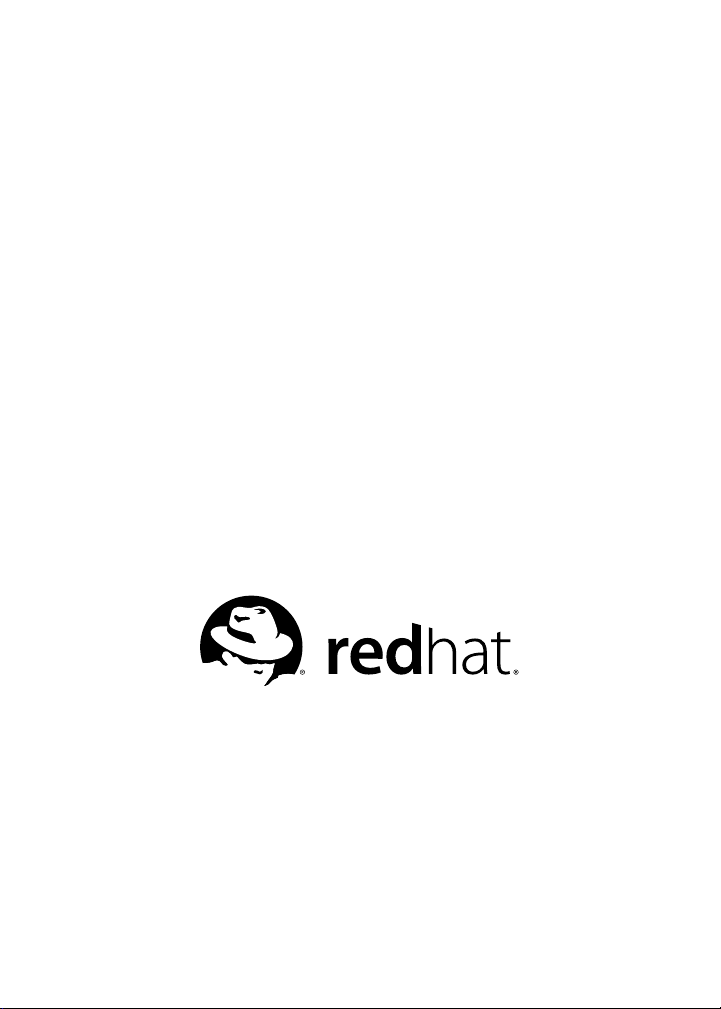
1.2.1. Superior Performance and Scalability
You can obtain the highest shared-file performance when applications access storage directly. The GFS SAN configuration in Figure 1-1 provides superior file performance for
shared files and file systems. Linux applications run directly on GFS nodes. Without file
protocols or storage servers to slow data access, performance is similar to individual Linux
servers with directly connected storage; yet, each GFS application node has equal access
to all data files. GFS supports over 300 GFS nodes.
Page 18
4 Chapter 1. GFS Overview
SAN
Fabric
GFS
Applications
Shared Files
Figure 1-1. GFS with a SAN
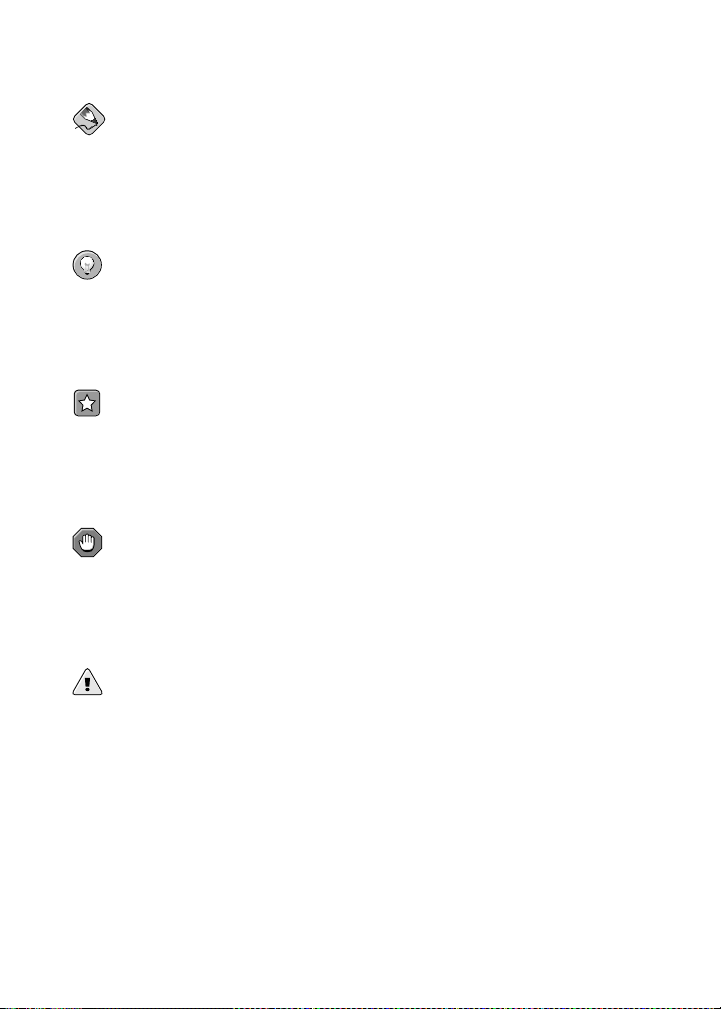
1.2.2. Performance, Scalability, Moderate Price
Multiple Linux client applications on a LAN can share the same SAN-based data as shown
in Figure 1-2. SAN block storage is presented to network clients as block storage devices
by GNBD servers. From the perspective of a client application, storage is accessed as if
it were directly attached to the server in which the application is running. Stored data is
actually on the SAN. Storage devices and data can be equally shared by network client
applications. File locking and sharing functions are handled by GFS for each network
client.
Note
Clients implementing ext2 and ext3 file systems can be configured to access their own
dedicated slice of SAN storage.
Page 19
Chapter 1. GFS Overview 5
LAN
Clients
GNBD
servers
SAN
Fabric
GFS
Applications
Shared Files
Figure 1-2. GFS and GNBD with a SAN
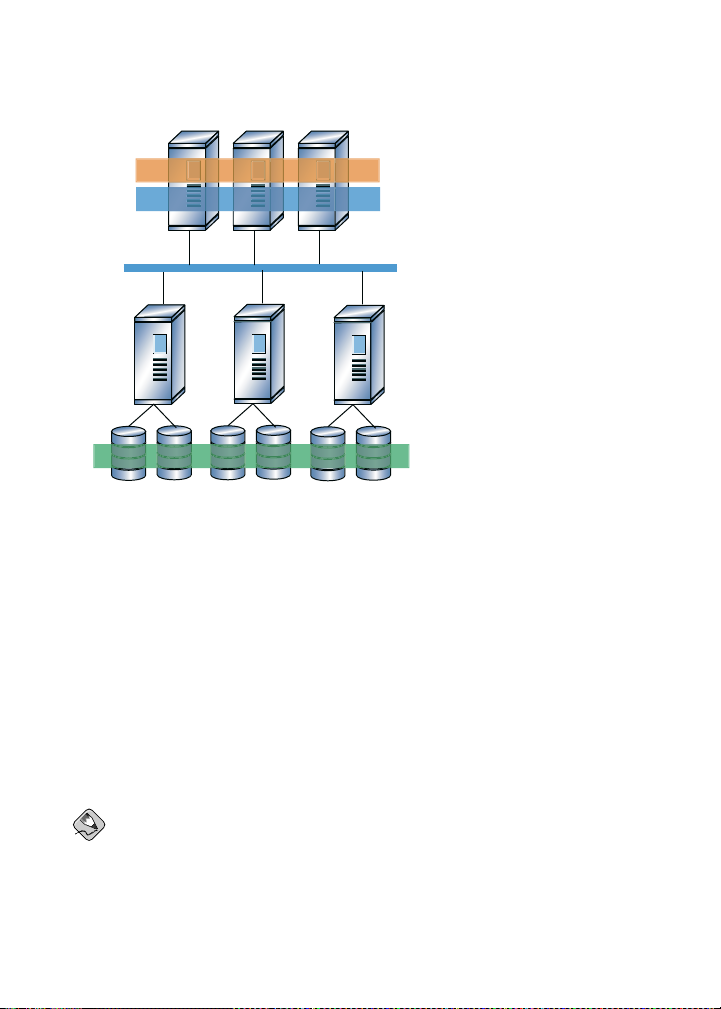
1.2.3. Economy and Performance
Figure 1-3 shows how Linux client applications can take advantage of an existing Ethernet
topology to gain shared access to all block storage devices. Client data files and file systems
can be shared with GFS on each client. Application failover can be fully automated with
Red Hat Cluster Suite.
Page 20
6 Chapter 1. GFS Overview
LAN
Clients
GNBD
servers
Disk
A
GFS
Applications
Disk
B
Disk
D
Disk
C
Disk
E
Disk
F
Shared Files
Figure 1-3. GFS and GNBD with Directly Connected Storage
1.3. GFS Functions
GFS is a native file system that interfaces directly with the VFS layer of the Linux
kernel file-system interface. GFS is a cluster file system that employs distributed
metadata and multiple journals for optimal operation in a cluster. Cluster management
of GFS nodes is managed through Red Hat Cluster Suite. Volume management
is managed through CLVM (Cluster Logical Volume Manager). For information
about Red Hat Cluster Suite refer to Red Hat Cluster Suite Configuring and
Managing a Cluster. For information about using CLVM, refer to the LVM HOWTO
(http://www.tldp.org/HOWTO/LVM-HOWTO/index.html).
Note
CLVM is a cluster-wide implementation of LVM, enabled by the CLVM daemon, clvmd
running in a Red Hat Cluster Suite cluster. The daemon makes it possible to use LVM2
to manage logical volumes across a cluster, allowing all nodes in the cluster to share the
logical volumes.
Page 21

Chapter 1. GFS Overview 7
GFS provides the following main functions:
• Making a File System
• Mounting a File System
• Unmounting a File System
• GFS Quota Management
• Growing a File System
• Adding Journals to a File System
• Direct I/O
• Data Journaling
• Configuring atime Updates
• Suspending Activity on a File System
• Displaying Extended GFS Information and Statistics
• Repairing a File System
• Context-Dependent Path Names (CDPN)
1.4. GFS Software Subsystems
GFS consists of the following subsystems: GFS and GNBD.
Table 1-1 summarizes the GFS Software subsystems and their components.
Software
Components Description
Subsystem
GFS gfs.ko Kernel module that implements the
GFS file system and is loaded on GFS
cluster nodes.
gfs_fsck Command that repairs an unmounted
GFS file system.
gfs_grow Command that grows a mounted GFS
file system.
Page 22

8 Chapter 1. GFS Overview
Software
Components Description
Subsystem
gfs_jadd Command that adds journals to a
mounted GFS file system.
gfs_mkfs Command that creates a GFS file
system on a storage device.
gfs_quota Command that manages quotas on a
mounted GFS file system.
gfs_tool Command that configures or tunes a
GFS file system. This command can
also gather a variety of information
about the file system.
lock_harness.ko Implements a pluggable lock module
interface for GFS that allows for a
variety of locking mechanisms to be
used (for example, the DLM lock
module, lock_dlm.ko).
lock_dlm.ko A lock module that implements DLM
locking for GFS. It plugs into the lock
harness, lock_harness.ko and
communicates with the DLM lock
manager in Red Hat Cluster Suite.
lock_gulm.ko A lock module that implements
GULM locking for GFS. It plugs into
the lock harness, lock_harness.ko
and communicates with the GULM
lock manager in Red Hat Cluster
Suite.
lock_nolock.ko A lock module for use when GFS is
used as a local file system only. It
plugs into the lock harness,
lock_harness.ko and provides
local locking.
GNBD gnbd.ko Kernel module that implements the
GNBD device driver on clients.
gnbd_export Command to create, export and
manage GNBDs on a GNBD server.
gnbd_import Command to import and manage
GNBDs on a GNBD client.
Page 23

Chapter 1. GFS Overview 9
Software
Subsystem
Table 1-1. GFS Software Subsystem Components
Components Description
gnbd_serv A server daemon that allows a node to
export local storage over the network.
1.5. Before Setting Up GFS
Before you install and set up GFS, note the following key characteristics of your GFS file
systems:
Number of file systems
Determine how many GFS file systems to create initially. (More file systems can be
added later.)
File-system name
Determine a unique name for each file system. Each file-system name is required in
the form of a parameter variable. For example, this book uses file-system names gfs1
and gfs2 in some example procedures.
Journals
Determine the number of journals for your GFS file systems. One journal is required
for each node that mounts a GFS file system. Make sure to account for additional
journals needed for future expansion.
GFS nodes
Determine which nodes in the Red Hat Cluster Suite will mount the GFS file systems.
GNBD server nodes
If you are using GNBD, determine how many GNBD server nodes are needed. Note
the hostname and IP address of each GNBD server node for setting up GNBD clients
later.
Storage devices and partitions
Determine the storage devices and partitions to be used for creating logical volumes
(via CLVM) in the file systems.
Page 24

10 Chapter 1. GFS Overview
Page 25
Chapter 2.
System Requirements
This chapter describes the system requirements for Red Hat GFS Release 6.1 and consists
of the following sections:
• Section 2.1 Platform Requirements
• Section 2.2 Red Hat Cluster Suite
• Section 2.3 Fencing
• Section 2.4 Fibre Channel Storage Network
• Section 2.5 Fibre Channel Storage Devices
• Section 2.6 Network Power Switches
• Section 2.7 Console Access
2.1. Platform Requirements
Table 2-1 shows the platform requirements for GFS.
Operating System Hardware
Red Hat Enterprise Linux AS, ES,
or WS, Version 4 or later
Table 2-1. Platform Requirements
Architecture
ia64, x86-64, x86
SMP supported
RAM
256 MB, minimum
2.2. Red Hat Cluster Suite
Red Hat GFS runs with Red Hat Cluster Suite 4.0 or later. The Red Hat Cluster Suite
software must be installed on the cluster nodes before you can install and run Red Hat
GFS.
Note
Red Hat Cluster Suite 4.0 provides the infrastructure for application failover in the cluster
and network communication among GFS nodes (and other Red Hat Cluster Suite nodes).
Page 26
12 Chapter 2. System Requirements
2.3. Fencing
You must configure each GFS node in your Red Hat cluster for at least one form of fencing.
Fencing is configured and managed in Red Hat Cluster Suite. For more information about
fencing options, refer to Red Hat Cluster Suite Configuring and Managing a Cluster.
2.4. Fibre Channel Storage Network
Table 2-2 shows requirements for GFS nodes that are to be connected to a Fibre Channel
SAN.
Requirement Description
HBA (Host Bus Adapter) One HBA minimum per GFS node
Connection method Fibre Channel switch
Note: If an FC switch is used for fencing, you may
want to consider using Brocade, McData, or Vixel
FC switches, for which Red Hat Cluster Suite
fencing agents exist. Refer to Red Hat Cluster Suite
Configuring and Managing a Cluster for more
information about supported fencing agents.
Note: When a small number of nodes is used, it may
be possible to connect the nodes directly to ports on
the storage device.
Note: FC drivers may not work reliably with FC hubs.
Table 2-2. Fibre Channel Network Requirements
2.5. Fibre Channel Storage Devices
Table 2-3 shows requirements for Fibre Channel devices that are to be connected to a GFS
cluster.
Requirement Description
Page 27

Chapter 2. System Requirements 13
Requirement Description
Device Type FC RAID array or JBOD
Size 8 TB maximum supported per GFS file systen.
Table 2-3. Fibre Channel Storage Device Requirements
Note: Make sure that the devices can operate reliably
when heavily accessed simultaneously from multiple
initiators.
Note: Make sure that your GFS configuration does not
exceed the number of nodes an array or JBOD
supports.
2.6. Network Power Switches
You can fence GFS nodes with power switches and fencing agents available with Red Hat
Cluster Suite. For more information about fencing with network power switches, refer to
Red Hat Cluster Suite Configuring and Managing a Cluster.
2.7. Console Access
Make sure that you have console access to each GFS node. Console access to each node
ensures that you can monitor nodes and troubleshoot problems.
Page 28

14 Chapter 2. System Requirements
Page 29

Chapter 3.
Installing GFS
Installing GFS consists of installing Red Hat GFS RPMs on nodes in a Red Hat cluster.
Before installing the RPMs, make sure of the following:
• The cluster nodes meet the requirements as described in Chapter 2 System Requirements.
• You have noted the key characteristics of your GFS configuration (refer to Section 1.5
Before Setting Up GFS).
• The correct Red Hat Cluster Suite software is installed in the cluster.
The rest of this chapter provides procedures for installing RPMs for Red Hat Cluster Suite
and Red Hat GFS. The same information can be found in the Red Hat guide, Red Hat
Cluster Suite Configuring and Managing a Cluster, but is provided here for your convenience. If you have already installed the appropriate Red Hat Cluster Suite RPMs, follow
the procedures that pertain to installing the Red Hat GFS RPMs.
3.1. Installing the Red Hat Cluster Suite Packages
Red Hat Cluster Suite consists of the following RPM packages:
• rgmanager — Manages cluster services and resources
• system-config-cluster — Contains the Cluster Configuration Tool, used to
graphically configure the cluster and the display of the current status of the nodes,
resources, fencing agents, and cluster services
• ccsd — Contains the cluster configuration services daemon (ccsd) and associated files
• magma — Contains an interface library for cluster lock management
• magma-plugins — Contains plugins for the magma library
• cman — Contains the Cluster Manager (CMAN), which is used for managing cluster
membership, messaging, and notification
• cman-kernel — Contains required CMAN kernel modules
• dlm — Contains distributed lock management (DLM) library
• dlm-kernel — Contains required DLM kernel modules
• fence — The cluster I/O fencing system that allows cluster nodes to connect to a variety
of network power switches, fibre channel switches, and integrated power management
interfaces
Page 30

16 Chapter 3. Installing GFS
• gulm — Contains the GULM lock management userspace tools and libraries (an alter-
native to using CMAN and DLM).
• iddev — Contains libraries used to identify the file system (or volume manager) in
which a device is formatted
Also, you can optionally install Red Hat GFS on your Red Hat Cluster Suite. Red Hat GFS
consists of the following RPMs:
• GFS — The Red Hat GFS module
• GFS-kernel — The Red Hat GFS kernel module
• gnbd — The GFS Network Block Device module
• gnbd-kernel — Kernel module for the GFS Network Block Device
• lvm2-cluster — Cluster extensions for the logical volume manager
• GFS-kernheaders — GFS kernel header files
• gnbd-kernheaders — gnbd kernel header files
Tip
You can access the Red Hat Cluster Suite and Red Hat GFS products by using Red
Hat Network to subscribe to and access the channels containing the Red Hat Cluster
Suite and Red Hat GFS packages. From the Red Hat Network channel, you can manage
entitlements for your cluster nodes and upgrade packages for each node within the Red
Hat Network Web-based interface. For more information on using Red Hat Network, visit
the following URL:
http://rhn.redhat.com
You can install Red Hat Cluster Suite and Red Hat GFS RPMs using either of the following
methods:
• Automatic RPM installation — Using up2date
• Custom RPM installation — Selectively installing RPMs using the rpm utility
For automatic RPM installation, refer to Section 3.1.1 Automatic RPM Installation. For
custom RPM installation, refer to Section 3.1.2 Custom RPM Installation.
Page 31

Chapter 3. Installing GFS 17
3.1.1. Automatic RPM Installation
Automatic RPM installation consists of running the up2date utility at each node for the
Red Hat Cluster Suite and Red Hat GFS products.
Note
If you are installing the GFS RPMs, you must run up2date for Red Hat Cluster Suite
before running it for Red Hat GFS.
To automatically install RPMs, follow these steps at each node:
1. Log on as the root user.
Note
The following steps specify using up2date installall with the --force option.
Using the --force option includes kernels that are required for successful installation of Red Hat Cluster Suite and Red Hat GFS. (Without the --force option,
up2date skips kernels by default.)
2. Run up2date --force --installall=channel-label for Red Hat Cluster
Suite. The following example shows running the command for i386 RPMs:
# up2date --force --installall=rhel-i386-as-4-cluster
3. (Optional) If you are installing Red Hat GFS, run up2date --force
--installall=channel-label for Red Hat GFS. The following example shows
running the command for i386 RPMs:
# up2date --force --installall=rhel-i386-as-4-gfs-6.1
3.1.2. Custom RPM Installation
Custom RPM installation consists of the following steps:
1. Determine which RPMs to install. For information on determining which RPMs to
install, refer to Section 3.1.2.1 Determining RPMs To Install.
2. Install the RPMs using the rpm utility. For information about installing the RPMs
using the rpm utility, refer to Section 3.1.2.2 Installing Packages with the rpm Utility.
Page 32

18 Chapter 3. Installing GFS
Note
If you are installing the GFS RPMs, you must install Red Hat Cluster Suite before Red
Hat GFS.
3.1.2.1. Determining RPMs To Install
Determining which RPMs to install is based on the following criteria:
• The lock manager Red Hat Cluster Suite is using — either DLM or GULM
• The Red Hat Cluster Suite and Red Hat GFS functions you are using (besides the stan-
dard functions)
• Whether to include development libraries
• The type of kernel (or kernels) is installed
Use the following tables for determining which RPMs to install:
• Table 3-1 — For Red Hat Cluster Suite with DLM
• Table 3-2 — For Red Hat Cluster Suite with GULM
• Table 3-3 — For Red Hat GFS
The tables contain the following information to assist you in determining which packages
to install:
• RPMs — The names of the RPMs (excluding revision numbers)
• Inclusion — The tables provide the following information about whether an RPM should
be included in the installation:
• Req: Required RPM — You must install the RPM.
• Opt: Optional RPM — Refer to the "Purpose" for more information about determining
whether to include the RPM.
• Dev: Development RPM — Used for development purposes. Refer to the "Purpose"
for more information about determining whether to include the RPM.
• Purpose — Provides a concise description of the RPM purpose. Assists in determining
which RPMs to include other than the required RPMs.
Page 33

Chapter 3. Installing GFS 19
To determine which RPMs to include in the installation, perform the following steps:
1. Determine whether you are installing Red Hat Cluster Suite with DLM or Red Hat
Cluster Suite with GULM.
a. If you are installing Red Hat Cluster Suite with DLM, refer to Table 3-1 to
identify which RPMs are required, optional, and for development.
b. If you are installing Red Hat Cluster Suite with GULM, refer to Table 3-2 to
identify which RPMs are required, optional, and for development.
2. If you are installing Red Hat GFS, refer to Table 3-3 to identify which RPMs are
required, optional, and for development.
3. With the information gathered in the previous steps, proceed to install the RPMs
using the procedures in Section 3.1.2.2 Installing Packages with the rpm Utility.
RPMs Inclusion Depends
Purpose
on
Kernel
Type?
ccs-ver-rel.arch Req No The Cluster
Configuration
System
cman-ver-rel.arch Req No The Cluster
Manager
cman-kernel-ver-rel.arch
cman-kernel-hugemem-ver-rel.arch
cman-kernel-smp-ver-rel.arch
Req Yes The Cluster
Manager kernel
modules
Note: The types of RPMs available vary
according to RHN channel.
dlm-ver-rel.arch Req No The Distributed
Lock Manager
dlm-kernel-ver-rel.arch
dlm-kernel-hugemem-ver-rel.arch
dlm-kernel-smp-ver-rel.arch
Req Yes The Distributed
Lock Manager
kernel modules
Note: The types of RPMs available vary
according to RHN channel.
fence-ver-rel.arch Req No The cluster I/O
fencing system
Page 34

20 Chapter 3. Installing GFS
RPMs Inclusion Depends
Purpose
on
Kernel
Type?
iddev-ver-rel.arch Req No A library that
identifies device
contents
magma-ver-rel.arch Req No A cluster/lock
manager API
abstraction library
magma-plugins-ver-rel.arch Req No Cluster manager
plugins for magma
gulm-ver-rel.arch
Note: The gulm module is required with
DLM because the magma-plugins
module has a dependency on the gulm
RPM.
Req No The Grand Unified
Lock Manager
(GULM, available
for this release and
earlier versions of
Red Hat GFS)
perl-Net-Telnet-ver-rel.arch Req No Net-Telnet Perl
module
rgmanager-ver-rel.arch Opt No Open source HA
resource group
failover
system-config-cluster-ver-rel.archReq No GUI to manage
cluster
configuration
ipvsadm-ver-rel.arch Opt No Utility to administer
the Linux Virtual
Server
piranha-ver-rel.arch Opt No Cluster
administration tools
ccs-devel-ver-rel.arch Dev No CCS static library
cman-kernheaders-ver-rel.arch Dev No cman kernel header
files
dlm-devel-ver-rel.arch Dev No The Distributed
Lock Manager
user-space libraries
Page 35

Chapter 3. Installing GFS 21
RPMs Inclusion Depends
Purpose
on
Kernel
Type?
dlm-kernheaders-ver-rel.arch Dev No dlm kernel header
files
iddev-devel-ver-rel.arch Dev No iddev development
libraries
magma-devel-ver-rel.arch Dev No A cluster/lock
manager API
abstraction library
Table 3-1. RPM Selection Criteria: Red Hat Cluster Suite with DLM
RPMs Inclusion Depends
Purpose
on
Kernel
Type?
ccs-ver-rel.arch Req No The Cluster
Configuration
System
fence-ver-rel.arch Req No The cluster I/O
fencing system
gulm-ver-rel.arch Req No The Grand Unified
Lock Manager
(GULM, available
for this release and
earlier versions of
Red Hat GFS)
iddev-ver-rel.arch Req No A library that
identifies device
contents
magma-ver-rel.arch Req No A cluster/lock
manager API
abstraction library
magma-plugins-ver-rel.arch Req No Cluster manager
plugins for magma
Page 36

22 Chapter 3. Installing GFS
RPMs Inclusion Depends
Purpose
on
Kernel
Type?
perl-Net-Telnet-ver-rel.arch Req No Net-Telnet Perl
module
system-config-cluster-ver-rel.archReq No GUI to manage
cluster
configuration
ipvsadm-ver-rel.arch Opt No Utility to administer
the Linux Virtual
Server
piranha-ver-rel.arch Opt No Cluster
administration tools
ccs-devel-ver-rel.arch Dev No CCS static library
gulm-devel-ver-rel.arch Dev No gulm libraries
iddev-devel-ver-rel.arch Dev No iddev development
libraries
magma-devel-ver-rel.arch Dev No A cluster/lock
manager API
abstraction library
Table 3-2. RPM Selection Criteria: Red Hat Cluster Suite with GULM
RPMs Inclusion Depends
Purpose
on
Kernel
Type?
GFS-ver-rel.arch Req No The Red Hat GFS
module
GFS-kernel-ver-rel.arch
GFS-kernel-hugemem-ver-rel.arch
GFS-kernel-smp-ver-rel.arch
Req Yes The Red Hat GFS
kernel modules
Note: The types of RPMs available vary
according to RHN channel.
gnbd-ver-rel.arch Opt No The GFS Network
Block Device
Page 37

Chapter 3. Installing GFS 23
RPMs Inclusion Depends
Purpose
on
Kernel
Type?
gnbd-kernel-ver-rel.arch
gnbd-kernel-hugemem-ver-rel.arch
gnbd-kernel-smp-ver-rel.arch
Opt Yes Kernel module for
GFS Network
Block Device
Note: The types of RPMs available vary
according to RHN channel.
lvm2-cluster-ver-rel.arch Req No Cluster extensions
for the logical
volume manager
GFS-kernheaders-ver-rel.arch Dev No GFS kernel header
files
gnbd-kernheaders-ver-rel.arch Dev No gnbd kernel header
files
Table 3-3. RPM Selection Criteria: Red Hat GFS
3.1.2.2. Installing Packages with the rpm Utility
You can use the rpm utility to install RPMs from CDs created with RHN ISOs. The procedure consists of copying RPMs to a local computer, removing the RPMs that are not
needed for the installation, copying the RPMs to the cluster nodes, and installing them.
To install the RPMs, follow these instructions:
1. At a local computer (one that is not part of the cluster) make a temporary directory
to contain the RPMs. For example:
$ mkdir /tmp/RPMS/
2. Insert the Red Hat Cluster Suite CD into the CD-ROM drive.
Note
If a Question dialog box is displayed that asks if you want to run autorun, click No.
3. Copy all the RPM files from the CD (located in /media/cdrom/RedHat/RPMS/)
to the temporary directory created earlier. For example:
$ cp /media/cdrom/RedHat/RPMS/*.rpm /tmp/RPMS/
Page 38

24 Chapter 3. Installing GFS
Note
If your local computer is running a version of Red Hat Enterprise Linux that
is earlier than Red Hat Enterprise Linux 4, the path to the RPMs on the CD
may be different. For example, on Red Hat Enterprise Linux 3, the path is
/mnt/cdrom/RedHat/RPMS/.
4. Eject the CD from the CD-ROM drive.
5. (Optional) If you are installing Red Hat GFS, insert a Red Hat GFS CD into the
CD-ROM drive. If you are not installing Red Hat GFS, proceed to step 8.
Note
If a Question dialog box is displayed that asks if you want to run autorun, click No.
6. Copy all the RPM files from the CD (located in /media/cdrom/RedHat/RPMS/)
to the temporary directory created earlier. For example:
$ cp /media/cdrom/RedHat/RPMS/*.rpm /tmp/RPMS/
Note
If your local computer is running a version of Red Hat Enterprise Linux that
is earlier than Red Hat Enterprise Linux 4, the path to the RPMs on the CD
may be different. For example, on Red Hat Enterprise Linux 3, the path is
/mnt/cdrom/RedHat/RPMS/.
7. Eject the CD from the CD-ROM drive.
8. Change to the temporary directory containing the copied RPM files. For example:
$ cd /tmp/RPMS/
9. Remove the "-kernel" RPMs for kernels that are not installed in the cluster node, and
any other RPMs that are not being installed (for example, optional or development
RPMS). The following example removes SMP and hugemem "-kernel" RPM files:
$ rm *-kernel-smp* *-kernel-hugemem*
For information about selecting the RPMs to install, refer to Section 3.1.2.1 Determining RPMs To Install.
10. Log in to each cluster node as the root user and make a directory to contain the
RPMs. For example:
# mkdir /tmp/node-RPMS/
Page 39

Chapter 3. Installing GFS 25
11. Copy the RPMs from the temporary directory in the local computer to directories in
the cluster nodes using the scp command. For example, to copy the RPMs to node
rhcs-node-01, run the following command at the local computer:
$ scp /tmp/RPMS/*.rpm root@rhcs-node-01:/tmp/node-RPMS/
12. At each node (logged in as root), change to the temporary directory created earlier
(/tmp/node-RPMS) and install the RPMs by running the rpm utility as follows:
# cd /tmp/node-RPMS/
# rpm -Uvh *
Page 40

26 Chapter 3. Installing GFS
Page 41

Chapter 4.
Getting Started
This chapter describes procedures for initial setup of GFS and contains the following sections:
• Section 4.1 Prerequisite Tasks
• Section 4.2 Initial Setup Tasks
4.1. Prerequisite Tasks
Before setting up Red Hat GFS, make sure that you have noted the key characteristics of the
GFS nodes (refer to Section 1.5 Before Setting Up GFS) and have loaded the GFS modules
into each GFS node. Also, make sure that the clocks on the GFS nodes are synchronized.
It is recommended that you use the Network Time Protocol (NTP) software provided with
your Red Hat Enterprise Linux distribution.
Note
The system clocks in GFS nodes must be within a few minutes of each other to prevent unnecessary inode time-stamp updating. Unnecessary inode time-stamp updating
severely impacts cluster performance.
4.2. Initial Setup Tasks
Initial GFS setup consists of the following tasks:
1. Setting up logical volumes.
2. Making a GFS files system.
3. Mounting file systems.
Follow these steps to set up GFS initially.
1. Using CLVM (Cluster Logical Volume Manager), create a logical volume for each
Red Hat GFS file system.
Page 42

28 Chapter 4. Getting Started
Note
You can use init.d scripts included with Red Hat Cluster Suite to automate activating and deactivating logical volumes. For more information about init.d scripts,
refer to Red Hat Cluster Suite Configuring and Managing a Cluster .
2. Create GFS file systems on logical volumes created in Step 1. Choose a unique name
for each file system. For more information about creating a GFS file system, refer to
Section 5.1 Making a File System.
Command usage:
gfs_mkfs -p lock_dlm -t ClusterName:FSName -j NumberJournals
BlockDevice
3. At each node, mount the GFS file systems. For more information about mounting a
GFS file system, refer to Section 5.2 Mounting a File System.
Command usage:
mount -t gfs BlockDevice MountPoint
mount -t gfs -o acl BlockDevice MountPoint
The -o acl mount option allows manipulating file ACLs. If a file system is mounted
without the -o acl mount option, users are allowed to view ACLs (with getfacl),
but are not allowed to set them (with setfacl).
Note
You can use init.d scripts included with Red Hat Cluster Suite to automate mounting and unmounting GFS file systems. For more information about init.d scripts,
refer to Red Hat Cluster Suite Configuring and Managing a Cluster .
Page 43

Chapter 5.
Managing GFS
This chapter describes the tasks and commands for managing GFS and consists of the
following sections:
• Section 5.1 Making a File System
• Section 5.2 Mounting a File System
• Section 5.3 Unmounting a File System
• Section 5.4 GFS Quota Management
• Section 5.5 Growing a File System
• Section 5.6 Adding Journals to a File System
• Section 5.7 Direct I/O
• Section 5.8 Data Journaling
• Section 5.9 Configuring atime Updates
• Section 5.10 Suspending Activity on a File System
• Section 5.11 Displaying Extended GFS Information and Statistics
• Section 5.12 Repairing a File System
• Section 5.13 Context-Dependent Path Names
5.1. Making a File System
Once a cluster is set up and running, you can create a GFS file system with the gfs_mkfs
command. A file system is created on an activated CLVM volume. The following information is required to run the gfs_mkfs command:
• Lock protocol/module name (for example, lock_dlm)
• Cluster name
• Number of journals (one journal required for each node that may be mounting the file
system)
Page 44

30 Chapter 5. Managing GFS
5.1.1. Usage
gfs_mkfs -p LockProtoName -t LockTableName -j Number BlockDevice
Warning
Make sure that you are very familiar with using the LockProtoName and
LockTableName parameters. Improper use of the LockProtoName and
LockTableName parameters may cause file system or lock space corruption.
LockProtoName
Specifies the name of the locking protocol (for example, lock_dlm) to use.
LockTableName
This parameter has two parts separated by a colon (no spaces) as follows:
ClusterName:FSName
• ClusterName, the name of the Red Hat cluster for which the GFS file system is
being created.
• FSName, the file-system name, can be 1 to 16 characters long, and the name must
be unique among all file systems in the cluster.
Number
Specifies the number of journals to be created by the gfs_mkfs command. One journal is required for each node that mounts the file system. (More journals than are
needed can be specified at creation time to allow for future expansion.)
BlockDevice
Specifies a volume.
5.1.2. Examples
In this example, lock_dlm is the locking protocol that the file system uses. The cluster
name is alpha, and the file-system name is gfs1. The file system contains eight journals
and is created on /dev/vg01/lvol0.
gfs_mkfs -p lock_dlm -t alpha:gfs1 -j 8 /dev/vg01/lvol0
Page 45

Chapter 5. Managing GFS 31
In this example, a second lock_dlm file system is made, which can be used in cluster
alpha. The file-system name is gfs2. The file system contains eight journals and is created
on /dev/vg01/lvol1.
gfs_mkfs -p lock_dlm -t alpha:gfs2 -j 8 /dev/vg01/lvol1
5.1.3. Complete Options
Table 5-1 describes the gfs_mkfs command options (flags and parameters).
Flag Parameter Description
-b BlockSize Sets the file-system block size to BlockSize.
-D Enables debugging output.
-h Help. Displays available options.
-J MegaBytes Specifies the size of the journal in megabytes.
-j Number Specifies the number of journals to be created
-p LockProtoName Specifies the name of the locking protocol to
-O Prevents the gfs_mkfs command from asking
-q Quiet. Do not display anything.
Default block size is 4096 bytes.
Default journal size is 128 megabytes. The
minimum size is 32 megabytes.
by the gfs_mkfs command. One journal is
required for each node that mounts the file
system.
Note: More journals than are needed can be
specified at creation time to allow for future
expansion.
use. Recognized cluster-locking protocols
include:
lock_dlm — The standard locking module.
lock_gulm — The locking module
compatible with earlier versions of GFS.
lock_nolock — May be used when GFS is
acting as a local file system (one node only).
for confirmation before writing the file system.
Page 46

32 Chapter 5. Managing GFS
Flag Parameter Description
-r MegaBytes Specifies the size of the resource groups in
megabytes. Default resource group size is 256
megabytes.
-s Blocks Specifies the journal-segment size in file-system
blocks.
-t LockTableName This parameter has two parts separated by a
colon (no spaces) as follows:
ClusterName:FSName.
ClusterName is the name of the Red Hat
cluster for which the GFS file system is being
created. The cluster name is set in the
/etc/cluster/cluster.conf file via the
Cluster Configuration Tool and displayed at
the Cluster Status Tool in the Red Hat
Cluster Suite cluster management GUI.
FSName, the file-system name, can be 1 to 16
characters in length, and the name must be
unique among all file systems in the cluster.
-V Displays command version information.
Table 5-1. Command Options: gfs_mkfs
5.2. Mounting a File System
Before you can mount a GFS file system, the file system must exist (refer to Section 5.1
Making a File System), the volume where the file system exists must be activated, and
the supporting clustering and locking systems must be started (refer to Chapter 4 Getting
Started and Red Hat Cluster Suite Configuring and Managing a Cluster). After those requirements have been met, you can mount the GFS file system as you would any Linux file
system.
To manipulate file ACLs, you must mount the file system with the -o acl mount option.
If a file system is mounted without the -o acl mount option, users are allowed to view
ACLs (with getfacl), but are not allowed to set them (with setfacl).
5.2.1. Usage
Mounting Without ACL Manipulation
mount -t gfs BlockDevice MountPoint
Page 47

Chapter 5. Managing GFS 33
Mounting With ACL Manipulation
mount -t gfs -o acl BlockDevice MountPoint
-o acl
GFS-specific option to allow manipulating file ACLs.
BlockDevice
Specifies the block device where the GFS file system resides.
MountPoint
Specifies the directory where the GFS file system should be mounted.
5.2.2. Example
In this example, the GFS file system on /dev/vg01/lvol0 is mounted on the /gfs1
directory.
mount -t gfs /dev/vg01/lvol0 /gfs1
5.2.3. Complete Usage
mount -t gfs BlockDevice MountPoint -o option
The -o option consists of GFS-specific options (refer to Table 5-2) or acceptable standard Linux mount -o options, or a combination of both. Multiple option parameters
are separated by a comma and no spaces.
Note
The mount command is a Linux system command. In addition to using GFS-specific options described in this section, you can use other, standard, mount command options (for
example, -r). For information about other Linux mount command options, see the Linux
mount man page.
Table 5-2 describes the available GFS-specific -o option values that can be passed to
GFS at mount time.
Page 48

34 Chapter 5. Managing GFS
Option Description
acl Allows manipulating file ACLs. If a file system
is mounted without the acl mount option,
users are allowed to view ACLs (with
getfacl), but are not allowed to set them (with
setfacl).
hostdata=HostIDInfo This field provides host (the computer on which
the file system is being mounted) identity
information to the lock module. The format and
behavior of HostIDInfo depends on the lock
module used. For lock_gulm, it overrides the
uname -n network node name used as the
default value by lock_gulm. This field is
ignored by the lock_dlm and lock_nolock
lock modules.
ignore_local_fs
Caution: This option should not be
used when GFS file systems are
shared.
localcaching
Caution: This option should not be
used when GFS file systems are
shared.
Forces GFS to treat the file system as a
multihost file system. By default, using
lock_nolock automatically turns on the
localcaching and localflocks flags.
Tells GFS that it is running as a local file
system. GFS can then turn on selected
optimization capabilities that are not available
when running in cluster mode. The
localcaching flag is automatically turned on
by lock_nolock.
localflocks
Caution: This option should not be
used when GFS file systems are
shared.
lockproto=LockModuleName Allows the user to specify which locking
Tells GFS to let the VFS (virtual file system)
layer do all flock and fcntl. The localflocks
flag is automatically turned on by
lock_nolock.
protocol to use with the file system. If
LockModuleName is not specified, the
locking protocol name is read from the
file-system superblock.
locktable=LockTableName Allows the user to specify which locking table
to use with the file system.
Page 49

Chapter 5. Managing GFS 35
Option Description
oopses_ok This option allows a GFS node to not panic
when an oops occurs. (By default, a GFS node
panics when an oops occurs, causing the file
system used by that node to stall for other GFS
nodes.) A GFS node not panicking when an
oops occurs minimizes the failure on other
GFS nodes using the file system that the failed
node is using. There may be circumstances
where you do not want to use this option —
for example, when you need more detailed
troubleshooting information. Use this option
with care.
Note: This option is turned on automatically if
lock_nolock locking is specified; however,
you can override it by using the
ignore_local_fs option.
upgrade Upgrade the on-disk format of the file system so
that it can be used by newer versions of GFS.
Table 5-2. GFS-Specific Mount Options
5.3. Unmounting a File System
The GFS file system can be unmounted the same way as any Linux file system — by using
the umount command.
Note
The umount command is a Linux system command. Information about this command can
be found in the Linux umount command man pages.
5.3.1. Usage
umount MountPoint
MountPoint
Specifies the directory where the GFS file system should be mounted.
Page 50

36 Chapter 5. Managing GFS
5.4. GFS Quota Management
File-system quotas are used to limit the amount of file-system space a user or group can
use. A user or group does not have a quota limit until one is set. GFS keeps track of the
space used by each user and group even when there are no limits in place. GFS updates
quota information in a transactional way so system crashes do not require quota usages to
be reconstructed.
To prevent a performance slowdown, a GFS node synchronizes updates to the quota file
only periodically. The "fuzzy" quota accounting can allow users or groups to slightly exceed the set limit. To minimize this, GFS dynamically reduces the synchronization period
as a "hard" quota limit is approached.
GFS uses its gfs_quota command to manage quotas. Other Linux quota facilities cannot
be used with GFS.
5.4.1. Setting Quotas
Two quota settings are available for each user ID (UID) or group ID (GID): a hard limit
and a warn limit.
A hard limit is the amount of space that can be used. The file system will not let the user
or group use more than that amount of disk space. A hard limit value of zero means that no
limit is enforced.
A warn limit is usually a value less than the hard limit. The file system will notify the user
or group when the warn limit is reached to warn them of the amount of space they are
using. A warn limit value of zero means that no limit is enforced.
Limits are set using the gfs_quota command. The command only needs to be run on a
single node where GFS is mounted.
5.4.1.1. Usage
Setting Quotas, Hard Limit
gfs_quota limit -u User -l Size -f MountPoint
gfs_quota limit -g Group -l Size -f MountPoint
Setting Quotas, Warn Limit
gfs_quota warn -u User -l Size -f MountPoint
gfs_quota warn -g Group -l Size -f MountPoint
Page 51

Chapter 5. Managing GFS 37
User
A user ID to limit or warn. It can be either a user name from the password file or the
UID number.
Group
A group ID to limit or warn. It can be either a group name from the group file or the
GID number.
Size
Specifies the new value to limit or warn. By default, the value is in units of megabytes.
The additional -k, -s and -b flags change the units to kilobytes, sectors, and filesystem blocks, respectively.
MountPoint
Specifies the GFS file system to which the actions apply.
5.4.1.2. Examples
This example sets the hard limit for user Bert to 1024 megabytes (1 gigabyte) on file
system /gfs.
gfs_quota limit -u Bert -l 1024 -f /gfs
This example sets the warn limit for group ID 21 to 50 kilobytes on file system /gfs.
gfs_quota warn -g 21 -l 50 -k -f /gfs
5.4.2. Displaying Quota Limits and Usage
Quota limits and current usage can be displayed for a specific user or group using the
gfs_quota get command. The entire contents of the quota file can also be displayed
using the gfs_quota list command, in which case all IDs with a non-zero hard limit,
warn limit, or value are listed.
5.4.2.1. Usage
Displaying Quota Limits for a User
gfs_quota get -u User -f MountPoint
Page 52

38 Chapter 5. Managing GFS
Displaying Quota Limits for a Group
gfs_quota get -g Group -f MountPoint
Displaying Entire Quota File
gfs_quota list -f MountPoint
User
A user ID to display information about a specific user. It can be either a user name
from the password file or the UID number.
Group
A group ID to display information about a specific group. It can be either a group
name from the group file or the GID number.
MountPoint
Specifies the GFS file system to which the actions apply.
5.4.2.2. Command Output
GFS quota information from the gfs_quota command is displayed as follows:
user User: limit:LimitSize warn:WarnSize value:Value
group Group: limit:LimitSize warn:WarnSize value:Value
The LimitSize, WarnSize, and Value numbers (values) are in units of megabytes by
default. Adding the -k, -s, or -b flags to the command line change the units to kilobytes,
sectors, or file-system blocks, respectively.
User
A user name or ID to which the data is associated.
Group
A group name or ID to which the data is associated.
LimitSize
The hard limit set for the user or group. This value is zero if no limit has been set.
Page 53

Chapter 5. Managing GFS 39
Value
The actual amount of disk space used by the user or group.
5.4.2.3. Comments
When displaying quota information, the gfs_quota command does not resolve UIDs and
GIDs into names if the -n option is added to the command line.
Space allocated to GFS’s hidden files can be left out of displayed values for the root UID
and GID by adding the -d option to the command line. This is useful when trying to match
the numbers from gfs_quota with the results of a du command.
5.4.2.4. Examples
This example displays quota information for all users and groups that have a limit set or
are using any disk space on file system /gfs.
gfs_quota list -f /gfs
This example displays quota information in sectors for group users on file system /gfs.
gfs_quota get -g users -f /gfs -s
5.4.3. Synchronizing Quotas
GFS stores all quota information in its own internal file on disk. A GFS node does not
update this quota file for every file-system write; rather, it updates the quota file once every
60 seconds. This is necessary to avoid contention among nodes writing to the quota file,
which would cause a slowdown in performance.
As a user or group approaches their quota limit, GFS dynamically reduces the time between its quota-file updates to prevent the limit from being exceeded. The normal time
period between quota synchronizations is a tunable parameter, quota_quantum, and can
be changed using the gfs_tool command. By default, the time period is 60 seconds. Also,
the quota_quantum parameter must be set on each node and each time the file system is
mounted. (Changes to the quota_quantum parameter are not persistent across unmounts.)
You can use the gfs_quota sync command to synchronize the quota information from
a node to the on-disk quota file between the automatic updates performed by GFS.
Page 54

40 Chapter 5. Managing GFS
5.4.3.1. Usage
Synchronizing Quota Information
gfs_quota sync -f MountPoint
MountPoint
Specifies the GFS file system to which the actions apply.
Tuning the Time Between Synchronizations
gfs_tool settune MountPoint quota_quantum Seconds
MountPoint
Specifies the GFS file system to which the actions apply.
Seconds
Specifies the new time period between regular quota-file synchronizations by GFS.
Smaller values may increase contention and slow down performance.
5.4.3.2. Examples
This example synchronizes the quota information from the node it is run on to file system
/gfs.
gfs_quota sync -f /gfs
This example changes the default time period between regular quota-file updates to one
hour (3600 seconds) for file system /gfs on a single node.
gfs_tool settune /gfs quota_quantum 3600
5.4.4. Disabling/Enabling Quota Enforcement
Enforcement of quotas can be disabled for a file system without clearing the limits set for
all users and groups. Enforcement can also be enabled. Disabling and enabling of quota enforcement is done by changing a tunable parameter, quota_enforce, with the gfs_tool
command. The quota_enforce parameter must be disabled or enabled on each node
where quota enforcement should be disabled/enabled. Each time the file system is mounted,
enforcement is enabled by default. (Disabling is not persistent across unmounts.)
Page 55

Chapter 5. Managing GFS 41
5.4.4.1. Usage
gfs_tool settune MountPoint quota_enforce {0|1}
MountPoint
Specifies the GFS file system to which the actions apply.
quota_enforce {0|1}
0 = disabled
1 = enabled
5.4.4.2. Comments
A value of 0 disables enforcement. Enforcement can be enabled by running the command
with a value of 1 (instead of 0) as the final command line parameter. Even when GFS is
not enforcing quotas, it still keeps track of the file-system usage for all users and groups so
that quota-usage information does not require rebuilding after re-enabling quotas.
5.4.4.3. Examples
This example disables quota enforcement on file system /gfs.
gfs_tool settune /gfs quota_enforce 0
This example enables quota enforcement on file system /gfs.
gfs_tool settune /gfs quota_enforce 1
5.4.5. Disabling/Enabling Quota Accounting
By default, quota accounting is enabled; therefore, GFS keeps track of disk usage for every
user and group even when no quota limits have been set. Quota accounting incurs unnecessary overhead if quotas are not used. You can disable quota accounting completely by
setting the quota_account tunable parameter to 0. This must be done on each node and
after each mount. (The 0 setting is not persistent across unmounts.) Quota accounting can
be enabled by setting the quota_account tunable parameter to 1.
Page 56

42 Chapter 5. Managing GFS
5.4.5.1. Usage
gfs_tool settune MountPoint quota_account {0|1}
MountPoint
Specifies the GFS file system to which the actions apply.
quota_account {0|1}
0 = disabled
1 = enabled
5.4.5.2. Comments
To enable quota accounting on a file system, the quota_account parameter must be set
back to 1. Afterward, the GFS quota file must be initialized to account for all current disk
usage for users and groups on the file system. The quota file is initialized by running:
gfs_quota init -f MountPoint.
Note
Initializing the quota file requires scanning the entire file system and may take a long time.
5.4.5.3. Examples
This example disables quota accounting on file system /gfs on a single node.
gfs_tool settune /gfs quota_account 0
This example enables quota accounting on file system /gfs on a single node and initializes
the quota file.
gfs_tool settune /gfs quota_account 1
gfs_quota init -f /gfs
Page 57

Chapter 5. Managing GFS 43
5.5. Growing a File System
The gfs_grow command is used to expand a GFS file system after the device where the
file system resides has been expanded. Running a gfs_grow command on an existing GFS
file system fills all spare space between the current end of the file system and the end of
the device with a newly initialized GFS file-system extension. When the fill operation is
completed, the resource index for the file system is updated. All nodes in the cluster can
then use the extra storage space that has been added.
The gfs_grow command must be run on a mounted file system, but only needs to be run
on one node in a cluster. All the other nodes sense that the expansion has occurred and
automatically start using the new space.
To verify that the changes were successful, use the gfs_grow command with the -T (test)
and -v (verbose) flags. Running the command with those flags displays the current state of
the mounted GFS file system.
5.5.1. Usage
gfs_grow MountPoint
MountPoint
Specifies the GFS file system to which the actions apply.
5.5.2. Comments
Before running the gfs_grow command:
• Back up important data on the file system.
• Display the volume that is used by the file system to be expanded by running a
gfs_tool df MountPoint command.
• Expand the underlying cluster volume with LVM. (Refer to the LVM HOWTO at
http://www.tldp.org/HOWTO/LVM-HOWTO/index.html for command usage with
CLVM.)
After running the gfs_grow command, run a df command to check that the new space is
now available in the file system.
5.5.3. Examples
In this example, the file system on the /gfs1 directory is expanded.
gfs_grow /gfs1
Page 58

44 Chapter 5. Managing GFS
In this example, the state of the mounted file system is checked.
gfs_grow -Tv /gfs1
5.5.4. Complete Usage
gfs_grow [Options] {MountPoint | Device} [MountPoint | Device]
MountPoint
Specifies the directory where the GFS file system is mounted.
Device
Specifies the device node of the file system.
Table 5-3 describes the GFS-specific options that can be used while expanding a GFS file
system.
Option Description
-h Help. Displays a short usage message.
-q Quiet. Turns down the verbosity level.
-T Test. Do all calculations, but do not write any data to the disk
-V Displays command version information.
-v Turns up the verbosity of messages.
Table 5-3. GFS-specific Options Available While Expanding A File System
and do not expand the file system.
5.6. Adding Journals to a File System
The gfs_jadd command is used to add journals to a GFS file system after the device
where the file system resides has been expanded. Running a gfs_jadd command on a
GFS file system uses space between the current end of the file system and the end of the
device where the file system resides. When the fill operation is completed, the journal index
is updated.
The gfs_jadd command must be run on mounted file system, but it only needs to be run
on one node in the cluster. All the other nodes sense that the expansion has occurred.
Page 59

Chapter 5. Managing GFS 45
To verify that the changes were successful, use the gfs_jadd command with the -T (test)
and -v (verbose) flags. Running the command with those flags displays the current state of
the mounted GFS file system.
5.6.1. Usage
gfs_jadd -j Number MountPoint
Number
Specifies the number of new journals to be added.
MountPoint
Specifies the directory where the GFS file system is mounted.
5.6.2. Comments
Before running the gfs_jadd command:
• Back up important data on the file system.
• Run a gfs_tool df MountPoint command to display the volume used by the file
system where journals will be added.
• Expand the underlying cluster volume with LVM. (Refer to the LVM HOWTO at
http://www.tldp.org/HOWTO/LVM-HOWTO/index.html for command usage with
CLVM.)
After running the gfs_jadd command, run a gfs_jadd command with the -T and -v
flags enabled to check that the new journals have been added to the file system.
5.6.3. Examples
In this example, one journal is added to the file system on the /gfs1 directory.
gfs_jadd -j1 /gfs1
In this example, two journals are added to the file system on the /gfs1 directory.
gfs_jadd -j2 /gfs1
In this example, the current state of the file system on the /gfs1 directory is checked for
the new journals.
Page 60

46 Chapter 5. Managing GFS
gfs_jadd -Tv /gfs1
5.6.4. Complete Usage
gfs_jadd [Options] {MountPoint | Device} [MountPoint | Device]
MountPoint
Specifies the directory where the GFS file system is mounted.
Device
Specifies the device node of the file system.
Table 5-4 describes the GFS-specific options that can be used when adding journals to a
GFS file system.
Flag Parameter Description
-h Help. Displays short usage message.
-J MegaBytes Specifies the size of the new journals in
-j Number Specifies the number of new journals to be added
-T Test. Do all calculations, but do not write any
-q Quiet. Turns down the verbosity level.
-V Displays command version information.
megabytes. Default journal size is 128
megabytes. The minimum size is 32 megabytes.
To add journals of different sizes to the file
system, the gfs_jadd command must be run for
each size journal. The size specified is rounded
down so that it is a multiple of the
journal-segment size that was specified when the
file system was created.
by the gfs_jadd command. The default value is
1.
data to the disk and do not add journals to the file
system. Enabling this flag helps discover what
the gfs_jadd command would have done if it
were run without this flag. Using the -v flag with
the -T flag turns up the verbosity level to display
more information.
Page 61

Chapter 5. Managing GFS 47
Flag Parameter Description
-v Turns up the verbosity of messages.
Table 5-4. GFS-specific Options Available When Adding Journals
5.7. Direct I/O
Direct I/O is a feature of the file system whereby file reads and writes go directly from the
applications to the storage device, bypassing the operating system read and write caches.
Direct I/O is used only by applications (such as databases) that manage their own caches.
An application invokes direct I/O by opening a file with the O_DIRECT flag. Alternatively,
GFS can attach a direct I/O attribute to a file, in which case direct I/O is used regardless of
how the file is opened.
When a file is opened with O_DIRECT, or when a GFS direct I/O attribute is attached to
a file, all I/O operations must be done in block-size multiples of 512 bytes. The memory
being read from or written to must also be 512-byte aligned.
One of the following methods can be used to enable direct I/O on a file:
• O_DIRECT
• GFS file attribute
• GFS directory attribute
5.7.1. O_DIRECT
If an application uses the O_DIRECT flag on an open() system call, direct I/O is used for
the opened file.
To cause the O_DIRECT flag to be defined with recent glibc libraries, define _GNU_SOURCE
at the beginning of a source file before any includes, or define it on the cc line when
compiling.
5.7.2. GFS File Attribute
The gfs_tool command can be used to assign (set) a direct I/O attribute flag, directio,
to a GFS file. The directio flag can also be cleared.
Page 62

48 Chapter 5. Managing GFS
5.7.2.1. Usage
Setting the directio Flag
gfs_tool setflag directio File
Clearing the directio Flag
gfs_tool clearflag directio File
File
Specifies the file where the directio flag is assigned.
5.7.2.2. Example
In this example, the command sets the directio flag on the file named datafile in
directory /gfs1.
gfs_tool setflag directio /gfs1/datafile
5.7.3. GFS Directory Attribute
The gfs_tool command can be used to assign (set) a direct I/O attribute flag,
inherit_directio, to a GFS directory. Enabling the inherit_directio flag
on a directory causes all newly created regular files in that directory to automatically
inherit the directio flag. Also, the inherit_directio flag is inherited by any new
subdirectories created in the directory. The inherit_directio flag can also be cleared.
5.7.3.1. Usage
Setting the inherit_directio flag
gfs_tool setflag inherit_directio Directory
Clearing the inherit_directio flag
gfs_tool clearflag inherit_directio Directory
Directory
Specifies the directory where the inherit_directio flag is set.
Page 63

Chapter 5. Managing GFS 49
5.7.3.2. Example
In this example, the command sets the inherit_directio flag on the directory named
/gfs1/data/.
gfs_tool setflag inherit_directio /gfs1/data/
5.8. Data Journaling
Ordinarily, GFS writes only metadata to its journal. File contents are subsequently written
to disk by the kernel’s periodic sync that flushes file-system buffers. An fsync() call on a
file causes the file’s data to be written to disk immediately. The call returns when the disk
reports that all data is safely written.
Data journaling can result in a reduced fsync() time, especially for small files, because
the file data is written to the journal in addition to the metadata. An fsync() returns as
soon as the data is written to the journal, which can be substantially faster than the time it
takes to write the file data to the main file system.
Applications that rely on fsync() to sync file data may see improved performance by using data journaling. Data journaling can be enabled automatically for any GFS files created
in a flagged directory (and all its subdirectories). Existing files with zero length can also
have data journaling turned on or off.
Using the gfs_tool command, data journaling is enabled on a directory (and all its subdirectories) or on a zero-length file by setting the inherit_jdata or jdata attribute
flags to the directory or file, respectively. The directory and file attribute flags can also be
cleared.
5.8.1. Usage
Setting and Clearing the inherit_jdata Flag
gfs_tool setflag inherit_jdata Directory
gfs_tool clearflag inherit_jdata Directory
Setting and Clearing the jdata Flag
gfs_tool setflag jdata File
gfs_tool clearflag jdata File
Directory
Specifies the directory where the flag is set or cleared.
Page 64

50 Chapter 5. Managing GFS
File
Specifies the zero-length file where the flag is set or cleared.
5.8.2. Examples
This example shows setting the inherit_jdata flag on a directory. All files created in
the directory or any of its subdirectories will have the jdata flag assigned automatically.
Any data written to the files will be journaled.
gfs_tool setflag inherit_jdata /gfs1/data/
This example shows setting the jdata flag on a file. The file must be zero size. Any data
written to the file will be journaled.
gfs_tool setflag jdata /gfs1/datafile
5.9. Configuring atime Updates
Each file inode and directory inode has three time stamps associated with it:
• ctime — The last time the inode status was changed
• mtime — The last time the file (or directory) data was modified
• atime — The last time the file (or directory) data was accessed
If atime updates are enabled as they are by default on GFS and other Linux file systems
then every time a file is read, its inode needs to be updated.
Because few applications use the information provided by atime, those updates can require a significant amount of unnecessary write traffic and file-locking traffic. That traffic
can degrade performance; therefore, it may be preferable to turn off atime updates.
Two methods of reducing the effects of atime updating are available:
• Mount with noatime
• Tune GFS atime quantum
5.9.1. Mount with noatime
A standard Linux mount option, noatime, can be specified when the file system is
mounted, which disables atime updates on that file system.
Page 65

Chapter 5. Managing GFS 51
5.9.1.1. Usage
mount -t gfs BlockDevice MountPoint -o noatime
BlockDevice
Specifies the block device where the GFS file system resides.
MountPoint
Specifies the directory where the GFS file system should be mounted.
5.9.1.2. Example
In this example, the GFS file system resides on the /dev/vg01/lvol0 and is mounted on
directory /gfs1 with atime updates turned off.
mount -t gfs /dev/vg01/lvol0 /gfs1 -o noatime
5.9.2. Tune GFS atime Quantum
When atime updates are enabled, GFS (by default) only updates them once an hour. The
time quantum is a tunable parameter that can be adjusted using the gfs_tool command.
Each GFS node updates the access time based on the difference between its system time
and the time recorded in the inode. It is required that system clocks of all GFS nodes in a
cluster be synchronized. If a node’s system time is out of synchronization by a significant
fraction of the tunable parameter, atime_quantum, then atime updates are written more
frequently. Increasing the frequency of atime updates may cause performance degradation
in clusters with heavy work loads.
By using the gettune flag of the gfs_tool command, all current tunable parameters
including atime_quantum (default is 3600 seconds) are displayed.
The gfs_tool settune command is used to change the atime_quantum parameter
value. It must be set on each node and each time the file system is mounted. (The setting is not persistent across unmounts.)
5.9.2.1. Usage
Displaying Tunable Parameters
gfs_tool gettune MountPoint
Page 66

52 Chapter 5. Managing GFS
MountPoint
Specifies the directory where the GFS file system is mounted.
Changing the atime_quantum Parameter Value
gfs_tool settune MountPoint atime_quantum Seconds
MountPoint
Specifies the directory where the GFS file system is mounted.
Seconds
Specifies the update period in seconds.
5.9.2.2. Examples
In this example, all GFS tunable parameters for the file system on the mount point /gfs1
are displayed.
gfs_tool gettune /gfs1
In this example, the atime update period is set to once a day (86,400 seconds) for the GFS
file system on mount point /gfs1.
gfs_tool settune /gfs1 atime_quantum 86400
5.10. Suspending Activity on a File System
You can suspend write activity to a file system by using the gfs_tool freeze command.
Suspending write activity allows hardware-based device snapshots to be used to capture the
file system in a consistent state. The gfs_tool unfreeze command ends the suspension.
5.10.1. Usage
Start Suspension
gfs_tool freeze MountPoint
End Suspension
gfs_tool unfreeze MountPoint
Page 67

Chapter 5. Managing GFS 53
MountPoint
Specifies the file system.
5.10.2. Examples
This example suspends writes to file system /gfs.
gfs_tool freeze /gfs
This example ends suspension of writes to file system /gfs.
gfs_tool unfreeze /gfs
5.11. Displaying Extended GFS Information and Statistics
You can use the gfs_tool command to gather a variety of details about GFS. This section
describes typical use of the gfs_tool command for displaying statistics, space usage, and
extended status.
5.11.1. Usage
Displaying Statistics
gfs_tool counters MountPoint
The counters flag displays statistics about a file system. If -c is used, the gfs_tool
command continues to run, displaying statistics once per second.
Displaying Space Usage
gfs_tool df MountPoint
The df flag displays a space-usage summary of a given file system. The information is
more detailed than a standard df.
Displaying Extended Status
gfs_tool stat File
The stat flag displays extended status information about a file.
MountPoint
Specifies the file system to which the action applies.
Page 68

54 Chapter 5. Managing GFS
File
Specifies the file from which to get information.
The gfs_tool command provides additional action flags (options) not listed in this section. For more information about other gfs_tool flags, refer to the gfs_tool man page.
5.11.2. Examples
This example reports extended file-system usage about file system /gfs.
gfs_tool df /gfs
This example reports extended file status about file /gfs/datafile.
gfs_tool stat /gfs/datafile
5.12. Repairing a File System
When nodes fail with the file system mounted, file-system journaling allows fast recovery.
However, if a storage device loses power or is physically disconnected, file-system corruption may occur. (Journaling cannot be used to recover from storage subsystem failures.)
When that type of corruption occurs, you can recover the GFS file system by using the
gfs_fsck command.
The gfs_fsck command must only be run on a file system that is unmounted from all
nodes.
Note
The gfs_fsck command has changed from previous releases of Red Hat GFS in the
following ways:
• You can no longer set the interactive mode with [Ctrl]-[C]. Pressing [Ctrl]-[C] now can-
cels the gfs_fsck command. Do not press [Ctrl]-[C] unless you want to cancel the
command.
• You can increase the level of verbosity by using the -v flag. Adding a second -v flag
increases the level again.
• You can decrease the level of verbosity by using the -q flag. Adding a second -q flag
decreases the level again.
• The -n option opens a file system as read-only and answers no to any queries au-
tomatically. The option provides a way of tr ying the command to reveal errors without
actually allowing the gfs_fsck command to take effect.
Page 69

Chapter 5. Managing GFS 55
Refer to the gfs_fsck man page, gfs_fsck(8), for additional information about other
command options.
5.12.1. Usage
gfs_fsck -y BlockDevice
-y
The -y flag causes all questions to be answered with yes. With the -y flag specified,
the gfs_fsck command does not prompt you for an answer before making changes.
BlockDevice
Specifies the block device where the GFS file system resides.
5.12.2. Example
In this example, the GFS file system residing on block device /dev/vg01/lvol0 is repaired. All queries to repair are automatically answered with yes.
gfs_fsck -y /dev/vg01/lvol0
5.13. Context-Dependent Path Names
Context-Dependent Path Names (CDPNs) allow symbolic links to be created that point to
variable destination files or directories. The variables are resolved to real files or directories
each time an application follows the link. The resolved value of the link depends on the
node or user following the link.
CDPN variables can be used in any path name, not just with symbolic links. However, the
CDPN variable name cannot be combined with other characters to form an actual directory
or file name. The CDPN variable must be used alone as one segment of a complete path.
5.13.1. Usage
For a Normal Symbolic Link
ln -s Target LinkName
Page 70

56 Chapter 5. Managing GFS
Target
Specifies an existing file or directory on a file system.
LinkName
Specifies a name to represent the real file or directory on the other end of the link.
For a Variable Symbolic Link
ln -s Variable LinkName
Variable
Specifies a special reserved name from a list of values (refer to Table 5-5) to represent
one of multiple existing files or directories. This string is not the name of an actual
file or directory itself. (The real files or directories must be created in a separate step
using names that correlate with the type of variable used.)
LinkName
Specifies a name that will be seen and used by applications and will be followed to
get to one of the multiple real files or directories. When LinkName is followed, the
destination depends on the type of variable and the node or user doing the following.
Variable Description
@hostname This variable resolves to a real file or directory named with
the hostname string produced by the output of the following
command: echo ‘uname -n‘
@mach This variable resolves to a real file or directory name with the
machine-type string produced by the output of the following
command: echo ‘uname -m‘
@os This variable resolves to a real file or directory named with
the operating-system name string produced by the output of
the following command: echo ‘uname -s‘
@sys This variable resolves to a real file or directory named with
the combined machine type and OS release strings produced
by the output of the following command: echo ‘uname
-m‘_‘uname -s‘
@uid This variable resolves to a real file or directory named with
the user ID string produced by the output of the following
command: echo ‘id -u‘
Page 71

Chapter 5. Managing GFS 57
Variable Description
@gid This variable resolves to a real file or directory named with
the group ID string produced by the output of the following
command: echo ‘id -g‘
Table 5-5. CDPN Variable Values
5.13.2. Example
In this example, there are three nodes with hostnames n01, n02 and n03. Applications
on each node uses directory /gfs/log/, but the administrator wants these directories
to be separate for each node. To do this, no actual log directory is created; instead, an
@hostname CDPN link is created with the name log. Individual directories /gfs/n01/,
/gfs/n02/, and /gfs/n03/ are created that will be the actual directories used when each
node references /gfs/log/.
n01# cd /gfs
n01# mkdir n01 n02 n03
n01# ln -s @hostname log
n01# ls -l /gfs
lrwxrwxrwx 1 root root 9 Apr 25 14:04 log -> @hostname/
drwxr-xr-x 2 root root 3864 Apr 25 14:05 n01/
drwxr-xr-x 2 root root 3864 Apr 25 14:06 n02/
drwxr-xr-x 2 root root 3864 Apr 25 14:06 n03/
n01# touch /gfs/log/fileA
n02# touch /gfs/log/fileB
n03# touch /gfs/log/fileC
n01# ls /gfs/log/
fileA
n02# ls /gfs/log/
fileB
n03# ls /gfs/log/
fileC
Page 72

58 Chapter 5. Managing GFS
Page 73

Chapter 6.
Using GNBD with Red Hat GFS
GNBD (Global Network Block Device) provides block-level storage access over an Ethernet LAN. GNBD components run as a client in a GFS node and as a server in a GNBD
server node. A GNBD server node exports block-level storage from its local storage (either
directly attached storage or SAN storage) to a GFS node.
This chapter describes how to use GNBD with Red Hat GFS and consists of the following
sections:
• Section 6.1 GNBD Driver and Command Usage
• Section 6.2 Running GFS on a GNBD Server Node
Note
Multipath GNBD is not available with Red Hat GFS 6.1. That is, device mapper multipath
(dm-multipath) cannot use GNBD. GNBD without multipath is available.
6.1. GNBD Driver and Command Usage
The Global Network Block Device (GNBD) driver allows a node to export its local storage
as a GNBD over a network so that other nodes on the network can share the storage. Client
nodes importing the GNBD use it like any other block device. Importing a GNBD on
multiple clients forms a shared storage configuration through which GFS can be used.
The GNBD driver is implemented through the following components.
• gnbd_serv — Implements the GNBD server. It is a user-space daemon that allows a
node to export local storage over a network.
• gnbd.ko — Implements the GNBD device driver on GNBD clients (nodes using GNBD
devices).
Two user commands are available to configure GNBD:
• gnbd_export (for servers) — User program for creating, exporting, and managing
GNBDs on a GNBD server.
Page 74

60 Chapter 6. Using GNBD with Red Hat GFS
• gnbd_import (for clients) — User program for importing and managing GNBDs on a
GNBD client.
6.1.1. Exporting a GNBD from a Server
The gnbd_serv daemon must be running on a node before it can export storage as a
GNBD. You can start the gnbd_serv daemon running gnbd_serv as follows:
#gnbd_serv
gnbd_serv: startup succeeded
Once local storage has been identified to be exported, the gnbd_export command is used
to export it.
Note
A server should not import the GNBDs to use them as a client would. If a server exports
the devices uncached, they may also be used by ccsd and gfs.
6.1.1.1. Usage
gnbd_export -d pathname -e gnbdname [-c]
pathname
Specifies a storage device to export.
gnbdname
Specifies an arbitrary name selected for the GNBD. It is used as the device name on
GNBD clients. This name must be unique among all GNBDs exported in a network.
-o
Export the device as read-only.
-c
Enable caching. Reads from the exported GNBD and takes advantage of the Linux
page cache.
By default, the gnbd_export command does not enable caching.
Page 75

Chapter 6. Using GNBD with Red Hat GFS 61
Note
If you have been using GFS 5.2 or earlier and do not want to change your GNBD
setup you should specify the -c option. Before GFS Release 5.2.1, Linux caching
was enabled by default for gnbd_export. If the -c option is not specified, GNBD
runs with a noticeable performance decrease. Also, if the -c option is not specified,
the exported GNBD runs in timeout mode, using the default timeout value (the -t
option). For more information about the gnbd_export command and its options, refer
to the gnbd_export man page.
6.1.1.2. Examples
This example exports device /dev/sdb2 as GNBD delta with cache enabled.
gnbd_export -d /dev/sdb2 -e delta -c
6.1.2. Importing a GNBD on a Client
The gnbd.ko kernel module must be loaded on a node before it can import GNBDs. When
GNBDs are imported, device nodes are created for them in /dev/gnbd/ with the name
assigned when they were exported.
6.1.2.1. Usage
gnbd_import -i Server
Server
Specifies a GNBD server by hostname or IP address from which to import GNBDs.
All GNBDs exported from the server are imported on the client running this command.
6.1.2.2. Example
This example imports all GNBDs from the server named nodeA.
gnbd_import -i nodeA
Page 76

62 Chapter 6. Using GNBD with Red Hat GFS
6.2. Running GFS on a GNBD Server Node
You can run GFS on a GNBD server node, with some restrictions. In addition, running
GFS on a GNBD server node reduces performance. The following restrictions apply when
running GFS on a GNBD server node.
Important
When running GFS on a GNBD server node you must follow the restrictions listed; otherwise, the GNBD server node will fail.
1. A GNBD server node must have local access to all storage devices needed to mount a
GFS file system. The GNBD server node must not import (gnbd_import command)
other GNBD devices to run the file system.
2. The GNBD server must export all the GNBDs in uncached mode, and it must export
the raw devices, not logical volume devices.
3. GFS must be run on top of a logical volume device, not raw devices.
Note
You may need to increase the timeout period on the exported GNBDs to accommodate
reduced performance. The need to increase the timeout period depends on the quality of
the hardware.
Page 77

Appendix A.
Upgrading GFS
To upgrade a node to Red Hat GFS 6.1 from earlier versions of Red Hat GFS, you must
convert the GFS cluster configuration archive (CCA) to a Red Hat Cluster Suite cluster configuration system (CCS) configuration file (/etc/cluster/cluster.conf) and convert
GFS pool volumes to LVM2 volumes.
This appendix contains instructions for upgrading from GFS 6.0 (or GFS 5.2.1) to Red Hat
GFS 6.1, using GULM as the lock manager.
Note
You must retain GULM lock management for the upgrade to Red Hat GFS 6.1; that is,
you cannot change from GULM lock management to DLM lock management during the
upgrade to Red Hat GFS 6.1. However, after the upgrade to GFS 6.1, you can change
lock managers. Refer to Red Hat Cluster Suite Configuring and Managing a Cluster for
information about changing lock managers.
The following procedure demonstrates upgrading to Red Hat GFS 6.1 from a GFS 6.0 (or
GFS 5.2.1) configuration with an example pool configuration for a pool volume named
argus (refer to Example A-1).
poolname argus
subpools 1
subpool 0 512 1 gfs_data
pooldevice 0 0 /dev/sda1
Example A-1. Example pool Configuration Information for Pool Volume Named ar-
gus
1. Halt the GFS nodes and the lock server nodes as follows:
a. Unmount GFS file systems from all nodes.
b. Stop the lock servers; at each lock server node, stop the lock server as follows:
# service lock_gulmd stop
c. Stop ccsd at all nodes; at each node, stop ccsd as follows:
# service ccsd stop
Page 78

64 Appendix A. Upgrading GFS
d. Deactivate pools; at each node, deactivate GFS pool volumes as follows:
# service pool stop
e. Uninstall Red Hat GFS RPMs.
2. Install new software:
a. Install Red Hat Enterprise Linux version 4 software (or verify that it is in-
stalled).
b. Install Red Hat Cluster Suite and Red Hat GFS RPMs.
3. At all GFS 6.1 nodes, create a cluster configuration file directory (/etc/cluster)
and upgrade the CCA (in this example, located in /dev/pool/cca) to the new Red
Hat Cluster Suite CCS configuration file format by running the ccs_tool upgrade
command as shown in the following example:
# mkdir /etc/cluster
# ccs_tool upgrade /dev/pool/cca
/etc/cluster/cluster.conf
4. At all GFS 6.1 nodes, start ccsd, run the lock_gulmd -c command, and start
clvmd as shown in the following example:
# ccsd
# lock_gulmd -c
Warning! You didn’t specify a cluster name before --use_ccs
Letting ccsd choose which cluster we belong to.
# clvmd
Note
Ignore the warning message following the lock_gulmd -c command. Because the
cluster name is already included in the converted configuration file, there is no need
to specify a cluster name when issuing the lock_gulmd -c command.
5. At all GFS 6.1 nodes, run vgscan as shown in the following example:
# vgscan
Reading all physical volumes. This may take a while...
Found volume group "argus" using metadata type pool
6. At one GFS 6.1 node, convert the pool volume to an LVM2 volume by running the
vgconvert command as shown in the following example:
# vgconvert -M2 argus
Volume group argus successfully converted
7. At all GFS 6.1 nodes, run vgchange -ay as shown in the following example:
# vgchange -ay
1 logical volume(s) in volume group "argus" now active
Page 79

Appendix A. Upgrading GFS 65
8. At the first node to mount a GFS file system, run the mount command with the
upgrade option as shown in the following example:
# mount -t gfs -o upgrade /dev/pool/argus /mnt/gfs1
Note
This step only needs to be done once — on the first mount of the GFS file system.
Note
If static minor numbers were used on pool volumes and the GFS 6.1 nodes are
using LVM2 for other purposes (root file system) there may be problems activating
the pool volumes under GFS 6.1. That is because of static minor conflicts. Refer
to the following Bugzilla report for more information:
https://bugzilla.redhat.com/bugzilla/show_bug.cgi?id=146035
Page 80

66 Appendix A. Upgrading GFS
Page 81

Index
A
activating your subscription, v
adding journals to a file system, 44
atime, configuring updates, 50
mounting with noatime, 50
tuning atime quantum, 51
audience, i
C
CDPN variable values table, 56
cluster software
installation and configuration
automatic installation of RPMs, 17
custom installation of RPMs, 17
custom installation using the rpm utility,
23
determining RPMs to install, 18
steps for installing and initializing, 15
steps for installing and initializing, 15
configuration, before, 9
configuration, initial, 27
prerequisite tasks, 27
console access
system requirements, 13
conventions
document, i
D
data journaling, 49
direct I/O, 47
directory attribute, 48
file attribute, 47
O_DIRECT, 47
displaying extended GFS information and
statistics, 53
F
features, new and changed, 1
feedback, v
fencing
system requirements, 12
fibre channel network requirements table, 12
fibre channel storage device requirements table,
12
fibre channel storage devices
system requirements, 12
fibre channel storage network
system requirements, 12
file system
adding journals, 44
atime, configuring updates, 50
mounting with noatime, 50
tuning atime quantum, 51
context-dependent path names (CDPNs), 55
data journaling, 49
direct I/O, 47
directory attribute, 48
file attribute, 47
O_DIRECT, 47
growing, 43
making, 29
mounting, 32
quota management, 36
disabling/enabling quota accounting, 41
disabling/enabling quota enforcement, 40
displaying quota limits, 37
setting quotas, 36
synchronizing quotas, 39
repairing, 54
suspending activity, 52
unmounting, 35
Page 82

68
G
GFS
atime, configuring updates, 50
mounting with noatime, 50
tuning atime quantum, 51
direct I/O, 47
directory attribute, 48
file attribute, 47
O_DIRECT, 47
displaying extended information and statistics, 53
managing, 29
quota management, 36
disabling/enabling quota accounting, 41
disabling/enabling quota enforcement, 40
displaying quota limits, 37
setting quotas, 36
synchronizing quotas, 39
upgrading
(See upgrading GFS)
GFS functions, 6
GFS software subsystem components table, 7
GFS software subsystems, 7
GFS-specific options for adding journals table,
46
GFS-specific options for expanding file systems
table, 44
gfs_mkfs command options table, 31
GNBD
driver and command usage, 59
exporting from a server, 60
importing on a client, 61
using, 59
using GFS on a GNBD server node, 62
growing a file system, 43
M
making a file system, 29
managing GFS, 29
mount table, 34
mounting a file system, 32
N
network power switches
system requirements, 13
O
overview, 1
configuration, before, 9
economy, 3
features, new and changed, 1
GFS functions, 6
GFS software subsystems, 7
performance, 3
scalability, 3
P
path names, context-dependent (CDPNs), 55
platform
system requirements, 11
platform requirements table, 11
preface
(See introduction)
prerequisite tasks
configuration, initial, 27
I
initial tasks
setup, initial, 27
installing system software, 25
introduction, i
audience, i
references, vi
Q
quota management, 36
disabling/enabling quota accounting, 41
disabling/enabling quota enforcement, 40
displaying quota limits, 37
setting quotas, 36
synchronizing quotas, 39
Page 83

69
R
recommended references table, vi
Red Hat Cluster Suite, 15
custom installation of software
with the rpm utility, 23
installation, 15
determining RPMs to install, 18
RPM installation
automatic, 17
custom, 17
system requirements, 11
references, recommended, vi
registering your subscription, v
repairing a file system, 54
RPMs, Red Hat Cluster Suite DLM
selection criteria of, 19
RPMs, Red Hat Cluster Suite, GULM
selection criteria of, 21
RPMs, Red Hat GFS
selection criteria of, 22
S
setup, initial
initial tasks, 27
software, installing, 25
subscription registration, v
suspending activity on a file system, 52
system requirements, 11
console access, 13
fencing, 12
fibre channel storage devices, 12
fibre channel storage network, 12
network power switches, 13
platform, 11
Red Hat Cluster Suite, 11
GFS-specific options for adding journals, 46
GFS-specific options for expanding file systems, 44
gfs_mkfs command options, 31
mount options, 34
platform requirements, 11
recommended references, vi
Red Hat Cluster Suite DLM RPM selection
criteria, 19
Red Hat Cluster Suite GULMRPM selection
criteria, 21
Red Hat GFS RPM selection criteria, 22
U
unmounting a file system, 35
upgrading GFS, 63
upgrade procedure, 63
T
tables
CDPN variable values, 56
fibre channel network requirements, 12
fibre channel storage device requirements, 12
GFS software subsystem components, 7
Page 84

Page 85

Colophon
The manuals are written in DocBook SGML v4.1 format. The HTML and PDF formats are
produced using custom DSSSL stylesheets and custom jade wrapper scripts. The DocBook
SGML files are written using Emacs with the help of PSGML mode.
Garrett LeSage created the admonition graphics (note, tip, important, caution, and warning). They may be freely redistributed with the Red Hat documentation.
The Red Hat Product Documentation Team consists of the following people:
Sandra A. Moore — Primary Writer/Maintainer of the Red Hat Enterprise Linux Instal-
lation Guide for x86, Itanium™, AMD64, and Intel® Extended Memory 64 Technology
(Intel® EM64T); Primary Writer/Maintainer of the Red Hat Enterprise Linux Installation
Guide for the IBM® POWER Architecture; Primary Writer/Maintainer of the Red Hat Enterprise Linux Installation Guide for the IBM® S/390® and IBM® eServer™ zSeries®
Architectures
John Ha — Primary Writer/Maintainer of the Red Hat Cluster Suite Configuring and Managing a Cluster; Co-writer/Co-maintainer of the Red Hat Enterprise Linux Security Guide;
Maintainer of custom DocBook stylesheets and scripts
Edward C. Bailey — Primary Writer/Maintainer of the Red Hat Enterprise Linux Introduc-
tion to System Administration; Primary Writer/Maintainer of the Release Notes; Contributing Writer to the Red Hat Enterprise Linux Installation Guide for x86, Itanium™, AMD64,
and Intel® Extended Memory 64 Technology (Intel® EM64T)
Karsten Wade — Primary Writer/Maintainer of the Red Hat SELinux Guide; Contributing
Writer to the Red Hat Enterprise Linux System Administration Guide
Andrius T. Benokraitis — Primary Writer/Maintainer of the Red Hat Enterprise Linux Ref-
erence Guide; Co-writer/Co-maintainer of the Red Hat Enterprise Linux Security Guide;
Contributing Writer to the Red Hat Enterprise Linux System Administration Guide
Paul Kennedy — Primary Writer/Maintainer of the Red Hat GFS Administrator’s Guide;
Contributing Writer to the Red Hat Cluster Suite Configuring and Managing a Cluster
Mark Johnson — Primary Writer/Maintainer of the Red Hat Desktop Deployment Guide;
Contributing Writer of Red Hat Network documentation
Melissa Goldin — Primary Writer/Maintainer of the Red Hat Enterprise Linux Step By
Step Guide; Contributing Writer of Red Hat Network Documentation
Lucy Ringland — Red Hat GFS Documentation Editor.
The Red Hat Localization Team consists of the following people:
Amanpreet Singh Alam — Punjabi translations
Jean-Paul Aubry — French translations
David Barzilay — Brazilian Portuguese translations
Page 86

72
Runa Bhattacharjee — Bengali translations
Chester Cheng — Traditional Chinese translations
Verena Fuehrer — German translations
Kiyoto Hashida — Japanese translations
N. Jayaradha — Tamil translations
Michelle Jiyeen Kim — Korean translations
Yelitza Louze — Spanish translations
Noriko Mizumoto — Japanese translations
Ankitkumar Rameshchandra Patel — Gujarati translations
Rajesh Ranjan — Hindi translations
Nadine Richter — German translations
Audrey Simons — French translations
Francesco Valente — Italian translations
Sarah Wang — Simplified Chinese translations
Ben Hung-Pin Wu — Traditional Chinese translations
Tongjie Tony Fu — Simplified Chinese Translations
Manuel Ospina — Spanish Translations
 Loading...