

Page 1

Red Hat Enterprise Linux WS 2.1
Red Hat Enterprise Linux WS
Installation Guide
Page 2

Red Hat Enterprise Linux WS 2.1: Red Hat Enterprise Linux WS Installation Guide
Copyright © 2003 by Red Hat, Inc.
Red Hat, Inc.
1801 Varsity Drive
Raleigh NC 27606-2072 USA
Phone: +1 919 754 3700
Phone: 888 733 4281
Fax: +1 919 754 3701
PO Box 13588
Research Triangle Park NC 27709 USA
rhel-ig-ws-x86(EN)-2.1-HTML-RHI (2003-01-31T11:13-0400)
Copyright © 2003 by Red Hat, Inc. This material may be distributedonly subject to the terms and conditions set forth in the
Open Publication License, V1.0 or later (the latest version is presentlyavailableat http://www.opencontent.org/openpub/).
Distribution of substantively modified versions of this document is prohibitedwithout the explicit permission of the copyright
holder.
Distribution of the work or derivative of the work in any standard (paper)book form for commercial purposes is prohibited
unless prior permission is obtained from the copyright holder.
Red Hat, Red Hat Network, the Red Hat "ShadowMan" logo, RPM, Maximum RPM, the RPM logo, Linux Library,
PowerTools,Linux Undercover, RHmember, RHmember More, Rough Cuts, Rawhide and all Red Hat-based trademarksand
logos are trademarks or registered trademarks of Red Hat, Inc. in the United States and other countries.
Linux is a registered trademark of Linus Torvalds.
Motif and UNIX are registeredtrademarks of The Open Group.
Itanium is a registered trademark of Intel Corporation.
Netscape is a registeredtrademark of Netscape Communications Corporation in the United States and other countries.
Windows is a registered trademark of Microsoft Corporation.
SSH and Secure Shell are trademarks of SSH CommunicationsSecurity, Inc.
FireWire is a trademark of Apple Computer Corporation.
S/390 and zSeries are trademarks of InternationalBusiness Machines Corporation.
All other trademarks and copyrights referredto are the property of their respectiveowners.
Page 3

Table of Contents
Introduction.......................................................................................................................................... i
1. Document Conventions..........................................................................................................i
2. How to Use This Manual .....................................................................................................iii
2.1. We Need Feedback! ..............................................................................................iii
I. Installing Red Hat Enterprise Linux WS....................................................................................... i
1. Steps to Get You Started....................................................................................................... 1
1.1. Do You Have the Right Components? ...................................................................1
1.2. Is Your Hardware Compatible?..............................................................................2
1.3. Do You Have Enough Disk Space?........................................................................ 2
1.4. Can You Install Using the CD-ROM?....................................................................3
1.5. Which Installation Class is Best For You?.............................................................5
2. System Requirements Table..................................................................................................9
3. Installing Red Hat Enterprise Linux WS ............................................................................11
3.1. The Installation Program User Interface..............................................................11
3.2. Starting the Installation Program ......................................................................... 11
3.3. Selecting an Installation Method .........................................................................14
3.4. Beginning the Installation ....................................................................................15
3.5. Language Selection.............................................................................................. 16
3.6. Keyboard Configuration.......................................................................................17
3.7. Mouse Configuration ........................................................................................... 18
3.8. Welcome to Red Hat Enterprise Linux WS .........................................................19
3.9. Install Options......................................................................................................19
3.10. Disk Partitioning Setup ......................................................................................20
3.11. Automatic Partitioning....................................................................................... 21
3.12. Partitioning Your System................................................................................... 23
3.13. Partitioning with fdisk .......................................................................................29
3.14. Boot Loader Installation ....................................................................................29
3.15. GRUB Password ................................................................................................32
3.16. Network Configuration ...................................................................................... 33
3.17. Firewall Configuration .......................................................................................34
3.18. Language Support Selection ..............................................................................37
3.19. Time Zone Configuration...................................................................................38
3.20. Account Configuration....................................................................................... 39
3.21. Package Group Selection ................................................................................... 41
3.22. X Configuration — Video Card ......................................................................... 44
3.23. Preparing to Install ............................................................................................. 45
3.24. Installing Packages............................................................................................. 46
3.25. Boot Disk Creation ............................................................................................ 46
3.26. X Configuration — Monitor and Customization ...............................................47
3.27. Installation Complete .........................................................................................49
4. Installing Red Hat Enterprise Linux WS via Text Mode.................................................... 51
4.1. Things You Should Know.................................................................................... 51
4.2. The Installation Program User Interface..............................................................52
4.3. Starting the Installation Program ......................................................................... 54
4.4. Installation Cross-Reference Table......................................................................55
4.5. Installing from a Hard Drive................................................................................56
4.6. Installing over a Network.....................................................................................57
Page 4

II. Appendixes ...................................................................................................................................61
A. Removing Red Hat Enterprise Linux WS ..........................................................................63
B. Getting Technical Support.................................................................................................. 65
B.1. Remember to Sign Up ......................................................................................... 65
B.2. An Overview of Red Hat Support ....................................................................... 65
B.3. Scope of Red Hat Support ...................................................................................66
B.4. How to Get Technical Support............................................................................66
B.5. Questions for Technical Support.........................................................................68
C. Troubleshooting Your Installation of Red Hat Enterprise Linux WS ................................69
C.1. You are Unable to Boot Red Hat Enterprise Linux WS ......................................69
C.2. Trouble Beginning the Installation...................................................................... 69
C.3. Trouble During the Installation ........................................................................... 70
C.4. Problems After Installation .................................................................................72
D. An Introduction to Disk Partitions ..................................................................................... 77
D.1. Hard Disk Basic Concepts .................................................................................. 77
E. Driver Disks........................................................................................................................93
E.1. Why Do I Need a Driver Disk? ........................................................................... 93
Index...................................................................................................................................................95
Page 5

Introduction
Welcome to the Red Hat Enterprise Linux WS Installation Guide. This guide contains useful information to assist you during the installation of Red Hat Enterprise Linux WS. From fundamental concepts
such as installation preparation to the step-by-step installation procedure, this book will be a valuable
resource as you install Red Hat Enterprise Linux WS.
This manual will walk you through a typical installation using the Red Hat Enterprise Linux WS CDROMs. Once you have completed the installation as outlined in this manual, you will have a fully
functioning Red Hat Enterprise Linux WS system.
1. Document Conventions
When you read this manual, you will see that certain words are represented in different fonts, typefaces, sizes, and weights. This highlighting is systematic; different words are represented in the same
style to indicate their inclusion in a specific category. The types of words that are represented this way
include the following:
command
Linux commands (and other operating system commands, when used) are represented this way.
This style should indicate to you that you can type the word or phrase on the command line
and press [Enter] to invoke a command. Sometimes a command contains words that would be
displayed in a different style on their own (such as filenames). In these cases, they are considered
to be part of the command, so the entire phrase will be displayed as a command. For example:
Use the cat testfile command to view the contents of a file, named testfile, in the current
working directory.
filename
Filenames, directory names, paths, and RPM package names are represented this way. This style
should indicate that a particular file or directory exists by that name on your Red Hat Linux
system. Examples:
The .bashrc file in your home directory contains bash shell definitions and aliases for your own
use.
The /etc/fstab file contains information about different system devices and filesystems.
Install the webalizer RPM if you want to use a Web server log file analysis program.
application
This style should indicate to you that the program named is an end-user application (as opposed
to system software). For example:
Use Netscape Navigator to browse the Web.
[key]
A key on the keyboard is shown in this style. For example:
To use [Tab] completion, type in a character and then press the [Tab] key. Your terminal will
display the list of files in the directory that start with that letter.
[key]-[combination]
A combination of keystrokes is represented in this way. For example:
The [Ctrl]-[Alt]-[Backspace] key combination will restart the X Window System.
Page 6

ii Introduction
text found on a GUI interface
A title, word, or phrase found on a GUI interface screen or window will be shown in this style.
When you see text shown in this style, it is being used to identify a particular GUI screen or an
element on a GUI screen (such as text associated with a checkbox or field). Example:
Select the Require Password checkbox if you would like your screensaver to require a password
before stopping.
top level of a menu on a GUI screen or window
When you see a word in this style, it indicates that the word is the top level of a pulldown menu.
If you click on the word on the GUI screen, the rest of the menu should appear. For example:
Under Settings on a GNOME terminal, you will see the following menu items: Preferences,
Reset Terminal, Reset and Clear, and Color selector.
If you need to type in a sequence of commands from a GUI menu, they will be shown like the
following example:
Click on Programs=>Applications=>Emacs to start the Emacs text editor.
button on a GUI screen or window
This style indicates that the text will be found on a clickable button on a GUI screen. For
example:
Click on the Back button to return to the webpage you last viewed.
computer output
When you see text in this style, it indicates text displayed by the computer on the command line.
You will see responses to commands you typed in, error messages, and interactive prompts for
your input during scripts or programs shown this way. For example:
Use the ls command to display the contents of a directory:
$ ls
Desktop axhome logs paulwesterberg.gif
Mail backupfiles mail reports
The output returned in response to the command (in this case, the contents of the directory) is
shown in this style.
prompt
A prompt, which is a computer’s way of signifying that it is ready for you to input something,
will be shown in this style. Examples:
$
#
[stephen@maturin stephen]$
leopard login:
user input
Text that the user has to type, either on the command line, or into a text box on a GUI screen, is
displayed in this style. In the following example, text is displayed in this style:
To boot your system into the text based installation program, you will need to type in the text
command at the boot: prompt.
Additionally, we use several different strategies to draw your attention to certain pieces of information.
In order of how critical the information is to your system, these items will be marked as note, tip,
important, caution, or a warning. For example:
Page 7
Introduction iii
Note
Remember that Linux is case sensitive. In other words, a rose is not a ROSE is not a rOsE.
Tip
The directory /usr/share/doc contains additional documentation for packages installed on your
system.
Important
If you modify the DHCP configuration file, the changes will not take effect until you restart the DHCP
daemon.
Caution
Do not perform routine tasks as root — use a regular user account unless you need to use the root
account for system administration tasks.
Warning
If you choose not to partition manually, a server installation will remove all existing partitions on all
installed hard drives. Do not choose this installation class unless you are sure you have no data you
need to save.
2. How to Use This Manual
This manual focuses on a CD-ROM based installation, so it is ideal for users (both new and old) who
want a quick and simple installation solution. It will help you prepare your system, walk you through
the installation, and assist you in the configuration of Red Hat Enterprise Linux WS.
If you are an experienced user who wants to perform a Red Hat Enterprise Linux WS CD-ROM
installation, and you do not need a review of the basics, you can skip ahead to Chapter 3 to begin the
installation process.
Tip
Refer to the Red Hat Frequently Asked Questions for answers to questions and problems that may
occur before, during, or after the installation. You will find the FAQ online at:
http://www.redhat.com/support/docs/faqs/rhl_general_faq/
Page 8

iv Introduction
2.1. We Need Feedback!
If you spot a typo in the Red Hat Enterprise Linux WS Installation Guide, or if you have thought of a
way to make this manual better, we would love to hear from you! Please submit a report in Bugzilla
(http://bugzilla.redhat.com/bugzilla/) against the component rhel-ig-ws-x86.
Be sure to mention the manual’s identifier:
rhel-ig-ws-x86(EN)-2.1-HTML-RHI (2003-01-31T11:13-0400)
That way we will know exactly which version of the guide you have.
If you have a suggestion for improving the documentation, try to be as specific as possible when de-
scribing it. If you have found an error, please include the section number and some of the surrounding
text so we can find it easily.
If you have a support question (for example, if you need help configuring X, or if you are not sure how
to partition your hard drive[s]), please register your product at http://www.redhat.com/apps/activate/
and use the online support system for those type of requests.
Page 9

I. Installing Red Hat Enterprise Linux WS
Table of Contents
1. Steps to Get You Started................................................................................................................. 1
2. System Requirements Table...........................................................................................................9
3. Installing Red Hat Enterprise Linux WS ................................................................................... 11
4. Installing Red Hat Enterprise Linux WS via Text Mode ..........................................................51
Page 10

Page 11

Chapter 1.
Steps to Get You Started
Before you install Red Hat Enterprise Linux WS, you should perform the following steps:
1.1. Do You Have the Right Components?
If you have purchased an Official Red Hat Enterprise Linux WS product, you are ready to go. However, mistakes occasionally happen, so now is a good time to double-check the contents of your product.
A black, red, and white Registration Information card is included with your product. A list of the
contents of your boxed set version is on the back of the card. Please read over the list and check
to make sure that you have all the CDs and manuals that are included with the version of Red Hat
Enterprise Linux WS that you purchased.
If you have purchased an Official Red Hat Enterprise Linux WS product from Red Hat, Inc. (or one
of its distributors), and you are missing one or more of the items listed, please let us know. Contact
information is also available on the Registration Information card.
How to identify our official boxed set: The bottom of our box has an ISBN number next to one of the
bar codes. That ISBN number should be in this form:
1-58569-x-y
(The x and y will be unique numbers.)
Red Hat partners with companies (international and domestic) so that we can make Red Hat Enterprise
Linux WS available to you in the most convenient form. Because of these partnerships, you might find
that your Red Hat Enterprise Linux WS product may not have been actually produced by Red Hat.
If your product has a different ISBN number (or none at all), you will need to contact the company
that produced it. Normally, third-party producers will include their logo and/or contact information on
the outside of their box; an official Red Hat Enterprise Linux WS boxed set lists only our name and
contact information.
1.1.1. Where to Find Other Manuals
If your particular product did not include all of the printed Red Hat Enterprise Linux WS manuals,
you can find them online or on the Red Hat Enterprise Linux WS Documentation CD included with
your official Red Hat Enterprise Linux WS product.
To find the manuals in both HTML and PDF formats online, go to http://www.redhat.com/docs.
1.1.2. Registering Your Product
If you have purchased an Official Red Hat Enterprise Linux WS product, you should register your
product. Registration offers many useful services, such as installation support, access to Red Hat
Network, and more.
To register your product, go to http://www.redhat.com/apps/activate/. You will find your Product ID
on the Registration Information card in your Official Red Hat Enterprise Linux WS boxed set. Once
registered, you will have access to all the extras that Red Hat provides to its registered users.
For more information on registering and the scope of Red Hat technical support offerings, see Appendix B.
Page 12
2 Chapter 1. Steps to Get You Started
1.2. Is Your Hardware Compatible?
Hardware compatibility is particularly important if you have an older system ora system that you built
yourself. Red Hat Enterprise Linux WS 2.1 should be compatible with most hardware in systems that
were factory built within the last two years. However, hardware specifications change almost daily, so
it is hard to guarantee that your hardware will be 100% compatible.
The most recent list of supported hardware can be found at http://hardware.redhat.com/hcl/.
1.3. Do You Have Enough Disk Space?
Nearly every modern-day operating system (OS) uses disk partitions, and Red Hat Enterprise Linux
WS is no exception. When you install Red Hat Enterprise Linux WS, you may have to work with
disk partitions. If you have not worked with disk partitions before (or need a quick review of the basic
concepts) read Appendix D before proceeding.
The disk space used by Red Hat Enterprise Linux WS must be separate from the disk space used by
other OSes you might have installed on your system , such as Windows, OS/2, or even a different
version of Linux. At least two partitions (/ and swap) must be dedicated to Red Hat Enterprise Linux
WS.
Before you start the installation process, one of the following conditions must be met:
• Your computer must have enough unpartitioned
1
disk space for the installation of Red Hat Enter-
prise Linux WS.
• You must have one or more partitions that may be deleted, thereby freeing up enough disk space to
install Red Hat Enterprise Linux WS.
1.3.1. Installation Disk Space Requirements
Note
These recommendations are based on an installation that only installs one language (such as English). If you plan to install multiple languages to use on your system, you should increase the disk
space requirements.
See Section 1.5, for further information regarding disk space requirements for your specific installation needs.
Workstation
For a Workstation installation, choosing to install GNOME2or KDE3, requires at least 1.0 GB of
1. Unpartitioned disk space meansthat the hard drive(s)you are installing to have not been divided into sections
for data. When you partition a disk, each partition will behave like a separate disk drive.
2. Acronym for GNU Network Object Model Environment. GNOME is part of the GNU project and part of
the free software, or open source, movement. GNOME is a Windows-like desktop system that works on UNIX
and UNIX-like systems. The main objective of GNOME is to provide a user-friendly suite of applications and an
easy-to-use desktop.
3. Acronym for K Desktop Environment. A network-transparent, contemporarydesktop environment for UNIX
workstations, KDE is part of the open source movement. It is free to anyone and its source code is available to
anyone to modify.
Page 13
Chapter 1. Steps to Get You Started 3
free space. Choosing both GNOME and KDE requires at least 1.3 GB of free disk space.
Custom
A Custom installation requires for a minimal installation (without the Workstation packages) and
at least 3.2 GB of free space if every package is selected.
If you are not sure that you meet these conditions, or if you want to know how to create free disk
space for your Red Hat Enterprise Linux WS installation, please refer to Appendix D.
1.4. Can You Install Using the CD-ROM?
There are several methods that can be used to install Red Hat Enterprise Linux WS. This manual
focuses on installing from the CD-ROM. For instructions on alternative installation methods, refer to
Chapter 4.
Installing from a CD-ROM requires that you have purchased a Red Hat Enterprise Linux WS 2.1
product, or you have a Red Hat Enterprise Linux WS CD-ROM, and you have a CD-ROM drive.
Most new computers will allow booting from the CD-ROM. If your system will support booting from
the CD-ROM, it is an easy way to begin a local CD-ROM installation.
Your BIOS may need to be changed to allow booting from your CD-ROM drive. For more information
about editing your BIOS, see Section 3.2.1.
1.4.1. Alternative Boot Methods
If you cannot boot from the CD-ROM drive, the following alternative boot method is available:
Local Boot Disk
If you need a local boot disk4, you must create it. The local boot disk image file, boot.img,
is located in the images directory on your Red Hat Enterprise Linux WS CD-ROM. Refer to
Section 1.4.2, for more information on making a boot disk.
Note
USB Floppies — You can also boot the Red Hat Enterprise Linux WS installation program using a
USB floppy as a boot disk (if your system supports booting from a USB floppy).
Note
Although it is not required to boot your installation, you may occasionally find that a driver disk is
needed to continue with the installation. Appendix E explains why a driver disk may be necessary for
your installation, and how to obtain one if needed.
4. A boot disk is a diskette you create during an installation that can later be used to boot the operatingsystem.
Normally, your computer boots from a hard disk, but if the hard disk is damaged, you can boot the computerfrom
a bootable diskette.
Page 14

4 Chapter 1. Steps to Get You Started
1.4.2. Making Installation Diskettes
You may need to create a diskette from an image file; for example, you may need to use
updated diskette images obtained from the Red Hat Enterprise Linux WS errata page
(http://www.redhat.com/apps/support/errata) or you may need to create a boot disk.
An image file contains an exact copy (or image) of a diskette’s contents. Since a diskette contains
filesystem information in addition to the data contained in files, the image file is not usable until it has
been written to a diskette.
To start, you will need a blank, formatted, high-density (1.44MB), 3.5-inch diskette. You will need
access to a computer with a 3.5-inch diskette drive. The computer must be able to run either an MSDOS program or the dd utility found on most Linux-like operating systems.
The images directory on your Red Hat Enterprise Linux WS CD-ROM contains the boot images.
Once you have selected the proper image (such as boot.img for a CD-ROM-based installation or
bootnet.img for a network installation), transfer the image file onto a diskette.
1.4.2.1. Using the rawrite Utility
Tomake a diskette using MS-DOS, use the rawrite utility included on the Red Hat Enterprise Linux
WS CD-ROM in the dosutils directory. First, label a blank, formatted 3.5-inch diskette appropriately (such as "Boot Disk" or "Updates Disk"). Insert it into the diskette drive. Then, use the following
commands (assuming your CD-ROM is drive d:):
C:\
d:
D:\
cd \dosutils
D:\dosutils
Enter disk image source file name: ..\images\boot.img
Enter target diskette drive: a:
Please insert a formatted diskette into drive A: and
press --ENTER-- : [Enter]
D:\dosutils
First, rawrite asks you for the filename of a diskette image; enter the directory and name of the
image you wish to write (for example, ..\images\boot.img). Then rawrite asks for a diskette
drive to write the image to; enter a:. Finally, rawrite asks for confirmation that a formatted diskette
is in the drive you have selected. After pressing [Enter] to confirm, rawrite copies the image file
onto the diskette. If you need to make another diskette, label that diskette, and run rawrite again,
specifying the appropriate image file.
rawrite
1.4.2.2. Using the dd Command
Tomake a diskette under Linux (or any other Linux-like operating system), you must have permission
to write to the device representing a 3.5-inch diskette drive (known as /dev/fd0 under Linux).
First, label a blank, formatted diskette appropriately (such as "Boot Disk" or "Updates Disk"). Insert
it into the diskette drive (but do not issue a mount5command). After mounting the Red Hat Enterprise
Linux WS CD-ROM, change to the directory containing the desired image file, and use the following
command (changing the name of the image file and diskette device as appropriate):
# dd if=boot.img of=/dev/fd0 bs=1440k
To make another diskette, label that diskette, and run dd again, specifying the appropriate image file.
5. When you mount a floppy or CD-ROM, you make that device’s contents available to you. See the Official
Red Hat Linux Getting Started Guide for more information.
Page 15

Chapter 1. Steps to Get You Started 5
1.5. Which Installation Class is Best For You?
Usually, Red Hat Enterprise Linux WS is installed on its own disk partition or set of partitions, or over
another installation of Linux.
Warning
Installing Red Hat Enterprise Linux WS over another installation of Linux (including Red Hat Linux)
does not preserve any information (files or data) from a prior installation. Make sure you save or back
up any important files!
Red Hat Enterprise Linux WS provides two different classes, or types, of installations:
Workstation
The Workstation configuration includes, at your option, the ability to install a default X Window
System environment with management.
Custom
A Custom installation allows you the greatest flexibility during your installation. You choose
your boot loader, which packages you want, and more. Custom installations are most appropriate
for those users more familiar with Red Hat Linux installations and for those afraid of losing
complete flexibility.
These classes give you the option of simplifying the installation process (with some potential for loss
of configuration flexibility), or retaining flexibility with a slightly more complex installation process.
Next, take a detailed look at each class, so you can decide which one is right for you.
1.5.1. Workstation Installation
Below are the minimum recommended disk space requirements for a Workstation installation where
only one language (such as English) will be installed.
Note
The minimum recommended disk space requirements as listed below, are just minimum recommendations for the installation itself. You should adjust these disk space requirements as appropriate for
your specific computing needs (such as disk space for personal files, additional applications you may
install at a later time, and so on).
• Workstation (minimum, no graphical interface): 800 MB
• Workstation (default, choosing GNOME or KDE): 1 GB
• Workstation (choosing GNOME and KDE): 1.3 GB
• Workstation (choosing everything, GNOME and KDE): 1.5 GB
If you plan to choose all group packages, as well as select additional individual packages, you may
want to allow yourself 2.0 GB or more of disk space. This will provide space where additional data
may be written.
Page 16
6 Chapter 1. Steps to Get You Started
1.5.1.1. What a Workstation Installation Will Do
A Workstation installation, with automatic partitioning, will create the following partitions:
Note
The partitions represented below were created on a system with 9 GB of hard drive space and 512
MB of RAM. Depending on the amount of hard drive space and memory you have available, these
values may differ slightly.
• A 47 MB partition (mounted as /boot) in which the Linux kernel and related files are kept.
• A partition of at least 4877 MB (mounted as /usr).
• The size of the swap partition is determined by the amount of RAM in your system and the amount
of space available on your hard drive. If you have 128 MB of RAM, then the swap partition created
can be 128 MB – 256 MB (twice your RAM), depending on how much disk space is available.
For this example, a 1020 MB swap partition (mounted as
• A 2738 MB ext partition.
• A partition of at least 2094 MB (mounted as /home).
• A 384 MB partition (mounted as /).
• A 259 MB partition (mounted as /var).
swap) is created.
This partitioning scheme offers a reasonably flexible filesystem configuration for most server tasks.
1.5.2. Custom Installations
The Custom installation allows you the most flexibility during your installation. During a Custom
installation, you have complete control over the packages that will be installed on your system.
The recommended disk space requirements for a Custom installation are as follows:
Note
The minimum recommended disk space requirements as listed below, are just minimum recommendations for the installation itself. You should adjust these disk space requirements as appropriate for
your specific computing needs (such as disk space for personal files, additional applications you may
install at a later time, and so on).
• Custom (minimum, without Workstation packages): 350 MB
• Custom (minimum, with Workstation packages): 500 MB
• Custom (default): 1 GB
• Custom (choosing everything): 3.2 GB
Page 17

Chapter 1. Steps to Get You Started 7
1.5.2.1. What a Custom Installation Will Do
As you might guess from the name, a custom installation puts the emphasis on flexibility. You have
complete control over which packages will be installed on your system.
If you choose automatic partitioning, a Custom installation will create the following partitions:
Note
The partitions represented below were created on a system with 9 GB of hard drive space and 512
MB of RAM. Depending on the amount of hard drive space and memory you have available, these
values may differ slightly.
• The size of the swap partition is determined by the amount of RAM in your system and the amount
of space available on your hard drive. If you have 128 MB of RAM, then the swap partition created
can be 128 MB – 256 MB (twice your RAM), depending on how much disk space is available.
For this example, a 1020 MB swap partition (mounted as
• A 47 MB partition (mounted as /boot) in which the Linux kernel and related files reside.
• A 2609 MB root partition (mounted as /) in which all other files are stored (the exact size of this
swap) is created.
partition is dependent on your available disk space).
Page 18

8 Chapter 1. Steps to Get You Started
Page 19
Chapter 2.
System Requirements Table
The most recent list of supported hardware can be found at http://hardware.redhat.com/hcl/.
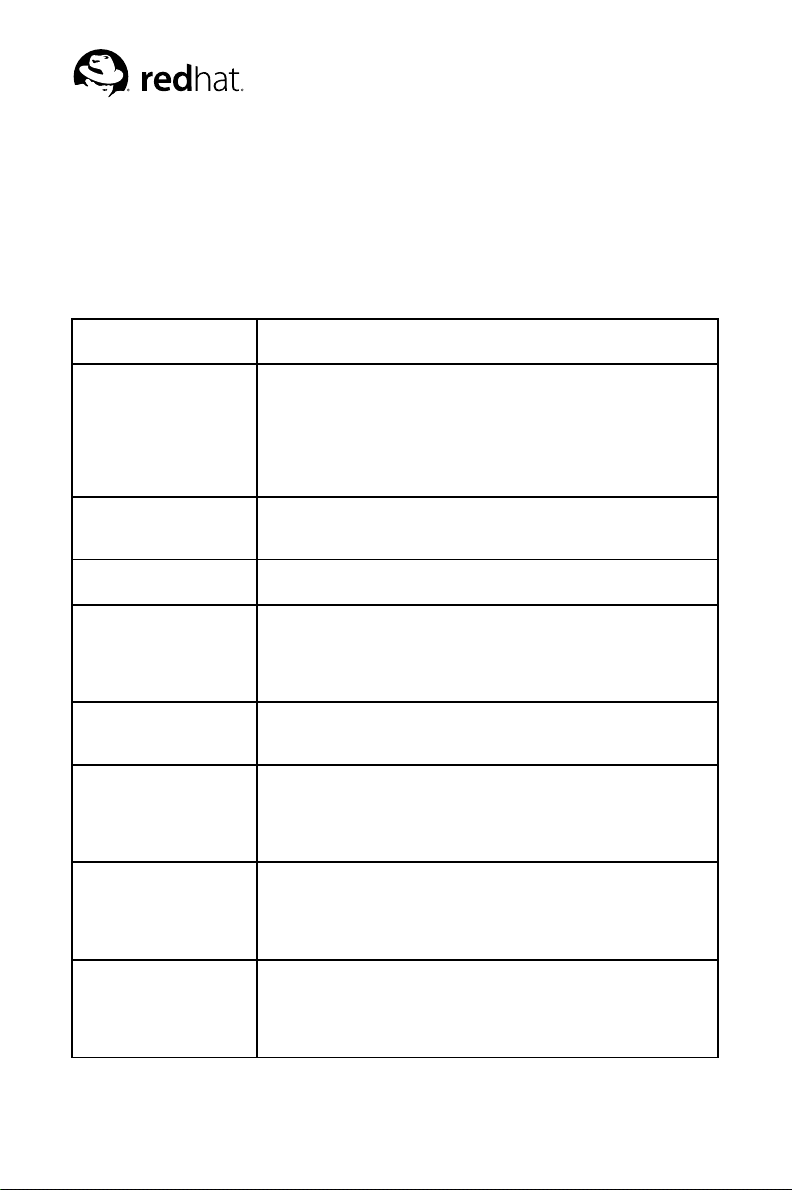
This chapter provides you with a system requirements table, which will help you keep a record ofyour
current system settings and requirements. Enter information about your system in the table provided
as a handy reference to help make your Red Hat Enterprise Linux WS installation go more smoothly.
hard drive(s): type, label,
size; ex: IDE hda=1.2 GB
partitions: map of
partitions and mount
points; ex:
/dev/hda1=/home,
/dev/hda2=/ (fill this in
once you know where they
will reside)
memory: amount of RAM
installed on your system;
ex: 64 MB, 128 MB
CD-ROM: interface type;
ex: SCSI, IDE (ATAPI)
SCSI adapter: if present,
make and model number;
ex: BusLogic SCSI
Adapter, Adaptec
2940UW
network card: if present,
make and model number;
ex: Tulip, 3COM 3C590
mouse: type, protocol, and
number of buttons; ex:
generic 3 button PS/2
mouse, MouseMan 2
button serial mouse
monitor: make, model,
and manufacturer
specifications; ex:
Optiquest Q53, ViewSonic
G773
video card: make, model
number and size of
VRAM; ex: Creative Labs
Graphics Blaster 3D, 8MB
Page 20

10 Chapter 2. System Requirements Table
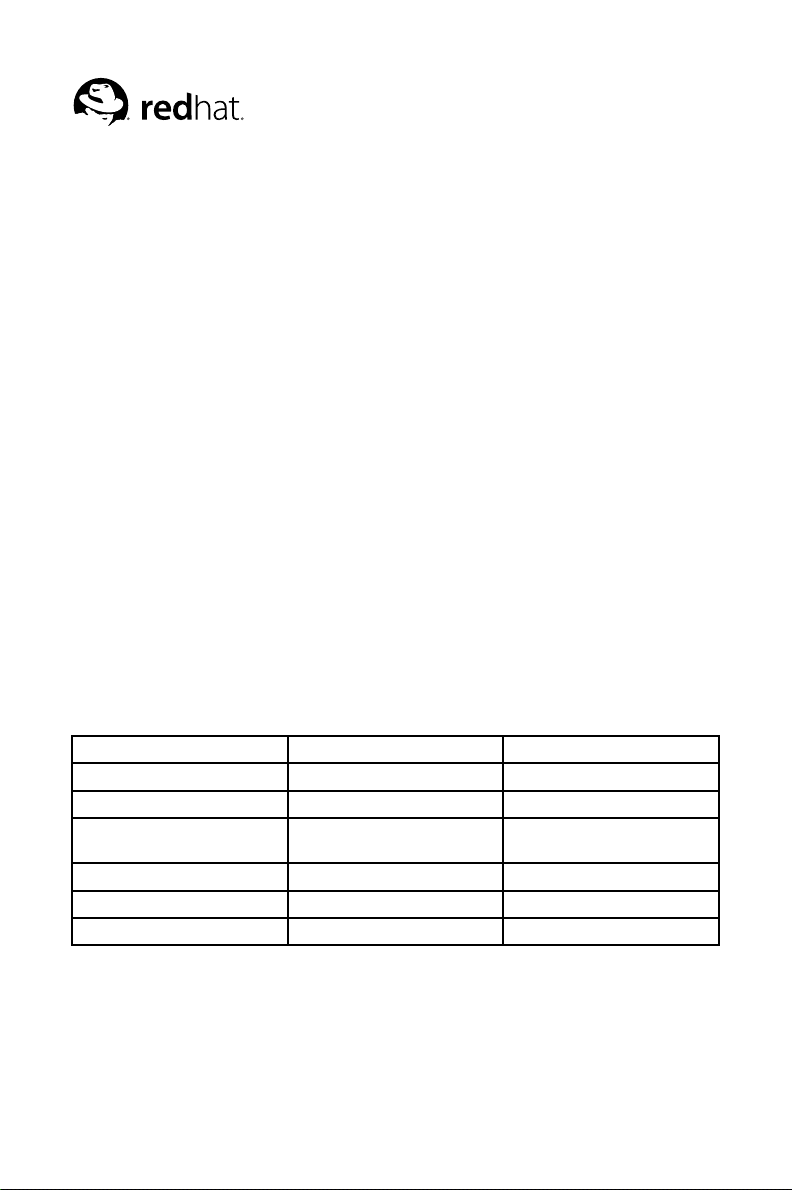
sound card: make, chipset
and model number; ex: S3
SonicVibes, Sound Blaster
32/64 AWE
IP, DHCP, and BOOTP
addresses: four numbers,
separated by dots; ex:
10.0.2.15
netmask: four numbers,
separated by dots; ex:
255.255.248.0
gateway IP address: four
numbers, separated by
dots; ex: 10.0.2.245
one or more name server
IP addresses (DNS): one
or more sets of
dot-separated numbers; ex:
10.0.2.1
domain name: the name
given to your organization;
ex: for Red Hat, this
would be redhat.com
hostname: the name of
your computer; your
personal choice of names;
ex: cookie, southpark
Table 2-1. System Requirements Table
If any of these networking requirements or terms are unfamiliar to you, contact your network administrator for assistance.
Page 21
Chapter 3.
Installing Red Hat Enterprise Linux WS
This chapter explains how to install Red Hat Enterprise Linux WS from the CD-ROM using the
graphical, mouse-based installation program. The following topics are discussed:
• Getting familiar with the installation program’s user interface
• Starting the installation program
• Selecting an installation method
• Configuration steps during the installation (language, keyboard, mouse, etc.)
• Finishing the installation
3.1. The Installation Program User Interface
If you have used a graphical user interface (GUI) before, you will be familiar with this process;
simply use your mouse to navigate the screens, "click" buttons, or enter text fields. You can also
navigate through the installation using the [Tab] and [Enter] keys.
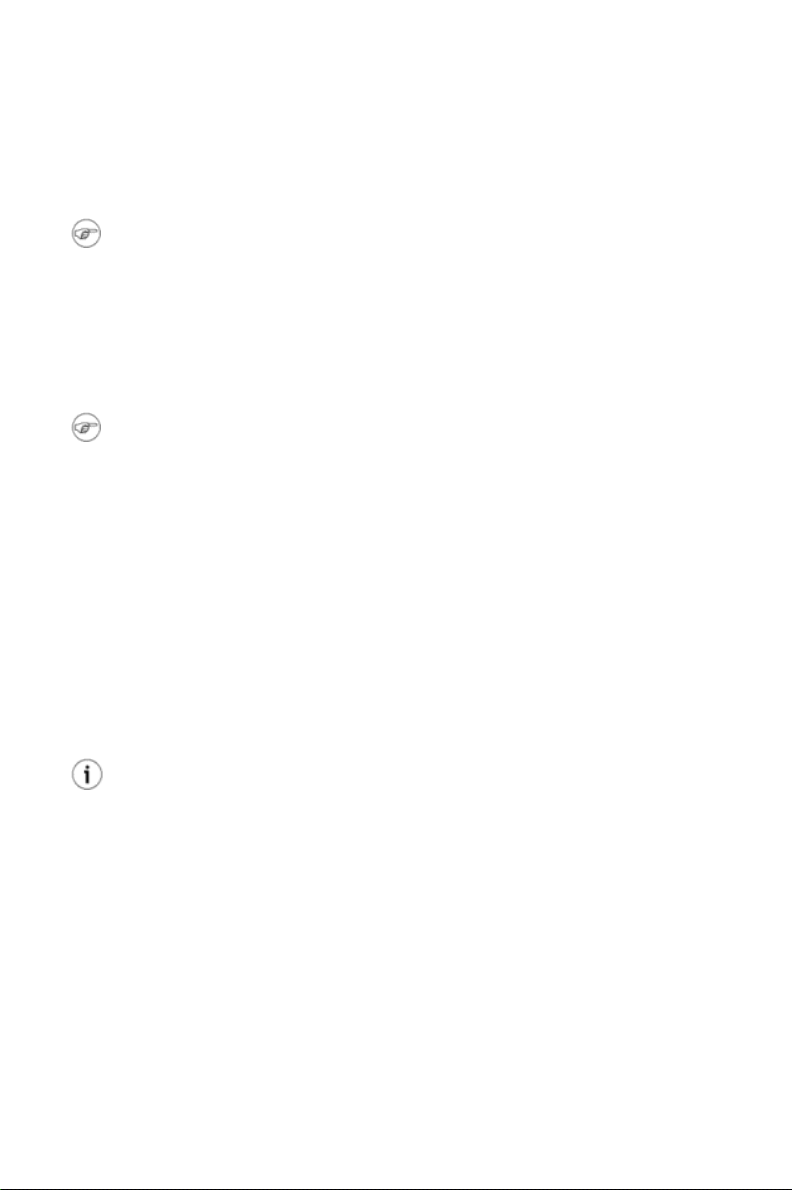
3.1.1. A Note about Virtual Consoles
The Red Hat Enterprise Linux WS installation program offers more than the dialog boxes of the
installation process. Several different kinds of diagnostic messages are available to you, in addition
to providing a way to enter commands from a shell prompt. The installation program displays these
messages on five virtual consoles, among which you can switch using a single keystroke combination.
These virtual consoles can be helpful if you encounter a problem while installing Red Hat Enterprise
Linux WS. Messages displayed on the installation or system consoles can help pinpoint a problem.
Please see Table 3-1 for a listing of the virtual consoles, keystrokes used to switch to them, and their
contents.
Console Keystrokes Contents
1 [Ctrl]-[Alt]-[F1] installation dialog
2 [Ctrl]-[Alt]-[F2] shell prompt
3 [Ctrl]-[Alt]-[F3] install log (messages from
4 [Ctrl]-[Alt]-[F4] system-related messages
5 [Ctrl]-[Alt]-[F5] other messages
7 [Ctrl]-[Alt]-[F7] X graphical display
Table 3-1. Console, Keystrokes, and Contents
Generally, there is no reason to leave the default console (virtual console #7) unless you are attempting
to diagnose installation problems.
installation program)
Page 22
12 Chapter 3. Installing Red Hat Enterprise Linux WS
3.2. Starting the Installation Program
Tostart the installation, you must first boot the installation program. Please make sure you have all the
resources you will need for the installation. If you have already read through Chapter 1, and followed
the instructions, you should be ready to begin.
Note
Occasionally, some hardware components require a driver disk during the installation. A driver disk
adds support for hardware that is not otherwise supported by the installation program. Refer to Appendix E for more information.
3.2.1. Booting the Installation Program
Note
To create a boot disk, refer to Section 1.4.2.
You can boot the Red Hat Enterprise Linux WS installation program using any one of the following
media (depending upon what your system can support):
• Bootable CD-ROM — Your machine supports a bootable CD-ROM drive and you want to perform
a local CD-ROM installation.
• Local boot disk — Your machine will not support a bootable CD-ROM and you want to install from
a local CD-ROM or a hard drive.
• Network boot disk — Use a network boot disk to install via NFS, FTP, and HTTP.
Insert the boot disk into your computer’s first diskette drive and reboot (or boot using the CD-ROM,
if your computer supports booting from it). Your BIOS settings may need to be changed to allow you
to boot from the diskette or CD-ROM.
Tip
To change your BIOS settings, watch the instructions provided on your display when your computer
first begins to boot. Often you will see a line of text telling you to press the [Del] or [F1] key to enter
the BIOS settings.
Once you’ve entered your BIOS setup program, find the section where you can alter your boot sequence. The default is often C, A or A, C (depending on whether you boot from your hard drive [C]
or a diskette drive [A]). Change this sequence so that the CD-ROM is first in your boot order and that
C or A (whichever is your typical boot default) is second. This instructs the computer to first look at
the CD-ROM drive for bootable media; if it does not find bootable media on the CD-ROM drive, it will
then check your hard drive or diskette drive.
Save your changes before exiting the BIOS. For more information, please refer to the documentation
that came with your system.
After a short delay, a screen containing the boot: prompt should appear. The screen contains information on a variety of boot options. Each boot option also has one or more help screens associated
with it. To access a help screen, press the appropriate function key as listed in the line at the bottom
of the screen.
Page 23

Chapter 3. Installing Red Hat Enterprise Linux WS 13
As you boot the installation program, be aware of two issues:
• Once you see the boot: prompt, the installation program will automatically begin if you take no
action within the first minute. To disable this feature, press one of the help screen function keys.
• If you press a help screen function key, there will be a slight delay while the help screen is read
from the boot media.
Normally, you only need to press [Enter] to boot. Watch the boot messages to see if the Linux kernel
detects your hardware. If your hardware is properly detected, please continue to the next section. If it
does not properly detect your hardware, you may need to restart the installation in expert mode.
3.2.1.1. Additional Boot Options
If you do not wish to perform a CD-ROM GUI installation, you can start a text mode installation using
the following boot command:
boot: text
For text mode installation instructions, please refer to Chapter 4.
If you are having trouble booting into the graphical installation program, you can try to boot using the
no framebuffer (nofb) boot option.
At the boot command, enter the following:
boot: nofb
This option allows you to use the graphical installation program without using a framebuffer.
Enter expert mode using the following boot command:
boot: linux expert
If you need to perform the installation in serial mode, type the following command:
boot: linux console=
device
In the above command,deviceshould be the device you are using (such as ttyS0 or ttyS1). For
example, linux console=ttyS0,115200n8.
3.2.1.2. Kernel Options
Options can also be passed to the kernel. For example, to instruct the kernel to use all the RAM in a
system with 128 MB of RAM, enter:
boot: linux mem=128M
After entering any options, press [Enter] to boot using those options.
If you need to specify boot options to identify your hardware, please write them down. The boot
options will be needed during the boot loader configuration portion of the installation (please see
Section 3.14 for more information).
Page 24

14 Chapter 3. Installing Red Hat Enterprise Linux WS
3.2.1.3. Booting Without Diskettes
The Red Hat Enterprise Linux WS CD-ROM can be booted by computers that support bootable CDROMs. Not all computers support this feature, so if your system cannot boot from the CD-ROM, there
is one other way to start the installation without using a boot disk. The following method is specific
to x86-based computers only.
If you have MS-DOS installed on your system, youcan boot directly from the CD-ROM drive without
using a boot disk. To do this (assuming your CD-ROM is drive d:), use the following commands:
C:\
d:
D:\cd \dosutils
D:\dosutilsautoboot.bat
This method will not work if run in a DOS window — the autoboot.bat file must be executed with
DOS as the only operating system. In other words, Windows cannot be running.
If your computer cannot boot directly from CD-ROM (and you cannot use a DOS-based autoboot),
you will have to use a boot diskette to get things started.
3.3. Selecting an Installation Method
What type ofinstallation method do you wish to use? The following installation methods are available:
CD-ROM
If you have a CD-ROM drive and the Red Hat Enterprise Linux WS CD-ROM, you can use this
method. You will need a boot disk or a bootable CD-ROM. PCMCIA boot and driver disks may
also be used. Continue reading this chapter for further instructions.
Hard Drive
If you have copied the Red Hat Enterprise Linux WS ISO images to a local hard drive, you can
use this method. You will need a boot disk. PCMCIA boot and driver disks may also be used.
Refer to Chapter 4, for hard drive installation instructions.
NFS Image
If you are installing from an NFS server which is exporting the Red Hat Enterprise Linux WS
CD-ROM(s) or a mirror image of *PROD;, you can use this method. You will need a network
boot disk. PCMCIA boot and driver disks may also be used. Refer to Chapter 4, for network
installation instructions. Please note that NFS installations may also be performed in GUI mode.
FTP
If you are installing directly from an FTP server, use this method. You will need a network boot
disk. PCMCIA boot and driver disks may also be used. Refer to Chapter 4, for FTP installation
instructions.
Page 25
Chapter 3. Installing Red Hat Enterprise Linux WS 15
HTTP
If you are installing directly from an HTTP (Web) server, use this method. You will need a
network boot disk. PCMCIA boot and driver disks may also be used. Refer to Chapter 4, for
HTTP installation instructions.
3.4. Beginning the Installation
If you are planning to install via CD-ROM using the graphical interface, please continue reading.
If you would rather perform a text mode installation, reboot your system and at the boot: prompt,
type text. Refer to Chapter 4, for more information.
3.4.1. Installing from CD-ROM
Toinstall Red Hat Enterprise Linux WS from a CD-ROM, choose the CD-ROM option from the boot
loader screen and select OK. When prompted, insert the Red Hat Enterprise Linux WS CD into your
CD-ROM drive (if you did not boot from the CD-ROM). Once the CD is in the CD-ROM drive, select
OK, and press [Enter].
The installation program will then probe your system and attempt to identify your CD-ROM drive. It
will start by looking for an IDE (also known as an ATAPI) CD-ROM drive. If found, it will continue
to the next stage of the installation process (see Section 3.5).
Note
To abort the installation process at this time, reboot your machine and then eject the boot diskette or
CD-ROM. You can safely cancel the installation at any point before the About to Install screen. See
Section 3.23, for more information.
If a CD-ROM drive is not detected, you will be asked what type of CD-ROM drive you have. Choose
from the following types:
SCSI
Select this if your CD-ROM drive is attached to a supported SCSI adapter; the installation
program will then ask youto choose a SCSI driver. Choose the driver that most closely resembles
your adapter. You may specify options for the driver if necessary; however, most drivers will
detect your SCSI adapter automatically.
Other
If your CD-ROM drive is neither an IDE nor a SCSI, it is an "other." Sound cards with proprietary CD-ROM interfaces are good examples of CD-ROMs in the Other category. The installation program will display a list of drivers for supported CD-ROM drives — choose a driver and,
if necessary, specify any driver options.
Tip
A partial list of optional parameters for CD-ROM drives can be found in the Official Red Hat Linux
Reference Guide, in the General Parameters and Modules appendix.
Page 26
16 Chapter 3. Installing Red Hat Enterprise Linux WS
3.4.1.1. What If the IDE CD-ROM Was Not Found?
If you have an IDE (ATAPI) CD-ROM, but the installation program fails to find your it and asks you
what type of CD-ROM drive you have, try the following boot command. Restart the installation, and
at the boot: prompt enter linux hdX =cdrom. Replace the X with one of the following letters,
depending on the interface the unit is connected to, and whether it is configured as master or slave:
• a — first IDE controller, master
• b — first IDE controller, slave
• c — second IDE controller, master
• d — second IDE controller, slave
If you have a third and/or fourth controller, continue assigning letters in alphabetical order, going from
controller to controller, and master to slave.
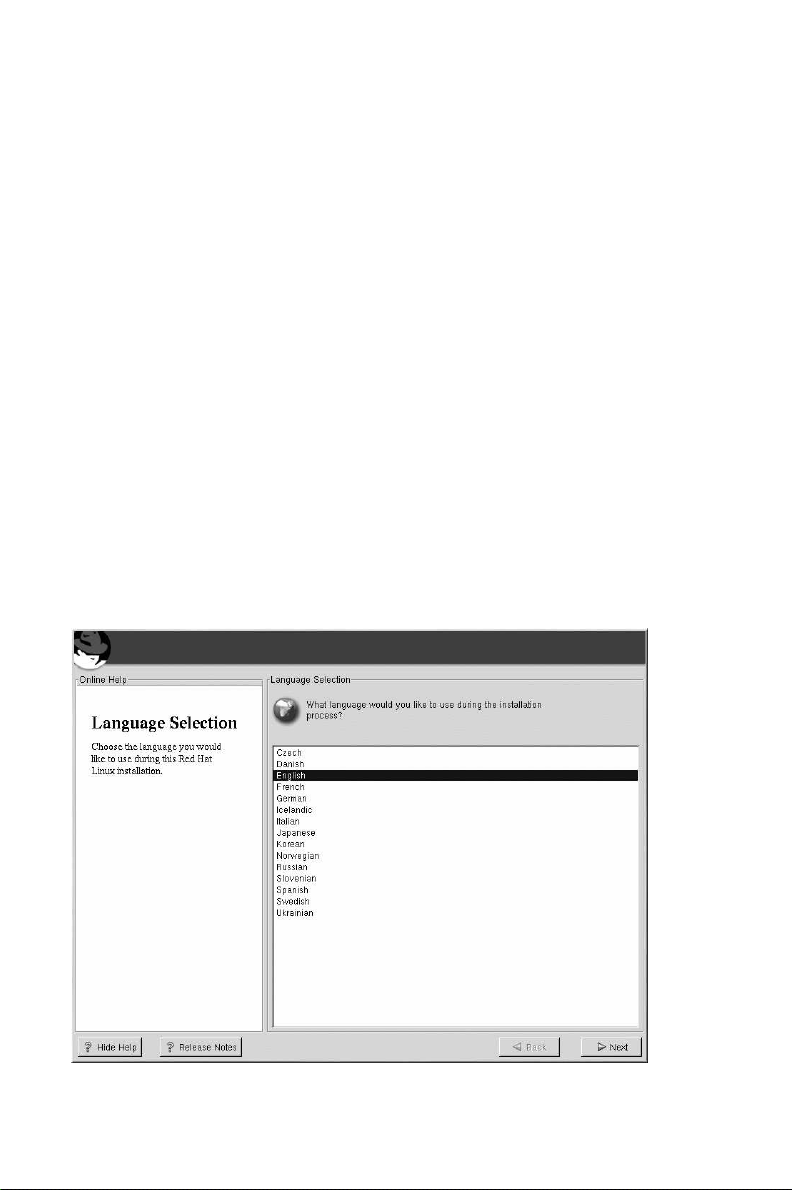
3.5. Language Selection
Using your mouse, select the language you would prefer to use for the installation and as the system
default (see Figure 3-1).
Selecting the appropriate language will also help target your time zone configuration later in the
installation. The installation program will try to define the appropriate time zone based on what you
specify on this screen.
Once you select the appropriate language, click Next to continue.
Figure 3-1. Language Selection
Page 27
Chapter 3. Installing Red Hat Enterprise Linux WS 17
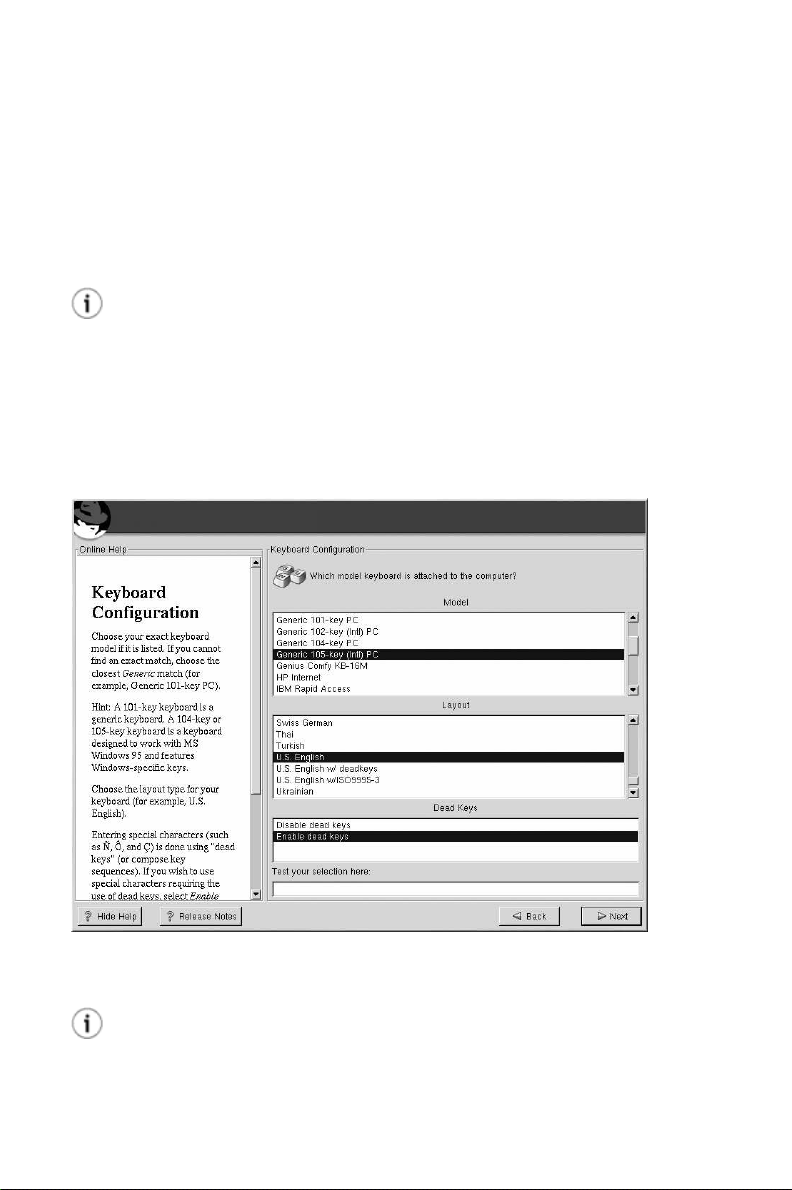
3.6. Keyboard Configuration
Choose the keyboard model that best fits your system (see Figure 3-2). If you cannot find an exact
match, choose the best Generic match for your keyboard type (for example, Generic 101-key PC).
Next, choose the correct layout type for your keyboard (for example, U.S. English).
Creating special characters with multiple keystrokes (such as Ñ, Ô, and Ç) is done using "dead keys"
(also known as compose key sequences). Dead keys are enabled by default. If you do not wish to use
them, select Disable dead keys.
Tip
The following example will help you determine if you need dead keys enabled. An example of a dead
key is the backspace (^H) key on a US English 101 Standard Keyboard. Dead keys are not exclusive
to non-English keyboards.
To test your keyboard configuration, use the blank text field at the bottom of the screen to enter text.
Once you have made the appropriate selections, click Next to continue.
Figure 3-2. Keyboard Configuration
Tip
To change your keyboard type after you have installed Red Hat Enterprise Linux WS, log in as root
and use the /usr/sbin/kbdconfig command. Alternatively, you can type setup at the root prompt.
Page 28

18 Chapter 3. Installing Red Hat Enterprise Linux WS
To become root, type su - at the shell prompt in a terminal window and then press [Enter]. Then,
enter the root password.
Tip
To re-enable dead keys (assuming you chose to disable them during the installation), you will also
need to comment out the line enabling dead keys in the XF86Config-4 file (or, it you are using
XFree86 version 3, the XF86Config file) in /etc/X11.
An InputDevice section, that would disable dead keys on a keyboard layout that used dead keys (for
example, German), would look similar to the following:
Section "InputDevice"
EndSection
By default, the keyboard layout for various languages which use dead keys should have them enabled
unless the nodeadkeys option is present.
Identifier "Keyboard0"
Driver "keyboard"
Option "XkbRules" "xfree86"
Option "XkbModel" "pc101"
Option "XkbLayout" "de"
Option "XkbVariant" "nodeadkeys"
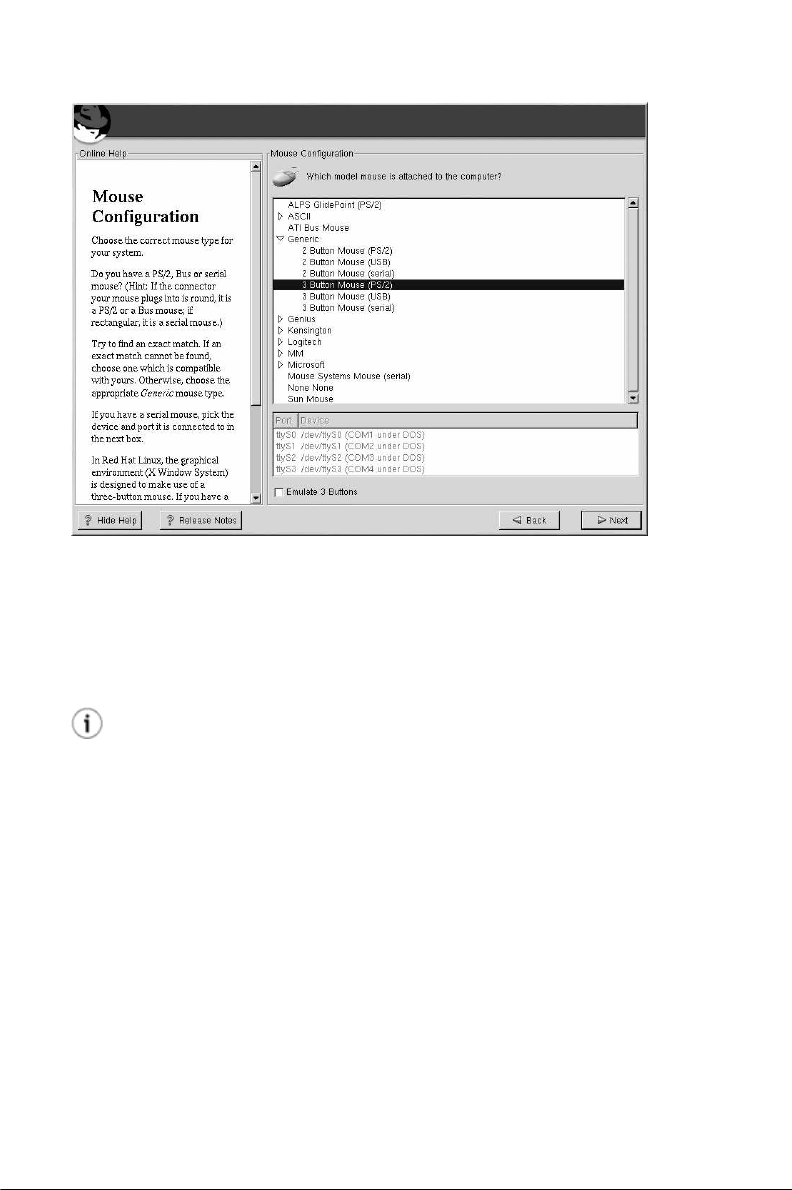
3.7. Mouse Configuration
Choose the correct mouse type for your system. If you cannot find an exact match, choose a mouse
type that you are sure is compatible with your system (see Figure 3-3).
To determine your mouse’s interface, follow the mouse cable back to where it plugs into your system.
If the connector at the end of the mouse cable plugs into a rectangular connector, you have a serial or
USB mouse; if the connector is round, you have a PS/2 mouse or mouse port.
If you are not sure if your mouse is a serial or USB mouse, check the vendor documentation.
If you cannot find a mouse that you are sure is compatible with your system, select one of the Generic
entries, based on your mouse’s number of buttons, and its interface.
Page 29
Chapter 3. Installing Red Hat Enterprise Linux WS 19
Figure 3-3. Mouse Configuration
If you have a PS/2 or a bus mouse, you do not need to pick a port and device. If you have a serial
mouse, you should choose the correct port and device that your serial mouse is on.
The Emulate 3 Buttons checkbox allows you to use a two-button mouse as if it had three buttons. In
general, the X Window System is easier to use with a three-button mouse. If you select this checkbox,
you can emulate a third, "middle" button by pressing both mouse buttons simultaneously.
Tip
To change your mouse configuration after you have completed the installation of Red Hat Enterprise
Linux WS, become root; then use the /usr/sbin/mouseco nfig command from a shell prompt.
To configure your mouse to work as a left-handed mouse, reset the order of the mouse buttons. To
do this, after you have booted your Red Hat Enterprise Linux WS system, type gpm -B 321 at the
shell prompt.
3.8. Welcome to Red Hat Enterprise Linux WS
The Welcome screen does not prompt you for any input. Please read over the help text in the left panel
for additional instructions and information on where to register your Official Red Hat Enterprise Linux
WS product.
Please notice the Hide Help button at the bottom left corner of the screen. The help screen is open
by default. If you do not want to view the help information, click on Hide Help to minimize the help
portion of the screen.
Click on the Next button to continue.
Page 30

20 Chapter 3. Installing Red Hat Enterprise Linux WS
3.9. Install Options
Choose the type of installation you would like to perform (see Figure 3-4). Red Hat Enterprise Linux
WS allows you to choose the installation type that best fits your needs. Your options are Workstation
and Custom.
Note
The choices for Installation Type presented on the Install Options screen vary depending on which
product you are installing.
Figure 3-4. Choosing Your Installation Type
For more information about the different installation classes, please refer to Section 1.5.
3.10. Disk Partitioning Setup
Partitioning allows you to divide your hard drive into isolated sections, where each section behaves
as its own hard drive. Partitioning is particularly useful if you run more than one operating system. If
you are not sure how you want your system to be partitioned, read Appendix D for more information.
On this screen, you can choose to perform automatic partitioning, or manual partitioning using Disk
Druid or fdisk (see Figure 3-5).
Automatic partitioning allows you to perform an installation without having to partition your drive(s)
yourself. If you do not feel comfortable with partitioning your system, it is recommended that you do
not choose to partition manually and instead let the installation program partition for you.
Page 31

Chapter 3. Installing Red Hat Enterprise Linux WS 21
To partition manually, choose either the Disk Druid or fdisk (recommended for experts only) partitioning tool.
Figure 3-5. Disk Partitioning Setup
If you chose to manually partition using Disk Druid, refer to Section 3.12.
If you chose to manually partition using fdisk, refer to Section 3.13.
Page 32

22 Chapter 3. Installing Red Hat Enterprise Linux WS
3.11. Automatic Partitioning
Figure 3-6. Automatic Partitioning
Automatic partitioning allows you to have some control concerning what data is removed (if any)
from your system. Your options are:
• Remove all Linux partitions on this system — select this option to remove only Linux partitions
(partitions created from a previous Linux installation). This will not remove other partitions you
may have on your hard drive(s).
• Remove all partitions on this system — select this option to remove all partitions on your
hard drive(s) (this includes partitions created by other operating systems such as Windows
95/98/NT/2000).
Caution
If you select this option, all data on the selected hard drive(s) will be removed by the installation
program. Do not select this option if you have information that you want to keep on the hard drive(s)
where you are installing Red Hat Enterprise Linux WS.
• Keep all partitions and use existing free space — select this option to retain your current data
and partitions, assuming you have enough free space available on your hard drive(s).
Using your mouse, choose the hard drive(s) on which you want Red Hat Enterprise Linux WS to be
installed. If you have two or more hard drives, you can choose which hard drive(s) should contain this
installation. Unselected hard drives, and any data on them, will not be touched.
Page 33

Chapter 3. Installing Red Hat Enterprise Linux WS 23
Caution
If you have a RAID card, be aware that some BIOSes do not support booting from the RAID card. In
cases such as these, the /boot partition must be created on a partition outside of the RAID array,
such as on a separate hard drive. An internal hard drive is necessary to use for partition creation with
problematic RAID cards.
If you have chosen to automatically partition your system, you should select Review and manually
edit your /boot partition.
To review and make any necessary changes to the partitions created by automatic partitioning, select
the Review option. After selecting Review and clicking Next to move forward, you will see the partitions created for you in Disk Druid. You will also be able to make modifications to these partitions
if they do not meet your needs.
Click Next once you have made your selections to proceed.
3.12. Partitioning Your System
If you chose automatic partitioning and did not select Review, please skip ahead to Section 3.16.
If you chose automatic partitioning and selected Review, you can either accept the current partition
settings (click Next), or modify the setup using Disk Druid, the manual partitioning tool.
If you chose Manually partition with fdisk, please skip ahead to Section 3.13.
At this point, you must tell the installation program where to install Red Hat Enterprise Linux WS.
This is done by defining mount points for one or more disk partitions in which Red Hat Enterprise
Linux WS will be installed. You may also need to create and/or delete partitions at this time (refer to
Figure 3-7).
Note
If you have not yet planned how you will set up your partitions, refer to Appendix D. At a bare minimum, you need an appropriately-sized root partition, and a swap partition equal to twice the amount
of RAM you have on the system.
Page 34

24 Chapter 3. Installing Red Hat Enterprise Linux WS
Figure 3-7. Partitioning with Disk Druid
The partitioning tool used in Red Hat Enterprise Linux WS is Disk Druid. With the exception of
certain esoteric situations, Disk Druid can handle the partitioning requirements for a typical Red Hat
Enterprise Linux WS installation.
3.12.1. Graphical Display of Hard Drive(s)
Disk Druid offers a graphical representation of your hard drive(s).
Using your mouse, click once to highlight a particular field in the graphical display. Double-click to
edit an existing partition or to create a partition out of existing free space.
Above the display, you will see the drive name (such as /dev/hda ), the geom (which shows the
hard disk’s geometry and consists of three numbers representing the number of cylinders, heads, and
sectors as reported by the hard disk), and the model of the hard drive as detected by the installation
program.
3.12.2. Disk Druid’s Buttons
These buttons control Disk Druid’s actions. They are used to change the attributes of a partition (for
example the filesystem type and mount point) and also to create RAID devices. Buttons on this screen
are also used to accept the changes you have made, or to exit Disk Druid. For further explanation,
take a look at each button in order:
• New: Used to request a new partition. When selected, a dialog box appears containing fields (such
as mount point and size) that must be filled in.
• Edit: Used to modify attributes of the partition currently selected in the Partitions section. Select-
ing Edit opens a dialog box. Some or all of the fields can be edited, depending on whether the
partition information has already been written to disk.
Page 35

Chapter 3. Installing Red Hat Enterprise Linux WS 25
You can also edit free space as represented in the graphical display to create a new partition within
that space. Either highlight the free space and then select the Edit button, or double-click on the
free space to edit it.
• Delete: Used to remove the partition currently highlighted in the Current Disk Partitions section.
You will be asked to confirm the deletion of any partition.
• Reset: Used to restore Disk Druid to its original state. All changes made will be lost if you Reset
the partitions.
• Make RAID: Make RAID can be used if you want to provide software RAID redundancy to any
or all disk partitions. It should only be used if you have experience using RAID. To read more about
RAID, please refer to RAID (Redundant Array of Independent Disks) in the Official Red Hat Linux
Customization Guide.
To make a RAID device, you must first create software RAID partitions. Once you have created
two or more software RAID partitions, select Make RAID to join the software RAID partitions
into a RAID device.
3.12.3. Partition Fields
Above the partition hierarchy are labels which present information about the partitions you are creating. The labels are defined as follows:
• Device: This field displays the partition’s device name.
• Start: This field shows the sector on your hard drive where the partition begins.
• End: This field shows the sector on your hard drive where the partition ends.
• Size: This field shows the partition’s size (in MB).
• Type: This field shows the partition’s type (for example, ext2, ext3, or vfat ).
• Mount Point: A mount point isthe location within the directory hierarchy at which a volume exists;
the volume is "mounted" at this location. This field indicates where the partition will be mounted.
If a partition exists, but is not set, then you need to define its mount point. Double-click on the
partition or click the Edit button.
• Format: This field shows if the partition being created will be formatted.
3.12.4. Recommended Partitioning Scheme
Unless you have a reason for doing otherwise, we recommend that you create the following partitions:
• A swap partition (at least 32 MB) — swap partitions are used to support virtual memory. In other
words, data is written to a swap partition when there is not enough RAM to store the data your
system is processing. The size of your swap partition should be equal to twice your computer’s
RAM, or 32 MB, whichever amount is larger, but no more than 2048 MB (or 2 GB). In Disk
Druid, the partition field for swap should look similar to the following:
Swaphda6 64M 64M Linux swap
For example, if you have 1 GB of RAM or less, your swap partition should be at least equal to the
amount of RAM on your system, up to two times the RAM. For more than 1 GB of RAM, 2 GB of
swap is recommended. Creating a large swap space partition will be especially helpful if you plan
to upgrade your RAM at a later time.
• A /boot partition (50 MB) —the partition mounted on /boot contains the operating system kernel
(which allows your system to boot Red Hat Enterprise Linux WS), along with files used during the
bootstrap process. Due to the limitations of most PC BIOSes, creating a small partition to hold
Page 36

26 Chapter 3. Installing Red Hat Enterprise Linux WS
these files is a good idea. For most users, a 50 MB boot partition is sufficient. In Disk Druid, the
partition field for /boot should look similar to:
/boot hda1 50M 50M Linux native
Caution
If your hard drive is more than 1024 cylinders (and your system was manufactured more than two
years ago), you may need to create a /boot partition if you want the / (root) partition to use all of
the remaining space on your hard drive.
Caution
If you have a RAID card, be aware that some BIOSes do not support booting from the RAID card.
In cases such as these, the /boot partition must be created on a partition outside of the RAID
array, such as on a separate hard drive.
• A root partition (350 MB - 3.2 GB) — this is where "/" (the root directory) will be located. In this
setup, all files (except those stored in /boot) are on the root partition.
A 350 MB partition will allow you to install a minimal Custom installation (without the Workstation
packages), a 1.0GB root partition will permit the equivalent of a default Workstation (with GNOME
or KDE) installation (with very little free space), while a 3.2 GB root partition will let you perform
a full Custom installation, choosing everything.
In Disk Druid, the partition field for / should look similar to:
/ hda5 3734M 3734M Linux native
3.12.5. Adding Partitions
To add a new partition, select the New button. A dialog box appears (see Figure 3-8).
Note
You must dedicate at least one partition to Red Hat Enterprise Linux WS, and optionally more. For
more information, see Appendix D.
Page 37

Chapter 3. Installing Red Hat Enterprise Linux WS 27
Figure 3-8. Creating a New Partition
• Mount Point: Enter the partition’s mount point. For example, if this partition should be the root
partition, enter /; enter /boot for the /boot partition, and so on. You can also use the pulldown
menu to choose the correct mount point for your partition.
• Filesystem Type: Using the pulldown menu, select the appropriate filesystem type for this partition.
For more information on filesystem types, see Section 3.12.5.1.
• Allowable Drives: This field contains a list of the hard disks installed on your system. If a hard
disk’s box is highlighted, then a desired partition can be created on that hard disk. If the box is
not checked, then the partition will never be created on that hard disk. By using different checkbox
settings, you can have Disk Druid place partitions as you see fit, or let Disk Druid decide where
partitions should go.
• Size (Megs): Enter the size (in megabytes) of the partition. Note, this field starts with a "1" (one);
unless changed, only a 1 MB partition will be created.
• Additional Size Options: Choose whether to keep this partition at a fixed size, to allow it to "grow"
(fill up the available hard drive space) to a certain point, or to allow it to grow to fill any remaining
hard drive space available.
If you choose Fill all space up to (MB), you must give size constraints in the field to the right of
this option. This allows you to keep a certain amount of space free on your hard drive for future
use.
• Force to be a primary partition: Select whether the partition you are creating should be one of the
first four partitions on the hard drive. If unselected, the partition created will be a logical partition.
Page 38

28 Chapter 3. Installing Red Hat Enterprise Linux WS
See Section D.1.3, for more information.
• Check for bad blocks: Checking for bad blocks can help prevent data loss by locating the bad
blocks on a drive and making a list of them to prevent using them in the future. If you wish to check
for bad blocks while formatting each filesystem, please make sure to select this option.
Selecting Check for bad blocks may dramatically increase your total installation time. Since most
newer hard drives are quite large in size, checking for bad blocks may take a long time; the length
of time depends on the size of your hard drive. If you choose to check for bad blocks, you can
monitor your progress on virtual console #6.
• Ok: Select Ok once you are satisfied with the settings and wish to create the partition.
• Cancel: Select Cancel if you do not want to create the partition.
3.12.5.1. Filesystem Types
Red Hat Enterprise Linux WS allows you to create different partition types, based on the filesystem
they will use. The following is a brief description of the different filesystems available, and how they
can be utilized.
• ext2 — An ext2 filesystem supports standard Unix file types (regular files, directories, symbolic
links, etc). It provides the ability to assign long file names, up to 255 characters. Versions prior to
Red Hat Enterprise Linux WS 2.1 used ext2 filesystems by default.
• ext3 — The ext3 filesystem is based on the ext2 filesystem and has one main advantage — journal-
ing. Using a journaling filesystem reduces time spent recovering a filesystem after a crash as there
is no need to fsck1the filesystem.
• software RAID — Creating two or more software RAID partitions allows you to create a RAID
device. For more information regarding RAID, refer to the chapter RAID (Redundant Array of
Independent Disks) in the Official Red Hat Linux Customization Guide.
• swap — Swap partitions are used to support virtual memory. In other words, data is written to a
swap partition when there is not enough RAM to store the data your system is processing.
• vfat — The VFAT filesystem is a Linux filesystem that is compatible with Windows 95/NT long
filenames on the FAT filesystem.
3.12.6. Editing Partitions
To edit a partition, select the Edit button or double-click on the existing partition.
Note
If the partition already exists on your hard disk, you will only be able to change the partition’s mount
point. If you want to make any other changes, you will need to delete the partition and recreate it.
1. The fsck application is used to check the filesystem for metadata consistency and optionally repair one or
more Linux filesystems.
Page 39

Chapter 3. Installing Red Hat Enterprise Linux WS 29
3.12.7. Deleting a Partition
To delete a partition, highlight it in the Partitions section and click the Delete button. You will be
asked to confirm the deletion.
Skip to Section 3.14 for further installation instructions.
3.13. Partitioning with fdisk
This section applies only if you chose to use fdisk to partition your system.
To partition your system without using fdisk, please skip to Section 3.11 for automatic partitioning or
Section 3.12 for partitioning with Disk Druid.
If you have already completed disk partitioning, skip to Section 3.14 for further installation instruc-
tions.
Caution
Unless you have previously used fdisk and understand how it works, we do not recommend that you
use it. It is much easier for new users to accidentally corrupt or lose data using fdisk .
Disk Druid is easier to understand than fdisk. To exit fdisk, click Back to return to the previous
screen, deselect fdisk, and then click Next.
If you have chosen to use fdisk, the next screen will prompt you to select a drive to partition using
fdisk. Once you have chosen which drive to partition, you will be presented with the fdisk command
screen. If you do not know what command to use, type [m] at the prompt for help.
When you are finished making partitions, type [w] to save your changes and quit. You will be taken
back to the original fdisk screen where you can partition another drive or continue the installation.
Note
None of the changes you make take effect until you save them and exit fdisk using the w command.
You can quit fdisk at any time without saving changes using the q command.
After you have partitioned your drive(s), click Next. You will need to use Disk Druid to assign mount
points to the partitions you just created with fdisk.
You will not be able to add new partitions using Disk Druid, but you can edit mount points for the
partitions you have already created. For each partition created with fdisk, click on the Edit button,
choose the appropriate mount point for that partition from the pulldown menu, and click on OK.
3.14. Boot Loader Installation
In order to boot the system without a boot disk, you usually need to install a boot loader. You can
choose to install either GRUB (selected by default) or LILO.
GRUB is a software boot loader that can be used to start Red Hat Enterprise Linux WS on your
computer. It can also start other operating systems, such as Windows 9x. Here, you will be asked how
(or whether) you want to configure a boot loader and which one (GRUB or LILO).
Page 40

30 Chapter 3. Installing Red Hat Enterprise Linux WS
Choose which boot loader you want to install. If you would rather use LILO, make sure it is selected
instead of GRUB.
Caution
If you choose not to install GRUB or LILO for any reason, you will not be able to boot your Red
Hat Enterprise Linux WS system directly, and you will need to use another boot method (such as a
boot diskette). Use this option only if you are sure you have another way of booting your Red Hat
Enterprise Linux WS system!
Figure 3-9. Boot Loader Installation
If you chose to install a boot loader (GRUB or LILO), you must determine where it will be installed.
You may install your boot loader in one of two places:
The master boot record (MBR)
The recommended place to install a boot loader, unless the MBR already starts another operating
system loader, such as System Commander or OS/2’s Boot Manager. The MBR is a special area
on your hard drive that is automatically loaded by your computer’s BIOS, and is the earliest point
at which the boot loader can take control of the boot process. If you install it in the MBR, when
your machine boots, GRUB (or LILO) will present a boot prompt. You can then boot Red Hat
Enterprise Linux WS or any other operating system that you have configured the boot loader to
boot.
Page 41

Chapter 3. Installing Red Hat Enterprise Linux WS 31
The first sector of your root partition
Recommended if you are already using another boot loader on your system (such as OS/2’s Boot
Manager). In this case, your other boot loader will take control first. You can then configure that
boot loader to start GRUB (or LILO), which will then boot Red Hat Enterprise Linux WS.
Caution
If you have a RAID card, be aware that some BIOSes do not support booting from the RAID card. In
cases such as these, the boot loader should not be installed on the MBR of the RAID array. Rather,
the boot loader should be installed on the MBR of the same drive as the /boot partition was created.
Select where you would like GRUB (or LILO) to be installed on your system. If your system will use
only Red Hat Enterprise Linux WS, you should choose the MBR.
If you want to add default options to GRUB or LILO’s boot command, enter them into the Kernel
parameters field. Any options you enter will be passed to the Linux kernel every time it boots.
The Force use of LBA32 (not normally required) option allows you to exceed the 1024 cylinder
limit for the /boot partition. If you have a system which supports the LBA32 extension for booting
operating systems above the 1024 cylinder limit, you shouldplace your /boot partition above this
limit. If the installation program has not already detected this extension from your BIOS, you should
select the Force use of LBA32 (not normally required) option.
Every bootable partition is listed, including partitions used by other operating systems. The partition
holding your Red Hat Enterprise Linux WS system’s root filesystem will have a Boot label of Red
Hat Enterprise Linux WS. Other partitions may also have boot labels. If you would like to add
boot labels for other partitions (or change an existing boot label), click once on the partition to select
it. Once selected, you can change the boot label by editing the name in the Boot label text field.
Note
The Boot label column lists what you must enter at the boot prompt in order to boot the desired
operating system. However, if you forget the boot labels defined on your system, you can always
press [Tab] at the prompt to display a list of defined boot labels.
3.14.1. Rescue Mode
If you need to use rescue mode, there are several options available to you.
• Using the CD-ROM to boot, type linux rescue at the boot: prompt.
• Using the network boot disk you have created, type linux rescue at the boot: prompt. You
will then be prompted to retrieve the rescue image from the network.
• Using the boot disk you have created, type linux rescue at the boot: prompt. You then pick
an installation method and choose a valid installation tree to load from.
For more information regarding rescue mode,refer to the Official Red Hat Linux Customization Guide.
Page 42

32 Chapter 3. Installing Red Hat Enterprise Linux WS
3.14.2. Alternative Boot Loaders
If you do not wish to use GRUB or LILO to boot your Red Hat Enterprise Linux WS system, you
have several alternatives:
Boot disk
You can use the boot disk created by the installation program (if you elected to create one).
LOADLIN
You can load Linux from MS-DOS. Unfortunately, it requires a copy of the Linux kernel (and
an initial RAM disk, if you have a SCSI adapter) to be available on an MS-DOS partition. The
only way to accomplish this is to boot your Red Hat Enterprise Linux WS system using some
other method (for example, from LILO on a diskette) and then copy the kernel to an MS-DOS
partition. LOADLIN is available from ftp://metalab.unc.edu/pub/Linux/system/boot/dualboot/
and associated mirror sites.
SYSLINUX
SYSLINUX is an MS-DOS program very similar to LOADLIN. It is also available from
ftp://metalab.unc.edu/pub/Linux/system/boot/loaders/ and associated mirror sites.
Some commercial boot loaders
You can load Linux using commercial boot loaders. For example, System Commander and Partition Magic are able to boot Linux (but still require GRUB or LILO to be installed in your Linux
root partition).
3.14.3. SMP Motherboards, GRUB, and LILO
This section is specific to SMP motherboards only. If the installation program detects an SMP motherboard on your system, it will create two /boot/grub/grub.conf or /etc/lilo.conf entries
(depending on the boot loader you installed), rather than the usual single entry.
The two entries in grub.conf will be Red Hat Enterprise Linux WS (kernel version)
and Red Hat Enterprise Linux WS (kernel versions-smp). The Red Hat Enterprise
Linux WS (kernel version-smp) will boot by default. However, if you have trouble with the
SMP kernel, you can elect to boot the Red Hat Enterprise Linux WS (kernel version) entry instead. You will retain all the functionality as before, but you will only be operating with a single
processor.
The two entries in lilo.conf will be linux and linux-up. The linux entry will boot by default.
However, if you have trouble with the SMP kernel, you can elect to boot the linux-up entry instead.
You will retain all the functionality as before, but you will only be operating with a single processor.
3.15. GRUB Password
If you did not select GRUB as your boot loader, or did not install a boot loader, skip to Section 3.16.
GRUB passwords provide a security mechanism in an environment where physical access to your
server is available.
Page 43

Chapter 3. Installing Red Hat Enterprise Linux WS 33
If you are installing GRUB as your boot loader, you should create a password to protect your system. Otherwise, users may be able to pass options to the kernel which can compromise your system
security.
Figure 3-10. GRUB Password
If you choose to use a GRUB password to enhance your system security, be sure toselect the checkbox
labeled Use a GRUB Password.
Once selected, enter a password and confirm it.
3.16. Network Configuration
If you do not have a network device, you will not see this screen. Skip ahead to Section 3.17.
If you have a network device and you have not already configured your networking (such as booting
from a network boot disk you created and entering in your network information as prompted), you
now have the opportunity (as shown in Figure 3-11) to do so.
If you have multiple devices, you will see a tab for each device. You may switch between devices (for
example, between eth0 and eth1) and the information you provide on each tab will be specific to each
device.
Indicate if you would like to configure your IP address using DHCP (Dynamic Host Configuration
Protocol). If you select Activate on boot, your network interface will be started when you boot. If you
do not have DHCP client access or you are unsure what to provide here, please contact your network
administrator.
Next enter, where applicable, the IP Address, Netmask, Network, and Broadcast addresses. If you
are unsure about any of these, please contact your network administrator.
If you have a fully qualified domain name for the network device, enter it in the Hostname field.
Page 44

34 Chapter 3. Installing Red Hat Enterprise Linux WS
Finally, enter the Gateway and Primary DNS (and if applicable the Secondary DNS and Ternary
DNS) addresses.
Figure 3-11. Network Configuration
Note
Do not use the numbers as seen in this sample configuration. These values will not work for your own
network configuration. If you are not sure what values to enter, contact your network administrator for
assistance.
Tip
Even if your computer is not part of a network, you can enter a hostname for your system. If you do
not take this opportunity to enter a name, your system will be known as localhost.
3.17. Firewall Configuration
Red Hat Enterprise Linux WS offers firewall protection for enhanced system security. A firewall exists
between your computer and the network, and determines which resources on your computer remote
users on the network can access. A properly configured firewall can greatly increase the security of
your system.
Page 45

Chapter 3. Installing Red Hat Enterprise Linux WS 35
Figure 3-12. Firewall Configuration
Choose the appropriate security level for your system.
High
If you choose High, your system will not accept connections (other than the default settings) that
are not explicitly defined by you. By default, only the following connections are allowed:
• DNS replies
• DHCP — so any network interfaces that use DHCP can be properly configured
If you choose High, your firewall will not allow the following:
• Active mode FTP (passive mode FTP, used by default in most clients, should still work)
• IRC DCC file transfers
• RealAudio™
• Remote X Window System clients
If you are connecting your system to the Internet, but do not plan to run a server, this is the safest
choice. If additional services are needed, you can choose Customize to allow specific services
through the firewall.
Medium
Page 46

36 Chapter 3. Installing Red Hat Enterprise Linux WS
If you choose Medium, your firewall will not allow remote machines to have access to certain
resources on your system. By default, access to the following resources are not allowed:
• Ports lower than 1023 — the standard reserved ports, used by most system services, such as
FTP, SSH, telnet, and HTTP
• The NFS server port (2049)
• The local X Window System display for remote X clients
• The X Font server port (by default, xfs does not listen on the network; it is disabled in the font
server)
If you want to allow resources such as RealAudio™ while still blocking access to normal system
services, choose Medium. Select Customize to allow specific services through the firewall.
No firewall
No firewall provides complete access to your system and does no security checking. Security
checking is the disabling of access to certain services. This should only be selected if you are
running on a trusted network (not the Internet) or plan to do more firewall configuration later.
Choose Customize to add trusted devices or to allow additional incoming services.
Trusted Devices
Selecting any of the Trusted Devices allows access to your system for all traffic from that device;
it is excluded from the firewall rules. For example, if you are running a local network, but are
connected to the Internet via a PPP dialup, you can check eth0 and any traffic coming from your
local network will be allowed. Selecting eth0 as trusted means all traffic over the Ethernet is
allowed, put the ppp0 interface is still firewalled. If you want to restrict traffic on an interface,
leave it unchecked.
It is not recommended that you make any device that is connected to public networks, such as
the Internet, a Trusted Device.
Allow Incoming
Enabling these options allow the specified services to pass through the firewall. Note, during a
workstation installation, the majority of these services are not installed on the system.
DHCP
If you allow incoming DHCP queries and replies, you allow any network interface that uses
DHCP to determine its IP address. DHCP is normally enabled. If DHCP is not enabled,
your computer can no longer get an IP address.
SSH
Secure SHell (SSH) is a suite of tools for logging into and executing commands on a remote
machine. If you plan to use SSH tools to access your machine through a firewall, enable this
option. You need to have the openssh-server package installed in order to access your
machine remotely, using SSH tools.
Telnet
Telnet is a protocol for logging into remote machines. Telnet communications are unencrypted and provide no security from network snooping. Allowing incoming Telnet access
is not recommended. If you do want to allow inbound Telnet access, you will need to install
the telnet-server package.
Page 47

Chapter 3. Installing Red Hat Enterprise Linux WS 37
WWW (HTTP)
The HTTP protocol is used by Apache (and by other Web servers) to serve webpages. If
you plan on making your Web server publicly available, enable this option. This option is
not required for viewing pages locally or for developing webpages. You will need to install
the apache package if you want to serve webpages.
Mail (SMTP)
If you want to allow incoming mail delivery through your firewall, so that remote hosts can
connect directly to your machine to deliver mail, enable this option. You do not need to
enable this if you collect your mail from your ISP’s server using POP3 or IMAP, or if you
use a tool such as fetchmail. Note that an improperly configured SMTP server can allow
remote machines to use your server to send spam.
FTP
The FTP protocol is used to transfer files between machines on a network. If you plan on
making your FTP server publicly available, enable this option. You need to install the wu-
ftpd (and possibly the anonftp) package for this option to be useful.
Other ports
You can allow access to ports which are not listed here, by listing them in the Other ports
field. Use the following format: port:protocol. For example, if you want to allow
IMAP access through your firewall, you can specify imap:tcp. You can also explicitly specify numeric ports; to allow UDP packets on port 1234 through the firewall, enter
1234:udp. To specify multiple ports, separate them with commas.
3.18. Language Support Selection
Red Hat Enterprise Linux WS can install and support multiple languages for use on your system.
You must select a language to use as the default language. The default language will be used on your
Red Hat Enterprise Linux WS system once installation is complete. If you choose to install other
languages, you can change your default language after the installation.
If you are only going to use one language on your system, selecting only that language will save
significant disk space. The default language is the language you selected to use during the installation.
However, if you select only one language, you will only be able to use that specified language after
the Red Hat Enterprise Linux WS installation is complete.
Page 48

38 Chapter 3. Installing Red Hat Enterprise Linux WS
Figure 3-13. Language Support Selection
To use more than one language on your system, choose specific languages to be installed or select all
languages to have all available languages installed on your Red Hat Enterprise Linux WS system.
Use the Reset button to cancel your selections. Resetting will revert to the default; only the language
you selected for use during the installation will be installed.
3.19. Time Zone Configuration
You can set your time zone by selecting your computer’s physical location or by specifying your time
zone’s offset from Coordinated Universal Time (UTC).
Notice the two tabs at the top of the screen (see Figure 3-14). The first tab allows you to configure
your time zone by your location. You can specify different areas to view: World, North America,
South America, Pacific Rim, Europe, Africa, and Asia.
Page 49

Chapter 3. Installing Red Hat Enterprise Linux WS 39
Figure 3-14. Configuring the Time Zone
On the interactive map, you can also click on a specific city, which is marked by a yellow dot; a red X
will appear indicating your selection. You can also scroll through a list and choose a time zone.
The second tab allows you to specify a UTC offset. The tab displays a list of offsets to choose from,
as well as an option to set daylight saving time.
On both tabs, you can select System Clock uses UTC. Please select this if you know that your system
is set to UTC.
Tip
If you wish to change your time zone configuration after you have booted your Red Hat Enterprise
Linux WS system, become root and use the /usr/sbin/timeconfig command.
3.20. Account Configuration
The Account Configuration screen allows you to set your root password. Additionally, you can set
up user accounts for you to log in to once the installation is complete (see Figure 3-15).
Page 50

40 Chapter 3. Installing Red Hat Enterprise Linux WS
Figure 3-15. Account Creation
3.20.1. Setting the Root Password
Setting up a root account and password is one of the most important steps during your installation.
Your root account is similar to the administrator account used on Windows NT machines. The root
account is used to install packages, upgrade RPMs, and perform most system maintenance. Logging
in as root gives you complete control over your system.
Use the root account only for system administration. Create a non-root account for your general use
and su - to root when you need to fix something quickly. These basic rules will minimize the chances
of a typo or an incorrect command doing damage to your system.
Tip
To become root, type su - at the shell prompt in a terminal window and then press [Enter]. Then,
enter the root password and press [Enter].
The installation program will prompt you to set a root password2for your system. You must enter a
root password. The installation program will not let you proceed to the next section without entering
a root password.
The root password must be at least six characters long; the password you type is not echoed to the
screen. You mustenter the password twice; if the two passwords do not match, the installation program
will ask you to enter them again.
2. A root password is the administrative password for your Red Hat Enterprise Linux WS system. You should
only log in as root when needed for system maintenance.The root account does not operate within the restrictions
placed on normal user accounts, so changes made as root can have implications for your entire system.
Page 51

Chapter 3. Installing Red Hat Enterprise Linux WS 41
You should make the root password something you can remember, but not something that is easy for
someone else to guess. Your name, your phone number, qwerty, password, root, 123456, and anteater
are all examples of bad passwords. Good passwords mix numerals with upper and lower case letters
and do not contain dictionary words: Aard387vark or 420BMttNT, for example. Remember that the
password is case-sensitive. If you write down your password, keep it in a secure place. However, it is
recommended that you do not write down this or any password you create.
Note
Do not use one of the example passwords offered in this manual. Using one of these passwords
could be considered a security risk.
Note
The root user (also known as the superuser) has complete access to the entire system; for this reason, logging in as the root user is best done only to perform system maintenance or administration.
3.20.2. Setting Up User Accounts
If you choose to create a user account now, you will have an account to log in to once the installation
has completed. This allows you to safely and easily log into your computer without having to be root
to create your user account.
Enter an account name. Then enter and confirm a password for that user account. Enter the full name
of the account user and press Add. Your account information will be added to the account list, and the
user account fields will be cleared so that you can add another user.
Figure 3-16. Creating a User Account
Choose New to add a new, non-root, user. Enter the user’s information and use the Add button to add
the user to the account list.
You can also Edit or Delete the user accounts you have created and no longer want.
Page 52

42 Chapter 3. Installing Red Hat Enterprise Linux WS
3.21. Package Group Selection
After your partitions have been selected and configured for formatting, you are ready to select packages for installation.
Note
Unless you choose a custom installation, the installation program will automatically choose most
packages for you. However, you must select either GNOME or KDE (or both) to install a graphical
environment.
GNOME and KDE are both graphical desktop environments3that handle the overall look and feel of
your system. You must choose one of these to have a default graphical setup, but you can also install
both to determine for yourself which you prefer.
You can select components, which group packages together according to function (for example,
GNOME, KDE, or Software Development ), individual packages, or a combination of the two.
To select a component, click on the checkbox beside it (see Figure 3-17).
Figure 3-17. Package Group Selection
Select each component you wish to install. Selecting Everything (at the end of the component list)
during a custom installation installs all packages included with Red Hat Enterprise Linux WS. If you
select every package, you will need approximately 1.7 GB of free disk space.
3. A desktop environment in Linux is similar to the environment you might see in other operating systems.
However, environments differ in their look and feel and are easily customized for your individual needs.
Page 53

Chapter 3. Installing Red Hat Enterprise Linux WS 43
Toselect packages individually, check the Select Individual Packages boxat the bottom of the screen.
3.21.1. Selecting Individual Packages
After selecting the components you wish to install, you can select or deselect individual packages
using your mouse (see Figure 3-18).
Figure 3-18. Selecting Individual Packages
You can choose to view the individual packages in tree view or flat view. Tree view allows you to
see the packages grouped by application type. When you expand this list and pick one group, the list
of packages in that group appears in the panel on the right. Flat view allows you to see all of the
packages in an alphabetical listing on the right of the screen.
To sort alphabetically, click on the Package tab. To sort packages by size, click on the Size (MB) tab.
To select an individual package, double-click the checkbox beside the package name. A check mark
in the box means that a package has been selected.
For more information about a specific package, click on the individual package name. The package
information will appear at the bottom of the screen.
You can also select or deselect all packages listed within a particular group, by clicking on the Select
all in group or Unselect all in group buttons.
Note
Some packages (such as the kernel and certain libraries) are required for every Red Hat Enterprise
Linux WS system and are not available to select or deselect. These base packages are selected by
default.
Page 54

44 Chapter 3. Installing Red Hat Enterprise Linux WS
3.21.2. Unresolved Dependencies
Many software packages, in order to work correctly, depend on other software packages that must
be installed on your system. For example, many of the graphical Red Hat system administration tools
require the python and pythonlib packages. To make sure your system has all the packages it needs
in order to be fully functional, Red Hat Enterprise Linux WS checks these package dependencies each
time you install or remove software packages.
If any package requires another package which you have not selected to install, the program presents a
list of these unresolved dependencies and gives you the opportunity to resolve them (see Figure 3-19).
The Unresolved Dependencies screen appears only if you are missing packages that are needed by
the packages you have selected. At the bottom of the screen, under the list of missing packages, an
Install packages to satisfy dependencies checkbox is selected by default. If you leave this checked,
the installation program will resolve dependencies automatically by adding all required packages to
the list of selected packages.
Figure 3-19. Unresolved Dependencies
3.22. X Configuration — Video Card
The first part of X configuration deals with video card configuration.
Page 55

Chapter 3. Installing Red Hat Enterprise Linux WS 45
3.22.1. Video Card Configuration
Xconfigurator will now present a list of video cards for you to choose from.
If you decided to install the X Window System packages, you now have the opportunity to configure
an X server for your system. If you did not choose to install the X Window System packages, skip
ahead to Section 3.23.
If your video card does not appear on the list (see Figure 3-20), X may not support it. However, if you
have technical knowledge about your card, you may choose Unlisted Card and attempt to configure
it by matching your card’s video chipset with one of the available X servers.
Figure 3-20. Video Card Setup
Next, enter the amount of video memory installed on your video card. If you are not sure, please
consult the documentation accompanying your video card. You will not damage your video card by
choosing more memory than is available, but the X server may not start correctly if you do.
If you decide that the values you have selected are incorrect, you can click the Restore original values
button to return to the suggested settings.
You can also select Skip X Configuration if you would rather configure X after the installation or not
at all.
3.23. Preparing to Install
You should now see a screen preparing you for the installation of Red Hat Enterprise Linux WS.
For your reference, a complete log of your installation can be found in /tmp/install.log once you
reboot your system.
Page 56

46 Chapter 3. Installing Red Hat Enterprise Linux WS
Warning
If, for some reason, you would rather not continue with the installation process, this is your last
opportunity to safely cancel the process and reboot your machine. Once you press the Next button,
partitions will be written and packages will be installed. If you wish to abort the installation, you should
reboot now before any existing information on any hard drive is rewritten.
To cancel this installation process, press your computer’s Reset button or use the [Control]-[Alt][Delete] key combination to restart your machine.
3.24. Installing Packages
At this point there is nothing left for you to do until all the packages have been installed (see Figure
3-21). How quickly this happens depends on the number of packages you have selected and your
computer’s speed.
Figure 3-21. Installing Packages
3.25. Boot Disk Creation
If you chose to create a boot disk, you should now insert a blank, formatted diskette into your diskette
drive (see Figure 3-22).
It is highly recommended that you create a boot disk. If your system were not able to boot properly
using GRUB or LILO, a boot disk would enable you to properly boot your Red Hat Enterprise Linux
WS system.
Page 57

Chapter 3. Installing Red Hat Enterprise Linux WS 47
After a short delay, your boot disk will be created; remove it from your diskette drive and label it
clearly. Note that if you would like to create a boot disk after the installation, you will be able to do
so. For more information, please see the mkbootdisk man page, by typing man mkbootdisk at the
shell prompt.
If you boot your system with the boot disk (instead of GRUB or LILO) , make sure you create a new
boot disk if you make any changes to your kernel.
Figure 3-22. Creating Your Boot Disk
3.26. X Configuration — Monitor and Customization
In order to complete X configuration, you must configure your monitor and customize your X settings.
3.26.1. Configuring Your Monitor
If you chose to skip X configuration, go to Section 3.27.
Xconfigurator, the X Window System configuration tool, presents a list of monitors for you to choose
from. In the list, you can either use the monitor that is autodetected for you, or choose another monitor.
Page 58

48 Chapter 3. Installing Red Hat Enterprise Linux WS
Figure 3-23. Monitor Selection
If your monitor does not appear on the list, select the most appropriate Generic model available. If
you do select a Generic monitor, Xconfigurator will suggest horizontal and vertical sync ranges.
These values are generally available in the documentation which accompanies your monitor, or from
your monitor’s vendor or manufacturer; please check your documentation to make sure these values
are set correctly.
Caution
Do not select a monitor similar to your monitor unless you are certain that the monitor you are
selecting does not exceed the capabilities of your monitor. Doing so may overclock your monitor and
damage or destroy it.
The horizontal and vertical ranges that Xconfigurator suggests for your monitor are also displayed
on this screen.
If you decide that the values you have selected are incorrect, you can click the Restore original values
button to return to the suggested settings.
Click Next when you have finished configuring your monitor.
3.26.2. Custom Configuration
Choose the correct color depth and resolution for your X configuration. Click Test Setting to try
out this configuration. If you do not like what you see during the test, click No to choose another
resolution.
Page 59

Chapter 3. Installing Red Hat Enterprise Linux WS 49
Note
If you need to exit out of the X test, use the [Ctrl]-[Alt]-[Backspace] key combination. Also note that
this will not work in some test cases.
We recommend that you test your configuration, to make sure the resolution and color settings are
usable.
If you installed both GNOME and KDE, you can choose which one to use as your default desktop
environment. If you installed one or the other, it will only show GNOME or KDE as the desktop
default.
You can also choose whether you want to boot your system into a text or graphical environment once
Red Hat Enterprise Linux WS is installed. Unless you have special needs, booting into a graphical
environment (similar to a Windows environment) is recommended. If you choose to boot into a text
environment, you will be presented with a command prompt (similar to a DOS environment).
Figure 3-24. X Customization
3.27. Installation Complete
Congratulations! Your Red Hat Enterprise Linux WS 2.1 installation is now complete!
The installation program will prompt you to prepare your system for reboot. Do not forget to remove
any diskette in the diskette drive or CD in the CD-ROM drive. If you did not install a boot loader, you
will need to use your boot disk now.
Page 60

50 Chapter 3. Installing Red Hat Enterprise Linux WS
After your computer’s normal power-up sequence has completed, you should see the graphical boot
loader prompt, at which you can do any of the following things:
• Press [Enter] — causes the default boot entry to be booted.
• Select a boot label, followed by [Enter] — causes the boot loader to boot the operating system
corresponding to the boot label. (Press [?] at the text mode boot loader prompt for a list of valid
boot labels.)
• Do nothing — after the boot loader’s timeout period, (by default, five seconds) the boot loader will
automatically boot the default boot entry.
Do whatever is appropriate to boot. If your system was not able to boot properly using GRUB or LILO,
or a third-party boot loader, a boot disk would enable you to properly boot your Red Hat Enterprise
Linux WS system. You should see one or more screens of messages scroll by. Eventually, you should
see a login: prompt or a GUI login screen (if you installed the X Window System and chose to start
X automatically).
Tip
If you are not sure what to do next, we suggest you begin with the Official Red Hat Linux Getting
Started Guide (available online at http://www.redhat.com/docs if not included as part of your product),
which covers topics relating to the basics of your system and is an introduction to using Red Hat
Enterprise Linux WS.
If you are a more experienced user looking for information on administration topics, you may find the
Official Red Hat Linux Reference Guide to be more helpful.
If you are looking for information on system configuration, you may find the Official Red Hat Linux
Customization Guide to be helpful.
Page 61

Chapter 4.
Installing Red Hat Enterprise Linux WS via Text
Mode
This release of Red Hat Enterprise Linux WS features a graphical, mouse-based installation program,
but you can also install Red Hat Enterprise Linux WS using a text mode, keyboard-based installation
program. This chapter briefly explains how to use the text mode installation program. Here are some
recommendations:
• If you are new to Linux installations, read Chapter 3, first. The main focus of that chapter is the
graphical installation process, but most of the concepts apply to the text mode installation as well.
After reading that chapter, Section 4.1, will give you more information regarding the aspects of
installing Red Hat Enterprise Linux WS that do not apply to the graphical installation process.
Additionally, Appendix D may be helpful to you, since it discusses disk partition resizing. If you
plan to install Red Hat Enterprise Linux WS on a disk where another operating system is currently
installed, this knowledge will be crucial.
• If you plan to install over a network (via NFS, FTP, or HTTP), you must make a network boot disk.
Chapter 1, explains how to do this.
• If you have never used the text mode installation program, or need a refresher on its user interface,
read this chapter.
4.1. Things You Should Know
Before attempting to install Red Hat Enterprise Linux WS, you should collect information about your
system. This information will help prevent any surprises during the installation. You can find most
of this information in the documentation that came with your system, or from the system’s vendor or
manufacturer.
Chapter 2 provides a table for you to fill out with your specific system requirements, which helps you
keep up with any information needed during your installation. Please review the hardware table at
Table 2-1.
The most recent list of supported hardware can be found at http://hardware.redhat.com/hcl/. You
should check your hardware against this list before proceeding.
4.1.1. Basic Hardware Configuration
You should have a basic understanding of the hardware installed in your computer, including the
following:
• Hard drive(s) — specifically, the number, size, and type. If you have more than one, it is helpful to
know which one is first, second, and so on. It is also good to know if your drives are IDE or SCSI.
If you have IDE drives, you should check your computer’s BIOS to see if you are accessing them in
linear mode. Please refer to your computer’s documentation for the proper key sequence to access
the BIOS. Note that your computer’s BIOS may refer to linear mode by other names, such as "large
disk mode." Again, your computer’s documentation should be consulted for clarification.
• Memory — the amount of RAM installed in your computer.
• CD-ROM —most importantly, the unit’s interface type (IDE, SCSI, or other interface) and,for non-
IDE, non-SCSI CD-ROMs, the make and model number. IDE CD-ROMs (also known as ATAPI)
are the most common type of CD-ROM in recently manufactured, PC-compatible computers.
Page 62

52 Chapter 4. Installing Red Hat Enterprise Linux WS via Text Mode
• SCSI adapter (if one is present) — the adapter’s make and model number.
• Network card (if one is present) — the card’s make and model number.
• Mouse — the mouse’s type (serial, PS/2,or bus mouse),protocol (Microsoft, Logitech, MouseMan,
etc.), and number of buttons; also, for serial mice, the serial port it is connected to.
On many newer systems, the installation program is able to automatically identify most hardware.
However, it is a good idea to collect this information anyway, just to be sure.
4.1.2. Video Configuration
If you will be installing the X Window System, you should also be familiar with the following:
• Your video card — the card’s make and model number (or the video chipset it uses) and the amount
of video RAM it has. (Most PCI-based cards are auto-detected by the installation program.)
• Your monitor — the unit’s make and model number, along with allowable ranges for horizontal and
vertical refresh rates. (Newer models may be auto-detected by the installation program.)
4.1.3. Network-related Information
If you are connected to a network, be sure you know the following:
• IP address — usually represented as a set of four numbers separated by dots, such as 10.0.2.15.
• Netmask — another set of four numbers separated by dots; an example netmask would be
255.255.248.0.
• Gateway IP address — another set of four dot-separated numbers; for example, 10.0.2.254.
• One or more name server IP addresses — one or more sets of dot-separated numbers; for example,
10.0.2.1 might be the address of a name server.
• Domain name — the name your organization uses; for example, Red Hat has a domain name of
redhat.com.
• Hostname — the name assigned to your individual system; for example, a computer might be
named pooh.
Note
The information provided here is as an example only! Do not use it when you install Red Hat Enterprise Linux WS! If you do not know the proper values for your network, ask your network administrator.
4.2. The Installation Program User Interface
The Red Hat Enterprise Linux WS text mode installation program uses a screen-based interface that
includes most of the on-screen "widgets" commonly found on graphical user interfaces. Figure 4-1,
and Figure 4-2, illustrate the screens you will see.
Page 63

Chapter 4. Installing Red Hat Enterprise Linux WS via Text Mode 53
Figure 4-1. Installation Program Widgets as seen in Configure TCP/IP
Figure 4-2. Installation Program Widgets as seen in Disk Druid
Here is a list of the most important widgets shown in Figure 4-1, and Figure 4-2:
• Window — windows (usually referred to as dialogs in this manual) will appear on your screen
throughout the installation process. At times, one window may overlay another; in these cases, you
can only interact with the window on top. When you are finished in that window, it will disappear,
allowing you to continue working in the window underneath.
Page 64

54 Chapter 4. Installing Red Hat Enterprise Linux WS via Text Mode
• Text Input — text input lines are regions where you can enter information required by the installa-
tion program. When the cursor rests on a text input line, you may enter and/or edit information on
that line.
• Checkbox — checkboxes allow you to select or deselect a feature. The box displays either an
asterisk (selected) or a space (unselected). When the cursor is within a checkbox, press [Space] to
select an unselected feature or to deselect a selected feature.
• Text widget — text widgets are regions of the screen for the display of text. At times, text widgets
may also contain other widgets, such as checkboxes. If a text widget contains more information
than can be displayed in the space reserved for it, a scroll bar appears; if you position the cursor
within the text widget, you can then use the [Up] and [Down] arrow keys to scroll through all
the information available. Your current position is shown on the scroll bar by a # character, which
moves up and down the scroll bar as you scroll.
• Button widget — button widgets are the primary method of interacting with the installation pro-
gram. You progress through the windows of the installation program by navigating these buttons,
using the [Tab] and [Enter] keys. Buttons can be selected when they are highlighted.
• Cursor — although not a widget, the cursor is used to select (and interact) with a particular widget.
As the cursor is moved from widget to widget, it may cause the widget to change color, or you may
only see the cursor itself positioned in or next to the widget. In Figure 4-1, the cursor is positioned
on the OK button. Figure 4-2, shows the cursor on the Edit button.
4.2.1. Using the Keyboard to Navigate
Navigation through the installation dialogs is performed through a simple set of keystrokes. To move
the cursor, use [Left], [Right], [Up], and [Down] arrow keys. Use [Tab], and [Alt]-[Tab] to cycle
forward or backward through each widget on the screen. Along the bottom, most screens display a
summary of available cursor positioning keys.
To "press" a button, position the cursor over the button (using [Tab], for example) and press [Space]
or [Enter]. To select an item from a list of items, move the cursor to the item you wish to select and
press [Enter]. To select an item with a checkbox, move the cursor to the checkbox and press [Space]
to select an item. To deselect, press [Space] a second time.
Pressing [F12] accepts the current values and proceeds to the next dialog; it is equivalent to pressing
the OK button.
Caution
Unless a dialog box is waiting for your input, do not press any keys during the installation process
(doing so may result in unpredictable behavior).
4.3. Starting the Installation Program
The following methods can be used to start the installation:
• Insert a boot diskette that you have created into the primary diskette drive and reboot your computer.
• Insert the Red Hat Enterprise Linux WS CD 1 into the drive and reboot, if your computer can boot
from the CD-ROM drive.
While the installation program loads, messages will scroll on your screen. When the installation program has loaded, this prompt appears:
Page 65

Chapter 4. Installing Red Hat Enterprise Linux WS via Text Mode 55
boot:
4.3.1. Text Mode Boot Options
If you press [Enter] at the boot: prompt, or if you take no action within the first minute after the
boot: prompt appears, the graphical installation program will start. Pressing one of the help screen
function keys as described in Section 4.3.2 disables this autostart feature.
To start the text mode installation program, before pressing [Enter], type:
boot: text
If the installation program does not properly detect your hardware, you may need to restart the installation in "expert" mode. To start an expert mode installation, type:
boot: text expert
Expert mode disables most hardware probing, and gives you the option of entering options for the
drivers loaded during the installation.
Note
The initial boot messages will not contain any references to SCSI or network cards. This is normal;
these devices are supported by modules that are loaded during the installation process.
Note that the command to start a serial installation has changed. If you must perform the installation
in serial mode, use the following command:
boot: linux text console=
device
In this command,deviceshould be the device you are using (such as ttyS0 or ttyS1).
You can also pass options to the kernel as you are booting the installation program. For example, to
instruct the kernel to use all the RAM in a 128 MB system, enter:
boot: linux text mem=128M
4.3.2. Displaying Online Help
Once the installation program isloaded into memory, you can obtain information about the installation
process and options by pressing [F1] through [F6]. For example, press [F2] to see general information
about the online help screens.
4.4. Installation Cross-Reference Table
Note
This installation cross-reference table only documents the screens seen when performing a Workstation installation.
Page 66

56 Chapter 4. Installing Red Hat Enterprise Linux WS via Text Mode
Most text mode installation screens can be cross-referenced with the corresponding GUI screen. Table
4-1 lists the screens, in order, and gives section references for more information.
For those screens which do not have adequate GUI counterparts, installation-related instructions and
screenshots will be provided in this chapter.
Text Mode Screen Text Mode Reference Point
Language Screen Section 3.5
Installing from a Hard Disk Section 4.5
Installing over a Network Section 4.6
Mouse Selection Section 3.7
Welcome Screen Section 3.8
Installation Type Section 3.9
Disk Partitioning Setup Section 3.10
Automatic Partitioning Section 3.11
fdisk Section 3.13
Hostname Configuration Section 3.16
Firewall Configuration Section 3.17
Network Configuration Section 3.16
Language Support and Default Language Section 3.18
Time Zone Selection Section 3.19
Root Password Section 3.20
Add User/User Account Setup Section 3.20
Package Installation (Group, Individual,
Dependencies)
Video Card Configuration Section 3.26
Package Installation Section 3.23 and Section 3.24
Boot Disk Creation Section 3.25
Monitor Configuration Section 3.26.1
Custom X Configuration Section 3.26.2
Installation Complete Section 3.27
Table 4-1. Installation Cross-reference Table
Section 3.21
Page 67

Chapter 4. Installing Red Hat Enterprise Linux WS via Text Mode 57
4.5. Installing from a Hard Drive
Note
Hard drive installations only work from ext2, ext3, or FAT filesystems. If you have a filesystem other
than those listed here, such as reiserfs, you will not be able to perform a hard drive installation.
Hard drive installations require the use of the ISO (or CD-ROM) images rather than copying an entire
installation tree. After placing the required ISO images (the binary Red Hat Enterprise Linux WS
CD-ROMs) in a directory, choose to install from the hard drive. You will then point the installation
program at that directory to perform the installation.
Verifying that the ISO images are intact before you attempt an installation will help to avoid problems
that are often encountered during a hard drive installation. To verify the ISO images are intact prior
to performing an installation, use an md5sum program (many md5sum programs are available for
various operating systems). An md5sum program should be available on the same server as the ISO
images.
The Select Partition screen (Figure 4-3) applies only if you are installing from a disk partition (that
is, if you selected Hard Drive in the Installation Method dialog). This dialog allows you to name
the disk partition and directory from which you are installing Red Hat Enterprise Linux WS.
Enter the device name of the partition containing the Red Hat ISO images. There is also a field labeled
Directory holding images. If the ISO images are not in the root directory of that partition, enter the
path to the ISO images (for example, if the ISO images are in /test/new/RedHat, you would enter
/test/new).
After you have identified the disk partition, you will next see the Welcome dialog. See Table 4-1, for
more information.
Figure 4-3. Selecting Partition Dialog for Hard Drive Installation
Page 68

58 Chapter 4. Installing Red Hat Enterprise Linux WS via Text Mode
4.6. Installing over a Network
If you are performing a network installation, the Configure TCP/IP dialog appears; for an explanation
of this dialog, go to Section 3.16, and then return here.
4.6.1. Setting Up the Server
If you are not sure how to do this, refer to the Official Red Hat Linux Customization Guide and the
Official Red Hat Linux Reference Guide for more information.
4.6.2. NFS Setup
The NFS dialog (Figure 4-4) applies only if you are installing from an NFS server (if you booted from
a network or PCMCIA boot disks and selected NFS Image in the Installation Method dialog).
Figure 4-4. NFS Setup Dialog
Enter the fully-qualified domain name or IP address of your NFS server. For example, if you are installing from a host named eastcoast in the domain redhat.com, enter eastcoast.redhat.com
in the NFS Server field.
Next, enter the name of the exported directory. If you followed the setup described in Section 4.6, you
would enter the directory /location/of/disk/space/ which contains the RedHat directory.
If the NFS server is exporting a mirror of the Red Hat Enterprise Linux WS installation tree,
enter the directory which contains the RedHat directory. (If you do not know this directory
path, ask your system administrator.) For example, if your NFS server contains the directory
/mirrors/redhat/i386/RedHat, enter /mirrors/redhat/i386.
Next you will see the Welcome dialog. See Table 4-1, for more information.
Page 69

Chapter 4. Installing Red Hat Enterprise Linux WS via Text Mode 59
4.6.3. FTP Setup
The FTP dialog (Figure 4-5) applies only if you are installing from an FTP server (if you selected FTP
in the Installation Method dialog). This dialog allows you to identify the FTP server from which you
are installing Red Hat Enterprise Linux WS.
Figure 4-5. FTP Setup Dialog
Enter the name or IP address of the FTP site you are installing from, and the name of the directory
containing the RedHat installation files for your architecture. For example, if the FTP site contains
the directory /mirrors/redhat/i386/RedHat, enter /mirrors/redhat/i386.
If everything has been specified properly, a message box appears indicating that base/hdlist is
being retrieved.
Next you will see the Welcome dialog. See Table 4-1, for more information.
4.6.4. HTTP Setup
The HTTP dialog (Figure 4-6) applies only if you are installing from an HTTP server (if you selected
HTTP in the Installation Method dialog). This dialog prompts you for information about the HTTP
server from which you are installing Red Hat Enterprise Linux WS.
Page 70

60 Chapter 4. Installing Red Hat Enterprise Linux WS via Text Mode
Figure 4-6. HTTP Setup Dialog
Enter the name or IP address of the HTTP site you are installing from, and the name of the directory
there containing the RedHat installation files for your architecture. For example, if the HTTP site
contains the directory /mirrors/redhat/i386/RedHat, enter /mirrors/redhat/i386.>
If everything has been specified properly, a message box appears indicating that base/hdlist is
being retrieved.
Next you will see the Welcome dialog. See Table 4-1, for more information.
Page 71

II. Appendixes
Table of Contents
A. Removing Red Hat Enterprise Linux WS .................................................................................63
B. Getting Technical Support........................................................................................................... 65
C. Troubleshooting Your Installation of Red Hat Enterprise Linux WS ....................................69
D. An Introduction to Disk Partitions.............................................................................................77
E. Driver Disks ..................................................................................................................................93
Page 72

Page 73

Appendix A.
Removing Red Hat Enterprise Linux WS
To uninstall Red Hat Enterprise Linux WS from your system, you will need to remove the GRUB or
LILO information from your master boot record (MBR).
In DOS, NT, and Windows 95 you can use fdisk to create a new MBR with the "undocumented" flag
/mbr. This will ONLY rewrite the MBR to boot the primary DOS partition. The command should
look like the following:
fdisk /mbr
If you need to remove Linux from a hard drive, and have attempted to do this with the default DOS
fdisk, you will experience the "Partitions exist but they do not exist" problem. The best way to remove
non-DOS partitions is with a tool that understands partitions other than DOS.
You can do this with the installation media by typing linux expert at the boot: prompt:
boot: linux expert
Select install (versus upgrade) and at the point when you should partition the drive, choose fdisk.
In fdisk, type [p] to print out the partition numbers, and remove the Linux partitions with the [d]
command. When you are satisfied with the changes you have made, you can quit with a [w] and the
changes will be saved to disk. If you deleted too much, type [q] and no changes will be made.
Once you have removed the Linux partitions, you can reboot your computer using [Control]-[Alt][Delete] instead of continuing with the install.
Page 74

64 Appendix A. Removing Red Hat Enterprise Linux WS
Page 75

Appendix B.
Getting Technical Support
B.1. Remember to Sign Up
If you have an official edition of Red Hat Enterprise Linux WS 2.1 and/or an official Red Hat OEM
partner kit, please remember to sign up for the benefits you are entitled to as a Red Hat customer.
You will be entitled to any or all of the following benefits, depending upon the Official Red Hat
Enterprise Linux WS product you purchased:
• Official Red Hat support — Get help with your installation questions from the Red Hat support
team.
• Red Hat Network — Easily update your packages and receive security notices that are customized
for your system. Go to http://rhn.redhat.com for details.
• Under the Brim: The Official Red HatE-Newsletter — Everymonth, get the latest news and product
information directly from Red Hat.
To sign up, go to http://www.redhat.com/apps/activate/. You will find your Product ID on the Registration Information Card in your Official Red Hat Enterprise Linux WS boxed set.
B.2. An Overview of Red Hat Support
Note
Refer to the service level agreement at http://www.redhat.com/support/sla/ for more information on
how the Red Hat technical support staff can assist you.
Red Hat provides installation assistance for Official Red Hat Enterprise Linux WS products and covers
installation on a single computer. This assistance is intended to help customers successfully install
Red Hat Enterprise Linux WS. Assistance with installation is offered via telephone and the Web.
Note, telephone support is only available with certain Red Hat Enterprise Linux WS products. Please
check your to see what types of support are available to you.
Red Hat Support will attempt to answer any questions you may have before the installation process is
initiated. Depending on the product purchased, it can include the following:
• Hardware compatibility questions
• Basic hard drive partitioning strategies
Red Hat Support can provide the following assistance during the installation process:
• Getting supported hardware recognized by the Red Hat Enterprise Linux WS operating system
• Assistance with drive partitioning
We can also help you with basic post-installation tasks, such as:
Page 76

66 Appendix B. Getting Technical Support
• Successfully configuring the X Window System using Xconfigurator
• Configuring a local parallel port printer to print text
• Configuring a mouse
Our installation assistance service is designed to get Red Hat Enterprise Linux WS running on your
system as quickly and as easily as possible. However, there are many other things that you may want
to do with your Red Hat Enterprise Linux WS system, from compiling a custom kernel to setting up
a Web server, which are not covered.
For assistance with these tasks, there is a wealth of online information available in the form of
HOWTO documents, Linux-related websites, and commercial publications. The various Linux
HOWTO documents are included with Red Hat Enterprise Linux WS on the Documentation CD in
the /HOWTOS directory. These HOWTOS are provided in text files that can easily be read from within
Red Hat Enterprise Linux WS and other operating systems.
A large number of Linux-related websites are available. The best starting point for finding information
on Red Hat Enterprise Linux WS is the Red Hat, Inc. website:
http://www.redhat.com/
Many Linux-related books are available. If you are new to Linux, a book that covers Linux basics will
be invaluable. We can recommend several titles: The Official Red Hat Linux Getting Started Guide;
Using Linux, by Bill Ball; Linux Clearly Explained, by Bryan Pfaffenberger; Linux for Dummies, by
Jon "maddog" Hall; and Learning Red Hat Linux, by Bill McCarty.
Certain Red Hat Enterprise Linux WS products include additional support programs covering advanced configurations. Please see the Red Hat Support website for more information. The Red Hat
technical support website is located at the following URL:
http://www.redhat.com/support/
B.3. Scope of Red Hat Support
Red Hat, Inc. can only provide installation assistance to customers who have purchased an Official Red
Hat Enterprise Linux WS boxed set and/or an Official Red Hat OEM partner kit. If you have obtained
Linux from any other company, you must contact that company for support. Other companies include:
• Macmillan
• Sams/Que
• Linux Systems Labs (LSL)
• Mandrake
• CheapBytes
Additionally, Red Hat Enterprise Linux WS obtained via any of the following methods does not
qualify for support from Red Hat:
• Red Hat Enterprise Linux WS PowerTools Archive
• Downloaded via FTP on the Internet
• Included in a package such as Motif or Applixware
• Copied or installed from another user’s CD
• A CD-ROM (or CD-ROM set) included in a Linux book or other publication.
Page 77

Appendix B. Getting Technical Support 67
B.4. How to Get Technical Support
In order to receive technical support for your Official Red Hat product, you must register your product
on the Red Hat website.
Every Official Red Hat product comes with a Product Identification code: a 16-character alphanumeric
string. The Product ID for Red Hat Enterprise Linux WS 2.1is located on the Registration Information
Card that can be found inside the box. Your Product ID is included in your boxed set, and you should
keep it in a safe place. You need this code, so do not lose the card!
Note
Do not throw away the card with your Product ID. You need the Product ID to get technical support. If
you lose the certificate, you may not be able to receive support.
The Product ID is the code that will enable your technical support and any other benefits or services
that you purchased from Red Hat, depending upon which Red Hat product you purchased.
B.4.1. Signing up for Technical Support
To sign up for technical support, you will need to:
1. Create a customer profile at http://www.redhat.com/apps/activate/. You may have already completed this step; if you have, continue to the next step.
2. Using the login name and password you created during the customer profile, please log in at the
Red Hat Support website at http://www.redhat.com/support.
If you created a new customer profile, once you activate your product you will see a webpage
that shows your registered products. There is also a button, Access Web Support, on this page
that will take you to the support website.
3. Update your contact information if necessary.
Note
If your email address is not correct, communications regarding your technical support requests
CANNOT be delivered to you, and you will not be able to retrieve your login and password by
email. Be sure that you give us your correct email address.
If you are worried about your privacy, please see the Red Hat privacy statement at
http://www.redhat.com/legal/privacy_statement.html.
4. Add a product to your profile. Please enter the following information:
• The Product ID for your boxed set product
• The Support Certificate Number or Entitlement Number if the product is a contract
5. Set your customer preferences.
6. Answer the optional customer questionnaire.
7. Submit the form.
If the previous steps were completed successfully, you can now login at
http://www.redhat.com/support and open a new technical service request. However, you must still
use your Product ID in order to obtain technical support via telephone (if the product you purchased
Page 78

68 Appendix B. Getting Technical Support
came with phone support). You will also be asked for your login name when contacting the technical
support team via telephone.
B.5. Questions for Technical Support
Technical support is both a science and a mystical art form. In most cases, support technicians must
rely on customer observations and communications with the customer in order to diagnose and solve
the problem. Therefore, it is extremely important that you are as detailed and clear as possible when
you state your questions and report your problems. Examples of what you should include are:
• Symptoms of the problem (for example: "Linux is not able to access my CD-ROM drive. When it
tries, I get timeout errors.")
• When the problem began (for example: "My system was working fine until yesterday, when a
lightning storm hit my area.")
• Any changes you made to your system (for example: "I added a new hard drive and used Partition
Wizzo to add Linux partitions.")
• Other information that may berelevant to your situation, such as the installation method (CD-ROM,
NFS, HTTP)
• Specific hardware devices that may be relevant to your problem (for example: If you cannot setup
networking, what kind of network card do you have?)
Note
Refer to the service level agreement at http://www.redhat.com/support/sla/ for more information on
how the Red Hat technical support staff can assist you.
B.5.1. How to Send Support Questions
Please login at http://www.redhat.com/support and open a new service request, or call the phone
number for support. If your product came with phone support, or you have purchased a phone support
contract, the phone number you will need to call will be provided to you during the sign up process.
For more information on using the Red Hat online support system go to
http://www.redhat.com/support/services/access.html.
Page 79

Appendix C.
Troubleshooting Your Installation of Red Hat
Enterprise Linux WS
This appendix discusses some common installation problems and their solutions.
C.1. You are Unable to Boot Red Hat Enterprise Linux WS
C.1.1. Is Your System Displaying Signal 11 Errors?
If you receive a fatal signal 11 during your installation, it is probably due to a hardware error in
memory on your system’s bus. A hardware error in memory can be caused by problems in executables
or with the system’s hardware. Like other operating systems, Red Hat Enterprise Linux WS places
its own demands on your system’s hardware. Some of this hardware may not be able to meet those
demands, even if they work properly under another OS.
Check to see if you have the latest installation and supplemental boot diskettes from Red Hat. Review
the online errata to see if newer versions are available. If the latest images still fail, it may be due to a
problem with your hardware. Commonly, these errors are in your memory or CPU-cache. A possible
solution for this error is turning off the CPU-cache in the BIOS. You could also try to swap your
memory around in the motherboard slots to see if the problem is either slot or memory related.
For more information concerning signal 11 errors, refer to http://www.bitwizard.nl/sig11/.
C.1.2. Are You Unable to Boot from a Network Boot Disk?
If you are experiencing difficulties in getting the network boot disk you made to boot your system
correctly, you may need an updated boot disk.
Check the online errata for updated diskette images (if available) and follow the instructions provided
to make an updated boot disk for your system.
C.1.3. Are You Unable to Boot With Your RAID Card?
If you have performed an installation and cannot boot your system properly, you may need to reinstall
and create your partitions differently.
Some BIOSes do not support booting from RAID cards. At the end of an installation, a text-based
screen showing the boot loader prompt (for example, GRUB:) and a flashing cursor may be all that
appears. If this is the case, you will need to repartition your system.
Whether you choose automatic or manual partitioning, you will need to install your /boot partition
outside of the RAID array, such as on a separate hard drive. An internal hard drive is necessary to use
for partition creation with problematic RAID cards.
You must also install your preferred boot loader (GRUB or LILO) outside of the RAID array — not
on the MBR. The boot loader should be installed on the MBR of the same drive as the /boot partition
was created.
Once these changes have been made, you should be able to finish your installation and boot the system
properly.
Page 80

70 Appendix C. Troubleshooting Your Installation of Red Hat Enterprise Linux WS
C.2. Trouble Beginning the Installation
C.2.1. Is Your Mouse Not Detected?
If the Mouse Not Detected screen (see Figure C-1) appears, then the installation program was not
able to identify your mouse correctly.
You can choose to continue with the GUI installation or use the text mode installation, which does not
require using a mouse. If you choose to continue with the GUI installation, you will need to provide
the installation program with your mouse configuration information (see Figure 3-3).
Figure C-1. Mouse Not Detected
For an overview of text mode installation instructions, please refer to Chapter 4.
C.2.2. Problems with Booting into the Graphical Installation
The Red Hat Enterprise Linux WS installation program uses frame buffers by default. However, there
are some video cards that will not work with this setting. The end result will be a problem booting
into the graphical installation program.
The installation program will first try to run in frame buffer mode. If that fails, it will try to run in a
lower resolution mode. If that still fails, the installation program will run in text mode.
Users who have video cards that will not run at 800 x 600 resolution should type lowres at the
boot: prompt to run the installation program in 640 x 480 resolution.
If this still does not work, you can run the installation program without frame buffers by typing nofb
at the boot: prompt.
Page 81

Appendix C. Troubleshooting Your Installation of Red Hat Enterprise Linux WS 71
C.3. Trouble During the Installation
C.3.1. Partition Creation Problems
If you are having trouble creating a partition (for example, a root (/) partition), make sure you are
setting its partition type to Linux Native.
Unless your BIOS supports otherwise, make sure /boot does not exceed the 1023 cylinder head.
If you do not, the installation program will not allow you to create a /boot or / partition. Some
new systems allow you to exceed the 1023 limit (with GRUB and the newer LILO versions that are
available), but most machines with older BIOS will not.
C.3.2. Using Remaining Space
You have a swap and a / (root) partition created, and you have selected the root partition to use the
remaining space, but it does not fill the hard drive.
If your hard drive is more than 1024 cylinders, you must create a /boot partition if you want the /
(root) partition to use all of the remaining space on your hard drive.
C.3.3. Other Partitioning Problems
If you are using Disk Druid to create partitions, but cannot move to the next screen, you probably
have not created all the partitions necessary for Disk Druid’s dependencies to be satisfied.
You must have the following partitions as a bare minimum:
• A /boot partition of type Linux native
• A / (root) partition of type Linux native
• A
swappartition of type Linux swap
Tip
When defining a partition’s type as Linux swap, you do not have to assign it a mount point. Disk
Druid automatically assigns the mount point for you.
C.3.4. Are You Seeing Python Errors?
During some installations of Red Hat Enterprise Linux WS, the installation program (also known as
Anaconda) may fail with a Python or traceback error. This error may occur after the selection of
individual packages or while trying to save the upgrade log in /tmp. The error may look similar to:
Traceback (innermost last):
File "/var/tmp/anaconda-7.1//usr/lib/anaconda/iw/progress_gui.py",
line 20, in run
rc = self.todo.doInstall ()
File "/var/tmp/anaconda-7.1//usr/lib/anaconda/todo.py", line 1468, in
doInstall
self.fstab.savePartitions ()
File "fstab.py", line 221, in savePartitions
sys.exit(0)
SystemExit: 0
Page 82

72 Appendix C. Troubleshooting Your Installation of Red Hat Enterprise Linux WS
Local variables in innermost frame:
self:
sys:module ’sys’ (built-in)
ToDo object:
(itodo
ToDo
p1
(dp2
S’method’
p3
(iimage
CdromInstallMethod
p4
(dp5
S’progressWindow’
p6
fstab.GuiFstab instance at 8446fe0
failed
This error occurs in some systems where links to /tmp are symbolic to other locations or have been
changed since creation. These symbolic or changed links are invalid during the installation process,
so the installation program cannot write information and fails.
If you experience such an error, first try to download any available errata for Anaconda. Errata can
be found at http://www.redhat.com/support/errata.
You can also search for bug reports related to this problem. To search the Red Hat bug tracking system,
go to http://bugzilla.redhat.com/bugzilla.
Finally, if you are still facing problems related to this error, register your product and contact our
support team. To register your product, go to http://www.redhat.com/apps/activate.
C.4. Problems After Installation
C.4.1. Trouble With the Graphical GRUB Screen?
If, for some reason, you need to disable the graphical boot screen, you can do so, as root, by editing
the /boot/grub/grub.conf file and then rebooting your system.
Todo this,comment out the line which begins with splashimage in the grub.conf file. To comment
out a line, insert the ; character at the beginning of the line.
Once you reboot, the grub.conf file will be reread and your changes will take place.
You may re-enable the graphical boot screen by uncommenting (or adding) the above line back into
the grub.conf file and rebooting.
C.4.2. Trouble With the Graphical LILO Screen?
If, for some reason, you need to disable the graphical boot screen, you can do so, as root, by editing
the /etc/lilo.conf file and then rerunning LILO.
First, as root, comment out (or delete) the line which reads message=/boot/message in the
/etc/lilo.conf file. To comment out a line, insert the ; character at the beginning of the line.
Next, rerun LILO by typing /sbin/lilo -v. The next time you boot, you will see the text LILO:
prompt, as used in previous Red Hat Enterprise Linux WS releases.
Page 83

Appendix C. Troubleshooting Your Installation of Red Hat Enterprise Linux WS 73
You may re-enable the graphical boot screen by adding the above line back into the lilo.conf file
and rerunning LILO.
C.4.3. Problems with Server Installations and X
If you performed a server installation and you are having trouble getting X to start, you may not have
installed the X Window System during your installation.
If you want the X Window System, you can perform an upgrade to install X. During the upgrade,
select the X Window System packages, and choose GNOME, KDE, or both.
Alternatively, you can install the XFree86 RPMs. For more information, refer to
http://www.redhat.com/support/docs/howto/XFree86-upgrade/XFree86-upgrade.html.
C.4.4. Problems When You Try to Log In
If you did not create a user account during the installation you will need to log in as root and use the
password you assigned to root.
If you cannot remember your root password, you will need to boot your system as linux single at
the LILO boot: or GRUB prompt. Then at the # prompt, you will need to type passwd root, which
will allow you to enter a new password for root. At this point you can type shutdown -r now and
the system will reboot with your new password.
If you cannot remember your user account password, you must become root. To become root, type su
- and enter your root password when prompted. Then, type passwd
to enter a new password for the specified user account.
If you selected either the Custom or Workstation installation and do not see the graphical login screen,
check your hardware for compatibility issues. The Hardware Compatibility List can be found at
http://hardware.redhat.com/hcl/.
username
. This allows you
C.4.5. Does Netscape Navigator Crash on JavaScript Pages?
If Netscape Navigator continuously crashes on pages that contain JavaScripts, you may need to edit
your ~/.mailcap file.
Edit the file using pico by typing pico ~/.mailcap at the prompt in a terminal window. (You may
use any text editor.)
Remove the following lines from the file:
application/x-javascript;;\
x-mozilla-flags=save
You can also turn off JavaScript within Netscape Navigator itself. Click on
Edit=>Preferences=>Advanced and make sure the Enable JavaScript checkbox is not selected.
If these do not help, you can also try to use a newer version of Netscape Navigator if available. Check
the Red Hat Enterprise Linux WS errata website under security advisories for more information.
C.4.6. Your Printer Will Not Work Under X
If you are not sure how to set up your printer or are having trouble getting it to work properly, try using
the graphical printconf program. Log in as root, open a terminal window, and type printconf-gui.
Page 84

74 Appendix C. Troubleshooting Your Installation of Red Hat Enterprise Linux WS
C.4.7. Is Your RAM Not Being Recognized?
Sometimes, the kernel does not recognize all of your memory (RAM). You can check this with the
following command:
cat /proc/meminfo
Find out if the displayed quantity is the same as the known amount of RAM in your system. If they
are not equal, add the following line to the /boot/grub/grub.conf or /etc/lilo.conf file,
depending on the boot loader you installed:
append="mem=xxM"
Replace xx with the amount of RAM you have in megabytes. Remember that per-image append
lines completely overwrite the global append line. It might be worth adding this to the per-image
descriptions, as shown in this example:
append="mem=128M"
In /boot/grub/grub.conf, the above example would look similar to the following:
#NOTICE: You have a /boot partition. This means that
# all kernel paths are relative to /boot/
default=0
timeout=30
splashimage=(hd0,0)/grub/splash.xpm.gz
title Red Hat Linux (2.4.6-2)
Once you reboot, the changes made to grub.conf will be reflected on your system.
In /etc/lilo.conf, the above example would look similar to the following:
boot=/dev/sda
Remember to run /sbin/lilo -v after changing /etc/lilo.conf.
Note that you can also produce the same effect by actually passing this option whenyou are specifying
the label/image to use in GRUB or LILO. For example if you had a label named linux, at the boot
loader menu you could type:
linux mem=xxM
Remember to replace xx with the amount of RAM in your system.
root (hd0,0)
kernel /vmlinuz-2.2.6-2 ro root=/dev/hda3
append="mem=128M"
map=/boot/map
install=/boot/boot.b
prompt
timeout=50
image=/boot/vmlinuz-2.2.12-20
label=linux
root=/dev/sda1
initrd=/boot/initrd-2.2.12-20.img
read-only
append="mem=128M"
Page 85

Appendix C. Troubleshooting Your Installation of Red Hat Enterprise Linux WS 75
C.4.8. Problems with Sound Configuration
If you do not have sound after your installation, you may need to run the sound configuration utility.
As root, type sndconfig in a terminal window.
Note
sndconfig must be run in runlevel 3. More information about runlevels can be found in the Official
Red Hat Linux Reference Guide, in chapter Boot Process, Init, and Shutdown.
If the sndconfig application does not help, you may need to select the Enable sound server
startup option under the Multimedia=>Sound in the GNOME Control Center.
To do this, click on Panel=>Programs=>Settings=>GNOME Control Center to launch the
GNOME Control Center. In the GNOME Control Center, select the Sound submenu of the
Multimedia menu. On the right, a General sound menu will appear. Select Enable sound
server startup and then click OK.
Page 86

76 Appendix C. Troubleshooting Your Installation of Red Hat Enterprise Linux WS
Page 87

Appendix D.
An Introduction to Disk Partitions
Disk partitions are a standard part of the personal computer landscape and have been for quite some
time. However, with many people purchasing computers featuring preinstalled operating systems,
relatively few people understand how partitions work. This chapter attempts to explain the reasons
for and use of disk partitions so the Red Hat Enterprise Linux WS installation will be as simple and
painless as possible.
If you are reasonably comfortable with disk partitions, you could skip ahead toSection D.1.4, for more
information on the process of freeing up disk space to prepare for a Red Hat Enterprise Linux WS
installation. This section also discusses the partition naming scheme used by Linux systems, sharing
disk space with other operating systems, and related topics.
D.1. Hard Disk Basic Concepts
Hard disks perform a very simple function — they store data and reliably retrieve it on command.
When discussing issues such as disk partitioning, it is important to know a bit about the underlying
hardware. Unfortunately, it is easy to become bogged down in details. Therefore, we will use a simplified diagram of a disk drive to help explain what is really happening when a disk drive is partitioned.
Figure D-1, shows a brand-new, unused disk drive.
Figure D-1. An Unused Disk Drive
Not much to look at, is it? But if we are talking about disk drives on a basic level, it will do. Say
that we would like to store some data on this drive. As things stand now, it will not work. There is
something we need to do first. ..
Page 88

78 Appendix D. An Introduction to Disk Partitions
D.1.1. It is Not What You Write, it is How You Write It
Experienced computer users probably got this one on the first try. We need to format the drive. Formatting (usually known as "making a filesystem") writes information to the drive, creating order out
of the empty space in an unformatted drive.
Figure D-2. Disk Drive with a Filesystem
As Figure D-2, implies, the order imposed by a filesystem involves some trade-offs:
• A small percentage of the drive’s available space is used to store filesystem-related data and can be
considered as overhead.
• A filesystem splits the remaining space into small, consistently-sized segments. For Linux, these
segments are known as blocks.
1
Given that filesystems make things like directories and files possible, these tradeoffs are usually seen
as a small price to pay.
It is also worth noting that there is no single, universal filesystem. As Figure D-3, shows, a disk
drive may have one of many different filesystems written on it. As you might guess, different filesystems tend to be incompatible; that is, an operating system that supports one filesystem (or a handful
of related filesystem types) may not support another. This last statement is not a hard-and-fast rule,
however. For example, Red Hat Enterprise Linux WS supports a wide variety of filesystems (including many commonly used by other operating systems), making data interchange between different
filesystems easy.
1. Blocks really are consistently sized, unlike our illustrations. Keep in mind, also, that an average disk drive
contains thousands of blocks. But for the purposes of this discussion, please ignore these minor discrepancies.
Page 89

Appendix D. An Introduction to Disk Partitions 79
Figure D-3. Disk Drive with a Different Filesystem
Of course, writing a filesystem to disk is only the beginning. The goal of this process is to actually
store and retrieve data. Let us take a look at our drive after some files have been written to it.
Figure D-4. Disk Drive with Data Written to It
As Figure D-4 shows, 14 of the previously-empty blocks are now holding data. However, by simply
looking at this picture, we cannot determine exactly how many files reside on this drive. There may
be as few as one or as many as 14 files, as all files use at least one block and some files use multiple
blocks. Another important point to note is that the used blocks do not have to form a contiguous
region; used and unused blocks may be interspersed. This is known as fragmentation. Fragmentation
can play a part when attempting to resize an existing partition.
Page 90

80 Appendix D. An Introduction to Disk Partitions
As with most computer-related technologies, disk drives changed over time after their introduction. In
particular, they got bigger. Not larger in physical size, but bigger in their capacity to store information.
And, this additional capacity drove a fundamental change in the way disk drives were used.
D.1.2. Partitions: Turning One Drive Into Many
As disk drive capacities soared, some people began to wonder if having all of that formatted space
in one big chunk was such a great idea. This line of thinking was driven by several issues, some
philosophical, some technical. On the philosophical side, above a certain size, it seemed that the additional space provided by a larger drive created more clutter. On the technical side, some filesystems
were never designed to support anything above a certain capacity. Or the filesystems could support
larger drives with a greater capacity, but the overhead imposed by the filesystem to track files became
excessive.
The solution to this problem was to divide disks into partitions. Each partition can be accessed as if it
was a separate disk. This is done through the addition of a partition table.
Note
While the diagrams in this chapter show the partition table as being separate from the actual disk
drive, this is not entirely accurate. In reality, the partition table is stored at the very start of the disk,
before any filesystem or user data. But for clarity, we will keep it separate in our diagrams.
Figure D-5. Disk Drive with Partition Table
As Figure D-5 shows, the partition table is divided into four sections. Each section can hold the
information necessary to define a single partition, meaning that the partition table can define no more
than four partitions.
Each partition table entry contains several important characteristics of the partition:
• The points on the disk where the partition starts and ends
• Whether the partition is "active"
• The partition’s type
Page 91

Appendix D. An Introduction to Disk Partitions 81
Let us take a closer look at each of these characteristics. The starting and ending points actually define
the partition’s size and location on the disk. The "active" flag is used by some operating systems’ boot
loaders. In other words, the operating system in the partition that is marked "active" will be booted.
The partition’s type can be a bit confusing. The type is a number that identifies the partition’s anticipated usage. If that statement sounds a bit vague, that is because the meaning of the partition type
is a bit vague. Some operating systems use the partition type to denote a specific filesystem type, to
flag the partition as being associated with a particular operating system, to indicate that the partition
contains a bootable operating system, or some combination of the three.
Table D-1, contains a listing of some popular (and obscure) partition types, along with their numeric
values.
Partition Type Value Partition Type Value
Empty 00 Novell Netware 386 65
DOS 12-bit FAT 01 PIC/IX 75
XENIX root 02 Old MINIX 80
XENIX usr 03 Linux/MINUX 81
DOS 16-bit=32M 04 Linux swap 82
Extended 05 Linux native 83
DOS 16-bit=32 06 Linux extended 85
OS/2 HPFS 07 Amoeba 93
AIX 08 Amoeba BBT 94
AIX bootable 09 BSD/386 a5
OS/2 Boot Manager 0a OpenBSD a6
Win95 FAT32 0b NEXTSTEP a7
Win95 FAT32 (LBA) 0c BSDI fs b7
Win95 FAT16 (LBA) 0e BSDI swap b8
Win95 Extended (LBA) 0f Syrinx c7
Venix 80286 40 CP/M db
Novell 51 DOS access e1
Microport 52 DOS R/O e3
GNU HURD 63 DOS secondary f2
Novell Netware 286 64 BBT ff
Table D-1. Partition Types
By this point, you might be wondering how all this additional complexity is normally used. See Figure
D-6, for an example.
Page 92

82 Appendix D. An Introduction to Disk Partitions
Figure D-6. Disk Drive With Single Partition
In many cases, there is only a single partition spanning the entire disk, essentially duplicating the
method used before partitions. The partition table has only one entry used, and it points to the start of
the partition.
We have labeled this partition as being of the "DOS" type. Although it is only one of several possible partition types listed in Table D-1, it is adequate for the purposes of this discussion. This is a
typical partition layout for most newly purchased computers with a consumer version of Microsoft
Windows™ preinstalled.
D.1.3. Partitions within Partitions — An Overview of Extended Partitions
Of course, over time it became obvious that four partitions would not be enough. As disk drives
continued to grow, it became more and more likely that a person could configure four reasonablysized partitions and still have disk space left over. There needed to be some way of creating more
partitions.
Enter the extended partition. As you may have noticed in Table D-1, there is an "Extended" partition
type. It is this partition type that is at the heart of extended partitions.
When a partition is created and its type is set to "Extended," an extended partition table is created. In
essence, the extended partition is like a disk drive in its own right — it has a partition table that points
to one or more partitions (now called logical partitions, as opposed to the four primary partitions)
contained entirely within the extended partition itself. Figure D-7, shows a disk drive with one primary
partition and one extended partition containing two logical partitions (along with some unpartitioned
free space).
Page 93

Appendix D. An Introduction to Disk Partitions 83
Figure D-7. Disk Drive With Extended Partition
As this figure implies, there is a difference between primary and logical partitions — there can only
be four primary partitions, but there is no fixed limit to the number of logical partitions that can exist.
(However, in reality, it is probably not a good idea to try to define and use more than 12 logical
partitions on a single disk drive.)
Now that we have discussed partitions in general, let us see how to use this knowledge to install Red
Hat Enterprise Linux WS.
D.1.4. Making Room For Red Hat Enterprise Linux WS
There are three possible scenarios you may face when attempting to repartition your hard disk:
• Unpartitioned free space is available
• An unused partition is available
• Free space in an actively used partition is available
Let us look at each scenario in order.
Note
Please keep in mind that the following illustrations are simplified in the interest of clarity and do not
reflect the exact partition layout that you will encounter when actually installing Red Hat Enterprise
Linux WS.
D.1.4.1. Using Unpartitioned Free Space
In this situation, the partitions already defined do not span the entire hard disk, leaving unallocated
space that is not part of any defined partition. Figure D-8 shows what this might look like.
Page 94

84 Appendix D. An Introduction to Disk Partitions
Figure D-8. Disk Drive with Unpartitioned Free Space
When you think about it, an unused hard disk also falls into this category. The only difference is that
all the space is not part of any defined partition.
In any case, you can simply create the necessary partitions from the unused space. Unfortunately, this
scenario, although very simple, is not very likely (unless you have just purchased a new disk just for
Red Hat Enterprise Linux WS). Most pre-installed operating systems are configured to take up all
available space on a disk drive (see Section D.1.4.3).
Next, we will discuss a slightly more common situation.
D.1.4.2. Using Space from an Unused Partition
In this case, maybe you have one or more partitions that you do not use any longer. Perhaps you have
dabbled with another operating system in the past, and the partition(s) you dedicated to it never seem
to be used anymore. Figure D-9, illustrates such a situation.
Figure D-9. Disk Drive With an Unused Partition
If you find yourself in this situation, you can use the space allocated to the unused partition. You will
first need to delete the partition, and then create the appropriate Linux partition(s) in its place. You
can either delete the partition using the DOS fdisk command, or you will be given the opportunity
to do so during a custom installation.
Page 95

Appendix D. An Introduction to Disk Partitions 85
D.1.4.3. Using Free Space from an Active Partition
This is the most common situation. It is also, unfortunately, the hardest to handle. The main problem
is that, even if you have enough free space, it is presently allocated to a partition that is already in use.
If you purchased a computer with pre-installed software, the hard disk most likely has one massive
partition holding the operating system and data.
Aside from adding a new hard drive to your system, you have two choices:
Destructive Repartitioning
Basically, you delete the single large partition and create several smaller ones. As you might
imagine, any data you had in the original partition is destroyed. This means that making a complete backup is necessary. For your own sake, make two backups, use verification (if available in
your backup software), and try to read data from your backup before you delete the partition.
Caution
If there was an operating system of some type installed on that partition, it will need to be
reinstalled as well. Be aware that some computers sold with pre-installed operating systems
may not include the CD-ROM media to reinstall the original operating system. The best time to
notice if this applies to your system is before you destroy your original partition and its operating
system installation.
After creating a smaller partition for your existing software, you can reinstall any software, restore your data, and continue your Red Hat Enterprise Linux WS installation. Figure D-10 shows
this being done.
Figure D-10. Disk Drive Being Destructively Repartitioned
Caution
As Figure D-10 shows, any data present in the original partition will be lost without proper
backup!
Non-Destructive Repartitioning
Here, you run a program that does the seemingly impossible: it makes a big partition smaller
without losing any of the files stored in that partition. Many people have found this method to be
reliable and trouble-free. What software should you use to perform this feat? There are several
disk management software products on the market. You will have to do some research to find the
one that is best for your situation.
Page 96

86 Appendix D. An Introduction to Disk Partitions
While the process of non-destructive repartitioning is rather straightforward, there are a number
of steps involved:
• Compress existing data
• Resize the existing partition
• Create new partition(s)
Next we will look at each step in a bit more detail.
D.1.4.3.1. Compress existing data
As Figure D-11 shows, the first step is to compress the data in your existing partition. The reason for
doing this is to rearrange the data such that it maximizes the available free space at the "end" of the
partition.
Figure D-11. Disk Drive Being Compressed
This step is crucial. Without it, the location of your data could prevent the partition from being resized
to the extent desired. Note also that, for one reason or another, some data cannot be moved. If this is
the case (and it severely restricts the size of your new partition(s)), you may be forced to destructively
repartition your disk.
D.1.4.3.2. Resize the existing partition
Figure D-12 shows the actual resizing process. While the actual result of the resizing operation varies
depending on the software used, in most cases the newly freed space is used to create an unformatted
partition of the same type as the original partition.
Page 97

Appendix D. An Introduction to Disk Partitions 87
Figure D-12. Disk Drive with Partition Resized
It is important to understand what the resizing software you use does with the newly freed space, so
that you can take the appropriate steps. In the case we have illustrated, it would be best to simply
delete the new DOS partition and create the appropriate Linux partition(s).
D.1.4.3.3. Create new partition(s)
As the previous step implied, it may or may not be necessary to create new partitions. However, unless
your resizing software is Linux-aware, it is likely you will need to delete the partition that was created
during the resizing process. Figure D-13 shows this being done.
Figure D-13. Disk Drive with Final Partition Configuration
Note
The following information is specific to Intel-based computers only.
As a convenience to Red Hat Enterprise Linux WS users, the DOS fips utility is included on the Red
Hat Linux/x86 CD 1 in the dosutils directory. This is a freely available program that can resize FAT
(File Allocation Table) partitions.
Page 98

88 Appendix D. An Introduction to Disk Partitions
Warning
Many people have successfully used fips to resize their hard drive partitions. However, because
of the nature of the operations carried out by fips and the wide variety of hardware and software
configurations under which it must run, Red Hat cannot guarantee that fips will work properly on
your system. Therefore, no installation support is available for fips. Use it at your own risk.
That said, if you decide to repartition your hard drive with fips, it is vital that you do two things:
• Perform a backup — Make two copies of all the important data on your computer. These copies
should be to removable media (such as tape or diskettes), and you should make sure they are readable before proceeding.
• Read the documentation — Completely read the fips documentation, located in the
dosutils/fipsdocs subdirectory on Red Hat Linux/x86 CD 1.
Should you decide to use fips, be aware that after fips runs you will be left with two partitions: the
one you resized, and the one fips created out of the newly freed space. If your goal is to use that
space to install Red Hat Enterprise Linux WS, you should delete the newly created partition, either
by using fdisk under your current operating system or while setting up partitions during a custom
installation.
D.1.5. Partition Naming Scheme
Linux refers to disk partitions using a combination of letters and numbers which may be confusing,
particularly if you are used to the "C drive" way of referring to hard disks and their partitions. In the
DOS/Windows world, partitions are named using the following method:
• Each partition’s type is checked to determine if it can be read by DOS/Windows.
• If the partition’s type is compatible, it is assigned a "drive letter." The drive letters start with a "C"
and move on to the following letters, depending on the number of partitions to be labeled.
• The drive letter can then be used to refer to that partition as well as the filesystem contained on that
partition.
Red Hat Enterprise Linux WS uses a naming scheme that is more flexible and conveys more information than the approach used by other operating systems. The naming scheme is file-based, with
filenames in the form:
/dev/xxy N
Here is how to decipher the partition naming scheme:
/dev/
This string is the name of the directory in which all device files reside. Since partitions reside
on hard disks, and hard disks are devices, the files representing all possible partitions reside in
/dev/.
xx
The first two letters of the partition name indicate the type of device on which the partition
resides. You will normally see either hd (for IDE disks) or sd (for SCSI disks).
Page 99

Appendix D. An Introduction to Disk Partitions 89
y
This letter indicates which device the partition is on. For example, /dev/hda (the first IDE hard
disk) or /dev/sdb (the second SCSI disk).
N
The final number denotes the partition. The first four (primary or extended) partitions are numbered 1 through 4. Logical partitions start at 5. So, for example, /dev/hda3 is the third primary
or extended partition on the first IDE hard disk, and /dev/sdb6 is the second logical partition
on the second SCSI hard disk.
Note
There is no part of this naming convention that is based on partition type; unlike DOS/Windows, all
partitions can be identified under Red Hat Enterprise Linux WS. Of course, this does not mean that
Red Hat Enterprise Linux WS can access data on every type of partition, but in many cases it is
possible to access data on a partition dedicated to another operating system.
Keep this information in mind; it will make things easier to understand when you are setting up the
partitions Red Hat Enterprise Linux WS requires.
D.1.6. Disk Partitions and Other Operating Systems
If your Red Hat Enterprise Linux WS partitions will be sharing a hard disk with partitions used by
other operating systems, most of the time you will have no problems. However, there are certain
combinations of Linux and other operating systems that require extra care. Information on creating
disk partitions compatible with other operating systems is available in several HOWTOs and MiniHOWTOs, available on the Red Hat Enterprise Linux WS Documentation CD in the HOWTO and
HOWTO/mini directories. In particular, the Mini-HOWTOs whose names start with Linux+ are quite
helpful.
D.1.7. Disk Partitions and Mount Points
One area that many people new to Linux find confusing is the matter of how partitions are used and
accessed by the Linux operating system. In DOS/Windows, it is relatively simple: Each partition gets
a "drive letter." You then usethe correct drive letter to refer to files and directories on its corresponding
partition.
This is entirely different from how Linux deals with partitions and, for that matter, with disk storage
in general. The main difference is that each partition is used to form part of the storage necessary to
support a single set of files and directories. This is done by associating a partition with a directory
through a process known as mounting. Mounting a partition makes its storage available starting at the
specified directory (known as a mount point).
For example, if partition /dev/hda5 were mounted on /usr, that would mean that all
files and directories under /usr would physically reside on /dev/hda5. So the file
/usr/share/doc/FAQ/txt/Linux-FAQ would be stored on /dev/hda5, while the file
/etc/X11/gdm/Sessions/Gnome would not.
Continuing our example, it is also possible that one or more directories below /usr would be
mount points for other partitions. For instance, a partition (say, /dev/hda7) could be mounted on
/usr/local, meaning that /usr/local/man/whatis would then reside on /dev/hda7 rather
than /dev/hda5.
Page 100

90 Appendix D. An Introduction to Disk Partitions
D.1.8. How Many Partitions?
At this point in the process of preparing to install Red Hat Enterprise Linux WS, you will need to give
some consideration to the number and size of the partitions to be used by your new operating system.
The question of "how many partitions" continues to spark debate within the Linux community and,
without any end to the debate in sight, it is safe to say that there are probably as many partition layouts
as there are people debating the issue.
Keeping this in mind, we recommend that, unless you have a reason for doing otherwise, you should
at least create the following partitions:
• A swap partition — Swap partitions are used to support virtual memory. In other words, data is
written to swap when there is not RAM to hold the data your system is processing. You must create
a swap partition to correctly use Red Hat Enterprise Linux WS. The minimum size of your swap
partition should be equal to twice the amount of your computer’s RAM or 32 MB, whichever is
larger.
• A /boot partition — The partition mounted on /boot contains the operating system kernel (which
allows your system to boot Red Hat Enterprise Linux WS), along with a few other files used during
the bootstrap process.
Caution
Make sure you read Section D.1.9 — the information there applies to the /boot partition!
Due to the limitations of most PC BIOSes, creating a small partition to hold these files is a good
idea. For most users, a 32 MB boot partition is sufficient.
• A root partition (/) — The root partition is where / (the root directory) resides. In this partitioning
layout, all files (except those stored in /boot) reside on the root partition. Because of this, it is in
your best interest to maximize the size of your root partition. A 1.0GB root partition will permit the
equivalent of a Workstation installation (with very little free space), while a 3.2 GB root partition
will let you install every package. Obviously, the more space you can give the root partition, the
better.
Specific recommendations concerning the proper size for various Red Hat Enterprise Linux WS partitions can be found in Section 1.5.
D.1.9. One Last Wrinkle: Using GRUB or LILO
GRUB and LILO are the most commonly used methods to boot Red Hat Enterprise Linux WS onIntelbased systems. As operating system loaders, they operate "outside" of any operating system, using
only the Basic I/O System (or BIOS) built into the computer hardware itself. This section describes
GRUB and LILO’s interactions with PC BIOSes and is specific to Intel-compatible computers.
D.1.9.1. BIOS-Related Limitations Impacting GRUB and LILO
GRUB and LILO are subject to some limitations imposed by the BIOS in most Intel-based computers.
Specifically, most BIOSes cannot access more than two hard drives, and they cannot access any data
stored beyond cylinder 1023 of any drive. Note that some recent BIOSes do not have these limitations,
but this is by no means universal.
All the data GRUB and LILO need to access at boot time (including the Linux kernel) is located in the
/boot directory. If you follow the partition layout recommended above or are performing a Red Hat
Enterprise Linux WS install, the /boot directory will be in a small, separate partition. Otherwise, it
may reside in the root partition (/). In either case, the partition in which /boot resides must conform
to the following guidelines if you are going to use GRUB or LILO to boot your Red Hat Enterprise
Linux WS system:
 Loading...