

Red Hat DIRECTORY SERVER 8.1 - USING THE ADMIN SERVER, Directory Server 8.1 Using Instructions
Page 1

Red Hat Directory
Server 8.1
Using the Admin Server
with Red Hat Directory Server
Ella Deon Lackey
Page 2

Using the Admin Server
Red Hat Directory Server 8.1 Using the Admin Server
with Red Hat Directory Server
Edition 8.1.1
Author Ella Deon Lackey
Copyright © 2009 Red Hat, Inc.
Copyright © 2009 Red Hat, Inc.. This material may only be distributed subject to the terms and
conditions set forth in the Open Publication License, V1.0 or later (the latest version of the OPL is
presently available at http://www.opencontent.org/openpub/).
Red Hat and the Red Hat "Shadow Man" logo are registered trademarks of Red Hat, Inc. in the United
States and other countries.
All other trademarks referenced herein are the property of their respective owners.
1801 Varsity Drive
Raleigh, NC 27606-2072 USA
Phone: +1 919 754 3700
Phone: 888 733 4281
Fax: +1 919 754 3701
PO Box 13588 Research Triangle Park, NC 27709 USA
The Admin Server is a support server which drives access to the Directory Server Console, provides
a web server for Directory Server web applications, and stores some Directory Server configuration.
This guide covers how to manage the Admin Server through the Console, through the command line,
and through the web services, along with covering basic Admin Server concepts.
Page 3

iii
Preface v
1. Examples and Formatting ................................................................................................ v
1.1. Command and File Examples ............................................................................... v
1.2. Tool Locations ...................................................................................................... v
1.3. LDAP Locations ................................................................................................... v
1.4. Text Formatting and Styles ................................................................................... v
2. Additional Reading ......................................................................................................... vi
3. Giving Feedback ............................................................................................................ vii
4. Documentation History .................................................................................................. viii
1. Introduction to Red Hat Admin Server 1
2. Admin Server Configuration 3
2.1. Directory Server File Locations ..................................................................................... 3
2.2. Starting and Stopping the Admin Server ........................................................................ 4
2.2.1. Starting and Stopping Admin Server from the Console ......................................... 4
2.2.2. Starting and Stopping Admin Server from the Command Line ............................... 5
2.3. Opening the Admin Server Console .............................................................................. 6
2.4. Viewing Logs ............................................................................................................... 8
2.4.1. Viewing the Logs through the Console ................................................................ 8
2.4.2. Viewing Logs in the Command Line ................................................................... 9
2.4.3. Changing the Log Name in the Console ............................................................ 10
2.4.4. Changing the Log Location in the Command Line .............................................. 11
2.4.5. Setting the Logs to Show Hostnames Instead of IP Addresses ............................ 12
2.5. Changing the Port Number ......................................................................................... 12
2.5.1. Changing the Port Number in the Console ........................................................ 12
2.5.2. Changing the Port Number in the Command Line .............................................. 13
2.6. Setting Host Restrictions ............................................................................................. 14
2.6.1. Setting Host Restrictions in the Console ............................................................ 14
2.6.2. Setting Host Restrictions in the Command Line ................................................. 16
2.7. Changing the Admin User's Name and Password ......................................................... 17
2.8. Working with SSL ....................................................................................................... 19
2.8.1. Requesting and Installing a Server Certificate .................................................... 19
2.8.2. Installing a CA Certificate ................................................................................. 24
2.8.3. Enabling SSL .................................................................................................. 27
2.8.4. Creating a Password File for the Admin Server ................................................. 29
2.9. Changing Directory Server Settings ............................................................................. 30
2.9.1. Changing the Configuration Directory Host or Port ............................................. 31
2.9.2. Changing the User Directory Host or Port ......................................................... 31
3. Admin Express 35
3.1. Managing Servers in Admin Express ........................................................................... 35
3.1.1. Opening Admin Express .................................................................................. 35
3.1.2. Starting and Stopping Servers .......................................................................... 35
3.1.3. Viewing Server Logs ........................................................................................ 36
3.1.4. Viewing Server Information ............................................................................... 36
3.1.5. Monitoring Replication from Admin Express ....................................................... 37
3.2. Configuring Admin Express ......................................................................................... 40
3.2.1. Admin Express File Locations .......................................................................... 40
3.2.2. Admin Express Configuration Files ................................................................... 41
3.2.3. Admin Express Directives ................................................................................ 46
4. Admin Server Command-Line Tools 49
Page 4

Using the Admin Server
iv
4.1. sec-activate ................................................................................................................ 49
4.2. modutil ....................................................................................................................... 49
Index 63
Page 5

v
Preface
The Admin Server Guide provides information on using a support administrative server with identity
management projects including Red Hat Directory Server and Red Hat Certificate System. The Admin
Server runs the Java consoles used by those servers, as well as providing web services and storing
configuration information for those services.
The Admin Server is installed and configured automatically with Red Hat Directory Server. This guide
covers how to use and manage the Admin Server through its own Java Console (part of Red Hat
Console, along with the Directory Server Console), through native command-line tools, and through
the integrated web services.
1. Examples and Formatting
Each of the examples used in this guide, such as file locations and commands, have certain defined
conventions.
1.1. Command and File Examples
All of the examples for Red Hat Directory Server commands, file locations, and other usage are given
for Red Hat Enterprise Linux 5 (32-bit) systems. Be certain to use the appropriate commands and files
for your platform.
To start the Red Hat Directory Server:
service dirsrv start
Example 1. Example Command
1.2. Tool Locations
The tools for Red Hat Directory Server are located in the /usr/bin and the /usr/sbin directories.
These tools can be run from any location without specifying the tool location.
1.3. LDAP Locations
There is another important consideration with the Red Hat Directory Server tools. The LDAP tools
referenced in this guide are Mozilla LDAP, installed with Red Hat Directory Server in the /usr/lib/
mozldap directory on Red Hat Enterprise Linux 5 (32-bit) (or /usr/lib64/mozldap for 64-bit
systems).
However, Red Hat Enterprise Linux systems also include LDAP tools from OpenLDAP in the /usr/
bin directory. It is possible to use the OpenLDAP commands as shown in the examples, but you must
use the -x argument to disable SASL, which OpenLDAP tools use by default.
1.4. Text Formatting and Styles
Certain words are represented in different fonts, styles, and weights. Different character formatting is
used to indicate the function or purpose of the phrase being highlighted.
Page 6

Preface
vi
Formatting Style Purpose
Monospace font Monospace is used for commands, package
names, files and directory paths, and any text
displayed in a prompt.
Monospace
with a
background
This type of formatting is used for anything
entered or returned in a command prompt.
Italicized text Any text which is italicized is a variable, such
as instance_name or hostname. Occasionally,
this is also used to emphasize a new term or
other phrase.
Bolded text Most phrases which are in bold are application
names, such as Cygwin, or are fields or
options in a user interface, such as a User
Name Here: field or Save button.
Other formatting styles draw attention to important text.
NOTE
A note provides additional information that can help illustrate the behavior of the system or
provide more detail for a specific issue.
IMPORTANT
Important information is necessary, but possibly unexpected, such as a configuration
change that will not persist after a reboot.
WARNING
A warning indicates potential data loss, as may happen when tuning hardware for
maximum performance.
2. Additional Reading
The Directory Server Administrator's Guide describes how to set up, configure, and administer Red
Hat Directory Server and its contents. this manual does not describe many of the basic directory and
architectural concepts that you need to deploy, install, and administer a directory service successfully.
Those concepts are contained in the Red Hat Directory Server Deployment Guide. You should read
that book before continuing with this manual.
When you are familiar with Directory Server concepts and have done some preliminary planning for
your directory service, install the Directory Server. The instructions for installing the various Directory
Server components are contained in the Red Hat Directory Server Installation Guide. Many of the
scripts and commands used to install and administer the Directory Server are explained in detail in the
Red Hat Directory Server Configuration, Command, and File Reference.
Page 7

Giving Feedback
vii
Also, Managing Servers with Red Hat Console contains general background information on how to
use the Red Hat Console. You should read and understand the concepts in that book before you
attempt to administer Directory Server.
The document set for Directory Server contains the following guides:
• Red Hat Directory Server Release Notes contain important information on new features, fixed bugs,
known issues and workarounds, and other important deployment information for this specific version
of Directory Server.
• Red Hat Directory Server Deployment Guide provides an overview for planning a deployment of the
Directory Server.
• Red Hat Directory Server Administrator's Guide contains procedures for the day-to-day maintenance
of the directory service. Includes information on configuring server-side plug-ins.
• Red Hat Directory Server Configuration, Command, and File Reference provides reference
information on the command-line scripts, configuration attributes, and log files shipped with
Directory Server.
• Red Hat Directory Server Installation Guide contains procedures for installing your Directory Server
as well as procedures for migrating from a previous installation of Directory Server.
• Red Hat Directory Server Schema Reference provides reference information about the Directory
Server schema.
• Red Hat Directory Server Plug-in Programmer's Guide describes how to write server plug-ins in
order to customize and extend the capabilities of Directory Server.
• Using Red Hat Console gives an overview of the primary user interface and how it interacts with the
Directory Server and Admin Server, as well as how to perform basic management tasks through the
main Console window.
• Using the Admin Server describes the different tasks and tools associated with the Admin Server
and how to use the Admin Server with the Configuration and User Directory Server instances.
For the latest information about Directory Server, including current release notes, complete product
documentation, technical notes, and deployment information, see the Red Hat Directory Server
documentation site at http://www.redhat.com/docs/manuals/dir-server/.
3. Giving Feedback
If there is any error in this Using the Admin Server or there is any way to improve the documentation,
please let us know. Bugs can be filed against the documentation for Red Hat Directory Server through
Bugzilla, http://bugzilla.redhat.com/bugzilla. Make the bug report as specific as possible, so we can be
more effective in correcting any issues:
• Select the Red Hat Directory Server product.
• Set the component to Doc - managing-servers.
• Set the version number to 8.1.
• For errors, give the page number (for the PDF) or URL (for the HTML), and give a succinct
description of the problem, such as incorrect procedure or typo.
Page 8

Preface
viii
For enhancements, put in what information needs to be added and why.
• Give a clear title for the bug. For example, "Incorrect command example for setup
script options" is better than "Bad example".
We appreciate receiving any feedback — requests for new sections, corrections, improvements,
enhancements, even new ways of delivering the documentation or new styles of docs. You are
welcome to contact Red Hat Content Services directly at mailto:docs@redhat.com.
4. Documentation History
Revision 8.1.1 September 9, 2009 Ella Deon Lackey
Removing any references to the Directory Server Gateway or Org Chart.
Revision 8.1.0 April 28, 2009 Ella Deon Lackey dlackey@redhat.com
Initial draft for version 8.1.
Page 9
Chapter 1.
1
Introduction to Red Hat Admin Server
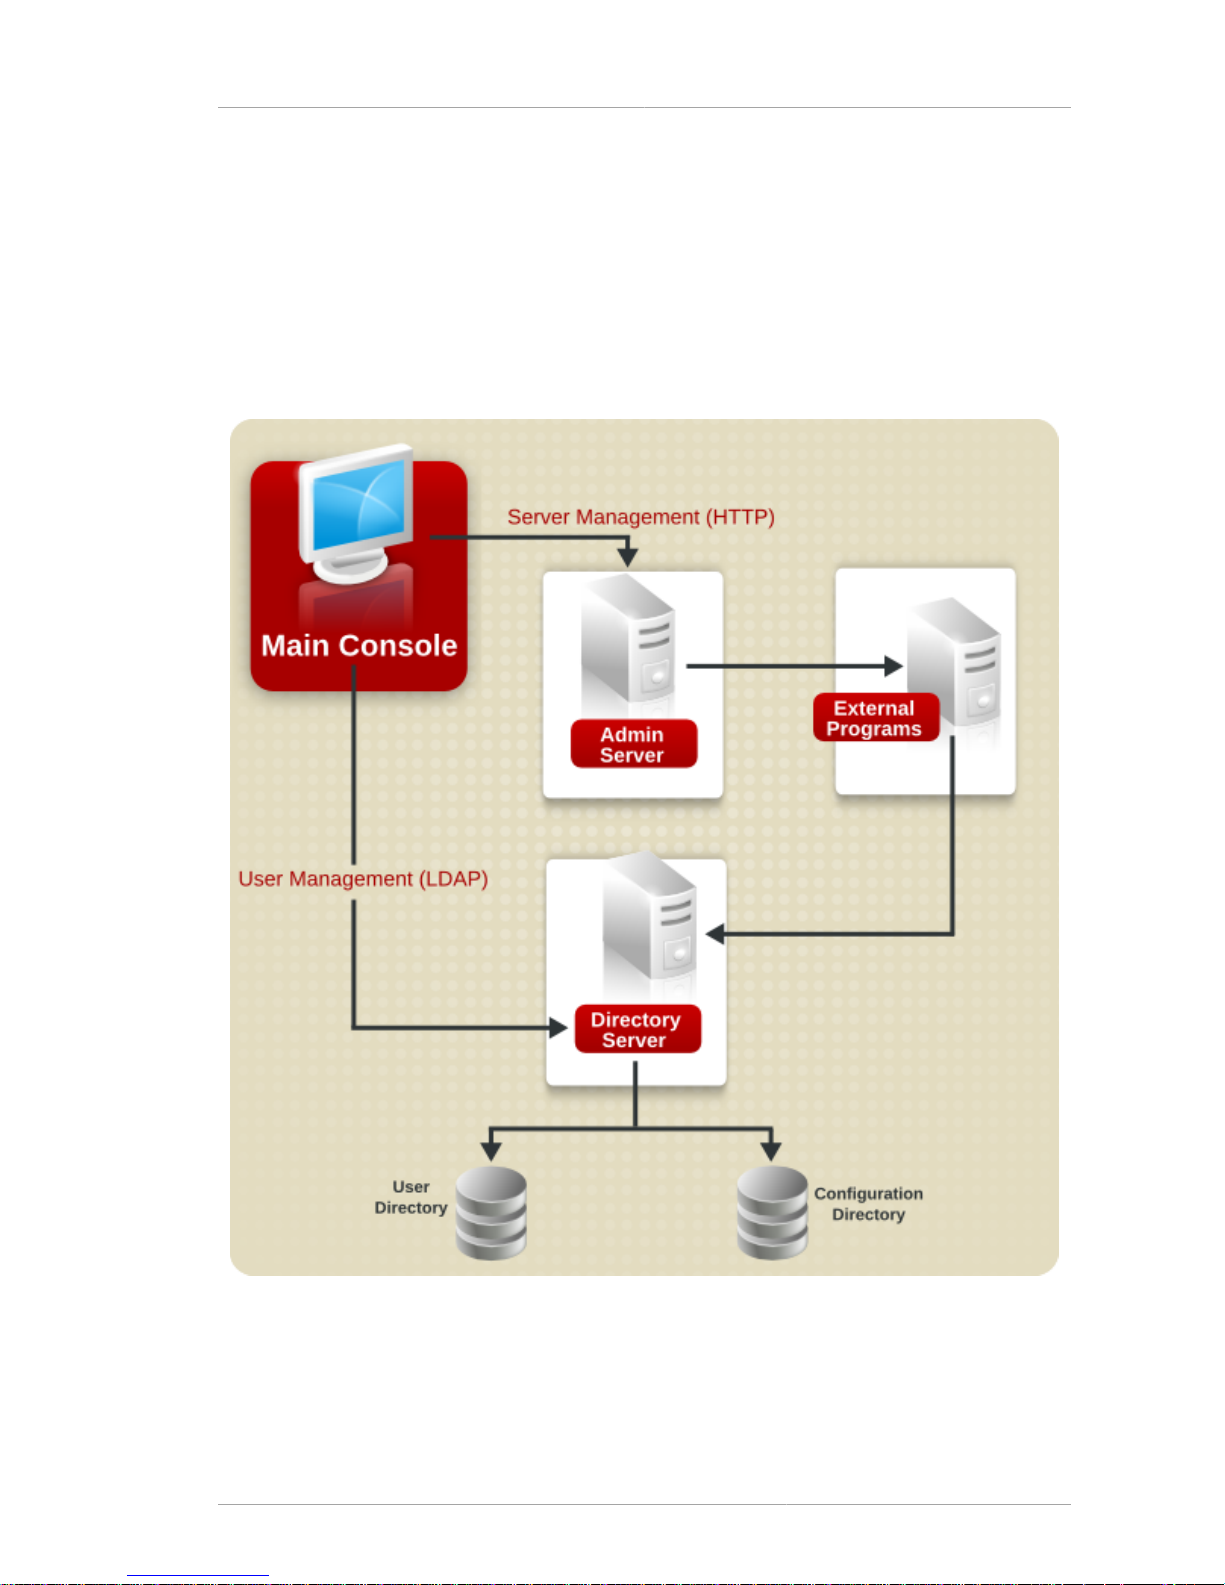
Identity management and directory services with Red Hat Directory Server use three components,
working in tandem:
• A Java-based management console
• An administration server which also functions as a web server
• An LDAP directory server
Figure 1.1. Interactions between the Console, Admin Server and Directory Server
The Admin Server processes configuration requests for Directory Server instances and performs many
common server tasks, such as stopping and starting server instances. Directory services are usually
divided into two categories: configuration databases which store the Console and Admin Server
settings and some Directory Server configuration and user databases which contain user and group
Page 10

Chapter 1. Introduction to Red Hat Admin Server
2
information. These databases can be kept in the same Directory Server instance, but it is also possible
to break these services into separate Directory Server instances. In that case, a Directory Server
instance's configuration are stored in a separate Directory Server, called the Configuration Directory
Server, and user data is stored in the User Directory Server. Because the Admin Server processes
server configuration requests for Red Hat Directory Server, the Configuration Directory Server and
User Directory Server instances are both defined in the Admin Server configuration.
As a web server, the Admin Server provides all of the online functions of the Directory Server,
including handling connections to the Console and hosting web applications such as Admin Express.
Clients connect to the Admin Server both over secure and standard connections, since the Admin
Server supports both HTTP or HTTPS, if SSL/TLS is enabled.
When Red Hat Directory Server or Red Hat Certificate System (which depends on Red Hat Directory
Server) is installed, then the Admin Server is automatically installed and configured as well. There
can be multiple Directory Server instances and multiple Certificate System subsystems on a single
machine, and all use the same instance of Admin Server.
There can be only one Admin Server per machine. This single Admin Server instance can handle
multiple instances of Directory Server and other clients which can use the Admin Server, like Red Hat
Certificate System.
When the Console is opened to manage an instance of Directory Server or Certificate System, even
if the Console is on a different machine than the server instance being managed, it contacts the local
Admin Server instance to perform the requested tasks. For example, Admin Server can execute
programs to modify the server and application settings that are stored in the configuration directory or
to change the port number that a server listens to.
The Admin Server itself can be managed through its own Java-based interface, by editing its
configuration files, or through command-line tools.
Page 11

Chapter 2.
3
Admin Server Configuration
The Admin Server is a separate server from Red Hat Directory Server or Red Hat Certificate System,
although they work interdependently. The Admin Server processes, file locations, and configuration
options are also separate. This chapter covers the Admin Server information, including starting and
stopping the Admin Server, enabling SSL, viewing logs, and changing Admin Server configuration
properties, such as the server port number.
2.1. Directory Server File Locations
Red Hat Admin Server conforms to the Filesystem Hierarchy Standards. For more information on
FHS, see the FHS homepage, http://www.pathname.com/fhs/.
There are slight difference in the file locations depending on the platform, so the default Red Hat
Enterprise Linux FHS locations (used in the examples) may not match every installation. Some
platforms treat the Admin Server as optional software and therefore, under FHS, store Admin Server
files in /opt directories.
The files and directories installed with Directory Server are listed in the tables below for each
supported platform.
File or Directory Location
Log files /var/log/dirsrv/admin-serv
Configuration files /etc/dirsrv/admin-serv
Instance directory /usr/lib/dirsrv/admin-serv
Database files /var/lib/dirsrv/admin-serv
Runtime files /var/lock/dirsrv/admin-serv.*
/var/run/dirsrv/admin-serv.*
Init scripts /etc/rc.d/init.d/dirsrv-admin
/etc/sysconfig/dirsrv-admin
Tools /usr/bin/
/usr/sbin/
Table 2.1. Red Hat Enterprise Linux 4 and 5 (x86 and x86_64)
File or Directory Location
Log files /var/opt/dirsrv/admin-serv/logs
Configuration files /etc/opt/dirsrv/admin-serv/runs
Instance directory /opt/dirsrv/admin-serv
Database files /var/opt/dirsrv/admin-serv
Runtime files /var/opt/dirsrv/admin-serv
Binaries /opt/dirsrv/bin/
/opt/dirsrv/sbin/
Libraries /opt/dirsrv/lib/
Table 2.2. HP-UX 11i (IA64)
Page 12

Chapter 2. Admin Server Configuration
4
2.2. Starting and Stopping the Admin Server
The Admin Server is running when the setup-ds-admin.pl configuration script completes. Avoid
stopping and starting the server to prevent interrupting server operations.
• When starting in SSL, the start script prompts for the password for the security (SSL certificate)
database. It is possible to restart in SSL without being prompted for a password by using a
password file. See Section 2.8.4, “Creating a Password File for the Admin Server” for more
information.
If there is not password file, then the Admin Server cannot be restarted in SSL through the Console,
only the command-line scripts.
• Rebooting the host system can automatically start the Admin Server's httpd process. The directory
provides startup or run command (rc) scripts. On Red Hat Enterprise Linux, use the chkconfig
command to enable the Admin Server to start on boot. For HP-UX, check the operating system
documentation for details on adding these scripts.
2.2.1. Starting and Stopping Admin Server from the Console
1. Start the Console, and open the Admin Console.
/usr/bin/redhat-idm-console -a http://localhost:9830
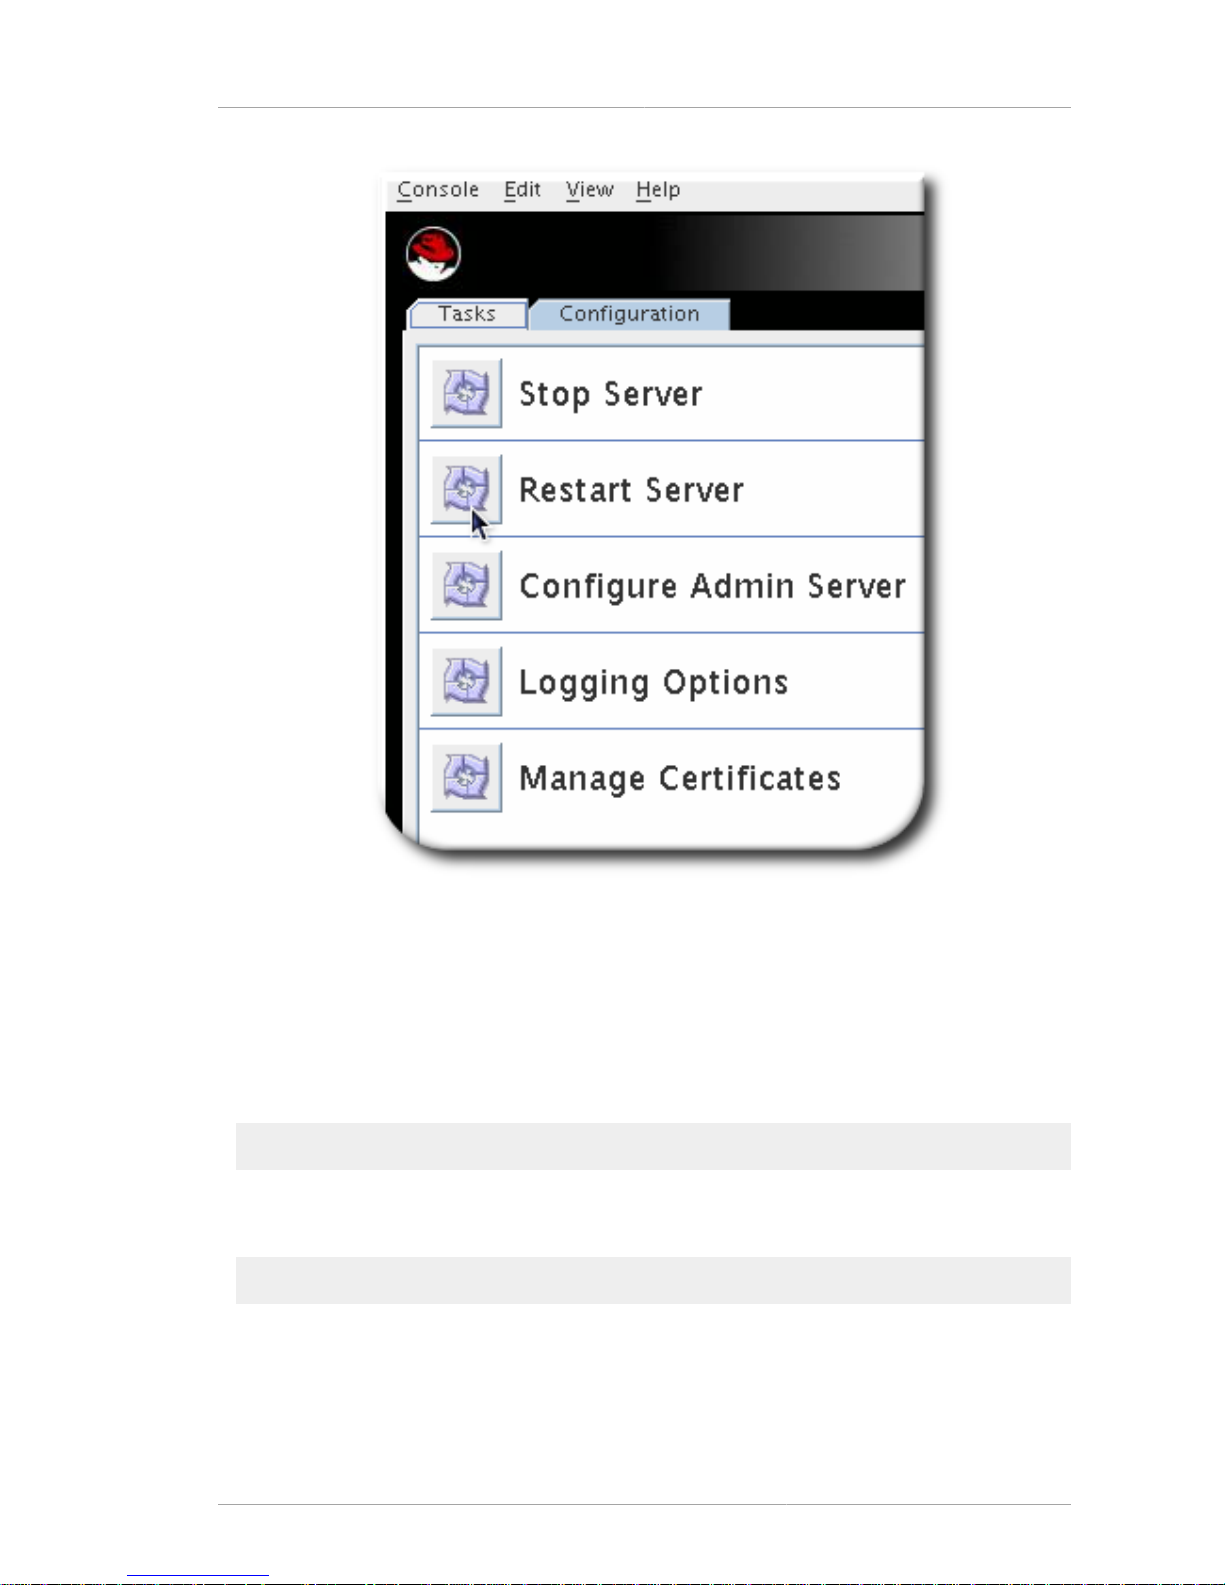
2. In the Tasks tab, click Restart Server or Stop Server.
Page 13
Starting and Stopping Admin Server from the Command Line
5
When the Admin Server is successfully started or stopped from the Console, the server displays a
message box stating that the server has either started or shut down.
2.2.2. Starting and Stopping Admin Server from the Command Line
There are two ways to start, stop, or restart the Admin Server:
• There are scripts in the /usr/sbin directory.
/usr/sbin/{start|stop|restart}-ds-admin
• The Admin Server service can also be stopped and started using system tools on Red Hat
Enterprise Linux 5 (32-bit) using the service command. For example:
service dirsrv-admin {start|stop|restart}
Page 14
Chapter 2. Admin Server Configuration
6
NOTE
The service name for the Admin Server process on Red Hat Enterprise Linux 5 (32-bit)
is dirsrv-admin.
2.3. Opening the Admin Server Console
There is a simple script to launch the main Console. On Red Hat Enterprise Linux, run the following:
/usr/bin/redhat-idm-console
HP-UX has a different location for the script:
/opt/dirsrv/bin/redhat-idm-console
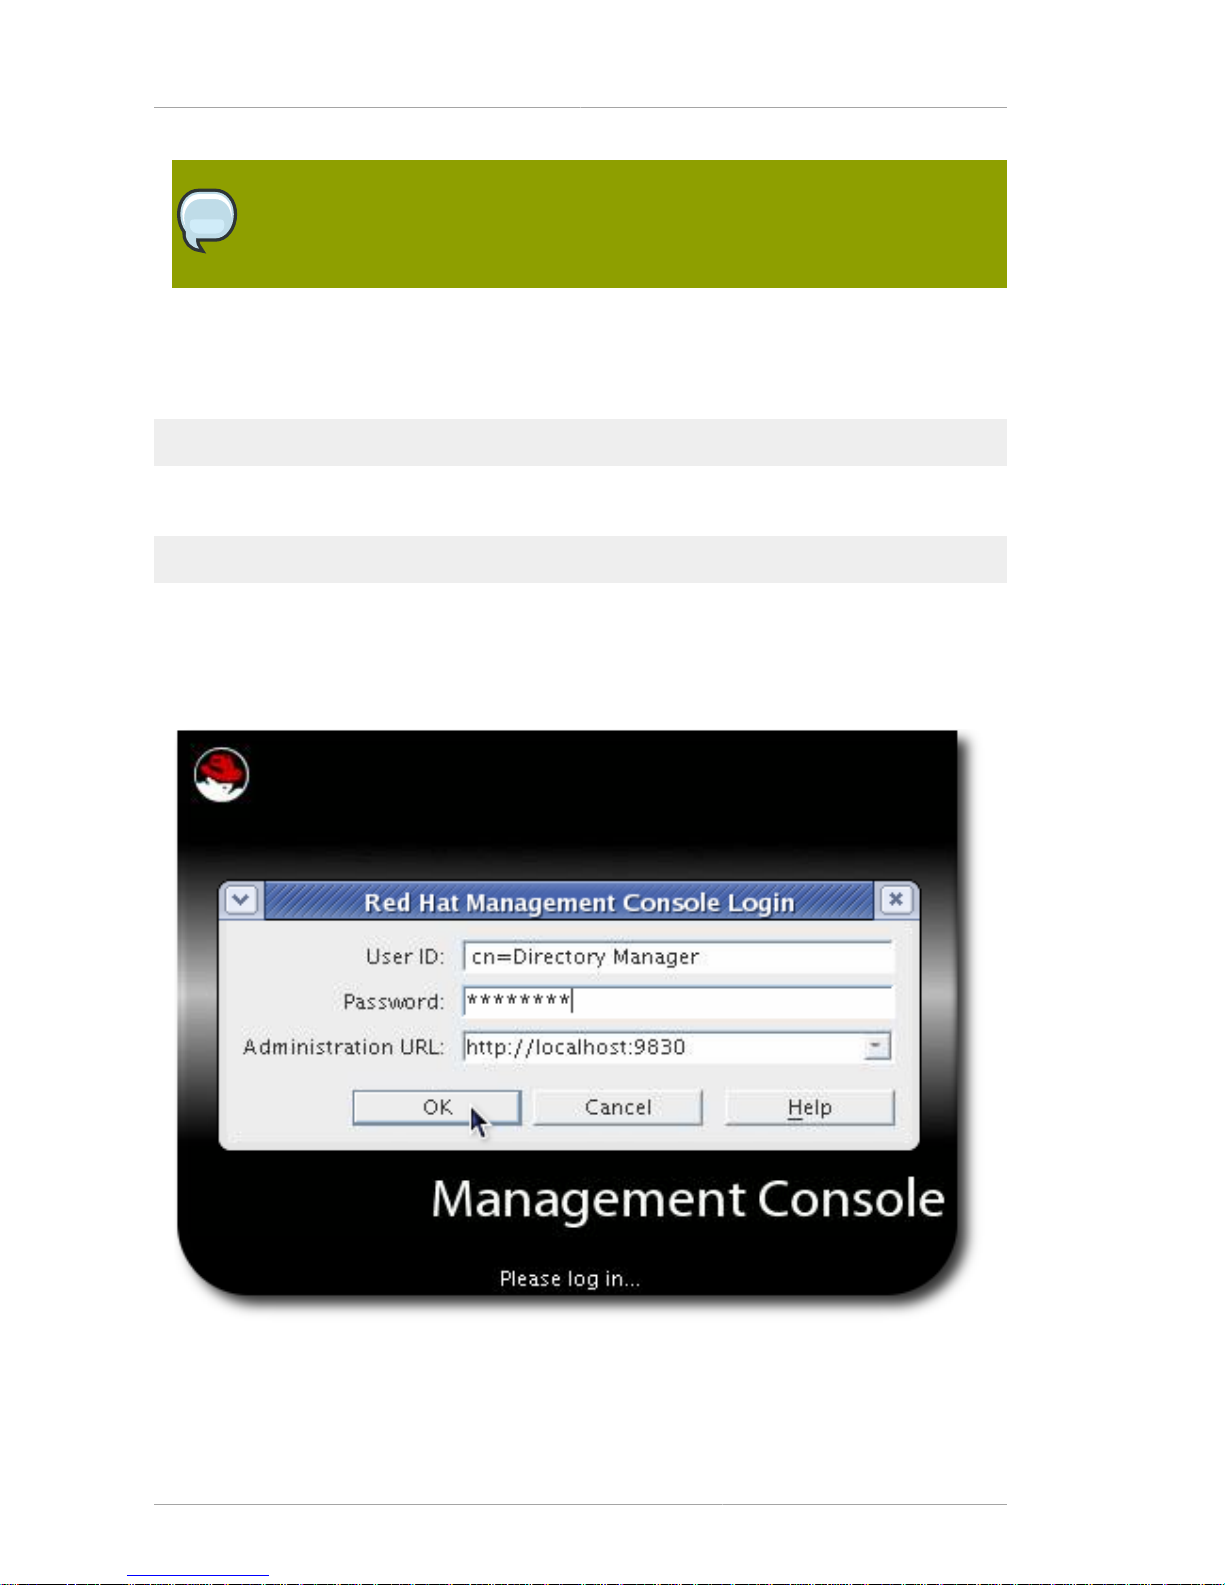
When the login screen opens, the Admin Server prompts for the username, password, and Admin
Server location. The Admin Server location is a URL; for a standard connection, this has the http:
prefix for a standard HTTP protocol. If SSL/TLS is enabled, then this uses the https: prefix for the
secure HTTPS protocol.
Figure 2.1. Login Box
Page 15
Opening the Admin Server Console
7
TIP
It is possible to send the Admin Server URL and port with the start script. For example:
/usr/bin/redhat-idm-console -a http://localhost:9830
The a option is a convenience, particularly for logging into a Directory Server for the first
time. On subsequent logins, the URL is saved. If the Admin Server port number is not
passed with the redhat-idm-console command, then the server prompts for it at the
Console login screen.
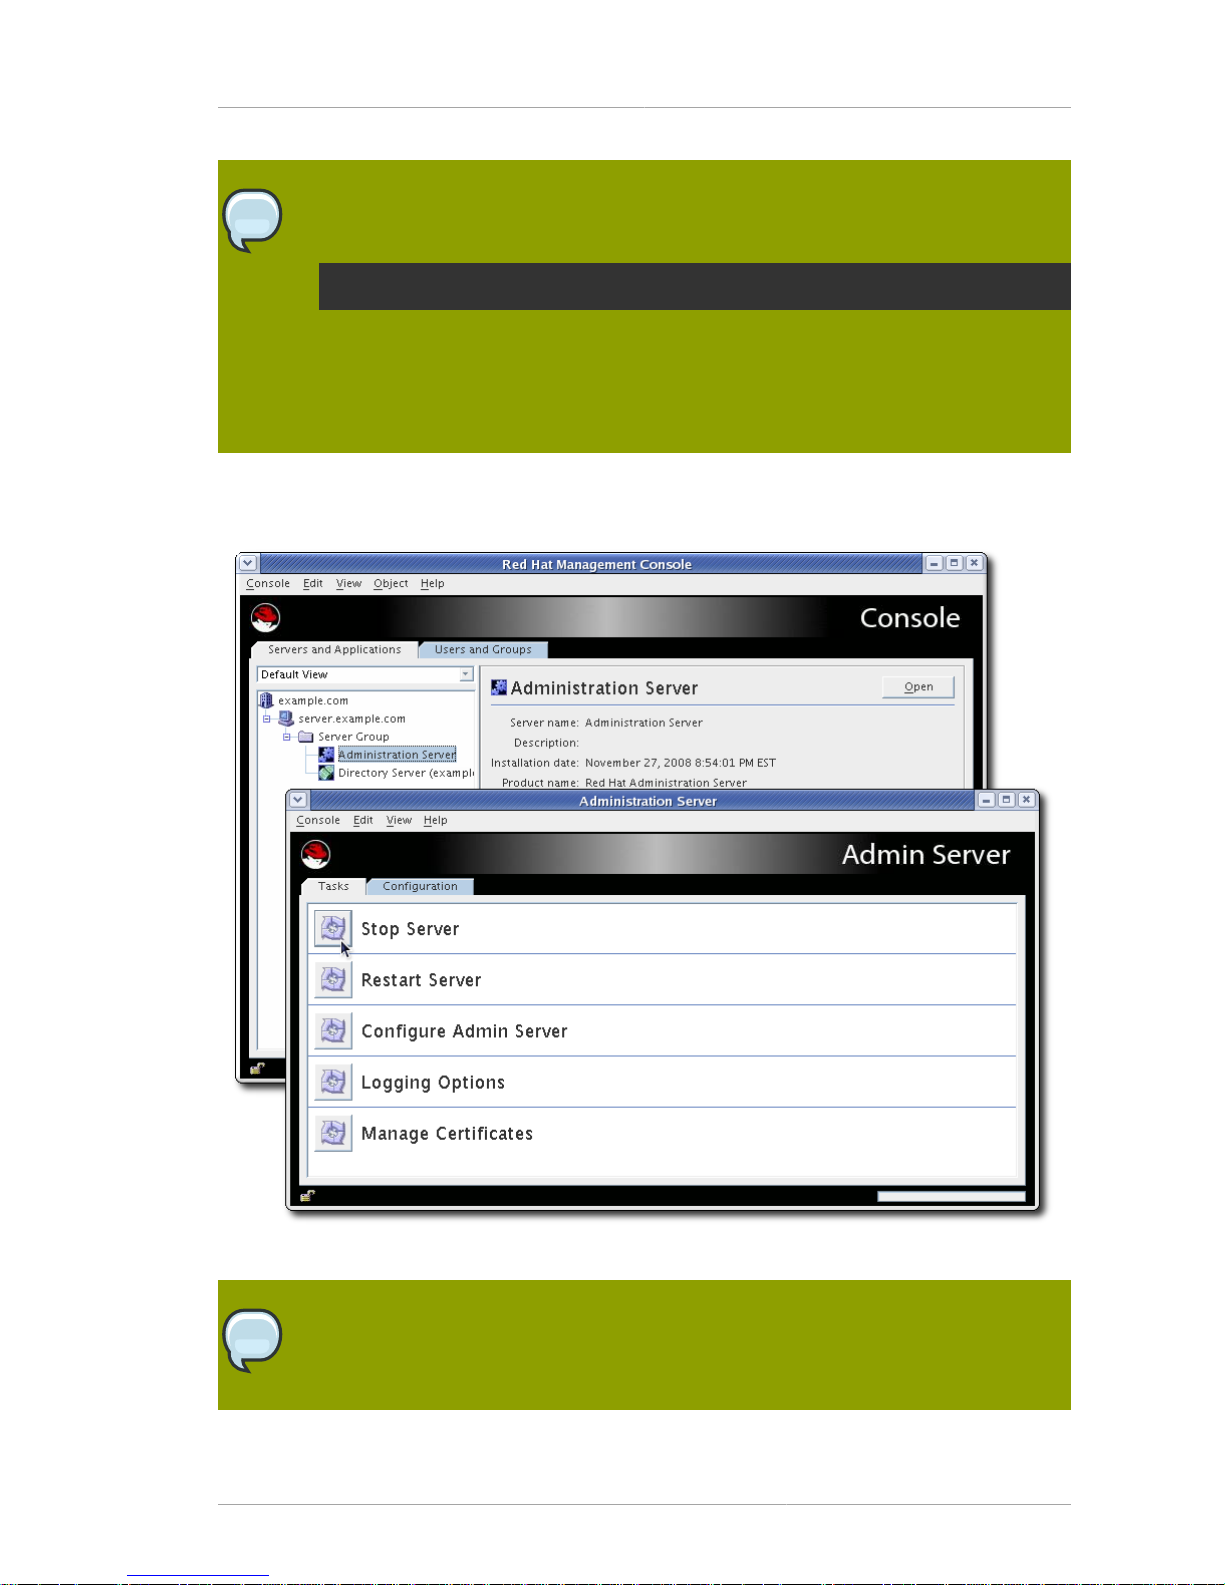
This opens the main Console window. To open the Admin Server Console, select the Admin Server
instance from the server group on the left, and then click the Open at the top right of the window.
Figure 2.2. The Admin Server Console
NOTE
Make sure that Sun JDK or OpenJDK version 1.6.0 is set in the PATH before launching
the Console. Run the following to see if the Java program is in the PATH and to get the
version and vendor information:
Page 16
Chapter 2. Admin Server Configuration
8
java -version
2.4. Viewing Logs
Log files monitor activity for Admin Server and can help troubleshoot server problems. Admin Server
logs use the Common Logfile Format, a broadly supported format that provides information about the
server.
Admin Server generates two kinds of logs:
• Access logs. Access logs show requests to and responses from the Admin Server. By default, the
file is located at /var/log/dirsrv/admin-serv/access.
• Error logs. Error logs show messages for errors which the server has encountered since the log file
was created. It also contains informational messages about the server, such as when the server was
started and who tried unsuccessfully to log on to the server. By default, the file is located at /var/
log/dirsrv/admin-serv/error.
The logs can be viewed through Admin Server Console or by opening the log file.
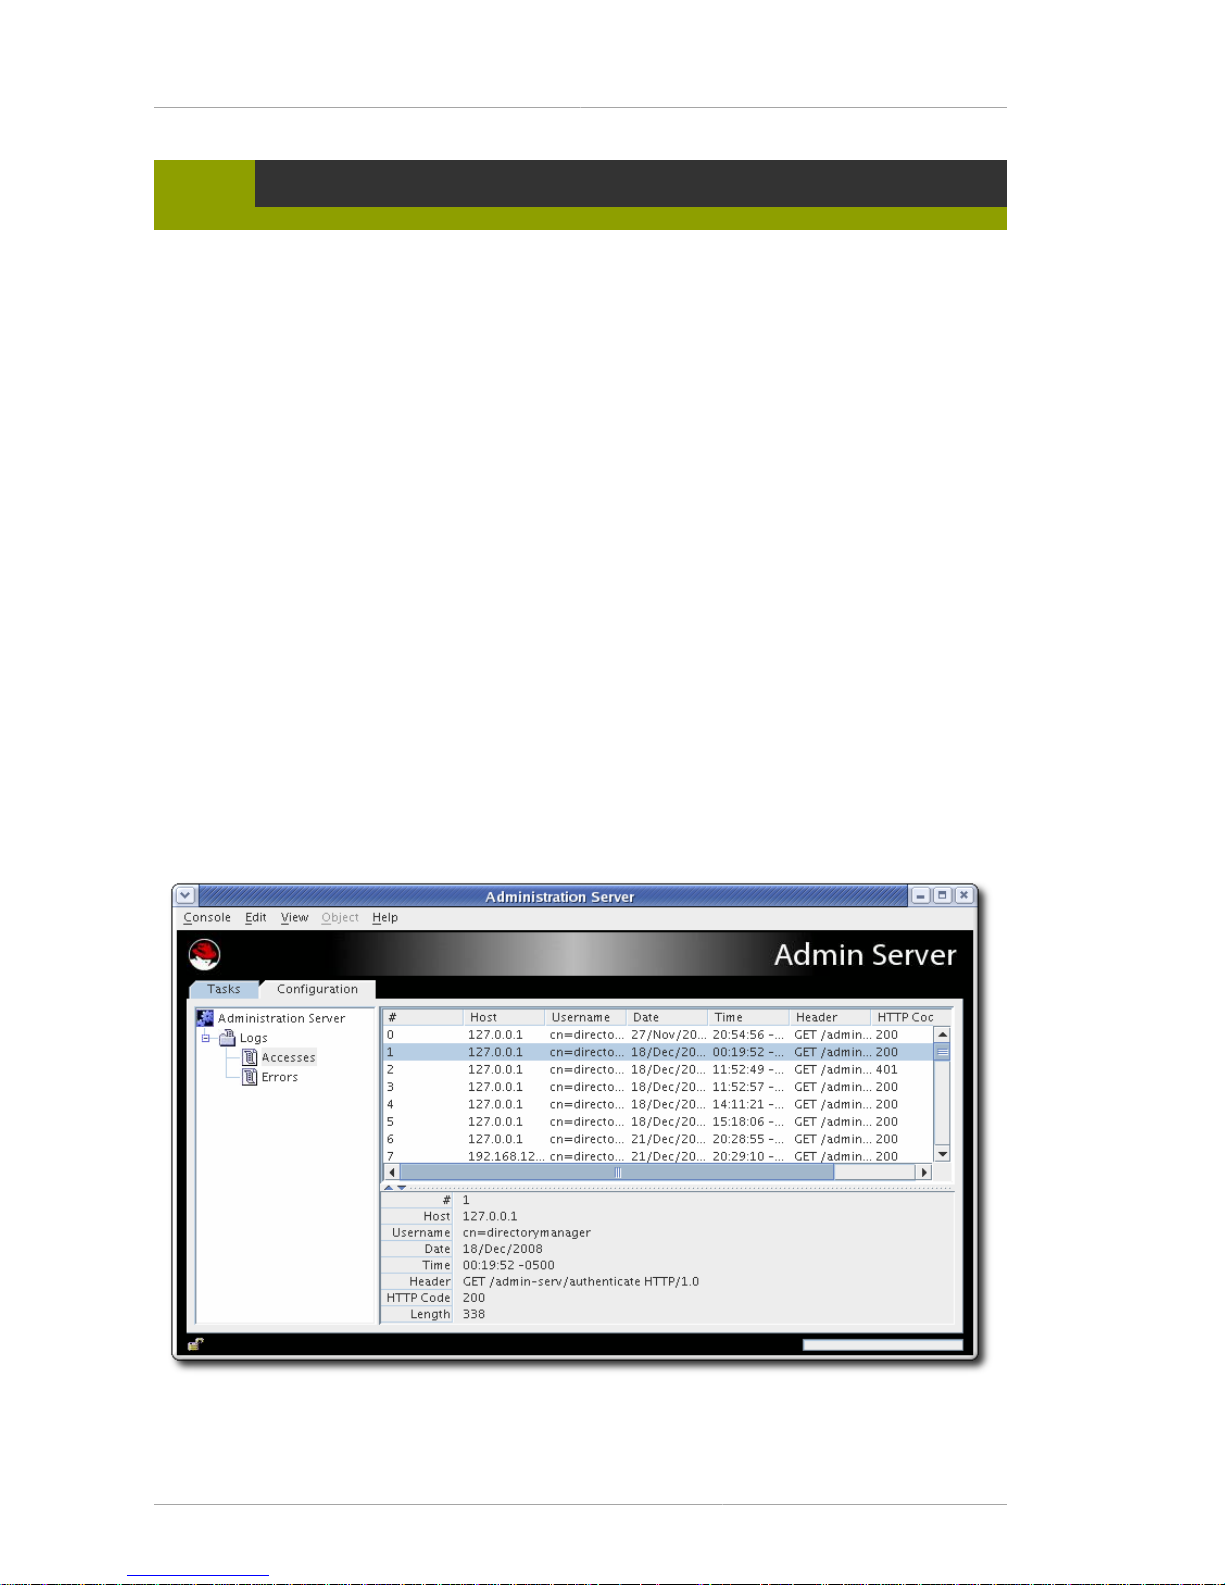
2.4.1. Viewing the Logs through the Console
1. Open the Admin Server management window.
2. Click the Configuration tab.
3. Expand the Logs directory, and click the log file name, either Accesses or Error.
Page 17

Viewing Logs in the Command Line
9
2.4.2. Viewing Logs in the Command Line
The access log, by default, is at /var/log/dirsrv/admin-serv/access. To view the access log,
open it in an editor such as vi.
Access logs show connections to the Admin Server based on the IP address of the client, the
username, and the method that the request was sent. Each line has the following format:
ip_address - bind_DN [timestamp -0500] "GET|POST cgi" HTTP_response bytes
Example logs are shown in Example 2.1, “Example Access Logs”.
127.0.0.1 - cn=directory manager [23/Dec/2008:19:32:52 -0500] "GET /adminserv/authenticate HTTP/1.0" 200 338
192.168.123.121 - cn=directory manager [23/Dec/2008:19:33:14 -0500] "POST /
admin-serv/tasks/Configuration/ServerSetup HTTP/1.0" 200 244
192.168.123.121 - cn=directory manager [23/Dec/2008:19:33:16 -0500] "GET /
admin-serv/tasks/Configuration/ReadLog?op=count&name=access HTTP/1.0" 200
10
Example 2.1. Example Access Logs
The error log, by default, is at /var/log/dirsrv/admin-serv/errors. To view the error log,
open it in an editor such as vi.
Error logs record any problem response from the Admin Server. Like the access log, error logs also
records entries based the client's IP address, along with the type of error message, and the message
text:
[timestamp] [severity] [client ip_address error_message
The severity message indicates whether the error is critical enough for administrator intervention.
[warning], [error], and [critical] require immediate administrator action. Any other severity
means the error is informational or for debugging.
Example logs are shown in Example 2.2, “Example Error Logs”.
Page 18

Chapter 2. Admin Server Configuration
10
[Mon Dec 22 23:44:59 2008] [notice] [client 127.0.0.1]
admserv_host_ip_check: ap_get_remote_host could not resolve 127.0.0.1
[Mon Dec 22 23:44:59 2008] [notice] [client 127.0.0.1]
admserv_host_ip_check: host [localhost.localdomain] did not match pattern
[*.example.com] -will scan aliases
[Mon Dec 22 23:44:59 2008] [notice] [client 127.0.0.1]
admserv_host_ip_check: host alias [localhost] did not match pattern
[*.example.com]
[Mon Dec 22 23:44:59 2008] [notice] [client 127.0.0.1]
admserv_check_authz(): passing [/admin-serv/authenticate] to the userauth
handler
[Mon Dec 22 23:45:16 2008] [notice] [client 192.168.123.121]
admserv_host_ip_check: ap_get_remote_host could not resolve
192.168.123.121
Example 2.2. Example Error Logs
2.4.3. Changing the Log Name in the Console
The access and error log files' names can be changed to rotate the files. This rotation has to be done
manually to create new files if the existing log files become too large.
1. Open the Admin Server management window.
2. Click the Configuration tab.
3. Click Logs in the left panel.
4. In the Logs window on the right, enter the new log file name.
WARNING
The path to the log file is absolute and cannot be changed.
Page 19

Changing the Log Location in the Command Line
11
5. Click OK to save the changes.
6. Open the Tasks tab, and click the Restart Server button to restart the server and apply the
changes.
2.4.4. Changing the Log Location in the Command Line
The access and error log files' names and locations can be changed to rotate the files. This rotation
has to be done manually to create new files if the existing log files become too large. The location
can be changed if the default location in /var/log/dirsrv/admin-serv/ does not meet the
application needs.
The Admin Server configuration is stored in two locations. The main entry is an LDAP entry in the
Configuration Directory Server's o=NetscapeRoot database. The other is the console.conf file.
Changing the log settings requires changing both settings.
1. Edit the Admin Server configuration entry in the Configuration Directory Server.
a. Get the name of the Admin Server entry. Since the Admin Server entry has a special object
class, nsAdminConfig, it is possible to search for the entry using that object class to retrieve
the DN.
/usr/lib/mozldap/ldapsearch -D "cn=directory manager" -w
secret -p 389 -h server.example.com -b "o=NetscapeRoot"
"(objectclass=nsAdminConfig)" dn
version:1
dn: cn=configuration, cn=admin-serv-example, cn=Red Hat
Administration Server, cn=Server Group, cn=server.example.com,
ou=example.com, o=NetscapeRoot
b. The Admin Server entry can be edited using ldapmodify. The access and error log settings
are stored in the nsAccessLogs and nsErrorLogs attributes, respectively. For example:
/usr/lib/mozldap/ldapmodify -D "cn=directory manager" -w secret -p
389 -h server.example.com
dn: cn=configuration, cn=admin-serv-example, cn=Red Hat
Administration Server, cn=Server Group, cn=server.example.com,
ou=example.com, o=NetscapeRoot
changetype:modify
replace:nsAccessLog
nsAccessLog:/var/log/dirsrv/admin-serv//access_new
Hit Enter twice to submit the operation, and then Control+C to close ldapmodify.
2. Open the Admin Server configuration directory.
cd /etc/dirsrv/admin-serv
Page 20

Chapter 2. Admin Server Configuration
12
3. Edit the console.conf file. For the access log, edit the path and filename in the CustomLog
parameter. For the error log, edit the path and filename in the ErrorLog parameter.
CustomLog /var/log/dirsrv/admin-serv//access_new common
ErrorLog /var/log/dirsrv/admin-serv//error_new
Leave the term common after the access log path; this means that the access log is in the
Common Log Format.
4. Restart the Admin Server.
service dirsrv-admin restart
2.4.5. Setting the Logs to Show Hostnames Instead of IP Addresses
By default, the logs show the IP address of the clients which connect to the Admin Server. This is
faster for the Admin Server, since it does not have to do a DNS lookup for every connection. It is
possible to set the Admin Server to perform a DNS lookup so that hostnames are used in the logs.
Along with being friendlier to read and search, using hostnames instead of IP addresses also removes
some unnecessary error messages about being unable to resolve hostnames.
To configure the Admin Server to perform DNS lookups:
1. Edit the console.conf file for the Admin Server.
cd /etc/dirsrv/admin-serv
vim console.conf
2. Set the HostnameLookups parameter to on. By default, this is turned off, so that IP addresses
are recorded in logs instead of hostnames.
HostnameLookups on
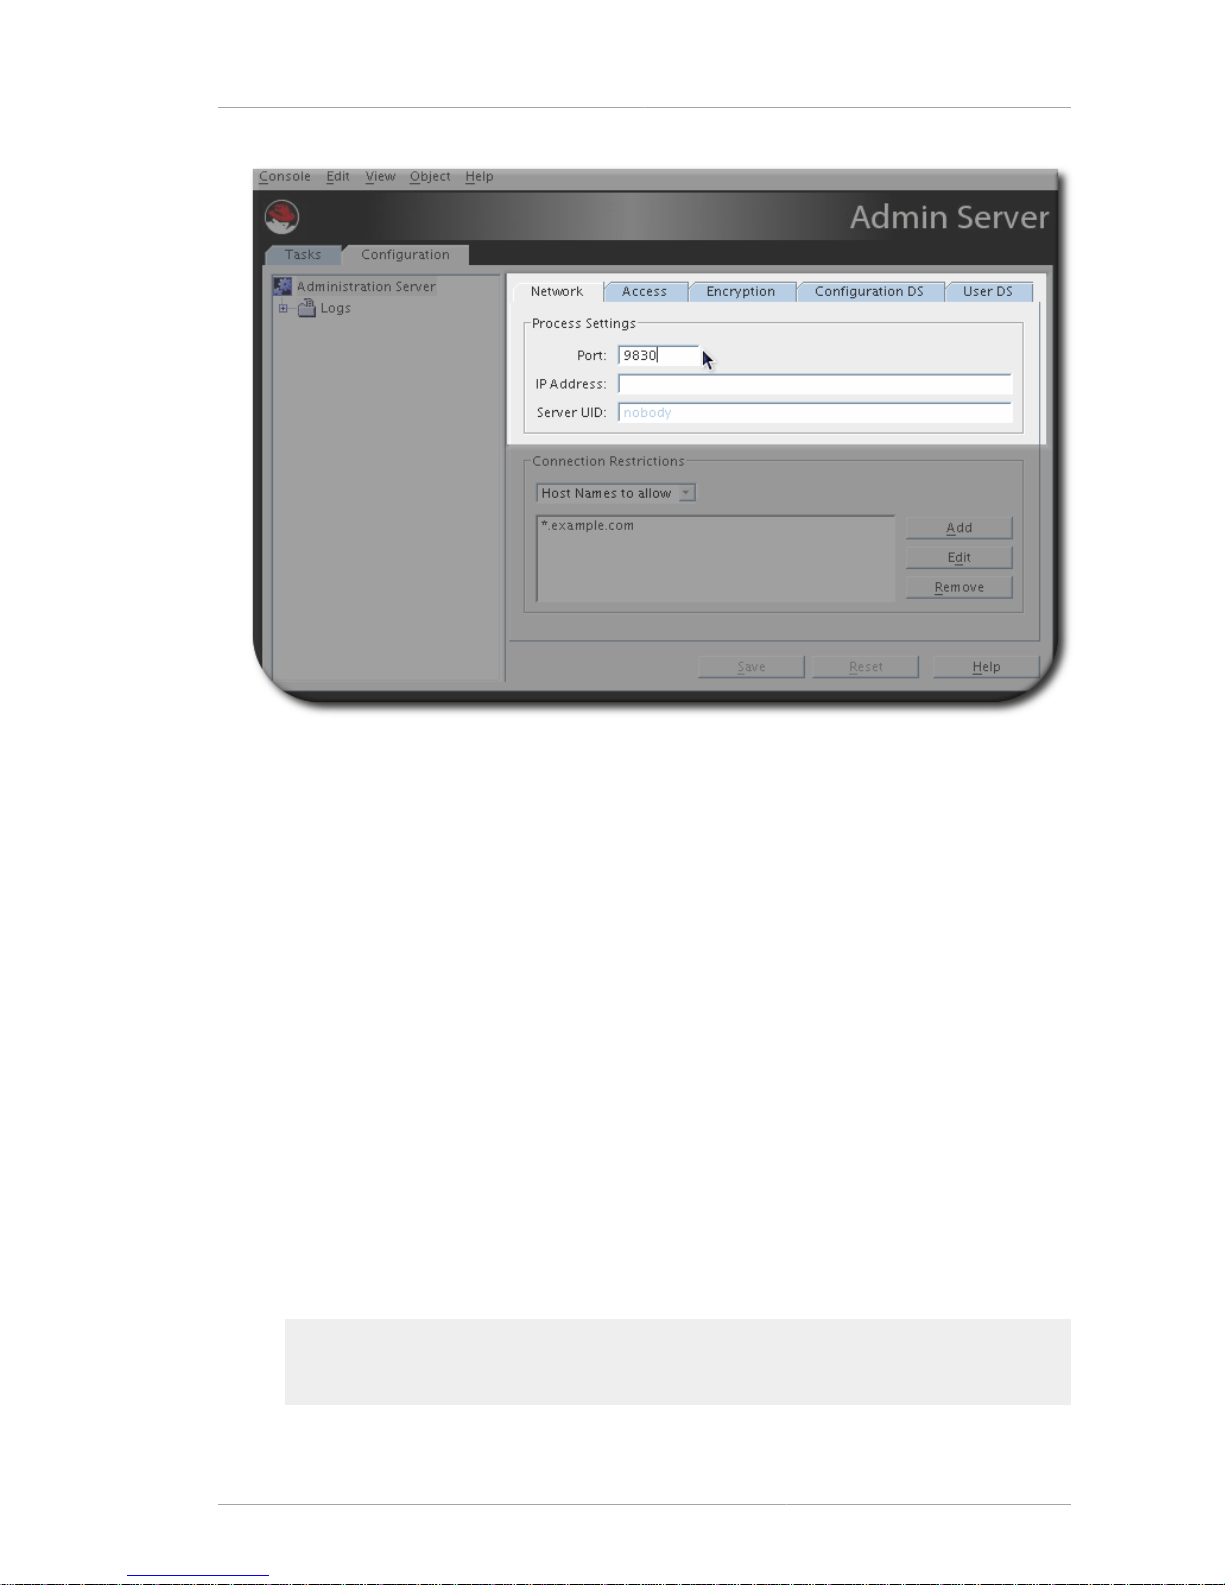
2.5. Changing the Port Number
The port number specifies where an instance of Admin Server listens for messages.
The default port number for Admin Server is set when the instance is first installed and the
configuration script, such as setup-ds-admin.pl, is run. The default port number is 9830, although
if that number is in use, then the setup program will use a randomly-generated number larger than
1024 or one can assign any port number between 1025 and 65535.
2.5.1. Changing the Port Number in the Console
1. Open the Admin Server management window.
2. Click the Configuration tab.
3. Click the Network tab.
Page 21
Changing the Port Number in the Command Line
13
4. Enter the port number for the Admin Server instance in the Port field. The Admin Server port
number has a default number of 9830.
5. Click OK.
6. Open the Tasks tab, and click the Restart Server button to restart the server and apply the
changes.
7. Close the Console, and then restart the Console, specifying the new Admin Server port number in
the connection URL.
2.5.2. Changing the Port Number in the Command Line
The port number for the Admin Server is 9830 by default.
The Admin Server configuration is stored in two locations. The main entry is an LDAP entry in the
Configuration Directory Server's o=NetscapeRoot database. The other is the console.conf file.
Changing the port number requires changing both settings.
1. Edit the Admin Server configuration entry in the Configuration Directory Server.
a. Get the name of the Admin Server entry. Since the Admin Server entry has a special object
class, nsAdminConfig, it is possible to search for the entry using that object class to retrieve
the DN.
/usr/lib/mozldap/ldapsearch -D "cn=directory manager" -w
secret -p 389 -h server.example.com -b "o=NetscapeRoot"
"(objectclass=nsAdminConfig)" dn
Page 22

Chapter 2. Admin Server Configuration
14
version:1
dn: cn=configuration, cn=admin-serv-example, cn=Red Hat
Administration Server, cn=Server Group, cn=server.example.com,
ou=example.com, o=NetscapeRoot
b. The Admin Server entry can be edited using ldapmodify. The port number is set in the
nsServerPort attribute. For example:
/usr/lib/mozldap/ldapmodify -D "cn=directory manager" -w secret -p
389 -h server.example.com
dn: cn=configuration, cn=admin-serv-example, cn=Red Hat
Administration Server, cn=Server Group, cn=server.example.com,
ou=example.com, o=NetscapeRoot
changetype:modify
replace:nsServerPort
nsServerPort:10030
Hit Enter twice to submit the operation, and then Control+C to close ldapmodify.
2. Open the Admin Server configuration directory.
cd /etc/dirsrv/admin-serv
3. Edit the Listen parameter in the console.conf file.
Listen 0.0.0.0:10030
4. Restart the Admin Server.
service dirsrv-admin restart
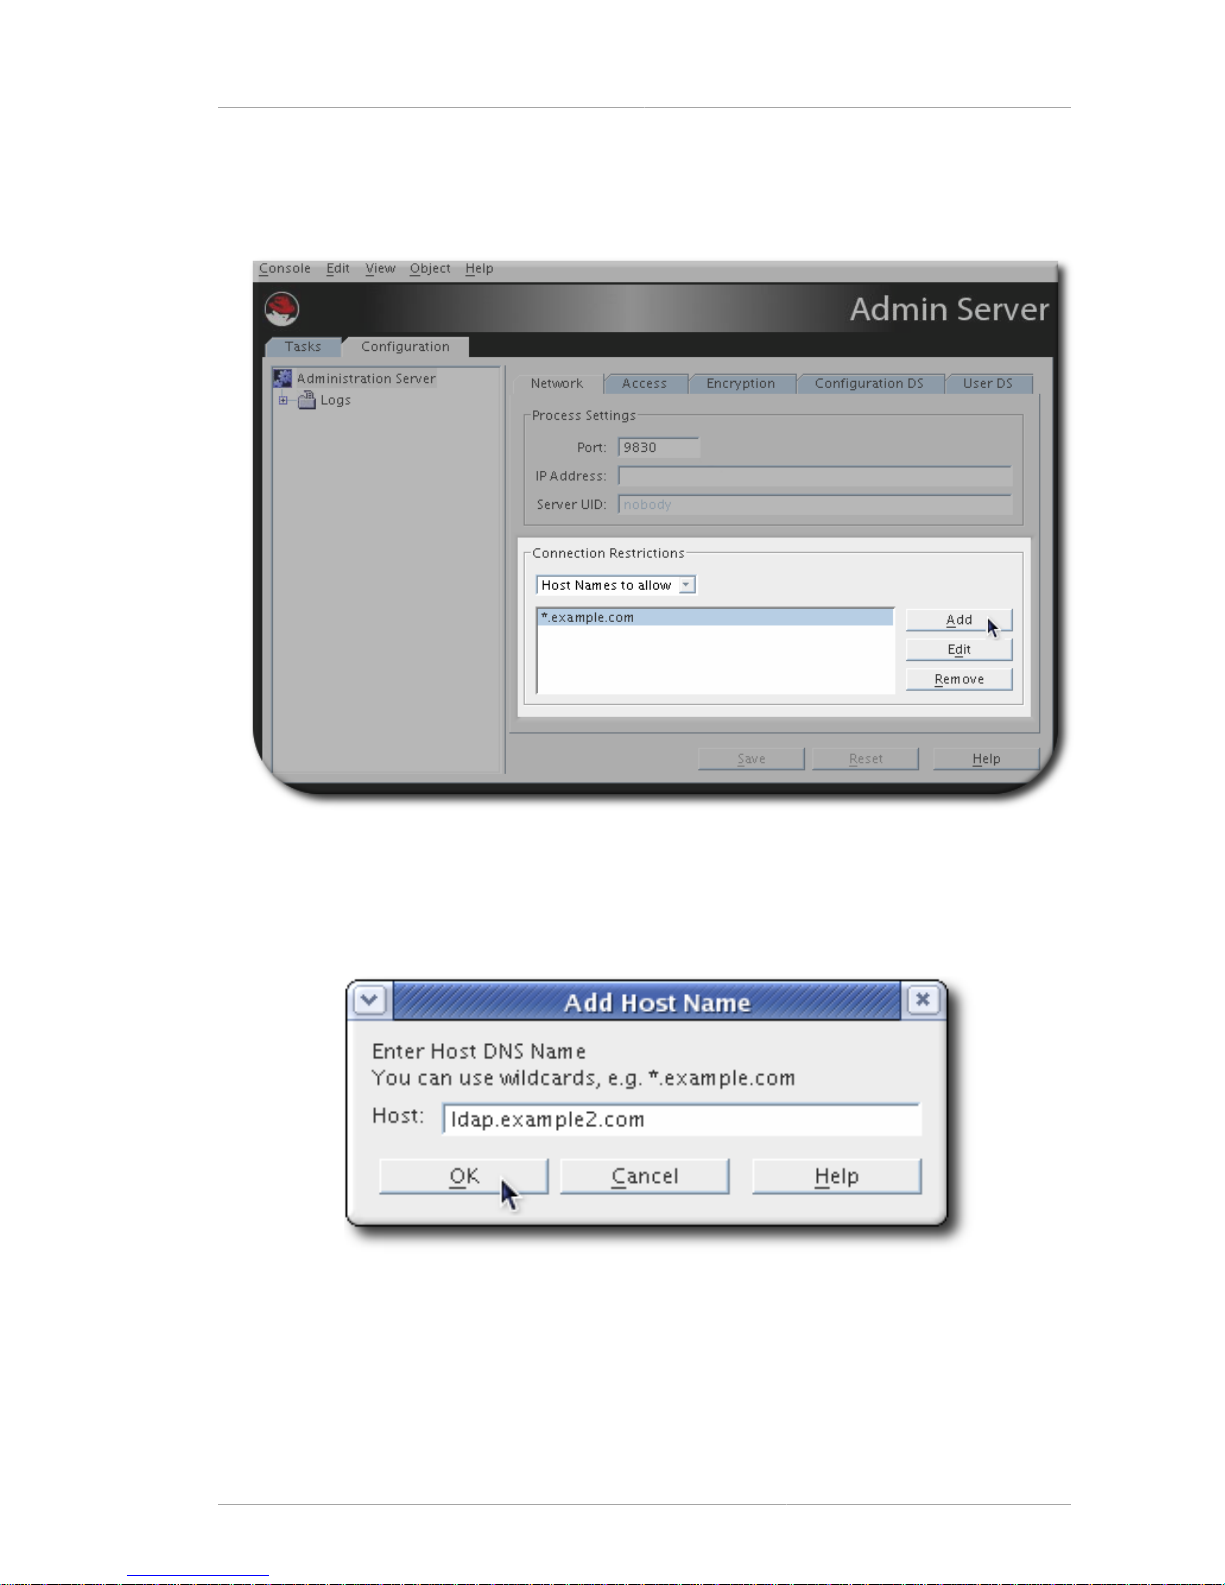
2.6. Setting Host Restrictions
Connection restrictions specify which hosts are allowed to connect to the Admin Server. You can
list these hosts by DNS name, IP address, or both. Only host machines listed within the connection
restriction parameters are allowed to connect to the Admin Server. This setting allows wildcards within
a domain or an IP address range to make setting connection restrictions simpler.
2.6.1. Setting Host Restrictions in the Console
1. Open the Admin Server management window.
2. Click the Configuration tab.
3. Click the Network tab.
Page 23
Setting Host Restrictions in the Console
15
4. The Connection Restrictions area displays a list of hosts allowed to connect to the Admin
Server. The drop-down list specifies whether the list entries are added by DNS name or by IP
address. The list is evaluated first by host names, and then by IP addresses.
5. Click the Add button to add another host to the list of allowed computers. To add a hostname,
make sure the drop-down list at the top reads Host Names to allow; to add an IP address, select
IP Addresses to allow.
6. Fill in the host information.
The * wildcard can be used to specify a group of hosts. For instance, *.example.com allows all
machines in the example.com domain to access the instance. Entering 205.12.*. allows all
hosts whose IP addresses begin with 205.12 to access the instance.
Page 24

Chapter 2. Admin Server Configuration
16
When specifying IP address restrictions, include all three separating dots. If you do not, the Admin
Server returns an error message.
7. Click OK to close the Add... dialog box, and then click the Save button to save the new host.
8. Open the Tasks tab, and click the Restart Server button to restart the server and apply the
changes.
To change the information for a host or IP address listed, click the Edit button and change the given
information. To remove an allowed host or IP address, select the host from the list, and click Remove.
Admin Server.
2.6.2. Setting Host Restrictions in the Command Line
Host restrictions sets rules for what network clients can connect to the Admin Server and, therefore,
to services which use the Admin Server. There are two kinds of host restrictions, restrictions based on
the host or domain name and restrictions based on the IP address.
The Admin Server host restrictions are set in the main configuration entry in the Configuration
Directory Server's o=NetscapeRoot database. There are two attributes for setting host restrictions,
nsAdminAccessAddresses and nsAdminAccessHosts for IP addresses and hostnames,
respectively.
NOTE
The Admin Server supports both IPv4 and IPv6 addresses.
The Admin Server entry can be edited using ldapmodify.
To set host restrictions:
1. Get the name of the Admin Server entry. Since the Admin Server entry has a special object class,
nsAdminConfig, it is possible to search for the entry using that object class to retrieve the DN.
/usr/lib/mozldap/ldapsearch -D "cn=directory manager" -w secret -p 389 h server.example.com -b "o=NetscapeRoot" "(objectclass=nsAdminConfig)"
dn
version:1
dn: cn=configuration, cn=admin-serv-example, cn=Red Hat Administration
Server, cn=Server Group, cn=server.example.com, ou=example.com,
o=NetscapeRoot
2. To set IP address-based restrictions, edit the nsAdminAccessAddresses attribute.
/usr/lib/mozldap/ldapmodify -D "cn=directory manager" -w secret -p 389 h server.example.com
Page 25

Changing the Admin User's Name and Password
17
dn: cn=configuration, cn=admin-serv-example, cn=Red Hat Administration
Server, cn=Server Group, cn=server.example.com, ou=example.com,
o=NetscapeRoot
changetype:modify
replace:nsAdminAccessAddresses
nsAdminAccessAddresses:72.5.*.*
Hit Enter twice to submit the operation, and then Control+C to close ldapmodify.
The nsAdminAccessAddresses value can use wildcards to allow ranges. For example, to allow
all IP addresses:
nsAdminAccessAddresses:*
To allow only a subset of addresses on a local network:
nsAdminAccessAddresses:192.168.123.*
3. To set hostname or domain-based restrictions, edit the nsAdminAccessHosts attribute.
/usr/lib/mozldap/ldapmodify -D "cn=directory manager" -w secret -p 389 h server.example.com
dn: cn=configuration, cn=admin-serv-example, cn=Red Hat Administration
Server, cn=Server Group, cn=server.example.com, ou=example.com,
o=NetscapeRoot
changetype:modify
replace:nsAdminAccessHosts
nsAdminAccessHosts:*.example.com
Hit Enter twice to submit the operation, and then Control+C to close ldapmodify.
4. Restart the Admin Server to apply the changes.
service dirsrv-admin restart
2.7. Changing the Admin User's Name and Password
During installation, you are asked to enter a username and password for the Configuration
Administrator, the user authorized to access and modify the entire configuration directory. The
Configuration Administrator entry is stored in the directory under the following DN:
uid=userID,ou=Administrators,ou=TopologyManagement,o=NetscapeRoot
The Configuration Administrator's username and password are managed through the Directory Server
and are represented in an LDAP entry; this is described in the Directory Server Administrator's Guide.
During installation, the Configuration Administrator's username and password are used to
automatically create the Administration Server Administrator. This user can perform a limited number
Page 26

Chapter 2. Admin Server Configuration
18
of administrative tasks, such as starting, stopping, and restarting servers in a local server group. The
Administration Server Administrator is created for the purpose of logging into the Console when the
Directory Server is not running.
The Administration Server Administrator does not have an LDAP entry; it exists only as an entity in a
local configuration file, /etc/dirsrv/admin-serv/admpw.
Even though they are created at the same time during installation, and are identical at that time, the
Configuration Administrator and Administration Server Administrator are two separate entities. If you
change the username or password for one in the Console, the Console does not automatically make
the same changes for the other.
The Administration Server Administrator has full access to all configuration settings in the Admin
Server. The information for the admin user is set on the Access tab in the Console.
NOTE
The Admin Server administrator username and password are stored in the /etc/
dirsrv/admin-serv/admpw file. For example:
admin:{SHA}W6ph5Mm5Pz8GgiULbPgzG37mj9g=
The password is encrypted and cannot be changed directly in the admpw file. The
username can be changed in this file, but cannot be used to log into the Console unless
the password is updated in the Console first. For this reason, it is better to edit the
Administration Server Administrator username and password only through the Admin
Server Console.
To change the Administration Server Administrator's ID or password:
1. Open the Admin Server management window.
2. Click the Configuration tab.
3. Click the Access tab.
4. Change the admin user's name or password. The username is the ID given for logging into the
Admin Server.
Page 27

Working with SSL
19
5. Click Save.
2.8. Working with SSL
The Admin Server can run over HTTPS (secure HTTP) if SSL is enabled on the server. There are
steps to enabling SSL:
1. Generating and submitting a certificate request.
2. Receiving and installing the certificate.
3. Trusting the certificate authority (CA) which issued the certificate.
4. Changing the Admin Server configuration to allow SSL connections.
2.8.1. Requesting and Installing a Server Certificate
The Admin Server Console has a tool, the Certificate Request Wizard, which generates a valid
certificate request to submit to any certificate authority (CA).
1. In the Admin Server Console, select the Tasks tab, and click Manage Certificates.
Page 28

Chapter 2. Admin Server Configuration
20
2. Create a certificate request.
a. Select the Server Certs tab, and click the Request button.
Click Next.
b. Enter the Requester Information in the blank text fields, then click Next.
Page 29

Requesting and Installing a Server Certificate
21
• Server Name. The fully qualified hostname of the Directory Server as it is used in DNS and
reverse DNS lookups; for example, server.example.com. The server name is critical for
client-side validation to work, which prevents man-in-the-middle attacks.
IMPORTANT
This must be a valid hostname that can be resolved correctly by all Admin
Server clients, or TLS/SSL will not work.
• Organization. The legal name of the company or institution. Most CAs require this
information to be verified with legal documents such as a copy of a business license.
• Organizational Unit. Optional. A descriptive name for the organization within the company.
• Locality. Optional. The company's city name.
• State or Province. The full name of the company's state or province (no abbreviations).
• Country. The two-character abbreviation for the country's name (ISO format). The country
code for the United States is US.
c. Enter the password that used to protect the private key, and click Next.
Page 30

Chapter 2. Admin Server Configuration
22
The Next button is grayed out until a password is supplied.
3. The Request Submission dialog box provides two ways to submit a request: directly to the CA (if
there is one internally) or manually. To submit the request manually, select Copy to Clipboard or
Save to File to save the certificate request which will be submitted to the CA.
To submit the request to a CA manually, either email it or use the web form for the CA, if one is
available. Copy the certificate request information and submit it using the appropriate method.
-----BEGIN NEW CERTIFICATE REQUEST----MIIBrjCCARcCAQAwbjELMAkGA1UEBhMCVXMxEzARBgNVBAgTCkNBTElGT1J
Page 31

Requesting and Installing a Server Certificate
23
OSUExLDAqBgVBAoTI25ldHNjYXBlIGNvbW11bmljYXRpb25zIGNvcnBvcmF
0aW9uMRwwGgYDVQQDExNtZWxsb24ubmV0c2NhcGUuY29tMIGfMA0GCSqGSI
b3DQEBAQUAA4GNADCBiQKBgQCwAbskGh6SKYOgHy+UCSLnm3ok3X3u83Us7
ug0EfgSLR0f+K41eNqqRftGR83emqPLDOf0ZLTLjVGJaH4Jn4l1gG+JDf/n
/zMyahxtV7+mT8GOFFigFfuxaxMjr2j7IvELlxQ4IfZgWwqCm4qQecv3G+N
9YdbjveMVXW0v4XwIDAQABoAAwDQYK
------END NEW CERTIFICATE REQUEST-----
4. Wait for the CA to respond with the server certificate; this can be as short as a few hours for an
internal CA or as long as several weeks for a third-party CA.
5. Save the issued certificate to a file.
NOTE
Keep a backup of the certificate data in a safe location. If the system ever loses the
certificate data, the certificate can be reinstalled using the backup file.
6. Install the certificate.
a. Select the Tasks tab, and click Manage Certificates.
Page 32

Chapter 2. Admin Server Configuration
24
b. Select the Server Certs tab, and click Install.
c. Give the absolute path to the certificate (In this file radio button) or paste the certificate text in
the text box (In the following encoded text block radio button), then click Next.
d. Check that the certificate information displayed is correct, and click Next.
e. Name the certificate, and click Next.
f. Provide the password that protects the private key. This password is the same as the one
provided in step c.
After installing the server certificate, configure the Admin Server to trust the CA which issued the
server's certificate.
2.8.2. Installing a CA Certificate
To configure the Admin Server to trust the CA, obtain the CA's certificate and install it into the server's
certificate database. Some commercial CAs provide a web site that allow users to automatically
download the certificate, while others will email it back to users.
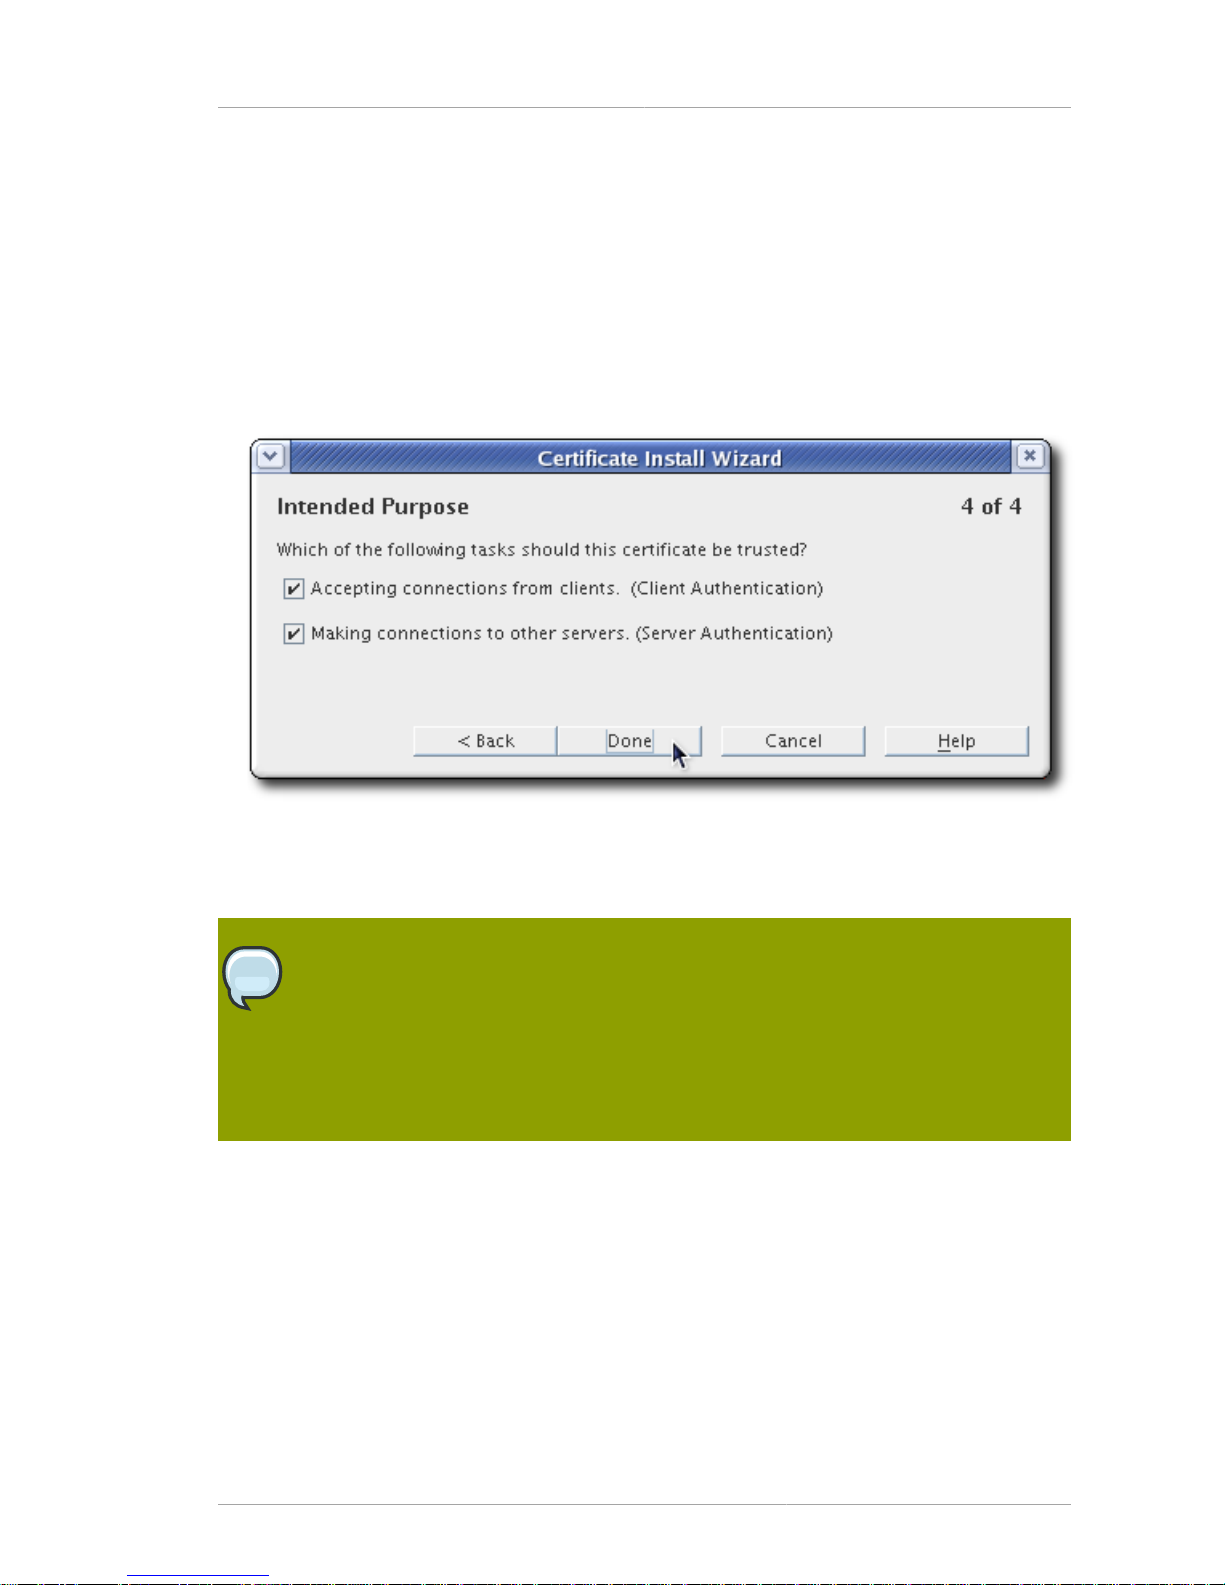
After receiving the CA certificate, use the Certificate Install Wizard to configure the Admin Server to
trust the CA.
1. In the Admin Server Console, select the Tasks tab, and click Manage Certificates.
Page 33

Installing a CA Certificate
25
2. Go to the CA Certs tab, and click Install.
Page 34

Chapter 2. Admin Server Configuration
26
3. If the CA's certificate is saved to a file, enter the path in the field provided. Alternatively, copy and
paste the certificate, including the headers, into the text box. Click Next.
Page 35
Enabling SSL
27
4. Click Next to move through the panels that show the CA certificate information and the certificate
name.
5. Select the purpose of trusting this certificate authority; it is possible to select both options:
• Accepting connections from clients (Client Authentication). The server checks that the client's
certificate has been issued by a trusted certificate authority.
• Accepting connections to other servers (Server Authentication). This server checks that
the directory to which it is making a connection (for replication updates, for example) has a
certificate that has been issued by a trusted certificate authority.
6. Click Done.
After installing the CA certificate, it is listed in the CA Certificates tab in the Console.
NOTE
If a CA certificate is incorrectly generated, it is listed in the Server Certificates tab in the
Console rather than the CA Certificates tab. The certificate still works as a CA certificate,
even though it is listed in the wrong tab.
Still, request certificates from a real certificate authority to minimize the risk of using an
incorrectly generated certificate and breaking SSL/TLS in the Admin Server.
2.8.3. Enabling SSL
1. Open the Admin Server management window.
2. Click the Configuration tab.
3. Click the Encryption tab.
Page 36

Chapter 2. Admin Server Configuration
28
4. Select the Enable SSL for this server checkbox.
5. Select the Use this cipher family: RSA checkbox.
6. Choose the security device where the key is stored. By default, the key is stored in the local key
database, Internal (Software-based). If the key is stored on an external device (such as a smart
card), select that device from the menu.
7. Choose the server certificate to use with SSL.
The certificates available in the token certificate database are listed in the drop-down menu.
8. Click the Settings button to set the ciphers that the Admin Server accepts for SSL/TLS
connections.
Page 37

Creating a Password File for the Admin Server
29
9. Set whether to require client authentication to the Admin Server. Client authentication means that
the server checks that the client's certificate has been issued by a trusted CA.
10. Click Save.
2.8.4. Creating a Password File for the Admin Server
Normally, if SSL is enabled, the server prompts for a security password when the Admin Server is
restarted:
Starting dirsrv-admin:
Please enter password for "internal" token:
The Admin Server can use a password file when TLS/SSL is enabled so that the server restarts
silently, without prompting for the security password.
WARNING
This password is stored in clear text within the password file, so its usage represents a
significant security risk. Do not use a password file if the server is running in an unsecured
environment.
Page 38

Chapter 2. Admin Server Configuration
30
1. Open the Admin Server configuration directory.
cd /etc/dirsrv/admin-serv
2. Create a password file named password.conf. The file should include a line with the token
name and password, in the form token:password. For example:
internal:secret
For the NSS software crypto module (the default software database), the token is always called
internal.
The password file should be owned by the Admin Server user and set to read-only by the Admin
Server user, with no access to any other user (mode 0400).
NOTE
To find out what the Admin Server user ID is, run grep in the Admin Server
configuration directory:
cd /etc/dirsrv/admin-serv
grep \^User console.conf
3. In the /etc/dirsrv/admin-serv directory, edit the nss.conf file to point to the location of the
new password file.
# Pass Phrase Dialog:
# Configure the pass phrase gathering process.
# The filtering dialog program (`builtin' is a internal
# terminal dialog) has to provide the pass phrase on stdout.
NSSPassPhraseDialog file:/etc/dirsrv/admin-serv/password.conf
4. Restart the Admin Server.1 For example:
service dirsrv-admin restart
After TLS/SSL is enabled, then the Admin Server can only be connected to using HTTPS. All of the
previous HTTP (standard) URLs for connecting to the Admin Server and its services no longer work.
This is true whether connecting to the Admin Server using the Console or using a web browser.
2.9. Changing Directory Server Settings
The Admin Server stored information about the Directory Server Configuration Directory (which
stores the instance configuration information) and the Directory Server User Directory (which stores
the actual directory entries). These can be the same directory instance, but they do not have to be.
The settings for both of those databases can be edited in the Admin Server configuration so that it
communicates with a different Directory Server instance.
Page 39

Changing the Configuration Directory Host or Port
31
2.9.1. Changing the Configuration Directory Host or Port
Configuration data are stored under o=NetscapeRoot in the Configuration Directory. The
configuration database contains server settings such as network topology information and server
instance entries. When server configuration changes are stored in the configuration directory subtree.
WARNING
Changing the Directory Server host name or port number impacts the rest of the servers
in the server group. Changing a setting here means the same change must be made for
every server in the server group.
1. Open the Admin Server management window.
2. Click the Configuration tab.
3. Click the Configuration DS tab.
4. Set the Configuration Directory Server connection information.
• The LDAP Host is the hostname of the Configuration Directory Server machine.
• The LDAP Port is the port number to use for the Directory Server instance. The regular LDAP
port is 389; the default LDAPS (secure) port number is 636.
• Check the Secure Connection checkbox to use the secure port. Before checking this box,
make sure that the Configuration Directory Server has enabled SSL.
5. Click Save.
2.9.2. Changing the User Directory Host or Port
The user directory is used for authentication, user management, and access control. It stores all user
and group data, account data, group lists, and access control instructions (ACIs).
Page 40

Chapter 2. Admin Server Configuration
32
There can be multiple user directories in a single deployment because using multiple user directories
enhances overall performance for organizations which are geographically spread out, which have high
usage, or have discrete divisions which benefit from individual directories.
Admin Server can be configured to authenticate users against multiple user directories.
To change the information for the user directory:
1. Open the Admin Server management window.
2. Click the Configuration tab.
3. Click the User DS tab.
4. Set the User Directory Server connection information.
5. Edit the user directory information.
The Use Default User Directory radio button uses the default user directory associated with the
domain. To use multiple Directory Server instances or to use a different instance, select the Set
User Directory radio button and set the required information:
• The LDAP Host and Port field specifies the location of the user directory instance.
It is possible to configure multiple locations for the user directory for authentication and other
directory functions; separate each location with a space. For example:
server.example.com:389 alt.example.com:389
Page 41

Changing the User Directory Host or Port
33
NOTE
If more than one location is given in the LDAP Host and Port field, the settings for
the remaining fields will apply to all of those instances.
• Check the Secure Connection box to use SSL to connect to the user directory. Only select this
if the Directory Server is already configured to use SSL.
• Give the User Directory Subtree. For example:
dc=example,dc=com
Every location listed in the LDAP Host and Port field must contain that subtree and the subtree
must contain the user information.
• Optionally, enter the Bind DN and Bind Password for the user which connects to the user
directory.
6. Click Save.
Page 42

34
Page 43

Chapter 3.
35
Admin Express
3.1. Managing Servers in Admin Express
Admin Express provides a quick, simple web-based gateway to do basic management of servers.
There are three tasks that can be performed through Admin Express:
• Stopping and starting the server
• Checking the server access, error, and audit logs
• Monitoring the progress and information for replication between Directory Servers
3.1.1. Opening Admin Express
The Admin Server services pages URL is the Admin Server host and port. For example:
http://ldap.example.com:9830/
The Admin Express page is always available at that URL.
NOTE
If SSL/TLS is enabled on the Admin Server, then the URL must use the prefix https:
with the same port number. The standard HTTP URLs will not work.
https://ldap.example.com:9830/
3.1.2. Starting and Stopping Servers
On the main Admin Express page, there are buttons to turn servers off and on.
Figure 3.1. Stopping and Stopping Servers
IMPORTANT
If either the Admin Server or the Configuration Directory Server is turned off through the
Admin Express page, then it must be restarted through the command line, not through
Page 44

Chapter 3. Admin Express
36
the Admin Express On/Off buttons because Admin Express requires access to both the
Admin Server and Configuration Directory Server in order to function.
Other Directory Server instances can be safely stopped and restarted through Admin
Express.
3.1.3. Viewing Server Logs
Admin Express can show and search the access and error logs for Directory Server and Admin Server
and the audit logs for the Directory Server.
1. In the Admin Express page, click the Logs link by the server name.
2. Select which log type to view, how many lines to return, and any string to search for, and click OK.
Figure 3.2. Checking Logs
3.1.4. Viewing Server Information
The Server Info link on the Admin Express page opens a page with the basic description of the
server instance, such as the build number, installation date, and server port number. This is the same
information displayed in the Console when an instance is selected.
Page 45

Monitoring Replication from Admin Express
37
Figure 3.3. Checking Server Information
The Directory Server information is located in the /etc/dirsrv/slapd-instance_name/
dse.ldif file; the Admin Server information is located in .conf files in the /etc/dirsrv/adminserv directory.
3.1.5. Monitoring Replication from Admin Express
Admin Express has an option to monitor replication status in real-time, meaning that it shows
the number of updates, times the most recent updates were sent, error and success messages,
replication schedule, the replicated directory suffix, and other information. Unlike other ways of
checking replication status, the Admin Express Replication Status page shows the real-time status of
replication, including updates in progress, current changes sequence numbers, and the lag between
when a change is made on the supplier and when that change is sent to the consumer.
Monitoring replication is set up using a simple configuration file which specifies which server to monitor
and what supplier and consumer replicas to include in the status page.
When trying to monitor replication status through Admin Express, remember two things:
• The Replication Status page is only available for supplier servers. (It can be opened for other types
of replicas; there's just no information available and has the message The server is not a master or
it has no replication agreement.)
• The configuration file must be in a directory that is accessible to Admin Server, and the file must be
readable by the Admin Server user. By default, the user is nobody.
The user is set in the console.conf file. To check the user, use grep to return the value:
grep \^User /etc/dirsrv/admin-serv/console.conf
Page 46

Chapter 3. Admin Express
38
The configuration file should be readable by the Admin Server user and no other users, so consider
resetting the permissions on the file:
chmod 0400 filename
To view in-progress status of replication in Admin Express:
1. Create a configuration file. The configuration file lists all of the servers to monitor for replication,
giving their hostname, port, the bind credentials to use, and then optional settings for aliases and
time lag colors.
#Configuration File for Monitoring Replication Via Admin Express
[connection] Required. Gives the server host, port, supplier bind DN,
and password.
host1.example.com:389:cn=replication manager:mypassword
host2.example.com:3891:cn=replication manager:altpassword
[alias] Optional. Gives a friendly-name alias to the servers and
consumers.
M1 = host1.example.com:389
M2 = host2.example.com:3891
C1 = host3.example.com:3892
C2 = host4.example.com:3890
[color] Optional. Sets the color for the time lag boxes.
0 = #ccffcc
5 = #FFFFCC
60 = #FFCCCC
The configuration file must be in a directory that is accessible to the Admin Server, and the file
must be readable by the Admin Server user. By default, the user is nobody.
The user is set in the console.conf file. To check the user, use grep to return the value:
grep \^User /etc/dirsrv/admin-serv/console.conf
The configuration file should be readable by the Admin Server user and no other users, so
consider resetting the permissions on the file:
chmod 0400 filename
2. In the Admin Server web page, click the Admin Express link, and log in.
3. Click the Replication Status link by the supplier server name.
4. Type the path to the configuration file in the Configuration file field. Also, set the refresh rate,
which is how frequently the replication status page updates; the default is 300 seconds.
Page 47

Monitoring Replication from Admin Express
39
Figure 3.4. Viewing Replication Status
5. Click OK.
The Replication Status page shows the status for sending updates to every consumer listed in the
configuration file.
Figure 3.5. Viewing Replication Status
Table Description
Table header The table header shows the replica ID of the
supplier replica, the replicated suffix root (such
as dc=example,dc=com), and the maximum
change state number (CSN) on the supplier.
(The CSN is the ID of the latest change on the
supplier, while the max CSN for the supplier
shows the last update it received.)
Max CSN The ID number of the most recent CSN the
consumer has received that originated from the
supplier.
Time lag How long it takes for the consumer to receive
updates from the supplier; this is the time
difference between the supplier and the
consumer's max CSNs. When a consumer is in
sync with its supplier, the time lag is 0.
Page 48

Chapter 3. Admin Express
40
Table Description
Last Modify Time Gives the time of the last update for the
consumer (the time the last CSN entry was sent).
Supplier Gives the name of the supplier sending
updates to that consumer; this can be useful
if a consumer receives updates from multiple
suppliers or there are multiple suppliers being
monitored on the Replication Status page.
Sent/Skipped The number of changes that were sent from
the supplier and the number skipped in the
replication update. The numbers are kept in
suppliers' memory only and are cleared if the
supplier is restarted.
Update Status The status code (and meaning) for the last
update. This column can indicate a possible
deadlock if all the suppliers complain that they
cannot acquire a busy replica. It is normal
for there to be a busy message if one of the
suppliers is doing an update.
Update Start and End The timestamps for when the most recent update
process started and ended.
Schedule The configured replication schedule. 0:-:
means that the consumer is continually updated
by the supplier.
SSL? Indicates whether the supplier connects to the
consumer over SSL.
3.2. Configuring Admin Express
Admin Express can be edited for the page appearance, but most functionality is controlled through
the web server or the Admin Server configuration and should be edited through those servers, not by
editing the configuration files directly.
3.2.1. Admin Express File Locations
The directories for all of the Admin Express configuration files are listed in Table 3.1, “Admin Express
File Directories”; the specific files are described in each section describing the different Admin Express
page configurations.
Directory Description
/etc/dirsrv/admin-serv Contains the local.conf, httpd.conf, and other configuration files which
define the Admin Server and configure the web server.
/usr/share/dirsrv/html/ Contains the HTML files and graphics used for the Admin Express appearance.
Table 3.1. Admin Express File Directories
Page 49

Admin Express Configuration Files
41
3.2.2. Admin Express Configuration Files
The behavior for Admin Express is mostly set through the web server configuration and should not
be edited. The other Admin Express configuration is set through directives which insert data or form
fields.
There is not cascading style sheet (CSS) file to centralize the formatting for pages in Admin Express.
All formatting is done inline with the tags or through <style> tags in the page head. For information
on editing inline tags, see http://directory.fedoraproject.org/wiki/HTMLEditing.
3.2.2.1. Files for the Admin Server Welcome Page
The configuration files for the introductory page for Admin Express is located in the /usr/share/
dirsrv/dsgw/html directory. One file sets the formatting, copyright text, and some web application
text, admserv.html.
Figure 3.6. Intro Page Elements
Page 50

Chapter 3. Admin Express
42
All of the formatting for the page is set inline. The text files are inserted using the INCLUDEIFEXISTS
directive.
<tr valign="TOP">
<td> </td>
<td bgcolor="#9999cc" colspan="4"> <font color="white" size="+1"><font
face="Verdana, sans-serif">Services
for Administrators</font></font></td>
<td> </td>
</tr>
<tr valign="TOP">
<td> </td>
<td colspan="4">
<table border="0" cellspacing="0" cellpadding="0">
<tr valign="TOP">
<td><img src="/icons/spacer.gif" width="6" height="6"></td>
<td></td>
</tr>
<!-- INCLUDEIFEXISTS admserv_dsgw.html -->
The text files themselves have inline formatting for the inserted table rows.
3.2.2.2. Files for the Replication Status Appearance
There are two pages for monitoring the replication status. The first is for the configuration page, which
requires two files:
• The body of the page, /usr/share/dirsrv/html/monreplication.html
• The heading of the page, /usr/share/dirsrv/html/htmladmin.html
Figure 3.7. Monitoring Replication Setup Page Elements
The Replication Status page uses two script-related configuration files:
• The body of the page, which is configured in the replication monitoring script, /usr/bin/repl-
monitor.pl
• Optionally, the configuration file for the replication monitoring, which can configure the time lag
colors with the [colors] section
• The heading of the page, /usr/share/dirsrv/html/htmladmin.html
Page 51

Admin Express Configuration Files
43
Figure 3.8. Monitoring Replication View Page Elements
The text for the table headings, labels, and page sections are set in the Perl script. For example:
#Print the header of consumer
print "\n<tr class=bgColor16>\n";
print "<th nowrap>Receiver</th>\n";
print "<th nowrap>Time Lag</th>\n";
print "<th nowrap>Max CSN</th>\n";
....
print "</tr>\n";
The styles for the Replication Status page are printed in the Perl script in the <style> tag in the HTML
header. Many of the classes are the same as those in the style.css for the other web applications.
These can be edited in the Perl script or by uncommenting the stylesheet reference and supplying a
CSS file. For example:
# print the HTML header
print "Content-type: text/html\n\n";
print "<!DOCTYPE HTML PUBLIC \"-//W3C//DTD HTML 3.2//EN\"><html>\n";
print "<head><title>Replication Status</title>\n";
# print "<link type=text/css rel=stylesheet href=\"master-style.css\">
\n";
print "<style text/css>\n";
print "Body, p, table, td, ul, li {color: #000000; font-family: Arial,
Helvetica, sans-serif; font-size: 12px;}\n";
print "A {color:blue; text-decoration: none;}\n";
print "BODY {font-family: Arial, Helvetica, sans-serif}\n";
print "P {font-family: Arial, Helvetica, sans-serif}\n";
print "TH {font-weight: bold; font-family: Arial, Helvetica, sansserif}\n";
print "TD {font-family: Arial, Helvetica, sans-serif}\n";
print ".bgColor1 {background-color: #003366;}\n";
print ".bgColor4 {background-color: #cccccc;}\n";
print ".bgColor5 {background-color: #999999;}\n";
print ".bgColor9 {background-color: #336699;}\n";
print ".bgColor13 {background-color: #ffffff;}\n";
print ".bgColor16 {background-color: #6699cc;}\n";
Page 52

Chapter 3. Admin Express
44
print ".text8 {color: #0099cc; font-size: 11px; font-weight: bold;}\n";
print ".text28 {color: #ffcc33; font-size: 12px; font-weight: bold;}\n";
print ".areatitle {font-weight: bold; color: #ffffff; font-family:
Arial, Helvetica, sans-serif}\n";
print ".page-title {font-weight: bold; font-size: larger; font-family:
Arial, Helvetica, sans-serif}\n";
print ".page-subtitle {font-weight: bold; font-family: Arial, Helvetica,
sans-serif}\n";
print "</style></head>\n<body class=bgColor4>\n";
3.2.2.3. Files for the Server Information Page
There are two files formatting the server information page:
• The body of the page, /usr/share/dirsrv/html/viewdata.html
• The heading of the page, /usr/share/dirsrv/html/htmladmin.html
Figure 3.9. Server Information Page Elements
The viewdata.html file is very simple, using only the two directives to insert the server data, plus
other directives to insert other information. For the Admin Server, the SHOW_DATA directive takes the
information from the /etc/dirsrv/admin-serv/local.conf file. For the Directory Server, it
takes the data from the /etc/dirsrv/slapd-instance_name/dse.ldif file. The ID_TITLE is
the name of the server instance.
<body text="#000000" bgcolor="#FFFFFF" link="#666699" vlink="#666699"
alink="#333366">
Page 53

Admin Express Configuration Files
45
<br>
<table BORDER=0 CELLSPACING=2 CELLPADDING=2 WIDTH="100%">
<!-- ID_TITLE -->
<p>
<!-- SHOW_DATA -->
<p>
<font face="PrimaSans BT, Verdana, sans-serif"><font size=-1>Additional
Information:</font></font>
<p>
<!-- CHECK_UPGRADE -->
<p>
<!-- SHOW_URL -->
</table>
<!-- HELPBUTTON -->
</body>
3.2.2.4. Files for the Server Logs Page
There are two files formatting the server logs page:
• The body of the page, /usr/share/dirsrv/html/viewlog.html
• The heading of the page, /usr/share/dirsrv/html/htmladmin.html
Page 54

Chapter 3. Admin Express
46
Figure 3.10. Log View Page Elements
The page information is set through the inserted directives. The server instance name is set in the
ID_TITLE directive. The log is displayed through the ACCESS_LOG directives. The form at the top is
formatted with directive pairs, one which sets the descriptive text and the other inserting the field type.
For example, this sets the log type menu:
<form method=GET action=ViewLog>
<font face="PrimaSans BT, Verdana, sans-serif"><font size=-1>
<!-- BEGINELEM -->
<!-- ELEM txt="Log to view: " -->
<!-- LOG_TO_VIEW -->
....
<!-- SUBMIT -->
</font></font>
</form>
3.2.3. Admin Express Directives
The Admin Express directives are HTML comments that are interpreted by the CGI scripts; these
directives are used to set form fields and to pull data from the server configuration and log files.
Directive Description Example
ACCESS_LOG Inserts the server log file. <!-- ACCESS_LOG -->
ADMURL <!-- ADMURL -->
Page 55

Admin Express Directives
47
Directive Description Example
BEGINELEM Marks the opening of form input
elements. This is always paired
with ENDELEM.
<!-- BEGINELEM -->
CHECK_UPGRADE <!-- CHECK_UPGRADE -->
ELEM Inserts a text element. This has
one argument, txt=, which
defines the text to use.
<!-- ELEM txt="Field name here:
" -->
ELEMADD Inserts a text element. This has
one argument, txt=, which
defines the text to use.
<!-- ELEMADD txt="Field name
here: " -->
ENDELEM Marks the ending of form input
elements. This is always paired
with BEGINELEM.
<!-- ENDELEM -->
HELP_BUTTON Inserts a button to open
context-specific help.
<!-- HELP_BUTTON -->
HELPLINK Inserts a link to the general
Admin Express help file.
<!-- HELPLINK -->
HIDDEN_ID <!-- HIDDEN_ID -->
ID_TITLE Inserts the name of the server
instance, such as admin-
serv or example (if the
Directory Server instance name
is slapd-example)
<!-- ID_TITLE -->
INCLUDEIFEXISTS Inserts the contents of the
HTML file. The inserted file
should include both the text and
any HTML markup.
<!-- INCLUDEIFEXISTS
"file.html" -->
LOG_TO_VIEW Inserts a drop-down menu with
the types of logs available to
view.
<!-- LOG_TO_VIEW -->
NUM_TO_VIEW Inserts a form field to set the
number of lines to return.
<!-- NUM_TO_VIEW -->
REFRESHINTERVAL Inserts a form field to set the
refresh interval (in seconds) for
replication monitoring.
<!-- REFRESHINTERVAL -->
SERVHOST <!-- SERVHOST -->
SERVPORT <!-- SERVPORT -->
SHOW_DATA Inserts the server data from the
configuration file, including the
port number, installation date,
and build number.
<!-- SHOW_DATA -->
SHOW_URL <!-- SHOW_URL -->
SITEROOT <!-- SITEROOT -->
Page 56

Chapter 3. Admin Express
48
Directive Description Example
STRING_TO_VIEW Inserts a form field to use to set
the search string for the logs.
<!-- STRING_TO_VIEW -->
SUBMIT Inserts a three-button set: to
save or submit the form; to
reset the form; and to open a
help topic.
<!-- SUBMIT -->
Table 3.2. Admin Express Directives
Page 57

Chapter 4.
49
Admin Server Command-Line Tools
Red Hat Admin Server has command-line utilities which make it easier to manage the Admin Server
without having to launch the Admin Console.
This chapter explains where to find and how to use the Admin Server tools.
4.1. sec-activate
The sec-activate tool activates and deactivates SSL for the Admin Server.
• Location
• Syntax
Location
The sec-activate tool is located in the /usr/lib/dirsrv/cgi-bin/ directory.
Syntax
sec-activate serverRoot SSLEnabled
Argument Description
serverRoot The location of the Admin Server configuration
directory. The default location is /etc/dirsrv/
admin-serv.
SSLEnabled Sets whether to turn SSL on or off for the
Admin Server.
For example:
sec-activate /etc/dirsrv/admin-serv on
4.2. modutil
The modutil tool is a command-line utility for managing PKCS #11 module information stored in
secmod.db files or hardware tokens. modutil can perform a variety of security database operations:
• Adding and deleting PKCS #11 modules
• Changing passwords
• Setting defaults
• Listing module contents
• Enabling or disabling slots
• Enabling or disabling FIPS-140-1 compliance
• Assigning default providers for cryptographic operations
Page 58

Chapter 4. Admin Server Command-Line Tools
50
• Creating key3.db, cert8.db, and secmod.db security databases.
Security module database management is part of a process that typically involves managing key
databases (key3.db files) and certificate databases (cert8.db files). The key, certificate, and
PKCS #11 module management process generally begins with creating the keys and key database
necessary to generate and manage certificates and the certificate database.
• Location
• Syntax
• Tasks and Options
• JAR Information File
• Examples of Using modutil
Location
The modutil tool is located in the /usr/bin folder.
Syntax
modutil task [option]
task is one of the commands listed in Table 4.1, “Task Commands for modutil” and option is from
Table 4.2, “Options for modutil”. Each modutil command can take one task and one option.
Tasks and Options
You can use the modutil tool to perform a number of different tasks. These tasks are specified
through the use of commands and options. Commands specify the task to perform. Options modify a
task command.
NOTE
Each modutil command can take one task and one option.
Table 4.1, “Task Commands for modutil” describes what the modutil commands do and what options
are available for each. Table 4.2, “Options for modutil” defines what the options do.
Tasks Description Allowed Options
-add moduleName Adds the named PKCS #11
module to the database.
-libfile libraryFile
-mechanisms mechanismList
-changepw token Changes the password for the
named token. If the token has
not been initialized, this option
initializes it with the supplied
password. In this context, the
-pwfile passwordFile
-newpwfile newPasswordFile
Page 59

modutil
51
Tasks Description Allowed Options
term password is equivalent
to a personal identification
number (PIN).
-create Creates new secmod.db,
key3.db, and cert8.db
files. If any of these security
databases already exist in
a specified directory, the
modutil tool displays an error
message.
-dbdir dbFolder
-default moduleName Sets the security mechanisms
for which the named module is
a default provider.
-mechanisms mechanismList
-delete moduleName Deletes the named module.
You cannot delete the internal
PKCS #11 module.
-disable moduleName Disables all slots on the named
module. To disable a specific
slot, use the -slot option.
-slot slotName
-enable moduleName Enables all slots on the named
module. To enable a specific
slot, use the -slot option.
-slot slotName
-fips true|false Enables or disables FIPS-140-1
compliance for the internal
module. true enabled FIPS
compliance, and false disable
FIPS compliance.
-force Disables the modutil tool's
interactive prompts so it can
be run from a script. Use this
command only after manually
testing each planned operation
to check for warnings and to
ensure that bypassing the
prompts will cause no security
lapses or loss of database
integrity.
-jar JARfile Adds a new PKCS #11 module
to the database. The module
must be contained in the
named JAR file.
The JAR file identifies all files
to install, the module name,
and mechanism flags. It should
also contain any files to be
installed on the target machine,
including the PKCS #11 module
-installdir installation_directory
-tempdir temporaryFolder
Page 60

Chapter 4. Admin Server Command-Line Tools
52
Tasks Description Allowed Options
library and other files, such as
documentation.
The JAR file uses the Netscape
Server PKCS #11 JAR format.
See JAR Information File for
more information on creating
JAR files.
-list [moduleName] Shows basic information
about the contents of the
secmod.db file. To display
detailed information about a
particular module, including
its slots and tokens, specify a
value for moduleName.
-undefault moduleName Specifies the security
mechanisms for which the
named module will not be a
default provider.
-mechanisms mechanismList
Table 4.1. Task Commands for modutil
Table 4.2, “Options for modutil” describes the different options for the modutil task commands.
Option Description
-dbdir dbFolder Specifies a folder in which to access or create
security module database files. This argument is
required for every command. This should point
to the Admin Server configuration directory. For
example:
-dbdir /etc/dirsrv/admin-serv
-installdir installation_directory Specifies the root installation folder for the
files supplied with the -jar JAR-file task. The
installation_directory folder should be one in
which it is appropriate to store dynamic library
files.
-libfile libraryFile Specifies the library file which contains the PKCS
#11 module that is being added to the database.
Use the full path to identify the file.
-mechanisms mechanismList Specifies the security mechanisms for which
a particular module is the default provider.
The mechanismList is a colon-separated list
of mechanism names. Enclose this list in
quotation marks if it contains spaces. The
module becomes a default provider for the
listed mechanisms when those mechanisms are
enabled. If more than one module is assigned as
a mechanism's default provider, the mechanism's
Page 61

modutil
53
Option Description
default provider is listed as undefined. The
following mechanisms are currently available:
• RSA
• DSA
• RC2, RC4, and RC5
• AES
• DES
• DH
• SHA1 and SHA256
• SSL and TLS
• MD2 and MD5
• RANDOM (for random number generation)
• FRIENDLY (for certificates that are publicly
readable).
-newpwfile newPasswordFile Specifies a text file containing a token's new
password. This allows the password to be
automatically updated when using the changepw command.
-nocertdb Instructs modutil not to open the certificate or
key databases. This has several effects:
• When used with the -changepw command, no
one is able to set or change the password on
the internal module, because the password is
stored in key3.db.
• When used with the -create command, only
a secmod.db file will be created; cert8.db
and key3.db will not be created.
• When used with the -jar command,
signatures on the JAR file will not be checked.
-pwfile passwordFile Specifies a text file containing a token's current
password. This allows automatic entry of
the password when using the -changepw
command.
-slot slotName Specifies a particular slot to enable or disable
when using the -enable or -disable
commands.
-tempdir temporaryFolder Specifies a folder in which to store temporary
files created by the -jar command. If a
Page 62

Chapter 4. Admin Server Command-Line Tools
54
Option Description
temporary folder is not specified, the current
folder is used.
Table 4.2. Options for modutil
JAR Information File
JAR (Java Archive) is a platform-independent file format that aggregates many files into one. JAR files
are used by modutil to install PKCS #11 modules. When modutil uses a JAR file, a special JAR
information file must be included. This information file contains special scripting instructions and must
be specified in the JAR file's MANIFEST file. Although the information file can have any name, it is
specified using the Pkcs11_install_script METAINFO command.
For details on how to declare this METAINFO command in the MANIFEST, see http://docs.sun.com/
source/816-6164-10/contents.htm.
If a PKCS #11 installer script is stored in the information file pk11install, the text file for the Signing
Tool contains the following METAINFO tag:
+ Pkcs11_install_script: pk11install
The JAR information file in Example 4.1, “Example JAR File” has instructions for installing a PKCS #11
module on different platforms.
Page 63

modutil
55
ForwardCompatible { IRIX:6.2:mips SUNOS:5.5.1:sparc }
Platforms {
Linux:2.0.32:x86 {
ModuleName { "Fortezza Module" }
ModuleFile { win32/fort32.dll }
DefaultMechanismFlags{0x00000001 }
CipherEnableFlags{ 0x00000001 }
Files {
win32/setup.exe {
Executable
RelativePath { %temp%/setup.exe }
}
win32/setup.hlp {
RelativePath { %temp%/setup.hlp }
}
win32/setup.cab {
RelativePath { %temp%/setup.cab }
}
}
}
Linux:2.0.32:x86 {
EquivalentPlatform {WINNT::x86}
}
SUNOS:5.5.1:sparc {
ModuleName { "Fortezza UNIX Module" }
ModuleFile { unix/fort.so }
DefaultMechanismFlags{ 0x00000001 }
CipherEnableFlags{ 0x00000001 }
Files {
unix/fort.so {
RelativePath{%root%/lib/fort.so}
AbsolutePath{/usr/local/Red Hat/lib/fort.so}
FilePermissions{555}
}
xplat/instr.html {
RelativePath{%root%/docs/inst.html}
AbsolutePath{/usr/local/Red Hat/docs/inst.html}
FilePermissions{555}
}
}
}
IRIX:6.2:mips {
EquivalentPlatform { SUNOS:5.5.1:sparc}
}
}
Example 4.1. Example JAR File
Creating a JAR information file involves writing a script that specifies which tasks to perform when
installing a module. Keys, predefined commands, and options that modutil interprets can be used to
specify different module installation procedures for different platforms.
Page 64

Chapter 4. Admin Server Command-Line Tools
56
Keys are case-insensitive strings that are grouped into three categories:
• Global Keys
• Per-Platform Keys
• Per-File Keys
Global Keys
Global keys define the platform-specific sections of the JAR information file. There are two global
keys: ForwardCompatible and Platforms.
ForwardCompatible is an optional key that specifies a list of system architectures and operating
systems that are compatible with later versions of the same architectures and operating systems. If
the platform that modutil is installing the module on is not specified by the Platforms key, then the
ForwardCompatible list is checked for any platforms that have the same OS and architecture in an
earlier version. If one is found, its attributes are used for the current platform.
The ForwardCompatible key uses the following format:
ForwardCompatible { Solaris:5.5.1:sparc }
The platforms listed between the braces must have entries within the Platforms key.
Platforms is a required key that specifies a list of platforms. Each entry in the list is itself a key-value
pair: the key is the name of the platform and the value list contains various attributes of the platform.
The ModuleName, ModuleFile, and Files attributes must be specified for each platform unless an
EquivalentPlatform attribute is specified. For more information, see Per-Platform Keys.
The platform string is in the following format:
system name:OS release:architecture
The modutil program obtains the system name, release number, and architecture values from
the system on which the modutil tool is running. The following system names and platforms are
currently recognized:
• HP-UX (hppa1.1)
• Linux (x86) is x86_64 recognized?
• Solaris (sparc)
For example:
Linux:5.2.0:x86
Per-Platform Keys
These keys have meaning only within an entry in the Platforms list.
Page 65

modutil
57
ModuleName is a required key that specifies the common name for the module. This name acts as a
reference to the module for Red Hat Communicator, the modutil tool, servers, or any other program
that uses the Red Hat security module database.
ModuleFile is a required key that names the PKCS #11 module file (.so) for this platform. The file
name should be a path that is relative to the JAR file location.
DefaultMechanismFlags is an optional key that specifies mechanisms for which this module is a
default provider. This key-value pair is a bitstring specified in hexadecimal (0x) format. It is constructed
as a bitwise OR of the string constants listed in Table 4.3, “Mechanisms and Default Mechanism
Flags”. Omitting the DefaultMechanismFlags entry causes the value to to default to 0x0.
Mechanism Hexadecimal Bitstring Value
RSA 0x00000001
DSA 0x00000002
RC2 0x00000004
RC4 0x00000008
DES 0x00000010
DH 0x00000020
FORTEZZA 0x00000040
RC5 0x00000080
SHA1 0x00000100
MD5 0x00000200
MD2 0x00000400
RANDOM 0x08000000
FRIENDLY 0x10000000
OWN_PW_DEFAULTS 0x20000000
DISABLE 0x40000000
Table 4.3. Mechanisms and Default Mechanism Flags
Files is a required key that lists the files that need to be installed for this module. Each entry in the
file list is a key-value pair. The key includes the path to the file that is contained in the JAR archive and
the value list contains the attributes of the file. At a minimum, you must specify either RelativePath
or AbsolutePath for each file. If desired, you can specify additional attributes. For more information,
see Per-File Keys.
The EquivalentPlatform key specifies that the attributes of the named platform should also be
used for the current platform. Using this key saves time when more than one platform uses the same
settings.
Per-File Keys
These keys have meaning only within an entry in a Files list. At a minimum, RelativePath or
AbsolutePath must be specified. If both are specified, the relative path is tried first, and the absolute
path is used only if a relative root folder is not provided by modutil.
The RelativePath key specifies the destination path of the file, relative to a folder indicated at
installation. You can assign values for two variables in the relative path, %root% and %temp%. At
Page 66

Chapter 4. Admin Server Command-Line Tools
58
run time, %root% is replaced with a folder in which files should be installed, such as the server's root
folder. The %temp% folder is created at the beginning of the installation and destroyed at the end.
The purpose of %temp% is to hold executable files (such as setup programs) or files that are used
by these programs. Files destined for the temporary folder are in place before any executable file is
launched. They are not deleted until all executable files have finished.
The AbsolutePath key specifies the destination of the file as an absolute path. If both
RelativePath and AbsolutePath are specified, modutil attempts to use the relative path. If it is
unable to determine a relative path, it uses the absolute path.
The Executable key specifies that a file is to be executed during the course of the installation.
Typically, this key is used to identify a setup program provided by a module vendor. The setup
program itself is specified by the RelativePath or AbsolutePath key.
For example, to specify that the setup.exe program (located in the %temp% folder) is an executable
file, include the following lines in your JAR information file:
Executable
RelativePath { %temp%/setup.exe }
More than one file can be specified as executable, in which case the files are run in the order in which
they are listed in the script file. Use the Executable key before a RelativePath or AbsolutePath
key to indicate
The FilePermissions key specifies the access permissions to apply to a file. The modutil
program interprets the key as a string of octal digits, following the standard UNIX format. This
key is a bitwise OR of the string constants listed in Table 4.4, “File Permissions Specified Using
FilePermissions”. For example, to specify read and execute access for all users, enter 555 (bitwise
400 + 100 + 040 + 010 + 004 + 001).
The following table lists the file permissions that can be specified using FilePermissions.
File Permission Bitstring Value
User Read 400
User Write 200
User Execute 100
Group Read 040
GroupWrite 020
Group Execute 010
Other Read 004
Other Write 002
Other Execute 001
Table 4.4. File Permissions Specified Using FilePermissions
Some platforms may not understand these permissions. The permissions are applied only if they make
sense for the current platform. If this key is omitted, a default value of 777 (read, write, and execute for
all users) is assumed.
Page 67

modutil
59
Examples of Using modutil
• Creating Database Files
• Displaying Module Information
• Setting a Default Provider
• Enabling a Slot
• Enabling FIPS Compliance
• Adding a Cryptographic Module
• Installing a Cryptographic Module from a JAR File
• Changing the Password on a Token
Creating Database Files
To create a set of security management database files in a directory:
modutil -create -dbdir /etc/dirsrv/admin-serv
WARNING: Performing this operation while the browser is running could cause
corruption of your security databases. If the browser is currently running,
you should exit browser before continuing this operation. Type
'q <enter>' to abort, or <enter> to continue:
Creating "/etc/dirsrv/admin-serv/key3.db"...done.
Creating "/etc/dirsrv/admin-serv/cert8.db"...done.
Creating "/etc/dirsrv/admin-serv/secmod.db"...done.
Displaying Module Information
To retrieve detailed information about a specific module:
modutil -list -dbdir /etc/dirsrv/admin-serv
Using database directory /etc/dirsrv/admin-serv...
Listing of PKCS #11 Modules
-----------------------------------------------------------
1. NSS Internal PKCS #11 Module
slots: 2 slots attached
status: loaded
slot: NSS Internal Cryptographic Services
token: NSS Generic Crypto Services
slot: NSS User Private Key and Certificate Services
token: NSS Certificate DB
-----------------------------------------------------------
Page 68

Chapter 4. Admin Server Command-Line Tools
60
Setting a Default Provider
To make a specific module the default provider for the RSA, DSA, and RC2 security mechanisms:
modutil -default "Cryptographic Module" -dbdir /etc/dirsrv/admin-serv mechanisms RSA:DSA:RC2
WARNING: Performing this operation while the browser is running could cause
corruption of your security databases. If the browser is currently running,
you should exit browser before continuing this operation. Type
'q <enter>' to abort, or <enter> to continue:
Using database directory /etc/dirsrv/admin-serv...
Successfully changed defaults.
Enabling a Slot
To enable a particular slot in a module:
modutil -enable "Cryptographic Module" -slot "Cryptographic Reader" dbdir /etc/dirsrv/admin-serv
WARNING: Performing this operation while the browser is running could cause
corruption of your security databases. If the browser is currently running,
you should exit browser before continuing this operation. Type
'q <enter>' to abort, or <enter> to continue:
Using database directory /etc/dirsrv/admin-serv...
Slot "Cryptographic Reader" enabled.
Enabling FIPS Compliance
To enable FIPS-140-1 compliance in the Admin Server's internal module:
modutil -fips true
WARNING: Performing this operation while the browser is running could cause
corruption of your security databases. If the browser is currently running,
you should exit browser before continuing this operation. Type
'q <enter>' to abort, or <enter> to continue:
FIPS mode enabled.
Adding a Cryptographic Module
To add a new cryptographic module to the database:
modutil -dbdir "/etc/dirsrv/admin-serv" -add "Cryptorific Module" -libfile
"/crypto.dll" -mechanisms RSA:DSA:RC2:RANDOM
WARNING: Performing this operation while the browser is running could cause
Page 69

modutil
61
corruption of your security databases. If the browser is currently running,
you should exit browser before continuing this operation. Type
'q <enter>' to abort, or <enter> to continue:
Using database directory /etc/dirsrv/admin-serv...
Module "Cryptorific Module" added to database.
Installing a Cryptographic Module from a JAR File
To install a module using a JAR file, first create the JAR file script. For example:
Platforms {
Linux:2.0.32:x86 {
ModuleName { "SuperCrypto Module" }
ModuleFile { crypto.dll }
DefaultMechanismFlags{0x0000}
CipherEnableFlags{0x0000}
Files {
crypto.dll {
RelativePath{ %root%/system32/crypto.dll }
}
setup.exe {
Executable
RelativePath{ %temp%/setup.exe }
}
}
}
Win95::x86 {
EquivalentPlatform { Winnt::x86 }
}
}
To install from the script, use the following command.
modutil -dbdir "/etc/dirsrv/admin-serv" -jar install.jar -installdir "/etc"
WARNING: Performing this operation while the browser is running could cause
corruption of your security databases. If the browser is currently running,
you should exit browser before continuing this operation. Type
'q <enter>' to abort, or <enter> to continue:
Using database directory /etc/dirsrv/admin-serv...
This installation JAR file was signed by:
----------------------------------------------
**SUBJECT NAME**
C=US, ST=California, L=Mountain View, CN=SuperCrypto Inc.,
OU=Digital ID Class 3 - Red Hat Object Signing,
Page 70

Chapter 4. Admin Server Command-Line Tools
62
OU="www.verisign.com/repository/CPS Incorp. by Ref.,LIAB.LTD(c)9 6",
OU=www.verisign.com/CPS Incorp.by Ref. LIABILITY LTD.(c)97 VeriSign,
OU=VeriSign Object Signing CA - Class 3 Organization, OU="VeriSign,
Inc.", O=VeriSign Trust Network **ISSUER NAME**,
OU=www.verisign.com/CPS Incorp.by Ref. LIABILITY LTD.(c)97 VeriSign,
OU=VeriSign Object Signing CA - Class 3 Organization, OU="VeriSign,
Inc.", O=VeriSign Trust Network
----------------------------------------------
Do you wish to continue this installation? (y/n)
Using installer script "installer_script"
Successfully parsed installation script
Current platform is Linux:2.0.32:x86
Using installation parameters for platform Linux:2.0.32:x86
Installed file crypto.dll to /winnt/system32/crypto.dll
Installed file setup.exe to ./pk11inst.dir/setup.exe
Executing "./pk11inst.dir/setup.exe"... "./pk11inst.dir/setup.exe" executed
successfully
Installed module "SuperCrypto Module" into module database
Installation completed successfully
Changing the Password on a Token
To change the password for a security device in use by a module.
modutil -dbdir "/etc/dirsrv/admin-serv" -changepw "Admin Server Certificate
DB"
WARNING: Performing this operation while the browser is running could cause
corruption of your security databases. If the browser is currently running,
you should exit browser before continuing this operation. Type
'q <enter>' to abort, or <enter> to continue:
Using database directory /etc/dirsrv/admin-serv...
Enter old password:
Enter new password:
Re-enter new password:
Token "Admin Server Certificate DB" password changed successfully.
Page 71

63
Index
A
access log
changing location and name
in the command line, 11
in the Console, 10
defined, 8
viewing in command line, 9
viewing in Console, 8
access settings
for Admin Server, 17
Admin Express
configuring, 40
directives, 46
file locations, 40
files, 41
for replication status, 42
for server information page, 44
for the server logs page, 45
for the welcome page, 41
opening, 35
replication monitoring, 37
starting and stopping servers, 35
viewing server information, 36
viewing server logs, 36
Admin Server
access settings for, 17
defined, 1
directory settings for, 30
enabling SSL, 27
encryption settings for, 19
logging options for, 8
login, 6
password file, 29
port number, 12
in the command line, 13
in the Console, 12
requesting a certificate, 19
restarting, 4
starting and stopping
command line, 5
Console, 4
starting and stopping servers, 35
starting the Console, 6
viewing logs, 36
viewing server information, 36
Admin Server Console
starting, 6
Administration Server Administrator
defined, 17
administrators
changing username, 17
resetting passwords, 17
authentication, 6
C
certificates, 19
installing, 24
Configuration Administrator
defined, 17
configuration directory
changing settings for, 31
overview, 31
connection restrictions, 14
setting in the command line, 16
setting in the Console, 14
D
directives, 46
Directory Server
file locations, 3
replication monitoring, 37
starting and stopping servers, 35
viewing information, 36
viewing logs, 36
E
encryption
settings for Admin Server, 19
error log
changing location and name
in the command line, 11
in the Console, 10
defined, 8
viewing in command line, 9
viewing in Console, 8, 9
F
File locations, 3
Filesystem Hierarchy Standard, 3
H
host restriction, 14
setting in the command line, 16
setting in the Console, 14
J
JAR information file
global keys, 56
Page 72

Index
64
per-file keys, 57
per-platform keys, 56
syntax, 55
L
logs
changing location and name
in the command line, 11
in the Console, 10
viewing access, 8, 9
viewing error, 8, 9, 9
M
modutil
commands
add, 50
changepw, 50
create, 50
default, 50
delete, 50
disable, 50
enable, 50
fips, 50
force, 50
jar, 50
list, 50
undefault, 50
options
dbdir, 52
installdir, 52
libfile, 52
mechanisms, 52
newpwfile, 52
nocertdb, 52
pwfile, 52
slot, 52
tempdir, 52
overview and syntax, 49
usage examples, 59
using JAR information file with, 54
P
password file
Admin Server, 29
passwords, 17
port number, 12
changing in the command line, 13
changing in the Console, 12
R
replication monitoring, 37
restart
Admin Server, 4
S
sec-activate, 49
SSL, 19
Admin Server password file, 29
certificates, 19
installing certificates, 24
using with Admin Server, 27
Starting and stopping
Admin Server Console, 6
Directory Server and Admin Server, 4
starting and stopping servers, 35
U
user directory
settings, 31
V
viewing server information, 36
viewing server logs, 36
 Loading...