

Red Hat DIRECTORY SERVER 8.1 - USING RED HAT CONSOLE 4-28-2008, Directory Server 8.1 Using Instruction
Page 1

Red Hat Directory
Server 8.1
Using Red Hat Console
For Red Hat Directory Server
Ella Deon Lackey
Publication date: Released April 28, 2009
Page 2

Using Red Hat Console
Red Hat Directory Server 8.1 Using Red Hat Console
For Red Hat Directory Server
Edition 8.1.1
Author Ella Deon Lackey
Copyright © 2009 Red Hat, Inc.
Copyright © 2009 Red Hat, Inc.. This material may only be distributed subject to the terms and
conditions set forth in the Open Publication License, V1.0 or later (the latest version of the OPL is
presently available at http://www.opencontent.org/openpub/).
Red Hat and the Red Hat "Shadow Man" logo are registered trademarks of Red Hat, Inc. in the United
States and other countries.
All other trademarks referenced herein are the property of their respective owners.
1801 Varsity Drive
Raleigh, NC 27606-2072 USA
Phone: +1 919 754 3700
Phone: 888 733 4281
Fax: +1 919 754 3701
PO Box 13588 Research Triangle Park, NC 27709 USA
This guide provides background information that system architects and administrators need to
successfully install and manage Red Hat Directory Servers in their enterprise. Read about Red Hat
server basics here before you begin installing and configuring servers in your enterprise.
Page 3

iii
Preface v
1. Purpose of This Guide .................................................................................................... v
2. Examples and Formatting ................................................................................................ v
2.1. Command and File Examples ............................................................................... v
2.2. Tool Locations ...................................................................................................... v
2.3. LDAP Locations ................................................................................................... v
2.4. Text Formatting and Styles ................................................................................... vi
3. Additional Reading ......................................................................................................... vii
4. Giving Feedback ........................................................................................................... viii
5. Documentation History .................................................................................................. viii
1. Overview of Red Hat Console 1
1.1. How the Console, Directory Server, and Administration Server Work Together .................. 1
1.2. Red Hat Console Menus .............................................................................................. 4
1.3. Red Hat Console Tabs ................................................................................................. 5
1.3.1. The Servers and Applications Tab ...................................................................... 5
1.3.2. The Users and Groups Tab ................................................................................ 6
1.4. Server-Specific Consoles .............................................................................................. 7
1.4.1. The Directory Server Console ............................................................................ 7
1.4.2. The Administration Server Console ..................................................................... 8
2. Basic Tasks in the Red Hat Console 11
2.1. Installing the Console ................................................................................................. 11
2.2. Launching the Console ............................................................................................... 11
2.3. Opening a Directory or Administration Server Window .................................................. 12
2.4. Changing the Console Appearance ............................................................................. 13
2.4.1. Changing Profile Locations ............................................................................... 14
2.4.2. Restoring Default Font Settings ........................................................................ 15
2.4.3. Changing Console Fonts .................................................................................. 16
2.4.4. Reordering Table Columns ............................................................................... 18
2.4.5. Customizing the Main Window ......................................................................... 19
2.4.6. Working with Custom Views ............................................................................. 20
3. Managing Server Instances 25
3.1. Editing Domain, Host, Server Group, and Instance Information ...................................... 25
3.2. Creating and Removing Admin Domains ...................................................................... 26
3.2.1. Creating and Editing an Admin Domain ............................................................. 26
3.2.2. Removing an Admin Domain ............................................................................ 27
3.3. Creating a New Directory Server Instance ................................................................... 28
3.4. Deleting a Directory Server Instance ........................................................................... 29
4. Managing Directory Server Users and Groups 31
4.1. Searching for Users and Groups ................................................................................. 31
4.2. Creating Directory Entries ........................................................................................... 33
4.2.1. Directory and Administrative Users ................................................................... 33
4.2.2. Groups ............................................................................................................ 36
4.2.3. Organizational Units ......................................................................................... 39
4.3. Modifying Directory Entries ......................................................................................... 41
4.3.1. Editing Entries ................................................................................................. 41
4.3.2. Allowing Sync Attributes for Entries .................................................................. 41
4.3.3. Changing Administrator Entries ........................................................................ 42
4.3.4. Removing an Entry from the Directory .............................................................. 47
5. Setting Access Controls 49
Page 4

Using Red Hat Console
iv
5.1. Granting Admin Privileges to Users for Directory Server and Administration Server ......... 49
5.2. Setting Access Permissions on Console Elements ....................................................... 51
6. Using SSL/TLS with Red Hat Console 57
6.1. Overview of SSL/TLS ................................................................................................. 57
6.2. Installing Certificates ................................................................................................... 59
6.2.1. Generating a Certificate Request ...................................................................... 59
6.2.2. Installing the Certificate .................................................................................... 61
6.2.3. Trusting a Certificate Authority or Adding a Certificate Chain ............................... 64
6.3. Enabling TLS/SSL ...................................................................................................... 67
6.4. Creating Password Files ............................................................................................. 72
6.4.1. Creating a Password File for the Directory Server .............................................. 72
6.4.2. Creating a Password File for the Administration Server ...................................... 73
Index 75
Page 5

v
Preface
Welcome to the Managing Servers with Red Hat Console Guide.
Red Hat Directory Server and Administration Server have a special Java-based console which
simplifies administering the directories. This guide covers the basic structure of the Red Hat Console
for both the Directory Server and the Administration Server and provides an overview of how to use
the main Red Hat Console to manage users and access within the Console.
1. Purpose of This Guide
There are three Java consoles bundled together to manage the servers in Red Hat Directory Server:
• The Red Hat Console, which is the first console to open. This has a unified view of all Administration
Server and Directory Server instances being managed and can perform basic user and group tasks,
like adding, searching, editing, and deleting entries.
• The Administration Server, which manages the Administration Server local instance, including
viewing logs and changing the Administration Server configuration.
• The Directory Server Console, a separate window for each Directory Server instance with manages
the server through changing configuration and viewing logs and performance monitors and
manages the directory and directory policies.
This guide provides a basic overview of how to use and navigate through Red Hat Console so that
managing servers through the consoles is easy and effective.
2. Examples and Formatting
Each of the examples used in this guide, such as file locations and commands, have certain defined
conventions.
2.1. Command and File Examples
All of the examples for Red Hat Directory Server commands, file locations, and other usage are given
for Red Hat Enterprise Linux 5 (32-bit) systems. Be certain to use the appropriate commands and files
for your platform.
To start the Red Hat Directory Server:
service dirsv start
Example 1. Example Command
2.2. Tool Locations
The tools for Red Hat Directory Server are located in the /usr/bin and the /usr/sbin directories.
These tools can be run from any location without specifying the tool location.
2.3. LDAP Locations
There is another important consideration with the Red Hat Directory Server tools. The LDAP tools
referenced in this guide are Mozilla LDAP, installed with Red Hat Directory Server in the /usr/lib/
Page 6
Preface
vi
mozldap directory on Red Hat Enterprise Linux 5 (32-bit) (or /usr/lib64/mozldap for 64-bit
systems).
However, Red Hat Enterprise Linux systems also include LDAP tools from OpenLDAP in the /usr/
bin directory. It is possible to use the OpenLDAP commands as shown in the examples, but you must
use the -x argument to disable SASL, which OpenLDAP tools use by default.
2.4. Text Formatting and Styles
Certain words are represented in different fonts, styles, and weights. Different character formatting is
used to indicate the function or purpose of the phrase being highlighted.
Formatting Style Purpose
Monospace font Monospace is used for commands, package
names, files and directory paths, and any text
displayed in a prompt.
Monospace
with a
background
This type of formatting is used for anything
entered or returned in a command prompt.
Italicized text Any text which is italicized is a variable, such
as instance_name or hostname. Occasionally,
this is also used to emphasize a new term or
other phrase.
Bolded text Most phrases which are in bold are application
names, such as Cygwin, or are fields or
options in a user interface, such as a User
Name Here: field or Save button.
Other formatting styles draw attention to important text.
NOTE
A note provides additional information that can help illustrate the behavior of the system or
provide more detail for a specific issue.
IMPORTANT
Important information is necessary, but possibly unexpected, such as a configuration
change that will not persist after a reboot.
WARNING
A warning indicates potential data loss, as may happen when tuning hardware for
maximum performance.
Page 7

Additional Reading
vii
3. Additional Reading
The Directory Server Administrator's Guide describes how to set up, configure, and administer Red
Hat Directory Server and its contents. this manual does not describe many of the basic directory and
architectural concepts that you need to deploy, install, and administer a directory service successfully.
Those concepts are contained in the Red Hat Directory Server Deployment Guide. You should read
that book before continuing with this manual.
When you are familiar with Directory Server concepts and have done some preliminary planning for
your directory service, install the Directory Server. The instructions for installing the various Directory
Server components are contained in the Red Hat Directory Server Installation Guide. Many of the
scripts and commands used to install and administer the Directory Server are explained in detail in the
Red Hat Directory Server Configuration, Command, and File Reference.
Also, Managing Servers with Red Hat Console contains general background information on how to
use the Red Hat Console. You should read and understand the concepts in that book before you
attempt to administer Directory Server.
The document set for Directory Server contains the following guides:
• Red Hat Directory Server Release Notes contain important information on new features, fixed bugs,
known issues and workarounds, and other important deployment information for this specific version
of Directory Server.
• Red Hat Directory Server Deployment Guide provides an overview for planning a deployment of the
Directory Server.
• Red Hat Directory Server Administrator's Guide contains procedures for the day-to-day maintenance
of the directory service. Includes information on configuring server-side plug-ins.
• Red Hat Directory Server Configuration, Command, and File Reference provides reference
information on the command-line scripts, configuration attributes, and log files shipped with
Directory Server.
• Red Hat Directory Server Installation Guide contains procedures for installing your Directory Server
as well as procedures for migrating from a previous installation of Directory Server.
• Red Hat Directory Server Schema Reference provides reference information about the Directory
Server schema.
• Red Hat Directory Server Plug-in Programmer's Guide describes how to write server plug-ins in
order to customize and extend the capabilities of Directory Server.
• Using Red Hat Console gives an overview of the primary user interface and how it interacts with
the Directory Server and Administration Server, as well as how to perform basic management tasks
through the main Console window.
• Using the Admin Server describes the different tasks and tools associated with the Administration
Server and how to use the Administration Server with the Configuration and User Directory Server
instances.
For the latest information about Directory Server, including current release notes, complete product
documentation, technical notes, and deployment information, see the Red Hat Directory Server
documentation site at http://www.redhat.com/docs/manuals/dir-server/.
Page 8

Preface
viii
4. Giving Feedback
If there is any error in this Managing Servers with Red Hat Console or there is any way to improve
the documentation, please let us know. Bugs can be filed against the documentation for Red Hat
Directory Server through Bugzilla, http://bugzilla.redhat.com/bugzilla. Make the bug report as specific
as possible, so we can be more effective in correcting any issues:
• Select the Red Hat Directory Server product.
• Set the component to Doc - managing-servers.
• Set the version number to 8.1.
• For errors, give the page number (for the PDF) or URL (for the HTML), and give a succinct
description of the problem, such as incorrect procedure or typo.
For enhancements, put in what information needs to be added and why.
• Give a clear title for the bug. For example, "Incorrect command example for setup
script options" is better than "Bad example".
We appreciate receiving any feedback — requests for new sections, corrections, improvements,
enhancements, even new ways of delivering the documentation or new styles of docs. You are
welcome to contact Red Hat Content Services directly at mailto:docs@redhat.com.
5. Documentation History
Revision 8.1.1 September 9, 2009 Ella Deon Lackey
Removing any references to the Directory Server Gateway or Org Chart.
Revision 8.1.0 April 28, 2009 Ella Deon Lackey dlackey@redhat.com
Initial draft for version 8.1.
Page 9
Chapter 1.
1
Overview of Red Hat Console
Red Hat Console is the user interface to manage Red Hat Directory Server and Administration Server
configuration and directory information. There is a single main Console window which administers the
servers (collected and identified in administration domains). The main Console allows you to open
server-specific Consoles to manage the settings and information in individual instances.
This chapter provides an overview of how the Console interacts with the Directory Server and
Administration Server and walks through the Console windows and options.
1.1. How the Console, Directory Server, and Administration
Server Work Together
The Red Hat Console is an independent Java application which works in conjunction with instances of
Red Hat Directory Server and Administration Server. Most server management functions are carried
out in server-specific console windows for the Directory Server and Administration Server. Red Hat
Console is part of a system that manages Red Hat Directory Server instances and the Administration
Server and, therefore, information in the directory. Although Red Hat Directory Server, Red Hat
Console, and Red Hat Administration Server work tightly with one another, each plays a specific role in
managing servers, applications, and users.
Red Hat Console is the front-end management application for Red Hat Directory Server. It finds
all servers and applications registered in the configuration directory, displays them in a graphical
interface, and can manage and configure them. The Main Console can also search for, create, and
edit user and group entries in the user directory.
Figure 1.1. The Red Hat Console Interface
Page 10
Chapter 1. Overview of Red Hat Console
2
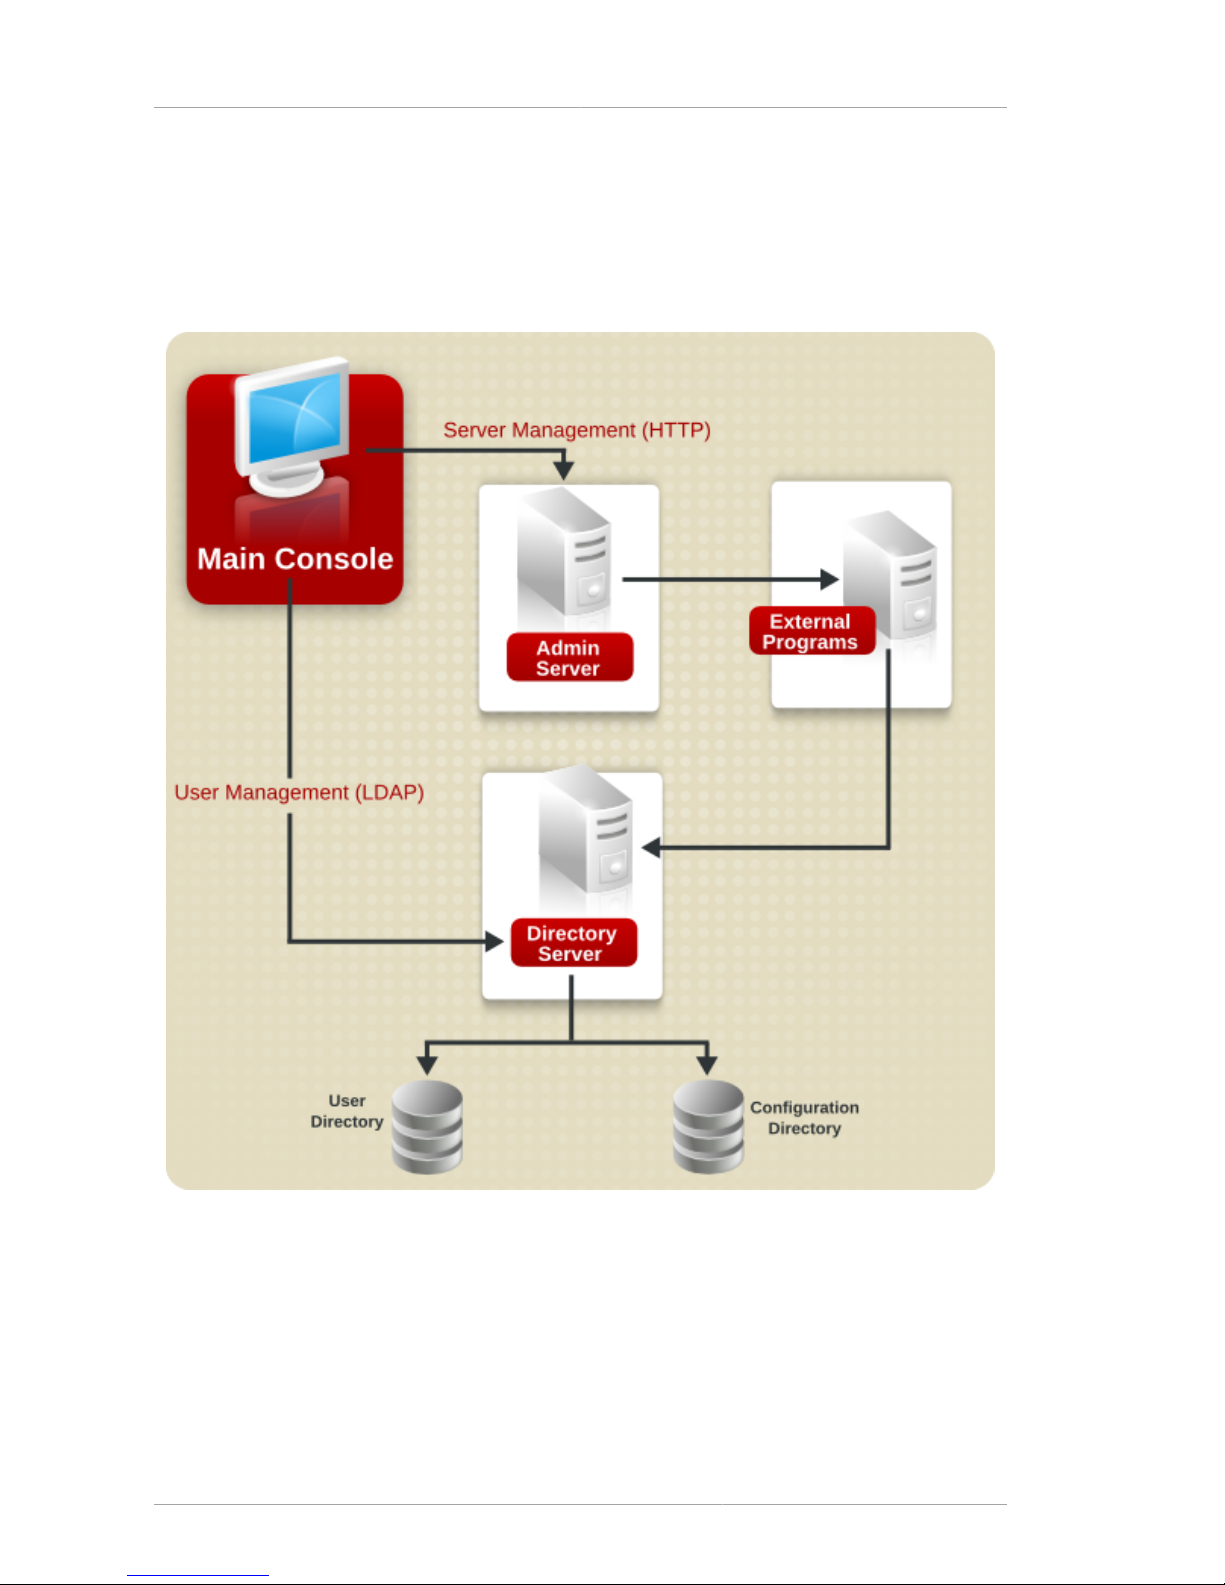
When a user logs into Red Hat Console, the Console connects to the Administration Server over
Hypertext Transfer Protocol (HTTP). The Administration Server receives requests to administer the
different Directory Server instances and performs the changes to the configuration, such as changing
a port number. When a request is sent to the Red Hat Console to add or edit user entries, the Console
sends a Lightweight Directory Access Protocol (LDAP) message directly to Directory Server to update
the user directory.
Figure 1.2. Simple System Using Red Hat Console
Red Hat Directory Server stores server and application configuration settings as well as user
information. Typically, application and server configuration information is stored in one subtree
of Red Hat Directory Server while user and group entries are stored in another subtree. With a
large enterprise, however, configuration and user information can be stored in separate instances
of Directory Server (which can be on the same host machine or on two different host machines).
Figure 1.2, “Simple System Using Red Hat Console” illustrates a relatively simple Red Hat Directory
Server system. As an enterprise grows and needs change, additional hosts and Directory and Admin
Page 11
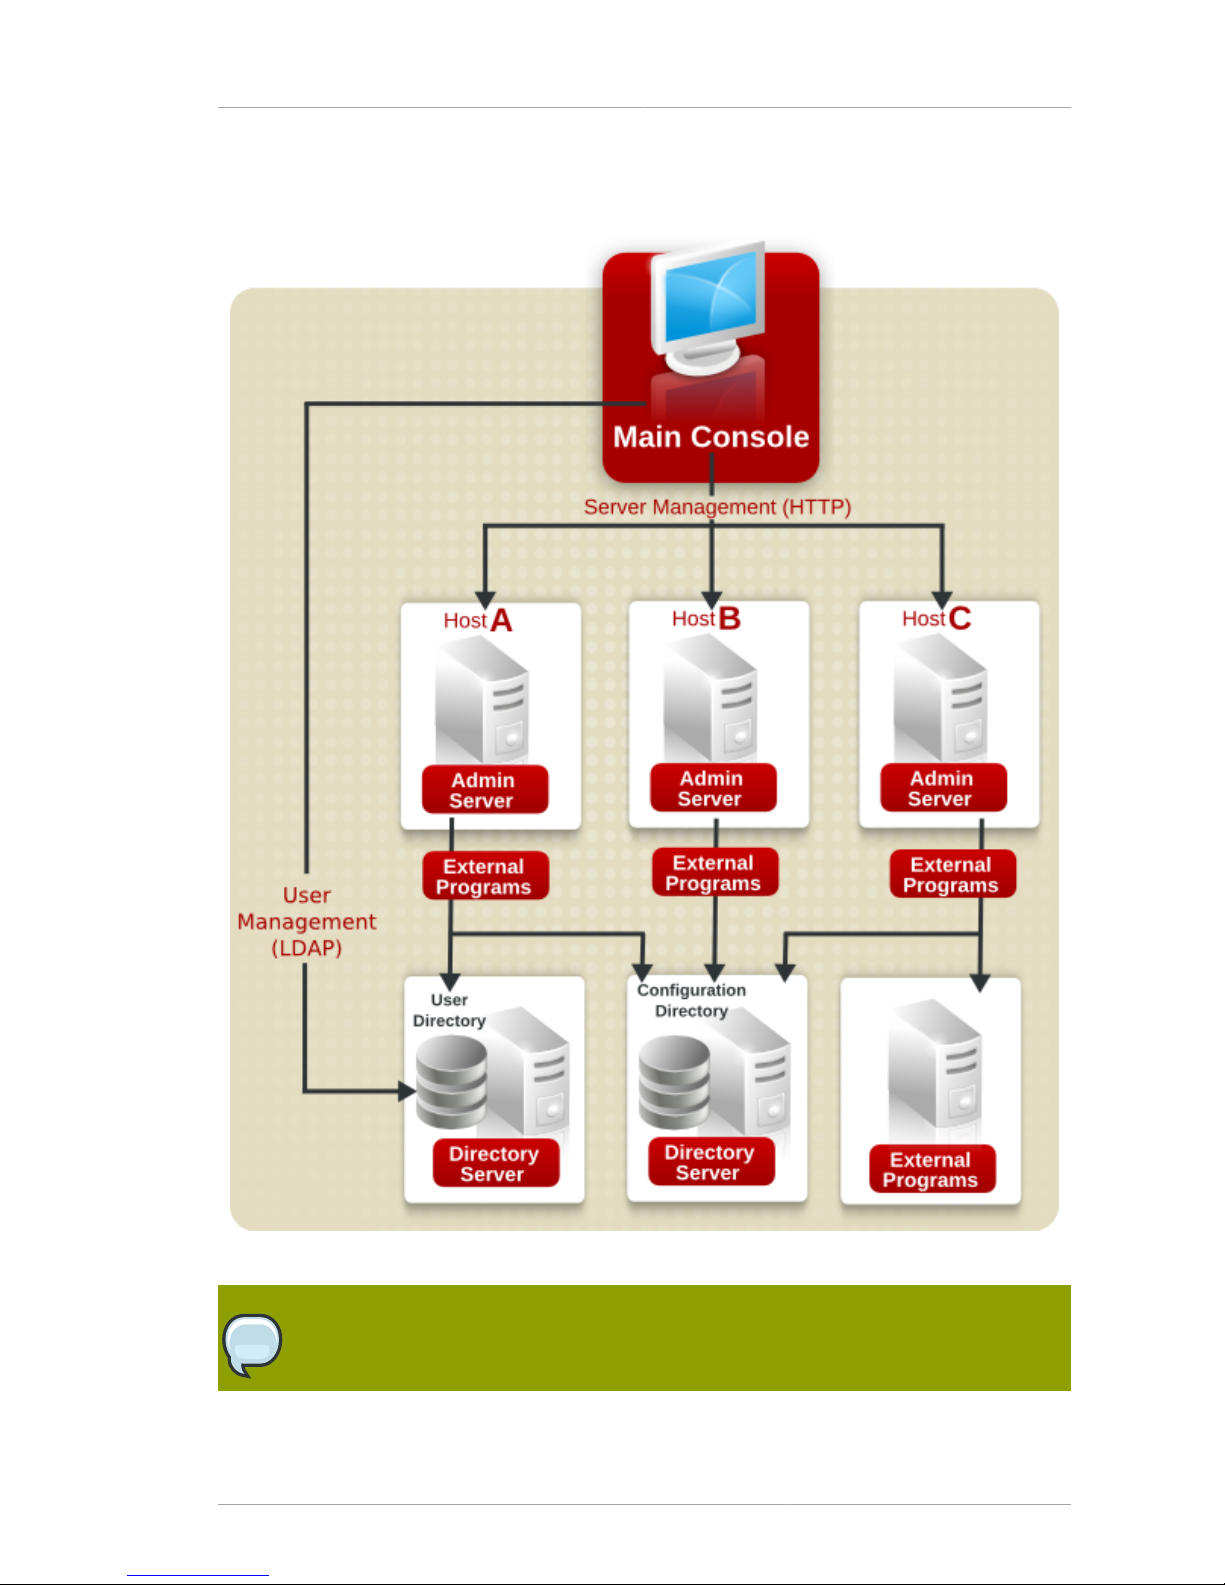
How the Console, Directory Server, and Administration Server Work Together
3
Servers can be added to the administration domain in the Console, so that a single Console can
manage multiple Directory and Admin Servers.
Figure 1.3. A More Complex System
NOTE
When the terms configuration directory and user directory are used in this guide, they
refer to where the configuration information and the user information is stored, regardless
Page 12
Chapter 1. Overview of Red Hat Console
4
of whether that is in the subtrees of a single instance of Directory Server or in two
separate instances of Directory Server.
1.2. Red Hat Console Menus
There are five menu items in the top menu the Console. The options for each of these menus
varies depending on the Console window open (the main Console, Directory Server Console, or
Administration Server Console) and the types of objects available in that server area.
Figure 1.4. Main Console Menus
Menu Description
Console Manages the Console session, such as closing
the window or exiting the session entirely.
• For the main window, this menu also can be
used to add and remove admin domain.
• For the Directory Server Console, this allows
people to log in as a different user.
• For the Administration Server Console, it
manages security issues, such as certificates
and tokens.
Edit Sets display preferences, for all three Consoles.
For the Directory Server Console, this also
provides ways to copy, paste, and delete
directory entries or text.
View Sets whether to display certain parts of the
Console window, such as the top banner, menus,
and side navigation panes. This also refreshes
the current display. For the Directory Server
Console, this menu also sets what parts of the
directory or which databases to view.
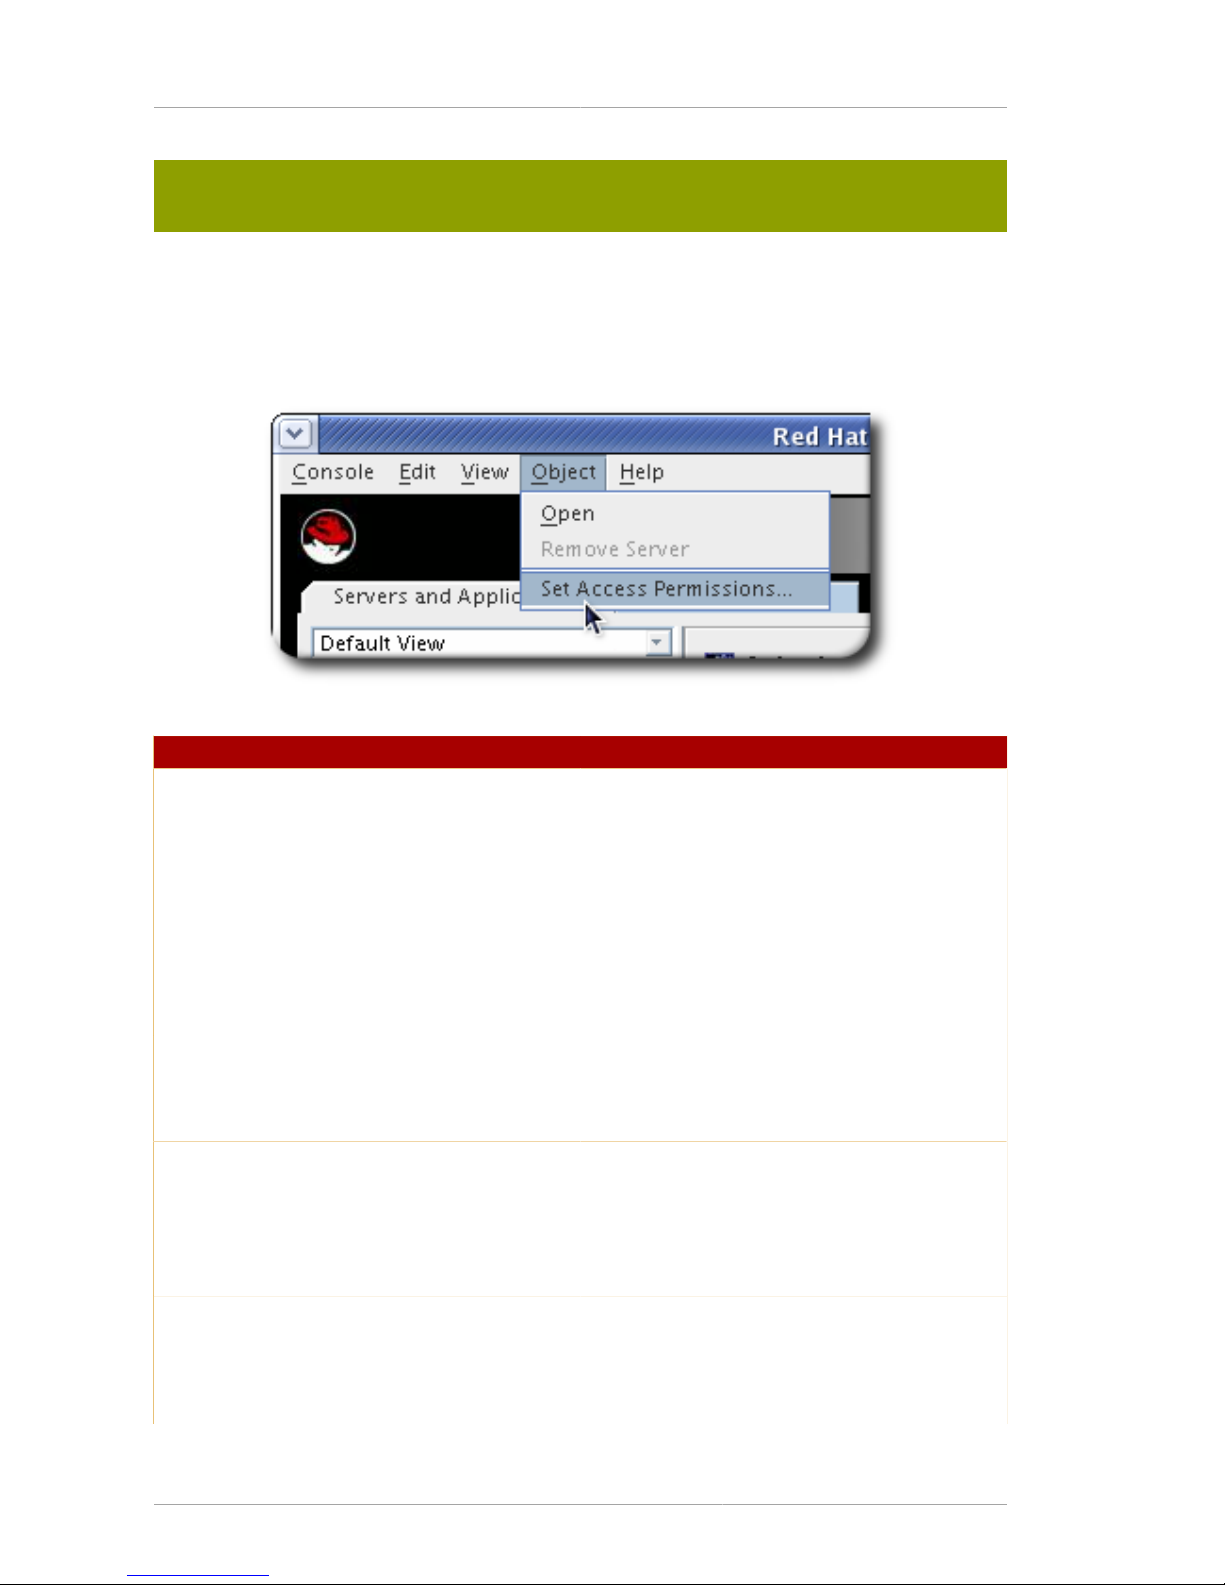
Object Provides available operations for the active
object; this is the same as the right-click menu
for the active area or entry.
• For the main window, this menu simply opens
or deletes a server instance.
Page 13
Red Hat Console Tabs
5
Menu Description
• For the Directory Server Console, this provides
all of the configuration options for the directory
entries, such as advanced property editors or
creating new entries.
• For the Administration Server Console, this
opens a configuration editor, starts, and stops
the server.
Help Opens context-specific help for the current
Console area.
Table 1.1. Console Menus
1.3. Red Hat Console Tabs
There are two tabs in the main Console window:
• Servers and Applications, for managing the Directory Server and Administration Server instances
• Users and Groups, for searching for and creating user and group entries within the Directory
Server
1.3.1. The Servers and Applications Tab
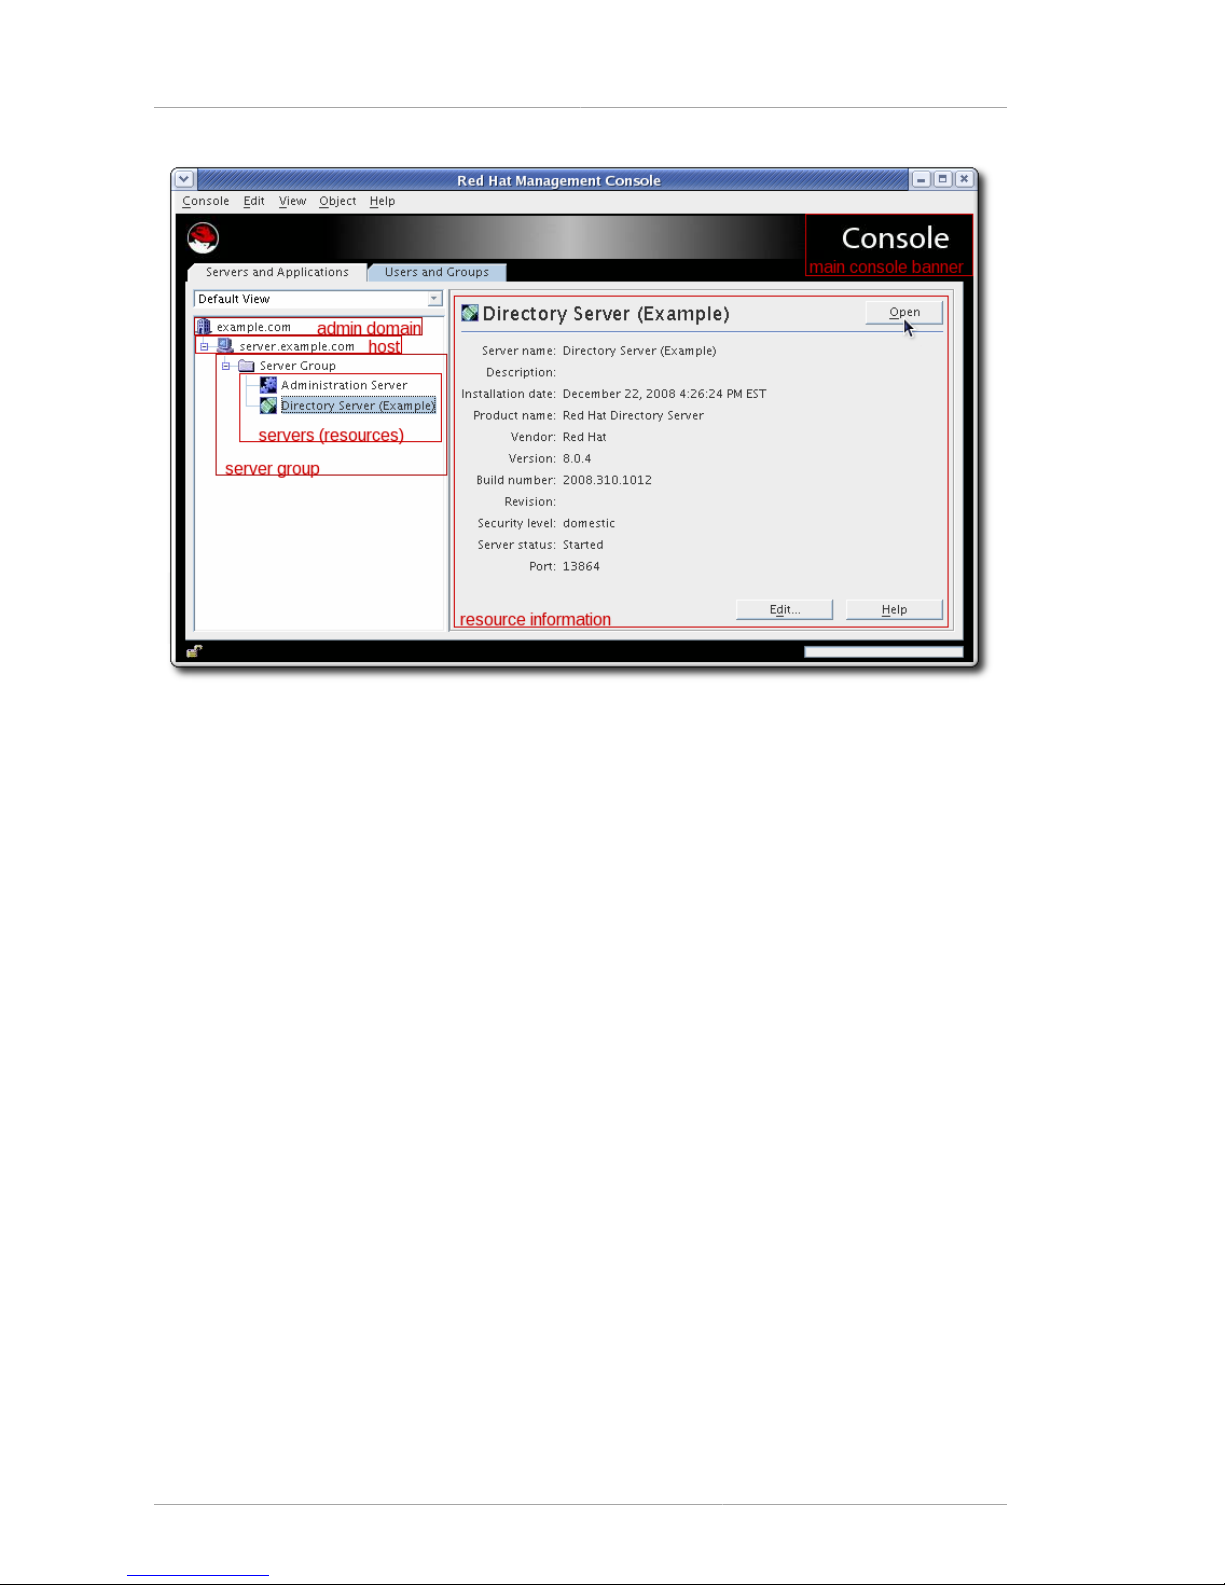
The Servers and Applications tab, by default, has a navigation tree on the left for viewing hosts
and Directory and Administration Servers and a center information panel. To access the Directory
Server instance, directory information, or Administration Server, open the server resource listed in the
navigation tree. The information for the server instance, such as the build number and port number,
The navigation tree displays the Red Hat Directory Server topology, a hierarchical representation of all
the resources (such as servers and hosts), that are registered in a configuration directory.
Page 14
Chapter 1. Overview of Red Hat Console
6
Figure 1.5. The Servers and Applications Tab
The top of the topology is the administration domain. An administration domain is a collection of host
systems and servers that share the same user directory. The server which hosts Directory Server or
Administration Server instances belongs to the admin domain; that is the host.
A server group consists of all Directory Servers that are managed by a common Administration Server.
A number of server groups can exist within an administration domain.
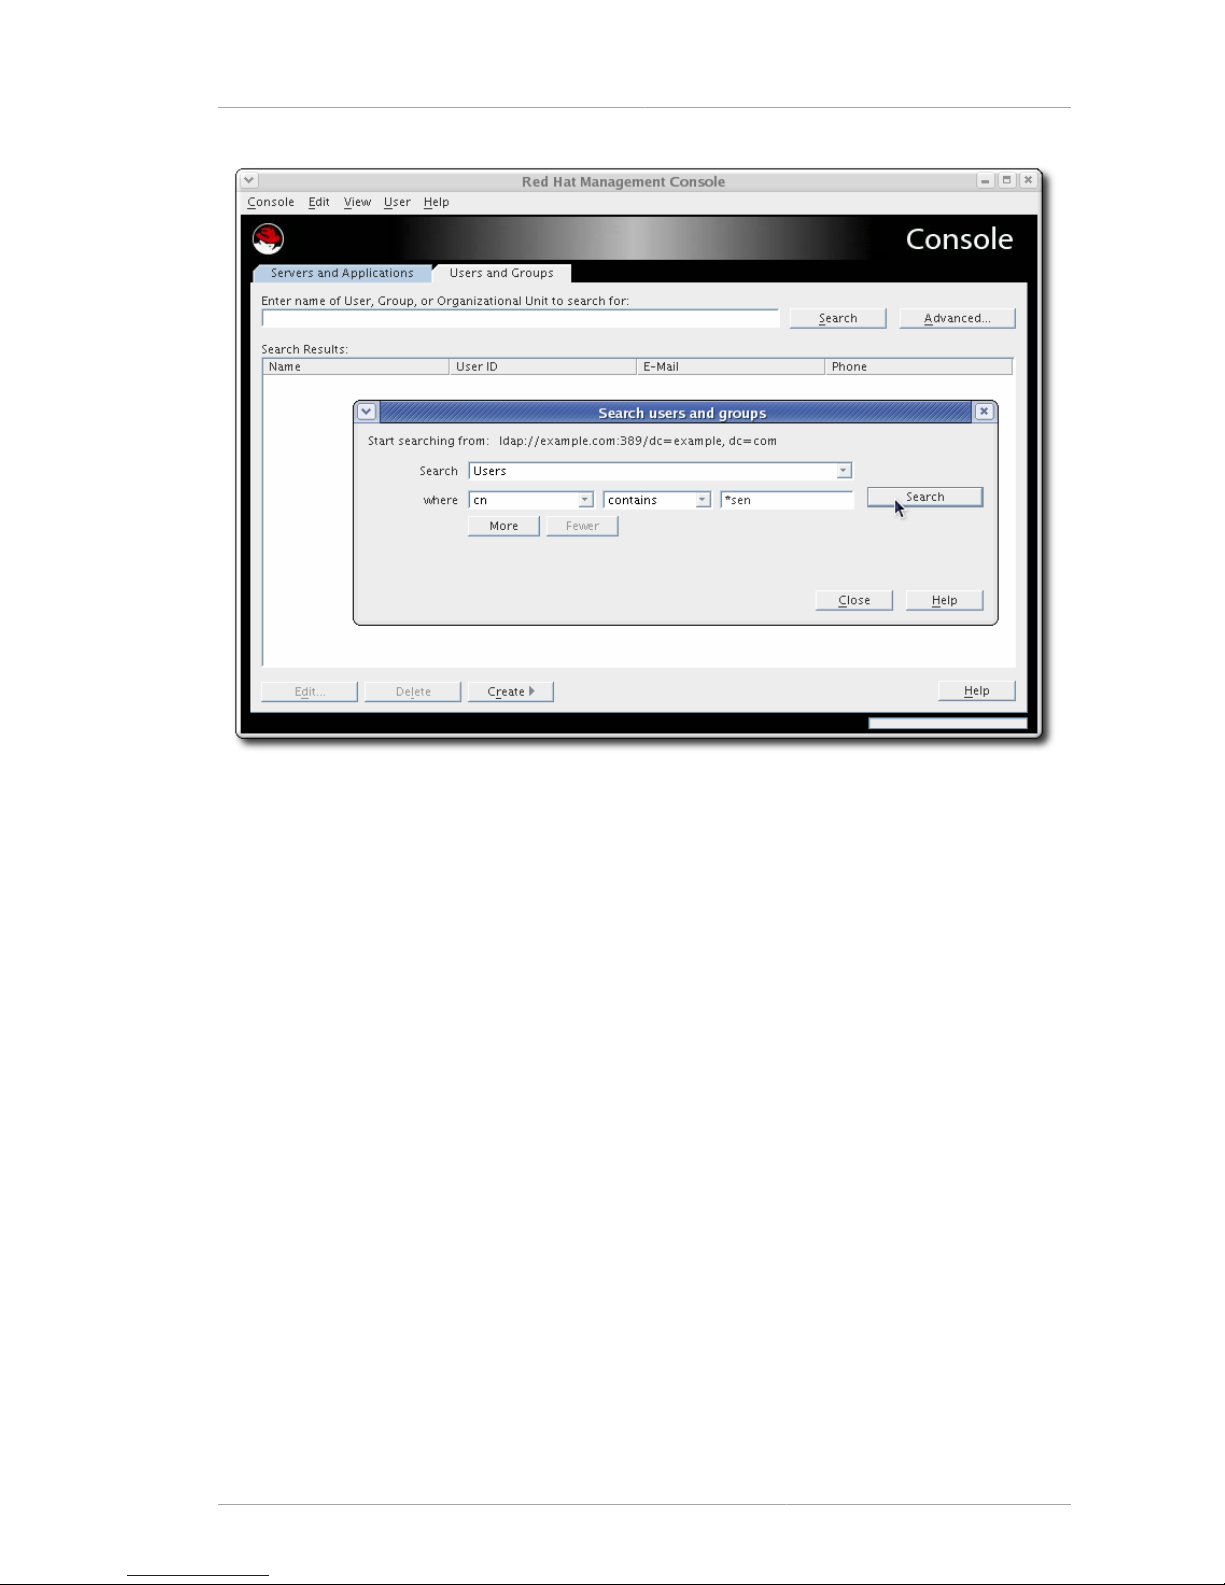
1.3.2. The Users and Groups Tab
The Users and Groups tab can search for user and group entries in any Directory Server
administered by the Console. Any of the returned entries can be edited or deleted through this tab,
assuming that the users has the proper access permissions. New entries can also be created through
the Users and Groups tab.
Page 15
Server-Specific Consoles
7
Figure 1.6. The Users and Groups Tab
Switch the directory being searched or where the entries are added through the options in the Users
menu, as described in Section 4.1, “Searching for Users and Groups”.
1.4. Server-Specific Consoles
The main Console can open into two server-specific windows to manage the Administration Server
and Directory Server. These windows are opened by clicking the server name in the navigation area,
and then clicking the Open button in the resources area.
1.4.1. The Directory Server Console
The Directory Server Console manages the specific Directory Server instance configuration, including
the port number, SSL settings, and logging. The Directory Server Console also manages the directory
information (entries) and directory operations like importing and exporting databases, creating suffixes,
and extending the schema.
Page 16

Chapter 1. Overview of Red Hat Console
8
Figure 1.7. The Directory Server Console
There are four tabs in the Directory Server Console:
• Tasks, which has shortcuts to common server operations, including starting and stopping the
Directory Server instance, importing and exporting databases, and managing SSL certificates
• Configuration, which defines all of the server configuration settings, including SASL and SSL
authentication, port numbers, schema, replication and synchronization, databases and suffixes,
logging, and plug-ins
• Directory, which access and manages the directory information, including user entries and all group
entries, including roles, classes of service, views, and groups
• Status, which monitors the server performance and displays the different monitoring and
performance counters for the Directory Server and databases
Similar to the main Console, the Directory Server Console tabs have a navigation area on the left and
a center panel that displays information about the active setting, entry, or database.
The procedures for using the Directory Server Console to manage the Directory Server configuration
and directory entries is covered in the Directory Server Administrator's Guide.
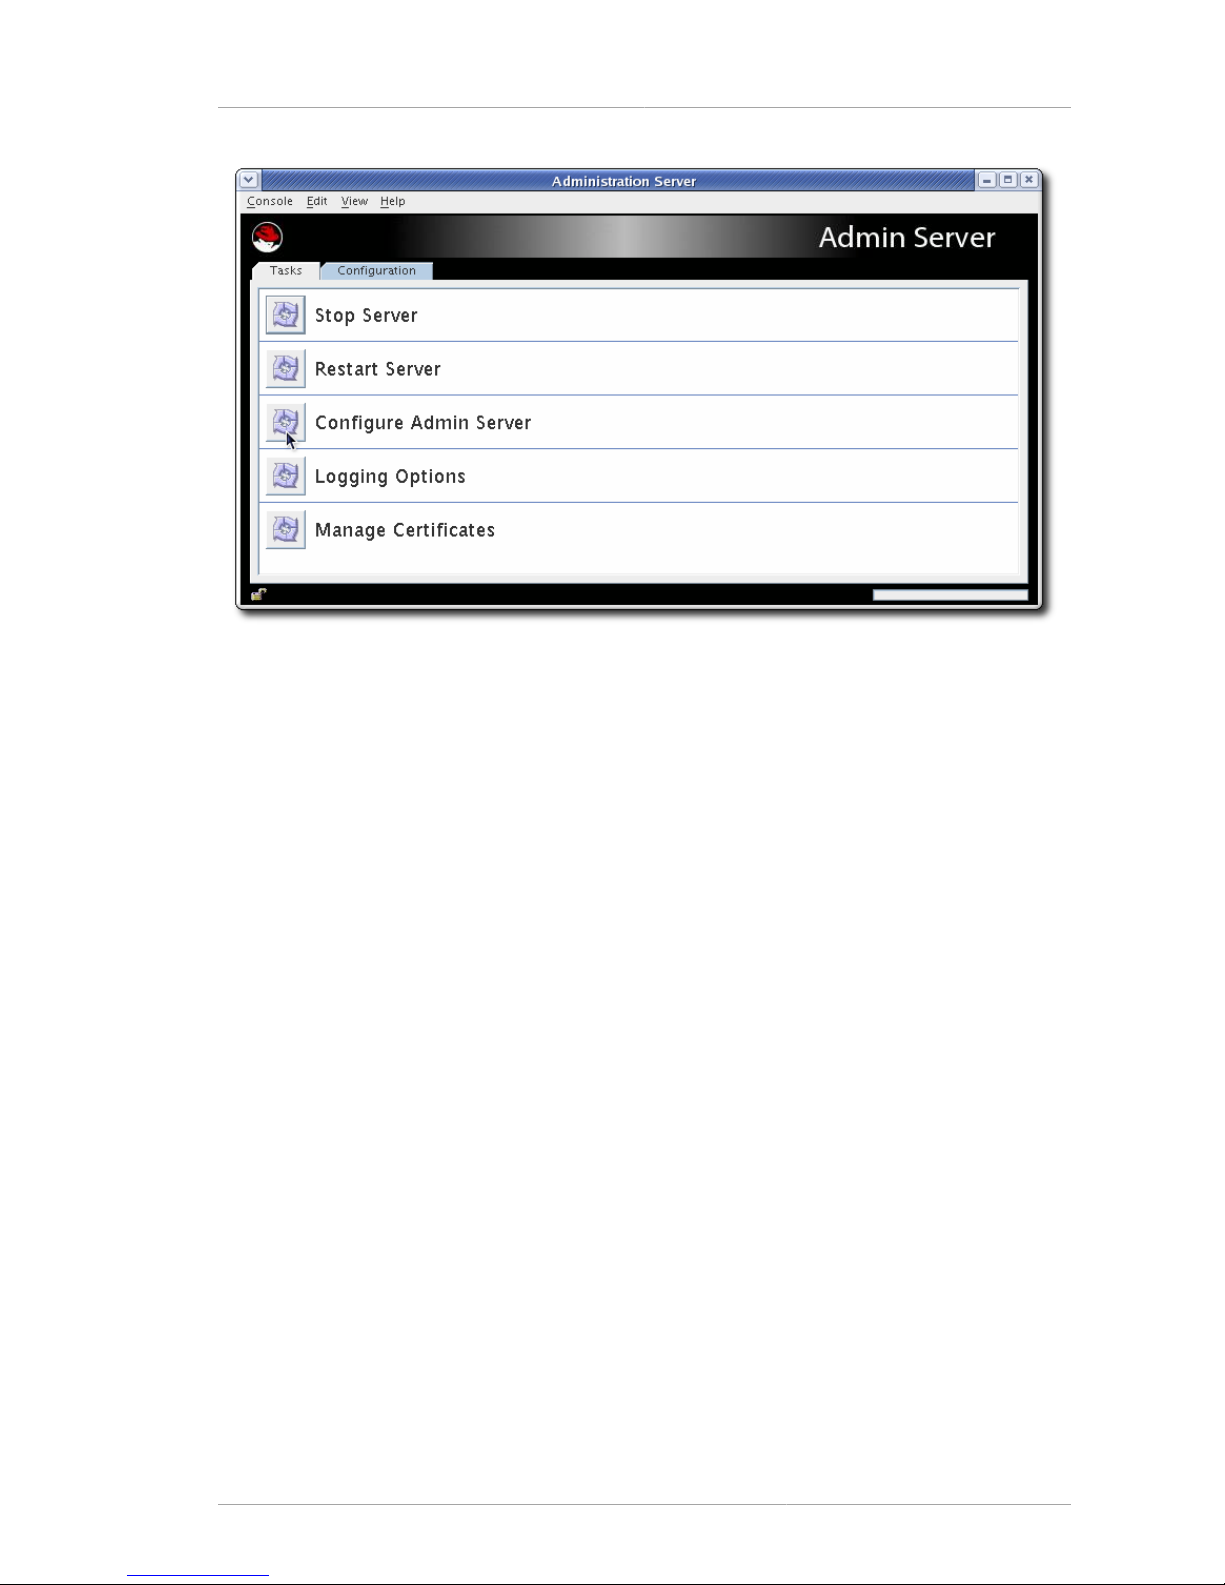
1.4.2. The Administration Server Console
The Administration Server itself administers the configuration of other servers, especially the
configuration and user directories for the server group. The Administration Server Console manages
the Administration Server settings and the settings for these two Directory Server directories;
whenever the settings are changed in the Directory Server configuration, the modifications must be
carried into the Administration Server configuration for the server to properly manage those servers.
Page 17
The Administration Server Console
9
Figure 1.8. The Administration Server Console
The Administration Server Console is simpler than the Directory Server Console, with only two tabs:
• Tasks, which has shortcuts to common server operations, including starting and stopping the
Administration Server instance, setting up logging, and managing SSL certificates
• Configuration, which defines all of the Administration Server configuration settings, including SSL
authentication, port numbers, and logging, as well as the Configuration Directory Server and User
Directory Server settings which the Administration Server uses to connect to the directory services
The procedures for using the Administration Server Console to manage the Administration Server
configuration and associated directory services is covered in the Using the Admin Server guide.
Page 18

10
Page 19
Chapter 2.
11
Basic Tasks in the Red Hat Console
While most server management functions are carried out in server-specific console windows for the
Red Hat Directory Server and Administration Server, the main Red Hat Console itself has some basic
management functions, such as creating server instances, searching the directory, setting some
access controls, and allowing some entry modifications.
This chapter covers basic tasks in the Red Hat Console, including installing the Console, creating and
editing server instances, and configuring the Console appearance.
2.1. Installing the Console
The Red Hat Console package, redhat-ds-console.noarch, can be installed on Red Hat
Enterprise Linux systems using tools like yum. For example:
yum install redhat-idm-console
The Red Hat Console package and also be downloaded through Red Hat Network and installed using
package management tools such as rpm and pkgadd. For example:
rpm -ivh redhat-idm-console-1.0.0-22.el4idm.i386.rpm
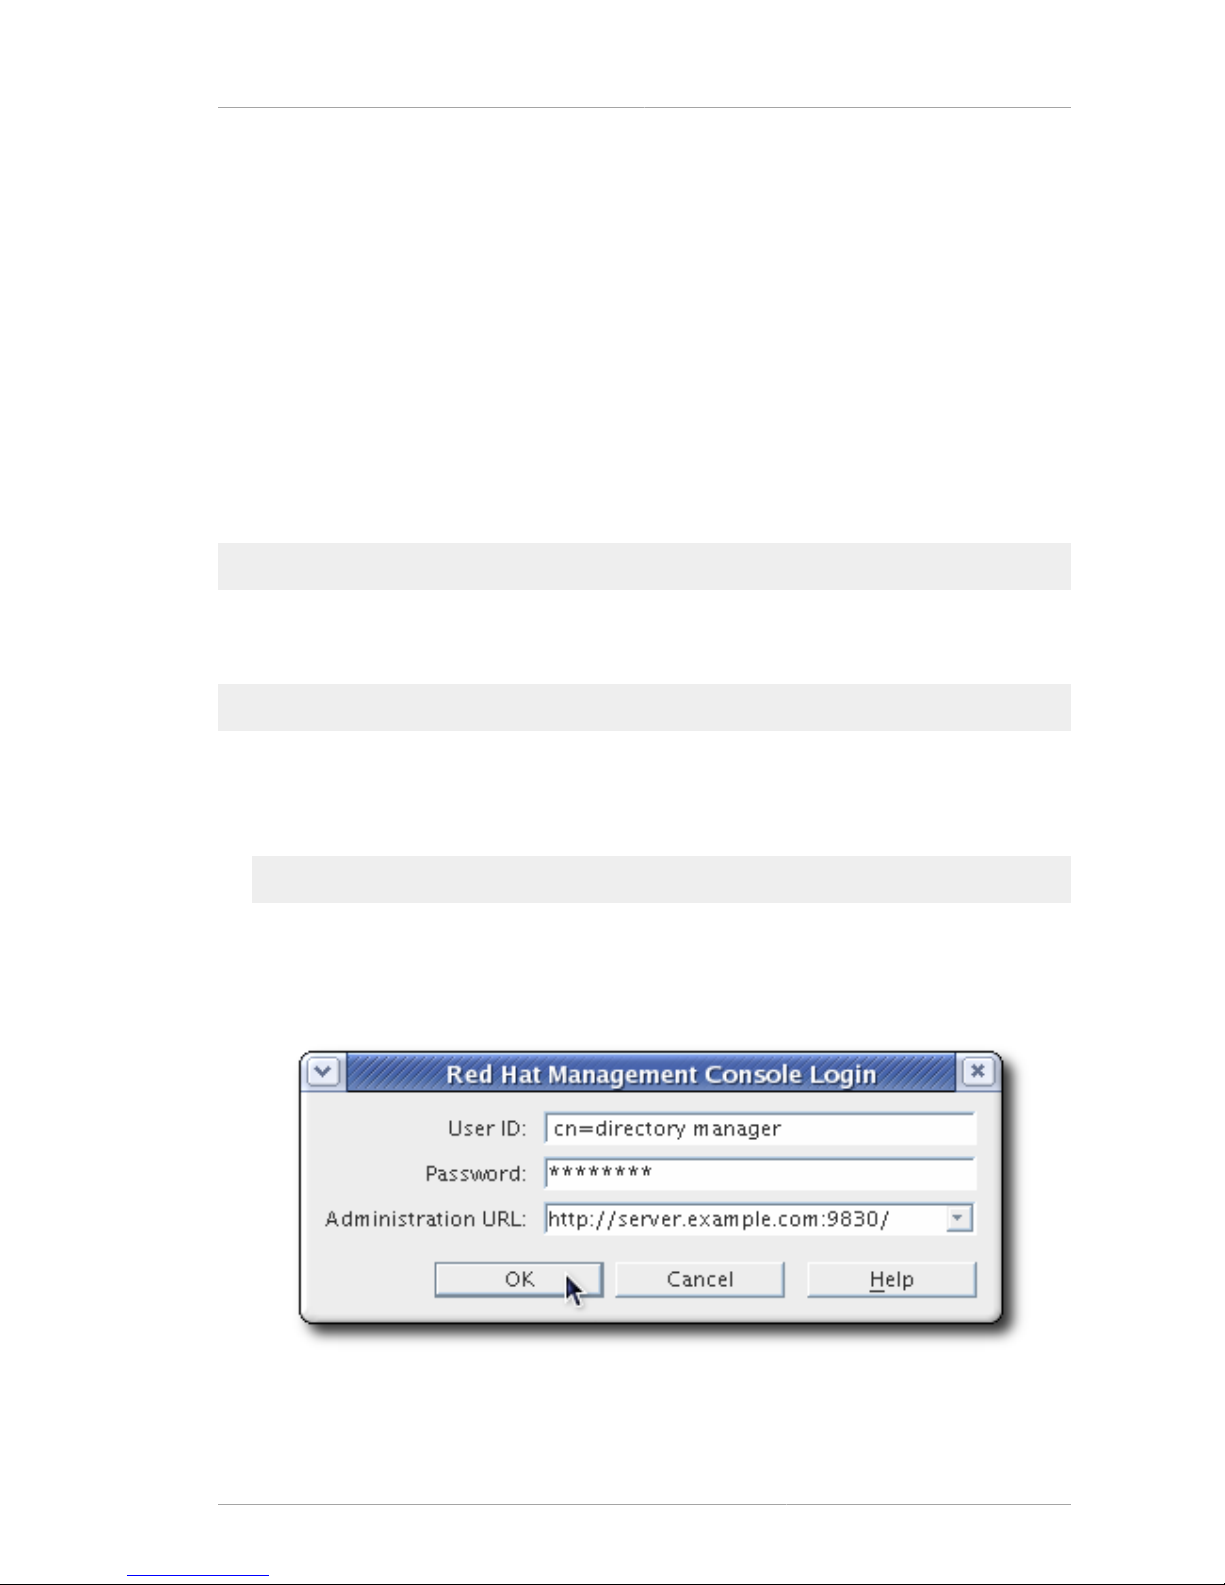
2.2. Launching the Console
1. Run the redhat-idm-console command. For example:
redhat-idm-console -a http://server.example.com:9830
The different options for the redhat-idm-console command are listed in Table 2.1, “Arguments
for redhat-idm-console”.
2. Enter the user name and password.
Also, enter or select the URL for the instance of Administration Server, if one was not passed
with the command. The URL can be either the hostname or the IP address of the Administration
Page 20

Chapter 2. Basic Tasks in the Red Hat Console
12
Server host. The Administration Server port number must be given, as well. The five most recent
Administration Server URLs accessed are available as a drop-down menu option.
Argument Description Example
-a adminURL Specifies a base URL for the
instance of Administration
Server to log into.
-a http://
eastcoast.example.com:987
-f fileName Writes errors and system
messages to fileName.
-f system.out
-h Prints out the help message for
redhat-idm-console.
-s Specifies the directory instance
to access, either by specifying
the DN of the server instance
entry (SIE) or the instance
name, such as slapd-
example.
-s slapd-example
-u Gives the user DN to use to log
into the Console.
-u "cn=Directory Manager"
-w Gives the password to use to
log into the Console.
-w secret
-w - Reads the password from the
standard output.
-x options Specifies extra options.
There are three values for
extraOptions:
nowinpos, which puts the
Console window in the upper
left corner of the screen
nologo, which keeps the splash
screen from being displayed
and only opens the login dialog
javalaf, which uses the Java
look and feel for the Console
interface rather than the
platform-specific styles
To use multiple options,
separate them with a comma.
-x nologo,nowinpos
-y file Reads the password from the
specified input file.
-y password.txt
Table 2.1. Arguments for redhat-idm-console
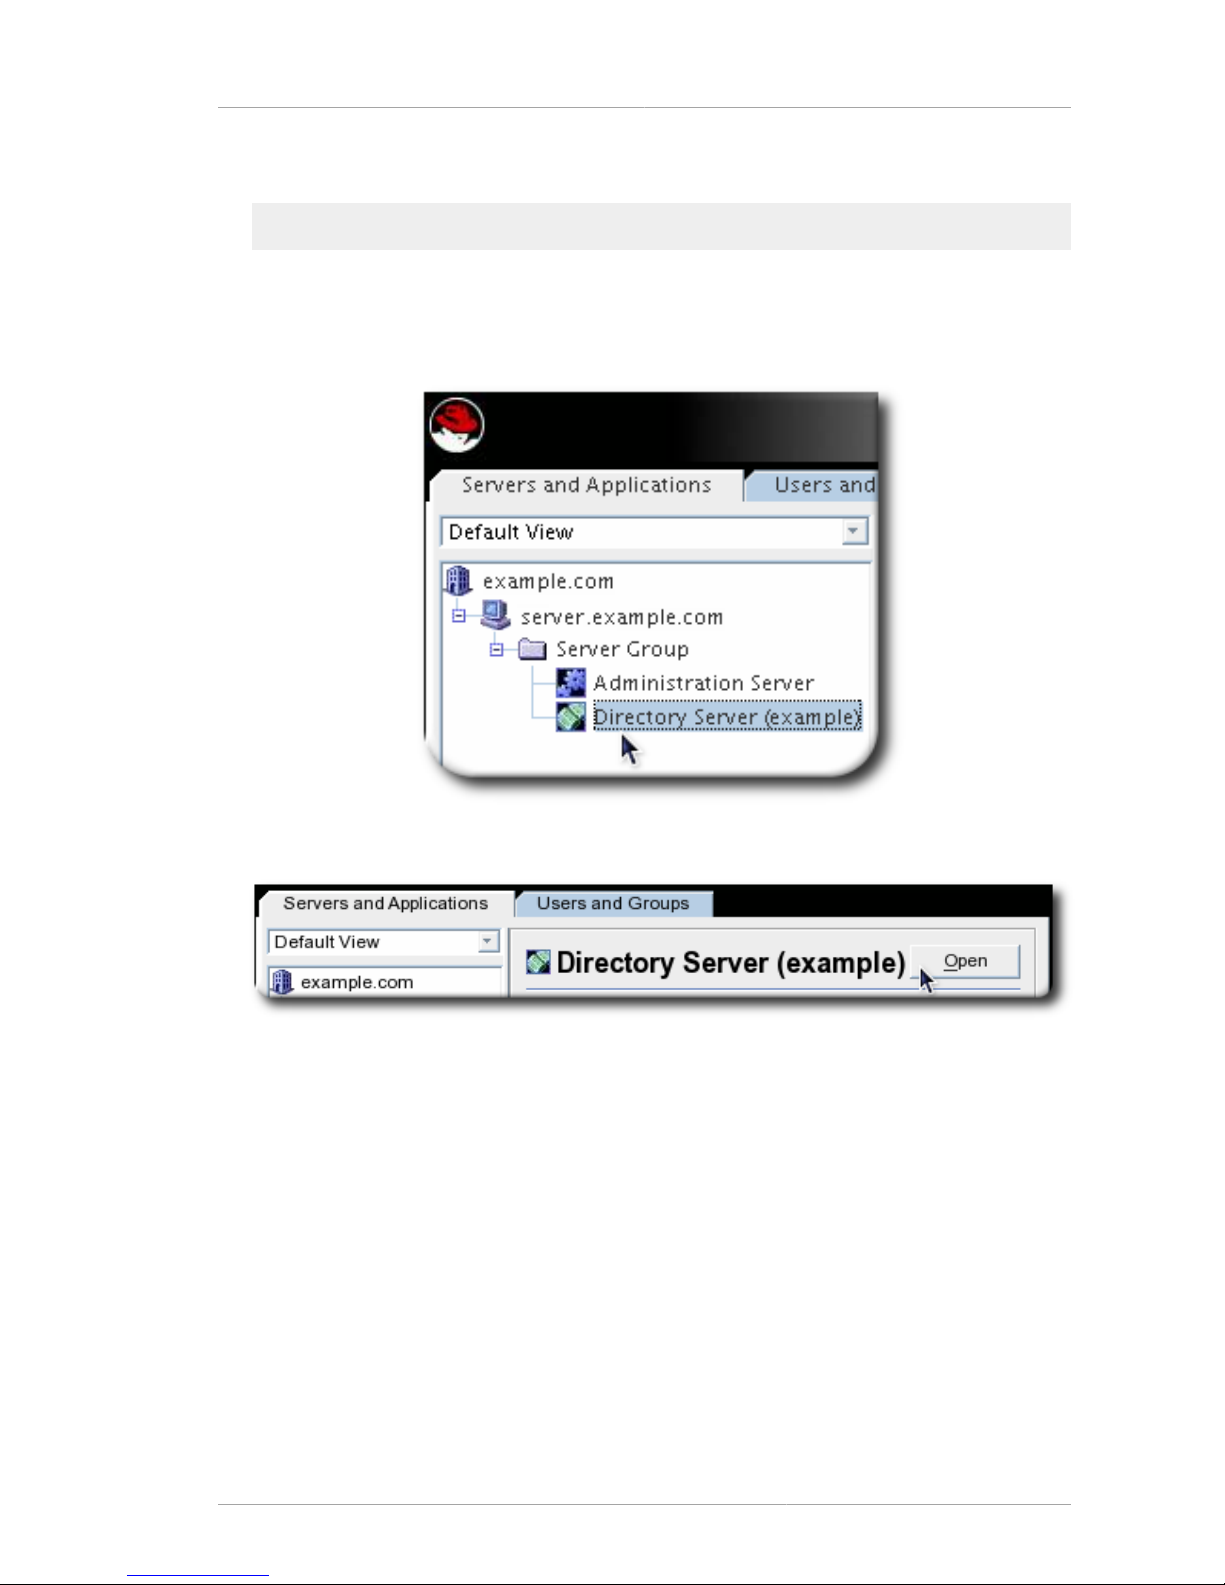
2.3. Opening a Directory or Administration Server Window
The Red Hat Console is the avenue to access instance-specific management windows for the
Directory Server and Administration Server. To open a console window for a specific server instance:
Page 21
Changing the Console Appearance
13
1. Open the Red Hat Console.
redhat-idm-console
2. Click the Servers and Applications tab, which lists all of the Directory Server and Administration
Server instances within the configured Directory Server domain.
3. In the navigation tree, click a server to select it.
4. In the the right-hand panel, click Open.
Alternatively, double-click the server icon in the navigation tree.
2.4. Changing the Console Appearance
The fonts used for different elements in the Console can be edited. The font settings and the location
where the font profiles are stored can be customized. The default font settings can be restored easily.
This section also describes how to control other aspects of the appearance of the Console. For
example, table columns can be easily rearranged. It is also possible to control which server instances
are displayed (called a navigation view) which makes it easy to sort and find server instances.
Access control instructions can be applied to user interface elements, which is discussed in Chapter 5,
Setting Access Controls.
• Section 2.4.1, “Changing Profile Locations”
Page 22

Chapter 2. Basic Tasks in the Red Hat Console
14
• Section 2.4.2, “Restoring Default Font Settings”
• Section 2.4.3, “Changing Console Fonts”
• Section 2.4.4, “Reordering Table Columns”
• Section 2.4.5, “Customizing the Main Window”
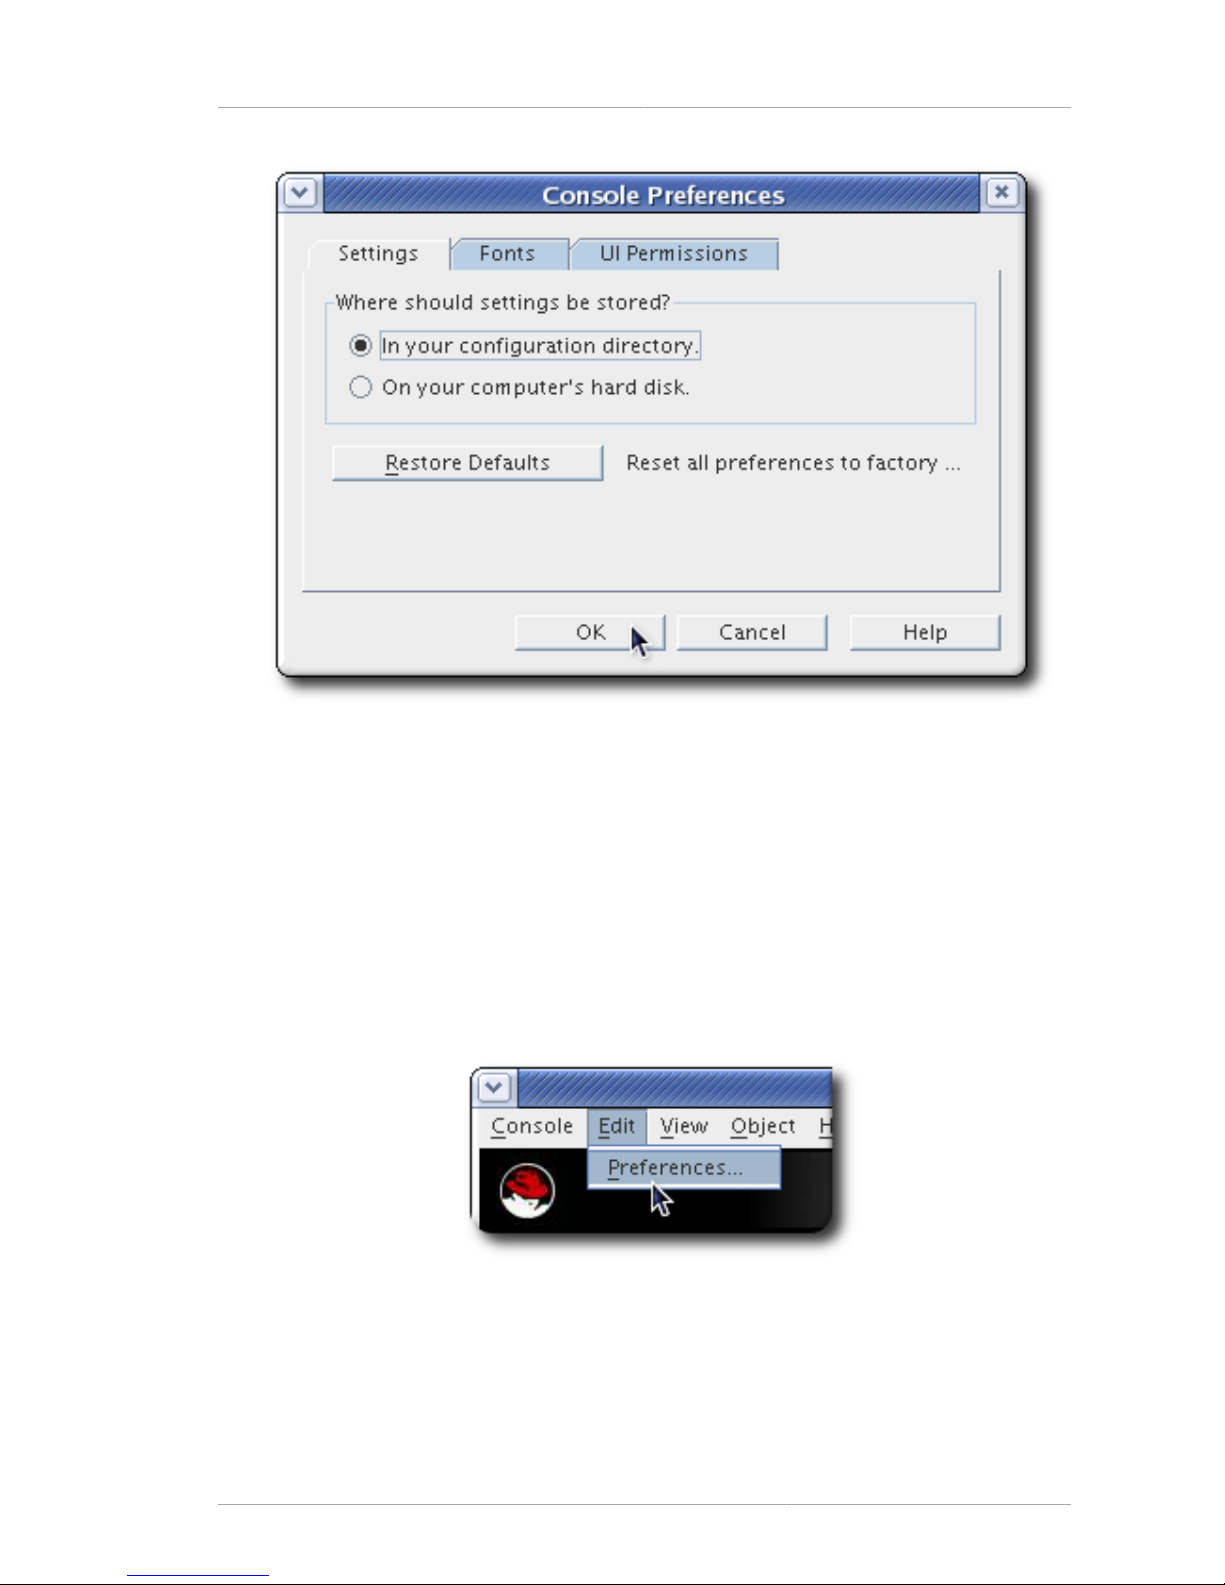
2.4.1. Changing Profile Locations
The Console formatting is stored in profiles. An entry's profiles can be stored locally, which means that
they are only available at a specific workstation, or can be stored in the configuration directory, so they
are accessible anywhere.
To set the profile location:
1. Click Edit in the top menu, and choose Preferences.
2. Click the Settings tab.
3. Select the radio button for the location to save the settings.
Page 23
Restoring Default Font Settings
15
• In your configuration directory means that the settings are stored in the Directory Server
configuration, making them available no matter where you log into the Console.
• On your computer's hard disk stores the setting profiles locally. This is mainly useful if you want
specific, different settings used by default on different Consoles, such as a workstation and a
laptop.
4. Click OK.
2.4.2. Restoring Default Font Settings
1. Click Edit in the top menu, and choose Preferences.
2. Click the Settings tab.
3. Click the Restore Defaults button to revert to the default display settings.
Page 24

Chapter 2. Basic Tasks in the Red Hat Console
16
4. Click OK.
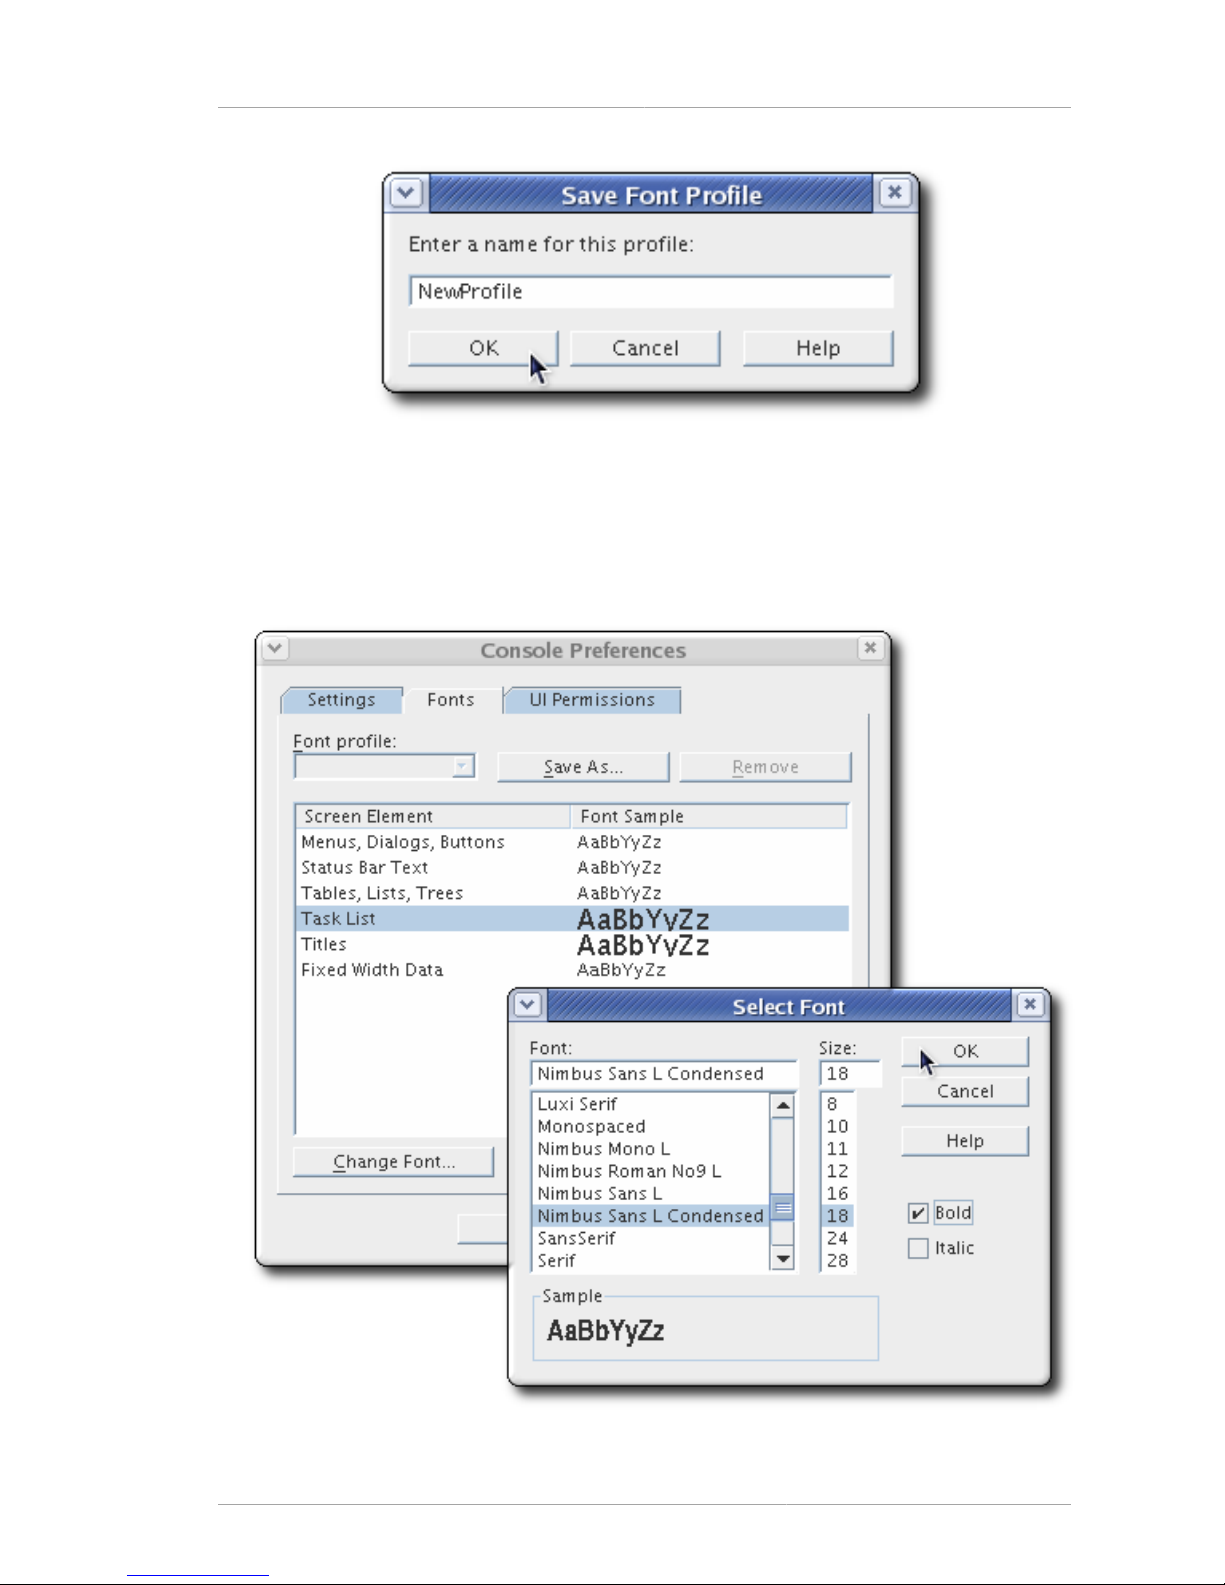
2.4.3. Changing Console Fonts
Different parts of the Console, such as table headings and regular text, have different font settings.
The font settings are stored in profiles. The profiles define the font family, size, and formatting for every
text element. There can be multiple font profiles available, and the font profiles can be private, such as
settings for a specific user or group, or public, so that any user can access them.
The default profile can be edited without having to create new profiles.
To edit or create a font profile:
1. In the main Red Hat Console window, from the Edit menu, choose Preferences.
2. Click the Fonts tab.
3. To save the new settings as a new profile, click the Save As button, and fill in the profile name.
Page 25
Changing Console Fonts
17
To edit the default (or current) profile, simply begin editing the fonts.
4. In the Screen Element column, click a screen element to edit, then click the Change Font button.
5. Edit the font for that specific element. There are three settings which can be changed: the font
family, the size, and the formatting (bold or italic).
Page 26
Chapter 2. Basic Tasks in the Red Hat Console
18
6. Click OK to save the profile.
7. Restart the Console to apply the changes.
To load and use a saved font profile, open the Font tab in the Preference dialog, and simply select the
font profile to use and click OK.
To delete a font profile, simply make sure that it is selected from the drop-down menu in the Fonts tab,
and click the Remove button.
2.4.4. Reordering Table Columns
The columns in a table can be rearranged by dragging them into a new position.
1. Click in the table heading.
2. Still holding down the left mouse button, drag the column to its new location. The other table
columns will automatically shift down to their new positions.
Page 27

Customizing the Main Window
19
3. When you release the mouse button, the column snaps into its new position.
2.4.5. Customizing the Main Window
Different elements of the main Red Hat Console window can be displayed or hidden; this is set by
check boxes in the View menu.
Page 28

Chapter 2. Basic Tasks in the Red Hat Console
20
There are three parts of the Console which can be hidden: the navigation tree (the smaller panel
on the left of the Console window); the decorative background and banner at the top of the Console
window; and the status bar at the bottom of the Console.
2.4.6. Working with Custom Views
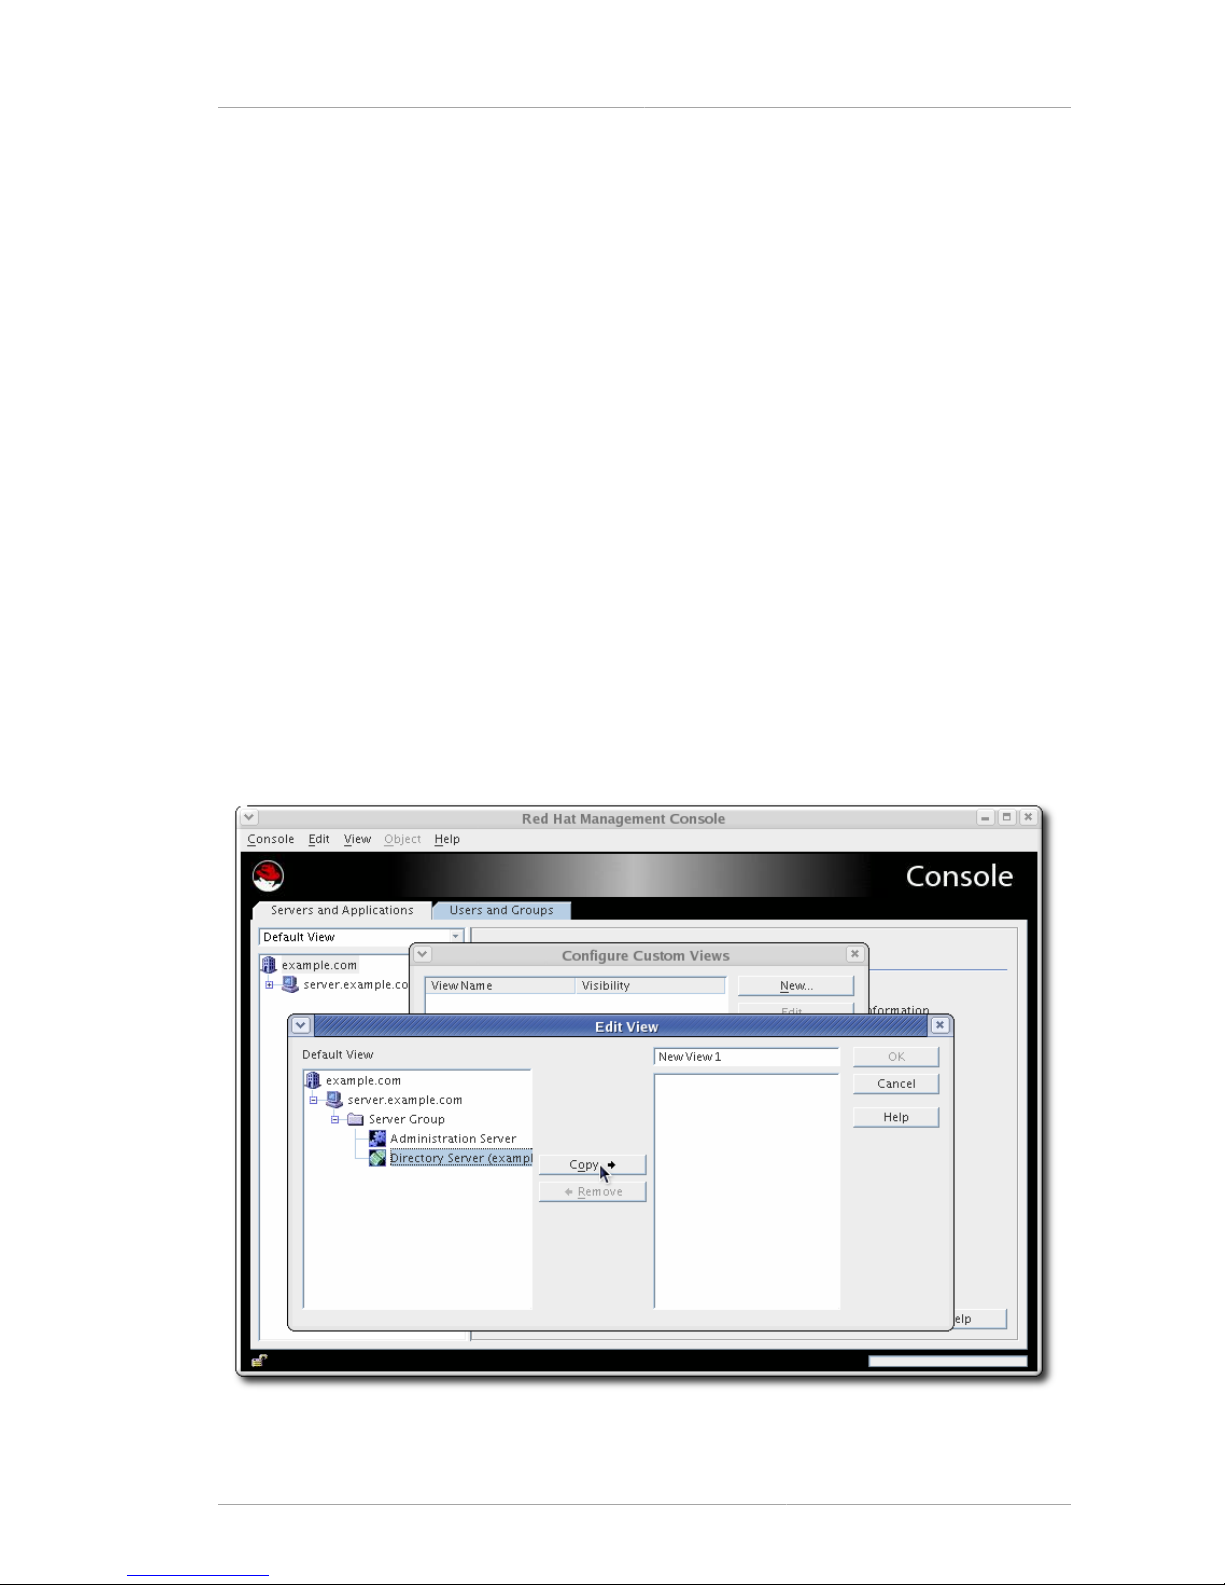
The Console allows different views to be created to show different server and domain entries in the
Red Hat Console window. Views show only a defined set of server entries; this makes it easier to
maintain large numbers of instances or to have a quick way to perform specific tasks.
2.4.6.1. Creating Custom Views
Custom views show different, defined server instances. Views are either public or private. A public
view is visible to any user, while a private view is visible only to the person who created it.
1. In the View menu, choose Custom View Configuration.
Page 29

Working with Custom Views
21
2. Click New.
3. Choose whether the new view will be public or private, then click OK.
• A public view is visible to all Console users by default, but access control instructions (ACIs)
can be set to restrict access. For more information, see Section 2.4.6.3, “Setting Access
Permissions for a Public View”.
Page 30

Chapter 2. Basic Tasks in the Red Hat Console
22
• A private view is only visible to the user who sets it, and ACIs cannot be set to change the
access to it.
4. In the Edit View window, enter a descriptive name for this view.
5. Select a resource from the Default View navigation tree on the left. Click Copy to list it in the
panel on the right and include it in the view.
To select a range of resources, click the SHIFT key and select the first and last entries; select
multiple, separate resources by holding down the Ctrl key and selecting the entries.
To edit a custom view, select it from the list, click the Edit button, and make the changes to the name
or resources.
To delete a custom view, select it from the list, and click the Remove button.
2.4.6.2. Switching to a Custom View
Choose the desired custom view from the drop-down list on the Servers and Applications tab.
To return to the default view, choose Default View from the drop-down list.
2.4.6.3. Setting Access Permissions for a Public View
1. From the View menu, choose Custom View Configuration.
2. Choose a public Custom View from the list and click Access.
Page 31

Working with Custom Views
23
3. Set the access control instructions.
Page 32

Chapter 2. Basic Tasks in the Red Hat Console
24
4. Click OK to save the ACI.
For more information on setting access permissions and creating access control instructions, see
Chapter 5, Setting Access Controls.
Page 33

Chapter 3.
25
Managing Server Instances
The server instances managed by the Red Hat Console are arranged in a hierarchy. At the top
is the admin domain. Within the domain are hosts, representing different server machines. Each
host has server groups, which identifies an inter-related group of Directory Servers using the same
Administration Server instance. The individual Directory Server instances and a single Administration
Server instance belong withing a server group. There can only be one Administration Server instance
per server group.
These high level entries can be created and managed in the Red Hat Console.
3.1. Editing Domain, Host, Server Group, and Instance
Information
The Red Hat Console displays some information about every admin domain, host, group, and server
instances. Most of this information — such as the installation date and build number — are not
editable, but some information is.
1. In the Servers and Applications tab, select the entry to modify.
2. Click Edit.
3. Edit the instance's information. Every entry has the option to change its name and description. The
host, which is the physical machine on which the instances are installed, also has the option of
changing the location.
Page 34

Chapter 3. Managing Server Instances
26
4. Click OK.
3.2. Creating and Removing Admin Domains
An admin domain is a container entry for server groups (and each server group contains Directory
Server instances which are configured to work with the same Configuration Directory Server and the
same Administration Server, which is also in the server group).
3.2.1. Creating and Editing an Admin Domain
To create a new admin domain:
1. In the top menu, click the Console menu item.
2. Select Create New Administration Domain.
3. Fill in the admin domain's information, including information for a new Directory Server instance.
Page 35

Removing an Admin Domain
27
4. Click OK.
To edit an admin domain, select the entry in the server window and click the Edit button.
WARNING
The admin domain settings affect all servers within the domain. Making any changes to
the admin domain settings means that all servers in the domain must be restarted.
3.2.2. Removing an Admin Domain
To remove an admin domain:
1. Highlight the admin domain to remove in the navigation tree.
2. In the top menu, click the Console menu item.
3. Select Remove Administration Domain.
Page 36

Chapter 3. Managing Server Instances
28
4. Click Yes.
NOTE
Any server group and servers within the domain must be removed before the domain can
be deleted.
3.3. Creating a New Directory Server Instance
After the default Red Hat Directory Server and Administration Server instances are installed and
configured, additional Directory Server instances can be created using the same schema and
configuration and in the same installation directory, /etc/dirsrv. Having multiple instances on the
same host makes it easier to maintain divisions between directories while simplifying administering
multiple directories.
1. In Red Hat Console, select the server group that will contain the new server instance.
2. Right-click on the server group entry, and select Create Instance Of, and then Red Hat Directory
Server.
Page 37

Deleting a Directory Server Instance
29
Alternatively, click Object in the top menu bar, and select Create Instance Of.
3. Fill in the information for the new instance of Directory Server, including the base DN, Directory
Manager, and port.
4. Click OK.
3.4. Deleting a Directory Server Instance
1. In the Red Hat Console, select the instance to delete.
2. Right-click the server instance, and select Remove Server.
Page 38

Chapter 3. Managing Server Instances
30
3. Click Yes to confirm the deletion.
Page 39

Chapter 4.
31
Managing Directory Server Users and
Groups
Users for both multiple Red Hat Directory Server instances and Administration Server can be created,
edited, and searched for in the Red Hat Console. The main Console window can also be used to
create organizational units and groups and to add entries to the new ous and groups.
Chapter 5, Setting Access Controls describes how to work with user and group information when
setting access privileges and other security information.
4.1. Searching for Users and Groups
The Users and Groups searches for directory entries; by default, it looks in the default user directory
configured for the Administration Server, but the directory can be changed to any Red Hat Directory
Server instance.
To search the directory:
1. Click the Users and Groups tab.
2. Enter the search criteria, and click Search.
• For a simple search, enter all or part of an entry name in the text box. To return all entries, leave
the search field blank or enter an asterisk (*).
• For a more complex or focused search, click the Advanced button, and enter the attributes to
search (such as cn, givenname, or ou), the kind of search, and the search term. To add or
remove search criteria, click the More and Fewer buttons.
Page 40

Chapter 4. Managing Directory Server Users and Groups
32
3. Click Search. Results are displayed in the list box.
To change the search directory:
1. Click the Users and Groups tab.
2. In the top menu, select the User menu item, and choose Change Directory.
3. Fill in the user directory information.
Page 41

Creating Directory Entries
33
• User Directory Host. The fully qualified hostname for the Directory Server instance.
• User Directory Port and Secure Connection. The port number for the connection and whether
this is an SSL (LDAPS).
• User Directory Subtree. The DN of the subtree to search in the directory; for example,
dc=example,dc=com for the base DN or ou=Marketing, dc=example,dc=com for a
subtree.
• Bind DN and Bind Password. The credentials to use to authenticate to the directory.
4. Click OK.
4.2. Creating Directory Entries
The Red Hat Console can be used to add, edit, and delete users, groups, and organization units in the
Users and Groups tab. The different kinds of entries and options for creating entries is explained in
more detail in the Directory Server Administrator's Guide.
4.2.1. Directory and Administrative Users
NOTE
A user can be added to the Directory Server user database through the Console or a user
can be added as an Administration Server administrator. The process is almost identical,
with two exceptions:
• A Directory Server user is added by clicking the Create button, then the Users option,
while an administrator is created by selecting the Administrator option.
Page 42

Chapter 4. Managing Directory Server Users and Groups
34
• An administrator doesn't require selecting an organization unit, while the
Directory Server user does, because the administrator is automatically added to
ou=Groups,ou=Topology,o=NetscapeRoot.
1. Click the Users and Groups tab.
2. Click the Create button, and choose User.
Alternatively, open the User option in the top menu, and choose Create > User.
3. Select the are in the directory tree under which the entry is created.
Page 43

Directory and Administrative Users
35
NOTE
When creating an administrator, there is no option to select the ou to which to add the
user as there is with a regular Directory Server user. This is because the administrator
is added to ou=Groups,ou=Topology,o=NetscapeRoot, with the admin users.
The entry can be added to an ou or a view, if views have been added to the directory.
4. In the Create User window, enter user information. The Common Name and User ID fields are
automatically filled in with the combined values the First Name and Last Name fields. These first,
last, and common name fields are required; a password is also required for the user to be able to
log into the Directory Server and the Console, but is not a required attribute.
5. Optionally, click the Languages link on the left, select an alternate language and fill in
internationalized values for common attributes.
This option allows international users to select a language other than English and to represent
their names in their preferred language. The pronunciation attribute allows for phonetic searching
against the international name attributes.
Page 44

Chapter 4. Managing Directory Server Users and Groups
36
6. Click OK.
4.2.2. Groups
A group consists of users who share a common attribute or are part of a list. Red Hat Directory Server
supports three types of groups: static, dynamic, and certificate. Each group differs by the way in which
users, or members, are added to it:
• A static group has members who are manually added to it, so it is static because the members do
not change unless an administrator manually adds or removes users.
• A dynamic group automatically includes users based on one or more attributes in their entries; the
attributes and values are determined using LDAP URLs. For example, a dynamic group can use
an LDAP filter which searches for entries which contain the attributes and values st=California
and department=sales. As entries are added to the directory with those two attributes, the users
are automatically added as members to the dynamic group. If those attributes are removed from the
entry, the entry is removed from the group.
• A certificate group includes all users who have a specific attribute-value pair in the subject
name of the certificate. For example, the certificate group could be based on having the string
st=California,ou=Sales,ou=West in the subject name. If a user logs onto a server using a
certificate with those attributes in his certificate, the user is automatically added to the group and is
granted all of the access privileges of that group.
To create a group:
Page 45

Groups
37
1. Click the Users and Groups tab.
2. Click the Create button, and choose Group.
Alternatively, open the User option in the top menu, and choose Create > Group.
3. Select the are in the directory tree under which the entry is created.
The subtree entry can be an ou or a view, if views have been added to the directory.
4. Enter the group's name and description.
Page 46

Chapter 4. Managing Directory Server Users and Groups
38
It is possible to save the new group entry at this point, without adding members. Click OK.
5. Click the Members link to add members to the group, and click the tab of the type of group
membership, Static, Dynamic, or Certificate.
6. Configure the members. For static groups, manually search for and add users; for dynamic
groups, construct the LDAP URL to use to find entries; and for certificate groups, enter the values
to search for in user certificate subject names.
Page 47

Organizational Units
39
NOTE
The different kinds of groups and how to configure their members are explained in more
detail in the Directory Server Administrator's Guide.
4.2.3. Organizational Units
An organizational unit can include a number of groups and users. An org unit usually represents a
distinct, logical division in an organization, such as different departments or geographical locations.
Each organizationalUnitName (ou) is a new subtree branch in the directory tree. This is reflected
in the relative distinguished name of the ou, such as ou=People,dc=example,dc=com, which
becomes part of the distinguished names of its sub-entries.
1. Click the Users and Groups tab.
Page 48

Chapter 4. Managing Directory Server Users and Groups
40
2. Click the Create button, and choose Organizational Unit.
Alternatively, open the User option in the top menu, and choose Create > Organizational Unit.
3. Select the directory subtree under which to locate the new organizational unit.
4. Fill in the organizational unit information. The Alias offers an alternative name for the
organizational unit that can be used instead of the full name.
5. Click OK.
Page 49

Modifying Directory Entries
41
4.3. Modifying Directory Entries
4.3.1. Editing Entries
1. Search for the entry to edit.
See Section 4.1, “Searching for Users and Groups” for more information on searching for entries.
2. Select the entry, and click Edit.
3. Edit the entry information, and click OK to save the changes.
4.3.2. Allowing Sync Attributes for Entries
Red Hat Directory Server and Active Directory synchronization unify some Unix and Windows-specific
directory attributes; to carry over a Directory Server entry to Active Directory, the entry must have
ntUser attributes. (Likewise, Windows entries must have posixAccount attributes.)
Windows (NT) attributes must an be enabled on entries. By default, these attributes are added
manually to individual entries. The user edit windows have links on the left for NT User to allow
Directory Server entries to contain Windows-specific attributes for synchronization.
It is also possible to configure the server so that all new entries will automatically possess the ntUser
object class; this is described in the Directory Server—Active Directory synchronization chapter of the
Directory Server Administrator's Guide.
Page 50

Chapter 4. Managing Directory Server Users and Groups
42
NOTE
Any Red Hat Directory Server entry must have the ntUser object class and required
attributes added in order to be synchronized to Active Directory.
To enable synchronization:
1. Select or create a user, and click the NT User link.
2. Enable the NT account, and check how the entry will be synchronized (meaning, whether a new
entry will be created and whether that entry should be deleted on Active Directory if it is delete on
Directory Server).
3. Click OK.
4.3.3. Changing Administrator Entries
When the Administration Server is installed, two entries are created with administrator access in the
Console. The main entry is the Configuration Administrator, who is authorized to access and modify
the entire configuration directory (o=NetscapeRoot). The Configuration Administrator entry is stored
in the uid=username, ou=Administrators,ou=TopologyManagement,o=NetscapeRoot entry.
The Configuration Administrator's username and password are automatically used to create the
Administration Server Administrator, who can perform a limited number of tasks, such as starting,
Page 51

Changing Administrator Entries
43
stopping, and restarting servers. The Administration Server Administrator is created so that a user
can log into the Red Hat Console when the Directory Server is not running. The Administration Server
Administrator does not have an LDAP entry; it exists in the Administration Server's configuration file, /
usr/share/dirsrv/properties/admpw.
IMPORTANT
Even though they are created at the same time during installation, and are identical at
that time, the Configuration Administrator and Administration Server Administrator are two
separate entities. If the username or password is changed for one, Red Hat Console does
not automatically make the same changes for the other.
• Section 4.3.3.1, “Changing the Configuration Administrator and Password”
• Section 4.3.3.2, “Changing the Admin Password”
• Section 4.3.3.3, “Adding Users to the Configuration Administrators Group”
4.3.3.1. Changing the Configuration Administrator and Password
1. In the Users and Groups, click Advanced.
2. Search for the Configuration Administrator. Select the Administrators object, and enter the
administrator's username, Configuration Administrator by default.
3. Select the Configuration Administrator from the list of search results, and then click Edit.
Page 52

Chapter 4. Managing Directory Server Users and Groups
44
4. Change the administrator's uid and password. The uid is the naming attribute used to log into
the Console and run commands.
5. Click OK.
NOTE
If you are logged into the Console as the Configuration Administrator when you edited the
Configuration Administrator entry, update the login information for the directory.
Page 53

Changing Administrator Entries
45
1. In the Users and Groups tab, click the User menu in the top menu and select
Change Directory.
2. Update the Bind DN and Bind Password fields with the new information for the
Configuration Administrator, and click OK.
4.3.3.2. Changing the Admin Password
1. Select the Administration Server in the Servers and Applications tab, and click Open.
2. Click the Configuration tab, and open the Access tab.
3. Set the new password.
CAUTION
Do not change the admin username.
4. Click Save.
5. Restart the Administration Server.
service dirsrv-admin restart
4.3.3.3. Adding Users to the Configuration Administrators Group
1. In the Users and Groups tab, click the User menu in the top menu and select Change Directory.
2. Change to the o=NetscapeRoot subtree, which contains the configuration information and the
Configuration Administrators group.
Page 54

Chapter 4. Managing Directory Server Users and Groups
46
3. Search for the Configuration Administrators group, and click Edit.
4. Click the Members link in the left of the edit window.
5. Click Add, and search for the user to add to the group.
Page 55

Removing an Entry from the Directory
47
NOTE
Only users in the o=NetscapeRoot database can be added to the Configuration
Administrators group. This means that the entry must be created as an administrator,
not a regular user, when added through the Console. See Section 4.2.1, “Directory
and Administrative Users”.
4.3.4. Removing an Entry from the Directory
1. Search for the entry to deleted.
See Section 4.1, “Searching for Users and Groups” for more information on searching for entries.
NOTE
All entries must be removed from under an organization unit before it can be deleted.
2. Select the entry in the results list, and click Delete. Click OK to confirm the deletion.
Page 56

48
Page 57

Chapter 5.
49
Setting Access Controls
Access control instructions (ACIs) can be set in the Red Hat Console to set limits on what users can
see and what operations they can perform on Red Hat Directory Server and Administration Server
instances managed in the Console.
ACIs define what operations users can do with a specific instance of Red Hat Directory Server or
Administration Server. ACIs set rules on areas of the subtree which can be accessed or modified,
what operations are allowed, even what hosts can be used to access the server and what times of day
access is allowed.
For Red Hat Console, access controls can be used to grant administrative privileges very easily to
specific users and to set restrictions on different aspects of the main Console, such as searching the
directory, adding and editing users and groups, and editing server or Console settings.
ACIs and access control lists (ACLs) are described in much more detail in the Directory Server
Administrator's Guide.
5.1. Granting Admin Privileges to Users for Directory
Server and Administration Server
Users can be granted administrative privileges, the same as the admin user for the Administration
Server and similar to the cn=Directory Manager user in Directory Server (though not exactly the
same as the Directory Manager, which is a special user).
1. Highlight a server in the Console navigation tree.
2. Select the Object menu, and choose Set Access Permissions.
Alternatively, right-click the entry, and choose Set Access Permissions.
Page 58

Chapter 5. Setting Access Controls
50
3. Click Add to add a new user to the list of administrators for the server. The default users,
Directory Manager for the Directory Server and admin for the Administration Server, are not
listed in the Set Permissions Dialog box.
4. Search for the users to add as an administrators. In the results, highlight the selected users, and
click Add to add them to the administrators list.
For more information on searching for users and groups, see Section 4.1, “Searching for Users
and Groups”.
Page 59

Setting Access Permissions on Console Elements
51
5. Click OK to add the names to the Set Permissions Dialog list, then click OK again to save the
changes and close the dialog.
NOTE
Granting a user the right to administer a server does not automatically allow that user to
give others the same right. To allow a user to grant administrative rights to other users,
add that user to the Configuration Administrators group, as described in Section 4.3.3.3,
“Adding Users to the Configuration Administrators Group”.
5.2. Setting Access Permissions on Console Elements
There are five elements defined in the Console for access control rules:
• User and Groups Tab (viewing)
• User and Groups Tab (editing)
• Topology Tab (editing)
• Custom View Tab (editing)
• Server Security (editing)
By default, each of these Console elements has five inherited ACIs:
• Enabling anonymous access
• Default anonymous access
• Configuration administrator's modifications
• Enabling group expansions
• SIE (host) group permissions
These inherited ACIs cannot be edited, but new ACIs can be added for each Console element in
addition to these defaults. Additional ACIs can limit anonymous access, for example, and change
other permissions within the Red Hat Console, which, in turn, affects access to the Directory Server
and Administration Server instances.
To create new ACIs:
1. In the top menu, select Edit and then Preferences.
Page 60

Chapter 5. Setting Access Controls
52
2. Select the Console element from the list, and click the Permissions button.
3. In the ACI Manager window, click the New button.
Page 61

Setting Access Permissions on Console Elements
53
The five inherited ACIs are not displayed by default; to see them listed, click the Show inherited
ACIs checkbox.
4. Configure the ACI by setting, at a minimum, the users to which it applies and the rights which are
allowed. To configure the ACI in the wizard (visually):
a. Enter a name for the ACI in the ACI Name field.
b. In the Users/Groups tab, click the Add button to open the search window. Search for and
add the users to which apply the ACI.
Select the users from the results list and click the Add button to include them. Click OK to
save the list.
c. In the Rights tab, specify which operations are permitted as part of this ACI.
Page 62

Chapter 5. Setting Access Controls
54
To hide a Console element entirely from the selected users, groups, and hosts, click Check
None to block any access.
d. Optionally, set the target entry in the subtree, hostnames, or times of day where the ACI is in
effect.
More complex ACIs may not be able to be edited visually; in those cases, click the Edit Manually
button, and configure the ACI entry directly.
Use the Check syntax button to validate the ACI.
Page 63

Setting Access Permissions on Console Elements
55
5. Click OK to save the ACI.
6. Restart Red Hat Console to apply the new ACI.
Page 64

56
Page 65

Chapter 6.
57
Using SSL/TLS with Red Hat Console
Secure Sockets Layer (SSL) and Transport Layer Security (TLS) are protocols which set up secure,
encrypted communication between an SSL/TLS server and a client which connects to it. In Red
Hat Directory Server, the Directory Server can be configured to communicate with LDAP over SSL,
LDAPS. Likewise, the Administration Server can be configured to run over secure HTTP (HTTPS)
rather than standard HTTP. Both the Directory Server and Administration Server are SSL servers.
The Red Hat Console can be configured as an SSL client, which connects to the servers over SSL,
and can be configured so that all Console operations are over SSL.
6.1. Overview of SSL/TLS
Transport Layer Security (TLS) and its predecessor Secure Sockets Layer (SSL) set rules that
govern authentication (identity verification) between two entities and set up encrypted communication
between servers and clients. For Red Hat Directory Server and Administration Server, TLS/SSL
means that directory operations run over LDAPS (secure LDAP) and HTTPS (secure HTTP),
respectively.
Secure communication depends on the ability to hide and uncover information by disguising it with
complex codes. Both the TLS server (the application which is being contacted) and the TLS client (the
user or application which contacts the server) have to be able to understand the encoded information.
1
Cryptography encrypts and protects information using recognized algorithms and ciphers, or
mathematical equations which can scramble information; sets of related algorithms and ciphers are
called cipher suites. The equations are also used to unscramble the information as long as a server
has the right information to decode the data; the decoder information is called a key. Keys come in two
halves; the private key is held by only one entity and encrypts (wraps) the information. The public key
matches the private key and can be used to decrypt information wrapped by the private key.
A certificate contains a public key which can be used to decrypt information, algorithms used for a
digital signature (similar to a fingerprint), and identity information for the server or user.
In server authentication (the TLS method allowed by the Red Hat Console), the server presents
a certificate (containing a public key, algorithms used for the digital signature, and server identity
information) to the client. The client may be validated (authenticated) to the server through simple
authentication, such as a username and password, or no authentication. With client authentication,
both the server and client present certificates proving their identity.
TLS/SSL communication has two major parts: the SSL/TLS handshake (where the server and client
authenticate their identities) and secure communication (the encrypted session between the client and
server). Authentication and encryption are performed using secure materials, called certificates and
keys.
The TLS handshake is when the server and client negotiate the parameters of the connection and
generate the keys which will be used for secure communication:
1. The TLS client initiates contact with the TLS server. The client sends information about its TLS
configuration to help the server negotiate the connection parameters:
• The TLS/SSL version the client is using (all TLS/SSL versions are backward compatible)
1
For Red Hat Directory Server, the Directory Server and Administration Server are the TLS servers, and the Red Hat Console
or a user through LDAP tools or browsers are the TLS client.
Page 66

Chapter 6. Using SSL/TLS with Red Hat Console
58
• A list of acceptable cipher suites
• A list of acceptable compression methods
• A randomly-generated number
2. The server responds to the client:
• The chosen TLS/SSL version (this is the highest version in common with both the server and
client)
• The selected cipher suite (the most secure version the server and client have in common)
• The selected compression method (the most secure version the server and client have in
common)
• A randomly-generated number of its own
3. The server then sends its certificate. The server and client will use the public key in the certificate
to decrypt messages once the handshake ends and the secure session is established.
4. The client verifies the identity of the server using the information in the server certificate:
• The validity period (the expiration date of the server certificate)
• Whether the client possesses a copy of the CA certificate for the authority which issued the
server's certificate (whether the certificate was issued by a trusted CA)
• Verifying the digital signature of the issuing CA for the server certificate
• Whether the domain name for the server in the certificate subject name matches the actual
domain name of the server
5. Depending on the cipher suite being used, the client sends the server key material to use to
generate session keys to encrypt data. This key material can be public key or a master key secret
which is used to derive the encryption keys.
6. Using the key material sent by the client, the randomly-generated numbers from the client and
server, and the selected cipher, the server and client independently derive the same encryption
keys.
7. The client sends a notification to the server that all subsequent messages from it will be encrypted.
It also sends a hash and a message authentication key which are wrapped in the client's
encryption key.
8. The server successfully decrypts the client's message using its derived encryption keys.
9. The server then sends a hash and a MAC key to the client, wrapped in the server's encryption key.
10. The client successfully decrypts the server's message using its derived encryption keys.
11. The TLS handshake closes, and the secure channel opens between the server and the client.
The Red Hat Console can be configured to be encrypted by SSL/TLS by configuring the Red Hat
Directory Server to enable SSL in the Console.
Page 67

Installing Certificates
59
6.2. Installing Certificates
Before the Directory Server can be set to run in TLS/SSL, server and CA certificates must be properly
installed in the servers.
Obtaining and installing certificates consists of the following steps:
1. Generate a certificate request.
2. Send the certificate request to a certificate authority.
3. Install the server certificate.
4. Set the Directory Server to trust the certificate authority.
The Directory Server Console has two wizards to make it easier to request and install certificates.
6.2.1. Generating a Certificate Request
1. In the Directory Server Console, select the Tasks tab, and click Manage Certificates.
2. Select the Server Certs tab, and click the Request button. This opens the Certificate Request
Wizard.
3. Click Next.
4. Enter the Requester Information in the blank text fields, then click Next.
Page 68

Chapter 6. Using SSL/TLS with Red Hat Console
60
• Server Name. Enter the fully qualified hostname of the Directory Server as it is used in DNS and
reverse DNS lookups; for example, dir.example.com. The server name is critical for clientside validation to work, which prevents man-in-the-middle attacks.
IMPORTANT
This must be a valid hostname that can be resolved correctly by all server clients, or
TLS/SSL will not work.
• Organization. Enter the legal name of the company or institution. Most CAs require this
information to be verified with legal documents such as a copy of a business license.
• Organizational Unit. Optional. Enter a descriptive name for the organization within the company.
• Locality. Optional. Enter the company's city name.
• State or Province. Enter the full name of the company's state or province (no abbreviations).
• Country. Select the two-character abbreviation for the country's name (ISO format). The country
code for the United States is US.
5. Enter the password that will be used to protect the private key, and click Next.
The Next button is grayed out until a password is supplied.
Page 69

Installing the Certificate
61
6. The Request Submission dialog box provides two ways to submit a request: directly to the CA (if
there is one internally) or manually. To submit the request manually, select Copy to Clipboard or
Save to File to save the certificate request which will be submitted to the CA.
7. Click Done to dismiss the Certificate Request Wizard.
After generating the certificate request, send it to the CA, and wait for the CA to issue the server
certificate.
When the CA issues the certificate, save it to a text file that is local to the Red Hat Directory Server.
The certificate must be available to install in the Directory Server. This file can also be used as a
backup to re-install the certificate in the server in case the certificate is ever lost.
6.2.2. Installing the Certificate
1. In the Directory Server Console, select the Tasks tab, and click Manage Certificates.
Page 70

Chapter 6. Using SSL/TLS with Red Hat Console
62
2. Select the Server Certs tab, and click Install.
3. Give the certificate location or paste the certificate text in the text box, then click Next.
Page 71

Installing the Certificate
63
• In this file. Enter the absolute path to the certificate in this field.
• In the following encoded text block. Copy the text from the CA's email or from the created text
file, and paste it in this field.
4. Check that the certificate information displayed is correct, and click Next.
5. Give a name to the certificate, and click Next.
Page 72

Chapter 6. Using SSL/TLS with Red Hat Console
64
6. Provide the password that protects the private key. This password is the same as the one provided
in step 5 in Section 6.2.1, “Generating a Certificate Request”.
After installing the server certificate, it is listed in the Certificates tab.
If necessary, configure the Directory Server to trust the CA which issued the server's certificate.
6.2.3. Trusting a Certificate Authority or Adding a Certificate Chain
Configuring the Directory Server to trust the certificate authority consists of obtaining the CA's
certificate (a process which varies, depending on the CA) and installing it in the server's certificate
database. Instead of a single CA certificate, some sites have a certificate chain, which is several CA
certificates in a single certificate blob. Certificate chains are treated the same as CA certificates.
1. In the Directory Server Console, select the Tasks tab, and click Manage Certificates.
2. Go to the CA Certs tab, and click Install.
Page 73

Trusting a Certificate Authority or Adding a Certificate Chain
65
3. If the CA's certificate is saved to a file, enter the path in the field provided. Alternatively, copy and
paste the certificate, including the headers, into the text box. Click Next.
4. Check that the certificate information that opens is correct, and click Next.
5. Name the certificate, and click Next.
Page 74

Chapter 6. Using SSL/TLS with Red Hat Console
66
6. Select the purpose of trusting this certificate authority; it is possible to select both options:
• Accepting connections from clients (Client Authentication). The server checks that the client's
certificate has been issued by a trusted certificate authority.
• Accepting connections to other servers (Server Authentication). This server checks that
the directory to which it is making a connection (for replication updates, for example) has a
certificate that has been issued by a trusted certificate authority.
7. Click Done.
After installing the CA certificate, it is listed in the CA Certificates tab.
Page 75

Enabling TLS/SSL
67
NOTE
If a CA certificate is incorrectly generated, it is listed in the Server Certificates tab in the
Console rather than the CA Certificates tab. The certificate still works as a CA certificate,
even though it is listed in the wrong tab.
Still, request certificates from a real certificate authority to minimize the risk of using an
incorrectly generated certificate and breaking SSL/TLS in the Administration Server.
6.3. Enabling TLS/SSL
In order to run the Red Hat Console over TLS/SSL, the Administration Server and Directory Server
must also be configured to run in TLS/SSL.
This configures server authentication for the Console and the Red Hat Directory Server and
Administration Server.
1. Obtain server certificates and CA certs, and install them on the Directory Server. This is described
in Section 6.2, “Installing Certificates”.
2. Obtain and install server and CA certificates on the Administration Server. This is a similar process
as for the Directory Server.
NOTE
It is important that the Administration Server and Directory Server have a CA
certificate in common so that they can trust the other's certificates.
3. If the default port number of 636 is not used, change the secure port setting.
a. Change the secure port number in the Configuration>Settings tab of the Directory Server
Console, and save.
Page 76

Chapter 6. Using SSL/TLS with Red Hat Console
68
b. Restart the Directory Server2. It restarts over the regular port.
service dirsrv restart slapd-example
4. In the Configuration tab of the Directory Server Console, highlight the server name at the top of
the table, and select the Encryption tab.
5. Select the Enable SSL checkbox.
6. Check the Use this Cipher Family checkbox.
7. Select the certificate to use from the drop-down menu.
Page 77

Enabling TLS/SSL
69
8. Click Cipher Settings. By default, all ciphers are selected.
9. Set the preferences for client authentication.
• Do not allow client authentication. With this option, the server ignores the client's certificate. This
does not mean that the bind will fail.
• Allow client authentication. This is the default setting. With this option, authentication is
performed on the client's request.
• Require client authentication. With this option, the server requests authentication from the client.
With this option, all clients must use a certificate to authenticate to the server, and no simple
authentication (username/password) is allowed.
Page 78

Chapter 6. Using SSL/TLS with Red Hat Console
70
NOTE
To use client certificate-based authentication with replication, configure the consumer
server either to allow or to require client authentication.
10. To verify the authenticity of requests, select the Check hostname against name in certificate for
outbound SSL connections option. The server does this verification by matching the hostname
against the value assigned to the common name (cn) attribute of the subject name in the being
presented for authentication. The hostname that is checked in the certificate is the same one set in
the server name field in the request in Section 6.2.1, “Generating a Certificate Request”.
By default, this feature is disabled. If it's enabled and if the hostname does not match the cn
attribute of the certificate, appropriate error and audit messages are logged. Red Hat recommends
enabling this option to protect Directory Server's outbound TLS/SSL connections against a manin-the-middle (MITM) attack.
11. Check the Use SSL in the Console box.
NOTE
This is the only option which sets whether the Red Hat Console will run over SSL.
12. Hit Save.
13. In the Administration Server Console, select the Configuration tab. Select the Encryption tab,
check the Enable SSL checkbox, and fill in the appropriate certificate information.
After TLS/SSL is enabled, then the Administration Server can only be connected to using HTTPS.
All of the previous HTTP (standard) URLs for connecting to the Administration Server and its
Page 79

Enabling TLS/SSL
71
services no longer work. This is true whether connecting to the Administration Server using the
Console or using a web browser.
14. In the Configuration DS tab, change the port number to the new Directory Server secure port
information, even if the default port of 636 is used. Check the Secure Connection checkbox.
15. In the User DS tab, select the Set User Directory radio button, and fill in the Directory Server
secure port information, the LDAP URL, and the user database information. Check the Secure
Connection checkbox.
Page 80

Chapter 6. Using SSL/TLS with Red Hat Console
72
16. Save the new TLS/SSL settings and Configuration DS and User DS information in the
Administration Server Console.
17. Restart the Directory Server. The server must be restarted from the command line.
service dirsrv restart slapd-example
When the server restarts, it prompts for the PIN or password to unlock the key database. This is
the same password used when the server certificate and key were imported into the database.
Using a pin.txt file to store the token database passwords allows the Directory Server to restart
without prompting for the password. This is covered in Section 6.4.1, “Creating a Password File for
the Directory Server”.
18. Restart the Administration Server. The server must be restarted from the command line.
service dirsrv-admin restart
When the server restarts, it prompts for the PIN or password to unlock the key database. This is
the same password used when the server certificate and key were imported into the database.
Using a password.conf file to store the token database passwords allows the Administration
Server to restart without prompting for the password. This is covered in Section 6.4.2, “Creating a
Password File for the Administration Server”.
NOTE
After configuring SSL/TLS for the Administration Server, be certain that the address reads
https when next logging into the Administration Server or Red Hat Console. With SSL/
TLS, all connections to the Administration Server must be over HTTPS. Otherwise, the
operation will time out, unable to find the server since it is running on a secure connection.
After successfully connecting, a dialog box appears to accept the certificate. Click OK to
accept the certificate (either only for that current session or permanently).
6.4. Creating Password Files
If SSL/TLS is enabled for the Directory Server or Administration Server, then the server prompts for a
password to access the certificate and key databases every time the server is restarted. The servers
can restart silently if that password is supplied in a password file which the start scripts can access.
6.4.1. Creating a Password File for the Directory Server
It is possible to store the certificate password in a password file. By placing the certificate database
password in a file, the server can be started from the Directory Server Console and also restarted
automatically when running unattended.
Page 81

Creating a Password File for the Administration Server
73
WARNING
This password is stored in clear text within the password file, so its usage represents a
significant security risk. Do not use a password file if the server is running in an unsecured
environment.
The password file must be in the same directory where the other key and certificate databases
for Directory Server are stored. This is usually the main configuration directory, /etc/dirsrv/
slapd-instance_name. The file should be named pin.txt.
Include the token name and password in the file. For example:
Internal (Software) Token:secret
For the NSS software crypto module (the default software database), the token is always called
internal.
The PIN file should be owned by the Directory Server user and set to read-only by the Directory
Server user, with no access to anyone other user (mode 0400).
6.4.2. Creating a Password File for the Administration Server
Like the Directory Server, the Administration Server can use a password file during login when TLS/
SSL is enabled.
WARNING
This password is stored in clear text within the password file, so its usage represents a
significant security risk. Do not use a password file if the server is running in an unsecured
environment.
1. Open the Administration Server configuration directory, /etc/dirsrv/admin-serv.
2. Create a password file named password.conf. The file should include a line with the token
name and password, in the form token:password. For example:
internal:secret
For the NSS software crypto module (the default software database), the token is always called
internal.
The password file should be owned by the Administration Server user and set to read-only by the
Administration Server user, with no access to any other user (mode 0400).
NOTE
To find out what the Administration Server user ID is, run grep in the Administration
Server configuration directory:
cd /etc/dirsrv/admin-serv
Page 82

Chapter 6. Using SSL/TLS with Red Hat Console
74
grep \^User console.conf
3. In the /etc/dirsrv/admin-serv directory, edit the nss.conf file to point to the location of the
new password file.
# Pass Phrase Dialog:
# Configure the pass phrase gathering process.
# The filtering dialog program (`builtin' is a internal
# terminal dialog) has to provide the pass phrase on stdout.
NSSPassPhraseDialog file://etc/dirsrv/admin-serv/password.conf
4. Restart the Administration Server.
service dirsrv-admin restart
Page 83

75
Index
A
Access Control
to navigation tree, 49
admin domain
creating, 26, 27
administration domain
defined, 5
removing, 27
Administration Server
defined, 1
Administration Server Administrator
changing user name or password for, 45
defined, 42
administrators, overview of, 42
C
certificate
password, 72
certificate group, 36
Configuration Administrator
changing user name or password for, 43
defined, 42
Configuration Administrators group
adding users to, 45
configuration directory
defined, 1
custom views, 13
changing to, 22
creating, 20
editing, 22
removing, 22
setting ACIs on, 22
using, 20
D
deleting
Directory Server instance, 29
digital signatures, 57
directory
changing the search directory, 32
directory entries
creating, 33
removing, 47
searching for, 31
Directory Server
configuration subtree, 1
deleting instance, 29
role in managing resources and users, 1
user subtree, 1
dynamic group, 36
E
encryption, 57
F
fonts
changing, 16
G
groups
creating, 37
editing, 41
locating, 31
removing, 47
types, 36
H
host information, modifying, 25
L
logging into Console
logging in, 12
M
management window
opening for Directory or Administration Server,
12
menus, in Red Hat Console, 4
N
navigation tree
overview, 5
setting access permissions to, 49
O
organizational units
creating, 39
removing, 47
P
password
changing for a user or administrator, 41
password file
Administration Server, 73
SSL certificate, 72
passwords
certificate, 72
preferences, 13
Page 84

Index
76
font, 16
UI permissions, 13
R
Red Hat Console
defined, 1
information panel, 5
logging into, 12
menus, 4
overview of, 1
tabs, 5
S
searching
changing the search directory, 32
for directory entries, 31
server
defined, 5
opening a management window for, 12
server group
defined, 5
modifying information for, 25
server instance
creating, 28
modifying information for, 25
SSL, 57
Administration Server password file, 73
certificate password, 72
static group, 36
synchronization options
enabling, 42
overview, 41
T
tables
changing column position in, 18
tabs, in Red Hat Console, 5
TLS, 57
topology
defined, 5
U
user entries
changing passwords for, 41
creating, 33
editing, 41
locating, 31
removing, 47
Users and Groups tab, changing the search
directory for, 32
 Loading...