

Page 1

Administrator’s Guide
Red Hat Directory Server
Version 7.1
Updated February 2009
May 2005
Page 2

Red Hat, Inc.
1801 Varsity Drive
Raleigh NC 27606-2072 USA
Phone: +1 919 754 3700
Phone: 888 733 4281
Fax: +1 919 754 3701
PO Box 13588
Research Triangle Park NC 27709 USA
© 2001 Sun Microsystems, Inc. Used by permission. © 2005 by Red Hat, Inc. All rights reserved. This material may be distributed only subject to the
terms and conditions set forth in the Open Publication License, V1.0 or later (the latest version is presently available at
http://www.opencontent.org/openpub/).
Distribution of substantively modified versions of this document is prohibited without the explicit permission of the copyright holder.
Distribution of the work or derivative of the work in any standard (paper) book form for commercial purposes is prohibited unless prior permission is
obtained from the copyright holder.
Red Hat and the Red Hat "Shadow Man" logo are registered trademarks of Red Hat, Inc. in the United States and other countries.
All other trademarks referenced herein are the property of their respective owners.
The GPG fingerprint of the security@redhat.com key is:
CA 20 86 86 2B D6 9D FC 65 F6 EC C4 21 91 80 CD DB 42 A6 0E
Page 3

Contents
Introduction to This Reference Guide . . . . . . . . . . . . . . . . . . . . . . . . . . . . . . . . . . . . . . . . . . . . . . . . . . . . . . 27
Directory Server Overview . . . . . . . . . . . . . . . . . . . . . . . . . . . . . . . . . . . . . . . . . . . . . . . . . . . . . . . . . . . . . . 27
Prerequisite Reading . . . . . . . . . . . . . . . . . . . . . . . . . . . . . . . . . . . . . . . . . . . . . . . . . . . . . . . . . . . . . . . . . . . 28
Conventions Used in This Book . . . . . . . . . . . . . . . . . . . . . . . . . . . . . . . . . . . . . . . . . . . . . . . . . . . . . . . . . . 29
Related Information . . . . . . . . . . . . . . . . . . . . . . . . . . . . . . . . . . . . . . . . . . . . . . . . . . . . . . . . . . . . . . . . . . . . 30
Part 1 Administering Red Hat Directory Server . . . . . . . . . . . . . . . . . . . . . . . . . . . . . . . . . . . . . . . . . . 31
Chapter 1 Introduction to Red Hat Directory Server . . . . . . . . . . . . . . . . . . . . . . . . . . . . . . . . . . . . . . . 33
Overview of Directory Server Management . . . . . . . . . . . . . . . . . . . . . . . . . . . . . . . . . . . . . . . . . . . . . . . . 33
Using the Directory Server Console . . . . . . . . . . . . . . . . . . . . . . . . . . . . . . . . . . . . . . . . . . . . . . . . . . . . . . . 34
Starting Directory Server Console . . . . . . . . . . . . . . . . . . . . . . . . . . . . . . . . . . . . . . . . . . . . . . . . . . . . . . 34
Copying Entry DNs to the Clipboard . . . . . . . . . . . . . . . . . . . . . . . . . . . . . . . . . . . . . . . . . . . . . . . . . . . 35
Configuring the Directory Manager . . . . . . . . . . . . . . . . . . . . . . . . . . . . . . . . . . . . . . . . . . . . . . . . . . . . . . 35
Binding to the Directory from Red Hat Console . . . . . . . . . . . . . . . . . . . . . . . . . . . . . . . . . . . . . . . . . . . . 36
Changing Login Identity . . . . . . . . . . . . . . . . . . . . . . . . . . . . . . . . . . . . . . . . . . . . . . . . . . . . . . . . . . . . . 36
Viewing the Current Bind DN from the Console . . . . . . . . . . . . . . . . . . . . . . . . . . . . . . . . . . . . . . . . . 37
Starting and Stopping the Directory Server . . . . . . . . . . . . . . . . . . . . . . . . . . . . . . . . . . . . . . . . . . . . . . . . 37
Starting and Stopping the Server from the Console . . . . . . . . . . . . . . . . . . . . . . . . . . . . . 37
Starting and Stopping the Server from the Command-Line . . . . . . . . . . . . . . . . . . . . . . 38
Configuring LDAP Parameters . . . . . . . . . . . . . . . . . . . . . . . . . . . . . . . . . . . . . . . . . . . . . . . . . . . . . . . . . . . 38
Changing Directory Server Port Numbers . . . . . . . . . . . . . . . . . . . . . . . . . . . . . . . . . . . . . . . . . . . . . . 38
Placing the Entire Directory Server in Read-Only Mode . . . . . . . . . . . . . . . . . . . . . . . . . . . . . . . . . . . 40
Tracking Modifications to Directory Entries . . . . . . . . . . . . . . . . . . . . . . . . . . . . . . . . . . . . . . . . . . . . . 41
Cloning a Directory Server . . . . . . . . . . . . . . . . . . . . . . . . . . . . . . . . . . . . . . . . . . . . . . . . . . . . . . . . . . . . . . 42
Creating a New Directory Server Instance . . . . . . . . . . . . . . . . . . . . . . . . . . . . . . . . . . . . . . . . . . . . . . 42
Contents 3
Page 4

Cloning the Directory Configuration . . . . . . . . . . . . . . . . . . . . . . . . . . . . . . . . . . . . . . . . . . . . . . . . . . . 43
Starting the Server in Referral Mode . . . . . . . . . . . . . . . . . . . . . . . . . . . . . . . . . . . . . . . . . . . . . . . . . . . . . . 43
Using the refer Command . . . . . . . . . . . . . . . . . . . . . . . . . . . . . . . . . . . . . . . . . . . . . . . . . . . . . . . . . . . . 44
Chapter 2 Creating Directory Entries . . . . . . . . . . . . . . . . . . . . . . . . . . . . . . . . . . . . . . . . . . . . . . . . . . . . 45
Managing Entries from the Directory Console . . . . . . . . . . . . . . . . . . . . . . . . . . . . . . . . . . . . . . . . . . . . . . 45
Creating a Root Entry . . . . . . . . . . . . . . . . . . . . . . . . . . . . . . . . . . . . . . . . . . . . . . . . . . . . . . . . . . . . . . . . 46
Creating Directory Entries . . . . . . . . . . . . . . . . . . . . . . . . . . . . . . . . . . . . . . . . . . . . . . . . . . . . . . . . . . . . 47
Creating an Entry Using a Predefined Template . . . . . . . . . . . . . . . . . . . . . . . . . . . . . . . . . . . . . . . 48
Creating Other Types of Entries . . . . . . . . . . . . . . . . . . . . . . . . . . . . . . . . . . . . . . . . . . . . . . . . . . . . . 48
Modifying Directory Entries . . . . . . . . . . . . . . . . . . . . . . . . . . . . . . . . . . . . . . . . . . . . . . . . . . . . . . . . . . 49
Displaying the Property Editor . . . . . . . . . . . . . . . . . . . . . . . . . . . . . . . . . . . . . . . . . . . . . . . . . . . . . 50
Adding an Object Class to an Entry . . . . . . . . . . . . . . . . . . . . . . . . . . . . . . . . . . . . . . . . . . . . . . . . . 50
Removing an Object Class . . . . . . . . . . . . . . . . . . . . . . . . . . . . . . . . . . . . . . . . . . . . . . . . . . . . . . . . . . 50
Adding an Attribute to an Entry . . . . . . . . . . . . . . . . . . . . . . . . . . . . . . . . . . . . . . . . . . . . . . . . . . . . 51
Adding Very Large Attributes . . . . . . . . . . . . . . . . . . . . . . . . . . . . . . . . . . . . . . . . . . . . . . . . . . . . . . 52
Adding Attribute Values . . . . . . . . . . . . . . . . . . . . . . . . . . . . . . . . . . . . . . . . . . . . . . . . . . . . . . . . . . . 52
Removing an Attribute Value . . . . . . . . . . . . . . . . . . . . . . . . . . . . . . . . . . . . . . . . . . . . . . . . . . . . . . . 53
Adding an Attribute Subtype . . . . . . . . . . . . . . . . . . . . . . . . . . . . . . . . . . . . . . . . . . . . . . . . . . . . . . . 53
Deleting Directory Entries . . . . . . . . . . . . . . . . . . . . . . . . . . . . . . . . . . . . . . . . . . . . . . . . . . . . . . . . . . . . 55
Managing Entries from the Command-Line . . . . . . . . . . . . . . . . . . . . . . . . . . . . . . . . . . . . . . . . . . . . . . . . 55
Providing Input from the Command-Line . . . . . . . . . . . . . . . . . . . . . . . . . . . . . . . . . . . . . . . . . . . . . . 56
Creating a Root Entry from the Command-Line . . . . . . . . . . . . . . . . . . . . . . . . . . . . . . . . . . . . . . . . . 57
Adding Entries Using LDIF . . . . . . . . . . . . . . . . . . . . . . . . . . . . . . . . . . . . . . . . . . . . . . . . . . . . . . . . . . . 57
Adding and Modifying Entries Using ldapmodify . . . . . . . . . . . . . . . . . . . . . . . . . . . . . . . . . . . . . . . 58
Adding Entries Using ldapmodify . . . . . . . . . . . . . . . . . . . . . . . . . . . . . . . . . . . . . . . . . . . . . . . . . . 59
Modifying Entries Using ldapmodify . . . . . . . . . . . . . . . . . . . . . . . . . . . . . . . . . . . . . . . . . . . . . . . . 60
Deleting Entries Using ldapdelete . . . . . . . . . . . . . . . . . . . . . . . . . . . . . . . . . . . . . . . . . . . . . . . . . . . . . 61
Using Special Characters . . . . . . . . . . . . . . . . . . . . . . . . . . . . . . . . . . . . . . . . . . . . . . . . . . . . . . . . . . . . . 62
LDIF Update Statements . . . . . . . . . . . . . . . . . . . . . . . . . . . . . . . . . . . . . . . . . . . . . . . . . . . . . . . . . . . . . . . . 63
Adding an Entry Using LDIF . . . . . . . . . . . . . . . . . . . . . . . . . . . . . . . . . . . . . . . . . . . . . . . . . . . . . . . . . . 64
Renaming an Entry Using LDIF . . . . . . . . . . . . . . . . . . . . . . . . . . . . . . . . . . . . . . . . . . . . . . . . . . . . . . . 66
A Note on Renaming Entries . . . . . . . . . . . . . . . . . . . . . . . . . . . . . . . . . . . . . . . . . . . . . . . . . . . . . . . 67
Modifying an Entry Using LDIF . . . . . . . . . . . . . . . . . . . . . . . . . . . . . . . . . . . . . . . . . . . . . . . . . . . . . . . 67
Adding Attributes to Existing Entries Using LDIF . . . . . . . . . . . . . . . . . . . . . . . . . . . . . . . . . . . . . 68
Changing an Attribute Value Using LDIF . . . . . . . . . . . . . . . . . . . . . . . . . . . . . . . . . . . . . . . . . . . . 69
Deleting All Values of an Attribute Using LDIF . . . . . . . . . . . . . . . . . . . . . . . . . . . . . . . . . . . . . . . 70
Deleting a Specific Attribute Value Using LDIF . . . . . . . . . . . . . . . . . . . . . . . . . . . . . . . . . . . . . . . 71
Deleting an Entry Using LDIF . . . . . . . . . . . . . . . . . . . . . . . . . . . . . . . . . . . . . . . . . . . . . . . . . . . . . . . . . 71
Modifying an Entry in an Internationalized Directory . . . . . . . . . . . . . . . . . . . . . . . . . . . . . . . . . . . . 72
Maintaining Referential Integrity . . . . . . . . . . . . . . . . . . . . . . . . . . . . . . . . . . . . . . . . . . . . . . . . . . . . . . . . . 72
How Referential Integrity Works . . . . . . . . . . . . . . . . . . . . . . . . . . . . . . . . . . . . . . . . . . . . . . . . . . . . . . 73
Using Referential Integrity with Replication . . . . . . . . . . . . . . . . . . . . . . . . . . . . . . . . . . . . . . . . . . . . . 73
4 Red Hat Directory Server Administrator’s Guide • May 2005
Page 5

Configuring the Supplier Server . . . . . . . . . . . . . . . . . . . . . . . . . . . . . . . . . . . . . . . . . . . . . . . . . . . . 74
Enabling/Disabling Referential Integrity . . . . . . . . . . . . . . . . . . . . . . . . . . . . . . . . . . . . . . . . . . . . . . . 74
From the Directory Server Console . . . . . . . . . . . . . . . . . . . . . . . . . . . . . . . . . . . . . . . . . . . . . . . . . . 74
Recording Updates in the Changelog . . . . . . . . . . . . . . . . . . . . . . . . . . . . . . . . . . . . . . . . . . . . . . . . . . . 75
From the Directory Server Console . . . . . . . . . . . . . . . . . . . . . . . . . . . . . . . . . . . . . . . . . . . . . . . . . . 75
Modifying the Update Interval . . . . . . . . . . . . . . . . . . . . . . . . . . . . . . . . . . . . . . . . . . . . . . . . . . . . . . . . 76
From the Directory Server Console . . . . . . . . . . . . . . . . . . . . . . . . . . . . . . . . . . . . . . . . . . . . . . . . . . 76
Modifying the Attribute List . . . . . . . . . . . . . . . . . . . . . . . . . . . . . . . . . . . . . . . . . . . . . . . . . . . . . . . . . . 77
From the Directory Server Console . . . . . . . . . . . . . . . . . . . . . . . . . . . . . . . . . . . . . . . . . . . . . . . . . . 77
Chapter 3 Configuring Directory Databases . . . . . . . . . . . . . . . . . . . . . . . . . . . . . . . . . . . . . . . . . . . . . . . 79
Creating and Maintaining Suffixes . . . . . . . . . . . . . . . . . . . . . . . . . . . . . . . . . . . . . . . . . . . . . . . . . . . . . . . . 79
Creating Suffixes . . . . . . . . . . . . . . . . . . . . . . . . . . . . . . . . . . . . . . . . . . . . . . . . . . . . . . . . . . . . . . . . . . . . 80
Creating a New Root Suffix Using the Console . . . . . . . . . . . . . . . . . . . . . . . . . . . . . . . . . . . . . . . . 82
Creating a New Sub Suffix Using the Console . . . . . . . . . . . . . . . . . . . . . . . . . . . . . . . . . . . . . . . . 83
Creating Root and Sub Suffixes from the Command-Line . . . . . . . . . . . . . . . . . . . . . . . . . . . . . . 84
Maintaining Suffixes . . . . . . . . . . . . . . . . . . . . . . . . . . . . . . . . . . . . . . . . . . . . . . . . . . . . . . . . . . . . . . . . . 87
Using Referrals in a Suffix . . . . . . . . . . . . . . . . . . . . . . . . . . . . . . . . . . . . . . . . . . . . . . . . . . . . . . . . . . 87
Enabling Referrals Only During Update Operations . . . . . . . . . . . . . . . . . . . . . . . . . . . . . . . . . . . 88
Disabling a Suffix . . . . . . . . . . . . . . . . . . . . . . . . . . . . . . . . . . . . . . . . . . . . . . . . . . . . . . . . . . . . . . . . . 89
Deleting a Suffix . . . . . . . . . . . . . . . . . . . . . . . . . . . . . . . . . . . . . . . . . . . . . . . . . . . . . . . . . . . . . . . . . . 89
Creating and Maintaining Databases . . . . . . . . . . . . . . . . . . . . . . . . . . . . . . . . . . . . . . . . . . . . . . . . . . . . . . 90
Creating Databases . . . . . . . . . . . . . . . . . . . . . . . . . . . . . . . . . . . . . . . . . . . . . . . . . . . . . . . . . . . . . . . . . . 90
Creating a New Database for an Existing Suffix Using the Console . . . . . . . . . . . . . . . . . . . . . . 92
Creating a New Database for a Single Suffix from the Command-Line . . . . . . . . . . . . . . . . . . . 93
Adding Multiple Databases for a Single Suffix . . . . . . . . . . . . . . . . . . . . . . . . . . . . . . . . . . . . . . . . 94
Adding the Custom Distribution Function to a Suffix . . . . . . . . . . . . . . . . . . . . . . . . . . . . . . . . . . 94
Maintaining Directory Databases . . . . . . . . . . . . . . . . . . . . . . . . . . . . . . . . . . . . . . . . . . . . . . . . . . . . . . 95
Placing a Database in Read-Only Mode . . . . . . . . . . . . . . . . . . . . . . . . . . . . . . . . . . . . . . . . . . . . . . 96
Deleting a Database . . . . . . . . . . . . . . . . . . . . . . . . . . . . . . . . . . . . . . . . . . . . . . . . . . . . . . . . . . . . . . . 97
Configuring Transaction Logs for Frequent Database Updates . . . . . . . . . . . . . . . . . . . . . . . . . . 97
Database Encryption . . . . . . . . . . . . . . . . . . . . . . . . . . . . . . . . . . . . . . . . . . . . . . . . . . . . . . . . . . . . . . . . . 98
Encryption Keys . . . . . . . . . . . . . . . . . . . . . . . . . . . . . . . . . . . . . . . . . . . . . . . . . . . . . . . . . . . . . . . . . . 99
Encryption Ciphers . . . . . . . . . . . . . . . . . . . . . . . . . . . . . . . . . . . . . . . . . . . . . . . . . . . . . . . . . . . . . . . 99
Encrypting Pre-existing Data . . . . . . . . . . . . . . . . . . . . . . . . . . . . . . . . . . . . . . . . . . . . . . . . . . . . . . 100
Configuring Database Encryption from the Console . . . . . . . . . . . . . . . . . . . . . . . . . . . . . . . . . . 101
Configuring Database Encryption Using the Command-Line . . . . . . . . . . . . . . . . . . . . . . . . . . 101
Exporting and Importing an Encrypted Database . . . . . . . . . . . . . . . . . . . . . . . . . . . . . . . . . . . . 102
Creating and Maintaining Database Links . . . . . . . . . . . . . . . . . . . . . . . . . . . . . . . . . . . . . . . . . . . . . . . . 103
Configuring the Chaining Policy . . . . . . . . . . . . . . . . . . . . . . . . . . . . . . . . . . . . . . . . . . . . . . . . . . . . . 103
Chaining Component Operations . . . . . . . . . . . . . . . . . . . . . . . . . . . . . . . . . . . . . . . . . . . . . . . . . . 103
Chaining LDAP Controls . . . . . . . . . . . . . . . . . . . . . . . . . . . . . . . . . . . . . . . . . . . . . . . . . . . . . . . . . 107
Creating a New Database Link . . . . . . . . . . . . . . . . . . . . . . . . . . . . . . . . . . . . . . . . . . . . . . . . . . . . . . . 109
Contents 5
Page 6

Creating a New Database Link Using the Console . . . . . . . . . . . . . . . . . . . . . . . . . . . . . . . . . . . . 109
Creating a Database Link from the Command-Line . . . . . . . . . . . . . . . . . . . . . . . . . . . . . . . . . . . 111
Chaining Using SSL . . . . . . . . . . . . . . . . . . . . . . . . . . . . . . . . . . . . . . . . . . . . . . . . . . . . . . . . . . . . . . . . . 120
Maintaining Database Links . . . . . . . . . . . . . . . . . . . . . . . . . . . . . . . . . . . . . . . . . . . . . . . . . . . . . . . . . 121
Updating Remote Server Authentication Information . . . . . . . . . . . . . . . . . . . . . . . . . . . . . . . . . 121
Deleting Database Links . . . . . . . . . . . . . . . . . . . . . . . . . . . . . . . . . . . . . . . . . . . . . . . . . . . . . . . . . . 121
Database Links and Access Control Evaluation . . . . . . . . . . . . . . . . . . . . . . . . . . . . . . . . . . . . . . . . . 122
Advanced Feature: Tuning Database Link Performance . . . . . . . . . . . . . . . . . . . . . . . . . . . . . . . . . . 123
Managing Connections to the Remote Server . . . . . . . . . . . . . . . . . . . . . . . . . . . . . . . . . . . . . . . . 124
Detecting Errors During Normal Processing . . . . . . . . . . . . . . . . . . . . . . . . . . . . . . . . . . . . . . . . . 126
Managing Threaded Operations . . . . . . . . . . . . . . . . . . . . . . . . . . . . . . . . . . . . . . . . . . . . . . . . . . . 127
Advanced Feature: Configuring Cascading Chaining . . . . . . . . . . . . . . . . . . . . . . . . . . . . . . . . . . . . 128
Overview of Cascading Chaining . . . . . . . . . . . . . . . . . . . . . . . . . . . . . . . . . . . . . . . . . . . . . . . . . . 128
Configuring Cascading Chaining Defaults Using the Console . . . . . . . . . . . . . . . . . . . . . . . . . . 131
Configuring Cascading Chaining Using the Console . . . . . . . . . . . . . . . . . . . . . . . . . . . . . . . . . . 132
Configuring Cascading Chaining from the Command-Line . . . . . . . . . . . . . . . . . . . . . . . . . . . . 133
Summary of Cascading Chaining Configuration Attributes . . . . . . . . . . . . . . . . . . . . . . . . . . . . 136
Cascading Chaining Configuration Example . . . . . . . . . . . . . . . . . . . . . . . . . . . . . . . . . . . . . . . . 136
Configuring Server One . . . . . . . . . . . . . . . . . . . . . . . . . . . . . . . . . . . . . . . . . . . . . . . . . . . . . . . . . . 137
Configuring Server Two . . . . . . . . . . . . . . . . . . . . . . . . . . . . . . . . . . . . . . . . . . . . . . . . . . . . . . . . . . 139
Configuring Server Three . . . . . . . . . . . . . . . . . . . . . . . . . . . . . . . . . . . . . . . . . . . . . . . . . . . . . . . . . 141
Using Referrals . . . . . . . . . . . . . . . . . . . . . . . . . . . . . . . . . . . . . . . . . . . . . . . . . . . . . . . . . . . . . . . . . . . . . . . 143
Setting Default Referrals . . . . . . . . . . . . . . . . . . . . . . . . . . . . . . . . . . . . . . . . . . . . . . . . . . . . . . . . . . . . . 143
Setting a Default Referral Using the Console . . . . . . . . . . . . . . . . . . . . . . . . . . . . . . . . . . . . . . . . . 143
Setting a Default Referral from the Command-Line . . . . . . . . . . . . . . . . . . . . . . . . . . . . . . . . . . . 144
Creating Smart Referrals . . . . . . . . . . . . . . . . . . . . . . . . . . . . . . . . . . . . . . . . . . . . . . . . . . . . . . . . . . . . 144
Creating Smart Referrals Using the Directory Server Console . . . . . . . . . . . . . . . . . . . . . . . . . . 145
Creating Smart Referrals from the Command-Line . . . . . . . . . . . . . . . . . . . . . . . . . . . . . . . . . . . 146
Creating Suffix Referrals . . . . . . . . . . . . . . . . . . . . . . . . . . . . . . . . . . . . . . . . . . . . . . . . . . . . . . . . . . . . 147
Creating Suffix Referrals Using the Console . . . . . . . . . . . . . . . . . . . . . . . . . . . . . . . . . . . . . . . . . 147
Creating Suffix Referrals from the Command-Line . . . . . . . . . . . . . . . . . . . . . . . . . . . . . . . . . . . 148
Chapter 4 Populating Directory Databases . . . . . . . . . . . . . . . . . . . . . . . . . . . . . . . . . . . . . . . . . . . . . . . 149
Importing Data . . . . . . . . . . . . . . . . . . . . . . . . . . . . . . . . . . . . . . . . . . . . . . . . . . . . . . . . . . . . . . . . . . . . . . . 149
Importing a Database from the Console . . . . . . . . . . . . . . . . . . . . . . . . . . . . . . . . . . . . . . . . . . . . . . . 150
Initializing a Database from the Console . . . . . . . . . . . . . . . . . . . . . . . . . . . . . . . . . . . . . . . . . . . . . . . 152
Importing from the Command-Line . . . . . . . . . . . . . . . . . . . . . . . . . . . . . . . . . . . . . . . . . . . . . . . . . . . 153
Importing Using the ldif2db Command-Line Script . . . . . . . . . . . . . . . . . . . . . . . . . . . . . . . . . . . 153
Importing Using the ldif2db.pl Perl Script . . . . . . . . . . . . . . . . . . . . . . . . . . . . . . . . . . . . . . . . . . . 154
Importing Using the ldif2ldap Command-Line Script . . . . . . . . . . . . . . . . . . . . . . . . . . . . . . . . . 155
Exporting Data . . . . . . . . . . . . . . . . . . . . . . . . . . . . . . . . . . . . . . . . . . . . . . . . . . . . . . . . . . . . . . . . . . . . . . . 156
Exporting Directory Data to LDIF Using the Console . . . . . . . . . . . . . . . . . . . . . . . . . . . . . . . . . . . . 157
Exporting a Single Database to LDIF Using the Console . . . . . . . . . . . . . . . . . . . . . . . . . . . . . . . . . 158
6 Red Hat Directory Server Administrator’s Guide • May 2005
Page 7

Exporting to LDIF from the Command-Line . . . . . . . . . . . . . . . . . . . . . . . . . . . . . . . . . . . . . . . . . . . . 159
Backing Up and Restoring Data . . . . . . . . . . . . . . . . . . . . . . . . . . . . . . . . . . . . . . . . . . . . . . . . . . . . . . . . . 159
Backing Up All Databases . . . . . . . . . . . . . . . . . . . . . . . . . . . . . . . . . . . . . . . . . . . . . . . . . . . . . . . . . . . 160
Backing Up All Databases from the Server Console . . . . . . . . . . . . . . . . . . . . . . . . . . . . . . . . . . . 160
Backing Up All Databases from the Command-Line . . . . . . . . . . . . . . . . . . . . . . . . . . . . . . . . . . 161
Backing Up the dse.ldif Configuration File . . . . . . . . . . . . . . . . . . . . . . . . . . . . . . . . . . . . . . . . . . . . . 162
Restoring All Databases . . . . . . . . . . . . . . . . . . . . . . . . . . . . . . . . . . . . . . . . . . . . . . . . . . . . . . . . . . . . . 162
Restoring All Databases from the Console . . . . . . . . . . . . . . . . . . . . . . . . . . . . . . . . . . . . . . . . . . . 162
Restoring Your Database from the Command-Line . . . . . . . . . . . . . . . . . . . . . . . . . . . . . . . . . . . 163
Restoring a Single Database . . . . . . . . . . . . . . . . . . . . . . . . . . . . . . . . . . . . . . . . . . . . . . . . . . . . . . . . . . 164
Restoring Databases That Include Replicated Entries . . . . . . . . . . . . . . . . . . . . . . . . . . . . . . . . . . . . 164
Restoring the dse.ldif Configuration File . . . . . . . . . . . . . . . . . . . . . . . . . . . . . . . . . . . . . . . . . . . . . . . 165
Enabling and Disabling Read-Only Mode . . . . . . . . . . . . . . . . . . . . . . . . . . . . . . . . . . . . . . . . . . . . . . . . 166
Enabling Read-Only Mode . . . . . . . . . . . . . . . . . . . . . . . . . . . . . . . . . . . . . . . . . . . . . . . . . . . . . . . . . . . 166
Disabling Read-Only Mode . . . . . . . . . . . . . . . . . . . . . . . . . . . . . . . . . . . . . . . . . . . . . . . . . . . . . . . . . . 166
Chapter 5 Advanced Entry Management . . . . . . . . . . . . . . . . . . . . . . . . . . . . . . . . . . . . . . . . . . . . . . . . 167
Using Groups . . . . . . . . . . . . . . . . . . . . . . . . . . . . . . . . . . . . . . . . . . . . . . . . . . . . . . . . . . . . . . . . . . . . . . . . . 167
Managing Static Groups . . . . . . . . . . . . . . . . . . . . . . . . . . . . . . . . . . . . . . . . . . . . . . . . . . . . . . . . . . . . . 168
Adding a New Static Group . . . . . . . . . . . . . . . . . . . . . . . . . . . . . . . . . . . . . . . . . . . . . . . . . . . . . . . 168
Modifying a Static Group . . . . . . . . . . . . . . . . . . . . . . . . . . . . . . . . . . . . . . . . . . . . . . . . . . . . . . . . . 169
Managing Dynamic Groups . . . . . . . . . . . . . . . . . . . . . . . . . . . . . . . . . . . . . . . . . . . . . . . . . . . . . . . . . . 169
Adding a New Dynamic Group . . . . . . . . . . . . . . . . . . . . . . . . . . . . . . . . . . . . . . . . . . . . . . . . . . . . 169
Modifying a Dynamic Group . . . . . . . . . . . . . . . . . . . . . . . . . . . . . . . . . . . . . . . . . . . . . . . . . . . . . . 170
Using Roles . . . . . . . . . . . . . . . . . . . . . . . . . . . . . . . . . . . . . . . . . . . . . . . . . . . . . . . . . . . . . . . . . . . . . . . . . . 170
About Roles . . . . . . . . . . . . . . . . . . . . . . . . . . . . . . . . . . . . . . . . . . . . . . . . . . . . . . . . . . . . . . . . . . . . . . . 171
Managing Roles Using the Console . . . . . . . . . . . . . . . . . . . . . . . . . . . . . . . . . . . . . . . . . . . . . . . . . . . 172
Creating a Managed Role . . . . . . . . . . . . . . . . . . . . . . . . . . . . . . . . . . . . . . . . . . . . . . . . . . . . . . . . . 173
Creating a Filtered Role . . . . . . . . . . . . . . . . . . . . . . . . . . . . . . . . . . . . . . . . . . . . . . . . . . . . . . . . . . . 174
Creating a Nested Role . . . . . . . . . . . . . . . . . . . . . . . . . . . . . . . . . . . . . . . . . . . . . . . . . . . . . . . . . . . 174
Viewing and Editing an Entry’s Roles . . . . . . . . . . . . . . . . . . . . . . . . . . . . . . . . . . . . . . . . . . . . . . 175
Modifying a Role Entry . . . . . . . . . . . . . . . . . . . . . . . . . . . . . . . . . . . . . . . . . . . . . . . . . . . . . . . . . . . 176
Making a Role Inactive . . . . . . . . . . . . . . . . . . . . . . . . . . . . . . . . . . . . . . . . . . . . . . . . . . . . . . . . . . . 176
Reactivating a Role . . . . . . . . . . . . . . . . . . . . . . . . . . . . . . . . . . . . . . . . . . . . . . . . . . . . . . . . . . . . . . . 176
Deleting a Role . . . . . . . . . . . . . . . . . . . . . . . . . . . . . . . . . . . . . . . . . . . . . . . . . . . . . . . . . . . . . . . . . . 177
Managing Roles Using the Command-Line . . . . . . . . . . . . . . . . . . . . . . . . . . . . . . . . . . . . . . . . . . . . 177
Examples: Managed Role Definition . . . . . . . . . . . . . . . . . . . . . . . . . . . . . . . . . . . . . . . . . . . . . . . . 178
Example: Filtered Role Definition . . . . . . . . . . . . . . . . . . . . . . . . . . . . . . . . . . . . . . . . . . . . . . . . . . 179
Example: Nested Role Definition . . . . . . . . . . . . . . . . . . . . . . . . . . . . . . . . . . . . . . . . . . . . . . . . . . . 180
Using Roles Securely . . . . . . . . . . . . . . . . . . . . . . . . . . . . . . . . . . . . . . . . . . . . . . . . . . . . . . . . . . . . . . . . 180
Assigning Class of Service . . . . . . . . . . . . . . . . . . . . . . . . . . . . . . . . . . . . . . . . . . . . . . . . . . . . . . . . . . . . . . 182
About CoS . . . . . . . . . . . . . . . . . . . . . . . . . . . . . . . . . . . . . . . . . . . . . . . . . . . . . . . . . . . . . . . . . . . . . . . . . 182
About the CoS Definition Entry . . . . . . . . . . . . . . . . . . . . . . . . . . . . . . . . . . . . . . . . . . . . . . . . . . . . 183
Contents 7
Page 8

About the CoS Template Entry . . . . . . . . . . . . . . . . . . . . . . . . . . . . . . . . . . . . . . . . . . . . . . . . . . . . 183
How a Pointer CoS Works . . . . . . . . . . . . . . . . . . . . . . . . . . . . . . . . . . . . . . . . . . . . . . . . . . . . . . . . 184
How an Indirect CoS Works . . . . . . . . . . . . . . . . . . . . . . . . . . . . . . . . . . . . . . . . . . . . . . . . . . . . . . . 184
How a Classic CoS Works . . . . . . . . . . . . . . . . . . . . . . . . . . . . . . . . . . . . . . . . . . . . . . . . . . . . . . . . . 185
Managing CoS Using the Console . . . . . . . . . . . . . . . . . . . . . . . . . . . . . . . . . . . . . . . . . . . . . . . . . . . . . 186
Creating a New CoS . . . . . . . . . . . . . . . . . . . . . . . . . . . . . . . . . . . . . . . . . . . . . . . . . . . . . . . . . . . . . . 186
Creating the CoS Template Entry . . . . . . . . . . . . . . . . . . . . . . . . . . . . . . . . . . . . . . . . . . . . . . . . . . 188
Editing an Existing CoS . . . . . . . . . . . . . . . . . . . . . . . . . . . . . . . . . . . . . . . . . . . . . . . . . . . . . . . . . . . 190
Deleting a CoS . . . . . . . . . . . . . . . . . . . . . . . . . . . . . . . . . . . . . . . . . . . . . . . . . . . . . . . . . . . . . . . . . . . 190
Managing CoS from the Command-Line . . . . . . . . . . . . . . . . . . . . . . . . . . . . . . . . . . . . . . . . . . . . . . . 190
Creating the CoS Definition Entry from the Command-Line . . . . . . . . . . . . . . . . . . . . . . . . . . . 191
Creating the CoS Template Entry from the Command-Line . . . . . . . . . . . . . . . . . . . . . . . . . . . . 194
Example of a Pointer CoS . . . . . . . . . . . . . . . . . . . . . . . . . . . . . . . . . . . . . . . . . . . . . . . . . . . . . . . . . 195
Example of an Indirect CoS . . . . . . . . . . . . . . . . . . . . . . . . . . . . . . . . . . . . . . . . . . . . . . . . . . . . . . . . 196
Example of a Classic CoS . . . . . . . . . . . . . . . . . . . . . . . . . . . . . . . . . . . . . . . . . . . . . . . . . . . . . . . . . 197
Creating Role-Based Attributes . . . . . . . . . . . . . . . . . . . . . . . . . . . . . . . . . . . . . . . . . . . . . . . . . . . . . . . 198
Access Control and CoS . . . . . . . . . . . . . . . . . . . . . . . . . . . . . . . . . . . . . . . . . . . . . . . . . . . . . . . . . . . . . 199
Chapter 6 Managing Access Control . . . . . . . . . . . . . . . . . . . . . . . . . . . . . . . . . . . . . . . . . . . . . . . . . . . . 201
Access Control Principles . . . . . . . . . . . . . . . . . . . . . . . . . . . . . . . . . . . . . . . . . . . . . . . . . . . . . . . . . . . . . . 202
ACI Structure . . . . . . . . . . . . . . . . . . . . . . . . . . . . . . . . . . . . . . . . . . . . . . . . . . . . . . . . . . . . . . . . . . . . . . 202
ACI Placement . . . . . . . . . . . . . . . . . . . . . . . . . . . . . . . . . . . . . . . . . . . . . . . . . . . . . . . . . . . . . . . . . . . . . 203
ACI Evaluation . . . . . . . . . . . . . . . . . . . . . . . . . . . . . . . . . . . . . . . . . . . . . . . . . . . . . . . . . . . . . . . . . . . . . 203
ACI Limitations . . . . . . . . . . . . . . . . . . . . . . . . . . . . . . . . . . . . . . . . . . . . . . . . . . . . . . . . . . . . . . . . . . . . 204
Default ACIs . . . . . . . . . . . . . . . . . . . . . . . . . . . . . . . . . . . . . . . . . . . . . . . . . . . . . . . . . . . . . . . . . . . . . . . . . 205
Creating ACIs Manually . . . . . . . . . . . . . . . . . . . . . . . . . . . . . . . . . . . . . . . . . . . . . . . . . . . . . . . . . . . . . . . 206
The ACI Syntax . . . . . . . . . . . . . . . . . . . . . . . . . . . . . . . . . . . . . . . . . . . . . . . . . . . . . . . . . . . . . . . . . . . . 206
Example ACI . . . . . . . . . . . . . . . . . . . . . . . . . . . . . . . . . . . . . . . . . . . . . . . . . . . . . . . . . . . . . . . . . . . . 207
Defining Targets . . . . . . . . . . . . . . . . . . . . . . . . . . . . . . . . . . . . . . . . . . . . . . . . . . . . . . . . . . . . . . . . . . . 207
Targeting a Directory Entry . . . . . . . . . . . . . . . . . . . . . . . . . . . . . . . . . . . . . . . . . . . . . . . . . . . . . . . 209
Targeting Attributes . . . . . . . . . . . . . . . . . . . . . . . . . . . . . . . . . . . . . . . . . . . . . . . . . . . . . . . . . . . . . . 211
Targeting Both an Entry and Attributes . . . . . . . . . . . . . . . . . . . . . . . . . . . . . . . . . . . . . . . . . . . . . 212
Targeting Entries or Attributes Using LDAP Filters . . . . . . . . . . . . . . . . . . . . . . . . . . . . . . . . . . . 212
Targeting Attribute Values Using LDAP Filters . . . . . . . . . . . . . . . . . . . . . . . . . . . . . . . . . . . . . . 213
Targeting a Single Directory Entry . . . . . . . . . . . . . . . . . . . . . . . . . . . . . . . . . . . . . . . . . . . . . . . . . 214
Defining Permissions . . . . . . . . . . . . . . . . . . . . . . . . . . . . . . . . . . . . . . . . . . . . . . . . . . . . . . . . . . . . . . . 215
Allowing or Denying Access . . . . . . . . . . . . . . . . . . . . . . . . . . . . . . . . . . . . . . . . . . . . . . . . . . . . . . 215
Assigning Rights . . . . . . . . . . . . . . . . . . . . . . . . . . . . . . . . . . . . . . . . . . . . . . . . . . . . . . . . . . . . . . . . . 215
Rights Required for LDAP Operations . . . . . . . . . . . . . . . . . . . . . . . . . . . . . . . . . . . . . . . . . . . . . . 217
Permissions Syntax . . . . . . . . . . . . . . . . . . . . . . . . . . . . . . . . . . . . . . . . . . . . . . . . . . . . . . . . . . . . . . 218
Access Control and the modrdn Operation . . . . . . . . . . . . . . . . . . . . . . . . . . . . . . . . . . . . . . . . . . 219
Bind Rules . . . . . . . . . . . . . . . . . . . . . . . . . . . . . . . . . . . . . . . . . . . . . . . . . . . . . . . . . . . . . . . . . . . . . . . . . . . 219
Bind Rule Syntax . . . . . . . . . . . . . . . . . . . . . . . . . . . . . . . . . . . . . . . . . . . . . . . . . . . . . . . . . . . . . . . . . . . 220
8 Red Hat Directory Server Administrator’s Guide • May 2005
Page 9

Defining User Access - userdn Keyword . . . . . . . . . . . . . . . . . . . . . . . . . . . . . . . . . . . . . . . . . . . . . . . 221
Anonymous Access (anyone Keyword) . . . . . . . . . . . . . . . . . . . . . . . . . . . . . . . . . . . . . . . . . . . . . 222
General Access (all Keyword) . . . . . . . . . . . . . . . . . . . . . . . . . . . . . . . . . . . . . . . . . . . . . . . . . . . . . 222
Self Access (self Keyword) . . . . . . . . . . . . . . . . . . . . . . . . . . . . . . . . . . . . . . . . . . . . . . . . . . . . . . . . 222
Parent Access (parent Keyword) . . . . . . . . . . . . . . . . . . . . . . . . . . . . . . . . . . . . . . . . . . . . . . . . . . . 222
LDAP URLs . . . . . . . . . . . . . . . . . . . . . . . . . . . . . . . . . . . . . . . . . . . . . . . . . . . . . . . . . . . . . . . . . . . . . 222
Wildcards . . . . . . . . . . . . . . . . . . . . . . . . . . . . . . . . . . . . . . . . . . . . . . . . . . . . . . . . . . . . . . . . . . . . . . . 223
Examples . . . . . . . . . . . . . . . . . . . . . . . . . . . . . . . . . . . . . . . . . . . . . . . . . . . . . . . . . . . . . . . . . . . . . . . 223
Defining Group Access - groupdn Keyword . . . . . . . . . . . . . . . . . . . . . . . . . . . . . . . . . . . . . . . . . . . 225
Examples . . . . . . . . . . . . . . . . . . . . . . . . . . . . . . . . . . . . . . . . . . . . . . . . . . . . . . . . . . . . . . . . . . . . . . . 225
Defining Role Access - roledn Keyword . . . . . . . . . . . . . . . . . . . . . . . . . . . . . . . . . . . . . . . . . . . . . . . 226
Defining Access Based on Value Matching . . . . . . . . . . . . . . . . . . . . . . . . . . . . . . . . . . . . . . . . . . . . . 226
Using the userattr Keyword . . . . . . . . . . . . . . . . . . . . . . . . . . . . . . . . . . . . . . . . . . . . . . . . . . . . . . . 227
Using the userattr Keyword with Inheritance . . . . . . . . . . . . . . . . . . . . . . . . . . . . . . . . . . . . . . . . 230
Granting Add Permission Using the userattr Keyword . . . . . . . . . . . . . . . . . . . . . . . . . . . . . . . . 231
Defining Access from a Specific IP Address . . . . . . . . . . . . . . . . . . . . . . . . . . . . . . . . . . . . . . . . . . . . 232
Defining Access from a Specific Domain . . . . . . . . . . . . . . . . . . . . . . . . . . . . . . . . . . . . . . . . . . . . . . . 233
Defining Access at a Specific Time of Day or Day of Week . . . . . . . . . . . . . . . . . . . . . . . . . . . . . . . 234
Examples . . . . . . . . . . . . . . . . . . . . . . . . . . . . . . . . . . . . . . . . . . . . . . . . . . . . . . . . . . . . . . . . . . . . . . . 234
Defining Access Based on Authentication Method . . . . . . . . . . . . . . . . . . . . . . . . . . . . . . . . . . . . . . 235
Examples . . . . . . . . . . . . . . . . . . . . . . . . . . . . . . . . . . . . . . . . . . . . . . . . . . . . . . . . . . . . . . . . . . . . . . . 236
Using Boolean Bind Rules . . . . . . . . . . . . . . . . . . . . . . . . . . . . . . . . . . . . . . . . . . . . . . . . . . . . . . . . . . . 236
Creating ACIs from the Console . . . . . . . . . . . . . . . . . . . . . . . . . . . . . . . . . . . . . . . . . . . . . . . . . . . . . . . . . 237
Displaying the Access Control Editor . . . . . . . . . . . . . . . . . . . . . . . . . . . . . . . . . . . . . . . . . . . . . . . . . 238
Viewing Current ACIs . . . . . . . . . . . . . . . . . . . . . . . . . . . . . . . . . . . . . . . . . . . . . . . . . . . . . . . . . . . . . . 240
Creating a New ACI . . . . . . . . . . . . . . . . . . . . . . . . . . . . . . . . . . . . . . . . . . . . . . . . . . . . . . . . . . . . . . . . 240
Editing an ACI . . . . . . . . . . . . . . . . . . . . . . . . . . . . . . . . . . . . . . . . . . . . . . . . . . . . . . . . . . . . . . . . . . . . . 241
Deleting an ACI . . . . . . . . . . . . . . . . . . . . . . . . . . . . . . . . . . . . . . . . . . . . . . . . . . . . . . . . . . . . . . . . . . . . 242
Access Control Usage Examples . . . . . . . . . . . . . . . . . . . . . . . . . . . . . . . . . . . . . . . . . . . . . . . . . . . . . . . . . 242
Granting Anonymous Access . . . . . . . . . . . . . . . . . . . . . . . . . . . . . . . . . . . . . . . . . . . . . . . . . . . . . . . . 244
ACI “Anonymous example.com” . . . . . . . . . . . . . . . . . . . . . . . . . . . . . . . . . . . . . . . . . . . . . . . . . . 244
ACI “Anonymous World” . . . . . . . . . . . . . . . . . . . . . . . . . . . . . . . . . . . . . . . . . . . . . . . . . . . . . . . . 245
Granting Write Access to Personal Entries . . . . . . . . . . . . . . . . . . . . . . . . . . . . . . . . . . . . . . . . . . . . . 246
ACI “Write example.com” . . . . . . . . . . . . . . . . . . . . . . . . . . . . . . . . . . . . . . . . . . . . . . . . . . . . . . . . 246
ACI “Write Subscribers” . . . . . . . . . . . . . . . . . . . . . . . . . . . . . . . . . . . . . . . . . . . . . . . . . . . . . . . . . . 247
Restricting Access to Key Roles . . . . . . . . . . . . . . . . . . . . . . . . . . . . . . . . . . . . . . . . . . . . . . . . . . . . . . . 249
ACI “Roles” . . . . . . . . . . . . . . . . . . . . . . . . . . . . . . . . . . . . . . . . . . . . . . . . . . . . . . . . . . . . . . . . . . . . . 249
Granting a Group Full Access to a Suffix . . . . . . . . . . . . . . . . . . . . . . . . . . . . . . . . . . . . . . . . . . . . . . . 251
ACI “HR” . . . . . . . . . . . . . . . . . . . . . . . . . . . . . . . . . . . . . . . . . . . . . . . . . . . . . . . . . . . . . . . . . . . . . . . 251
Granting Rights to Add and Delete Group Entries . . . . . . . . . . . . . . . . . . . . . . . . . . . . . . . . . . . . . . 252
ACI “Create Group” . . . . . . . . . . . . . . . . . . . . . . . . . . . . . . . . . . . . . . . . . . . . . . . . . . . . . . . . . . . . . 253
ACI “Delete Group” . . . . . . . . . . . . . . . . . . . . . . . . . . . . . . . . . . . . . . . . . . . . . . . . . . . . . . . . . . . . . . 254
Granting Conditional Access to a Group or Role . . . . . . . . . . . . . . . . . . . . . . . . . . . . . . . . . . . . . . . . 255
Contents 9
Page 10

ACI “HostedCompany1” . . . . . . . . . . . . . . . . . . . . . . . . . . . . . . . . . . . . . . . . . . . . . . . . . . . . . . . . . 255
Denying Access . . . . . . . . . . . . . . . . . . . . . . . . . . . . . . . . . . . . . . . . . . . . . . . . . . . . . . . . . . . . . . . . . . . . 257
ACI “Billing Info Read” . . . . . . . . . . . . . . . . . . . . . . . . . . . . . . . . . . . . . . . . . . . . . . . . . . . . . . . . . . . 257
ACI “Billing Info Deny” . . . . . . . . . . . . . . . . . . . . . . . . . . . . . . . . . . . . . . . . . . . . . . . . . . . . . . . . . . 258
Setting a Target Using Filtering . . . . . . . . . . . . . . . . . . . . . . . . . . . . . . . . . . . . . . . . . . . . . . . . . . . . . . . 260
Allowing Users to Add or Remove Themselves from a Group . . . . . . . . . . . . . . . . . . . . . . . . . . . . 260
ACI “Group Members” . . . . . . . . . . . . . . . . . . . . . . . . . . . . . . . . . . . . . . . . . . . . . . . . . . . . . . . . . . . 260
Defining Permissions for DNs That Contain a Comma . . . . . . . . . . . . . . . . . . . . . . . . . . . . . . . . . . . 261
Proxied Authorization ACI Example . . . . . . . . . . . . . . . . . . . . . . . . . . . . . . . . . . . . . . . . . . . . . . . . . . 262
Viewing the ACIs for an Entry . . . . . . . . . . . . . . . . . . . . . . . . . . . . . . . . . . . . . . . . . . . . . . . . . . . . . . . . . . 263
Get Effective Rights Control . . . . . . . . . . . . . . . . . . . . . . . . . . . . . . . . . . . . . . . . . . . . . . . . . . . . . . . . . 263
Using Get Effective Rights from the Command-Line . . . . . . . . . . . . . . . . . . . . . . . . . . . . . . . . . . 265
Using Get Effective Rights from the Console . . . . . . . . . . . . . . . . . . . . . . . . . . . . . . . . . . . . . . . . . 268
Get Effective Rights Return Codes . . . . . . . . . . . . . . . . . . . . . . . . . . . . . . . . . . . . . . . . . . . . . . . . . 269
Advanced Access Control: Using Macro ACIs . . . . . . . . . . . . . . . . . . . . . . . . . . . . . . . . . . . . . . . . . . . . . 269
Macro ACI Example . . . . . . . . . . . . . . . . . . . . . . . . . . . . . . . . . . . . . . . . . . . . . . . . . . . . . . . . . . . . . . . . 270
Macro ACI Syntax . . . . . . . . . . . . . . . . . . . . . . . . . . . . . . . . . . . . . . . . . . . . . . . . . . . . . . . . . . . . . . . . . . 272
Macro Matching for ($dn) . . . . . . . . . . . . . . . . . . . . . . . . . . . . . . . . . . . . . . . . . . . . . . . . . . . . . . . . . 273
Macro Matching for [$dn] . . . . . . . . . . . . . . . . . . . . . . . . . . . . . . . . . . . . . . . . . . . . . . . . . . . . . . . . . 274
Macro Matching for ($attr.attrName) . . . . . . . . . . . . . . . . . . . . . . . . . . . . . . . . . . . . . . . . . . . . . . . 275
Access Control and Replication . . . . . . . . . . . . . . . . . . . . . . . . . . . . . . . . . . . . . . . . . . . . . . . . . . . . . . . . . 276
Logging Access Control Information . . . . . . . . . . . . . . . . . . . . . . . . . . . . . . . . . . . . . . . . . . . . . . . . . . . . . 276
Compatibility with Earlier Releases . . . . . . . . . . . . . . . . . . . . . . . . . . . . . . . . . . . . . . . . . . . . . . . . . . . . . . 277
Chapter 7 User Account Management . . . . . . . . . . . . . . . . . . . . . . . . . . . . . . . . . . . . . . . . . . . . . . . . . . . 279
Managing the Password Policy . . . . . . . . . . . . . . . . . . . . . . . . . . . . . . . . . . . . . . . . . . . . . . . . . . . . . . . . . . 279
Configuring the Password Policy . . . . . . . . . . . . . . . . . . . . . . . . . . . . . . . . . . . . . . . . . . . . . . . . . . . . . 280
Configuring a Global Password Policy Using the Console . . . . . . . . . . . . . . . . . . . . . . . . . . . . . 281
Configuring a Subtree/User Password Policy Using the Console . . . . . . . . . . . . . . . . . . . . . . . 282
Configuring a Global Password Policy Using the Command-Line . . . . . . . . . . . . . . . . . . . . . . 283
Configuring Subtree/User Password Policy Using the Command-Line . . . . . . . . . . . . . . . . . . 286
Setting User Passwords . . . . . . . . . . . . . . . . . . . . . . . . . . . . . . . . . . . . . . . . . . . . . . . . . . . . . . . . . . . . . 290
Password Change Extended Operation . . . . . . . . . . . . . . . . . . . . . . . . . . . . . . . . . . . . . . . . . . . . . . . . 290
Configuring the Account Lockout Policy . . . . . . . . . . . . . . . . . . . . . . . . . . . . . . . . . . . . . . . . . . . . . . 292
Configuring the Account Lockout Policy Using the Console . . . . . . . . . . . . . . . . . . . . . . . . . . . 292
Configuring the Account Lockout Policy Using the Command-Line . . . . . . . . . . . . . . . . . . . . 292
Managing the Password Policy in a Replicated Environment . . . . . . . . . . . . . . . . . . . . . . . . . . . . . 294
Sycnhronizing Passwords . . . . . . . . . . . . . . . . . . . . . . . . . . . . . . . . . . . . . . . . . . . . . . . . . . . . . . . . . . . 295
Inactivating Users and Roles . . . . . . . . . . . . . . . . . . . . . . . . . . . . . . . . . . . . . . . . . . . . . . . . . . . . . . . . . . . . 296
Inactivating User and Roles Using the Console . . . . . . . . . . . . . . . . . . . . . . . . . . . . . . . . . . . . . . . . . 296
Inactivating User and Roles Using the Command-Line . . . . . . . . . . . . . . . . . . . . . . . . . . . . . . . . . . 297
Activating User and Roles Using the Console . . . . . . . . . . . . . . . . . . . . . . . . . . . . . . . . . . . . . . . . . . 297
Activating User and Roles Using the Command-Line . . . . . . . . . . . . . . . . . . . . . . . . . . . . . . . . . . . . 298
10 Red Hat Directory Server Administrator’s Guide • May 2005
Page 11

Setting Resource Limits Based on the Bind DN . . . . . . . . . . . . . . . . . . . . . . . . . . . . . . . . . . . . . . . . . . . . 299
Setting Resource Limits Using the Console . . . . . . . . . . . . . . . . . . . . . . . . . . . . . . . . . . . . . . . . . . . . . 299
Setting Resource Limits Using the Command-Line . . . . . . . . . . . . . . . . . . . . . . . . . . . . . . . . . . . . . . 300
Chapter 8 Managing Replication . . . . . . . . . . . . . . . . . . . . . . . . . . . . . . . . . . . . . . . . . . . . . . . . . . . . . . . 301
Replication Overview . . . . . . . . . . . . . . . . . . . . . . . . . . . . . . . . . . . . . . . . . . . . . . . . . . . . . . . . . . . . . . . . . . 302
Read-Write Replica/Read-Only Replica . . . . . . . . . . . . . . . . . . . . . . . . . . . . . . . . . . . . . . . . . . . . . . . 302
Supplier/Consumer . . . . . . . . . . . . . . . . . . . . . . . . . . . . . . . . . . . . . . . . . . . . . . . . . . . . . . . . . . . . . . . . 303
Changelog . . . . . . . . . . . . . . . . . . . . . . . . . . . . . . . . . . . . . . . . . . . . . . . . . . . . . . . . . . . . . . . . . . . . . . . . . 303
Unit of Replication . . . . . . . . . . . . . . . . . . . . . . . . . . . . . . . . . . . . . . . . . . . . . . . . . . . . . . . . . . . . . . . . . . 304
Replication Identity . . . . . . . . . . . . . . . . . . . . . . . . . . . . . . . . . . . . . . . . . . . . . . . . . . . . . . . . . . . . . . . . . 304
Replication Agreement . . . . . . . . . . . . . . . . . . . . . . . . . . . . . . . . . . . . . . . . . . . . . . . . . . . . . . . . . . . . . . 305
Compatibility with Earlier Versions of Directory Server . . . . . . . . . . . . . . . . . . . . . . . . . . . . . . . . . 305
Replication Scenarios . . . . . . . . . . . . . . . . . . . . . . . . . . . . . . . . . . . . . . . . . . . . . . . . . . . . . . . . . . . . . . . . . . 306
Single-Master Replication . . . . . . . . . . . . . . . . . . . . . . . . . . . . . . . . . . . . . . . . . . . . . . . . . . . . . . . . . . . 306
Multi-Master Replication . . . . . . . . . . . . . . . . . . . . . . . . . . . . . . . . . . . . . . . . . . . . . . . . . . . . . . . . . . . . 307
Cascading Replication . . . . . . . . . . . . . . . . . . . . . . . . . . . . . . . . . . . . . . . . . . . . . . . . . . . . . . . . . . . . . . . 310
Handling Complex Replication Configurations . . . . . . . . . . . . . . . . . . . . . . . . . . . . . . . . . . . . . . . . . . . . 312
Creating the Supplier Bind DN Entry . . . . . . . . . . . . . . . . . . . . . . . . . . . . . . . . . . . . . . . . . . . . . . . . . 313
Configuring Supplier Settings . . . . . . . . . . . . . . . . . . . . . . . . . . . . . . . . . . . . . . . . . . . . . . . . . . . . . . . . 315
Configuring a Read-Write Replica . . . . . . . . . . . . . . . . . . . . . . . . . . . . . . . . . . . . . . . . . . . . . . . . . . . . 315
Configuring a Read-Only Replica . . . . . . . . . . . . . . . . . . . . . . . . . . . . . . . . . . . . . . . . . . . . . . . . . . . . . 316
Configuring a Hub Supplier . . . . . . . . . . . . . . . . . . . . . . . . . . . . . . . . . . . . . . . . . . . . . . . . . . . . . . . . . 317
Creating a Replication Agreement . . . . . . . . . . . . . . . . . . . . . . . . . . . . . . . . . . . . . . . . . . . . . . . . . . . . 318
Configuring Single-Master Replication . . . . . . . . . . . . . . . . . . . . . . . . . . . . . . . . . . . . . . . . . . . . . . . . . . . 320
Configuring the Read-Only Replica on the Consumer Server . . . . . . . . . . . . . . . . . . . . . . . . . . . . . 321
Configuring the Read-Write Replica on the Supplier Server . . . . . . . . . . . . . . . . . . . . . . . . . . . . . . 322
Initializing the Replicas for Single-Master Replication . . . . . . . . . . . . . . . . . . . . . . . . . . . . . . . . . . . 324
Configuring Multi-Master Replication . . . . . . . . . . . . . . . . . . . . . . . . . . . . . . . . . . . . . . . . . . . . . . . . . . . 324
Configuring 2-Way Multi-Master Replication . . . . . . . . . . . . . . . . . . . . . . . . . . . . . . . . . . . . . . . . . . 325
Configuring the Read-Only Replicas on the Consumer Servers . . . . . . . . . . . . . . . . . . . . . . . . . 325
Configuring the Read-Write Replicas on the Supplier Servers . . . . . . . . . . . . . . . . . . . . . . . . . . 327
Initializing the Replicas for Multi-Master Replication . . . . . . . . . . . . . . . . . . . . . . . . . . . . . . . . . 330
Configuring 4-Way Multi-Master Replication . . . . . . . . . . . . . . . . . . . . . . . . . . . . . . . . . . . . . . . . . . 330
Configuring the Read-Only Replicas on the Consumer Servers . . . . . . . . . . . . . . . . . . . . . . . . . 330
Configuring the Read-Write Replicas on the Supplier Servers . . . . . . . . . . . . . . . . . . . . . . . . . . 332
Initializing the Replicas for Multi-Master Replication . . . . . . . . . . . . . . . . . . . . . . . . . . . . . . . . . 335
Preventing Monopolization of the Consumer in Multi-Master Replication . . . . . . . . . . . . . . . . . . 336
Configuring Cascading Replication . . . . . . . . . . . . . . . . . . . . . . . . . . . . . . . . . . . . . . . . . . . . . . . . . . . . . . 337
Configuring the Read-Only Replica on the Consumer Server . . . . . . . . . . . . . . . . . . . . . . . . . . . . . 338
Configuring the Read-Only Replica on the Hub Supplier . . . . . . . . . . . . . . . . . . . . . . . . . . . . . . . . 340
Configuring the Read-Write Replica on the Supplier Server . . . . . . . . . . . . . . . . . . . . . . . . . . . . . . 341
Initializing the Replicas for Cascading Replication . . . . . . . . . . . . . . . . . . . . . . . . . . . . . . . . . . . . . . 343
Contents 11
Page 12

Making a Replica Updatable . . . . . . . . . . . . . . . . . . . . . . . . . . . . . . . . . . . . . . . . . . . . . . . . . . . . . . . . . . . . 343
Deleting the Changelog . . . . . . . . . . . . . . . . . . . . . . . . . . . . . . . . . . . . . . . . . . . . . . . . . . . . . . . . . . . . . . . . 343
Removing the Changelog . . . . . . . . . . . . . . . . . . . . . . . . . . . . . . . . . . . . . . . . . . . . . . . . . . . . . . . . . . . . 344
Moving the Changelog to a New Location . . . . . . . . . . . . . . . . . . . . . . . . . . . . . . . . . . . . . . . . . . . . . 344
Initializing Consumers . . . . . . . . . . . . . . . . . . . . . . . . . . . . . . . . . . . . . . . . . . . . . . . . . . . . . . . . . . . . . . . . . 345
When to Initialize a Consumer . . . . . . . . . . . . . . . . . . . . . . . . . . . . . . . . . . . . . . . . . . . . . . . . . . . . . . . 345
Online Consumer Initialization Using the Console . . . . . . . . . . . . . . . . . . . . . . . . . . . . . . . . . . . . . . 346
Performing Online Consumer Initialization . . . . . . . . . . . . . . . . . . . . . . . . . . . . . . . . . . . . . . . . . 346
Manual Consumer Initialization Using the Command-Line . . . . . . . . . . . . . . . . . . . . . . . . . . . . . . 347
Manual Consumer Initialization Overview . . . . . . . . . . . . . . . . . . . . . . . . . . . . . . . . . . . . . . . . . . 347
Exporting a Replica to LDIF . . . . . . . . . . . . . . . . . . . . . . . . . . . . . . . . . . . . . . . . . . . . . . . . . . . . . . . 347
Importing the LDIF File to the Consumer Server . . . . . . . . . . . . . . . . . . . . . . . . . . . . . . . . . . . . . 348
Filesystem Replica Initialization . . . . . . . . . . . . . . . . . . . . . . . . . . . . . . . . . . . . . . . . . . . . . . . . . . . . . . 348
Initializing the Consumer Replica from the Backup Files . . . . . . . . . . . . . . . . . . . . . . . . . . . . . . 349
Forcing Replication Updates . . . . . . . . . . . . . . . . . . . . . . . . . . . . . . . . . . . . . . . . . . . . . . . . . . . . . . . . . . . . 350
Forcing Replication Updates from the Console . . . . . . . . . . . . . . . . . . . . . . . . . . . . . . . . . . . . . . . . . 351
Forcing Replication Updates from the Command-Line . . . . . . . . . . . . . . . . . . . . . . . . . . . . . . . . . . 351
Replication over SSL . . . . . . . . . . . . . . . . . . . . . . . . . . . . . . . . . . . . . . . . . . . . . . . . . . . . . . . . . . . . . . . . . . . 354
Configuring Replication over SSL Using the Replication Agreement Wizard . . . . . . . . . . . . . . . . 355
Replication with Earlier Releases . . . . . . . . . . . . . . . . . . . . . . . . . . . . . . . . . . . . . . . . . . . . . . . . . . . . . . . . 355
Configuring Directory Server as a Consumer of a Legacy Directory Server . . . . . . . . . . . . . . . . . 356
Using the Retro Changelog Plug-in . . . . . . . . . . . . . . . . . . . . . . . . . . . . . . . . . . . . . . . . . . . . . . . . . . . . . . 357
Enabling the Retro Changelog Plug-in . . . . . . . . . . . . . . . . . . . . . . . . . . . . . . . . . . . . . . . . . . . . . . . . . 358
Trimming the Retro Changelog . . . . . . . . . . . . . . . . . . . . . . . . . . . . . . . . . . . . . . . . . . . . . . . . . . . . . . . 359
Searching and Modifying the Retro Changelog . . . . . . . . . . . . . . . . . . . . . . . . . . . . . . . . . . . . . . . . . 359
Retro Changelog and the Access Control Policy . . . . . . . . . . . . . . . . . . . . . . . . . . . . . . . . . . . . . . . . 360
Monitoring Replication Status . . . . . . . . . . . . . . . . . . . . . . . . . . . . . . . . . . . . . . . . . . . . . . . . . . . . . . . . . . 360
Monitoring Replication Status from the Directory Server Console . . . . . . . . . . . . . . . . . . . . . . . . . 360
Monitoring Replication Status from Administration Express . . . . . . . . . . . . . . . . . . . . . . . . . . . . . 361
Solving Common Replication Conflicts . . . . . . . . . . . . . . . . . . . . . . . . . . . . . . . . . . . . . . . . . . . . . . . . . . . 364
Solving Naming Conflicts . . . . . . . . . . . . . . . . . . . . . . . . . . . . . . . . . . . . . . . . . . . . . . . . . . . . . . . . . . . 364
Renaming an Entry with a Multi-Valued Naming Attribute . . . . . . . . . . . . . . . . . . . . . . . . . . . . 365
Renaming an Entry with a Single-Valued Naming Attribute . . . . . . . . . . . . . . . . . . . . . . . . . . . 366
Solving Orphan Entry Conflicts . . . . . . . . . . . . . . . . . . . . . . . . . . . . . . . . . . . . . . . . . . . . . . . . . . . . . . 367
Solving Potential Interoperability Problems . . . . . . . . . . . . . . . . . . . . . . . . . . . . . . . . . . . . . . . . . . . . 368
Troubleshooting Replication-Related Problems . . . . . . . . . . . . . . . . . . . . . . . . . . . . . . . . . . . . . . . . . . . . 368
Interpreting Error Messages and Symptoms . . . . . . . . . . . . . . . . . . . . . . . . . . . . . . . . . . . . . . . . . . . . 369
Useful Tools . . . . . . . . . . . . . . . . . . . . . . . . . . . . . . . . . . . . . . . . . . . . . . . . . . . . . . . . . . . . . . . . . . . . . . . 373
Chapter 9 Extending the Directory Schema . . . . . . . . . . . . . . . . . . . . . . . . . . . . . . . . . . . . . . . . . . . . . . 375
Overview of Extending Schema . . . . . . . . . . . . . . . . . . . . . . . . . . . . . . . . . . . . . . . . . . . . . . . . . . . . . . . . . 375
Managing Attributes . . . . . . . . . . . . . . . . . . . . . . . . . . . . . . . . . . . . . . . . . . . . . . . . . . . . . . . . . . . . . . . . . . 376
Viewing Attributes . . . . . . . . . . . . . . . . . . . . . . . . . . . . . . . . . . . . . . . . . . . . . . . . . . . . . . . . . . . . . . . . . 376
12 Red Hat Directory Server Administrator’s Guide • May 2005
Page 13

Creating Attributes . . . . . . . . . . . . . . . . . . . . . . . . . . . . . . . . . . . . . . . . . . . . . . . . . . . . . . . . . . . . . . . . . 377
Editing Attributes . . . . . . . . . . . . . . . . . . . . . . . . . . . . . . . . . . . . . . . . . . . . . . . . . . . . . . . . . . . . . . . . . . 378
Deleting Attributes . . . . . . . . . . . . . . . . . . . . . . . . . . . . . . . . . . . . . . . . . . . . . . . . . . . . . . . . . . . . . . . . . 379
Managing Object Classes . . . . . . . . . . . . . . . . . . . . . . . . . . . . . . . . . . . . . . . . . . . . . . . . . . . . . . . . . . . . . . . 379
Viewing Object Classes . . . . . . . . . . . . . . . . . . . . . . . . . . . . . . . . . . . . . . . . . . . . . . . . . . . . . . . . . . . . . . 380
Creating Object Classes . . . . . . . . . . . . . . . . . . . . . . . . . . . . . . . . . . . . . . . . . . . . . . . . . . . . . . . . . . . . . 381
Editing Object Classes . . . . . . . . . . . . . . . . . . . . . . . . . . . . . . . . . . . . . . . . . . . . . . . . . . . . . . . . . . . . . . . 382
Deleting Object Classes . . . . . . . . . . . . . . . . . . . . . . . . . . . . . . . . . . . . . . . . . . . . . . . . . . . . . . . . . . . . . . 383
Turning Schema Checking On and Off . . . . . . . . . . . . . . . . . . . . . . . . . . . . . . . . . . . . . . . . . . . . . . . . . . . 383
Chapter 10 Managing Indexes . . . . . . . . . . . . . . . . . . . . . . . . . . . . . . . . . . . . . . . . . . . . . . . . . . . . . . . . . 385
About Indexes . . . . . . . . . . . . . . . . . . . . . . . . . . . . . . . . . . . . . . . . . . . . . . . . . . . . . . . . . . . . . . . . . . . . . . . . 385
About Indexes and Indexing Performance . . . . . . . . . . . . . . . . . . . . . . . . . . . . . . . . . . . . . . . . . . . . . 386
Index Types . . . . . . . . . . . . . . . . . . . . . . . . . . . . . . . . . . . . . . . . . . . . . . . . . . . . . . . . . . . . . . . . . . . . . 388
About Default, System, and Standard Indexes . . . . . . . . . . . . . . . . . . . . . . . . . . . . . . . . . . . . . . . . . . 390
Overview of Default Indexes . . . . . . . . . . . . . . . . . . . . . . . . . . . . . . . . . . . . . . . . . . . . . . . . . . . . . . 390
Overview of System Indexes . . . . . . . . . . . . . . . . . . . . . . . . . . . . . . . . . . . . . . . . . . . . . . . . . . . . . . 391
Overview of Standard Indexes . . . . . . . . . . . . . . . . . . . . . . . . . . . . . . . . . . . . . . . . . . . . . . . . . . . . . 391
Overview of the Searching Algorithm . . . . . . . . . . . . . . . . . . . . . . . . . . . . . . . . . . . . . . . . . . . . . . . . . 392
idlistscanlimit . . . . . . . . . . . . . . . . . . . . . . . . . . . . . . . . . . . . . . . . . . . . . . . . . . . . . . . . . . . . . . . . . . . 393
Phonetic Searches . . . . . . . . . . . . . . . . . . . . . . . . . . . . . . . . . . . . . . . . . . . . . . . . . . . . . . . . . . . . . . . . 394
Balancing the Benefits of Indexing . . . . . . . . . . . . . . . . . . . . . . . . . . . . . . . . . . . . . . . . . . . . . . . . . . . . 395
Creating Indexes . . . . . . . . . . . . . . . . . . . . . . . . . . . . . . . . . . . . . . . . . . . . . . . . . . . . . . . . . . . . . . . . . . . . . . 397
Creating Indexes from the Server Console . . . . . . . . . . . . . . . . . . . . . . . . . . . . . . . . . . . . . . . . . . . . . 397
Creating Indexes from the Command-Line . . . . . . . . . . . . . . . . . . . . . . . . . . . . . . . . . . . . . . . . . . . . 398
Adding an Index Entry . . . . . . . . . . . . . . . . . . . . . . . . . . . . . . . . . . . . . . . . . . . . . . . . . . . . . . . . . . . 399
Running the db2index.pl Script . . . . . . . . . . . . . . . . . . . . . . . . . . . . . . . . . . . . . . . . . . . . . . . . . . . . 401
Creating VLV Indexes from the Server Console . . . . . . . . . . . . . . . . . . . . . . . . . . . . . . . . . . . . . . . . . 402
Creating VLV Indexes from the Command-Line . . . . . . . . . . . . . . . . . . . . . . . . . . . . . . . . . . . . . . . . 403
Adding a Browsing Index Entry . . . . . . . . . . . . . . . . . . . . . . . . . . . . . . . . . . . . . . . . . . . . . . . . . . . 404
Running the vlvindex Script . . . . . . . . . . . . . . . . . . . . . . . . . . . . . . . . . . . . . . . . . . . . . . . . . . . . . . . 406
Setting Access Control for VLV Information . . . . . . . . . . . . . . . . . . . . . . . . . . . . . . . . . . . . . . . . . 407
Deleting Indexes . . . . . . . . . . . . . . . . . . . . . . . . . . . . . . . . . . . . . . . . . . . . . . . . . . . . . . . . . . . . . . . . . . . . . . 407
Deleting Indexes from the Server Console . . . . . . . . . . . . . . . . . . . . . . . . . . . . . . . . . . . . . . . . . . . . . 408
Deleting Indexes from the Command-Line . . . . . . . . . . . . . . . . . . . . . . . . . . . . . . . . . . . . . . . . . . . . . 409
Deleting an Index Entry . . . . . . . . . . . . . . . . . . . . . . . . . . . . . . . . . . . . . . . . . . . . . . . . . . . . . . . . . . 409
Running the db2index.pl Script . . . . . . . . . . . . . . . . . . . . . . . . . . . . . . . . . . . . . . . . . . . . . . . . . . . . 411
Deleting Browsing and VLV Indexes from the Server Console . . . . . . . . . . . . . . . . . . . . . . . . . . . . 411
Deleting Browsing and VLV Indexes from the Command-Line . . . . . . . . . . . . . . . . . . . . . . . . . . . 412
Deleting a Browsing Index Entry . . . . . . . . . . . . . . . . . . . . . . . . . . . . . . . . . . . . . . . . . . . . . . . . . . . 413
Running the vlvindex Script . . . . . . . . . . . . . . . . . . . . . . . . . . . . . . . . . . . . . . . . . . . . . . . . . . . . . . . 414
Attribute Name Quick Reference Table . . . . . . . . . . . . . . . . . . . . . . . . . . . . . . . . . . . . . . . . . . . . . . . . . . . 415
Contents 13
Page 14

Chapter 11 Managing SSL and SASL . . . . . . . . . . . . . . . . . . . . . . . . . . . . . . . . . . . . . . . . . . . . . . . . . . . 417
Introduction to SSL in the Directory Server . . . . . . . . . . . . . . . . . . . . . . . . . . . . . . . . . . . . . . . . . . . . . . . 418
Enabling SSL: Summary of Steps . . . . . . . . . . . . . . . . . . . . . . . . . . . . . . . . . . . . . . . . . . . . . . . . . . . . . 418
Command-Line Functions for Start TLS . . . . . . . . . . . . . . . . . . . . . . . . . . . . . . . . . . . . . . . . . . . . . . . . . . 419
Troubleshooting Start TLS . . . . . . . . . . . . . . . . . . . . . . . . . . . . . . . . . . . . . . . . . . . . . . . . . . . . . . . . . . . 419
Obtaining and Installing Server Certificates . . . . . . . . . . . . . . . . . . . . . . . . . . . . . . . . . . . . . . . . . . . . . . . 420
Step 1: Generate a Certificate Request . . . . . . . . . . . . . . . . . . . . . . . . . . . . . . . . . . . . . . . . . . . . . . . . . 421
Step 2: Send the Certificate Request . . . . . . . . . . . . . . . . . . . . . . . . . . . . . . . . . . . . . . . . . . . . . . . . . . . 422
Step 3: Install the Certificate . . . . . . . . . . . . . . . . . . . . . . . . . . . . . . . . . . . . . . . . . . . . . . . . . . . . . . . . . . 423
Step 4: Trust the Certificate Authority . . . . . . . . . . . . . . . . . . . . . . . . . . . . . . . . . . . . . . . . . . . . . . . . . 424
Step 5: Confirm That Your New Certificates Are Installed . . . . . . . . . . . . . . . . . . . . . . . . . . . . . . . . 425
Using certutil . . . . . . . . . . . . . . . . . . . . . . . . . . . . . . . . . . . . . . . . . . . . . . . . . . . . . . . . . . . . . . . . . . . . . . . . . 425
Starting the Server with SSL Enabled . . . . . . . . . . . . . . . . . . . . . . . . . . . . . . . . . . . . . . . . . . . . . . . . . . . . 428
Enabling SSL Only in the Directory Server: . . . . . . . . . . . . . . . . . . . . . . . . . . . . . . . . . . . . . . . . . . . . . 429
Enabling SSL in the Directory Server, Admin Server, and Console . . . . . . . . . . . . . . . . . . . . . . . . 430
Creating a Password File . . . . . . . . . . . . . . . . . . . . . . . . . . . . . . . . . . . . . . . . . . . . . . . . . . . . . . . . . . . . 433
Setting Security Preferences . . . . . . . . . . . . . . . . . . . . . . . . . . . . . . . . . . . . . . . . . . . . . . . . . . . . . . . . . . . . 433
Using Certificate-Based Authentication . . . . . . . . . . . . . . . . . . . . . . . . . . . . . . . . . . . . . . . . . . . . . . . . . . 435
Setting up Certificate-Based Authentication . . . . . . . . . . . . . . . . . . . . . . . . . . . . . . . . . . . . . . . . . . . . 436
Allowing/Requiring Client Authentication . . . . . . . . . . . . . . . . . . . . . . . . . . . . . . . . . . . . . . . . . . . . 437
Configuring LDAP Clients to Use SSL . . . . . . . . . . . . . . . . . . . . . . . . . . . . . . . . . . . . . . . . . . . . . . . . . . . 437
Introduction to SASL . . . . . . . . . . . . . . . . . . . . . . . . . . . . . . . . . . . . . . . . . . . . . . . . . . . . . . . . . . . . . . . . . . 439
Authentication Mechanisms . . . . . . . . . . . . . . . . . . . . . . . . . . . . . . . . . . . . . . . . . . . . . . . . . . . . . . . . . 440
SASL Identity Mapping . . . . . . . . . . . . . . . . . . . . . . . . . . . . . . . . . . . . . . . . . . . . . . . . . . . . . . . . . . . . . 441
Legacy Identity Mapping . . . . . . . . . . . . . . . . . . . . . . . . . . . . . . . . . . . . . . . . . . . . . . . . . . . . . . . . . 442
Configuring SASL Identity Mapping from the Console . . . . . . . . . . . . . . . . . . . . . . . . . . . . . . . . . . 442
Configuring SASL Identity Mapping from the Command-Line . . . . . . . . . . . . . . . . . . . . . . . . . . . 443
Configuring Kerberos . . . . . . . . . . . . . . . . . . . . . . . . . . . . . . . . . . . . . . . . . . . . . . . . . . . . . . . . . . . . . . . 443
Realms . . . . . . . . . . . . . . . . . . . . . . . . . . . . . . . . . . . . . . . . . . . . . . . . . . . . . . . . . . . . . . . . . . . . . . . . . 444
Configuring the KDC Server . . . . . . . . . . . . . . . . . . . . . . . . . . . . . . . . . . . . . . . . . . . . . . . . . . . . . . 444
Example . . . . . . . . . . . . . . . . . . . . . . . . . . . . . . . . . . . . . . . . . . . . . . . . . . . . . . . . . . . . . . . . . . . . . . . . 445
Chapter 12 Monitoring Server and Database Activity . . . . . . . . . . . . . . . . . . . . . . . . . . . . . . . . . . . . . . 447
Viewing and Configuring Log Files . . . . . . . . . . . . . . . . . . . . . . . . . . . . . . . . . . . . . . . . . . . . . . . . . . . . . . 447
Defining a Log File Rotation Policy . . . . . . . . . . . . . . . . . . . . . . . . . . . . . . . . . . . . . . . . . . . . . . . . . . . 448
Defining a Log File Deletion Policy . . . . . . . . . . . . . . . . . . . . . . . . . . . . . . . . . . . . . . . . . . . . . . . . . . . 449
Access Log . . . . . . . . . . . . . . . . . . . . . . . . . . . . . . . . . . . . . . . . . . . . . . . . . . . . . . . . . . . . . . . . . . . . . . . . 450
Viewing the Access Log . . . . . . . . . . . . . . . . . . . . . . . . . . . . . . . . . . . . . . . . . . . . . . . . . . . . . . . . . . 450
Configuring the Access Log . . . . . . . . . . . . . . . . . . . . . . . . . . . . . . . . . . . . . . . . . . . . . . . . . . . . . . . 450
Error Log . . . . . . . . . . . . . . . . . . . . . . . . . . . . . . . . . . . . . . . . . . . . . . . . . . . . . . . . . . . . . . . . . . . . . . . . . . 451
Viewing the Error Log . . . . . . . . . . . . . . . . . . . . . . . . . . . . . . . . . . . . . . . . . . . . . . . . . . . . . . . . . . . . 452
Configuring the Error Log . . . . . . . . . . . . . . . . . . . . . . . . . . . . . . . . . . . . . . . . . . . . . . . . . . . . . . . . 452
Audit Log . . . . . . . . . . . . . . . . . . . . . . . . . . . . . . . . . . . . . . . . . . . . . . . . . . . . . . . . . . . . . . . . . . . . . . . . . 453
14 Red Hat Directory Server Administrator’s Guide • May 2005
Page 15

Viewing the Audit Log . . . . . . . . . . . . . . . . . . . . . . . . . . . . . . . . . . . . . . . . . . . . . . . . . . . . . . . . . . . 453
Configuring the Audit Log . . . . . . . . . . . . . . . . . . . . . . . . . . . . . . . . . . . . . . . . . . . . . . . . . . . . . . . . 454
Manual Log File Rotation . . . . . . . . . . . . . . . . . . . . . . . . . . . . . . . . . . . . . . . . . . . . . . . . . . . . . . . . . . . . . . 455
Monitoring Server Activity . . . . . . . . . . . . . . . . . . . . . . . . . . . . . . . . . . . . . . . . . . . . . . . . . . . . . . . . . . . . . 455
Monitoring Your Server from the Directory Server Console . . . . . . . . . . . . . . . . . . . . . . . . . . . . . . 455
Viewing the Server Performance Monitor . . . . . . . . . . . . . . . . . . . . . . . . . . . . . . . . . . . . . . . . . . . 455
Overview of Server Performance Monitor Information . . . . . . . . . . . . . . . . . . . . . . . . . . . . . . . . . . 456
General Information (Server) . . . . . . . . . . . . . . . . . . . . . . . . . . . . . . . . . . . . . . . . . . . . . . . . . . . . . . 456
Resource Summary . . . . . . . . . . . . . . . . . . . . . . . . . . . . . . . . . . . . . . . . . . . . . . . . . . . . . . . . . . . . . . 457
Current Resource Usage . . . . . . . . . . . . . . . . . . . . . . . . . . . . . . . . . . . . . . . . . . . . . . . . . . . . . . . . . . 457
Connection Status . . . . . . . . . . . . . . . . . . . . . . . . . . . . . . . . . . . . . . . . . . . . . . . . . . . . . . . . . . . . . . . . 458
Global Database Cache Information . . . . . . . . . . . . . . . . . . . . . . . . . . . . . . . . . . . . . . . . . . . . . . . . 459
Monitoring Your Server from the Command-Line . . . . . . . . . . . . . . . . . . . . . . . . . . . . . . . . . . . . . . 460
Monitoring Database Activity . . . . . . . . . . . . . . . . . . . . . . . . . . . . . . . . . . . . . . . . . . . . . . . . . . . . . . . . . . . 461
Monitoring Database Activity from the Server Console . . . . . . . . . . . . . . . . . . . . . . . . . . . . . . . . . . 462
Viewing Database Performance Monitors . . . . . . . . . . . . . . . . . . . . . . . . . . . . . . . . . . . . . . . . . . . 462
Overview of Database Performance Monitor Information . . . . . . . . . . . . . . . . . . . . . . . . . . . . . . . . 462
General Information (Database) . . . . . . . . . . . . . . . . . . . . . . . . . . . . . . . . . . . . . . . . . . . . . . . . . . . . 462
Summary Information Table . . . . . . . . . . . . . . . . . . . . . . . . . . . . . . . . . . . . . . . . . . . . . . . . . . . . . . 463
Database Cache Information Table . . . . . . . . . . . . . . . . . . . . . . . . . . . . . . . . . . . . . . . . . . . . . . . . . 464
Database File-Specific Table . . . . . . . . . . . . . . . . . . . . . . . . . . . . . . . . . . . . . . . . . . . . . . . . . . . . . . . 464
Monitoring Databases from the Command-Line . . . . . . . . . . . . . . . . . . . . . . . . . . . . . . . . . . . . . . . . 465
Monitoring Database Link Activity . . . . . . . . . . . . . . . . . . . . . . . . . . . . . . . . . . . . . . . . . . . . . . . . . . . . . . 467
Chapter 13 Monitoring Directory Server Using SNMP . . . . . . . . . . . . . . . . . . . . . . . . . . . . . . . . . . . . . 469
About SNMP . . . . . . . . . . . . . . . . . . . . . . . . . . . . . . . . . . . . . . . . . . . . . . . . . . . . . . . . . . . . . . . . . . . . . . . . . 470
Configuring the Master Agent . . . . . . . . . . . . . . . . . . . . . . . . . . . . . . . . . . . . . . . . . . . . . . . . . . . . . . . . . . 470
Configuring the Subagent . . . . . . . . . . . . . . . . . . . . . . . . . . . . . . . . . . . . . . . . . . . . . . . . . . . . . . . . . . . . . . 471
Subagent Configuration File . . . . . . . . . . . . . . . . . . . . . . . . . . . . . . . . . . . . . . . . . . . . . . . . . . . . . . . . . 471
agentx-master . . . . . . . . . . . . . . . . . . . . . . . . . . . . . . . . . . . . . . . . . . . . . . . . . . . . . . . . . . . . . . . . . . . 471
agent-logdir . . . . . . . . . . . . . . . . . . . . . . . . . . . . . . . . . . . . . . . . . . . . . . . . . . . . . . . . . . . . . . . . . . . . . 471
server . . . . . . . . . . . . . . . . . . . . . . . . . . . . . . . . . . . . . . . . . . . . . . . . . . . . . . . . . . . . . . . . . . . . . . . . . . 472
Starting the Subagent . . . . . . . . . . . . . . . . . . . . . . . . . . . . . . . . . . . . . . . . . . . . . . . . . . . . . . . . . . . . . . . 472
Testing the Subagent . . . . . . . . . . . . . . . . . . . . . . . . . . . . . . . . . . . . . . . . . . . . . . . . . . . . . . . . . . . . . . . . 472
Configuring the Directory Server for SNMP . . . . . . . . . . . . . . . . . . . . . . . . . . . . . . . . . . . . . . . . . . . . . . 473
Using the Management Information Base . . . . . . . . . . . . . . . . . . . . . . . . . . . . . . . . . . . . . . . . . . . . . . . . . 473
Operations Table . . . . . . . . . . . . . . . . . . . . . . . . . . . . . . . . . . . . . . . . . . . . . . . . . . . . . . . . . . . . . . . . . . . 474
Entries Table . . . . . . . . . . . . . . . . . . . . . . . . . . . . . . . . . . . . . . . . . . . . . . . . . . . . . . . . . . . . . . . . . . . . . . . 475
Interaction Table . . . . . . . . . . . . . . . . . . . . . . . . . . . . . . . . . . . . . . . . . . . . . . . . . . . . . . . . . . . . . . . . . . . 476
Chapter 14 Tuning Directory Server Performance . . . . . . . . . . . . . . . . . . . . . . . . . . . . . . . . . . . . . . . . 479
Tuning Server Performance . . . . . . . . . . . . . . . . . . . . . . . . . . . . . . . . . . . . . . . . . . . . . . . . . . . . . . . . . . . . . 479
Contents 15
Page 16

Tuning Database Performance . . . . . . . . . . . . . . . . . . . . . . . . . . . . . . . . . . . . . . . . . . . . . . . . . . . . . . . . . . 480
Optimizing Search Performance . . . . . . . . . . . . . . . . . . . . . . . . . . . . . . . . . . . . . . . . . . . . . . . . . . . . . . 481
Tuning Transaction Logging . . . . . . . . . . . . . . . . . . . . . . . . . . . . . . . . . . . . . . . . . . . . . . . . . . . . . . . . . 483
Changing the Location of the Database Transaction Log . . . . . . . . . . . . . . . . . . . . . . . . . . . . . . . . . 484
Changing the Database Checkpoint Interval . . . . . . . . . . . . . . . . . . . . . . . . . . . . . . . . . . . . . . . . . . . . 484
Disabling Durable Transactions . . . . . . . . . . . . . . . . . . . . . . . . . . . . . . . . . . . . . . . . . . . . . . . . . . . . . . 485
Specifying Transaction Batching . . . . . . . . . . . . . . . . . . . . . . . . . . . . . . . . . . . . . . . . . . . . . . . . . . . . . . 486
Miscellaneous Tuning Tips . . . . . . . . . . . . . . . . . . . . . . . . . . . . . . . . . . . . . . . . . . . . . . . . . . . . . . . . . . . . . 486
Avoid Creating Entries Under the cn=config Entry in the dse.ldif File . . . . . . . . . . . . . . . . . . . . . 486
Part 2 Plug-ins Reference . . . . . . . . . . . . . . . . . . . . . . . . . . . . . . . . . . . . . . . . . . . . . . . . . . . . . . . . . . . 487
Chapter 15 Administering Directory Server Plug-ins . . . . . . . . . . . . . . . . . . . . . . . . . . . . . . . . . . . . . . 489
Server Plug-in Functionality Reference . . . . . . . . . . . . . . . . . . . . . . . . . . . . . . . . . . . . . . . . . . . . . . . . . . . 489
7-bit Check Plug-in . . . . . . . . . . . . . . . . . . . . . . . . . . . . . . . . . . . . . . . . . . . . . . . . . . . . . . . . . . . . . . . . . 489
ACL Plug-in . . . . . . . . . . . . . . . . . . . . . . . . . . . . . . . . . . . . . . . . . . . . . . . . . . . . . . . . . . . . . . . . . . . . . . . 490
ACL Preoperation Plug-in . . . . . . . . . . . . . . . . . . . . . . . . . . . . . . . . . . . . . . . . . . . . . . . . . . . . . . . . . . . 491
Binary Syntax Plug-in . . . . . . . . . . . . . . . . . . . . . . . . . . . . . . . . . . . . . . . . . . . . . . . . . . . . . . . . . . . . . . . 491
Boolean Syntax Plug-in . . . . . . . . . . . . . . . . . . . . . . . . . . . . . . . . . . . . . . . . . . . . . . . . . . . . . . . . . . . . . . 492
Case Exact String Syntax Plug-in . . . . . . . . . . . . . . . . . . . . . . . . . . . . . . . . . . . . . . . . . . . . . . . . . . . . . 492
Case Ignore String Syntax Plug-in . . . . . . . . . . . . . . . . . . . . . . . . . . . . . . . . . . . . . . . . . . . . . . . . . . . . 493
Chaining Database Plug-in . . . . . . . . . . . . . . . . . . . . . . . . . . . . . . . . . . . . . . . . . . . . . . . . . . . . . . . . . . 494
Class of Service Plug-in . . . . . . . . . . . . . . . . . . . . . . . . . . . . . . . . . . . . . . . . . . . . . . . . . . . . . . . . . . . . . 494
Country String Syntax Plug-in . . . . . . . . . . . . . . . . . . . . . . . . . . . . . . . . . . . . . . . . . . . . . . . . . . . . . . . 495
Distinguished Name Syntax Plug-in . . . . . . . . . . . . . . . . . . . . . . . . . . . . . . . . . . . . . . . . . . . . . . . . . . 495
Generalized Time Syntax Plug-in . . . . . . . . . . . . . . . . . . . . . . . . . . . . . . . . . . . . . . . . . . . . . . . . . . . . . 496
Integer Syntax Plug-in . . . . . . . . . . . . . . . . . . . . . . . . . . . . . . . . . . . . . . . . . . . . . . . . . . . . . . . . . . . . . . 497
Internationalization Plug-in . . . . . . . . . . . . . . . . . . . . . . . . . . . . . . . . . . . . . . . . . . . . . . . . . . . . . . . . . . 498
ldbm Database Plug-in . . . . . . . . . . . . . . . . . . . . . . . . . . . . . . . . . . . . . . . . . . . . . . . . . . . . . . . . . . . . . . 498
Legacy Replication Plug-in . . . . . . . . . . . . . . . . . . . . . . . . . . . . . . . . . . . . . . . . . . . . . . . . . . . . . . . . . . 499
Multi-Master Replication Plug-in . . . . . . . . . . . . . . . . . . . . . . . . . . . . . . . . . . . . . . . . . . . . . . . . . . . . . 500
Octet String Syntax Plug-in . . . . . . . . . . . . . . . . . . . . . . . . . . . . . . . . . . . . . . . . . . . . . . . . . . . . . . . . . . 500
CLEAR Password Storage Plug-in . . . . . . . . . . . . . . . . . . . . . . . . . . . . . . . . . . . . . . . . . . . . . . . . . . . . 501
CRYPT Password Storage Plug-in . . . . . . . . . . . . . . . . . . . . . . . . . . . . . . . . . . . . . . . . . . . . . . . . . . . . 501
NS-MTA-MD5 Password Storage Plug-in . . . . . . . . . . . . . . . . . . . . . . . . . . . . . . . . . . . . . . . . . . . . . . 502
SHA Password Storage Plug-in . . . . . . . . . . . . . . . . . . . . . . . . . . . . . . . . . . . . . . . . . . . . . . . . . . . . . . . 503
SSHA Password Storage Plug-in . . . . . . . . . . . . . . . . . . . . . . . . . . . . . . . . . . . . . . . . . . . . . . . . . . . . . . 503
Postal Address String Syntax Plug-in . . . . . . . . . . . . . . . . . . . . . . . . . . . . . . . . . . . . . . . . . . . . . . . . . . 504
PTA Plug-in . . . . . . . . . . . . . . . . . . . . . . . . . . . . . . . . . . . . . . . . . . . . . . . . . . . . . . . . . . . . . . . . . . . . . . . 505
Referential Integrity Postoperation Plug-in . . . . . . . . . . . . . . . . . . . . . . . . . . . . . . . . . . . . . . . . . . . . . 505
Retro Changelog Plug-in . . . . . . . . . . . . . . . . . . . . . . . . . . . . . . . . . . . . . . . . . . . . . . . . . . . . . . . . . . . . 506
16 Red Hat Directory Server Administrator’s Guide • May 2005
Page 17

Roles Plug-in . . . . . . . . . . . . . . . . . . . . . . . . . . . . . . . . . . . . . . . . . . . . . . . . . . . . . . . . . . . . . . . . . . . . . . 507
Space Insensitive String Syntax Plug-in . . . . . . . . . . . . . . . . . . . . . . . . . . . . . . . . . . . . . . . . . . . . . . . . 508
State Change Plug-in . . . . . . . . . . . . . . . . . . . . . . . . . . . . . . . . . . . . . . . . . . . . . . . . . . . . . . . . . . . . . . . . 509
Telephone Syntax Plug-in . . . . . . . . . . . . . . . . . . . . . . . . . . . . . . . . . . . . . . . . . . . . . . . . . . . . . . . . . . . 509
UID Uniqueness Plug-in . . . . . . . . . . . . . . . . . . . . . . . . . . . . . . . . . . . . . . . . . . . . . . . . . . . . . . . . . . . . . 510
URI Plug-in . . . . . . . . . . . . . . . . . . . . . . . . . . . . . . . . . . . . . . . . . . . . . . . . . . . . . . . . . . . . . . . . . . . . . . . . 511
Enabling and Disabling Plug-ins from the Server Console . . . . . . . . . . . . . . . . . . . . . . . . . . . . . . . . . . 512
Chapter 16 Using the Pass-through Authentication Plug-in . . . . . . . . . . . . . . . . . . . . . . . . . . . . . . . . . 513
How Directory Server Uses PTA . . . . . . . . . . . . . . . . . . . . . . . . . . . . . . . . . . . . . . . . . . . . . . . . . . . . . . . . 513
PTA Plug-in Syntax . . . . . . . . . . . . . . . . . . . . . . . . . . . . . . . . . . . . . . . . . . . . . . . . . . . . . . . . . . . . . . . . . . . 515
Configuring the PTA Plug-in . . . . . . . . . . . . . . . . . . . . . . . . . . . . . . . . . . . . . . . . . . . . . . . . . . . . . . . . . . . 518
Turning the Plug-in On or Off . . . . . . . . . . . . . . . . . . . . . . . . . . . . . . . . . . . . . . . . . . . . . . . . . . . . . . . . 518
Configuring the Servers to Use a Secure Connection . . . . . . . . . . . . . . . . . . . . . . . . . . . . . . . . . . . . 519
Specifying the Authenticating Directory Server . . . . . . . . . . . . . . . . . . . . . . . . . . . . . . . . . . . . . . . . . 520
Specifying the Pass-through Subtree . . . . . . . . . . . . . . . . . . . . . . . . . . . . . . . . . . . . . . . . . . . . . . . . . . 521
Configuring the Optional Parameters . . . . . . . . . . . . . . . . . . . . . . . . . . . . . . . . . . . . . . . . . . . . . . . . . 522
PTA Plug-in Syntax Examples . . . . . . . . . . . . . . . . . . . . . . . . . . . . . . . . . . . . . . . . . . . . . . . . . . . . . . . . . . 523
Specifying One Authenticating Directory Server and One Subtree . . . . . . . . . . . . . . . . . . . . . . . . . 524
Specifying Multiple Authenticating Directory Servers . . . . . . . . . . . . . . . . . . . . . . . . . . . . . . . . . . . 524
Specifying One Authenticating Directory Server and Multiple Subtrees . . . . . . . . . . . . . . . . . . . . 525
Using Non-Default Parameter Values . . . . . . . . . . . . . . . . . . . . . . . . . . . . . . . . . . . . . . . . . . . . . . . . . 525
Specifying Different Optional Parameters and Subtrees for Different Authenticating Directory
Servers . . . . . . . . . . . . . . . . . . . . . . . . . . . . . . . . . . . . . . . . . . . . . . . . . . . . . . . . . . . . . . . . . . . . . . . . . . . . 526
Chapter 17 Using the Attribute Uniqueness Plug-in . . . . . . . . . . . . . . . . . . . . . . . . . . . . . . . . . . . . . . . 529
Overview of the Attribute Uniqueness Plug-in . . . . . . . . . . . . . . . . . . . . . . . . . . . . . . . . . . . . . . . . . . . . 529
Overview of the UID Uniqueness Plug-in . . . . . . . . . . . . . . . . . . . . . . . . . . . . . . . . . . . . . . . . . . . . . . . . 531
Attribute Uniqueness Plug-in Syntax . . . . . . . . . . . . . . . . . . . . . . . . . . . . . . . . . . . . . . . . . . . . . . . . . . . . 531
Creating an Instance of the Attribute Uniqueness Plug-in . . . . . . . . . . . . . . . . . . . . . . . . . . . . . . . . . . . 534
Configuring Attribute Uniqueness Plug-ins . . . . . . . . . . . . . . . . . . . . . . . . . . . . . . . . . . . . . . . . . . . . . . . 535
Viewing Plug-in Configuration Information . . . . . . . . . . . . . . . . . . . . . . . . . . . . . . . . . . . . . . . . . . . . 535
Configuring Attribute Uniqueness Plug-ins from the Directory Server Console . . . . . . . . . . . . . 536
Configuring Attribute Uniqueness Plug-ins from the Command-Line . . . . . . . . . . . . . . . . . . . . . 537
Turning the Plug-in On or Off . . . . . . . . . . . . . . . . . . . . . . . . . . . . . . . . . . . . . . . . . . . . . . . . . . . . . 537
Specifying a Suffix or Subtree . . . . . . . . . . . . . . . . . . . . . . . . . . . . . . . . . . . . . . . . . . . . . . . . . . . . . . 537
Using the markerObjectClass and requiredObjectClass Keywords . . . . . . . . . . . . . . . . . . . . . . 538
Attribute Uniqueness Plug-in Syntax Examples . . . . . . . . . . . . . . . . . . . . . . . . . . . . . . . . . . . . . . . . . . . 539
Specifying One Attribute and One Subtree . . . . . . . . . . . . . . . . . . . . . . . . . . . . . . . . . . . . . . . . . . . . . 540
Specifying One Attribute and Multiple Subtrees . . . . . . . . . . . . . . . . . . . . . . . . . . . . . . . . . . . . . . . . 540
Replication and the Attribute Uniqueness Plug-in . . . . . . . . . . . . . . . . . . . . . . . . . . . . . . . . . . . . . . . . . 541
Simple Replication Scenario . . . . . . . . . . . . . . . . . . . . . . . . . . . . . . . . . . . . . . . . . . . . . . . . . . . . . . . . . . 541
Contents 17
Page 18

Multi-Master Replication Scenario . . . . . . . . . . . . . . . . . . . . . . . . . . . . . . . . . . . . . . . . . . . . . . . . . . . . 542
Chapter 18 Windows Sync . . . . . . . . . . . . . . . . . . . . . . . . . . . . . . . . . . . . . . . . . . . . . . . . . . . . . . . . . . . . 543
About Windows Sync . . . . . . . . . . . . . . . . . . . . . . . . . . . . . . . . . . . . . . . . . . . . . . . . . . . . . . . . . . . . . . . . . . 543
How Windows Sync Works . . . . . . . . . . . . . . . . . . . . . . . . . . . . . . . . . . . . . . . . . . . . . . . . . . . . . . . . . . 547
Installing Sync Services . . . . . . . . . . . . . . . . . . . . . . . . . . . . . . . . . . . . . . . . . . . . . . . . . . . . . . . . . . . . . . . . 549
Prerequisites for NT4 . . . . . . . . . . . . . . . . . . . . . . . . . . . . . . . . . . . . . . . . . . . . . . . . . . . . . . . . . . . . . . . 549
Installing and Configuring the Password Sync Service . . . . . . . . . . . . . . . . . . . . . . . . . . . . . . . . . . . 550
Reconfiguring the Password Sync Service . . . . . . . . . . . . . . . . . . . . . . . . . . . . . . . . . . . . . . . . . . . 552
Setting Up SSL for the Password Sync Service . . . . . . . . . . . . . . . . . . . . . . . . . . . . . . . . . . . . . . . 552
Installing and Configuring the NT4 LDAP Service . . . . . . . . . . . . . . . . . . . . . . . . . . . . . . . . . . . . . . 553
Uninstalling the Sync Services . . . . . . . . . . . . . . . . . . . . . . . . . . . . . . . . . . . . . . . . . . . . . . . . . . . . . . . . 557
Configuring Windows Sync . . . . . . . . . . . . . . . . . . . . . . . . . . . . . . . . . . . . . . . . . . . . . . . . . . . . . . . . . . . . 557
Using Windows Sync . . . . . . . . . . . . . . . . . . . . . . . . . . . . . . . . . . . . . . . . . . . . . . . . . . . . . . . . . . . . . . . . . . 561
Synchronized Entries . . . . . . . . . . . . . . . . . . . . . . . . . . . . . . . . . . . . . . . . . . . . . . . . . . . . . . . . . . . . . . . 562
Groups . . . . . . . . . . . . . . . . . . . . . . . . . . . . . . . . . . . . . . . . . . . . . . . . . . . . . . . . . . . . . . . . . . . . . . . . . . . . 564
Manually Initiating Synchronization . . . . . . . . . . . . . . . . . . . . . . . . . . . . . . . . . . . . . . . . . . . . . . . . . . 565
The Need for Resynchronization . . . . . . . . . . . . . . . . . . . . . . . . . . . . . . . . . . . . . . . . . . . . . . . . . . . . . . 566
Checking Synchronization Status . . . . . . . . . . . . . . . . . . . . . . . . . . . . . . . . . . . . . . . . . . . . . . . . . . . . . 566
Modifying the Synchronization Agreement . . . . . . . . . . . . . . . . . . . . . . . . . . . . . . . . . . . . . . . . . . . . 567
Active Directory Schema Compatibility . . . . . . . . . . . . . . . . . . . . . . . . . . . . . . . . . . . . . . . . . . . . . . . . . . 567
NT4-Specific Limitations . . . . . . . . . . . . . . . . . . . . . . . . . . . . . . . . . . . . . . . . . . . . . . . . . . . . . . . . . . . . . . . 568
Troubleshooting . . . . . . . . . . . . . . . . . . . . . . . . . . . . . . . . . . . . . . . . . . . . . . . . . . . . . . . . . . . . . . . . . . . . . . 569
Part 3 Appendixes . . . . . . . . . . . . . . . . . . . . . . . . . . . . . . . . . . . . . . . . . . . . . . . . . . . . . . . . . . . . . . . . . 571
Appendix A LDAP Data Interchange Format . . . . . . . . . . . . . . . . . . . . . . . . . . . . . . . . . . . . . . . . . . . . 573
LDIF File Format . . . . . . . . . . . . . . . . . . . . . . . . . . . . . . . . . . . . . . . . . . . . . . . . . . . . . . . . . . . . . . . . . . . . . . 573
Continuing Lines in LDIF . . . . . . . . . . . . . . . . . . . . . . . . . . . . . . . . . . . . . . . . . . . . . . . . . . . . . . . . . . . . 575
Representing Binary Data . . . . . . . . . . . . . . . . . . . . . . . . . . . . . . . . . . . . . . . . . . . . . . . . . . . . . . . . . . . . 575
Specifying Directory Entries Using LDIF . . . . . . . . . . . . . . . . . . . . . . . . . . . . . . . . . . . . . . . . . . . . . . . . . 577
Specifying Organization Entries . . . . . . . . . . . . . . . . . . . . . . . . . . . . . . . . . . . . . . . . . . . . . . . . . . . . . . 577
Specifying Organizational Unit Entries . . . . . . . . . . . . . . . . . . . . . . . . . . . . . . . . . . . . . . . . . . . . . . . . 579
Specifying Organizational Person Entries . . . . . . . . . . . . . . . . . . . . . . . . . . . . . . . . . . . . . . . . . . . . . . 580
Defining Directories Using LDIF . . . . . . . . . . . . . . . . . . . . . . . . . . . . . . . . . . . . . . . . . . . . . . . . . . . . . . . . 581
LDIF File Example . . . . . . . . . . . . . . . . . . . . . . . . . . . . . . . . . . . . . . . . . . . . . . . . . . . . . . . . . . . . . . . 583
Storing Information in Multiple Languages . . . . . . . . . . . . . . . . . . . . . . . . . . . . . . . . . . . . . . . . . . . . . . . 584
Appendix B Finding Directory Entries . . . . . . . . . . . . . . . . . . . . . . . . . . . . . . . . . . . . . . . . . . . . . . . . . . 587
Finding Entries Using the Server Console . . . . . . . . . . . . . . . . . . . . . . . . . . . . . . . . . . . . . . . . . . . . . . . . 587
Using ldapsearch . . . . . . . . . . . . . . . . . . . . . . . . . . . . . . . . . . . . . . . . . . . . . . . . . . . . . . . . . . . . . . . . . . . . . . 588
18 Red Hat Directory Server Administrator’s Guide • May 2005
Page 19

Using Special Characters . . . . . . . . . . . . . . . . . . . . . . . . . . . . . . . . . . . . . . . . . . . . . . . . . . . . . . . . . . . . 588
ldapsearch Command-Line Format . . . . . . . . . . . . . . . . . . . . . . . . . . . . . . . . . . . . . . . . . . . . . . . . . . . 589
Commonly Used ldapsearch Options . . . . . . . . . . . . . . . . . . . . . . . . . . . . . . . . . . . . . . . . . . . . . . . . . 589
ldapsearch Examples . . . . . . . . . . . . . . . . . . . . . . . . . . . . . . . . . . . . . . . . . . . . . . . . . . . . . . . . . . . . . . . . 592
Returning All Entries . . . . . . . . . . . . . . . . . . . . . . . . . . . . . . . . . . . . . . . . . . . . . . . . . . . . . . . . . . . . . 592
Specifying Search Filters on the Command-Line . . . . . . . . . . . . . . . . . . . . . . . . . . . . . . . . . . . . . 592
Searching the Root DSE Entry . . . . . . . . . . . . . . . . . . . . . . . . . . . . . . . . . . . . . . . . . . . . . . . . . . . . . 592
Searching the Schema Entry . . . . . . . . . . . . . . . . . . . . . . . . . . . . . . . . . . . . . . . . . . . . . . . . . . . . . . . 593
Using LDAP_BASEDN . . . . . . . . . . . . . . . . . . . . . . . . . . . . . . . . . . . . . . . . . . . . . . . . . . . . . . . . . . . 593
Displaying Subsets of Attributes . . . . . . . . . . . . . . . . . . . . . . . . . . . . . . . . . . . . . . . . . . . . . . . . . . . 593
Specifying Search Filters Using a File . . . . . . . . . . . . . . . . . . . . . . . . . . . . . . . . . . . . . . . . . . . . . . . 594
Specifying DNs That Contain Commas in Search Filters . . . . . . . . . . . . . . . . . . . . . . . . . . . . . . . 594
Using Client Authentication When Searching . . . . . . . . . . . . . . . . . . . . . . . . . . . . . . . . . . . . . . . . 594
LDAP Search Filters . . . . . . . . . . . . . . . . . . . . . . . . . . . . . . . . . . . . . . . . . . . . . . . . . . . . . . . . . . . . . . . . . . . 595
Search Filter Syntax . . . . . . . . . . . . . . . . . . . . . . . . . . . . . . . . . . . . . . . . . . . . . . . . . . . . . . . . . . . . . . . . . 595
Using Attributes in Search Filters . . . . . . . . . . . . . . . . . . . . . . . . . . . . . . . . . . . . . . . . . . . . . . . . . . 596
Using Operators in Search Filters . . . . . . . . . . . . . . . . . . . . . . . . . . . . . . . . . . . . . . . . . . . . . . . . . . 596
Using Compound Search Filters . . . . . . . . . . . . . . . . . . . . . . . . . . . . . . . . . . . . . . . . . . . . . . . . . . . 597
Search Filter Examples . . . . . . . . . . . . . . . . . . . . . . . . . . . . . . . . . . . . . . . . . . . . . . . . . . . . . . . . . . . . 598
Searching an Internationalized Directory . . . . . . . . . . . . . . . . . . . . . . . . . . . . . . . . . . . . . . . . . . . . . . . . . 599
Matching Rule Filter Syntax . . . . . . . . . . . . . . . . . . . . . . . . . . . . . . . . . . . . . . . . . . . . . . . . . . . . . . . . . . 599
Matching Rule Formats . . . . . . . . . . . . . . . . . . . . . . . . . . . . . . . . . . . . . . . . . . . . . . . . . . . . . . . . . . . 600
Using Wildcards in Matching Rule Filters . . . . . . . . . . . . . . . . . . . . . . . . . . . . . . . . . . . . . . . . . . . 602
Supported Search Types . . . . . . . . . . . . . . . . . . . . . . . . . . . . . . . . . . . . . . . . . . . . . . . . . . . . . . . . . . . . . 602
International Search Examples . . . . . . . . . . . . . . . . . . . . . . . . . . . . . . . . . . . . . . . . . . . . . . . . . . . . . . . 603
Less-Than Example . . . . . . . . . . . . . . . . . . . . . . . . . . . . . . . . . . . . . . . . . . . . . . . . . . . . . . . . . . . . . . 603
Less-Than or Equal-to Example . . . . . . . . . . . . . . . . . . . . . . . . . . . . . . . . . . . . . . . . . . . . . . . . . . . . 604
Equality Example . . . . . . . . . . . . . . . . . . . . . . . . . . . . . . . . . . . . . . . . . . . . . . . . . . . . . . . . . . . . . . . . 604
Greater-Than or Equal-to Example . . . . . . . . . . . . . . . . . . . . . . . . . . . . . . . . . . . . . . . . . . . . . . . . . 604
Greater-Than Example . . . . . . . . . . . . . . . . . . . . . . . . . . . . . . . . . . . . . . . . . . . . . . . . . . . . . . . . . . . . 605
Substring Example . . . . . . . . . . . . . . . . . . . . . . . . . . . . . . . . . . . . . . . . . . . . . . . . . . . . . . . . . . . . . . . 605
Appendix C LDAP URLs . . . . . . . . . . . . . . . . . . . . . . . . . . . . . . . . . . . . . . . . . . . . . . . . . . . . . . . . . . . . . 607
Components of an LDAP URL . . . . . . . . . . . . . . . . . . . . . . . . . . . . . . . . . . . . . . . . . . . . . . . . . . . . . . . . . . 607
Escaping Unsafe Characters . . . . . . . . . . . . . . . . . . . . . . . . . . . . . . . . . . . . . . . . . . . . . . . . . . . . . . . . . . . . 609
Examples of LDAP URLs . . . . . . . . . . . . . . . . . . . . . . . . . . . . . . . . . . . . . . . . . . . . . . . . . . . . . . . . . . . . . . . 609
Appendix D Internationalization . . . . . . . . . . . . . . . . . . . . . . . . . . . . . . . . . . . . . . . . . . . . . . . . . . . . . . . 613
About Locales . . . . . . . . . . . . . . . . . . . . . . . . . . . . . . . . . . . . . . . . . . . . . . . . . . . . . . . . . . . . . . . . . . . . . . . . 613
Identifying Supported Locales . . . . . . . . . . . . . . . . . . . . . . . . . . . . . . . . . . . . . . . . . . . . . . . . . . . . . . . . . . 614
Supported Language Subtypes . . . . . . . . . . . . . . . . . . . . . . . . . . . . . . . . . . . . . . . . . . . . . . . . . . . . . . . . . . 616
Troubleshooting Matching Rules . . . . . . . . . . . . . . . . . . . . . . . . . . . . . . . . . . . . . . . . . . . . . . . . . . . . . . . . 618
Contents 19
Page 20

Glossary . . . . . . . . . . . . . . . . . . . . . . . . . . . . . . . . . . . . . . . . . . . . . . . . . . . . . . . . . . . . . . . . . . . . . . . . . . . . . 619
Index . . . . . . . . . . . . . . . . . . . . . . . . . . . . . . . . . . . . . . . . . . . . . . . . . . . . . . . . . . . . . . . . . . . . . . . . . . . . . . . . 635
20 Red Hat Directory Server Administrator’s Guide • May 2005
Page 21

List of Figures
Figure 1-1 Viewing the Bind DN . . . . . . . . . . . . . . . . . . . . . . . . . . . . . . . . . . . . . . . . . . . . . . . . . . . . . 37
Figure 3-1 A Sample Directory Tree with One Root Suffix . . . . . . . . . . . . . . . . . . . . . . . . . . . . . . . . 80
Figure 3-2 A Sample Directory Tree with Two Root Suffixes . . . . . . . . . . . . . . . . . . . . . . . . . . . . . 81
Figure 3-3 A Sample Directory Tree with a Root Suffix Off Limits to Search Operations . . . . . . 81
Figure 3-4 A Sample Directory Tree with a Sub Suffix . . . . . . . . . . . . . . . . . . . . . . . . . . . . . . . . . . . 82
Figure 4-1 Splitting a Database Contents into Two Databases . . . . . . . . . . . . . . . . . . . . . . . . . . . . 156
Figure 5-1 Sample Pointer CoS . . . . . . . . . . . . . . . . . . . . . . . . . . . . . . . . . . . . . . . . . . . . . . . . . . . . . . 184
Figure 5-2 Sample Indirect CoS . . . . . . . . . . . . . . . . . . . . . . . . . . . . . . . . . . . . . . . . . . . . . . . . . . . . . . 185
Figure 5-3 Sample Classic CoS . . . . . . . . . . . . . . . . . . . . . . . . . . . . . . . . . . . . . . . . . . . . . . . . . . . . . . 186
Figure 6-1 Using Inheritance With the userattr Keyword . . . . . . . . . . . . . . . . . . . . . . . . . . . . . 231
Figure 6-2 Selecting an Object in the Navigation Tree to Set Access Control . . . . . . . . . . . . . . . . 239
Figure 6-3 Access Control Editor Window . . . . . . . . . . . . . . . . . . . . . . . . . . . . . . . . . . . . . . . . . . . . 239
Figure 6-4 Example Directory Tree for Macro ACIs . . . . . . . . . . . . . . . . . . . . . . . . . . . . . . . . . . . . 271
Figure 8-1 Single-Master Replication . . . . . . . . . . . . . . . . . . . . . . . . . . . . . . . . . . . . . . . . . . . . . . . . . 307
Figure 8-2 Multi-Master Replication (Two Suppliers) . . . . . . . . . . . . . . . . . . . . . . . . . . . . . . . . . . . 308
Figure 8-3 Multi-Master Replication (Four Suppliers) . . . . . . . . . . . . . . . . . . . . . . . . . . . . . . . . . . . 308
Figure 8-4 Cascading Replication . . . . . . . . . . . . . . . . . . . . . . . . . . . . . . . . . . . . . . . . . . . . . . . . . . . . 311
Figure 18-1 Active Directory - Directory Server Synchronization Process . . . . . . . . . . . . . . . . . . . 545
Figure 18-2 Windows NT4 Server - Directory Server Synchronization Process . . . . . . . . . . . . . . . 546
Figure 18-3 Multi-Master Directory Server - Windows Domain Synchronization . . . . . . . . . . . . 547
21
Page 22

22 Red Hat Directory Server Administrator’s Guide • May 2005
Page 23

List of Tables
Table 2-1 Entry Templates and Corresponding Object Classes . . . . . . . . . . . . . . . . . . . . . . . . . . . . 47
Table 2-2 Description of ldapmodify Parameters Used for Adding Entries . . . . . . . . . . . . . . . . . 59
Table 2-3 Description of ldapmodify Parameters Used for Modifying Entries . . . . . . . . . . . . . . 60
Table 2-4 Description of ldapdelete Parameters Used for Deleting Entries . . . . . . . . . . . . . . . . . 62
Table 3-1 Suffix Attributes . . . . . . . . . . . . . . . . . . . . . . . . . . . . . . . . . . . . . . . . . . . . . . . . . . . . . . . . . . 85
Table 3-2 Components Allowed to Chain . . . . . . . . . . . . . . . . . . . . . . . . . . . . . . . . . . . . . . . . . . . . . 104
Table 3-3 LDAP Controls and Their OIDs . . . . . . . . . . . . . . . . . . . . . . . . . . . . . . . . . . . . . . . . . . . . 109
Table 3-4 Database Link Configuration Attributes . . . . . . . . . . . . . . . . . . . . . . . . . . . . . . . . . . . . . 116
Table 3-5 Database Link Connection Management Attributes . . . . . . . . . . . . . . . . . . . . . . . . . . . 125
Table 3-6 Database Link Processing Error Detection Parameters . . . . . . . . . . . . . . . . . . . . . . . . . 127
Table 3-7 Cascading Chaining Configuration Attributes . . . . . . . . . . . . . . . . . . . . . . . . . . . . . . . . 136
Table 4-1 Import Method Comparison . . . . . . . . . . . . . . . . . . . . . . . . . . . . . . . . . . . . . . . . . . . . . . . 150
Table 5-1 Object Classes and Attributes for Roles . . . . . . . . . . . . . . . . . . . . . . . . . . . . . . . . . . . . . . 178
Table 5-2 CoS Definition Entry Object Classes . . . . . . . . . . . . . . . . . . . . . . . . . . . . . . . . . . . . . . . . . 191
Table 5-3 CoS Definition Entry Attributes . . . . . . . . . . . . . . . . . . . . . . . . . . . . . . . . . . . . . . . . . . . . 191
Table 5-4 CoS Definitions . . . . . . . . . . . . . . . . . . . . . . . . . . . . . . . . . . . . . . . . . . . . . . . . . . . . . . . . . . 193
Table 6-1 LDIF Target Keywords . . . . . . . . . . . . . . . . . . . . . . . . . . . . . . . . . . . . . . . . . . . . . . . . . . . . 208
Table 6-2 LDIF Bind Rule Keywords . . . . . . . . . . . . . . . . . . . . . . . . . . . . . . . . . . . . . . . . . . . . . . . . . 220
Table 6-3 Permissions That Can Be Set on Entries . . . . . . . . . . . . . . . . . . . . . . . . . . . . . . . . . . . . . . 265
Table 6-4 Permissions That Can Be Set on Attributes . . . . . . . . . . . . . . . . . . . . . . . . . . . . . . . . . . . 265
Table 6-5 Returned Result Codes . . . . . . . . . . . . . . . . . . . . . . . . . . . . . . . . . . . . . . . . . . . . . . . . . . . . 269
Table 6-6 Macros in ACI Keywords . . . . . . . . . . . . . . . . . . . . . . . . . . . . . . . . . . . . . . . . . . . . . . . . . . 273
Table 7-1 Password Policy Attributes . . . . . . . . . . . . . . . . . . . . . . . . . . . . . . . . . . . . . . . . . . . . . . . . 283
Table 7-2 Account Lockout Policy Attributes . . . . . . . . . . . . . . . . . . . . . . . . . . . . . . . . . . . . . . . . . 293
Table 8-1 Replicate_Now Variables . . . . . . . . . . . . . . . . . . . . . . . . . . . . . . . . . . . . . . . . . . . . . . . . . . 353
Table 8-2 Attributes of a Retro Changelog Entry . . . . . . . . . . . . . . . . . . . . . . . . . . . . . . . . . . . . . . . 357
Table 8-3 Directory Server Console - Replication Status . . . . . . . . . . . . . . . . . . . . . . . . . . . . . . . . 361
23
Page 24

Table 9-1 Attributes Tab Reference . . . . . . . . . . . . . . . . . . . . . . . . . . . . . . . . . . . . . . . . . . . . . . . . . . 376
Table 9-2 Object Classes Tab Reference . . . . . . . . . . . . . . . . . . . . . . . . . . . . . . . . . . . . . . . . . . . . . . . 380
Table 10-1 Default Indexes . . . . . . . . . . . . . . . . . . . . . . . . . . . . . . . . . . . . . . . . . . . . . . . . . . . . . . . . . . 390
Table 10-2 System Indexes . . . . . . . . . . . . . . . . . . . . . . . . . . . . . . . . . . . . . . . . . . . . . . . . . . . . . . . . . . 391
Table 10-3 Attribute Name Quick Reference Table . . . . . . . . . . . . . . . . . . . . . . . . . . . . . . . . . . . . . . 415
Table 11-1 Supported Kerberos Systems . . . . . . . . . . . . . . . . . . . . . . . . . . . . . . . . . . . . . . . . . . . . . . . 443
Table 12-1 Server Performance Monitoring - Resource Summary . . . . . . . . . . . . . . . . . . . . . . . . . 457
Table 12-2 Server Performance Monitoring - Current Resource Usage . . . . . . . . . . . . . . . . . . . . . 458
Table 12-3 Server Performance Monitoring - Connection Status . . . . . . . . . . . . . . . . . . . . . . . . . . 458
Table 12-4 Server Performance Monitoring - Global Database Cache . . . . . . . . . . . . . . . . . . . . . . 459
Table 12-5 Database Performance Monitoring - Summary Information . . . . . . . . . . . . . . . . . . . . 463
Table 12-6 Database Performance Monitoring - Database Cache Information . . . . . . . . . . . . . . . 464
Table 12-7 Database Performance Monitoring - Database File-Specific . . . . . . . . . . . . . . . . . . . . . 465
Table 12-8 Database Link Monitoring Attributes . . . . . . . . . . . . . . . . . . . . . . . . . . . . . . . . . . . . . . . 467
Table 13-1 Operations - Managed Objects and Descriptions . . . . . . . . . . . . . . . . . . . . . . . . . . . . . . 474
Table 13-2 Entries - Managed Objects and Descriptions . . . . . . . . . . . . . . . . . . . . . . . . . . . . . . . . . 475
Table 13-3 Interaction - Managed Objects and Descriptions . . . . . . . . . . . . . . . . . . . . . . . . . . . . . . 476
Table 15-1 Details of 7-Bit Check Plug-in . . . . . . . . . . . . . . . . . . . . . . . . . . . . . . . . . . . . . . . . . . . . . . 489
Table 15-2 Details of ACI Plug-in . . . . . . . . . . . . . . . . . . . . . . . . . . . . . . . . . . . . . . . . . . . . . . . . . . . . . 490
Table 15-3 Details of Preoperation Plug-in . . . . . . . . . . . . . . . . . . . . . . . . . . . . . . . . . . . . . . . . . . . . . 491
Table 15-4 Details of Binary Syntax Plug-in . . . . . . . . . . . . . . . . . . . . . . . . . . . . . . . . . . . . . . . . . . . . 491
Table 15-5 Details of Boolean Syntax Plug-in . . . . . . . . . . . . . . . . . . . . . . . . . . . . . . . . . . . . . . . . . . . 492
Table 15-6 Details of Case Exact String Syntax Plug-in . . . . . . . . . . . . . . . . . . . . . . . . . . . . . . . . . . 492
Table 15-7 Details of Case Ignore String Syntax Plug-in . . . . . . . . . . . . . . . . . . . . . . . . . . . . . . . . . 493
Table 15-8 Details of Cloning Database Plug-in . . . . . . . . . . . . . . . . . . . . . . . . . . . . . . . . . . . . . . . . 494
Table 15-9 Details of Class of Service Plug-in . . . . . . . . . . . . . . . . . . . . . . . . . . . . . . . . . . . . . . . . . . 494
Table 15-10 Details of Country String Plug-in . . . . . . . . . . . . . . . . . . . . . . . . . . . . . . . . . . . . . . . . . . . 495
Table 15-11 Details of Distinguished Name Syntax Plug-in . . . . . . . . . . . . . . . . . . . . . . . . . . . . . . . 495
Table 15-12 Details of Generalized Time Syntax Plug-in . . . . . . . . . . . . . . . . . . . . . . . . . . . . . . . . . . 496
Table 15-13 Details of Integer Syntax Plug-in . . . . . . . . . . . . . . . . . . . . . . . . . . . . . . . . . . . . . . . . . . . 497
Table 15-14 Details of Internationalization Plug-in . . . . . . . . . . . . . . . . . . . . . . . . . . . . . . . . . . . . . . . 498
Table 15-15 Details of ldbm Database Plug-in . . . . . . . . . . . . . . . . . . . . . . . . . . . . . . . . . . . . . . . . . . . 498
Table 15-16 Details of Legacy Replication Plug-in . . . . . . . . . . . . . . . . . . . . . . . . . . . . . . . . . . . . . . . 499
Table 15-17 Details of Multi-Master Replication Plug-in . . . . . . . . . . . . . . . . . . . . . . . . . . . . . . . . . . 500
Table 15-18 Details of Octet String Syntax Plug-in . . . . . . . . . . . . . . . . . . . . . . . . . . . . . . . . . . . . . . . 500
Table 15-19 Details of CLEAR Password Storage Plug-in . . . . . . . . . . . . . . . . . . . . . . . . . . . . . . . . . 501
Table 15-20 Details of CRYPT Password Storage Plug-in . . . . . . . . . . . . . . . . . . . . . . . . . . . . . . . . . 501
24 Red Hat Directory Server Administrator’s Guide • May 2005
Page 25

Table 15-21 Details of NS-MTA-MD5 Password Storage Plug-in . . . . . . . . . . . . . . . . . . . . . . . . . . . 502
Table 15-22 Details of SHA Password Storage Plug-in . . . . . . . . . . . . . . . . . . . . . . . . . . . . . . . . . . . . 503
Table 15-23 Details of SSHA Password Storage Plug-in . . . . . . . . . . . . . . . . . . . . . . . . . . . . . . . . . . . 503
Table 15-24 Details of Postal Address String Syntax Plug-in . . . . . . . . . . . . . . . . . . . . . . . . . . . . . . . 504
Table 15-25 Details of PTA Plug-in . . . . . . . . . . . . . . . . . . . . . . . . . . . . . . . . . . . . . . . . . . . . . . . . . . . . 505
Table 15-26 Details of Referential Integrity Postoperation Plug-in . . . . . . . . . . . . . . . . . . . . . . . . . . 505
Table 15-27 Details of Retro Changelog Plug-in . . . . . . . . . . . . . . . . . . . . . . . . . . . . . . . . . . . . . . . . . 506
Table 15-28 Details of Roles Plug-in . . . . . . . . . . . . . . . . . . . . . . . . . . . . . . . . . . . . . . . . . . . . . . . . . . . 507
Table 15-29 Details of Space Insensitive String Syntax Plug-in . . . . . . . . . . . . . . . . . . . . . . . . . . . . . 508
Table 15-30 Details of State Change Plug-in . . . . . . . . . . . . . . . . . . . . . . . . . . . . . . . . . . . . . . . . . . . . . 509
Table 15-31 Details of Telephone Syntax Plug-in . . . . . . . . . . . . . . . . . . . . . . . . . . . . . . . . . . . . . . . . 509
Table 15-32 Details of UID Uniqueness Plug-in . . . . . . . . . . . . . . . . . . . . . . . . . . . . . . . . . . . . . . . . . . 510
Table 15-33 Details of URI Plug-in . . . . . . . . . . . . . . . . . . . . . . . . . . . . . . . . . . . . . . . . . . . . . . . . . . . . . 511
Table 16-1 PTA Plug-in Parameters . . . . . . . . . . . . . . . . . . . . . . . . . . . . . . . . . . . . . . . . . . . . . . . . . . . 516
Table 17-1 Attribute Uniqueness Plug-in Variables . . . . . . . . . . . . . . . . . . . . . . . . . . . . . . . . . . . . . 533
Table 18-1 User Entry Schema Mapping between Directory Server and Windows Servers . . . . 562
Table 18-2 User Entry Schema That Is the Same in Directory Server and Windows Servers . . . 563
Table 18-3 Group Entry Schema Mapping between Directory Server and Windows Servers . . 565
Table 18-4 Group Entry Schema that are directly mapped between Directory Server and Windows
Servers 565
Table A-1 LDIF Fields . . . . . . . . . . . . . . . . . . . . . . . . . . . . . . . . . . . . . . . . . . . . . . . . . . . . . . . . . . . . . . 574
Table A-2 LDIF Elements in Organization Entries . . . . . . . . . . . . . . . . . . . . . . . . . . . . . . . . . . . . . . 578
Table A-3 LDIF Elements in Organizational Unit Entries . . . . . . . . . . . . . . . . . . . . . . . . . . . . . . . . 579
Table A-4 LDIF Elements in Person Entries . . . . . . . . . . . . . . . . . . . . . . . . . . . . . . . . . . . . . . . . . . . 581
Table B-1 Search Filter Operators . . . . . . . . . . . . . . . . . . . . . . . . . . . . . . . . . . . . . . . . . . . . . . . . . . . . 596
Table B-2 Search Filter Boolean Operators . . . . . . . . . . . . . . . . . . . . . . . . . . . . . . . . . . . . . . . . . . . . 597
Table B-3 Search Types, Operators, and Suffixes . . . . . . . . . . . . . . . . . . . . . . . . . . . . . . . . . . . . . . . 603
Table C-1 LDAP URL Components . . . . . . . . . . . . . . . . . . . . . . . . . . . . . . . . . . . . . . . . . . . . . . . . . . 607
Table D-1 Supported Locales . . . . . . . . . . . . . . . . . . . . . . . . . . . . . . . . . . . . . . . . . . . . . . . . . . . . . . . . 615
Table D-2 Supported Language Subtypes . . . . . . . . . . . . . . . . . . . . . . . . . . . . . . . . . . . . . . . . . . . . . 617
List of Tables 25
Page 26

26 Red Hat Directory Server Administrator’s Guide • May 2005
Page 27

Introduction to This Reference Guide
Red Hat Directory Server (Directory Server) is a powerful and scalable distributed
directory server based on the industry-standard Lightweight Directory Access
Protocol (LDAP). Directory Server is the cornerstone for building a centralized and
distributed data repository that can be used in your intranet, over your extranet
with your trading partners, or over the public Internet to reach your customers.
This Administrator’s Guide describes all of the administration tasks you need to
perform to maintain Directory Server.
Directory Server Overview
Directory Server provides the following key features:
• Multi-master replication — Provides a highly available directory service for
both read and write operations. Multi-master replication can be combined with
simple and cascading replication scenarios to provide a highly flexible and
scalable replication environment.
• Chaining and referrals — Increases the power of your directory by storing a
complete logical view of your directory on a single server while maintaining
data on a large number of directory servers transparently for clients.
• Roles and Class of Service — Provides a flexible mechanism for grouping and
sharing attributes between entries in a dynamic fashion.
• Improved access control mechanism — Provides support for macros that
dramatically reduce the number of access control statements used in the
directory and increase the scalability of access control evaluation.
• Resource-limits by bind DN — Gives you the power to control the amount of
server resources allocated to search operations based on the bind DN of the
client.
27
Page 28

Prerequisite Reading
• Multiple databases — Provides a simple way of breaking down your
directory data to simplify the implementation of replication and chaining in
your directory service.
• Password Policy and Account Lockout — Allows you to define a set of rules
that govern how passwords and user accounts are managed in the Directory
Server.
• SSL — Provides secure communications over the network including ciphers
with up to 168-bit encryption.
The major components of Directory Server include:
• An LDAP server — The core of the directory service, provided by the
ns-slapd
• Directory Server Console — An improved management console that
dramatically reduces the effort of setting up and maintaining your directory
service. The directory console is part of Red Hat Console, the common
management framework for LDAP directory services.
• SNMP Agent — Permits you to monitor your Directory Server in real time
using the Simple Network Management Protocol (SNMP).
daemon and compliant with the LDAP v3 Internet standards.
• Online backup and restore — Allows you to create backups and restore from
backups while the server is running.
Prerequisite Reading
This manual describes how to administer the Directory Server and its contents.
However, this manual does not describe many of the basic directory and
architectural concepts that you need to deploy, install, and administer your
directory service successfully. Those concepts are contained in the Red Hat
Directory Server Deployment Guide. You should read that book before continuing
with this manual.
When you are familiar with Directory Server concepts and have done some
preliminary planning for your directory service, you can install the Directory
Server. The instructions for installing the various Directory Server components
are contained in the Red Hat Directory Server Installation Guide.
Also, Managing Servers with Red Hat Console contains general background
information on how to use the Red Hat Console. You should read and understand
the concepts in that book before you attempt to administer Directory Server.
28 Red Hat Directory Server Administrator’s Guide • May 2005
Page 29

Conventions Used in This Book
This section explains the conventions used in this book.
•
Monospaced font
computer screen or text that you should type. It is also used for filenames,
functions, and examples.
•
NOTE Notes and Cautions mark important information. Make sure you
read the information before continuing with a task.
• The greater than symbol (>) is used as a separator for successive menu
selections. For example, Object > New > User means that you should pull
down the Object menu, drag the mouse down to highlight New, and drag the
mouse across to the New submenu in which you must select User.
• Throughout this book you will see path references of the form:
serverRoot/slapd-serverID/...
—This typeface is used for any text that appears on the
Conventions Used in This Book
serverRoot is the installation directory. The default installation directory is
/opt/redhat-ds/servers
. If you have installed Directory Server in a different
location, you should adapt the path accordingly.
serverID is the ID or identifier you assigned to an instance of Directory Server
when you installed it. For example, if you gave the server an identifier of
phonebook
/opt/redhat-ds/servers/slapd-phonebook/. . .
, then the actual path would look like this:
• In examples/sample code, paths assume that the Directory Server is installed
in the default location
/opt/redhat-ds/servers
. If you have installed your
Directory Server in a different location, adapt the paths accordingly. Also, all
examples use
phonebook
for the server identifier where appropriate.
29
Page 30

Related Information
Related Information
The document set for Directory Server also contains the following guides:
• Red Hat Directory Server Deployment Guide — Provides an overview for
planning your deployment of the Directory Server. Includes deployment
examples.
• Red Hat Directory Server Installation Guide — Contains procedures for
installing your Directory Server as well as procedures for migrating from a
previous installation of Directory Server.
• Red Hat Directory Server Configuration, Command, and File Reference — Provides
reference information on the command-line scripts, configuration attributes,
and log files shipped with Directory Server.
• Red Hat Directory Server Schema Reference — Provides reference information
about the Red Hat Directory Server schema.
• Red Hat Directory Server Plug-in Programmer’s Guide — Describes how to
write server plug-ins in order to customize and extend the capabilities of
Directory Server.
• Red Hat Directory Server Gateway Customization Guide — Introduces Directory
Server Gateway and explains how to implement a gateway instance with
basic directory look-up functionality. Also contains information useful for
implementing a more powerful gateway instance with directory
authentication and administration capability.
• Red Hat Directory Server Org Chart — Introduces the Red Hat Directory Server
Org Chart application and explains how to integrate it with an instance of
Directory Server.
• Red Hat Directory Server DSML Gateway Guide — Introduces the Red Hat
Directory Server DSML Gateway function and explains how to customize it
for use as an independent gateway.
For a list of documentation installed with Directory Server, open this file:
serverRoot
For the latest information about Directory Server, including current release notes,
complete product documentation, technical notes, and deployment information,
check this site:
http://www.redhat.com/docs/manuals/dir-server/
30 Red Hat Directory Server Administrator’s Guide • May 2005
/manual/en/slapd/index.htm
Page 31

Administering Red Hat Directory Server
Chapter 1, “Introduction to Red Hat Directory Server”
Chapter 2, “Creating Directory Entries”
Chapter 3, “Configuring Directory Databases”
Part 1
Chapter 4, “Populating Directory Databases”
Chapter 5, “Advanced Entry Management”
Chapter 6, “Managing Access Control”
Chapter 7, “User Account Management”
Chapter 8, “Managing Replication”
Chapter 9, “Extending the Directory Schema”
Chapter 10, “Managing Indexes”
31
Page 32

Chapter 11, “Managing SSL and SASL”
Chapter 12, “Monitoring Server and Database Activity”
Chapter 13, “Monitoring Directory Server Using SNMP”
Chapter 14, “Tuning Directory Server Performance”
32 Red Hat Directory Server Administrator’s Guide • May 2005
Page 33

Chapter 1
Introduction to Red Hat Directory Server
Red Hat Directory Server (Directory Server) product includes a Directory Server,
an Administration Server to manage multiple server instances, and Red Hat
Console to manage server instances through a graphical interface. This chapter
provides overview information about the Directory Server and the most basic
tasks you need to start administering a directory service.
It includes the following sections:
• Overview of Directory Server Management (page 33)
• Using the Directory Server Console (page 34)
• Configuring the Directory Manager (page 35)
• Binding to the Directory from Red Hat Console (page 36)
• Starting and Stopping the Directory Server (page 37)
• Configuring LDAP Parameters (page 38)
• Cloning a Directory Server (page 42)
• Starting the Server in Referral Mode (page 43)
Overview of Directory Server Management
The Directory Server is a robust, scalable server designed to manage an
enterprise-wide directory of users and resources. It is based on an open-systems
server protocol called the Lightweight Directory Access Protocol (LDAP). The
Directory Server runs as the
server manages the directory databases and responds to client requests.
33
ns-slapd
process or service on your machine. The
Page 34

Using the Directory Server Console
You perform most Directory Server administrative tasks through the Red Hat
Administration Server, a second server that helps manage Directory Server. For
Directory Server, you use a part of the Red Hat Administration Server called Red
Hat Console. The Directory Server Console is a part of Red Hat Console designed
specifically for use with Directory Server.
You can perform most Directory Server administrative tasks from the Directory
Server Console. You can also perform administrative tasks manually by editing
the configuration files or by using command-line utilities. For more information
about the Red Hat Console, see Managing Servers with Red Hat Console.
Using the Directory Server Console
The Directory Server Console is an integral part of the Red Hat Console. You start
the Directory Server Console from Red Hat Console, as described below.
Starting Directory Server Console
1.
Check that the Directory Server daemon,
not, as
root
user, enter the following command to start it:
slapd-serverID
, is running. If it is
serverRoot
2.
Check that the Administration Server daemon,
not, as
3.
Start Red Hat Console by entering the following command:
root
serverRoot/start-admin
serverRoot/startconsole
/slapd-
user, enter the following command to start it:
The Console login window is displayed. If your configuration directory (the
directory that contains the
instance of Directory Server, a window is displayed requesting the
administrator user ID, password, and the URL of the Red Hat Administration
Server for that Directory Server.
4.
Log in using the bind DN and password of a user with sufficient access
permissions for the operations you want to perform.
For example, use
cn=Directory Manager
Red Hat Console is displayed.
34 Red Hat Directory Server Administrator’s Guide • May 2005
serverID
/start-slapd
o=NetscapeRoot
admin-serv
, is running. If it is
suffix) is stored in a separate
and the appropriate password. The
Page 35

Configuring the Directory Manager
5.
Navigate through the tree in the left-hand pane to find the machine hosting
your Directory Server, and click on its name or icon to display its general
properties.
6.
To edit the name and description of your Directory Server, click the Edit
button. Enter the new name and description in the text boxes. The name will
appear in the tree on the left. Click OK to set the new name and description.
7.
Double-click the name of your Directory Server in the tree or click the Open
button to display the Directory Server Console.
Copying Entry DNs to the Clipboard
Using the Directory tab, you can copy the DN of an entry to the clipboard.
To do this:
1.
In the Directory Server Console, select the Directory tab.
2.
Browse through the tree until the entry whose DN you want to copy is
displayed.
3.
Select the entry in the tree, and then select Edit >Copy DN, or press
Shift+Ctrl+C.
Configuring the Directory Manager
The Directory Manager is the privileged database administrator, comparable to the
root
user in UNIX. Access control does not apply to the entry you define as
Directory Manager. You initially defined this entry during installation. The
default is
The password for this user is defined in the
To change the Directory Manager DN and password and the encryption scheme
used for this password:
1.
2.
cn=Directory Manager
Log in to the Directory Console as Directory Manager.
If you are already logged in to the Console, see “Binding to the Directory
from Red Hat Console,” on page 36, for instructions on how to log in as a
different user.
In the Directory Server Console, select the Configuration tab, and then select
the top entry in the navigation tree in the left pane.
.
nsslapd-rootdn
Chapter 1 Introduction to Red Hat Directory Server 35
attribute.
Page 36

Binding to the Directory from Red Hat Console
3.
Select the Manager tab in the right pane.
4.
Enter the new distinguished name for the Directory Manager in the Root DN
field.
The default value is
5.
From the Manager Password Encryption pull-down menu, select the storage
scheme you want the server to use to store the password for Directory
Manager.
6.
Enter the new password, and confirm it using the text fields provided.
7.
Click Save.
cn=Directory Manager
.
Binding to the Directory from Red Hat Console
When you create or manage entries from the Directory Server Console and when
you first access the Red Hat Console, you are given the option to log in by
providing a bind DN and a password. This option lets you indicate who is
accessing the directory tree. This determines the access permissions granted to
you and whether you can perform the requested operation.
Changing Login Identity
You can log in with the Directory Manager DN when you first start the Red Hat
Console. At any time, you can choose to log in as a different user, without having
to stop and restart the Console.
To change your login in Red Hat Console:
1.
In the Directory Server Console, select the Tasks tab.
2.
Click “Log on to the Directory Server as a New User.”
A login dialog box appears.
3.
Enter the new DN and password, and click OK.
Enter the full distinguished name of the entry with which you want to bind to
the server. For example, if you want to bind as the Directory Manager, then
enter the following in the Distinguished Name text box:
cn=Directory Manager
36 Red Hat Directory Server Administrator’s Guide • May 2005
Page 37

Starting and Stopping the Directory Server
For more information about the Directory Manager DN and password, refer to
“Configuring the Directory Manager,” on page 35.
Viewing the Current Bind DN from the Console
You can view the bind DN you used to log in to the Directory Server Console by
clicking the login icon in the lower-left corner of the display. The current bind DN
appears next to the login icon, as shown here:
Figure 1-1 Viewing the Bind DN
Starting and Stopping the Directory Server
Your Directory Server is running when you finish installing. It is best to avoid
stopping and starting the server to prevent interrupting replication, searches, and
other server operations.
• If you have enabled SSL for the Directory Server, you cannot restart the server
from the Console; you must use the command-line. It is possible to restart
without being prompted for a password see “Creating a Password File,” on
page 433, for more information.
• Rebooting the system does not automatically start the
is because the directory does not automatically create startup or run
command (rc) scripts. Check your operating system documentation for
details on adding these scripts.
Starting and Stopping the Server from the Console
1.
Start the Directory Server Console.
For instructions, refer to “Starting Directory Server Console,” on page 34.
2.
In the Tasks tab, click “Start the Directory Server” or “Stop the Directory
Server” as appropriate.
When you successfully start or stop your Directory Server from the Directory
Server Console, the server displays a message box stating that the server has
either started or shut down.
Chapter 1 Introduction to Red Hat Directory Server 37
ns-slapd
process. This
Page 38

Configuring LDAP Parameters
Starting and Stopping the Server from the Command-Line
Use one of the following scripts:
or
serverRoot/slapd-serverID/start-slapd
serverRoot/slapd-serverID/stop-slapd
where
Both of these scripts must run with the same UID and GID as the Directory
Server. For example, if the Directory Server runs as
start-slapd
serverID
is the identifier you specified for the server when you installed it.
and
stop-slapd
utilities as
Configuring LDAP Parameters
You can view and change the parameters relevant to the server’s network and
LDAP settings through the Directory Server Console. This section provides
information on:
• Changing Directory Server Port Numbers
• Placing the Entire Directory Server in Read-Only Mode
• Tracking Modifications to Directory Entries
For information on schema checking, see chapter 9, “Extending the Directory
Schema.”
Changing Directory Server Port Numbers
You can modify the port or secure port number of your user Directory Server
using the Directory Server Console or by changing the value of the
attribute under the
cn=config
entry.
nobody
nobody
.
, you must run the
nsslapd-port
If you want to modify the port or secure port for a Directory Server that contains
the configuration information (
Directory Server Console.
If you change the configuration directory or user directory port or secure port
numbers, you should be aware of the following repercussions:
38 Red Hat Directory Server Administrator’s Guide • May 2005
o=NetscapeRoot
subtree), you may do so through
Page 39

Configuring LDAP Parameters
• You need to change the configuration or user directory port or secure port
• If you have other Directory Servers installed that point to the configuration or
To modify the port or secure port on which either a user or a configuration
directory listens for incoming requests:
1.
2.
3.
number configured for Red Hat Administration Server. See Managing Servers
with Red Hat Console for information.
user directory, you need to update those servers to point to the new port
number.
In the Directory Server Console, select the Configuration tab, and then select
the top entry in the navigation tree in the left pane.
Select the Settings tab in the right pane.
Enter the port number you want the server to use for non-SSL
communications in the “Port” text box.
The default value is
4.
Enter the port number you want the server to use for SSL communications in
389
.
the Encrypted Port text box.
The encrypted port number that you specify must not be the same port
number as you are using for normal LDAP communications. The default
value is
5.
Click Save.
636
.
A warning will appear: “You are about to change the port number for the
Configuration Directory. This will affect all Administration Servers that use
this directory and you’ll need to update them with the new port number. Are
you sure you want to change the port number?” Click on Yes.
Then a dialog will appear, saying that the changes will not take effect until the
server is restarted. Click OK.
NOTE Do not restart the Directory Server at this point. If you do, you will
not be able to make the necessary changes to the Administration
Server.
6.
Open the Administration Server Console.
Open the Configuration tab, then select the Configuration DS tab.
Chapter 1 Introduction to Red Hat Directory Server 39
Page 40

Configuring LDAP Parameters
7.
NOTE If you try to save these changes at this step, you will get a warning
8.
9.
10.
In the “LDAP Port” field, type in the new LDAP port number for your
Directory Server port.
Check the “Secure Connection” box if this is a secure port.
box that reads, “Invalid LDAP Host/LDAP Port, can not connect.”
Click OK, and ignore this warning.
In the Task tab of the Directory Server Console, click on “Restart Directory
Server.” A dialog will appear, asking if you want to restart the server. Click
Yes.
See “Starting and Stopping the Directory Server,” on page 37, for information.
Now you can go to the Configuration DS tab of the Administration Console
and select Save.
A dialog will appear, reading “The Directory Server setting has been
modified. You must shutdown and restart your Administration Server and all
the servers in the Server Group for the changes to take effect.” Click OK.
In the Tasks tab of the Administration Server Console, click on “Restart
Admin Server.” A dialog will appear, saying that the Admin Server has been
successfully restarted. Click on Close.
NOTE You must close and reopen the Console before you can do anything
else in the Console. Refresh may not update the Console, and, if
you try to do anything, you will get a warning that reads, “Unable
to contact LDAP server.”
Placing the Entire Directory Server in Read-Only Mode
If you maintain more than one database with your Directory Server and you need
to place all your databases in read-only mode, you can do this in a single
operation. However, if your Directory Server contains replicas, you must not use
read-only mode because it will disable replication.
To put the Directory Server in read-only mode:
1.
In the Directory Server Console, select the Configuration tab, and then select
the top entry in the navigation tree in the left pane.
40 Red Hat Directory Server Administrator’s Guide • May 2005
Page 41

Configuring LDAP Parameters
2.
3.
4.
NOTE This operation also makes the Directory Server configuration
For information on placing a single database in read-only mode, refer to
“Enabling Read-Only Mode,” on page 166.
Tracking Modifications to Directory Entries
You can configure the server to maintain special attributes for newly created or
modified entries:
Select the Settings tab in the right pane.
Select the Make Entire Server Read-Only checkbox.
Click Save, and then restart the server.
read-only; therefore, you cannot update the server configuration,
enable or disable plug-ins, or even restart the Directory Server
while it is in read-only mode. Once you have enabled read-only
mode, you cannot undo it from the Console; you must modify the
configuration files.
•
creatorsName
— The distinguished name of the person who initially created
the entry.
•
createTimestamp
— The timestamp for when the entry was created in GMT
(Greenwich Mean Time) format.
•
modifiersName
— The distinguished name of the person who last modified
the entry.
•
modifyTimestamp
— The timestamp for when the entry was last modified in
GMT format.
NOTE When a database link is used by a client application to create or
modify entries, the
creatorsName
and
modifiersName
attributes
do not reflect the real creator or modifier of the entries. These
attributes contain the name of the administrator who is granted
proxy authorization rights on the remote server. For information on
proxy authorization, refer to “Providing Bind Credentials,” on page
112.
Chapter 1 Introduction to Red Hat Directory Server 41
Page 42

Cloning a Directory Server
To enable the Directory Server to track this information:
1.
In the Directory Server Console, select the Configuration tab, and then select
the top entry in the navigation tree in the left pane.
2.
Select the Settings tab in the right pane.
3.
Select the Track Entry Modification Times checkbox.
The server adds the
modifyTimestamp
4.
Click Save, and then restart the server.
See “Starting and Stopping the Directory Server,” on page 37, for more
information.
creatorsName, createTimestamp, modifiersName
attributes to every newly created or modified entry.
Cloning a Directory Server
Once you have set up and configured your Directory Server, Red Hat Console
offers a simple way of duplicating your configuration on another instance of the
Directory Server. This is a two-phase procedure:
• First, you must create a new instance of the Directory Server.
• Second, you must clone the configuration of your first Directory Server
instance and apply it to the new one.
NOTE The configuration information that is duplicated during these
operations does not include the
configuration directory.
o=NetscapeRoot
, and
suffix of the
Creating a New Directory Server Instance
1.
In the Red Hat Console window, select Server Group in the navigation tree,
and then right click.
2.
From the pop-up menu, select Create Instance of > Directory Server.
The Create New Instance dialog box is displayed.
3.
Enter a unique identifier for the server in the Server Identifier field.
This name must not include the period (.) symbol.
42 Red Hat Directory Server Administrator’s Guide • May 2005
Page 43

Starting the Server in Referral Mode
4.
Enter the a port number for LDAP communications in the Network port field.
5.
Enter the suffix managed by this new instance of the directory in the base
suffix field.
6.
Enter a DN for the Directory Manager in the Root DN field.
For information on the role and privileges of the Directory Manager entry,
refer to “Configuring the Directory Manager,” on page 35.
7.
Enter the password for this user in the Password for Root DN field, and
confirm it by entering it again in the Confirm Password field.
8.
Enter the user ID for the Directory Server daemon in the Server Runtime User
ID field.
9.
Click OK.
A status box appears to confirm that the operation was successful. To dismiss
it, click OK.
Cloning the Directory Configuration
1.
In the Red Hat Console window, expand the Server Group folder, and
right-click on the Directory Server that you want to clone.
2.
From the pop-up menu, select Clone Server Config.
A new window is displayed with the list of target servers for cloning.
3.
In this window, select the server to which you want the configuration to
apply, and click the Clone To button.
A message is displayed to give you the status of the operation.
Starting the Server in Referral Mode
Referrals are used to redirect client applications to another server while the
current server is unavailable or when the client requests information that is not
held on the current server.
For example, you can also start Directory Server in referral mode if you’re making
configuration changes to the Directory Server and you want all clients to be
referred to another supplier for the duration. To do this, you must start the server
with the
refer
command.
Chapter 1 Introduction to Red Hat Directory Server 43
Page 44

Starting the Server in Referral Mode
If the server is already running, you can put it in referral mode by using the
Directory Server Console. This procedure is explained in “Setting Default
Referrals,” on page 143.
Using the refer Command
Follow these steps to start the Directory Server in referral mode:
1.
Go to the
2.
Run the
/bin/slapd/server
cd serverRoot/slapd-serverID/bin/slapd/server
refer
command, as follows:
./ns-slapd refer -D instance_dir [-p port] -r referral_url
directory under your installation directory:
instance_dir
is the directory instance for which queries will be referred,
port
is the
option port number of the Directory Server you want to start in referral mode,
and
referral_url
is the referral returned to clients. For information on the format of
an LDAP URL, refer to Appendix C, “LDAP URLs.”
44 Red Hat Directory Server Administrator’s Guide • May 2005
Page 45

Chapter 2
Creating Directory Entries
This chapter discusses how to use the Directory Server Console and the
ldapmodify
your directory.
During the planning phase of your directory deployment, you should characterize
the types of data that your directory will contain. You should read Red Hat
Directory Server Deployment Guide before creating entries and modifying the
default schema. Also, entries stored in an Active Directory or Windows NT4
directory service can be added to the Directory Server through Windows User
Sync; see chapter 18, “Windows Sync,” for more information on adding or
modifying synchronized entries through Windows User Sync.
and
ldapdelete
command-line utilities to modify the contents of
This chapter consists of the following sections:
• Managing Entries from the Directory Console (page 45)
• Managing Entries from the Command-Line (page 55)
• LDIF Update Statements (page 63)
• Maintaining Referential Integrity (page 72)
Managing Entries from the Directory Console
You can use the Directory tab and the Property Editor on the Directory Server
Console to add, modify, or delete entries individually.
If you want to add several entries simultaneously, you can use the command-line
utilities described in “Managing Entries from the Command-Line,” on page 55.
This section provides information about:
• Creating a Root Entry
45
Page 46

Managing Entries from the Directory Console
• Creating Directory Entries
• Modifying Directory Entries
• Deleting Directory Entries
This section assumes some basic knowledge of object classes and attributes. For
an introduction to object classes and attributes, refer to Red Hat Directory Server
Deployment Guide. For information on the definition and use of all schema
provided with the Directory Server, refer to the Red Hat Directory Server Schema
Reference.
NOTE You cannot modify your directory unless the appropriate access
Creating a Root Entry
Each time you create a new database, you associate it with the suffix that will be
stored in the database. The directory entry representing that suffix is not
automatically created.
control rules have been set. For information on creating access
control rules for your directory, see chapter 6, “Managing Access
Control.”
To create a root entry for a database:
1.
In the Directory Server Console, select the Configuration tab.
For information on starting the Directory Server Console, refer to “Using the
Directory Server Console,” on page 34.
2.
Create a new database, as explained in “Creating and Maintaining
Databases,” on page 90.
3.
In the Directory tab, right-click the top object representing the Directory
Server, and choose New Root Object.
The secondary menu under New Root Object displays a list of suffixes that do
not have a corresponding entry.
4.
Choose the suffix corresponding to the entry that you want to create.
The New Object window is displayed.
46 Red Hat Directory Server Administrator’s Guide • May 2005
Page 47

Managing Entries from the Directory Console
5.
In the New Object window, select the object class corresponding to the new
entry.
The object class you select must contain the attribute you used to name the
suffix. For example, if you are creating the entry corresponding to the suffix
ou=people,dc=example,dc=com
organizationalUnit
object class or another object class that allows the ou
, then you can choose the
attribute.
6.
Click OK in the New Object window.
The Property Editor for the new entry is displayed. You can either accept the
current values by clicking OK or modify the entry, as explained in “Modifying
Directory Entries,” on page 49.
Creating Directory Entries
Directory Server Console offers several predefined templates for creating directory
entries. Templates are available for the following types of entries:
• User
• Group
• Organizational Unit
• Role
• Class of Service
Table 2-1 shows what type of object class is used for each template.
Table 2-1 Entry Templates and Corresponding Object Classes
Template Object Class
User inetOrgPerson
Group groupOfUniqueNames
Organizational Unit organizationalUnit
Role nsRoleDefinition
Class of Service cosSuperDefinition
Chapter 2 Creating Directory Entries 47
Page 48

Managing Entries from the Directory Console
These templates contain fields representing all the mandatory attributes and some
of the commonly used optional attributes. To create an entry using one of these
templates, refer to “Creating an Entry Using a Predefined Template,” on page 48.
To create any other type of entry, refer to “Creating Other Types of Entries,” on
page 48.
Creating an Entry Using a Predefined Template
1.
In the Directory Server Console, select the Directory tab.
For information on starting the Directory Server Console, refer to “Using the
Directory Server Console,” on page 34.
2.
Right-click the entry in the left pane under which you want to add the new
entry, and select the appropriate type of entry: User, Group, Organizational
Unit, Role, Class of Service, or Other.
The corresponding Create window is displayed.
3.
Supply values for all of the mandatory attributes (identified by an asterisk)
and, if you want, for any of the optional attributes.
The Create window does not provide fields for all optional attributes.
4.
To display the full list of attributes, click the Advanced button.
The Property Editor is displayed. Refer to “Modifying Directory Entries,” on
page 49, for information on using the Property Editor.
5.
Click OK to dismiss the Create window.
The new entry is displayed in the right pane.
Creating Other Types of Entries
1.
In the Directory Server Console, select the Directory tab.
For information on starting the Directory Server Console, refer to “Using the
Directory Server Console,” on page 34.
2.
Right-click the entry in the left pane under which you want to add the new
entry, and select Other.
The New Object window is displayed.
3.
In the object class list, select an object class that defines your new entry.
48 Red Hat Directory Server Administrator’s Guide • May 2005
Page 49

Managing Entries from the Directory Console
4.
Click OK.
If you selected an object class related to a type of entry for which a predefined
template is available, the corresponding Create window is displayed. (See
“Creating an Entry Using a Predefined Template,” on page 48).
In all other cases, the Property Editor is displayed. It contains a list of
mandatory attributes.
5.
Supply a value for all the listed attributes.
Some fields are empty, but some might have a generic placeholder value (such
as
New
), which you should replace with a meaningful value for your entry.
Some object classes can have several naming attributes. Remember to select the
naming attribute you want to use to name your new entry.
To provide values for optional attributes that are not listed, refer to “Modifying
Directory Entries,” on page 49.
6.
Click OK to save the new entry and dismiss the Property Editor window.
The new entry is displayed in the right pane.
Modifying Directory Entries
To modify directory entries from Directory Server Console, you must start the
Property Editor. The Property Editor contains the list of object classes and
attributes belonging to an entry.
From the Property Editor, you can:
• Add an object class to an entry.
• Remove an object class from an entry.
• Add an attribute to an entry.
• Add an attribute value to an entry.
• Remove an attribute value from an entry.
• Add an attribute subtype to an entry.
This section describes how to start the Property Editor and how to use it to modify
an entry’s attributes and attribute values.
Chapter 2 Creating Directory Entries 49
Page 50

Managing Entries from the Directory Console
Displaying the Property Editor
You can start the Property Editor in several ways:
• From the Directory tab, by right-clicking an entry in the left or right pane, and
selecting Properties from the pop-up menu.
• From the Directory tab, by double-clicking an entry in the left or right pane.
• From the Create User, Group, Organizational Unit, Role, and Class of Service
templates, by clicking the Advanced button (see “Creating an Entry Using a
Predefined Template,” on page 48).
• From the New Object window, by clicking OK (see “Creating Other Types of
Entries,” on page 48).
Adding an Object Class to an Entry
To add an object class to an entry:
1.
In the Directory tab of the Directory Server Console, right-click the entry you
want to modify, and select Advanced from the pop-up menu.
You can also double-click the entry. The Property Editor is displayed; click on
the Advanced button.
2.
Select the object class field, and click Add Value.
The Add Object Class window is displayed. It shows a list of object classes
that you can add to the entry.
3.
Select the object class you want to add, and click OK.
The object class you selected appears in the list of object classes in the
Advanced Property Editor. To dismiss the Add Object Class window, click
Cancel.
4.
Click OK in the Advanced Property Editor when you have finished editing
the entry. The Advanced Property Editor is dismissed.
Click OK in the Property Editor. The Property Editor is dismissed.
Removing an Object Class
To remove an object class from an entry:
50 Red Hat Directory Server Administrator’s Guide • May 2005
Page 51

Managing Entries from the Directory Console
1.
In the Directory tab of the Directory Server Console, right-click the entry you
want to modify, and select Advanced from the pop-up menu.
You can also double-click the entry. The Property Editor is displayed; click on
the Advanced button.
2.
Click the cursor in the text box that shows the object class you want to remove,
and click Delete Value.
3.
Click OK in the Advanced Property Editor when you have finished editing the
entry. The Advanced Property Editor is dismissed.
Click OK in the Property Editor. The Property Editor is dismissed.
Adding an Attribute to an Entry
Before you can add an attribute to an entry, the entry must contain an object class
that either requires or allows the attribute. See “Adding an Object Class to an
Entry,” on page 50, and chapter 9, “Extending the Directory Schema,” for more
information.
To add an attribute to an entry:
1.
In the Directory tab of the Directory Server Console, right-click the entry you
want to modify, and select Advanced from the pop-up menu.
You can also double-click the entry. The Property Editor is displayed; click on
the Advanced button.
2.
Click Add Attribute.
The Add Attribute dialog box is displayed.
3.
Select the attribute you want to add from the list, and click OK.
The Add Attribute window is dismissed, and the attribute you selected
appears in the list of attributes in the Advanced Property Editor.
4.
Type in the value for the new attribute in the text box to the right of the
attribute name.
5.
Click OK in the Advanced Property Editor when you have finished editing the
entry. The Advanced Property Editor is dismissed.
Click OK in the Property Editor. The Property Editor is dismissed.
Chapter 2 Creating Directory Entries 51
Page 52

Managing Entries from the Directory Console
Adding Very Large Attributes
The configuration attribute
LDAP requests. The default configuration of Directory Server sets this attribute at
2Mbytes. LDAP add or modify operations will fail when attempting to add very
large attributes that result in a request that is larger than 2Mbytes.
To add very large attributes, you must first change the setting for the
nsslapd-maxbersize
LDAP request you will make.
When determining the value to set, you must consider all elements of the LDAP
add and modify operations used to add the attributes, not just the single attribute.
The list of what is included in determining this size is as follows:
• The size of each attribute name in the request.
• The size of the values of each of the attributes in the request.
• The size of the DN in the request.
• Some overhead (10Kbytes should be sufficient).
nsslapd-maxbersize
sets the maximum size limit for
configuration attribute to a value larger than the largest
For further information about the
nsslapd-maxbersize
attribute and for
information about setting this attribute, see the section “nsslapd-maxbersize
(Maximum Message Size)” in chapter 2, “Core Server Configuration Reference,”
in Red Hat Directory Server Configuration, Command, and File Reference.
Adding Attribute Values
When an entry contains multi-valued attributes, you can supply multiple values
for these attributes.
To add an attribute value to a multi-valued attribute:
1.
In the Directory tab of the Directory Server Console, right-click the entry you
want to modify, and select Advanced from the pop-up menu.
You can also double-click the entry. The Property Editor is displayed; click on
the Advanced button.
2.
Select the attribute to which you want to add a value, and then click Add
Value.
A new blank text field is displayed in the right column.
3.
Type in the name of the new attribute value.
52 Red Hat Directory Server Administrator’s Guide • May 2005
Page 53

Managing Entries from the Directory Console
4.
Click OK in the Advanced Property Editor when you have finished editing the
entry. The Advanced Property Editor is dismissed.
Click OK in the Property Editor. The Property Editor is dismissed.
Removing an Attribute Value
To remove an attribute value from an entry:
1.
In the Directory tab of the Directory Server Console, right-click the entry you
want to modify, and select Advanced from the pop-up menu.
You can also double-click the entry. The Property Editor is displayed; click on
the Advanced button.
2.
Click the cursor in the text box that contains the attribute value you want to
remove, and click Delete Value.
If you want to remove the entire attribute and all its values from the entry,
select Delete Attribute from the Edit menu.
3.
Click OK in the Advanced Property Editor when you have finished editing the
entry. The Advanced Property Editor is dismissed.
Click OK in the Property Editor. The Property Editor is dismissed.
Adding an Attribute Subtype
You can add three different kinds of subtypes to attributes contained within an
entry: language, binary, and pronunciation.
Language Subtype
Sometimes a user's name can be more accurately represented in characters of a
language other than the default language. For example, Noriko's name is Japanese,
and she prefers that her name be represented by Japanese characters when
possible. You can select Japanese as a language subtype for the
so that other users can search for her Japanese name.
If you specify a language subtype for an attribute, the subtype is added to the
attribute name as follows:
attribute;lang-subtype
attribute is the attribute you are adding to the entry and subtype is the two character
abbreviation for the language. See Table D-2, on page 617, for a list of supported
language subtypes. For example:
givenname;lang-ja
Chapter 2 Creating Directory Entries 53
givenname
attribute
Page 54

Managing Entries from the Directory Console
You can assign only one language subtype per attribute instance in an entry. To
assign multiple language subtypes, add another attribute instance to the entry,
and then assign the new language subtype. For example, the following is illegal:
cn;lang-ja;lang-en-GB:Smith
Instead, use:
cn: lang-ja: ja_value
cn: lang-en-GB: en-GB_value
Binary Subtype
Assigning the binary subtype to an attribute indicates that the attribute value is
binary. For example,
Although you can store binary data within an attribute that does not contain the
binary
subtype (for example,
that multiple variants of the attribute type may exist.
Pronunciation Subtype
Assigning the pronunciation subtype to an attribute indicates that the attribute
value is a phonetic representation. The subtype is added to the attribute name as
attribute
;phonetic
usercertificate;binary
jpegphoto
), the
.
.
binary
subtype indicates to clients
This subtype is commonly used in combination with a language subtype for
languages that have more than one alphabet, where one is a phonetic
representation.
You might want to use this with attributes that are expected to contain user
names, such as cn or
givenname
indicates that the attribute value is the phonetic version of the entry's Japanese
name.
To Add a Subtype Using the Property Editor
1.
In the Directory tab of the Directory Server Console, right-click the entry you
want to modify, and select Properties from the pop-up menu.
You can also double-click the entry. The Property Editor is displayed.
2.
Click Add Attribute.
The Add Attribute dialog box displays.
3.
Select the attribute you want to add from the list.
4.
To assign a language subtype to the attribute, select it from the Language
drop-down list.
54 Red Hat Directory Server Administrator’s Guide • May 2005
. For example,
givenname;lang-ja;phonetic
Page 55

Managing Entries from the Command-Line
5.
From the Subtype drop-down list, you can also assign one of two other
subtypes, binary or pronunciation.
6.
Click OK.
The Add Attribute window is dismissed.
7.
When you have finished defining the information for the entry, click OK in the
Advanced Property Editor. The Advanced Property Editor is dismissed.
Click OK in the Property Editor. The Property Editor is dismissed.
Deleting Directory Entries
To delete entries using the Directory Server Console:
1.
In the Directory Server Console, select the Directory tab.
For information on starting the Directory Server Console, refer to “Using the
Directory Server Console,” on page 34.
2.
Right-click the entry you want to delete in the navigation tree or in the right
pane, and select Delete from the pop-up menu.
To select multiple entries, use Ctrl+click or Shift+click, and then select Delete
from the Edit menu.
The server deletes the entry or entries immediately. There is no undo.
Managing Entries from the Command-Line
The command-line utilities allow you to manipulate the contents of your directory.
They can be useful if you want to write scripts to perform bulk management of
your directory or to test your Directory Server. For example, you might want to
ensure that it returns the expected information after you have made changes to
access control information.
Using the command-line utilities, you can provide information directly from the
command-line or through an input file in LDIF.
This section provides information about:
• Providing Input from the Command-Line
• Creating a Root Entry from the Command-Line
Chapter 2 Creating Directory Entries 55
Page 56

Managing Entries from the Command-Line
• Adding Entries Using LDIF
• Adding and Modifying Entries Using ldapmodify
• Deleting Entries Using ldapdelete
• Using Special Characters
NOTE You cannot modify your directory unless the appropriate access
Providing Input from the Command-Line
control rules have been set. For information on creating access
control rules for your directory, see chapter 6, “Managing Access
Control.”
When you provide input to the
ldapmodify
and
ldapdelete
utilities directly
from the command-line, you must use LDIF statements. For detailed information
on LDIF statements, refer to “LDIF Update Statements,” on page 63.
The
ldapmodify
and
ldapdelete
utilities read the statements that you enter in
exactly the same way as if they were read from a file. When you finish providing
input, enter the character that your shell recognizes as the end of file (EOF) escape
sequence. The utility then begins operations based on the input you supplied.
Typically, the EOF escape sequence is one of the following, depending upon the
type of machine you use, almost always control-D (^D).
For example, suppose you want to input some LDIF update statements to
ldapmodify
prompt> ldapmodify -D bindDN -w password -h hostname
> dn: cn=Barry Nixon, ou=people, dc=example,dc=com
> changetype: modify
> delete: telephonenumber
> > add: manager
> manager: cn=Harry Cruise, ou=people, dc=example,dc=com
> ^D
prompt>
. Then, you would do the following:
When you add an entry from the command-line or from LDIF, make sure that an
entry representing a subtree is created before new entries are created under that
branch. For example, if you want to place an entry in a
People
subtree, then
create an entry representing that subtree before creating entries within the
subtree.
56 Red Hat Directory Server Administrator’s Guide • May 2005
Page 57

Managing Entries from the Command-Line
For example:
dn: dc=example,dc=com
dn: ou=People, dc=example,dc=com
...
People subtree entries.
...
dn: ou=Group, dc=example,dc=com
...
Group subtree entries.
...
Creating a Root Entry from the Command-Line
You can use the
ldapmodify
command-line utility to create a new root entry in a
database. For example, you might add the new root entry as follows:
prompt> ldapmodify -a -D bindDN -w password
The
ldapmodify
utility binds to the server and prepares it to add an entry.
You create the new root object as follows:
dn: Suffix_Name
objectclass: newobjectclass
The DN corresponds to the DN of the root or sub-suffix contained by the database.
The
newobjectclass
value depends upon the type of object class you are adding to the
database. You may need to specify additional mandatory attributes depending
upon the root object you add.
NOTE You can use this method only if you have one database per suffix. If
you create a suffix that is stored in several databases, you must use
the
ldif2db
utility with the -n option to specify the database that
will hold the new entries. For information, refer to “Importing from
the Command-Line,” on page 153.
Adding Entries Using LDIF
You can use an LDIF file to add multiple entries or to import an entire database. To
add entries using an LDIF file and the Directory Server Console:
Chapter 2 Creating Directory Entries 57
Page 58

Managing Entries from the Command-Line
1.
Define the entries in an LDIF file.
LDIF is described in Appendix A, “LDAP Data Interchange Format.”
2.
Import the LDIF file from the Directory Server Console.
See “Importing a Database from the Console,” on page 150, for information.
When you import the LDIF file, select “Append to database” on the Import
dialog box so that the server will only import entries that do not currently
exist in the directory.
You can also add entries described in an LDIF file from the command-line using
the
ldapmodify
Adding and Modifying Entries Using ldapmodify
command with the -f option.
You use the
Directory Server database. The
ldapmodify
command to add and modify entries in an existing
ldapmodify
command opens a connection to the
specified server using the distinguished name and password you supply and
modifies the entries based on LDIF update statements contained in a specified
file. Because
everything that
ldapmodify
ldapdelete
uses LDIF update statements,
can do.
ldapmodify
can do
If schema checking is turned on when you use this utility, then the server
performs schema checking for the entire entry when it is modified:
• If the server detects an attribute or object class in the entry that is not known
to the server, then the modify operation will fail when it reaches the
erroneous entry. All entries that were processed before the error was
encountered will be successfully added or modified. If you run
ldapmodify
with the -c option (do not stop on errors), all correct entries processed after
the erroneous entry will be successfully added or modified.
• If a required attribute is not present, the modify operation fails. This happens
even if the offending object class or attribute is not being modified. This
situation can occur if you run the Directory Server with schema checking
turned off, add unknown object classes or attributes, and then turn schema
checking on.
For more information, see “Turning Schema Checking On and Off,” on page 383.
To create a database suffix (such as
dc=example,dc=com
) using
ldapmodify
, you
must bind to the directory as the Directory Manager.
58 Red Hat Directory Server Administrator’s Guide • May 2005
Page 59

Adding Entries Using ldapmodify
Here is a typical example of how to use the
directory. Suppose that:
ldapmodify
Managing Entries from the Command-Line
utility to add entries to the
• You want to create the entries specified in the file
new.ldif
.
• You have created a database administrator who has the authority to modify the
entries and whose distinguished name is
• The database administrator’s password is
• The server is located on
• The server uses port number
cyclops
845
.
.
In this example, the LDIF statements in the
cn=Directory Manager
King-Pin
new.ldif
.
file do not specify a change
.
type. They follow the format defined in “LDIF File Format,” on page 573.
To add the entries, you must enter the following command:
ldapmodify -a -D "cn=Directory Manager" -w King-Pin -h cyclops -p
845 -f new.ldif
The following table describes the
Table 2-2 Description of ldapmodify Parameters Used for Adding Entries
Parameter Name Description
-a Specifies that the modify operation will add new entries to the
directory.
-D Specifies the distinguished name with which to authenticate
to the server. The value must be a DN recognized by the
Directory Server, and it must also have the authority to
modify the entries.
ldapmodify
parameters used in the example:
-w Specifies the password associated with the distinguished
name specified in the -D parameter.
-h Specifies the name of the host on which the server is running.
-p Specifies the port number that the server uses.
-f Optional parameter that specifies the file containing the LDIF
update statements used to define the modifications. If you do
not supply this parameter, the update statements are read
from stdin. For information on supplying LDIF update
statements from the command-line, refer to “Providing Input
from the Command-Line,” on page 56.
Chapter 2 Creating Directory Entries 59
Page 60

Managing Entries from the Command-Line
For full information on
ldapmodify
parameters, refer to the Red Hat Directory
Server Configuration, Command, and File Reference.
Modifying Entries Using ldapmodify
Here is a typical example of how to use the
that are present in the directory. Suppose that:
• You want to modify entries as specified in the file
• You have created a database administrator that has the authority to modify
the entries and whose distinguished name is
• The database administrator’s password is
• The server is located on
• The server uses port number
cyclops
845
To modify the entries, you must first create the
appropriate LDIF update statements and then enter the following command:
ldapmodify -D "cn=Directory Manager" -w King-Pin -h cyclops -p
845 -f modify_statements
The following table describes the
Table 2-3 Description of ldapmodify Parameters Used for Modifying Entries
Parameter Name Description
ldapmodify
.
.
ldapmodify
King-Pin
modify_statements
utility to modify entries
modify_statements
cn=Directory Manager
.
file with the
parameters used in the example:
.
.
-D Specifies the distinguished name with which to authenticate
to the server. The value must be a DN recognized by the
Directory Server, and it must also have the authority to
modify the entries.
-w Specifies the password associated with the distinguished
name specified in the -D parameter.
-h Specifies the name of the host on which the server is running.
-p Specifies the port number that the server uses.
-f Optional parameter that specifies the file containing the LDIF
update statements used to define the modifications. If you do
not supply this parameter, the update statements are read
from stdin. For information on supplying LDIF update
statements from the command-line, refer to “Providing Input
from the Command-Line,” on page 56.
60 Red Hat Directory Server Administrator’s Guide • May 2005
Page 61

Managing Entries from the Command-Line
For full information on
ldapmodify
parameters, refer to the Red Hat Directory
Server Configuration, Command, and File Reference.
Deleting Entries Using ldapdelete
Use the
utility opens a connection to the specified server using the distinguished name and
password you provide and deletes the entry or entries.
You can only delete entries at the end of a branch. You cannot delete entries that
are branch points in the directory tree.
For example, of the following three entries:
you can delete only the last two entries. The entry that identifies the
can be deleted only if there aren’t any entries below it. If you want to delete
ou=People,dc=example,dc=com
O’Connor’s entries and all other entries in that subtree.
Here is a typical example of how to use the
• You want to delete the entries identified by the distinguished names
ldapdelete
ou=People,dc=example,dc=com
cn=Paula Simon,ou=People,dc=example,dc=com
cn=Jerry O’Connor,ou=People,dc=example,dc=com
command-line utility to delete entries from the directory. This
, you must first delete Paula Simon and Jerry
ldapdelete
cn=Robert Jenkins,ou=People,dc=example,dc=com
Jangles, ou=People,dc=example,dc=com
.
utility. Suppose that:
and
People
cn=Lisa
subtree
• You have created a database administrator that has the authority to modify the
entries, and whose distinguished name is
• The database administrator’s password is
• The server is located on
• The server uses port number
cyclops
845
.
.
cn=Directory Manager
King-Pin
.
.
To delete the entries for users Robert Jenkins and Lisa Jangles, enter the following
command:
ldapdelete -D "cn=Directory Manager" -w King-Pin -h cyclops -p
845 "cn=Robert Jenkins,ou=People,dc=example,dc=com" "cn=Lisa
Jangles,ou=People,dc=example,dc=com"
The following table describes the
ldapdelete
parameters used in the example:
Chapter 2 Creating Directory Entries 61
Page 62

Managing Entries from the Command-Line
Table 2-4 Description of ldapdelete Parameters Used for Deleting Entries
Parameter Name Description
-D Specifies the distinguished name with which to authenticate
-w Specifies the password associated with the distinguished
-h Specifies the name of the host on which the server is running.
-p Specifies the port number that the server uses.
to the server. The value must be a DN recognized by the
Directory Server, and it must also have the authority to
modify the entries.
name specified in the -D parameter.
For full information on
ldapdelete
parameters, refer to the Red Hat Directory
Server Configuration, Command, and File Reference.
Using Special Characters
When using the Directory Server command-line client tools, you may need to
specify values that contain characters that have special meaning to the
command-line interpreter (such as space [ ], asterisk [*], backslash [\], and so
forth). When this situation occurs, enclose the value in quotation marks (“”). For
example:
-D "cn=Barbara Jensen,ou=Product Development,dc=example,dc=com"
Depending on the command-line utility you use, you should use either single or
double quotation marks for this purpose. Refer to your operating system
documentation for more information.
In addition, if you are using DNs that contain commas, you must escape the
commas with a backslash (\). For example:
-D "cn=Patricia Fuentes,ou=people,o=example.com Bolivia\,S.A."
To delete user Patricia Fuentes from the
would enter the following command:
ldapdelete -D "cn=Directory Manager,dc=example,dc=com" -w
King-Pin -h cyclops -p 845 "cn=Patricia
Fuentes,ou=People,o=example.com Bolivia\,S.A."
example.com Bolivia, S.A.
tree, you
62 Red Hat Directory Server Administrator’s Guide • May 2005
Page 63

LDIF Update Statements
LDIF Update Statements
Use LDIF update statements to define how
ldapmodify
should change your
directory. In general, LDIF update statements are a series of statements that:
• Specify the distinguished name of the entry to be modified.
• Specify a change type that defines how a specific entry is to be modified (
delete, modify, modrdn
).
add
,
• Specify a series of attributes and their changed values.
A change type is required unless you use
you specify the -a parameter, then an add operation (
ldapmodify
with the -a parameter. If
changetype: add
) is
assumed. However, any other change type overrides the -a parameter.
If you specify a modify operation (
changetype: modify
), a change operation is
required that indicates how the entry should be changed.
If you specify
changetype: modrdn
, change operations are required that specify
how the relative distinguished name (RDN) is to be modified. A distinguished
name’s RDN is the left-most value in the DN. For example, the distinguished name
uid=ssarette,dc=example,dc=com
has an RDN of
uid=ssarette
.
The general format of LDIF update statements is as follows:
dn: distinguished_name
changetype_identifier
change_operation_identifier
list_of_attributes
-
change_operation_identifier
list_of_attributes
-
A dash (-) must be used to denote the end of a change operation if subsequent
change operations are specified. For example, the following statement adds the
telephone number and manager attributes to the entry:
dn: cn=Lisa Jangles,ou=People,dc=example,dc=com
changetype: modify
add: telephonenumber
telephonenumber: (408) 555-2468
add: manager
manager: cn=Harry Cruise,ou=People,dc=example,dc=com
Chapter 2 Creating Directory Entries 63
Page 64

LDIF Update Statements
In addition, the line continuation operator is a single space. Therefore, the
following two statements are identical:
dn: cn=Lisa Jangles,ou=People,dc=example,dc=com
dn: cn=Lisa Jangles,
ou=People,
dc=example,dc=com
The following sections describe the change types in detail.
Adding an Entry Using LDIF
Use
changetype: add
make sure to create an entry representing a branch point before you try to create
new entries under that branch. That is, if you want to place an entry in a
and a
Groups
subtree, then create the branch point for those subtrees before
creating entries within the subtrees.
to add an entry to your directory. When you add an entry,
People
The following LDIF update statements can be used to create the
Groups
subtrees and then to create entries within those trees:
dn: dc=example,dc=com
changetype: add
objectclass: top
objectclass: organization
o: example.com
dn: ou=People, dc=example,dc=com
changetype: add
objectclass: top
objectclass: organizationalUnit
ou: People
ou: Marketing
dn: cn=Pete Minsky,ou=People,dc=example,dc=com
changetype: add
objectclass: top
objectclass: person
objectclass: organizationalPerson
objectclass: inetOrgPerson
cn: Pete Minsky
givenName: Pete
sn: Minsky
ou: People
ou: Marketing
uid: pminsky
People
and the
64 Red Hat Directory Server Administrator’s Guide • May 2005
Page 65

dn: cn=Sue Jacobs,ou=People,dc=example,dc=com
changetype: add
objectclass: top
objectclass: person
objectclass: organizationalPerson
objectclass: inetOrgPerson
cn: Sue Jacobs
givenName: Sue
sn: Jacobs
ou: People
ou: Marketing
uid: sjacobs
dn: ou=Groups,dc=example,dc=com
changetype: add
objectclass: top
objectclass: organizationalUnit
ou: Groups
dn: cn=Administrators,ou=Groups,dc=example,dc=com
changetype: add
objectclass: top
objectclass: groupOfNames
member: cn=Sue Jacobs,ou=People,dc=example,dc=com
member: cn=Pete Minsky,ou=People,dc=example,dc=com
cn: Administrators
LDIF Update Statements
dn: ou=example.com Bolivia\, S.A.,dc=example,dc=com
changetype: add
objectclass: top
objectclass: organizationalUnit
ou: example.com Bolivia\, S.A.
dn: cn=Carla Flores,ou=example.com Bolivia\,
S.A.,dc=example,dc=com
changetype: add
objectclass: top
objectclass: person
objectclass: organizationalPerson
objectclass: inetOrgPerson
cn: Carla Flores
givenName: Carla
sn: Flores
ou: example.com Bolivia\, S.A.
uid: cflores
Chapter 2 Creating Directory Entries 65
Page 66

LDIF Update Statements
Renaming an Entry Using LDIF
Use
changetype:modrdn
An entry’s RDN is the left-most element in the distinguished name. Therefore, the
RDN for
cn=Barry Nixon,ou=People,dc=example,dc=com
is
cn=Barry Nixon
And the RDN for
ou=People,dc=example,dc=com
is
ou=People
Therefore, this rename operation allows you to change the left-most value in an
entry’s distinguished name.
For example, the entry
cn=Sue Jacobs,ou=People,dc=example,dc=com
to change an entry’s relative distinguished name (RDN).
can be modified to be
cn=Susan Jacobs,ou=People,dc=example,dc=com
but it cannot be modified to be
cn=Sue Jacobs,ou=old employees,dc=example,dc=com
The following example can be used to rename Sue Jacobs to Susan Jacobs:
dn: cn=Sue Jacobs,ou=Marketing,dc=example,dc=com
changetype: modrdn
newrdn: cn=Susan Jacobs
deleteoldrdn: 0
Because
deleteoldrdn
is 0, this example retains the existing RDN as a value in
the new entry. The resulting entry would therefore have a common name (cn)
attribute set to both Sue Jacobs and Susan Jacobs, in addition to all the other
attributes included in the original entry. However, if you used
dn: cn=Sue Jacobs,ou=Marketing,dc=example,dc=com
changetype: modrdn
newrdn: cn=Susan Jacobs
deleteoldrdn: 1
66 Red Hat Directory Server Administrator’s Guide • May 2005
Page 67

LDIF Update Statements
the server would delete
cn=Sue Jacobs
, and only
cn=Susan Jacobs
would
remain within the entry.
A Note on Renaming Entries
You cannot rename an entry with the
moves to a completely different subtree. To move an entry to a completely different
branch, you must create a new entry in the alternative subtree using the old entry’s
attributes, and then delete the old entry.
Also, for the same reasons that you cannot delete an entry if it is a branch point,
you cannot rename an entry if it has any children. Doing so would orphan the
children in the tree, which is not allowed by the LDAP protocol. For example, of
the following three entries:
ou=People,dc=example,dc=com
cn=Paula Simon,ou=People,dc=example,dc=com
cn=Jerry O’Connor,ou=People,dc=example,dc=com
you can rename only the last two entries. The entry that identifies the
subtree can be renamed only if no other entries exist below it.
modrdn
change type such that the entry
People
Modifying an Entry Using LDIF
Use
changetype:modify
values to the entry. When you specify
a change operation to indicate how the entry is to be modified. Change operations
can be as follows:
to add, replace, or remove attributes and/or attribute
changetype:modify
, you must also provide
•
add:
attribute
Adds the specified attribute or attribute value. If the attribute type does not
currently exist for the entry, then the attribute and its corresponding value are
created. If the attribute type already exists for the entry, then the specified
attribute value is added to the existing value. If the particular attribute value
already exists for the entry, then the operation fails, and the server returns an
error.
•
replace:
attribute
The specified values are used to entirely replace the attribute’s value(s). If the
attribute does not already exist, it is created. If no replacement value is
specified for the attribute, the attribute is deleted.
•
delete:
attribute
Chapter 2 Creating Directory Entries 67
Page 68

LDIF Update Statements
The specified attribute is deleted. If more than one value of an attribute exists
for the entry, then all values of the attribute are deleted in the entry. To delete
just one of many attribute values, specify the attribute and associated value
on the line following the delete change operation.
This section contains the following topics:
• Adding Attributes to Existing Entries Using LDIF
• Changing an Attribute Value Using LDIF
• Deleting All Values of an Attribute Using LDIF
• Deleting a Specific Attribute Value Using LDIF
Adding Attributes to Existing Entries Using LDIF
You use
attribute value to an entry.
For example, the following LDIF update statement adds a telephone number to
the entry:
changetype:modify
dn: cn=Barney Fife,ou=People,dc=example,dc=com
changetype: modify
add: telephonenumber
telephonenumber: 555-1212
with the add operation to add an attribute and an
The following example adds two telephone numbers to the entry:
dn: cn=Barney Fife,ou=People,dc=example,dc=com
changetype: modify
add: telephonenumber
telephonenumber: 555-1212
telephonenumber: 555-6789
The following example adds two
attribute to the entry:
dn: cn=Barney Fife,ou=People,dc=example,dc=com
changetype: modify
add: telephonenumber
telephonenumber: 555-1212
telephonenumber: 555-6789
add: manager
manager: cn=Sally Nixon,ou=People,dc=example,dc=com
68 Red Hat Directory Server Administrator’s Guide • May 2005
telephonenumber
attributes and a
manager
Page 69

LDIF Update Statements
The following example adds a
jpeg
photograph to the directory. The
jpeg
photo
can be displayed by Directory Server Gateway. In order to add this attribute to the
directory, you must use the
ldapmodify
should read the referenced file for binary values if the attribute value
ldapmodify -b
parameter, which indicates that
begins with a slash:
dn: cn=Barney Fife,ou=People,dc=example,dc=com
changetype: modify
add: jpegphoto
jpegphoto: /path/to/photo
You can also add a
jpeg
photograph to the directory using the following standard
LDIF notation:
jpegphoto: < file:/path/to/photo
If you use this standard notation, you do not need to specify the
ldapmodify -b
parameter. However, you must add the following line to the beginning of your
LDIF file or your LDIF update statements:
version:1
For example, you could use the following
prompt> ldapmodify -D userDN -w user_password
>version: 1
>dn: cn=Barney Fife,ou=People,dc=example,dc=com
>changetype: modify
>add: userCertificate
>userCertificate;binary:< file: BarneysCert
ldapmodify
command:
NOTE You can use the standard LDIF notation only with the
ldapmodify
command, not with other command-line utilities.
Changing an Attribute Value Using LDIF
Use
changetype:modify
attribute in an entry.
For example, the following LDIF update statement changes Barney’s manager from
Sally Nixon to Wally Hensford:
dn: cn=Barney Fife,ou=People,dc=example,dc=com
changetype: modify
replace: manager
manager: cn=Wally Hensford, ou=People, dc=example,dc=com
with the replace operation to change all values of an
Chapter 2 Creating Directory Entries 69
Page 70

LDIF Update Statements
If the entry has multiple instances of the attribute, then, to change one of the
attribute values, you must delete the attribute value that you want to change and
then add the replacement value. For example, consider the following entry:
cn=Barney Fife,ou=People,dc=example,dc=com
objectClass: inetOrgPerson
cn: Barney Fife
sn: Fife
telephonenumber: 555-1212
telephonenumber: 555-6789
To change the telephone number
555-1212
to
555-4321
, use the following LDIF
update statement:
dn: cn=Barney Fife,ou=People,dc=example,dc=com
changetype: modify
delete: telephonenumber
telephonenumber: 555-1212
add: telephonenumber
telephonenumber: 555-4321
Barney’s entry is now as follows:
cn=Barney Fife,ou=People,dc=example,dc=com
objectClass: inetOrgPerson
cn: Barney Fife
sn: Fife
telephonenumber: 555-6789
telephonenumber: 555-4321
Deleting All Values of an Attribute Using LDIF
Use
changetype:modify
entry. If the entry has more than one instance of the attribute, you must indicate
which of the attributes you want to delete.
For example, the following LDIF update statement deletes all instances of the
telephonenumber
appears in the entry:
with the delete operation to delete an attribute from an
attribute from the entry, regardless of how many times it
dn: cn=Barney Fife,ou=People,dc=example,dc=com
changetype: modify
delete: telephonenumber
If you want to delete just a specific instance of the
then you simply delete that specific attribute value. The following section
describes how to do this.
70 Red Hat Directory Server Administrator’s Guide • May 2005
telephonenumber
attribute,
Page 71

Deleting a Specific Attribute Value Using LDIF
Use
changetype:modify
from an entry.
For example, consider the following entry:
cn=Barney Fife,ou=People,dc=example,dc=com
objectClass: inetOrgPerson
cn: Barney Fife
sn: Fife
telephonenumber: 555-1212
telephonenumber: 555-6789
with the delete operation to delete an attribute value
LDIF Update Statements
To delete the
555-1212
telephone number from this entry, use the following LDIF
update statement:
dn: cn=Barney Fife,ou=People,dc=example,dc=com
changetype: modify
delete: telephonenumber
telephonenumber: 555-1212
Barney’s entry then becomes:
cn=Barney Fife,ou=People,dc=example,dc=com
objectClass: inetOrgPerson
cn: Barney Fife
sn: Fife
telephonenumber: 555-6789
Deleting an Entry Using LDIF
Use
changetype:delete
delete leaf entries. Therefore, when you delete an entry, make sure that no other
entries exist under that entry in the directory tree. That is, you cannot delete an
organizational unit entry unless you have first deleted all the entries that belong to
the organizational unit.
For example, of the following three entries:
to delete an entry from your directory. You can only
ou=People,dc=example,dc=com
cn=Paula Simon,ou=People,dc=example,dc=com
cn=Jerry O’Connor,ou=People,dc=example,dc=com
you can delete only the last two entries. The entry that identifies the
People
can be deleted only if no other entries exist below it.
The following LDIF update statements can be used to delete person entries:
Chapter 2 Creating Directory Entries 71
subtree
Page 72

Maintaining Referential Integrity
dn: cn=Pete Minsky,ou=People,dc=example,dc=com
changetype: delete
dn: cn=Sue Jacobs,ou=People,dc=example,dc=com
changetype: delete
CAUTION Do not delete the suffix
o=NetscapeRoot
Administration Server uses this suffix to store information about
installed Directory Servers. Deleting this suffix could force you to
reinstall the Directory Server.
Modifying an Entry in an Internationalized Directory
If the attribute values in your directory are associated with one or more languages
other than English, the attribute values are associated with language tags. When
using the
ldapmodify
command-line utility to modify an attribute that has an
associated language tag, you must match the value and language tag exactly or
the modify operation will fail.
For example, if you want to modify an attribute value that has a language tag of
lang-fr
, you must include
dn: bjensen,dc=example,dc=com
changetype: modify
replace: homePostalAddress;lang-fr
homePostalAddress;lang-fr: 34 rue de Seine
lang-fr
in the modify operation, as follows:
Maintaining Referential Integrity
. The Red Hat
Referential integrity is a database mechanism that ensures relationships between
related entries are maintained. In the Directory Server, referential integrity can be
used to ensure that an update to one entry in the directory is correctly reflected in
any other entries that may refer to the updated entry.
For example, if a user’s entry is removed from the directory and referential
integrity is enabled, the server also removes the user from any groups of which
the user is a member. If referential integrity is not enabled, the user remains a
member of the group until manually removed by the administrator. This is an
important feature if you are integrating the Directory Server with other products
that rely on the directory for user and group management.
72 Red Hat Directory Server Administrator’s Guide • May 2005
Page 73

Maintaining Referential Integrity
How Referential Integrity Works
When the Referential Integrity Plug-in (see “Referential Integrity Postoperation
Plug-in,” on page 505) is enabled, it performs integrity updates on specified
attributes immediately after a delete or rename operation. By default, the
Referential Integrity Plug-in is disabled.
NOTE The Referential Integrity Plug-in should only be enabled on one
supplier replica in a multi-master replication environment to avoid
conflict resolution loops. When enabling the plug-in on servers
issuing chaining requests, be sure to analyze your performance
resource and time needs, as well as your integrity needs. Integrity
checks can be time-consuming and draining on memory/CPU.
Whenever you delete or rename a user or group entry in the directory, the
operation is logged to the referential integrity log file
(
serverRoot/slapd-serverID/logs/referint
update interval, the server performs a search on all attributes for which referential
integrity is enabled and matches the entries resulting from that search with the
DNs of deleted or modified entries present in the log file. If the log file shows that
the entry was deleted, the corresponding attribute is deleted. If the log file shows
that the entry was changed, the corresponding attribute value is modified
accordingly.
). After a specified time, known as the
By default, when the Referential Integrity Plug-in is enabled, it performs integrity
updates on the
after a delete or rename operation. You can, however, configure the behavior of the
Referential Integrity Plug-in to suit your own needs. You can do any of the
following:
• Record referential integrity updates in the replication changelog.
• Modify the update interval.
• Select the attributes to which you apply referential integrity.
• Disable referential integrity.
member, uniquemember, owner
, and
seeAlso
attributes immediately
Using Referential Integrity with Replication
There are certain limitations associated with the use of the Referential Integrity
Plug-in in a replication environment:
Chapter 2 Creating Directory Entries 73
Page 74

Maintaining Referential Integrity
• You should never enable it on a dedicated consumer server (a server that
• You should never enable it on a server that contains a combination of
• You can enable it on a supplier server that contains only read-write replicas.
• In the context of multi-master replication, you should enable it on just one
Configuring the Supplier Server
When your replication environment satisfies the conditions listed above, you can
enable the Referential Integrity Plug-in.
1.
2.
contains only read-only replicas).
read-write and read-only replicas.
supplier.
Enable the Referential Integrity Plug-in.
This task is described in “Enabling/Disabling Referential Integrity,” on
page 74.
Configure the plug-in to record any integrity updates in the changelog.
This task is described in “Recording Updates in the Changelog,” on page 75.
3.
Ensure that the Referential Integrity Plug-in is disabled on all consumer
servers.
NOTE Because the supplier server sends any changes made by the
Referential Integrity Plug-in to consumer servers, it is unnecessary
to run the Referential Integrity Plug-in on consumer servers.
Enabling/Disabling Referential Integrity
You can enable or disable referential integrity from the Directory Server Console
or from the command-line.
From the Directory Server Console
1.
In the Directory Server Console, select the Configuration tab.
For information on starting the Directory Server Console, refer to “Using the
Directory Server Console,” on page 34.
74 Red Hat Directory Server Administrator’s Guide • May 2005
Page 75

Maintaining Referential Integrity
2.
Expand the Plugins folder in the navigation tree, and select the Referential
Integrity Postoperation Plug-in.
The settings for the plug-in are displayed in the right pane.
3.
Check the “Enable plugin” checkbox to enable the plug-in; clear it to disable it.
4.
Click Save to save your changes.
5.
For your changes to be taken into account, go to the Tasks tab, and select
Restart the Directory Server.
Recording Updates in the Changelog
You can decide to record updates in the replication changelog instead of recording
them in the default location, the
serverRoot/slapd-serverID/logs
integrity updates to be replicated to consumer servers in the context of replication.
You can make this change from the Directory Server Console.
From the Directory Server Console
1.
In the Directory Server Console, select the Configuration tab.
referint
file in the
directory. You must do this if you want referential
For information on starting the Directory Server Console, refer to “Using the
Directory Server Console,” on page 34.
2.
Expand the Plugins folder in the navigation tree, and select the Referential
Integrity Postoperation Plug-in.
The settings for the plug-in are displayed in the right pane.
3.
In the arguments list, replace the
referint
filename with the absolute path to
the changelog directory.
4.
Click Save to save your changes.
5.
For your changes to be taken into account, go to the Tasks tab, and select
Restart the Directory Server.
Chapter 2 Creating Directory Entries 75
Page 76

Maintaining Referential Integrity
Modifying the Update Interval
By default, the server makes referential integrity updates immediately after a
delete or a modrdn operation. If you want to reduce the impact this operation has
on your system, you may want to increase the amount of time between updates.
Although there is no maximum update interval, the following intervals are
commonly used:
• Update immediately.
• 90 seconds (updates occur every 90 seconds).
• 3600 seconds (updates occur every hour).
• 10,800 seconds (updates occur every 3 hours).
• 28,800 seconds (updates occur every 8 hours).
• 86,400 seconds (updates occur once a day).
• 604,800 seconds (updates occur once a week).
You can modify the update interval from the Directory Server Console.
From the Directory Server Console
1.
In the Directory Server Console, select the Configuration tab.
For information on starting the Directory Server Console, refer to “Using the
Directory Server Console,” on page 34.
2.
Expand the Plugins folder in the navigation tree, and select the Referential
Integrity Postoperation Plug-in.
The settings for the plug-in are displayed in the right pane.
3.
In the arguments list, replace the value in the first text box with the
appropriate time interval.
4.
Click Save to save your changes.
5.
For your changes to be taken into account, go to the Tasks tab, and select
Restart the Directory Server.
76 Red Hat Directory Server Administrator’s Guide • May 2005
Page 77

Maintaining Referential Integrity
Modifying the Attribute List
By default, the Referential Integrity Plug-in is set up to check for and update the
member, uniquemember, owner
attributes to be updated from the Directory Server Console. For example, you may
add the
nsroledn
attribute if roles are being used.
Keep in mind that any attribute specified in the Referential Integrity Plug-in
parameter list needs to have equality indexing on all databases. Otherwise, the
plug-in scans every entry of the databases for matching the deleted or modified
DN, degrading performance severely. If you add an attribute, ensure that it is
indexed in all the backends.
You can improve the performance by removing any unused attributes from the list.
From the Directory Server Console
1.
In the Directory Server Console, select the Configuration tab.
For information on starting the Directory Server Console, refer to “Using the
Directory Server Console,” on page 34.
2.
Expand the Plugins folder in the navigation tree, and select the Referential
Integrity Postoperation Plug-in.
, and
seeAlso
attributes. You can add or delete
The settings for the plug-in are displayed in the right pane.
3.
In the Arguments section, use the Add and Delete buttons to modify the
attributes in the list.
4.
Click Save to save your changes.
5.
For your changes to be taken into account, go to the Tasks tab, and select
Restart the Directory Server.
NOTE For best performance, the attributes set for updating should also be
indexed. For information on indexing, see chapter 10, “Managing
Indexes.”
Chapter 2 Creating Directory Entries 77
Page 78

Maintaining Referential Integrity
78 Red Hat Directory Server Administrator’s Guide • May 2005
Page 79

Chapter 3
Configuring Directory Databases
Your directory is made up of databases over which you can distribute your
directory tree. This chapter describes how to create suffixes, the branch points for
your directory tree, and how to create the databases associated with each suffix.
This chapter also describes how to create database links to reference databases on
remote servers and how to use referrals to point clients to external sources of
directory data.
This chapter includes the following sections:
• Creating and Maintaining Suffixes (page 79)
• Creating and Maintaining Databases (page 90)
• Creating and Maintaining Database Links (page 103)
• Using Referrals (page 143)
For conceptual information on distributing your directory data, refer to the Red Hat
Directory Server Deployment Guide.
Creating and Maintaining Suffixes
You can store different pieces of your directory tree in different databases and then
distribute these databases across multiple servers. Your directory tree contains
branch points called nodes. These nodes may be associated with databases. You
create nodes using the Directory tab in the Directory Server Console, where you
freely edit the entries that appear in your directory tree.
A suffix is a node of your directory tree associated with a particular database. You
create these special nodes using the Database tab on the Directory Server Console.
For example, a simple directory tree might appear as illustrated in Figure 3-1.
79
Page 80

Creating and Maintaining Suffixes
Figure 3-1 A Sample Directory Tree with One Root Suffix
The
one database, the
ou=contractors
This section describes creating suffixes on your Directory Server and associating
them with databases. This section contains procedures for the following:
• Creating Suffixes
ou=people
suffix and all the entries and nodes below it might be stored in
ou=groups
suffix on another database, and the
suffix on yet another database.
• Maintaining Suffixes
Creating Suffixes
You can create both root and subsuffixes to organize the contents of your
directory tree. A root suffix is the parent of a sub suffix. It can be part of a larger
tree you have designed for your Directory Server. A sub suffix is a branch
underneath a root suffix. The data for root and subsuffixes are contained by
databases.
Your directory might contain more than one root suffix. For example, an ISP
might host several websites, one for
ISP would create two root suffixes, one corresponding to the
naming context and one corresponding to the
context. The directory tree appears as illustrated in Figure 3-2.
80 Red Hat Directory Server Administrator’s Guide • May 2005
example.com
dc=redhat,dc=com
and one for
dc=example,dc=com
redhat.com
naming
. The
Page 81

Creating and Maintaining Suffixes
Figure 3-2 A Sample Directory Tree with Two Root Suffixes
You can also create root suffixes to exclude portions of your directory tree from
search operations. For example,
their European office from a search on the general
example.com
Corporation might want to exclude
example.com
Corporation
directory. To do this, they create two root suffixes. One root suffix corresponds to
the general
example.com
Corporation directory tree,
dc=example,dc=com
, and one
root suffix corresponds to the European branch of their directory tree,
l=europe,dc=example,dc=com
. From a client application’s perspective, the
directory tree looks as illustrated in Figure 3-3.
Figure 3-3 A Sample Directory Tree with a Root Suffix Off Limits to Search Operations
Searches performed by client applications on the
example.com
l=europe,dc=example,dc=com
Corporation’s directory will not return entries from the
branch of the directory, as it is a separate root
dc=example,dc=com
branch of
suffix.
If
example.com
Corporation decides that they want to include the entries in the
European branch of their directory tree in general searches, they would make the
European branch a sub suffix of the general branch. To do this, they create a root
suffix
example.com
beneath it for their European directory entries,
Corporation,
dc=example,dc=com
l=europe,dc=example,dc=com
, and then create a sub suffix
.
From a client application’s perspective, the directory tree would appear as
illustrated in Figure 3-4.
Chapter 3 Configuring Directory Databases 81
Page 82

Creating and Maintaining Suffixes
Figure 3-4 A Sample Directory Tree with a Sub Suffix
This section describes creating root and subsuffixes for your directory using
either the Directory Server Console or the command-line. This section contains
the following procedures:
• Creating a New Root Suffix Using the Console
• Creating a New Sub Suffix Using the Console
• Creating Root and Sub Suffixes from the Command-Line
Creating a New Root Suffix Using the Console
The following procedure describes creating a suffix and associating it with a
database:
1.
In the Directory Server Console, select the Configuration tab.
2.
Right-click Data in the left navigation pane, and select New Root Suffix from
the pop-up menu.
The “Create new root suffix” dialog box is displayed.
3.
Enter a unique suffix in the “New suffix” field.
The suffix must be named according to dc naming conventions. For example,
you might enter a new suffix name of
4.
Select the “Create associated database automatically” checkbox if you want a
database to be created at the same time as the new root suffix.
Deselect the checkbox if you want to create a database for the new root suffix
later. You may want to do this if you want to be able to specify a directory
where the database will be created. The new root suffix will be disabled until
you create a database.
82 Red Hat Directory Server Administrator’s Guide • May 2005
dc=example,dc=com
.
Page 83

Creating and Maintaining Suffixes
5.
If you selected the “Create associated database automatically” checkbox in step
4, enter a unique name for the new database in the “Database name” field.
For the name, you can use a combination of alphanumeric, dash (-), and
underscore (_) characters; no other characters are allowed. For example, you
might name the new database
6.
Click OK to create the new root suffix.
example2
.
The suffix appears automatically under the Data branch in the left navigation
pane.
Creating a New Sub Suffix Using the Console
The following procedure describes creating a sub suffix under an already existing
root or sub suffix:
1.
In the Directory Server Console, select the Configuration tab.
2.
Under the Data in the left navigation pane, select the suffix under which you
want to add a new sub suffix. Right-click the suffix, and select New Sub Suffix
from the pop-up menu.
The “Create new sub suffix” dialog box is displayed.
3.
Enter a unique suffix name in the “New suffix” field.
The suffix must be named according to dc naming conventions. For example,
you might enter a new suffix name of
ou=groups
.
The root suffix is automatically added to the name. For example, if you are
creating the sub suffix
Console automatically names it
4.
Select the “Create associated database automatically” checkbox if you want a
ou=groups
ou=groups,dc=example,dc=com
under the
dc=example,dc=com
suffix, the
.
database to be created at the same time as the new sub suffix.
Deselect the checkbox if you want to create a database for the new sub suffix
later. The new sub suffix will be disabled until you create a database.
5.
If you selected the “Create associated database automatically” checkbox in step
4, enter a unique name for the new database in the “Database name” field.
For the name, you can use a combination of alphanumeric, dash (-), and
underscore (_) characters; no other characters are allowed. For example, you
might name the new database
example3
.
Chapter 3 Configuring Directory Databases 83
Page 84

Creating and Maintaining Suffixes
6.
Creating Root and Sub Suffixes from the Command-Line
Use the
configuration file. The suffix configuration information is stored in the
cn=mapping tree,cn=config
Click OK to create the new sub suffix.
The suffix appears automatically under its root suffix in the Data tree in the
left navigation pane.
ldapmodify
command-line utility to add new suffixes to your directory
entry.
NOTE Avoid creating entries under the
file. The
cn=config
entry in the simple, flat
cn=config
entry in the
dse.ldif
configuration
dse.ldif
file is not stored in the same highly scalable database as regular
entries. As a result, if many entries, particularly entries that are
likely to be updated frequently, are stored under
cn=config
,
performance will probably suffer.
For example, you want to add a new root suffix to the configuration file using the
ldapmodify
utility. First, type the following to change to the directory containing
the utility:
cd serverRoot/shared/bin
Then, run
The
ldapmodify
ldapmodify -a -h example1 -p 389 -D "cn=directory manager" -w
secret
ldapmodify
, as follows:
utility binds to the server and prepares it to add an entry to the
configuration file.
Next, you create the root suffix entry for
dn: cn="dc=example,dc=com",cn=mapping tree,cn=config
objectclass: top
objectclass: extensibleObject
objectclass: nsMappingTree
nsslapd-state: backend
nsslapd-backend: UserData
cn: dc=example,dc=com
example.com
Corporation, as follows:
To create a sub suffix for groups under this root suffix, you would do an
ldapmodify
84 Red Hat Directory Server Administrator’s Guide • May 2005
operation to add the following entry:
Page 85

dn: cn="ou=groups,dc=example,dc=com",cn=mapping tree,cn=config
objectclass: top
objectclass: extensibleObject
objectclass: nsMappingTree
nsslapd-state: backend
nsslapd-backend: GroupData
nsslapd-parent-suffix: "dc=example,dc=com"
cn: ou=groups,dc=example,dc=com
NOTE If you want to maintain your suffixes using the Directory Server
Console, you will need to respect the same spacing you use to name
the root and subsuffixes via the command-line.
For example, if you name a root suffix
ou=groups ,dc=example,dc=com
any subsuffixes you create under this root will need to specify two
spaces after
The following table describes the attributes used to configure a suffix entry:
Table 3-1 Suffix Attributes
Attribute Name Value
ou=groups
as well.
Creating and Maintaining Suffixes
(with two spaces after
groups
),
dn Defines the DN for the suffix. The DN is contained in quotes. The
value you enter takes the following form:
cn="dc=domain,dc=com",cn=mapping tree, cn=config
This attribute is required.
cn Defines the relative DN (RDN) of the entry.
This attribute is required.
objectclass Tells the server that the entry is root or sub suffix entry. It always
takes the value nsMappingTree.
This attribute is required.
Chapter 3 Configuring Directory Databases 85
Page 86

Creating and Maintaining Suffixes
Table 3-1 Suffix Attributes (Continued)
Attribute Name Value
nsslapd-state Determines how the suffix handles operations. This attribute takes
the following values:
• backend: the backend (database) is used to process all
operations.
• disabled: the database is not available for processing
operations. The server returns a “No such search object” error in
response to requests made by client applications.
• referral: a referral is returned for requests made to this suffix.
• referral on update: the database is used for all operations
except update requests, which receive a referral.
The default value is disabled.
nsslapd-referral Defines the LDAP URL of the referral to be returned by the suffix.
This attribute can be multi-valued, with one referral per value. This
attribute is required when the value of the nsslapd-state
attribute is referral or referral on update.
nsslapd-backend Gives the name of the database or database link used to process
requests. This attribute can be multi-valued, with one database or
database link per value. Refer to “Creating and Maintaining
Database Links,” on page 103, for more information about database
links.
This attribute is required when the value of the nsslapd-state
attribute is set to backend or referral on update.
nsslapd-distribution-plugin Specifies the shared library to be used with the custom distribution
function. This attribute is required only when you have specified
more than one database in the nsslapd-backend attribute.
Refer to “Creating and Maintaining Databases,” on page 90, for
more information about the custom distribution function.
nsslapd-distribution-funct Specifies the name of your custom distribution function. This
attribute is required only when you specify more than one database
in the nsslapd-backend attribute.
Refer to “Creating and Maintaining Databases,” on page 90, for
more information about the custom distribution function.
86 Red Hat Directory Server Administrator’s Guide • May 2005
Page 87

Creating and Maintaining Suffixes
Table 3-1 Suffix Attributes (Continued)
Attribute Name Value
nsslapd-parent-suffix Provides the DN of the parent entry for a sub suffix. By default, this
attribute is not present, which means that the suffix is regarded as a
root suffix.
For example, you want to create a sub suffix
o=sales,dc=example,dc=com under the root suffix
dc=example,dc=com. Add the following value to the
nsslapd-parent-suffix attribute of the sub suffix:
nsslapd-parent-suffix: "dc=example,dc=com"
Maintaining Suffixes
This section describes the following procedures:
• Using Referrals in a Suffix
• Enabling Referrals Only During Update Operations
• Disabling a Suffix
• Deleting a Suffix
Using Referrals in a Suffix
Referrals can be used to point a client application temporarily to a different server.
For example, you might add a referral to a suffix so that the suffix points to a
different server when the database associated with the suffix is taken off-line for
maintenance.
For more information on referrals in general, refer to Red Hat Directory Server
Deployment Guide.
To set referrals in a suffix:
1.
In the Directory Server Console, select the Configuration tab.
2.
Under Data in the left pane, select the suffix for which you want to add a
referral.
3.
Click the Suffix Settings tab, and select the “Return Referrals for all
Operations” radio button.
Chapter 3 Configuring Directory Databases 87
Page 88

Creating and Maintaining Suffixes
4.
5.
6.
Enabling Referrals Only During Update Operations
You may want to configure your directory to redirect update and write requests
made by client applications to a read-only database.
For example, you can enable referrals for update operations when you have a
local copy of the directory data that you do not own. You want the data to be
available for searches but not for updates. You do this by enabling referrals only
during update requests. When a client application asks to update an entry, the
client is referred to the server that owns the data, where the modification request
can proceed.
Click the Referrals tab. Enter an LDAP URL in the “Enter a new referral”
field, or click Construct to be guided through the creation of an LDAP URL.
For more information about the structure of LDAP URLs, see Appendix C,
“LDAP URLs.”
Click Add to add the referral to the list.
You can enter multiple referrals. The directory will return the entire list of
referrals in response to requests from client applications.
Click Save.
To enable referrals only during update operations:
1.
In the Directory Server Console, select the Configuration tab.
2.
Under Data in the left pane, click the suffix for which you want to add a
referral.
3.
Click the Suffix Settings tab, and select the “Return Referrals for Update
Operations” radio button.
4.
Click the Referrals tab. Enter an LDAP URL in the “Enter a new referral”
field, or click Construct to be guided through the creation of an LDAP URL.
For more information about the structure of LDAP URLs, refer to Appendix
C, “LDAP URLs.”
5.
Click Add to add the referral to the list.
You can enter multiple referrals. The directory will return the entire list of
referrals in response to requests from client applications.
6.
Click Save.
88 Red Hat Directory Server Administrator’s Guide • May 2005
Page 89

Creating and Maintaining Suffixes
Disabling a Suffix
Sometimes, you may need to take down a database for maintenance, but the data
the database contains is not replicated. Rather than returning a referral, you can
disable the suffix responsible for the database.
Once you disable a suffix, the contents of the database related to the suffix are
invisible to client applications when they perform LDAP operations such as search,
add, and modify.
To disable a suffix:
1.
In the Directory Server Console, select the Configuration tab.
2.
Under Data in the left navigation pane, click the suffix you want to disable.
3.
Click the Suffix Setting tab, and deselect the “Enable this suffix” checkbox.
A red dot appears on the Suffix Setting tab to alert you to changes that need to
be saved.
4.
Click Save.
The suffix is no longer enabled.
Deleting a Suffix
The following procedure describes deleting a suffix:
CAUTION When you delete a suffix, you also delete all database entries and
replication information associated with that suffix.
1.
In the Directory Server Console, select the Configuration tab.
2.
Under Data in the left navigation pane, select the suffix you want to delete.
3.
Select Delete from the Object menu.
You can also right-click the suffix and select Delete from the pop-up menu.
4.
Select “Delete this suffix and all of its subsuffixes” if you want to remove all the
suffix and every suffix below it.
Select “Delete this suffix only” if you want to remove only this particular
suffix, not its subsuffixes.
Chapter 3 Configuring Directory Databases 89
Page 90
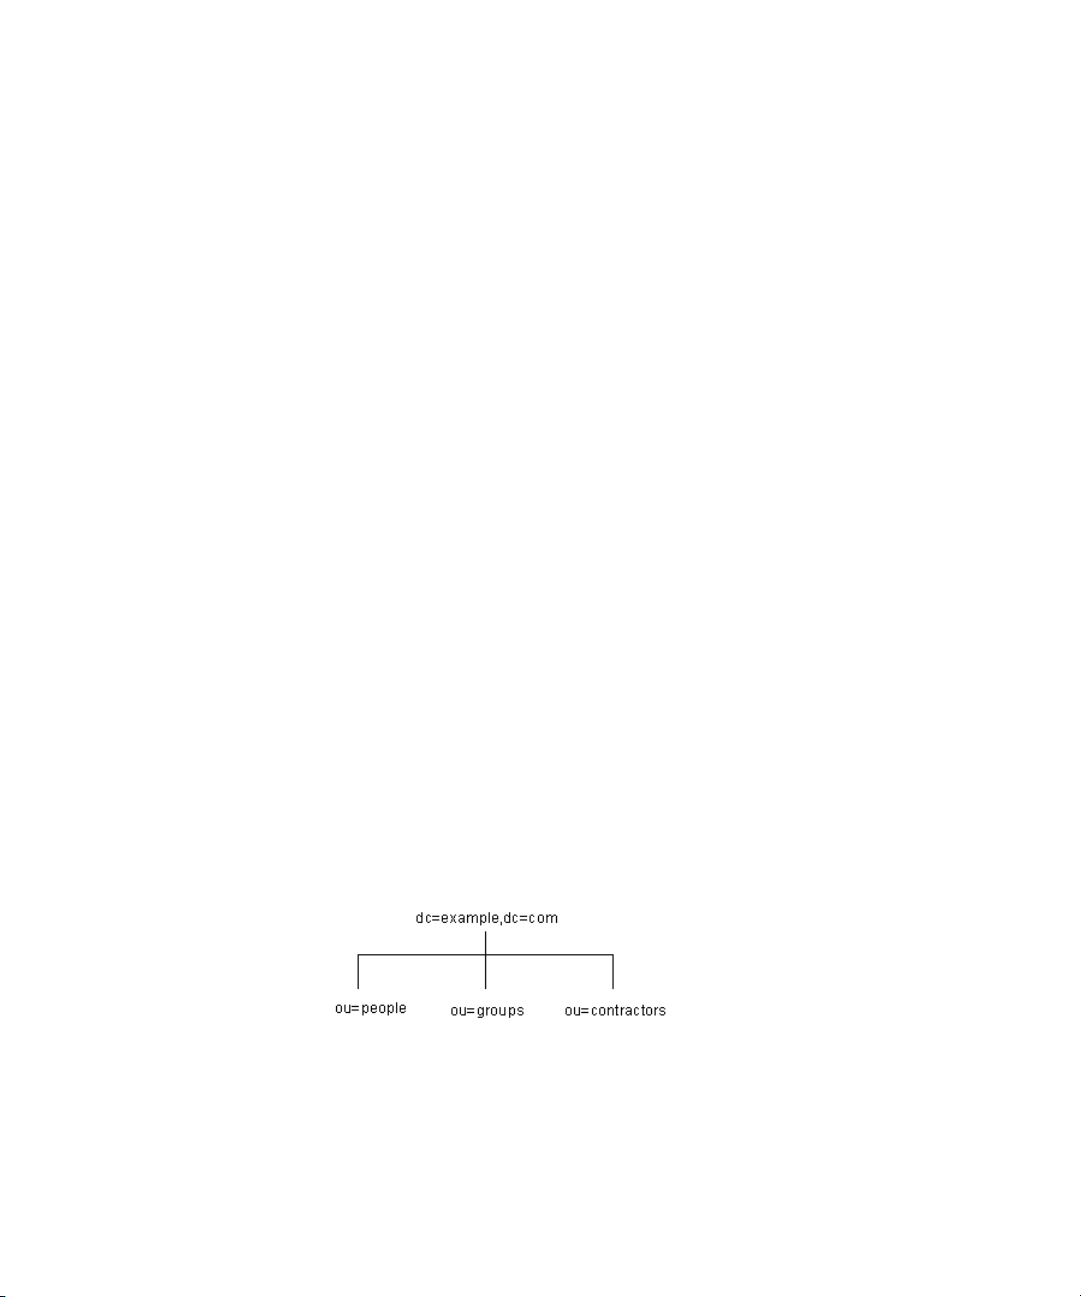
Creating and Maintaining Databases
5.
Click OK to delete the suffix.
A progress dialog box is displayed that tells you the steps being completed by
the Console.
Creating and Maintaining Databases
After you create suffixes for organizing your directory data, you create databases
to contain your directory data. Databases are used to store your directory data.
This section contains information about creating databases to contain your
directory data, deleting databases, using database encryption, and making
databases temporarily read-only.
• Creating Databases
• Maintaining Directory Databases
• Database Encryption
Creating Databases
Directory Server supports the use of multiple databases over which you can
distribute your directory tree. There are two ways you can distribute your data
across multiple databases:
• One database per suffix.
The data for each suffix is contained in a separate database. For example, your
directory tree appears as follows:
You add three databases to store the data contained in your separate suffixes,
as follows:
90 Red Hat Directory Server Administrator’s Guide • May 2005
Page 91
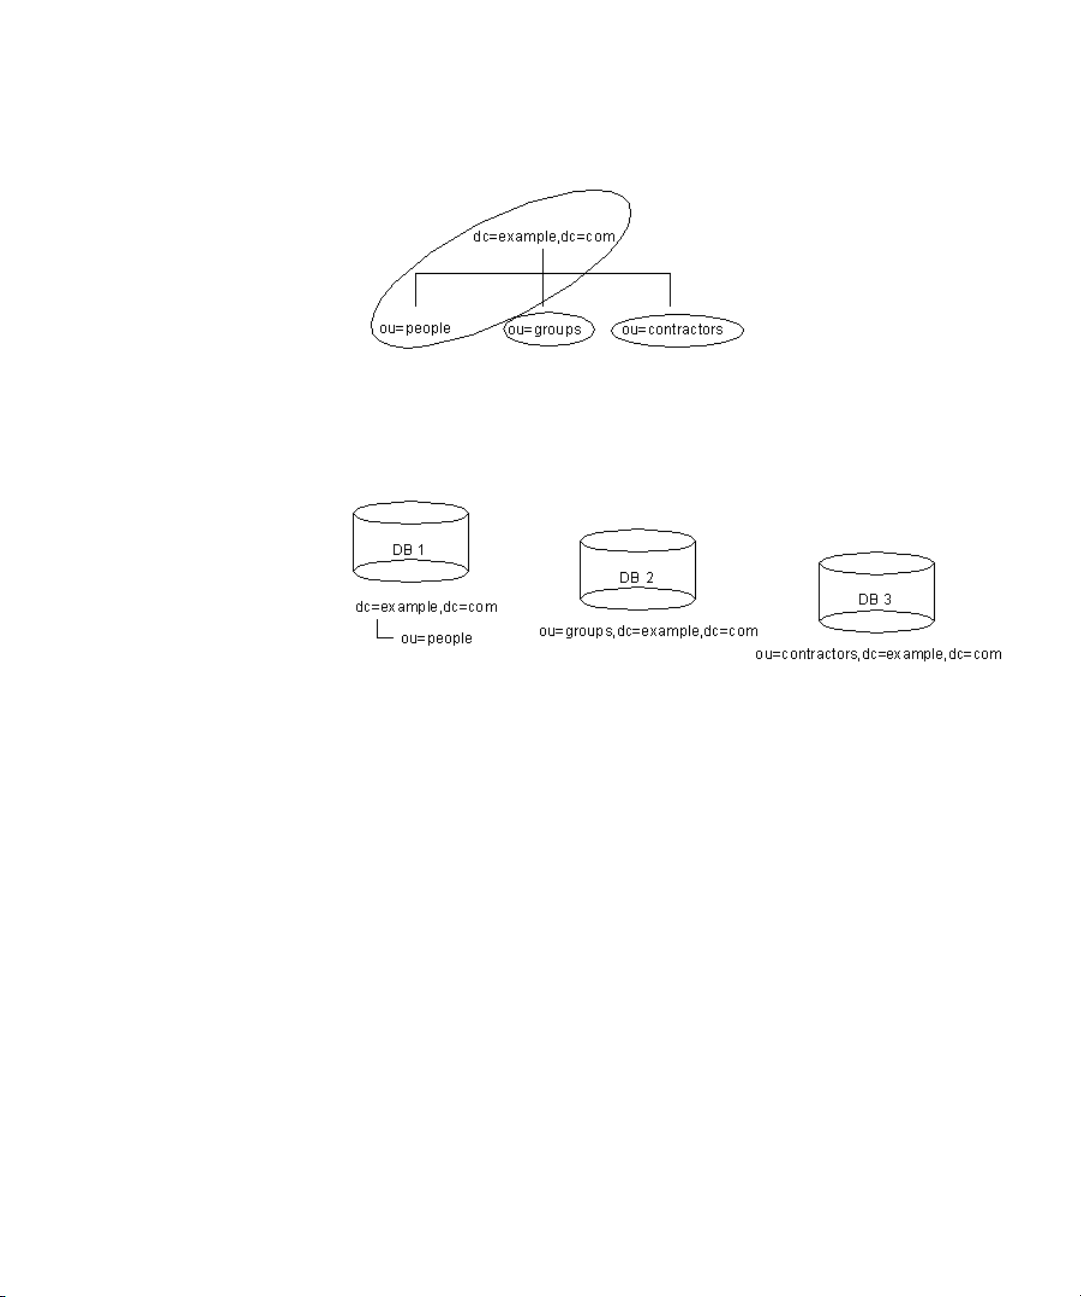
Creating and Maintaining Databases
This division of the tree corresponds to three databases, as follows:
Database one contains the data for
dc=example,dc=com
dc=example,dc=com
, so that clients can conduct searches based at
. Database two contains the data for
database three contains the data for
ou=people
ou=contractors
plus the data for
ou=groups
.
• Multiple databases for one suffix.
Suppose the number of entries in the
ou=people
branch of your directory tree
is so large that you need two databases to store them. In this case, the data
contained by
ou=people
could be distributed across two databases. This is
illustrated as follows:
Chapter 3 Configuring Directory Databases 91
, and
Page 92

Creating and Maintaining Databases
Database one contains people with names from A-K, and database two
contains people with names from L-Z. Database three contains the
data, and database four contains the
You need to use the custom distribution plug-in to distribute data from a
single suffix across multiple databases. Contact Red Hat Professional Services
for information on how to create distribution logic for your Directory Server.
ou=contractors
data.
ou=groups
Creating a New Database for an Existing Suffix Using the Console
The following procedure describes adding a database to a suffix you have already
created:
1.
In the Directory Server Console, select the Configuration tab.
2.
In the left pane, expand Data, then click the suffix to which you want to add
the new database.
3.
Right-click the suffix, and select New Database from the pop-up menu.
The “Create New Database” dialog box is displayed.
4.
In the “Create New Database” dialog box, enter a unique name for the
database.
This value cannot contain commas, tabs, an equals sign (=), asterisk (*),
backslash (\), forward slash (/), plus sign (+), quote (‘), double quote (“), or a
question mark (?). It can contain numbers; for instance, you might name the
new database
92 Red Hat Directory Server Administrator’s Guide • May 2005
example2
.
Page 93

Creating and Maintaining Databases
5.
In the “Create database in” field, enter the path to the directory where you
want to store the new database. You can also click Browse to locate a directory
on your local machine.
By default, the directory stores the new database in this directory:
serverRoot/slapd-serverID/db
6.
Click OK. Click Yes in the confirmation dialog to create the new database.
NOTE To see the new suffix in the Directory tab, you first need to create a
root entry associated with the suffix. Refer to “Creating Directory
Entries,” on page 47.
Creating a New Database for a Single Suffix from the Command-Line
Use the
configuration file. The database configuration information is stored in the
database,cn=plugins,cn=config
ldapmodify
command-line utility to add a new database to your directory
cn=ldbm
entry.
For example, you want to add a new database to the server
the following to change to the directory containing the
cd serverRoot/shared/bin
Add a new entry to the configuration file by performing an
example1
ldapmodify
ldapmodify
. First, type
utility:
, as
follows:
ldapmodify -a -h example1 -p 389 -D "cn=directory manager" -w
secret
The
ldapmodify
utility binds to the server and prepares it to add an entry to the
configuration file.
Next, you create the entry for the new database, as follows:
dn: cn=UserData,cn=ldbm database,cn=plugins,cn=config
objectclass: extensibleObject
objectclass: nsBackendInstance
nsslapd-suffix: ou=people,dc=example,dc=com
The entry added corresponds to a database named
for the root or sub suffix
ou=people,dc=example,dc=com
UserData
.
that contains the data
To create a root or sub suffix from the command-line, refer to “Creating Root and
Sub Suffixes from the Command-Line,” on page 84. The database name, given in
the DN attribute, must correspond with the value in the
nsslapd-backend
attribute of the suffix entry.
Chapter 3 Configuring Directory Databases 93
Page 94

Creating and Maintaining Databases
Adding Multiple Databases for a Single Suffix
You can distribute a single suffix across multiple databases. However, to
distribute the suffix, you need to create a custom distribution function to extend
the directory. For more information on creating a custom distribution function,
contact Red Hat Professional Services.
NOTE Once you have distributed entries, you cannot redistribute them.
The following restrictions apply:
• You cannot change your distribution function once you have
deployed entry distribution.
• You cannot use the LDAP
modrdn
operation to rename entries
if that would cause them to be distributed into a different
database.
• You cannot replicate distributed local databases.
• You cannot use the
ldapmodify
operation to change entries if
that would cause them to be distributed into a different
database.
Violating these restrictions prevents Directory Server from
correctly locating and returning entries.
Once Red Hat Professional Services has helped you create a custom distribution
logic plug-in, you need to add it to your directory. The following procedures
describe adding distribution logic to a suffix in your directory.
Adding the Custom Distribution Function to a Suffix
The distribution logic is a function declared in a suffix. This function is called for
every operation reaching this suffix, including subtree search operations that start
above the suffix. You can insert a distribution function into a suffix using both the
Console and the command-line.
For information about creating your own custom distribution logic, contact Red
Hat Professional Services.
Adding Custom Distribution Using the Console
1.
In the Directory Server Console, select the Configuration tab.
2.
Expand Data in the left navigation pane. Select the suffix to which you want
to apply your distribution function.
94 Red Hat Directory Server Administrator’s Guide • May 2005
Page 95

Creating and Maintaining Databases
3.
Select the Databases tab in the right window.
4.
Click Add to associate additional databases with the suffix.
The “Database List” dialog box is displayed. Select a database from the list, and
click OK.
5.
Enter the path to your distribution library in the “Distribution library” field, or
click Browse to locate a distribution library on your local machine.
6.
Enter the name of your distribution function in the “Function name” field.
7.
Click Save to save your changes.
Adding Custom Distribution from the Command-Line
Use the
suffix entry itself:
ldapmodify
nsslapd-backend: Database1
nsslapd-backend: Database2
nsslapd-backend: Database3
nsslapd-distribution-plugin:
nsslapd-distribution-funct:
command-line utility to add the following attributes to the
/full/name/of/a/shared/library
distribution-function-name
The
nsslapd-backend
suffix. The
nsslapd-distribution-plugin
library that your plug-in uses. The
attribute specifies all of the databases associated with this
attribute specifies the name of the
nsslapd-distribution-funct
attribute
provides the name of the distribution function itself.
For more information about using the
ldapmodify
command-line utility, refer to
“Adding and Modifying Entries Using ldapmodify,” on page 58.
Maintaining Directory Databases
This section describes jobs associated with maintaining your directory databases. It
includes the following procedures:
• Placing a Database in Read-Only Mode
• Deleting a Database
• Configuring Transaction Logs for Frequent Database Updates
Chapter 3 Configuring Directory Databases 95
Page 96

Creating and Maintaining Databases
Placing a Database in Read-Only Mode
When a database is in read-only mode, you cannot create, modify, or delete any
entries. For example, you must put a database in read-only mode if you are
manually initializing a consumer.
If your Directory Server manages multiple databases, you can place all of them
into read-only mode at the same time by placing your entire server in read-only
mode. For more information, see “Placing the Entire Directory Server in
Read-Only Mode,” on page 40.
This section includes procedures for the following:
• Making a Database Read-Only Using the Console
• Making a Database Read-Only from the Command-Line
Making a Database Read-Only Using the Console
To place a database in read-only mode from the Directory Server Console:
1.
In the Directory Server Console, select the Configuration tab.
2.
Expand Data in the left pane. Expand the suffix containing the database you
want to put in read-only mode.
3.
Select the database you want to put into read-only mode.
4.
Select the Database Settings tab in the right pane.
5.
Select the “Database is read-only” checkbox.
6.
Click Save.
Making a Database Read-Only from the Command-Line
If you want to manually place a database into read-only mode, you must change
the read-only attribute,
command-line utility. The
is located in the
entry (where
cn=database_name,cn=ldbm database,cn=plugins,cn=config
database_name
NOTE By default, the name of the database created at installation time is
userRoot
96 Red Hat Directory Server Administrator’s Guide • May 2005
nsslapd-readonly
.
, to on. To do so, use the
nsslapd-readonly
attribute for a particular database
is the name of the database).
ldapmodify
Page 97

Creating and Maintaining Databases
Deleting a Database
The following procedure describes deleting a directory database using the
Directory Server Console. Deleting a database deletes the configuration
information and entries for that database only, not the physical database itself.
1.
In the Directory Server Console, select the Configuration tab.
2.
In the left navigation pane, locate the database you want to delete, and select it.
3.
From the Object menu, select Delete.
You can also right-click the database and select Delete from the pop-up menu.
The Deleting Database confirmation dialog box is displayed.
4.
Click Yes to confirm that you want to delete the database.
A progress dialog box appears telling you the steps the Directory Server
completes during the deletion.
Once deleted, the database no longer appears in the right pane.
Configuring Transaction Logs for Frequent Database Updates
When the server is going to be asked to perform frequent database updates (LDAP
adds, modifies, replication), the database transaction log files should be configured
to be on a different disk than the primary database files.
Storing the transaction log files on a separate physical disk improves performance
because the disk heads do not thrash moving between the log files and the data
files.
1.
Stop the Directory Server instance.
serverRoot/slapd-serverID/stop-slapd
2.
Create the new directory, if necessary, where the transaction logs will be
located.
mkdir /home/exampledb-txnlogs
3.
Set the appropriate file permissions on the directory so that the Directory
Server user can access it; the default Directory Server user and group are
nobody:nobody
chown nobody:nobody /home/exampledb-txnlogs
4.
Open the Directory Server instance's configuration directory.
cd
serverRoo
.
t/slapd-serverID/config
Chapter 3 Configuring Directory Databases 97
Page 98

Creating and Maintaining Databases
5.
Edit the
for the new log file path:
nsslapd-db-logdirectory: /home/exampledb-txnlogs
dse.ldif
file, and change the
nsslapd-db-logdirectory
attribute
This attribute goes on the same entry that has the
nsslapd-dbcachesize
attribute.
6.
Open the database directory.
cd
serverRoot
7.
Remove all of the
8.
Move the
9.
Start the Directory Server instance again.
serverRoott
/slapd-
log.*
/slapd-
serverID
__db.*
files.
files to the new location.
serverID
/db
/stop-slapd
Database Encryption
Directory Server offers a number of mechanisms to secure access to sensitive data,
such as access control rules to prevent unauthorized users from reading certain
entries or attributes within entries and SSL to protect data from eavesdropping
and tampering on untrusted networks. However, an unauthorized person could
potentially extract sensitive information from directory database files from copies
of files or old hard drives because information in a database is stored in plain text.
Thus, sensitive information such as government identification numbers may not
be protected enough by standard access control measures.
Since this potential information loss can present a significant security risk,
Directory Server can encrypt selected portions of its database. Once encrypted,
the data are safe even in the event that an attacker has a copy of the server’s
database files.
Database encryption encrypts attributes as they are stored within the database. When
configured, every instance of a particular attribute, even index data, is encrypted
for every entry stored in that database. Encryption and the encryption cipher are
configured per attribute per backend.
Indexed attributes may be encrypted, and database encryption is fully compatible
with indexing. The contents of the index files that are normally derived from
attribute values are also encrypted to prevent an attacker from recovering part or
all of the encrypted data from an analysis of the indexes.
98 Red Hat Directory Server Administrator’s Guide • May 2005
Page 99

Creating and Maintaining Databases
Since the server pre-encrypts all index keys before looking up an index for an
encrypted attribute, there is some hit to server performance for searches that make
use of an encrypted index, but the effect is not serious enough to offset the benefits
of indexing entries.
Encryption Keys
In order to use database encryption, the server must be configured for SSL because
database encryption uses the server’s SSL encryption key and the same PIN as SSL.
The PIN must either be entered manually upon server startup or a PIN file must be
used.
Randomly generated symmetric cipher keys are used to encrypt and decrypt
attribute data. A separate key is used for each configured cipher. These keys are
“wrapped” using the public key from the server’s SSL certificate, and the resulting
wrapped key is stored within the server’s configuration files. The effective strength
of the database encryption is never higher than the strength of the server’s SSL key.
Without access to the server’s private key, it is not possible to recover the
symmetric keys from the wrapped copies.
CAUTION There is no mechanism for recovering a lost key. Therefore, it is
especially important to backup the server’s certificate database
safely. If the server's certificate were lost, it would not be possible to
decrypt any encrypted data stored in its database.
CAUTION If the SSL certificate is going to expire and needs to be renewed,
export the encrypted backend instance before renewing the
certificate. After the certificate is renewed, re-import the exported
LDIF file.
Encryption Ciphers
The following ciphers are supported for database encryption:
• Advanced Encryption Standard (AES)
• Triple Data Encryption Standard (3DES)
All ciphers are used in Cipher Block Chaining mode.
Chapter 3 Configuring Directory Databases 99
Page 100

Creating and Maintaining Databases
The encryption cipher is configurable on a per-attribute basis and must be
selected by the administrator at the time encryption is enabled for an attribute.
Configuration can be done through the Console or through the command-line.
Once the encryption cipher is set, it should not be changed without exporting and
re-importing the data.
Encrypting Pre-existing Data
To enable database encryption on an attribute with existing stored data, you have
to export the database to LDIF first, then make the configuration change, then
re-import the data to the database. See “Exporting and Importing an Encrypted
Database,” on page 102. The server does not enforce consistency between
encryption configuration and stored data; therefore, pay careful attention that all
existing data are exported before enabling or disabling encryption.
When enabling encryption for data that is already present in the the database,
several additional security concerns arise:
• It is possible for old, unencrypted data to persist in the server’s database page
pool backing file even after a successful re-import with encryption. To
remove this data, stop the server, delete the file named
then re-start the server. This will force recovery, which deletes the backing
file. However, it is possible that the data from the deleted file could still be
recovered from the hard drive unless steps are taken to overwrite the disk
blocks that it occupied.
db/guardian
, and
• After enabling encryption and importing data, be sure to delete the LDIF file
because it contains plaintext values for the now encrypted data. Again, steps
should be taken to ensure that the disk blocks that it occupied are
overwritten.
• The unencrypted data previously stored in the server's database may persist
on disk after a successful re-import with encryption. This is because the old
database files are deleted as part of the import process. Steps should be taken
to ensure that the disk blocks that those files occupied are overwritten.
• Data stored in the server’s replication log database is never encrypted;
therefore, care should be taken to protect those files if replication is used.
• The server does not attempt to protect unencrypted data stored in memory.
This data may be copied into a system page file by the operating system. For
this reason, steps should be taken to ensure that any page or swap files are
adequately protected.
100 Red Hat Directory Server Administrator’s Guide • May 2005
 Loading...