

Page 1

Red Hat Certificate
System 7.2
Administration Guide
Publication date: November 6, 2006, and updated on August 25, 2009
Page 2

Administration Guide
Red Hat Certificate System 7.2 Administration Guide
Copyright © 2008 Red Hat, Inc.
Copyright © 2008 Red Hat, Inc..
The text of and illustrations in this document are licensed by Red Hat under a Creative Commons
Attribution–Share Alike 3.0 Unported license ("CC-BY-SA"). An explanation of CC-BY-SA is available
at http://creativecommons.org/licenses/by-sa/3.0/. In accordance with CC-BY-SA, if you distribute this
document or an adaptation of it, you must provide the URL for the original version.
Red Hat, as the licensor of this document, waives the right to enforce, and agrees not to assert,
Section 4d of CC-BY-SA to the fullest extent permitted by applicable law.
Red Hat, Red Hat Enterprise Linux, the Shadowman logo, JBoss, MetaMatrix, Fedora, the Infinity
Logo, and RHCE are trademarks of Red Hat, Inc., registered in the United States and other countries.
Linux® is the registered trademark of Linus Torvalds in the United States and other countries.
All other trademarks are the property of their respective owners.
1801 Varsity Drive
Raleigh, NC 27606-2072 USA
Phone: +1 919 754 3700
Phone: 888 733 4281
Fax: +1 919 754 3701
PO Box 13588 Research Triangle Park, NC 27709 USA
This manual covers all aspects of installing, configuring, and managing Certificate System
subsystems. It also covers management tasks such as adding users; requesting and revoking
certificates; publishing CRLs; and managing smart cards. This guide is intended for Certificate System
administrators.
Page 3

iii
About This Guide xv
1. Who Should Read This Guide ........................................................................................ xv
2. Recommended Knowledge ............................................................................................. xv
3. What Is in This Guide .................................................................................................... xv
4. Examples and Formatting ............................................................................................. xvii
5. Additional Reading ...................................................................................................... xviii
6. Giving Feedback ......................................................................................................... xviii
7. Document History ......................................................................................................... xix
1. Overview 1
1.1. Features ...................................................................................................................... 1
1.1.1. Subsystems ...................................................................................................... 1
1.1.2. Interfaces .......................................................................................................... 2
1.1.3. Logging ............................................................................................................. 2
1.1.4. Auditing ............................................................................................................. 2
1.1.5. Self-Tests .......................................................................................................... 3
1.1.6. Authorization ..................................................................................................... 3
1.1.7. Security-Enhanced Linux Support ....................................................................... 3
1.1.8. Authentication .................................................................................................... 4
1.1.9. Certificate Issuance ........................................................................................... 4
1.1.10. Certificate Profiles ............................................................................................ 4
1.1.11. CRLs ............................................................................................................... 5
1.1.12. Publishing ....................................................................................................... 5
1.1.13. Notifications ..................................................................................................... 5
1.1.14. Jobs ................................................................................................................ 5
1.1.15. Dual Key Pairs ................................................................................................ 5
1.1.16. HSMs and Crypto Accelerators ......................................................................... 5
1.1.17. Support for Open Standards ............................................................................. 6
1.1.18. Java SDK Extension Mechanism for Customization ............................................ 6
1.2. How the Certificate System Works ................................................................................ 7
1.2.1. About the Certificate Manager ............................................................................ 7
1.2.2. How the Certificate Manager Works .................................................................... 9
1.2.3. Data Recovery Manager .................................................................................. 11
1.2.4. Online Certificate Status Manager .................................................................... 11
1.2.5. Token Key Service ........................................................................................... 12
1.2.6. Token Processing System ................................................................................ 12
1.3. Deployment Scenarios ................................................................................................ 12
1.3.1. Single Certificate Manager ............................................................................... 12
1.3.2. Certificate Manager and DRM .......................................................................... 13
1.3.3. Cloned Certificate Manager .............................................................................. 14
1.3.4. Smart Card Enrollment .................................................................................... 15
1.4. System Architecture ................................................................................................... 15
1.4.1. Certificate System Instance .............................................................................. 17
1.4.2. HTTP Engine .................................................................................................. 17
1.4.3. User Interfaces ................................................................................................ 17
1.4.4. JSS and the JNI Layer .................................................................................... 18
1.4.5. NSS ................................................................................................................ 18
1.4.6. PKCS #11 ....................................................................................................... 19
1.4.7. Management Tools .......................................................................................... 19
1.4.8. JRE ................................................................................................................ 20
1.4.9. Internal Database ............................................................................................ 20
1.4.10. SSL/TLS and Supported Cipher Suites ............................................................ 20
Page 4

Administration Guide
iv
1.5. CS SDK ..................................................................................................................... 21
1.6. Support for Open Standards ....................................................................................... 21
1.6.1. Certificate Management Formats and Protocols ................................................. 21
1.6.2. Security and Directory Protocols ....................................................................... 22
2. Installation and Configuration 23
2.1. Deployment Considerations ......................................................................................... 23
2.1.1. Security Domains ............................................................................................ 24
2.1.2. Cloning a Subsystem ....................................................................................... 24
2.1.3. Self-Signed Root CA or Subordinate CA ........................................................... 24
2.2. Prerequisites .............................................................................................................. 25
2.2.1. Supported Platforms ........................................................................................ 25
2.2.2. Required Programs and Dependencies ............................................................. 26
2.2.3. Packages Installed ........................................................................................... 28
2.3. Configuration Preparation ........................................................................................... 32
2.3.1. Required Information ........................................................................................ 32
2.3.2. Default Settings ............................................................................................... 33
2.4. Configuration Setup Wizard ........................................................................................ 34
2.4.1. Security Domain Panel .................................................................................... 34
2.4.2. Subsystem Type Panel .................................................................................... 35
2.4.3. PKI Hierarchy Panel ........................................................................................ 36
2.4.4. CA Information Panel ....................................................................................... 37
2.4.5. TKS Information Panel ..................................................................................... 37
2.4.6. DRM Information Panel .................................................................................... 38
2.4.7. Authentication Directory Panel .......................................................................... 39
2.4.8. Internal Database Panel ................................................................................... 39
2.4.9. Key Store Panel .............................................................................................. 40
2.4.10. Key Pairs Panel ............................................................................................. 41
2.4.11. Subject Names Panel ..................................................................................... 42
2.4.12. Requests and Certificates Panel ..................................................................... 43
2.4.13. Export Keys and Certificates Panel ................................................................. 44
2.4.14. Administrator Panel ........................................................................................ 45
2.5. Installing the Certificate System ................................................................................. 46
2.5.1. Installing from an ISO Image ............................................................................ 46
2.5.2. Installing through up2date ................................................................................ 48
2.6. Configuring the Default Subsystem Instances ............................................................... 48
2.6.1. Configuring a CA ............................................................................................. 48
2.6.2. Configuring a DRM, OCSP, or TKS ................................................................... 50
2.6.3. Configuring a TPS ........................................................................................... 51
2.7. Creating Additional Subsystem Instances ..................................................................... 52
2.7.1. Cloning a Subsystem ....................................................................................... 53
2.8. Silent Installation ........................................................................................................ 54
2.9. Updating Certificate System Packages ........................................................................ 56
2.9.1. Updating Certificate System on Red Hat Enterprise Linux ................................... 56
2.9.2. Updating Certificate System on Solaris ............................................................. 57
2.10. Uninstalling Certificate System Subsystems ............................................................... 57
2.10.1. Removing a Subsystem Instance .................................................................... 57
2.10.2. Removing Certificate System Subsystems ....................................................... 58
3. Administrative Basics 59
3.1. Administrative Console ............................................................................................... 59
3.2. Enabling SSL Client Authentication for the Certificate System Console ........................... 60
Page 5

v
3.3. System Passwords ..................................................................................................... 62
3.3.1. Protecting the password.conf File ..................................................................... 62
3.3.2. Password-Quality Checker ............................................................................... 64
3.4. Starting, Stopping, and Restarting Certificate System Subsystems ................................. 64
3.4.1. Starting a Server Instance ................................................................................ 64
3.4.2. Stopping a Server Instance .............................................................................. 64
3.4.3. Restarting a Server Instance ............................................................................ 64
3.4.4. Restarting a Subsystem after a Machine Restart ............................................... 65
3.5. Mail Server ................................................................................................................ 65
3.6. Configuration Files ..................................................................................................... 66
3.6.1. Locating the Configuration File ......................................................................... 66
3.6.2. Editing the Configuration File ........................................................................... 66
3.6.3. Guidelines for Editing the Configuration File ...................................................... 66
3.6.4. Duplicating Configuration from One Instance to Another ..................................... 68
3.6.5. Other File Locations ........................................................................................ 68
3.6.6. Default Server Instance Locations .................................................................... 70
3.7. Using Security-Enhanced Linux ................................................................................... 72
3.8. Using Java Servlets .................................................................................................... 73
3.9. Logs .......................................................................................................................... 73
3.9.1. About Logs ...................................................................................................... 74
3.9.2. Services That Are Logged ................................................................................ 77
3.9.3. Log Levels (Message Categories) ..................................................................... 78
3.9.4. Buffered Versus Unbuffered Logging ................................................................. 80
3.9.5. Log File Rotation ............................................................................................. 80
3.9.6. Configuring Logs in the Console ....................................................................... 81
3.9.7. Configuring Logs in the CS.cfg File ................................................................... 82
3.9.8. Configuring TPS Logs ...................................................................................... 83
3.9.9. Monitoring Logs ............................................................................................... 84
3.9.10. Signing Log Files ........................................................................................... 85
3.9.11. Registering a Log Module ............................................................................... 86
3.9.12. Deleting a Log Module ................................................................................... 86
3.9.13. Signed Audit Log ........................................................................................... 86
3.10. Self-Tests ................................................................................................................. 90
3.10.1. Self-Test Logging ........................................................................................... 91
3.10.2. Self-Test Configuration ................................................................................... 91
3.10.3. Modifying Self-Test Configuration .................................................................... 91
3.11. Ports ........................................................................................................................ 92
3.11.1. About Ports ................................................................................................... 92
3.11.2. Changing a Port Number ................................................................................ 94
3.12. The Internal LDAP Database ..................................................................................... 95
3.12.1. Changing the Internal Database Configuration ................................................. 96
3.12.2. Enabling SSL Client Authentication with the Internal Database .......................... 97
3.12.3. Restricting Access to the Internal Database ..................................................... 98
3.13. Backing up and Restoring Certificate System ............................................................. 98
4. Certificate Manager 101
4.1. How the Certificate Manager Works ........................................................................... 101
4.1.1. Enrollment ..................................................................................................... 101
4.1.2. Revocation .................................................................................................... 102
4.2. Certificate Manager Certificates ................................................................................. 103
4.2.1. CA Signing Key Pair and Certificate ................................................................ 103
4.2.2. OCSP Signing Key Pair and Certificate ........................................................... 104
Page 6

Administration Guide
vi
4.2.3. SSL Server Key Pair and Certificate ............................................................... 104
4.2.4. Certificate Considerations ............................................................................... 104
4.2.5. Cross-Pair Certificates .................................................................................... 105
4.3. CA Hierarchy ............................................................................................................ 105
4.3.1. Subordination to a Public CA .......................................................................... 106
4.3.2. Subordination to a Certificate System CA ........................................................ 106
4.4. Security Domains ..................................................................................................... 106
4.4.1. The domain.xml File ...................................................................................... 107
4.4.2. Security Domain Roles ................................................................................... 108
4.4.3. Creating a Security Domain ............................................................................ 109
4.4.4. Joining a Security Domain .............................................................................. 110
4.4.5. Additional Security Domain Information ........................................................... 110
4.5. Configuring the Certificate Manager Instance ............................................................. 110
4.6. CA Certificate Reissuance ........................................................................................ 112
4.7. Changing the Rules for Issuing Certificates ................................................................ 112
4.8. Setting Restrictions on CA Certificates through Certificate Extensions .......................... 114
4.9. Creating Certificate Manager Agents and Administrators ............................................. 116
4.10. Checking the Revocation Status of Agent Certificates ............................................... 117
4.11. CRL Signing Key Pair and Certificate ....................................................................... 119
4.12. DNs in the Certificate System .................................................................................. 120
4.12.1. Extending Attribute Support .......................................................................... 121
5. Online Certificate Status Protocol Responder 125
5.1. About OCSP Services .............................................................................................. 125
5.1.1. OCSP Response Signing ............................................................................... 125
5.1.2. OCSP Responses .......................................................................................... 126
5.2. CA OCSP Services .................................................................................................. 126
5.2.1. The Certificate Manager's Internal OCSP Service ............................................ 126
5.2.2. Online Certificate Status Manager ................................................................... 126
5.3. Online Certificate Status Manager Certificates ............................................................ 127
5.3.1. OCSP Signing Key Pair and Certificate ........................................................... 127
5.3.2. SSL Server Key Pair and Certificate ............................................................... 127
5.3.3. Recognizing Online Certificate Status Manager Certificates .............................. 128
5.4. Configuring the Online Certificate Status Manager ...................................................... 128
5.5. Creating Online Certificate Status Manager Agents and Administrators ......................... 129
5.6. Configuring the Certificate Manager's Internal OCSP Service ...................................... 130
5.7. Setting up the OCSP Responder ............................................................................... 131
5.8. Identifying the CA to the OCSP Responder ................................................................ 132
5.8.1. Verify Certificate Manager and Online Certificate Status Manager Connection ..... 133
5.8.2. Configure the Revocation Info Stores .............................................................. 133
5.9. Testing the OCSP Service Setup ............................................................................... 134
5.10. Submitting OCSP Requests Using the GET Method .................................................. 135
5.11. Setting up a Redirect for Certificates Issued in Certificate System 7.1 and Earlier ......... 137
6. Data Recovery Manager 141
6.1. PKI Setup for Archiving and Recovering Keys ............................................................ 141
6.1.1. Clients That Can Generate Dual Key Pairs ...................................................... 141
6.2. Data Recovery Manager Certificates .......................................................................... 141
6.2.1. Transport Key Pair and Certificate .................................................................. 142
6.2.2. Storage Key Pair ........................................................................................... 142
6.2.3. SSL Server Certificate .................................................................................... 142
6.3. Forms for Users and Key Recovery Agents ................................................................ 142
Page 7

vii
6.4. Overview of Archiving Keys ....................................................................................... 143
6.4.1. Reasons to Archive Keys ............................................................................... 143
6.4.2. Where the Keys Are Stored ............................................................................ 143
6.4.3. How Key Archival Works ................................................................................ 143
6.5. Overview of Key Recovery ........................................................................................ 145
6.5.1. Key Recovery Agents and Their Passwords .................................................... 145
6.5.2. Key Recovery Agent Scheme ......................................................................... 146
6.6. Configuring Key Archival and Recovery Process ........................................................ 146
6.6.1. Setting up Key Archival .................................................................................. 147
6.6.2. Setting up Key Recovery ................................................................................ 147
6.6.3. Testing the Key Archival and Recovery Setup .................................................. 148
6.7. Creating Data Recovery Manager Agents and Administrators ...................................... 149
7. Token Processing System 151
7.1. Working with Multiple Instances of a Subsystem ......................................................... 151
7.1.1. Configuring Failover Support .......................................................................... 152
7.1.2. Configuring Multiple Instances for Different Functions ....................................... 152
7.2. Formatting Smart Cards ............................................................................................ 154
7.3. Resetting the Smart Card PIN ................................................................................... 154
7.4. Applet Upgrade ........................................................................................................ 154
7.5. Enrolling Smart Cards through the Enterprise Security Client ....................................... 155
7.5.1. Enabling SSL in TPS ..................................................................................... 156
7.5.2. Server-Side Key Generation and Archival of Encryption Keys ............................ 157
7.5.3. Smart Card Certificate Enrollment Profiles ....................................................... 159
7.5.4. Automating Encryption Key Recovery .............................................................. 159
7.5.5. Configuring Symmetric Key Changeover ......................................................... 161
7.5.6. Setting Token Types for Specified Smart Cards ............................................... 163
7.6. Configuring LDAP Authentication ............................................................................... 165
7.7. Token Database ....................................................................................................... 166
7.8. Configuring TPS Logging .......................................................................................... 166
7.8.1. Thread Correlation ......................................................................................... 166
7.9. TPS Configuration Parameters .................................................................................. 166
7.9.1. TKS Configuration File Parameters ................................................................. 182
8. Token Key Service 183
8.1. Overview .................................................................................................................. 183
8.2. Using Master Keys ................................................................................................... 183
8.3. Configuring the TKS to Associate the Master Key with Its Version ................................ 184
8.4. Using HSM for Generating Keys ................................................................................ 185
8.5. Creating Token Key Service Agents and Administrators .............................................. 186
9. Enterprise Security Client 189
9.1. Overview .................................................................................................................. 189
10. Managing Certificates 191
10.1. Certificate Overview ................................................................................................ 191
10.1.1. Types of Certificates .................................................................................... 191
10.1.2. Determining Which Certificates to Install ........................................................ 193
10.1.3. Certificate Data Formats ............................................................................... 195
10.1.4. Certificate Setup Wizard ............................................................................... 195
10.2. Requesting and Receiving Certificates ..................................................................... 196
10.2.1. Requesting Certificates ................................................................................. 197
10.2.2. Submitting Certificate Requests .................................................................... 212
Page 8

Administration Guide
viii
10.2.3. Retrieving Certificates from the End-Entities Page .......................................... 216
10.3. Managing User Certificates .................................................................................... 218
10.3.1. Managing Certificate System User and Agent Certificates ............................... 219
10.3.2. Importing Certificates into Mozilla Firefox ....................................................... 220
10.4. Managing the Certificate Database .......................................................................... 221
10.4.1. Installing Certificates in the Certificate System Database ................................ 221
10.4.2. Viewing Database Content ........................................................................... 225
10.4.3. Deleting Certificates from the Database ......................................................... 227
10.4.4. Changing the Trust Settings of a CA Certificate ............................................. 228
10.5. Configuring the Server Certificate Use Preferences ................................................... 229
11. Managing Tokens 231
11.1. Tokens for Storing Certificate System Keys and Certificates ....................................... 231
11.1.1. Internal Tokens ............................................................................................ 231
11.1.2. External Tokens ........................................................................................... 231
11.1.3. Considerations for External Tokens ............................................................... 231
11.2. Using Hardware Security Modules with Subsystems .................................................. 232
11.2.1. Chrysalis LunaSA HSM ................................................................................ 233
11.2.2. Installing External Tokens and Unsupported HSM ........................................... 233
11.3. Managing Tokens Used by the Subsystems .............................................................. 234
11.3.1. Viewing Tokens ............................................................................................ 234
11.3.2. Changing a Token's Password ...................................................................... 234
11.4. Detecting Tokens .................................................................................................... 234
11.5. Hardware Cryptographic Accelerators ...................................................................... 235
12. Certificate Profiles 237
12.1. About Certificate Profiles ......................................................................................... 237
12.2. How Certificate Profiles Work .................................................................................. 238
12.3. Setting up Certificate Profiles .................................................................................. 239
12.3.1. Modifying Certificate Profiles through the CA Console .................................... 239
12.3.2. Modifying Certificate Profiles through the Command Line ................................ 248
12.3.3. Populating Certificates with Directory Attributes .............................................. 251
12.3.4. Customizing the Enrollment Form ................................................................. 254
12.4. Certificate Profile Reference .................................................................................... 254
12.5. Input Reference ...................................................................................................... 255
12.5.1. Certificate Request Input .............................................................................. 255
12.5.2. CMC Certificate Request Input ...................................................................... 255
12.5.3. Dual Key Generation Input ........................................................................... 255
12.5.4. File-Signing Input ......................................................................................... 255
12.5.5. Image Input ................................................................................................. 256
12.5.6. Key Generation Input ................................................................................... 256
12.5.7. nsHcertificateRequest (Token Key) Input ....................................................... 256
12.5.8. nsNcertificateRequest (Token User Key) Input ............................................... 256
12.5.9. Subject DN Input ......................................................................................... 256
12.5.10. Subject Name Input .................................................................................... 256
12.5.11. Submitter Information Input ......................................................................... 257
12.6. Output Reference ................................................................................................... 257
12.6.1. Certificate Output ......................................................................................... 257
12.6.2. PKCS #7 Output .......................................................................................... 257
12.6.3. CMMF Output .............................................................................................. 257
12.7. Defaults Reference ................................................................................................. 258
12.7.1. Authority Info Access Extension Default ........................................................ 258
Page 9

ix
12.7.2. Authority Key Identifier Extension Default ...................................................... 259
12.7.3. Basic Constraints Extension Default .............................................................. 260
12.7.4. CRL Distribution Points Extension Default ..................................................... 261
12.7.5. Extended Key Usage Extension Default ........................................................ 263
12.7.6. Freshest CRL Extension Default ................................................................... 264
12.7.7. Issuer Alternative Name Extension Default .................................................... 266
12.7.8. Key Usage Extension Default ....................................................................... 267
12.7.9. Name Constraints Extension Default ............................................................. 268
12.7.10. Netscape Certificate Type Extension Default ................................................ 272
12.7.11. Netscape Comment Extension Default ......................................................... 272
12.7.12. No Default Extension .................................................................................. 272
12.7.13. OCSP No Check Extension Default ............................................................. 272
12.7.14. Policy Constraints Extension Default ........................................................... 273
12.7.15. Policy Mappers Extension Default ............................................................... 274
12.7.16. Signing Algorithm Default ........................................................................... 274
12.7.17. Subject Alternative Name Extension Default ................................................. 275
12.7.18. Subject Directory Attributes Extension Default .............................................. 277
12.7.19. Subject Key Identifier Extension Default ...................................................... 278
12.7.20. Subject Name Default ................................................................................ 278
12.7.21. Token Supplied Subject Name Default ......................................................... 279
12.7.22. User Supplied Extension Default ................................................................. 279
12.7.23. User Supplied Key Default .......................................................................... 280
12.7.24. User Signing Algorithm Default ................................................................... 281
12.7.25. User Supplied Subject Name Default ........................................................... 281
12.7.26. User Supplied Validity Default ..................................................................... 281
12.7.27. Validity Default ........................................................................................... 281
12.8. Constraints Reference ............................................................................................. 282
12.8.1. Basic Constraints Extension Constraint ......................................................... 282
12.8.2. Extended Key Usage Extension Constraint .................................................... 283
12.8.3. Extension Constraint .................................................................................... 283
12.8.4. Key Constraint ............................................................................................. 283
12.8.5. Key Usage Extension Constraint ................................................................... 283
12.8.6. No Constraint .............................................................................................. 285
12.8.7. Netscape Certificate Type Extension Constraint ............................................. 285
12.8.8. Signing Algorithm Constraint ......................................................................... 285
12.8.9. Subject Name Constraint .............................................................................. 285
12.8.10. Unique Subject Name Constraint ................................................................ 286
12.8.11. Validity Constraint ....................................................................................... 286
13. Revocation and CRLs 287
13.1. Revocation ............................................................................................................. 287
13.1.1. SSL Client Authenticated Revocation ............................................................ 287
13.1.2. Certificate Revocation Forms ........................................................................ 287
13.2. CMC Revocation .................................................................................................... 288
13.2.1. Setting up CMC Revocation ......................................................................... 288
13.2.2. Testing CMC Revoke ................................................................................... 289
13.3. About CRLs ............................................................................................................ 289
13.3.1. Reasons for Revoking a Certificate ............................................................... 290
13.3.2. Publishing CRLs .......................................................................................... 291
13.3.3. CRL Issuing Points ...................................................................................... 291
13.3.4. Delta CRLs .................................................................................................. 291
13.3.5. How CRLs Work .......................................................................................... 291
Page 10

Administration Guide
x
13.4. Issuing CRLs .......................................................................................................... 292
13.4.1. Configuring Issuing Points ............................................................................ 294
13.4.2. Configuring CRLs for Each Issuing Point ....................................................... 295
13.4.3. Setting CRL Extensions ................................................................................ 299
13.5. Setting Full and Delta CRL Schedules ..................................................................... 300
13.5.1. Configuring Extended Updated Intervals for CRLs in the Console .................... 301
13.5.2. Configuring Extended Updated Intervals for CRLs in CS.cfg ............................ 302
14. Publishing 303
14.1. About Publishing ..................................................................................................... 303
14.1.1. About Publishers .......................................................................................... 303
14.1.2. About Mappers ............................................................................................ 303
14.1.3. About Rules ................................................................................................. 304
14.1.4. Publishing to Files ........................................................................................ 304
14.1.5. LDAP Publishing .......................................................................................... 304
14.1.6. OCSP Publishing ......................................................................................... 305
14.1.7. How Publishing Works ................................................................................. 305
14.2. Setting up Publishing .............................................................................................. 306
14.3. Publishers .............................................................................................................. 307
14.3.1. Configuring Publishers for Publishing to a File ............................................... 307
14.3.2. Configuring Publishers for Publishing to OCSP .............................................. 309
14.3.3. Configuring Publishers for LDAP Publishing ................................................... 311
14.4. Mappers ................................................................................................................. 312
14.4.1. Configuring Mappers .................................................................................... 312
14.5. Rules ..................................................................................................................... 316
14.5.1. Modifying Publishing Rules for Certificates and CRLs ..................................... 317
14.6. Enabling Publishing ................................................................................................ 321
14.6.1. Publishing Cross-Pair Certificates ................................................................. 323
14.7. Testing Publishing to Files ....................................................................................... 323
14.8. Viewing Certificates and CRLs Published to File ....................................................... 325
14.9. Configuring the Directory for LDAP Publishing .......................................................... 325
14.9.1. Schema ....................................................................................................... 325
14.9.2. Entry for the CA ........................................................................................... 326
14.9.3. Bind DN ...................................................................................................... 327
14.9.4. Directory Authentication Method .................................................................... 327
14.10. Updating Certificates and CRLs in a Directory ........................................................ 327
14.10.1. Manually Updating Certificates in the Directory ............................................. 328
14.10.2. Manually Updating the CRL in the Directory ................................................. 329
14.11. Registering and Deleting Mapper and Publisher Plug-in Modules .............................. 329
14.12. Module Reference ................................................................................................. 330
14.12.1. Publisher Plug-in Modules .......................................................................... 330
14.12.2. Mapper Plug-in Modules ............................................................................ 333
14.12.3. Rule Instances ........................................................................................... 339
15. Authentication for Enrolling Certificates 343
15.1. Enrollment Overview ............................................................................................... 343
15.1.1. The Authentication Process .......................................................................... 343
15.2. Agent-Approved Enrollment ..................................................................................... 344
15.2.1. Configuring Agent-Approved Enrollment ........................................................ 344
15.3. Automated Enrollment ............................................................................................. 344
15.3.1. Setting up Directory-Based Authentication ..................................................... 345
15.3.2. Setting up PIN-based Enrollment .................................................................. 346
Page 11

xi
15.4. Setting up CMC Enrollment ..................................................................................... 350
15.4.1. Setting up the Server for Multiple Requests in a Full CMC Request .................. 351
15.4.2. Testing CMCEnroll ....................................................................................... 352
15.5. Certificate-Based Enrollment ................................................................................... 352
15.5.1. Setting up Certificate-Based Enrollment ......................................................... 353
15.6. Testing Enrollment .................................................................................................. 354
15.7. Managing Authentication Plug-ins ............................................................................ 355
16. User and Group Authorization 357
16.1. About Authorization ................................................................................................. 357
16.1.1. How Authorization Works ............................................................................. 357
16.1.2. Default Groups ............................................................................................ 357
16.2. Creating Users ....................................................................................................... 360
16.3. Setting up a Trusted Manager ................................................................................. 361
16.4. Modifying Certificate System User Entries ................................................................ 364
16.4.1. Changing a Certificate System User's Login Information ................................. 364
16.4.2. Changing a Certificate System User's Certificate ............................................ 365
16.4.3. Changing Members in a Group ..................................................................... 365
16.4.4. Deleting a Certificate System User ................................................................ 365
16.5. Creating a New Group ............................................................................................ 366
16.6. Authorization for Certificate System Users ................................................................ 367
16.6.1. Access Control Lists (ACLs) ......................................................................... 367
16.6.2. Access Control Instructions (ACIs) ................................................................ 367
16.6.3. Changing Privileges ..................................................................................... 367
16.6.4. How ACIs Are Formed ................................................................................. 367
16.6.5. Editing ACLs ................................................................................................ 370
16.7. ACL Reference ....................................................................................................... 372
16.7.1. certServer.acl.configuration ........................................................................... 372
16.7.2. certServer.admin.certificate ........................................................................... 373
16.7.3. certServer.admin.request.enrollment .............................................................. 373
16.7.4. certServer.auth.configuration ......................................................................... 374
16.7.5. certServer.ca.certificate ................................................................................ 374
16.7.6. certServer.ca.certificates ............................................................................... 375
16.7.7. certServer.ca.configuration ............................................................................ 375
16.7.8. certServer.ca.connector ................................................................................ 376
16.7.9. certServer.ca.clone ....................................................................................... 376
16.7.10. certServer.ca.crl ......................................................................................... 377
16.7.11. certServer.ca.directory ................................................................................ 377
16.7.12. certServer.ca.group .................................................................................... 377
16.7.13. certServer.ca.ocsp ...................................................................................... 378
16.7.14. certServer.ca.profiles .................................................................................. 378
16.7.15. certServer.ca.profile .................................................................................... 378
16.7.16. certServer.ca.requests ................................................................................ 379
16.7.17. certServer.ca.request.enrollment ................................................................. 379
16.7.18. certServer.ca.request.profile ........................................................................ 380
16.7.19. certServer.ca.systemstatus .......................................................................... 380
16.7.20. certServer.ee.certificate .............................................................................. 380
16.7.21. certServer.ee.certificates ............................................................................. 381
16.7.22. certServer.ee.certchain ............................................................................... 381
16.7.23. certServer.ee.crl ......................................................................................... 382
16.7.24. certServer.ee.profile .................................................................................... 382
16.7.25. certServer.ee.profiles .................................................................................. 382
Page 12

Administration Guide
xii
16.7.26. certServer.ee.facetofaceenrollment .............................................................. 383
16.7.27. certServer.ee.request.enrollment ................................................................. 383
16.7.28. certServer.ee.request.facetofaceenrollment .................................................. 383
16.7.29. certServer.ee.request.ocsp .......................................................................... 384
16.7.30. certServer.ee.request.revocation ................................................................. 384
16.7.31. certServer.ee.requestStatus ........................................................................ 384
16.7.32. certServer.general.configuration .................................................................. 385
16.7.33. certServer.job.configuration ......................................................................... 385
16.7.34. certServer.kra.certificate.transport ................................................................ 386
16.7.35. certServer.kra.configuration ......................................................................... 386
16.7.36. certServer.kra.connector ............................................................................. 387
16.7.37. certServer.kra.key ....................................................................................... 387
16.7.38. certServer.kra.keys ..................................................................................... 387
16.7.39. certServer.kra.request ................................................................................. 388
16.7.40. certServer.kra.requests ............................................................................... 388
16.7.41. certServer.kra.request.status ....................................................................... 388
16.7.42. certServer.kra.systemstatus ........................................................................ 389
16.7.43. certServer.log.configuration ......................................................................... 389
16.7.44. certServer.log.configuration.SignedAudit.expirationTime ................................ 390
16.7.45. certServer.log.configuration.fileName ........................................................... 390
16.7.46. certServer.log.content.SignedAudit .............................................................. 391
16.7.47. certServer.log.content ................................................................................. 391
16.7.48. certServer.ocsp.ca ...................................................................................... 392
16.7.49. certServer.ocsp.cas .................................................................................... 392
16.7.50. certServer.ocsp.certificate ........................................................................... 392
16.7.51. certServer.ocsp.configuration ...................................................................... 393
16.7.52. certServer.ocsp.crl ...................................................................................... 393
16.7.53. certServer.profile.configuration .................................................................... 393
16.7.54. certServer.publisher.configuration ................................................................ 394
16.7.55. certServer.registry.configuration ................................................................... 395
16.7.56. certServer.usrgrp.administration .................................................................. 395
17. Automated Notifications 397
17.1. About Automated Notifications ................................................................................. 397
17.1.1. Types of Automated Notifications .................................................................. 397
17.1.2. Determining End-Entity Email Addresses ....................................................... 397
17.2. Setting Up Automated Notifications .......................................................................... 398
17.2.1. Configuring Specific Notifications by Editing the Configuration File ................... 399
17.2.2. Testing Configuration .................................................................................... 400
17.3. Customizing Notification Messages .......................................................................... 401
17.3.1. Notification Message Templates .................................................................... 402
17.3.2. Token Definitions .......................................................................................... 403
18. Automated Jobs 405
18.1. About Automated Jobs ............................................................................................ 405
18.1.1. Setting up Automated Jobs ........................................................................... 405
18.1.2. Types of Automated Jobs ............................................................................. 405
18.2. Setting up the Job Scheduler .................................................................................. 406
18.2.1. Enabling and Configuring the Job Scheduler .................................................. 406
18.3. Setting up Specific Jobs .......................................................................................... 407
18.3.1. Configuring Specific Jobs Using the Certificate Manager Console .................... 408
18.3.2. Configuring Jobs by Editing the Configuration File .......................................... 410
Page 13

xiii
18.3.3. Configuration Parameters of requestInQueueNotifier ...................................... 410
18.3.4. Configuration Parameters of publishCerts ...................................................... 411
18.3.5. Configuration Parameters of unpublishExpiredCerts ....................................... 412
18.3.6. Frequency Settings for Automated Jobs ........................................................ 413
18.4. Managing Job Plug-ins ............................................................................................ 414
18.4.1. Registering or Deleting a Job Module ............................................................ 414
19. Configuring the Certificate System for High Availability 417
19.1. High Availability Overview ....................................................................................... 417
19.1.1. Architecture of a Failover System ................................................................. 417
19.1.2. Load Balancing ............................................................................................ 418
19.2. Cloning Preparation ................................................................................................ 418
19.2.1. Diagnostics .................................................................................................. 419
19.3. Testing the Cloned Configuration ............................................................................. 419
19.4. Clone-Master Conversion ........................................................................................ 420
19.4.1. Converting a Master CA into a Cloned CA ..................................................... 421
19.4.2. Converting a Cloned CA into a Master CA ..................................................... 422
19.4.3. Converting a Master OCSP into a Cloned OCSP .......................................... 423
19.4.4. Converting a Cloned OCSP into a Master OCSP .......................................... 423
A. Certificate and CRL Extensions 425
A.1. Introduction to Certificate Extensions ......................................................................... 425
A.1.1. Structure of Certificate Extensions .................................................................. 426
A.1.2. Sample Certificate Extensions ........................................................................ 427
A.2. Note on Object Identifiers ......................................................................................... 428
A.3. Standard X.509 v3 Certificate Extensions .................................................................. 429
A.3.1. authorityInfoAccess ........................................................................................ 429
A.3.2. The authorityKeyIdentifier ............................................................................... 430
A.3.3. basicConstraints ............................................................................................ 431
A.3.4. certificatePolicies ........................................................................................... 431
A.3.5. CRLDistributionPoints .................................................................................... 431
A.3.6. extKeyUsage ................................................................................................. 432
A.3.7. issuerAltName Extension ............................................................................... 433
A.3.8. keyUsage ...................................................................................................... 433
A.3.9. nameConstraints ........................................................................................... 435
A.3.10. OCSPNocheck ............................................................................................ 435
A.3.11. policyConstraints .......................................................................................... 435
A.3.12. policyMappings ............................................................................................ 436
A.3.13. privateKeyUsagePeriod ................................................................................ 436
A.3.14. subjectAltName ........................................................................................... 436
A.3.15. subjectDirectoryAttributes ............................................................................. 437
A.3.16. subjectKeyIdentifier ...................................................................................... 437
A.4. Introduction to CRL Extensions ................................................................................. 438
A.4.1. Structure of CRL Extensions .......................................................................... 438
A.4.2. Sample CRL and CRL Entry Extensions ......................................................... 439
A.5. Standard X.509 v3 CRL Extensions .......................................................................... 439
A.5.1. Extensions for CRLs ...................................................................................... 440
A.5.2. CRL Entry Extensions .................................................................................... 446
A.6. Netscape-Defined Certificate Extensions ................................................................... 448
A.6.1. netscape-cert-type ......................................................................................... 448
A.6.2. netscape-comment ........................................................................................ 448
B. Introduction to Public-Key Cryptography 449
Page 14

Administration Guide
xiv
B.1. Internet Security Issues ............................................................................................ 449
B.2. Encryption and Decryption ........................................................................................ 450
B.2.1. Symmetric-Key Encryption ............................................................................. 450
B.2.2. Public-Key Encryption .................................................................................... 451
B.2.3. Key Length and Encryption Strength ............................................................... 452
B.3. Digital Signatures ..................................................................................................... 452
B.4. Certificates and Authentication .................................................................................. 453
B.4.1. A Certificate Identifies Someone or Something ................................................ 453
B.4.2. Authentication Confirms an Identity ................................................................. 454
B.4.3. How Certificates Are Used ............................................................................. 457
B.4.4. Single Sign-on ............................................................................................... 459
B.4.5. Contents of a Certificate ................................................................................ 460
B.4.6. How CA Certificates Establish Trust ............................................................... 462
B.5. Managing Certificates ............................................................................................... 467
B.5.1. Issuing Certificates ........................................................................................ 467
B.5.2. Certificates and the LDAP Directory ................................................................ 468
B.5.3. Key Management .......................................................................................... 468
B.5.4. Revoking Certificates ..................................................................................... 469
Glossary 471
Index 485
Page 15

xv
About This Guide
This guide explains how to install, configure, and maintain the Red Hat Certificate System and how to
use it for issuing and managing certificates to end entities such as web browsers, users, servers, and
virtual private network (VPN) clients.
1. Who Should Read This Guide
This guide is intended for experienced system administrators planning to deploy the Certificate
System. Certificate System agents should refer to the Certificate System Agent's Guide for information
on how to perform agent tasks, such as handling certificate requests and revoking certificates.
2. Recommended Knowledge
Before reading this guide, be familiar with the following concepts:
• Intranet, extranet, and Internet security and the role of digital certificates in a secure enterprise,
including the following topics:
• Encryption and decryption
• Public keys, private keys, and symmetric keys
• Significance of key lengths
• Digital signatures
• Digital certificates, including different types of digital certificates
• The role of digital certificates in a public-key infrastructure (PKI)
• Certificate hierarchies
• LDAP and Red Hat Directory Server
• Public-key cryptography and the Secure Sockets Layer (SSL) protocol, including the following:
• SSL cipher suites
• The purpose of and major steps in the SSL handshake
3. What Is in This Guide
This guide contains the following elements:
• Chapter 1, Overview lists Certificate System features, an overview of how the Certificate System
works, an architectural overview of Certificate System, and lists the standards used in the product.
• Chapter 2, Installation and Configuration provides step-by-step installation instructions.
• Chapter 3, Administrative Basics provides information and procedures for performing configuration
that is common to all subsystems such as using the administrative console, starting and stopping
the server, viewing and setting logs, and running self-tests.
Page 16

About This Guide
xvi
• Chapter 4, Certificate Manager provides information and instructions for configuring the Certificate
Manager and an overview of the configuration options.
• Chapter 5, Online Certificate Status Protocol Responder provides information and instructions for
configuring an Online Certificate Status Manager.
• Chapter 6, Data Recovery Manager provides information and an overview of the configuration
options for a Data Recovery Manager.
• Chapter 7, Token Processing System describes managing tokens on smart cards through the Token
Processing System (TPS).
• Chapter 8, Token Key Service provides an overview of the Token Key Service (TKS), which
manages the master keys required set up a secure communication channel between the TPS and
the client.
• Chapter 9, Enterprise Security Client provides an overview of the Enterprise Security Client, a
cross-platform client for end users to register and manage keys and certificates on smart cards and
tokens.
• Chapter 10, Managing Certificates provides information on requesting, installing, and managing
certificates.
• Chapter 11, Managing Tokens provides information on managing user certificates using smart cards.
• Chapter 12, Certificate Profiles provides information and procedures for configuring profiles.
• Chapter 13, Revocation and CRLs provides information and procedures for configuring CRLs and
revoking certificates.
• Chapter 14, Publishing provides information and procedures for publishing certificates.
• Chapter 16, User and Group Authorization provides information and procedures for setting up
access control lists (ACL) that define authorization, creating users, and assigning users to groups to
give them the privileges defined by the group ACLs.
• Chapter 15, Authentication for Enrolling Certificates provides information and procedures for setting
up various authentication methods to automate certificate enrollment.
• Chapter 17, Automated Notifications provides information and procedures for configuring
notifications.
• Chapter 18, Automated Jobs provides information and procedures for configuring jobs.
• Chapter 19, Configuring the Certificate System for High Availability provides information about
clones and configuring the Certificate System for failover support.
• Appendix A, Certificate and CRL Extensions provides general information about certificate and CRL
extensions.
• Appendix B, Introduction to Public-Key Cryptography provides general information about public-key
cryptography.
Page 17

Examples and Formatting
xvii
4. Examples and Formatting
All of the examples for Red Hat Certificate System commands, file locations, and other usage are
given for Red Hat Enterprise Linux 5 systems. Be certain to use the appropriate commands and files
for your platform.
To start the Red Hat Certificate System:
/etc/init.d/rhpki-ca start
Example 1. Example Command
All of the tools for Red Hat Certificate System are located in the /usr/bin directory. These tools can
be run from any location without specifying the tool location.
There is another important consideration with the LDAP utilities. The LDAP tools referenced in
this guide are Mozilla LDAP, installed with Red Hat Certificate System in the /usr/dir/mozldap
directory on Red Hat Enterprise Linux.
However, Red Hat Enterprise Linux systems also include LDAP tools from OpenLDAP in the /usr/
bin directory. It is possible to use the OpenLDAP commands as shown in the examples, but you must
use the -x argument to disable SASL, which OpenLDAP tools use by default.
Certain words are represented in different fonts, styles, and weights. Different character formatting is
used to indicate the function or purpose of the phrase being highlighted.
Formatting Style Purpose
Monospace font Monospace is used for commands, package names, files and
directory paths, and any text displayed in a prompt.
Monospace
with a
background
This type of formatting is used for anything entered or returned
in a command prompt.
Italicized text Any text which is italicized is a variable, such as
instance_name or hostname. Occasionally, this is also used to
emphasize a new term or other phrase.
Bolded text Most phrases which are in bold are application names, such as
Cygwin, or are fields or options in a user interface, such as a
User Name Here: field or Save button.
Other formatting styles draw attention to important text.
NOTE
A note provides additional information that can help illustrate the behavior of the system or
provide more detail for a specific issue.
IMPORTANT
Important information is necessary, but possibly unexpected, such as a configuration
change that will not persist after a reboot.
Page 18

About This Guide
xviii
WARNING
A warning indicates potential data loss, as may happen when tuning hardware for
maximum performance.
5. Additional Reading
The Certificate System Administrator's Guide describes how to set up, configure, and administer the
Certificate System subsystems and how to configure backend certificate management functions, such
as publishing and logging. The Administrator's Guide also describes how to configure subsystems to
relate to one another to manage certificates and tokens and how to manage certificates and tokens;
this guide is targeted for Certificate System administrators.
The Certificate System Agent's Guide describes how agents — users responsible for processing
certificate requests and managing other aspects of certificate management — can use the Certificate
System subsystems web services pages to process certificate requests, key recovery, OCSP requests
and CRLs, and other functions.
The documentation for Certificate System includes the following guides:
• Certificate System Administrator's Guide explains all administrative functions for the Certificate
System, such as adding users, creating and renewing certificates, managing smart cards, publishing
CRLs, and modifying subsystem settings like port numbers.
• Certificate System Agent's Guide details how to perform agent operations for the CA, RA, DRM, and
TPS subsystems through the Certificate System agent services interfaces.
• Certificate System Command-Line Tools Guide covers the command-line scripts supplied with Red
Hat Certificate System.
• Managing Smart Cards with the Enterprise Security Client explains how to install, configure, and use
the Enterprise Security Client, the user client application for managing smart cards, user certificates,
and user keys.
• Certificate System Migration Guides cover version-specific procedures for migrating from older
versions of Certificate System to Red Hat Certificate System 7.2.
• Release Notes contains important information on new features, fixed bugs, known issues and
workarounds, and other important deployment information for Red Hat Certificate System 7.2.
Additional Certificate System information is provided in the Certificate System SDK, an online
reference to HTTP interfaces, javadocs, samples, and tutorials related to Certificate System. A
downloadable zip file of this material is available for user interaction with the tutorials.
For the latest information about Red Hat Certificate System, including current release notes, complete
product documentation, technical notes, and deployment information, see http://www.redhat.com/docs/
manuals/cert-system/.
6. Giving Feedback
If there is any error in this Administrator's Guide or there is any way to improve the documentation,
please let us know. Bugs can be filed against the documentation for Red Hat Certificate System
Page 19

Document History
xix
through Bugzilla, http://bugzilla.redhat.com/bugzilla. Make the bug report as specific as possible, so
we can be more effective in correcting any issues:
• Select the Red Hat Certificate System product.
• Set the component to Doc - administration-guide.
• Set the version number to 7.2.
• For errors, give the page number (for the PDF) or URL (for the HTML), and give a succinct
description of the problem, such as incorrect procedure or typo.
For enhancements, put in what information needs to be added and why.
• Give a clear title for the bug. For example, "Incorrect command example for setup
script options" is better than "Bad example".
We appreciate receiving any feedback — requests for new sections, corrections, improvements,
enhancements, even new ways of delivering the documentation or new styles of docs. You are
welcome to contact Red Hat Content Services directly at docs@redhat.com.
7. Document History
Revision 7.2.7 August 25, 2009 Ella Deon Lackey
Rewrote the section on issuing delta and full CRLs, per Bugzilla #510132.
Changed PK12Export to pk12util in the cloning configuration overview, per Bugzilla #519058.
Revision 7.2.5 February 22, 2009 Ella Deon Lackey dlackey@redhat.com
Removed all references to certificate renewal, per Bugzilla #325361 and #433360.
Corrected error about custom logs, per Bugzilla #449847.
Minor edits for the term "policy," per Bugzilla #472598.
Revision 7.2.6 February 27, 2009 Ella Deon Lackey dlackey@redhat.com
Removed incorrect note about useing certutil to process a certificate request, per Bugzilla #241972.
Revision 7.2.5 February 22, 2009 Ella Deon Lackey dlackey@redhat.com
Removed all references to certificate renewal, per Bugzilla #325361 and #433360.
Corrected error about custom logs, per Bugzilla #449847.
Minor edits for the term "policy," per Bugzilla #472598.
Revision 7.2.4 January 14, 2009 Ella Deon Lackey dlackey@redhat.com
Updates per Errata RHSA 2000:0006.
Added information for using the GET method to post OCSP requests and a section for debug logging
for Errata RHSA 2008:0577.
Expanding and clarifying the process for configuring symmetric key changeover and adding a new
parameter to use to configure it, per Bugzilla 245267.
Added information for sending OCSP request information to the debug log; added new debug log
description, per Bugzilla 243939.
Added information for sending OCSP requests through GET, per Bugzilla 238514, 308161, and
249229.
Changing URI parameter for certificate extensions to URINAME.
Removed an incorrect reference to a plug-in for the Enterprise Security Client.
Revision 7.2.3 August 11, 2008 Ella Deon Lackey dlackey@redhat.com
Page 20

About This Guide
xx
Edited to token management sections per Bugzilla 455345.
Revision 7.2.2 July 3, 2008 Ella Deon Lackey dlackey@redhat.com
Added information for configuring client authentication, per Bugzilla 236253.
Added information that there can be CRLs can be updated at multiple preset times, per Bugzilla
439547.
Revision 7.2.1 July 1, 2008 Ella Deon Lackey dlackey@redhat.com
Changes to the User Supplied Extension Default section for Erratum RHSA 2008:0500.
Corrected TPS logging levels and clarified the log levels section, per Bugzilla 248370.
Clarified regular expression description.
Corrected TPS delimiter example, per Bugzilla 246031.
Corrected uninstall example, per Bugzilla 224453.
Removed references to DSA and changed them to RSA, per Bugzilla 224697.
Removed references to ECC, per Bugzilla 304141.
Revision 7.2.0 November 7, 2006 Ella Deon Lackey dlackey@redhat.com
Initial draft.
Page 21

Chapter 1.
1
Overview
This chapter provides an overview of Red Hat Certificate System, a highly configurable set of software
components and tools for creating, deploying, and managing certificates. Based on open standards for
certificate management, Certificate System provides a complete, customizable, robust, scalable, and
high-performance certificate management solution for public-key infrastructure (PKI), extranets, and
intranets.
1.1. Features
This section discusses the Certificate System features.
1.1.1. Subsystems
The Certificate System is installed on each host running a Certificate System subsystem. The
subsystems on that host are then installed with a default configuration covering basic administrative
tasks like logging and containing configurable, subsystem-specific plug-in modules. More than one
subsystem can be installed on each host, or multiple instances of one subsystem can be installed on
the same host or on different hosts.
The Certificate System has five highly-configurable subsystems, which provide flexibility in designing
the PKI. The five subsystems that comprise Certificate System are as follows:
• The Certificate Manager is the subsystem that provides Certificate Authority functionality for issuing,
revoking, and publishing certificates and creating and publishing CRLs. See Chapter 4, Certificate
Manager for details.
• The Online Certificate Status Manager is an optional subsystem that provides OCSP responder
services, which means it stored CRLs for CAs and can distribute the load for verifying certificate
status. See Chapter 5, Online Certificate Status Protocol Responder for details.
• The Data Recovery Manager (DRM) is an optional subsystem that provides private encryption key
storage and retrieval. See Chapter 6, Data Recovery Manager for details.
• The Token Key Service (TKS) manages one or more master keys required to set up secure
channels directly to the token management system. The privileged operations such as key
generation can only be requested on the tokens through a secure channel.
• The Token Processing System (TPS) provides the registration authority functionality in the token
management infrastructure and establishes secure channels between the Enterprise Security Client
and the back-end subsystems. See Chapter 7, Token Processing System for more information on
using the TPS to manage tokens.
The subsystems are highly integrated with each other depending on the deployment scenario and use.
OCSP and CA instances work together for CRL publishing and certificate verification. CA and DRM
instances work together for key recovery and archival. Smart card tokens, which processed through
a user interface called the Enterprise Security Client, are managed by the TPS. The TPS, however,
is configured to work with at least two essential subsystem instances, a TKS to generate keys and
a CA to process token operations. A TPS can also be configured to use a DRM for server-side key
generation and key archival and recovery.
Page 22

Chapter 1. Overview
2
1.1.2. Interfaces
Each of the subsystems contains interfaces for interaction with various portions of the subsystem. The
CA, DRM, OCSP, and TKS subsystems have an administrative console to manage and configure the
subsystem itself, such as adding users and certificates and viewing logs. The CA, OCSP, DRM, and
TPS subsystems have an agent interface specific to that subsystem which allows agents to perform
the tasks assigned to them. A Certificate Manager has an end-entity services interface for end entities
to enroll in the PKI.
Note
Not all subsystems have all types of interfaces. The TKS subsystem does not have an
agent interface. The TPS subsystem does not have an administrative console, but rather
has administrative functions that are accessible through the HTML agent services page.
Only a CA has an end-entities page.
The three types of interfaces are described as follows:
• Administrative Interface - The administrative interface, a Java™ application called the Console,
provides a GUI interface for performing administrative tasks and configuring plug-in modules. This
interface is similar for subsystems. The administrative interface requires user ID and password
authentication and can be configured for SSL certificate-based authentication.
• Agent Services Interface - The agent services interface is a customizable HTML interface used to
perform agent tasks, such as editing and approving requests for issuing or revoking certificates. The
agent services interface for a CA, DRM, OCSP, and TPS are specific to those subsystems.
• End-Entity Services Interface - The end-entity interface is a customizable HTML interface used
by end entities to enroll in the PKI, request certificates, revoke certificates, and pick up issued
certificates. It contains forms for different types of enrollments and for enrolling different types of end
entities. The Certificate Manager has an end-entity services interface; the other subsystems do not.
1.1.3. Logging
The Certificate System and each subsystem produce extensive system and error logs that record
system events so that the systems can be monitored and debugged. All log records are stored in
the local file system for quick retrieval. Logs are configurable, so logs can be created for specific
types of events and at the desired logging level. Custom logs can be created using the CS SDK. See
Section 3.9, “Logs” for details.
1.1.3.1. Signing Logs
Certificate System allows logs to be signed digitally before archiving them or distributing them
for auditing. This feature enables log files to be checked for tampering after being signed. See
Section 3.9.10, “Signing Log Files” for details.
1.1.4. Auditing
The Certificate System maintains audit logs for all events, such as requesting, issuing and revoking
certificates and publishing CRLs. These logs are then signed. This allows authorized access or activity
to be detected. An outside auditor can then audit the system if required. The assigned auditor user
account is the only account which can view the signed audit logs. This user's certificate is used to
Page 23

Self-Tests
3
sign and encrypt the logs. Audit logging is configured to specify the events that are logged. See
Section 3.9.13, “Signed Audit Log” for details.
1.1.5. Self-Tests
The Certificate System provides the framework for system self-tests that are automatically run at
startup and can be run on demand. A set of configurable self-tests are already included with the
Certificate System, and additional self-tests can be created through the CS SDK. See Section 3.10,
“Self-Tests” for details.
1.1.6. Authorization
Certificate System users can be assigned to groups, and they then have the privileges of whichever
group they are members. A user only has privileges for the instance of the subsystem in which the
user is created and the privileges of the group to which the user is a member.
The Certificate System provides an authorization framework for creating groups and assigning access
control to those groups. The default access control on preexisting groups can be modified, and access
control can be assigned to individual users and IP addresses. Access points for authorization have
been created for the major portions of the system, and access control rules can be set for each point.
Additional access points and access control lists (ACLs) can be created through the CS SDK.
The Certificate System is configured by default with four user types with different access levels to the
system:
• Administrators , who can perform any administrative or configuration task.
• Agents , who can edit and approve requests.
• Auditors , who can view and configure audit logs.
• Trusted managers , which are subsystems with trusted relationship with another subsystem.
Additionally, when a security domain is created, the CA subsystem which hosts the domain is
automatically granted the role of Security Domain Administrator, which gives the subsystem the
ability to manage the security domain and the subsystem instances within it. Other security domain
administrator roles can be created for the different subsystem instances. These roles are described in
Section 4.4.2, “Security Domain Roles”.
1.1.7. Security-Enhanced Linux Support
Security-enhanced Linux, or SELinux, is a collection of mandatory access control rules which are
enforced across a system to restrict unauthorized access and tampering. These mandatory access
controls limit users and applications to the lowest amount of access possible for them to operate.
Processes or applications, such as CGIs, may have special policies in place to enable them to run
under the restricted access rules.
The Certificate System is able to run under SELinux configuration, which enhances the security of
the information created and maintained by the Certificate System. All Certificate System subsystems
can be installed and run with SELinux policies fully enforced. By default, the Certificate System
subsystems run unconfined by SELinux policies.
Page 24

Chapter 1. Overview
4
1.1.8. Authentication
Certificate System provides authentication options for certificate enrollment. These include agentapproved enrollment, in which an agent processes the request, and automated enrollment, in which
an authentication method is used to authenticate the end entity and then the CA automatically issues
a certificate. CMC enrollment is also supported, which automatically processes a request approved by
an agent.
1.1.9. Certificate Issuance
The Certificate System supports enrolling and issuing certificates and processing certificate requests
from a variety of end entities, such as web browsers, servers, and virtual private network (VPN)
clients. Issued certificates conform to X.509 version 3 standards.
The Certificate Manager can issue certificates with the following characteristics:
• Certificates that are X.509 version 3-compliant
• Unicode support for the certificate subject name and issuer name
• Support for empty certificate subject names
• Support for customized subject name components
• Support for customized extensions
Additionally, smart cards can have certificates enrolled and maintained through the Enterprise Security
Client. The Enterprise Security Client communicates directly with the TPS system, which, in turn,
processes requests through the CA and DRM subsystems. Certificates are generated automatically
when the token is first formatted, and all additional certificates belonging to the user can be imported
onto the token. For more information about certificates being issued through the Enterprise Security
Client, see the Certificate System Enterprise Security Client Guide, which is available at http://
redhat.com/docs/manuals/cert-system/. For information about configuring subsystems to manage
smart cards, see Chapter 7, Token Processing System.
1.1.10. Certificate Profiles
The Certificate System uses certificate profiles to configure the content of the certificate, the
constraints for issuing the certificate, the enrollment method used, and the input and output forms for
that enrollment. A single certificate profile is associated with issuing a particular type of certificate.
A set of certificate profiles is included for the most common certificate types; the profile settings
can be modified. Certificate profiles are configured by an administrator, and then sent to the agent
services page for agent approval. Once a certificate profile is approved, it is enabled for use. A
dynamically-generated HTML form for the certificate profile is used in the end-entities page for
certificate enrollment, which calls on the certificate profile. The server verifies that the defaults and
constraints set in the certificate profile are met before acting on the request and uses the certificate
profile to determine the content of the issued certificate.
Additional certificate profile plug-in modules can be created using the CS SDK. See Chapter 12,
Certificate Profiles for details.
Page 25

CRLs
5
1.1.11. CRLs
The Certificate System can create certificate revocation lists (CRLs) from a configurable framework
which allows user-defined issuing points so a CRL can be created for each issuing point. Delta
CRLs can also be created for any issuing point that is defined. CRLs can be issued for each type of
certificate or for a specific subset of a type of certificate. The extensions used and the frequency and
intervals when CRLs are published can all be configured.
The Certificate Manager issues X.509-standard CRLs. A CRL can be automatically updated whenever
a certificate is revoked or at specified intervals. See Chapter 13, Revocation and CRLs for details.
1.1.12. Publishing
Certificates can be published to files and an LDAP directory, and CRLs to files, an LDAP directory, and
an OCSP responder. The publishing framework provides a robust set of tools to publish to all three
places and to set rules to define with more detail which types of certificates or CRLs are published
where. The default publishing modules can be enabled and configured, or additional publishing plug-in
modules can be created using the CS SDK. See Chapter 14, Publishing for details.
1.1.13. Notifications
The notification feature sets up automated messages when a particular event occurs, such as when
a certificate is issued or revoked. The notification framework comes with default modules that can be
enabled and configured, or additional notification plug-in modules can be created using the CS SDK.
See Chapter 17, Automated Notifications for details.
1.1.14. Jobs
The jobs feature sets up automated jobs that run at defined intervals. The default jobs can be enabled
and configured, or additional jobs plug-in modules can be created using the CS SDK. See Chapter 18,
Automated Jobs for details.
1.1.15. Dual Key Pairs
The Certificate System supports generating dual key pairs, separate key pairs for signing and
encrypting email messages and other data. To support separate key pairs for signing and encrypting
data, dual certificates are generated for end entities, and the encryption keys are archived. If a client
makes a certificate request for dual key pairs, the server issues two separate certificates.
1.1.16. HSMs and Crypto Accelerators
The Certificate System supports hardware security modules (HSMs) and crypto accelerators provided
by third-party vendors of PKCS #11-compliant tokens.
The server can be configured to use different PKCS #11 modules to generate and store key pairs
(and certificates) for all Certificate System subsystems � CA, DRM, OCSP, TKS, and TPS. PKCS #11
hardware devices also provide key backup and recovery features for the information stored on the
hardware token. Refer to the PKCS #11 vendor documentation for information on retrieving keys from
the tokens.
Page 26

Chapter 1. Overview
6
1.1.17. Support for Open Standards
The Certificate System supports open standards and protocols so that its subsystems can
communicate across a heterogeneous computing environment. Some of the standards and areas
which the Certificate System supports include the following:
• Formulates, signs, and issues industry-standard X.509 version 3 public-key certificates; version 3
certificates include extensions that make it easy to include organization-defined attributes. These
certificates are used for extranet and Internet authentication.
• Supports the RSA public-key algorithm for signing and encryption, and the MD2, MD5, SHA-1,
SHA-256, and SHA-512 algorithms for hashing.
• Supports signature key lengths of up to 4096 bits for RSA.
• Supports multiple message formats, such as KEYGEN/SPAC, CRMF/CMMF, and PKCS #10 and
CMC for certificate requests. All requests are delivered to the Certificate System over HTTP or
HTTPS.
• Supports certificate formats for SSL-based client and server authentication, secure Multipurpose
Internet Mail Extensions (S/MIME) message signing and encryption, and VPN clients.
• Supports generating and publishing CRLs conforming to X.509 version 1 and 2.
• Publishes certificates and CRLs to any LDAP-compliant directory over LDAP and HTTP/HTTPS
connections.
• Publishes certificates and CRLs to a flat file for importing into other resources. For example, the
sample code for Flat File CRL and certificate publisher can be customized to store certificates and
CRLs in an Oracle RDBMS.
• Publishes CRLs to an online validation authority (or OCSP responder) for real-time certificate
verification by OCSP-compliant clients.
1.1.18. Java SDK Extension Mechanism for Customization
The Java™ software development kit (SDK) provided with the Certificate System includes APIs and
tutorials for customizing different aspects of the system. The following modules can be customized
and created:
• Authentication
• Authorization
• Logs
• Certificate Profiles
• Jobs
• Mapper and publisher classes
Page 27

How the Certificate System Works
7
1.2. How the Certificate System Works
The Certificate System manages certificates through a flexible, scalable system for issuing and
publishing certificates; creating and publishing CRLs; and providing key storage and retrieval
capabilities.
The Certificate Manager is the central point of the Certificate System; this subsystem accepts
requests, generates and manages certificates, and generates and manages CRLs and revoked
certificates. The Online Certificate Status Manager handles validity requests for certificates issued by
the Certificate Manager, informing clients whether the certificate is still in effect and valid or has been
revoked or expired. The Data Recovery Manager (DRM) stores keys and certificates and can recover
the keys if a token is lost or damaged, so that encrypted information can still be accessed. The Token
Key Service and Token Processing System work together to manage tokens which contain the userspecific keys and certificates.
The following sections describe the subsystems in more detail.
1.2.1. About the Certificate Manager
The Certificate Manager subsystem provides the capability of a Certificate Authority (CA). It can issue,
revoke, and publish certificates, as well as compile and publish CRLs. Since the Certificate Manager
acts as a CA, it can be configured as a self-signing CA, where it is the root CA, or it can act as a
subordinate CA, where it obtains its signing certificate from another CA.
1.2.1.1. Certificate Manager Flexibility and Scalability
Multiple CAs can be configured to form a vertical or horizontal chain of CAs. A vertical hierarchy
has a root CA (that is either self-signing or subordinate to a public CA) and then one or more CAs
subordinate to this root CA. The subordinate CAs can have more CAs below them, forming a chain of
CAs. A horizontal arrangement has a CA which is duplicated, or cloned, so that two CAs are set up in
an identical manner and use the same CA signing certificate but issue certificates from a different set
of serial numbers.
The different possible Certificate Manager deployments provide flexibility to the PKI through the
following features:
• Configuration as either a root or subordinate CA
• High-availability cloning to allow CAs with identical functionality, keys, and certificates to issue
certificates with different sets of serial numbers.
1.2.1.1.1. Root or Subordinate CA
The Certificate System CA can function as a root CA, meaning that the server signs its own CA
signing certificate as well as other CA signing certificates, creating an organization-specific CA
hierarchy. The server can alternatively be configured as a subordinate CA, meaning the server's CA
signing key is signed by another CA in an existing CA hierarchy. See Section 2.1.3, “Self-Signed Root
CA or Subordinate CA” for details.
1.2.1.1.2. Linked CA
The Certificate System Certificate Manager can function as a linked CA, chaining up to many thirdparty or public CAs for validation; this provides cross-company trust, so applications can verify
Page 28

Chapter 1. Overview
8
certificate chains outside the company certificate hierarchy. A Certificate Manager is chained to a thirdparty CA by requesting the Certificate Manager's CA signing certificate from the third-party CA.
1.2.1.1.3. CA Cloning
Instead of creating a hierarchy of root and subordinate CAs, it is possible to create multiple clones of
a Certificate Manager and configure each clone to issue certificates that fall within a distinct range of
serial numbers. Because clone CAs and original CAs use the same CA signing key and certificate to
sign the certificates they issue, the issuer name in all the certificates is the same. Clone CAs and the
original Certificate Managers issue certificates as if they are a single CA. These servers can be placed
on different hosts for high availability failover support. See Chapter 19, Configuring the Certificate
System for High Availability for information on configuring clones for failover in a Certificate System
system.
1.2.1.2. Cross-Pair Certificates
It is possible to create a trusted relationship between two separate CAs by issuing and storing crosssigned certificates between these two CAs. By using cross-signed certificate pairs, certificates issued
outside the organization's PKI can be trusted within the system.
1.2.1.3. Certificate Manager Functionality
The Certificate Manager issues and revokes certificates when it receives signed requests. These
requests can come from its own agents (users who are assigned privileges to approve enrollment
and revocation requests) or from a third-party application that uses its agent certificate (this agent
certificate must be set up for CMC enroll or revoke with the Certificate Manager).
The Certificate Manager also compiles lists of revoked certificates, called certificate revocation lists
(CRLs), that it can publish to files, an LDAP directory, or an OCSP service.
The Certificate Manager maintains a database of issued certificates and processed requests, so that it
can track expiration and revocation.
1.2.1.4. Types of Certificates
Certificate System can issue and manage the following certificates:
• CA signing certificates
• OCSP signing certificates
• Cross-signed pair certificates
• SSL server certificates
• VPN client certificates
• End user certificates
This list is not comprehensive; many other types of certificates can be issued by the Certificate
System.
Page 29

How the Certificate Manager Works
9
1.2.1.5. Revocation and CRLs
Revoking certificates can be initiated either by an agent or by the end user. An administrator can also
revoke the certificates of any of the subsystems or agents.
The Certificate System also supports CMC revocation. When the CMCAuth plug-in is enabled, CMC
enrollment and CMC revocation are both enabled. CMC revocation sends signed revocation requests
that are automatically processed.
The Certificate System can create certificate revocation lists (CRLs) that it can publish to files, an
LDAP directory, or to an OCSP responder. It is also possible to create CRLs through certificate issuing
points, which allows more than one CRL to be defined by the issuing point. Lastly, creating delta CRLs
creates a list which contains only the certificates that were revoked since the last CRL was produced.
See Chapter 13, Revocation and CRLs for details.
1.2.2. How the Certificate Manager Works
The next sections describe the different operations of the Certificate Manager and the associated
processes and configuration settings.
1.2.2.1. Accepting Enrollment Requests
The Certificate Manager server has an end-entities page with the forms for different types of
certificates and users. This interface can be customized to limit the forms that are available, change
the appearance of the pages, or add or delete fields. Certificate requests that come through the
Certificate Managers end-entities page are processed by the Certificate Manager. If it is an agentapproved enrollment, an agent of the Certificate Manager must approve the request. If it is an
automated enrollment, the request is approved if the end entity supplies the correct information and
authenticates successfully.
1.2.2.2. Authentication Methods
Authentication plug-ins set up automated enrollment and configure the methods for the end entity
to authenticate itself. For agent-approved enrollment, the agent approves the request by default.
Each end-entity form is associated with a particular authentication method which is configured in the
certificate profile, either one of the automated methods or the agent-approved method. The Certificate
Manager processes the request according to the method associated with the form.
1.2.2.3. Processing Requests
When the Certificate Manager processes requests from its end-entities page, it first considers the
authentication method. If it is an agent-approved authentication method, the request is queued in
the agent services interface where it awaits agent approval. The agent can change some aspects of
the certificate that will be issued and can approve, deny, or change the status of the request. For an
automated enrollment, the CA authenticates the user and continues processing the request.
The Certificate Manager next evaluates the request to ensure that it meets the certificate profile set for
this type of enrollment.
Certificate profiles connect an authentication method and certificate type to a set of constraints and
certificate content definitions (defaults). A single module can be configured for a type of certificate
to use a specific authentication method and set constraints for the certificate, as well as defining the
Page 30

Chapter 1. Overview
10
certificate content. The default certificate profiles can be modified and new custom modules created.
See Chapter 12, Certificate Profiles for details.
If the policies in the certificate profile are not met, the request is rejected. If they are met, the certificate
is issued.
1.2.2.4. Creating Certificates
The Certificate Manager issues certificates when it receives signed requests either from agents (users
who are assigned privileges to approve enrollment and revocation requests) or from a third-party
application that is set up for CMC enroll with the Certificate Manager.
The Certificate Manager creates the certificate using the information in the request and from the
certificate profile that are set.
1.2.2.5. Publishing Certificates
Certificates can be published to a file, an LDAP directory, or OCSP responder. Configuring publishing
sets rules to determine which certificates are published using which method and where they are
published. See Chapter 14, Publishing for details.
1.2.2.6. Key Archival
If a CA is configured with a DRM, then the private keys are archived in the DRM during certificate
enrollment. See Chapter 6, Data Recovery Manager for details.
1.2.2.7. Storing Certificate Requests and Certificates
When it issues a certificate, the Certificate Manager stores both the certificate and the certificate
request in its internal database.
1.2.2.8. Revoking Certificates
End entities can submit certificate revocation requests in the end-entities page if they lose their private
key or if their certificate has been compromised. When an end entity requests a revocation, the
request is sent to the agent services interface for agent approval.
An agent can revoke a certificate if the owner of the certificate is unwilling or unable to do so.
When the certificate is revoked, it is marked revoked in the internal database and in the publishing
system. The certificate is added to the certificate revocation list (CRL) produced by the Certificate
Manager. See Chapter 13, Revocation and CRLs for details.
1.2.2.9. CRLs
Whenever a certificate is revoked, any CRLs that are set up are edited and updated in the internal
database. It is published to a file, an LDAP directory, or an OCSP responder, if these services have
been set up. The CA can be configured to issue CRLs and define CRL issuing points that define which
certificates go into each CRL.
CRL configuration grants flexibility to define which CRL is published where, the extensions contained
in a CRL, and the frequency and intervals when a CRL are published. Publishing delta CRLs
publishes a list of only those certificates that have been revoked since a certain date. See Chapter 13,
Revocation and CRLs for details.
Page 31

Data Recovery Manager
11
1.2.3. Data Recovery Manager
The Data Recovery Manager (DRM) is an optional subsystem that acts as a Key Recovery Authority.
When configured in conjunction with a Certificate Manager, the DRM stores private encryption keys as
part of the certificate enrollment process. Private encryption keys archived in a DRM are recovered in
a PKCS #12 file only after multiple key recovery agents approve the recovery request.
NOTE
The DRM archives encryption keys. It does not archive signing keys, since archiving
signing keys undermines the non-repudiation properties of signing keys.
1.2.3.1. Key Archival
If a DRM is set up as part of the PKI, the private encryption key for an end entity is requested and
stored when the enrollment request is made.
1.2.3.2. Key Retrieval
If a DRM is set up as part of the PKI, the users' private encryption keys can be retrieved to decrypt
messages or other documents that have been encrypted with the private encryption key.
Version 7.1 of Red Hat Certificate System introduced a new m-of-n, ACL-based recovery scheme to
replace the old m-of-n, secret-splitting-based recovery scheme.
In the old scheme, the password for the storage token was split and protected by individual recovery
agent passwords. This made it hard to access the storage private, but it did not allow CS to fully
leverage the key protection facility provided by the underlying hardware token.
In the new scheme, CS uses its existing access control scheme to ensure recovery agents are
appropiately authenticated via SSL, and ensures that the agent belongs to the specific recovery agent
group. The recovery request is executed only when m-of-n recovery agents have granted authorization
to the request.
By default, the DRM sets up a 1-of-1 ACL-based recovery scheme, and the agent must belong to the
group "Data Recovery Manager Agents". You can change the scheme by modifying the appropriate
parameters in the CS.cfg file. Refer to Chapter 6, Data Recovery Manager for more information on
this topic.
1.2.4. Online Certificate Status Manager
The Online Certificate Status Manager is an optional subsystem that acts as an OCSP service.
Although the Certificate Manager is configured with an internal OCSP service, an external OCSP
responder is offered as a separate subsystem to provide OCSP service outside a firewall while the
Certificate Manager resides inside a firewall or to balance the load of requests on the Certificate
Manager.
The Online Certificate Status Manager performs the task of an online certificate validation authority by
enabling OCSP-compliant clients to verify certificate status. (An online certificate-validation authority
is often referred to as an OCSP responder.) The Online Certificate Status Manager can also receive
CRLs from multiple Certificate Managers, and clients can query the Online Certificate Status Manager
for the revocation status of certificates issued by all the Certificate Managers.
Page 32

Chapter 1. Overview
12
When an OCSP responder is set up with a Certificate Manager, and publishing is set up to the OCSP
responder, CRLs are published to the OCSP responder when they are issued or updated.
1.2.5. Token Key Service
The Token Key Service (TKS) provides secure channels for communication between smart card
tokens and a TPS instance. It creates these channels by using a pre-generated master key to derive
secret keys that are specific for each individual token enrolled through the TPS. These secure
channels allow the commands and keys sent to the smart card to be encrypted, and the shared
secrets between tokens and the TKS help the smart card validate that the privileged commands
sent to it are from the appropriate TPS. During server-side key generation, the TKS also generates
transport keys which wrap, or encrypt, the user's private keys to secure them during transit.
1.2.6. Token Processing System
The Token Processing System (TPS) is the conduit between the Enterprise Security Client, the user
interface for end users to manage their smart cards, and the other subsystems in the Certificate
System. It automatically initiates certificate enrollments with the CA and key recovery through the
DRM. It uses the TKS to generate and store master keys used to derive token-specific secret keys.
1.3. Deployment Scenarios
1.3.1. Single Certificate Manager
Some deployments require a single Certificate Manager to handle all end-entity interactions. No DRM
is necessary to provide key archival or recovery capabilities, and no OCSP is required for certificate
verification. This Certificate Manager can use a signing certificate issued by a public certificate
authority or its self-signed CA signing certificate to sign all the certificates it issues.
Page 33
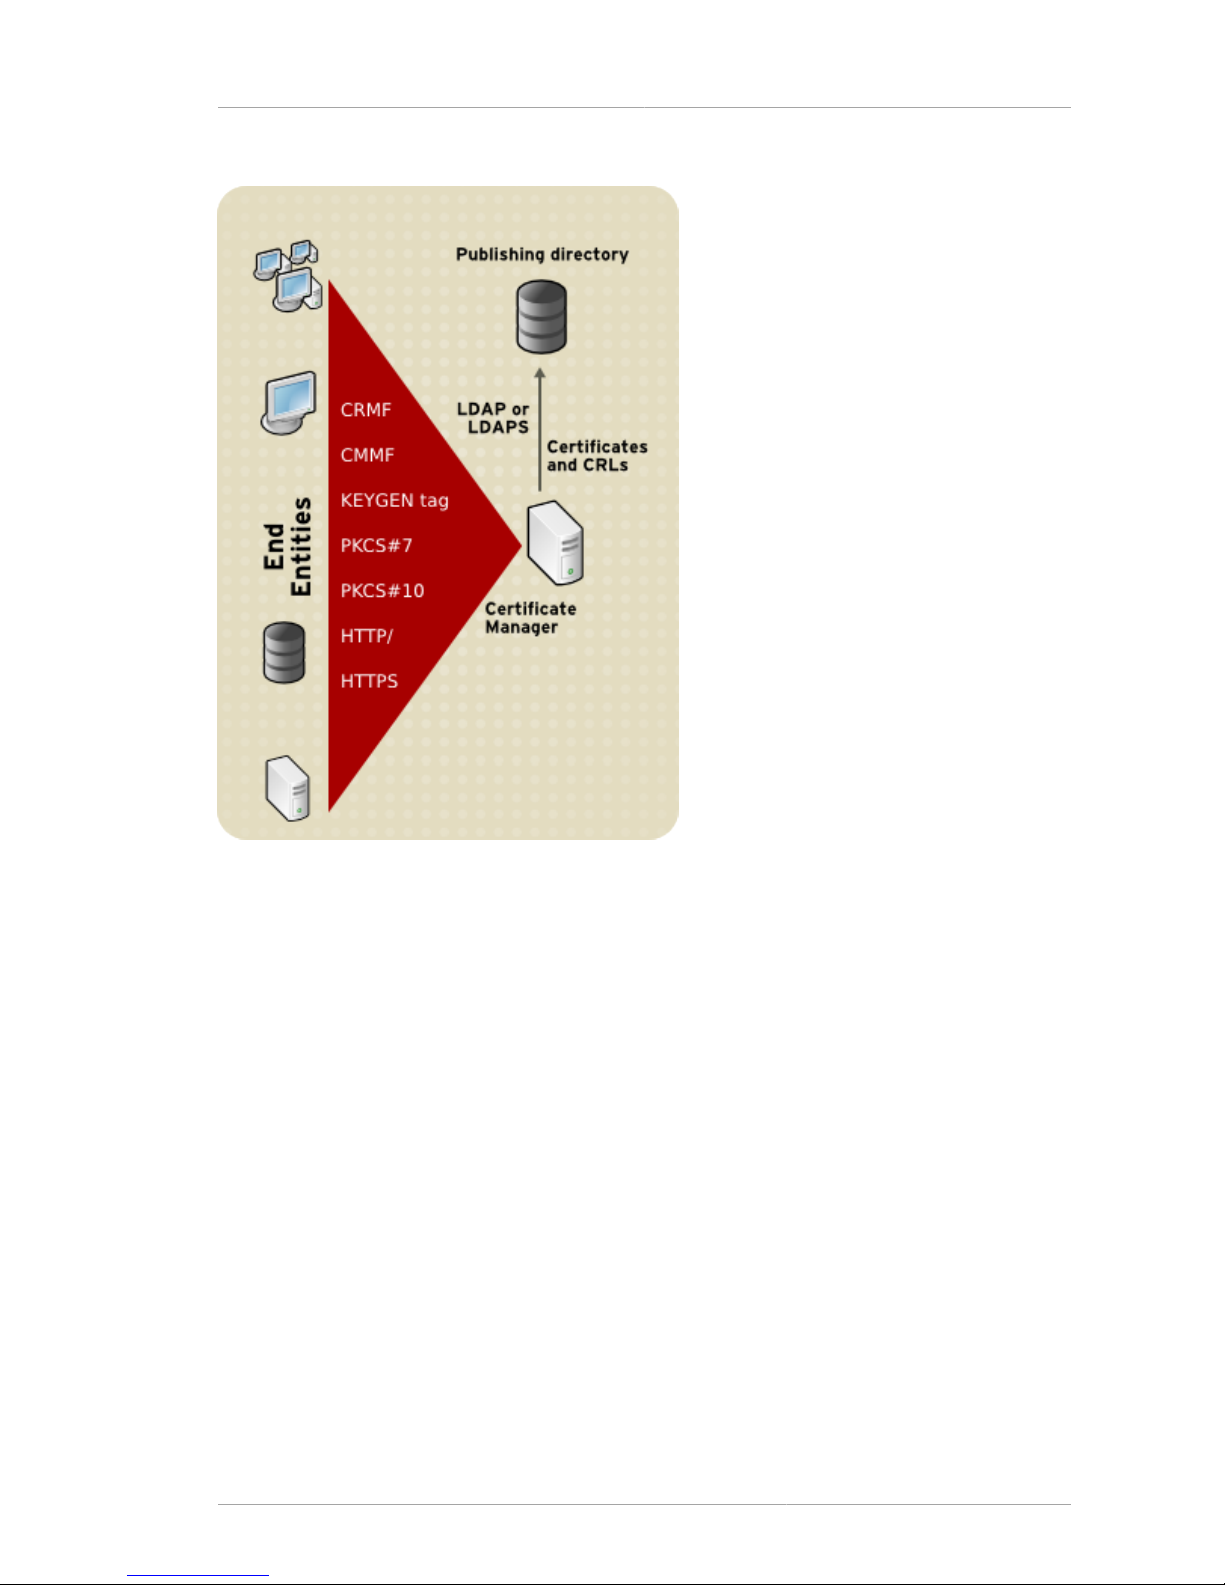
Certificate Manager and DRM
13
Figure 1.1. Single-Root Certificate Manager
Figure 1.1, “Single-Root Certificate Manager” shows the relationships between a single Certificate
Manager, end entities, and a publishing directory. The Certificate Manager can publish both end-entity
certificates and CRLs to a directory.
1.3.2. Certificate Manager and DRM
In a more complex scenario, the organization requires key archival and recovery capabilities along
with the CA; for example, when encrypted mail is widely used, the organization risks data loss if it
is unable to recover encryption keys. In this case, the Certificate System deployment has both the
Certificate Manager and a DRM.
To add key storage and recovery, a DRM can be installed on the same machine or on a different
machine. Figure 1.2, “Certificate Manager and DRM in Different Instances” illustrates the relationship
between a DRM and a Certificate Manager. All communication between the Certificate Manager and
the DRM takes place over HTTPS.
Page 34

Chapter 1. Overview
14
Figure 1.2. Certificate Manager and DRM in Different Instances
NOTE
The DRM is intended for archival and recovery of private encryption keys only. Therefore,
end entities must use either a browser that supports dual-key generation.
When determining the location of a DRM, consider possible firewall interactions, the physical security
required for each subsystem, and the physical location of the Certificate Manager agent, DRM agent,
and other people responsible for administering the Certificate Manager and recovering keys.
Like a Certificate Manager, a DRM has special physical security requirements, since a compromised
DRM has devastating security consequences for the entire PKI. Consider keeping the DRM in a
special locked room or building; this consideration can affect the deployment strategy.
1.3.3. Cloned Certificate Manager
A cloned Certificate Manager uses the same CA signing key and certificate as another Certificate
Manager, the master Certificate Manager. Since each Certificate Manager issues certificates with
serial numbers in a restricted range, all of the servers together act as a single CA operating in several
server processes.
The advantage of cloning is that it distributes the Certificate Manager's load across several processes
or even several physical machines. For a CA with a high enrollment demand, the distribution gained
from cloning allows more certificates to be signed and issued in a given time interval.
Page 35

Smart Card Enrollment
15
A cloned Certificate Manager has the same features, such as agent and end-entity gateway functions,
of a regular Certificate Manager.
1.3.4. Smart Card Enrollment
Most certificates are enrolled through the CA. This is useful for certificates enrolled through an
application such as a web browser or web server. For managing smart cards, or tokens, there is
an additional Certificate System client, Enterprise Security Client, which manages all maintenance
operations for certificates and keys stored on smart cards.
The Enterprise Security Client communicates directly with a TPS instance. The TPS subsystem
handles token-based certificate functions, and the TKS manages keys which protect the secure
communication between the TPS subsystem and the Enterprise Security Client. The TKS and TPS
subsystems work together to support all token operations, such as enrollment, through the Enterprise
Security Client. Additionally, the TPS subsystem can be configured to use the DRM subsystem to
handle server-side key generation and key archival and recovery. The interactions between the TPS,
TKS, DRM, and CA subsystems to process token operations through the Enterprise Security Client
are shown in Figure 1.3, “Token Management Configuration”.
For more information on managing subsystems for smart card tokens, see Chapter 7, Token
Processing System. For more information on performing token operations for users, see the Certificate
System Enterprise Security Client Guide, which is available at http://redhat.com/docs/manuals/cert-
system/.
Figure 1.3. Token Management Configuration
1.4. System Architecture
Figure 1.4, “Certificate System Architecture” shows the structure of the Certificate System; this
structure is explained in more detail in the following sections.
Page 36
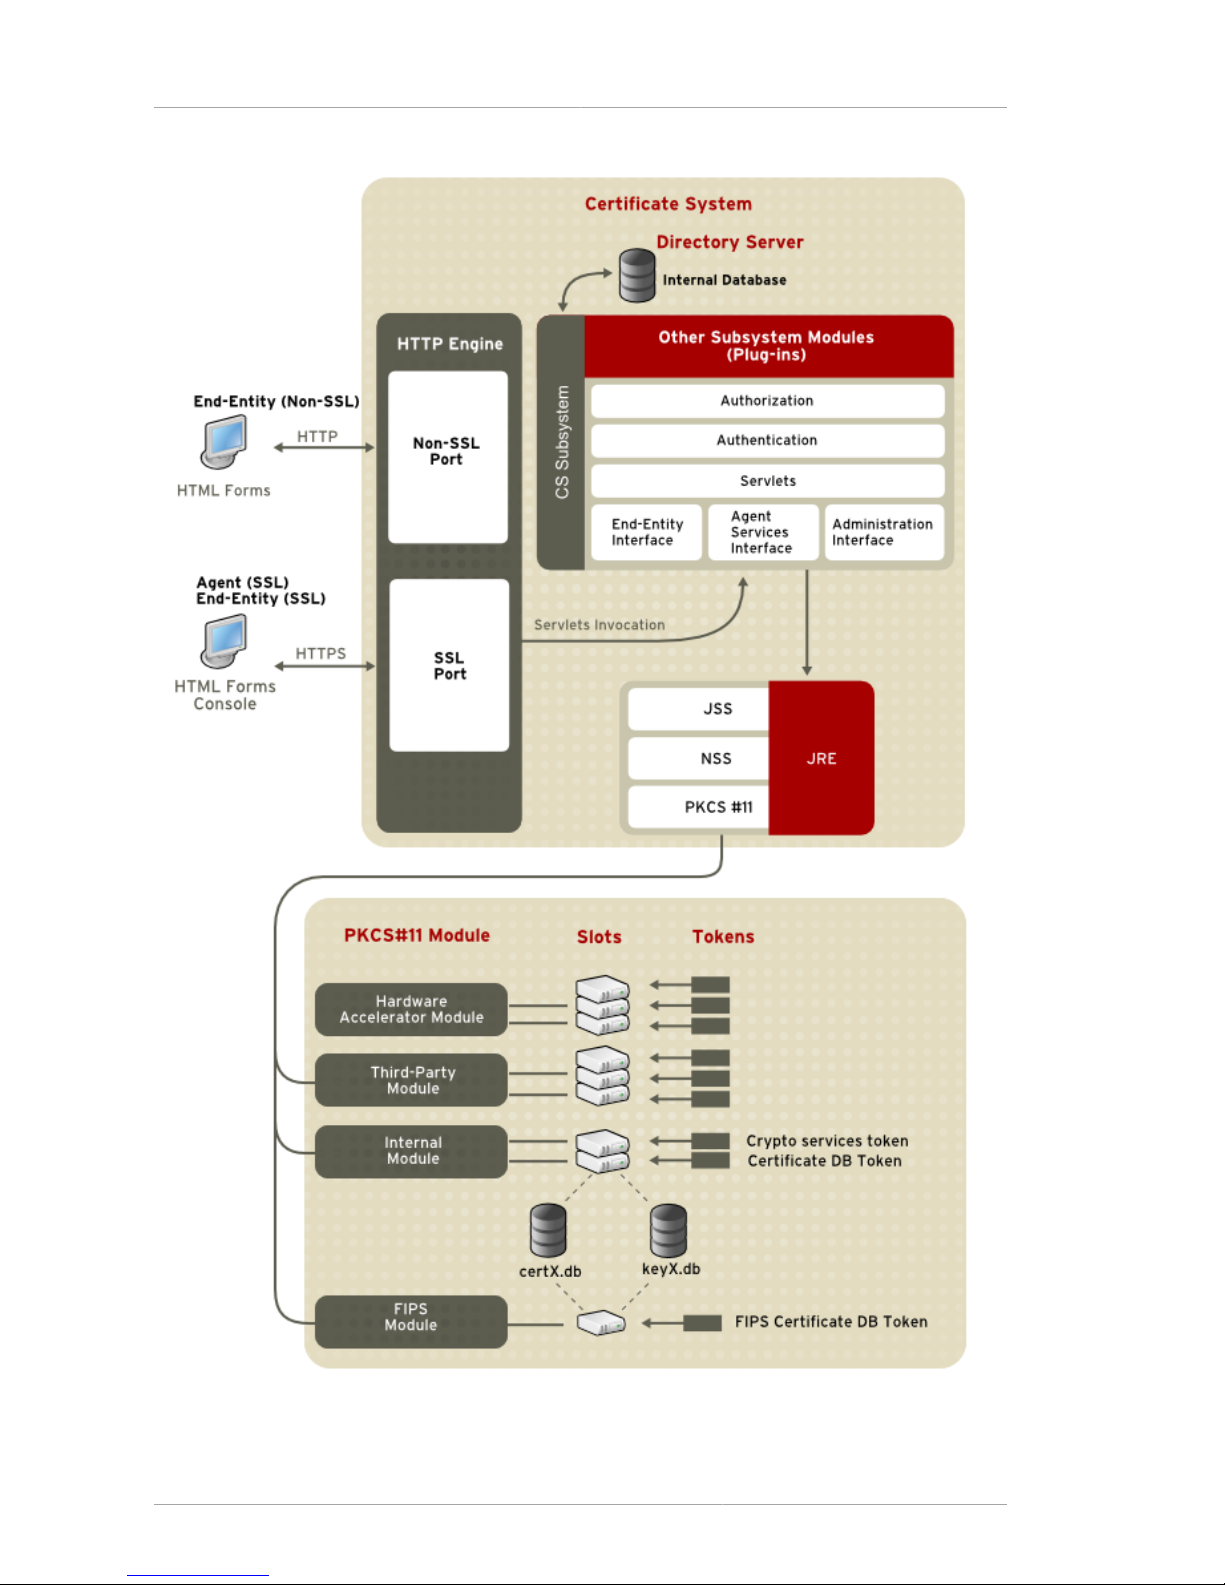
Chapter 1. Overview
16
Figure 1.4. Certificate System Architecture
Page 37

Certificate System Instance
17
1.4.1. Certificate System Instance
Within the Certificate System component, a set of common modules, which can all be extended with
custom Java™ plug-ins, are provided for all subsystems. Although some may not be used in the
default setting, they are available for further customization.
• Authentication.
• Authorization. The default is access control from the internal LDAP database.
• ACL evaluators. The default is to use user/group evaluators.
• Certificate profiles, which have customizable extensions and constraints.
• The job scheduler, which can be edited to control routinely-scheduled events.
• Email notification.
• Event listeners.
• Publishing. Both the publisher and mapper can be modified.
• Logging, including signed audit logs. The logging mechanism can be extended.
• Self-tests. Both the start-up and manually-initiated self-tests can be extended.
• Servlets, depending on subsystem installation.
• Password quality checker.
1.4.2. HTTP Engine
The Certificate System employs Red Hat Fortitude as its HTTP engine; this runs secure Tomcat
for the CA, OCSP, TKS, and DRM subsystems and secure Apache for TPS. Fortitude supports the
subsystem instance HTTP interfaces and provides the entry point for all users and applications to
access Certificate System subsystem functions through the different user interfaces: administrative
console, agent services, and end-entities pages. The subsystem pages are accessed over HTTP,
but they are created by subsystem-specific servlets contained in the Certificate System. While the
HTTP engine provides the connection entry points, Certificate System completes the interfaces by
providing the servlets specific to each interface. These servlets can return data in HTML or XML
formats, making it easier for system administrators to write scripts which interact with these servlets.
For more information, see Section 3.8, “Using Java Servlets”.
1.4.3. User Interfaces
Each of the subsystems contains interfaces for interacting with other parts of the subsystem. Four
subsystems (CA, DRM, OCSP, and TPS) have an agent interface for agents to perform the tasks
assigned to them; four subsystems (CA, DRM, OCSP, and TKS) also have an administrative console
for managing that instance, such as adding users and viewing logs. A CA subsystem also has an endentity services interface for users to enroll in the PKI.
• End-Entities Interface . The CA java servlets in the end-entities page process the HTML forms
submitted through the HTTP entry point. From the information in these forms, the servlets enroll and
revoke certificates for users and allow users to retrieve issued certificates.
Page 38

Chapter 1. Overview
18
NOTE
The OCSP, DRM, TKS, and TPS subsystems do not have end-entity pages.
• Agent Services Interface . The agent services page java servlets process HTML form submitted
through the agent services HTTP pages. From the information in each submitted form, the agent
servlets allow agents to perform agent tasks, such as editing and approving requests for issuing or
revoking certificates and approving certificate profiles.
NOTE
The TPS interface is different than the agent services pages for the other three
subsystems. This HTML interface also functions as the administrative interface in place
of a Java™ console.
• Administrative Interface (Subsystem Console) . The administrative java servlets process
commands from the administrative entry-point. From the information supplied in the commands, the
administration servlets allow administrators to perform administrative tasks and configure plug-in
modules. This interface is similar for the CA, DRM, OCSP, and TKS subsystems. While there are
some common configuration types, there are different plug-ins available, depending on the kind of
subsystem. The auditor shares the same interface with the administrator, except with the ability to
view all configurations and logs, including audit logs; administrators cannot view audit logs.
NOTE
The TPS subsystem does not have an administrative console; administrator tasks are
performed through an HTML interface accessed through the agent services URL.
These servlets can return data in HTML or XML formats, making it easier for system administrators
to write scripts which interact with these servlets. For more information, see Section 3.8, “Using Java
Servlets”.
1.4.4. JSS and the JNI Layer
JSS provides a Java™ interface for security operations performed by NSS. JSS and higher levels of
the Certificate System architecture are built with the Java™ Native Interface (JNI), which provides
binary compatibility across different versions of the Java™ Virtual Machine (JVM). This design allows
customized subsystem services to be compiled and built once and run on a range of platforms. JSS
supports most of the security standards and encryption technologies supported by NSS. JSS also
provides a pure Java™ interface for ASN.1 types and BER-DER encoding. JSS documentation is
available on-line at http://www.mozilla.org/projects/security/pki/jss/index.html.
1.4.5. NSS
Network Security Services (NSS) is a set of libraries designed to support cross-platform development
of security-enabled communications applications. Applications built with the NSS libraries support
the SSL protocol for authentication, tamper detection, and encryption, as well as PKCS #11 for
Page 39

PKCS #11
19
cryptographic token interfaces. Red Hat uses NSS to support these features in a wide range
of products, including Certificate System. NSS documentation is available on-line at http://
www.mozilla.org/projects/security/pki/nss/overview.html.
1.4.6. PKCS #11
Public-Key Cryptography Standard (PKCS) #11 specifies an API used to communicate with devices
that hold cryptographic information and perform cryptographic operations. Because it supports PKCS
#11, Certificate System is compatible with a wide range of hardware and software devices.
At least one PKCS #11 module must be available to any Certificate System subsystem instance.
As shown in Figure 1.4, “Certificate System Architecture”, a PKCS #11 module (also called a
cryptographic module or cryptographic service provider) manages cryptographic services such as
encryption and decryption. PKCS #11 modules are analogous to drivers for cryptographic devices that
can be implemented in either hardware or software. Red Hat provides a built-in PKCS #11 module with
the Certificate System.
A PKCS #11 module always has one or more slots which can be implemented as physical hardware
slots in a physical reader such as smart cards or as conceptual slots in software. Each slot for a
PKCS #11 module can in turn contain a token, which is the hardware or software device that actually
provides cryptographic services and optionally stores certificates and keys.
Two cryptographics modules are included in the Certificate System:
• The default internal PKCS #11 module, which comes with two tokens:
• The internal crypto services token, which performs all cryptographic operations such as
encryption, decryption, and hashing.
• The internal key storage token ("Certificate DB token" in Figure 1.4, “Certificate System
Architecture”), which handles all communication with the certificate and key database files that
store certificates and keys.
• The FIPS 140-1 module. This module complies with the FIPS 140-1 government standard for
cryptographic module implementations. The FIPS 140-1 module includes a single, built-in FIPS
140-1 certificate database token (as shown in Figure 1.4, “Certificate System Architecture”), which
handles both cryptographic operations and communication with the certificate and key database
files.
Any PKCS #11 module can be used with the Certificate System. The server uses a file called
secmod.db to track modules that are available. This file can be modified using the modutil
tool. This file needs to be modified when there are changes to the system like installing hardware
accelerators to use for signing operations. For more information on modutil, see http://
www.mozilla.org/projects/security/pki/nss/tools/.
1.4.7. Management Tools
The following command-line tools are provided with the Certificate System to help manage the system:
• Audit log signature verification tool (AuditVerify)
• Enrollment PIN generation tool (setpin)
• Mass revocation tool (revoker)
• (Signed) Certificate System request tool
Page 40

Chapter 1. Overview
20
• Bulk certificate issuance tool (bulkissuance)
For more information about Certificate System command-line tools, see the Certificate System
Command-Line Tools Guide, which is available at http://redhat.com/docs/manuals/cert-system/.
1.4.8. JRE
The Java™ Runtime Environment (JRE) provides the Java™ Virtual Machine (JVM) and supporting
class libraries needed to run the Certificate System.
1.4.9. Internal Database
The Certificate System uses Red Hat Directory Server as its database for storing information such
as certificates, requests, users, roles, ACLs, and other internal information. The Certificate System
communicates with the internal LDAP database securely through SSL client authentication.
1.4.10. SSL/TLS and Supported Cipher Suites
Secure Sockets Layer (SSL) and Transport Layer Security (TLS) protocols are universally accepted
standards for authenticated and encrypted communication between clients and servers. Both client
and server authentication occur over SSL/TLS. SSL/TLS uses a combination of public key and
symmetric-key encryption. Symmetric-key encryption is much faster than public-key encryption,
but public-key encryption provides better authentication techniques. An SSL/TLS session always
begins with an exchange of messages called the SSL handshake, initial communication between the
server and client. The handshake allows the server to authenticate itself to the client using public-key
techniques, then allows the client and the server to cooperate in the creation of symmetric keys used
for rapid encryption, decryption, and tamper detection during the session that follows.
Both of these protocols support using a variety of different cryptographic algorithms, or ciphers, for
operations such as authenticating the server and client, transmitting certificates, and establishing
session keys. Clients and servers may support different cipher suites, or sets of ciphers. Among other
functions, the SSL handshake determines how the server and client negotiate which cipher suite they
will use to authenticate each other, to transmit certificates, and to establish session keys.
Key-exchange algorithms such as RSA govern the way the server and client determine the symmetric
keys to use during an SSL session. The most common SSL cipher suites use RSA key exchange, and
Certificate System supports RSA public-key systems.
Longer RSA keys are required to provide security as computing capabilities increase. The
recommended RSA key-length is 2048 bits. Though many web servers continue to use 1024-bit keys,
web servers should migrate to at least 2048 bits. For 64-bit machines, consider using stronger keys.
All CAs should use at least 2048-bit keys, and stronger keys (such as 3072 or 4096 bits) if possible.
Certificate System supports several different cipher suites with the RSA key exchange:
• AES and SHA-1 Message Authentication. Advanced Encryption Standard (AES) ciphers have a
fixed block size of 128-bits, and the keys can be either 128-bit or 256-bit. There are 3.4 x 10
38
possible 128-bit keys and 1.1 x 1077 possible 256-bit keys. There are more possible keys than any
other cipher, making AES the strongest cipher supported by SSL. These cipher suites are FIPScompliant.
• Triple DES and SHA-1 Message Authentication. Triple DES (Data Encryption Standard) is the
second-strongest cipher supported by SSL, but it is not as fast as RC4. Triple DES uses a key
Page 41

CS SDK
21
three times as long as the key for standard DES. Because the key size is so large, there are
approximately 3.7 * 1050 possible keys. This cipher suite is FIPS-compliant.
• RC4 and RC2 and MD5 Message Authentication. The RC4 and RC2 ciphers have 128-bit
encryption, which permits approximately 3.4 * 1038 possible keys. This makes RC4 or RC2 keys
very difficult to crack. RC4 ciphers are faster than RC2 ciphers.
RC4 can use SHA-1 message authentication as well as MD5 message authentication.
• DES and SHA-1 Message Authentication. DES 56-bit encryption permits approximately 7.2
* 1016 possible keys. This cipher suite is no longer FIPS-compliant because it is too weak
cryptographically.
1.5. CS SDK
The Certificate System Software Development Kit (SDK) includes information for developing new plugin modules and for customizing different components of the Certificate System. The CS SDK contains
the following:
• Javadocs. Complete Javadoc specification of the Certificate System Application Programming
Interface (API).
• Samples. Sample source code of different plug-in modules included with the Certificate System.
This source code is included only for reference and is only to demonstrate how a particular
Certificate System feature was implemented. Since this code is currently present in the Certificate
System, it does not need to be recompiled.
• Tutorials. A tutorial to demonstrate how to create custom plug-in modules for the Certificate System.
Each tutorial includes sample Java™ source code, environment, build script, and a detailed
instructions for building and installing the plug-in modules. Some tutorials also contain sample
configuration files.
1.6. Support for Open Standards
This section lists the standard message formats and protocols supported by the Certificate System.
1.6.1. Certificate Management Formats and Protocols
The Certificate System supports the following certificate management formats and protocols. For more
details about the proposed PKIX standards listed here, see http://www.ietf.org/html.charters/pkix-
charter.html under Internet Drafts.
• Certificate Request Message Format (CRMF). A message format to send a certificate request to a
CA. A standard from the Internet Engineering Task Force (IETF) PKIX working group.
• Certificate Management Message Formats (CMMF). Message formats to send certificate requests
and revocation requests from end entities to a CA and to return information to end entities. A
proposed standard from the IETF PKIX working group. CMMF has been subsumed by another
standard, CMC.
• Certificate Management Messages over CS (CMC). A general interface to public-key certification
products based on CS and PKCS #10, including a certificate enrollment protocol for RSA-signed
Page 42

Chapter 1. Overview
22
certificates with Diffie-Hellman public-keys. A standard from the IETF PKIX working group. CMC
incorporates CRMF and CMMF.
• Cryptographic Message Syntax (CS). A superset of PKCS #7 syntax used for digital signatures and
encryption. A proposed standard from the IETF PKIX working group.
• PKIX Certificate and CRL Profile (PKIX Part 1). The first part of the four-part standard under
development by the IETF for a public-key infrastructure for the Internet. Part 1 specified standards
for certificates and CRLs. Certificate System will support the other PKIX parts as they are finalized.
For more information about PKIX Part 1, see ftp://ftp.isi.edu/in-notes/rfc2459.txt.
1.6.2. Security and Directory Protocols
The Certificate System supports the following security and directory protocols:
• FIPS PUBS 140-1. Federal Information Standards Publications (FIPS PUBS) 140-1 is a US
government standard for implementing cryptographic modules such as hardware or software
that encrypts and decrypts data, creates and verifies digital signatures, and other cryptographics
functions.
• Hypertext Transport Protocol (HTTP) and Hypertext Transport Protocol Secure (HTTPS). Protocols
used to communicate with web servers.
• KEYGEN tag. An HTML tag that generates a key pair for use with a certificate.
• Lightweight Directory Access Protocol (LDAP) v2, v3. A directory service protocol designed to
run over TCP/IP and across multiple platforms. LDAP is a simplified version of Directory Access
Protocol (DAP), used to access X.500 directories. LDAP is under IETF change control and has
evolved to meet Internet requirements.
• Public-Key Cryptography Standard (PKCS) #7. An encrypted data and message format developed
by RSA Data Security to represent digital signatures, certificate chains, and encrypted data. This
format is used to deliver certificates to end entities.
• Public-Key Cryptography Standard (PKCS) #10. A message format developed by RSA Data
Security for certificate requests. This format is supported by many server products.
• Public-Key Cryptography Standard (PKCS) #11. Specifies an API used to communicate with devices
such as hardware tokens that hold cryptographic information and perform cryptographic operations.
• X.509 v1, v3. Digital certificate formats recommended by the International Telecommunications
Union (ITU).
• Secure Sockets Layer (SSL) 2.0, 3.0. A set of rules governing server authentication, client
authentication, and encrypted communication between servers and clients.
• Security-Enhanced Linux. Security-enhanced Linux, or SELinux, is a set of security protocols
enforcing mandatory access control on Linux system kernels. This was developed by the United
States National Security Agency to keep applications from accessing confidential or protected files
through lenient or flawed access controls.
Page 43

Chapter 2.
23
Installation and Configuration
The Certificate System is comprised of subsystems which can be independently installed on different
servers, multiple instances installed on a single server, and other flexible configurations for availability,
scalability, and failover support. The procedures for downloading, installing, and configuring instances
of Certificate System subsystems are described in this chapter.
The Certificate System servers include five subsystems:
• Certificate Authority (CA)
• Data Recovery Manager (DRM), sometimes referred to as a Key Recovery Authority (KRA)
• Online Certificate Status Protocol (OCSP) Responder
• Token Key Service (TKS)
• Token Processing System (TPS)
The Certificate System client is the Enterprise Security Client. For information about the Enterprise
Security Client, see the Certificate System Enterprise Security Client Guide.
There are two steps for installing the Certificate System: the first is installing the server packages, and
the second is configuring the subsystem through the HTML-based configuration wizard.
The installation and configuration process for the Certificate System is as follows:
1. Install a Red Hat Directory Server. This can be on a different machine from the Certificate System,
which is the recommended scenario for most deployments.
2. Download the Certificate System packages from the Red Hat Network channel. Each subsystem
has its own packages, as well as dependencies and related packages. These are listed in
Section 2.2.3, “Packages Installed”.
3. Install the Certificate System CA subsystem. See Section 2.5, “Installing the Certificate System ”
for complete instructions on installing the CA.
4. Configure the CA subsystem. For information on configuring the Certificate Manager (CA)
subsystem, see Section 2.6, “Configuring the Default Subsystem Instances”.
5. Install the other Certificate System subsystems on the appropriate hosts. See Section 2.5,
“Installing the Certificate System ” for complete instructions on installing the subsystems.
6. Configure each subsystem through its HTML administrative services page. Go through the
installation screens. When completed, all necessary CA, server, and agent and user certificates
are generated and installed.
See Section 2.6, “Configuring the Default Subsystem Instances” for more information on the
subsystem configuration pages.
2.1. Deployment Considerations
Before beginning installation, the following issues must be decided:
• What types of subsystems to install.
Page 44

Chapter 2. Installation and Configuration
24
• How many subsystems to install.
• On which hosts to install the subsystems.
• How and where to install an available Red Hat Directory Server. Only one Directory Server is
required, although there can be more than one. It is recommended that the Directory Server only be
used for certificate management.
• To what security domain the subsystem should be added or, for CAs, whether to create a new
security domain.
• Whether the subsystem should be a clone of an existing subsystem.
• Whether the Certificate Manager should be a self-signed root CA or a subordinate CA.
2.1.1. Security Domains
A security domain is a registry of PKI services. Certificate System subsystems register information
about themselves in these domains so users of PKI services can find other services by inspecting
the registry. The security domain service in Certificate System manages both the registration of PKI
services for Certificate System subsystems and a set of shared trust policies. Security domains
streamline information between subsystems. Each Certificate System subsystem instance must be
a member of a security domain; a CA subsystem is the only subsystem which can host a security
domain.
The security domain shares the CA internal database for privileged user and group information
to determine which users can update the security domain, register new PKI services, and issue
certificates. There must be at least one security domain for a PKI, but there can also be multiple
domains.
2.1.2. Cloning a Subsystem
More than one subsystem can be configured in an installation of Certificate System. There can be
multiple instances of a type of subsystem on a host or across different hosts. For failover support, one
configuration option is to duplicate, or clone, an instance so that more than one instance has the same
configuration information. Clones and masters share the same set of keys and certificates. Cloned
CAs issue certificates with the same issuer name and keys, but use different sets of serial numbers.
A master and clone function essentially as a single server with failover support. This can also be used
for load balancing for high-traffic subsystems. For details about cloning a subsystem, see Chapter 19,
Configuring the Certificate System for High Availability.
2.1.3. Self-Signed Root CA or Subordinate CA
A Certificate Manager can be configured either a root CA or a subordinate CA. A self-signing root CA
issues and signs its own CA signing certificate. A subordinate CA can be subordinate to a public CA
or to a Certificate System root CA; either way, the other CA signs the subordinate CA's certificates. A
subordinate CA is restricted in the types and contents of the certificates it can issue by the contents
and settings of the CA signing certificate issued to it, such as the kinds of certificates that it can issue,
the extensions that it is allowed to include in certificates, the levels of subordinate CAs the subordinate
CA can create, the validity period of certificates it can issue, and the validity period of the subordinate
CA's signing certificate.
• Subordination to a Public CA . Chaining the Certificate System CA to a third-party public CA
introduces the restrictions that public CAs place on the kinds of certificates the subordinate CA can
Page 45

Prerequisites
25
issue and the nature of the certificate chain. This may not be acceptable for some PKI deployments.
One benefit of chaining to a public CA is that the third party is responsible for submitting the root CA
certificate to a web browser or other client software, which is a major advantage for certificates that
are accessed by different companies with browsers that cannot be controlled by the administrator.
• Subordination to a Certificate System CA . Setting up a Certificate System CA as the root CA means
that the Certificate System administrator has control over all subordinate CAs by setting policies that
control the contents of the CA signing certificates issued. A subordinate CA issues certificates by
evaluating its own authentication and certificate profile configuration, without regard for the root CA's
configuration.
It is easiest to make the first CA installed a self-signed root, so that it is not necessary to apply to a
third party and wait for the certificate to be issued. Before deploying the full PKI, however, consider
whether to have a root CA, how many to have, and where both root and subordinate CAs will be
located.
2.2. Prerequisites
This section covers required information such as the supported platforms, the packages installed, and
dependencies and programs.
• Section 2.2.1, “Supported Platforms”
• Section 2.2.2, “Required Programs and Dependencies”
• Section 2.2.3, “Packages Installed”
2.2.1. Supported Platforms
Certificate System server packages are available for the following platforms:
• Red Hat Enterprise Linux AS 4 (Intel 32-bit)
• Red Hat Enterprise Linux AS 4 (Intel 64-bit)
• Red Hat Enterprise Linux ES 4 (Intel 32-bit)
• Red Hat Enterprise Linux ES 4 (Intel 64-bit)
• Solaris 9 (Sparc 64-bit)
Certificate System client packages are available for the following platforms:
• Apple Macintosh OS X 10.4.x (Tiger) (Power PC 32-bit, Intel Mac)
• Microsoft Windows XP Professional (Intel 32-bit)
• Red Hat Enterprise Linux AS 4 (Intel 32-bit)
• Red Hat Enterprise Linux AS 4 (Intel 64-bit)
• Red Hat Enterprise Linux ES 4 (Intel 32-bit)
• Red Hat Enterprise Linux ES 4 (Intel 64-bit)
Page 46

Chapter 2. Installation and Configuration
26
2.2.2. Required Programs and Dependencies
The following must be installed before installing the Certificate System:
• Java™ 1.5.0 Java Runtime Environment (JRE). Certificate System does not support earlier versions
of the JRE. This JRE is required for running Tomcat, among other applications for the Certificate
System.
• On 32-bit Red Hat Enterprise Linux 4 platforms, Certificate System 7.2 requires the 32-bit version
of the IBM JRE 1.5.0. A pre-packaged binary distribution of this package, the java-1.5.0-ibm
rpm package, is available through either the Red Hat Enterprise Linux AS (v. 4 for x86) Extras
Red Hat Network channel or the Red Hat Enterprise Linux ES (v. 4 for x86) Extras Red Hat
Network channel.
A similar package is available for 64-bit Red Hat Enterprise Linux 4 platforms. This package is
available through either the Red Hat Enterprise Linux AS (v. 4 for AMD64/EM64T) Extras Red
Hat Network channel or the Red Hat Enterprise Linux ES (v. 4 for AMD64/EM64T) Extras Red
Hat Network channel.
As root, run /usr/sbin/alternatives --config java to insure that the IBM Java™
1.5.0 JRE is selected.
Warning
Both the 32-bit xSeries (Intel-compatible) and 64-bit AMD/Opteron/EM64T versions of
the IBM J2SE JRE 5.0 RPM packages available through the IBM download site are
packaged in a format which is incompatible with Certificate System 7.2.
• For 64-bit Solaris 9 (SPARC) platforms, the user must download and install the latest version
of the 64-bit Sun J2SE Java™ Runtime Environment 5.0 (Update 9) available from the Sun
download site, http://java.sun.com/javase/downloads/index.jsp.
IMPORTANT
The 64-bit Solaris version of the Certificate System requires the user to install the
32-bit version of the JRE as well as installing the 64-bit version. The 32-bit version
is used for the applet and Java™ Web Start support. Read http://java.sun.com/
j2se/1.5.0/README.html, http://java.sun.com/j2se/1.5.0/ReleaseNotes.html, and
http://java.sun.com/j2se/1.5.0/jre/install-solaris-64.html before installing the Certificate
System.
Under the section Java Runtime Environment (JRE) 5.0 Update 9, Sun only makes this JRE
available through a self-extracting file which is incompatible with Certificate System since this
format does not use the native Solaris packaging utility database.
It is possible to obtain the Sun 5.0 JRE in a compatible format. Click Download under the JDK
5.0 Update 9 section, and, under Solaris SPARC Platform - J2SETM Development Kit
5.0 Update 9, select Solaris SPARC 32-bit packages - tar.Z (jdk-1_5_0_09solaris-sparc.tar.Z) and Solaris SPARC 64-bit packages - tar.Z (use
32-bit version for applet and Java Web Start support) (jdk-1_5_0_09solaris-sparcv9.tar.Z).
Page 47

Required Programs and Dependencies
27
After downloading these two files, uncompress them using the gunzip utility, and extract the
contents using the tar utility.
The contents of the 32-bit file, jdk-1_5_0_09-solaris-sparc.tar.Z, are COPYRIGHT,
LICENSE, README.html, SUNWj5cfg, SUNWj5dev, SUNWj5dmo, SUNWj5jmp, SUNWj5man, and
SUNWj5rt.
The contents of the 64-bit file, jdk-1_5_0_09-solaris-sparcv9.tar.Z, are SUNWj5dmx,
SUNWj5dvx, and SUNWj5rtx.
Since only the JRE is needed on Solaris 9 systems, use the pkgadd utility to add the 32-bit
package, SUNWj5rt, first, and then add the 64-bit package, SUNWj5rtx.
• Java™ Development Kit (JDK). A JDK must be present on Red Hat Enterprise Linux systems. See
http://kbase.redhat.com/faq/FAQ_54_4667.shtm for more information. While almost any JDK is
sufficient, installing one of these JDKs is recommended:
• For 32-bit Red Hat Enterprise Linux 4 platforms, a pre-packaged binary distribution of the 32-bit
version of the IBM JDK 1.5.0, the java-1.5.0-ibm-devel rpm package, is available through
either the Red Hat Enterprise Linux AS (v. 4 for x86) Extras Red Hat Network channel or the
Red Hat Enterprise Linux ES (v. 4 for x86) Extras Red Hat Network channel.
• A similar package is available for 64-bit Red Hat Enterprise Linux 4 platforms. This package is
available through either the Red Hat Enterprise Linux AS (v. 4 for AMD64/EM64T) Extras Red
Hat Network channel or the Red Hat Enterprise Linux ES (v. 4 for AMD64/EM64T) Extras Red
Hat Network channel.
After installing the JDK, run /usr/sbin/alternatives --config javac as root to insure
that a JDK is available.
Solaris 9 systems do not require downloading and installing a JDK; however, it may be required
to download and install the Sun JDK 5.0 package in order to obtain a compatible Sun JRE 5.0
package.
• Apache. Before installing any Certificate System TPS subsystems on Red Hat Enterprise Linux,
there should be a local installation of Apache. When installing the TPS subsystem on Solaris 9, a
specially-configured Apache server is included as part of the Certificate System 7.2 packages.
• Red Hat Directory Server. Before a Certificate System can be installed, there must be an installed
Directory Server available because the Certificate System uses the Directory Server user database
to store its certificate information.
• The Solaris version of Certificate System was tested on Sun Solaris 9 with patch level 118558-28.
• The following package groups and packages must be installed on all Red Hat Enterprise Linux
systems:
• dialup (package group)
• gnome-desktop (package group)
• compat-arch-support (package group)
• web-server (package group)
Page 48

Chapter 2. Installation and Configuration
28
• kernel-smp (package)
• e2fsprogs (package)
• firefox (package)
• On 64-bit Red Hat Enterprise Linux platforms, be certain that the 64-bit (x86_64) compat-libstdc
++ libraries are installed, and not only the 32-bit (i386) libraries. To confirm this, run the following as
root:
rpm -qa --queryformat 'compat-libstdc++-%{VERSION}-%{RELEASE}.%{ARCH}.rpm\n' | grep x86_64
Numerous libraries should be displayed.
2.2.3. Packages Installed
Multiple packages are installed with the Certificate System, in addition to the core Certificate System
components.
• Section 2.2.3.1, “Red Hat Enterprise Linux RPMs”
• Section 2.2.3.2, “Solaris Packages”
2.2.3.1. Red Hat Enterprise Linux RPMs
RPMs have the format package_name-version_number-release_number-architecture.rpm; only the
package name is shown in the tables.
RPMs for Certificate System subsystems and components
osutil rhpki-kra rhpki-tks
pkisetup rhpki-manage rhpki-tps
rhpki-ca rhpki-migrate rhpki-util
rhpki-common rhpki-native-tools symkey
rhpki-console rhpki-ocsp tomcatjss
rhpki-java-tools
Table 2.1.
RPMs for the Enterprise Security Client
ccid pcsc-lite
coolkey pcsc-lite-doc
esc pcsc-lite-libs
ifd-egate
Table 2.2.
RPMs for Tomcat Web Services
ant jakarta-commons-discovery oro
avalon-framework jakarta-commons-el regexp
avalon-logkit jakarta-commons-fileupload rhino
Page 49

Packages Installed
29
RPMs for Tomcat Web Services
axis jakarta-commons-httpclient3 tomcat5
bcel jakarta-commons-launcher tomcat5-jasper
classpathx-jaf jakarta-commons-logging tomcat5-servlet-2.4-api
classpathx-mail jakarta-commons-modeler velocity
eclipse-ecj jakarta-commons-pool werken.xpath
geronimo-specs jdom wsdl4j
gnu-crypto-sasl-jdk1.4 jms xalan-j2
jakarta-commons-beanutils jpackage-utils xerces-j2
jakarta-commons-collections ldapjdk xml-commons
jakarta-commons-daemon log4j xml-commons-apis
jakarta-commons-dbcp mx4j xml-commons-resolver
jakarta-commons-digester oldjdom xmlbeans
Table 2.3.
RPMs for Fortitude Web
Services
fortitude-web
mod_nss
mod_revocator
Table 2.4.
RPMs for Apache Web Services
pdksh perl-XML-NamespaceSupport
perl-HTML-Parser perl-XML-Parser
perl-HTML-Tagset perl-XML-SAX
perl-Parse-RecDescent perl-XML-Simple
perl-URI perl-libwww-perl
Table 2.5.
RPMs for LDAP Support
mozldap
mozldap-tools
Table 2.6.
RPMs for Network Security
Services (NSS)
dirsec-jss
dirsec-nspr
dirsec-nss
dirsec-nss-tools
Table 2.7.
Page 50

Chapter 2. Installation and Configuration
30
RPMs for Java™
java-1.5.0-ibm
java-1.5.0-ibm-devel
Table 2.8.
2.2.3.2. Solaris Packages
Solaris packages have the format VENDORpackage_name-version_number-release_numberarchitecture.pkg; only the package name is shown in the tables.
NOTE
Package names for 64-bit Sparc 9 packages always have an x at the end of the primary
package name. For example, the 64-bit package for the CA subsystem is named
RHATrhpki-cax-7.2.0-3.noarch.pkg, with a vendor prefix of RHAT, and an x
at the end of the primary package name, rhpki-ca. Since some packages contain
subpackages, the x is appended to the end of the primary package name, not the end
of the secondary subpackage name. For example, the 64-bit packages for dirsec-
nss include RHATdirsec-nssx-3.11.3-1.sparcv9.pkg and RHATdirsec-nssxtools-3.11.3-1.sparcv9.pkg.
Packages for Certificate System
RHATosutilx RHATrhpki-krax RHATrhpki-tksx
RHATpkisetupx RHATrhpki-managex RHATrhpki-tpsx
RHATrhpki-cax RHATrhpki-migratex RHATrhpki-utilx
RHATrhpki-commonx RHATrhpki-native-toolsx RHATsymkeyx
RHATrhpki-consolex RHATrhpki-ocspx RHATtomcatjssx
RHATrhpki-java-toolsx
Table 2.9.
Packages for Tomcat Web Services
RHATantx RHATjakarta-commons-elx RHATregexpx
RHATavalon-frameworkx RHATjakarta-commons-
fileuploadx
RHATrhinox
RHATavalon-logkitx RHATjakarta-commons-
httpclient3x
RHATtomcat5-jasperx
RHATaxisx RHATjakarta-commons-
launcherx
RHATtomcat5-servlet-2-4-apix
RHATbcelx RHATjakarta-commons-
loggingx
RHATtomcat5x
RHATclasspathx-jafx RHATjakarta-commons-
modelerx
RHATvelocityx
RHATclasspathx-mailx RHATjakarta-commons-poolx RHATwerken-xpathx
RHATgeronimo-specsx RHATjdomx RHATwsdl4jx
RHATgnu-crypto-sasl-jdk1-4x RHATjmsx RHATxalan-j2x
Page 51

Packages Installed
31
Packages for Tomcat Web Services
RHATjakarta-commonsbeanutilsx
RHATjpackage-utilsx RHATxerces-j2x
RHATjakarta-commonscollectionsx
RHATldapjdkx RHATxml-commons-apisx
RHATjakarta-commonsdaemonx
RHATlog4jx RHATxml-commons-resolverx
RHATjakarta-commons-dbcpx RHATmx4jx RHATxml-commonsx
RHATjakarta-commonsdigesterx
RHAToldjdomx RHATxmlbeansx
RHATjakarta-commonsdiscoveryx
RHATorox
Table 2.10.
Packages for Fortitude Web
Services
RHATfortitude-webx
RHATmod-nssx
RHATmod-revocatorx
Table 2.11.
Packages for Apache Web Services
RHATapr-utilx RHATmod-perlx RHATperl-XML-Parserx
RHATaprx RHATpcrex RHATperl-XML-SAXx
RHATdb4x RHATperl-HTML-Parserx RHATperl-XML-Simplex
RHATdb4x-utils RHATperl-HTML-Tagsetx RHATperl-libwww-perlx
RHATexpatx RHATperl-Parse-RecDescentx RHATperlx
RHAThttpdx RHATperl-URIx
RHAThttpdx-manual RHATperl-XML-
NamespaceSupportx
Table 2.12.
Packages for LDAP Support
RHATmozldapx
RHATmozldapx-tools
Table 2.13.
Packages for Network
Security Services (NSS)
RHATdirsec-jssx
RHATdirsec-nsprx
RHATdirsec-nssx
RHATdirsec-nssx-tools
Table 2.14.
Page 52

Chapter 2. Installation and Configuration
32
Packages for Java™
SUNWj5rt (32-bit JRE)
SUNWj5rtx (64-bit JRE)
Table 2.15.
2.3. Configuration Preparation
• Section 2.3.1, “Required Information”
• Section 2.3.2, “Default Settings”
2.3.1. Required Information
When the Certificate System subsystems are configured, some outside information must be available.
This includes the following:
• Login PIN.
There is a randomly-generated PIN in the preop.pin parameter in the CS.cfg file in the instance
conf/ directory. This is used to log into the configuration wizard.
• Security domain information.
CAs can create a new security domain, which requires a unique name and a username and
password for the CA agent who administers the domain.
All other subsystems must join an existing security name. Have the username and password of the
CA agent who administers the domain.
• CA information.
If the subsystem is not a CA, then it is necessary to select a CA from a drop-down menu or add
an external CA. If a Certificate System CA is selected, then supply the CA agent username and
password.
• Subsystem information.
When installing a TPS, the CA and TKS subsystems must be installed and configured before
installing the TPS; a DRM subsystem must also be installed and configured if server-side key
generation is selected. When configuring the TPS, the TKS and DRM to connect with the TPS are
selected from a drop-down list of all subsystems within the security domain. The bind information for
the selected subsystems must be available.
• Directory Server hostname and port number.
The Certificate System uses the user database of the Directory Server to store its information,
and the hostname and port number of the LDAP directory is required for the Certificate System to
access the database.
• Directory Manager DN and password.
The Certificate System must be able to bind to the user database, so a user ID and password must
be supplied to bind to the Directory Server. This user is normally the Directory Manager. The default
Directory Manager DN is cn=Directory Manager.
Page 53
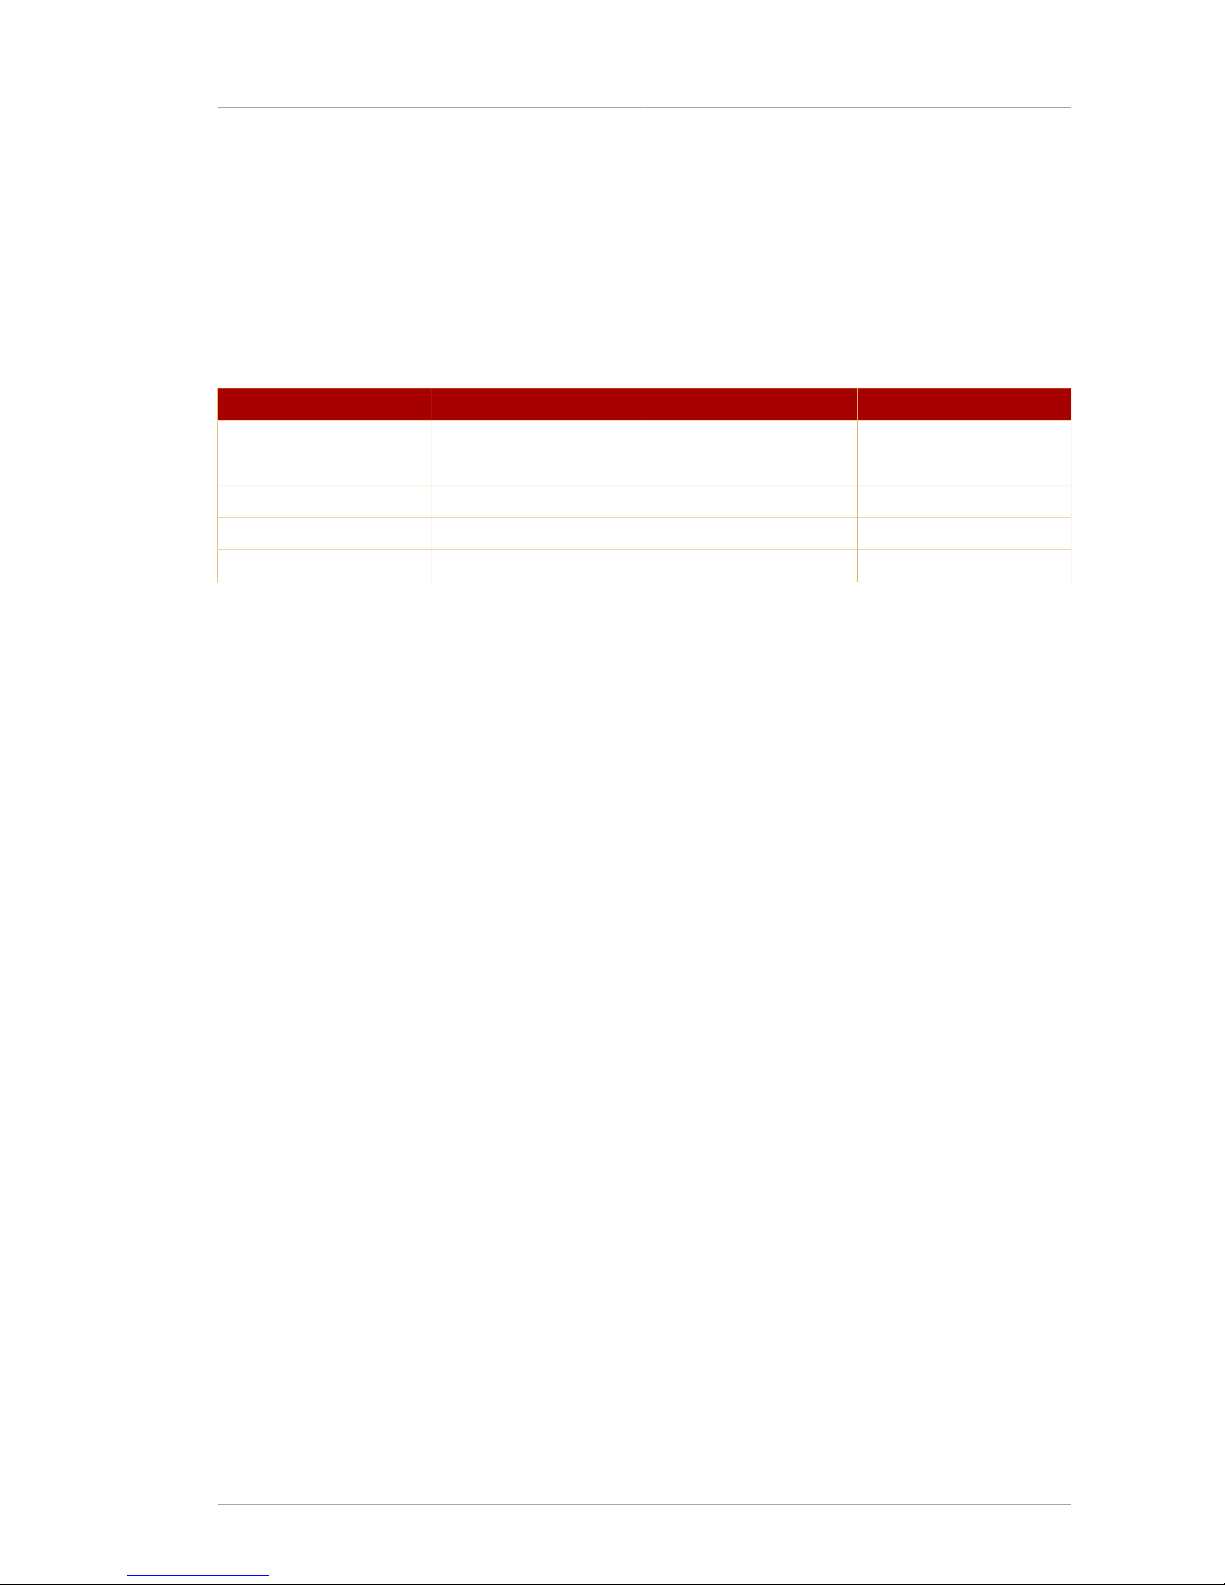
Default Settings
33
• Certificate and key recovery files.
If the subsystem being configured is a clone of another subsystem, then the backup files for the
master subsystem must be locally accessible.
2.3.2. Default Settings
The ports and file directories in Table 2.16, “Default Subsystem Instance Ports and File Locations”
show the default installation and configuration information.
Susbsystem SSL Port Non-SSL Port Instance Directory
CA 9443 9080 /var/lib/rhpki-ca
DRM 10443 10080 /var/lib/rhpki-kra
OCSP 11443 11080 /var/lib/rhpki-ocsp
TKS 13443 13080 /var/lib/rhpki-tks
TPS 7889 7888 /var/lib/rhpki-tps
Table 2.16. Default Subsystem Instance Ports and File Locations
The following certificates are created by default when any of the following subsystem instances are
installed:
• Certificate Manager
• CA signing certificate
• OCSP signing certificate (for the CA's internal OCSP service)
• SSL server certificate
• Subsystem certificate
The subsystem certificate is always issued by the security domain so that domain-level operations
that require client authentication are based on this subsystem certificate.
• DRM
• Transport certificate
• Storage certificate
• SSL server certificate
• Subsystem certificate
• OCSP
• OCSP signing certificate
• SSL server certificate
• Subsystem certificate
• TKS
• SSL server certificate
Page 54

Chapter 2. Installation and Configuration
34
• Subsystem certificate
• TPS
• SSL server certificate
• Subsystem certificate
2.4. Configuration Setup Wizard
When the installation process is complete, either when installing the initial subsystems or running the
pkicreate tool, the script returns a URL pointing to the configuration page of the new subsystem.
This HTML configuration wizard is used to configure the subsystem settings like the instance name
and security domain, to request and generate keys and certificates, and to configure which Directory
Server to use.
This section describes the configuration wizard panels. The panels shown are slightly different for
configuring the different subsystems or when configuring a clone.
• Section 2.4.1, “Security Domain Panel”
• Section 2.4.2, “Subsystem Type Panel”
• Section 2.4.3, “PKI Hierarchy Panel”
• Section 2.4.4, “CA Information Panel”
• Section 2.4.5, “TKS Information Panel”
• Section 2.4.6, “DRM Information Panel”
• Section 2.4.7, “Authentication Directory Panel”
• Section 2.4.8, “Internal Database Panel”
• Section 2.4.9, “Key Store Panel”
• Section 2.4.10, “Key Pairs Panel”
• Section 2.4.11, “Subject Names Panel”
• Section 2.4.12, “Requests and Certificates Panel”
• Section 2.4.13, “Export Keys and Certificates Panel”
• Section 2.4.14, “Administrator Panel”
2.4.1. Security Domain Panel
This panel creates a new security domain or adds the new subsystem to an existing security
domain. A security domain can be created only if the subsystem being configured is a CA. All
other subsystems do not have the option to create a domain, so these subsystems must join an
existing security domain. Creating a new domain creates a registry called domain.xml in the /var/
lib/CAinstanceID/conf/ directory. Editing the file manually is not recommended.
Page 55

Subsystem Type Panel
35
The first security domain for the Certificate System is created when the default CA is configured. Every
subsystem must belong to a security domain; no system can be successfully configured without an
existing security domain. The only subsystem which can host a security domain is a CA.
Figure 2.1. Security Domain
If the subsystem is being added to an existing domain, provide the security domain URL and the
administrator UID and password for the domain.
Figure 2.2. Supplying the Security Domain Bind Information
For more information on security domains, see Section 4.4, “Security Domains”.
2.4.2. Subsystem Type Panel
This panel creates a master subsystem or clones an existing subsystem. Creating a master
subsystem only requires giving a subsystem name. The subsystem URL is filled automatically. When
Page 56
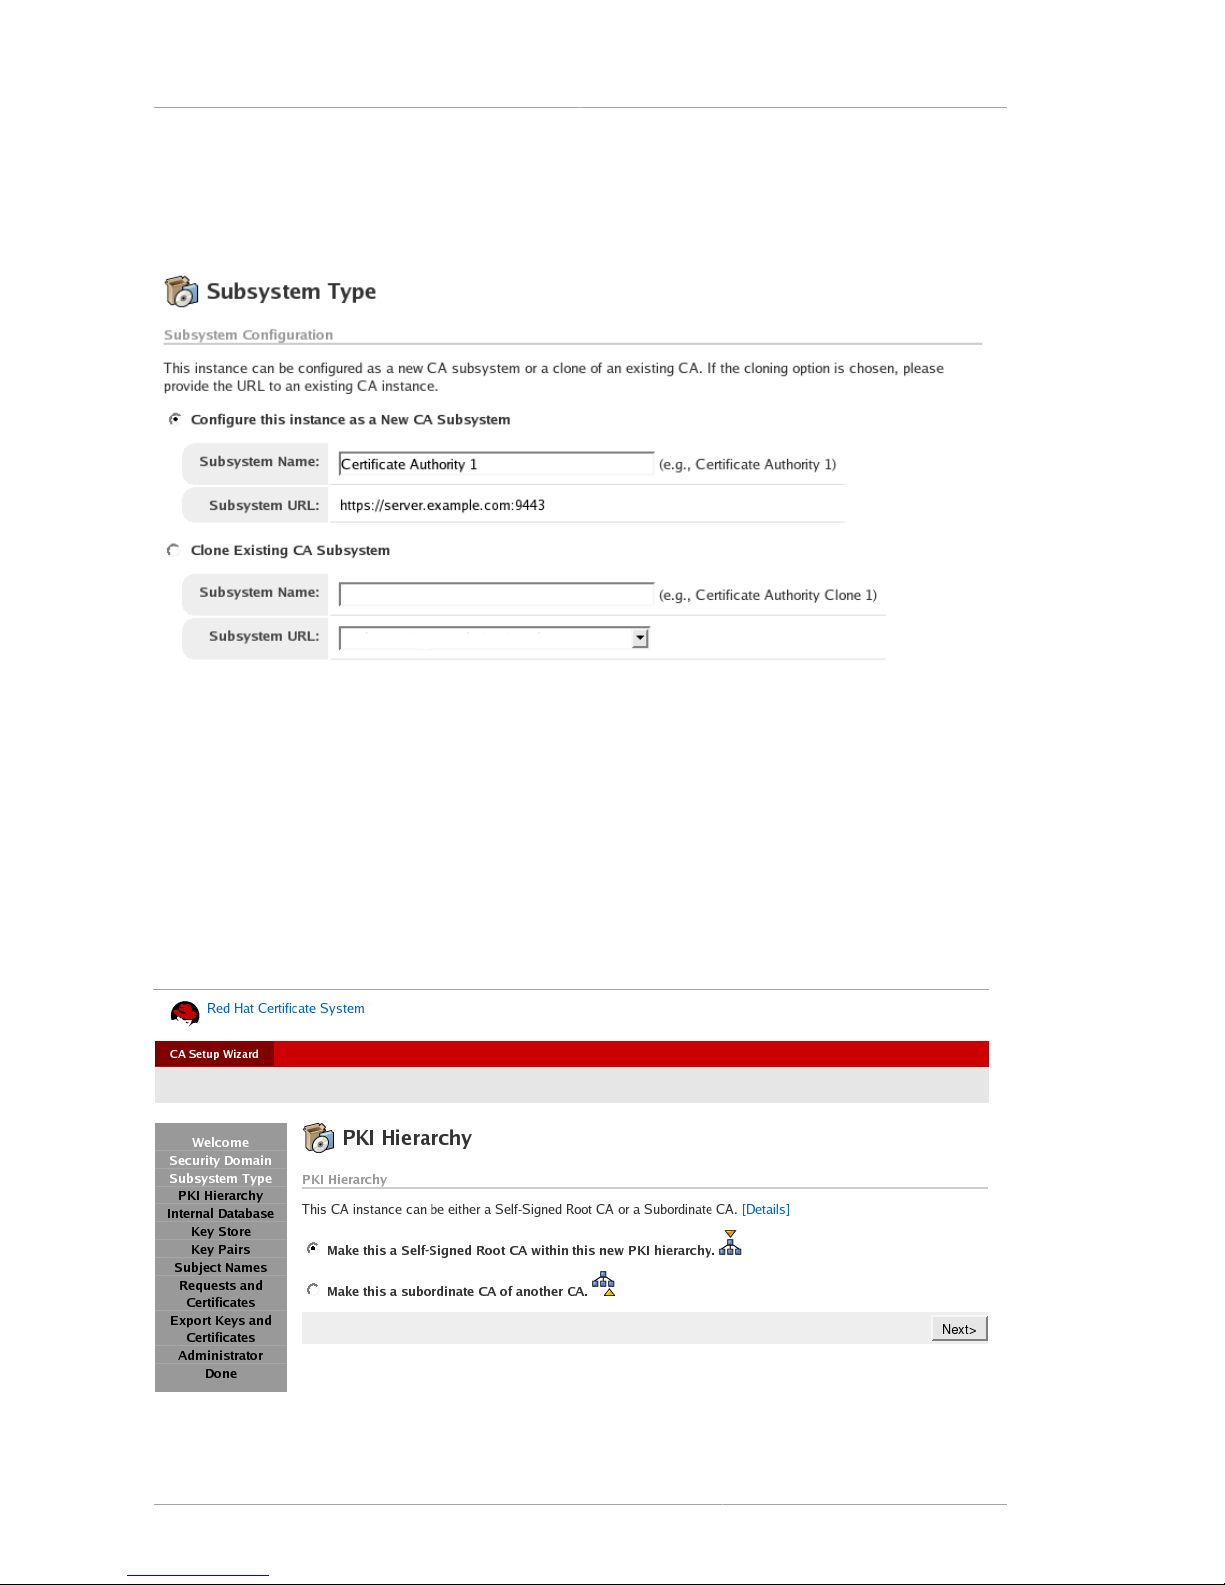
Chapter 2. Installation and Configuration
36
cloning an existing subsystem, select the master subsystem from the list provided, and give the name
of the new cloned subsystem. The list of subsystems in the Clone section list is retrieved from the
security domain provided in the Security Domain panel.
Figure 2.3. Creating the Instance
Cloning a subsystem automatically supplies the rest of the subsystem information based on the
master's configuration and regenerates the master's certificates.
2.4.3. PKI Hierarchy Panel
This option is only available to CAs; this creates the overall arrangement of CAs. CAs can be arranged
in a hierarchy, with root CAs, which sign CA signing certificates and set certificate policies, and layers
of subordinate CAs, which have CA signing certificates signed by a root CA and which must obey
the issuance policies set by that root. This panel determines where in the CA hierarchy the new CA
instance belongs.
Figure 2.4. Setting the PKI Hierarchy
Page 57
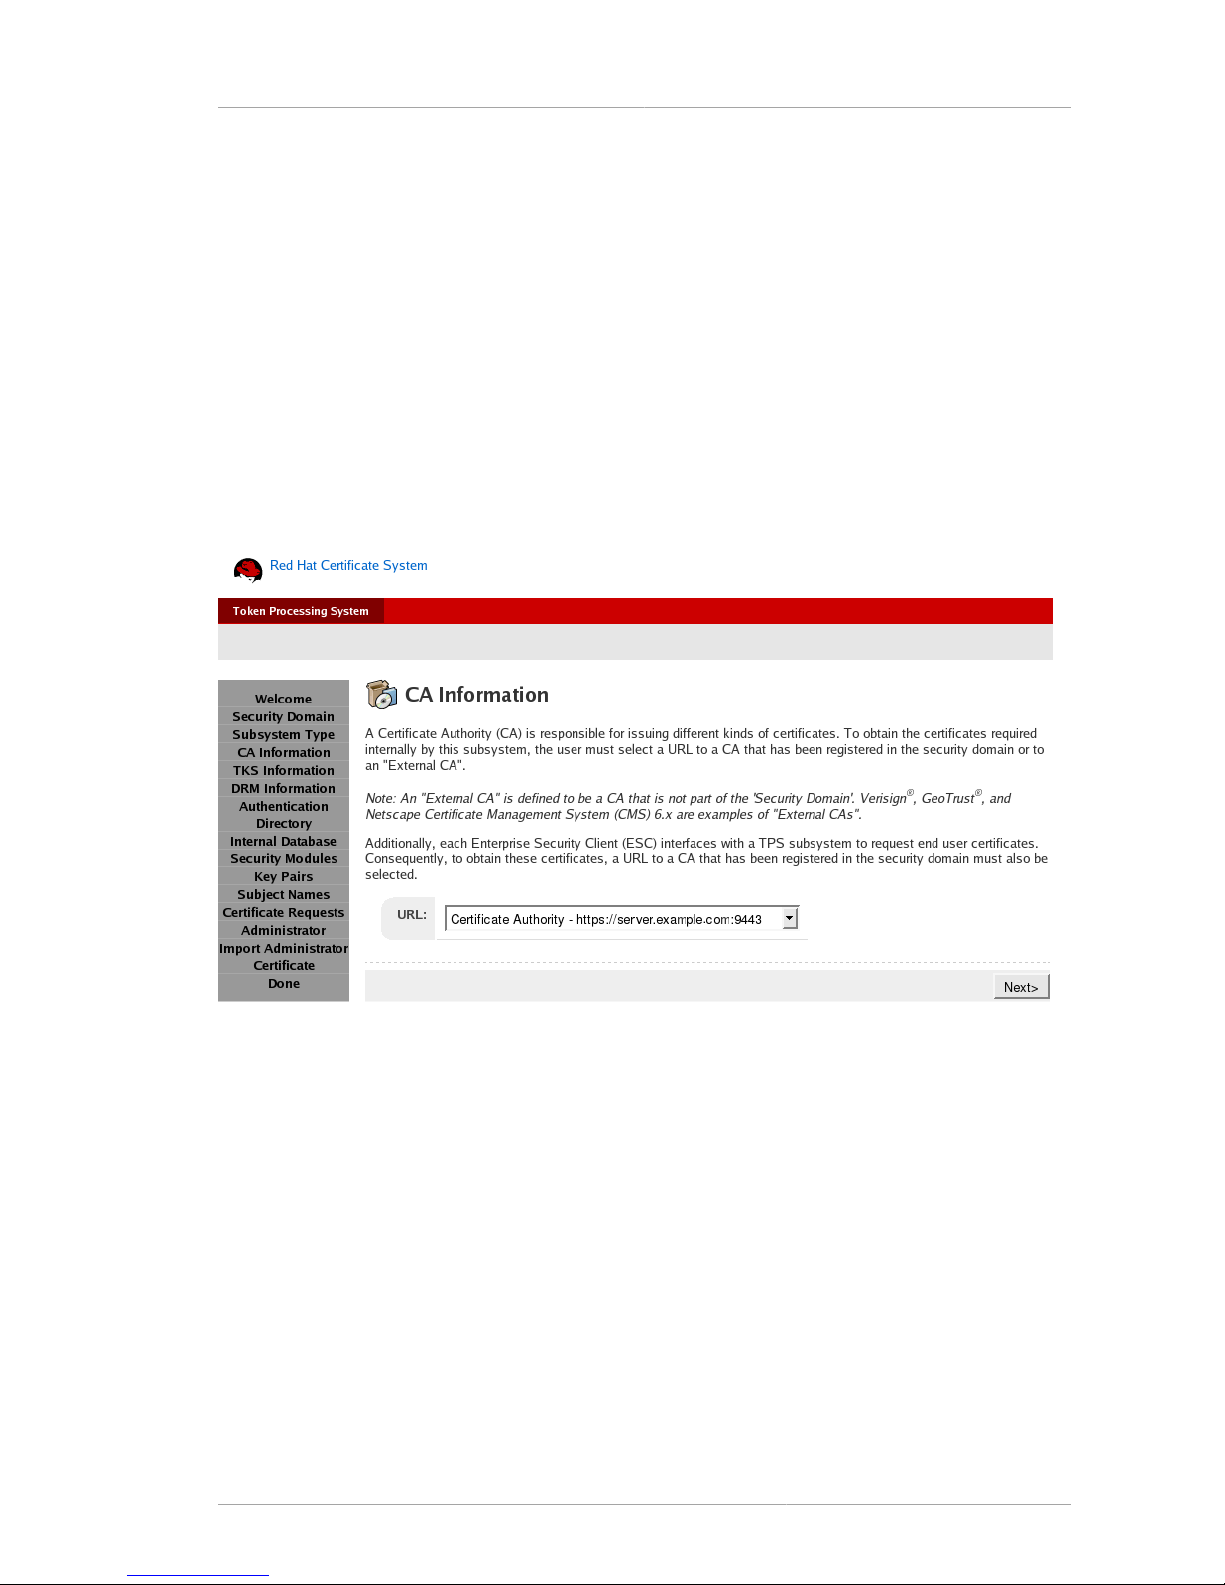
CA Information Panel
37
For a CA, there are two possible configuration options:
• Root CA. A root CA signs its own CA signing certificate and, therefore, can set its own certificate
issuance rules.
• Subordinate CA. A subordinate CA receives its CA signing certificate from a root CA. The root CA
must be referenced here; it can be another Certificate System CA, but, for the default (i.e., first) CA
instance, this will probably be an external root CA. The certificate requests generated in this process
must be submitted to the external CA and be approved before configuration can be completed.
2.4.4. CA Information Panel
This panel appears only during TPS configuration. This identifies the CA which will work with the TPS
to issue and revoke certificates stored on the smart card. The TPS must be associated with a CA
within the security domain which can perform the token operations; the CA is selected from a dropdown list of all CAs within the domain.
Figure 2.5. Selecting the CA
2.4.5. TKS Information Panel
This panel is only available when configuring a TPS subsystem. The TPS must be associated with an
existing TKS subsystem. Similarly to setting the CA information, the TKS is selected from a list of all
configured TKS subsystems within the security domain.
Page 58

Chapter 2. Installation and Configuration
38
Figure 2.6. Selecting the TKS
2.4.6. DRM Information Panel
This panel is only available when configuring a TPS subsystem. The TPS can be associated with an
existing DRM subsystem to enable server-side key generation. Similarly to setting the CA information,
the DRM is selected from a list of all configured DRM subsystems within the security domain.
Figure 2.7. Selecting the DRM
Page 59

Authentication Directory Panel
39
2.4.7. Authentication Directory Panel
This panel is only available when configuring a TPS subsystem. All subsystems are configured to use
a Directory Server database for system certificates and users. The TPS subsystem has an additional
database for certificates and keys and to authenticate users which access the Enterprise Security
Client. This is configured in the Authentication Directory panel.
Figure 2.8. Configuring the TPS Authentication Database
Directory Server must be installed and available so that information can be supplied in this panel,
and the appropriate database and suffix must be created before the TPS is configured; these are
not created by the configuration wizard but are accessed by it. Only Red Hat Directory Server 7.1 or
higher is supported.
2.4.8. Internal Database Panel
This panel collects information for the internal directory service used for storing certificate requests
and certificates.
Directory Server must be installed and available so that information can be supplied in this panel. If the
suffix and the database name provided in this screen are not present in the Directory Server instance,
then the configuration wizard attempts to create them. It is also possible to provide an existing suffix
and database. Only Red Hat Directory Server 7.1 or higher is supported.
Page 60

Chapter 2. Installation and Configuration
40
Figure 2.9. Configuring the Internal LDAP Database Information
NOTE
Do not share the same suffix and database name for more than one Certificate System
subsystem. The same instance can be used for more than one subsystem, but different
suffix and database names must be specified. Additionally, if a subsystem is being cloned,
the same directory instance cannot be used for both the master and clone.
If a subsystem is cloned, the configuration wizard attempts to configure multi-master replication
agreements between the master subsystem's internal database and the new clone's internal database.
2.4.9. Key Store Panel
This panel displays a list of automatically-discovered tokens that can be used to store certificates
and keys. The Certificate System automatically discovers Safenet's LunaSA and nCipher's netHSM
hardware security modules (HSM) and returns them on this screen. The discovery process assumes
that the client software installations for these modules are local on the same system as the Certificate
System subsystem and are in the following locations:
• LunaSA: /usr/lunasa/lib/libCryptoki2.so
• nCipher: /opt/nfast/toolkits/pkcs11/libcknfast.so
NOTE
Previously, all possible slots had to be logged into before configuration could proceed; in
Certificate System 7.2 it is possible to configure the instance while being logged into only
one slot.
Page 61

Key Pairs Panel
41
Figure 2.10. Selecting the Key and Certificate Location
The LunaSA partitions, the nCipher slots, and the NSS internal software token are provided in this
screen.
The internal software token is logged in by default. The password to this database is stored in /var/
lib/instance_ID/conf/password.conf.
If an HSM module is selected, the administrator provides the password, and password.conf is
updated with this information by default.
The status field in this panel describes the status of the token.
• Found . The token was discovered by Certificate System and added to secmod.db.
• Not-Found . The Certificate System was unable to find the supported HSMs.
• Logged In . The login attempt to the slot was successful.
• Not Logged In . The subsystem is not logged into the slot yet.
The login button corresponding to the slot brings up a login prompt for the token password.
2.4.10. Key Pairs Panel
This screen shows the type and size of the keys to be generated. The default values are RSA and
2048-bit for all keys.
Page 62

Chapter 2. Installation and Configuration
42
Figure 2.11. Setting the Key Pair Type
2.4.11. Subject Names Panel
This panel lists the different certificate subject names for all of the certificates issued for the subsystem
being installed. This panel also sets which CA will issue these certificates. If the certificates for the
subsystem, including certificates for a subordinate CA, will be issued by an external CA such as
VeriSign or a Certificate System CA which is outside the security domain, select External CA from the
list.
Page 63

Requests and Certificates Panel
43
Figure 2.12. Setting the Certificate Subject Name
If an existing subsystem is being cloned, all of these fields are grayed out except the Server
Certificate name field because the server certificate is regenerated.
2.4.12. Requests and Certificates Panel
This panel has links to the certificate requests and the issued certificates, if the certificates were
issued successfully. The generated certificate requests are stored in the instance's CS.cfg
configuration file for retrieval later.
Page 64

Chapter 2. Installation and Configuration
44
Figure 2.13. Certificate Request and Certificate Links
If the certificates are signed by an external CA, such as a third-party CA or a Certificate System CA
which is outside the security domain, then action required is shown under the certificate name, and
there are action links to submit the certificate. The configuration wizard will not proceed past this panel
until the new certificates are pasted into the fields. In this case, the Requests and Certificates panel
appears as shown.
2.4.13. Export Keys and Certificates Panel
This panel offers the option to export the new certificate to a .p12 file. A .p12 backup file of a master
subsystem's certificates and keys is required when configuring the clone; these files can also be
used to restore the keys and certificates if the current certificate repository, such as a token, is lost or
damaged.
NOTE
It is not possible to export keys and certificates stored on an HSM to a .p12 file.
Page 65
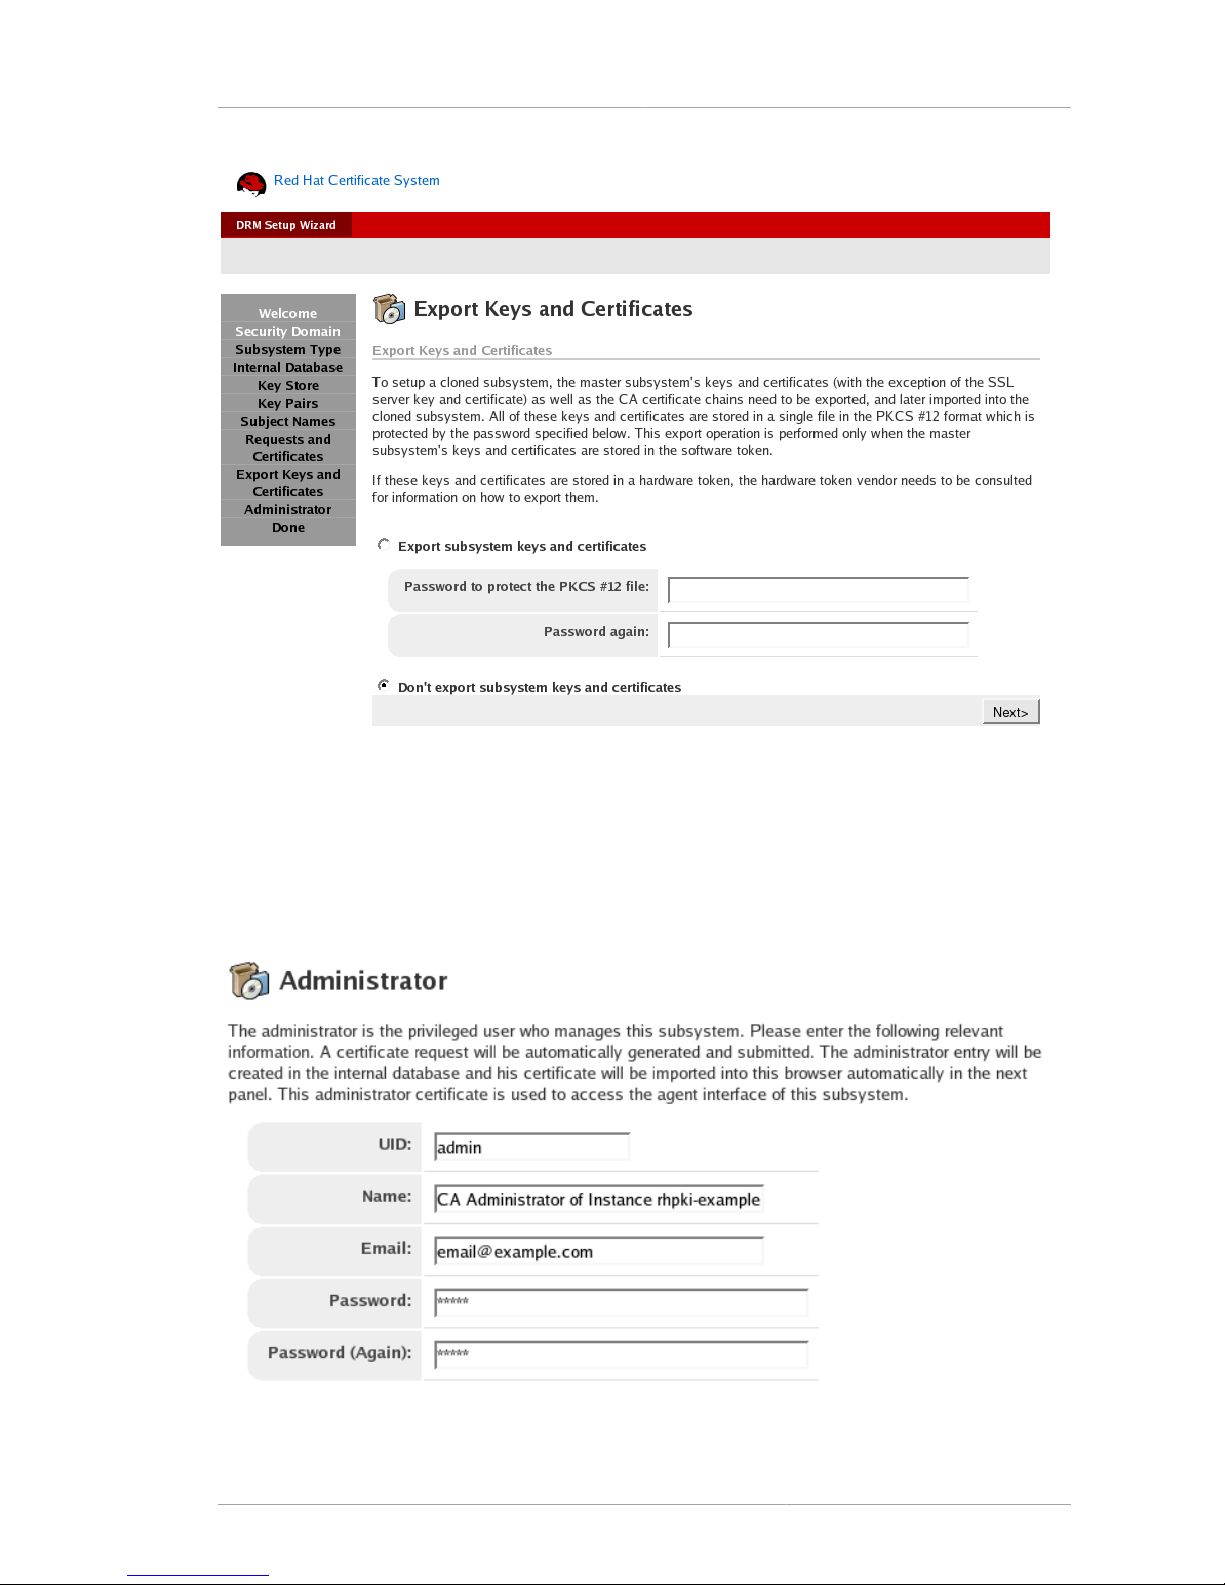
Administrator Panel
45
Figure 2.14. Exporting the Certificates and Keys
2.4.14. Administrator Panel
This panel creates the first administrator user for the instance. This user also has agent privileges,
so the agent certificates and keys for the agent certificate are generated on the browser used to go
through the configuration wizard. This administrator/agent user can use this agent certificate to access
the agent interface for managing requests.
Figure 2.15. CA Administrator
Page 66

Chapter 2. Installation and Configuration
46
Pressing Next causes the browser to generate a key pair which consists of a public key and a private
key. The public key is packaged in a certificate request that is submitted to the CA. If the requests are
submitted to a Certificate System CA, the CA approves and signs the certificate request automatically,
and the certificate is returned in the browser in the next panel.
2.5. Installing the Certificate System
The installation process consists of two main steps: obtaining the packages and configuring the
subsystems. This section explains how to obtain and install the Certificate System packages.
There are two ways to obtain and install the subsystem packages. For all supported platforms, the
Certificate System packages can be downloaded as ISO images through the appropriate Red Hat
Network channel. These packages are then installed through a package utility; on Red Hat Enterprise
Linux systems, this is rpm and on Solaris 9, pkgadd.
Alternatively, if the appropriate network access is available, the subsystems and all dependencies can
be downloaded and installed on Red Hat Enterprise Linux systems using the up2date command.
Whether downloading and installing the Certificate System from an ISO image or through up2date,
several packages are also installed for related applications and dependencies, not only for the
subsystem packages. These packages are listed in Section 2.2.3.1, “Red Hat Enterprise Linux RPMs”
and Section 2.2.3.2, “Solaris Packages”.
• Section 2.5.1, “Installing from an ISO Image”
• Section 2.5.2, “Installing through up2date”
2.5.1. Installing from an ISO Image
For Sun Solaris and Red Hat Enterprise Linux AS and ES, use the following procedure to install the
Certificate System from an ISO image:
1. Open the appropriate Red Hat Certificate System 7.2 Red Hat Network channel and download
the packages.
Solaris packages are contained in a single ISO image; Red Hat Enterprise Linux packages can be
downloaded as an ISO image or individually.
2. Log into the machine as the root user.
3. Install the rhpki-manage package and run rhpki-install manually. For example, on Red Hat
Enterprise Linux:
rpm -Uvh rhpki-manage-version.noarch.rpm
After you have installed the rhpki-manage package, use the rhpki-install script to install
the subsystem. For example:
rhpki-install -pki_subsystem=subsystem_type
-pki_package_path=/path/to/ISO_image -force
Page 67

Installing from an ISO Image
47
NOTE
The DONT_RUN_PKICREATE environment variable can stop the pkicreate script
from running automatically after the subsystems are installed. This allows the default
instances to be installed in user-defined installation directories, instead of the default
locations in /var/lib. It can be preferable to install through the ISO image with this
environment variable set to block the pkicreate script for deployments where the
default instances must be installed in custom locations.
The following options are available for subsystem:
• ca installs the Certificate Authority.
• drm installs the Data Recovery Manager.
• ocsp installs the Online Certificate Status Protocol Responder.
• tks installs the Token Key System.
• tps installs the Token Processing System.
• esc installs the Enterprise Security Client.
The force option bypasses any confirmation prompts that may otherwise appear during the
installation.
For example, to install the CA and then the DRM, use the following commands:
rhpki-install -pki_subsystem=ca
-pki_package_path=/media/cdrom/RedHat/RPMS -force
rhpki-install -pki_subsystem=drm
-pki_package_path=/media/cdrom/RedHat/RPMS -force
The rhpki-install script uses the rpm program on Red Hat Enterprise Linux systems and
pkginfo and pkgadd programs on Solaris 9 systems.
4. When the installation process is complete, a URL to access this instance is printed to the screen
with the following format.
Configuration Wizard listening on
http://hostname.domainname:unsecure-port/subsystem_type
/admin/console/config/login?pin=pin
For example, a new CA may have the following URL:
http://server.example.com:9080/ca/admin/console/config/login?pin=Yc6EuvuY2OeezKeX7REk
Page 68

Chapter 2. Installation and Configuration
48
NOTE
When the first subsystem is installed on a machine, the installation process automatically
creates a new user (pkiuser) and group (pkiuser). All default Certificate System
instances will run as this user and group.
2.5.2. Installing through up2date
NOTE
There is an environment variable, DONT_RUN_PKICREATE, which will stop the
pkicreate script from running automatically after the subsystems are installed. This
allows the default instances to be installed in user-defined installation directories, instead
of the default locations in var/lib. It can be preferable to install through the ISO image
with this environment variable set to block the pkicreate script for deployments where
the default instances must be installed in custom locations.
To install the subsystems on Red Hat Enterprise Linux using the up2date command, run a command
like the following for each subsystem:
up2date rhpki-subsystem
subsystem can be ca for the CA, kra for the DRM, ocsp for the OCSP, tks for the TKS, and tps for
the TPS.
up2date is used only for the first subsystem instance; any additional subsystem instances should be
added using pkicreate.
To install the client using up2date, run the following:
up2date esc
2.6. Configuring the Default Subsystem Instances
After the packages have been installed, the subsystem has to be configured by going through the
HTML configuration wizard. The configuration process is similar for the subsystems; differences in
the wizard are described in the panel descriptions in Section 2.4, “Configuration Setup Wizard”. The
general process is outlined in this section.
• Section 2.6.1, “Configuring a CA”
• Section 2.6.2, “Configuring a DRM, OCSP, or TKS”
• Section 2.6.3, “Configuring a TPS”
2.6.1. Configuring a CA
1. Open the configuration wizard. When the instance is installed, the process returns a success
message which includes a URL with the login PIN. For example:
Page 69

Configuring a CA
49
http://server.example.com:9080/ca/admin/console/config/login?pin=kI7E1MByNIUcPJ6RKHmH
Using this URL skips the login screen.
Alternatively, log into the setup wizard through admin link on the services page and supply the
preop.pin value from the CS.cfg file when prompted.
http://server.example.com:9080/ca/services
2. Create a new security domain.
The default CA instance must create a new security domain; subsequent CAs can create a new
domain or join an existing security domain.
3. Enter a name for the new instance.
4. Set up the PKI hierarchy. It is recommended that the first CA be a root, or self-signed, CA,
meaning that it signs its own CA signing certificate rather than submitting its certificates to a thirdparty CA for issuance. Subsequent CAs can be subordinate CAs.
5. Fill in the Directory Server hostname, port, bind DN, and bind password.
6. Select the key store token; a list of detected hardware tokens and databases is given.
To determine whether a token is detected by the Certificate System, use the TokenInfo tool. For
more information on this tool, see the Certificate System Command-Line Tools Guide.
7. Set the key size. The default RSA key size is 2048.
8. Optionally, give subject names for the certificates.
9. The next panels generate and show certificate requests, certificates, and key pairs.
If an external CA is used to issue the certificates, configuration cannot go forward until they are
received from the external CA. When they are issued, paste the certificates into this panel to
add them to the CA database, and then proceed with the installation. Click Apply to view the
certificates as they are imported.
10. If the subsystem will ever be cloned, or as a protection if keys or certificates are ever lost, back up
the keys and certificates when prompted.
11. Give the information for the new subsystem administrator.
12. Click Next through the remaining panels to import the agent certificate into the browser and
complete the configuration.
13. When the configuration is complete, restart the subsystem.
/etc/init.d/rhpki-ca restart
Page 70

Chapter 2. Installation and Configuration
50
2.6.2. Configuring a DRM, OCSP, or TKS
1. Open the configuration wizard. When the instance is installed, the process returns a success
message which includes a URL with the login PIN. For example:
http://server.example.com:10080/kra/admin/console/config/login?pin=kI7E1MByNIUcPJ6RKHmH
Using this URL skips the login screen.
Alternatively, log into the setup wizard through admin link on the services page and supply the
preop.pin value from the CS.cfg file when prompted.
http://server.example.com:10080/kra/services
2. Join an existing security domain. Supply the hostname and SSL port of the CA which hosts the
domain. When the CA is successfully contacted, then supply the admin username and password
for the CA so that it can be properly accessed.
3. Enter a name for the new instance.
4. Fill in the Directory Server hostname, port, bind DN, and bind password.
5. Select the key store token; a list of detected hardware tokens and databases is given.
To determine whether a token is detected by the Certificate System, use the TokenInfo tool. For
more information on this tool, see the Certificate System Command-Line Tools Guide.
6. Set the key size. The default RSA key size is 2048.
7. Select the CA which will generate the subsystem certificates; to use a Certificate System CA,
select the CA from the drop-down menu of the CAs configured within the security domain.
Optionally, give subject names to the listed certificates.
8. The next panels generate and show certificate requests, certificates, and key pairs.
If an external CA is used to issue the certificates, configuration cannot go forward until they
are received from the CA. When they are issued, paste the certificates into this panel to add
them to the subsystem database, and then proceed with the installation. Click Apply to view the
certificates as they are imported.
9. If the subsystem will every be cloned, or as a protection if keys or certificates are ever lost, back
up the keys and certificates when prompted.
10. Give the information for the new subsystem administrator.
11. Click Next through the remaining panels to import the agent certificate into the browser and
complete the configuration.
12. When the configuration is complete, restart the subsystem.
/etc/init.d/rhpki-kra restart
Page 71

Configuring a TPS
51
2.6.3. Configuring a TPS
1. Open the configuration wizard. When the instance is installed, the process returns a success
message which includes a URL with the login PIN. For example:
http://server.example.com:7888/tps/admin/console/config/login?pin=kI7E1MByNIUcPJ6RKHmH
Using this URL skips the login screen.
Alternatively, log into the setup wizard through admin link on the services page and supply the
preop.pin value from the CS.cfg file when prompted.
http://server.example.com:7888/tps/services
2. Join an existing security domain. Supply the hostname and SSL port of the CA which hosts the
domain. When the CA is successfully contacted, then supply the admin username and password
for the CA so that it can be properly accessed.
3. Enter a name for the new instance.
4. Supply the CA information for the Certificate System CA which will be used to issue and revoke
certificates for token operations requested through the TPS subsystem.
5. Supply information about the TKS which will manage the TPS keys. Select the TKS from the dropdown menu of TKS subsystems within the security domain.
6. There is an option for server-side key generation for tokens enrolled through the TPS. If serverside key generation is selected, supply information about the DRM which will be used to generate
keys and archive encryption keys. Key and certificate recovery is initiated automatically through
the TPS, which is a DRM agent. Select the DRM from the drop-down menu of DRM subsystems
within the security domain.
7. Fill in the Directory Server hostname, port, bind DN, and bind password.
8. Select the key store token; a list of detected hardware tokens and databases is given.
To determine whether a token is detected by the Certificate System, use the TokenInfo tool. For
more information on this tool, see the Certificate System Command-Line Tools Guide.
9. Set the key size.
10. Select the CA which will generate the subsystem certificates; to use a Certificate System CA,
select the CA from the drop-down menu of the CAs configured within the security domain.
To select and external CA, select the External CA radio button and supply the appropriate
information.
Optionally, give subject names to the listed certificates.
11. The next panels generate and show certificate requests, certificates, and key pairs.
If an external CA is used to issue the certificates, configuration cannot go forward until they are
received from the CA. When they are issued, paste the certificates into this panel to add them to
the TPS database, and then proceed with the installation. Click Apply to view the certificates as
they are imported.
Page 72

Chapter 2. Installation and Configuration
52
12. Give the information for the new subsystem administrator.
13. Click Next through the remaining panels to import the agent certificate into the browser and
complete the configuration.
14. When the configuration is complete, restart the subsystem.
/etc/init.d/rhpki-tps restart
2.7. Creating Additional Subsystem Instances
There can be multiple instances of the same type of subsystem on a single machine or multiple
instances can be installed on separate machines throughout a deployment. Creating additional
subsystem instances is similar to installing and configuring the default instances; there is a script to
run to create a basic installation and then an HTML-based configuration wizard.
All additional CA, DRM, OCSP, TKS, and TPS instances are installed by running a special tool,
pkicreate. After that, they are configured through the HTML-based administration page. For more
information on pkicreate, see the Certificate System Command-Line Tools Guide.
NOTE
Additional subsystems can be duplicates, or clones, of existing subsystems. Cloning can
be used for load balancing for heavily trafficked servers and for failover support. Clones
are installed the same as other subsystems, with slight differences in the subsequent
configuration. For more information on using cloning as part of a deployment strategy, see
Chapter 19, Configuring the Certificate System for High Availability.
1. Run the pkicreate command. Through the options on this tool, the type of subsystem being
created, the configuration directory, instance name, port numbers, and other basic configuration
information are set. For example, creating a second DRM instance would have the following
command:
pkicreate -pki_instance_root=/var/lib/rhpki-drm2 -subsystem_type=kra pki_instance_name=rhpki-drm2
-secure_port=10543 -unsecure_port=10180 -tomcat_server_port=1802 -verbose
NOTE
For a TPS subsystem, do not use the tomcat_server_port option since the TPS
subsystem uses Apache rather than Tomcat as its web server.
For more information on the pkicreate tool options, see the Certificate System Command-Line
Tools Guide.
2. When the instance is successfully created, the process returns a URL for the HTML configuration
page. For example:
http://server.example.com:10180/kra/admin/console/config/login?pin=nt2z2keqcqAZiBRBGLDf
Page 73
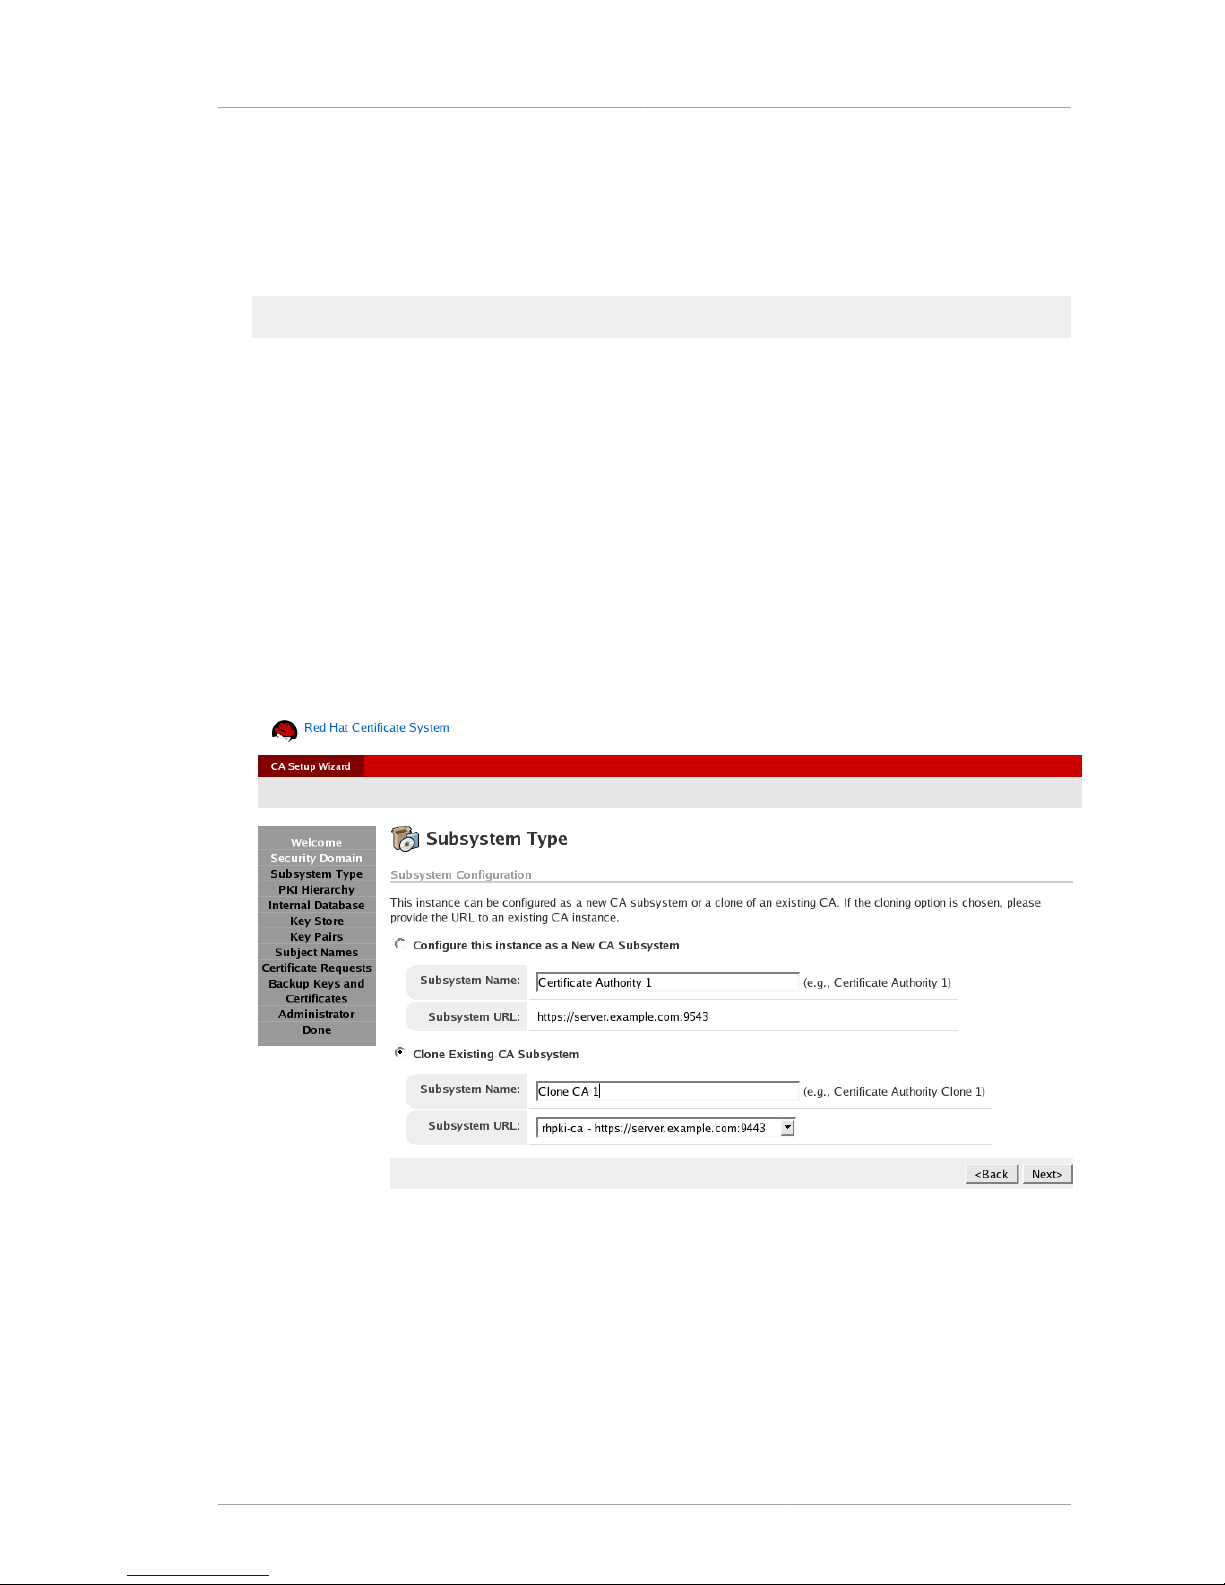
Cloning a Subsystem
53
3. Open the new instance URL, and go through the configuration wizard as described in Section 2.6,
“Configuring the Default Subsystem Instances”. Supply the security domain, CA, instance ID,
internal LDAP database, and agent information.
4. When the configuration is complete, restart the subsystem.
/etc/init.d/instance_ID restart
2.7.1. Cloning a Subsystem
For failover protection and for availability for high-traffic subsystems, it is possible to clone an existing
CA, DRM, TKS, or OCSP subsystem. To clone a subsystem, do the following:
1. Create a new instance using pkicreate.
2. Open the configuration wizard.
3. In the Security Domain panel, add the clone to the same security domain to which the master
belongs.
4. The Subsystem Type panel sets whether to create a new instance or a clone; select the clone
radio button.
Figure 2.16. Selecting the Subsystem to Clone
5. Give the path and filename of the PKCS #12 backup file which was saved when the master
instance was created. If a backup was not created at that time, use the pk12util utility to create
a PKCS #12 file.
Page 74

Chapter 2. Installation and Configuration
54
Figure 2.17. Supplying the Key and Certificate Information
NOTE
When cloning a CA, the master and clone instances have the same CA signing key.
6. The subsystem information is automatically supplied from the master instance to the clone
instance once the keys are successfully restored. Complete the configuration process.
7. Restart the clone instance.
/etc/init.d/instance-id restart
For more information on using cloning as part of a deployment strategy, see Chapter 19, Configuring
the Certificate System for High Availability.
2.8. Silent Installation
The Certificate System includes a tool, pkisilent, which can completely create and configure an
instance. Normally, adding instances requires running the pkicreate utility to create the instance
and then accessing the subsystem HTML page to complete the configuration. The pkisilent
utility creates and configures the instance in a single step. The pkisilent tool is downloaded
independently from the Certificate System packages. It is available through the Red Hat Certificate
System 7.2 Red Hat Network channel.
NOTE
Run this tool on a system which already has a subsystem installed, since this tool
depends on having libraries, JRE, and core jar files already installed.
The silent installation tool has the following format:
perl pkisilent Configuresubsystem_type -options
Page 75

Silent Installation
55
The options are slightly different between the subsystems; all subsystems except for the CA
subsystem require extra options specifying the Certificate Manager to which to submit the certificate
requests.
Example 2.1, “Silent Installation of a CA” shows a silent installation script to install a CA subsystem:
perl pkisilent ConfigureCA -cs_hostname localhost -cs_port 9543
-client_certdb_dir /tmp/ -client_certdb_pwd redhat
-preop_pin sYY8er834FG9793fsef7et5 -domain_name "testca" -admin_user admin
-admin_email "admin@redhat.com" -admin_password redhat
-agent_name "rhpki-ca2 agent" -agent_key_size 2048 -agent_key_type rsa
-agent_cert_subject "ca agent cert" -ldap_host server -ldap_port 389
-bind_dn "cn=directory manager" -bind_password redhat
-base_dn "o=rhpki-ca2" -db_name "rhpki-ca2" -key_size 2048 -key_type rsa
-save_p12 true -backup_pwd redhat
Example 2.1. Silent Installation of a CA
Example 2.2, “Silent Installation of a TKS” shows a silent installation script to install a TKS subsystem;
this script has extra options to point to the CA server:
perl pkisilent ConfigureTKS -cs_hostname localhost -cs_port 13543
-ca_hostname server.example.com -ca_port 9080 -ca_ssl_port 9443
-ca_agent_name agent -ca_agent_password redhat
-client_certdb_dir /tmp/ -client_certdb_pwd redhat
-preop_pin fS44I6SASGF34FD76WKJHIW4 -domain_name "testca" -admin_user admin
-admin_email "admin@redhat.com" -admin_password redhat
-agent_name "rhpki-tks2 agent" -ldap_host server -ldap_port 389
-bind_dn "cn=directory manager" -bind_password redhat -base_dn "o=rhpki-tks2"
-db_name "rhpki-tks2" -key_size 2048 -key_type rsa -agent_key_size 2048
-agent_key_type rsa
-agent_cert_subject "tks agent cert" -backup_pwd redhat
Example 2.2. Silent Installation of a TKS
NOTE
The ConfigureCA can be used to create a security domain or to add the CA to an
existing domain; the other scripts only add the subsystem to an existing security domain.
perl pkisilent ConfigureTPS -cs_hostname localhost -cs_port 7988
-ca_hostname server.example.com -ca_port 9080 -ca_ssl_port 9443
-ca_agent_name agent -ca_agent_password redhat
-client_certdb_dir /tmp/ -client_certdb_pwd redhat
-preop_pin fS44I6SASGF34FD76WKJHIW4 -domain_name "testca" -admin_user admin
-admin_email "admin@redhat.com" -admin_password redhat
-agent_name "rhpki-tks2 agent" -ldap_host server -ldap_port 389
-bind_dn "cn=directory manager" -bind_password redhat -base_dn "o=rhpki-tps2"
-db_name "rhpki-tks2" -key_size 2048 -key_type rsa -agent_key_size 2048
-agent_key_type rsa -agent_cert_subject "tps agent cert" -ldap_auth_host server
-ldap_auth_port 389 -ldap_auth_base_dn "o=TPS DB,dc=example,dc=com"
Example 2.3. Silent Installation of a TPS
For more information on using this tool, see the Certificate System Command-Line Tools Guide.
Page 76

Chapter 2. Installation and Configuration
56
2.9. Updating Certificate System Packages
There are many packages, listed in Section 2.2.3.1, “Red Hat Enterprise Linux RPMs” and
Section 2.2.3.2, “Solaris Packages”, installed with Certificate System for related applications and
dependencies, not just the subsystem packages. For all supported platforms, individual Certificate
System packages may be updated through the native package utilities, rpm on Red Hat Enterprise
Linux systems and pkgrm and pkgadd on Solaris 9.
Alternatively, if the appropriate network access is available, an individual package can be updated on
Red Hat Enterprise Linux systems using the up2date command.
NOTE
All Certificate System instances must be stopped before beginning any updates.
• Section 2.9.1, “Updating Certificate System on Red Hat Enterprise Linux”
• Section 2.9.2, “Updating Certificate System on Solaris”
2.9.1. Updating Certificate System on Red Hat Enterprise Linux
For Red Hat Enterprise Linux, and individual package can up updated either by installing the specific
RPM or by running up2date to update the package.
To install the RPM:
1. Stop all Certificate System instances.
/etc/init.d/instance_ID stop
2. Log in as root.
3. Install the updated package.
rpm -Uvh package_name
For example:
rpm -Uvh rhpki-java-tools-7.2.0-4.noarch.rpm
4. Restart the Certificate System instances.
/etc/init.d/instance_ID start
Alternatively, using the up2date command.
1. Stop all Certificate System instances.
/etc/init.d/instance_ID stop
2. Log in as root.
Page 77

Updating Certificate System on Solaris
57
3. Run up2date for the package. For example:
up2date rhpki-java-tools-7.2.0-4.noarch
4. Restart the Certificate System instances.
/etc/init.d/instance_ID start
2.9.2. Updating Certificate System on Solaris
1. Stop all Certificate System instances.
/etc/init.d/instance_ID stop
2. Log in as root.
3. Install the updated package.
pkgrm old_package_name
pkadd -d ./new_package.pkg
For example:
pkgrm RHATrhpki-native-toolsx
pkadd -d ./RHATrhpki-native-toolsx-7.2.0-4.pkg
4. For the remaining subsystems, use tks, ocsp, etc., as the pki_subsystem parameter.
5. Restart the Certificate System instances.
/etc/init.d/instance_ID start
NOTE
The Solaris Certificate System version has the same directory structure and configuration
as the Red Hat Enterprise Linux version of Certificate System.
2.10. Uninstalling Certificate System Subsystems
It is possible to remove individual subsystem instances or to uninstall all packages associated with an
entire subsystem. Instances and subsystems are installed and uninstalled individually. For example, it
is possible to uninstall a DRM subsystem while leaving an installed and configured CA subsystem. It is
also possible to remove a single CA instance while leaving other CA instances on the machine.
2.10.1. Removing a Subsystem Instance
To remove a subsystem instance, run the following command:
pkiremove -pki_instance_root=pki_instance_root
Page 78

Chapter 2. Installation and Configuration
58
-pki_instance_name=pki_instance_ID
The pki_instance_root is the directory path of the instance, such as /var/lib. The
pki_instance_name is the instance name, such as rhpki-ca. force automatically answers yes to all
uninstallation questions without prompting the user.
pkiremove -pki_instance_root=/var/lib -pki_instance_name=rhpki-ca1
PKI instance Deletion Utility ...
PKI instance Deletion Utility cleaning up instance ...
Stopping rhpki-ca1:
process already stopped
Removing dir /var/lib/rhpki-ca1
Removing file /var/log/rhpki-ca1-install.log
Removing file /etc/init.d/rhpki-ca1
Removing file /usr/share/applications/rhpki-ca1-config.desktop
Removing file /usr/bin/dtomcat5-rhpki-ca1
Example 2.4. Removing a CA Instance
pkiremove removes the instance and any related files, such as the certificate databases, certificates,
keys, and associated users. It does not uninstall the subsystem.
2.10.2. Removing Certificate System Subsystems
To uninstall an individual Certificate System subsystem, do the following:
1. Remove all the associated subsystem instances using pkiremove. For example:
pkiremove -pki_instance_root=/var/lib -pki_instance_name=rhpki-ca
2. Run the uninstall utility. rhpki-uninstall is one of the tools included in the rhpki-manage
package. For example:
rhpki-uninstall -pki_subsystem=ca
The subsystem type can be ca, drm, esc, ocsp, tks, tps, or all. This command uninstalls
the Certificate System servers as well as the Enterprise Security Client. This also removes all
Certificate System RPMs used by the specified subsystems.
3. If all of the Certificate System subsystems on the machine have been uninstalled, remove the
Certificate System uninstall utility; this means removing the rhpki-manage package.
rpm -ev rhpki-manage
Page 79

Chapter 3.
59
Administrative Basics
This chapter discusses the Certificate System administrative console, the configuration files, and other
basic administrative tasks such as starting and stopping the server, managing logs, changing port
assignments, and changing the internal database.
3.1. Administrative Console
The Certificate System provides a GUI-based administration tool called the Console that is used
for administrative tasks such as managing users and maintaining the subsystem, performs daily
operational and managerial duties for the subsystem, and configures the server.
NOTE
The TPS subsystem does not have an administrative console; administrative functions are
performed through the HTML services pages and by manually editing the CS.cfg file.
The Console is launched using the pkiconsole utility, with the hostname, subsystem SSL port, and
subsystem type specified.
pkiconsole https://hostname:SSLport/subsystemType
For a Certificate Manager running a a host named host.example.com on the default CA SSL port
9443, the console command would be as follows:
pkiconsole https://host.example.com:9443/ca
When the command is run, a prompt, opens for the administrative user ID and password.
The Console can be used to access the server locally or remotely, as long as the Certificate System is
installed. The Console has the following tabs:
• The Configuration tab shows information about the subsystem and is the way the configuration
settings are modified. The choices available in this tab are different depending on which subsystem
type the instance is. All subsystems have the following options:
• Users and groups
• Access control lists
• Logs
• Certificates
Page 80
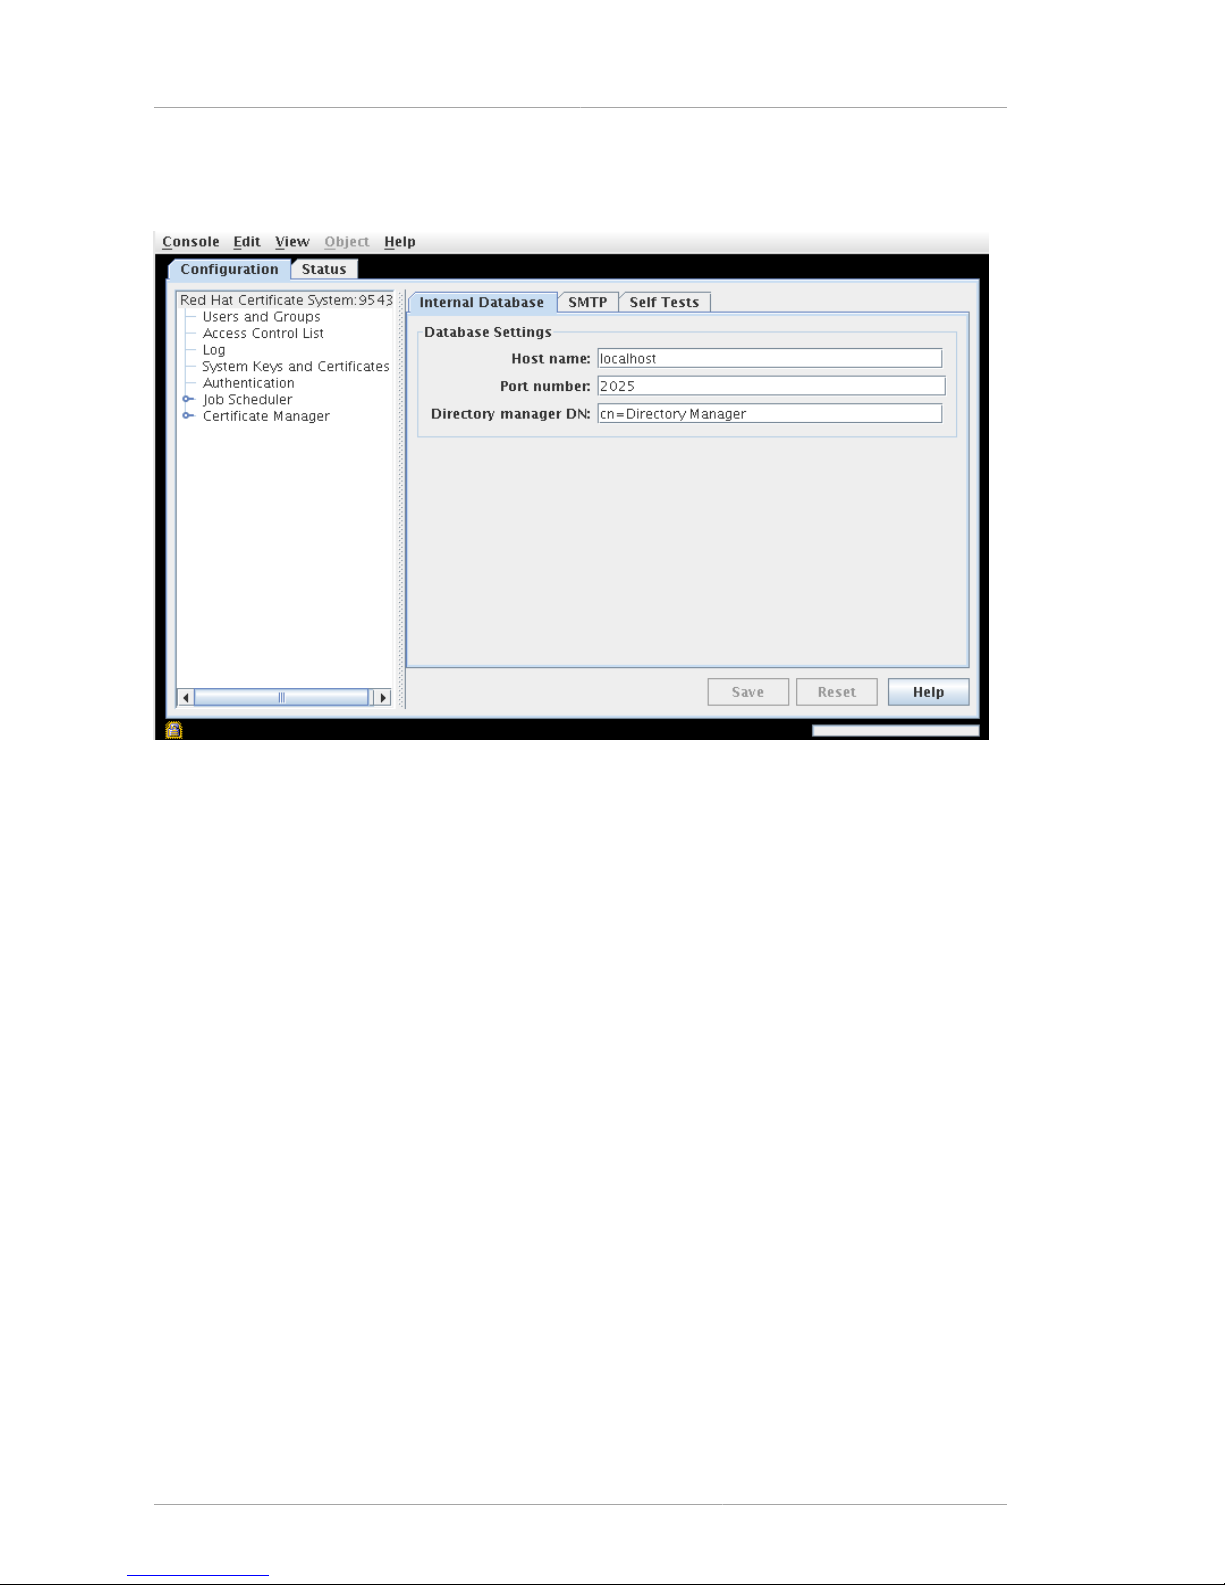
Chapter 3. Administrative Basics
60
• The Status tab allows the administrator to view the contents of various logs maintained by the
Certificate System instance. See Section 3.9, “Logs” for more information.
Figure 3.1. Certificate System Console
3.2. Enabling SSL Client Authentication for the Certificate
System Console
Certificate-based authentication to the Certificate System Console can be enabled so that
administrators must authenticate using a client certificate before logging into the Certificate System
Console. Store the administrators' certificates before enabling certificate-based authentication.
To enable SSL client authentication, both the client and the server need configured to run over SSL.
First, setup the Certificate System server to use SSL client authentication:
1. Store the certificates for any administrator using this system. The certificate should be either from
the CA itself or from whichever CA signed the certificate for the subsystem.
a. Open the subsystem console.
b. Select the Users and Groups option on the left.
c. In the Users tab, select the administrative user, and click Manage Certificates.
d. Click Import.
e. Paste in the base-64 encoded SSL client certificate.
Make sure the client certificate is good for SSL client authentication; otherwise, the server will
not accept the client certificate and will post an error message in the error log in the /var/
log/instanceID/system:
Page 81

Enabling SSL Client Authentication for the Certificate System Console
61
failure (14290): Error receiving connection
SEC_ERROR_INADEQUATE_CERT_TYPE - Certificate type not approved for application.)
2. Stop the subsystem.
/etc/init.d/instance_ID stop
3. Open the instance configuration directory, /var/lib/instance_ID/conf.
4. Open the file CS.cfg.
5. Change the value of the authType parameter from pwd to sslclientauth:
authType=sslclientauth
6. Save the file.
7. Open the server.xml file.
8. Change the clientAuth="false" attribute to clientAuth="true" in the SSL Connector
section:
<Connector port="9443" maxHttpHeaderSize="8192"
maxThreads="150" minSpareThreads="25" maxSpareThreads="75"
enableLookups="false" disableUploadTimeout="true"
acceptCount="100" scheme="https" secure="true"
clientAuth="true" sslProtocol="SSL"
.....
serverCertFile="/var/lib/rhpki-ca/conf/serverCertNick.conf"
passwordFile="/var/lib/rhpki-ca/conf/password.conf"
passwordClass="org.apache.tomcat.util.net.jss.PlainPasswordFile"
certdbDir="/var/lib/rhpki-ca/alias"/>
9. Start the subsystem.
/etc/init.d/instance_ID start
After setting up the server, then configure the client to use SSL client authentication.
The Console must have access to the administrator certificate and keys used for SSL client
authentication to the server. The Console's default certificate and key databases are stored in the
.mcc directory.
To provide access to the administrator certificate and keys, either export them from the administrator's
browser into a .p12 file and then import it by using pk12util, or copy the browser's certificate and
key databases into the .mcc directory. (This procedure assumes that the certificates are exported
from the browser into a .p12 file.)
1. Export the certificate and keys into a file, such as admin.p12.
2. Open the .mcc directory, and run pk12util to export the certificates.
pk12util -i admin.p12 -d . -W [p12filepassword]
Page 82

Chapter 3. Administrative Basics
62
If the procedure is successful, the command prints the following:
pk12util: PKCS12 IMPORT SUCCESSFUL
Start the Console; now, it prompts for a certificate.
3.3. System Passwords
The Certificate System stores passwords used to bind to servers or to unlock tokens when the server
starts in a plain text file, password.conf.
Passwords for the internal database and other database-related passwords for optional features are
stored in a plain text file, password.conf, in the subsystem conf/ directory. The passwords stored
within it are used to bind to the various Certificate System services. Since the password.conf file is
in clear text, it is possible to modify them simply through a text editor.
The list of passwords stored in this file includes the following:
• The bind password used by the Certificate System instance to access and update the internal
database.
• The bind password used by the Certificate System instance to access and remove PINs from
the authentication directory, if the Certificate System is configured to remove PINs from the
authentication directory.
• The bind password used by the subsystem to access and update the LDAP directory; this is
required only if the Certificate System instance is configured for publishing certificates and CRLs to
an LDAP-compliant directory.
• For a TPS instance, the bind password used to access and update the token database.
The password.conf file also contains the token passwords needed to open the private keys of the
subsystem.
• For a Certificate Manager, the token password unlocks the private keys for the Certificate Manager's
CA signing, SSL server, subsystem, and OCSP signing certificates.
• For a DRM, the token password unlocks the private keys for the DRM's storage, transport,
subsystem, and SSL server certificates.
• For an OCSP, the token password unlocks the private keys for the OCSP's signing, subsystem, and
SSL server certificates.
• For a TPS, the token password unlocks the private keys for the subsystem and SSL server
certificates.
3.3.1. Protecting the password.conf File
Certificate System centralizes all passwords in a clear-text file, password.conf, in the conf
directory. The default configuration creates and stores all required passwords in this file, which
keeps password management simple and clean and allows the file to be edited in a text editor and
passwords to be manually added, deleted, or modified.
Page 83

Protecting the password.conf File
63
However, storing passwords in clear text can be dangerous. Setting proper file permissions protects
this file. Alternatively, the password.conf file can be by-passed by doing the following:
1. Back up the password.conf file.
2. Remove the password.conf file.
rm password.conf
3. Create a pipe corresponding to password.conf.
mkfifo password.conf
4. With the password.conf pipe, start the subsystem instance.
a. Run the standard start script. For example:
/etc/init.d/rhpki-ca start
b. Monitor the Tomcat web server log file, catalina.out, and the debug log. For example:
tail -f /var/lib/rhpki-ca/logs/catalina.out /var/lib/rhpki-ca/logs/debug
The server process will hang as it restarts because it is waiting for the input from the default
password.conf file.
c. Redirect the password to the password.conf pipe. Assuming that the backup file for
password.conf is called password.bak, run cat password.bak > password.conf.
Repeat this command until the server is fully started; this is apparent in the debug log.
This process still uses a clear text password file, password.bak, but this moves the password store
so that it is external to the Certificate System instance and can be stored anywhere, such as a smart
card. This only requires a utility which can reconstruct the original password file. For example, this
processes uses the zip tool to protect the password file:
1. Zip and protect the password.conf file using zip.
zip -e secret.zip password.conf
2. Delete the password.conf file, and create a pipe called password.conf.
3. Run the regular start script.
4. Monitor the Tomcat web server log, catalina.out, and the debug log.
5. Provide the passwords to the subsystem instance by running the following:
unzip -c secret.zip password.conf > password.conf
This is a simple and very flexible way to protect the clear text password file while still allowing
passwords to be managed easily through a text editor.
Page 84

Chapter 3. Administrative Basics
64
3.3.2. Password-Quality Checker
A Certificate System plug-in, password-quality checker, monitors the quality of passwords set within
the Certificate System. All passwords used in the Certificate System are checked by the passwordquality checker, which by default checks that the length of a password is at least 8 characters long.
There are no checks regarding which characters are valid or invalid. Trying to set passwords that do
not meet the quality rules returns an error message.
NOTE
The TPS subsystem does not have a password-quality checker.
The Certificate System enforces password quality on only those passwords that it creates and
manages. Passwords for LDAP directory access are not subjected to quality checks. In an LDAP
directory access, the remote directory enforces the quality of the password because it is created and
managed by the directory.
To customize the required quality of passwords, use the plug-in for the password-quality checker
included as a sample in the CS SDK.
3.4. Starting, Stopping, and Restarting Certificate System
Subsystems
Each Certificate System subsystem instance is started, stopped, and restarted separately. This section
describes how to start, stop, and restart a subsystem instance.
3.4.1. Starting a Server Instance
A subsystem instance is started like other system programs. To start an instance:
1. Log in as root.
2. Run /etc/init.d/, specifying the instance name. For example, for an instance named rhpki-
ca, the command is as follows:
/etc/init.d/rhpki-ca start
3.4.2. Stopping a Server Instance
A subsystem instance is stopped like other system programs. To stop an instance:
1. Log in as root.
2. Run /etc/init.d/, specifying the instance name. For example, for an instance named rhpki-
ca, the command is as follows:
/etc/init.d/rhpki-ca stop
3.4.3. Restarting a Server Instance
A subsystem instance is stopped like other system programs. To stop an instance:
Page 85

Restarting a Subsystem after a Machine Restart
65
1. Log in as root.
2. Run /etc/init.d/, specifying the instance name. For example, for an instance named rhpki-
ca, the command is as follows:
/etc/init.d/rhpki-ca restart
3.4.4. Restarting a Subsystem after a Machine Restart
If a computer running a subsystem is shut down unexpectedly, more services than just the subsystem
must be restarted, in the proper order, for the subsystem to be available both through the HTML
services page and the administrative console.
1. Restart the Directory Server Administration Server.
cd /opt/redhat-ds/
./start-admin
2. Restart the Directory Server.
cd /opt/redhat-ds/slapd-instance_ID
./start-slapd
3. Restart the Certificate System subsystem instance.
/etc/init.d/instance_ID start
3.5. Mail Server
The notifications and jobs features use the mail server set in the Certificate System CA instances to
send notification messages. Set up a mail server by doing the following:
1. Open the CA subsystem administrative console. For example:
pkiconsole https://host.example.com:9443/ca
2. In the Configuration tab, highlight the instance name at the top, and select the SMTP tab.
3. Supply the server name and port number of the mail server.
The server name is the fully qualified DNS hostname of the machine on which the mail server
is installed, such as mail.example.com. By default, the hostname of the mail server is
localhost instead of the actual hostname.
The default port number on which the SMTP mail server listens is 25.
4. Click Save.
Page 86

Chapter 3. Administrative Basics
66
3.6. Configuration Files
The runtime properties of a Certificate System subsystem are governed by a set of configuration
parameters. These parameters are stored in a file that is read by the server during startup.
An ASCII file, named CS.cfg, is created and populated with the appropriate configuration parameters
when a subsystem is first installed. The way the instance functions are modified is by making changes
through the subsystem console, which is the recommended method. The changes made in the
administrative console are reflected in the configuration file.
It is also possible to edit the CS.cfg configuration file directly. Since the TPS subsystem does not
use an administrative console, all configuration changes must be made by editing the CS.cfg file
manually.
3.6.1. Locating the Configuration File
Each instance of a Certificate System subsystem has its own configuration file, CS.cfg. The file
for the subsystem is different depending on the installation choices and on which subsystem type is
installed.
The CS.cfg file is located in the /var/lib/instance_ID/conf directory.
3.6.2. Editing the Configuration File
WARNING
Do not edit the configuration file directly without being familiar with the configuration
parameters or without being sure that the changes are acceptable to the server. The
Certificate System fails to start if the configuration file is modified incorrectly. Incorrect
configuration can also result in data loss.
To modify the configuration file:
1. Stop the subsystem instance.
The configuration file is stored in the cache when the instance is started. Any changes made to
the instance through the Console are changed in the cached version of the file. When the server
is stopped or restarted, the configuration file stored in the cache is written to disk. Stop the server
before editing the configuration file or the changes will be overwritten by the cached version when
the server is stopped.
2. Open the /var/lib/instance_ID/conf directory.
3. Open the CS.cfg file in a text editor.
4. Edit the parameters in the file, and save the changes.
5. Start the subsystem instance.
3.6.3. Guidelines for Editing the Configuration File
This section covers information and tips about the configuration file.
Page 87

Guidelines for Editing the Configuration File
67
• The format for parameters is as follows:
#comment
[parameter]=value
• Comment lines begin with the pound (#) character. Comment lines, blank lines, unknown
parameters, or misspelled parameters are ignored by the server.
• Subsystem-specific parameters are distinguished by a prefix identifying the subsystem as follows:
• ca for the Certificate Manager
• kra for the DRM
• ocsp for the OCSP
• tks for the TKS
• tps for the TPS
• The parameter names and their values are strings. The parameter names can
be hierarchically structured with periods separating the levels; for example,
ca.Policy.rule.RSAKeyRule.maxSize. The entries corresponding to a lower level, such as
Policy in the example, can be requested from the configuration corresponding to its higher level,
ca in the example.
• The values that need to be localized such as DNs in multibyte format should be entered in utf8
format.
• The values of some parameters are referenced by other parts of the configuration file.
• The configuration file supports the UNIX-style file separator, the forward slash (/). If the backward
slash (\) file separator is required, use two backward slashes (\\) instead of one.
• Authentication parameters (CA only):
• All authentication-specific information, such as names of registered authentication plug-in
modules and any configured instances, appears in the authentication section of the configuration
file.
• Each registered authentication plug-in module is identified by its implementation name and the
corresponding Java™ class.
• Each configured instance of an authentication module is identified by the name or ID set when
creating it.
• There can be multiple instances from an implementation; each instance must have a unique
name. To do this, copy all of the parameters belonging to the module used to create the instance.
Change the name of each of these parameters to the new name for this instance, and then
change the values of all the parameters as appropriate.
• The name of an authentication instance must be used in the corresponding certificate profile so
that the server is able to determine the authentication method during end-user enrollment.
• Job Scheduler parameters (CA only):
Page 88

Chapter 3. Administrative Basics
68
• All job-specific information, such as registered job modules and configured instances, appears in
the job scheduler section of the configuration file.
• Each registered job module is identified by its implementation name and the corresponding
Java™ class.
• Each job or configured instance of a job module is identified by the name specified when the job
was created.
• There can be as many instances of an implementation as desired; each instance must have a
unique name. To do this, copy all of the parameters belonging to the module used to create the
instance. Change the name of each of these parameters to the new name for this instance, and
then change the values of all the parameters as appropriate.
3.6.4. Duplicating Configuration from One Instance to Another
When deploying a large number of Certificate System instances that are identical and all these
instances should have the same configuration, it is possible to configure one of the instances and
then replace the configuration files of the other instances with the one that contains the required
configuration.
NOTE
Be careful when replacing configuration of one instance with another. The configuration
file for the original instance contains instance-specific parameters. If the new instance's
configuration file is directly replaced with that of the first instance, the new instance will fail
to start properly if the instance specific parameters are not adjusted to those required by
the new instance.
The recommended way to create duplicate instances is to clone the instances when the
subsystem instance is configured. For more information on cloning, see Chapter 19,
Configuring the Certificate System for High Availability.
3.6.5. Other File Locations
Certificate System servers consist of subsystems and instances. Server subsystems are contained
in non-relocatable RPMs analogous to shared libraries, Java™ archive files, binaries, and templates
which must be stored in a fixed location, while server instances analogous to relocatable, user-specific
default and customized forms and data, which can be stored anywhere on a system.
Since Certificate System server RPMs are non-relocatable, the subsystem file locations listed in
Table 3.1, “Server File Locations” are fixed.
Directory Location Contents
/usr/bin pkicreate and pkiremove instance
configuration scripts and tools (Java™, native,
and security) shared by the CA, DRM, OCSP,
and TKS subsystems.
/usr/lib Libraries shared by the CA, DRM, OCSP, and
TKS subsystems. For 32-bit Red Hat Enterprise
Linux AS and ES i386 machines only.
Page 89

Other File Locations
69
Directory Location Contents
/usr/lib/dirsec Security libraries shared by the CA, DRM,
OCSP, and TKS subsystems. For 32-bit Red Hat
Enterprise Linux AS and ES i386 machines only.
/usr/lib/java JNI Java™ archive files shared by the CA, DRM,
OCSP, and TKS subsystems. For 32-bit Red Hat
Enterprise Linux AS and ES i386 machines only.
/usr/lib/java/dirsec JNI security Java™ archive files shared by the
CA, DRM, OCSP, and TKS subsystems. For 32-
bit Red Hat Enterprise Linux AS and ES i386
machines only.
/usr/lib64 Libraries shared by the CA, DRM, OCSP, and
TKS subsystems. For 64-bit Red Hat Enterprise
Linux AS and ES x86_64 machines only.
/usr/lib64/dirsec Security libraries shared by the CA, DRM,
OCSP, and TKS subsystems. For 64-bit Red Hat
Enterprise Linux AS and ES x86_64 machines
only.
/usr/lib64/java JNI Java™ archive files shared by the CA, DRM,
OCSP, and TKS subsystems. For 64-bit Red Hat
Enterprise Linux AS and ES x86_64 machines
only.
/usr/lib64/java/dirsec JNI security Java™ archive files shared by the
CA, DRM, OCSP, and TKS subsystems. For 64-
bit Red Hat Enterprise Linux AS and ES x86_64
machines only.
/usr/share/doc LICENSE and README text files shared by the
Certificate System subsystems.
/usr/share/java/rhpki Java™ archive files shared by the CA, DRM,
OCSP, and TKS subsystems.
/usr/share/java/rhpki/subsystem_type Java™ archive files shared by all instances of a
subsystem type. For example, /usr/share/
java/rhpki/ca contains files shared by all CA
subsystem instances.
/usr/share/rhpki Common files and templates used to create CA,
DRM, OCSP, and TKS instances.
/usr/share/rhpki/subsystem_type Files and templates used to create subsystem
instances. For instance, /usr/share/rhpki/
ca contains files used to create CA instances.
/var/lib/tomcat5/common/lib Java™ archive files shared by local Tomcat web
applications and shared by the CA, DRM, OCSP,
and TKS subsystems.
/var/lib/tomcat5/server/lib Java™ archive files used by the local Tomcat
web server and shared by the CA, DRM, OCSP,
and TKS subsystems.
Page 90

Chapter 3. Administrative Basics
70
Directory Location Contents
/usr/lib/httpd/modules For TPS subsystems only. Apache modules
shared by TPS subsystems. For 32-bit Red Hat
Enterprise Linux AS and ES i386 machines only.
/usr/lib/mozldap For TPS subsystems only. Mozilla LDAP SDK
tools shared by TPS subsystems. For 32-bit Red
Hat Enterprise Linux AS and ES i386 machines
only.
/usr/lib64/httpd/modules For TPS subsystems only. Apache modules
shared by TPS subsystems. For 64-bit Red Hat
Enterprise Linux AS and ES x86_64 machines
only.
/usr/lib64/mozldap For TPS subsystems only. Mozilla LDAP SDK
tools shared by TPS subsystems. For 64-bit
Red Hat Enterprise Linux AS and ES x86_64
machines only.
Table 3.1. Server File Locations
3.6.6. Default Server Instance Locations
The Certificate System server instances are created by the pkicreate utility. Although Certificate
System server instances are relocatable, the following are the default instance locations:
• Section 3.6.6.1, “CA Default Instance Location”
• Section 3.6.6.2, “DRM Default Instance Location”
• Section 3.6.6.3, “OCSP Default Instance Location”
• Section 3.6.6.4, “TKS Default Instance Location”
• Section 3.6.6.5, “TPS Default Instance Location”
3.6.6.1. CA Default Instance Location
Default Location Type of Object Description
/etc/init.d/rhpki-ca File The script used to start, stop, or
restart the CA instance.
/etc/rhpki-ca Directory Contains the configuration file
for the CA instance.
/var/lib/rhpki-ca Directory Contains the user-specific
default and customized forms
and data for the CA instance.
/var/log/rhpki-ca Directory Contains the log files for the CA
instance.
/var/log/rhpki-cainstall.log
File A log file containing the
configuration steps performed
to create the CA instance
Page 91

Default Server Instance Locations
71
Default Location Type of Object Description
/var/run/rhpki-ca.pid File A file containing the active
process ID of the running CA
instance.
Table 3.2. CA Default Instance Location
3.6.6.2. DRM Default Instance Location
Default Location Type of Object Description
/etc/init.d/rhpki-kra File The script used to start, stop, or
restart the DRM instance.
/etc/rhpki-kra Directory Contains the configuration file
for the DRM instance.
/var/lib/rhpki-kra Directory Contains the user-specific
default and customized forms
and data for the DRM instance.
/var/log/rhpki-kra Directory Contains the log files for the
DRM instance.
/var/log/rhpki-krainstall.log
File A log file containing the
configuration steps performed
to create the DRM instance.
/var/run/rhpki-kra.pid File A file containing the active
process ID of the running DRM
instance.
Table 3.3. DRM Default Instance Location
3.6.6.3. OCSP Default Instance Location
Default Location Type of Object Description
/etc/init.d/rhpki-ocsp File The script used to start, stop, or
restart the OCSP instance.
/etc/rhpki-ocsp Directory Contains the configuration file
for the OCSP instance.
/var/lib/rhpki-ocsp Directory Contains the user-specific
default and customized
forms and data for the OCSP
instance.
/var/log/rhpki-ocsp Directory Contains the log files for the
OCSP instance.
/var/log/rhpki-ocspinstall.log
File A log file containing the
configuration steps performed
to create the OCSP instance.
/var/run/rhpki-ocsp.pid File A file containing the active
process ID of the running
OCSP instance.
Table 3.4. OCSP Default Instance Location
Page 92

Chapter 3. Administrative Basics
72
3.6.6.4. TKS Default Instance Location
Default Location Type of Object Description
/etc/init.d/rhpki-tks File The script used to start, stop, or
restart the TKS instance.
/etc/rhpki-tks Directory Contains the configuration file
for the TKS instance.
/var/lib/rhpki-tks Directory Contains the user-specific
default and customized forms
and data for the TKS instance.
/var/log/rhpki-tks Directory Contains the log files for the
TKS instance.
/var/log/rhpki-tksinstall.log
File A log file containing the
configuration steps performed
to create the TKS instance.
/var/run/rhpki-tks.pid File A file containing the active
process ID of the running TKS
instance.
Table 3.5. TKS Default Instance Location
3.6.6.5. TPS Default Instance Location
Default Location Type of Object Description
/etc/init.d/rhpki-tps File The script used to start, stop, or
restart the TPS instance.
/etc/rhpki-tps/conf Directory Contains the configuration file
for the TPS instance.
/var/lib/rhpki-tps Directory Contains the user-specific
default and customized forms
and data for the TPS instance.
/var/log/rhpki-tps Directory Contains the log files for the
TPS instance.
/var/log/rhpki-tpsinstall.log
File A log file containing the
configuration steps performed
to create the TPS instance.
/var/log/rhpki-tps/
rhpki-tps.pid
File A file containing the active
process ID of the running TPS
instance.
Table 3.6. TPS Default Instance Location
3.7. Using Security-Enhanced Linux
Security-enhanced Linux, or SELinux, is a collection of mandatory access control rules which are
enforced across a system to restrict unauthorized access and tampering by limiting users and
applications to the lowest amount of access possible for them to operate. All Certificate System
subsystems can be installed and run with SELinux policies fully enforced.
Page 93

Using Java Servlets
73
SELinux is configured through the config configuration file in the /etc/selinux/ directory. The
typical SELinux configuration is as follows:
###########################################
# SELINUX= can take one of these three values:
# enforcing - SELinux security policy is enforced.
# permissive - SELinux prints warnings instead of enforcing.
# disabled - SELinux is fully disabled.
SELINUX=enforcing
# SELINUXTYPE= type of policy in use. Possible values are:
# targeted - Only targeted network daemons are protected.
# strict - Full SELinux protection.
SELINUXTYPE=targeted
###########################################
NOTE
All of the instances run in un-confined mode with no security-enhanced policies in effect
for the server.
3.8. Using Java Servlets
Each subsystem Java™ servlet supports a parameter called xml, which can have a value of either
true or false. This parameter sets what kind of data the servlet returns; by default all of the
subsystem interfaces, like the agent services page or the end-entities page, returns data in HTML.
Setting the xml with a value of true returns XML data. This XML information is useful for writing
scripts that interact with the server.
The xml parameter is appended to the end of the interface link. For example, the server returns an
HTML page when the following link is accessed:
https://server.example.com:9443/ca/ee/ca/displayBySerial?op=displayBySerial&serialNumber=0x1
Appending xml=true to the end of the link returns the same page in XML:
https://server.example.com:9443/ca/ee/ca/displayBySerial?
op=displayBySerial&serialNumber=0x1&xml=true
3.9. Logs
This section explains how to use the Console to configure logs maintained by the Certificate System
instance and how to view log contents.
This section contains the following subsections:
• Section 3.9.1, “About Logs”
• Section 3.9.2, “Services That Are Logged”
• Section 3.9.3, “Log Levels (Message Categories)”
• Section 3.9.4, “Buffered Versus Unbuffered Logging”
Page 94

Chapter 3. Administrative Basics
74
• Section 3.9.5, “Log File Rotation”
• Section 3.9.6, “Configuring Logs in the Console”
• Section 3.9.7, “Configuring Logs in the CS.cfg File”
• Section 3.9.8, “Configuring TPS Logs”
• Section 3.9.9, “Monitoring Logs”
• Section 3.9.10, “Signing Log Files”
• Section 3.9.11, “Registering a Log Module”
• Section 3.9.12, “Deleting a Log Module”
3.9.1. About Logs
The Certificate System subsystems create log files that record events related to activities, such as
administration, communications using any of the protocols the server supports, and various other
processes employed by the subsystems. While a subsystem instance is running, it keeps a log of
information and error messages on all the components it manages. Additionally, the Apache and
Tomcat web servers generate error and access logs.
Log plug-in modules are listeners which are implemented as Java™ classes and are registered in the
configuration framework.
Each subsystem instance maintains its own log files.
All the log files and rotated log files, except for audit logs, are located in the /var/lib/instance_id/
logs directory.
Audit logs, signed and regular, are located in the /var/lib/instance_id/logs/signedAudit
directory. The default location for logs can be changed by modifying the configuration.
3.9.1.1. System Log
This log, system, records information about requests to the server (all HTTP and HTTPS requests)
and the responses from the server. Information recorded in this log includes the IP address of the
client machine that accessed the server; operations performed, such as search, add, and edit; and the
result of the access, such as the number of entries returned. This log is on by default.
3.9.1.2. Transactions Log
This log, transactions, records messages specific to the certificate service, such as certificate
requests, revocation requests, and CRL publication, and can detect any unauthorized access or
activity. This log is on by default.
3.9.1.3. Debug Logs
Debug logs for each subsystem record much more detailed information than system, transaction,
and access logs. Debug logs contain very specific information for every operation performed by the
subsystem, including plug-ins and servlets which are run, connection information, and server request
and response messages.
Page 95

About Logs
75
The general types of services which are recorded to the debug log are briefly discussed in
Section 3.9.2, “Services That Are Logged”. These services include authorization requests, processing
certificate requests, certificate status checks, and archiving and recovering keys, and access to web
services.
For example, the CA contains certificate request information:
[06/Jun/2008:14:59:38][http-9443-Processor24]: ProfileSubmitServlet: key=
$request.profileapprovedby$ value=admin
[06/Jun/2008:14:59:38][http-9443-Processor24]: ProfileSubmitServlet: key=$request.cert_request
$
value=MIIBozCCAZ8wggEFAgQqTfoHMIHHgAECpQ4wDDEKMAgGA1UEAxMBeKaBnzANBgkqhkiG9w0BAQEFAAOBjQAwgYkCgYEA63rhLAVqvVrmdjGgcLTWMb5Czx3DdHLrGO4MS8wfl8EP1bFhKDmxpXYOlsCTznAXby4iinwutOcBXcp2xICrNHwoVZPR2A4ZifIV
+vj2qrohyUlTYbL+bTrIWZAnzAW8scKynfMmeRuSPtoBPT1M58SWjB05pTqpuB8Bcc8tEUUCAwEAAakQMA4GA1UdDwEB/
wQEAwIF4DAzMBUGCSsGAQUFBwUBAQwIcmVnVG9rZW4wGgYJKwYBBQUHBQECDA1hdXRoZW50aWNhdG9yoYGTMA0GCSqGSIb3DQEBBQUAA4GBAH8Hg6uvDTVC5pDQtWkB4q2DFhou9pcMp1Ar84OX4d2TMoqCQfKBecx3+e423m9PAjTv
+ck/
xW0Nj8H32krmv7DzWzXkLBD2MSMTmxBORX5dCsxkCdiHCEgCfTOnxCJpdmjHPuSPOaQmtKBpAEVaQoUwnEytOqDkCkhlZ1nt02w1
[06/Jun/2008:14:59:38][http-9443-Processor24]: ProfileSubmitServlet: key=$request.profile$
value=true
[06/Jun/2008:14:59:38][http-9443-Processor24]: ProfileSubmitServlet: key=
$request.cert_request_type$ value=crmf
[06/Jun/2008:14:59:38][http-9443-Processor24]: ProfileSubmitServlet: key=
$request.requestversion$ value=1.0.0
[06/Jun/2008:14:59:38][http-9443-Processor24]: ProfileSubmitServlet: key=$request.req_locale$
value=en
[06/Jun/2008:14:59:38][http-9443-Processor24]: ProfileSubmitServlet: key=$request.requestowner
$ value=RA-test4.redbudcomputer.local-4747
[06/Jun/2008:14:59:38][http-9443-Processor24]: ProfileSubmitServlet: key=$request.dbstatus$
value=NOT_UPDATED
[06/Jun/2008:14:59:38][http-9443-Processor24]: ProfileSubmitServlet: key=$request.subject$
value=uid=jsmith, e=jsmith@example.com
[06/Jun/2008:14:59:38][http-9443-Processor24]: ProfileSubmitServlet: key=
$request.requeststatus$ value=begin
[06/Jun/2008:14:59:38][http-9443-Processor24]: ProfileSubmitServlet: key=
$request.auth_token.user$ value=uid=RAtest4.redbudcomputer.local-4747,ou=People,dc=test4.redbudcomputer.local-pki-ca
[06/Jun/2008:14:59:38][http-9443-Processor24]: ProfileSubmitServlet: key=$request.req_key$
value=MIGfMA0GCSqGSIb3DQEBAQUAA4GNADCBiQKBgQDreuEsBWq9WuZ2MaBwtNYxvkLP^M
HcN0cusY7gxLzB+XwQ/VsWEoObGldg6WwJPOcBdvLiKKfC605wFdynbEgKs0fChV^M
k9HYDhmJ8hX6+PaquiHJSVNhsv5tOshZkCfMBbyxwrKd8yZ5G5I+2gE9PUznxJaM^M
HTmlOqm4HwFxzy0RRQIDAQAB
[06/Jun/2008:14:59:38][http-9443-Processor24]: ProfileSubmitServlet: key=
$request.auth_token.authmgrinstname$ value=raCertAuth
[06/Jun/2008:14:59:38][http-9443-Processor24]: ProfileSubmitServlet: key=
$request.auth_token.uid$ value=RA-test4.redbudcomputer.local-4747
[06/Jun/2008:14:59:38][http-9443-Processor24]: ProfileSubmitServlet: key=
$request.auth_token.userid$ value=RA-test4.redbudcomputer.local-4747
[06/Jun/2008:14:59:38][http-9443-Processor24]: ProfileSubmitServlet: key=
$request.requestor_name$ value=
[06/Jun/2008:14:59:38][http-9443-Processor24]: ProfileSubmitServlet: key=$request.profileid$
value=caRAagentCert
[06/Jun/2008:14:59:38][http-9443-Processor24]: ProfileSubmitServlet: key=
$request.auth_token.userdn$ value=uid=RAtest4.redbudcomputer.local-4747,ou=People,dc=test4.redbudcomputer.local-pki-ca
[06/Jun/2008:14:59:38][http-9443-Processor24]: ProfileSubmitServlet: key=$request.requestid$
value=20
[06/Jun/2008:14:59:38][http-9443-Processor24]: ProfileSubmitServlet: key=
$request.auth_token.authtime$ value=1212782378071
[06/Jun/2008:14:59:38][http-9443-Processor24]: ProfileSubmitServlet: key=$request.req_x509info
$ value=MIICIKADAgECAgEAMA0GCSqGSIb3DQEBBQUAMEAxHjAcBgNVBAoTFVJlZGJ1ZGNv^M
bXB1dGVyIERvbWFpbjEeMBwGA1UEAxMVQ2VydGlmaWNhdGUgQXV0aG9yaXR5MB4X^M
DTA4MDYwNjE5NTkzOFoXDTA4MTIwMzE5NTkzOFowOzEhMB8GCSqGSIb3DQEJARYS^M
anNtaXRoQGV4YW1wbGUuY29tMRYwFAYKCZImiZPyLGQBARMGanNtaXRoMIGfMA0G^M
CSqGSIb3DQEBAQUAA4GNADCBiQKBgQDreuEsBWq9WuZ2MaBwtNYxvkLPHcN0cusY^M
Page 96

Chapter 3. Administrative Basics
76
7gxLzB+XwQ/VsWEoObGldg6WwJPOcBdvLiKKfC605wFdynbEgKs0fChVk9HYDhmJ^M
8hX6+PaquiHJSVNhsv5tOshZkCfMBbyxwrKd8yZ5G5I+2gE9PUznxJaMHTmlOqm4^M
HwFxzy0RRQIDAQABo4HFMIHCMB8GA1UdIwQYMBaAFG8gWeOJIMt+aO8VuQTMzPBU^M
78k8MEoGCCsGAQUFBwEBBD4wPDA6BggrBgEFBQcwAYYuaHR0cDovL3Rlc3Q0LnJl^M
ZGJ1ZGNvbXB1dGVyLmxvY2FsOjkwODAvY2Evb2NzcDAOBgNVHQ8BAf8EBAMCBeAw^M
HQYDVR0lBBYwFAYIKwYBBQUHAwIGCCsGAQUFBwMEMCQGA1UdEQQdMBuBGSRyZXF1^M
ZXN0LnJlcXVlc3Rvcl9lbWFpbCQ=
Likewise, the OCSP shows OCSP request information:
[07/Jul/2008:06:25:40][http-11080-Processor25]: OCSPServlet: OCSP Request:
[07/Jul/2008:06:25:40][http-11080-Processor25]: OCSPServlet:
MEUwQwIBADA+MDwwOjAJBgUrDgMCGgUABBSEWjCarLE6/BiSiENSsV9kHjqB3QQU
3.9.1.4. Installation Logs
Every time a subsystem is created either through the initial installation or creating additional instances
with pkicreate, an installation file with the complete debug output from the installation, including
any errors and, if the installation is successful, the URL and PIN to the configuration interface for
the instance. The file is created in the default log directory, /var/log, with a name in the form
instance_ID-install.log. For example:
/var/log/rhpki-ca-install.log
3.9.1.5. Self-Tests Log
The self-tests log records information obtained during the self-tests run when the server starts or
when the self-tests are manually run. The tests can be viewed by opening this log. This log is not
configurable through the Console. This log can only be configured by changing settings in the CS.cfg
file. The information about logs in this section does not pertain to this log. See Section 3.10, “Self-
Tests” for more information about self-tests.
3.9.1.6. Signed Audit Log
The audit log contains records for events that have been set up as recordable events. If the
logSigning attribute is set to true, the audit log is signed with a log signing certificate belonging to
the server. This certificate can be used by auditors to verify that the log has not been tampered with.
See Section 3.9.13, “Signed Audit Log”.
3.9.1.7. Apache and Tomcat Error and Access Logs
The CA, DRM, OCSP, and TKS subsystems use a Tomcat web server instance for their agent and
end-entities' interfaces. The TPS subsystem uses an Apache web server.
Error and access logs are created by the Apache and Tomcat web servers, which are installed with the
Certificate System and provide HTTP services. The error log contains the HTTP error messages the
server has encountered. The access log lists access activity through the HTTP interface.
Apache (TPS) Tomcat (CA, DRM, OCSP, TKS)
access_log admin.timestamp
error_log catalina.timestamp
catalina.out
Page 97
Services That Are Logged
77
Apache (TPS) Tomcat (CA, DRM, OCSP, TKS)
host-manager.timestamp
localhost.timestamp
localhost_access_log.timestamp
manager.timestamp
Table 3.7. Logs Created by Apache and Tomcat
These logs are not available or configurable within the Certificate System; they are only configurable
within Apache or Tomcat. See the Apache documentation for information about configuring these logs.
3.9.2. Services That Are Logged
All major components and protocols of Certificate System log messages to log files. Table 3.8,
“Services Logged” lists services that are logged by default. To view messages logged by a specific
service, customize log settings accordingly. For details, see Section 3.9.9, “Monitoring Logs”.
Service Description
ACLs Logs events related to access control lists.
Administration Logs events related to administration activities,
such as HTTPS communication between the
Console and the instance.
All Logs events related to all the services.
Authentication Logs events related to activity with the
authentication module.
Certificate Authority Logs events related to the Certificate Manager.
Database Logs events related to activity with the internal
database.
HTTP Logs events related to the HTTP activity of the
server.
NOTE
HTTP events are actually logged
to the errors log belonging to the
Apache server incorporated with the
Certificate System to provide HTTP
services.
Key Recovery Authority Logs events related to the DRM.
LDAP Logs events related to activity with the LDAP
directory, which is used for publishing certificates
and CRLs.
OCSP Logs events related to OCSP, such as OCSP
status GET requests.
Others Logs events related to other activities, such as
command-line utilities and other processes.
Page 98

Chapter 3. Administrative Basics
78
Service Description
Request Queue Logs events related to the request queue activity.
User and Group Logs events related to users and groups of the
instance.
Table 3.8. Services Logged
3.9.3. Log Levels (Message Categories)
The different events logged by Certificate System services are deteremined by the log levels, which
makes identifying and filtering events more simple. The different Certificate System log levels are
listed in Table 3.9, “Log Levels and Corresponding Log Messages” and Table 3.10, “TPS Log Levels
and Log Entries”.
NOTE
All of the Certificate System subsystems (CA, DRM, TKS, and OCSP) have seven log
levels, 0 to 6, except for the TPS subsystem, which has eleven log levels (0 to 10).
Log levels are represented by numbers 0 to 6 (0 to 10 for TPS), each number indicating the level of
logging to be performed by the server. The level sets how detailed the logging should be.
• A higher priority level means less detail because only events of high priority are logged; the highest
priority log level is 0.
• A lower priority level means greater detail because more kinds of events are recorded in the log file;
the lowest priority log level is 6 (10 for TPS).
Log level Message category Description
0 Debugging These messages contain
debugging information. This
level is not recommended
for regular use because
it generates too much
information.
1 Informational (default selection
for audit log)
These messages provide
general information about
the state of the Certificate
System, including status
messages such as Certificate
System initialization complete
and Request for operation
succeeded.
2 Warning These messages are warnings
only and do not indicate any
failure in the normal operation
of the server.
3 Failure; the default selection for
system and error logs
These messages indicate
errors and failures that prevent
Page 99

Log Levels (Message Categories)
79
Log level Message category Description
the server from operating
normally, including failures to
perform a certificate service
operation (User authentication
failed or Certificate revoked)
and unexpected situations
that can cause irrevocable
errors (The server cannot send
back the request it processed
for a client through the same
channel the request came from
the client).
4 Misconfiguration These messages indicate that a
misconfiguration in the server is
causing an error.
5 Catastrophic failure These messages indicate that,
because of an error, the service
cannot continue running.
6 Security-related events These messages identify
occurrences that affect the
security of the server. For
example, Privileged
access attempted by
user with revoked or
unlisted certificate.
Table 3.9. Log Levels and Corresponding Log Messages
There are an additional four log levels available for TPS subsystem logs:
Log level Message category Description
7 PDU related events
(debugging)
These messages contain
debugging information for
PDU events. This level is not
recommended for regular use
because it generates too much
information for normal use.
8 PDU related events These messages relate
transactions and rules
processed on a PDU, such as
creating MAC tokens.
9 PDU related events This log levels gives verbose
log messages for events
processed on a PDU, such as
creating MAC tokens.
10 All logging levels This log level enabled all
logging levels for the TPS logs.
Table 3.10. TPS Log Levels and Log Entries
Page 100

Chapter 3. Administrative Basics
80
Log levels can be used to filter log entries based on the severity of an event. By default, log level 3
(Failure) is set for all services.
The log level is successive; specifying a value of 3 causes levels 4, 5, and 6 to be logged. Log data
can be extensive, especially at lower (more verbose) logging levels. Make sure that the host machine
has sufficient disk space for all the log files. It is also important to define the logging level, log rotation,
and server-backup policies appropriately so that all the log files are backed up and the host system
does not get overloaded; otherwise, information can be lost.
3.9.4. Buffered Versus Unbuffered Logging
The Certificate System supports buffered logging for all types of logs. The server can be configured for
either buffered or unbuffered logging.
If buffered logging is configured, the server creates buffers for the corresponding logs and holds the
messages in the buffers for as long as possible. The server flushes out the messages to the log files
only when one of the following conditions occurs:
• The buffer gets full. The buffer is full when the buffer size is equal to or greater than the value
specified by the bufferSize configuration parameter. The default value for this parameter is 512
KB.
• The flush interval for the buffer is reached. The flush interval is reached when the time interval
since the last buffer flush is equal to or greater than the value specified by the flushInterval
configuration parameter. The default value for this parameter is 5 seconds.
• When current logs are read from Console. The server retrieves the latest log when it is queried for
current logs.
If the server is configured for unbuffered logging, the server flushes out messages as they are
generated to the log files. Because the server performs an I/O operation (writing to the log file) each
time a message is generated, configuring the server for unbuffered logging decreases performance.
3.9.5. Log File Rotation
Log files are rotated when either of the following occur:
• The size limit for the corresponding file is reached. The size of the corresponding log file is equal to
or greater than the value specified by the maxFileSize configuration parameter. The default value
for this parameter is 100 KB.
• The age limit for the corresponding file is reached. The corresponding log file is equal to or older
than the interval specified by the rolloverInterval configuration parameter. The default value
for this parameter is 2592000 seconds (every thirty days).
When a log file is rotated, the old file is named using the name of the file with an appended time
stamp. The appended time stamp is an integer that indicates the date and time the corresponding
active log file was rotated. The date and time have the forms YYYYMMDD (year, month, day) and
HHMMSS (hour, minute, second).
Log files, especially the audit log file, contain critical information. Periodically archive rotated log files
to some archive media. Log files are archived by copying the entire /logs directory to an archive
medium.
 Loading...