

Page 1
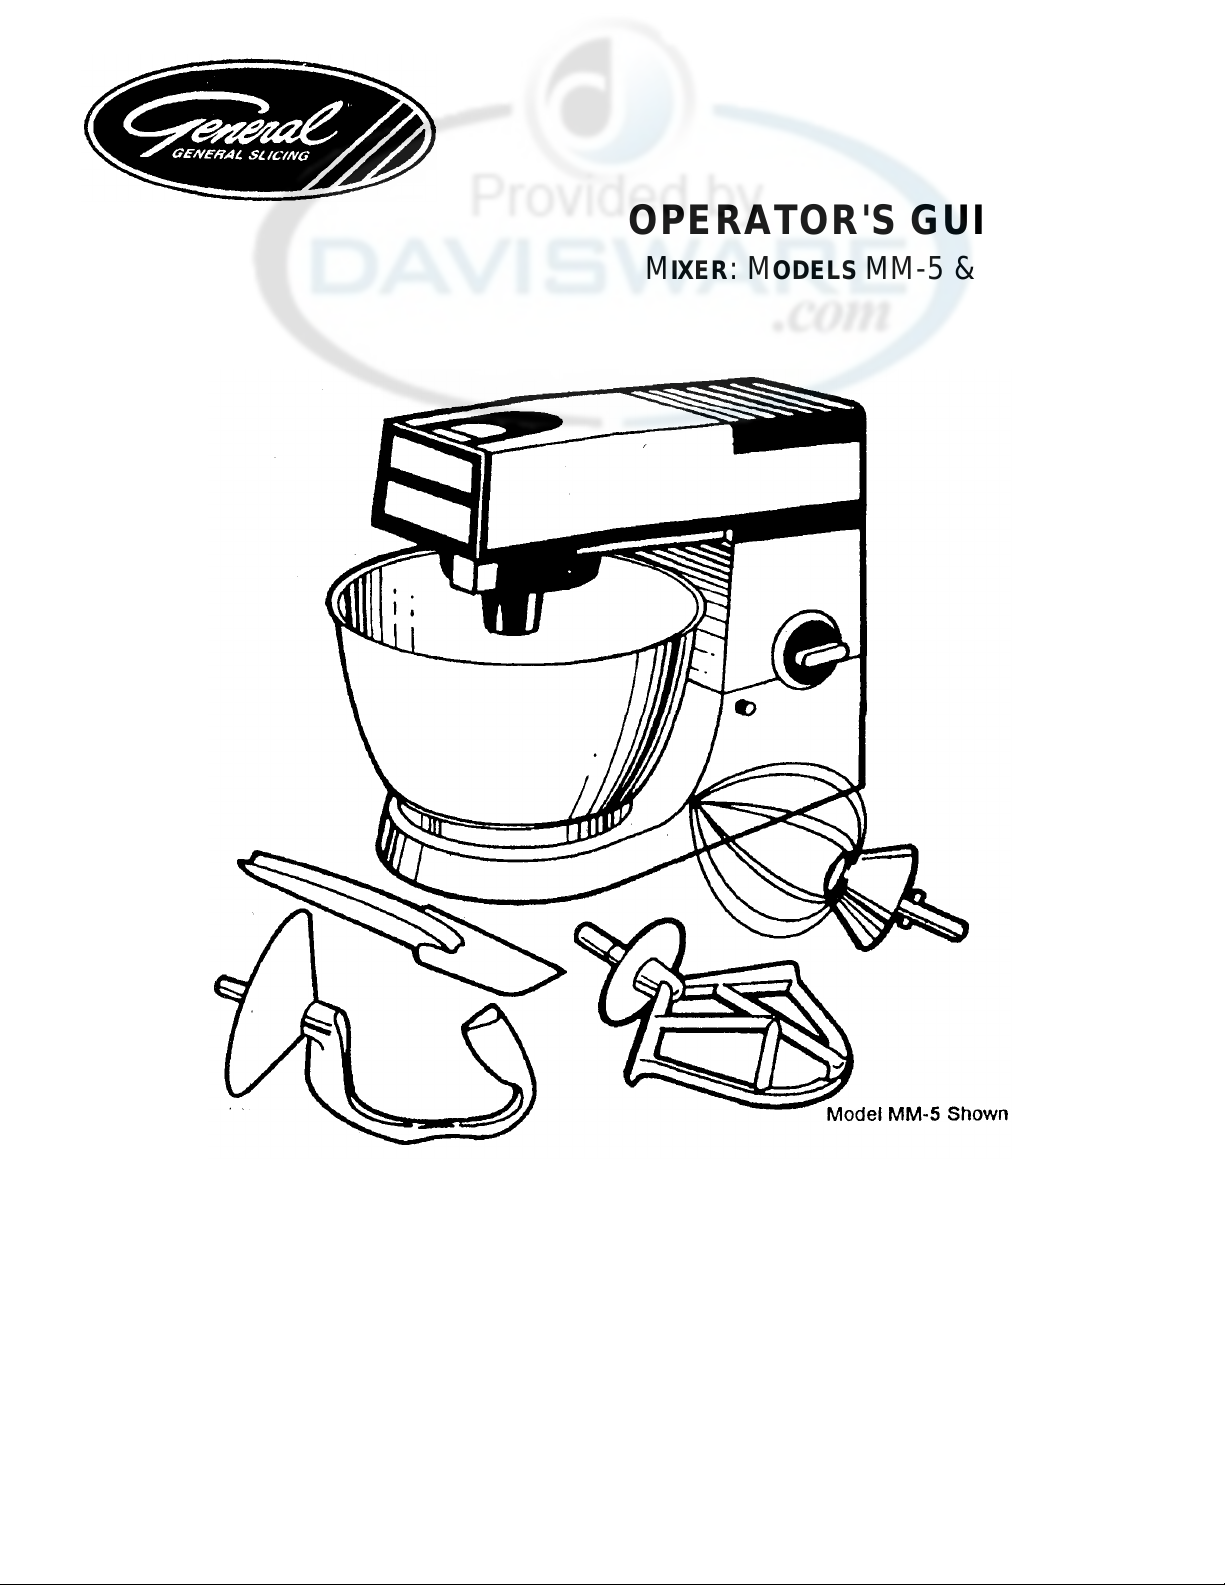
04 02 96
OPERATOR'S GUIDE
MIXER: MODELS MM-5 & MM-7
Safety .........................................…………….........…...2 Operation ....................................................……5
General Description..................................………….….3 Troubleshooting ..........................................……6
Unpacking...............................................………….…..4 Mixing Guide. ...............................................……7
Cleaning......................................................…………. .4 Lubrication, Parts Replacement and Service..…7
Electrical Requirements.............................……………5 Replacement Parts......................................……8
Page 2
SAFETY
2
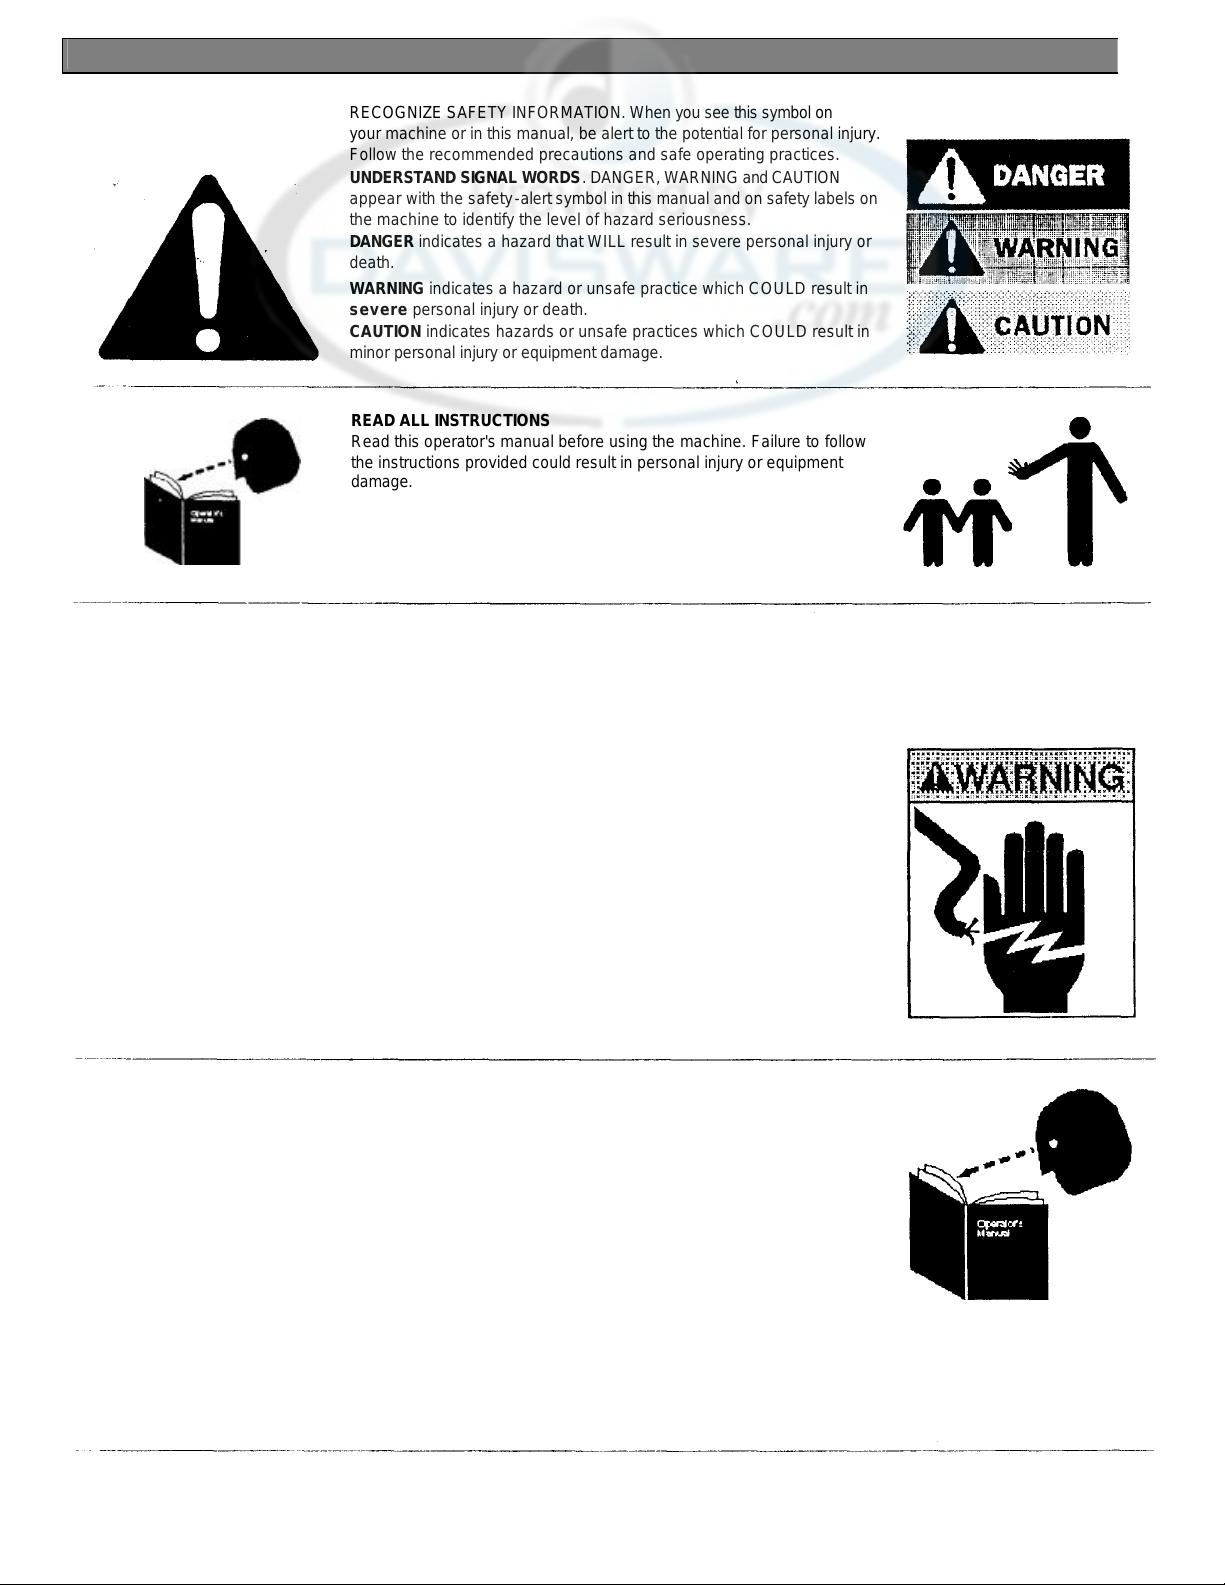
RECOGNIZE SAFETY INFORMATION. When you see this symbol on
your machine or in this manual, be alert to the potential for personal injury.
Follow the recommended precautions and safe operating practices.
UNDERSTAND SIGNAL WORDS. DANGER, WARNING and CAUTION
appear with the safety-alert symbol in this manual and on safety labels on
the machine to identify the level of hazard seriousness.
DANGER indicates a hazard that WILL result in severe personal injury or
death.
WARNING indicates a hazard or unsafe practice which COULD result in
severe personal injury or death.
CAUTION indicates hazards or unsafe practices which COULD result in
minor personal injury or equipment damage.
READ ALL INSTRUCTIONS
Read this operator's manual before using the machine. Failure to follow
the instructions provided could result in personal injury or equipment
damage.
KEEP OUT OF REACH OF CHILDREN
This mixer is intended for commercial use only.
DO NOT PUT HANDS OR ANY IMPLEMENT IN THE BOWL
WHILE THE MIXER IS OPERATING
DO NOT OPERATE IF DAMAGED
Do not operate this mixer with a damaged cord or plug, or if the mixer has
been dropped or damaged in any manner. Contact the nearest factoryauthorized service center for examination, repair or adjustment. (Refer to
the service center list included in the Owner's Information Packet.)
Do not allow the cord to touch hot surfaces.
Do not allow the cord to hang over the edge of a table or counter.
DO NOT LEAVE MIXER UNATTENDED
UNPLUG MIXER
Set the switch to OFF and unplug the mixer from the outlet when not in
use or when clearing a jammed attachment.
KEEP MACHINE AWAY FROM WATER
Do not let machine base stand in water
Do not immerse the mixer in water or any other liquid.
ATTACHMENTS
Do not use attachments not recommended by the manufacturer.
Follow the manufacturer's instructions for use of attachments
SAVE THESE INSTRUCTIONS.
Keep this booklet in a convenient location for future reference.
04 02 96
Page 3
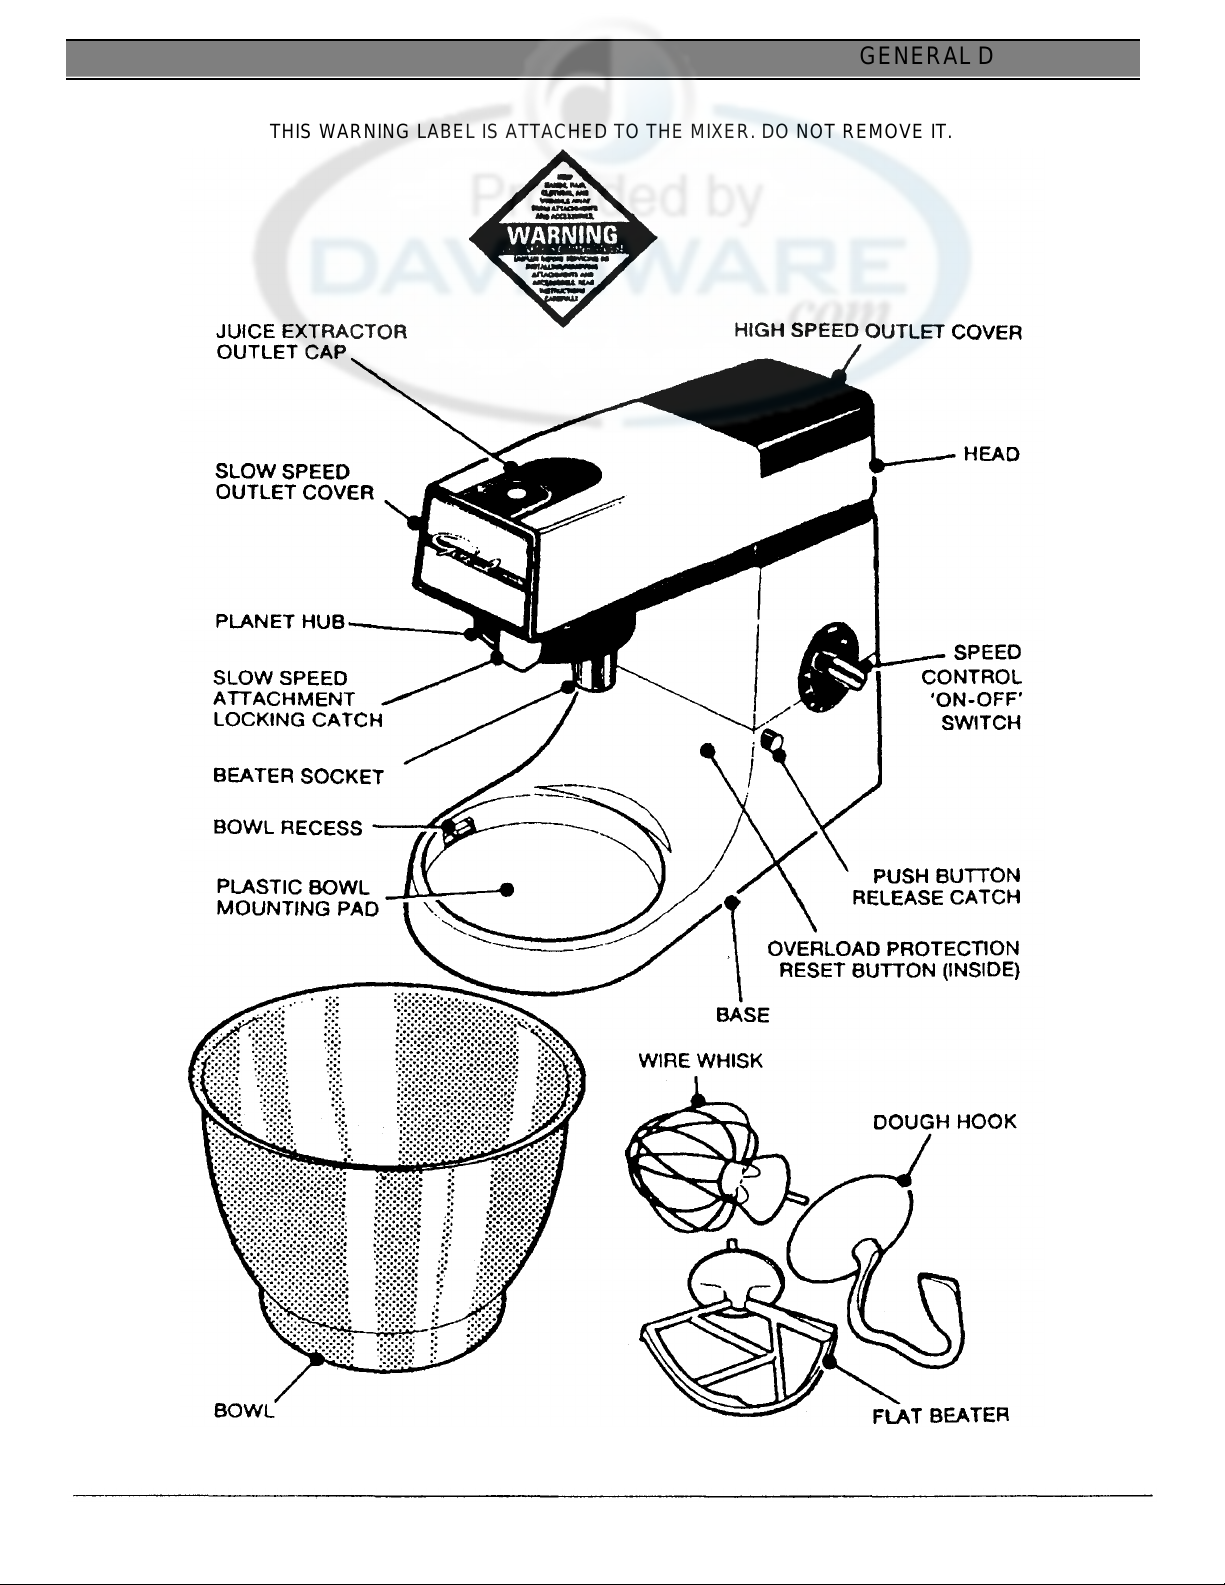
GENERAL DESCRIPTION
04. 02.96
3
THIS WARNING LABEL IS ATTACHED TO THE MIXER. DO NOT REMOVE IT.
Page 4
UNPACKING
4
04.02.96
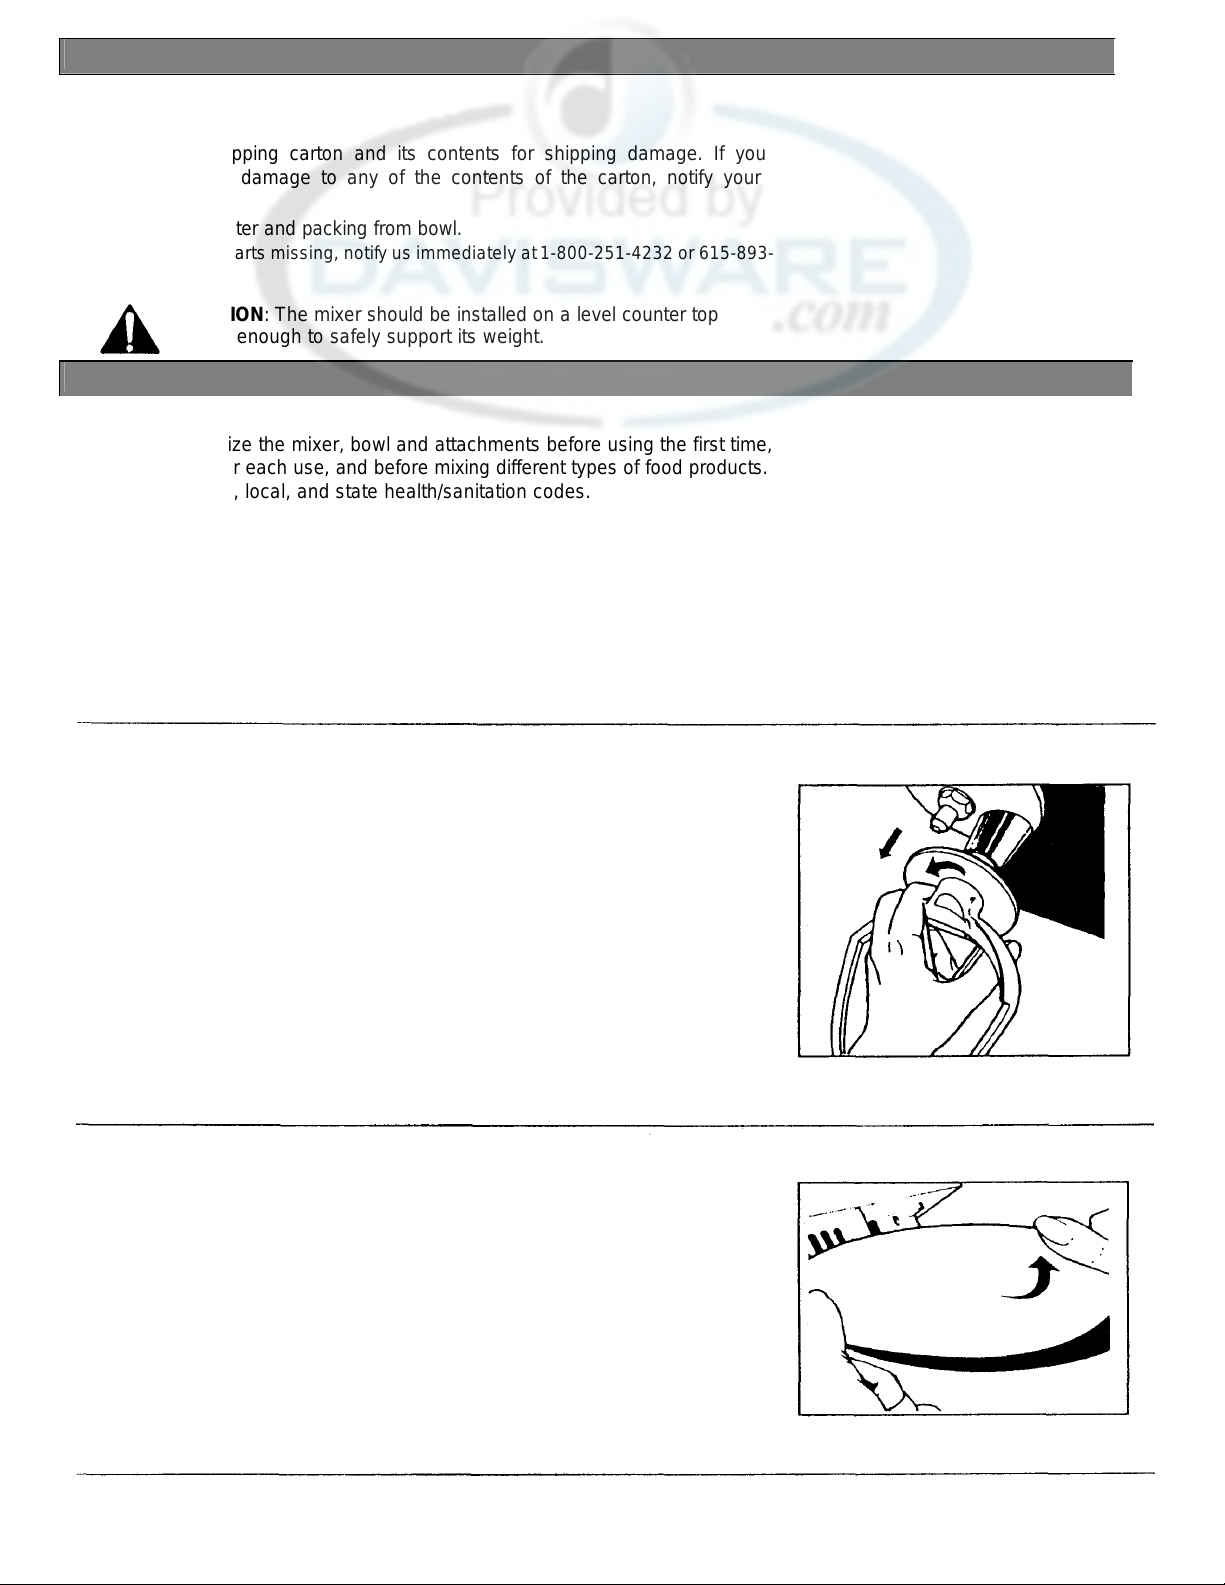
UNPACKING
Inspect the shipping carton and its contents for shipping damage. If you
detect shipping damage to any of the contents of the carton, notify your
carrier.
Remove flat beater and packing from bowl.
If there are any parts missing, notif y us immediately at 1-800-251-4232 or 615-893-
4820.
CAUTION: The mixer should be installed on a level counter top
strong enough to safely support its weight.
CLEANING
Clean and sanitize the mixer, bowl and attachments before using the first time,
immediately after each use, and before mixing different types of food products.
Follow company, local, and state health/sanitation codes.
NOTE: If egg mixtures or flour batters are used, rinse with cold water first. Wash
with hot, soapy water.
Do NOT use caus tic or abrasive cleaners.
Do NOT spray cleaning materials or water toward the switch areas.
DISASSEMBLY FOR CLEANING
Unplug Mixer.
Implement Removal
1. Press the push button release catch.
2. Place one hand under the front and raise the head until it locks in the
open position.
3. Remove implement by turning it counter-clockwise and pulling
downward.
Bowl Removal
1. Press down on the bowl rim and turn in a counter-clockwise
direction.
2. Lift and remove the bowl.
WASH ALL SURFACES
Clean implements, bowl and surfaces of the mixer with hot, soapy
water and a clean cloth.
Page 5
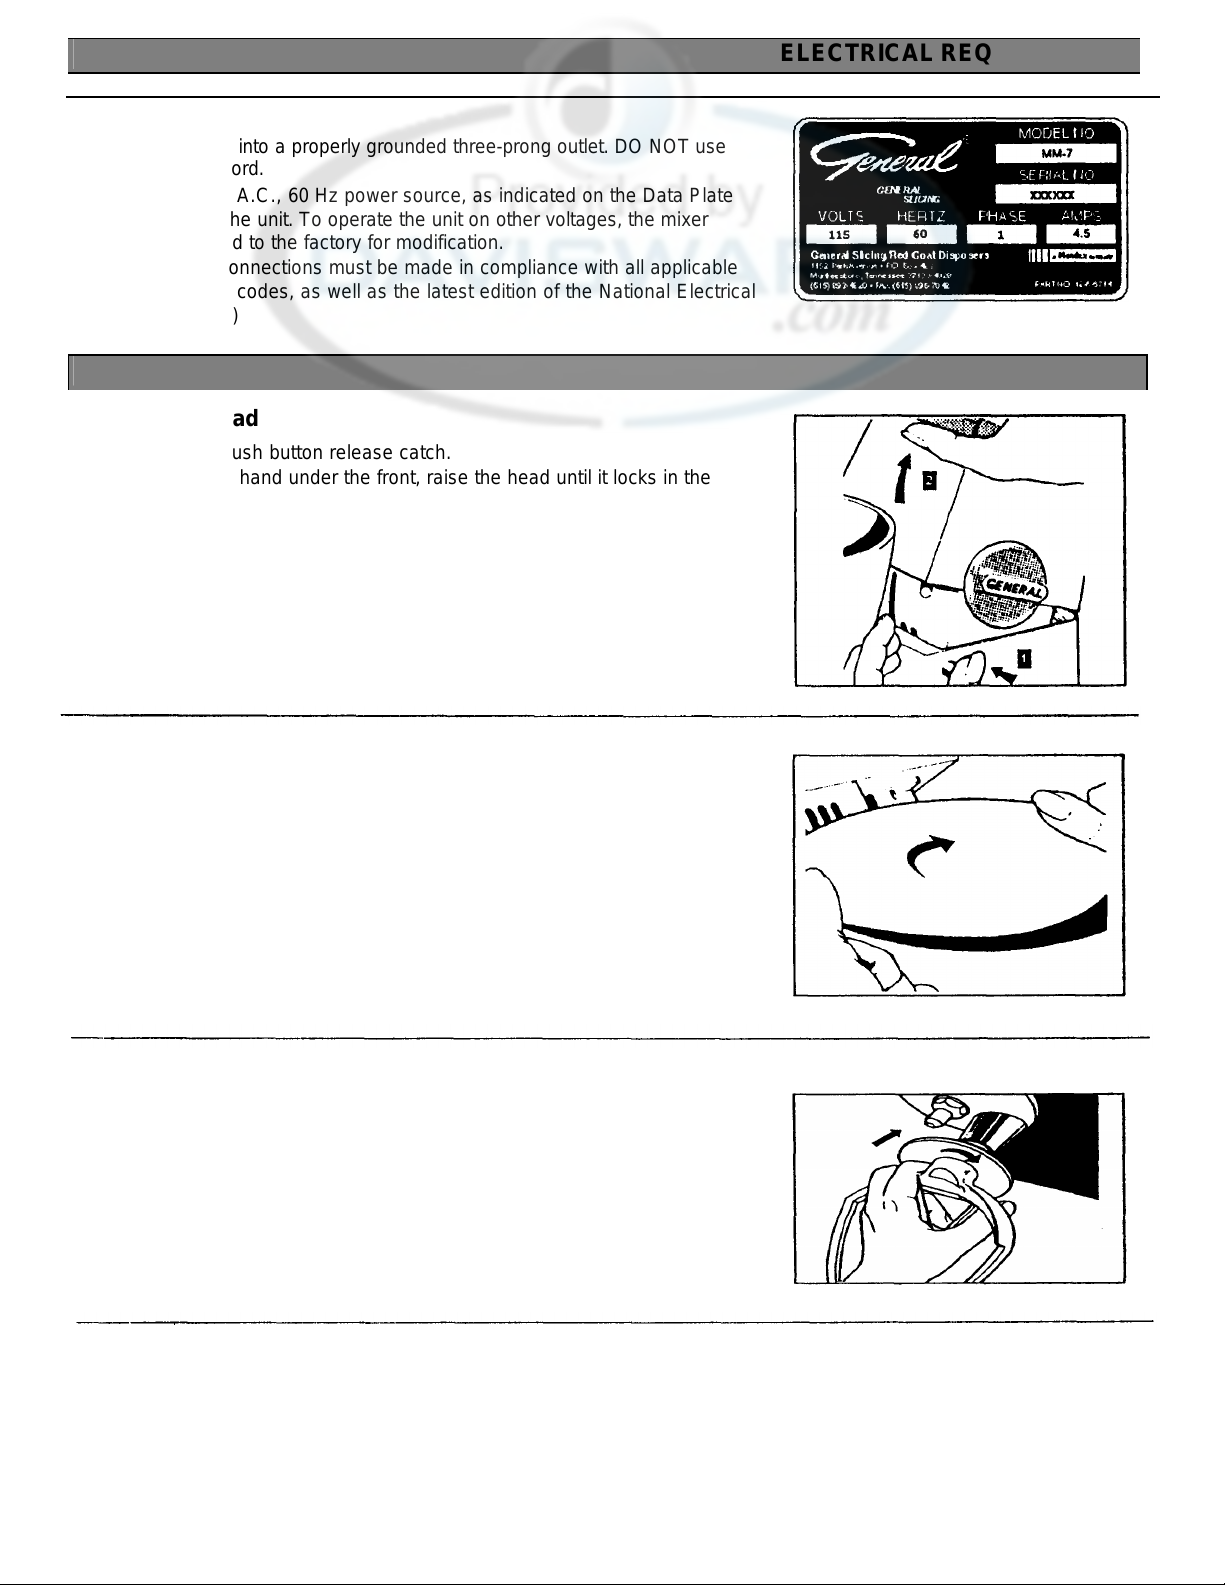
Plug the mixer into a properly grounded three-prong outlet. DO NOT use
an extension cord.
Use a 115 Volt, A.C., 60 Hz power source, as indicated on the Data Plate
on the back of the unit. To operate the unit on other voltages, the mixer
must be returned to the factory for modification.
All electrical connections must be made in compliance with all applicable
local electrical codes, as well as the latest edition of the National Electrical
Code (NFPA 70)
Raise the Head
1. Press the push button release catch.
2. Placing one hand under the front, raise the head until it locks in the
open position.
NOTE: The head should be in the locked position when fitting the bowl or
implements onto the unit.
ELECTRICAL REQUIREMENTS
OPERATION
Bowl Installation
1. Fit the plastic bowl mounting pad with the ribs downward into the bowl
recess.
2. Place the bowl in the recess, engaging the lugs in the slots into the
base of the bowl.
3. Press down on the bowl rim and turn in a clockwise direction to lock.
Implement Installation
Select Implement as per Mixing Guide on Page 7.
1. Gently slide the implement into the accessory socket, rotating it
slowly clockwise until a stop is reached.
2. Press firmly upwards until the implement locks into position.
5 04.02.96
Page 6

OPERATION . . . cont.
OPERATION
Clean and sanitize the mixer, bowl and attachments before using the first time,
immediately after each use, and before mixing different types of food products. Follow
company, local, and state health/sanitation codes.
NOTE: Rotate the control clockwise to start mixer and increase speed.
Rotate the control counter-clockwise to decrease speed and turn off mixer.
Always start on low speed and increase gradually to speed recommended on
Mixing Guide on Page 7. Ingredients and speeds should not exceed those
recommended on Mixing Guide.
1. Place ingredients in bowl.
2. Plug in mixer.
3. Rotate control clockwise to lowest speed.
4. Increase speed to Mixing Guide recommendat ion.
5. Rotate control counter-clockwise to stop mixer.
6. Clean mixer after each operation, as described in Cleaning Section.
TROUBLESHOOTING
WARNING: Unplug mixer before attempting to disassemble for
troubleshooting.
MACHINE STALLS OR WON'T START
Overload is tripped
The mixer is equipped with a manual reset thermal overload protection device.
Should overloading of the motor occur during mixing, the overload device will shut
the motor off. To reset the device, switch the mixer off, unplug the cord and raise the
head, exposing the green RESET switch. Allow the mixer to stand for a few minutes,
then press the RESET switch so that the operation can continue.
Causes of overload tripping
Mixture is too thick.
Check Mixing Guide and product consistency. Adjust to correct proportions.
Press green RESET switch following instructions above. Plug in mixer. Rotate
control clockwise to start.
Foreign object is in bowl, jamming implement.
Remove bowl and implement. Remove object causing jam. Press green
RESET sw itch following instructions above. Plug in mixer. Rotate control
clockwise to start.
Speed is set too high.
Consult Mixing Guide for correct speed setting. Press green RESET switch
following instructions above. Plug in mixer. Rotate control clockwise to st art.
6 04.02.96
Page 7

MIXING GUIDE
Each implement has been designed to do a specific type of work and should only be used for its intended purpose. Although a
DO NOT exceed the recommended maximum single batch quantities of products in the mixing bowl
7
04.02.96
MIXING GUIDE
particular implement may be used in a lighter mixture than normal, it should never be used in a heavier mixture, as this can
result in damage to the mixer.
Product Implement Capacity* MM-5 Capacity* MM-7 Speed
Cakes or Pudding Mixtures
Mashed Potatoes
Dough, Bread and Pizza
Basic Yeast Dough
Soft Yeast Dough
(60% AR) **
Egg Whites Wire Whisk 1 Pint (12-16) 1 Pint (12-16) High
* Total weight of all ingredients.
** % Absorption Ratio (AR) = Water weight divided by flour weight.
If high gluten flour is used, reduce total capacity by 10%. AR below 60% is not recommended.
Dough capacities are based on 70% water and 12% flour mixture.
Note: 3 cups of flour = 1 Ib; 2 cups of water = 1 Ib.
Flat Beater
Flat Beater
Dough Hook
6 Pounds
3 Pounds
2 Pounds
3 Pounds
10 Pounds
4 Pounds
3 Pounds
4 Pounds
Medium
Medium
Low
LUBRICATION, PARTS REPLACEMENT AND SERVICE
LUBRICATION
The mixer has been permanently lubricated. Do not add oil or grease.
PARTS REPLACEMENT
Use the replacement parts lists on pages 8 -13, and the parts distributors list included in
the Owner's Information Packet to order spare parts. Specify model and serial numbers,
part number and part name.
SERVICE CENTER
For repair consult the factory -authorized service center list included in the Owner's
Information Packet for the closest service center.
Page 8

REPLACEMENT PARTS LIST
MODEL: MM-5 MAIN BODY ASSEMBLY
General Slicing/Red Goat Disposers • 1152 Park Ave • P.O. Box 428 • Murfreesboro, Tennessee 37133-0428 • (615) 893-4820
12.2297
Page 9

REPLACEMENT PARTS PRICE LIST MODEL:
QTY.
PER
LIST
PRICE
2
366246
COVER:LIQUIDIZER OUTLET, BROWN…
1 13.00
353744
COVER:LIQUIDIZER OUTLET, BLACK…..
1 13.00
3
371227
SCREW:PN HD M3.5 X
25 ..................…..3
1.00 4 353768
SPIGOT
.
..............................................……1
4.00 5 353770
SPIGOT SEAT PLATE
........................……1
9.00
6 601244
COVER:TOP, SILVER.........................……
1 116.00
7 428549
BODY UPPER TRIM:BROWN
.............……1
6.00
353756
BODY UPPER TRI
M:BLACK………………
1 6.00
8 353718
WASHER:SMALL PULLEY....................….
1 1.00 9 353627
SCREW:PN
HD M5 X
20 .....................…..3
1.00
11 353823
MOTOR MOUNTING RING...................…..
1 3.00 12 35358
6 GEARBOX DOWEL TUBE
....................….2
2.00
13 615465
BODY:SILVER
.......................................…..1
100.00
14 05-MM-
CORDSET
.............................................….1
6.00 15 457370
BODY COVER ASSY
............................…
.1 22.00
16
353835
QUADRANT BRACKET
.........................…..1
2.00 17 198508
CIRCLIP (HINGE PIN)
...........................…..1
1.00 18 353691
HINGE PIN
............................................….1
3.00 19 353720
COUNTER BALANCE SPRING
...........
..…..1
9.00 20 353847
QUADRANT...........................................…..
1 6.00 21 177554
CATCH SPRING
....................................…..1
1.00 22 198493
CIRCLIP (CATCH PIN)
..........................…..1
1.00 23 353794
CATCH PIN
................
.........................…...1
6.00 24 366208
CATCH PIN BUTTON ASSY:BROWN
..….1
2.00
353562
CATCH PIN BUTTON ASSY:BLACK
....….1
2.00
25 357271
CORD CLAMP ASSY
............................….1
6.00
LIST
25B 343983
CLAMP
..........
.......................................... 1
2.00
25C 353665
SCREW:PN
HD M3 X
25 ......................... 2
2.00
26 353483
PEDESTAL WHITE
................................. 1
122.00
609882
PEDESTAL, SILVER
............................... 1
122.00
(S/N 051895 FWD)
26A 613704
FOOT (S/N
051193
FWD)
....................... 5
1.00
26B 365541
PIN:FOOT
................................................ 1
1.00
27 343270
5 QT BOWL:SS
....................................... 1
**
28 417239
BOWL MTG PAD:5
QT BOWL
................ 1
3.00
29 353639
SCREW:PN
HD M4 X
20 ......................... 1
1.00
30 353574
TERMINAL COVER
................................. 1
2.00
31 357312
SCREW:PN
REC HD
............................... 1
1.00 32 239168
TERMINAL BLOCK 2
-
WAY
..................... 1
3.00
33 366260
KNOB ATTACHMENT
............................. 1
1.00 34 353615
SCREW:PN
REC HD
............................... 2
1.00
353732
COVER:GEARBOX LOWER, BLACK
..... 1
12.00
36
201393
SCREW:PHP HD TYPE Y NO.
8 X 13 .... 2
1.00 37 353598
FELT PAD:GEARBOX
............................. 1
2.00
38 353225
GEARBOX ASSY
.................................... 1
233.00
38A 616603
PLANET HUB ASSY
................................ 1
52.00
38B 353237
GEARBOX SERVICE ASSY
.................... 1
111.00
38C 616598
LG PULLEY (S/N
051193
FWD)
.............. 1
20. 00
39 428575
WASHER:M6 STEEL ZINC PLATED
...... 2
1.00 40 353641
BOLT:HXHD M6 x
40 .............................. 2
1.00 41 197944
TIMING BELT
.......................................... 1
12. 00
42
28961/BN1
COVER:SLOW SPEED OUTLET, BROWN
1 18.00
353500
COVER:SLOW SPEED OUTLET, BLACK
1 18.00
375948
SPATULA
................................................ 1
**
Effective: October
1,1997
MM-5
MAIN BODY ASSEMBLY
KEY
NO. PART NO.
1 366193 COVER:JUICE EXTR OUTLET, BROWN...1 4.00
353548 COVER:JUICE EXTR OUTLET, BLACK….1 4.00
10 353811 BUSHING:MOTOR MTG. ADJUSTMENT..3 1.00
NAME: DESCRIPTION MACH.
EACH
QTY.
KEY
PART NO.
NO.
35 366234 COVER:GEARBOX LOWER, BROWN ... 1 12.00
PER
NAME: DESCRIPTION MACH.
PRICE
EACH
25A 353536 CLAMP UPPER ASSY...........................….1 4.00
** Refer to current equipment Price List for pricing of these items.
_________________________________________________________________________________________________________________________________________________________12.22.97
General Slicing/Red Goat Disposers • 1152 Park Ave • P.O. Box 428 • Murfreesboro, Tennessee 37133-0428 • (615) 893-4820
Page 10

REPLACEMENT PARTS LIST
MODEL: MM
-
7
MAIN BODY ASSEMBLY
General Slicing/Red Goat Disposers • 1152 Park Ave • P.O. Box 428 • Murfreesboro, Tennessee 37133-0428 • (615) 893-4820
Page 11

Effective: October
1,1997
REPLACEMENT PARTS PRICE LIST MODEL:
353548
COVER:JUIC
E EXTR OUTLET, BLACK
. 1 4.00
2
353744
COVER:LIQUIDIZER OUTLET, BLACK
.. 1 13.00
3
4
5
6
7
8
9
10
353811
BUSHING:MOTOR MTG. ADJUSTMENT
3 1 00 11 353823
MOTOR
MOUNTING RING
..................... 1
3.00
12
13
615465
BODY:SILVER
......................................... 1
10000
14
15
16
353835
QUADRANT BRACKET
........................... 1
200
17
18
19
353720
COUNTER BALANCE SPRING
.............. 1
9. 00
20
21
177554
CATCH SPRING
.......................
............... 1
1.00 22 198493
CIRCLIP (CATCH PIN)
............................ 1
1.00
23
24
25
26
26A 353536
CLAMP UPPER ASSY.
............................ 1
4.00
QTY. LIST KEY
PER PRICE
NO. PART NO.
NAME: DESCRIPTION MACH.
EACH
27
434964
CORD COVER
........................................ 1
17.00
28
434938
FOOT PLATE (THRU S/N
040793) 5
1.00 29 434926
FOOT:MM
-
7 (THRU S/N
040793) 5
1.00
613704
FOOT (S/N
051193
FWD)
....................... 5
30
434976
SCREW:PN
HD
M3.5 X 20 ...................... 5
1.00 31 239168
TERMINAL BLOCK 2
-
WAY
.....
................ 1
3.00 32 434940
TERMINAL COVER
................................. 1
6.00 34 434976
SCREW:PN
HD
M3.5 X 20 ...................... 1
1.00 35 434914
PLINTH:BROWN
.................................... 1
20.00
601232
PLINTH:BLACK
..........
............................. 1
20.00
36
434990
PEDESTAL:WHITE
................................ 1
205.00
601218
PEDESTAL:SILVER(THRU SN040793)
.. 1 205.00
618687
PEDESTAL:SILV (S/N
051193
FWD)
...... 1
205.00
37
456912
BOWL MOUNTING PAD
............
............. 1
3.00 38 A18748
STAINLESS BOWL:7 QT
........................ 1
** A26538
ACRYLIC BOWL:WHITE
7
QT
................ 1
** 39
353639
SCREW:PN
HD M4 X
20 ......................... 1
1.00 40 353574
TERMINAL COVER
............................
..... 1 2.00 41 357312
SCREW:PN
REC HD
............................... 1
1.00 42 239168
TERMINAL BLOCK 2
-
WAY
..................... 1
3.00 43 366260
KNOB ATTACHMENT
............................. 1
1.00 44 353615
SCREW:PN
REC HD
...........................
.... 2 1.00 45 366234
COVER:GEARBOX LOWER, BROWN
... 1 12.00
353732
COVER:GEARBOX LOWER, BLACK
..... 1
12.00
46
201393
SCREW:PHP HD TYPE Y NO.
8 X 13 .... 2
1.00 47 353598
FELT PAD:GEARBOX
............................ 1
2,00 48 437899
GEARBOX ASSY
.
................................... 1
273.00
48A 609777
PLANET HUB ASSY
................................ 1
80.00
48C 353196
LG PULLEY (THRU S/N
040793) .. 1
20.00
616598
LG PULLEY (S/N
051193
FWD)
.............. 1
20.00
49
428575
WASHER:M6 STEEL ZINC
PLATED
...... 2
1.00 50 353641
BOLT:HXHD M6 x
40 .............................. 2
1.00 51 197944
TIMING BELT
........................................ 1
12.00
52
353500
COVER:SLOW SPEED OUTLET, BLACK
.
18.00
53
375948
SPATULA
.........................
...................... 1
**
MAIN BODY ASSEMBLY
MM-7
QTY. LIST
KEY
NO. PART NO. NAME: DESCRIPTION MACH. EACH
1 366193 COVER:JUICE EXTR OUTLET, BROWN 1 4.00
366246 COVER:LIQUIDIZER OUTLET, BROWN 1 13.00
371227 SCREW:PN HD M3.5 X 25 ...................... 3 1.00
353768 SPIGOT ................................................... 1 4.00
353770 SPIGOT SEAT PLATE ............................ 1 9. 0
390479 COVER:TOP, WHITE .............................. 1 116. 0
601244 COVER:TOP, SILVER ............................. 1 116. 0
428549 BODY UPPER TRIM:BROWN ................. 1 6 DO
353756 BODY UPPER TRIM:BLACK................... 1 6.00
353718 WASHER:SMALL PULLEY...................... 1 1 00
353627 SCREW:PN HD M5 X 20 ......................... 3 1 00
353586 GEARBOX DOWEL TUBE ...................... 2 200
353471 BODY:WHITE .......................................... 1 10000
05-MM-2242 CORDSET ............................................... 1 6.00
457370 BODY COVER ASSY .............................. 1 2200
PER PRICE
1.00
198508 CIRCLIP (HINGE PIN)............................. 1 1130
353691 HINGE PIN .............................................. 1 3 DO
353847 QUADRANT............................................. 1 6.00
353794 CATCH PIN ............................................. 1 6.30
366208 CATCH PIN BUTTON ASSY:BROWN .... 1 2.00
353562 CATCH PIN BUTTON ASSY:BLACK ...... 1 200
435102 COVER:REAR,BLK (THRU 040793) ....... 1 400
357271 CORD CLAMP ASSY .............................. 1 6.00
26B 343983 CLAMP .................................................... 1 2.00
26C 353665 SCREW:PN HD M3 X 25 ......................... 2 2.00
** Refer to current equipment Price List for pricing of these items.
_____________________________________________________________________________________________________________________________________________________________12.0297
General Slicing/Red Goat Disposers • 1152 Park Ave • P.O. Box 428 • Murfreesboro, Tennessee 37133-0428 • (615) 893-4820
Page 12

REPLACEMENT PARTS PRICE LIST
QTY. LIST KEY
PER PRICE
NO. PART NO.
NAME: DESCRIPTION MACH.
EACH
1 601294
MOTOR CONTROLLER ASSY:115V
...... 1
324.00
(INC:ALL ITEMS BELOW)
615506
MOTOR CONTROLLE
R ASSY:220V
...... 1
324.00
(INC:ALL
ITEMS BELOW)
353031
CONTROL KNOB INSERT
...................... 1
2.00 (THRU S/N
011894)
609973
CONTROL KNOB INSERT
...................... 1
2.00
(S/N
051894
FWD)
3 198584
CIRCLIP.
............
...................................... 1
1.00 4 491704
CONTROL KNOB:BLACK
....................... 1
5.00 (THRU S/N
011894)
619772
CONTROL
KNOB:BLACK ....................... 1
4.00 (S/N
051894
FWD)
5 177724
SPRING:CAM FRICTION
...........
............. 1
1.00
(THRU S/N
011894)
177530
SPRING:CAM
FRICTION
........................ 1
1.00 (S/N
051894
FWD)
6 386301
SPEED CONTROL CAM
......................... 1
13.00
(THRU S/N
011894)
604662
SPEED CONTROL CAM
.........
................ 1
3.00 (S/N
051894
FWD)
602561
TORSION SPRING..................................
1 1.00
(NOT SHOWN
- THRU S/N
011894)
7 457459
SWITCH...................................................
1 16.00
QTY. LIST
602535
MICROSWITCH RETAINER
................... 1
1.00 8 404165
RESET SWITCH
...................................... 1
43.00
9
457497
CONTROL BAR ASSY COMP.:120V
...... 1
113.00
10
353055
SCREW
.....................................
.............. 2
1.00 11 177712
CONTACT ADJUSTING SPRING
........... 2
1.00 12 343567
LOCKING CLIP........................................
2 1.00 13 206159
SCREW:RNDHD
.................................... 2
1.00 14 202543
TENSION PIN...................
.......................
1 1.00 15 353017
SMALL PULLEY
...................................... 1
5.00
353110
LEAD BLUE TERM. BLOCK TO PCB
..... 1
3.00
353122
LEAD BROWN SWITCH TO CUTOUT
.... 1 3.00
353134
LEAD BROWN TERM. BLOCK
-
SWITCH
1 3.00
353342
LEAD RED
.............................................. 1
3.00
428604
FAN & MAGNET ASSY:METAL
.............. 1
22.00
457461
BRUSH ASSY
........................................ 1
4.00
Effective: October 1, 1997
ACCESSORIES
QTY. LIST
KEY
PER PRICE
NO. PART NO.
NAME: DESCRIPTION
MACH.
EACH
1
182781
BEATER ASSY:A702
&
MM-5
.................
1 ** 2 182779
BEATER SHAFT
ASSY:A702 &
MM-5
.... 1 13.00
3
177578
LOCKNUT.
............................................... 1
2.00 4 353677
WHISK
ASSY:A702 &
MM-5....................
1 **
5
** ** Refer to cur
rent equipment Price List for pricing
of these
items.
MODEL: MM-5
MOTOR CONTROLLER ASSEMBLY
KEY
NO. PART NO. NAME: DESCRIPTION MACH. EACH
602547 MICROSWITCH (THRU S/N 011894) ..... 1 13.00
PER PRICE
220284 DOUGH HOOK ASSY:A702 & MM-5 ...... 1
General Slicing/Red Goat Disposers • 1152 Park Ave • P.O. Box 428 • Murtreesboro, Tennessee 37133-0428 • (615) 893-4820
Page 13

REPLACEMENT PARTS PRICE LIST MODEL:
MM-7
QTY. LIST
QTY. LIST KEY
PER PRICE
KEY
PER PRICE
1 357257
GEARBOX COVER ASSY:A907
.......…....
1 58.00
13 608694
PLANET HUB ASSY:MM
-5........…............ 1
52.00 3
204450
WASHER SHIM:A929
.......................…......1
1.00
A901/MM
-5 5 353196
LG PULLEY (THRU S/N
040793)....………1
19.00
609777
PLANET HUB ASSY:MM
-7.......….............
1 75.00
616598
LG PULLEY (S/N
051193
FWD)
............…1
19.00
A907/MM
-
7/A717
6 353213
DRIVE PINION ASSY(THRU S/N
040793) 1
12.00
13A 182731
PLANETARY SHAFT
.............…................ 1
21.00
614239
DR PINION ASSY(S/N
051193
FWD)
...….1
12.00
A901/MM
-5 ONLY
7 353184
GEAR
&
PINION:A717
..........................….1
14.00
13C 183644
PLANETARY GEAR:MM
-7 &
A71
7 ..….....1
5.00
A907/MM
-
7/A717
A901/MM5, A907/MM
-5 & A717
8 177449
PENULTIMATE GEAR
................…..
........ 1
18.00
13D 199459
FASTENER:PUSH ON
............................. 1
1.00
A907/MM
-
7/A71
7..........................…........ 11
49459
14
434835
GEARBOX BODY LOWER
ASSY:MM
-
7 . 1 67.00
FIBER WASHER:PLANETARY HUB...
...... 1
1.00 16 185331 VERTICAL DRIVE SHAFT ASSY:7 QT
.... 1 45.00
12
479122
NUT:PLANETARY HUB
...................…...... 1
5.00
A907/MM
-
7/A717
GEARBOX ASSEMBLY
NO. PART NO. NAME: DESCRIPTION MACH. EACH NO. PART NO. NAME: DESCRIPTION MACH. EACH
General Slicing/Red Goat Disposers • 1152 Park Ave • P.O. Box 428 • Murfreesboro, Tennessee 37133-0428 • (615) 893-4820
* These items not available individually.
03.22.96
Page 14

Effective: October
1,1997
REPLACEMENT PARTS PRICE LIST MODEL:
QTY. LIST QTY. LIST KEY
PER PRICE
KEY
PER PRICE
**
MOTOR CONTROLLER ASSY:
1
15V
1
1B
434823
LOCKNUT BEATER:MM
-7 ..........…........... 1
2.00 (INC:ALL ITEMS BELOW)
1C
434744
SHAFT ASSY
..........................
....…........... 1
17.00
615506
MOTOR CONTROLLER ASSY:220V
1
324.00
1D
437904
CIRCLIP:SHAFT
..........................…........... 1
2.00 (INC:ALL
ITEMS BELOW)
2
434809
WHISK ASSY:MM
-7 ....................…........... 1
** 2
353031
CONTRO
L KNOB INSERT
1
2.00 3 434770
DOUGH HOOK............................…...........
1 ** 3 198584
CIRCLIP.
..................................................
1
1.00 3A 434794
SHIELD
........................................…........... 1
9.00 4 491704
CONTROL KNOB:PRINTED, BLACK
1
5.00 5 177724
SPRING:CAM FRICTION
1
1.00
6 386301
SPEED CONTROL CAM
1
13.00
7 457459
SWITCH
1
16.00
8
404165
RESET SWITCH
......................................
1
43.00
9
457497
CONTROL BAR ASSY COMP.: 120V
1
113.00
10
353055
SCREW
..................................
.................
2
1.00 11 177712
CONTACT ADJUSTING SPRING
2
1.00
13 206159
SCREW:RND HD
....................................
2
1.00
14 202543
TENSION PIN
.......................
...................
1
1.00
15 353017
SMALL PULLEY
......................................
1
5.00
353110
LEAD BLUE TERM. BLOCK TO PCB
..... 1 3.00
353122
LEAD BROWN SWITCH TO CUTOUT....
2
3.00
353134
LEAD BROWN TERM. BLOCK
-
SWITCH
1
3.00
353
342 LEAD RED
...............................................
1
3.00
428604
FAN & MAGNET ASSY:METAL
..............
1
22.00
457461
BRUSH ASSY
..........................................
2
4.00
MM-7
ACCESSORIES MOTOR CONTROLLER ASSEMBLY
NO. PART NO. NAME: DESCRIPTION MACH. EACH NO. PART NO. NAME: DESCRIPTION MACH. EACH
1 434756 BEATER ASSY ............................….......... 1
** Refer to current equipment Price List for pricing of these items.
——
1 601294
324.00
12 343567 LOCKING CLIP........................................ 2 1.00
. 11.08.97
General Slicing/Red Goat Disposers • 1152 Park Ave • P.O. Box 428 • Murfreesboro, Tennessee 37133-0428 • (615) 893-4820
 Loading...