

Page 1
OPERATION INSTRUCTION FOR MEA T MINCER
Page 2

INTRODUCTION
This instruction manual gi ves the customer all the necessary infor m at ion about the appliance and the
manufacturing standards applied, as well as all instructions for use and maintenance so that the
appliance can be used correctly maintaining its efficiency in time.
This instruction manual is for t he end user and for service personnel
1 INFORMATION ABOUT THE APPLIANCE
1.1 GENERAL WARNINGS
1.2 SAFTY FEA TURES INSTALLED
1.3 APPLI ANCE DESCRIPTI ON
1.3.1 GENERAL DESCRIPTION
1.3.2 CONSTRUCTURE CHA RACTERISTICS
1.3.3 APPLIANCE COMPONENTS
2 TECHNICAL DATA
2.1 TECHNI CAL CHARACTERISTICS
3 CONSIGNING THE APPLIANCE
3.1 TRANSPORTING THE APPLIANCE
3.2 CHECKING P ACKAGING UPO N CO NSI G N M ENT
3.3 DISPOSING OF PACKAGING
4 INSTALLING THE APPLIANCE
4.1 APPLIANCE LOCATION
4.2 CONNECTON TO THE ELECTRICITY SUPPLY
4.3 WIRING DIAGRAMS HM-12/HM-22/HM-22A
4.4 FUNCTIO NAL CHECK
5 USING THE APPLIANCE
5.1 CONTROLS
5.2 SETTING UP THE HM-12/HM-22/HM-22A FOR USE
5.3 FILLING THE MINCER(see fig 5)
6 REGULAR CLEANING
6.1 GENERALITIES
6.2 PROCEDURE TO FOLLOW FOR CLEANING THE APPLIANCE
7 MAINTENANCE
7.1 GENERALITIES
7.2 FOOT SUPPORTS
7.3 POWER SUPPLY CABLE
7.4 PUSH BUTTON LABEL
7.5 DISK AND BLADE
8 SCRAPPING
8.1 OUT OF SERVIE
8.2 SCRAPPING
INDEX
Page 3

1 INFORMA TION ABOUT THE APPLIANCE
1.1 GENERAL WARNINGS
The appliance must only be used by personnel who has carefully studied this manual and
understood all the safety standards described herein.
If there should be a turnover in personnel, it is necessary that this manual is carefully studied
before using the appliance.
Although safety devices are installed on the appliance, avoid touching the moving parts with your
hands and avoid touching t he appliance with wet hands.
Before cleaning or servic ing the appliance, disconnect the electricity power supply.
When cleaning or servicing the HM-12/HM-22/HM-22A (safety protections removed) take into
consideration all possible hazards-R esidua l Risks.
When cleaning or servicing the appliance always concentrate on what you are doing and avoid
any possible distractions.
Check the electricity power cable on a regular basis (to avoid electrical hazards and twists in the
cable always completely unwind it);a worn or damaged cable causes a dangerous electrical
hazard;aviod pressing the cable with weights or leaving it on hearted or sharp cutting
Surfaces and avoid pulling the cable to remove the plug from the socket.
If the HM-12/HM-22/HM-22A has a presumed malfunct ion or does not w ork correctly, do not use it
or repair it.contact the “Service Centre”.
This appliance is designed for only mincing meat in the mincer.Do not use this appliance for
frozen food or non-food pr oducts and do not insert any met allic objects into the mincer.
The manufacture cannot be held responsible for the following situations:
If the appliance or safety devices are tampered with by unauthorized personnel;
If non-original spare parts are used;
If the instructions given in t his man ual are not carefully followed or respect ed;
If unsuitable cleaning pr oducts (inflammable, corrosive or toxic) are used to clean the appl ia nce.
1.2 SAFTY FEATURES INSTALLED
Safety features against electrical hazards conform to standar ds GB47 06.38-2003, whereas mechanical
safety features confor m to G B4706.38-2003.
The HM-12/HM-22/HM-22A is fitted out with:
Relay in the command cir cuit f or r estarting the appliance if there if ther e is a power cut;
The HM-12/HM-22/HM-22A is fitted out with electric al and mechanical safety protection that conform to
the standards in force .These protections are for when the appliance is working and when it is being
cleaned or serviced .However ,there are RESIDUAL RISKS that cannot be completely eliminated and
are indicated by the wording CAUTION in this manual. These risks ref er to the risk of being cut or
injured when handling the bla de on t he HM-12/HM-22/HM-22A while cleaning.
1.3 APPLIANCE DE SC RI PTION
1.3.1 GENERAL DESCRIPTION
We have designed and manufactured the HM-12/HM-22/HM-22A g uar ant eeing;
The maximum of safety when us ing, cleaning and servicing;
The maximum of hygiene thanks to a meticulous selection of the materials that come in contact
with the food product, and thanks to the eliminatio n of any sharp a nd rough ed ges t hat comes in cont act
with the product, cleaning is easy and thorough;
The appliance can be easily st r ipped
Robust and stable co m ponents and structure
Maximum reduced noise l evel thanks to the geared transmission and oil bath
Page 4

Easy to handle
1.3.2 CONSTRUCTURE CHA RACTERISTICS
The HM-12/HM-22/HM-22A is made from stainless and aluminum ally for food appliances. These
metals are regarding hygiene, they are also acid and salt r esistant are also rust proof.
1.3.3 APPLIANCE CO MPO NE NT S
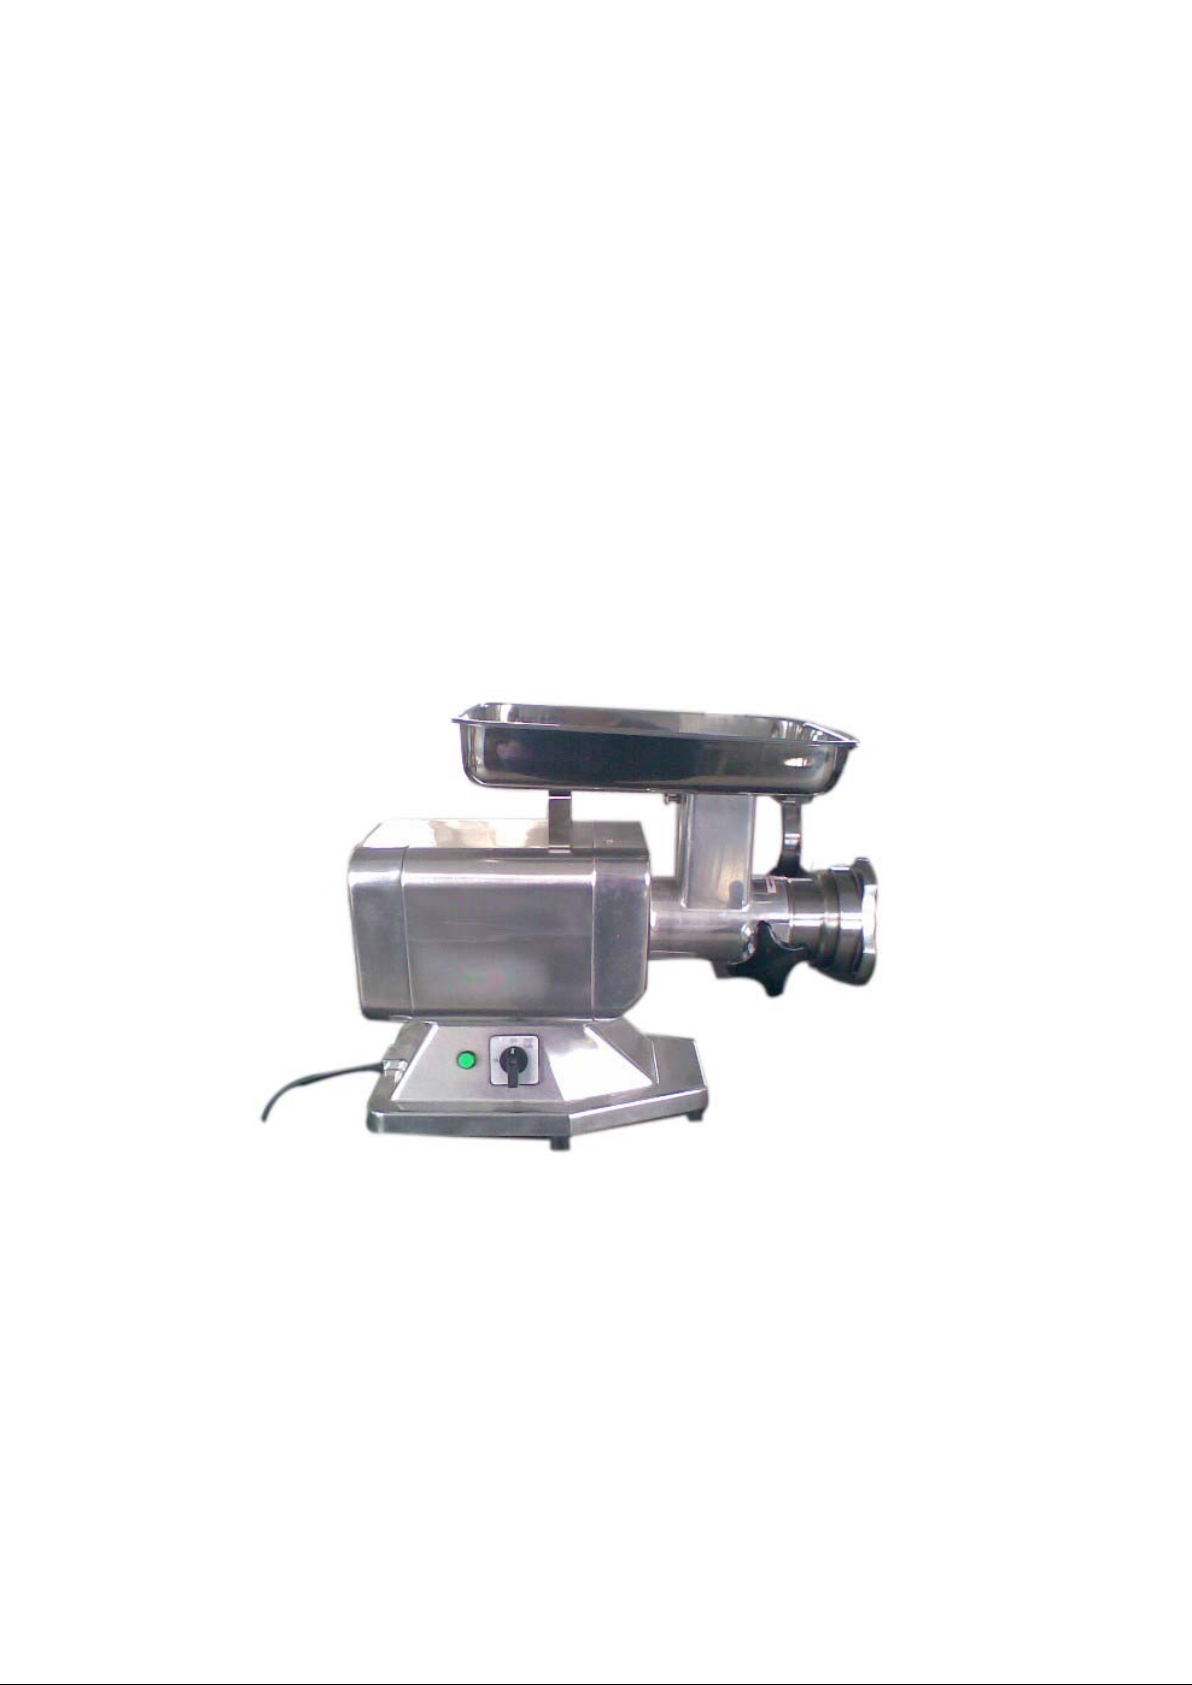
FIG 1-General view of the HM-12/HM-22/HM-22A
7
1111
1
1-controls 2-base
3-knob 4-disk
5-lock nut 6-union
7-food tray
2 TECHNICAL DATA
2.1 TECHNICAL CHARACTERISTI CS
6
5
4
3
2
Model HM-12 HM-22 HM-22A
Voltage
Power 850W 1100W 1100W
Holes in disk 6mm/8mm 8mm/5mm 10mm/6mm/5mm
Production: Max. 120kg/h 300kg/h 300kg/h
Weight 23.50kgs 24.00kgs 25.00kgs
Measurement 60.20x45.40x26.20cm 60.20x45.40x26.20cm 60.20x45.40x26.20cm
CAUTION: the appliance is designed for the electrical specifications given on the plate applied to the
rear of the appliance; before connecting to the electricity power supply refer to chapter 4.2 connecting
to the electricity supply.
220-240V/50Hz/60Hz
120V/60Hz
220-240V/50Hz/60Hz
120V/60Hz
220-240V/50Hz/60Hz
120V/60Hz
Page 5

3 CONSIGNING THE APPLIANCE
3.1 TRANSPORTING THE APPLIA NCE
The HM-12/HM-22/HM-22A leaves our warehouse carefully packed; packaging consists in:
a) this manual
b) food tray;
c) pestle
3.2 CHECKING PACKA GI NG UPON CONSIGNMENT
When the goods are received proceed w ith opening the packaging if there are no signs of damage, and
make sure that inside there are all the listed items.if when the goods are delivered there are signs of
damage to the packaging, agent or courier, and within three days from the date indicated on the
documents draw up a detailed list and report of all damage to the goods. Do not turn the packed
goods upside down! When transportin g the p acka ge make s ure it s f our main poi nt s are f irmly se cur ed
(maintain the goods parallel to the ground).
3.3 DISPOSING OF PACKAGING
The various ite ms used for pac kaging (car dboar d, pa llet s, pla stic straps, polyuret hane foam) are normal
urban waste product s and can be disposed of without dif ficult y.
If the appliance is destined to countries where are specific standards regarding waste, dispose of
packaging respect ing t he standards and laws in forc e.
4 INSTALLING THE APPLIANCE
4.1 APPLIANCE LOCATION
The work surface where the HM-12/HM-22/HM-22A will be located must be suitable for the size of the
appliance,please refer t o the measur eme nt s given in Tab 1.The work surface must be level and dr y and
at a height of 80 cm from the ground. The appliance must be located in a non-salty environment with a
max humidity value of 75% and with a temperature between 5℃ and 35℃;and however, always in
areas and environment s that do not cause any type of malfunct i on to the appliance.
4.2 CONNECTON TO THE ELECTRICITY SUPPLY
HM-12/HM-22/HM-22A with a single-phase motor
2
The HM-12/HM-22/HM-22A comes supply with a 3x1 mm
long power cable.
Connect with HM-12/HM-22/HM-22A to a 220-240V/50HZ power supply; At this poi nt makes sure the
main earth circuit functions correctly.
Also check that the information given on the technical data and serial number plate corresponds to the
information given in the accompanying documents.
4.3 WIRING DIAGRAMS HM-12/HM-22/HM-22A
FIG 3-Illustration
Page 6

4.4 FUNCTIONAL CHECK
To check the appliance works correctly proceed as follows;
Press the start button “turn over”and check that the screw feeder rotates anti-clockwise to the
outlet opening of the HM-12/HM-22/HM-22A;
By press the reverse button “on”check the grater roller changes direction and starts turning
clockwise;
Using the presser lever see if the appliance automatically st ops.
5 USING THE APPLIANCE
5.1 CONTROLS
FIG 4-Controls
2
1
3
1-Star t button “on”
2-Stop button “off”
3-Reverse button “turn ov er”
5.2 SETTING UP THE HM-12/HM-22/HM-22A FOR USE
N.B before using the appliance makes sure all the components that can be removed are secured in
position (see fig 6)
Mount the mincer outlet and block it into position using the handle located on the side of the
union;
Mount the screw feeder, blade and disk, and then screw on the lock nut.
5.3 FILLING THE MINCER(see fig5)
When using the mincer it is important that you stand in the correct position. Do not position yourself
so that any part of your body c om es
In direct contact with the mincer when working. FIG 5-fitting the mincer
N.B The mincer must be f illed when working. The procedure to fo ll ow is:
1. Place the food in the tray;
2. Start the mincer using the start button.
3. Raise the pestle;feed the meat into the
tube;Without forcing use the pestle to push
the meat into the opening.
4. If the meat suitably cut beforehand there should be no
problems with the screw feeder,however,if there are problems
tighten the lock nut until the meat is cut t o desired size.
5. So both the disk and blade last longer and t o m aintain their sharpness in time:
- When all the meat has been minced turn of f t he appliance;
- Blade and disk must always be coupled.
6. Do not tighten the lock nut excessively;
Page 7

7. Press the stop button when you have finished using the appliance, then strip the appliance and
thoroughly clean both the opening and all other component s.
6.1 GENERALITIES
The appliance clean must be cleaned at least once a day or if necessary more than once.
Scrupulously clean all the various components of the HM-12/HM-22/HM-22A whether they
come in direct contact w ith the food product or not.
Never clean the HM-12/HM-22/HM-22A with a pressurized water-jet, industrial cleaner, and
brushes or any other type of cleaning utensil that could damage t he surface of the appliance.
Before cleaning you must remove the electricity supply plug isolating the appliance
from the main power circuit.
6.2 PROCEDURE TO FOLLOW FOR CL EANING THE APPLIANCE
- remove the pestle and food tray;
- unscrew the lock nut: No.1 and r emov e the dis k: No.2, blade No. 3, screw feeder No.4, unscrew in the
direction indicated by t he ar r ow No. 5.
- unscrew the knob and re move the mincer No.6, always in the direction indicated by the arrow.
Now all the components can be washed( see fig 6 )using warm water ( 50 ℃) and a neutral detergent.
To clean the main struct ure use a damp cloth remember to frequently rinse
The grater roller mounted on the HM-12/HM-22/HM-22M Should be brushed. Carefully clean the
punched holes. Make sure all the components are co mp let ely dr y before remounting them.
N.B. to remount the HM-12/HM-22/HM-22A follows the above diagram s:
1) Mount the mincer block and block it in position using the knob; the pin on the knob must be inserted
into the opening No.7;
2) Insert the screw feeders No.4 into the mincer block make sure it is positi oned correctly;
3) Mount the blade No.3 onto the square pin on the screw feeder and then mount the disk No.2
maintaining the ori gin al coupling configuration;
4) Once all the components have been mounted secure by screwing the lock nut in place.
FIG 6-Removing components
6 REGULAR CLEANING
5
3
7 6 4 2
1
Page 8

FIG 7-Diagram of HM-12/HM-22/HM-22A st ripped for cleaning
Mincer block
food tray
knob nut
Screw feeder
pestle
disk
blade
7 MAINTENANCE
7.1 GENERALITIES
Before servicing the appliance you must disconnect the electricity supply plug isolating appliance from
the main power source.
7.2 FOOT SUPPORTS
In time the foot supports c an deteriorate causing instability. If this is the case replaces them.
7.3 POWER SUPPLY CABLE
Periodically check wear in the power cable and if necessary contact the “SERVICE CEN TRE” for a
replacement.
7.4 PUSH BUTTON LA BE L
In time the label on the could become marked or even damaged. If this
should happen contact the “SERVICE CENTRE” for a replacement.
7.5 DISK AND BLADE
Both the blade and disk can deteriorate in time. If this should happen contact the “SERVICE CENTRE”
for original replacements.
8 SCRAPPING
8.1 OUT OF SERVIE
If the appliance for some reason is to be put out of service, make sure it can no longer be used:
disconnect and remov e all electr i ca l c onnections.
8.2 SCRAPPING
Once the appliance is out of service it can be scrapped. Contact a specialized company to scrap it
conforming to the materials used for manufacturing t he various components (refer to chap 1 Para 3.2)
 Loading...