

Page 1
INSTRUCTION
MANUAL
PLEASE READ THESE INSTRUCTIONS CAREFULLY BEFORE USE
English
GENMAN 092009 RevA
R
R
GENERAL COOKING
U
L
R
C
L
A
S
S
I
F
I
E
D
GCP-40, GCP-60, GCP-100
Coffee Percolator
Page 2
Introduction
Thank you for choosing our high quality Automatic Coffee Percolator. We are certain you will be pleased with the performance of this product. Please read the following instructions carefully before use.
Warnings & Precautions:
The following warnings and precautions must be observed.
CAUTION! Never immerse the machine in water. If the machine has been soaked, it
must be dried and checked by a technician before being put back into use.
Before installation, please review all of the technical data noted in this manual.
CAUTION! During use the brewer can get very hot. Please use the appropriate handles when operating or handling the machine.
• Do not leave the brewer unattended while in operation for extended periods of
time.
• Be sure to unplug the power cord when the machine is not in use.
• Use care during cleaning not to damage, bend or break the individual components.
• In the following pages, extremely important items are marked by ► for your attention.
► Disclaimer: The Manufacturer will accept no liability for any injury or damage
caused by incorrect usage of the machine or by improper operation contrary to information given in this Instruction Manual.
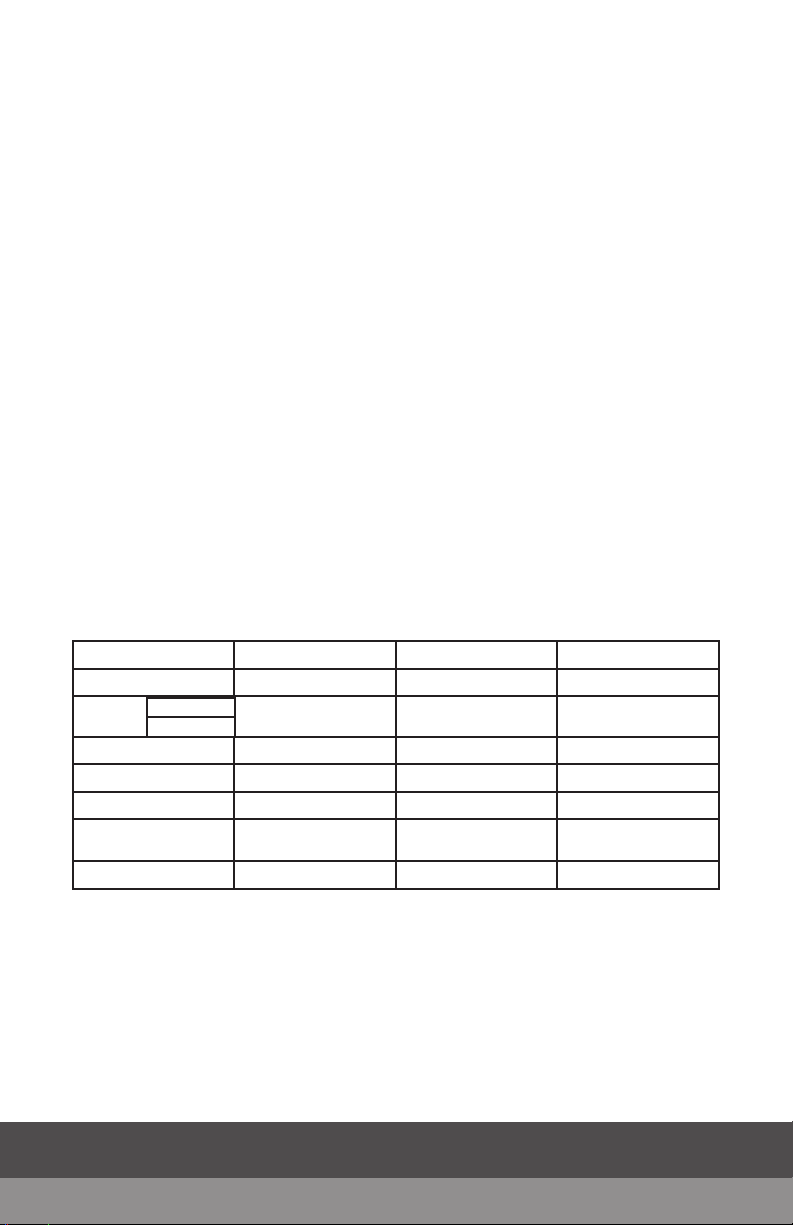
Technical Data:
Specification MCP40 MCP60 MCP100
Voltage 120V/220V 120V/220V 120V/220V
Wattage
Frequency 50/60Hz 50/60Hz 50/60Hz
Volume 6.5 L / 40 Cups 12 L / 60 Cups 15 L / 100 Cups
Brewing Time Approximately 25 Min. Approximately 45 Min. Approximately 65 Min.
Temp. when Brewing
Process Complete
Warming Temperature after 1 hrs 88 °C/190°F after 1 hrs 88 °C/190°F after 1 hrs 88 °C/190°F
Brewing
Holding
1350W
80W
94-97 °C 201-206°F 93-96 °C 199-205°F 92-95 °C 198-203°F
1350W
160W
1350 W
160W
► Specification and information for reference only.
Page 3

RR
GENERAL COOKING
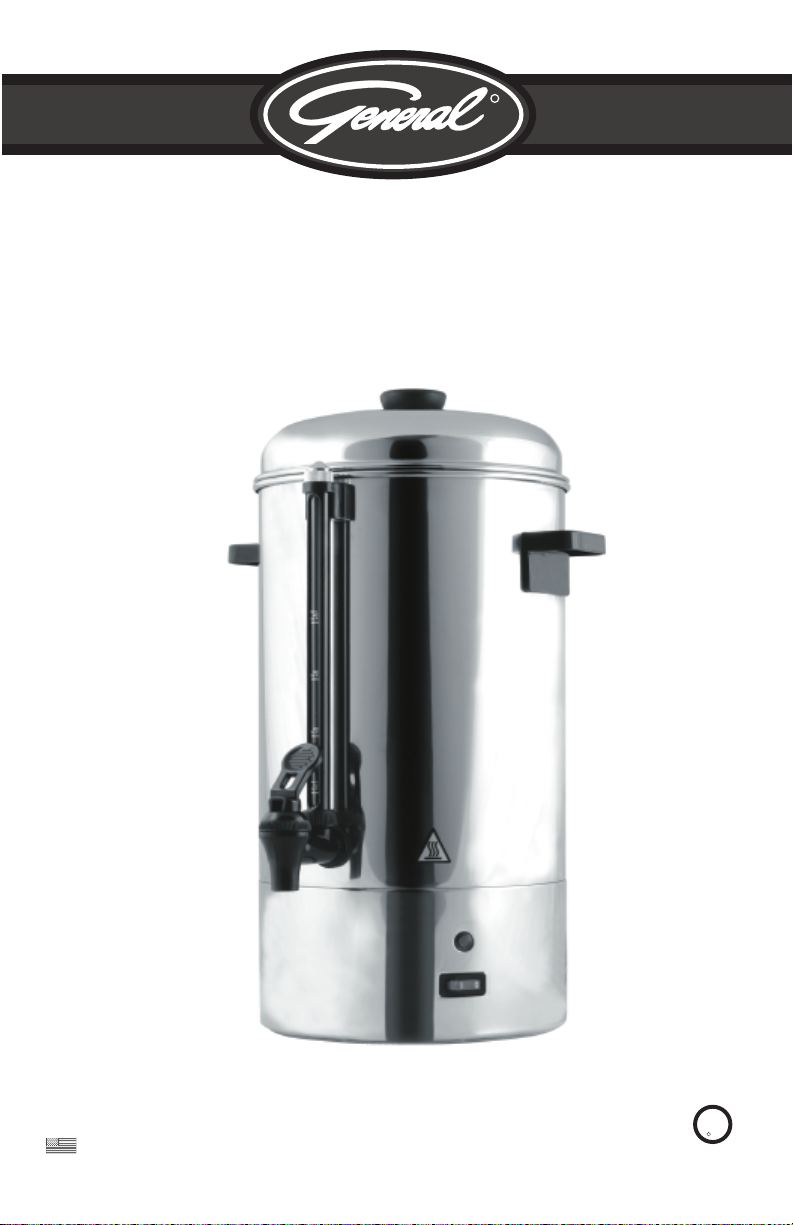
Parts:
Please check the following Packing List
before installation.
(1) Cover
(2) Urn Body
(3) Level Indicator
(4) Faucet
(5) Power Switch
(6) Indicator Light with Two Functions
Green and Yellow
(7) Urn Base
(8) Basket Cover
(9) Filter Basket
(10) Basket Tray (Optional)
(11) Percolator Tube
Operation Instruction:
To Brew Coffee, follow these instructions:
1. Fill with cool water not less than half of total capacity of the Urn.
(8)
2. Cover the Filter Basket
with the Basket Cover (7).
3. Center the Percolator Tube (10)into the Basket Tray (9), and make sure that the
foot of the Tube is positioned firmly on the well of the Urn.
4. Center the Filter Basket
(8)
into the Percolator Tube (10)and place the ground
coffee in to the Basket. Cover with the Basket Cover (8)and the Cover of the Urn (1).
5. Plug the cord into the electric outlet and turn the Power Switch
(5)
"ON". The
switch should light up.
6. When the Indicator Light turns Green(6), the brewing process is completed.
7. The secondary Heating System will start to operate automatically after the brewing process completes to keep coffee at service temperature.
8. When there are only about 3 cups of coffee left in the Urn, turn the Power Switch
(5)
"OFF" and unplug the power cord from the electric outlet.
NOTE: To reheat cold coffee in the Urn, ensure there is at least 12 cups of coffee in
the tank to reheat safely. Plug the cord into the electrical outlet and turn the Power
Switch (5)"ON".
CAUTION! When in use the brewer is very hot. Use care when handling!
Operation Instruction (continued):
Cleaning
It is important that the Machine and its accessories be kept clean after use.
For dirt or smudges on the Machine, clean with a soft damp cloth, and if necessary,
with a non-corrosive and/or non-abrasive detergent or cleaner.
Page 4

RR
GENERAL COOKING
Sediment Indicator
!
► The Indicator Light (6)will turn Yellow to alert the user that there is scale or sedi-
ment and the machine needs to be de-scaled.
In areas near the heating element, hard water will cause chalk and limestone to
accumulate over time. To keep the machine in its best condition and to ensure coffee brewing will result in the best-tasting coffee, we recommend performing a descale when you find there are scale sediments at the bottom of the machine or
when the de-sediment Indicator Light turns Yellow.
1. Use one pack of powerful de-sediment powder (provided) to a solution of 500
ml/2 pints water.
2. You may also use 500 ml/2 pt distilled white vinegar on the heating element
in the Urn.
3. Wait 5 to 6 minutes to allow the vinegar to run through the sediments/scale.
4. You may use a brush with soft bristles to brush the heating element.
5. Repeat steps 1 thru 3 until the scale is removed.
6. Use a dry cloth to wipe the vinegar away.
7. Pour clean water into the Urn, brush the heating element lightly to remove any
additional remaining sediment/scale.
8. The brewer is ready for use.
NOTE: To purchase a more powerful de-scaler than we recommend; please
contact your dealer or Asbury Foodservice.
Contact Us:
FOR WARRANTY, SERVICE OR PARTS, PLEASE CONTACT:
Asbury Service Warranty & Parts
Toll Free: 1.877.368.2797
Or visit:
www.asburyfoodservice.com
Read & Keep
these instructions
Fort Lauderdale, FL 33331, U.S.A.
Phone:(877) 368-2797 · Fax:(954) 202-7337
Indoor use only Do not discard
 Loading...