

Redfyre Gas-Fired Classic Range Cooker Quick Manual
Your new REDFYRE gas-fired range cooker has been manufactured to
the highest standards. If installed, used and serviced correctly it will
give you many years of economical, trouble-free operation.
Please read this carefully before lighting for the first time.
IMPORTANT
To make sure you get the best possible performance from your range cooker,
it must be installed and commissioned by a CORGI registered engineer.
Installation must be carried out to accepted standards, and comply with all
regional and national regulations. REDFYRE will accept no responsibility or
liability for any faults arising from poor or incorrect installation.
Any alteration not approved by REDFYRE could invalidate the approval of the
appliance and the operation of its warranty, as well as adversely affecting
your statutory rights.
It is recommended that a qualified engineer should carry out servicing
once a year. The burner should be turned off at least 4 hours before the
Service Engineer arrives, to allow the appliance to cool.
How to get the best from your
Gas-Fired Classic Range Cooker
PR0722 Issue 1 (April 2004)
3
2
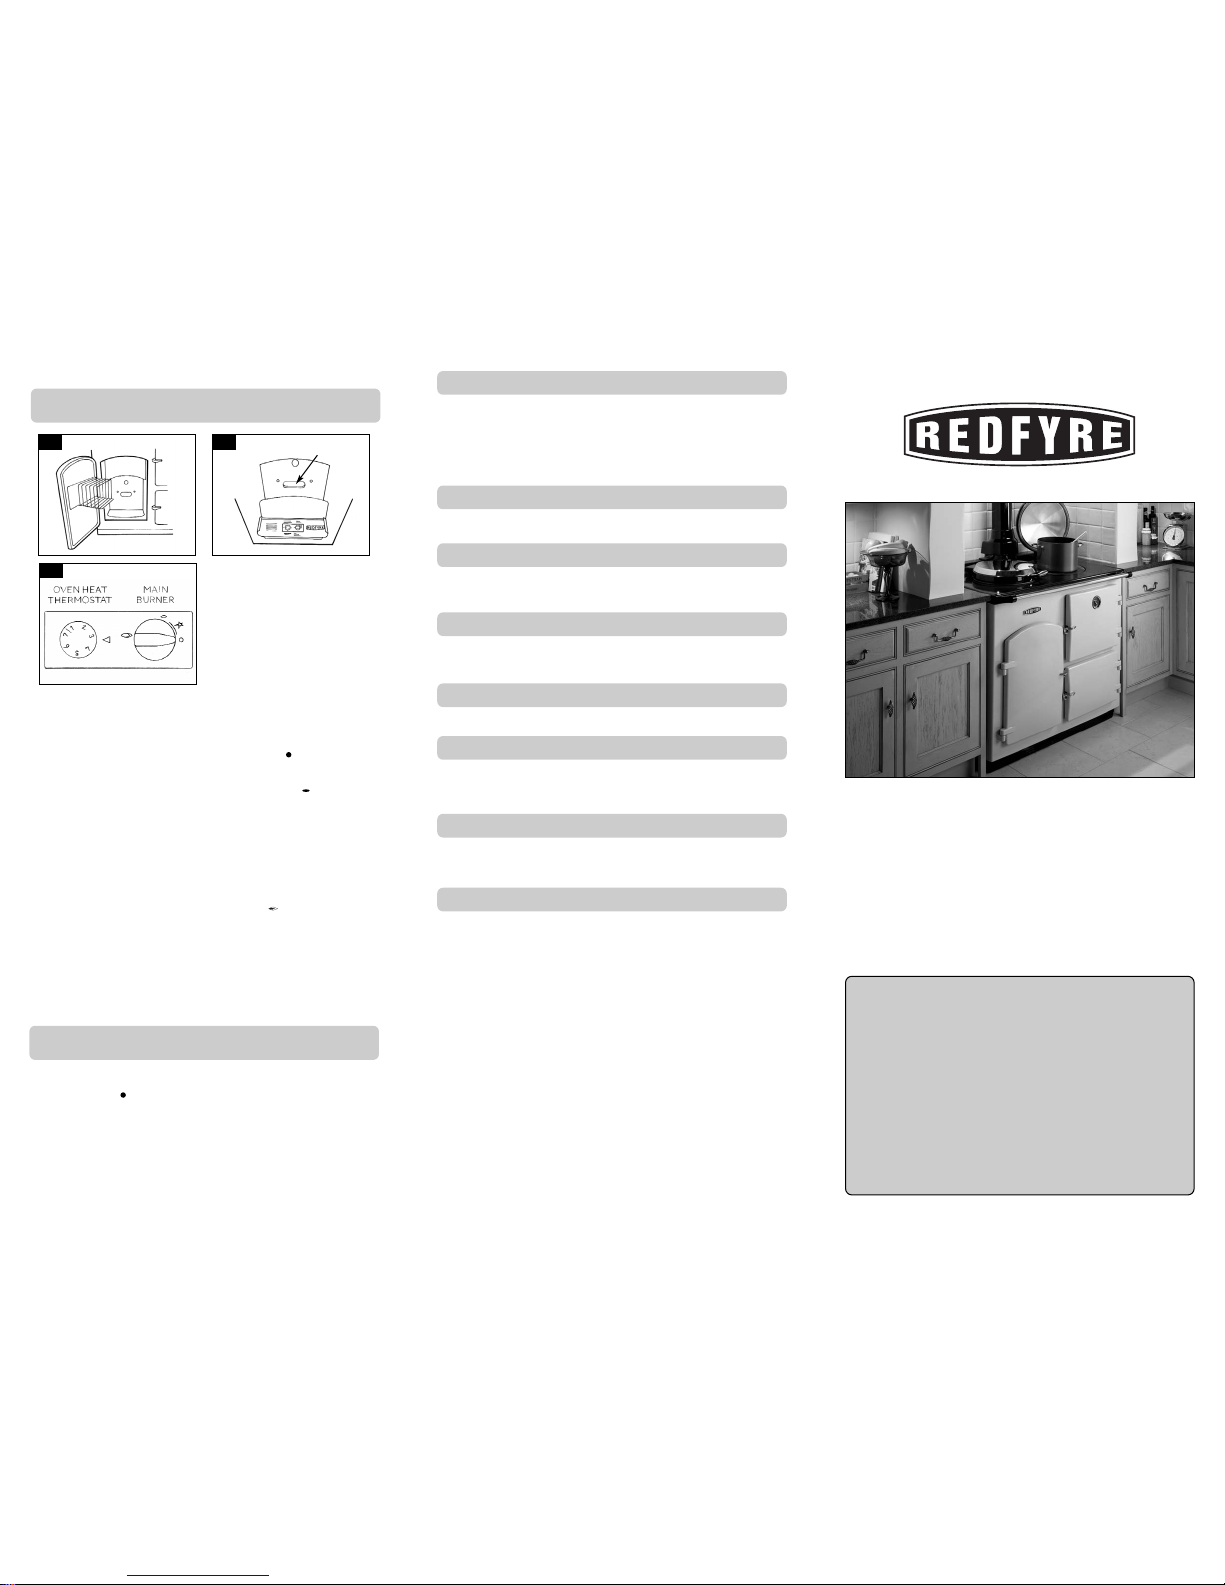
Open the burner door, see diagram 1, lift the control cover, see diagram 2.
There are two control knobs, the right hand knob controls the pilot ignition
and main burner. The left hand knob controls the oven temperature, see
diagram 3.
Ensure that the right hand control knob is pointing to off
().
Press in the right hand control knob and rotate it anti-clockwise until a click
is heard (keep pressing in) and the knob is pointing to pilot ( ). The pilot
should now light, this can be seen through the burner viewing window, see
diagram 2. If the pilot has not lit, repeat the procedure until it does.
Keep the control knob pressed for 10 seconds and then release it, the pilot
should stay alight. If the pilot goes out, repeat the procedures until it does.
If the pilot will not light after repeated attempts, contact the retailer or
installer from whom the cooker was purchased.
Turn the right hand control to point to main burner ( ) the main burner
will now light. The cooker can now be controlled using the oven heat
thermostat knob.
When lighting the cooker from cold set the oven heat thermostat control to
setting 5. The oven temperature will now rise, taking approximately 2
1
/
2
hours to reach 200°C.
When cooking is not required, turn the oven heat thermostat down to the
lowest setting to allow the cooker to ‘tick over’.
1
LIGHTING THE BURNER
TURNING OFF THE BURNER
To turn the pilot off, locate the control valve, turn the main burner control knob
until it points to off ( ), the pilot will go out.
IF THE FIRE IS EXTINGUISHED OR GOES OUT IN USE, WAIT 3 MINUTES
BEFORE ATTEMPTING TO RELIGHT THE FIRE. THE CONTROL VALVE HAS
AN INTERLOCK DEVICE AND THEREFORE CANNOT BE LIT UNTIL THE 3
MINUTES HAVE ELAPSED.
OXYGEN DEPLETION SENSOR
The appliance is fitted with an oxygen sensitive pilot system that will act to cut off the gas
supply to the cooker should the oxygen in the room fall below its normal level. If the
cooker is turned off by this device it usually indicates that there is a problem with the flue
system, this should be inspected by a qualified engineer.
DO NOT ATTEMPT TO USE THE COOKER UNTIL AN ENGINEER SAYS IT IS SAFE TO
DO SO.
THIS DEVICE IS NOT A SUBSTITUTE FOR AN INDEPENDENTLY MOUNTED
CARBON MONOXIDE DETECTOR.
FLAME FAILURE DEVICE
This is a safety feature incorporated on this appliance which automatically switches off
the gas supply if the pilot goes out and fails to heat the thermocouple.
RUNNING IN
The surface coating inside your REDFYRE cooker will "burn off" during the first few hours
of use producing some smoke. This will disappear after a short period of use. If the
odour persists, ask your installer for advice.
SERVICING
The cooker must be serviced every 12 months by a qualified Gas Engineer. In all
correspondence always quote the Model number and the Serial number which may be
found on the databadge.
VENTILATION
Any purpose provided ventilation should be checked periodically to ensure that it is free
from obstruction.
INSTALLATION DETAILS
To assist in any future correspondence, your installer should have completed the
commissioning sheet at the front of the installation instructions, this records the essential
installation details of the appliance. In all correspondence always quote the Model
number and Serial number.
Parts of this cooker become hot during normal use. It is therefore recommended that a
suitable guard be used for protection of young children and the infirm. Indeed, all parts
of the cooker should be treated as a ‘working surface’ except for the control access
panel.
HOT SURFACES
CLEANING THE COOKER
Your range cooker is finished in a high gloss vitreous enamel. To keep it in the best possible condition, follow these simple steps.
•Wipe over daily with a damp soapy cloth, then polish the enamel with a
clean dry duster.
• While you’re cooking, keep a damp cloth handy to wipe up spills.
• Should spills become baked on, use a non-abrasive cream cleaner.
Check that it’s approved by the Vitreous Enamel Development Council.
• If liquids that are either acidic, like fruit juice or milk, or have a high
sugar content like jams and preserves, are spilt onto the enamel – wipe
off immediately or the surface may be permanently discoloured.
• Abrasive pads, hard scrapers and oven cleaners containing citric acid can
ONLY be used on the stainless steel surfaces, NEVER use them on the
enamel as they will damage it.
To keep the hotplates and the inside of the ovens clean, use a light wire brush – but take
care not to touch the enamel. Carbonised fat splashes in the oven can also be removed
with the wire brush. The shelves can be soaked and cleaned with an oven cleaner.
The oven doors can be removed for easier cleaning, this should be done with care as
they are heavy. Lift them off their hinges and place them face down on a surface which
has been covered with a cloth to protect the enamel. Do not submerge the doors in
water.
WARNING :Beware of hot surfaces at all times! Only clean the cooker
when it has cooled down sufficiently.
BURNER VIEWING
WINDOW
Oven HeatOven Heat Thermostat
1
1
2
2
3
3
4
4
5
5
6
6
7
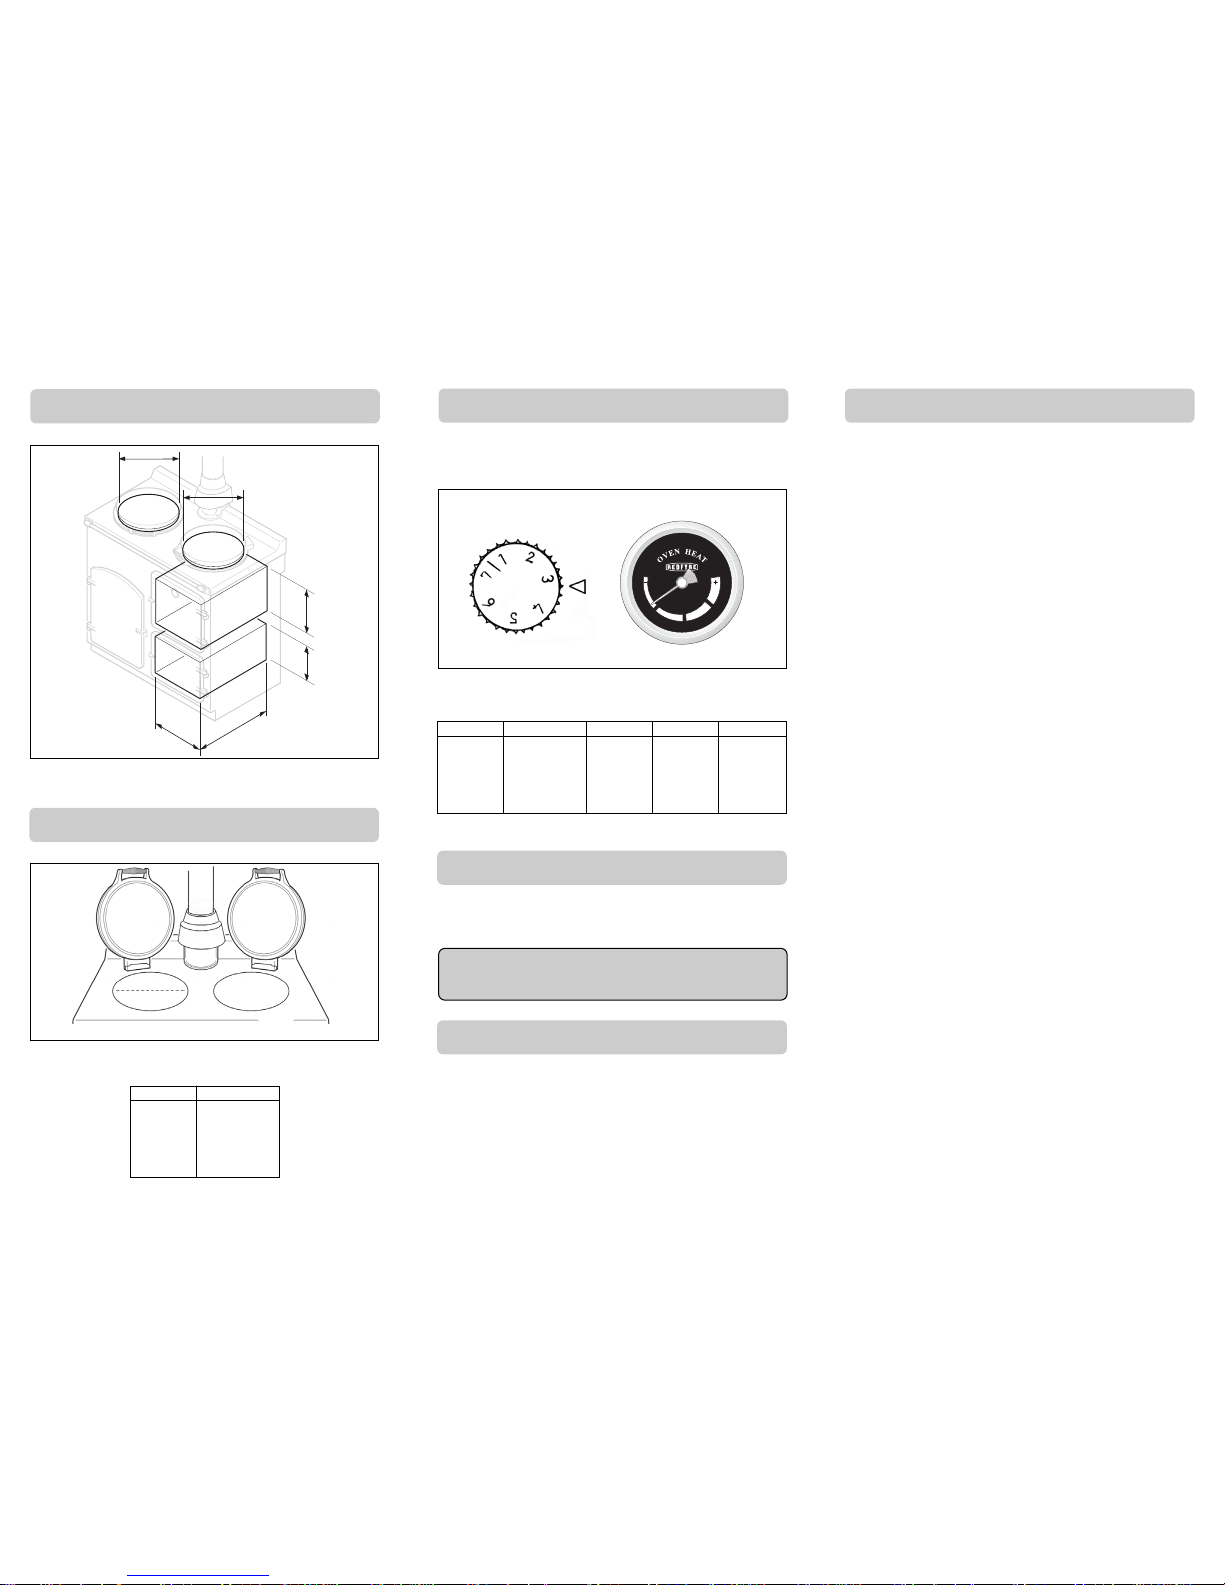
345mm
385mm
510mm
345mm
310mm
250mm
NOTE: The Top Oven of this cooker is one of the largest of any range cooker
currently on the market.
The temperature of the oven will depend on the setting of the oven heat control.
For rapid heating, turn the Thermostat up to 5 until the oven reaches the temperature you require then turn it back to hold the required temperature.
The Bottom Oven is approximately half the temperature of the top oven plus 10°,
making it ideal for simmering, slow cooking and warming.
To get the best economy from your range cooker it can be fitted with a timer.
This timer will allow you to control your cooker throughout the week ensuring
that it is always ready when you need it.
The timer will keep your cooker running on low and turn it on before breakfast,
lunch and tea time. The cooker will rise to the temperature set on the oven heat
thermostat.
Full details on how to use the timer is supplied with the timer kit, which is available from your REDFYRE stockist.
Below is a guide to the control positions, these temperatures are approximate.
Remember that the oven is hotter at the top and cooler at the bottom, with use
you will become accustomed to the temperature variations.
POSITION DESCRIPTION °C °F GAS MARK
Very cool 110°C-120°C 225°F-250°F 0.25-0.5
Cool 140°C-150°C 275°F-300°F 1-2
Moderate 160°C-180°C 325°F-350°F 3-4
Moderately Hot 190°C-200°C 375°F-400°F 5-6
Hot 210°C-230°C 425°F-450°F 7-8
Very Hot 240°C 475°F 9
OVEN AND HOB SIZES
Simmering Plate
This is cooler
than the
Boiling Plate.
Boiling Plate
The rear half of
this plate is hotter
than the front.
The temperature of the plates depends on the setting of the oven heat control.
Below is a rough guide, please note that these temperatures are approximate.
POSITION DESCRIPTION
Very cool
Cool
Moderate
Moderately Hot
Hot
Very Hot
USING THE HOT PLATES
USING THE TOP OVEN
USING THE BOTTOM OVEN
USING A TIMER
Take care not to leave the cooker running with the oven doors open for
long periods as the cooker will lose heat and take time to recover to
cooking temperature.
1
2
3
4
5
6
7
1
2
3
4
5
6
7
OVENS
The left hand side of the Top Oven is nearer the burner. When baking in the Top
Oven, turn the food 180° approximately half way through cooking to ensure even
browning.
PANS
For really good results it is essential to use good quality flat based pans. Pans
which bend or don’t sit flat will result in scorching and uneven cooking.
HOB LIDS
Ensure that the Hob Lids are closed when cooking has finished. If they are left up
the cooker temperature will drop quickly.
KETTLE
Make sure that the kettle is not left simmering for long periods of time. Not only
does this waste fuel but it also concentrates the minerals in the water which is not
good for you.
GRILLING
The upper part of the Top Oven is the hottest when the oven is on full. For grilling
use a shelf in the highest position.
TOAST
To make toast put the bread directly onto the hot plates or use the toasting ‘ bat’
provided.
The Boiling Plate will toast the bread faster, this results in toast that is crisp on the
outside and softer in the middle. The Simmering Plate toasts the bread more
slowly so that the bread is crisp all the way through.
BACOGLIDE
When cooking directly on the hot plates, e.g. eggs, drop scones, pancakes etc.
use REDFYRE Bacoglide to prevent food sticking to the surface. Sample pieces are
supplied with the cooker.
Bacoglide is available as sheets or a roll and can be purchased from your dealer.
COOKING TIPS
 Loading...