

Red Digital Cinema RED ROCKET-X Installation Instructions Manual
RED ROCKET-X
INSTALLATION INSTRUCTIONS
REDROCKET-X
RED.COM

RED ROCKET-X INSTALLATION INSTRUCTIONS
TABLE OF CONTENTS
Table of Contents 2
Disclaimer 3
Copyright Notice 3
Trademark Disclaimer 3
Compliance Statements 3
Safety Instructions 4
CHAPTER 1: RED ROCKET-X Overview 5
Introduction 5
Scope of These Instructions 5
System Requments 5
RED ROCKET-X Components 7
How to Handle the RED ROCKET-X 7
Additional Resources 7
CHAPTER 2: RED ROCKET-X Connectors 8
RED ROCKET-X Connectors 8
HD-SDI Slot Filler Connectors 9
CHAPTER 3: Install in a Mac Pro 10
Power Supply 10
Install RED ROCKET-X and HD-SDI Slot Filler 10
CHAPTER 4: Install in a Thunderbolt
Expansion Chassis 16
Power Supply 16
PCIe Slot Considerations 16
Install RED ROCKET-X 16
CHAPTER 5: Install in a Windows-Based
Computer 20
Required Tool 20
Power Supply 20
Attach the PC Extender to the RED ROCKETX 20
Install RED ROCKET-X and HD-SDI Slot Filler 21
CHAPTER 6: Install RED ROCKET-X
Software 25
Download Software 25
Install RED ROCKET-X (Mac OS X) 25
Install RED ROCKET-X (Windows) 30
Validate RED ROCKET-X Installation 34
CHAPTER 7: Set Up RED ROCKET-X in
REDCINE-X PRO 37
Set Up Decoding and Error Message
Preferences 37
Set Up Video Out 38
CHAPTER 8: Troubleshoot RED ROCKET-X39
Transcode Speeds 39
HDMI Adaptor Not Working 39
RED ROCKET-X Out of Date 39
Reduced Performance Over Thunderbolt 40
Mac OS X System Information Shows
Incorrect Number of PCIe Lanes for Rocket-X 40
Cannot Quit Installer 40
Cannot Use Monitor Via DisplayPort or HDMI 41
Thunderbolt Expansion Chassis Installations 42
APPENDIX A: Technical Specifications 43
Technical Data 43
Hardware Specifications 43
Supported HD-SDI Signals 43
C O P Y R I GH T © 201 9 R E D . C OM , LL C 955 - 0 0 33 , R E V -T | 2
RED ROCKET-X INSTALLATION INSTRUCTIONS
DISCLAIMER
RED® has made every effort to provide clear and accurate
information in this document, which is provided solely for the user’s
information. While thought to be accurate, the information in this
document is provided strictly “as is” and RED will not be held
responsible for issues arising from typographical errors or user’s
interpretation of the language used herein that is different from that
intended by RED. All safety and general information is subject to
change as a result of changes in local, federal or other applicable
laws.
RED reserves the right to revise this document and make changes
from time to time in the content hereof without obligation to notify any
person of such revisions or changes. In no event shall RED, its
employees or authorized agents be liable to you for any damages or
losses, direct or indirect, arising from the use of any technical or
operational information contained in this document.
For comments or questions about content in this document, send a
detailed email to OpsGuides@red.com.
COPYRIGHT NOTICE
COPYRIGHT© 2019 RED.COM, LLC.
All trademarks, trade names, logos, icons, images, written material,
code, and product names used in association with the accompanying
product ar e the copyrights, trademarks, or other intellectual property
owned and controlled exclusively by RED.COM, LLC. For a
comprehensive list, see www.red.com/trademarks.
TRADEMARK DISCLAIMER
All other company, brand, and product names ar e trademar ks or
registered trademarks of their respective holders. RED has no
affiliation to, is not associated or sponsored by, and has no express
rights in third-party trademarks. The terms HMDI and HDMI HighDefinition Multimedia Interface, and the HDMI Logo are trademark s or
registered trademar ks of HD MI Licensing LLC in the Untied States
and other countries. Mac, Mac Pro, and OS X are registered
trademarks of Apple Inc., registered in the U.S. and other countries.
Windows and Windows Vista are registered trademarks of Microsoft
Corporation in the United States and other countries. Thunderbolt is a
trademark of Intel Corporation in the U.S. and/or other countries.
Linux is a registered trademark of Linus Torvalds in the U.S. and other
countries. Phillips is a registered trademark of the Phillips Screw
Company in the United States or other countries.
COMPLIANCE STATEMENTS
FEDERAL COMMUNICATIONS COMMISSION (FCC)
STATEMENTS
This equipment has been tested and found to
comply with the limits for a Class A digital
device, pursuant to Part 15 of the FCC Rules.
These limits are designed to provide
reasonable protection against harmful
interference when the equipment is operated
in a commercial environment. This equipment
generates, uses, and can r adiate radio frequency energy and, if not
installed and used in accordance with the instruction manual, may
cause harmful interference to radio communications. Operation of this
equipment in a residential area is likely to cause harmful interference
in which case the user will be required to correct the interfer ence at
his own expense.
NOTE: Connecting this device to peripheral devices that do not
comply with Class A requirements or using an unshielded peripheral
data cable could also result in harmful interference to radio or
television r eception. The user is cautioned that any changes or
modifications not expressly approved by the party responsible for
compliance could void the user’s authority to operate this equipment.
To ensure that the use of this product does not contribute to
interference, it is necessary to use shielded I/O cables.
CAUTION: If the device is changes or modified
without permission from RED , the user may void
his or her authority to operate the equipment.
EUROPEAN UNION COMPLIANCE STATEMENT S
RED herewith declares that the
following product(s)
RED ROCKET-X
according to the provisions of the mentioned EC Directives—including
their relevant revisions at the time of this declaration— is (are) in
conformity with the detailed standards or other normative documents.
EMC Directive 2004/108/ EC
Low-Voltage Directive 2006/95/EC
INFORMATION
Products with the CE mar king comply with the EMC D irective
(2004/108/EC) and the Low V oltage Directive (2006/95/EC) issued by
the Commission of the European Community. Compliance with these
directives implies conformity to the following European Product Family
Standards.
EN 55022 (CISPR 22) – Electromagnetic Interference
EN 55024
EN 61000-4-2
EN 61000-4-3
ROHS COMPLIANCE
The E U directive 2002/95/EC ’Restriction of Hazardous Substances
(RoHS)’ prohibits the use of certain substances in electrical and
electronic equipment.
RESPONSIBLE PARTY
RED Digital Cinema
34 Parker
Irvine, CA 92618
USA
®
C O P Y R I GH T © 201 9 R E D . C OM , LL C 955 - 0 0 33 , R E V -T | 3
RED ROCKET-X INSTALLATION INSTRUCTIONS
SAFETY INSTRUCTIONS
Read the following safety instructions very carefully before attempting
any installation and/or performing any work on the RED ROCKET-X.
If the RED ROCKET- X is not used in compliance with the safety
instructions, the warranty and all resulting liability claims will be void.
DO NOT use the RED ROCKET-X near water. Avoid exposing
your RED ROCKET-X to moisture. The unit is not waterproof, so
contact with water could cause permanent damage to the unit as
well as electric shock and serious injury to the user. DO NOT use
the RED ROCKET-X in the rain or under other conditions with high
moisture, and immediately remove power source if the RED
ROCKET-X is exposed to moisture.
WARNING: To r educe the risk of fire or electric
shock, DO NOT expose the RED ROCKET-X to
rain or moisture.
DO NOT ex pose your RED ROCKET-X to excessive vibration or
impact (shock). Be car eful not to drop your RED ROCKET-X.
Internal mechanisms may be damaged by severe shock.
DO NOT operate or store near any heat sources such as
radiators, heat registers, stoves, or any other apparatus that
produce heat. Store in a protected, level and ventilated place.
Avoid exposure to temperature extremes, damp, severe vibration,
strong magnetic fields, direct sunlight or local heat sources during
storage. Recommended storage and usage temperatures for your
RED ROCKET-X are:
Operating range: 5°C to 40°C (41°F to 104°F)
Storage range: –20°C to 50°C (–4°F to 122°F)
If there are any performance issues with your RED ROCKET-X
when operating within this temperature range, submit a Support
ticket at https://support.red.com.
Only use the RED ROCKET-X when it is in good working order.
The system in which you are trying to install the RED ROCKET-X
usually work s with voltages that can be hazardous to your health.
Never work on the system or access its interior with any power
cable attached and plugged into a power source. Make sure the
power supply is disconnected from the components you intend to
work on.
Computer hardware contains components that are sensitive to
electrostatic discharge. If you touch them without precautionary
measures, they can be destroyed. Use a wrist strap connected to
ground when accessing electronic parts and take car e of
grounding the video system. Avoid touching the components of
the computer system and the RED ROCKET-X whenever possible.
Computer hardware contains components that are sensitive to
changing voltages. Connecting or disconnecting the RED
ROCKET-X to or from peripheral hardware while any system
component is powered on may damage the hardware. Power off
all peripheral hardware before connecting or disconnecting any
component, including the RED ROCKET-X.
The RED ROCKET-X may not be misused, abused, physically
damaged, neglected, exposed to fire, water or excessive changes
in the climate or temperature, or operated outside maximum
rating.
DO NOT perform any changes or extensions to the RED
ROCKET-X whatsoever.
CAUTION: Refer all service and repair to qualified
RED service personnel. To reduce the risk of
electric shock, and damage to the RED ROCKETX, DO NOT attempt to perform any servicing other
than any procedures that are recommended in
the operating instructions.
C O P Y R I GH T © 201 9 R E D . C OM , LL C 955 - 0 0 33 , R E V -T | 4

RED ROCKET-X INSTALLATION INSTRUCTIONS
CHAPTER 1:
RED ROCKET-X OVERVIEW
INTRODUCTION
Optimized for the 6K RED DRAGON® sensor, the RED ROCKET-X® is designed to accelerate your R3D® workflow.
The RED ROCKET-X processes and transcodes files up to 5 times faster than the RED ROCKET®. A redesigned
chassis works to protect the card, which uses a full-length x16 PCIe port for installation in your Mac Pro® (models
Early 2009, Mid 2010, and Mid 2012), Thunderbolt™ expansion chassis, PCIe expansion chassis, or Windows®-based
computer.
RED ROCKET- X provides real time, full quality playback onto a 1080/2K/4K monitor or projector via HDMI®,
DisplayPort, or HD-SDI through REDCINE-X PRO®.
NOTE: 4K is only available through DisplayPort or HDMI.
NOTE: The RED ROCKET- X supports all RED DRAGON®, RED DRAGON Monochrome, MYSTERIUM®,
MYSTERIUM-X®, and Monochrome R3D® files.
NOTE: The RED ROCKET-X supports HELIUM® R3D files with GPU assisted decoding.
NOTE: You can install and use a RED ROCKET and a RED ROCKET-X in the same system. However, you can only
use one (1) of these cards at a time. For example, DaVinci® Resolve® can access a RED ROCKET while REDCINE-X
PRO accesses a RED ROCKET-X.
NOTE: The RED ROCKET-X does not require or support the RED ROCKET Breakout Box. The RED ROCKET Breakout
Box is only compatible with the RED ROCKET.
SCOPE OF THESE INSTRUCTIONS
In order to install the RED ROCKET-X system, you should have experience with installing hardware components in a
computer system and be familiar with the hardware structure and interior of such a system. Additionally, you should
have general knowledge in the field of digital video and be comfortable working with computer software.
SYSTEM REQUMENTS
REQUIRED HARDWARE
The computer system must meet the following hardware requirements in order to use the RED ROCKET-X:
PCIe slot that accepts a x16 card, and has 16 lanes of data for maximum performance
Physical space to accommodate the 12" RED ROCKET-X card
One (1) 6-pin PCIe power cable (for Thunderbolt expansion chassis and PC installations)
8GB RAM
C O P Y R I GH T © 201 9 R E D . C OM , LL C 955 - 0 0 33 , R E V -T | 5

RED ROCKET-X INSTALLATION INSTRUCTIONS
SUPPORTED HARDWARE
The RED ROCKET-X can be installed in any of the following:
Mac Pro
Thunderbolt expansion chassis
PCIe expansion chassis
Windows-based computer
ADDITIONAL MAC PRO REQUIRED HARDWARE
The RED ROCKET-X can be installed directly in the following Mac Pro models:
Early 2009 (machine model 4,1)
Mid 2010 (machine model 5,1)
Mid 2012 (machine model 5,1)
NOTE: The Mac Pro Late 2013 (machine model 6,1) does not support expansions cards. However, you can connect a
RED ROCKET-X to a Mac Pro Late 2013 via a Thunderbolt expansion chassis.
SUPPORTED OPERATING SYSTEMS
®
The RED ROCKET-X can be used with the following operating systems:
Mac® OS X® 10.7 or later
Windows Vista® or later
Linux® (Red Hat)
NOTE: Be sure that you have installed the latest system updates and service packs for your system; otherwise you
may encounter software or hardware problems.
NOTE: If you are using a Linux application with RED ROCKET, you need to obtain the appropriate driver from the
company providing the application. If you are interested in developing your own tools for Linux you may want to sign
up for the R3D SDK. RED® DOES NOT provide drivers for Linux.
REQUIRED SOFTWARE
RED ROCKET-X driver: Part of the RED ROCKET-X Installer, available for download at www.red.com/downloads.
RED ROCKET-X firmware: Part of the RED ROCKET-X Installer, available for download at
www.red.com/downloads.
REDCINE-X PRO: Available for download at www.red.com/downloads.
Contact third-party software vendors about the availability of other RED ROCKET-X enabled software.
C O P Y R I GH T © 201 9 R E D . C OM , LL C 955 - 0 0 33 , R E V -T | 6

RED ROCKET-X INSTALLATION INSTRUCTIONS
RED ROCKET-X COMPONENTS
Each RED ROCKET-X package contains the following:
RED ROCKET-X
HD-SDI slot filler
PCIe 6-pin to 6-pin Dual Y Power Splitter (for Mac Pro installations)
PC extender (for Windows installations)
Two (2) M3x0.7 x 6 mm pan head screws (for PC extender installation)
HOW TO HANDLE THE RED ROCKET-X
When handling the RED ROCKET-X, hold the card by the gray card chassis and the metal bracket. Avoid touching the
board and connectors.
ADDITIONAL RESOURCES
The following resources offer additional information about RED, the DSMC® system, and the RED community:
RED.com: Check the official RED website for the latest information about RED products.
RED Learn Articles: RED offers in-depth technical articles about RED cameras, post-production, and digital
cinematography.
RED Downloads: Go to RED Downloads to download the latest firmware, operation guides, and post-production
software.
DSMC Toolkit: Go to RED Downloads to find the DSMC Toolkit, which offers many helpful tools and resources to
customize and improve your camera workflow.
RED Support: Check the RED SUPPORT site for FAQs, or to file a support ticket.
In-Camera Help: Select the Help button on an in-camera screen to open up the help for that screen.
REDUSER: Discuss all things RED on the REDUSER third-party forum.
C O P Y R I GH T © 201 9 R E D . C OM , LL C 955 - 0 0 33 , R E V -T | 7
RED ROCKET-X INSTALLATION INSTRUCTIONS
CHAPTER 2:
RED ROCKET-X CONNECTORS
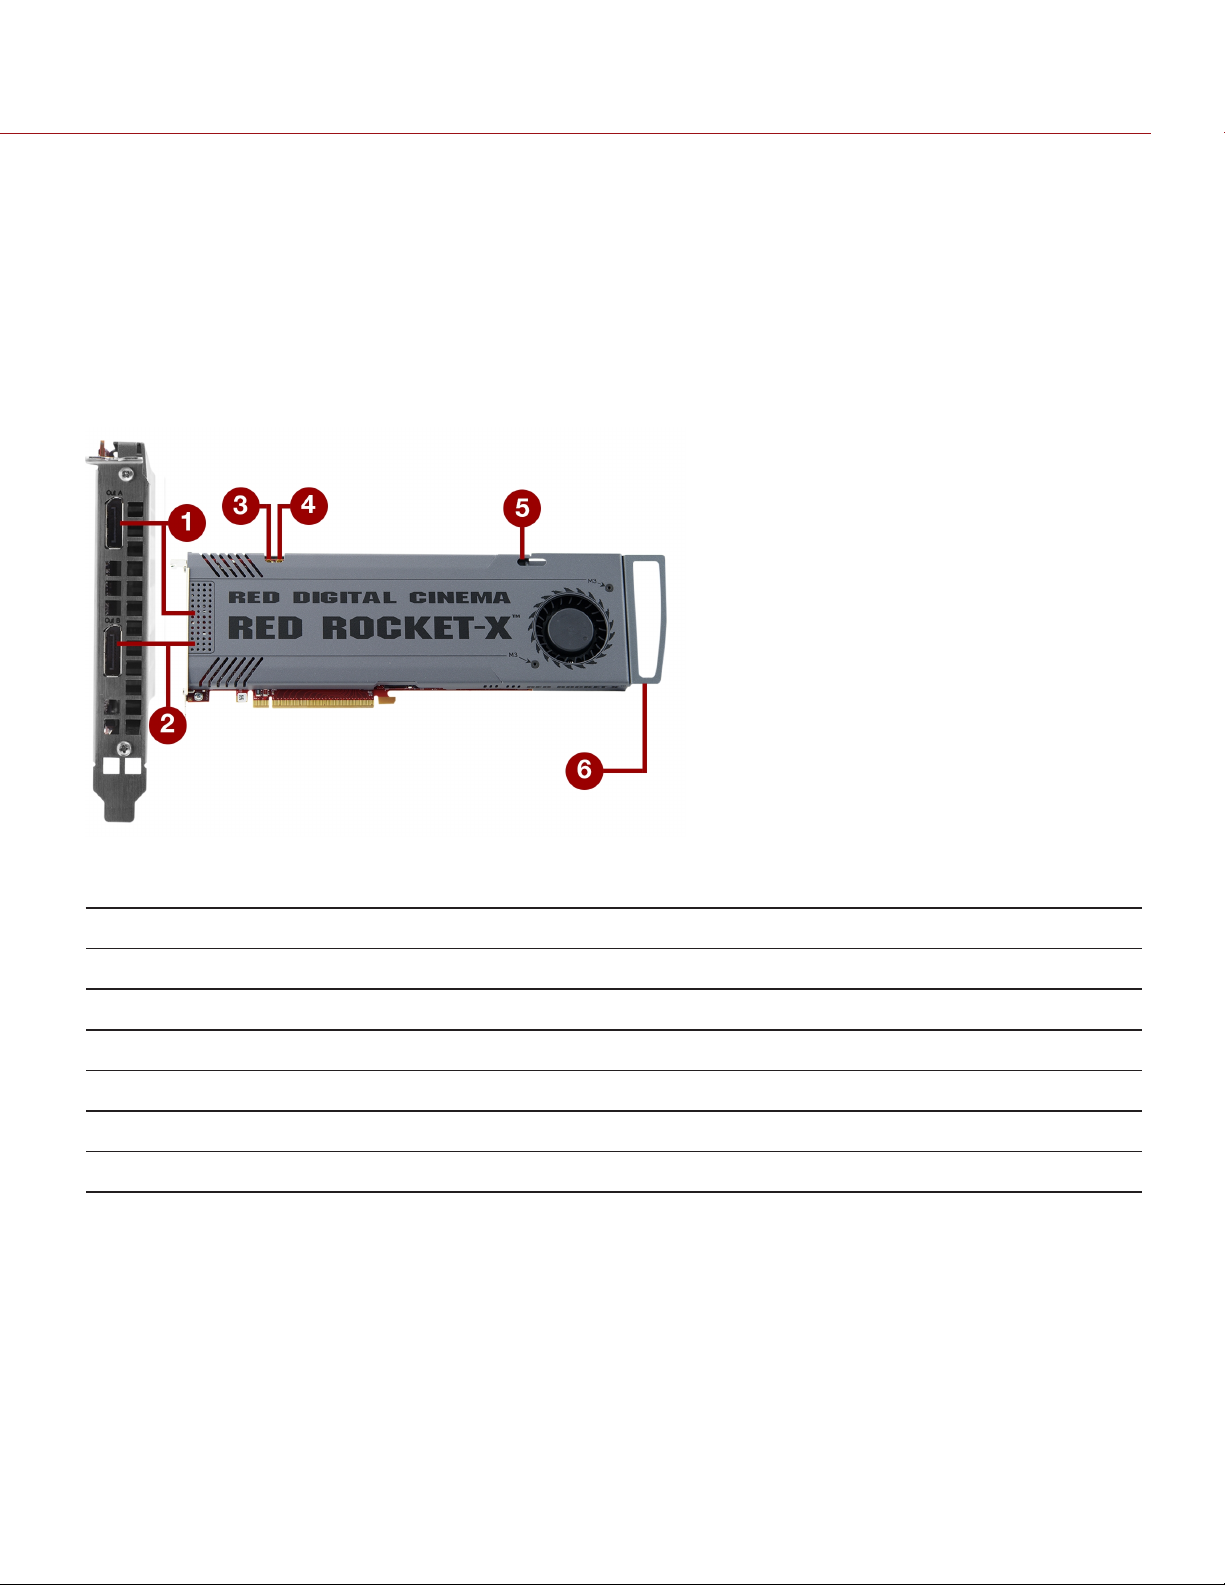
RED ROCKET-X CONNECTORS
Figure: RED ROCKET-X Connectors
# CONNECTOR DESCRIPTION
1 Out A
2 Out B
3 SDI Out A Connection for SDI Out A on the HD-SDI Slot Filler
4 SDI Out B Connection for SDI Out B on the HD-SDI Slot Filler
5 Power 6-pin PCIe female connector
6 PC extender PC extender to fit the RED ROCKET-X® securely in the PCIe slot and card holder
1. The RED ROCKET-X DisplayPort does not support DVI and DVI adaptors.
2. Disabled
1
2
Dual-mode DisplayPort (DP++) output connector
Dual-mode DisplayPort (DP++) output connector
C O P Y R I GH T © 201 9 R E D . C OM , LL C 955 - 0 0 33 , R E V -T | 8
RED ROCKET-X INSTALLATION INSTRUCTIONS
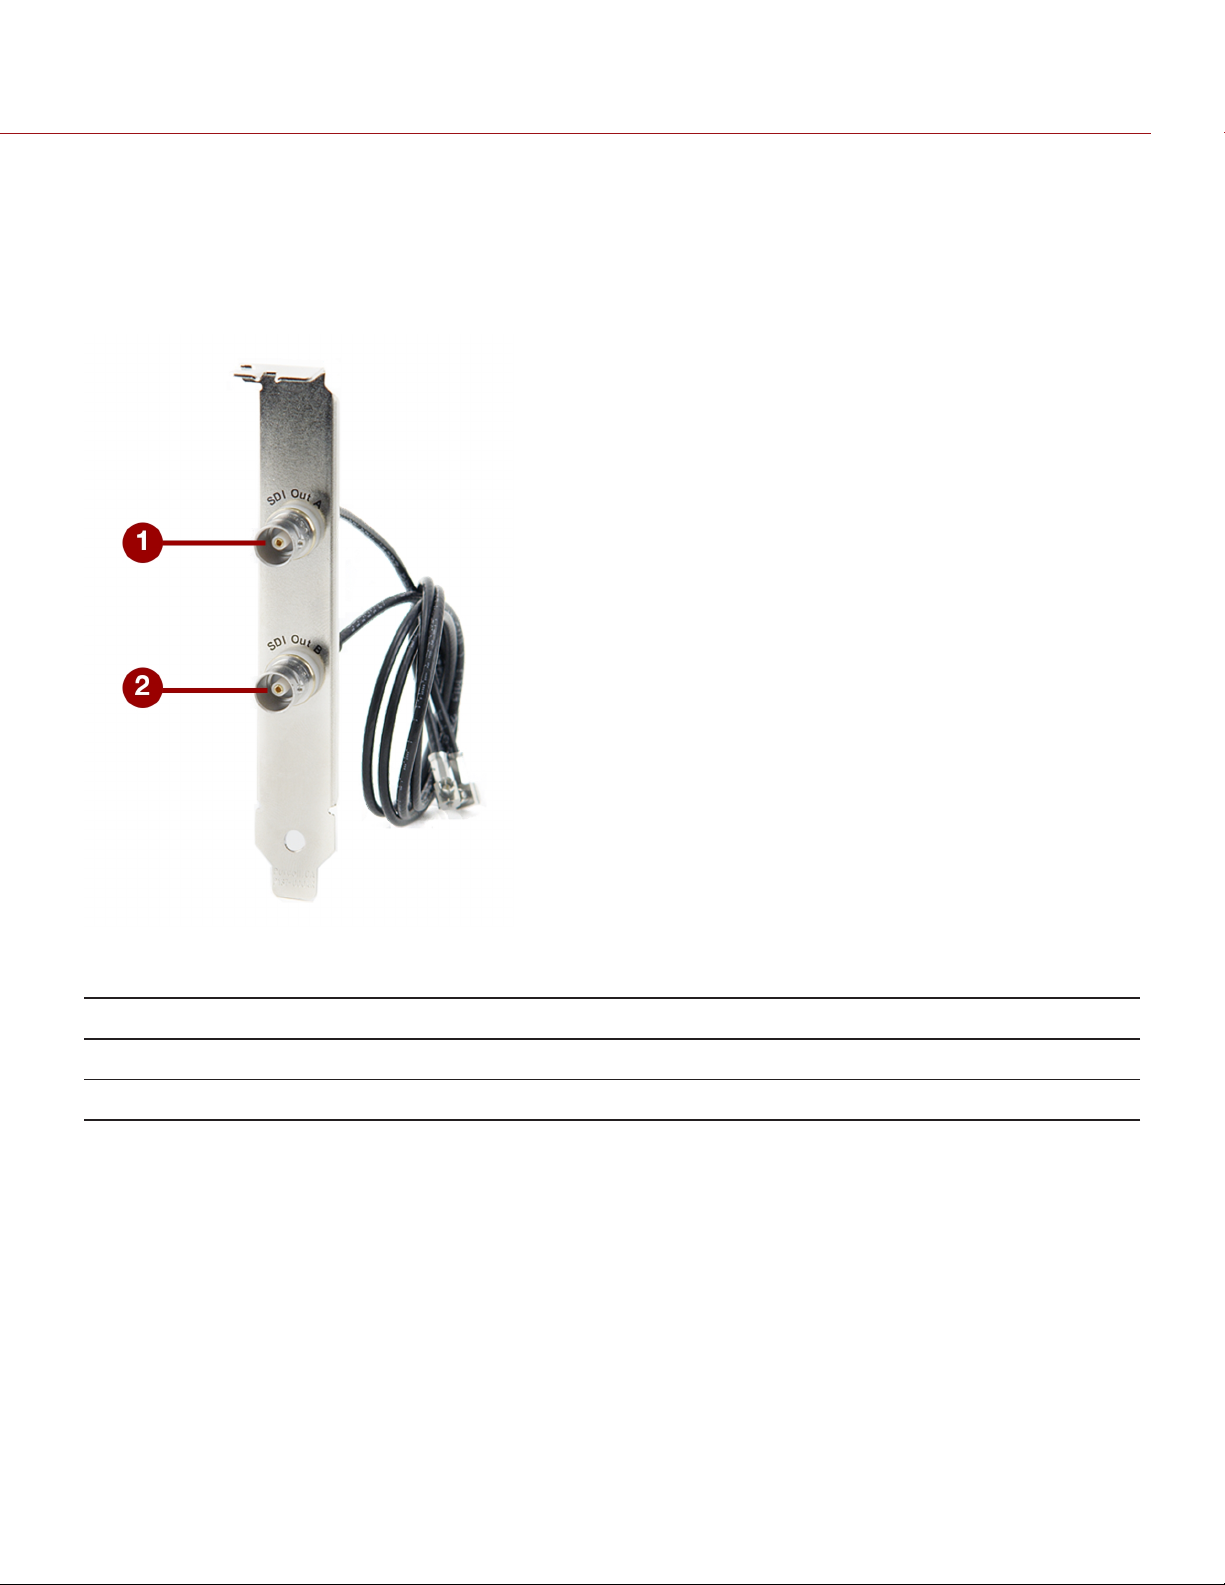
HD-SDI SLOT FILLER CONNECTORS
The HD-SDI slot filler provides optional high-definition serial digital interface (HD-SDI) connectors for the RED
ROCKET-X. Installing the HD-SDI slot filler is optional. Review your system and project requirements before you
decide whether or not to install the HD-SDI slot filler. For more information, go to "Supported HD-SDI Signals" on
page43.
Figure: HD-SDI Slot Filler
# CONNECTOR DESCRIPTION
1 SDI Out A BNC connector for an output of digital video signals (serial digital interface, port A)
2 SDI Out B BNC connector for an output of digital video signals (serial digital interface, port B)
C O P Y R I GH T © 201 9 R E D . C OM , LL C 955 - 0 0 33 , R E V -T | 9

RED ROCKET-X INSTALLATION INSTRUCTIONS
CHAPTER 3:
INSTALL IN A MAC PRO
The RED ROCKET-X® can be installed directly in the following Mac Pro® models:
Early 2009 (machine model 4,1)
Mid 2010 (machine model 5,1)
Mid 2012 (machine model 5,1)
The Mac Pro Late 2013 (machine model 6,1) does not support expansions cards. However, you can connect a RED
ROCKET-X to a Mac Pro Late 2013 via a Thunderbolt™ expansion chassis. For more information about installing a
RED ROCKET-X in a Thunderbolt expansion chassis, go to "Install in a Thunderbolt Expansion Chassis" on page16.
NOTE: DO NOT install more than one (1) RED ROCKET-X in a Mac Pro.
POWER SUPPLY
The RED ROCKET-X must be connected to your Mac Pro power supply via a PCIe 6-pin to 6-pin power cable. The
RED ROCKET-X ships with a PCIe 6-pin to 6-pin Dual Y Power Splitter in case both of the power connectors in your
Mac Pro are in use, or in case you do not have an extra PCIe 6-pin to 6-pin power cable.
WARNING: If you use the PCIe 6-pin to 6-pin Dual Y Power Splitter (included) to connect only the RED ROCKET-X or
graphics card, ensure that the unused connector does not come in contact with a fan or any moving parts.
WARNING: Regardless of how you connect the RED ROCKET-X, DO NOT overload the Mac Pro power supply.
WARNING: DO NOT connect both connectors of the PCIe 6-pin to 6-pin Dual Y Power Splitter to your graphics card.
INSTALL RED ROCKET-X AND HD-SDI SLOT FILLER
WARNING: The computer system that you are installing the RED ROCKET-X in works with voltages that can be
hazardous to your health.
Follow the instructions below to install the RED ROCKET-X and HD-SDI slot filler (optional) in a Mac Pro system:
1. Ensure that the computer is turned off.
2. Wait 5 to 10 minutes to ensure that the system components cool down.
3. Touch the metal on the outside of the computer to discharge any static electricity from your body.
NOTE: To avoid generating static electricity while installing the RED ROCKET-X, DO NOT walk around the room
until you have completed the installation and closed the computer.
4. Unplug the power cable and all external cables from the computer.
WARNING: Never work on the system or access its interior while any power cables are plugged in.
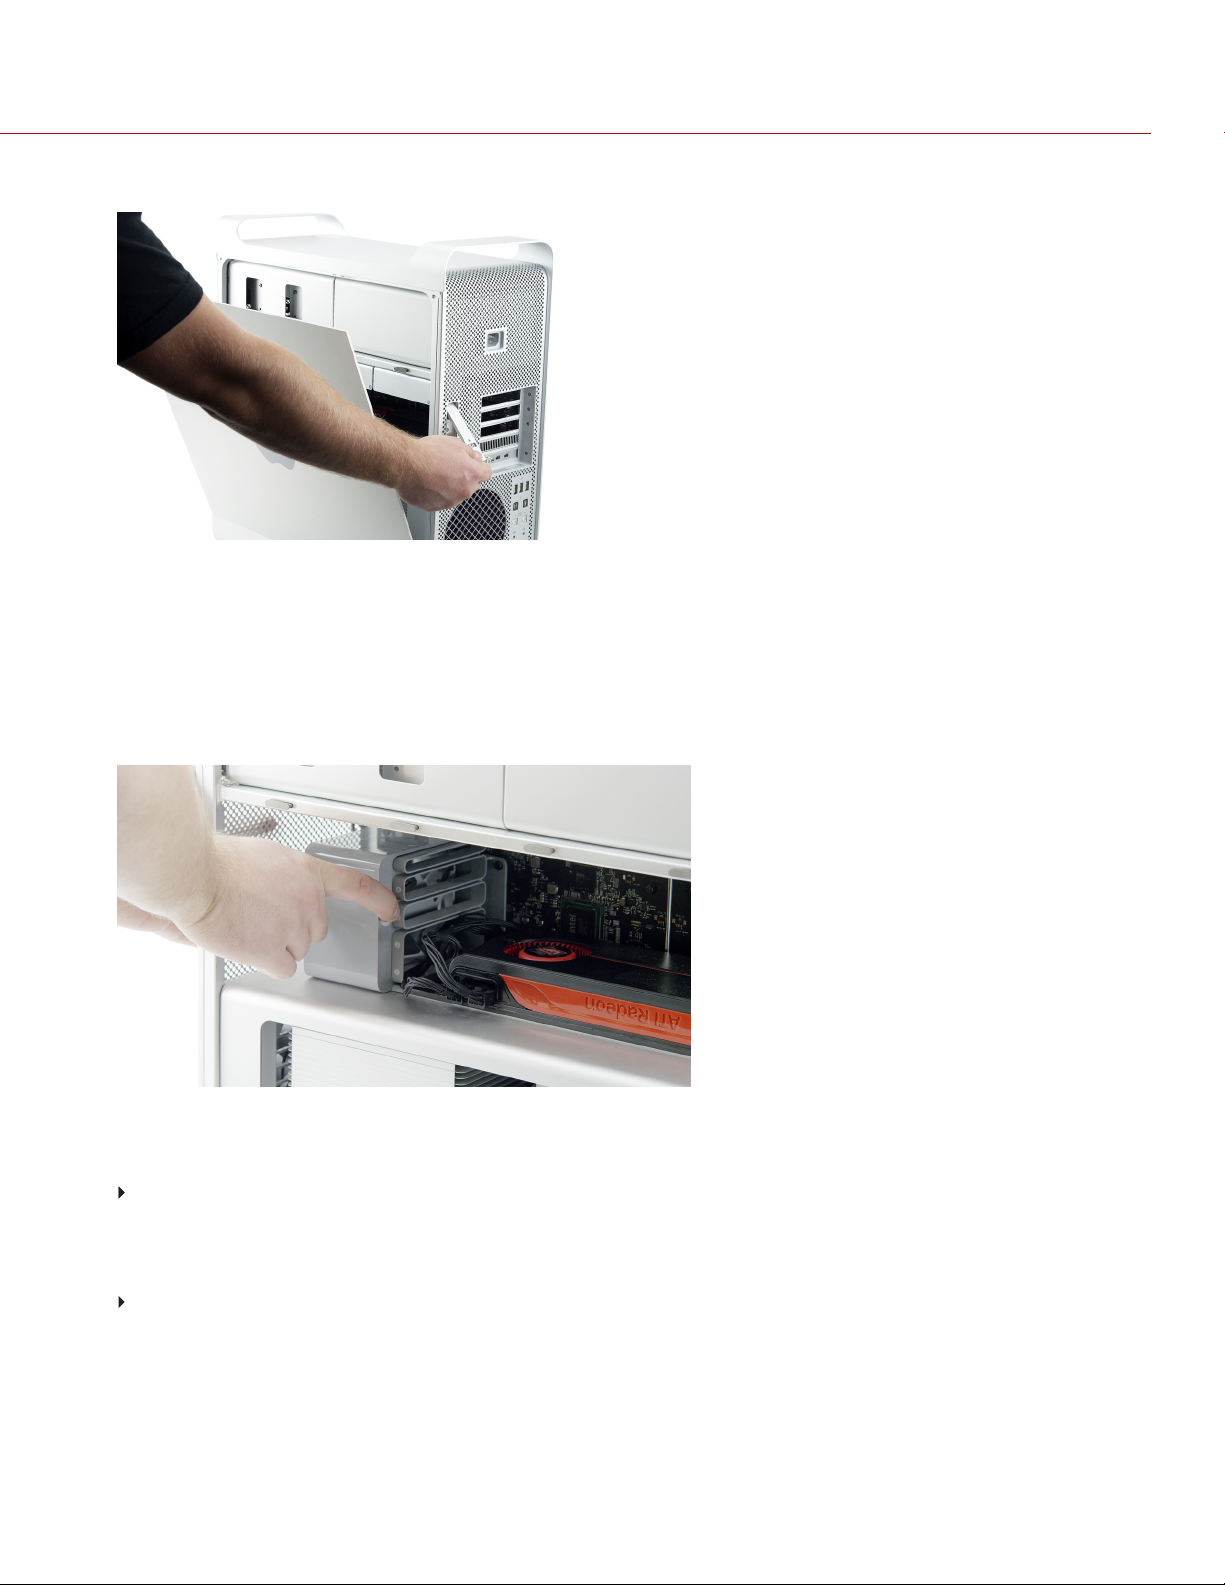
5. Hold the side access panel and lift the latch on the back of the computer.
C O P Y R I GH T © 201 9 R E D . C OM , LL C 955 - 0 0 33 , R E V -T | 10
RED ROCKET-X INSTALLATION INSTRUCTIONS
6. Remove the side access panel.
Figure: Remove Panel
7. Remove all hard drives except the one in the first bay (the one farthest to the left).
8. Loosen the two (2) thumbscrews that secure the PCI bracket to the enclosure and remove the PCI bracket.
9. Remove any cards that are not in slot 1 from the system.
10. Press the button on the PCI slider and move the PCIe fan to the side to create more room for installing the RED
ROCKET-X (slide the PCIe fan back into place after you install the RED ROCKET-X).
Figure: Slide PCIe Fan Away
11. Connect your power cable(s) to the Mac Pro based on your configuration needs:
If the graphics card is connected to one Mac Pro power connector and the other power connecter is unused,
connect a 6-pin PCIe power cable (either a PCIe 6-pin to 6-pin power cable or the included PCIe 6-pin to 6-pin
Dual Y Power Splitter) to power connector B on the backplane board (this is the upper power connector that is
closer to the optical drive). Connect the 6-pin PCIe power cable to the RED ROCKET-X in Step 17.
If both Mac Pro power connectors are in use, disconnect the graphics card from the power connector and
connect the PCIe 6-pin to 6-pin Dual Y Power Splitter (included) to power connector B on the backplane board
(this is the upper power connector that is closer to the optical drive). Connect the PCIe 6-pin to 6-pin Dual Y
Power Splitter to the graphics card and the RED ROCKET-X in Step 17-18.
NOTE: For more information on different ways to connect power, go to "Power Supply" on the previous page.
C O P Y R I GH T © 201 9 R E D . C OM , LL C 955 - 0 0 33 , R E V -T | 11
RED ROCKET-X INSTALLATION INSTRUCTIONS
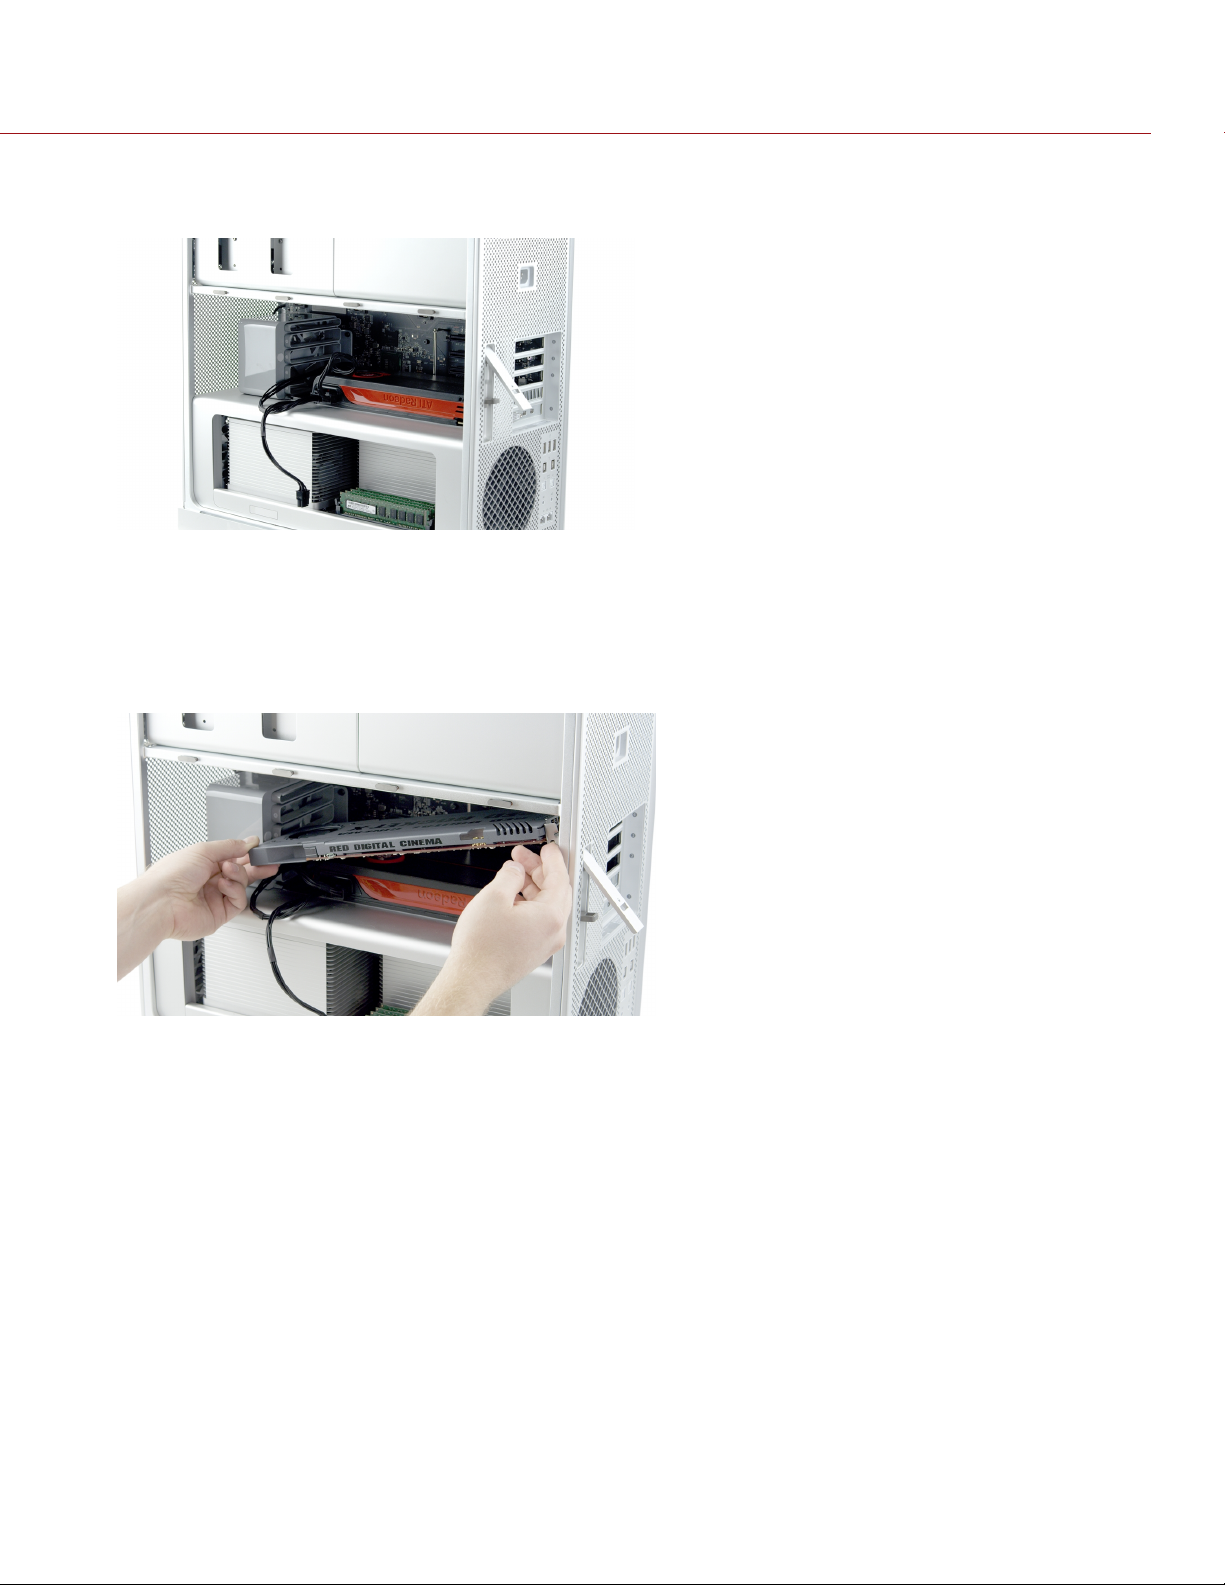
12. Feed the 6-pin PCIe power cable outside of the computer so that it is not in your way when you install the RED
ROCKET-X.
Figure: Connect Power
13. Angle the RED ROCKET-X so that the end with the DisplayPort connections is angled toward the upper right
corner.
14. Insert the RED ROCKET-X into the system so that the metal bracket at the end with the DisplayPort connections
clears the top.
Figure: Angle RED ROCKET-X
15. Straighten the RED ROCKET-X.
C O P Y R I GH T © 201 9 R E D . C OM , LL C 955 - 0 0 33 , R E V -T | 12

RED ROCKET-X INSTALLATION INSTRUCTIONS
16. Line up the RED ROCKET-X connectors with slot 2, and then gently but firmly press the card into the slot, ensuring
that the lip at the end slides between slot 2 and slot 3.
Figure: Insert RED ROCKET-X
NOTE: To prevent damage to your system and the RED ROCKET-X, DO NOT rock the card or use excessive force
when installing the RED ROCKET-X.
17. Plug your 6-pin PCIe power cable (either a PCIe 6-pin to 6-pin power cable or the included PCIe 6-pin to 6-pin
Dual Y Power Splitter) into the RED ROCKET-X. Make sure that the latch of the power cable aligns with the
corresponding slot on the RED ROCKET-X.
WARNING: If you use the PCIe 6-pin to 6-pin Dual Y Power Splitter (included) to connect only the RED ROCKET-X
or graphics card, ensure that the unused connector does not come in contact with a fan or any moving parts.
Figure: Connect Power to RED ROCKET-X
18. If you are using the PCIe 6-pin to 6-pin Dual Y Power Splitter (included) to connect both the graphics card and the
RED ROCKET-X to a single power connector in the Mac Pro, plug the second connector on the PCIe 6-pin to 6pin Dual Y Power Splitter (included) into the graphics card. For more information on different ways to connect
power, go to "Power Supply" on page10.
C O P Y R I GH T © 201 9 R E D . C OM , LL C 955 - 0 0 33 , R E V -T | 13
 Loading...