

Page 1

Page 2
Congratulations and thank you for your purchase of a RED ONE™ camera. Before un-
THANKS
CAMERA / ACCESSORY COMPONENTS
packing and assembling the camera body and any accessories, please review the QUICK
START GUIDE. If there is any physical damage to your camera or accessories, please
contact us immediately at info@red.com.
The following instructions will outline basic assembly of the RED ONE™ camera body,
RED™ BASE PRODUCTION PACK, RED™ LCD,
BRICK®, and RED™ Lens.
For additional information refer to the latest version of the RED ONE
TIONS GUIDE located at www.red.com/support.
Included with the RED ONE™ Camera Body are:
• 1 - Mini XLR Adaptor
• 1 - SD Card
• 1 - Min-XLR-to-Mini-XLR Cable
Included with the RED™ BASE PRODUCTION PACK are:
• 1 - Bottom Plate
• 1 - Bolt Set (includes tools)
• 1 - Cradle Assembly
• 1 - Right Handle
• 1 - Shoulder Dovetail
Included with the RED™ LCD are:
• 1 - LCD
• 1 - 5” Arm
• 1 - LCD Cable
REDFLASH™, RED DRIVE®, RED
TM
CAMERA: OPERA-
• 1 - BNC-to-DIN Cable
• 1 - Bolt Set (includes tools)
• 1 - Top Handle
• 1 - Top Mount
• 1 - Universal Mount
• 2 - 18” Stainless Rods
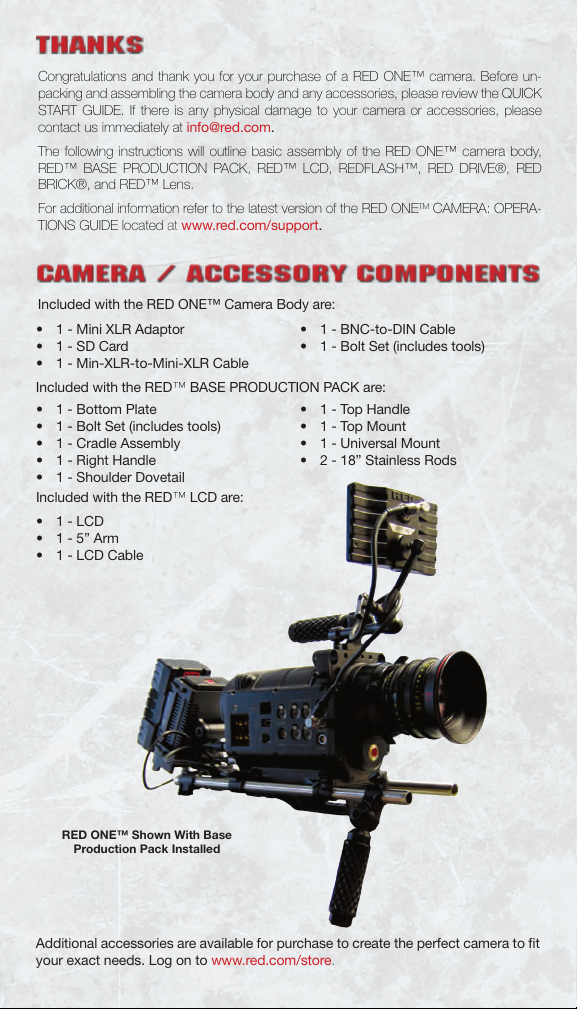
RED ONE™ Shown With Base
Production Pack Installed
Additional accessories are available for purchase to create the perfect camera to t
your exact needs. Log on to www.red.com/store.
Page 3
The following instructions will outline basic assembly of the RED ONE™ camera body,
CAMERA ASSEMBLY PROCEDURE
BASE PRODUCTION PACK, RED
™ LCD, REDFLASH™, RED DRIVE®, and RED
BRICK®.
When connecting cables between camera and components, align Red dots
on cable and connector and press in rmly to establish a secure connection.
Wingnuts can be indexed by pulling out and rotating to desired position. This
may be necessary during assembly to clear components.
Remove your RED ONE™ camera body and all accessories from packaging and
1.
place on a suitable work surface preferably in a dust-free environment.
Thoroughly inspect your camera and accessories.
2.
• If there is any physical damage to your camera or accessories, please contact us
immediately at info@red.com.
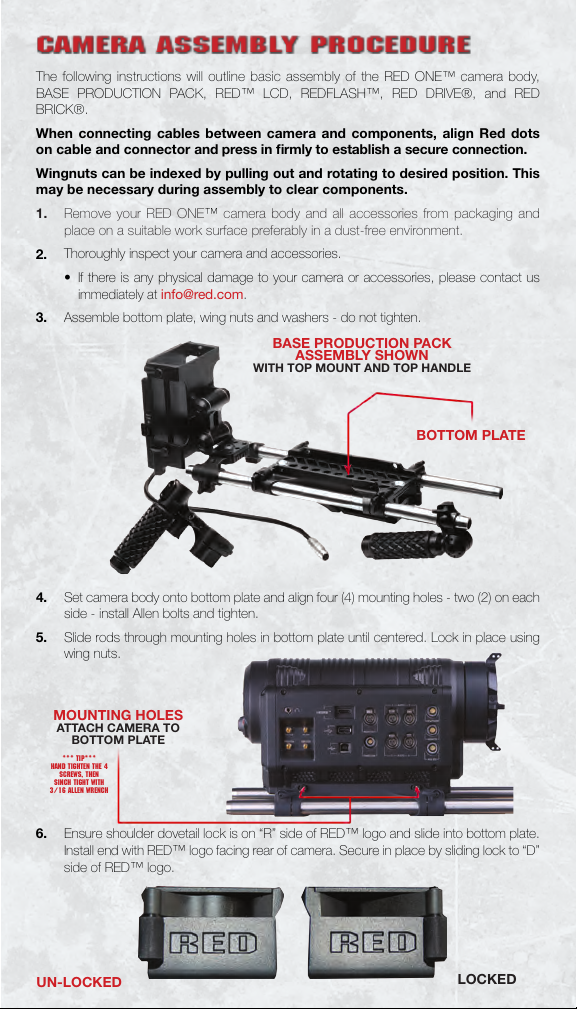
Assemble bottom plate, wing nuts and washers - do not tighten.
3.
BASE PRODUCTION PACK
ASSEMBLY SHOWN
WITH TOP MOUNT AND TOP HANDLE
BOTTOM PLATE
4. Set camera body onto bottom plate and align four (4) mounting holes - two (2) on each
side - install Allen bolts and tighten.
Slide rods through mounting holes in bottom plate until centered. Lock in place using
5.
wing nuts.
MOUNTING HOLES
ATTACH CAMERA TO
BOTTOM PLATE
*** TIP***
HAND TIGHTEN THE 4
SCREWS, THEN
SINCH TIGHT WITH
3/16 ALLEN WRENCH
Ensure shoulder dovetail lock is on “R” side of RED™ logo and slide into bottom plate.
6.
Install end with RED
side of RED
UN-LOCKED
™ logo facing rear of camera. Secure in place by sliding lock to “D”
™ logo.
LOCKED
Page 4
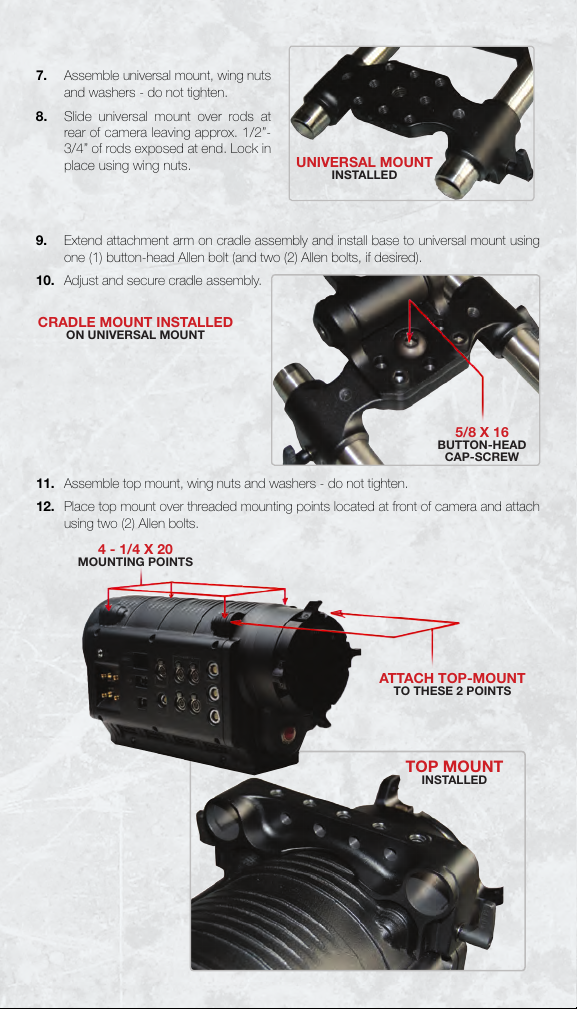
7. Assemble universal mount, wing nuts
and washers - do not tighten.
Slide universal mount over rods at
8.
rear of camera leaving approx. 1/2”-
3/4” of rods exposed at end. Lock in
place using wing nuts.
Extend attachment arm on cradle assembly and install base to universal mount using
9.
UNIVERSAL MOUNT
INSTALLED
one (1) button-head Allen bolt (and two (2) Allen bolts, if desired).
Adjust and secure cradle assembly.
10.
CRADLE MOUNT INSTALLED
ON UNIVERSAL MOUNT
5/8 X 16
BUTTON-HEAD
CAP-SCREW
11. Assemble top mount, wing nuts and washers - do not tighten.
12. Place top mount over threaded mounting points located at front of camera and attach
using two (2) Allen bolts.
4 - 1/4 X 20
MOUNTING POINTS
ATTACH TOP-MOUNT
TO THESE 2 POINTS
TOP MOUNT
INSTALLED
Page 5

13. Install top handle (pointing toward rear of camera) using two (2) Allen bolts.
TOP HANDLE
INSTALLED
14. Assemble right handle, wing nuts and washers - do not tighten.
15. Slide right handle over front of either rod. Lock in place using wing nut.
FRONT
OF
NOTE:
POSITION HANDLE HORIZONTALLY
TO EASE IN ASSEMBLY
RIGHT HANDLE INSTALLED
CAMERA
16. Working from front of camera, remove body cap from PL Mount by rotating retaining
ring counter-clockwise.
Mount and secure lens to PL Mount by inserting the tabs, (note notches and index pin)
17.
and rotate retaining ring clockwise.
IMPORTANT: IF USING S4/I COMPATIBLE LENSES DATA PINS SHOULD BE
ORIENTED TO 12 O’CLOCK WHEN MOUNTING LENS TO ENSURE COMMU-
NICATION BETWEEN LENS AND CAMERA.
Page 6

18. Install media.
• SD MEMORY: Insert supplied SD Memory Card at left front of camera.
• COMPACT FLASH: Insert REDFLASH™ compact ash (CF) card at left rear of
camera.
• RED DRIVE®: Loosen thumb screws on sides of cradle assembly, slide into
v-blocks in cradle and tighten thumb screws. Connect 90˚ end of cable to RED
DRIVE® and straight end to DRIVE connector on rear of camera.
SD MEMORY
LOCATION
INSERTING REDFLASH
ALIGN RED DRIVE SLOTS
WITH RAILS
AND SLIDE DOWNWARD
THUMB-SCREWS
TO LOCK/UNLOCK
(2 ON EACH SIDE)
19. Assemble arm and install in desired location using short stud.
TURN
*** TIP***
ONCE LOCKED, ONLY
LOOSEN ONE SIDE TO
LOCK/UNLOCK
TO EASE IN
INSERTION/EXTRACTION
RED ARM
SHOWN INSTALLED
ON TOP-MOUNT
Page 7

20. Install LCD to long stud on arm and tighten thumb screw. Connect cable between LCD
and MONITOR connector on side of camera body.
ALWAYS
ALIGN RED-DOTS
TIGHTEN THUMB-SCREW
21.
Connect cable from cradle mount to POWER connector on rear of camera.
ATTACH
POWER CABLE
TO CAMERA
TO SECURE LCD
22. Slide RED BRICK® battery into v-mount battery plate on Cradle Assembly.
NOTE: To ensure a good connection between battery and RED Cradle V-plate adapter, it
is recommended to perform a break-in sequence. To break-in: Fully engage/disengage a
RED BRICK® battery approx. 20 times in V-plate adaptor.
SLIDE RED BRICK
ONTO V-LOCK
BATTERY PLATE ON
CRADLE ASSEMBLY
NOTE:
ENSURE LOCK BUTTON POPS OUT AND MAKES AN
AUDIBLE CLICK WHEN INSTALLING RED BRICK.
23. Adjust balance of camera by loosening wing nuts and adjusting Rods, Universal Mount,
Cradle Assembly, Right Handle, and Shoulder Dovetail.
Page 8

This section describes the physical controls and connectors on the RED ONE™ camera.
CAMERA CONTROLS
LEFT FRONT OF CAMERA
On the left front of the camera body are a RECORD button (RED) to start and stop recording
and two (2) User Buttons. User Button 1 is pre-assigned to AUTO WB (White balance) and
User Button 2 is pre-assigned to 1:1 FOCUS CHECK, these button can be reprogrammed
as desired.
PL MOUNT
(SHOWN WITH
CAP INSTALLED)
RECORD
BUTTON
USER BUTTONS
1 AND 2
REAR OF CAMERA
On the rear of the camera, control buttons surround the LCD display.
• A, B, C - User Menu buttons, factory programmed for Sensitivity, Shutter and Color
Tem p er at ur e me nu s. T he se b u tt on s ma y be r e- pr og r am me d as d es ir ed
• SENSOR Menu Button - to access and modif y Sens itivi ty, Shut ter Sp eed, Color Tem-
perature, Varispeed and Timelapse settings
• VIDEO Menu Button - to access and modify View, Video, Viewnder, Audio and
Headphone settings
• EXIT Button - to exit menus
• Joystick (SELECT) - to navigate menus and make selections
• UNDO / Alternate Action Button - to navigate backward in selected menu, also
works in conjunction with other buttons for shortcuts
• SYSTEM Menu Button - to start a new project and congure the camera to your
specic likes and needs
• Record Button (RED) - to start and stop recording
• REC LED - provides record status (Red when recording)
• OK LED - Green indicates camera is ready for operation
JOYSTICK OPERATION
• Left/Right: Moves to left or right in menu to select dif-
ferent items.
• Down: Go to next menu screen for highlighted option in
menu, similar to enter/select.
• Up: Go to previous screen in menu. If in top level, will
EXIT menu.
• Press (like a button): Enter/Select
• Rotate (turn/twist like a knob): Changes value on
highlighted screen box.
Page 9

Five buttons above the LCD display control clip playback.
From left to right,Clip Start / Previous Clip, Reverse, Clip Play / Pause, Fast Fwd
and Clip End / Next Clip.
DISPLAY SHOWING:
PIN, BUILD AND VERSION
POWER ON/OFF
SWITCH
Underneath the status display buttons are (from left to right) the Power On/Off switch,
2 - 4-Pin Auxiliary Power / GPIO outputs (AUX 12V), 6-Pin camera system DC
POWER input and a 16-Pin DRIVE External Memory interface.
Page 10

The right side of the camera contains all the video, audio and time code inputs and outputs.
CAMERA I/O CONNECTIONS
POWERING CAMERA ON/OFF
• 1 - 3.5mm stereo headphone jack
• 4 - DIN 1.0/2.3 video connectors; 2
upper that support Program HD-SDI,
2 lower that support PREVIEW HD-SDI
and Video GENLOCK
• 1 - HDMI output - to connect to external
monitors
• 1 - USB Master port - to connect the
camera to another camera, acting as
the master
• 1 - USB Slave port - to connect the
camera to another camera, acting as
the slave
1. To power up the camera, press and release the Power On/Off switch.
• When using a RED BRICK® battery, press the power on/off switch once.
• When using a RED-CHARGER, connect it via the supplied power cable. Plug the
RED-CHARGER into an AC power source and switch it on. After the green LED
illuminates on the RED-CHARGER, the camera can be powered on by pressing
the On/Off switch.
The rear status display will illuminate and display “Booting” properties.
2.
3. After approximately 60 seconds the display the camera PIN, rmware build and rm-
ware version will display.
• The PIN is a unique product identication number included in the metadata re-
corded with each image. The PIN provides RED with tracking data for customer
service and assistance in authenticating legal ownership of the camera.
The rear display will automatically change to current camera values.
4.
5. When the camera is ready for use, the lower LED to the right of the status display
turns green.
To power down the camera, press and release the Power On/Off switch.
6.
• 1 - 5-pin mini-XLR AUDIO OUT
• 1 - 5-pin TIMECODE input/output
• 4 - 3-pin mini-XLR audio inputs (AUDIO
1, 2 and AUDIO 3-4).
• 1 - VIEWFINDER connector (RED EVF)
• 1 - MONITOR connector (RED LCD)
• 1 - 10-pin push lock LEMO connector
supporting the Aux/RS232 port that can
interface to a variety of B4 lenses and
lens motor control devices
Page 11

1. Level the camera on a stable surface or tripod.
BACK FOCUS ADJUSTMENT
2. Set a focus chart at a medium distance from the camera. (5 to 10 feet)
3. Attach a medium length prime lens to the camera, (50 to 75mm) and set the lens
focus to match the appropriate distance the camera is away from the chart.
Using a 5/32” Allen wrench, loosen the two (2) screws on the focus ring near the front
4.
of the camera.
FOCUS-RING
SCREWS
5. Adjust the camera focus ring until the focus chart is in focus.
NOTE: The digital zoom function of the camera can aid with visibility, and may
help achieve more accurate results.
ADJUST CAMERA
FOCUS-RING
6. Allow for an even amount of play on both sides of the lens focus marker. There should
be a depth of eld range of several inches, so it is best to allow for good focus on
either side of the exact distance marker.
Tighten the camera focus ring screws, and retest focus. Screws should be tightened
7.
to approx. 22.22 In-Lb of Torque. Some shifting may occur while tightening the focus
ring.
8. The “Edge Highlight” option in the viewnder menu is a handy tool (if viewnder is
installed), and can serve as a good double-check for proper focus.
Refer to the RED ONE™ OPERATION GUIDE available at www.red.com/support
Page 12

• RED™ has made every effort to provide clear and accurate information
DISCLAIMER
FCC RULES
©
RED.COM, INC. 2009
in this QUICK START GUIDE, which is provided solely for the user’s infor-
mation. While thought to be accurate, the information in this document is
provided strictly “as is” and RED™ will not be held responsible for issues
arising from typographical errors or user’s interpretation of the language
used herein that is different from that intended by RED™. All safety and
general information is subject to change as a result of changes in local,
federal or other applicable laws.
• RED™ reserves the right to revise this QUICK START GUIDE and make
changes from time to time in the content hereof without obligation to notify
any person of such revisions or changes. In no event shall RED™, its em-
ployees or authorized agents be liable to you for any damages or losses,
direct or indirect, arising from the use of any technical or operational infor-
mation contained in this document.
• For additional information refer to the latest version of the RED ONE™ OP-
ERATION GUIDE available at www.red.com/support.
• This equipment has been tested and found to comply with the limits for a
Class A digital device pursuant to Part 15 of the FCC Rules. These limits
are designed to provide reasonable protection against harmful interfer-
ence when the equipment is operated in a commercial environment.
• This equipment generates, uses, and can radiate radio frequency energy
and, if not installed and used in accordance with the instructions, may
cause harmful interference to radio communications. Operation of this
equipment in a residential area is likely to cause interference, in which
case, the user will be responsible for correcting the interference at the
user’s own expense.
• All trademarks, trade names, logos and product names used in association
with the accompanying product are trademarks or registered trademarks
of Red.com, Inc. in the U.S. and other countries.
 Loading...