

Page 1
ASSEMBLING & INSTALLATION INSTRUCTIONS
t
t
b
d
p
t
r
rend
kit
d
b
For Chain Hang OR Ceiling Mount
WARNING! SHUT POWER OFF AT FUSE OR CIRCUIT BREAKER .
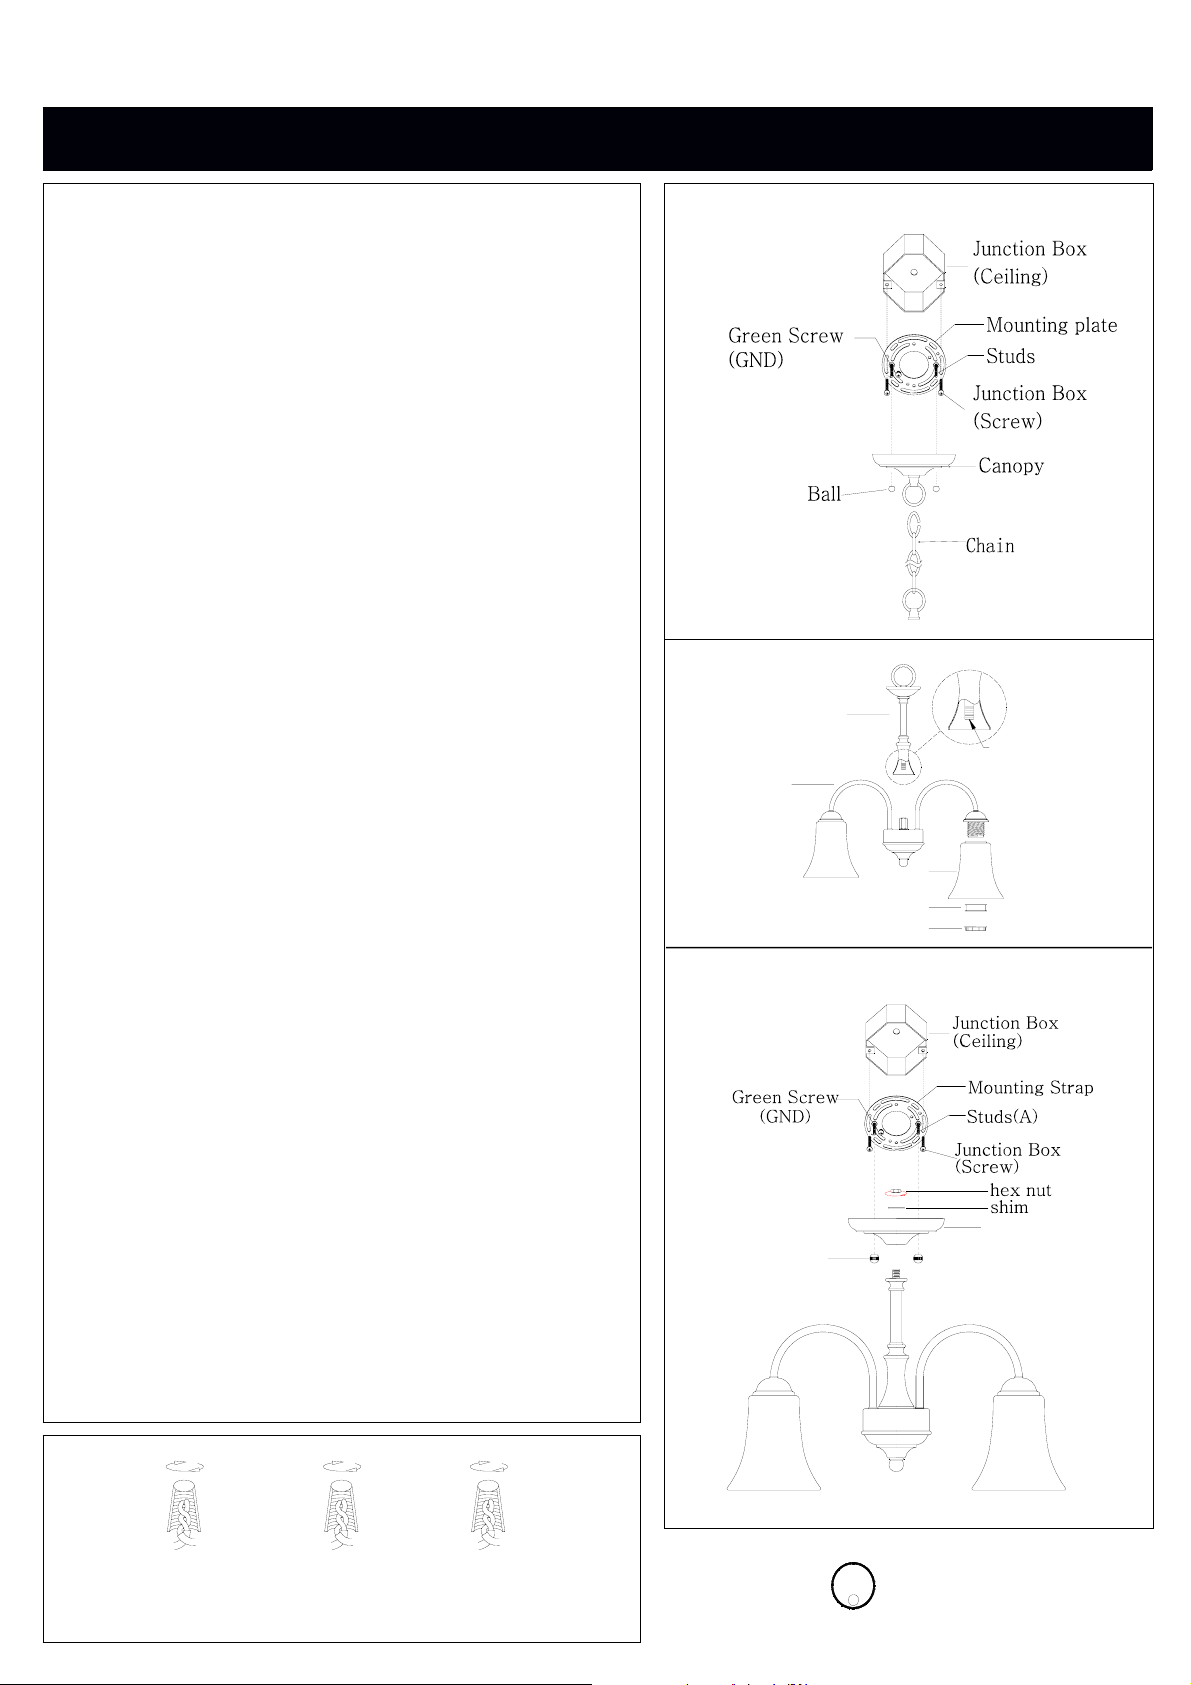
ASSEMBLING THE FIXTURE (Fig.2).
1. Return the arms to suitable position, see figure.2.
2. Attach the cloumn(A) to the fixture body (B) by turning it clockwise
until tight.
3. Attach the glass shade (E) and collar ring(D) to the lamp holder , then
lock it securely with check ring (C).
4. Install the light bulbs in accordance with the fixture specifications
NOTE: DO NOT EXCEED THE SPECIFIED WATTAGE!
HANGING THE FIXTURE (Fig.1)
1. Shu
2. Carefully unpack new fixture and lay all the parts on a clear
3. Threa
4. Using
5. By measuring, determine correc
6. Lace the fixture wires through the chain.
7. Open the othe
8. Feed the fixture wires through the loop of the canopy and pull until
9. Slide canopy up flush to ceiling, loc
off thepoweratthe circui
from ceiling, including the old single bar.
surface.
the two studs into thepre-drilled holes in the Mounting
plate spaced the same distance apart as the holes in the
canopy .Attach the Mounting plate to the Junction Box with the
two Junction Box Screws as shown. The side of the Mounting
plate marked "GND" must face to out.
roperchainpliers to open one endlinkof the chain
provided and connect to the fixture loop. Close the link.
proper hanging height. Using proper chain pliers disconnect and
discard remaining chain.
linkof the chain and hang the fixture on the
loop at the ceiling. Close the link.
taut.
reakerandremove old fixture
numberof links neededfo
securely withball nut.
**If you not need assembly the fixture loop , please pause
and refer to Fig 4.**
1. Take outthebottomloop of the canopy, take outthe loop an
cover of the fixture body, then take the canopy to the fixture body,
lock it with the shim and hex nut until tight.
2. Attach the fixture
nut.
ody to the ceiling, lockitsecurely with theball
Fig.1
Fig.2
Fig.4
A
Pipe
B
Screw
E
D
C
CONNECTING THE WIRES (Fig.3)
1. Take the black wire from the ceiling junction box and the smooth
wire leg from the fixture and twist bare ends together. Twist wire
connector onto end of wire until snug.
2. Repeat same process with white junction box wire and ribbed wire
leg of fixture wire. NOTE: Twist wires together in the same
direction you twist the wire connector onto wires.
3. If your junction box has a grounding wire (green or bare copper),
attach this wire and the bare copper wire from the fixture together
as step 1.If junction box has no ground wire, attach the bare copper
fixture wire to the green ground screw on the single bar.
4. Tuck these wire connections neatly into the ceiling outlet box and
then raise the canopy all the way to the ceiling.
with ball nut.
Your installation is now complete. Return power to the junction
box and test the fixture.
Lock it securely
Fig.3
FIXTURE
WIRES
Black or
Smooth
HOUSE
WIRES
Black
(Hot)
FIXTURE
WIRES
White or
Ribbed
HOUSE
WIRES
White
(Neutral)
FIXTURE
WIRES
Bare
Copper
(Ground)
HOUSE
WIRES
Green or
Bare Copper(Ground)
Ball Nut
U
L
R
Listed
Canopy
 Loading...