

Page 1

BALANCE CHARGER/DISCHARGER
FOR NICD/NIMH/LITHIUM/PB BATTERIES
Operating Manual
Dual Input Power(AC/DC)
SPIDER 1s
Thank you for purchasing the Spider 1 ACDC Charger
This is a rapid charge/discharge charger with built-in
balancer and specialised software.
Please read these instructions completely before using.
Page 2

Contents
1. Features
1
3
4
6
7
9
9
9
10
11
11
12
13
13
14
14
15
13
14
15
16
17
17
19
2. Exterior of the unit
3. Warnings and safety notes
4. Program flow chart
5. Initial Parameter set up (Users' set up)
6. Lithium battery(Lilo/LiPo/LiFe)program
7. NiMH/NiCd battery program
8. Pb( lead acid) battery program
10. Save Data Program
11. Load Data Program
12. Accessing additional battery information
13. Warnings and error messages
14. Specifications
6.1 Charging Lithium Battery
7.1 Charging NiCd/NiMH battery
8.1 Charging Pb battery
6.2 Charging Lithium battery at balance mode
7.2 Discharging NiCd/NiMH battery
8.2 Discharging Pb battery
6.4 'STORAGE' control Lithium battery
6.5 Discharging Lithium battery
6.6 Voltage balancing and monitoring while discharging
6.3 'FAST' charging Lithium battery
7.3 Charge-to-discharge & discharge-to-charge cycle NiMH/NiCd battery
15
9. Battery internal resistance testing system
Page 3

-1-
1. Features
Optimise operating software
When charging or discharging, the charger has an 'AUTO' function that sets
current automatically. For Lithium batteries, this can prevent an over-charging situation
which could lead to an explosion. Users can s et error c hecking of the c harger
to maximise s aftey
For Charging the charger is fitted with separate 2, 3,4,5 and 6 cell Lipo balance charging
ports and banana plug output port.
High-power and high-performance circuit
Individual voltage balancer for Lithium batteries
The charger has an individual-cell-voltage balancer inside and will not require
any extra balancer when chargi
ng Lithium batteries(Lilo/LiPO/LiFe)
Balance individual cells on discharge
The charger can also monitor and balance individual Lithium battery cells during
the discharging cycle. If the voltage of any one cell varies abnormally, the process
will stopped with an error message.
Various Lithium battery accepted
The charger can accept three types of Lithium batteries- Li-ion, LiPo and LiFe.
They have different cell chemistry. You will need to pre-select which one of them
that you are going to charge before the job. For their specifications, refer
'Warnings and safety notes' section.
Lithium battery 'Fast' and 'Storage' mode
You can charge Lithium batteries for special purposes. 'Fast' charge reduces the
charging time of Lithium battery and 'Storage' mode controls the final voltage of the
battery for storage.
The charger has a maximum output power of 80W. As a result it can charge or
discharge up to 15 cells NiCd/NiMH and 6 cell Lithium batteries with maximum
current of 7.0A. The charger is fitted with a high performance fan for optimized
cooling when needed.
Page 4

-2-
Maximum safety
Delta-peak sensitivity: The automatic charge termination program works on the
principle of the Delta-peak voltage detection.(NiCd/NiMH)
Auto-charge current limit: When charging NiCd or NiMH on 'AUTO' current mode,
you can set the upper limit of charge current suitable to each battery.
Capacity limit: Charging cycle will stop when capacity limit reached.
Temperature limit: The temperature of the battery will rise when charging
If you set a temperature limit the charging process will stop when that limit
is reached. (external temp sensor required)
Processing time limit: Time limit can be set, charger will stop when time expired.
Input power monitor: Input power is monitored to prevent damage to input
voltage such as car battery. If it drops below the lower limit the charging will terminate
Automatic cooling fan: The electric cooling fan comes into action automatically
only when the internal temperature of the unit is raised.
Data store/load
The charger is equiped with a 5 model memory. Allowing you to recall
battery programming data with ease.
Cyclic charging/discharging
rof yllaunitnoc egrahc>egrahcsid ro egrahcsid>egrahc fo selcyc 5 ot 1 mrofreP
battery refreshing and balancing.
Page 5
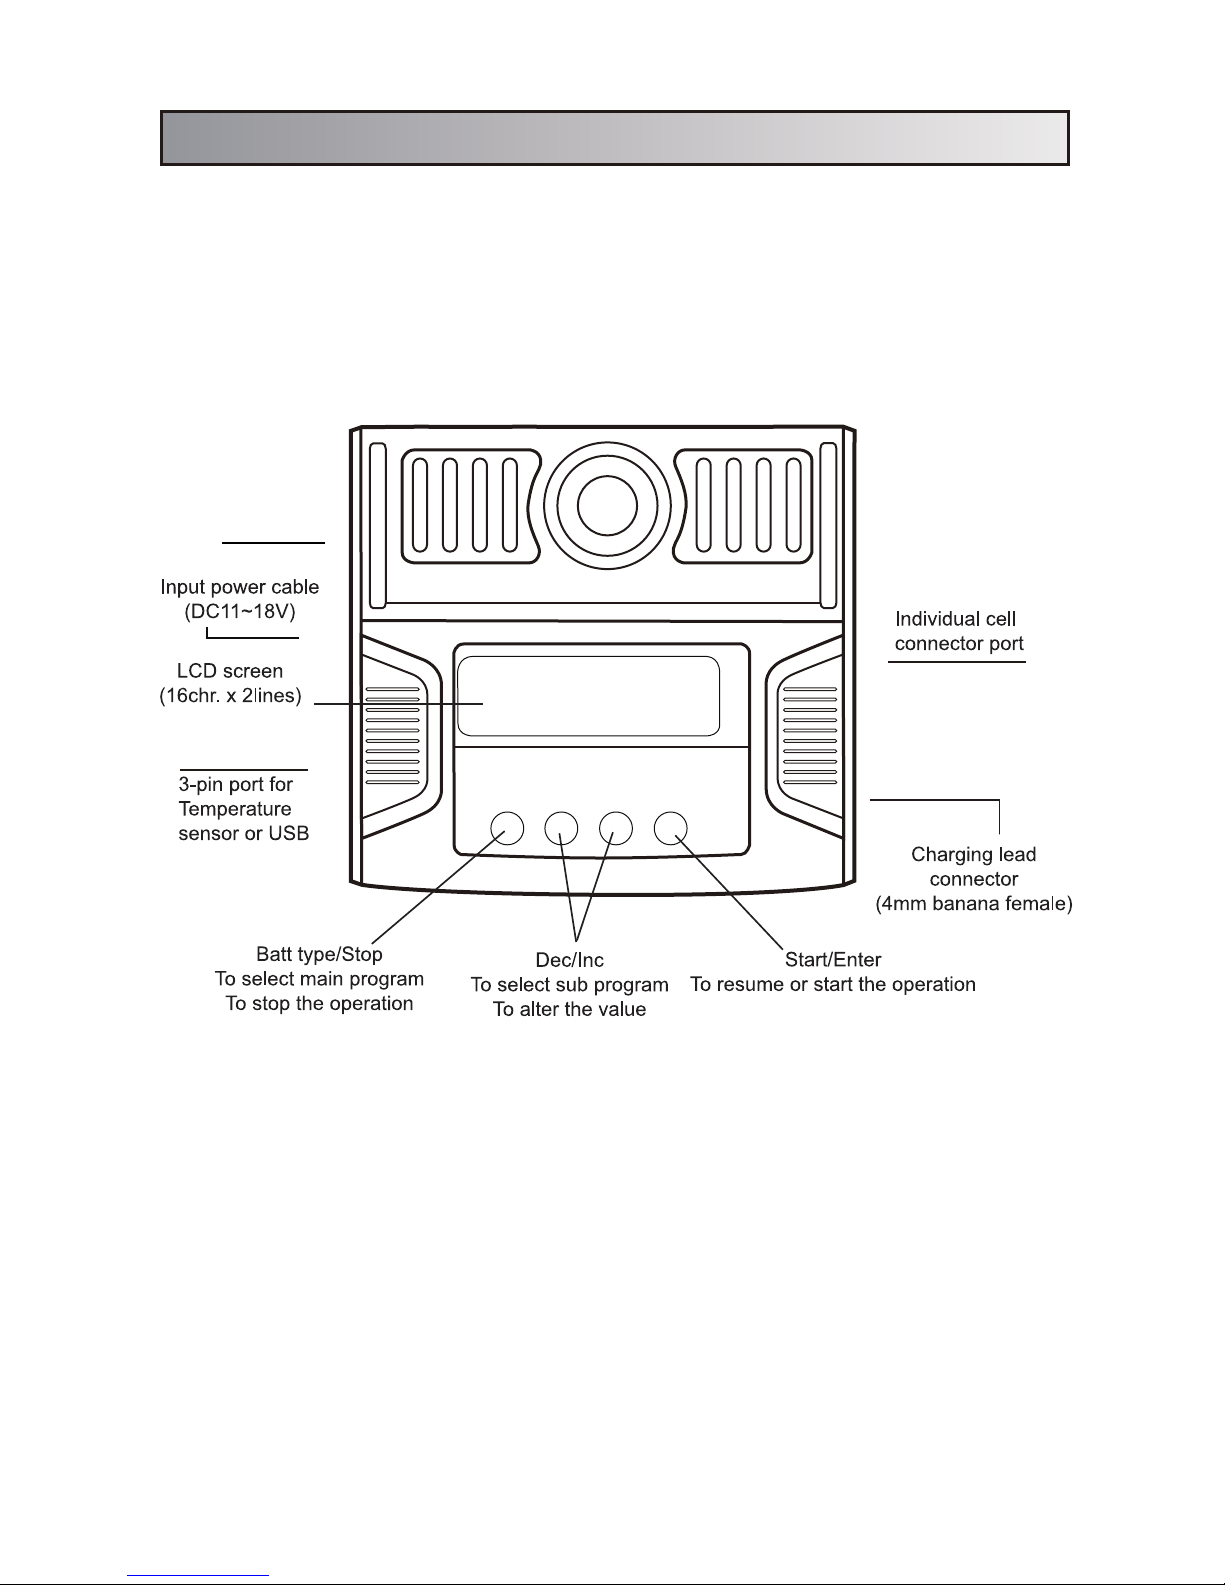
2. Exterior of the unit
Input power cable
(AC100-240V)
-3-
Page 6

-4-
3. Warnings and safety notes
• Never leave the charger unsupervised when it is connected to a power supply.
If any error is observed immediately terminate the process and refer to the
instruction manual.
• Keep the unit free from dust, damp, rain, heat, direct sunlight and vibration.
• The circuit of the unit is designed to be powered by a 10-18V DC only.
• This unit and the battery to charge or discharge should be set up on a heat-
resistant, non-flammable and non-conductive surface. Never place on a car seat,
carpet or similar. Keep all the flammable volatile materials well away from the
operating area.
• If the c harger program is set incorrectly it could c ause severe damaged to the
battery and/or severe injury..Please ensure you have identified your battery correctly
• To avoid short-circuits between the charge lead, always connect the charge cable
voltage level:1.2V/cell
allowable fast charge current:1C~2C depends on the
level ffo tuc egatlov egrahcsid llec fo ecnamrofrep
0.85V/cell(NiCd), 1.0V/cell(NiMH)
voltage level:3.6V/cell
max.charge voltage:4.1V/cell
allowable fast charge current: 1C or less
min.discharge voltage cut off level:2.5V/cell or higher
voltage level:3.7V/cell
max.charge voltage:4.2V/cell
allowable fast charge current: 1C or less
discharge voltage cut off level:3.0V/cell or higher
voltage level:3.3V/cell
max.charge voltage:3.6V/cell
allowable fast charge current: 4C or less(e.g. A123M1)
discharge voltage cut off level:2.0V/cell or higher
voltage level:2.0V/cell
(Lead-acid) max.charge voltage:2.46V/cell
allowable fast charge current:0.4C or less
discharge voltage cut off level:1.50V/cell or higher
NiCd/NiMH
Li-ion
LiPo
Life
Pb
to the unit first and only then to the battery to be charged or discharged. Reverse the
sequence when disconnecting.
•
Do not attempt to disassemble the battery pack.
Page 7

-5-
Always verify the capacity and the voltage of Lithium batteries, ensure the correct voltage
and capacity have been selected. Failure to select the correct setup could cause fire
and or explosion leading to serious injury.
Discharge
• The typical purpose of discharge is to determine the residual capacity of the battery,
or to lower the voltage of battery to a defined level. When you discharge the battery
you also have to pay attention to the capacity and voltage. To avoid over discharging
set the final discharge voltage correctly. Lithium batteries should never be
over discharged , if a lithium battery drops below its nominal voltage you may
experience a rapid loss of capacity or a total failure.
• Some rechargeable batteries are said to have a memory effect. If they are partly
used and recharged before the whole charge is drawn out, they‘remember’ this and
next time will only use that part of their capacity. This is a ‘memory effect’. NiCd and
NiMH batteries are said to suffer from memory effect. They prefer complete cycles;
fully charge then use until empty, do not recharge before storage-allow them to selfdischarge during storage. NiMH batteries have less memory effect than NiCd.
• The Lithium battery prefers a partial rather than a full discharge. Frequent full
discharges should be avoided if possible. Instead, charge the battery more often or
use a larger battery.
These warnings and safety notes are particularly important. Please
follow the instructions for maximum safety; otherwise the charger
and the battery could cause severe damaged and/or fire to property / person.
Page 8
-6-
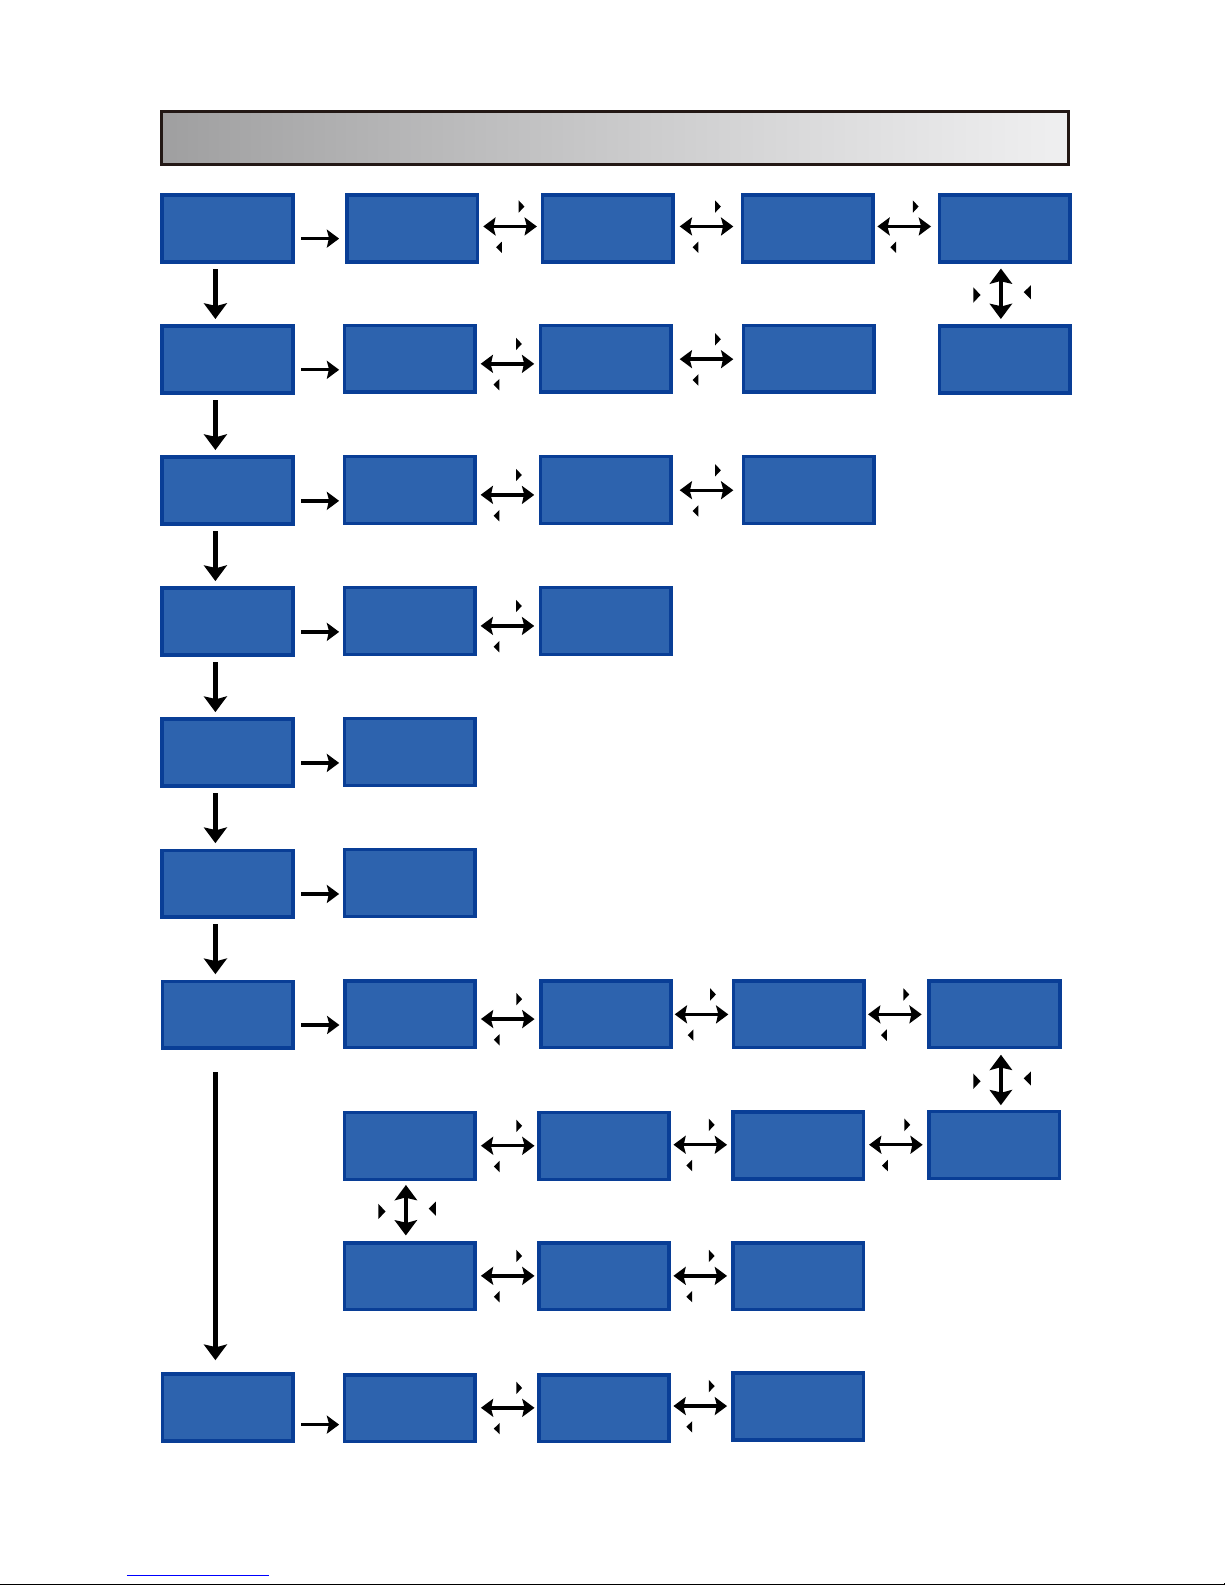
4. Program flow chart
PROGRAM SELECT
SAVE DATA
SAVE DATA
Start
Enter
PROGRAM SELECT
LOAD DATA
LOAD DATA
Start
Enter
Start
Enter
Key Beep
Buzzer
Input Power Low
Cut-Off
INC
DEC
LANGUAGE
ENGLISH
INC
DEC
Battery Pack IR
231mΩ
INC
DEC
Test LiXX Internal
Resistance
Measuring IR
WAIT DLEASE...
1:026 050 044
mΩ
4:039 042 044
mΩ
INC
DEC
PROGRAM SELECT
Pb BATT
Pb DISCHARGE
Pb
CHARGE
Start
Enter
INC
DEC
LIXX DISCHARGE
PROGRAM SELECT
NiMH BATT
NiMH CHARGE
'Aut' / 'Man'
NiMH DISCHARGE
NiMH CYCLE
Start
Enter
INC
DEC
INC
DEC
PROGRAM SELECT
Nicd BATT
N
icd
CHARGE
'Aut' / 'Man'
N
icd
DISCHARGE
Nicd CYCLE
Start
Enter
INC
DEC
INC
DEC
Capacity Cut-Off
Safety Timer
Temp Cut-Off
USB Enable
INC
DEC
INC
DEC
Waste Time
CHG>DCHG
INC
DEC
USER SET
PROGRAM
LIXX V. Type
Lilo / LiPo / LiFe
CHK Time
NiMH Sensitivity
D. Peak
Nicd S ensitivity
D. Peak
Start
Enter
INC
DEC
INC
DEC
INC
DEC
PROGRAM SELECT
LIXX BATT
LIXX CHARGE LIXX BALANCE
LIXX FAST CHG LIXX STORAGE
Start
Enter
INC
DEC
INC
DEC
INC
DEC
INC
DEC
INC
DEC
Batt type
stop
Batt type
stop
Batt type
stop
Batt type
stop
Batt type
stop
Batt type
stop
INC
DEC
Batt type
stop
Page 9
-7-
5. Initial Parameter set up (Users' set up)
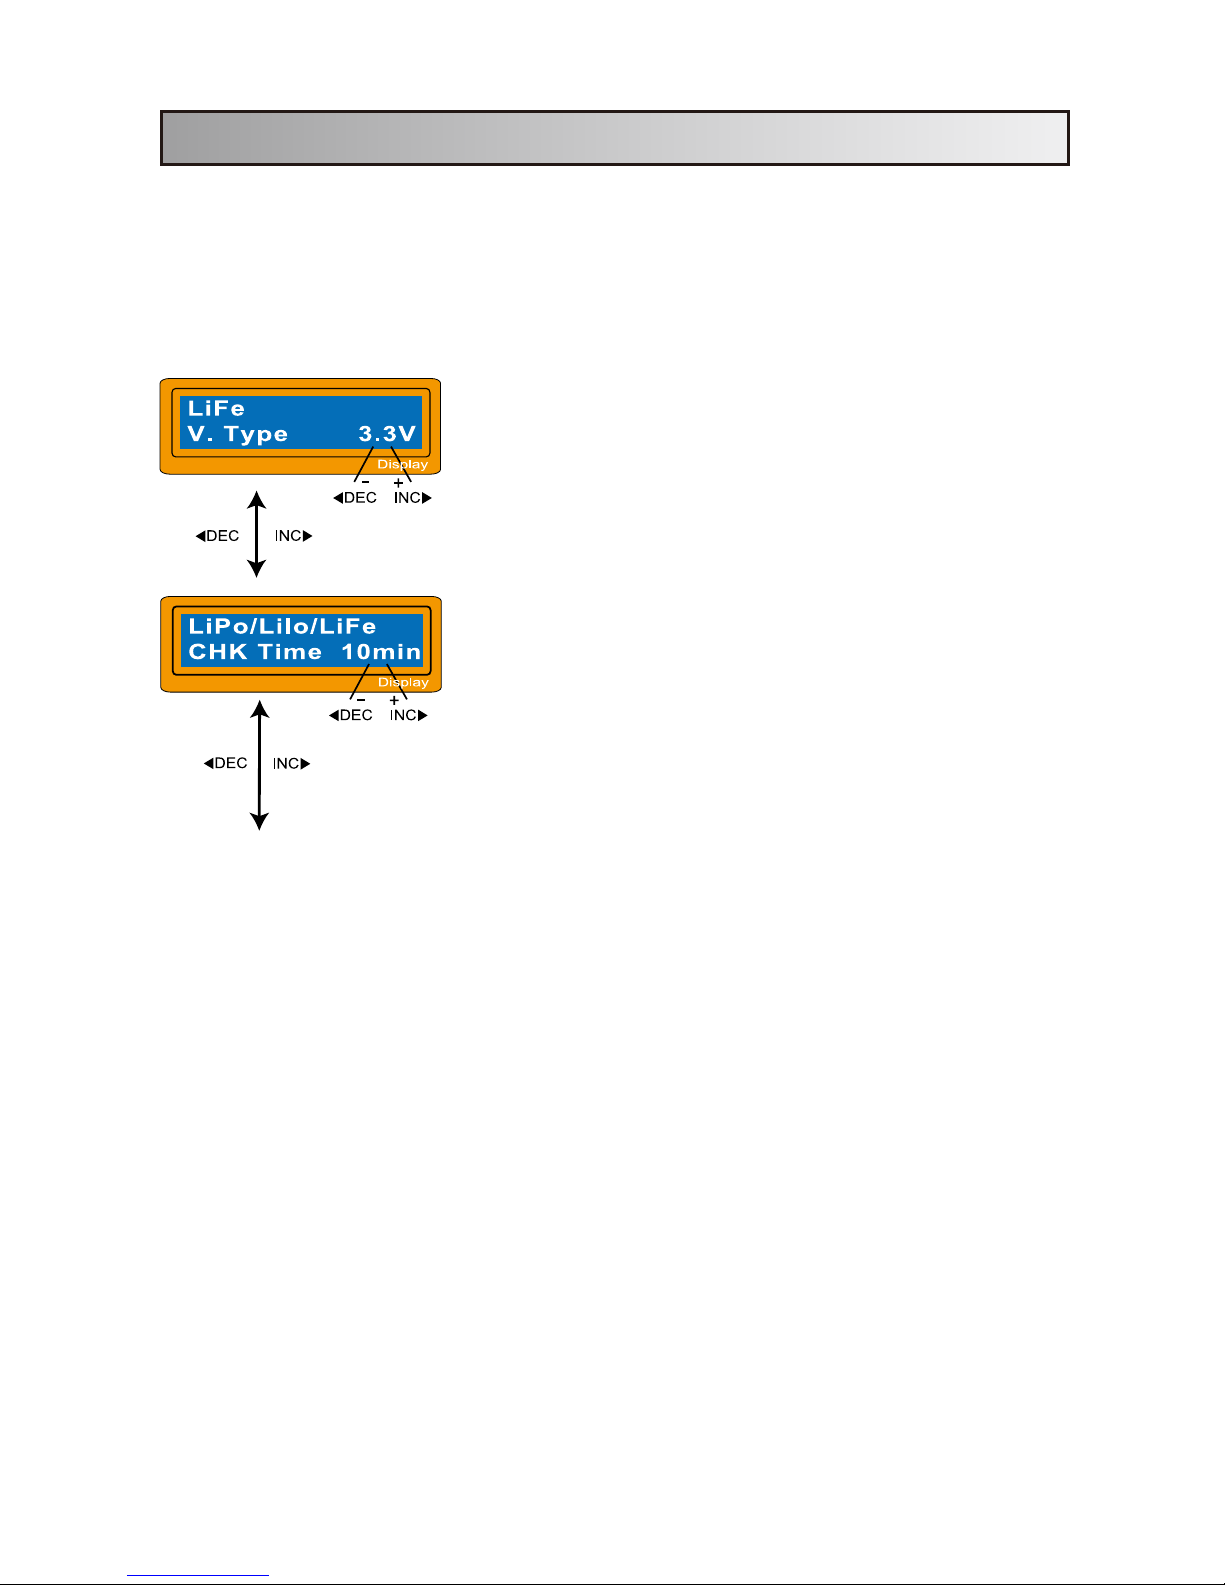
On first using the Spider 1 charger in User set mode it will offer default values
When you are ready to alter the parameter value in the program, press Start/
Enter key to make it blink then change the value with INC or DEC key. The value will
be stored by pressing Start/Enter key once.
The screen displays the nominal voltage of Lithium
battery. There are three kinds of Lithium battery;
LiFe(3.3V),Lilo(3.6V) or LiPo(3.7V). Please pay
attention to the nominal voltage of your selected
.battery
The charger will recognise the cell count of
battery automatically when charging. However the
battery can be perceived incorrectly if discharging. To
prevent the error, you can set the time to accurately
verify the cell count. Normally 10 minutes is enough.
For large capacity battery this time may need to increase.
If using auto detect please ensure the charger has selected
the correct cell count before proceeding.
Page 10
-8-
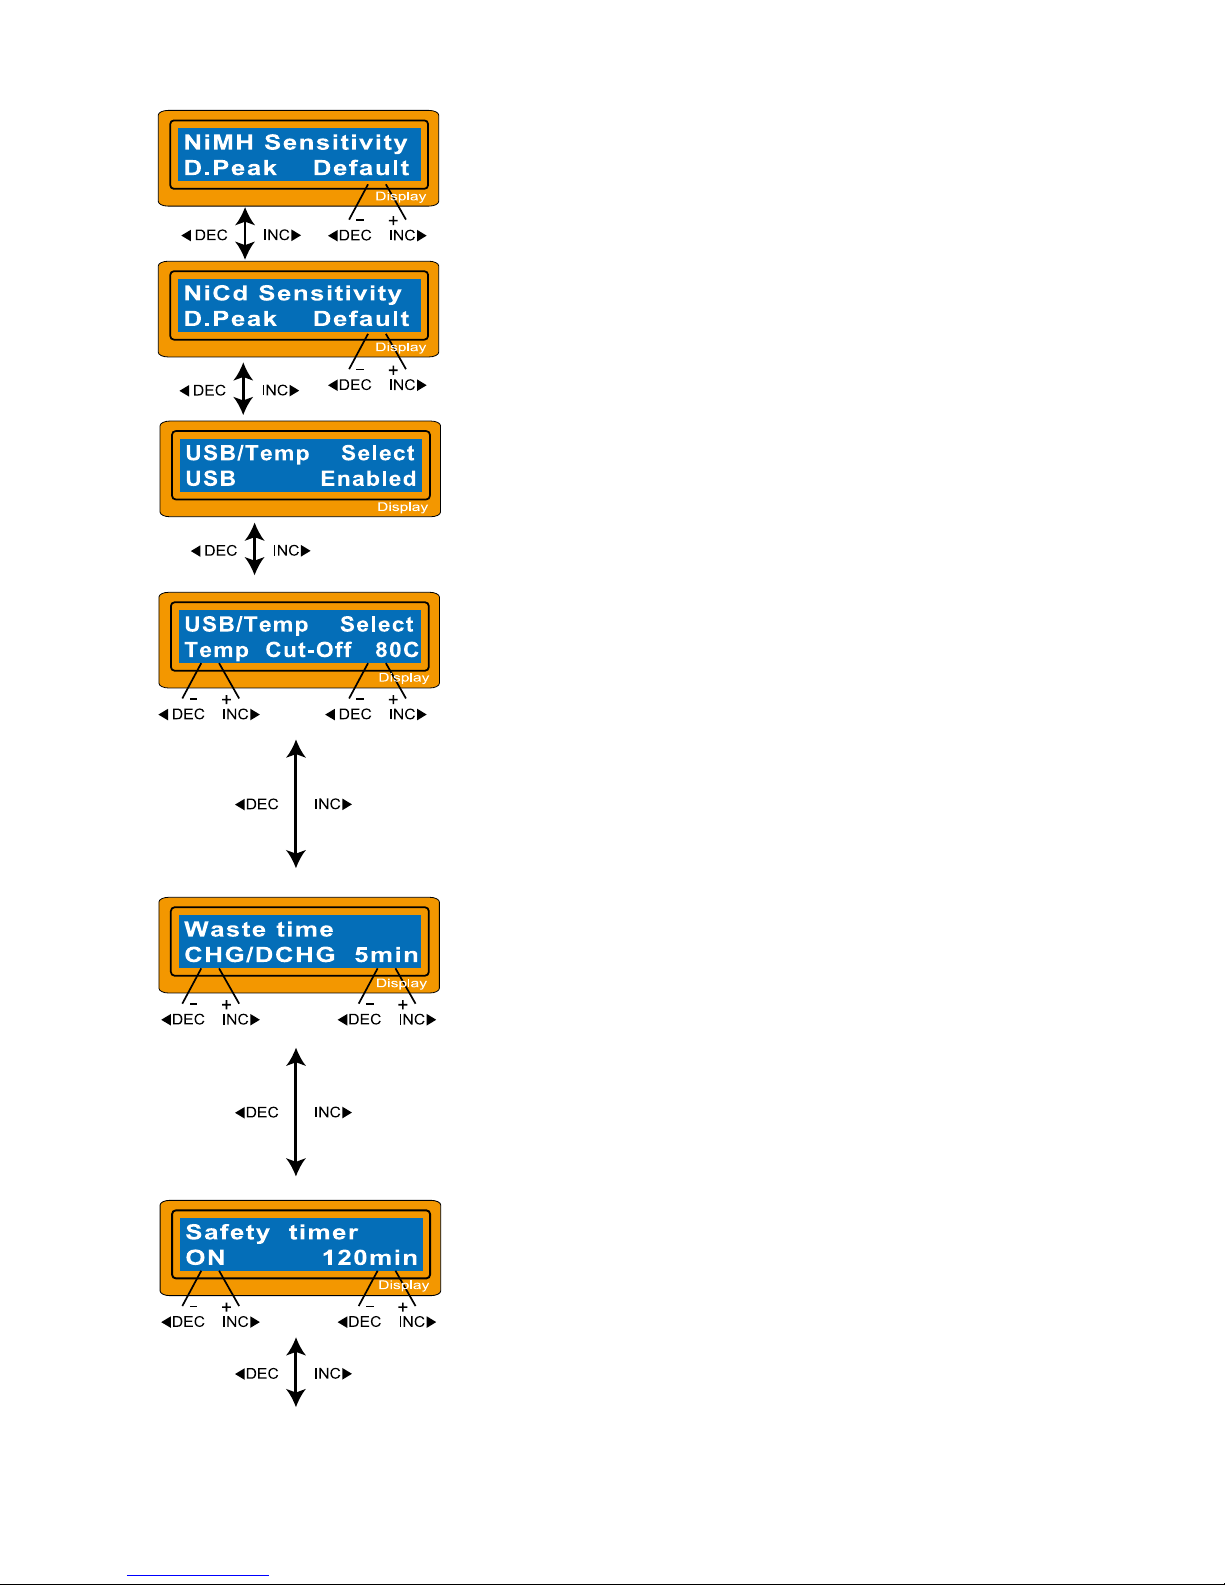
NiMH/NiCd SENSITIVITY:
This screen shows the Delta Peak sensitivity of
NiMH and NiCd batteries. The values range from
5 to 20mV per cell. If the sensitivity is set higher there
is a possibility of overcharging the battery, a lower setting
may result in undercharging the cells. Please refer to below
recommendations (NiCd default:12mV, NiMH default:7mV)
NiMH/NiCd SENSITIVITY:
You can select the function of 3-pin port at left side of
the unit.It can be used temperature sensor port or USB
port, selected at this screen. If the port is assigned as
a temp. port, an optional temperature probe contacting
the surface of battery can be used. When it is selected
as an USB port, you can link the charger to your PC
via an optional USB cable. This can utilize the optional
software that can show you the charge process at PC.
You can set the maximum temperature at which the
charger should allow battery to reach during charge.
Once a battery reaches this temperature during
charge, the process will be terminated to protect the
battery.
WASTE TIME:
During cyclic process of charge and discharge
The battery can often become warm.
You can set a time delay between each charge/discharge
cycle. To allow the batter to cool down before the next
cycle. The values range from 1 to 60 minutes
SAFETY TIMER:
When you start a charge process, the integral safety
timer automatically start
s running at the same time.
This is programmed to prevent overcharge the battery
if it proves to be faulty, or if the termination circuit
cannot detect a full battery. The value for the safety
timer should be generous enough to allow a full charge
of the battery .
Page 11
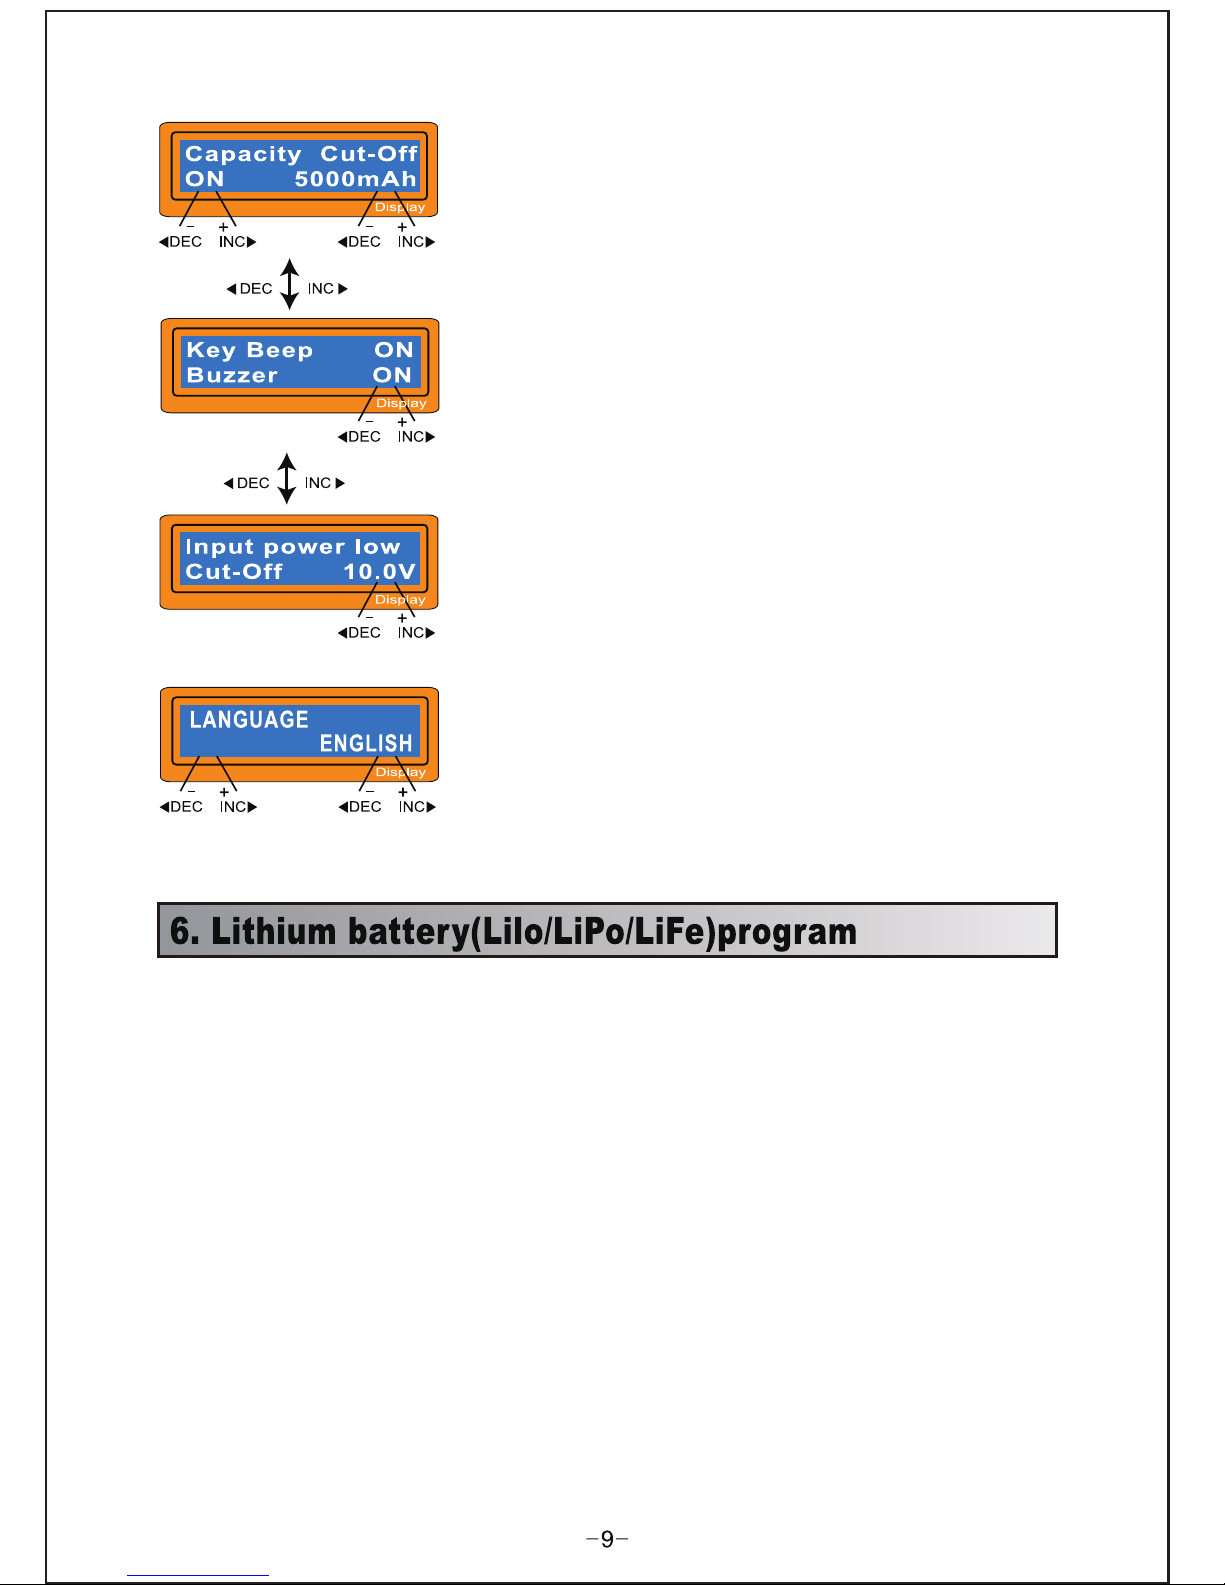
CAPACITY CUT-OFF:
This program sets the maximum charge capacity.
If the delta-peak voltage is not detected nor the safety
timer expires, this feature will automatically stop the
process at the selected capacity value.
KEY BEEP/BUZZER:
The beep sound is activated on key press.
Buzzer/melody for program completion. These
can be turned on/off.
INPUT POWER LOW:
This program alters the input battery voltage.
LANGUAGE:
Change language.
These programs are only suitable for charging and discharging lithium batteries
with a nominal voltage of 3.3v, 3.6v and 3.7v per cell. These batteries need to
adopt a different technique when charging. A constant voltage (CV) and constant
current (CC) method. The charge current varies according to the battery capacity
and performance. The final voltage of charge process is also very important; it
should be precisely matched to the below values. They are 4.2v for LiPo,
4.1v for Li-ion, and 3.6v for LiFe. The charge current and nominal voltage for each
cell must always be correct for the battery to charge.
Page 12
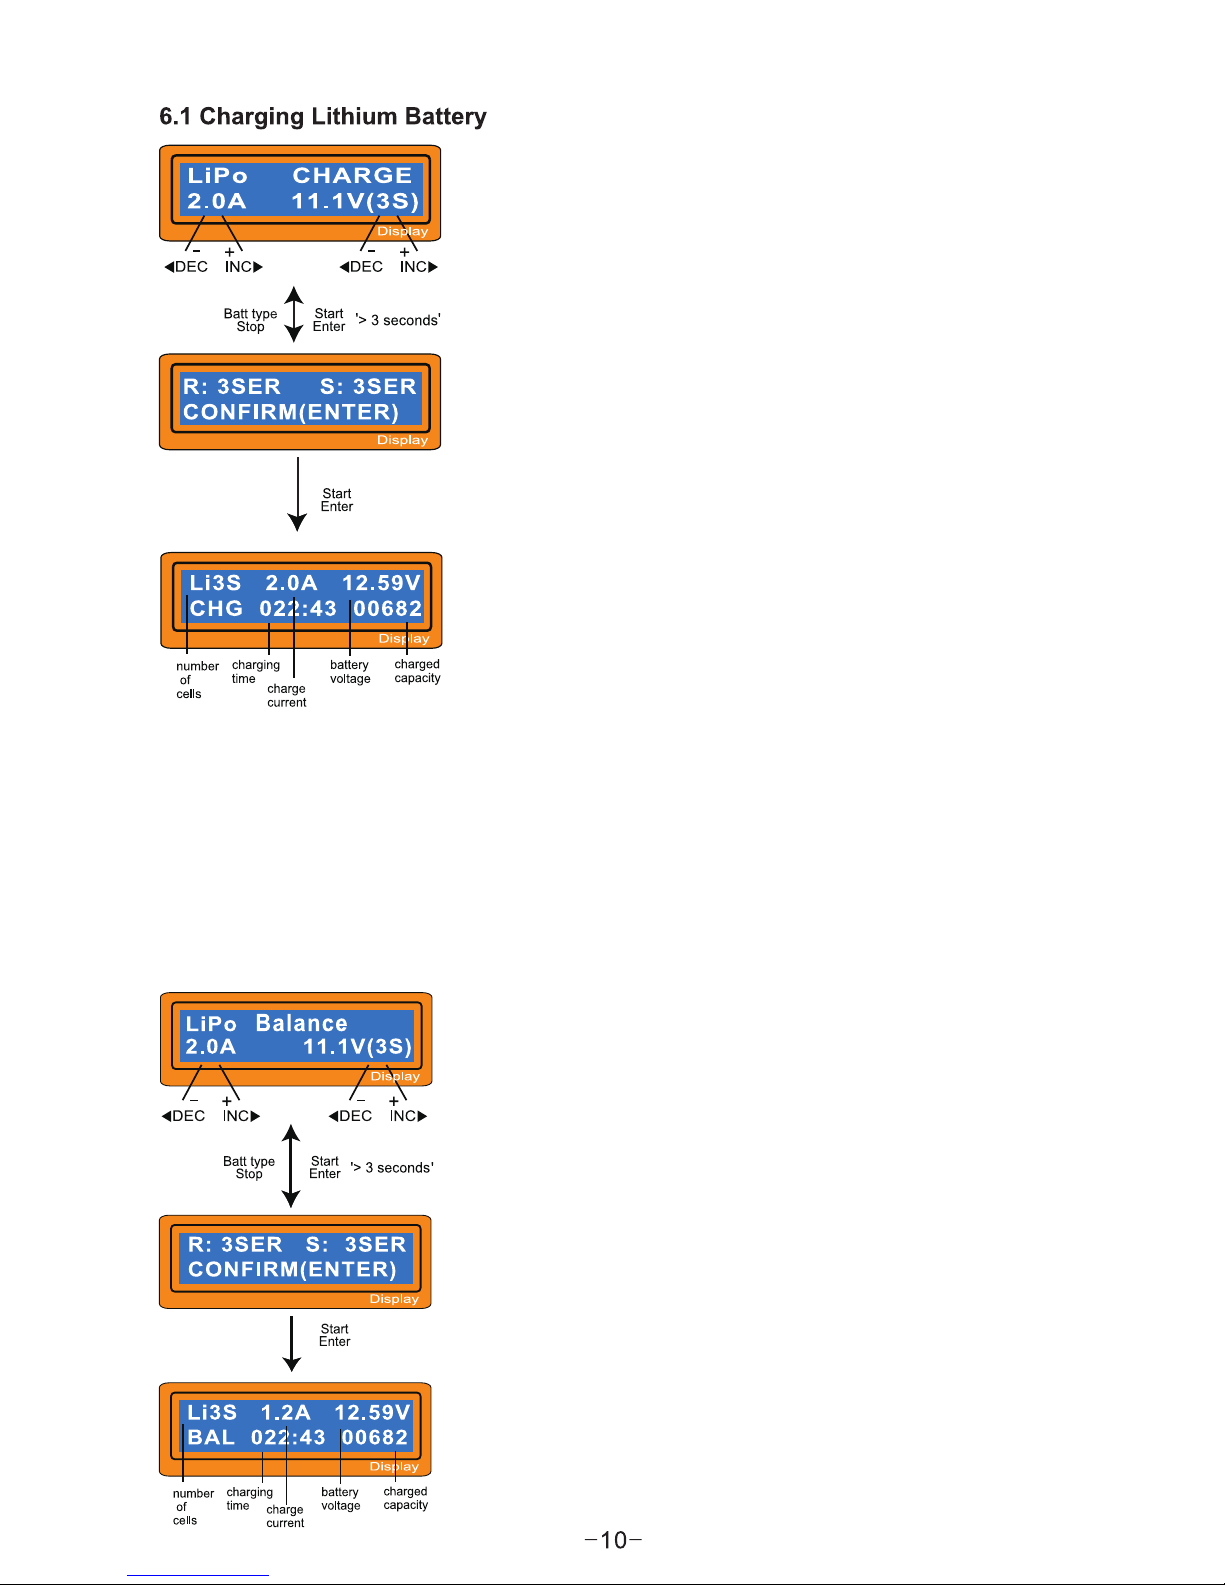
This shows the number of cells you set up and how
many cells the processor detects. ‘R:’ shows the number
of cells found by the charger and ‘S:’ is the number of cells
selected by you in the previous screeen. If both
numbers are identical you can start charging by press
Start/Enter button. If not, press Batt Type/Stop button
to go back to the previous screen. Then carefully check
the number of cells of the battery pack to charge again.
This screen shows the present status during the
charging process. To stop charging press
Batt Type/Stop key once.
6.2 Charging Lithium batteries in balance mode
This is for balancing the individual cell voltages of Lithium batteries. The battery pack
to be charged should be connected to one of the balance ports on the right side of the
charger. Also you need to connect the battery output plugs to the output of the charger.
In this mode, the internal processor of the charger will monitor the voltages of each cell
of the battery pack and controls the current fed to each cell to normilse the voltage.
This shows the number of cells you set up and how
many cells the processor detects. ‘R:’ shows the number
of cells found by the charger and ‘S:’ is the number of cells
selected by you in the previous screeen. If both
numbers are identical you can start charging by press
Start/Enter button. If not, press Batt Type/Stop button
to go back to the previous screen. Then carefully check
the number of cells of the battery pack to charge again.
This screen shows the present status during the
charging process. To stop charging press
Batt Type/Stop key once.
The left side of the first line shows the type of battery you
selected in users setting. The value on the left side of the
second line sets the charge current and the value on the
right side of second line sets the voltage of the battery pack.
After setting the current and voltage press Start/Enter
key for more than 3 seconds to start charging.
(Charge current:0.1~7.0A, Voltage 1~6 series)
The value on the left side of the second line sets a charge
current and the value on the right side of second line
sets the voltage of the battery pack.
After setting the current and voltage press Start/Enter
key for more than 3 seconds to start the process
(Charge current:0.1~7.0A, Voltage:1~6 series)
Page 13
-11-
6.3 'FAST' charging Lithium batteries
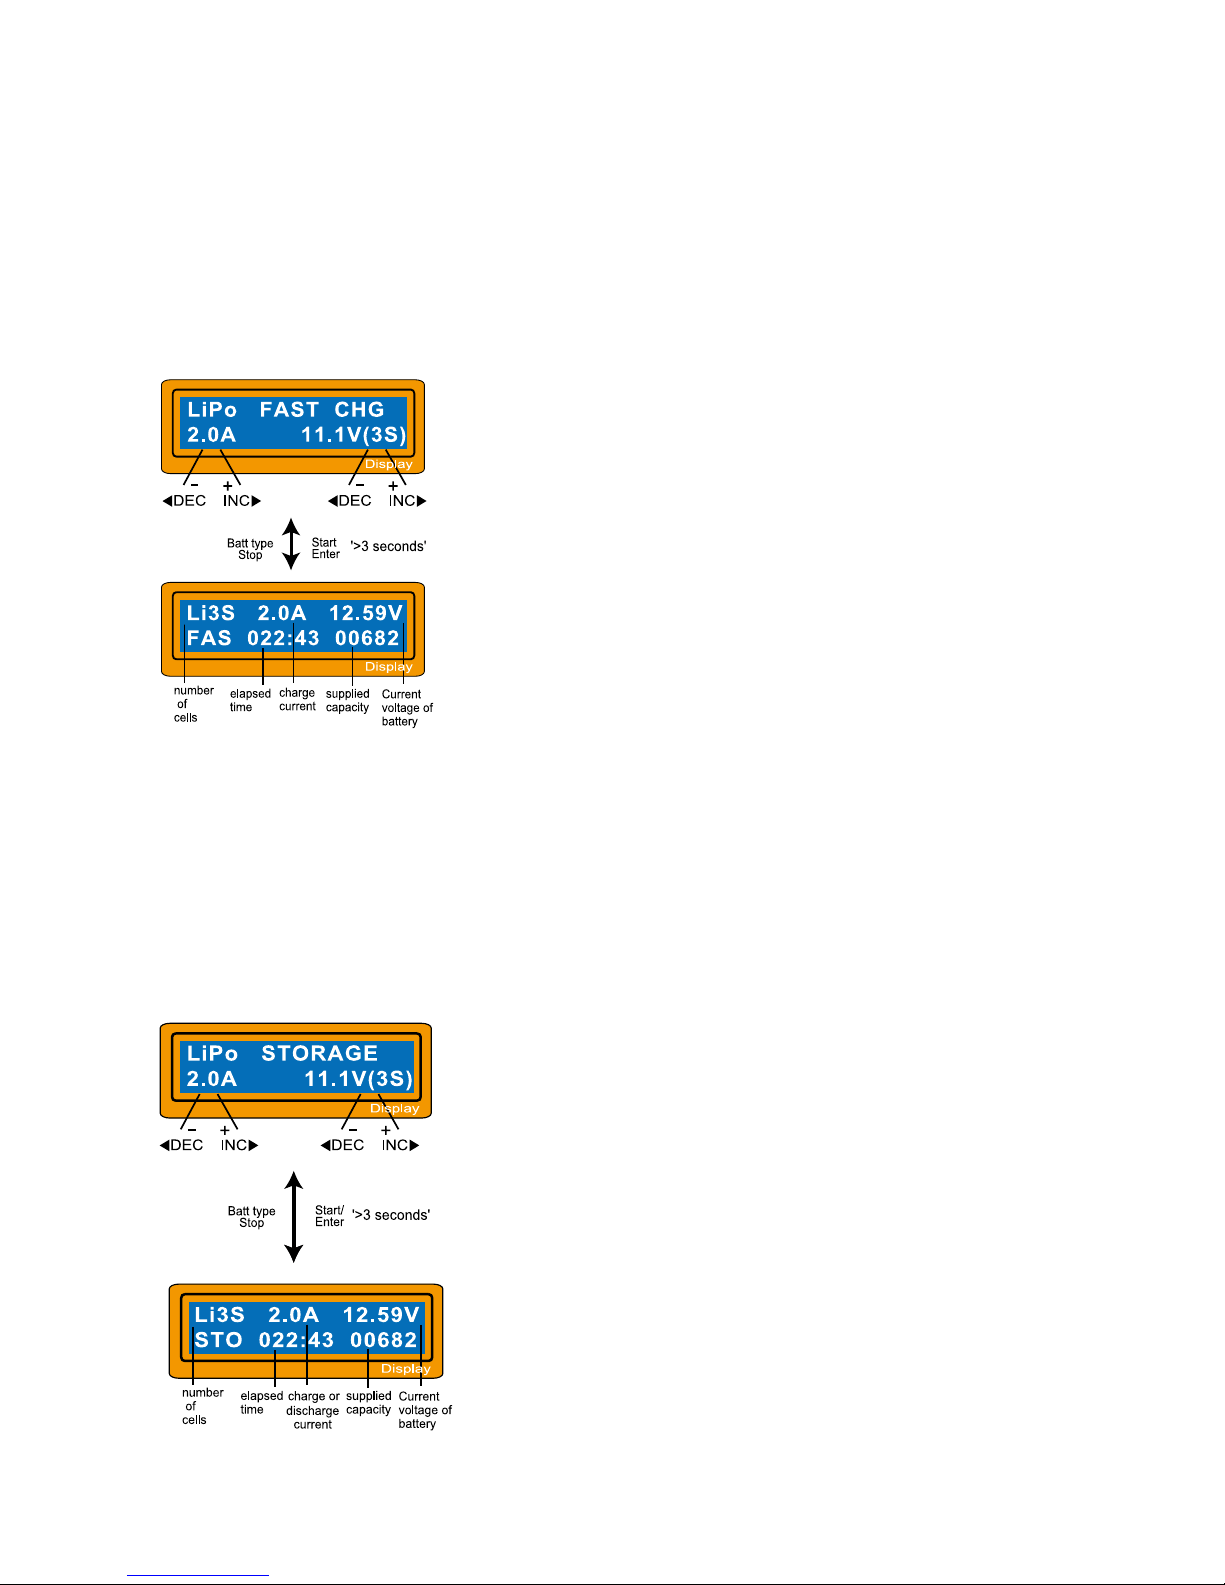
You can set up the charging current and the voltage
of the battery pack being charged. As you press Start/
Enter button the voltage confirmation will display.
If you confirm the voltage and current, press
Start/ Enter button again to start charging.
This shows the present state of 'FAST' charge. To
interrupt charging press Batt type/Stop key once.
6.4 'STORAGE' control Lithium batteries
This program will charge or discharge a battery voltage depending on initial detected
voltage. Each type of Lithium battery has varied voltages: Li-ion 3.75v, Li-Po 3.85v
LiFe is 3.3v per cell.
If the detected voltage of battery is higher than the storage level, the
program will start to discharge.
You can set up the current and the voltage of the
battery pack to be charged or discharged.
This screen shows the current situation during charging
process. To stop charging press Batt type/Stop key
once.
As the t he charging process ends t he current will drop from 1/5th of the initial value
to 1/10th. The battery will not reach f ull capacity, but the charge time is greatly
reduced.
Page 14
-12-
6.5 Discharging Lithium battery
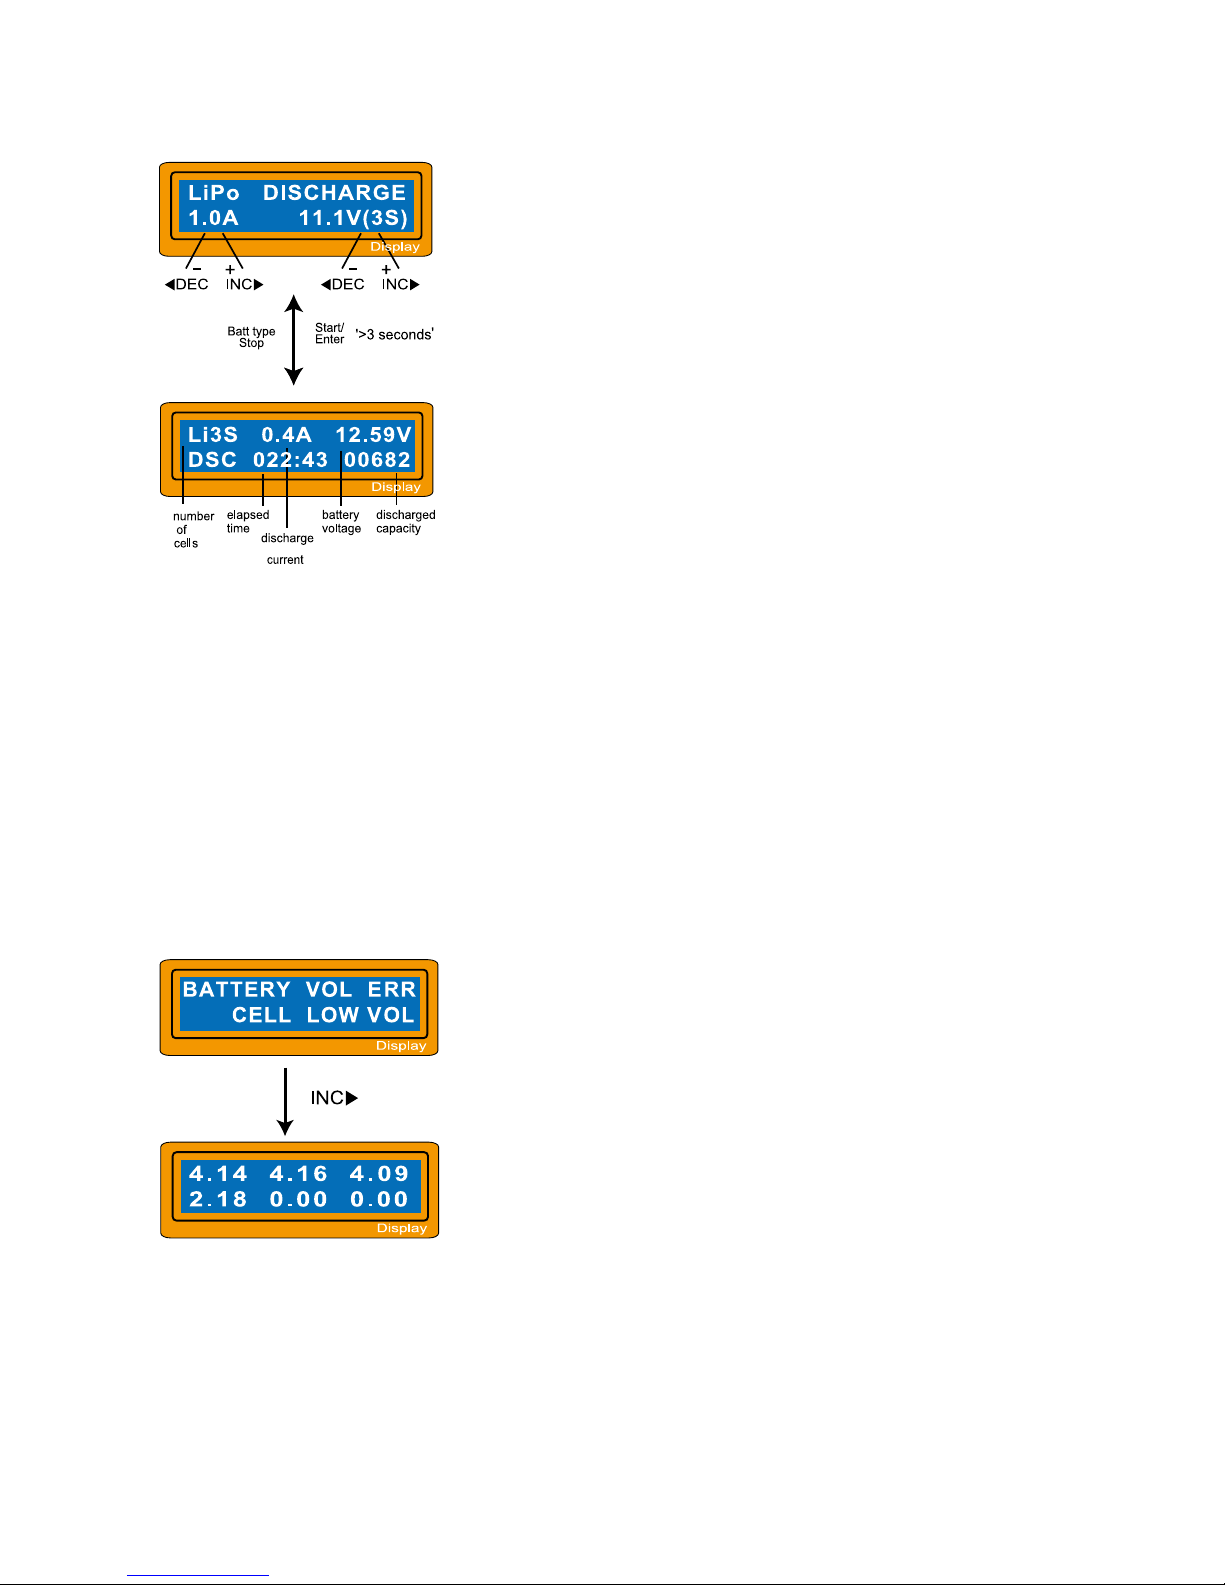
The value of discharge current on the left side of
screen may not exceed 1C for maximum safety
and the final voltage on the right should not be under
the voltage level that is recommended by the battery
manufacturer to avoid deep discharge.
To start discharge, press Start/ Enter key for more
than 3 seconds.
This shows the present state of discharge. To stop
discharging press Batt type/Stop key once.
6.6 Voltage balancing and monitoring while discharging
The charger monitors the voltage of individual cells during 'storage-mode' and
'discharge' of a Lithium battery pack. It tries to equal t he voltage of each cell.
For this feature, the individual plug of the battery pack should be connected to the
individual port of the charger.
If the voltage of any
one or more cells varies abnormally during the procedure, It
terminates the process with an error message. If this happens, the battery
pack contains a bad cell, or a bad connection. To c heck which cell is bad press
the I NC button at the t ime of error.
The charger has detected that the voltage of one cell
in the Lithium battery pack is too low.
In this case, the 4th cell is bad. If there is a
connection-break of the cable or plug, the voltage value
may show zero.
Page 15
-13-
7. NiMH/NiCd battery program
These programs are for charging or discharging NiMH (Nickel-Metal-Hydride) or
NiCd (Nickel-Cadmium) battery commonly used for R/C model applications. To alter
the value, press Start/Enter key to make it blink then change the value using the INC
Start/Enter key once.
To start the process, press Start/ Enter button for more than 3 seconds.
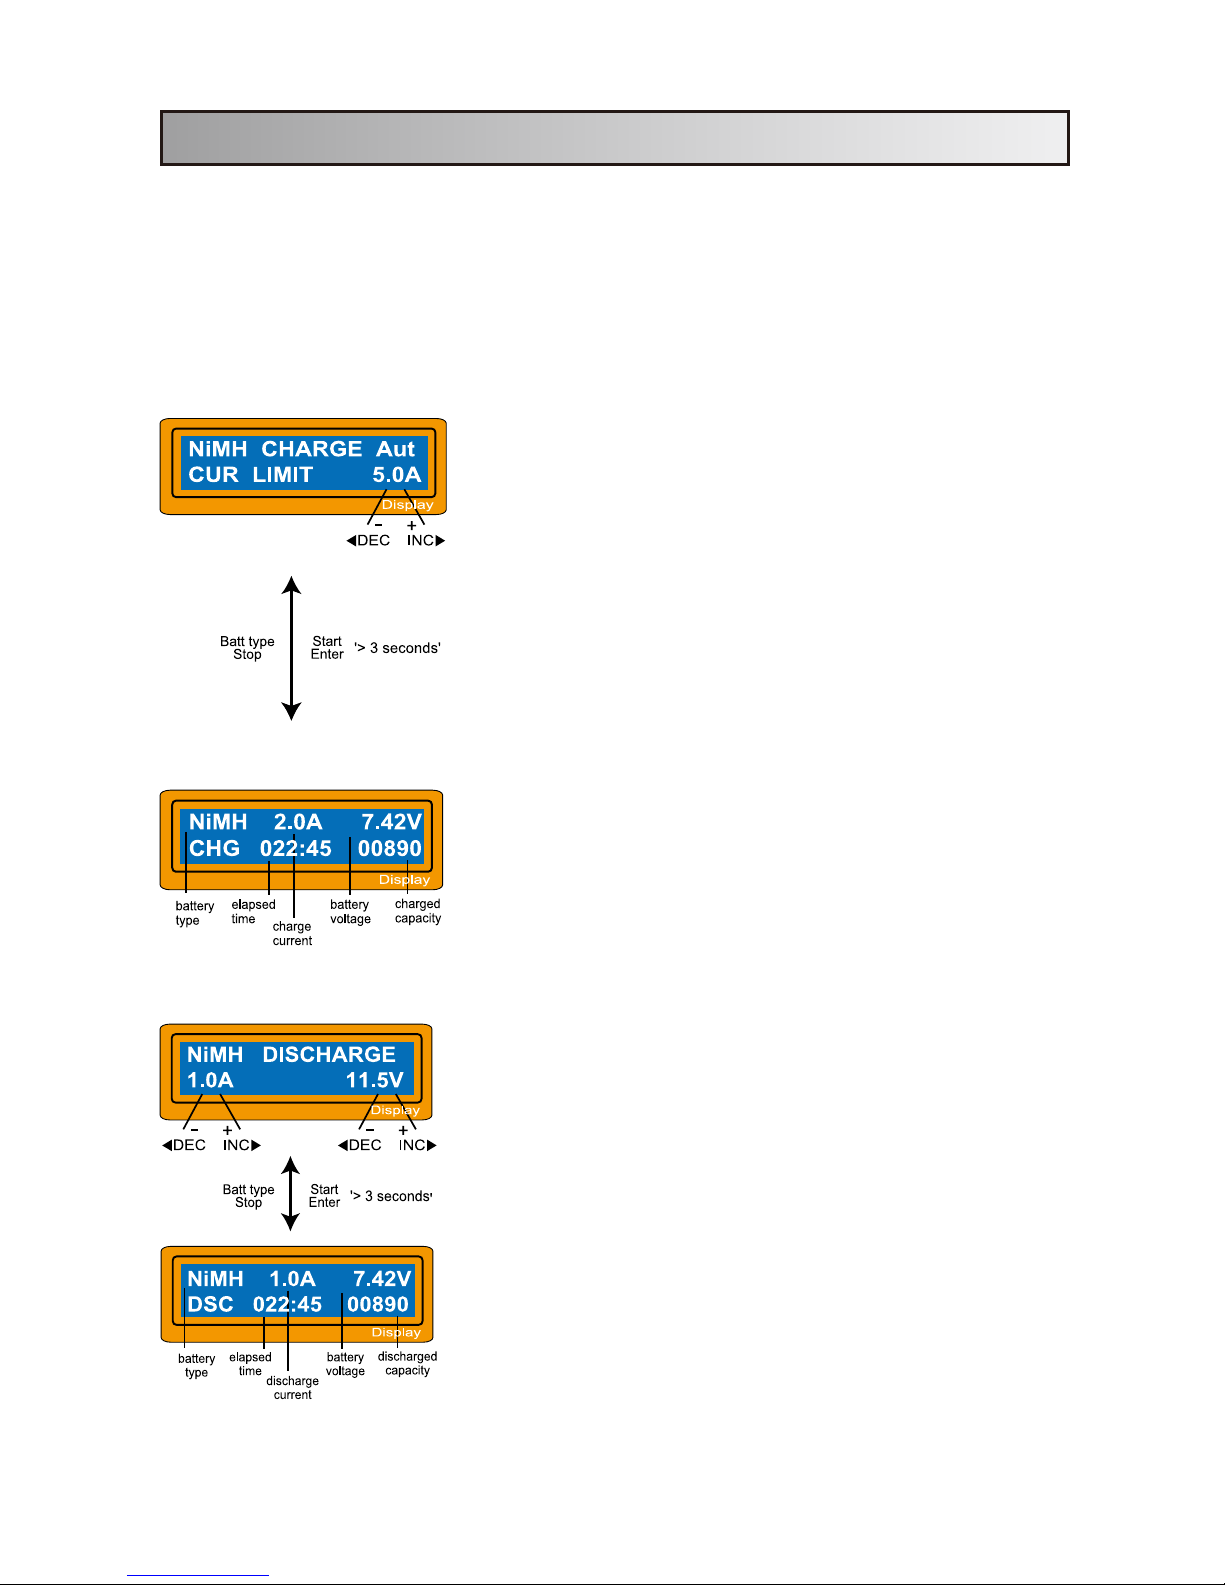
7.1 Charging NiCd/NiMH battery
This program simply charges the battery using the
current you set. In 'Aut' mode, you need to set the
upper limit of charge current to avoid over charging
the battery.
In 'Man' mode, you can charge the battery
with the charge current you set.
Each mode can be switched by pressing
INC and DEC button simultaneously when the current
field is blinking.
The screen displays the current state of charging . To
stop the process, press Batt type/Stop key once.
The audible sound indicates the end of the process.
7.2 Discharging NiCd/NiMH battery
Set discharge current on the left and final voltage on
the right. The discharge current ranges from 0.1 to 1.0A
and the final voltage ranges from 0.1 to 25.0V. To
start the process, press Start /Enter key more than 3
seconds.
This screen displays the current state of discharge. You
can alter the discharge current by pressing Start/Enter
key during the process. Once you change the current
value, store it by pressing Start/Enter button again.
To stop
discharging press Batt type/Stop key once.
The audible sound indicated the end of the process.
or DEC key. To store the value press
Page 16
8. Pb (Lead-acid) battery program
14
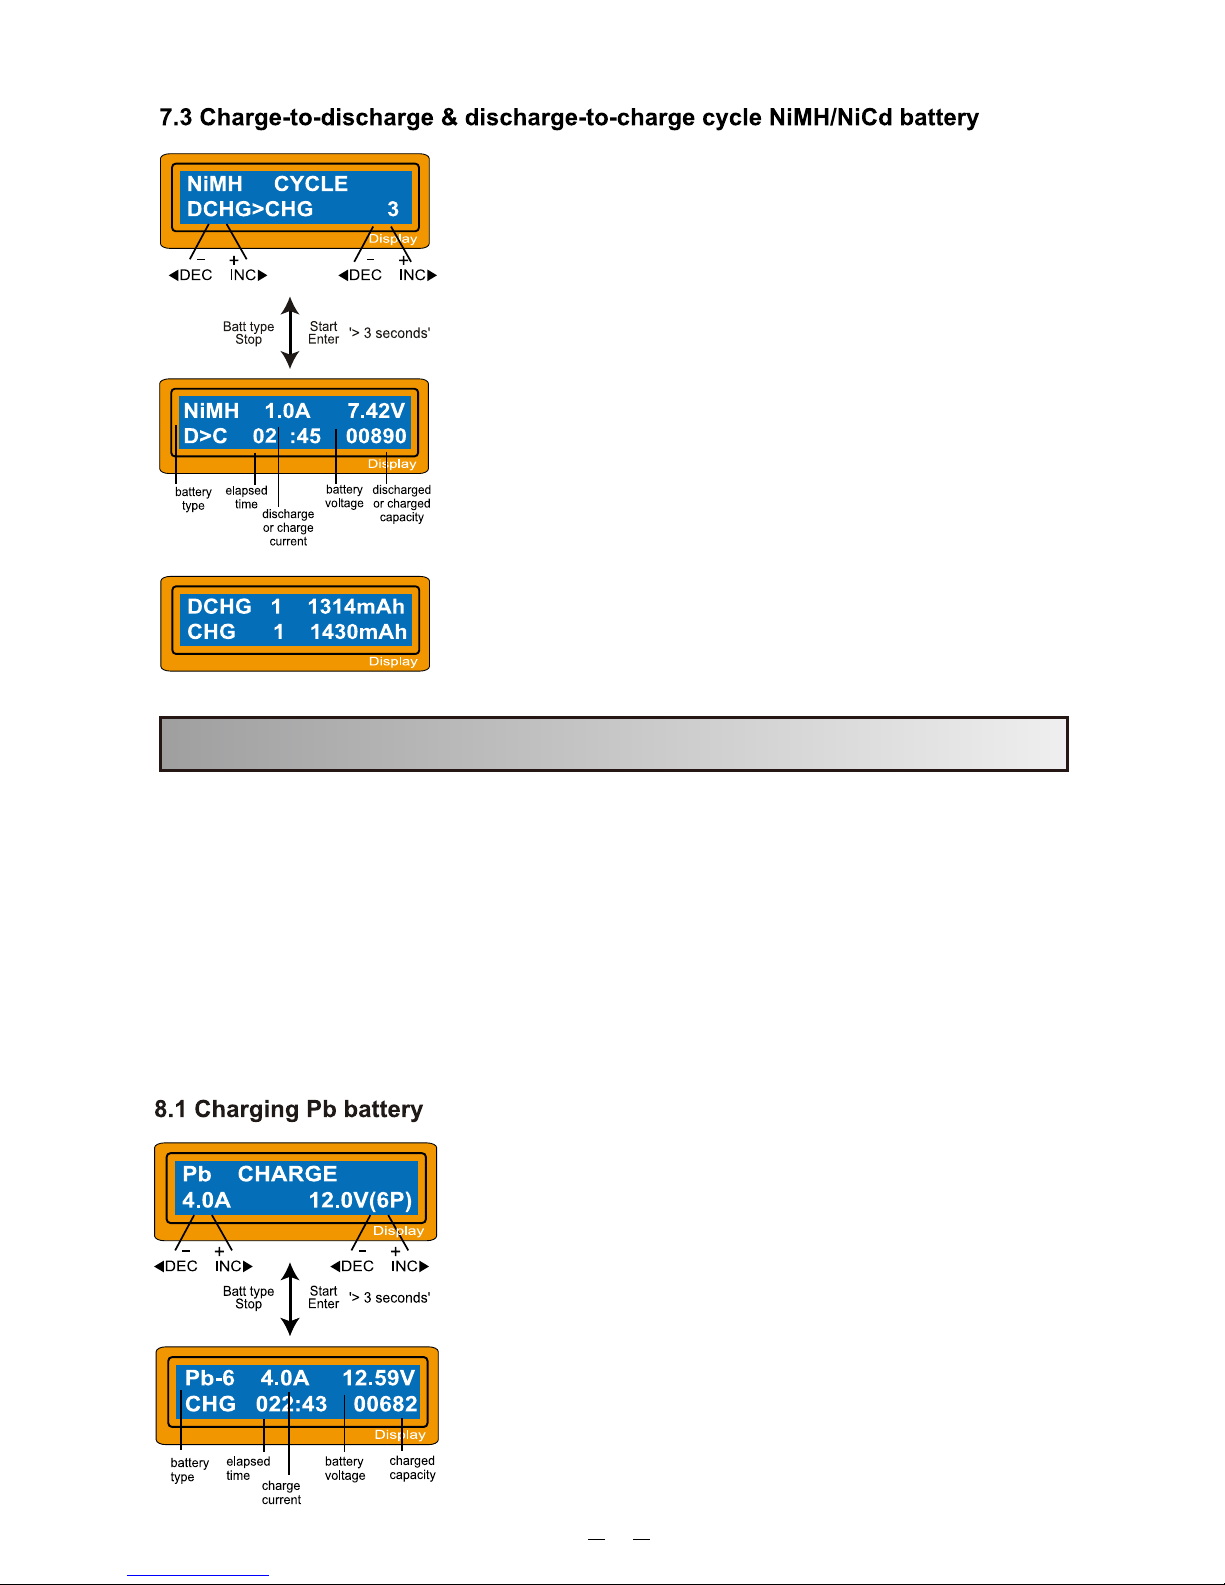
Set the sequence on the left and the number of cycle
on the right. You can use this function for balancing,
refreshing and break-in the battery. To avoid rising
temperature of the battery, there will a brief cool-off
period that already fixed at ‘User setting’ after each
charge and discharge process. The cycling number
ranges from 1 to 5.
To stop the process, press Batt type/Stop key once.
You can change the discharge or charge current by
pressing Start/Enter key once during the process. The
audible sound indicates the end of the process.
At the end of the process, you can see charged or
discharged electric capacities of the battery at each
cyclic process
By pressing INC or DEC button, the screeen shows the
result of each cycle in order.
This is programmed for charging Pb (lead-acid) battery with nominal voltage from 2 to 20v.
Pb batteries can only deliver low current compared to their capacity. The optimal charge
current is 1/10th of the capacity. Pb batteries must not be charged rapidly. Always follow
the instructions supplied by the battery manufacturer.
When you are ready to alter the parameter value, press Start/Enter to make it blink, then
change the value with INC or DEC key. The value will be stored by pressing
Start/Enter key once
Start the charge process by pressing Start/Enter key
for more than 3 seconds.
The screen displays the state of the charging process.
To stop charging, press Batt type/Stop key once.
An audible sound indicates the end of the charging
process.
Set up the charge current on the left and the nominal
voltage of the battery on the right. The charge current
ranges from 0.1 to 7.0A, and the voltage should be
matched with the battery being charged
Page 17
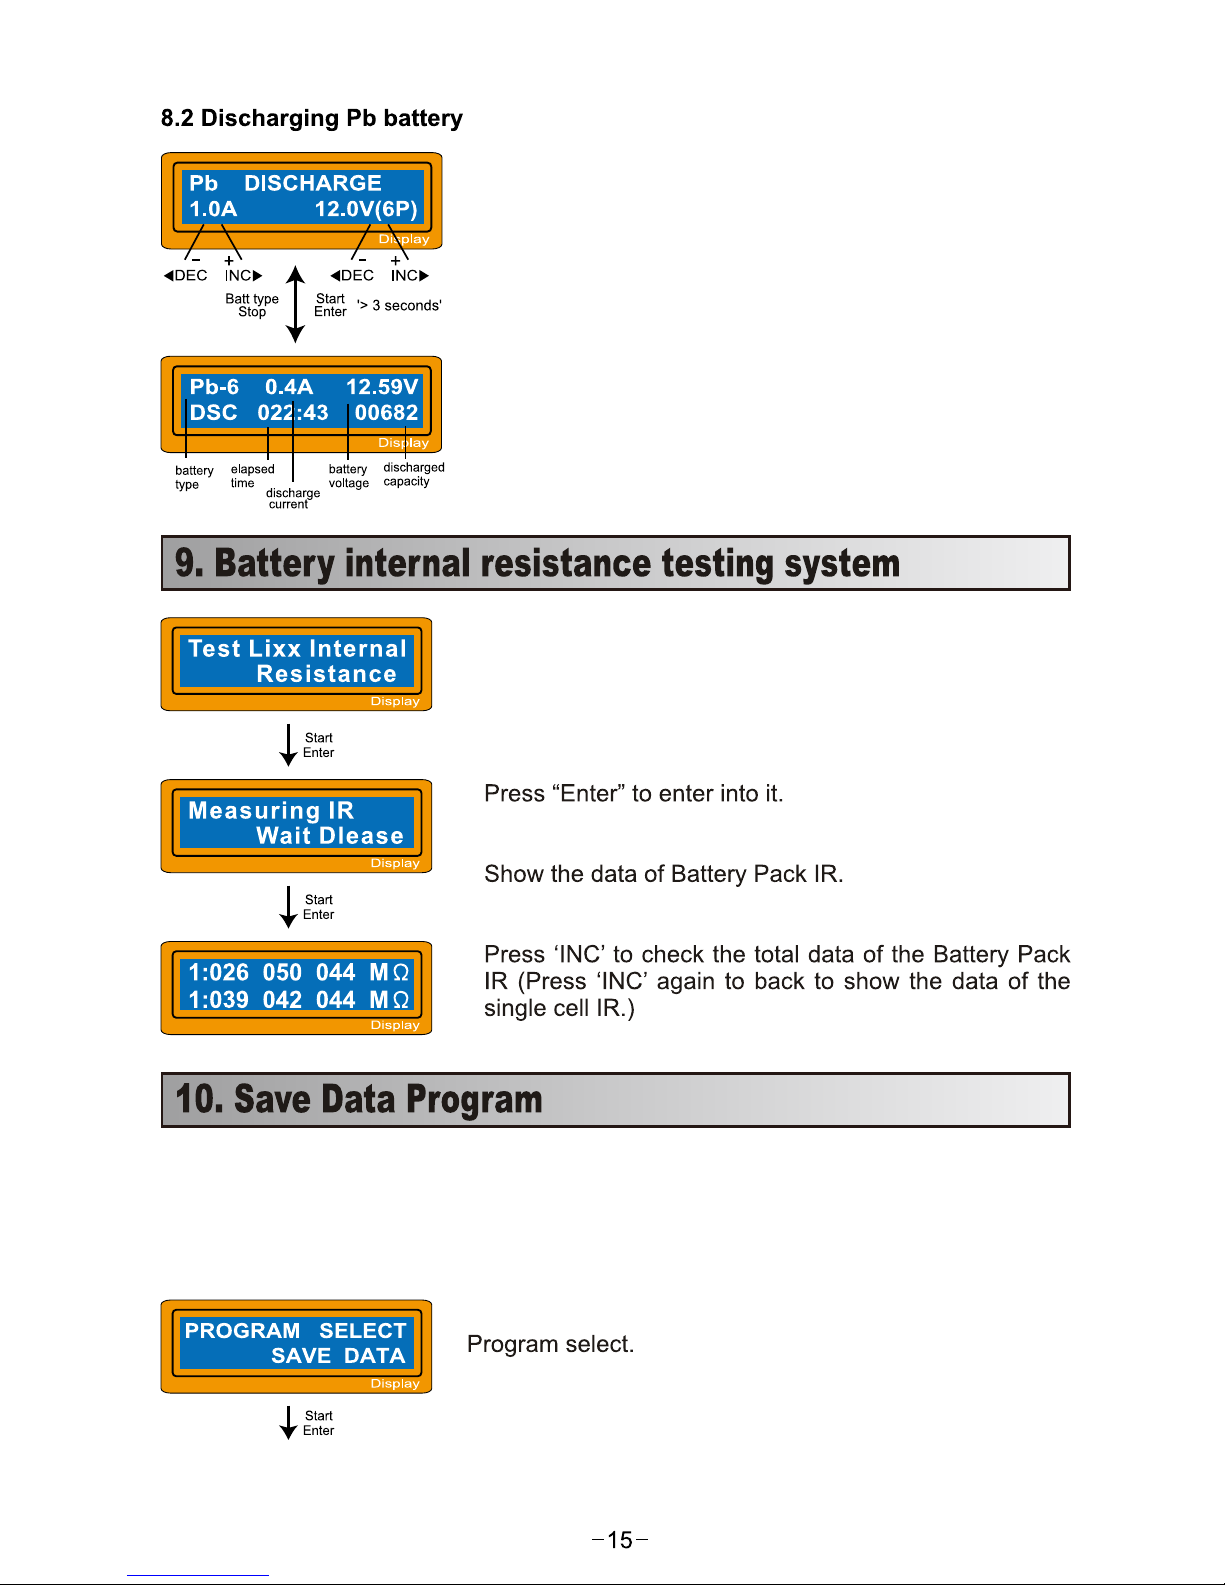
Set discharge current on the left and final coltage on the
right. The discharge current ranges from 0.1 to 1.0A
To start the process, press Start/Enter key for more
than 3 seconds.
The screen displays the current state of discharge. You
can alter the discharge current by pressing Start/Enter
key during the process. Once you change the current
value, store it by pressing Start/Enter button again.
To stop discharging press Batt Type/Stop key once.
An audible sound indicates the end of the process.
Internal Resistance Testing screen.
The charger has a data storage and load program for your convenience. This feature
can store up to 5 batteries data. They can be called back for charging and discharging
without setting up the program again. To set up the parameter value in the program
press Start/Enter key to make it blink then change the value with INC or DEC key.
Page 18
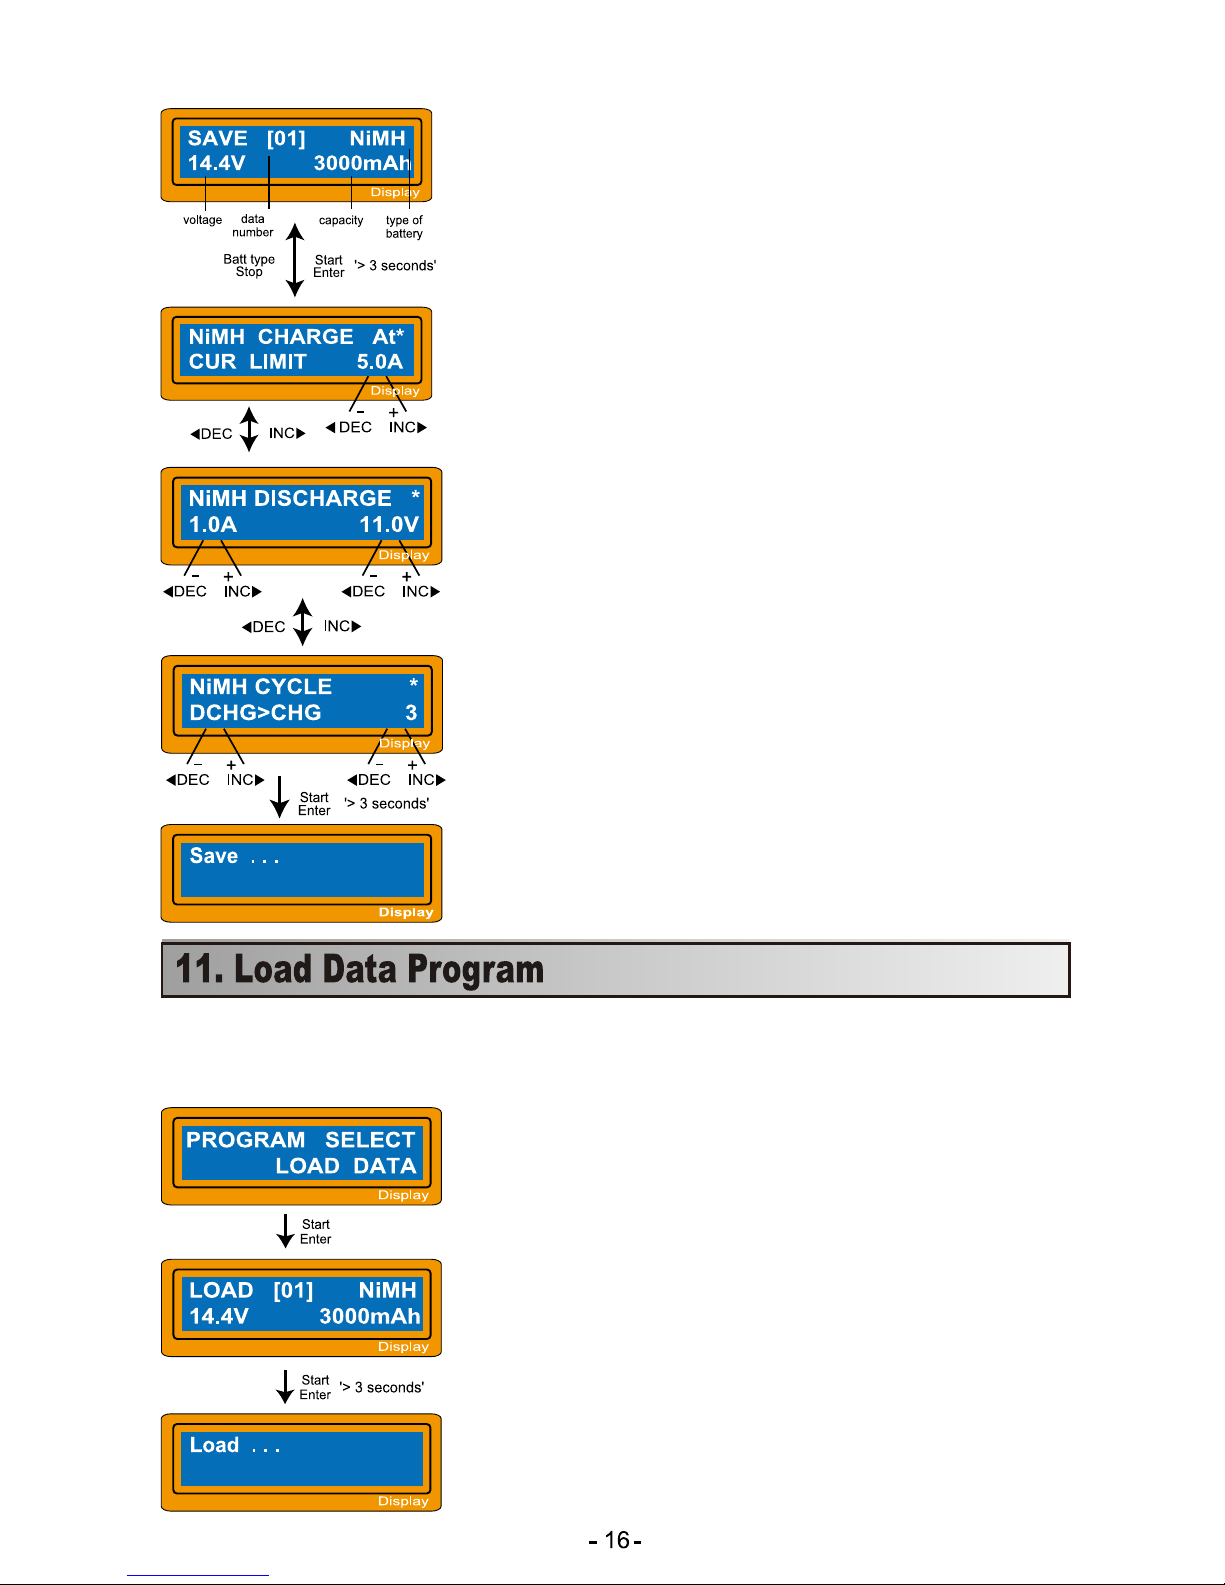
This program calls back the data that was stored in ‘Save Data’ program. To load
the data, press Start/Enter key once to begin blinking and select the number using
INC or DEC key then press Start/Enter key for more than 3 seconds.
This screen represents the specification of the battery.
The following screens will automatically display battery type
you set up. This example shows a NiMH battery pack, with
12 cells (12*1.2v:14.4v) and a capacity of 3000mAh.
Setting up the charge current for manual charge mode, or
the current limit for automatic charge mode. Each mode
can be switched by pressing INC and DEC button at the
same time when the current field is blinking.
Setting up discharge current and final voltage.
Setting up the sequence of charge and discharge, and
the cycling number
Saving data.
Program select
Select the data number to be loaded.
Loading data.
Page 19
-17-
12.
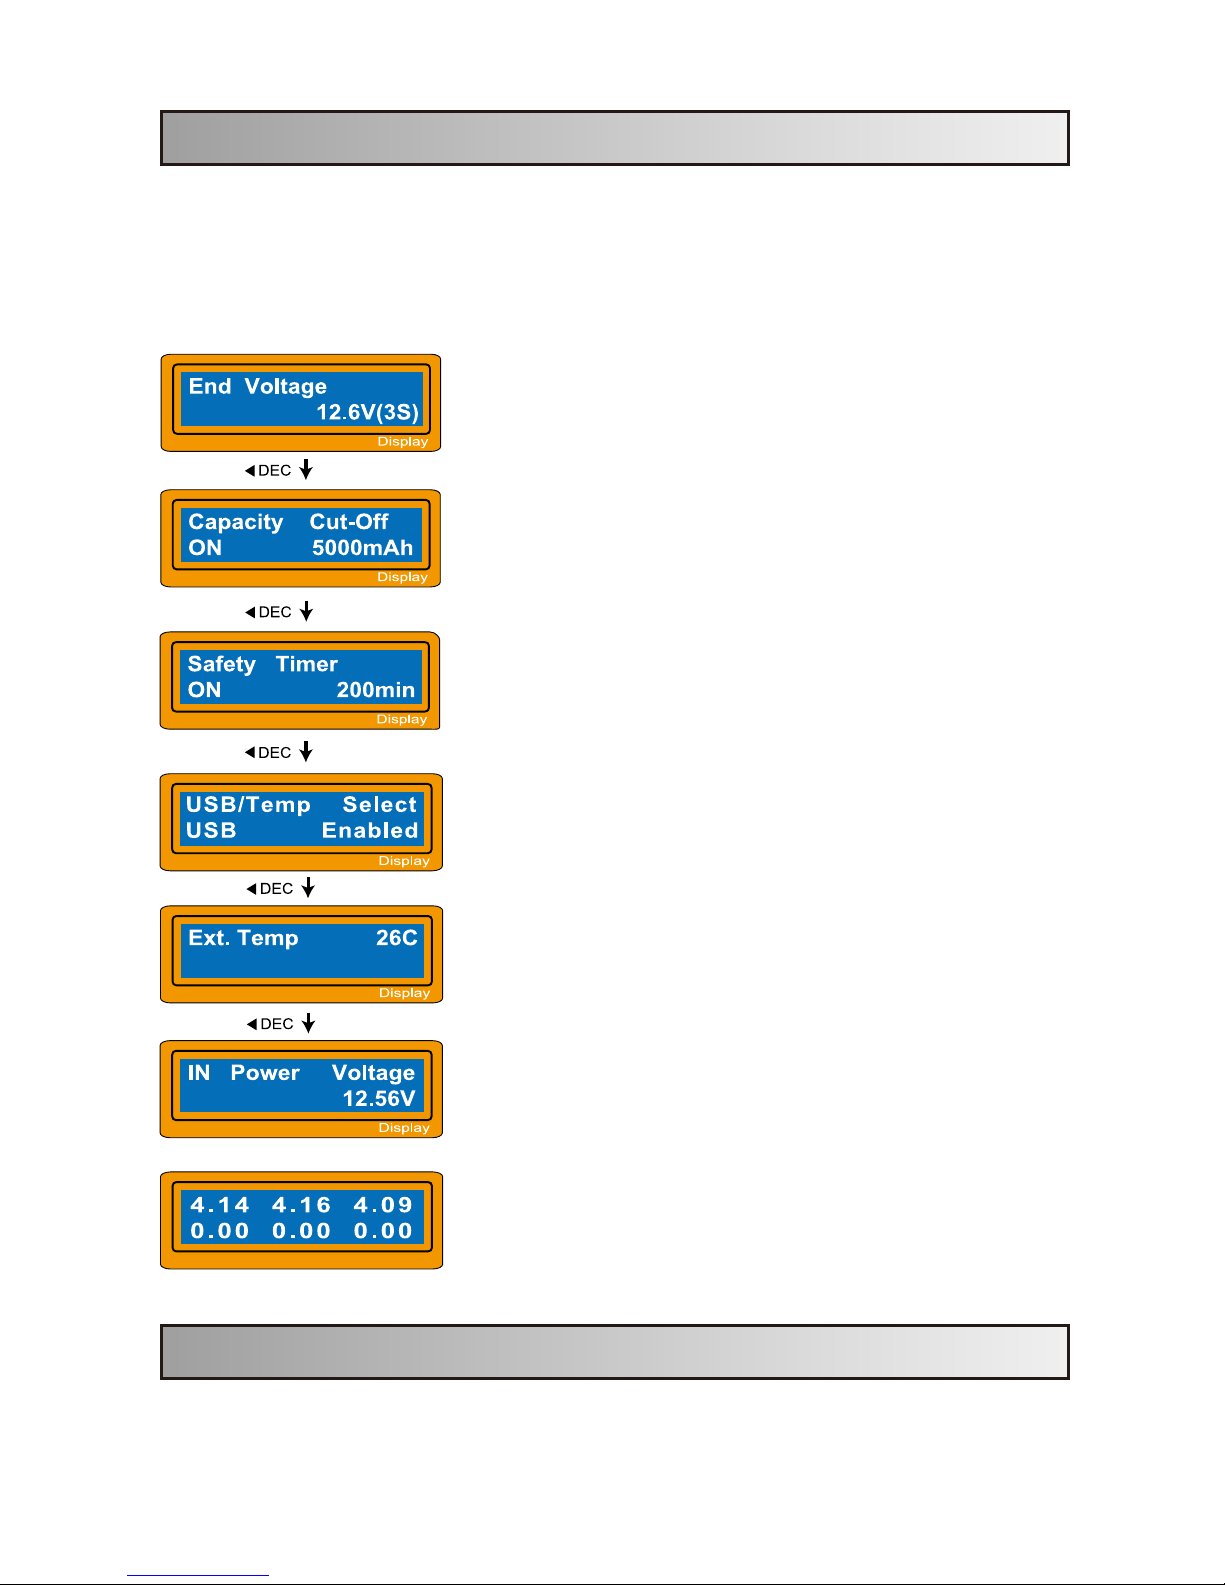
Program has reached final voltage and ended.
Displayed capacity cut-off function is turn on and the
setting value of capacity.
Displayed safety timer is turn on and duration of time
in minutes.
Displayed temperature cut-off function is turn on.
The external temperature is displayed when the
temperature probe is used ( not included).
Present input voltage.
13.
Accessing additional battery information
During charging and discharging you can access various information by pressing
the DEC button. During Lithium battery program pressing INC will access cell
voltage information.
The battery is connected with each port through checking
voltage of each cell in a battery pack. When the cable is
connected with the ports on the charger, the program will
display voltage of up to 6 batteries.
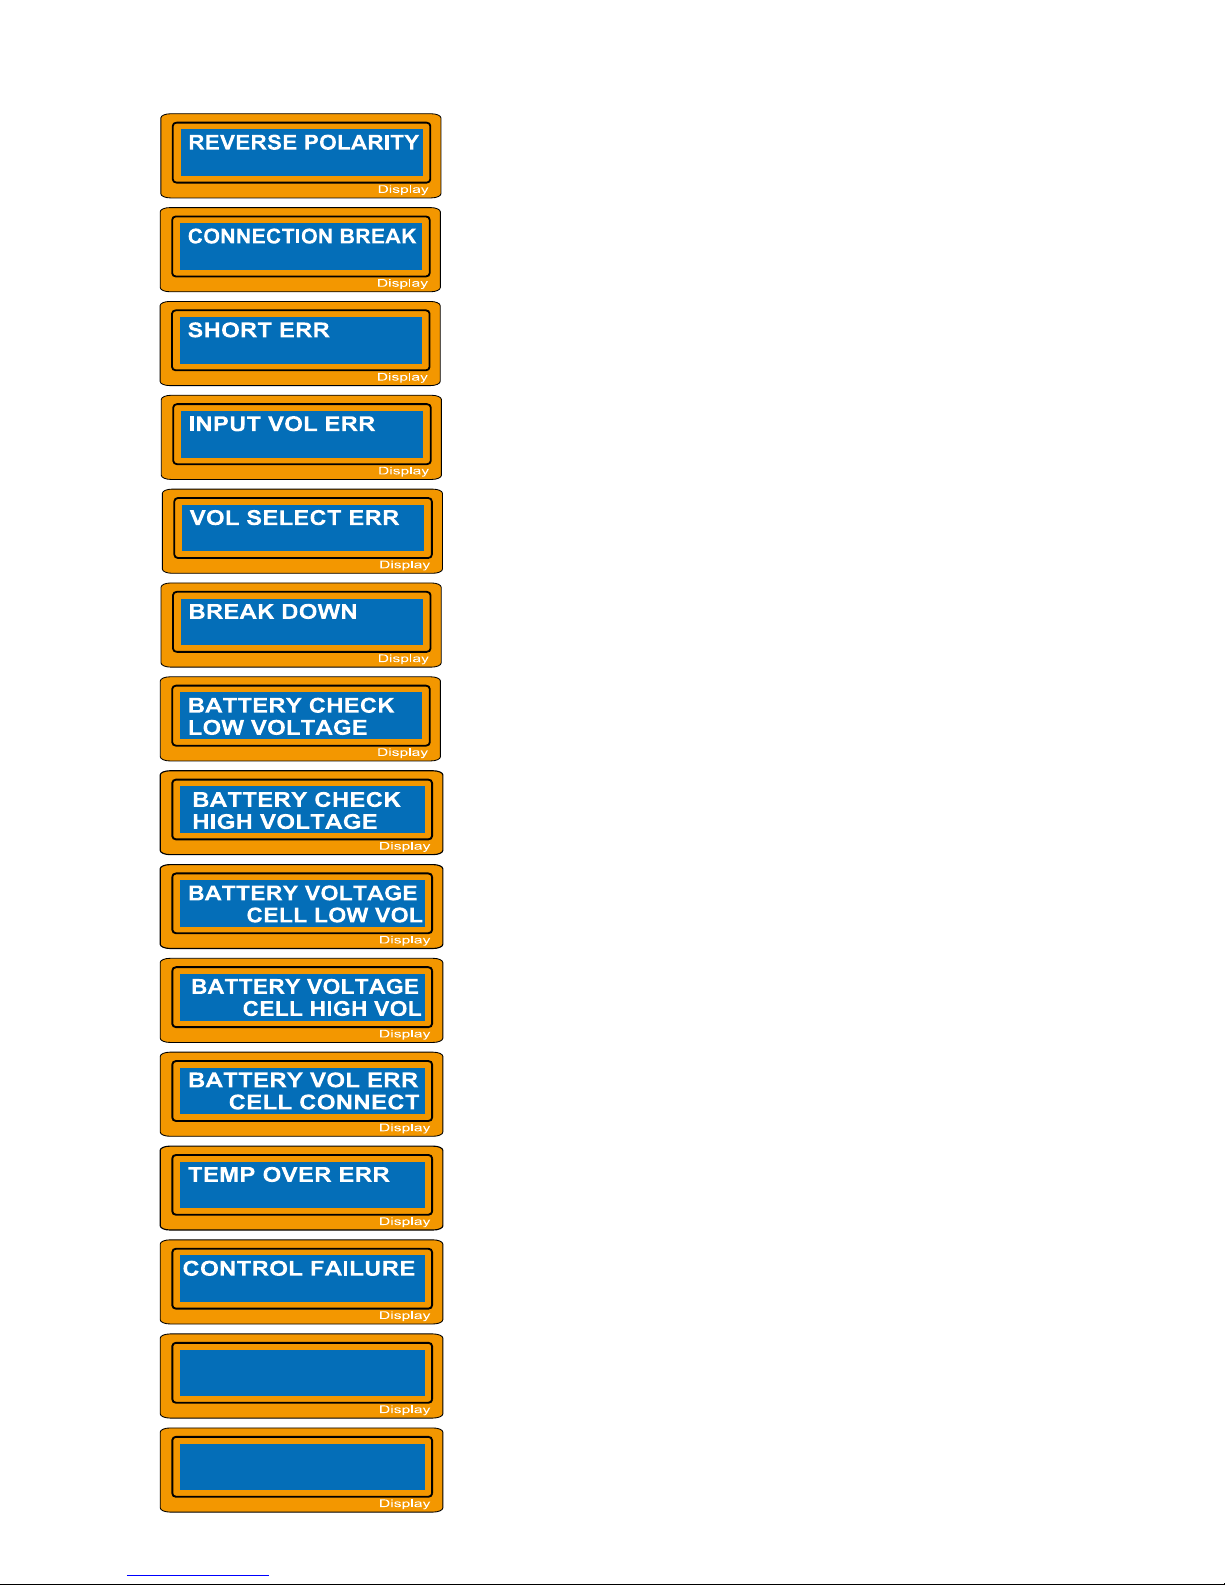
The charger has various protective and monitoring systems to verify the state of
electronics. In case of an error occuring, the screen displays the cause of the error
with an audible sound.
Warnings and error messages
Page 20
-18-
Incorrect polarity connected.
Battery connection is interrupted.
Short-circuit of the output termination.
Input voltage wrong.
The voltage of the battery pack has been selected
incorrectly!
The charger has malfunctioned for some reason.
Seek professional advice.
The voltage is lower than which is set. Please check
the number of cells in the battery pack.
The voltage is higher than which is set. Please
check the number of cells
in the battery pack.
Voltage of one cell in the battery pack is too low,
please check the voltage of each cell.
Voltage of one cell in the battery pack is too high;
please check the voltage of each cell.
The processor cannot control the feeding current,
please repair it.
Battery Pack IR
0mΩ
1: --- --- --- mΩ
4: --- --- --- mΩ
Wrong connector detected; please check the
connector and cable.
The internal temperature is too high.
The battery balance port or the power line connection
is not working.
Page 21

-19-
14. Specifications
Dual input power(AC/DC): Input AC:100~240Volt
Input DC: 11~18Volt
Circuit power: max.80W for charging
max.5W for discharging
Charge current range: 0.1~7.0A
Discharge current range: 0.1~1.0A
Current drain for balancing Li-po: 300mAh/cell
NiCd/ NiMH battery cell count: 1~15 cells
Lithium battery cell count: 1~6 Series
Pb battery voltage: 2 to 20V
Weight: 400g
Dimension: 136×127×56mm
Page 22

Note:
Page 23

RoHs
 Loading...