


www.altronics.com.au
®
OPERATING INSTRUCTIONS
Manufactured exclusively for Altronic Distributors Pty Ltd
REDBACK®Portable PA System REDBACK®Portable PA System
17/07/06
Distributed by Altronic Distributors Pty. Ltd. Perth. Western Australia.
Phone: 1300 780 999 Fax: 1300 790 999
Internet: www.altronics.com.au
PORTABLE PA SYSTEM

Specifications
Power output:........................................................................................................................70 watts Max
Frequency response: ............................................................................................................50Hz -16kHz
Speaker drivers: ..................................................................2 x 8” (200mm) woofers, high output tweeter
Amplifier Efficiency: .....................................................................................................>85% @ full power
OUTPUT CONNECTORS
Line output: ..................................................................................................................RCA stereo socket
INPUT CONNECTORS
Mic 1: .................................................................................................................6.35mm jack unbalanced
Mic 2: .................................................................................................................6.35mm jack unbalanced
Line input: ....................................................................................................................RCA stereo socket
DC power (charging):....................................................................................................2.1mm d.c. socket
240V a.c. power: ......................................................................................................IEC power connector
CONTROLS
Mic inputs: ............................................................................................................................Volume, Tone
Wireless mic inputs: .............................................................................................................Volume, Tone
Line inputs: ....................................................................................................................................Volume
Bass: ...............................................................................................................................±10dB @ 100Hz
Treble:..............................................................................................................................±13dB @ 10kHz
Power:...................................................................................................................................On/off switch
Indicators: .....................................................................................................Power, Charge, Battery Low
Power supply:....................................................240V a.c., 12-13.8V d.c. or internal battery (12V 4.5Ah)
WEIGHT/ DIMENSIONS
Weight: ............................................................................................................................................≈20kg
Dimensions (minus UHF aerials, handle in stored position): .........................
≈
620H x 310W x 275D mm
Colour: ..............................................................................................................................................Black
REDBACK®Portable PA System REDBACK®Portable PA SystemREDBACK®Portable PA System
Congratulations on purchasing a Redback Portable PASystem. This unit is designed to cater for a wide
variety of public address applications and is capable of addressing crowds of up to 500 people! The
modular design allows each unit to be customised to individual needs.
Portable PA Units
The Redback Portable PASystem is available in 6 variations, to suit a wide variety of requirements.
C 7152 Basic system
C 7156 Basic system with CD
C 7157 Basic system with cassette
C 7172 UHF wireless microphone system
C 7176 UHF wireless microphone system with CD
C 7177 UHF wireless microphone system with cassette
Basic System (C 7152):
The backbone of the system is the amplifier module and battery power supply. This consists of two wired
microphone inputs, all with volume controls and overall treble and bass. Separate volume controls are
provided for additional modules when fitted. The battery charger / power supply will power the unit
when away from 240V mains source. It will provide usable power for 6 to 8 hours. Additionally it is
supplied with a 12VDC input, allowing operation from a car battery. The basic system allows for up to 4
add-on modules of any type. Note that CD and cassette are not available as separate add on modules.
CD System (C 7156):
Same as basic system above with the addition of a anti-shock skip resistant CD mechanism. Provision is
available for up to 3 more add-on modules (such as radio microphone or MP3 module).
Cassette System (C 7157):
Same as basic system above with the addition of a auto reverse cassette deck with full logic mechanism
and record function. Provision is available for up to 3 add-on modules (such as radio microphone or MP3
module).
UHF Systems (C 7172 / C 7176 / C 7177)
The UHF systems are provided for customers requiring wireless microphones. These models have a
C 7166 16 Channel UHF module pre-fitted. They are available as a basic unit, CD system or cassette
system.
Add On Modules
C 7161 MP3 Recorder/Player:
This comprehensive unit can replace a traditional CD player. It has a USB input for uploading your choice
of music from PC to the 64MB internal memory, or it can play files direct from a user-recorded compact
flash (CF) card. Recording to the flash card is via the MP3 inputs or any of the portable PA’s inputs.
C 7166 16 Channel UHF Wireless Microphone:
Adds wireless microphone capability to the portable PA. Maximum of 2 modules per portable PAunit.
Provides coverage of 50 to 70m from the main unit.
System Features
• Modular design allows a unit to be tailored to suit specific applications • Trolley handle and wheels
• Carry handles top and side • Suitable for desk, floor or stand mounting • 6 to 8 hours use from internal battery pack • Two wired microphone inputs • Individual level controls for each module • Built in
top hat for stand mounting • External power via 240V a.c. or 12V d.c.
Page 2 Page 11
REDBACK®Portable PA System
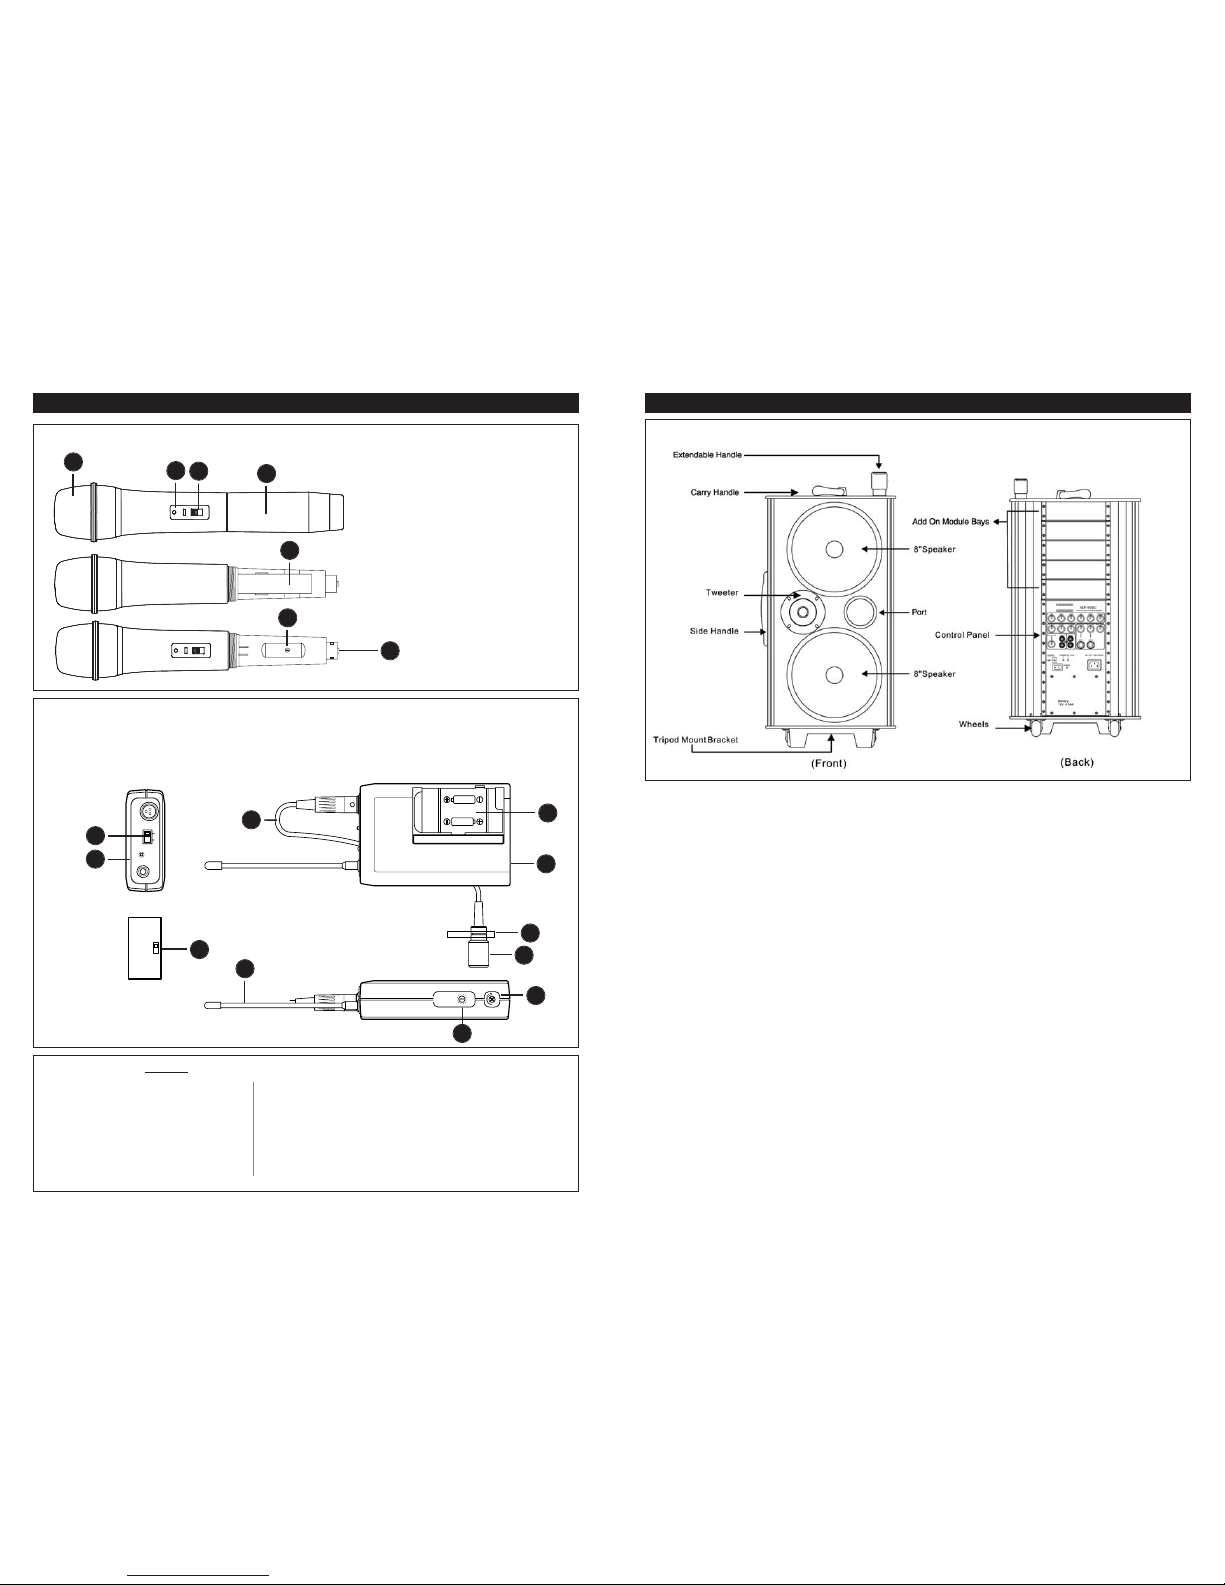
2 x 1.5V AA
1. Screen head
2. Low battery LED Indicator
3. On/Off switch
4. Battery cover
5. Battery housing
6. Frequency selector
7. 12V DC charging input
Fig 7. Handheld Microphone
1
2
3
4
7
5
6
!"#
$%!##&'
LINE MIC.
OFFON
LOW B ATT
INPUT
()*+
()*+
1
13
9
5
1. On/Off switch
2. Low battery LED Indicator
3. Line/mic switch
4. Cable
5. Antenna
6. Frequency select.
7. Gain control
8. Lavalier microphone
9. Tie clip
10. Battery compartment
11. Battery charger socket
1
2
3
7
8
9
10
11
5
6
4
Fig 8. Lavalier Beltpack
Table 1 : Frequency Cross Reference Chart (MHz)
Ch1: 790.375
Ch2: 791.125
Ch3: 792.125
Ch4: 793.250
Ch5: 794.250
Ch6: 795.125
Ch7: 796.250
Ch8: 797.375
Ch9: 798.375
Ch10: 799.875
Ch11: 800.875
Ch12: 801.625
Ch13: 802.750
Ch14: 803.875
Ch15: 804.750
Ch16: 805.375
Use only these channels in the
same location at the same time.
Other channels used together
will not provide interference
free transmission.
Channel 1
Channel 5
Channel 9
Channel 10
Channel 14
Channel 15
REDBACK®Portable PA System
Page 3
Fig1: Appearance of basic portable PAunit (C 7152).
DESIGN AND SPECIFICATIONS SUBJECT TO BE CHANGED WITHOUT NOTICE.
PRECAUTIONS:
* AVOID EXTREMELY DIRTY OR DUSTY ENVIRONMENTS.
* AVOID AREAS WHERE THERE IS EXTREMELY HIGH HUMIDITY.
Basic System Operation
1. Connect required microphones to Mic 1 & Mic 2 6.35mm sockets.
2. Connect line input to RCA sockets if required.
3. Connect line output to RCA sockets if required.
4. Before applying 12-13.8V d.c. or 240V a.c. power ensure volume levels are set to minimum on all inputs.
5. Connect 12-13.8V d.c. or 240V a.c. power and turn power switch ON.
6. Adjust input volume, bass, treble and microphone tone to desired settings
All input sources are mixed eg: CD, Mic 1 and Line Input can all be heard through the speakers at the same
time if their volume levels are increased.
For using the PAwith a wireless microphone consult “Wireless Microphone Operation” in this manual.
Using Balanced Microphones
When using a balanced XLR microphone use the XLR to 6.35mm adaptor (1 supplied per unit).
Alternatively, see figure 3 for information on wiring a suitable lead.
Replacing The Battery
When the battery fails to hold its charge for a reasonable length of time it will need replacing. Please refer
to qualified service personnel to arrange replacement. The unit requires a 12V 4.5Ah (S 5084) sealed lead
acid battery.
Page 10

REDBACK®Portable PA System
Fig2: Input & output controls
Fig3: Unbalanced lead configuration for using a 3 pin XLR balanced microphone with the portable PA.
Page 4
1
2
3
Tip
Sleeve
Charging Circuit Operation
When 240V a.c. or 12-13.8V d.c. power is applied the charging circuit will charge the in-built 12V 4.5Ah
battery. During the charging process the “charge” indicator on the main panel will illuminate. When in
portable operation (running off battery), the “bat. low” indicator will illuminate when charging is
required. Approximate charge time from flat condition is 6-8 hrs.
Note: The in-built battery will charge from the 12-13.8V dc or 240V ac inputs even when the portable
PA is switched off. The battery charge and bat. low LED's will function normally whilst the power is
off.
CAUTION
To prevent damage to the batteries we recommend that both 12-13.8V dc and 240V ac mains power
is removed (disconnected) if the portable PA will not be used for more than 48 hours
REDBACK®Portable PA System
Page 9
Operation: (See Fig 7)
1. Push to open the battery cover.
2. Insert 2 x 1.5V AA batteries into the battery holder according to polarity (+) and (-) indication marked
on the battery housing.
3. Replace battery cover.
4. Connect the microphone or guitar pickup to the unit.
5. Set the line / mic switch to match the sound source (line / mic). Line is for guitar/instrument pick up.
6. After setting the chosen frequency to the same frequency as the receiver, push the power switch to
“ON”. The LED indicator will flash to indicate the unit is operational.
7. Push the power button to “OFF” when mic is not used, and remove the battery in beltpack if not
used for a long time. This will prevent damage to the unit that a defective "leaking" battery may cause.
8. If the LED indicator is permanently illuminated, the battery needs to be replaced.
9. If the LED indicator does not flash at all when first switched on then check batteries are inserted
correctly and batteries are not completely flat.
Handheld Transmitter:
Operation: (See Fig 8)
1. Push to open the battery cover.
2. Insert 2 x 1.5V AA batteries into the battery holder according to polarity (+) and (-) indicator
marked on the battery housing.
3. Replace battery cover.
4. After setting the chosen frequency to the same frequency as the receiver, push the power switch to
"ON". The LED indicator will flash once to indicate the unit is operational.
5. Push the power button to "OFF" when mic is not in use. Remove the batteries from the unit if not to be
used for a long time. This will prevent damage to the unit that a defective "leaking" battery may cause.
6. If the LED indicator is permanently illuminated, the battery needs to be replaced.
7. If the LED indicator does not flash at all when first switched on then check batteries are inserted
correctly and batteries are not completely flat.
Troubleshooting:
1. Signal dropouts and noise may be suddenly encountered by interruption from outside if there is too
long a distance between microphone and receiver, or battery power is low. In such a case, adjust
receiver antenna or change battery.
2. Do not drop the microphone on a hard concrete floor, nor strike the microphone head front with
fist or fingers, nor blow strongly into the microphone head front.
3. Remove the battery in microphone if not in use for a long time. This will prevent damage that a
defective "leaking" battery may cause.

REDBACK®Portable PA System
CD Player Operation
The CD player module provides all of the typical CD functions.
1. Insert disc and press “PLAY/PAUSE” to start playback
2. To skip tracks press the “DOWN/REV” or “UP/CUE” buttons.
3. To search through tracks press and hold the “DOWN/REV” or “UP/CUE” buttons.
4. To repeat a track press the “REPEAT” button. Press again to cancel
5. Whilst playing a track the “A>B” button may be pressed to set a start and end point. This will repeat
one part of a track.
Cassette Operation
The auto-reverse full logic cassette deck provides easy playback and recording. Whilst in record mode the
cassette deck will record any sound output of the portable PA ie: mixed from all inputs. This is useful for
recording speeches etc. Volume is adjusted using the AUX1 control.
1. Insert casette and press “F.PLAY” for forward playback, “R.PLAY” for reverse playback.
2. To adjust speed of playback (useful in aerobics applications), the “SPEED ADJ” knob is provided.
3. The “MODE” button provides selection of single side, double side and looped playback
4. To skip parts of the tape press “REW” or “F.FWD” buttons.
5. To record from the portable PA’s inputs, press “REC”
Page 6
TAPE
CD
Modules
Fig5: Diagram showing the CD and cassette models. Note that only 2 add-on modules can be fitted to
the cassette version.
C 7177
C 7176
REDBACK®Portable PA System
MP3 Module Operation
Overview
The MP3 module provides MP3 playback and recording facilities. It has 64Mb inbuilt memory and
accepts a CF (compact flash) card when additional memory is required. Playback and recording can be
performed with either the inbuilt memory or CF card. The recording sound quality can be varied for both
the voice and music recording. From the in-built 64Mb flash memory the MP 3 files will give approximately 70minutes recording (at 128kb quality), 2 hours (at 80kb), and 4.5hours at 32kb. Tracks can be
uploaded from a PC to the MP3 module via the inbuilt mini USB port. Standard CD player type functions
are provided such as play, pause and repeat.
The MP3 module is equipped with its own (up / down) volume adjustment buttons. These are overridden by the MP3 volume knob on the main PAmodule.
Operation:
Press power button for 2 seconds to power on the MP3 module.
Recording:
Recording data can be via the 3.5mm mono sockets on the MP3 unit or from any of the inputs on the
portable PAincluding the 6.35mm microphone input and RCA line level inputs on the main module.
A: Recording via the 3.5mm mono VOC socket.
• This input is designed for voice quality only.
• Connect a microphone to the unit.
• To record a voice track using voice quality press the “REC” (record) button. The unit will display VOC.
• Press the mode button to switch between “Hi” and “Lo”
• Press the >> button to select where you want the file saved to. “CF” will record to the Compact Flash
card (if installed) , “MEM” will record to the in-built memory.
• Press RECORD again and the unit will begin recording. The record button will illuminate.
• To stop recording press STOP
B: Recording via the 3.5mm mono MP3 input
• This input is designed for MP3 music quality
• Connect a source to the unit
• To record a new track using MP3 quality press and hold the “REC” button for 2 seconds. The unit will
display “MP3”.
• Press the mode button to switch between high quality 128Kbps, medium 80kbps and low 32kbps.
• Press the >> button to select where you want the file saved to. “CF” will record to the Compact Flash
card (if installed) , “MEM” will record to the in-built memory.
• Press RECORD again and the unit will begin recording. The record button will illuminate.
• To stop recording press STOP.
Page 7
Fig6: MP3 player controls

REDBACK®Portable PA System
Adding Modules
The unit has been designed around a central expansion board (located above the main amplifier module,
inside the unit) which allows additional modules to be added to each unit without return to the supplier.
The expansion board shown in figure 3 utilises multipin connectors so new modules can be installed in
just a few minutes. For additional UHF radio microphone module installation refer to place of purchase.
MP3 modules should be connected to the 5 pin header marked as “For MP3”.
Only one record output is provided on the unit. If installing an MP3 module to a cassette version the
record output must be set to the correct module. For recording using MP3 module you must remove the
connection from the cassette module to the terminal labelled “REC IN” on the main board (see Fig4). The
MP3 module terminals can now be connected instead. For recording using the cassette module leave
connection as is.
B+
G
RGL
B+
G
RGL
B+
G
RGL
B+
G
RGL
FOR Mp3 FOR CDR FORAUX1
RGL
FOR Mp3 REC
/LED VU
GB+
RGL
Mp3 PLAYER
Module
CD-R PLAYER
Module
Module 1
PLAYER
B+
G
RGL
Module 2
PLAYER
REC
IN
B+
G
RGL
B+
G
RGL
B+
G
RGL
B+
GND
FORAUX2
TO MIC PRE
GB+
RGL
TO POW AMP
DC INPUT
FOR VU LED POWER
MIC1
GND
LINE
LINO
TS-900C MIX
PCB
TOP View
Fig4: Connections for each add-on module can be made via the expansion
board located inside the unit.
This photo shows the row of connection
headers at the rear of the main board inside
the PAmodule.
Page 5
REDBACK®Portable PA System
C: To record from any of the portable PA inputs.
• Press and hold for 2 seconds the record button. The display should show “MP3”.
• Press the mode button to switch between high quality 128Kbps, medium 80kbps and low 32kbps.
• Press the >> button to select where you want the file saved to. “CF” will record to the Compact Flash
card (if installed) , “MEM” will record to the in-built memory.
• Press RECORD again and the unit will begin recording. The record button will illuminate.
• To stop recording press STOP.
Uploading Data:
This can be direct from the compact flash card, or from a PC via the mini USB link.
• To use the compact flash card simply insert the card and the CF card will take priority.
• To use the PC connect the USB – mini USB lead (supplied)
• The PC will recognize the MP3 module (as a removable drive).
• Simply follow your PC prompts to upload the data to the Redback MP3 player.
• If a CF card is present in the MP3 player the tracks can saved to the CF card or to the internal memory.
• If no CF card is present the tracks will be saved to the MP3 internal memory.
Playback:
The mode button allows you to cycle between VOC and MP3 operation.
• Press Play to begin playback
• Press << and >> to select the appropriate track required.
• To skip through parts of a track you can press and hold the << or >> buttons.
• To set a file to repeat, press the “REPEAT/EQ” button. Press this button additional times to cycle
through “repeat 1”, “repeat all” and “no repeat”.
• To adjust the playback sound 5 in-built EQ settings are provided. Press and hold the “REPEAT/EQ”
button for 2 seconds. Press additional times to cycle through normal, pop, rock, classic and jazz modes.
• To mute sound output press the “POWER” button once. (Note: holding this button for 2 seconds will
turn the module off). To unmute press the “POWER” button again.
• Whilst playing a file the “A>B” button may be pressed to set a start and end point. This will repeat one
part of a file. Press this button a third time to exit “A>B” mode and continue playback.
• To delete a file, use the << and >> buttons to find the file you want to delete. Then press “DELETE”. A
confirmation appears on the screen, press “DELETE” again to wipe the file, or press “STOP” to cancel.
• Press “STOP” to return the module to standy mode at any time.
Wireless Microphone Operation
The PLL synthesized true diversity wireless microphone module operates on UHF frequency band.
790~806MHz with 16 selectable channels. The module is suitable for use with matching C 8872C
handheld or C 8875C beltpack transmitters, available separately. Operation details for these transmitters
are listed below.
Beltpack Microphone
A range of microphones and pickups are available for the belt pack transmitter including tie clip mic,
lecture type headset, aerobics type headset, and guitar pickup. The belt pack transmitter is equipped with
a line/mic switch.
Page 8
 Loading...