

Recordex SimplicityTouch ST-700 Gen 3 Technical Training Manual

Instructions for SimplicityTouch ST-700 Gen 3
TECHNICAL TRAINING GUIDE
Manuals included in guide:
1. Update panel firmware and reinstall applications……………….……………………………………………… page 2
2. Update router firmware……………………………………………………………………………………………………… page 10
3. Connect to wireless network (including changing router password and saving config file)… page 23
4. Connect to wired network (including changing router password and saving config file)……. Page 40
5. Disable wireless network interface……….……….……….…….…….……………….…………………………….. Page 60
6. Configure panel for use with proxy server…………………………………………………………………….…… page 68
7. Troubleshooting Tips…………………………………………………………………………………………………………. Page 74
Page 1

Instructions for SimplicityTouch ST-700 Gen 3
Update Panel Firmware and Reinstall Applications
Topics Covered:
Instructions for re-flashing panel firmware and reinstalling default applications.
Model Numbers Covered: 70” ST-700, Generation 3
Last Update:12/1/2016
e: support@recordexusa.com
TOOLS REQUIRED:
None.
ESTIMATED TIME REQUIRED:
Less than 10 min.

Re-flashing Firmware for ST-700 Gen 3 panel
!!!CAUTION!!!
The firmware for the ST-700 Gen 3 is specific to Gen 3 panels. Installing firmware from any other model will cause the panel to
become inoperable.
How to identify your panel as a ST-700 Gen 3 panel.
First, verify that the serial number begins with ST-700. This confirms that the panel is a SimplicityTouch 70” panel.
Second, verify that the last 4 digits of the serial number are 7757 or higher.
It is rare that you will need to manually reflash the FW on your ST-700. Before doing so please consult with Recordex technical
support at 888-712-0278 or support@recordexusa.com .

STEP REFERENCE IMAGE INSTRUCTIONS
1 Download the FW from our support site here.
And the APK-STORE files from our site here.
Unzip both and copy them to the root folder of
a USB flash drive.
2 Insert USB flash drive into a USB port labeled
with the home screen icon.

STEP REFERENCE IMAGE INSTRUCTIONS
3 Power on panel wait for panel to boot up to an
input screen. Then press the Input button on
panel or remote.
4 While the input selection menu is being dis-
played use the remote to enter the code for accessing the service menu.
The code is:
The PIN code can be obtained from Recordex
Technical Support by contacting support at:
888-888-712-0278
Contact tech support for PIN
support@recordexusa.com .

STEP REFERENCE IMAGE INSTRUCTIONS
5 Use the remote to select the option Upgrade
Main then press OK.
6 Select confirm.

STEP REFERENCE IMAGE INSTRUCTIONS
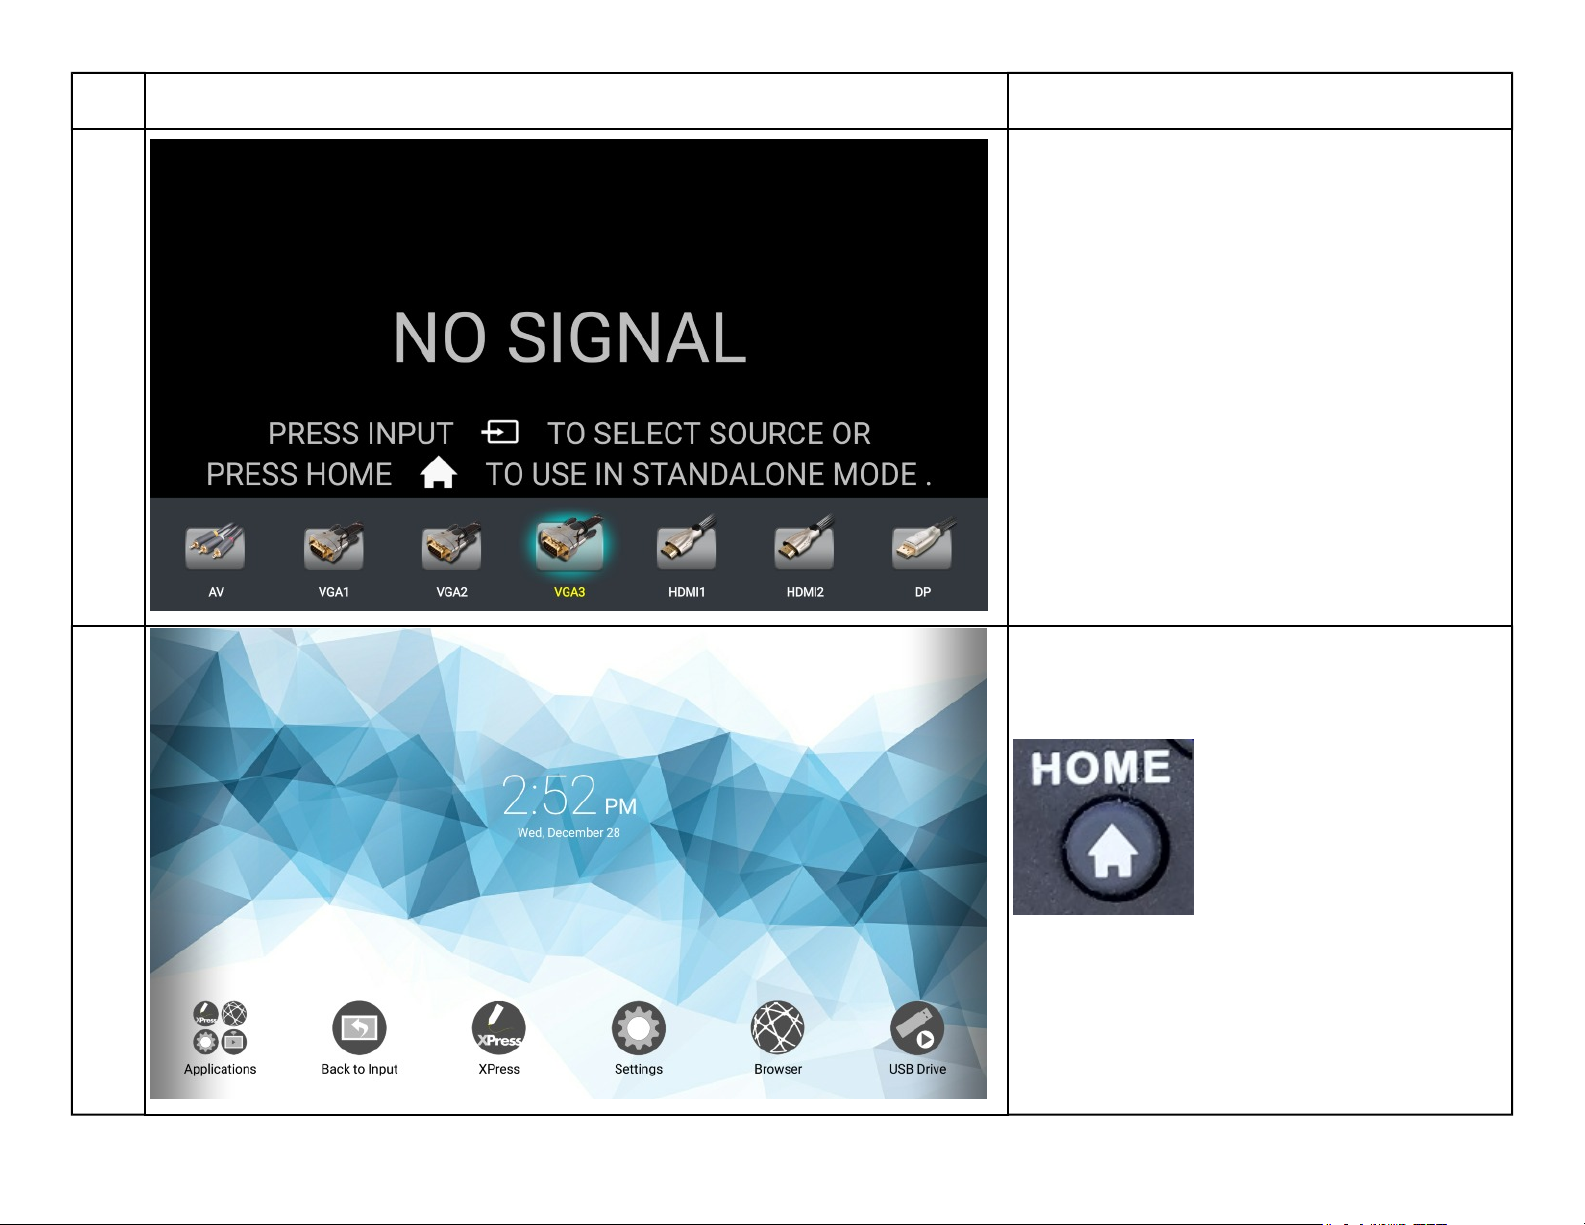
7 Wait for the panel to re-boot and it will show
the No Signal screen. In some cases it may require you to select a language and location.
8 After a full firmware re-flash you will need to
re-install the bundled applications. To do this
press the Home button to enter the home
screen.
STEP REFERENCE IMAGE INSTRUCTIONS
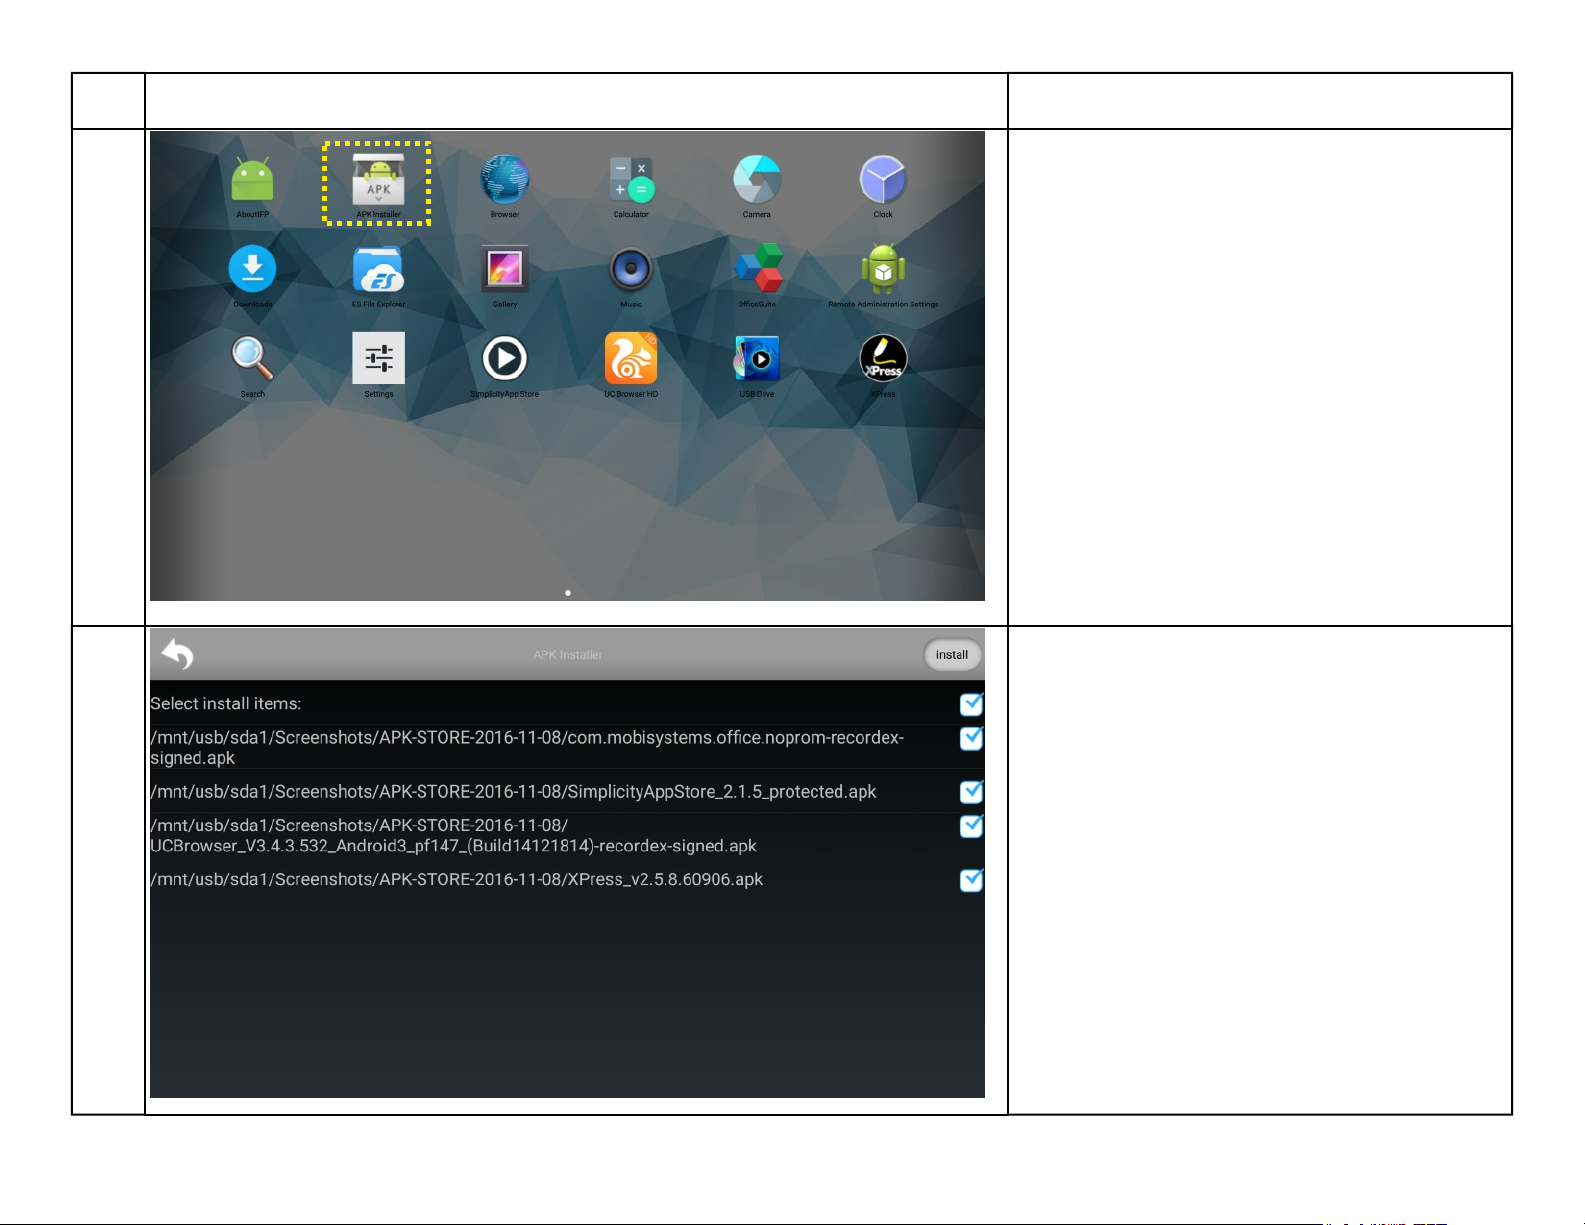
9 Select APK Installer.
10 Select the 4 applications included in the APK-
STORE folder that you copied to the USB drive
in step 2.
Then press install.

STEP REFERENCE IMAGE INSTRUCTIONS
11 Wait for applications to install.
Confirm that all 4 were installed successfully
and then press OK.
END.

Instructions for SimplicityTouch ST-700 Gen 3
Update Internal Router Firmware
Topics Covered:
How to update the FW of the internal router.
Model Numbers Covered: 70” ST-700, Generation 3
Last Update:12/1/2016
e: support@recordexusa.com
TOOLS REQUIRED:
None.
ESTIMATED TIME REQUIRED:
Less than 10 min.

Update the firmware of the internal router.
In rare cases it may be necessary to update the router’s firmware. In the rare case you are instructed by support to update the
router firmware these instructions will show step by step guide for doing so.
Tools required
Before updating the FW you need to place the router FW files (fw.bin and config.dat) onto a usb drive. The files can be requested
from Recordex Technical Support (888-712-0278 or support@recordexusa.com). The usb drive should then be plugged into a
home screen usb port on the panel.
STEP REFERENCE IMAGE INSTRUCTIONS
1 Power on panel wait for panel to boot up to an
input screen.
2 Press the Home button on remote or on key-
pad on front of panel. This will open the home
screen.
STEP REFERENCE IMAGE INSTRUCTIONS
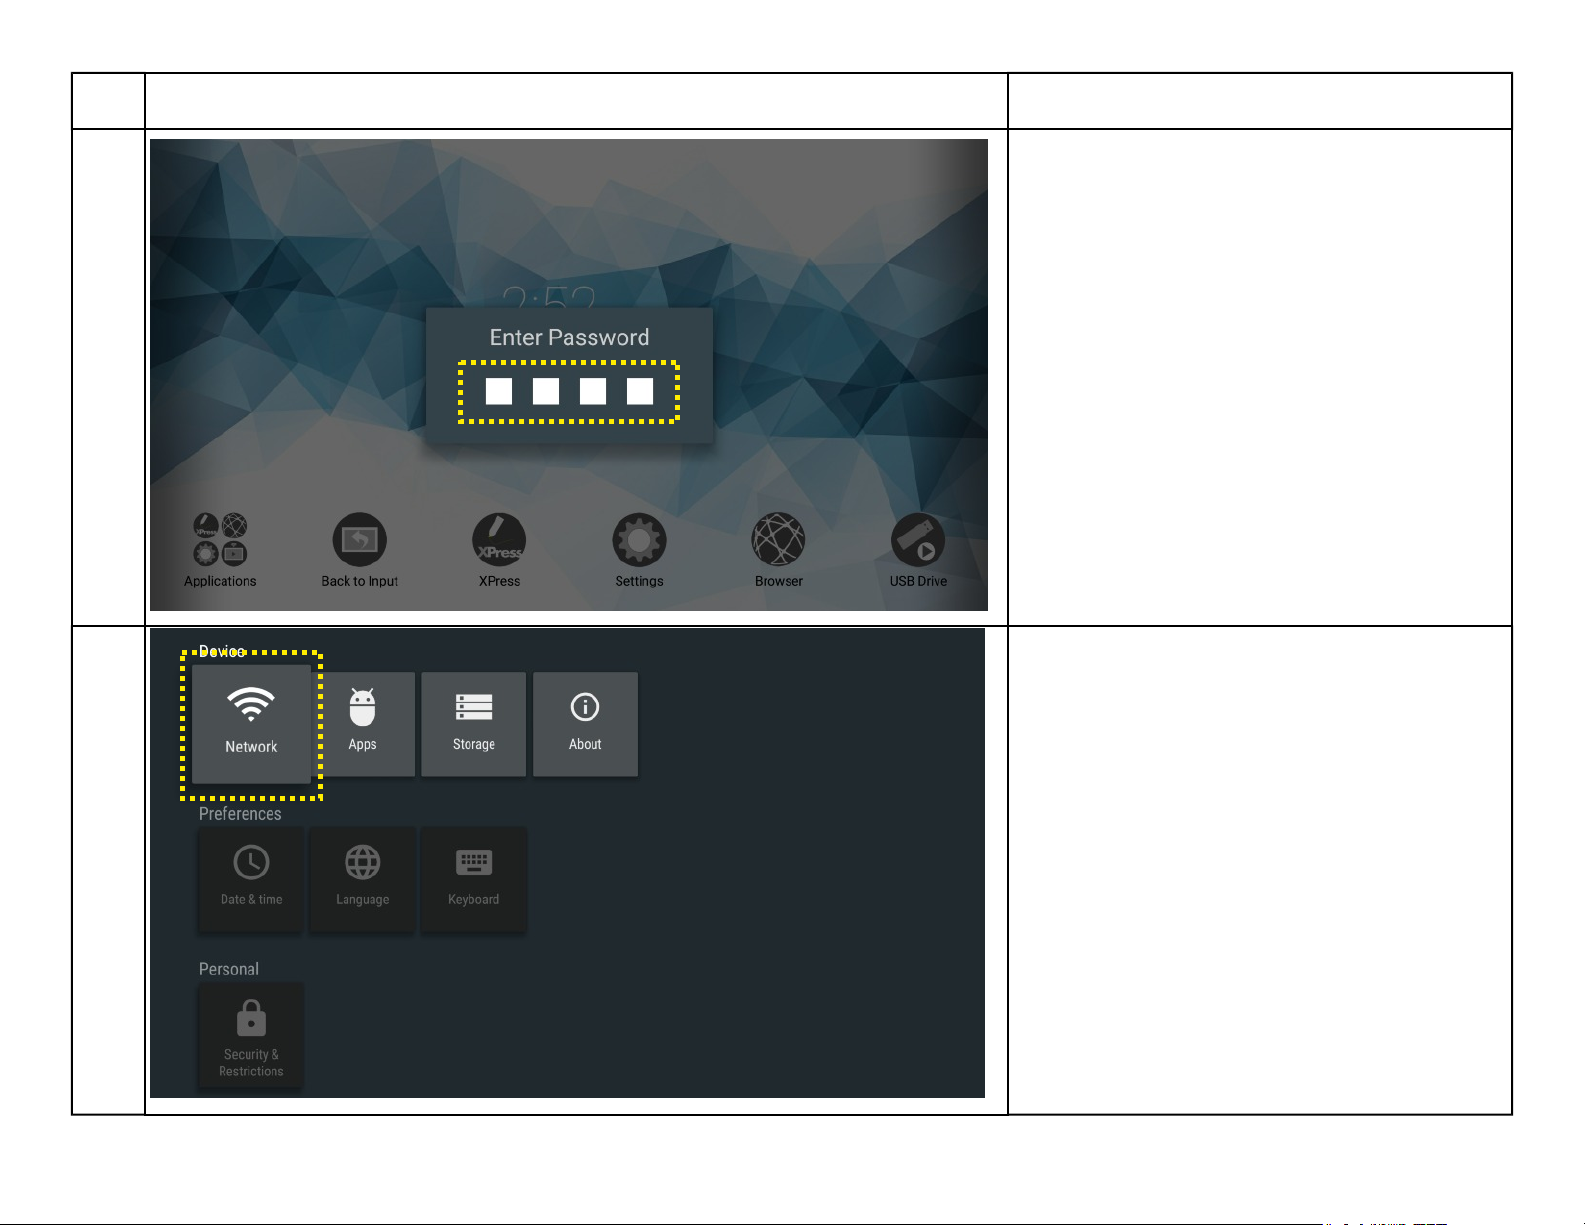
3 Press Settings and then enter the password to
access the home screen settings.
Note: Default password is 0 0 0 0. It is recommended that you change this password.
4 Select Network.
STEP REFERENCE IMAGE INSTRUCTIONS
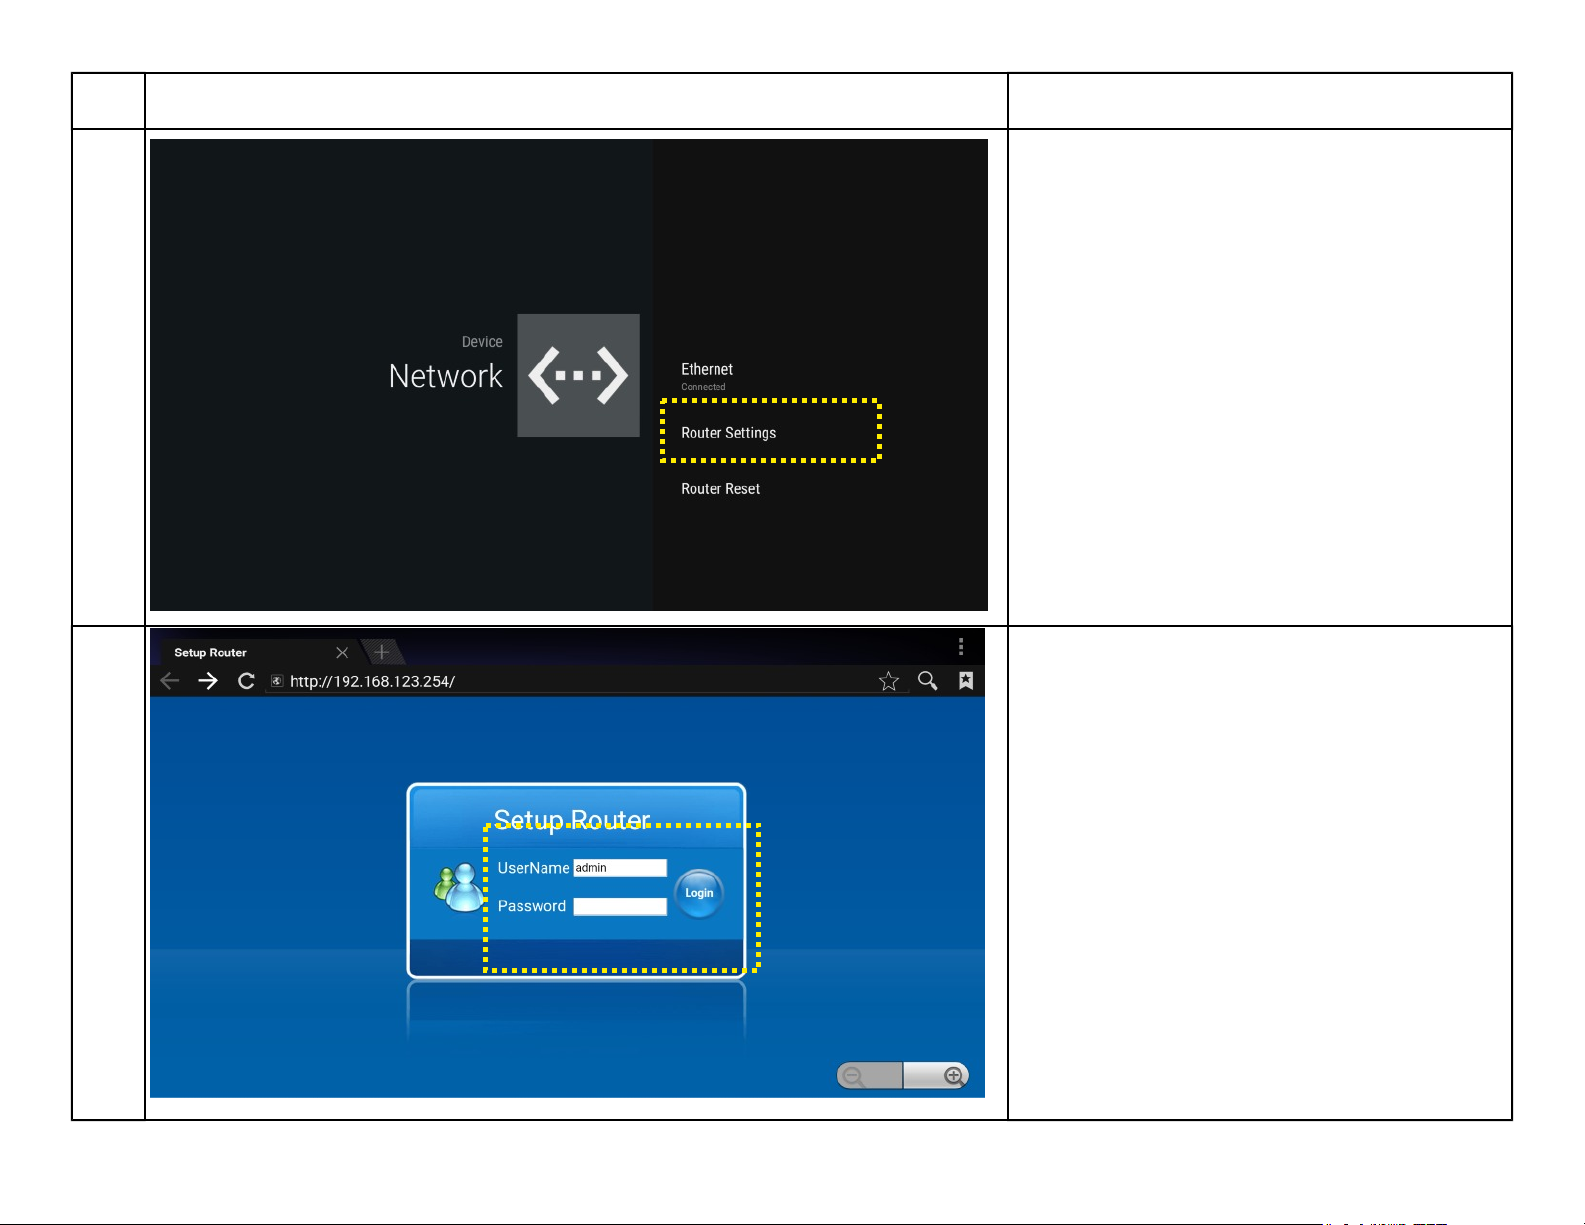
5 Select Router Settings.
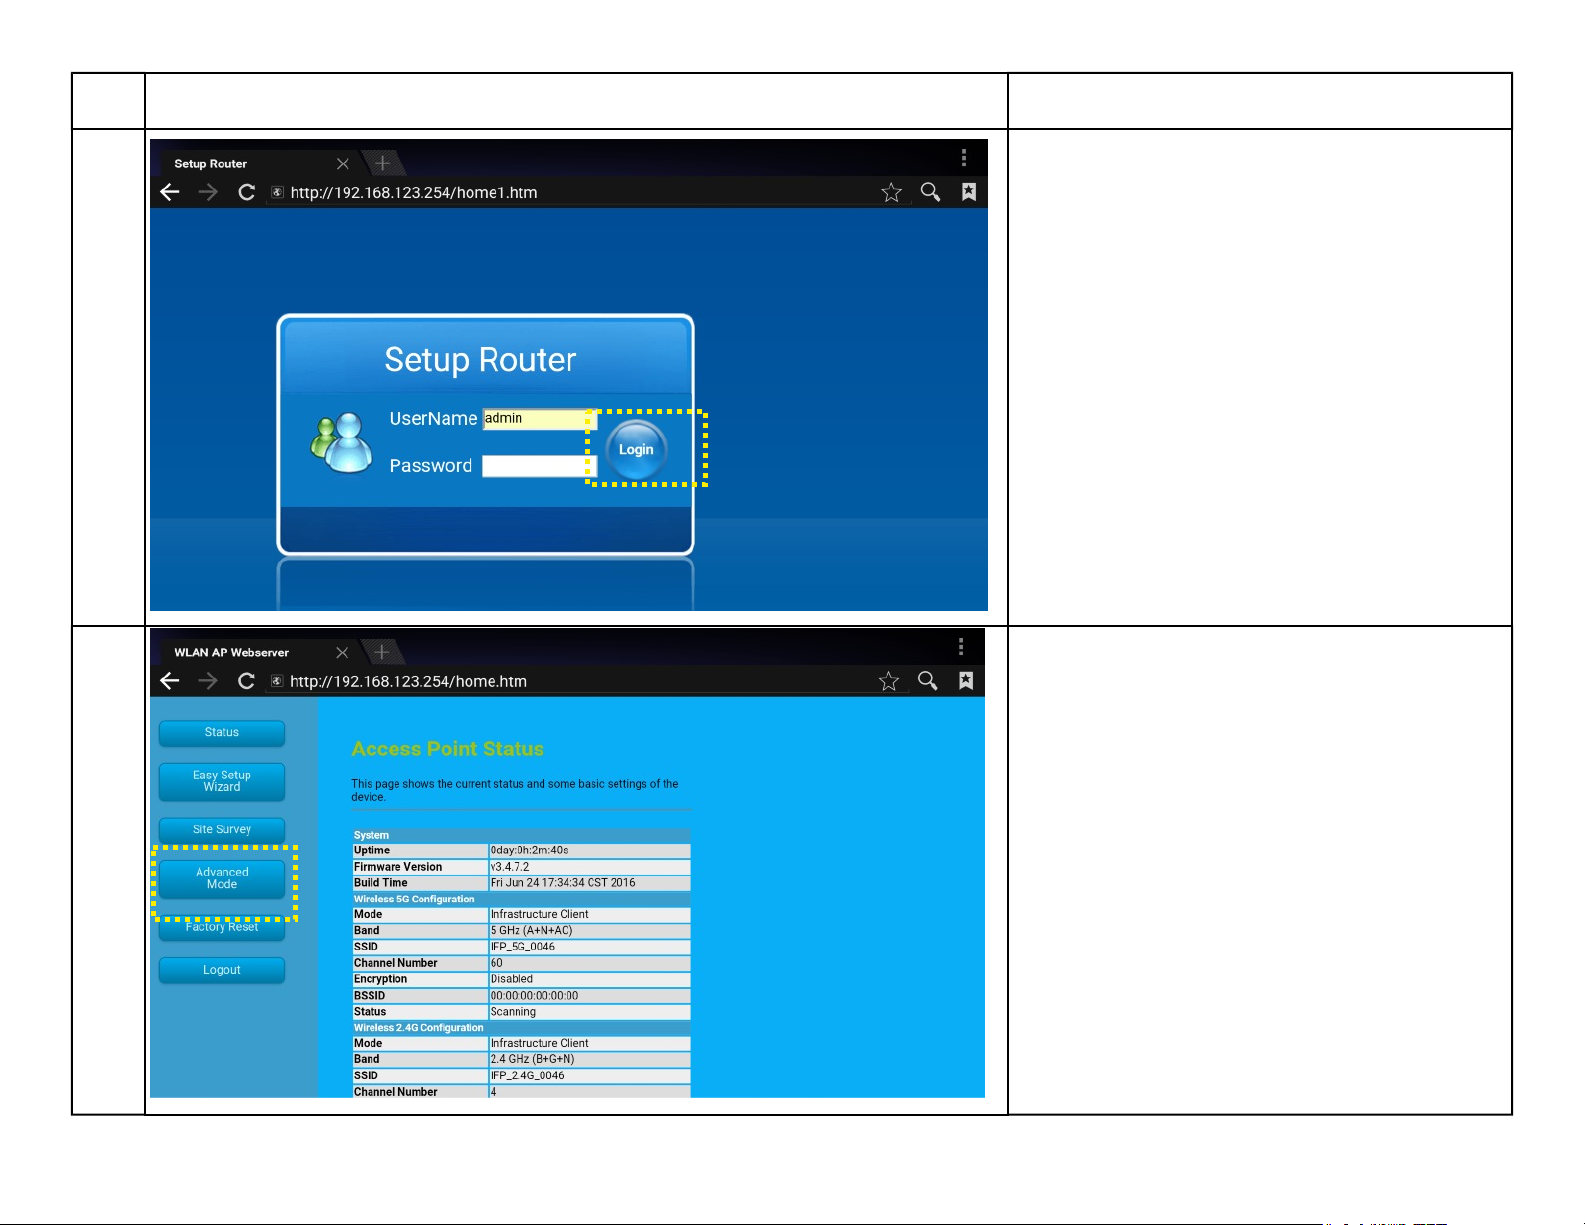
6 Login to router.
Note: Default login is:
UserName: Admin
Password: [leave blank]
It is recommended that you change the password.

STEP REFERENCE IMAGE INSTRUCTIONS
7 Select Advanced Mode from left menu.
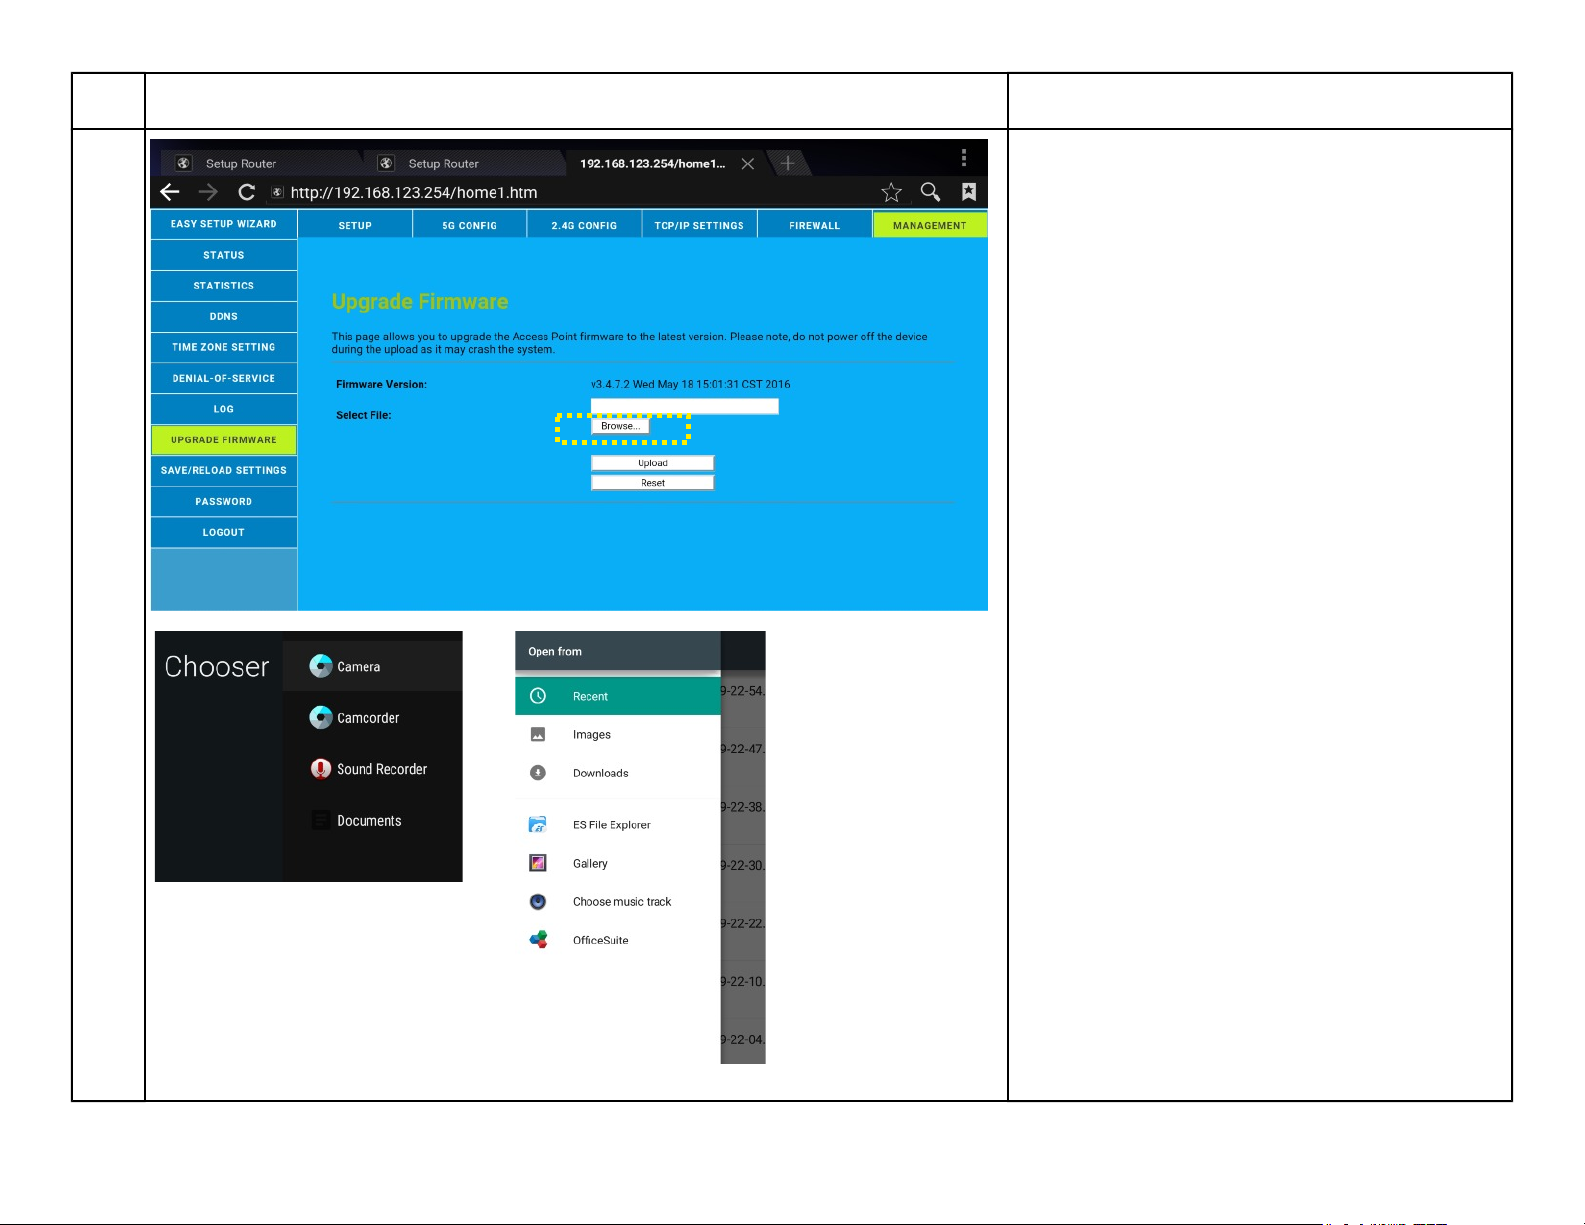
8 Select UPGRADE FIRMWARE from left menu.
Note if that option is not displayed then first
make sure that the management tab is selected
at top of router window.
STEP REFERENCE IMAGE INSTRUCTIONS
9 Select the Browse button.
Then Documents from the Chooser menu.
Then ES File Explorer from the Open from
menu.
STEP REFERENCE IMAGE INSTRUCTIONS
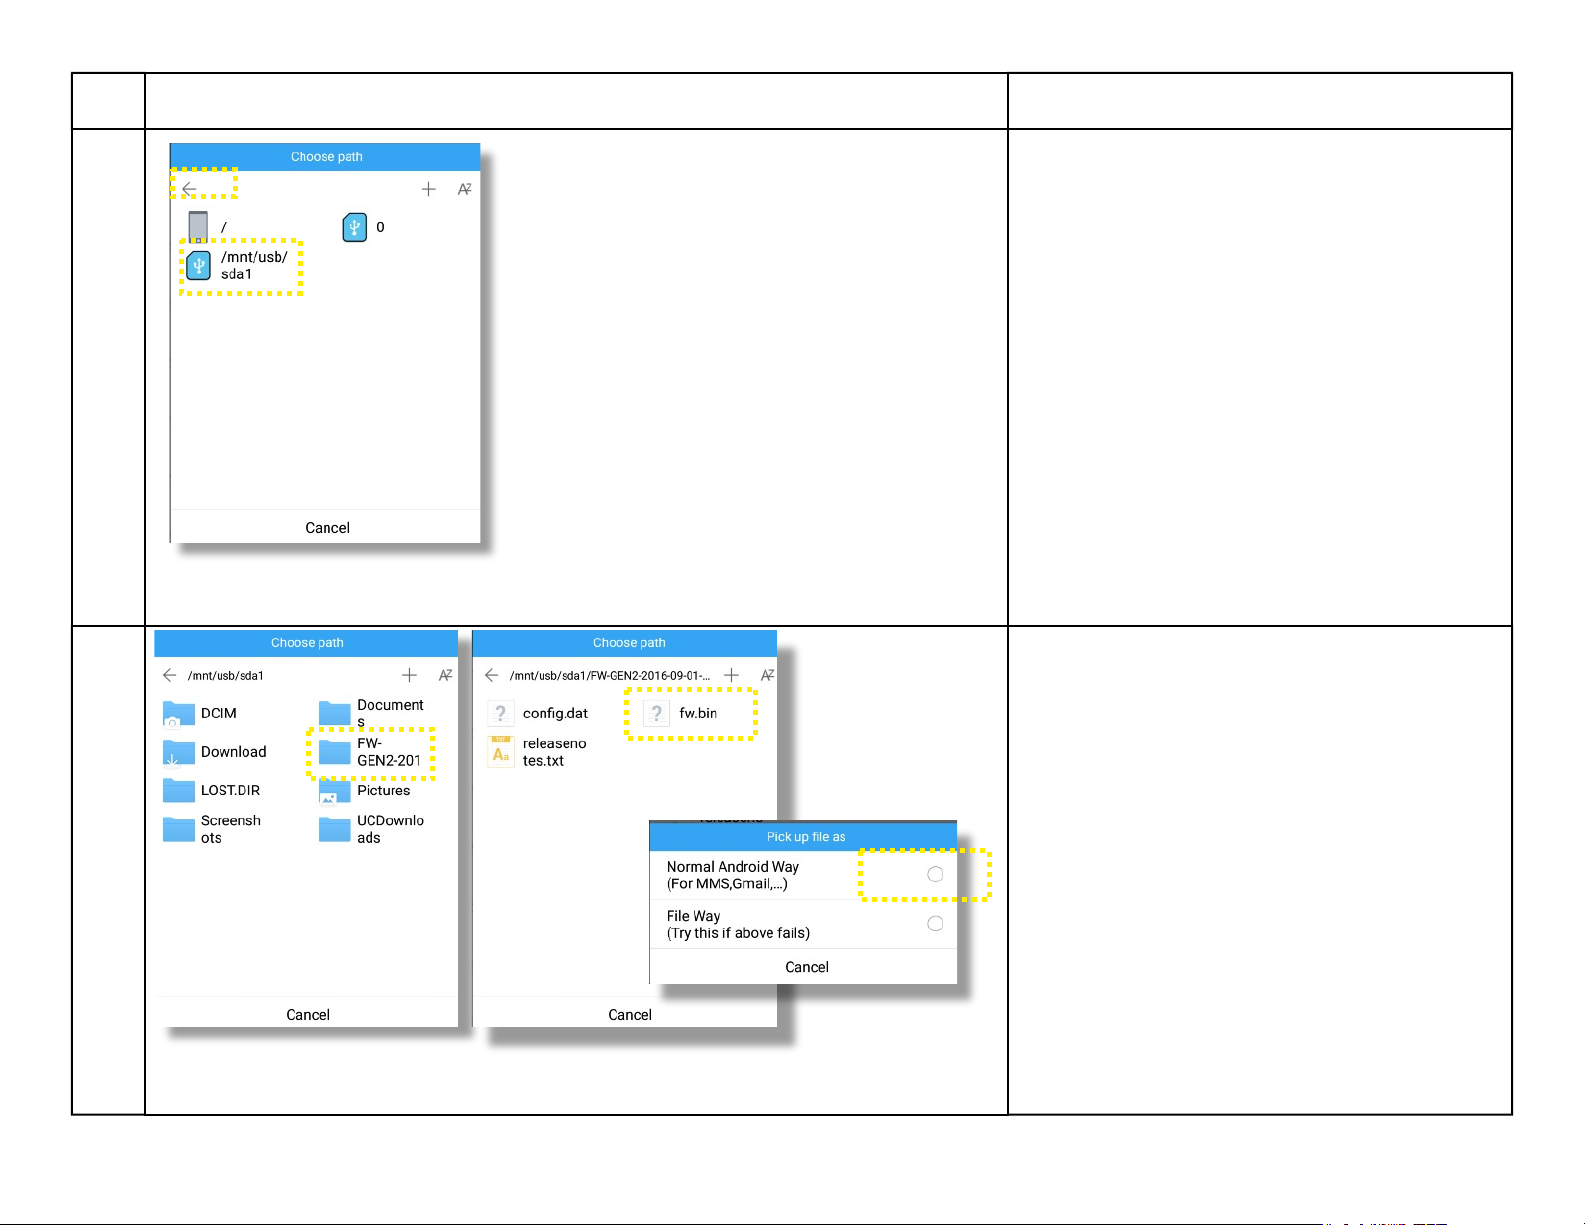
10 Press the back arrow button on the Choose
Path window until you see a screen that looks
like the reference image to the left.
Then select the /mnt/usb/sda1 path.
*Note: if you have more than one usb plugged
into panel then you may see sda1 and sdb1. In
this case choose the one that contains the router FW that you saved to the USB drive.
11 Select the folder containing the router FW.
Then select the fw.bin file (NOTE: Make sure
this is the correct fw for your router. Check
with support first).
Then select Normal Android Way from the
Pick up file as menu.

STEP REFERENCE IMAGE INSTRUCTIONS
12 Confirm that fw.bin is showing in the select file
box. Then press Upload.
13 Wait for router to apply fw and reboot. DO
NOT POWER OFF PANEL AT THIS TIME!
STEP REFERENCE IMAGE INSTRUCTIONS
14 After router restarts log into router.
15 Select Advanced Mode from left menu.

STEP REFERENCE IMAGE INSTRUCTIONS
16 Then select Save/Reload Settings from left
menu.
17 Select Browse from Load Settings From File.

STEP REFERENCE IMAGE INSTRUCTIONS
18 Press the back arrow button on the Choose
Path window until you see a screen that looks
like the reference image to the left.
Then select the /mnt/usb/sda1 path.
*Note: if you have more than one usb plugged
into panel then you may see sda1 and sdb1. In
this case choose the one that contains the router FW that you saved to the USB drive.
19 Select the folder containing the router
config.dat (saved settings file).
Then select the config.dat file (NOTE: Make
sure this is the config.dat for your router).
Then select Normal Android Way from the
Pick up file as menu.

STEP REFERENCE IMAGE INSTRUCTIONS
19 Confirm that config.dat shows in the Load Set-
tings From File box, then select Update.
20 Wait for router to apply settings and reboot.

Instructions for SimplicityTouch ST-700 Gen 3
Configure Router for Wired Connection
Topics Covered:
How to configure internal router for wired connection
Model Numbers Covered: 70” ST-700, Generation 3
Last Update:12/1/2016
e: support@recordexusa.com
TOOLS REQUIRED:
None.
ESTIMATED TIME REQUIRED:
Less than 10 min.

Configure Router for Wired Network
The SimplicityTouch can be configured to connect directly to your network via the internal router. The internal router supports
several features:
1) Wired connection (this is preferred and most common way to connect panel). See separate user guide for wired connection
instructions.
2) Wireless connection via Pre-shared Key.
3) Act as wireless access point allowing users to share the panels connection to local network (note, this is typically disabled and
not used in commercial environments).
The following instructions are how to connect by wired connection via ethernet cable.
Also, included are optional instructions for how to change router login info and save configuration to a file so that settings can be
re-loaded from a USB drive.
 Loading...